
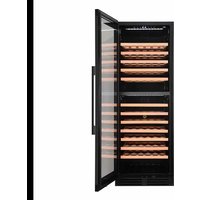
WI6045H-1B24 - Beverage Refrigerator Ecotronic - Free user manual and instructions
Find the device manual for free WI6045H-1B24 Ecotronic in PDF.


| Product type | Beverage Refrigerator |
| Brand | Ecotronic |
| Model | WI6045H-1B24 |
| Capacity | Approx. 60 L (holds up to 24 cans) |
| Dimensions (H x W x D) | 85.0 x 50.0 x 55.0 cm |
| Weight | 28 kg |
| Power supply | 220-240 V, 50/60 Hz, 100 W |
| Energy consumption | 0.8 kWh/24h (approx.) |
| Temperature range | 2°C to 12°C (adjustable thermostat) |
| Interior lighting | LED light, on/off switch |
| Shelves | 3 adjustable wire shelves |
| Door type | Reversible hinge, solid door with handle |
| Cooling system | Compressor-based, fan-assisted circulation |
| Defrost | Manual defrost |
| Noise level | 42 dB (approx.) |
| Installation | Freestanding, allow 10 cm clearance rear and sides |
| Cleaning | Wipe interior with damp cloth and mild detergent |
| Safety features | Leveling legs, tempered glass shelves, secure door latch |
| Spare parts availability | Thermostat, shelves, door gasket, LED bulb available |
| Repairability | DIY-friendly: user can replace thermostat, bulb, and shelves |
Frequently Asked Questions - WI6045H-1B24 Ecotronic
User questions about WI6045H-1B24 Ecotronic
0 question about this device. Answer the ones you know or ask your own.
Ask a new question about this device
Download the instructions for your Beverage Refrigerator in PDF format for free! Find your manual WI6045H-1B24 - Ecotronic and take your electronic device back in hand. On this page are published all the documents necessary for the use of your device. WI6045H-1B24 by Ecotronic.
USER MANUAL WI6045H-1B24 Ecotronic
Witt built-in wine appliances-2
WCI6045-1BG / WI6045H-1B24 WCI6060-1BG / WCI6060-2BG / WI6060H-2B26 / WCISK60BG WCI6088-2BG / WCI60188-2BG / WI60182H-2P101
TABLE OF CONTENTS
Warnings....3
Before loading and plugging in the wine cabinet ....5
Grounding instructions....6
Installation 6
Installation drawings....8
Operation....16
Turning on your wine cabinet....16
Operating noises....16
Loading your wine cabinet....16
Temperature setting....18
Control panels....19
Wine serving temperature chart 24
Important information about temperature....25
Defrosting/Condensation/Hygrometry/Ventilation 25
Sliding shelves....26
Reversibility of the door....27
Operating instructions - Auto-door....36
Operation abnormalities....37
Power failure....37
Troubleshooting guide....38
Before disposal of the appliance....39
Thanks for buying our Wine Cooler/Beverage Cooler, hope our advanced product will give your wine a different joyful taste. Before use, please read and follow all safety rules and operating instructions.
*Note: Features and illustrations are model dependent and may vary slightly from the manual to the actual product.
WARNINGS
The information in this document is subject to modification without any prior notice. Some models are available in dedicated countries only.
Witt offers no guarantee for our wine cellar if it is being used for any purpose other than that for which it was specifically designed. We cannot be held responsible for any error in this manual. is not responsible or liable for any spoilage or damage to wines or any other contents incidental or consequential to possible defects of the wine cellar. Warranty applies to the wine cellar only and not to the content of the wine cellar.
This appliance can be used by children aged from 8 years and above and persons with reduced physical, sensory or mental capabilities or lack of experience and knowledge if they have been given supervision or instruction concerning use of the appliance in a safe way and understand the hazards involved. Children shall not play with the appliance. Cleaning and user maintenance shall not be made by children without supervision.
Children should be supervised to ensure that they do not play with the appliance.
Please don't put such as acidic items, flammable, and explosive goods into wine cooler.
This equipment is intended for the storage and display of non-potentially-hazardous bottled or canned products only.
This appliance is intended to be used in household and similar applications such as
• staff kitchen areas in shops, offices and other working environments;
- farmhouses and by clients in hotels, motels and other residential type environments;
• bed and breakfast type environments;
• catering and similar non-retail applications.
DANGER: Risk of child entrapment. Before you throw away your old wine chiller:
• Take off the doors;
- Leave the shelves in place so that children may not easily climb inside;
- When disposing of the appliance, do so only at an authorized waste disposal centre.
R600a WARNINGS:
For your safety observe the following recommendations.
- This appliance contains a small quantity of R600a refrigerant which is environmentally friendly, but flammable. It does not damage the ozone layer, nor does it increase the greenhouse effect.
- During transportation and installation, ensure that the tubing of the refrigerant circuit is not damaged.
- Avoid using or manipulating sharp objects near by the appliances.
• Leaking refrigerant can ignite and may damage the eyes. - In the event any damage does occur, avoid exposure to open fires and any device which creates a spark. Disconnect the appliance from the mains power.
- Thoroughly ventilate the room in which the appliance is located for several minutes.
- Notify Customer Service for necessary action and advice.
- The room for installing the appliance must be at least 1 cubic metre per 8 grams of refrigerant. The refrigerant quantity contained in this appliance is listed above in grams; it is also noted on the Rating Plate of the appliance.
- WARNING: To avoid a hazard due to instability of the appliance, it must be fixed in accordance with the instructions.
- The symbol ⚠️ is a warning and indicates the refrigerant and insulation blowing gas are flammable.
• Warning: Risk of fire / flammable materials
- WARNING — Do not store explosive substances such as aerosol cans with a flammable propellant in this appliance.
- WARNING —When positioning the appliance, ensure the supply cord is not trapped or damaged.
- WARNING —Do not locate multiple portable socket-outlets or portable power supplies at the rear of the appliance.
- WARNING — The refrigerant and insulation blowing gas are flammable. When disposing of the appliance, do so only at an authorized waste disposal centre. Do not expose to flame.
It is hazardous for anyone other than an Authorized Service Person to carry out servicing or repairs to this appliance.
- WARNING: Keep ventilation openings in the appliance enclosure or in the built-in structure clear of obstruction.
-
WARNING: Do not use mechanical devices or other means to accelerate the defrosting process, other than those recommended by the manufacturer.
-
WARNING: Do not damage the refrigerant circuit.
- WARNING: Do not use electrical appliances inside the food storage compartments of the appliance, unless they are of the type recommended by the manufacturer.
- WARNING: If you do not use the machine for a long time, please unplug the power plug from the socket or switch off the power supply.
- Warning: This appliance is not intended for use by persons (including children) with reduced physical, sensory or mental capabilities, or lack of experience and knowledge, unless they have been given supervision or instruction concerning use of the appliance responsible for their safety.
- WARNING: Children should be supervised to ensure that they do not play with the appliance.
- WARNING: Do not use extension cords or ungrounded (two prong) adapters.
- WARNING: If the supply cord is damaged, it must be replaced by the manufacturer, its service agent or similar qualified person to avoid hazard.
Allow 24 hours before switching on the wine cellar. During this time, we recommend that you leave the door open to clear any residual doors.
BEFORE LOADING & PLUGGING IN THE WINE CELLAR
Important: All models without front venting (air opening) are strictly for free standing or built-in only. (See technical chart)
Recommendations:
The location you have selected for your wine cellar should:
- be unencumbered and well ventilated;
• be well away from any heat source and direct sunlight;
• not be too damp (laundry, pantry, bathroom etc.);
• have a flat floor; - have a standard and reliable electricity supply (standard socket to country standards, linked to the ground), it is NOT recommended to use a multi-socket or extension lead;
• have a surge protector fitted to the electrical outlet; - be kept away from the microwave oven. Certain microwave ovens do not have wave interference shield. When placed within 1 meter vicinity of the wine cabinet, they may affect the operation of the wine cabinet.
Notes:
- WCI6045-1BG, WI6045H-1B24, WCI6060-1BG, WCI6060-2BG, WI6060H-2B26, WCI6088-2BG, WCI60188-2BG, WI60182H-2P101, WCISK60BG are built-in model only.
Wine cellar should be placed where the ambient temperature is proper (Please view the end of Manual). If the temperature is above or below this range, it will affect the performance of the cellar. Placing in cold or hot temperature conditions may cause cellar's temperatures fluctuating, and it will not reach the ideal one.
GROUNDING INSTRUCTIONS
The wine cellar must be grounded in case of wire leakage. Grounding reduces the risk of electrical shock. The wine cellar is equipped with a power cord having a grounding wire and plug. The wine cellar plug must be plugged into a properly affixed and grounded electrical outlet.
Note: In locations where there is frequent lightning, it is advisable to use surge protectors.
Improper use of the grounding plug can result in the risk of electric shock. Consult a qualified electrician or service person if the grounding instructions are not completely understood.
If the supply cord is damaged, it must be replaced by a qualified person to avoid electrical hazard.
INSTALLING YOUR WINE CELLAR
Unpack and remove all the protection and adhesive strips from the packaging around and inside the wine cellar.
The wine cellar must be positioned such that the plug is accessible. Release the power cord. Move your wine cellar to its final location. The wine cellar should be installed in a suitable place where the compressor will not be subject to physical contact.
Levelling your wine cellar: Wine cellar must be levelled BEFORE loading your wines.
Your wine cellar is equipped with 4 adjustable feet to facilitate easy levelling. We recommend that you tighten the back feet to the maximum and adjust the front feet to level the wine cellar.
INSTALLATION INSTRUCTIONS
- Please follow the installation diagram when installing wine cellars. No less than the minimum installation dimension, or it will affect the venting of cellar.
- All WCI and WI models have rear ventilation and must be able to draw air from underneath the appliance.
- All wine cellars have a power switch located on the control panel, so power point location is not critical.
- The wine cellar requires a standard 240 volt/10-amp power point. (Or according to different countries specifications).
- The power cord is 2.0m in length and is fixed on the right side at the back when looking from front of cabinet.
- As with most appliances of today, the wine cellar has sensitive electronic components which are susceptible to damage through lightning and electricity supply faults. It is therefore advised to use a power surge protector to avoid problems of this nature.
- IMPORTANT: The manufacturer does not recommend installing the wine cabinet directly above a built-in oven. Depending on how often the wine cabinet is exposed to heat from the oven, it can affect the wine cabinet's ability to cool the wine and maintain an even temperature, and both the wine cabinet and its contents can be damaged. The manufacturer will carry out service on the wine cabinet in accordance with current legislation if the cabinet's ventilation requirements are carried out correctly, however the manufacturer cannot be held responsible for the contents inside the wine cabinet if installed above a built-in oven.
In Hot climate zone, an air vent or grid, with a minimum ventilation size of 200mm x 40mm MUST be cut out at the rear top of the back partitioning or at the top of either side of the partitioning, allowing cool fresh air full access to flow into the 30mm gap located at the rear of the cabinet.
This air vent or grid must not be opened on the same side as other appliances such as ovens or an area that is sealed and without access to fresh cool air. Failing to comply with the above specifications could result in WARRANTY void.
INSTALLATION DRAWINGS
Ensure good ventilation according to the installation drawings, otherwise it will affect the wine cooler working normally.
Note: The appliance must be positioned so that the plug is accessible after installed.
WCI6045-1BG/WI6045H-1B24


WCI6045-1BG with open door
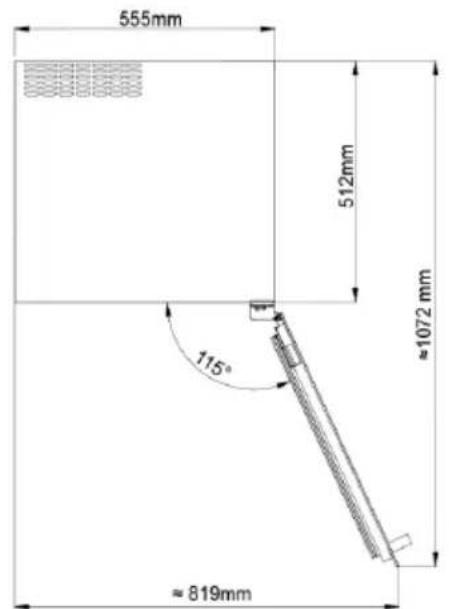
WI6045H-1B24 with open door


WCI6088-2BG with open door


WCI60188-2BG

WI60182H-2P101

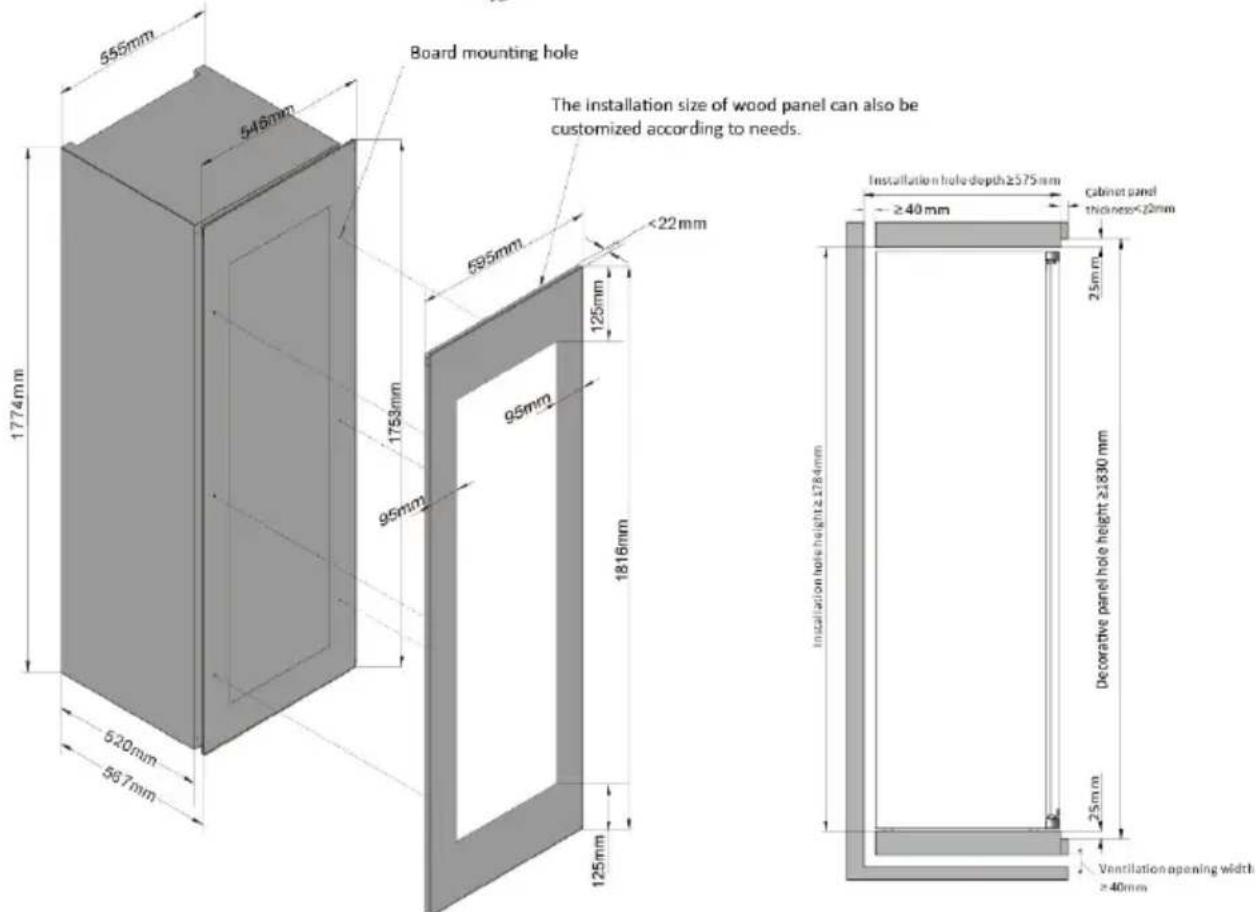
Fixing bracket installation
1.Level the wine cooler, take 2 fixing brackets ① 2 × 5^* 16 flat head screws ② and 4 screw covers ③ from the polybag. Remove 4 trunk-nails on the left side frame, fix the brackets ① on the left side of with a Philips screwdriver.
- Take 4 X 4*12 self-tapping screws ④ from the polybag, fix the bracket ① on left side of kitchen cabinet with a Philips screwdriver. And take another 4 X 4*12 self-tapping screws ④, fix the right side door hinges to the kitchen cabinet with these screws.

Installation of door panel
The wine cabinet door has the function of fine-tuning wood board:
- Take out the bracket ⑦, two 5 * 35 flat screws and two 5 * 25 flat screws ⑥ from the accessories package, fix the bracket on the upper and lower sides of the door panel with 4 * 12 self-tapping screws ④ according to the dimensions shown in the figure, pre hit two 5 * 35 screws on the bracket, hang the door panel on the door body, place
the screws in the oval groove in the door frame and adjust the door panel, and screw up and down with a screwdriver.
After the approximate position of the door panel is adjusted, screw two 5 * 25 screws through the oval hole of the positioning support ⑦ and let the screws pass through the middle hole of the door frame according to following figures and tighten the screws to prevent the door body from loosening. (See Figure 1.2)
- After the door panel is fully adjusted, take out six 5 * 45 ⑧ long self-tapping screws from the accessories package, uncover the door seal, drill the screws through the screw holes in the left and right door frames, and tighten the door panel (see Figure 3).
- Finally, put 4 * 12 self-tapping screws ④ through the holes on the upper and lower door hinges and fix them on the door panel (see Fig. 4).

WI60182H-2P101 with open door
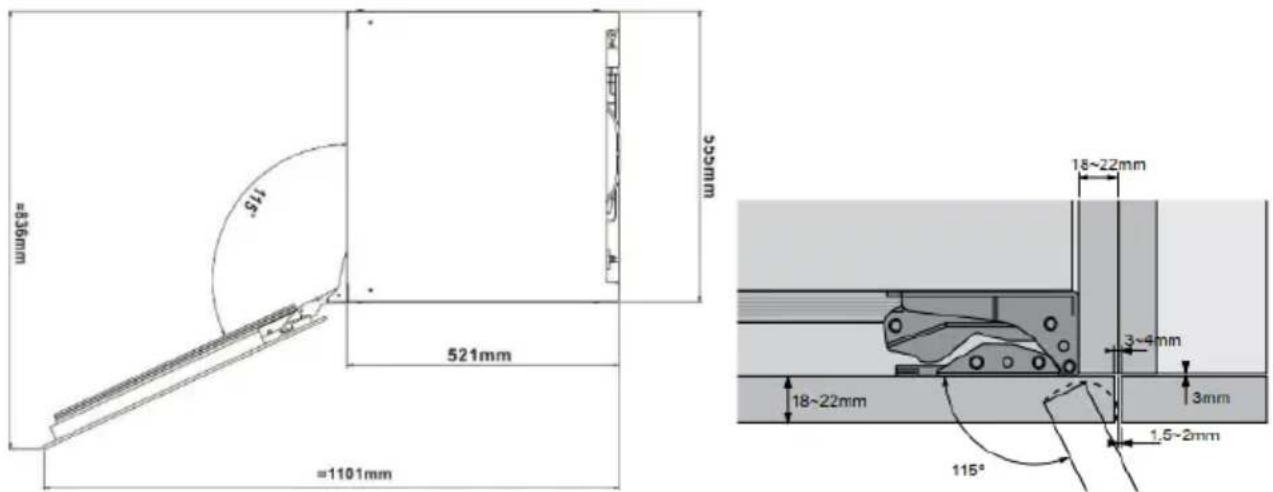
RADIATOR SYSTEM DESCRIPTION
WCI6045-1BG/WCI6060-1BG/WCI6060-2BG/WCI6088-2BG/WCI60188-2BG/WI6045H-1B24/WI6060H-1B26/WCISK60BG adopt back heat dissipation system

natural_image
Illustration of a 3D cabinet with heat exchanger and airflow arrows (no text or symbols)TURNING ON YOUR WINE CELLAR
Plug in and switch on the cellar by pressing on the power button for a few seconds. When you use the wine cellar for the first time (or restart the wine cellar after having it shut off for a long time), there will be a few degrees variance between the temperature you have selected and the one indicated on the LED readout. This is normal and it is due to the length of the activation time. Once the wine cellar is running for a few hours everything will stabilize.
Important: If the unit is unplugged, power is lost, or turned off, wait 3 to 5 minutes before restarting the unit. The wine cellar will not start if you attempt to restart before this time delay.
OPERATING NOISES
To reach the desired temperature settings, our wine cellars, like all wine cellars operating with compressors and fans, may produce the following types of noises. These noises are normal and may occur as follows:
Gurgling sound - caused by the refrigerant flowing through the appliance's coils.
- Cracking/popping sounds - resulting from the contraction and expansion of the refrigerant gas to produce cold.
• Fan operating sound - to circulate the air within the wine cellar.
An individual's perception of noise is directly linked to the environment in which the wine cellar is located, as well the specific type of models. Our wine cellars are in line with international standards for such appliance. We will always do its utmost to satisfy its customers but will not retake possession of the goods due to complaints based on normal operating noise occurrences.
LOADING YOUR WINE CELLAR
You may load your wine bottles in single or double rows while taking note of the following: if you do not have enough bottles to fill your wine cellar, it is better to distribute the load throughout the wine cellar to avoid “all on top” or “all below” type loads.
- Do remove or relocate adjustable wooden shelves to accommodate larger type of bottles or increase the capacity of the cellar by stacking the bottles up when necessary. (See removing shelves)
- Keep small gap between the walls and the bottles to allow air circulation. Like an underground cellar air circulation is important to prevent mould and for a better homogeneous temperature within the cellar.

DANGER!
- Do not overload your wine cellar to facilitate air circulation.
- Do not stack more than 1.5 rows of standard 0.75L bottles per shelves to facilitate air circulation.
- Avoid obstructing the internal fans (located inside on the back panel of the wine cellar).
- Do not slide the shelves outwards beyond the fixed position to prevent the bottles from falling.
- Do not pull out more than one loaded shelf at a time as this may cause the wine cellar to tilt forward.
- Do not cover the wooden shelves with alloy foil or other materials, as it will obstruct air circulation.
- Do not move your wine cellar while it is loaded with wines. This might distort the body of the wine cellar and cause back injury.
TYPES OF REGULATION
Please note that depending on the loading and settings chosen it takes about 24 hours for the wine cellar to see the temperature stabilizing.
During this time LED seems to move erratically in particular, it is normal, and this process occurs whenever the setting is modified and/or whenever many bottles are added to the cellar.
Designed to store and mature all wines: red, white, and sparkling. These wine cellars reproduce the ideal conditions for wine storage, at a constant recommended temperature of 12^ C. They can also be set to provide ideal serving temperature for full enjoyment of the wine's qualities. Unless stated by the wine maker on the bottle we recommend 7^ C for your champagne, 12^ C for whites and 18^ C for reds. (Refer to "Wine Service Temperature" recommendation chart)
TEMPERATURE SETTINGS
Important: The LED displays by default the actual internal air temperature.
The temperature of the power, before all Settings will be resumed after the electricity to power the pre-set temperature.
The electrical board of all models comes with memory function.
It is important to understand that there is a difference between the air temperature inside the wine cellar and the actual temperature of the wine: You will need to wait approximately 12 hours before noticing the effects of temperature adjustment due to the critical mass within a full wine cellar.
Once the temperature is set, it is strongly advised not to toy with it or adjust frequently. The thermostat will maintain the temperature inside the wine cellar within a +/- 2.5°C range. But the thermal inertia of the wine and the glass is such that within this temperature range, the actual temperature of the wine will only fluctuate 0.5°C to 1°C.
If the light is turned off before you get the door closed, then light will turn on automatically while you open the door, and it will be off automatically when the door is closed. If you want to keep the light always on, just turn on the light after you open the door.
CONTROL PANELS
Control panel WCI6045-1BG/WI6045H-1B24
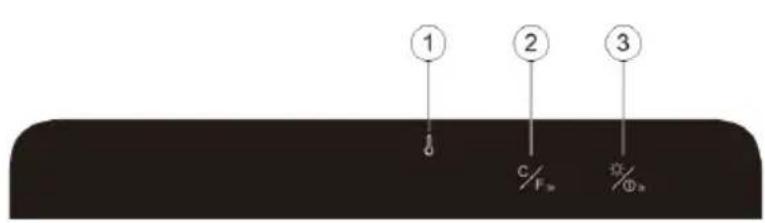
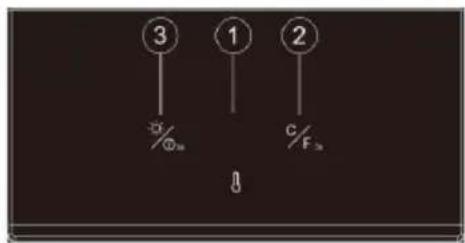
① Display Window
Display the measured temperature inside the wine cooler.
② Cycle Button
Each time, the temperature inside will drop 1^ C, until reduced to a minimum, and then a return to the highest temperature.
Press for 3 seconds, the window to achieve Celsius / Fahrenheit display conversion.
③ Cycle Button
In standby mode: press and hold for 3 seconds, power is turned on, the machine starts.
In the boot state: short press this button, LED lights on / off switch
In the boot state: press the button for 3 seconds, the power is off, the whole machine is closed.
Control panel WCI6060-1BG

① Lamp & Power Button
When power cord connected: press and hold for 3 seconds, power is turned on, the machine starts.
In the machine power-on-state: press this button, LED lights on; Press once again, LED lights off.
In the machine power-on-state: press and hold for 3 seconds, power is turned off, the machine is off.
② Temperature setting up button
Setting up the temperature in window ⑥ by 1 degree Celsius with each single touch, max. setting temperature: 20 degrees Celsius.
③ Temperature setting down button
Setting down the temperature in window ⑥ by 1 degree Celsius with each single touch, min. setting temperature: 5 degrees Celsius.
④ C/F display conversion button
Converting the degrees Celsius / Fahrenheit display in windows ⑥, by simultaneously pressing ②③ and hold for 3 seconds.
⑤ Window
Temperature display.
Control panel WCI6060-2BG/WI6060H-2B26/WCISK60BG

① Lamp & Power Button
When power cord connected: press and hold for 3 seconds, power is turned on, the machine starts. In the machine power-on-state: press this button, LED lights on; Press once again, LED lights off. In the machine power-on-state: press and hold for 3 seconds, power is turned off, the machine is off.
② Upper zone temperature setting button
Setting the upper zone temperature in window from 10 to 20 degree Celsius, by each single touch.
③ Lower zone temperature setting button
Setting the lower zone temperature in window from 5 to 12 degree Celsius, by each single touch.
④ C/F display conversion button
Converting the degrees Celsius / Fahrenheit display in windows, by simultaneously pressing and hold for 3 seconds②③.
⑤ Window
Temperature display.
① "ON/OFF" the power button
Press the button 3 seconds to power off (Window ④ digital countdown displays 3, 2, 1,). Press again (without delay), the power turns on.
② Upper zone temperature setting up button
Press one time, window ④ the set value will increase 1 degree Celsius in the original setting temperature, the setting range according to customer requirements.
③ Upper zone temperature setting down button
Press one time, window ④ the set value will reduce 1 degree Celsius in the original setting temperature, the setting range according to customer requirements.
④ Window
Display upper zone temperature.
⑤ Window
Display lower zone temperature.
⑥ Lower zone temperature setting up button
press one time, window ⑤ the set value will increase 1 degree Celsius in the original setting temperature, the setting range accordingly to customer requirements.
⑦ Lower zone temperature setting down button
press one time, window ⑤ the set value will reduce 1 degree Celsius in the original setting temperature, the setting range accordingly to customer requirements.
⑧ Lamp button
Press the button and the lamp turns on, the lamp will turn off once press again.
⑧ C/F display conversion function keys
Set the conversion degrees Celsius / Fahrenheit display, each press this button, the display window will be into degrees Celsius or Fahrenheit.
Control panel (optional) / Display light switched off for visual optimization
When this function is activated, only the interior lighting is switched on. The temperature light in the display is switched off. The display light is automatically switched on at door opening.
- Activation: Press and hold the keys ⑥ and ⑦ simultaneously for approx. 3 seconds. A beep sound confirms activation. The display light is switched off when the door is closed. The display light is automatically switched on when the door is opened.
- De-activation: Press and hold the keys ⑥ and ⑦ simultaneously for approx. 3 seconds. A beep sound confirms de-activation.
*Note: This function only applies to wine cabinets manufactured from August 2023.
Control panel WCI6088-2BG

① "ON/OFF" the power button
Press the button 3 seconds to power off (Window ④ digital countdown displays 3, 2, 1,). Press again (without delay), the power turns on.
② Upper zone temperature setting up button
Press one time, window ④ the set value will increase 1 degree Celsius in the original setting temperature, the setting range according to customer requirements.
③ Upper zone temperature setting down button
Press one time, window ④ the set value will reduce 1 degree Celsius in the original setting temperature, the setting range according to customer requirements.
④ Window
Display upper zone temperature.
⑤ Window
Display lower zone temperature.
⑥ Lower zone temperature setting up button
press one time, window ⑤ the set value will increase 1 degree Celsius in the original setting temperature, the setting range accordingly to customer requirements.
⑦ Lower zone temperature setting down button
press one time, window ⑤ the set value will reduce 1 degree Celsius in the original setting temperature, the setting range accordingly to customer requirements.
⑧ Lamp button
Press the button and the lamp turns on, the lamp will turn off once press again.
⑧ C/F display conversion function keys
Set the conversion degrees Celsius / Fahrenheit display, each press this button, the display window will be into degrees Celsius or Fahrenheit.
WINE SERVING TEMPERATURE CHART
All wines mature at the same temperature, which is a constant temperature set between 12^ C to 14^ C. The below chart is an indicative temperature chart to indicate the best temperature for drinking purposes.
| Wine | Serving temperature |
| Champagne NV, Sparkling, Spumante | 6°C |
| Dry White Semillon, Sauvignon Blanc | 8°C |
| Champagne Vintage | 10°C |
| Dry White Chardonnay | 10°C |
| Dry White Gewürztraminer, Riesling, Pinot grigio | 10°C |
| Sweet White Sauternes, Barsac, Montbazillac, Ice Wine, Late Harvest | 10°C |
| Beaujolais | 13°C |
| Sweet White Vintage: Sauternes | 14°C |
| White Vintage Chardonnay | 14°C |
| Red Pinot Noir | 16°C |
| Red Grenache, Syrah | 16°C |
| Red Vintage Pinot Noir | 18°C |
| Cabernet & Merlot: French, Australian, New Zealand, Chilean, Italian, Spanish, Californian, Argentinean | 20°C |
| Vintage Bordeaux | Room temperature not exceeding 20°C |
IMPORTANT INFORMATION ABOUT TEMPERATURE
Your wine cellar has been designed to guarantee optimum conditions for storing and/or serving your wines.
Fine wines require long and gentle developments and need specific conditions in which to reach their full potential.
All wines mature at the same temperature, which is a constant temperature set between 12^ C to 14^ C. Only the temperature of “degustation” (wine appreciation) varies according to the type of wines (see “Wine Serving Temperature Chart” above). And as it is for natural cellars used by wine producers for long period of storage, it is not the exact temperature that is important, but its consistency. In other words, if the temperature of your wine cellar is constant (between 12^ C to 14^ C) your wines will be stored in perfect conditions.
Not all wines will improve over the years. Some should be consumed at an early stage (2 to 3 years) while others have tremendous ageing capability (50 and over). All wines have a peak in maturity. Do check with your wine merchant to get the relevant information.
DEFROSTING/CONDENSATION/ HYGROMETRY/ VENTILATION
Your wine cellar is designed with “Auto-cycle” defrost system. During “Off-cycle” the refrigerated surfaces of the wine cellar defrost automatically. Defrost water from the wine cellar storage compartment drains automatically and part of it goes into a drainage container, which is located at the back of the wine cellar next to the compressor. The heat is transferred from the compressor and evaporates any condensation that has collected in the pan. Part of the remaining water is collected within the wine cellar for humidity purposes.
This system enables the creation of the correct humidity level inside your wine cellar required by the natural cork to maintain a long-lasting seal.
Notes: The water collected by condensation, is therefore recycled. Under extremely dry environmental conditions, you may have to add some water into the water container provided with your wine cellar.
All units are equipped with a double-glazed glass door that has a third internal acrylic layer to minimize condensation on the glass door.
The wine cellar is not totally sealed; fresh air admission is permitted through the drainpipe. Air is circulated through the cellar by means of a fan/fans and the hollow shelves.
Notes: During the refrigerating cycle, heat is given off and disperses through the external surfaces of the wine cellar. Avoid touching the surfaces during those cycles.
SLIDING SHELVES
Sliding wooden shelf installation and taking instruction:
Shelf taking: According to below instruction drawing to pull out the shelf to support bracket ①, press two sides of sliding roller buckles and pull out the shelf following the arrow mark ②.
Shelf installation: According to below instruction drawing to push in the shelf alignment with two sides of sliding roller following the arrow mark ③.

REVERSIBILITY OF THE DOOR
REMARK: WCBC6082-2BG/ WI6045H-1B24 models can't be door reversible.
REMARK: If your wine cabinet is equipped with lock at the bottom of the door, the door is not reversible, so you must order one right opening door to change the opening side.
Warning
To avoid accidents during the process of changing the door, we recommend that you get assistance. The glass door is heavy and may cause injury if dropped.
- Depending on to the model and the type of handle your wine cabinet is equipped with, you may have to rotate the door through 180 degrees.
- Depending on the type of handle your wine cabinet is equipped with, the door may not be reversible or may require that a left or right opening door be ordered to change the opening side.
-
To put the cabinet on open operation place, the door opened to the maximum angle.
-
Use small knife (2) to take off the decorative nail (1) on opposite side (Drawing 1).
-
Use the inner six angle screwdriver (Tool 5) to disassemble the screws (4) of drop-proof device (3), then remove the drop-proof device. (Drawing 1)
-
Hold the door, use six angle screwdriver (Tool 5) to screw out the door shaft core (6) from the two ends of the top of the door. Take out the door and set aside. (Drawing 2)
-
Discharge the upper and lower door hinge (7)(8) by M5 inner six angle screwdriver (Tool 5), then to assemble the door hinge on the opposite side. (Drawing 3 and 4)
-
Rotate the door 180 degrees, then install the door on the right side of the cabinet. (Drawing 5)
-
Finally, install the decorative nail and drop-proof device at the opposite side. (Drawing 6)


- Decorative nail
- Knife
- Drop-proof device
- M5 six angle
- M5 six angle screwdriver
- Door spindle core
- Upper door hinge
- Lower door hinge
-
Put the cabinet in an open operating area, have the door opened to the maximum angle.
-
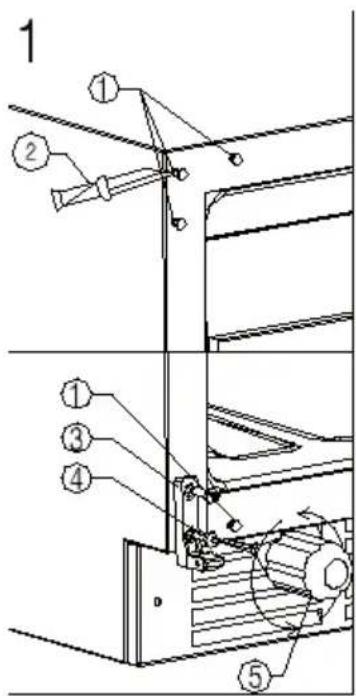
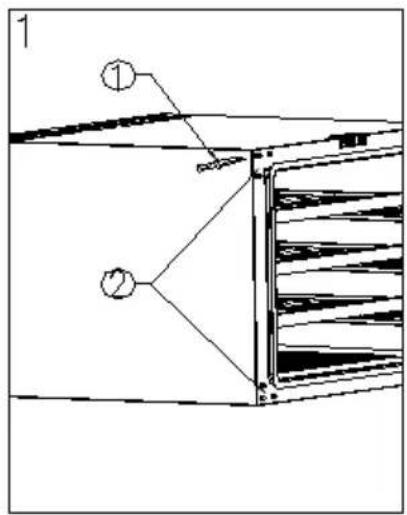
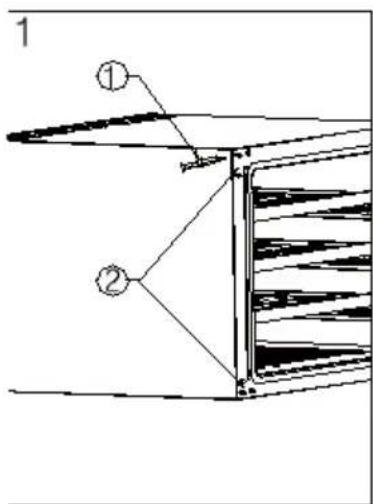
Use the knife ② to remove the decorative nails ① from the left side of the cabinet. (Figure 1)

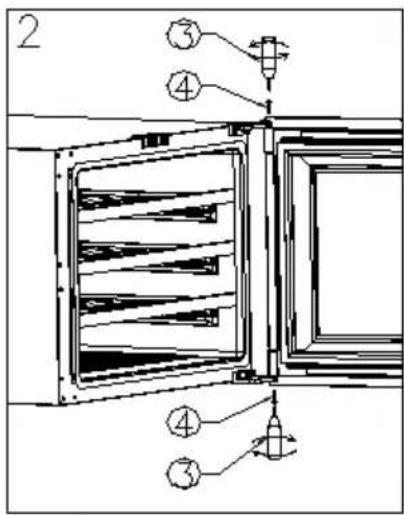
- Use the Phillips screwdriver④ to remove the M5 Phillips countersunk screw③ that fix the upper and lower door hinges. (Figure 2)

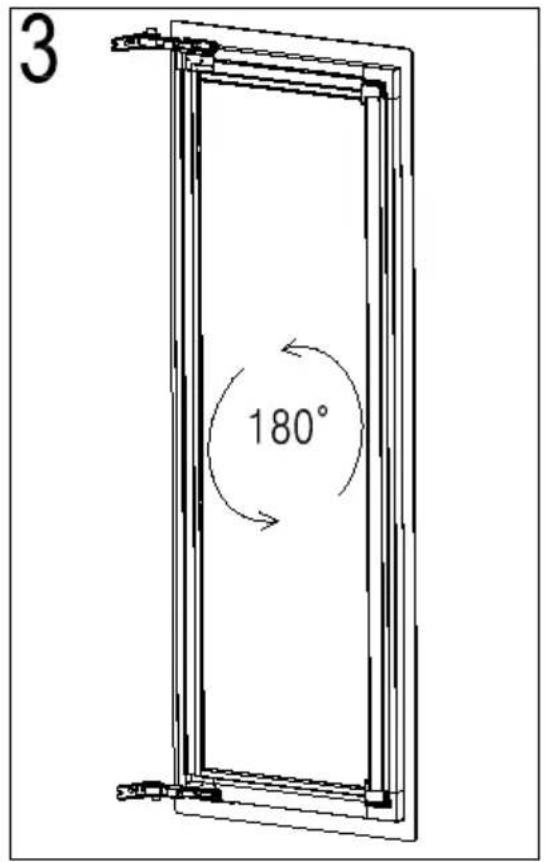
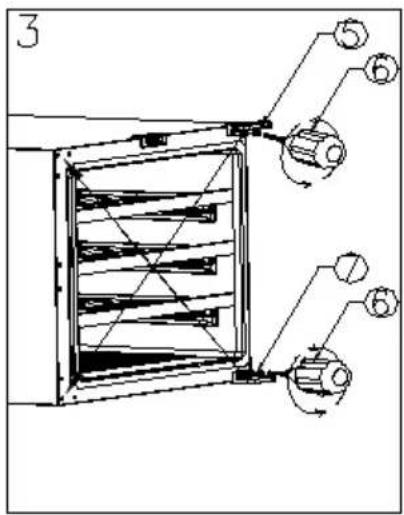
- Rotate the door by 180 degrees and install it to the other side of the cabinet. (Figure 3 and 4)

- At last, install all decorative nails to the other side of the door①, door installation is all set! (Figure 5)

WCI6045-1BG/WCI6060-1BG/WCI6060-2BG with touch opening


natural_image
Technical line drawing of a cabinet or enclosure with ladder and frame, no visible text or symbols
| 1. Knife | 2. Decorative nail | 3. Cross screwdriver |
| 4. Door shaft screw | 5. Upper door hinge | 6. M5 six angle screwdriver |
| 7. Lower door hinge | 8. Probe needle | 9. Metal plate |
Warning: To avoid accidents during the process of changing the door, we recommend that you get assistance. The glass door is heavy and may cause injury if dropped. Please turn off the power before reversing the door.
- Use knife to pry the six trunk-nails from left side of cabinet. Please be careful, don't hurt the hands and don't damage the surface of cabinet (Picture 1)
- Open the door, use Phillips screwdriver to loosen the screws of upper and lower door hinge, and then remove the door (Picture 2)
- Then use hexagon wrench to loosen the screws of upper and lower door hinge, remove the door hinge, and then install upper door hinge at lower opposite side, install lower door hinge at upper opposite side (Picture 3)
- The upper and lower ends of the removed door are directly aligned with the door hinges on the left side of the cabinet, adjust the door, and tighten the upper and lower screws with a Phillips screwdriver to complete the door replacement. Then install six trunk-nails to right side (Picture 4 & Picture 5)
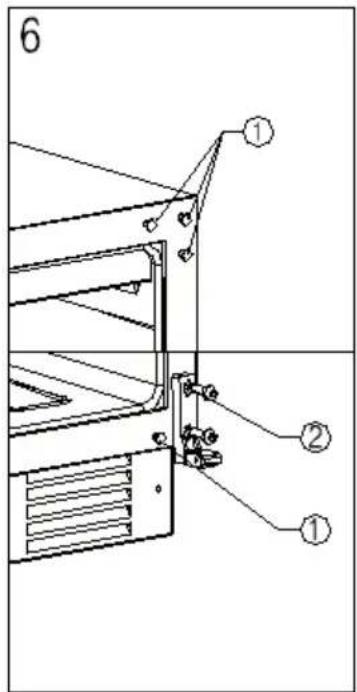
- After closing the door, check whether the probe on the door frame is aligned with the metal plate on the cabinet. If it is not aligned, loosen the screws on the upper and lower door hinges and adjust the door until it is aligned (Picture 6)
- Plug in the power, find the press sign, and slowly press twice, if the door can be opened, the reversible door is successful.
WCI6088-2BG / WI6060H-2B26 / WCISK60BG


natural_image
Pure technical line drawing of a mechanical component with no text or symbols| 1. Knife | 2. Decorative nail | 3. Cross screwdriver |
| 4. Door shaft screw | 5. Upper door hinge | 6. M5 six angle screwdriver |
| 7. Lower door hinge |
Remark: Before operating the reversibility, need to power off at first, and need to cooperate with two people!
- Open the to the maximum angle, pry out the four decorative nails (2) on the left side of the box with a medium knife (1) and put them aside for standby. Note: don't hurt your hands (see Figure 1).
- Open the door, screw off Door shaft screws (4) on the upper (5) and lower (7) door hinges with a cross screwdriver (3) and remove the door body for standby (see Figure 2).
- Use an M5 six angle screwdriver (6) to screw off the Allen screws on the right upper hinge (5) and lower hinge (7) and install them on the left side of the box after they are adjusted. (See fig. 3)
- Rotate the removed door 180 degrees, align the upper and lower ends directly with the door hinge hole on the left side of the box, adjust the door body, tighten the upper and lower screws (4) with a cross screwdriver, and install the removed Decorative nail (2) to the right to complete the door body replacement (see Figure 4 & Figure 5).
WCI6088-2BG / WI6060H-2B26 / WCISK60BG / WCI6060-1BG / WCI6060-2BG

-
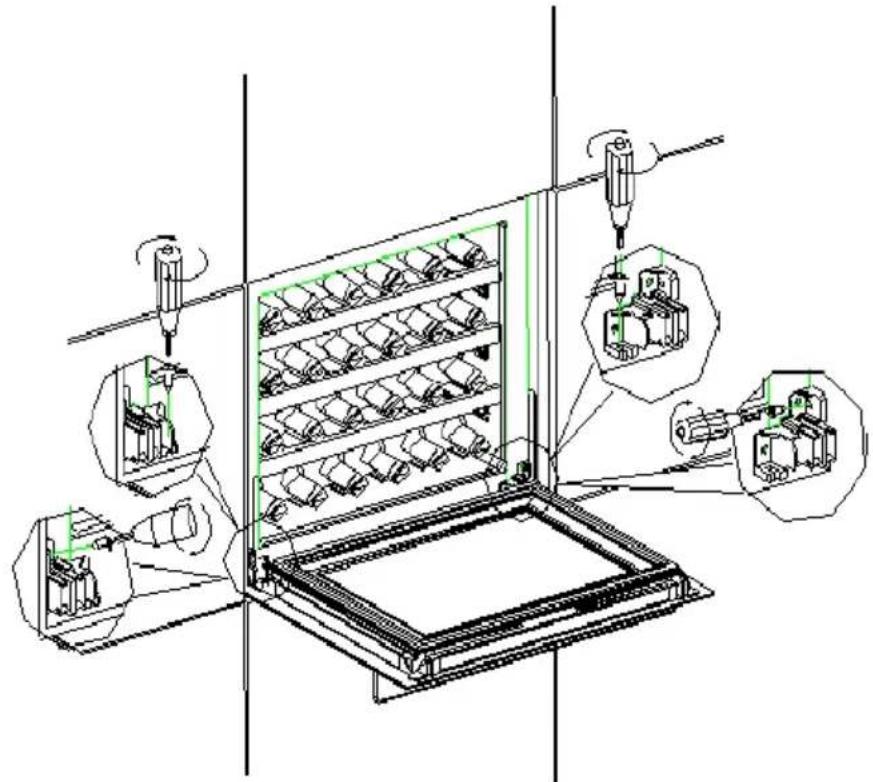
Put the wine cooler into the cabinet, then adjust the wine cooler to make it steady. Open the door, take out the fixed plate, 2pcs Inner Hexagon Screws, and Inner Hexagon Screwdriver from accessory bag, then use the inner hexagon screwdriver to tighten the fixed plate on the lower left side of wine cooler.
-
Take out 3pcs Phillips screws from accessory bag, use Phillips screwdriver to tighten the fixed plate on the lower left side of wine cooler (1pcs screw), then tighten the other 2pcs Phillips screws on the upper door hinge and lower door hinge.
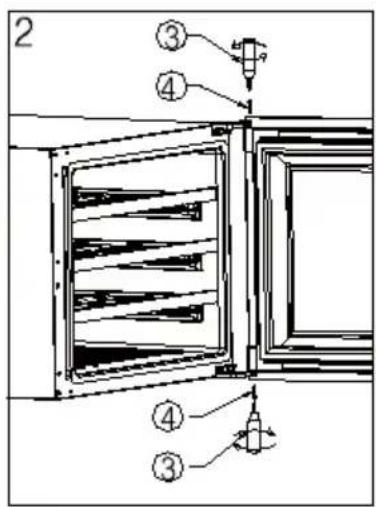
WI6045H-1B24
- Put the wine cooler inside the cabinet and level it.
- Open the door and take out 2 fixing screws from the plastic spare kit bag.
- Install the fixing screws through the fixing holes on both sides into the cabinet (see fig.).
AUTO-DOOR OPERATING INSTRUCTION WCI6060-1BG/WCI6060-2BG
- Operate the auto-door in the power-on state.
- Locate the touch point on the door. Place your finger on the touch point and keep your finger on the point for a few seconds until the door opening sensor is activated. Do not push/press your finger against the touch point – only a light touch is necessary. Open the door using your hands. Before closing the door, please control the push function (located on the top of the cabinet frame) is in the retracted position. Important: Do not close the door using force. Risk of product damage.

Before closing the door, control the push function is in the retracted position.
Note: In the power-off state, you cannot operate the auto-door. You can open the door from the crack directly with hand if needed.
Note: Before activating door opening and door closing mechanism, please wait minimum 4 seconds before re-activating the door opening via touch.
Note: When opening the door manually, the system can activate the opening sensor, when the door is closed. If this happens, the appliance will automatically re-open the door. Therefore, you should always check the door closing after manual door opening. If the door opens, wait until the push function is retracted before closing the door.
OPERATION ANOMALIES
Ensure that there is power to the electrical supply plug by connecting another electrical appliance to it. Check fuse, if any. Make sure that the door is closed properly.
If your wine cellar appears to be malfunctioning, unplug it and contact your after sales service. Any intervention on the cold circuit should be performed by a refrigeration technician who should carry out an inspection of the circuit sealing system. Similarly, any intervention on the electrical circuit should be performed by a qualified electrician.
Notes: Any intervention performed by a non-authorized technician We will lead to the warranty being considered as null and void.
POWER FAILURES
In the event of a power interruption, all previous temperature settings are automatically preservation, and it will revert to a preset temperature setting. (See pre-set chart)
Most power failures are corrected within a short period of time. An hour or two's loss of power will not affect wine cellar's temperatures. To avoid sudden change of temperature while the power is off, you should avoid opening the door. For longer period of power failure, do take steps to protect your wine.
Irrespective of the cause, if you notice either abnormal temperature or humidity levels inside your wine cellar, be reassured that only long and frequent exposure to these abnormal conditions can cause a detrimental effect on your wines.
TROUBLESHOOTING GUIDE
Common problems may easily be solved, saving you the cost of a possible service call. Please carefully read the instruction manual and revert to troubleshooting guide chart.
| PROBLEM POSSIBLE CAUSE | |
| Wine cellar does not operate. | Not plugged in.The appliance is turned off.The circuit breaker tripped, or the fuse is broken. |
| Wine cellar is not cold enough. | Check the temperature control setting.External environment may require a higher setting.The door is opened too often.The door is not closed completely.The door gasket does not seal properly. |
| Turns on and off frequently. | The room temperature is hotter than normal.A large number of contents has been added to the Wine cellar.The door is opened too often.The door is not closed completely.The temperature control is not set correctly.The door gasket does not seal properly. |
| The light does not work. | Not plugged in.The circuit breaker tripped or a blown fuse.The bulb is out of order.The light button is “OFF”. |
| Vibrations. | Check to assure that the Wine cellar is level. |
| The Wine cellar seems to make too much noise. | The rattling noise may come from the flow of the refrigerant, which is normal.As each cycle ends, you may hear gurgling sounds caused by the flow of refrigerant in your Wine cellar.Contraction and expansion of the inside walls may cause popping and crackling noises.The Wine cellar is not level. |
| The door will not close properly. | The Wine cellar is not level.The door was reversed and not properly installed.The gasket is faulty. (Magnet or rubber is spoiled)The shelves are out of position. |
BEFORE DISPOSAL OF THE APPLIANCE.
- Disconnect the main plug from the main socket.
- Cut off the main cable and discard it.
| Correct disposal of this product | |
 | This symbol on the product, or in its packaging, indicates that this product may not be treated as household waste. Instead, it should be taken to the appropriate waste collection point for the recycling of electrical and electronic equipment. By ensuring this product is disposed of correctly, you will help prevent potential negative consequences for the environment and human health, which could |
| disposal service, or the shop where you purchased the product. |
- Witt built-in wine appliances-2
- TABLE OF CONTENTS
- WARNINGS
- DANGER: Risk of child entrapment. Before you throw away your old wine chiller:
- R600a WARNINGS:
- It is hazardous for anyone other than an Authorized Service Person to carry out servicing or repairs to this appliance.
- BEFORE LOADING & PLUGGING IN THE WINE CELLAR
- Recommendations:
- Notes:
- GROUNDING INSTRUCTIONS
- INSTALLING YOUR WINE CELLAR
- INSTALLATION INSTRUCTIONS
- INSTALLATION DRAWINGS
- Fixing bracket installation
- Installation of door panel
- The wine cabinet door has the function of fine-tuning wood board:
- RADIATOR SYSTEM DESCRIPTION
- TURNING ON YOUR WINE CELLAR
- OPERATING NOISES
- LOADING YOUR WINE CELLAR
- DANGER!
- TYPES OF REGULATION
- TEMPERATURE SETTINGS
- CONTROL PANELS
- ① Display Window
- ② Cycle Button
- ③ Cycle Button
- Control panel WCI6060-1BG
- ① Lamp & Power Button
- ② Temperature setting up button
- ③ Temperature setting down button
- ④ C/F display conversion button
- ⑤ Window
- Control panel WCI6060-2BG/WI6060H-2B26/WCISK60BG
- ② Upper zone temperature setting button
- ③ Lower zone temperature setting button
- ① "ON/OFF" the power button
- ② Upper zone temperature setting up button
- ③ Upper zone temperature setting down button
- ④ Window
- ⑥ Lower zone temperature setting up button
- ⑦ Lower zone temperature setting down button
- ⑧ Lamp button
- ⑧ C/F display conversion function keys
- Control panel (optional) / Display light switched off for visual optimization
- WINE SERVING TEMPERATURE CHART
- IMPORTANT INFORMATION ABOUT TEMPERATURE
- DEFROSTING/CONDENSATION/ HYGROMETRY/ VENTILATION
- SLIDING SHELVES
- REVERSIBILITY OF THE DOOR
- Warning
- WCI6045-1BG/WCI6060-1BG/WCI6060-2BG with touch opening
- WCI6088-2BG / WI6060H-2B26 / WCISK60BG
- Remark: Before operating the reversibility, need to power off at first, and need to cooperate with two people!
- WCI6088-2BG / WI6060H-2B26 / WCISK60BG / WCI6060-1BG / WCI6060-2BG
- WI6045H-1B24
- AUTO-DOOR OPERATING INSTRUCTION WCI6060-1BG/WCI6060-2BG
- OPERATION ANOMALIES
- POWER FAILURES
- TROUBLESHOOTING GUIDE
- BEFORE DISPOSAL OF THE APPLIANCE.
Brand : Ecotronic
Model : WI6045H-1B24
Category : Beverage Refrigerator