
Dual Tube EQ - Audio Equalizer ART - Free user manual and instructions
Find the device manual for free Dual Tube EQ ART in PDF.


| Product Type | Dual Tube Equalizer |
| Channels | 2 (Dual) |
| Tube Type | 12AX7 (or equivalent) |
| Frequency Bands | 7-band per channel |
| Frequency Range | 20 Hz - 20 kHz |
| Input Connectors | 1/4" TRS balanced / unbalanced |
| Output Connectors | 1/4" TRS balanced / unbalanced |
| Power Supply | Internal, 100-240 VAC, 50/60 Hz |
| Dimensions (HxWxD) | 1.75" x 19" x 6.5" (1U rackmount) |
| Weight | 5.5 lbs (2.5 kg) |
| Rackmountable | Yes, 1U |
| Controls | Frequency sliders, Gain knobs, Bypass switch |
| Indicator LEDs | Power, Clip, Bypass per channel |
| Frequency Response | ±0.5 dB |
| Signal-to-Noise Ratio | >90 dB |
| Total Harmonic Distortion | <0.01% at nominal level |
| Maximum Input Level | +22 dBu |
| Maximum Output Level | +22 dBu |
| Input Impedance | 1 MΩ (unbalanced), 50 kΩ (balanced) |
| Output Impedance | 600 Ω |
| Cooling | Passive (no fan) |
| Operating Temperature | 41°F - 95°F (5°C - 35°C) |
| Care & Maintenance | Wipe with dry cloth; avoid solvents |
| Safety Precautions | Do not expose to rain or moisture; unplug before cleaning |
| Spare Parts & Repairability | Contact ART customer service for replacement tubes or repairs |
Frequently Asked Questions - Dual Tube EQ ART
User questions about Dual Tube EQ ART
0 question about this device. Answer the ones you know or ask your own.
Ask a new question about this device
Download the instructions for your Audio Equalizer in PDF format for free! Find your manual Dual Tube EQ - ART and take your electronic device back in hand. On this page are published all the documents necessary for the use of your device. Dual Tube EQ by ART.
USER MANUAL Dual Tube EQ ART
natural_image
Front view of a black electronic device labeled 'DUAL TUBE ED' with multiple ports and connectors (no readable text beyond label)USER'S GUIDE

APPLIED RESEARCH AND TECHNOLOGY
Table of Contents
Introduction 2
Features 2
Registration 2
Overview 3
EQ Tips 3-5
Unpacking 5
AC Power Hookup 6
Audio Connections 6
Installation 6....
Safety Precautions 6
Powering Up 6....
Front Panel Controls and Indicators 7
Gain Control 7
Clip Indicator 7.
Low Frequency Control 8....
Low Shift Switch 8....
Lo-Mid Frequency Control 8
Low-Mid Shift x10 Switch 8
Hi-Mid Frequency Control 9
Hi-Mid Shift x10 Switch 9
High Frequency Control 9
High Shift Switch 9
Output Level Control 10
Bypass Switch 10
Mono (cascade) switch 10
Power Switch 11
Rear Panel Connections 11
Input 11
Output 11
Mono connections 12
Tube Replacement 12
Instruments and the Audio Spectrum 12
Applications 13
Specifications 14
On-line Information 14
Warranty Information 15
Service Information 16
258-5004-101
Introduction
Thank you for purchasing Applied Research and Technology's Dual Tube EQ. The Dual Tube EQ may be used anywhere you need equalization or frequency adjustments. Offering a superb level of sound quality, the Dual Tube EQ will enhance the sonic textures of your studio or audio system for years to come.
Features
The Dual Tube EQ is a unique product. While every EQ gives you the ability to alter the frequency characteristics of a signal, very few sound really good when doing so. Developed in partnership with studio and live sound engineers, the Dual Tube EQ possesses flexibility and "sound" that is not available from any other product on the market - at any price! The Dual Tube EQ was designed and constructed with the best components, assuring a lifetime of quiet, reliable performance. The Dual Tube EQ offers:
- The award-winning A R T "SOUND"!
- Tube-based four-band (or eight-band!) equalization
- Selectable Low shelving filters - 40Hz or 120Hz
- Selectable High shelving filters - 6KHz or 18KHz
- Sweepable Lo and Hi mid-frequency bands
- Mid-frequency bands overlap from 200Hz to 2KHz
- Mid-frequency bands sweepable from 20Hz to 20KHz
- Hand-selected 12AX7a tubes
- XLR balanced inputs and outputs
- 1/4" TS unbalanced inputs and outputs
- Custom extruded aluminum chassis
- Independent input and output level controls
- Detented rotary controls
-
90dB dynamic range
- Internal power supply
- Three year warranty
- Designed and manufactured in the USA
Registration
If you haven't done so already, please take the time to fill out the User Registration Card for your purchase. Having you in our database allows us to keep you informed of updates, application notes, and new product introductions. It only takes a moment, and it will ensure that you are constantly up to date with your purchase.
Fill in the following for your future reference:
Date of purchase: ____
Purchased From:
Serial Number: 258-
Overview
Great recordings and great mixes are made from great sounds. With the exception of some classical and environmental recordings, equalization plays a large role in creating, tweaking and capturing great sounds in contemporary music. A good equalizer will make good sounds sound better, and (more importantly) bad sounds sound better.
Since we don't live in a perfect world where all instruments and sounds are "record-ready", A R T created the Dual Tube EQ to make our recordings a little easier and (hopefully) a little better.
The Tube EQ was designed to help "fix" the instruments that give us the most headaches when we're recording: kick, snare, bass, toms, guitar amps, voice, etc. The two sweepable parametric bands and selectable shelving bands on each channel have been optimized for musical instruments. The two sweepable bands overlap themselves - and the high and low shelving bands - providing you with the ultimate in flexibility. The Dual Tube EQ gives you all the control you need to effectively alter and dial in great sounds from even the poorest of sources.
EQ Tips
Why use an external EQ?
The goal of any recording is to get the sounds right before you commit them to tape. The Dual Tube EQ exists to help you get it right so you don't have to "fix it in the mix".
The best way to get a signal to any recorder is through the shortest signal path. In most cases, the shortest path is: mic to preamp to compressor to EQ to tape deck. The signal doesn't even go through the mixer! This isn't a new concept, but it has become more relevant with the availability of affordable mixing consoles. As their name implies, most affordable mixers excel in signal routing and mixing capabilities. However, they are not necessarily your best option for recording tracks. While their onboard EQ is nearly always adequate for tweaking a recorded
track during mixing, the Dual Tube EQ is a better sounding and more flexible equalizer. It all comes down to economics: Mixer manufacturers need to make trade-offs to keep prices down while keeping performance up.
The use of external processing (equalizers, preamps and compressors) has sonic and practical benefits when you consider that most recording is done one or two channels at a time. For those of us on a budget, it just doesn't make sense to spend a ton of money on a “cadillac” console when a budget mixer and a few pieces of external gear is more cost effective. Even those engineers who regularly work on “big” consoles use external EQs, compressors and preamps!
Why should I use a parametric EQ?
Parametric EQs can give you more control over a signal -- they can provide subtle or drastic results because they can be tuned to specific frequencies. Parametric EQs allow you to boost or cut narrow frequency bands to make individual instruments "sit" better with other instruments when combined in a mix. This is usually accomplished with one or two bands.
What is the best way to use EQ?
There are two schools of thought on EQ: 1) Use as much as you need to make things sound good. 2) Don't use any EQ. Most people follow the suggestion of "if it sounds good, it is good." You need to use your ears and judge for yourself as their are no steadfast rules for EQ'ing. Here are a few pointers to guide you.
Always tweak the instrument you are EQ'ing while listening to it in the mix. EQ'ing an instrument when it is soloed doesn't give you a good representation of how it will sound when mixed with other instruments. You'd be surprised at how bad a "killer" guitar track can sound when it is isolated from the rest of the mix. Remember, what makes it killer is how it sounds in relation to the other instruments! Keep the big picture in mind.
Most people think of EQ as boosting only ("we'll just add a little EQ..."). Many times a "bad" sounding instrument can be fixed by simply isolating the bad frequency and pulling it out. After you determine approximately where the "problem area" is in the instrument (highs, lows, mids), isolate the track and boost one
of the mid bands. Slowly sweep through the frequency range. When the really nasty sound jumps out at you (you'll know it when it happens) turn the boost back to "0" (12 o'clock). Now put the track back into the mix and cut the frequency. You'll have to adjust the level of the instrument depending on how much you cut, but you may find that with the "problem area" pulled out, the instrument works better in the mix.
When recording EQ'd instruments you want to make sure you have good representation of frequencies on tape. Always monitor "off" tape when recording. This ensures that what you're hearing is what is on tape. When recording things like kick drums, make sure you have enough low end "thud" and high end "click" (if applicable) before you record.
Recording guideline: You can always boost or cut frequencies after they've been recorded, but you can't add frequencies that weren't recorded! Always be prepared for the drummer who says he loves the John Bonham kick drum sound (lots of low end power and ambience) you got when recording but now, during the mix, he decides he wants to sound like Metallica (more click than punch).
If you get the sounds right when you're recording you shouldn't be spending a lot of time re-EQ'ing during the mix. During mixing you should be concentrating on the blending of tracks and the dynamics of the song. If you find yourself EQ'ing everything, take a break and come back to it later. Start mixing with a group of instruments (the whole drum kit or guitars and bass) instead of listening to individual tracks. Mixing is the time for tweaking - not applying a sonic re-design.
Once again, "if it sounds good, print it!" Trust your ears - never-mind where the knobs are pointing.
Unpacking
Your Dual Tube EQ was packed with care at the factory. The shipping carton was designed to protect it during initial shipment. Please retain this carton for use in transporting the Dual Tube EQ, or in the unlikely event that you need to return your Dual Tube EQ for servicing.
AC Power Hookup
The Dual Tube EQ has an internal power supply designed to operate at 100 to 125VAC, 50 to 60Hz. Units manufactured for use outside of the United States of America have been modified to comply with the required electrical specifications. Under no circumstances should the power cable be altered. If the cable becomes cut or damaged, discontinue its use and have it replaced before using the Dual Tube EQ.
Audio Connections
Audio connections to and from the Dual Tube EQ are balanced XLR (Pin 2 Hot (+), Pin 3 Cold (-), Pin 1 Ground) and unbalanced 1/4" (Tip Hot (+), Sleeve Ground). We recommend using only high-quality cables equipped with the appropriate connectors.
Installation
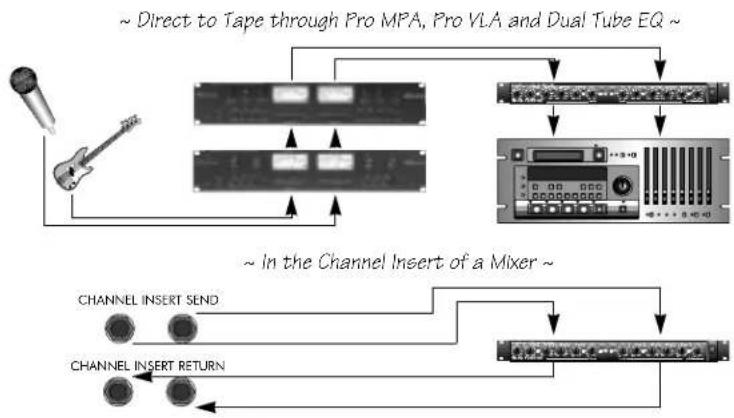
The Dual Tube EQ may be employed in a number of setups including:
- Between a mic/ line preamplifier and a mixer, digital multi-track recorder, DAT machine, hard disk recorder, or analog recorder.
- In a mixer's channel insert points.
- Between a mic/ line preamplifier and signal processors.
- Between electronic musical instruments (synthesizers, guitars, bass, samplers, acoustic instruments with pickups) and other gear.
* Note: The Dual Tube EQ is NOT a mic preamp! It doesn't have enough gain to amplify the mic signal to line level!
SAFETY PRECAUTIONS
Warning: To avoid the risk of shock or fire, do not expose this unit to moisture. Do not remove metal panels from the main chassis. Disassembling the chassis exposes dangerous voltages. There are no user-serviceable parts inside. Refer all servicing to qualified personnel. Note: If your power cord becomes damaged and must be replaced, always replace it with the proper type (3 prong).
POWERING UP
It is important to remember to turn the Dual Tube EQ on before any monitoring levels or power amps are turned on. The Dual Tube EQ has the ability to add gain to its input signal. This can cause the Dual Tube EQ to produce a "thump" on power up and
power down.
Note: Like all tube-based equipment, the Dual Tube EQ needs to warm up before being used. Allow one to two minutes for the tubes to reach proper operating voltage before using.
It is normal for the Tube EQ to be warm. The aluminum chassis is used for heat dissipation. It is recommended that the Dual Tube EQ be installed in an area where there is adequate ventilation.
If the Dual Tube EQ fails to power up when the power switch is turned on, check to see that its power cord is plugged into an active outlet. If the unit still fails to operate properly, turn it off and unplug it. Then consult your dealer or A R T's Customer Service department.
FRONT PANEL CONTROLS & INDICATORS
Each channel of the Dual EQ has identical features.

Gain Control
The Gain control sets the amount of input gain to the Dual Tube EQ. Turn the control clockwise to increase gain and counterclockwise to decrease it. To maximize your signal to noise ratio, it is important to start with a unity gain setting (meaning that the level into the Tube EQ is the same as the level out of the Dual Tube EQ). With the output level at its "0" position, adjust the input gain until the level is the same when the Dual Tube EQ is bypassed and active.
Clip Indicator
The Clip indicator will illuminate just before any gain stage of the Tube EQ reaches audible distortion. Typically this will indicate clipping at the input stage (which is corrected by turning down the input gain control). However, it will also indicate any distortion caused by excessive EQ'ing. In other words, if turning down the input gain control doesn't make the clip indicator turn off, check the frequency bands for excessive boost.
Low Frequency Control
The Low Frequency control adjusts a shelving filter with a selectable corner frequency of either 40Hz or 120Hz. The low shelving filter designed into the Tube EQ affects all frequencies below the corner frequency when applying boost or cut. In other words, cutting at 40Hz also cuts 30Hz, 20Hz, etc. The Low Frequency control has as range of +/- 12dB. Two ranges are selected with the Low Shift Switch: 40Hz or 120Hz. 40Hz is great for enhancing sub-low frequencies such as those in bass guitars and kick drums. Cutting 40Hz can also help to “clean up” mixes that sound muddy or “loose” in the low end. 120Hz is generally the low-end for vocals, guitars and toms. Boosting 120Hz can add “weight” or “beef” to a week vocal and cutting it can “thin out” a signal that takes up too much room in the low end.
Low Shift Switch
The Low Shift switch selects the corner frequency of the Low Frequency control. In the "out" position the corner is 40Hz. In the "in" position the corner is 120Hz.

Lo-Mid Frequency Control
The Lo-Mid control is a dual concentric pot (meaning there are two controls - one outer and one inner). The outer control is used to select a frequency while the inner control is used to apply +/-12dB of gain. The Lo-Mid control can cover two frequency ranges depending on the position of the Shift x 10 switch. These ranges are 20Hz to 200Hz and 200Hz to 2KHz.
Lo-Mid Shift x 10 Switch
The Lo-Mid Shift x 10 switch determines the range over which the Lo-Mid frequency control will cover. In its "out" position, the range is set at 20Hz to 200Hz. In its "in" position the range is set at 200Hz to 2KHz.
Note: You'll notice the Low Frequency and Lo-Mid Frequency controls overlap (meaning they cover the same frequencies). This is intentional and is one of the powerful features of the Tube EQ. This feature allows you the ultimate in flexibility.
Hi-Mid Frequency Control
The Hi-Mid control is a dual concentric pot (meaning there are two controls - one outer and one inner). The outer control is used to select a frequency while the inner control is used to apply +/-12dB of gain. The Hi-Mid control can cover two frequency ranges depending on the position of the Shift x 10 switch. These ranges are 200Hz to 2KHz and 2KHz to 20KHz.
Hi-Mid Shift x 10 Switch
The Hi-Mid Shift x 10 switch determines the range over which the Hi-Mid Frequency control will cover. In its "out" position the range is set at 200Hz to 2KHz. In its "in" position the range is set at 2KHz to 20KHz.
Note: You'll notice the Lo-Mid and Hi-Mid Frequency controls overlap (meaning they cover the same frequencies) in the 200Hz to 2KHz range. This is intentional and is another of the powerful features of the Tube EQ. This feature allows either or both controls to be used in this range. This is extremely useful if you want to cut at 200Hz and boost at 350Hz.
High Frequency Control
The High Frequency control adjusts a shelving filter with a selectable corner frequency of either 6KHz or 18KHz. The high shelving filter designed into the Tube EQ affects all frequencies above the corner frequency when applying boost or cut. In other words, cutting at 6KHz also cuts 7KHz, 8KHz, etc. The High Frequency control has as range of +/- 12dB. The two ranges are selected with the High Shift switch. 6KHz is great for adding top end to guitars, snare drums and vocals. Cutting 6KHz can also help to "take the edge off" brittle or harsh sounding instruments. 18KHz may be used to add "sizzle" to cymbals and is generally referred to as the "air" band. While there aren't very many instruments that contain 18KHz information directly, many instruments and mixes contain upper harmonics which can add extra definition and "space" when boosted. Cutting at 18KHz can decrease hiss and noise.
High Shift Switch
The High Shift switch selects the corner frequency of the High Frequency control. In the “out” position the corner is 18KHz. In the “in” position the corner is 6KHz.
Note: You'll notice the High Frequency and Hi-Mid Frequency controls overlap (meaning they cover the same frequencies). This is intentional and is one of the powerful features of the Tube EQ. This feature allows you the ultimate in flexibility. For example, on cymbals try boosting 18KHz with the High control while cutting 20KHz with the Hi-Mid control for a very bright, yet noise free result.
Output Level Control
The Output Level control sets the output level of the Dual Tube EQ. The output level is a gain stage intended to compensate for a boost or cut in level from the applied EQ. When the control is fully counterclockwise, there is no output. Turning the control clockwise increases the level of the output to a maximum of +10dB of gain. To achieve unity gain (meaning the level into the Tube EQ is the same as the level out of the Tube EQ) the output level should be adjusted after setting the EQ bands so that the bypass level is the same as the active level. If you are boosting EQ bands (adding gain), you'll have to turn down the output level control. If you are cutting EQ bands (decreasing gain), you'll have to turn up the output level control.
Note: Using the Dual Tube EQ for adding gain will not damage the unit. The only thing that will suffer will be the signal to noise ratio (meaning that if you use the Dual Tube EQ as a distortion box, it will probably be noisy). However, use caution and observe the input levels of the equipment that the Tube EQ is plugged into to be sure you are not overdriving it.
Bypass Switch
A Bypass switch is included on each channel of the Dual Tube EQ to enable you to remove it from your signal chain. When set to its "in" (bypass) position, signal is allowed to pass from the input to the output with no equalization. The bypass LED will glow red when Bypass is engaged. In its "out" position, the EQ is active. Use the Bypass switch when setting the Dual Tube EQ's input and output levels to achieve unity (no boost or cut) gain. Unity gain is achieved when the active level is the same as the bypassed level.
Mono (Cascade) Switch
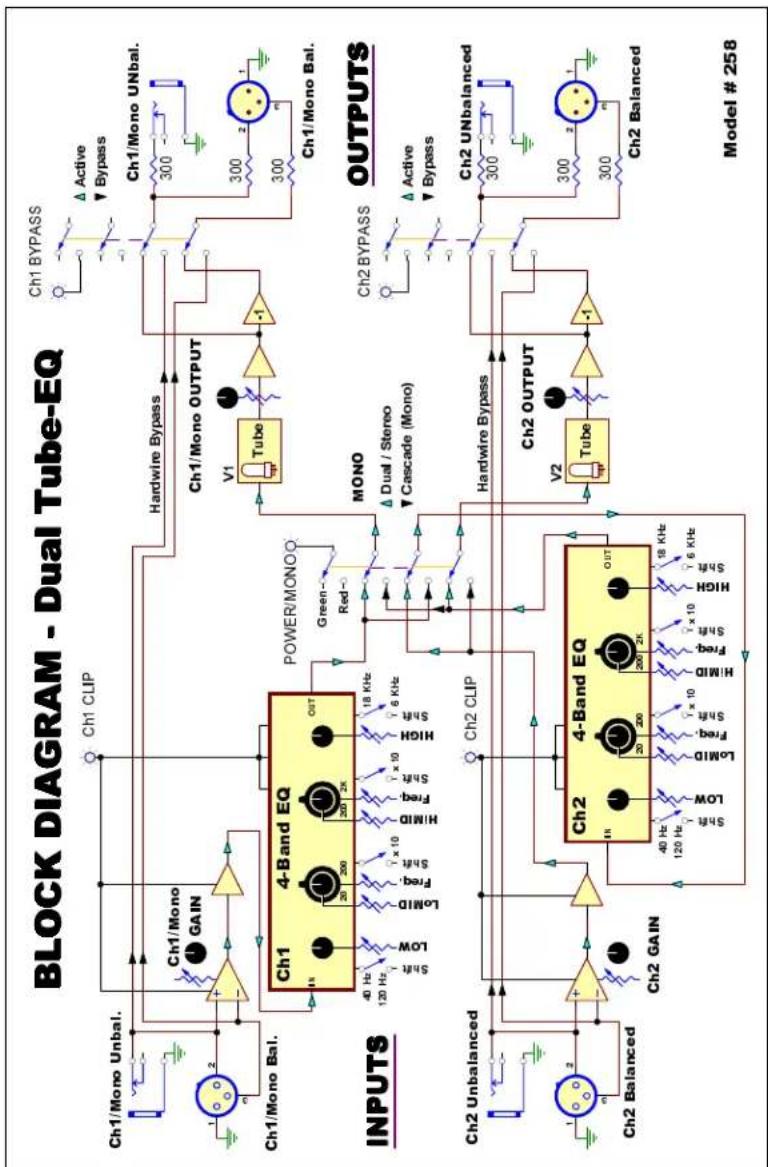
The Dual Tube EQ has a unique Cascade feature which allows it to be configured as a mono, eight-band EQ. When the Mono
switch is depressed the LED will glow red and all eight-bands of the Dual Tube EQ are active for the signal connected to channel One's input and output jacks (labeled channel 1/MONO on the rear panel). When this mode is used, the input and output level controls for channel two do not affect channel one.
Another cool feature is that channel Two may be used as a "tube" channel when the Dual Tube EQ is in Mono/cascade mode. When in Mono/cascade mode, the input and output controls and the tube are still available for use on Channel Two. This is useful if you simply wish to use a channel of the Dual Tube EQ to "sweeten up" a signal with a tube.
Power Switch
The Power switch applies and removes power from the unit. The Dual Tube EQ should be turned “on” only when all monitor levels are turned down, or off, to protect against any “thumping” caused by high gain settings. Likewise, the Dual Tube EQ should be turned “off” after turning all monitor levels down.
REAR PANEL CONNECTIONS

Input and Output Connections
The Dual Tube EQ's XLR connectors follow the AES standard: Pin 1 = Ground, Pin 2 = Hot (+), Pin 3 = Cold (-). The unbalanced 1/4" phone jacks are typical: Tip = Hot (+), Sleeve = Grd.
Input
One input jack per channel should be used at a time. Because of its design, the Dual Tube EQ can be hard-wired without having to disconnect the XLR inputs when using the 1/4" jacks. In this case, if no load is placed on the XLR input (no instrument or line-level source connected) the 1/4" jack will function as if there was nothing connected to the XLR input. However, the inverse is NOT true. If you are using the XLR input, you should not have anything plugged into the 1/4" jack.
Output
Both balanced and unbalanced output connections may be
used simultaneously. However, when using the Dual Tube EQ to convert an unbalanced signal to a balanced signal (and vise-versa) you will experience a level difference between the input and output signals. This isn't a big deal as you can compensate with the Input and Output Level controls, but the front panel "0" indicators will not be accurate unless using common connectors (both XLRs or both 1/4).
Note: If you experience a hum when using both output connectors simultaneously (one to the console and one to an instrument amp), a ground loop may be the problem. To remedy this problem, disconnect the ground wire (pin 1) from the XLR cable plugged into the Dual Tube EQ's output (or use a ground-lifted audio cable). This interrupts the ground path and therefore breaks the loop.
Mono (cascade) connections
When using the Dual Tube EQ as a mono, eight-band equalizer, use the channel one connections labeled "Mono Input and Output". In this mode channel two may be used as a tube channel with input and output level controls.
Tube Replacement
The tubes in your Dual Tube EQ should last for many years. The tubes used in your unit are carefully hand-sorted for performance. In the event that you need to replace them, A R T suggests that you do so with tubes available from A R T. These are matched to the Dual Tube EQ and will yield consistent sonic results. You'll find these tubes to be very reasonably priced. You can replace the tubes with other brands, however A R T has no responsibility for the resulting sound quality. They may sound better, they may sound worse. The choice is yours. Please realize that unauthorized alterations to the Dual Tube EQ will void the warranty.
Instruments and the Audio Spectrum
The following chart gives you an idea of where certain instruments lie in the audio spectrum. If an instrument isn't listed, use the one which most closely resembles it. The descriptions in quotations are references for you to experiment with. For example, if you have a kick drum with no "click" from the beater, try boosting around 2 - 2.5KHz. Since every instrument, microphone and room is different, these are only approximations but
should give you a good place to start.

APPLICATIONS
The Tube EQ is intended for use with line level sources. The proper placement of the Dual Tube EQ in a signal chain is: after a mic/line preamplifier, after a direct output or bus output from a console, after the output of a tape deck, or in the insert point of a mixer.
The Dual Tube EQ has gain and it is possible to plug an instrument directly into it. However, the Dual Tube EQ does not have enough gain to properly preamplify a microphone plugged directly into it.
flowchart
graph TD
    A["Radio Input"] --> B["Pro MPA / Pro VLA / Dual Tube EQ"]
    B --> C["Channel Insert / Channel Insert / Channel Insert / Channel Insert / Channel Insert / Channel Insert / Channel Insert / Channel Insert / Channel Insert / Channel Insert / Channel Insert / Channel Insert / Channel Insert / Channel Insert / Channel Insert / Channel Insert / Channel Insert / Channel Insert / Channel Insert / Channel Insert / Channel Insert / Channel Insert / Channel Insert / Channel Insert / Channel Insert / Channel Insert / Channel Insert / Channel Insert / Channel Insert / Channel Insert / Channel Insert / Channel Insert / Channel Insert / Channel Insert / Channel Extracts"]
    B --> D["In the Channel Insert of a Mixer"]
    D --> E["Channel Insert Send"]
    D --> F["Channel Insert Return"]
A R T Dual Tube EQ Specifications
Dimensions: 5.25"D x 19"W x 1.75"H
Weight: 7.0 lbs
Frequency Bands:
Low Shelf: 40Hz/120Hz Selectable
Low-Mid Sweepable: 20Hz to 200Hz/ 200Hz to 2KHz
High-Mid Sweepable: 200Hz to 2KHz/2KHz to 20KHz
High Shelf: 6KHz/18KHz Selectable
Gain/Frequency Band: +/- 12dB
Dynamic Range: >90dB (no weighting)
Input Impedance: 20k ohms (XLR), 1M Ohm (1/4")
Output Impedance: 600 ohms (XLR), 300 Ohms (1/4")
Maximum Input Level: +22dBu (XLR)
Maximum Output Level: +27dBu (XLR), +22dBu (1/4")
Total Harmonic Distortion (THD): <0.1%
Tubes:
2 Hand Selected 12AX7a
Power Requirements:
100-125 VAC, 16W (Export units
configured for country of desti-
nation)
A R T retains a policy of constant product improvement. A R T reserves the right to make changes in design or make additions to or improvements upon this product without any obligation to install the same on products previously manufactured. In other words, specifications are subject to change without notice.
Designed and manufactured in the United States of America.
Applied Research and Technology, Inc.
(716) 436-2720 (Phone)
215 Tremont Street
(716) 436-3942 (FAX)
Rochester, NY 14608 USA
WE'RE ON-LINE!
For Product information, questions, applications, tips, answers and general discussion with A R T employees look for A R T on the Internet..
Check out our Web Page at: http://www.artroch.com
Email us at artroch@aol.com
WARRANTY AND SERVICE INFORMATION Limited Warranty
Warranty service for this unit will be provided by Applied Research and Technology, Inc. in accordance with the following warranty statement.
Applied Research and Technology, Inc. (A R T) warrants to the original purchaser that this product is free from defects in workmanship and materials for a period of three years from the date of purchase. A R T will, without charge, repair or replace, at its option, defective product or component parts upon prepaid delivery to the factory service department or an authorized service center, accompanied by proof of purchase date in the form of a valid sales receipt.
EXCLUSIONS: This warranty does not apply in the event of misuse or abuse of the product or as a result of unauthorized alterations or repairs. This warranty is void if the serial number is altered, defaced or removed.
A R T reserves the right to make changes in design and make additions or improvements upon this product without any obligation to install the same on products previously manufactured.
A R T should not be liable for any consequential damages, including without limitation damages resulting from the loss of use. Some states do not allow limitation of incidental or consequential damages, so the above limitation or exclusion may not apply to you. This warranty gives you specific rights and you may also have other rights which vary from state to state.
For products purchased outside the United States, service will be provided by an authorized distributor of Applied Research and Technology, Inc. products.
SERVICE
The following information is provided in the unlikely event that your unit requires service. Use this procedure to return units in the United States only. For service outside the United States, please contact your authorized A R T distributor.
1) Be sure the unit is the cause of the problem. Check to make sure the unit has power supplied, all cables are connected correctly, and the cables themselves are in working condition.
2) If you find the unit to be at fault, write down a description of the problem, including how and when the problem occurs.
3) Call the factory for a Return Authorization (RA) number.
4) Pack the unit in its original carton or reasonable substitute. The packing box is not recommended for a shipping carton. Put the packaged unit in another box for shipping. Print the RA number clearly under the address.
5) Include with your unit: a return shipping address (we cannot ship to a P.O. Box), a copy of your purchase receipt, a daytime phone number and the description of the problem.
6) Ship the unit to:
Applied Research and Technology, Inc.
215 Tremont Street
Rochester, NY 14608
Atten: Repair Department
R.A.#
7) Contact our Customer Service department at (716) 436-2720 for your Return Authorization number or questions regarding your repair. Customer Service hours are Monday through Friday 9:00AM to 5:00PM Eastern time.
©1998 Applied Research and Technology, Inc.


flowchart
graph TD
    subgraph INPUTS
        A["Ch1/Mono Unbal."] --> B["Ch1/Mono Gain"]
        C["Ch1/Mono Bal."] --> D["Ch1 4-Band EQ"]
        E["Ch2 Unbalanced"] --> F["Ch2 GAIN"]
        G["Ch2 Balanced"] --> H["Ch2 CLIP"]
    end

    subgraph OUTPUTS
        I["Ch1 BYPASS"] --> J["Ch1/Mono UNbal."]
        K["Ch2 BYPASS"] --> L["Ch2 UNbalanced"]
        M["Ch2 Balanced"] --> N["Ch2 Balanced"]
    end

    B --> O["Power/MONO"]
    D --> P["Monoscale"]
    F --> Q["Output"]
    H --> R["Ch2 OUT"]
    I --> S["Ch1 BYPASS"]
    K --> T["Ch2 BYPASS"]
    M --> U["Ch2 Balanced"]

    style INPUTS fill:#f9f,stroke:#333
    style OUTPUTS fill:#bbf,stroke:#333


- Table of Contents
- Introduction
- Features
- Registration
- Overview
- EQ Tips
- Why use an external EQ?
- Why should I use a parametric EQ?
- What is the best way to use EQ?
- Unpacking
- AC Power Hookup
- Audio Connections
- Installation
- SAFETY PRECAUTIONS
- POWERING UP
- FRONT PANEL CONTROLS & INDICATORS
- Gain Control
- Clip Indicator
- Low Frequency Control
- Low Shift Switch
- Lo-Mid Frequency Control
- Lo-Mid Shift x 10 Switch
- Hi-Mid Frequency Control
- Hi-Mid Shift x 10 Switch
- High Frequency Control
- High Shift Switch
- Output Level Control
- Bypass Switch
- Mono (Cascade) Switch
- Power Switch
- REAR PANEL CONNECTIONS
- Input and Output Connections
- Input
- Output
- Mono (cascade) connections
- Tube Replacement
- Instruments and the Audio Spectrum
- APPLICATIONS
- A R T Dual Tube EQ Specifications
- WE'RE ON-LINE!
- WARRANTY AND SERVICE INFORMATION Limited Warranty
- SERVICE
Brand : ART
Model : Dual Tube EQ
Category : Audio Equalizer