A3F - Water dispenser Avalon - Free user manual and instructions
Find the device manual for free A3F Avalon in PDF.


| Product Type | Water Dispenser |
| Brand | Avalon |
| Model | A3F |
| Dimensions (HxWxD) | 43 x 12 x 12 inches (109 x 30 x 30 cm) |
| Weight | 35 lbs (15.9 kg) |
| Power Supply | 110-120V, 60Hz, 5.0A |
| Hot Water Capacity | 4.0 L/hr at 185°F (85°C) |
| Cold Water Capacity | 2.0 L/hr at 50°F (10°C) |
| Water Tank Capacity | 4.0 gallons (15.1 L) |
| Cooling Type | Compressor |
| Heating Type | Stainless Steel Heating Tank |
| Temperature Settings | Cold (adjustable 40-50°F), Hot (adjustable 175-195°F) |
| Water Source | Bottle or Direct Line (optional kit) |
| Filtration | Built-in Filtration System (replaceable filter) |
| Material | ABS Plastic, Stainless Steel Water Tank |
| Safety Features | Child Safety Lock on Hot Water, Automatic Shut-off, Anti-drip Nozzle |
| Cleaning | Wipe with damp cloth; descale every 3 months |
| Maintenance | Replace filter every 6 months; clean condenser coils annually |
| Noise Level | < 45 dB |
| Warranty | 1 Year Limited Manufacturer Warranty |
| Certifications | ETL, cETL, NSF 53 (filter) |
Frequently Asked Questions - A3F Avalon
User questions about A3F Avalon
0 question about this device. Answer the ones you know or ask your own.
Ask a new question about this device
Download the instructions for your Water dispenser in PDF format for free! Find your manual A3F - Avalon and take your electronic device back in hand. On this page are published all the documents necessary for the use of your device. A3F by Avalon.
USER MANUAL A3F Avalon
A few simple steps to ensure perfect water, every time.

bar
| Category | Value | |---|---| | Category 1 | 100 | | Category 2 | 100 | | Category 3 | 100 | | Category 4 | 100 | | Category 5 | 100 | | Category 6 | 100 | | Category 7 | 100 | | Category 8 | 100 | | Category 9 | 100 | | Category 10 | 100 | | Category 11 | 100 | | Category 12 | 100 | | Category 13 | 100 | | Category 14 | 100 | | Category 15 | 100 | | Category 16 | 100 | | Category 17 | 100 | | Category 18 | 100 | | Category 19 | 100 | | Category 20 | 100 | | Category 21 | 100 | | Category 22 | 100 | | Category 23 | 100 | | Category 24 | 100 | | Category 25 | 100 | | Category 26 | 100 | | Category 27 | 100 | | Category 28 | 100 | | Category 29 | 100 | | Category 30 | 100 | | Category 31 | 100 | | Category 32 | 100 | | Category 33 | 100 | | Category 34 | 100 | | Category 35 | 100 | | Category 36 | 100 | | Category 37 | 100 | | Category 38 | 100 | | Category 39 | 100 | | Category 40 | 100 | | Category 41 | 100 | | Category 42 | 100 | | Category 43 | 100 | | Category 44 | 100 | | Category 45 | 100 | | Category 46 | 100 | | Category 47 | 100 | | Category 48 | 100 | | Category 49 | 100 | | Category 50 | 100 | | Category 51 | 100 | | Category 52 | 100 | | Category 53 | 100 | | Category 54 | 100 | | Category 55 | 100 | | Category 56 | 100 | | Category 57 | 100 | | Category 58 | 100 | | Category 59 | 100 | | Category 60 | 100 | | Category 61 | 100 | | Category 62 | 100 | | Category 63 | 100 | | Category 64 | 100 | | Category 65 | 100 | | Category 66 | 100 | | Category 67 | 100 | | Category 68 | 100 | | Category 69 | 100 | | Category 70 | 100 | | Category 71 | 100 | | Category 72 | 100 | | Category 73 | 100 | | Category 74 | 100 | | Category 75 | 100 | | Category 76 | 100 | | Category 77 | 100 | | Category 78 | 100 | | Category 79 | 100 | | Category 80 | 100 | | Category 81 | 100 | | Category 82 | 100 | | Category 83 | 100 | | Category 84 | 100 | | Category 85 | 100 | | Category 86 | 100 | | Category 87 | 100 | | Category 88 | 100 | | Category 89 | 100 | | Category 90 | 100 | | Category 91 | 100 | | Category 92 | 100 | | Category 93 | 100 | | Category 94 | 100 | | Category 95 | 100 | | Category 96 | 100 | | Category 97 | 100 | | Category 98 | 100 | | Category 99 | 100 | | Total (Total) = [sum of bars] / [values] * (sum of bars + bars) * (sum of bars + bars) * (sum of bars + bars). The values in the table represent the sum of the bars and the corresponding sum of the bars for each category. There is no additional data series or multiple categories present in the chart.We're Here to Help
natural_image
Line drawing of a person wearing a headset and holding a tablet device on a tablet screen (no text or symbols)We are also available for live video chat!
Call Us:
1.800.256.0695
Email Us:
support@avalonh2o.com
sales@avalonh2o.com
Live Chat:
Monday-Thursday: 9 a.m.-5:30 p.m.
Friday: 9 a.m.-4:30 p.m.
Let's Connect
Follow our social media accounts and stay up to date on the latest Avalon news.

@avalon_h2o

Avalon Water Coolers Avalonh2o
www.avalonh2o.com
Use and Care Guide
MODEL: A3F
Registration
Please visit the website below to register your new water cooler within the first 30 days of purchase. Registration within the first 30 days will activate your one year warranty.
www.avalonh2o.com/register-my-avalon-cooler
Please keep your model number, order number and purchase date for future support. You can reach us at 1-800-256-0695.
Model Number ____
Order Number ____
Purchase Date ____


Tested and Certified by NSF International against NSF/ANSI Standard 42 & 53 in model A4FILTER for the reduction of lead, chlorine, cyst.
This ASFILTER is Tested and Certified by NSF International against NSFIANSI Standard 42 for materials and structural integrity requirements.
REPLACEMENT ELEMENT
COMPONENT
Contents
About Your Water Cooler
Meet Your Avalon Product 1-2
Part Names 3-4
Indicator Lights 5
Tech Specs 6
BioGuard 7
Getting Started
Unpacking 9
Install Filters 10
Install Water Bottle 11-12
Install/Remove Drip Tray 13
Powering the Dispenser 14
Activate Heating and Cooling 15
User Guide and Maintenance
Flushing the Filters 17
Dispensing Water 18
Refilling the Bottle 19-20
Replacing the Filters 21-22
Cleaning
Rinsing, Cleaning, and Draining 24–26
Cleaning 27-30
Troubleshooting
Safety 35-36
Meet Your Avalon Product
Inside the box, you'll find:
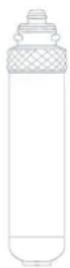
Sediment Filter
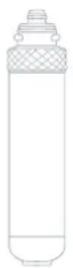
Carbon Block Filter
natural_image
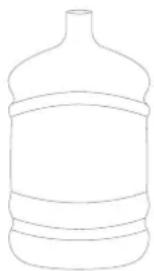
Simple line drawing of a water dispenser bottle (no text or symbols)5 Gallon Water Bottle
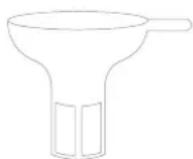
Water Bottle Filter Funnel
Meet Your Avalon Product

Child Safety Feature
Ensures safe hot water flows for the entire family

Energy Star Approved
Saves the environment and your wallet

Built-in Nightlight
Makes late night water trips a breeze

UL Listed
We design & manufacture with your safety in mind

Dual Stage Filtration
Double the filtration for twice the peace of mind

Attractive Design
Attractive stainless steel design with 3 water spouts

Custom Temperature
Piping hot, cool or crisp cold water

Bottom Loading
No more lifting, flipping or spills

Empty Bottle Indicator
Notifies you when your bottle is empty

NSF Certified Filters
We meet strict standards for public health protection
Part Names
Part Names
Indicator Lights

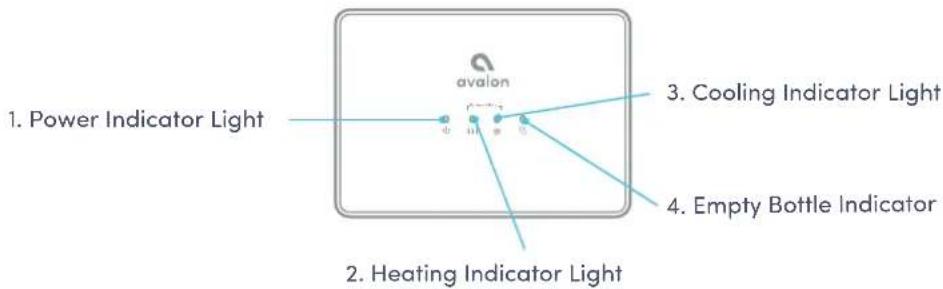
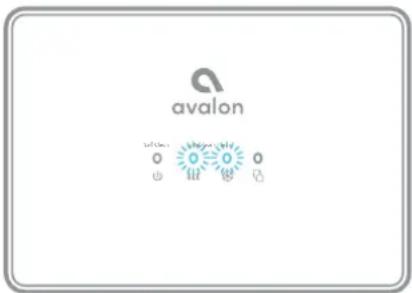
Power Indicator Light
This light will remain on as long as the water cooler is plugged in to indicate that the cooler is on.
Heating Indicator Light

This light will indicate when the water is heating. The light will remain on while the water is heating and will turn off when it has reached the correct temperature of 185^ F. As the water is dispensed the hot tank will refill and the water will heat. As the water reheats this indicator light will turn on.

Cooling Indicator Light
This light will indicate when the water is cooling. The light will remain on while the water is cooling and will turn off when it has reach the correct temperature of 47^ F. As the water is dispensed the cold tank will refill and the water will cool. As the water cools this indicator light will turn on.

Empty Bottle Indicator Light
This light will indicate that the bottle below is empty and will need to be refilled. This red light will blink to alert you of the empty bottle.

Filter Indicator Lights
The Heating Indicator Light and the Cooling Indicator Light will blink together to alert you that the filter needs to be replaced.
Tech Specs
| Model | A3F |
| Hot/Cold/Cool Output | 1.8L/min / 2.2L/min / 2.0L/min |
| Hot Water Capacity | 4 L/H ( ≥ 185°F) |
| Hot Tank Volume | 1.16 Liters |
| Cold Water Capacity | 2.5 L/H ( ≤ 47°F) |
| Cold Tank Volume | 3.6 Liters |
| Stage 1 Filtration | Sediment |
| Stage 2 Filtration | Carbon Block |
| Product Size | 13"(L)x12"(W)x41"(H) |
| Packing Size | 16"(L)x15"(W)x45"(H) |
| Net Weight/Gross Weight | 36.15 lb /46.5 lb |
| Voltage/Frequency | 115 V 60Hz |
| Cooling Method | Compressor |
| Heating Method | Internal Element |
| Heating Watts / Cooling Watts | 420W / 100 W |
| Power Consumption | 520 W |

BioGuard
Benefits:
The drip tray is the most unsanitary part of a water cooler. Water is constantly collecting in the drip tray and most people do not empty or clean the drip tray unless it is full. This can lead to unwanted bacteria and viruses building up in the drip tray. The dispensing area and spout can also be areas of unwanted bacteria growth. These bacteria or viruses can easily spread to drinking cups or other parts of the cooler. The press buttons are touched by so many people and can lead to bacteria growth as well. With our anti-microbial coating, you can be assured that the drip tray, dispensing area, spout, and press buttons all remain bacteria free all the time.
- Certain parts of the water cooler, such as the drip tray, dispensing area, spout, press buttons or press paddles have been treated with a unique anti-microbial coating using the BioGuard technology.
- This BioGuard technology is injected into the ABS material through a complex technique during the injection molding process creating an anti-microbial coating which has been tested to prevent bacteria such as Escherichia coli from forming on its surface.
- Unlike many other anti-bacterial coatings, BioGuard will not be affected by heat. It will not affect the strength of the given plastic. It will also not cause the plastic material to become discolored over time.
• This technology has been tested to be safe and non-toxic according to EPA standards.
• This technology will prevent viruses from remaining on the treated surfaces.
How It Works:
BioGuard is a soluble glass containing anti-microbial metal ions.
Glass is generally considered to be a material with high chemical inertness due to its strong network structure. It is possible though, to lower this chemical inertness by continuously altering its structure.
Glass also has another interesting property which retains metal as ions. We have combined this property along with our unique anti-microbial technology enabling the glass to have a low chemical inertness by retaining anti-microbial metal ions. With the presence of water or moisture, the glass with BioGuard will release metal ions gradually to function as anti-microbial material. This happens as Ag ions with positive charges are drawn toward microbes with negative charge and disturb their electrical balance causing their cell wall to burst and extinguish. It also can cause the Ag ions to bond to microbes inhibiting the enzyme activity and multiplication of microbes causing them to be destroyed.
Getting Started
Unpacking Your Avalon Water Cooler
The unit has been cleaned prior to departing from the factory. To remove any dust and debris that may collect during shipping we recommend cleaning the unit prior to installation. For cleaning instructions, see pages 24-30.
Locating Dispenser
Do NOT plug in the power cord yet.
Place dispenser upright on a hard and level surface in a cool and shaded location near a grounded wall outlet. Position the dispenser so there is about four inches of clearance from the wall on the back and both sides.
Unpack the machine, open the cabinet to remove the drip tray, and install it by inserting it into place at the top of the cabinet door, see page 13.
Getting Started
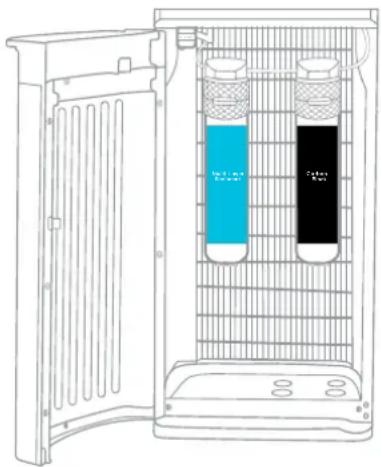
Installing the Filters
- Open the cabinet door.
- Remove the included 5 gallon water bottle from the cabinet.
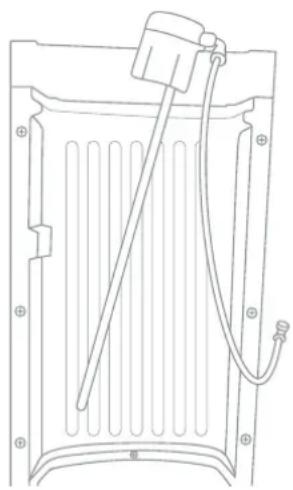
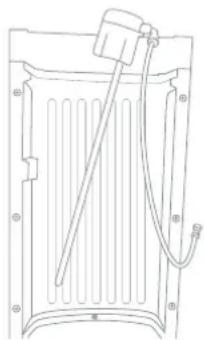
- Remove the probe assembly from inside the 5 gallon water bottle and hang it on the probe hanger.
natural_image
Line drawing of a mechanical component with internal channels and a spring-like structure (no text or symbols)- Twist the filters into the filter heads in the cabinet by rotating them clockwise. The Sediment Filter should be on the left and the Carbon Block Filter should be on the right.
Installing the Water Bottle
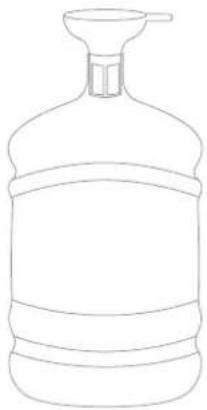
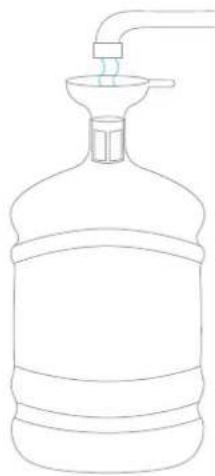
- It is recommended to insert the provided water bottle filter funnel into the neck of the 5 gallon water bottle while filling to ensure that no large particles enter the 5 gallon water bottle that can clog the machine's water pump.
natural_image
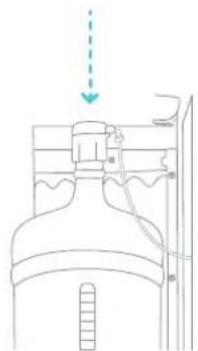
Line drawing of a water dispenser bottle with a funnel (no text or symbols)- Remove the water bottle filter funnel and insert the probe assembly back into the bottle.
natural_image
Diagram of a laboratory apparatus with a funnel and tubing, no visible text or symbols- Fill the included 5 gallon water bottle with tap water.
natural_image
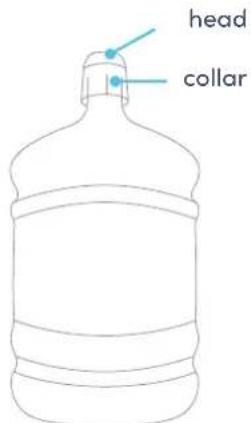
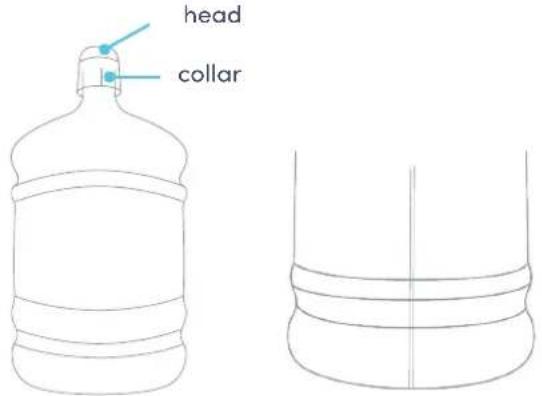
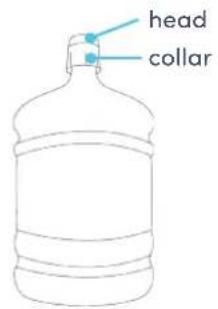
Line drawing of a water dispenser bottle with a funnel and piping (no text or symbols)- Slide the collar down until it clicks into place.
Getting Started
Installing the Water Bottle
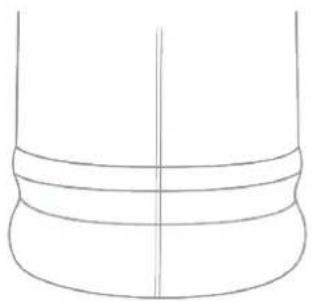
- Push the head down until the tube hits the bottom of bottle.
natural_image
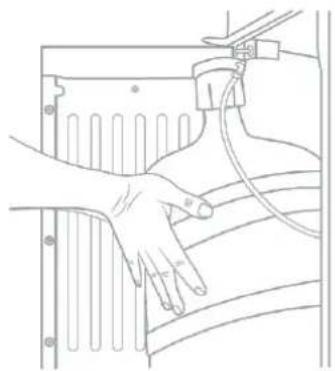
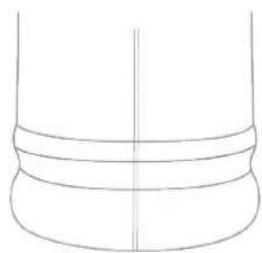
Simple line drawing of a cylindrical object with a horizontal band and a rounded base (no text or symbols)- Slide the bottle into cabinet and close the door.
natural_image
Line drawing of a hand holding a cable or connector attached to a panel (no text or symbols)Installing and Removing the Drip Tray
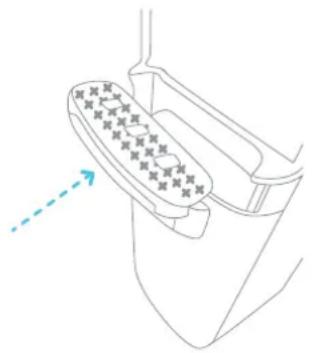
No external drain is needed, the overflow will collect here. The red float will rise to indicate when the drip tray needs to be emptied.
- To install the drip tray, simply slide it into the area at the top of the door until it snaps into place.
natural_image
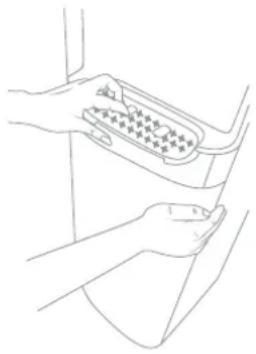
Diagram of a mechanical component with internal structure and directional arrow (no text or symbols)- To remove the drip tray, place your fingers in the grid of the drip tray with one hand and hold the door of the cooler shut with the other.
natural_image
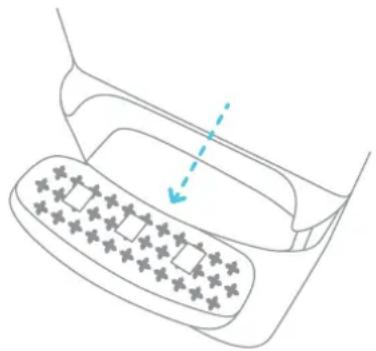
Line drawing of two hands inserting a connector into a device (no text or symbols)- Gently pull the drip tray toward you to release it. Once it has been released you can remove the drip tray from the door of the cooler to empty it.
natural_image
Diagram of a car interior showing a seatbelt with a blue arrow indicating direction (no text or symbols)Getting Started
Powering the Dispenser
Plug cord into a properly grounded wall outlet. At this time the pump will begin to move water from the bottle to the hot and cold tanks. It will take up to 12 minutes to fill the tanks for the first time.
Please note: During this period the pump will run continuously. You will hear a slight humming sound while the pump initially fills the tank and after each time water is dispensed. This is normal.
Activate Heating and Cooling
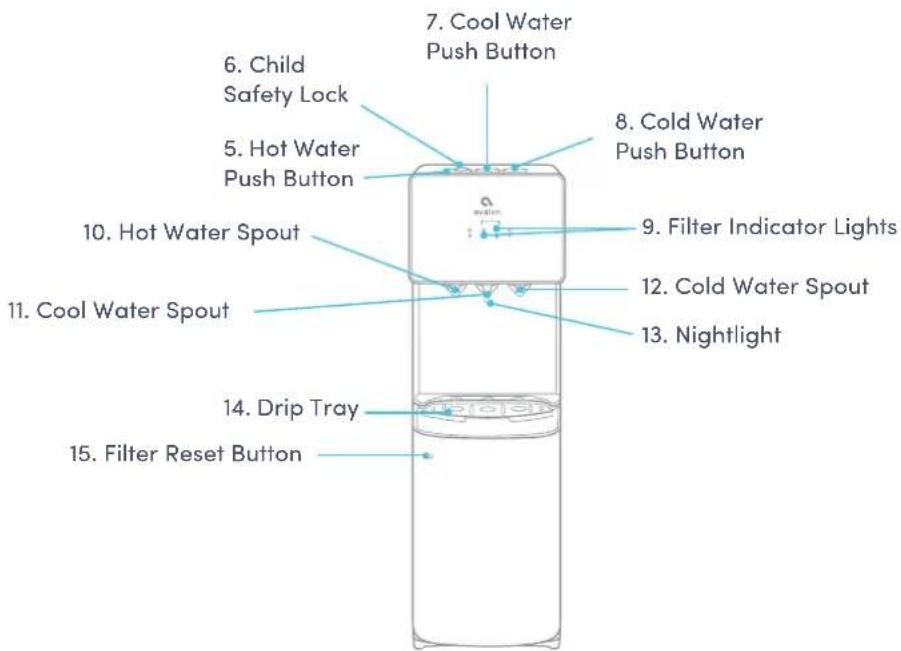
Before turning on the heating (#18) or cooling (#17) switches, ensure water is already filling inside the inner tanks by dispensing a drop of water from the hot (#10) and cold (#12) spouts.
To activate the cold water, push the cooling switch (#17) into the on (I) position by pushing the top of the switch in. If you do not wish to have cold water you can leave the switch in the off (O) position.
To activate the hot water, push the heating switch (#18) into the on (I) position by pushing the top of the switch in. If you do not wish to have hot water you can leave the switch in the off (O) position.
Please allow 15 minutes for the hot water to be heated. During this time the heating indicator light (#2) will be steady. The light will turn off when the heating process is complete. Please allow 1 hour for the cold water to be cooled. During this time the cooling indicator light (#3) will be steady. The light will be turned off when the cooling process is complete. If any error occurs in the heating or cooling process, the indicator light will blink.
User Guide and Maintenance
Flushing the Filters
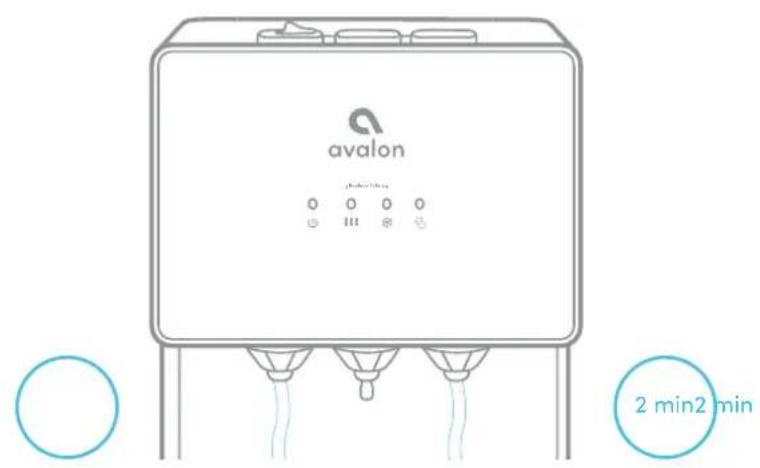
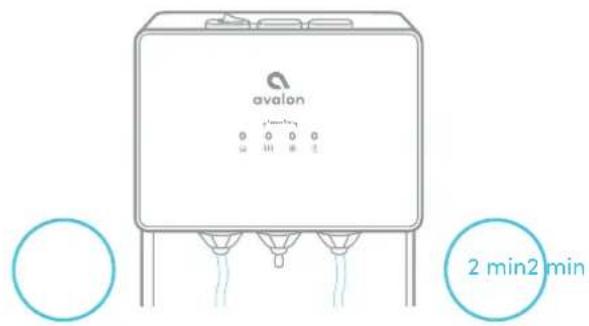
Before drinking the water, you will need to flush the filters. You can do so by dispensing water from the hot water spout (#10) and cold water spout (#12) for approximately 2 minutes ensuring the water is crystal clear.
Dispensing Water
Cold Water
Once you have turned the cooling switch (#17) into the on (I) position it will take initially 1 hour for the water to cool. During this time the cooling indicator light (#3) above the cold water icon will be steady. During this time the compressor could run continuously. This is normal. The light will be turned off when the cooling process is complete.
- Position a bottle, glass, pitcher or cooking pot below the cold water spout (#12).
- Depress the cold water push button (#8) downward to begin the flow of water.
- Once the desired fill level is achieved release the cold water push button (#8).
Cool Water
- Position the bottle, glass, pitcher or cooking pot below the cool water spout (#11).
- Depress the cool water push button (#7) downward to begin the flow of water.
- Once the desired fill level is achieved release the cool water push button (#7).
Hot Water
Once you have turned the heating switch (#18) into the on (l) position it will take initially 15 – 20 minutes for the water to heat up. During this time the heating indicator light (#2) above the hot water icon will be steady. The light will be turned off when the heating process is complete.
- Position a bottle, glass, pitcher or cooking pot below the hot water spout (#10).
- Slide the red child safety lock (#6) to the left and depress the hot water push button (#5) downward to begin the flow of water. You must hold the child safety lock (#6) and push the button at the same time.
- Once the desired fill level is achieved release the hot water push button (#5).
Refilling the Bottle
When the empty bottle indicator light (#4) is blinking red this is an alert that your bottle is empty and will need to be refilled as soon as possible.
Notice: Do not dispense hot, cool or cold water if the light is flashing as you could empty the tanks and cause the dispenser to overheat.
- Open the cabinet door.
- Slide the empty bottle out of the cabinet.
-
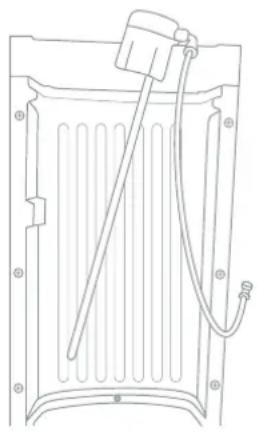
Remove the probe assembly from the empty bottle. Place probe assembly on the probe hanger.
-
It is recommended to insert the provided water bottle filter funnel into the neck of the 5 gallon water bottle while filling to ensure that no large particles enter the 5 gallon water bottle that can clog the machine's water pump.
natural_image
Line drawing of a refrigerator interior with ventilation slots and a coiled cable (no text or symbols)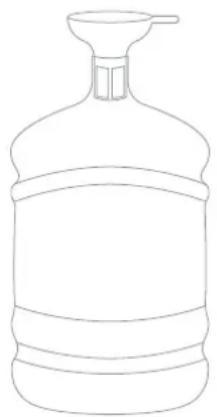
natural_image
Line drawing of a water dispenser bottle with a funnel (no text or symbols)User Guide and Maintenance
Refilling the Bottle
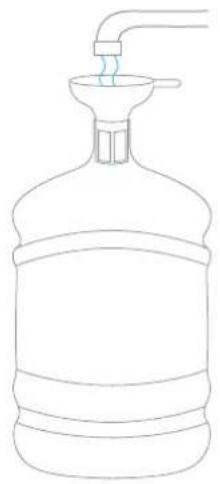
- Refill the empty bottle with tap water.
natural_image
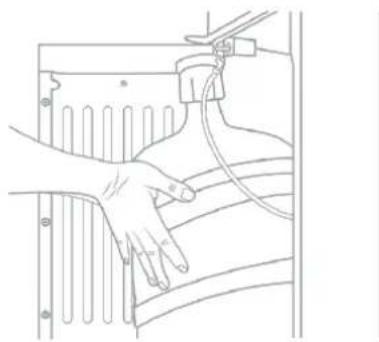
Line drawing of a water dispenser bottle with a funnel and tubing (no text or symbols)- Slide the bottle into the cabinet and close the door.
natural_image
Line drawing of a hand holding a device with cables and connectors (no text or symbols)- Remove the water bottle filter funnel and insert the probe assembly back into the bottle. Slide the collar down until it clicks into place. Push the head down until the tube hits the bottom of the bottle.
Replacing the FiltersReplacing the FiltersReplacing the Filte
- When the lifetime of the filters are near their end, either by means of water flow or by means of 6 months time, the Heating (#2) and Cooling (#3) indicator lights on the front panel will blink as a warning. They will continue to blink until the filters are replaced and reset. You may also notice that the water stops pumping until the filters are replaced.
- Open the cabinet door.
- Remove the included 5 gallon water bottle from the cabinet.
- Remove the probe assembly from inside the 5 gallon water bottle and hang it on the probe hanger.
natural_image
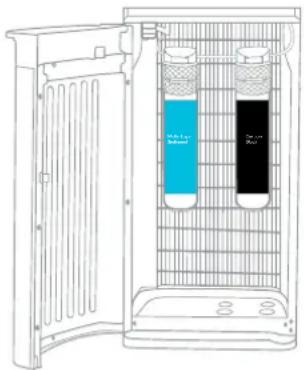
Technical line drawing of a mechanical component with a coiled spring and mounting holes (no text or symbols)- Twist the expired filters to remove them. Insert the new filters into the Filter Adapters by twisting them into place and rotating them clockwise.
Replacing the Filters
- Insert the probe assembly back into the bottle. Slide the collar down until it clicks into place. Push the head down until the tube hits the bottom of the bottle.
natural_image
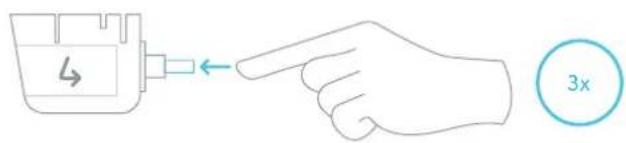
Simple line drawing of a cylindrical object with a flanged base and vertical centerline (no text or symbols)- After replacing the filters, press the Filter Reset Button (#15) 3 times consecutively, and close the door.
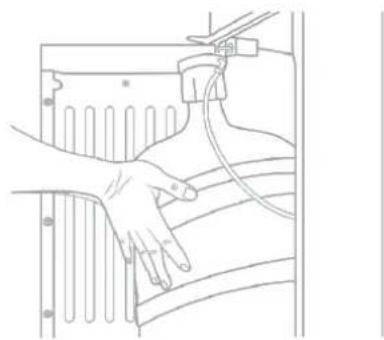
- Slide the bottle into the cabinet.
natural_image
Line drawing of a hand holding a device inside a vehicle chassis (no text or symbols)- In order to flush the new filters, allow the water to flow from the cool water spout (#11) and cold water spout (#12) for approximately 2 minutes.
Cleaning
Cleaning
Rinsing, Cleaning, and Draining
To prolong the lifetime of the machine, it is recommended that the unit be cleaned and sanitized manually about every six months.
To clean the outside of the unit
Use a disinfectant of your choice to wipe down the outside of the machine.
Disinfectant does not come with this unit. It can be purchased separately from a local store.
To rinse the inside of the unit
The machine has been disinfected prior to departing from the factory. However, it is recommended to rinse and drain the unit prior to installation.
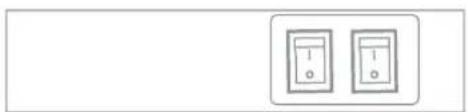
- Before cleaning, make sure that the cooling switch (#17) and heating switch (#18) are in the off (O) position and unplug the machine.
natural_image
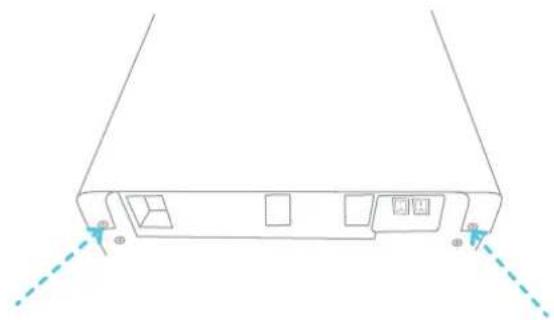
Two identical electrical meters with one meter slightly above the other (no text or symbols visible)- Remove the two screws located on the back (at the top, in line with the switches) of the cooler. Remove the top cover by lifting at an angle and pull off. Remove the white cold water tank cover and the separator.
natural_image
Line drawing of a device rear panel with two labeled ports and dashed arrows indicating orientation (no text or symbols)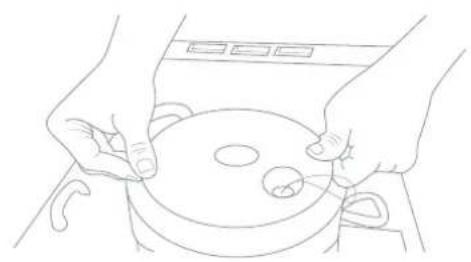
natural_image
Line drawing of hands operating a pot with a small circular component (no text or symbols)Rinsing, Cleaning, and Draining
- Pour 0.6 gallons of clean water into the cold tank. (The cold water tank is the open cylinder that the white cover was removed from).
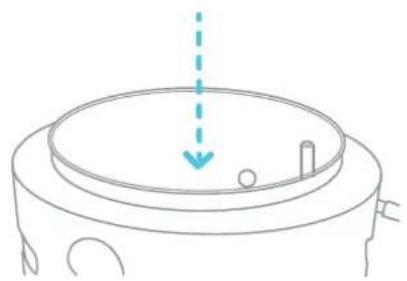
natural_image
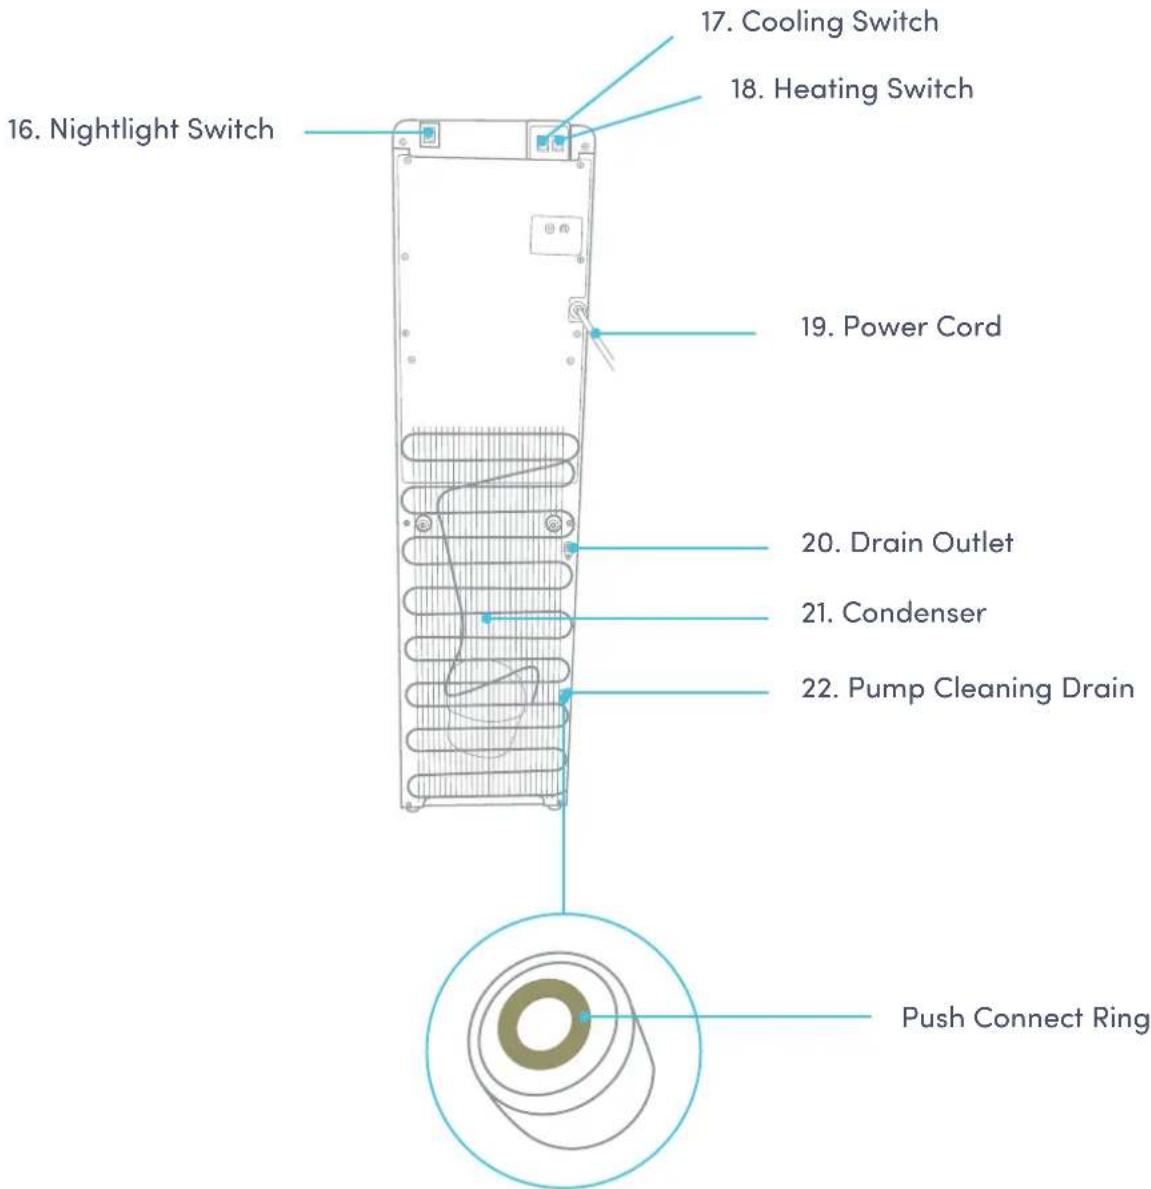
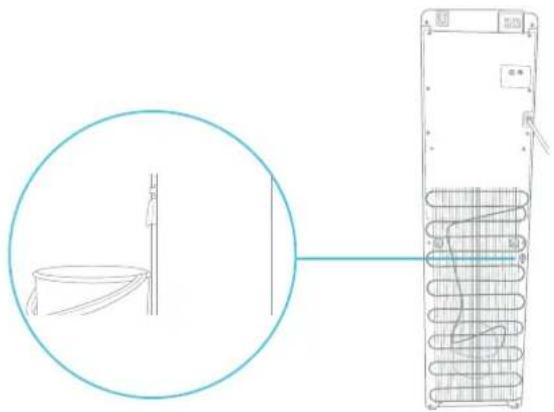
Diagram of a circular mechanical component with internal structure and a dashed arrow indicating direction (no text or symbols)- Place a large bucket beneath the upper Drain Outlet (#20) located on the back of the unit. Remove the drain cover and allow the water to drain from the unit. Water will start flowing as soon as the drain cover is removed.
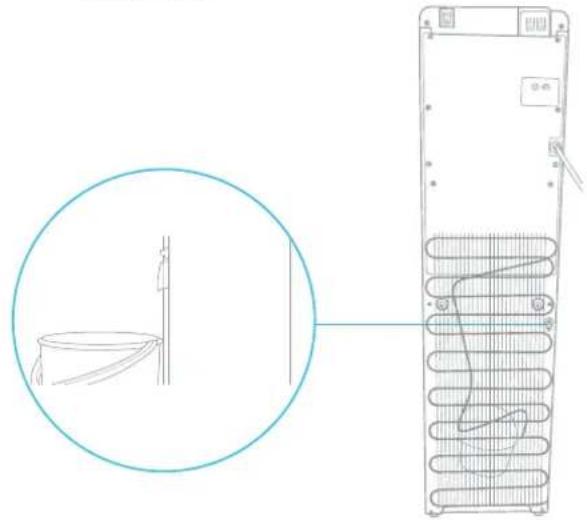
natural_image
Diagram showing a vertical structure with a circular inset view of a coiled spring or coiled tube, connected to a rectangular device (no text or symbols present)Caution: The dispenser will heat water to a temperature of approximately 185^ F. It can cause severe burns if not handled carefully. Please use caution while operating and cleaning. Please allow ample time for any hot water inside the machine to cool down before draining it.
Cleaning
Rinsing, Cleaning, and Draining
- Once water is completely drained, reposition the drain cover, cold tank cover and the top cover. Ensure that the pipes and wires are connected properly and you may use the dispenser as normal.
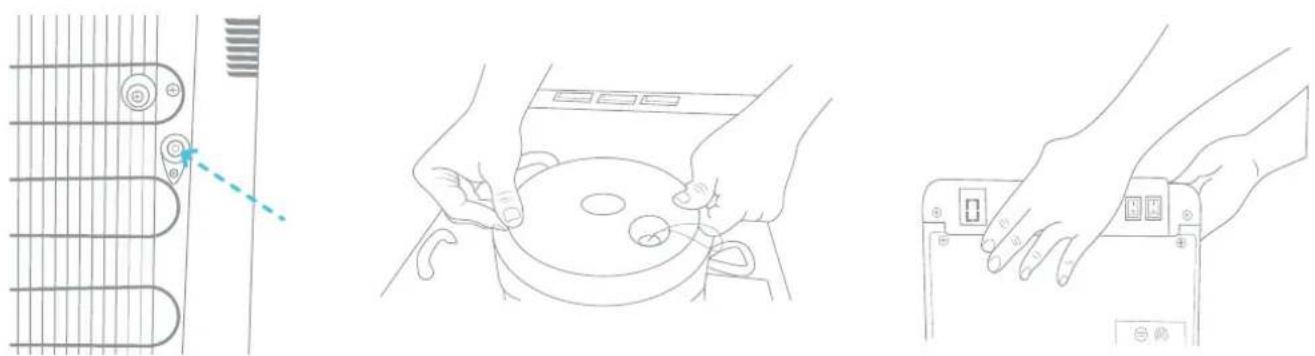
Cleaning
To remove mineral deposits that may have built up inside the cold tank, mix 4 L of water with 200 g of citric acid crystals (not included) or cleaning solution of your choice.
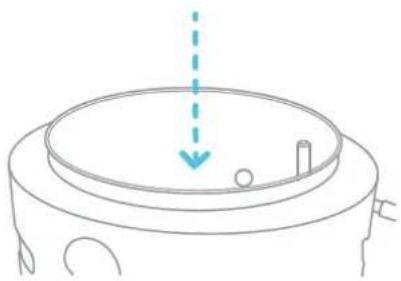
- Unscrew the top cover and lift off the cold tank lid.
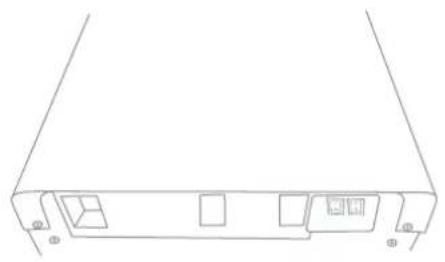
natural_image
Line drawing of a rectangular electronic device with internal compartments and mounting holes (no text or symbols)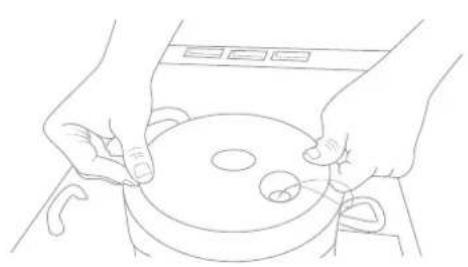
natural_image
Line drawing of hands operating a cooking pot with a lid and handle (no text or symbols)- Put the mixture into the machine's cold tank and make sure the water can flow out of the hot water spout (#10).
natural_image
Diagram of a circular mechanical component with a dashed arrow indicating downward motion (no text or symbols)Cleaning
Cleaning
- Plug in the power cord and turn on (I) the heating switch (#17). Allow the water to heat for 15 minutes.

-
Drain the liquid from the drain outlet (#19), then flush with water two or three times by following the rinsing instructions above. Only disassemble parts mentioned to avoid damaging the machine.
-
Turn off (O) the heating switch (#17) and allow the liquid mixture to cool down for 20 minutes.

natural_image
Two identical electrical switch symbols with measurement markings, no text or labels present
natural_image
Diagram showing a cable being inserted into a rack with a magnified inset (no text or symbols)Cleaning
To remove mineral deposits that may have built up inside the water pump, mix 1.5 gallons of water with 50 g of citric acid crystals (not included) or cleaning solution of your choice. This is recommended to be done at a time when the water bottle is already empty.
- Open the cabinet and remove the 5 gallon water bottle.
- Pour this cleaning solution into the 5 gallon water jug.
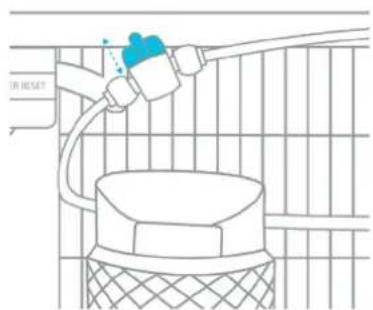
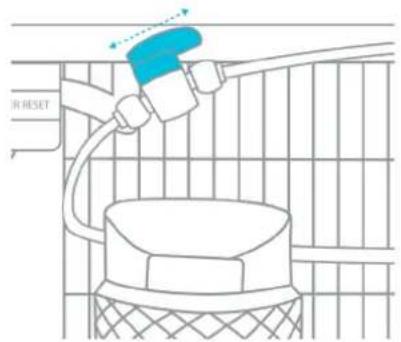
- Turn the valve located along the back of the cabinet above the filters to the off position (perpendicular to the tubing).
natural_image
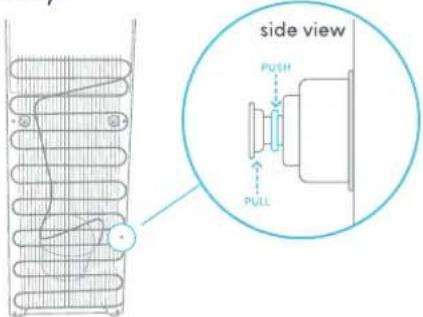
Diagram of a hand pouring liquid into a basket on a grid-patterned surface (no text or symbols)- Remove the push connect plug of the Pump Cleaning Drain (#22) by pressing in on the grey ring and pulling on the plug simultaneously.
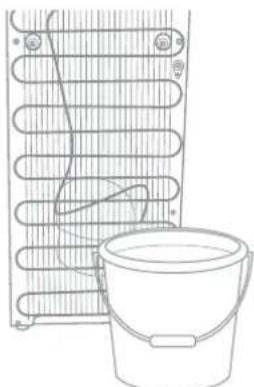
- Place a large cup or bucket below the Pump Cleaning Drain (#22) located at the lower back of the unit.
natural_image
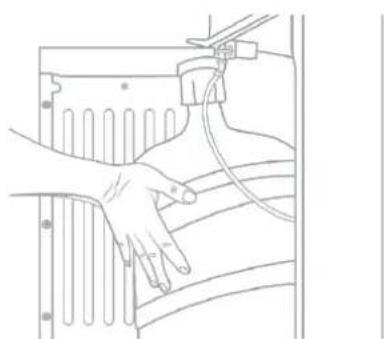
Line drawing of a coiled heater next to a bucket (no text or symbols)- Place the probe back into the 5 gallon water jug and slide it back into the cabinet and close the door.
natural_image
Line drawing of a hand holding a cable or connector attached to a wall-mounted device (no text or symbols)Cleaning
Cleaning
- Press the Cool Water Push Button (#7) for 3 seconds to activate the pump. The pump will begin pumping the cleaning solution from the 5 gallon water bottle back out through the Pump Cleaning Drain (#22) located at the lower back of the unit into your large cup or bucket.
- Once the cleaning solution stops flowing out of the Pump Cleaning Drain (#22), remove the empty 5 gallon water bottle and refill another gallon of tap water into it. Place it back inside the cabinet and close the door.
- Press the Cool Water Push Button (#7) for 3 seconds to activate the pump again. The water will flush through the pump and out through the Pump Cleaning Drain (#22) located at the lower back of the unit into your large cup or bucket.
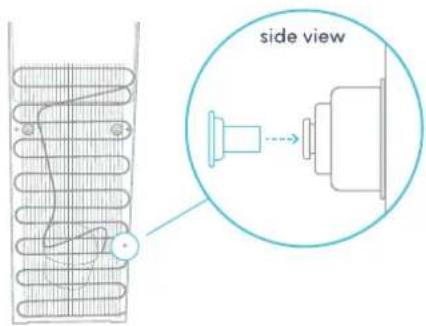
- Once the water stops flowing out of the Pump Cleaning Drain (#22), you can replace the plug into the Pump Cleaning Drain (#22).
- Turn the valve located along the back of the cabinet above the filters back to the on position (parallel to the tubing).
- Refer to the instructions on Refilling the Bottle and use as normal.
Troubleshooting
Troubleshooting
Troubleshooting
If you are having trouble with your water cooler please see the following solutions. You can also view our trouble shooting videos at the website below. Please feel free to contact us with any questions.

1-800-256-0695

support@avalonh2o.com

www.avalonh2o.com
Troubleshooting
Water is leaking in the unit
Please check to see that all of the connections are tight and there are no loose tubes or connections.
Water not dispensing at a hot or cold temperature
This could be caused by an over consumption of water in a short period of time causing the tanks to empty. Please allow 5 to 10 minutes for the water cooler tanks to refill. Allow the proper time for the water to heat and cool.
This could be caused by an interruption in the power supply. Please ensure that the power cord is connected to an outlet. Please make sure that the heating (#18) and cooling (#17) switches are in the on position.
No water is dispensing from the spout
- Check to make sure that the bottle is not empty. If it is, please replace is with a new one.
- Make sure to completely depress the push button controls and the child safety lock is being slid away from you and held in place while depressing the button.
Not pumping water after replacing the bottle
- Please make sure that the cabinet door is closed. If the door will not close, please make sure the 5 gallon water bottle is pushed all the way against the filters and adjust the tubing of the probe so it is not preventing the door from closing.
- Please unplug the water cooler and check all of the connections in the bottle cabinet. It is possible that a connection became loose while moving the bottle. Even a slightly loose connection can cause the cooler not to function properly.
Night light is not working
- Check to make sure the power cord is properly connected to a working outlet.
- Check to make sure the nightlight switch (#16) is on the on (I) position on the back of the dispenser.
Dispenser is very noisy
- Please make sure that the dispenser is positioned on a flat, level surface.
- Please make sure the filters have been replaced after 6 months.
- Please make sure that the pump has been cleaned according to the cleaning instructions.
Safety
Safety
To reduce risk of injury and property damage, user must read this entire guide before assembling, installing and operating the dispenser.
Failure to execute the instructions in this manual can cause personal injury or property damage.
This product dispenses water at very high temperatures. Failure to use this properly can cause personal injury.
When operating this dispenser, always exercise basic safety precautions, including the following:
- Prior to use, this dispenser much be properly assembles and installed in
- accordance with this manual.
- This dispenser is intended for water dispensing only. Do NOT use other liquids. Do NOT use for other purposes. Never use any other liquid in the dispenser other than known microbiologically safe tap water.
- For indoor use only. Keep water dispenser in a dry place away from direct sunlight. Do NOT use outdoors.
• Install and use only on a hard, flat and level surface. - Do NOT place dispenser in an enclosed space or cabinet.
- Do NOT operate the dispenser in the presence of explosive fumes.
- Position back of dispenser no closer than 20 cm from wall and permit free airflow between wall and dispenser. There must be at least 20 cm clearance on the sides of the dispenser to permit airflow.
- Use only properly grounded outlets.
- Do not use and extension cord with your water dispenser.
- Always grasp plug and pull straight out from outlet. Never unplug by pulling on power cord.
- To protect against electric shock, do NOT immerse cord, plug or any other part of the dispenser in water or other liquid.
Safety
Safety
- Ensure dispenser is unplugged prior to cleaning.
- Never allow children to dispense hot water without proper and direct supervision. Unplug unit to prevent unsupervised use by children.
• Service should be performed only by a certified technician. - Warning: Do not damage the refrigerant circuit.
- This appliance can be used my children aged from 8 years and above if they have been given supervision or instruction concerning use of the appliance in a safe way and if they understand the hazards involved. Cleaning and user maintenance shall not be made by children unless they are older than 8 and supervised. Keep the appliance and its cord out of reach of children less than 8 years.
- Appliances can be used by persons with reduced physical, sensory or mental capabilities or lack of experience and knowledge if they have been given supervision or instruction concerning use of the appliance in a safe way and understand the hazards involved. Children shall not play with the appliance.
- This appliance is intended to be used in a household and similar applications such as: kitchen area in shops, offices and other working environments, bed and breakfast type environments, catering and similar non-retail applications.
- Do not store explosive substances such as aerosol cans with flammable propellant in this appliance.
- If the supply cord is damaged, it must be replaced by a special cord assembly available from the manufacturer or its service agent.
- Never turn the machine upside down or lean it more than 45^ .
- Thermostat has been adjusted. There is no need to adjust it by yourself. When the matching is below the freezing point and blocked by ice, the cooling switch should be turned off for 4 hours before turning it on again to continue its operation.
- This machine should not be plugged back in until 3 minutes after it has been unplugged.

bar
| Category | Value | |---|---| | Category 1 | 100 | | Category 2 | 100 | | Category 3 | 100 | | Category 4 | 100 | | Category 5 | 100 | | Category 6 | 100 | | Category 7 | 100 | | Category 8 | 100 | | Category 9 | 100 | | Category 10 | 100 | | Category 11 | 100 | | Category 12 | 100 | | Category 13 | 100 | | Category 14 | 100 | | Category 15 | 100 | | Category 16 | 100 | | Category 17 | 100 | | Category 18 | 100 | | Category 19 | 100 | | Category 20 | 100 | | Category 21 | 100 | | Category 22 | 100 | | Category 23 | 100 | | Category 24 | 100 | | Category 25 | 100 | | Category 26 | 100 | | Category 27 | 100 | | Category 28 | 100 | | Category 29 | 100 | | Category 30 | 100 | | Category 31 | 100 | | Category 32 | 100 | | Category 33 | 100 | | Category 34 | 100 | | Category 35 | 100 | | Category 36 | 100 | | Category 37 | 100 | | Category 38 | 100 | | Category 39 | 100 | | Category 40 | 100 | | Category 41 | 100 | | Category 42 | 100 | | Category 43 | 100 | | Category 44 | 100 | | Category 45 | 100 | | Category 46 | 100 | | Category 47 | 100 | | Category 48 | 100 | | Category 49 | 100 | | Category 50 | 100 | | Category 51 | 100 | | Category 52 | 100 | | Category 53 | 100 | | Category 54 | 100 | | Category 55 | 100 | | Category 56 | 100 | | Category 57 | 100 | | Category 58 | 100 | | Category 59 | 100 | | Category 60 | 100 | | Category 61 | 100 | | Category 62 | 100 | | Category 63 | 100 | | Category 64 | 100 | | Category 65 | 100 | | Category 66 | 100 | | Category 67 | 100 | | Category 68 | 100 | | Category 69 | 100 | | Category 70 | 100 | | Category 71 | 100 | | Category 72 | 100 | | Category 73 | 100 | | Category 74 | 100 | | Category 75 | 100 | | Category 76 | 100 | | Category 77 | 100 | | Category 78 | 100 | | Category 79 | 100 | | Category 80 | 100 | | Category 81 | 100 | | Category 82 | 100 | | Category 83 | 100 | | Category 84 | 100 | | Category 85 | 100 | | Category 86 | 100 | | Category 87 | 100 | | Category 88 | 100 | | Category 89 | 100 | | Category 90 | 100 | | Category 91 | 100 | | Category 92 | 100 | | Category 93 | 100 | | Category 94 | 100 | | Category 95 | 100 | | Category 96 | 100 | | Category 97 | 100 | | Category 98 | 100 | | Category 99 | 100 | | Total (Total) = [sum of bars] / [values] * (sum of bars + bars) * (sum of bars + bars) * (sum of bars + bars). The values in the table represent the sum of the bars and the corresponding sum of the bars for each category. There is no additional data series or multiple categories present in the chart.- We're Here to Help
- Let's Connect
- Use and Care Guide
- Registration
- Contents
- About Your Water Cooler
- Getting Started
- User Guide and Maintenance
- Cleaning
- Troubleshooting
- Meet Your Avalon Product
- Part Names
- Indicator Lights
- BioGuard
- Benefits:
- How It Works:
- Unpacking Your Avalon Water Cooler
- Installing the Filters
- Installing the Water Bottle
- Installing and Removing the Drip Tray
- Powering the Dispenser
- Activate Heating and Cooling
- Flushing the Filters
- Dispensing Water
- Cold Water
- Cool Water
- Hot Water
- Refilling the Bottle
- Replacing the FiltersReplacing the FiltersReplacing the Filte
- Replacing the Filters
- Rinsing, Cleaning, and Draining
- Safety
Brand : Avalon
Model : A3F
Category : Water dispenser