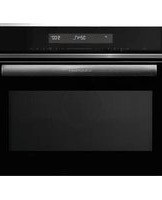
5C60M8690AU - Microwave BLAUPUNKT - Free user manual and instructions
Find the device manual for free 5C60M8690AU BLAUPUNKT in PDF.


| Product Type | Built-in Microwave Oven |
| Model | 5C60M8690AU |
| Brand | Blaupunkt |
| Capacity | 34 liters |
| Dimensions (H x W x D) | 380 x 595 x 380 mm |
| Weight | 20 kg |
| Power Supply | 230 V, 50 Hz |
| Microwave Power | 900 W |
| Grill Power | 1000 W |
| Convection Power | 2000 W |
| Functions | Microwave, Grill, Convection, Defrost, Auto Cook |
| Control Type | Touch Control |
| Display | LED Digital Display |
| Turntable Diameter | 315 mm |
| Child Lock | Yes |
| Interior Light | Yes |
| Material | Stainless Steel Cavity |
| Auto Cook Programs | 8 Programs |
| Cleaning | Wipe with damp cloth; no abrasive cleaners |
| Spare Parts | Door seal, glass turntable, roller ring |
| Repairability | Replacement parts available; eco-design |
| Installation Type | Built-in (60 cm wide niche) |
Frequently Asked Questions - 5C60M8690AU BLAUPUNKT
User questions about 5C60M8690AU BLAUPUNKT
0 question about this device. Answer the ones you know or ask your own.
Ask a new question about this device
Download the instructions for your Microwave in PDF format for free! Find your manual 5C60M8690AU - BLAUPUNKT and take your electronic device back in hand. On this page are published all the documents necessary for the use of your device. 5C60M8690AU by BLAUPUNKT.
USER MANUAL 5C60M8690AU BLAUPUNKT
Instructions for installation and use
Compact microwave oven 5C60M8690AU
Table of contents
Important safety instructions 3
Causes of damage 6
Installation 6
Your new appliance 8
Control panel 8
Touch keys and display 8
Function and screen display 8
Parameter adjustment 8
Cooling fan 9
Accessories 9
Before using the appliance for the first time ....14
Setting the clock ....14
Heating up the oven 14
Cleaning the accessories ....14
Setting the oven 14
Setting the type of heating and temperature ....14
Rapid preheating 15
The microwave ....15
Notes regarding ovenware 15
Microwave power settings 15
Setting the microwave 16
MicroCombi operation 16
Setting Microwave Combi operation 16
Automatic programmes 16
Setting a programme 16
Defrosting programmes 18
Setting the pre-set cooking 19
Setting the time-setting options 19
Setting the cooking time 19
Setting the clock 19
Setting the timer 19
Childproof lock 19
Switching on the childproof lock 19
Switching off the childproof lock 19
Care and cleaning 20
Cleaning agents 20
Technical data 20
Malfunction table 21
Acrylamide in foodstuffs 21
Energy and environment tips 22
Saving energy 22
Environ mentally-friendly disposal 22
PRECAUTIONS TO AVOID POSSIBLE EXPOSURE TO EXCESSIVE MICROWAVE ENERGY
(a) Do not attempt to operate this oven with the door open since this can result in harmful exposure to microwave energy. It is important not to break or tamper with the safety interlocks.
(b) Do not place any object between the oven front face and the door or allow soil or cleaner residue to accumulate on sealing surfaces.
(c) WARNING: If the door or door seals are damaged, the oven must not be operated until it has been repaired by a competent person.
ADDENDUM
If the apparatus is not maintained in a good state of cleanliness, its surface could be degraded and affect the lifespan of the apparatus and lead to a dangerous situation.
IMPORTANT SAFETY INSTRUCTIONS
IMPORTANT SAFETY INSTRUCTIONS WARNING
To reduce the risk of fire, electric shock, injury to persons or exposure to excessive microwave oven energy when using your appliance, follow basic precautions, including the following:
- This appliance can be used by children aged from 8 years and above and persons with reduced physical, sensory or mental capabilities or lack of experience and knowledge if they have been given supervision or instruction concerning use of the appliance in a safe way and understand the hazards involved. Children shall not play with the appliance. Cleaning and user maintenance shall not be made by children without supervision.
- Read and follow the specific:"PRE-CAUTIONS TO AVOID POSSIBLE EXPOSURE TO EXCESSIVE MICRO-WAVE ENERGY".
- Keep the appliance and its cord out of reach of children less than 8 years.
- If the supply cord is damaged, it must be replaced by the manufacturer, its service agent or similarly qualified persons in order to avoid a hazard. (For appliance with type Y attachment)
-
WARNING: It is hazardous for anyone other than a competent person to carry out any service or repair operation that involves the removal of a cover which gives protection against exposure to microwave energy.
-
WARNING: Liquids and other foods must not be heated in sealed containers since they are liable to explode.
- This appliance can be used by children aged from 8 years and above and persons with reduced physical, sensory or instruction concerning use of the appliance in a safe way and understand the hazards involved. Children shall not play with the appliance. Cleaning and user maintenance shall not be made by children without supervision unless they are aged from 8 years and above and supervised.
- When heating food in plastic or paper containers, keep an eye on the oven due to the possibility of ignition.
- Only use utensils that are suitable for use in microwave one.
- If smoke is emitted, switch off or unplug the appliance and keep the door closed in order to stifle any flames.
- Microwave heating of beverages can result in delayed eruptive boiling, therefore care must be taken when handling the container.
-
The contents of feeding bottles and baby food jars shall be stirred or shaken and the temperature checked before consumption, in order to avoid burns.
-
Eggs in their shell and whole hard-boiled eggs should not be heated in microwave ovens since they may explode, even after microwave heating has ended.
-
The oven should be cleaned regularly and any food deposits removed.
-
Failure to maintain the oven in a clean condition could lead to deterioration of the surface that could adversely affect the life of the appliance and possibly result in a hazardous situation.
-
Only use the temperature probe recommended for this oven. (for ovens provided with a facility to use a temperature-sensing probe.)
-
The microwave oven must be operated with the decorative door open. (for ovens with a decorative door.)
-
This appliance is intended to be used in household and similar applications such as:
-staff kitchen areas in shops, offices and other working environments;
-by clients in hotels, motels and other residential type environments;
-farm houses;
-bed and breakfast type environments.
-
Care should be taken not to displace the turntable when removing containers from the appliance. (For fixed appliances and built-in appliances being used equal or higher than 900mm above the floor and having detachable turntables. But this is not applicable for appliances with latnozitohm hinged door.)
-
The appliance shall not be cleaned team cleaner with a s .
-
WARNING: Ensure that the appliance is switched off before replacing the lamp to avoid the possibility of electric shock.
-
WARNING: Accessible parts may become hot during use. Young children should be kept away.
-
Steam cleaner is not to be used.
-
The microwave oven is intended for heating food and beverages. Drying of food or clothing and heating of warming pads, slippers, sponges, damp cloth and similar may lead to risk of injury, ignition or fire.
-
Surface of a storage drawer can get hot.
-
WARNING: The appliance and its accessible parts become hot during use. Care should be taken to avoid touching heating elements. Children less than 8 years of age shall be kept away unless continuously supervised.
-
During use the appliance becomes hot. Care should be taken to avoid touching heating elements inside the oven.
-
Metallic containers for food and beverages are not allowed during microwave cooking.
-
Do not use harsh abrasive cleaners or sharp metal scrapers to clean the oven door nacryeththeissalface, which may result in shattering of the glass.
-
The appliance is intended to be used built-in.
-
The appliance must not be installed behind a decorative door in order to avoid
overheating. (This is not applicable for appliances with decorative door.)
- WARNING: When the appliance is operated in the combination mode, children should only use the oven under adult supervision due to the temperatures generated.
READ CAREFULLY AND KEEP FOR FUTURE REFERENCE
![[01] x 1 [02] x 1 [03] x 2 [04] x 2 [05] x 1 [06] x 1 [07] x 1 [08] x 1 [9] x 2 [10] x 2 [11] x 2](/content/2026/05/897524/images/3acb4c4c8d1687438c960882c910e82e9d8f59ceb11df9fb27753be8ef72a1c4.jpg)
Causes of damage
Caution!
- Creation of sparks: Metal e.g. a spoon in a glass must be kept at least 2 cm from the oven walls and the inside of the door. Sparks could irreparably damage the glass on the inside of the door.
■ Water in the hot cooking compartment: Never pour water into the hot cooking compartment. This will cause steam. The temperature change can cause damage. - Moist food: Do not store moist food in the closed cooking compartment for long periods.
Do not use the appliance to store food. This can lead to corrosion. - Cooling with the appliance door open: Only leave the cooking compartment to cool with the door closed. Do not trap anything in the appliance door. Even if the door is only slightly ajar, the fronts of adjacent units may be damaged over time.
- Heavily soiled seal: If the seal is very dirty, the appliance door will no longer close properly during operation. The fronts of adjacent units could be damaged. Always keep the seal clean.
- Operating the microwave without food: Operating the appliance without food in the cooking compartment may lead to overloading. Never switch on the appliance unless there is food
in the cooking compartment. An exception to this rule is a short crockery test (see the section "Microwave, suitable crockery").
- Using the appliance door for standing on or placing objects on: Do not stand or place anything on the open appliance door. Do not place ovenware or accessories on the appliance door.
- Transporting the appliance: Do not carry or hold the appliance by the door handle. The door handle cannot support the weight of the appliance and could break.
- Microwave popcorn: Never set the microwave power too high. Use a power setting no higher than 600 watts. Always place the popcorn bag on a glass plate. The disc may jump if overloaded.
- Liquid that has boiled over must not be allowed to run through the turntable drive into the interior of the appliance. Monitor the cooking process. Choose a shorter cooking time initially, and increase the cooking time as required.
- The oven should be cleaned regularly and any food deposits removed since they may explode, even after microwave heating has ended.
- Failure to maintain the oven in a clean condition could lead to deterioration of the surface that could adversely affect the life of the appliance and possibly result in a hazardous situation.
Installation
Fitted units
- This appliance is only intended to be fully fitted in a kitchen.
- This appliance is not designed to be used as a tabletop appliance or inside a cupboard.
- The fitted cabinet must not have a back wall behind the appliance.
- A gap of at least 45 mm must be maintained between the wall and the base or back panel of the unit above.
- The fitted cabinet must have a ventilation opening of 250 cm ^2 on the front. To achieve this, cut back the base panel or fit a
ventilation grille.
■ Ventilation slots and intakes must not be covered.
- The safe operation of this appliance can only be guaranteed if it has been installed in accordance with these installation instructions.
- The fitter is liable for any damage resulting from incorrect installation.
- The units into which the appliance is fitted must be heat-resistant up 90 °C.
Installation height not less than 850mm.
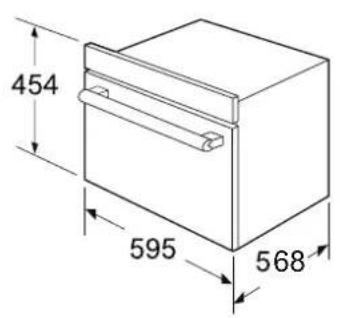
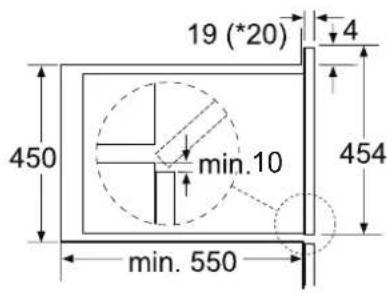
Installation dimensions
Ventilation openings
behind, min. 250 cm²


Note: There should be gap above the oven.
Building in
- Do not hold or carry the appliance by the door handle. The door handle cannot hold the weight of the appliance and may break off.
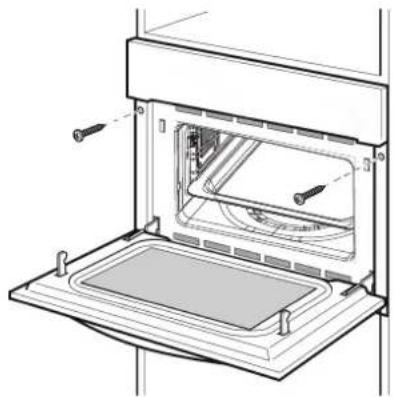
- Carefully push the microwave into the box, making sure that it is in the centre.
- Open the door and fasten the microwave with the screws that were supplied.
natural_image
Technical line drawing of an oven with internal components and mounting base (no text or symbols)* 20 mm for metal fascias
Fully insert the appliance and centre it.
Do not kink the connecting cable.
Screw the appliance into place.
The gap between the worktop and the appliance must not be closed by additional battens.
Important information
The appliance is designed to be permanently installed with a three-pin power cord and may only be connected by a licensed expert in accordance with the connection diagram.
Only a qualified electrician who takes the relevant regulations into account may replace the power cord.
Do not use multiple plugs, power strips or extensions. Overloading causes a risk of fire.
If the connection is no longer accessible following installation, an all-pin isolating switch with a contact gap of at least 3 mm must be provided.
Connect the wires of the mains power cord in accordance with the following colour coding:
Green and Earth wire < (E)
yellow
Blue Neutral wire (N)
Brown Live (L)
Great Britain and Australia:
Do not connect the appliance using a 13 A plug or protect it with a 13 A fuse. The appliance must be protected using a fuse that is rated 16 A or higher. The appliance must be disconnected from the power supply during all installation work. When the appliance is installed, protection must be provided against accidental contact in the future.
Your new appliance
Use this section to familiarise yourself with your new appliance. The control panel and the individual operating controls are
explained. You will find information on the cooking compartment and the accessories.
Control panel

Touch keys and display
The touch keys are used to set the various additional functions. On the display, you can read the values that you have set.
| Symbol | Function |
| Cancel | |
| Microwave | |
| Kitchen Timer/Childproof Lock | |
| Pre-set | |
| Preheat | |
| F | Function |
| - + | Parameter adjustment |
| Slider control bar | |
| A | Auto Menu |
| Clock/Temperature | |
| Weight | |
| Light bulb | |
| DII | Start/Pause |
Function and displayscreen
Use the function keys to set the type of cooking.
| Function | Use |
| — Conventional | The top and bottom elements work together to provide conventional cooking. The oven needs to be pre-heated to the required temperature: ideal for slow cooking dishes such as casseroles and stews. |
| Convection | For baking on several levels(e.g. baking trays of chocolate chip cookies). |
| — Conventional + Fan | Convenient and time savings, up to 4 dishes can be cooked simultaneously on different shelves without mixing of taste or smell. |
| Radiant Grilling | Best results can be obtained from using the top shelf for small items and lower shelves for larger items. |
| Double Grill+Fan | For gratin dishes and finishing roasted vegetables. |
| Double Grilling | The inside radiant elements and outside top element work simultaneously giving a rapid and even grilling heat, therefore effectively browning the top surface of the food. |
| Function | Use | |
| Pizza | Pizza is perfectly cooked with extra heat from both bottom and sides of the oven, guaranteeing pizza bases are crispy. | |
| Lower Heater Element | This is ideal for slow cooking dishes such as casseroles, stews. | |
| Microwave | Defrost, reheat and cooking. | |
| MW+Convection | For reducing large portions' cooking time with browning finish. | |
| MW+Double Grill +Fan | This function is suitable where quick browning is required; will cook the ingredients down to the core. | |
| MW+Pizza | This function is suitable where quick under browning is required; will cook the ingredients down to the core. | |
| * | Defrost | 3 defrosting programmes |
| A | Auto-programs | 13 cooking programmesThe type of heating and cooking time are set by weight . |
Parameter adjustment
Use the adjusting keys to set the parameters.
| parameter | function |
| Auto menu | Select 13 automatic programmes.From P 01 to P 13. |
| Temperature | Select the temperature of cooking(°C).____: 100-235 📋: 50-250 📋: 50-250 ____: 50-235 📋: 50-235 ≈+ 📋: 50-250 📋: 100-235 ≈+ 📋: 50-250 📋: 100-250 ≈+ 📋: 50-250 📋: 100-235 |
| Weight | Set the weight of cooking. |
| Time | Set the time of cooking. |
| Microwave | Select microwave power.100W,300W500W,700W and 900W |
Cooling fan
Your appliance has a cooling fan. The cooling fan switches on during operation. The hot air escapes above the door.
The cooling fan continues to run for a certain time after operation.
Caution!
Do not cover the ventilation slots. Otherwise, the appliance will overheat.
Notes
- The appliance remains cool during microwave operation. The cooling fan will still switch on. The fan may run on even when microwave operation has ended.
- Condensation may appear on the door window, interior walls and floor. This is normal and does not adversely affect microwave operation. Wipe away the condensation after cooking.
Accessories
Note:
Type and quantity of accessories is subject to actual demand.
Grill rack

For grilling, e.g. steaks, sausages and for toasting bread.
Baking tray
For safety reasons, the baking tray should be placed on the side hanger instead of being placed directly on the bottom board of the cavity.
Baking tray- Enamel tray

For making cake roll and roasting whole chicken.
- When cooking with microwave function, the use of enamel tray is prohibited.
Baking tray- Glass tray

- When cooking with microwave function, please use the glass tray.
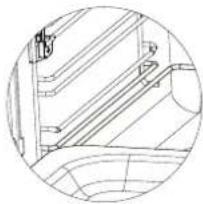
■ Used for catching liquids, such as water and grease when food is baked. - In order to ensure the best cooking effect, the glass tray should be placed in the bottom of the side hanger, as shown in the figures below eTglass tray should be pushed along the lowest guide rails of the side hanger in place.
natural_image
Technical line drawing of a mechanical assembly or bracket (no text or symbols)
natural_image
Line drawing of a simple oven or oven unit with internal compartments and ventilation slots (no text or symbols)
natural_image
Line drawing of an open oven with internal compartments and ventilation slots (no text or symbols)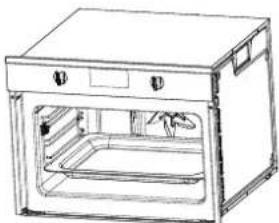
natural_image
Line drawing of an open oven with a tray and door (no text or symbols)

natural_image
Line drawing of an open oven with a fan inside, showing internal structure and ventilation slots (no text or symbols)![[11] [ ]09 [1 ]0](/content/2026/05/897524/images/38e049ac3813cf2dc38e55387e4d6647ca8a32bddd34bc85bd0b67bba2b9b1b6.jpg)
Once the oven has been lifted into place inside the appliance housing, locate the two holes in the casing of the oven and fix it into place using [09], [10] and [11].
Caution: Do not over tighten the screws [0] to avoid damage to the oven or appliance 9 housing - use a screwdriver only!
Installation of the ceramic clips and side rails

[03] × 2

[04] × 2
![[03] ① ② ③](/content/2026/05/897524/images/142d6a44623ca6a76a6abc3e11551d12b3edb3981ba7490b216e61c3f8aff47b.jpg)
![[04] ① ② ③](/content/2026/05/897524/images/6fbff6441a5b95dca5f1d206f230db060ea34e5ca7011b527884bbb184d765c3.jpg)

natural_image
Technical line drawing of an oven with fan and vent, showing internal structure and ventilation system (no text or labels)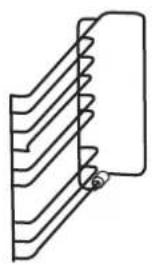
natural_image
Pure technical line drawing of a mechanical component with layered structure (no text or symbols)[05] × 1

natural_image
Pure line drawing of a mechanical component with no text or symbols[06] × 1
Left side rail installation [05]
![[03] [04] [05]](/content/2026/05/897524/images/70e1846d3f3f402fd64b8e83e6177f88b5e109fb86618e8258f397467cbe94bc.jpg)
![[04] [03] [05]](/content/2026/05/897524/images/f7971b6c2c375ddab17577f02eb71d1d5cdc2a0062a622922ead32de0b98b208.jpg)
![[04] [05] [03]](/content/2026/05/897524/images/21c6c61ee549e9278457108d40f3b4b43f1437b5df0e9c1ee36e08b0df926352.jpg)
Right side rail installation [06]
![[03] [06] [04]](/content/2026/05/897524/images/127e16ef8b03d7b0d69ac1b4d6a4761f93d465bb9fbdc37aa89e8dde5bbd118d.jpg)
![[03] [06] [04]](/content/2026/05/897524/images/fda48900228d9e8c3adc549bd671eee0094c6dc9698774b5fc35d8eba287afd8.jpg)
![[06] [04][03]](/content/2026/05/897524/images/796674726d319a7425a3f6a8b65ec98187f66ac6240e84a2726db90d2ca3acf8.jpg)
Before using the appliance for the first time
Here you will find everything you need to do before using your oven to prepare food for the first time. First read the section on Safety information.
Setting the clock
- In waiting state, touch the 89 key to enter clock setting mode. "00:00" will display and the hour figures will flash.
- Touch - or + or slide the ____ to set the hour figures. The input time should be within 0--23.
- Touch 89 to confirm, the minute figures will flash.
- Touch - or + or slide the ____ to set the minute figures. The input time should be within 0--59.
- Touch 89 to finish clock setting, ":" will flash. The time is set. And the appliance will enter waiting state.
Cleaning the accessories
Before you use the accessories for the first time, clean them thoroughly with hot soapy water and a soft dish cloth.
Heating up the oven
To remove the new cooker smell, heat up the oven when it is empty and closed. One hour with ☺ Convection at 250 °C is ideal. Ensure that no packaging remnants have been left in the cooking compartment.
- In waiting state, touch F key once. _ and the default temperature will light in the screen.
- Touch F key repeatedly till ⚙ lights. The default temperature of convection will display.
- Touch - or + or slide the — to set the temperature to 250°C.
- Touch 89 to enter cooking time setting mode. "00:00" will flash.
- Touch - or + or slide the ____ to set the cooking time to 60 minutes.
- Touch the ▷ key. The oven begins to heat up.
Setting the oven
There are various ways in which you can set your oven. Here we will explain how you can select the desired type of heating and temperature or grill setting. You can also select the oven cooking time for your dish. Please refer to the section on Setting the time-setting options.
Setting the type of heating and temperature
Example : Radiant Grilling at 200 °C for 25 minutes.
-
In waiting state, touch F key once. ____ and the default temperature will light in the screen.
-
Touch F key repeatedly till lights. The default temperature of radiant grilling will display.
-
Touch — or + or slide the ———— to set the temperature to 200^ C.
-
Touch 89 to enter cooking time setting mode. "00:00" will flash.
-
Touch - or + or slide the ____ to set the cooking time to 25 minutes.
-
Touch the ▷ key. The oven begins to heat up.
Opening the oven door during operation
Operation is suspended. After closing the door, touch the ▷ key. Operation continues.
Pausing operation
Touch the ▷|| key to pause operation. Then touch the ▷|| key to continue operation.
Changing the cooking time
This can be done at any time. Touch the Ⓧ key repeatedly till the cooking time flashes, and then touch — or+ or slide the ____ to set the cooking time.
Changing the temperature
This can be done at any time.
Touch - or + or slide the ____ to set the temperature.
Cancelling operation
This can be done at any time. Touch the key to enter into the waiting state.
Rapid Preheating
With rapid preheating, your oven reaches the set temperature particularly quickly.
Rapid Preheating is available for the following types of heating:

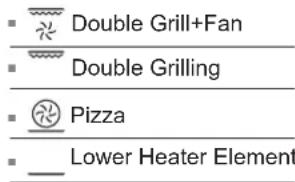
To ensure an oven cooking result, only put your food in the cooking compartment when the preheating phase is complete.
- Setting the type of heating and temperature.
- Touch the Ⓤ key.
The Ⓤ symbol lights up in the display.
The oven begins to heat up.
The preheating process is complete
A signal sounds. The Ⓤ symbol in the display blinks. Put your dish in the oven.
Cancelling rapid preheating
During setting the rapid preheating function, touch the ⏻ key can cancel the function.
During rapid preheating, touch the ⏻ can cancel the function.
Note: Only when you can hear alarm and preheating icon is blinking you can open the door and put food inside.
The microwave
Microwaves are converted to heat in foodstuffs. The microwave can be used solo, i.e. on its own, or in combination with a different type of heating. You will find information about ovenware and how to set the microwave.
Note:
The step quantities for the adjustment time of the coding switch are as follow:
| 0-1 min : | 5seconds |
| 1-3 min | 10seconds |
| 3-15 | 30secondsim |
| 15-60 | 1minute nim |
| Over 60 min : | 5minutes |
Notes regarding ovenware
Suitable ovenware
Suitable dishes are heat-resistant ovenware made of glass, glass ceramic, porcelain, ceramic or heat-resistant plastic. These materials allow microwaves to pass through.
You can also use serving dishes. This saves you having to transfer food from one dish to another. You should only use ovenware with decorative gold or silver trim if the manufacturer guarantees that they are suitable for use in microwaves.
Unsuitable ovenware
Metal ovenware is unsuitable. Metal does not allow microwaves to pass through. Food in covered metal containers will remain cold.
Caution!
Creation of sparks: metal – e.g. a spoon in a glass – must be kept at least 2 cm from the oven walls and the inside of the door. Sparks could destroy the glass on the inside of the door.
Ovenware test
Do not switch on the microwave unless there is food inside. The following ovenware test is the only exception to this rule.
Perform the following test if you are unsure whether your ovenware is suitable for use in the microwave:
- Heat the empty ovenware at maximum power for 12 to 1 minute.
- Check the temperature occasionally during that time.
The ovenware should still be cold or warm to the touch.
The ovenware is unsuitable if it becomes hot or sparks are generated.
Microwave power settings
Use the ≈ key to set the desired microwave power.
| 100W | -Defrosting sensitive/delicate foods-Defrosting irregularly-shaped foods-Softening ice cream-Allowing dough to rise |
| 300 W | -Defrosting-Melting chocolate and butter |
| 500 W | -cooking rice, soup |
| 700 W | -Reheating-cooking mushrooms,shell fish-cooking dishes containing eggs and cheese |
| 900 W | -Boiling water, reheating-cooking chicken, fish, vegetables |
Notes
■ When you touch a key, the selected power lights up.
- The microwave power can be set to 900 watts for a maximum of 30 minutes. With all other power settings a maximum cooking time of 1 hour 30 minutes is possible.
Setting the microwave
Example: Set microwave power to 300 W and cooking time to 17 minutes.
- In waiting state, touch the ≈ key to enter microwave function. The default microwave power 900W will appear. And the default cooking time will flash.
- Touch — or + or slide the ____ to set the cooking time to 17 minutes.
- Touch the ≈ key to activate the microwave power. Then touch or + or slide the — to set the microwave power to 300W.
- Touch the ▷□ key.
Operation begins. The cooking time starts counting down in the display.
The cooking time has elapsed
A signal sounds. Microwave operation has finished.
Opening the oven door during operation
Operation is suspended. After closing the door, touch the ▷ key . Operation continues.
Changing the cooking time
This can be done at any time. Touch — or + or slide the ____ to set the cooking time.
Changing the microwave power setting
This can be done at any time. Touch the ≈ key and then touch — or + or slide the ____ to set the microwave power.
Pausing operation
Touch the key briefly. The ov en is paused. Touch the ▷□ key again to continue operation.
Cancelling operation
This can be done at any time. Touch the key to enter into the waiting state.
Notes
- If you open the appliance door during cooking, the fan may continue to run.
MicroCombi operation
This involves simultaneous operation of the grill and the microwave. Using the microwave makes your dishes ready more quickly, but they are still nicely browned.
You can switch on all microwave power settings.
Exception: 700 and 900 watts
Setting Microwave Combi operation
Example: ≈ + ⚫ MW+Pizza function with 500 W and 190°C for 17 minutes.
- In waiting state, touch ≈ key, and then touch F repeatedly to set MicroCombi mode. Stop touching when 🔒 and ≈ display in the screen. The default microwave power will display and the default temperature will flash.
- Touch — or + or slide the ____ to set the temperature to 190°C.
- Touch the key to confirm the temperature. The default cooking time will flash, and touch — or + or slide the ____ to set the cooking time to 17 minutes.
- Touch the ≈ key. The default power will blink. Then touch - or + or slide the — to set the microwave power to 500W.
- Touch the ▷□ key. The oven begins to heat up.
Appliance operation begins. The cooking time starts counting down.
The cooking time has elapsed
A signal sounds. Combination mode has finished.
Opening the oven door during cooking
Operation is suspended. After closing the door, touch the ▷▶ key briefly. The programme will then continue.
Pausing operation
Touch the ▷II key briefly. The oven is paused. Touch the ▷II key again to continue operation.
Changing the cooking time
This can be done at any time. Touch the Ⓧ key repeatedly till the cooking time flashes, and then touch — or+ or slide the ____ to set the cooking time.
Changing the microwave power setting
This can be done at any time. Touch the ≡ key and then touch - or + or slide the ____ to set the microwave power.
Changing the temperature
This can be done at any time.
Touch - or + or slide the ____ to set the temperature.
Cancelling operation
This can be done at any time. Touch the ⏻ key to enter into the waiting state.
Automatic programmes
The automatic programmes enable you to prepare food very easily. You select the programme and enter the weight of your food. The automatic programme makes the optimum setting. You can choose from 13 programmes.
Always place the food in the cold cooking compartment.
Setting a programme
-
In waiting state, touch A key twice to enter the Auto menu function. The first programme number blinks in the screen.
-
Touch - or + or slide the number to select the programme
- Touch the 🔊 key.
- Touch - or + or slide the ____ to set the weight, cooking time will shown.
- Touch the ▷II key. The programme starts. You can see the cooking time is counting down.
Auto Menu
| Programme no. | Item | Weight(g) | Accessory layer and accessory |
| P 01** | Fresh vegetables | 200 | 1^st layer, glass tray |
| 400 | |||
| 600 | |||
| P 02** | Potatoes peeled/cooked | 240 | 1^st layer, glass tray |
| 480 | |||
| 720 | |||
| P 03 | Baked potatoes | 450 | 3^rd layer, grill rack |
| 1000 | |||
| P 04 | Chicken pieces(frozen) | 450 | 3^rd layer, grill rack |
| P 05* | Cake | 400 | 2^nd layer, grill rack |
| 500 | |||
| 600 | |||
| P 06* | Apple pie | 2400 | 2^nd layer, grill rack |
| P 07* | Quiche | 1000 | 3^rd layer, grill rack |
| P 08** | Reheat soup | 200 | 1^st layer, glass tray |
| 400 | |||
| 600 | |||
| P 09** | Reheat plate | 250 | 1^st layer, glass tray |
| 350 | |||
| P 10** | Reheat sauce/stew | 100 | 1^st layer, glass tray |
| 200 | |||
| 300 | |||
| P 11 | Frozen Pizza | 200 | 3^rd layer, grill rack |
| 400 | |||
| 600 | |||
| P 12* | Frozen oven chips | 300 | 3^rd layer, enamel tray |
| 400 | |||
| 500 | |||
| P 13 | Lasagna | 1600 | 3^rd layer, grill rack |
From the bottom to the top, the number of layers is from the first to the fourth.
Notes
- The programmes with a * are preheated. During preheating, the cooking time pauses and the preheating symbol is on. After preheating, you will hear an alarm and the preheating symbol will blink.
- The programmes with ** only use the microwave function.
Programme has ended
A signal sounds. The oven stops heating.
Changing the programme
Once you have started the programme, the programme number and weight cannot be changed.
Cancelling the programme
Touch the ⏻ key to cancel operation.
Changing the cooking time
If using automatic programmes, you cannot change the cooking time.
Defrosting programmes
You can use the 3 defrosting programmes to defrost meat, poultry and bread.
- In waiting state, touch A key once to enter the Defrost function. The first programme number blinks in the screen.
- Touch - or + or slide the ____ to select the programme number.
- Touch the ☐ key.
- Touch - or + or slide the ____ to set the weight, cooking time will shown.
- Touch the ▷II key. The programme starts. You can see the cooking time is counting down
Notes
■ Preparing food
Use food that has been frozen at -18 °C and stored in portion-sized quantities that are as thin as possible.
Take the food to be defrosted out of all packaging and weigh it. You need to know the weight to set the programme.
- Liquid will be produced when defrosting meat or poultry. Drain off this liquid when turning meat and poultry and under no circumstances use it for other purposes or allow it to come into contact with other foods.
■ Ovenware
Place the food in a microwaveable shallow dish, e.g. a china or glass plate, but do not cover.
- When defrosting chicken and chicken portions (d 01), an audible signal will sound on two occasions to indicate that the food should be turned.
■ Resting time
The defrosted food should be left to stand for an additional 10 to 30 minutes until it reaches an even temperature. Large pieces of meat require a longer standing time than smaller pieces. Flat pieces of meat and items made from minced meat should be separated from each other before leaving to stand.
After this time, you can continue to prepare the food, even though thick pieces of meat may still be frozen in the middle.
The giblets can be removed from poultry at this point.
Programme no. Weig Defrastge in kg
| d 01* | meat | 0.10 - 1.50 |
| d 02* | poultry | 0.10 - 1.50 |
| d 03* | fish | 0.10 - 0.80 |
*During defrosting,p lace the food on the glass . tray
*If you hear 3 beeps, turn the food. over
Then touch start key to continue defrosting.
Setting the pre-set cooking
More flexibility and convenience: The appliance can be programmed to preset the cooking end time and duration.
- In waiting state, touch the key. The symbol lights up in the display figohrelst whla flash.
- Touch — or + or slide the — to set the hour figures. The input time should be within 0--23.
- Touch ☒ to confirm, the minute figures will flash.
- Touch - or + or slide the ____ to set the minute figures. The input time should be within 0--59.
- Touch ☒ to finish the pre-set time setting.
- Setting the type of heating and temperature.
- Touch ▷ to finish the setting.
The pre-set time has elapsed
An audible signal sounds. The oven starts cooking.
Specifications
Before setting the pre-set cooking, the clock must has been set. Kitchen Timer can not be set after the pre-set cooking setting.
Setting the time-setting options
Your oven has various time-setting options. You can use the 89 key to call up the menu and switch between the individual functions. A time-setting option that has already been set can be changed directly with the parameter knob.
Setting the cooking time
The cooking time for your meal can be set on the oven. When the cooking time has elapsed, the oven switches itself off automatically. This means that you do not have to interrupt other work to switch off the oven. The cooking time cannot be accidentally exceeded.
The oven starts. The cooking time counts down in the display.
The cooking time has elapsed
An audible signal sounds. The oven stops heating.
Setting the clock
Refer to Before using the appliance for the first time.
Changing the clock
Repeat the steps of setting the clock.
Setting the timer
You can use the timer as a kitchen timer. It runs independently of the oven. The timer has its own audible signal. In this way, you can tell whether it is the timer or a cooking time which has elapsed.
- In waiting state. Touch 🔒 key to enter kitchen timer. "00:00min" will flash.
- Touch - or + or slide the ____ to set the timer time.
- Touch 🔒 key to start timer.
Childproof lock
The oven has a childproof lock to prevent children switching it on accidentally.
The oven will not react to any settings. The timer and clock can also be set when the childproof lock has been switched on.
Switching on the childproof lock
In waiting state, touch and hold the 🔒 key for approx. 3 seconds.
There will be a long beep and the ⚠ symbol appears in the display.
The childproof lock is activated.
Switching off the childproof lock
In locked state, touch and hold the ⚫ key for approx. 3 seconds. There will be a long beep and the ⬆ symbol goes out in the display. The childproof lock is deactivated.
Care and cleaning
With careful care and cleaning your microwave oven will retain its looks and remain good order. We will explain here how you should care for and clean your appliance correctly.
Risk of electric shock.!
Penetrating moisture may cause an electric shock. Do not use any high-pressure cleaners or steam cleaners.
Risk of burns!
Never clean the appliance immediately after switching off. Let the appliance cool down.
Risk of serious damage to health!
Microwave energy may escape if the cooking compartment door or the door seal is damaged. Never use the appliance if the cooking compartment door or the door seal is damaged. Contact the after-sales service.
Notes
- Slight differences in colour on the front of the appliance are caused by the use of different materials, such as glass, plastic and metal.
■ Shadows on the door panel which look like streaks, are caused by reflections made by the oven light. - Unpleasant odours, e.g. after fish has been prepared, can be removed very easily. Add a few drops of lemon juice to a cup of water. Place a spoon into the container as well, to prevent delayed boiling. Heat the water for 1 to 2 minutes at maximum microwave power.
Cleaning agents
To ensure that the different surfaces are not damaged by using the wrong cleaning agent, observe the information in the table. Do not use
■ sharp or abrasive cleaning agents,
■ metal or glass scrapers to clean the glass in the appliance door.
■ metal or glass scrapers to clean the door seal,
■ hard scouring pads and sponges,
■ cleaning agents with high concentrations of alcohol.
Wash new sponge cloths thoroughly before use.
Allow all surfaces to dry thoroughly before using the appliance again.
| Area Cleaning agents | |
| Appliance front Hot soapy water: | |
| Clean with a dish cloth and dry with a soft cloth. Do not use glass cleaners or metal or glass scrapers for cleaning. | |
| Appliance front with stainless steel | Hot soapy water:Clean with a dish cloth and dry with a soft cloth. Remove flecks of limescale, grease, starch and albumin (e.g. egg white) immediately. Corrosion can form under such residues. Special stainless steel cleaning agents can be obtained from the after-sales service or from specialist shops. Do not use glass cleaners or metal or glass scrapers for cleaning. |
| Cooking compartment | Hot soapy water or a vinegar solution:Clean with a dish cloth and dry with a soft cloth.If the oven is very dirty: Do not use oven spray or other aggressive oven cleaners or abrasive materials. Scouring pads, rough sponges and pan cleaners are also unsuitable. These items scratch the surface. Allow the interior surfaces to dry thoroughly. |
| Recess in cooking compartment | Damp cloth:Ensure that no water seeps through the turntable drive into the appliance interior. |
| Wire racks Hot soapy water: | |
| Clean using stainless steel cleaning agent or in the dishwasher. | |
| Door panels Glass cleaner: | |
| Clean with a dish cloth. Do not use a glass scraper. | |
| Seal Hot soapy water: | |
| Clean with a dish cloth, do not scour. Do not use a metal or glass scraper for cleaning. | |
Technical data
| 230 V~ 50 HzRated Voltage | |
| Microwave Input | 1650 W |
| Microwave Output | 900 W |
| Convection 1700 W | |
| Grill | 2200 W |
| Maximum Power | 3000 W |
Malfunction table
Malfunctions often have simple explanations. Please refer to the malfunction table before calling the after-sales service.
If a meal does not turn out exactly as you wanted, refer to the Expert Cooking Guide section, where you will find plenty of cooking tips and tricks.
Risk of electric shock!
Incorrect repairs are dangerous. Repairs may only be carried out by one of our trained after-sales engineers.
Malfunction table
| Problem | Possible cause | Remedy/information |
| The appliance does not work. | Faulty circuit breaker. | Look in the fuse box and check that the circuit breaker for the appliance is in working order. |
| Plug not plugged in. | Plug in the plug. | |
| Power cut | Check whether the kitchen light works. | |
| The appliance does not work. appears in the display panel. | Childproof lock is active. | Deactivate the childproof lock (see section: Childproof lock). |
| The microwave does not switch on. | Door not fully closed. | Check whether food residue or debris is trapped in the door. |
| It takes longer than before for the food to heat up in the microwave | The selected microwave power level is too low. | Select a higher power level. |
| A larger amount than usual has been placed in the appliance. | Double the amount = almost double the cooking time. | |
| The food was colder than usual. | Stir or turn the food during cooking. | |
| A particular operating mode or power level cannot be set. | The temperature, power level or combined setting is not possible for this operating mode. | Choose permitted settings. |
| E-01appears in the display panel. | The thermal safety switch-off function has been activated. | Call the after-sales service. |
| E-04appears in the display panel. | The thermal safety switch-off function has been activated. | Call the after-sales service. |
| E-17appears in the display panel. | Rapid heating has failed. | Call the after-sales service. |
Acrylamide in foodstuffs
Which foods are affected?
Acrylamide is mainly produced in grain and potato products that are heated to high temperatures, such as potato crisps, chips,
toast, bread rolls, bread, fine baked goods (biscuits, gingerbread, cookies).
| Tips for keeping acrylamide to a minimum when preparing food | |
| General | Keep cooking times to a minimum. Cook meals until they are golden brown, but not too dark. Large, thick pieces of food contain less acrylamide. |
| Baking biscuitsOven chips | Max. 200 °C in Top/bottom heating or max. 180 °C in 3D hot air or hot air mode. Max. 190°C in Top/bottom heating or max. 170 °C in 3D hot air or hot air mode. Egg white and egg yolk reduce the formation of acrylamide. Distribute thinly and evenly over the baking tray. Cook at least 400 g at once on a baking tray so that the chips do not dry out. |
Energy and environment tips
Here you can find tips on how to save energy when baking and roasting and how to dispose of your appliance properly.
Saving energy
- Only preheat the oven if this is specified in the recipe or in the operating instruction tables.
■ Use dark, black lacquered or enamelled baking tins. They absorb the heat particularly well. - Open the oven door as infrequently as possible while you are cooking, baking or roasting.
It is best to bake several cakes one after the other. The oven is still warm. This reduces the baking time for the second cake. You can also place two loaf tins next to each other.
- For longer cooking times, you can switch the oven off 10 minutes before the end of the cooking time and use the residual heat to finish cooking.
Environmentally-friendly disposal
Dispose of packaging in an environmentally-friendly manner.

This appliance complies with European Directive 2012/19/EC on Waste Electrical and Electronic Equipment (WEEE). The directive gives a framework for the collection and recycling of old appliances, which is valid across the EU.
Heating food

Risk of scalding!
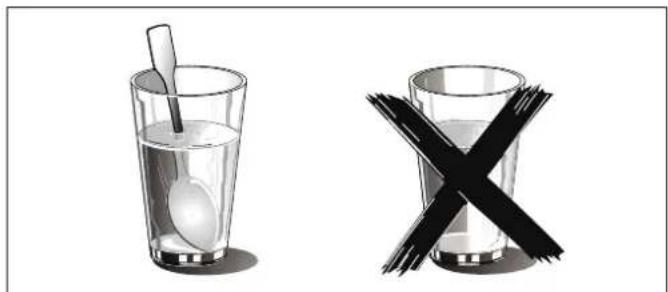
There is a possibility of delayed boiling when a liquid is heated. This means that the liquid reaches boiling temperature without the usual steam bubbles rising to the surface. Even if the container only moves a little, the hot liquid can suddenly boil over and spatter. When heating liquids, always place a spoon in the container. This will prevent delayed boiling.
natural_image
Two glassware illustrations: a spoon inside and a cross symbol crossed out (no text or symbols present)Service



- Instructions for installation and use
- Table of contents
- PRECAUTIONS TO AVOID POSSIBLE EXPOSURE TO EXCESSIVE MICROWAVE ENERGY
- ADDENDUM
- IMPORTANT SAFETY INSTRUCTIONS
- IMPORTANT SAFETY INSTRUCTIONS WARNING
- Causes of damage
- Caution!
- Installation
- Fitted units
- Installation dimensions
- Ventilation openings
- Building in
- Important information
- Connect the wires of the mains power cord in accordance with the following colour coding:
- Great Britain and Australia:
- Your new appliance
- Touch keys and display
- Function and displayscreen
- Parameter adjustment
- Cooling fan
- Notes
- Accessories
- Before using the appliance for the first time
- Setting the clock
- Cleaning the accessories
- Heating up the oven
- Setting the oven
- Setting the type of heating and temperature
- Pausing operation
- Rapid Preheating
- The microwave
- Note:
- Notes regarding ovenware
- Suitable ovenware
- Unsuitable ovenware
- Ovenware test
- Microwave power settings
- Setting the microwave
- MicroCombi operation
- Setting Microwave Combi operation
- Automatic programmes
- Setting a programme
- Defrosting programmes
- Setting the pre-set cooking
- Setting the time-setting options
- Setting the cooking time
- Setting the timer
- Childproof lock
- Switching on the childproof lock
- Switching off the childproof lock
- Care and cleaning
- Cleaning agents
- Malfunction table
- Acrylamide in foodstuffs
- Energy and environment tips
- Saving energy
- Environmentally-friendly disposal
- Heating food
- Risk of scalding!
- Service
Brand : BLAUPUNKT
Model : 5C60M8690AU
Category : Microwave