CS125-AO - Oven Cosori - Free user manual and instructions
Find the device manual for free CS125-AO Cosori in PDF.


| Product Type | Smart Air Fryer Toaster Oven |
| Brand | Cosori |
| Model | CS125-AO |
| Power Supply | AC 120V, 60Hz |
| Rated Power | 1800W |
| Capacity | Approx. 26 qt / 25 L, 6-Slice Toaster, 12" Pizza |
| Temperature Range | 80°–450°F / 27°–232°C |
| Time Range | 0–24 hr |
| Weight | 18.5 lb / 8.4 kg (including accessories) |
| Dimensions | 18.5 x 16.5 x 11.4 in / 47 x 42 x 29 cm |
| Heating Elements | Top and bottom (quartz or similar) |
| Cooking Functions | Toast, Bagel, Air Fry, Bake, Broil, Roast, Pizza, Cookies, Dehydrate, Ferment, Warm |
| Convection Fan | Yes, with two speeds (Normal and High) |
| Display Type | LED Display |
| Control Type | Control Knob, Buttons (Power, Fan/Light, TIME/TEMP, START/PAUSE, SHAKE) |
| Connectivity | Wi-Fi (2.4 GHz), Bluetooth, VeSync App |
| Voice Control Compatibility | Amazon Alexa, Google Assistant |
| Included Accessories | Wire Rack, Food Tray, Crumb Tray, Fry Basket, Recipe Book, User Manual |
| Interior Coating | Nonstick coating on walls |
| Safety Features | Automatic shutoff, cool-touch handle, overheat protection, polarized plug |
| Cleaning & Maintenance | Non-abrasive cleaners; removable crumb tray; baking soda paste for stubborn grease |
| Warranty | 1 year (extendable to 2 years with registration) |
Frequently Asked Questions - CS125-AO Cosori
User questions about CS125-AO Cosori
0 question about this device. Answer the ones you know or ask your own.
Ask a new question about this device
Download the instructions for your Oven in PDF format for free! Find your manual CS125-AO - Cosori and take your electronic device back in hand. On this page are published all the documents necessary for the use of your device. CS125-AO by Cosori.
USER MANUAL CS125-AO Cosori
natural_image
Line drawing of a COSORI microwave oven with digital display and control buttons (no text or symbols on main body)
Thank you for your purchase!

(We hope you love your new smart air fryer toaster oven as much as we do.)

join
the Cosori Cooks Community on Facebook facebook.com/groups/cosoricooks

explore
our recipe gallery www.cosori.com/recipes

enjoy
weekly, featured recipes made exclusively by our in-house chefs

natural_image
Simple line icons of a chef's hat, beard, phone receiver, and coffee maker on red background (no text or symbols)CONTACT OUR CHEFS
Our helpful, in-house chefs are ready to assist you with any questions you might have!
Email: recipes@cosori.com Toll-Free: (888) 402-1684 M-F, 9:00 am–5:00 pm PST/PDT
On behalf of all of us at Cosori,
Happy cooking!
Table of Contents
Package Contents 3
Specifications 3
Important Safeguards 4
Getting to Know Your Smart Air Fryer Toaster Oven 6
Display 7
Controls 8
Before First Use 10
Cooking with your Smart Air Fryer Toaster Oven 11
- Toast Function ("TOAST") 15
- Bagel Function ("BAGEL") 16
· Air Fry Function ("AIRFRY") 17
• Bake Function ("BAKE") 18
• Broil Function ("BROIL") 19
- Roast Function ("ROAST") 20
- Pizza Function ("PIZZA") 21
- Cookies Function ("COOKIES") 22
- Dehydrate Function ("DEHYD") 23
- Ferment Function ("FERMENT") 24
- Warm Function ("WARM") 25
Shaking Food 26
Care & Maintenance 27
Troubleshooting 28
VeSync App Troubleshooting 29
Warranty Information 31
Customer Support 33
Package Contents
1 × Smart Air Fryer Toaster Oven
1 × Wire Rack
1 × Food Tray
1 × Crumb Tray
1 × Fry Basket
1 × Recipe Book
1 × User Manual
1 × Quick Reference Guide
Specifications
| Power Supply AC 120V, 60Hz |
| Rated Power 1800W |
| Capacity Approx. 26 qt / 25 L, 6-Slice Toaster, 12" Pizza |
| Temperature Range 80°–450°F / 27°–232°C |
| Time Range 0–24 hr |
| Weight 18.5 lb / 8.4 kg (including accessories) |
| Dimensions 18.5 x 16.5 x 11.4 in / 47 x 42 x 29 cm |
Note: To access additional smart air fryer toaster oven functions, download the free VeSync app (see page 10).
READ AND SAVE THESE INSTRUCTIONS
IMPORTANT SAFEGUARDS
Follow basic safety precautions when using your smart air fryer toaster oven. Read all instructions.
Key Safety Points
- Do not touch hot surfaces. Use handle.
- The outside of the oven, including the door, is hot during and after use.
- Always use heat-resistant gloves, pads, or oven mitts when handling hot materials, and when placing items in or removing items from the oven, including trays, racks, accessories, or containers.
General Safety
- When the oven is not in use, and before cleaning, press ⚙ to turn it off, then unplug from outlet. Allow to cool completely before putting on or taking off parts.
- Do not immerse the housing, cord, or plug in water or liquid.
- Closely supervise children near the oven.
-
Do not use your oven if it is damaged, not working, or if the cord or plug is damaged. Contact Customer Support (see page 33).
-
Do not use third-party replacement parts or accessories, as this may cause injuries.
- Do not use outdoors.
- Do not place the oven or any of its parts on a stove, near gas or electric burners, or inside another heated oven.
- Be extremely cautious when removing a tray or rack if it contains hot oil, grease, or other hot liquids.
- Do not clean with metal scouring pads. Metal fragments can break off the pad and touch electrical parts, creating a risk of electric shock.
- Clean the crumb tray after using. Accumulated grease and crumbs can overheat and catch fire.
- Do not store anything on top of your oven when in operation. Do not store anything inside your oven other than recommended accessories.
- Do not operate with a separate remote-control system.
- Only use as directed in this manual.
- Not for commercial use. Household use only.
While Cooking
- Do not place oversized foods or metal utensils (except for Cosori accessories) into your oven.
- Do not place paper, cardboard, or non-heat-resistant plastic into your oven, or any materials which may catch fire or melt.
- To avoid overheating, do not use metal foil in the oven unless directed. Use extreme caution when using foil, and always fit the foil as securely as possible. If the foil contacts the oven's heating elements, this can cause overheating and risk of fire.
- Never put baking or parchment paper into the oven without food on top. Air circulation can cause paper to move and touch heating elements.
- Always use heat-safe containers. Be extremely cautious if using containers that aren't metal or glass.
- Keep your oven away from flammable materials (curtains, tablecloths, walls, etc). Use on a flat, stable, heat-resistant surface away from heat sources or liquids.
- Immediately turn off and unplug your oven if you see dark smoke coming out. Food is burning. Wait for smoke to clear before opening the oven door.
Plug & Cord
- Your oven has a polarized plug (one prong is wider than the other), which fits into a polarized outlet only one way. If the plug does not fit, reverse the plug. If it still does not fit, do not use the plug in that outlet. Do not alter the plug in any way.
- Do not let the power cord (or any extension cord) hang over the edge of a table or counter, or touch hot surfaces.
Note: This oven uses a short power-supply cord to reduce the risk of entangling or tripping. Use extension cords with care. The marked electrical rating of the extension cord must be as great as the rating of the oven (see page 3).
Electromagnetic Fields (EMF)
This oven complies with all standards regarding electromagnetic fields (EMF). If handled properly and according to the instructions in this user manual, the appliance is safe to use based on scientific evidence available today.
GETTING TO KNOW YOUR SMART AIR FRYER TOASTER OVEN
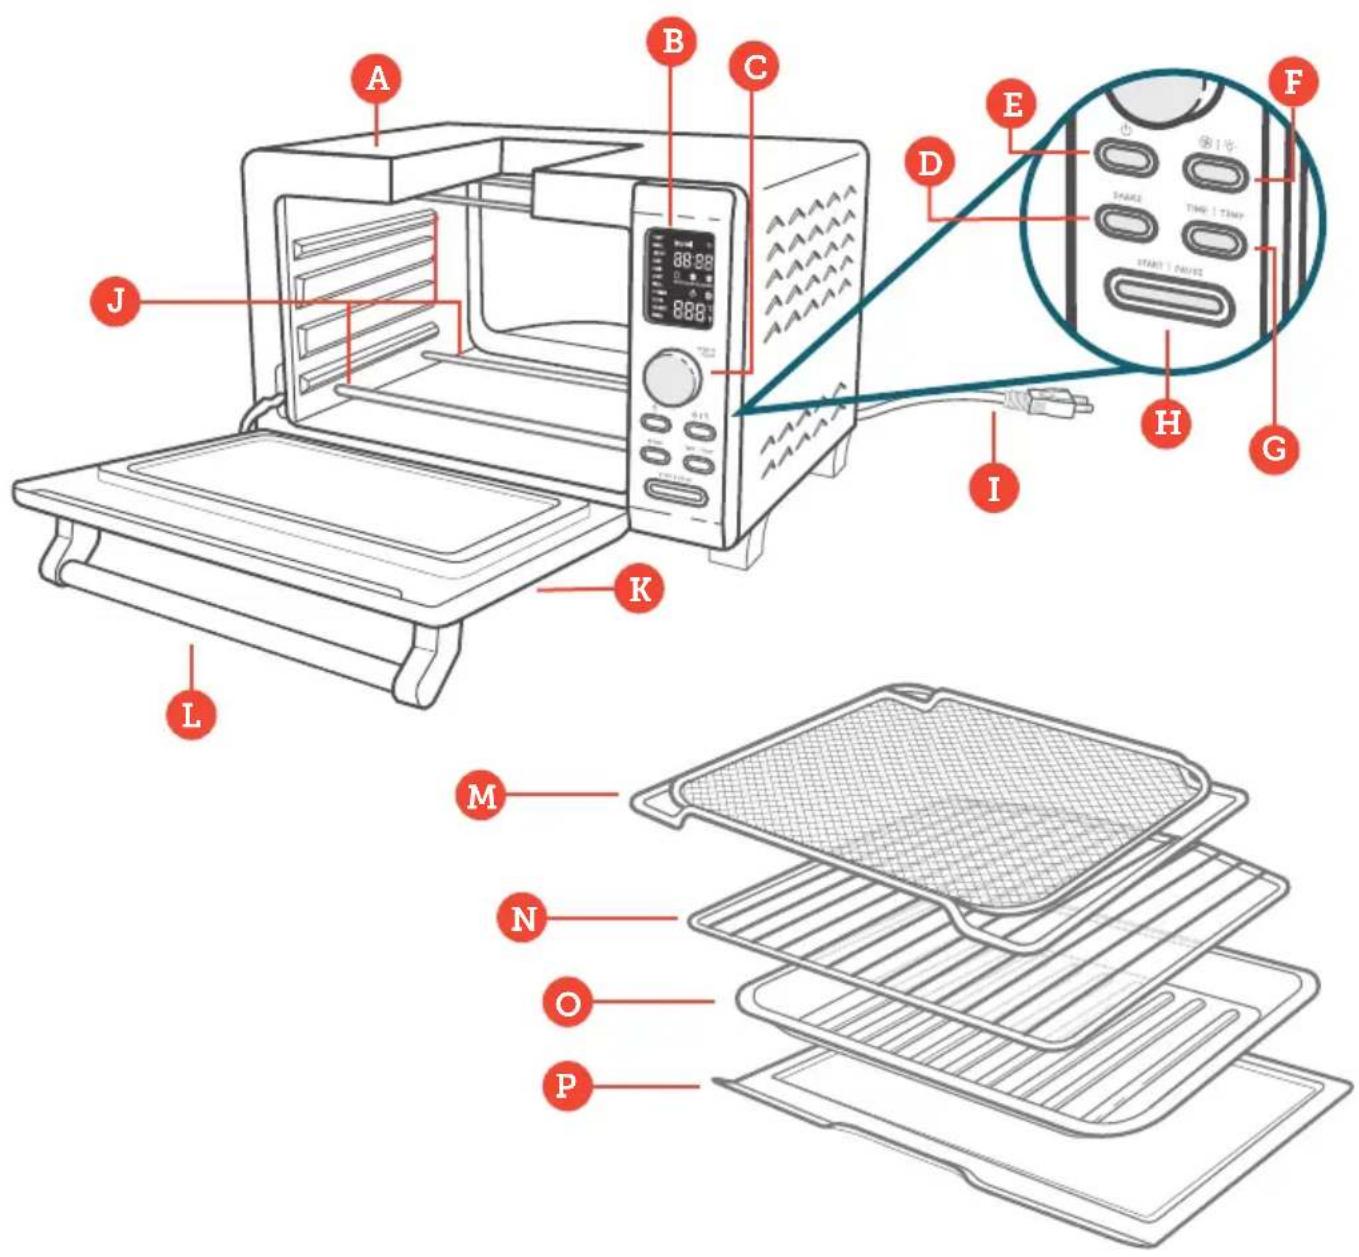
A. Housing
B. LED Display
C. Control Knob
D. SHAKE Button
E. Power Button
F. Fan/Light Button
G. TIME/TEMP Button
H. START/PAUSE Button
I. Power Cord
J. Heating Elements
K. Door
L. Handle
M. Fry Basket
N. Wire Rack
O. Food Tray
P. Crumb Tray
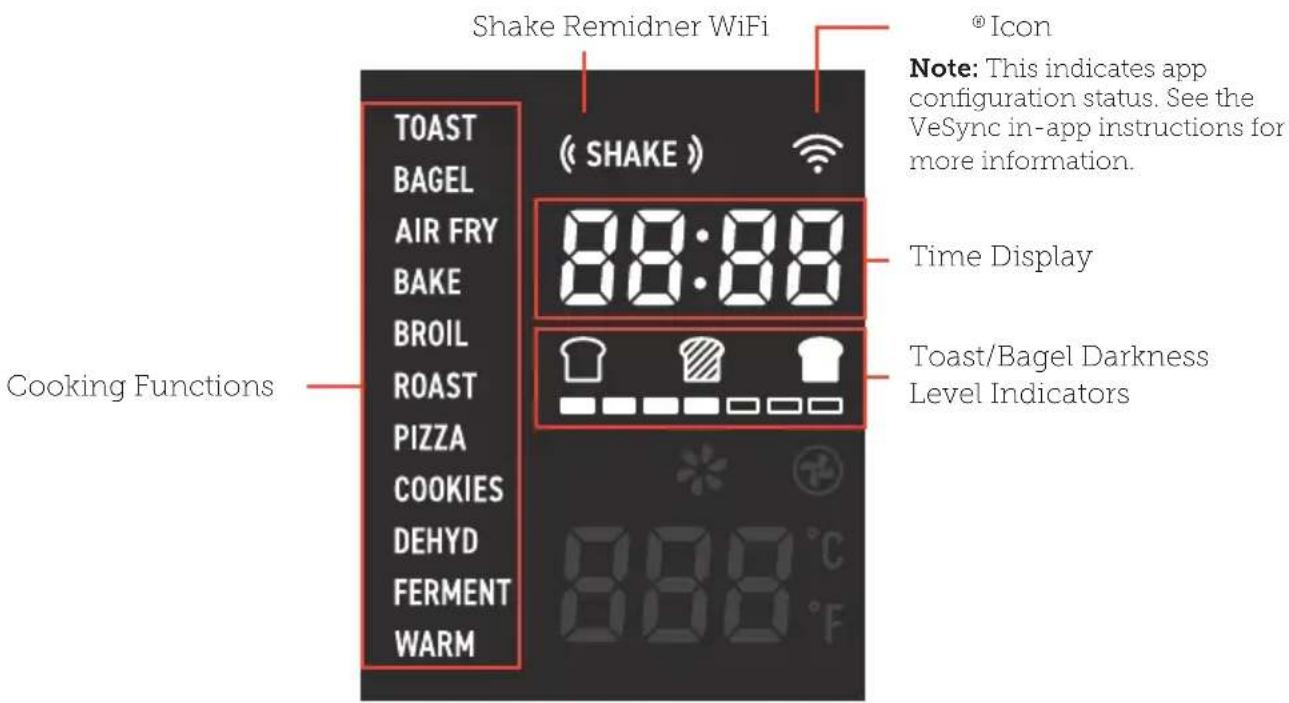
Control Knob
- Turn the knob to change cooking functions. The current function will blink on the display.
• After pressing TIME/TEMP, turn the knob to change time/temperature. Turn clockwise to increase and counterclockwise to decrease.
• After a function or setting is selected, press the knob to confirm the selection. - Press and hold the knob to save new preset settings or to reset a preset to default (see Customizing Cooking Functions, page 11).
Power Button
- Press to turn the oven on/off.
- While the oven is cooking or paused, press to cancel cooking. The oven will return to standby.
- Press and hold for 5 seconds to pair with the VeSync app. See the VeSync in-app instructions for more information.
- Press and hold for 15 seconds to reset the oven to factory settings (including removing the oven from the VeSync app and restoring all default cooking function settings).
Fan/Light Button
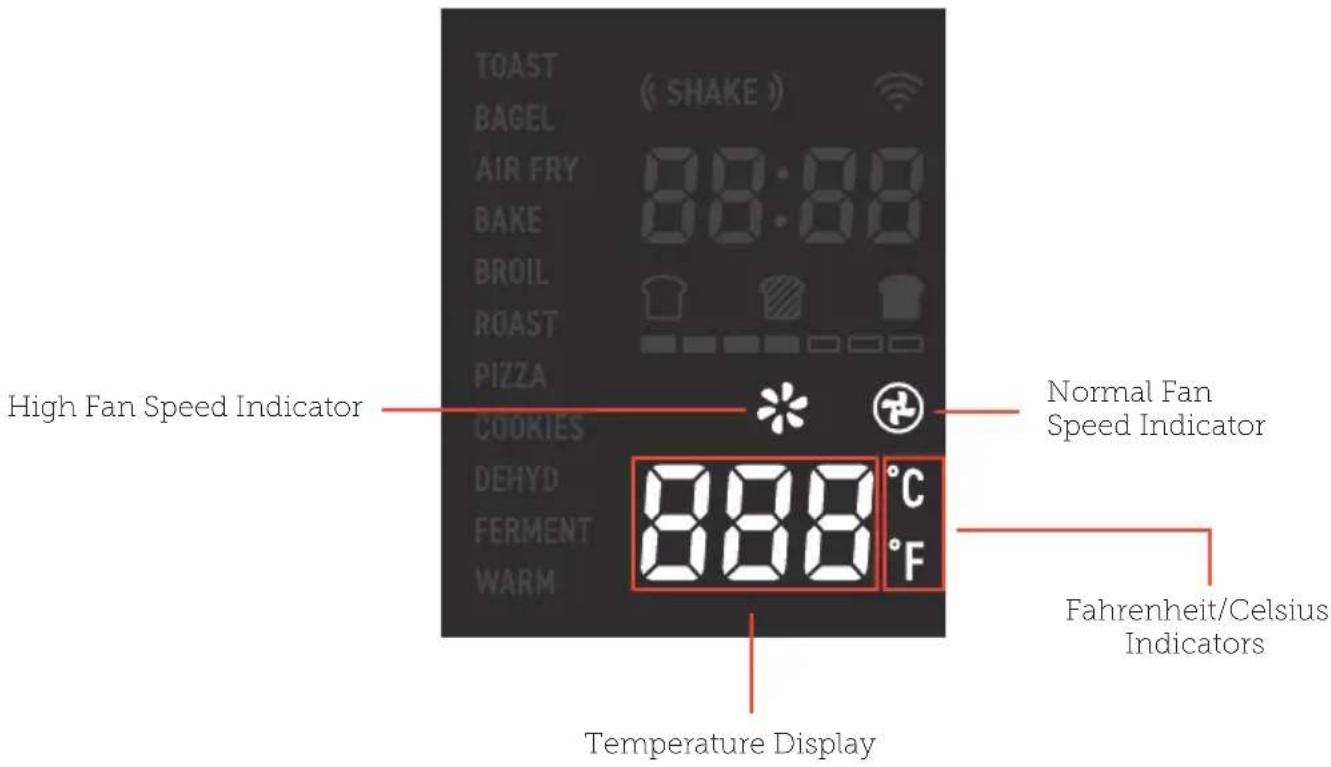
- Press repeatedly to cycle through fan speeds: normal, high, and off.
-
The fan can be used for all cooking functions except Toast and Bagel. The fan is automatically set when cooking with Air Fry and Dehydrate.
-
Press and hold to turn the interior light on/off.
• The interior light will turn on automatically when there is 1 minute of cooking time left. Press and hold to turn the light back off.
SHAKE Button
- Press to add or remove a Shake Reminder. The Shake Reminder will appear halfway through the remaining cooking time. The oven will beep, and (SHAKE) will blink on the display.
- The Shake Reminder cannot be added to the Toast or Bagel functions.
- For more information on shaking, see Shaking Food (page 26).
- Press and hold for 5 seconds to reset all presets to factory settings. The oven will stay paired with the VeSync app.
TIME/TEMP Button
- Press once to adjust time. Press again to adjust temperature. Turn the control knob clockwise to increase the setting and counterclockwise to decrease the setting.
- Time will adjust in increments of +/-1 , 5, 10, or 15 minutes (see chart).
- Temperature will adjust in increments of +/- 5^ F .
- Press and hold to switch temperature units between Fahrenheit and Celsius.
Time Increment Chart
| Air Fry, Bake, Broil, Roast, Pizza, Cookies, Warm | |
| Below 60 minutes +/- 1-minute increments | |
| 1–2 hours +/- 5-minute increments | |
| 2–3 hours +/- 10-minute increments | |
| Roast, Warm | |
| Above 3 hours +/- 15-minute increments | |
| Dehydrate, Ferment | |
| All times +/- 30-minute increments |
START/PAUSE Button
- Starts or pauses a cooking function.
- If preheating, cancels preheating and starts the cooking function immediately.
- Blinks when the oven has finished preheating. Press again to start the cooking function.
Note:
- When you open the oven door during cooking (such as to shake food), the oven will pause cooking automatically.
Setting Up
- Remove all packaging around and inside the oven.
- Place on a stable, level, heat-resistant surface, away from anything that can be damaged by heat.
- Wash all accessories and clean the oven's interior (see page 27). Dry and place accessories back in oven.
Test Run
A test run will help you become familiar with your oven, make sure it's working correctly, and clean it of possible residues in the process.
- Make sure there is no food or packaging in the oven and plug it in.
- Turn the control knob to "TOAST", then press the control knob to confirm. Turn the control knob to change the Darkness Level to Level 7 (the highest level).
- Press START/PAUSE to begin heating. The button will light up, and the display will show the timer counting down.
- The oven will stop heating and beep when finished.
VeSync App Setup
Note: Due to ongoing updates and improvements, the VeSync app may be slightly different than shown in the manual. In case of any differences, follow the in-app instructions.
- To download the VeSync app, scan the QR code or search "VeSync" in the Apple App Store® or Google Play Store.


Note: For Android™ users, choose "Allow" to use VeSync.
- Open the VeSync app. If you already have an account, tap Log In. To create a new account, tap Sign Up.
Note: You must create your own VeSync account to use third-party services and products. These will not work with a guest account. With a VeSync account, you can also allow your family and friends to control your smart air fryer toaster oven.
- Turn on Bluetooth ^® on your phone.
- Tap + in the VeSync app and select your smart oven.
- Follow the in-app instructions to finish setting up your smart oven.
Note:
- You can change the name and icon at any time by going to the smart oven screen and tapping 🎨
- You can use the VeSync app to connect your smart oven to Amazon Alexa or Google Assistant™.
COOKING WITH YOUR SMART AIR FRYER TOASTER OVEN
Note: You can use the VeSync app to control your smart air fryer toaster oven, follow in-app recipes, and more.
Caution:
- The outer surface of the oven, including the oven door, is hot during and after use. Temperature may be over 212°F / 100°C. Do not touch hot surfaces. Use handle.
• Always use heat-resistant gloves, pads, or oven mitts when handling hot materials, and when placing items in or removing items from the oven.
Note: Always leave the crumb tray at the bottom of the oven when cooking for easier cleaning.
Cooking Functions
Cooking functions are programmed with an ideal time and temperature for cooking certain foods. For more information on each cooking function, see its individual section, or the Cooking Functions Quick Reference Chart (see page 12).
Customizing Cooking Functions
-
You can customize a cooking function's default settings, including time and temperature.
• To change a function's default settings: -
When the oven is not cooking or is paused, turn the control knob to select the function you want to change. Press the control knob to confirm your selection.
- Select the settings you want to set as default.
a. For Bagel and Toast, turn the control knob to change the Darkness Level.
b. For other functions, press the TIME/TEMP button to switch between controlling time and temperature, and use the control knob to adjust the time and/or temperature.
- Press and hold the control knob for 5 seconds until the oven beeps 1 time.
- To reset one function: • To reset all functions:
-
When the oven is not cooking or is paused, turn the control knob to select the function you want to reset. Press the control knob to confirm your selection.
-
Without making any changes, press and hold the control knob for 5 seconds until the oven beeps 1 time.
-
Press and hold SHAKE for 5 seconds. This will reset all presets to factory settings.
Note: You can also customize and reset functions using the VeSync app.
Cooking Functions Quick Reference Chart
| Name Use | Suggested Accessory & Rack Position | Range | |
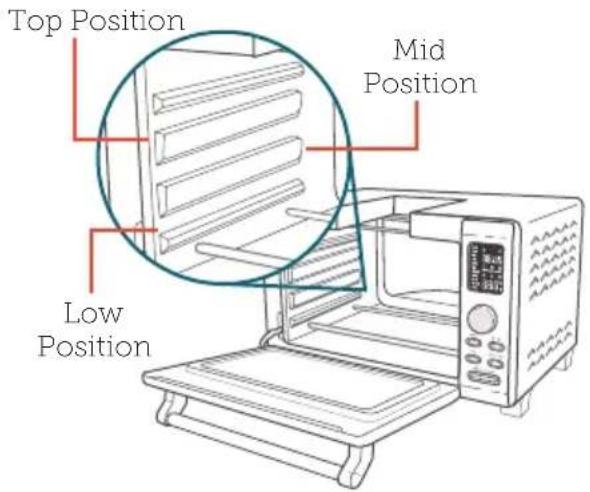
| Toast | Toast or brown breadManually preheat ovenDefrost food | Wire rack at mid position | DarknessLevel 1-7Temperature is automatic |
| Bagel | When toasting bagels, place the inside (cut side) facing upwards. The top side will be toasted more than the bottom sideToast bagels or crumpetsToast any bread that requires one side to be more toasted than the other | Wire rack at mid position | DarknessLevel 1-7Temperature is automatic |
| Air Fry | Cooks using intense heat and maximized airflowCook food such as french fries and chicken wingsIncludes automatic preheat | Fry basket at mid position | 150°-450°F / 66°-232°C1 min-2 hr |
| Bake | Cook foods evenly throughoutBake cakes, muffins, pastriesIncludes automatic preheat | Food tray or wire rack at low position | 150°-450°F / 66°-232°C1 min-2 hr |
| Broil | Cook open-faced sandwiches, thin cuts of meat (such as bacon), poultry, fish, sausages, and vegetablesBrown the tops of casseroles, gratins, and dessertsIncludes automatic preheat | Food tray at top position | 150°-450°F / 66°-232°C1 min-2 hr |
| Roast | Cook a variety of meat and poultryFood will be tender and juicy on the inside and well-roasted on the outsideIncludes automatic preheat | Food tray at low position | 150°-400°F / 66°-204°C1 min-6 hr |
| Pizza | Melt and brown cheese and toppings while crisping crustIncludes automatic preheat | Wire rack at mid position | 150°-450°F / 66°-232°C1 min-2 hr |
| Cookies | Bake cookies and other baked treatsIncludes automatic preheat | Food tray or wire rack at mid position | 150°-450°F / 66°-232°C1 min-2 hr |
| Dehydrate | Evenly dry out foods without cookingDry fruit or vegetable chips | Wire rack at mid position | 105°-180°F / 41°-82°C30 min-24 hr |
| Ferment | Precisely hold low temperaturesProof bread, rolls, pizza, and doughMake yogurt | Food tray or wire rack at low position | 80°-110°F / 27°-43°C30 min-12 hr |
| Warm | Keep food warm at the recommended temperature to prevent bacterial growth (160°F / 71°C or above) | Food tray or wire rack at low position | 140°-230°F / 60°-110°C1 min-12 hr |
Convection Fan
The fan circulates hot air in the oven for faster and more even cooking. Use the high fan speed (super convection) for crispier results, and for air frying. You can turn the fan on and off at any time during cooking.
Note: The fan cannot be used for the Toast or Bagel functions. Fan speed is set automatically for the Air Fry and Dehydrate functions.
The VeSync app allows you to access additional smart functions, including those listed below.
Remote Control
- All oven functions can be controlled remotely (except for starting cooking, for safety reasons).
• Cooking progress can be monitored from a distance.
Cooking Function Customization
- Cooking function settings can be changed or reset to default.
In-App Recipes
- Pre-programmed recipes made by Cosori's in-house chefs are available in the app. These recipes automatically set the recommended time and temperature.
- Create and save custom recipes.
Third-Party Voice Control
- Compatible with Amazon Alexa and Google Assistant™ for voice commands.
Note: The VeSync app is continually updated and app features will expand.
Automatic PreheatVeSync App Fun
Air Fry, Bake, Broil, Roast, Pizza, and Cookies all use automatic preheat.
- When you start the cooking function by pressing START/PAUSE, preheating will start automatically. The START/PAUSE button will light up, and the display will show "PrE
- Pressing START/PAUSE again during preheating will cancel preheating and immediately start cooking.
- Preheating times vary based on the temperature setting (see chart).
| Setting Temperature | Automatic Preheat Time |
| 300°F / 149°C and below | 2-4 min |
| 325°F / 163°C 3-5 min | |
| 350°F / 177°C 4-6 min | |
| 400°F / 204°C and above | 6-8 min |
- When preheating is finished, the oven will beep several times and the display will flash. This will repeat every minute. The START/PAUSE button will keep blinking until cooking is started.
• After 10 minutes of inactivity, the cooking function will cancel, the oven will stop heating, and the display will reset.
- Open the oven door to place food inside, then close the oven door to start cooking automatically. You can also press START/PAUSE to begin cooking if the food is already in the oven. The button will light up, and the display will show the timer counting down.
Toast Function ("TOAST")
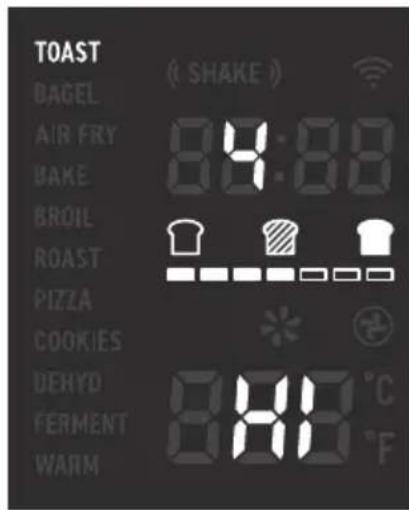
This function browns the outside of your bread while keeping the inside soft. Also ideal for English muffins and frozen waffles.
Can be used to manually preheat the oven or defrost food. Use Level 4 or higher.
Heating Elements: Top and bottom heating elements cycle on and off.
Rack Position: Mid
- Place up to 6 slices of bread on the wire rack. Insert the wire rack at mid position and close the oven door.
- Turn the control knob to "TOAST", which will blink on the display. Press the control knob to confirm your selection.
- Optionally, customize the darkness level. You can only do this before cooking starts.
a. Turn the control knob to adjust the darkness level between 1–7. The bars underneath the toast icons indicate the darkness level.
b. Use 1–2 for a light toast, 3–5 for a medium toast, and 6–7 for a dark toast.
Note:
- When setting the darkness level, consider the type, thickness, and freshness of the bread.
- Try lighter settings for raisin toast, white bread, and thinly-sliced bread.
- Try darker settings for rye, whole wheat, heavier-textured bread, and fresh bread.
- Time and temperature are set automatically. Time increases with darkness level. Temperature is set to the highest level (450°F / 232°C). The display will show "HI".
- Press START/PAUSE to begin. The button will light up, and the display will show the timer counting down.
- The oven will stop heating and beep when finished.
Bagel Function ("BAGEL")
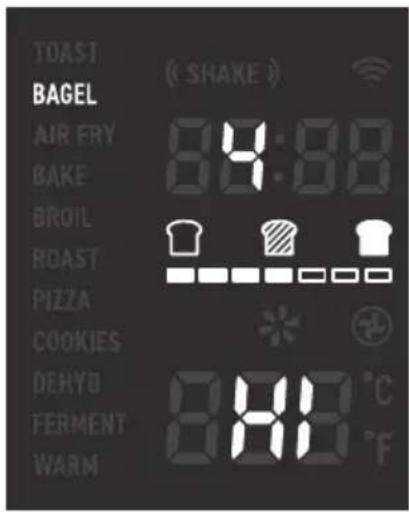
This function crisps the inside of a cut bagel while lightly toasting the outside.
Also ideal for toasting crumpets or thick-sliced specialty breads which require one side to be more toasted than the other.
Heating Elements: Top heating elements cycle on and off, and bottom heating elements are half on and half off.
Rack Position: Mid
- Slice the bagel in half. Center the halves on the wire rack. Insert the wire rack into the mid rack position and close the oven door.
Note: This function toasts more on the top than the bottom. The inside (cut side) of the bagel should face upwards for best results.
-
Tum the control knob to select "Bagel", which will blink on the display. Press the control knob to confirm your selection.
-
Optionally, customize the darkness level. You can only do this before cooking starts.
a. Turn the control knob to adjust the darkness level between 1–7. The bars underneath the toast icons indicate the darkness level.
b. Use 1–2 for a light toast, 3–5 for a medium toast, and 6–7 for a dark toast.
Note:
- When setting the darkness level, consider the type, thickness, and freshness of the bagel.
- Try lighter settings for bagels that are white, light-textured, thinner, or have raisins.
- Try darker settings for bagels that are fresh or have a heavier texture.
• Time and temperature are set automatically. Time increases with darkness level.
-
Press START/PAUSE to begin. The button will light up, and the display will show the timer counting down.
-
The oven will stop heating and beep when finished.
Air Fry Function ("AIRFRY")
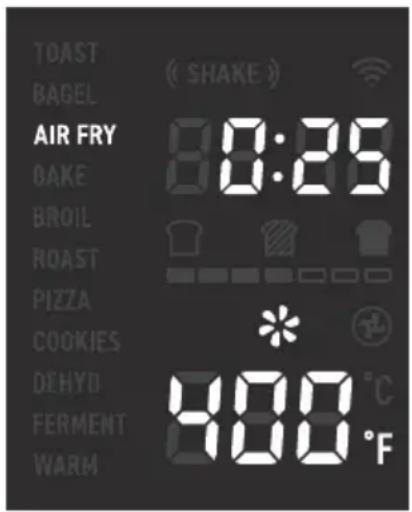
This function is ideal for cooking a variety of food, including french fries and chicken wings. Uses intense heat and maximized airflow.
Heating Elements: Top and bottom heating elements cycle on and off.
Rack Position: Mid
- Turn the control knob to "AIRFRY", which will blink on the display. Press the control knob to confirm your selection.
- Optionally, customize the temperature and time. You can do this anytime during cooking (except during preheating).
a. Press TIME/TEMP once to control time. Turn the control knob to adjust the time between 1 min–2 hr.
b. Press TIME/TEMP again to control temperature. Turn the control knob to adjust the temperature between 150^-450^ / 66^-232^ .
Note:
- For many air frying recipes, we recommend adding a Shake Reminder. Press SHAKE to add or remove a Shake Reminder.
- Small foods that are stacked, such as fries or nuggets, will usually need shaking. You can flip other foods, such as steak, to ensure even browning.
-
For more information, see Shaking Food (page 26).
-
Press START/PAUSE to begin. Preheating will start automatically. The START/PAUSE button will light up, and the display will show "PrE"
Note: Pressing START/PAUSE again during preheating will cancel preheating and immediately start cooking.
- When preheating completes, the oven will beep several times, the display will flash, and the START/PAUSE button will blink continuously.
- Place food in the fry basket.
a. When air frying fatty foods (such as chicken wings), use the food tray instead to prevent oil dripping. Discard excess oil between batches.
- Insert at mid position.
- Close the oven door to begin cooking (or press START/PAUSE if food is already inside). The button will light up, and the display will show the timer counting down.
Note: If you added a Shake Reminder, the reminder will appear halfway through the cooking time. The oven will beep, and
( SHAKE ) will blink on the display. Follow these instructions:
a. Take the fry basket out of the oven, being careful of hot steam. The oven will pause cooking automatically as long as the oven door is open.
b. Shake or flip the food.
c. Put the fry basket back into the oven. Cooking will automatically resume when you close the oven door.
- The oven will stop heating and beep several times when finished.
Bake Function ("BAKE")
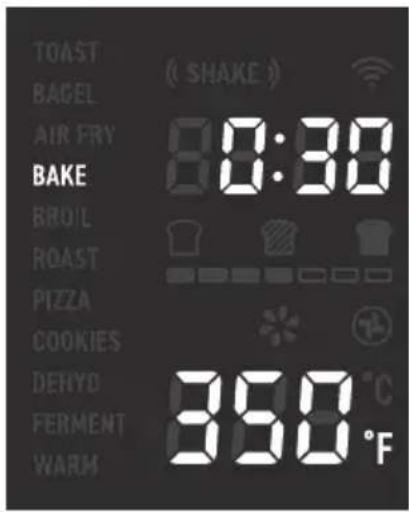
This function cooks food evenly throughout. Ideal for baking cakes, muffins, brownies, and pastries. Also ideal for cooking pre-packaged frozen meals, including lasagna and pot pies.
Heating Elements: Top and bottom heating elements cycle on and off.
Rack Position: Low
- If using the wire rack, insert at low position and close the oven door.
- Turn the control knob to "BAKE", which will blink on the display. Press the control knob to confirm your selection.
- Optionally, customize the temperature and time. You can do this anytime during cooking (except during preheating).
a. Press TIME/TEMP once to control time. Turn the control knob to adjust the time between 1 min-2 hr.
b. Press TIME/TEMP again to control temperature. Turn the control knob to adjust the temperature between 150^-450^ / 66^-232^ .
- Press START/PAUSE to begin. Preheating will start automatically. The START/PAUSE button will light up, and the display will show "PrE"
Note: Pressing START/PAUSE again during preheating will cancel preheating and immediately start cooking.
- When preheating is finished, the oven will beep several times, the display will flash, and the START/PAUSE button will blink continuously.
- Place food inside oven. If using the food tray, insert at low rack position.
Note:
• Citric acid (from oranges, lemons, and other foods) may damage the porcelain enamel finish of the trays or racks. Line the trays with foil or baking paper.
- Use extreme caution when using foil, and always fit foil as securely as possible. To avoid overheating and risk of fire, make sure foil does not contact the heating elements.
- Close the oven door to begin cooking (or press START/PAUSE if food is already inside). The button will light up, and the display will show the timer counting down.
- The oven will stop heating and beep when finished.
Broil Function ("BROIL")
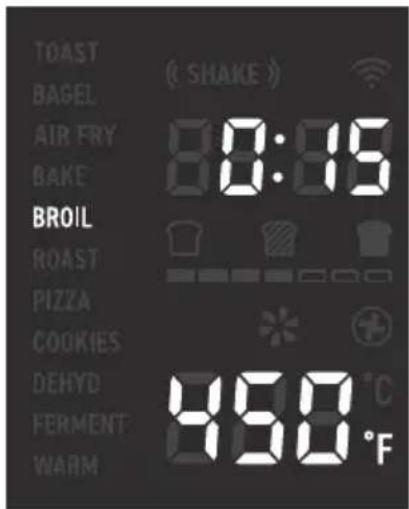
This function is ideal for cooking open-faced sandwiches, thin cuts of meat (such as bacon), poultry, fish, sausages, and vegetables.
Can also be used to brown the tops of casseroles, gratins, and desserts.
Heating Elements: Top heating elements stay on for 5 min, then cycle on and off. Bottom heating elements are half on and half off.
Rack Position: Top
-
Turn the control knob to "BROIL", which will blink on the display. Press the control knob to confirm your selection.
-
Optionally, customize the temperature and time. You can do this anytime during cooking (except during preheating).
a. Press TIME/TEMP once to control time. Turn the control knob to adjust the time between 1 min-2 hr.
b. Press TIME/TEMP again to control temperature. Turn the control knob to adjust the temperature between 150^-450^ / 66^-232^ .
- Press START/PAUSE to begin. Preheating will start automatically. The START/PAUSE button will light up, and the display will show "PrE"
Note: Pressing START/PAUSE again during preheating will cancel preheating and immediately start cooking.
-
When preheating completes, the oven will beep several times, the display will flash, and the START/PAUSE button will blink continuously.
-
Place food on the food tray.
a. Optionally, lightly grease the enamel food tray or line with foil to prevent food from sticking.
b. Use extreme caution when using foil, and always fit foil as securely as possible. To avoid overheating and risk of fire, make sure foil does not contact the heating elements.
- Insert the food tray at top position.
a. Insert at mid position instead for:
-
Bulky foods that may touch the upper heating elements
• Thicker foods such as burger patties
• Marinated foods such as chicken wings
• Foods requiring a gentler broil -
Close the oven door to begin cooking (or press START/PAUSE if food is already inside). The button will light up, and the display will show the timer counting down.
-
The oven will stop heating and beep when finished.
Roast Function ("ROAST")
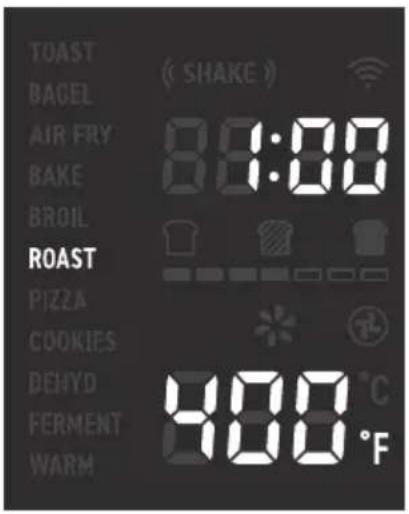
This function is ideal for cooking a variety of meats and poultry. Food will be tender and juicy on the inside and well-roasted on the outside.
Heating Elements: Top and bottom heating elements cycle on and off.
Rack Position: Low
- If using the wire rack, insert at low position and close the oven door.
- Turn the control knob to "ROAST", which will blink on the display. Press the control knob to confirm your selection.
- Optionally, customize the temperature and time. You can do this anytime during cooking (except during preheating).
a. Press TIME/TEMP once to control time. Turn the control knob to adjust the time between 1 min-6 hr.
b. Press TIME/TEMP again to control temperature. Turn the control knob to adjust the temperature between 150^-400^ / 66^-204^ .
- Press START/PAUSE to begin. Preheating will start automatically. The START/PAUSE button will light up, and the display will show "PrE
Note: Pressing START/PAUSE again during preheating will cancel preheating and immediately start cooking.
- When preheating completes, the oven will beep several times, the display will flash, and the START/PAUSE button will blink continuously.
- Place food inside oven. If using the food tray, insert at low rack position.
Note:
• Citric acid (from oranges, lemons, and other foods) may damage the porcelain enamel finish of the trays or racks. Line the trays with foil or baking paper.
- Use extreme caution when using foil, and always fit foil as securely as possible. To avoid overheating and risk of fire, make sure foil does not contact the heating elements.
- Close the oven door to begin cooking (or press START/PAUSE if food is already inside). The button will light up, and the display will show the timer counting down.
- The oven will stop heating and beep when finished.
Pizza Function ("PIZZA")
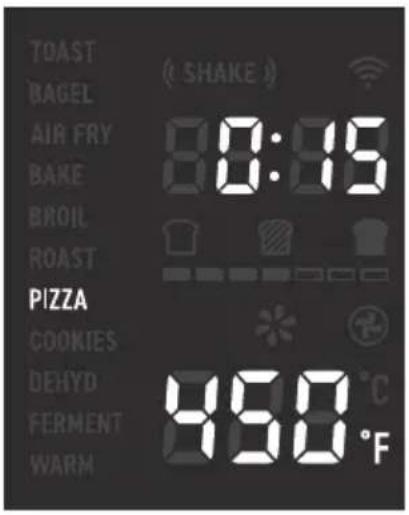
This function melts and browns cheese and toppings, while crisping the crust.
Heating Elements: Top and bottom heating elements cycle on and off.
Rack Position: Mid
- Insert wire rack at mid position and close the oven door.
- Turn the control knob to select "PIZZA", which will blink on the display. Press the control knob to confirm your selection.
- Optionally, customize the temperature and time. You can do this anytime during cooking (except during preheating).
a. Press TIME/TEMP once to control time. Turn the control knob to adjust the time between 1 min–2 hr.
b. Press TIME/TEMP again to control temperature. Turn the control knob to adjust the temperature between 150^-450^ / 66^-232^ .
Note: Try a slightly longer cooking time for pizzas with thicker crust, and an even longer cooking time for frozen pizzas.
- Press START/PAUSE to begin. Preheating will start automatically. The START/PAUSE button will light up, and the display will show "PFE
Note: Pressing START/PAUSE again during preheating will cancel preheating and immediately start cooking.
- When preheating is finished, the oven will beep several times, the display will flash, and the START/PAUSE button will blink continuously.
- Remove any cardboard, plastic, paper, or other flammable materials. Place pizza on a pan, and place the pan on the wire rack.
- Close the oven door to begin cooking (or press START/PAUSE if food is already inside). The button will light up, and the display will show the timer counting down.
Note: For large pizzas, open the oven door halfway through cooking and carefully turn the pizza 90 degrees for more even browning.
- The oven will stop heating and beep when finished.
Cookies Function ("COOKIES")
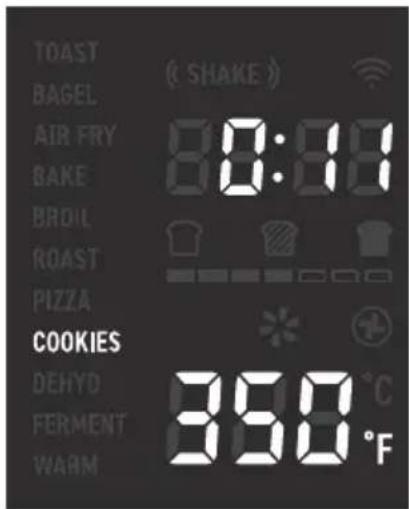
This function is ideal for baking homemade or commercially prepared cookies and other baked treats. Also ideal for ready-to-bake crescent rolls, cinnamon rolls, biscuits, and strudels.
Heating Elements: Top and bottom heating elements cycle on and off.
Rack Position: Mid
- If using the wire rack, insert wire rack into the middle rack position and close the oven door.
- Turn the control knob to select "COOKIES", which will blink on the display. Press the control knob to confirm your selection.
- Optionally, customize the temperature and time. You can do this anytime during cooking (except during preheating).
a. Press TIME/TEMP once to control time. Turn the control knob to adjust the time between 1 min-2 hr.
b. Press TIME/TEMP again to control temperature. Turn the control knob to adjust the temperature between 150^-450^ / 66^-232^ .
Note: The amount of dough per cookie may vary the cooking time. Frozen dough will need a longer cooking time.
- Press START/PAUSE to begin. Preheating will start automatically. The START/PAUSE button will blink, and the display will show "PrE
Note: Pressing START/PAUSE again during preheating will cancel preheating and immediately start cooking.
- When preheating is finished, the oven will beep several times, the display will flash, and the START/PAUSE button will light up continuously.
- Place food inside oven. If using the food tray, insert at mid position.
a. Optionally, lightly grease the enamel food tray or line with baking paper to prevent food from sticking.
b. Never put baking or parchment paper into the oven without food on top. Air circulation can cause paper to move and touch heating elements.
- Close the oven door to begin cooking (or press START/PAUSE if food is already inside). The button will light up, and the display will show the timer counting down.
- The oven will stop heating and beep when finished.
Dehydrate Function ("DEHYD")
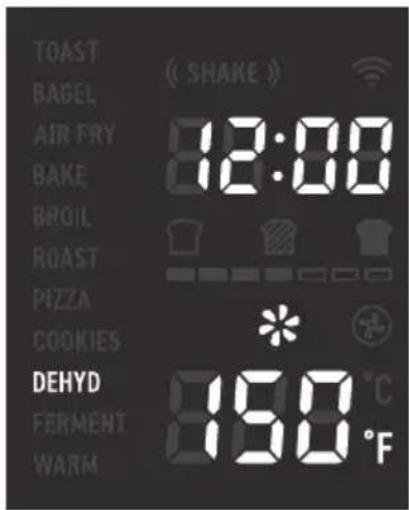
This function combines low and stable heat with automatic airflow to evenly dry out foods without cooking. Ideal for drying fruit or vegetable chips.
Heating Elements: Bottom heating elements cycle on and off.
Rack Position: Mid for 1 tray
- Place food on the wire rack.
a. When dehydrating foods that may drip, such as marinated jerky, place the food tray in the low rack position to collect drippings.
b. Optionally, to prevent staining when dehydrating certain foods (such as beets or marinated meats with dark sauces), line the rack or basket with baking paper.
c. Never put baking or parchment paper into the oven without food on top. Air circulation can cause paper to move and touch heating elements.
- Insert wire rack at mid position. If using multiple trays, insert into other positions. Close the oven door.
- Turn the control knob to select "DEHYD", which will blink on the display. Press the control knob to confirm your selection.
- Optionally, customize the temperature and time. You can do this anytime during cooking.
a. Press TIME/TEMP once to control time. Turn the control knob to adjust the time between 30 min-24 hr.
b. Press TIME/TEMP again to control temperature. Turn the control knob to adjust the temperature between 105°–180°F / 41°–82°C.
-
Press START/PAUSE to begin dehydrating. The button will light up, and the display will show the timer counting down.
-
The oven will stop heating and beep when finished.
Ferment Function ("FERMENT")
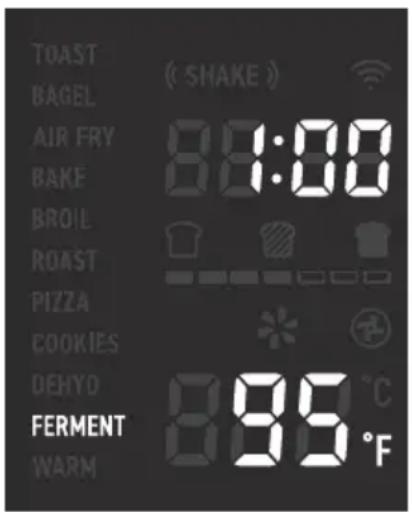
This function is designed to precisely hold low temperatures, providing an ideal environment for proofing bread, rolls, pizza, and dough.
Can also be used for making yogurt with an appropriate recipe (using 115^ F / 45^ C temperature and 12 hr time).
Heating Elements: Bottom heating elements cycle on and off.
Rack Position: Low
- Place dough in a heat-safe container. Cover and place on the food tray or wire rack. Insert into the low rack position and close the oven door.
- Turn the control knob to "FERMENT", which will blink on the display. Press the control knob to confirm your selection.
- Optionally, customize the temperature and time. You can do this anytime during cooking.
a. Press TIME/TEMP once to control time. Turn the control knob to adjust the time between 30 min–12 hr.
b. Press TIME/TEMP again to control temperature. Turn the control knob to adjust the temperature between 80^-110^ / 27^-43^ .
- Press START/PAUSE to begin fermentation. The button will light up, and the display will show the timer counting down.
- The oven will stop heating and beep when finished.
Warm Function ("WARM")
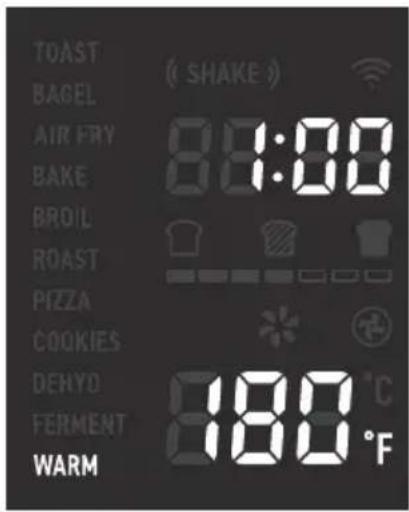
This function is designed to keep food warm. Maintains food at the recommended temperature to prevent bacterial growth (160°F / 71°C or above).
Heating Elements: Bottom heating elements cycle on and off.
Rack Position: Low
- Place hot food in a heat-safe container. Cover and place on the food tray or wire rack. Insert into the low rack position and close the oven door.
- Turn the control knob to "WARM", which will blink on the display. Press the control knob to confirm your selection.
- Optionally, customize the temperature and time. You can do this anytime during cooking.
a. Press TIME/TEMP once to control time. Turn the control knob to adjust the time between 1 min - 12 hr.
b. Press TIME/TEMP again to control temperature. Turn the control knob to adjust the temperature between 140^-230^ / 60^-110^ .
- Press START/PAUSE to begin warming. The button will blink, and the display will show the timer counting down.
- The oven will stop heating and beep when finished.
Shake Reminder
- The Shake Reminder is designed to remind you to check on your food, usually to shake it. Press SHAKE to turn on the Shake Reminder.
- You can use the Shake Reminder with any cooking function except Toast and Bagel. We especially recommend using the Shake Reminder with the Air Fry function (see page 17).
• The Shake Reminder will appear halfway through cooking time.
• If SHAKE is pressed during cooking, it will appear halfway through the remaining cooking time. - The Shake Reminder will alert you with several beeps, and "("SHAKE") blink on the display.
• The Shake Reminder will go away once you open the oven door to take out the basket.
What to Shake
- Small foods that are stacked, such as fries or nuggets, will usually need shaking.
- Without shaking, food may not be crispy or evenly cooked.
- You can flip other food, such as steak, to ensure even browning.
How to Shake
- Add the Shake Reminder to your cooking program by pressing SHAKE.
• We recommend using the fry basket if you are shaking food. You can optionally use the rack or tray instead. - When the Shake Reminder appears, take the fry basket out of the oven and shake, mix, or flip the food.
• To shake food, hold the basket just above a heat-resistant surface for safety purposes. Then, shake the basket. - If the basket is too heavy to shake, place the basket on a heat-resistant holder or surface. Then, shake the basket. Do not use this method if there is a risk of hot liquids splashing.
- If the basket is too heavy to shake and there are hot liquids present, place the basket on a heat-resistant holder or surface. Use tongs to mix or flip the food.
- When you open the oven door to take out the basket, the oven will pause cooking automatically. When you close the door, cooking will automatically resume.
- Avoid shaking longer than 30 seconds, as the oven may start to cool down.
Clean oven accessories (including trays, etc.) and oven interior after every use.
Note:
- The walls on the inside of the oven have a nonstick coating for easy cleaning.
- Do not use abrasive cleaners, metal scouring pads, or metal utensils on any part of the oven, including trays and other accessories. These will scratch or damage their surfaces.
-
This oven contains no user-serviceable parts. Any repairs should be performed by an authorized service representative.
-
Before cleaning, turn off and unplug the oven, and allow it to cool completely. Open the door for faster cooling.
-
Apply non-abrasive liquid cleanser or a mild spray solution to a soft, damp cloth or sponge (not the oven surface) and wipe all parts of the oven. Do not use a dry cloth on the display screen, or it may be scratched.
-
To clean the glass door, use a glass cleaner or mild detergent and a soft, damp sponge or soft, plastic scouring pad.
-
Let all surfaces dry completely before plugging in or turning on the oven.
Cleaning the Accessories
Note: After each use, slide out the crumb tray and discard crumbs.
-
Apply non-abrasive liquid cleanser or a mild spray solution to a soft, damp sponge or soft, plastic scouring pad (not the accessory surface). Wipe accessories and soak in warm, soapy water if necessary.
-
For stubborn grease:
a. In a small bowl, mix 2 US tbsp / 30 mL of baking soda with 1 US tbsp / 15 mL of water to form a spreadable paste.
b. Use a sponge to spread the paste on the accessories and scrub. Let the accessories sit for 15 minutes before rinsing.
c. Wash with soap and water.
-
Dry thoroughly.
-
Replace the crumb tray into the oven before plugging in or turning on the oven.
Storage
- Clean and dry the oven and all accessories.
- Insert the crumb tray into the oven. Insert the rack at mid position. Make sure the oven door is closed.
- Store the oven in an upright position. Do not store anything on top.
| Problem Possible Solution | |
| The oven will not turn on. Make sure the oven is plugged in. | |
| Food is not completely cooked. | Increase cooking temperature or time. |
| Food is overcooked or burned. | Decrease cooking temperature or time. |
| Make sure food items are not too large and are not touching the heating elements. | |
| Food is cooked unevenly. | Preheat the oven manually by using the Toast function set to Level 4. |
| Make sure food items are not too closely packed into a tray, rack, or other container. | |
| White smoke is coming out of the oven. | The oven may produce some white smoke when you use it for the first time. This is normal. To eliminate any residue from packing, see Test Run (page 10). |
| Excess oil or fatty foods may produce white smoke. Make sure the inside of the oven is cleaned properly and isn't greasy. | |
| Dark smoke is coming out of the oven. | Immediately press START/PAUSE and unplug your oven. Food is burning. Wait for smoke to clear before opening the oven door or pulling anything out. |
| Display shows Error Code “E” | There is an open circuit in the temperature monitor. Contact Customer Support (see page 33). |
| Display shows Error Code “E” | There is a short circuit in the temperature monitor. Contact Customer Support (see page 33). |
| Display shows Error Code “E” | The oven has been plugged into an incorrect power source, such as a 220–240V outlet. Unplug the oven. Only use the oven with 120V, 60Hz outlets, such as those in the US and Canada. |
If your problem is not listed, please contact Customer Support (see page 33).
Why isn't my oven connecting to the VeSync app?
- During the setup process, you must be on a secure 2.4 GHz WiFi ^ network. Confirm that the network is working correctly.
- Make sure the WiFi password you entered is correct.
- Turn on Bluetooth ^ on your phone (for Android users, make sure Location is turned on as well).
- Make sure your oven and phone are within 30 ft / 10 m of each other.
- Reset the oven by pressing and holding for 15 seconds, then try connecting again.
My oven is offline.
- Make sure the oven is plugged in. The oven may appear to be offline if it is unplugged, or if the outlet does not have power.
- Refresh the VeSync menu by swiping down on the screen.
- Make sure your router is connected to the internet and your phone's network connection is working.
- Delete the oven from the VeSync app. Swipe left (iOS ^ ) or tap and hold (Android), and tap Delete. Then reconfigure your oven with the VeSync app.
Note: Power outages, internet outages, or changing WiFi routers may cause your oven to go offline.
If your problem is not listed, please contact Customer Support (see page 33).
ATTRIBUTIONS
Apple App Store is a trademark of Apple Inc.
Google, Android and Google Play are trademarks of Google LLC.
Wi-Fi ^® is a registered trademark of Wi-Fi Alliance ^® .
Amazon, Alexa and all related logos are trademarks of Amazon.com, Inc. or its affiliates.
iOS is a registered trademark of Cisco Systems, Inc. and/or its affiliates in the United States and certain other countries.
The Bluetooth ^® word mark and logos are registered trademarks owned by Bluetooth SIG, Inc. and any use of such marks by Arovast Corporation is under license.
This device complies with Part 15 of the FCC Rules. Operation is subject to the following two conditions:
- This device may not cause harmful interference, and
- This device must accept any interference received, including interference that may cause undesired operation.
Any changes or modifications not expressly approved by the party responsible for compliance could void the user's authority to operate this equipment.
This equipment has been tested and found to comply with the limits for a Class B digital device, pursuant to Part 15 of the FCC Rules. These limits are designed to provide reasonable protection against harmful interference in a residential installation. This equipment generates, uses and can radiate radio frequency energy and, if not installed and used in accordance with the instructions, may cause harmful interference to radio communications. However, there is no guarantee that interference will not occur in a particular installation. If this equipment does cause harmful interference to radio or television reception, which can be determined by turning the equipment off and on, the user is encouraged to try to correct the interference by one of the following measures:
- Reorient or relocate the receiving antenna.
- Connect the equipment into an outlet on a circuit different from that to which the receiver is connected.
- Increase the separation between the equipment and receiver.
- Consult the dealer or an experienced radio/TV technician for help.
FCC RADIATION EXPOSURE STATEMENT
This equipment complies with FCC radiation exposure limits set forth for an uncontrolled environment. End users must follow the specific operating instructions for satisfying RF exposure compliance. To maintain compliance with FCC RF exposure compliance requirements, please follow operation instructions as documented in this manual. This transmitter must not be co-located or operating in conjunction with any other antenna or transmitter. This equipment should be installed and operated with a minimum distance of 20 cm between the radiator and your body. The availability of some specific channels and/or operational frequency bands are country dependent and are firmware programmed at the factory to match the intended destination. The firmware setting is not accessible by the end user.
| Product Smart Air Fryer Toaster Oven | |
| Model CS125-AO | |
| For your own reference, we strongly recommend that you record your order ID and date of purchase. | |
| Order ID | |
| Date of Purchase | |
TERMS & POLICY
Arovast Corporation ("Arovast") warrants this product to the original purchaser to be free from defects in material and workmanship, under normal use and conditions, for a period of 1 year from the date of original purchase.
Arovast agrees, at our option during the warranty period, to repair any defect in material or workmanship or furnish an equal product in exchange without charge, subject to verification of the defect or malfunction and proof of the date of purchase.
There is no other express warranty. This warranty does not apply:
- If the product has been modified from its original condition;
- If the product has not been used in accordance with directions and instructions in the user manual;
- To damages or defects caused by accident, abuse, misuse or improper or inadequate maintenance;
-
To damages or defects caused by service or repair of the product performed by an unauthorized service provider or by anyone other than Arovast;
-
To damages or defects occurring during commercial use, rental use, or any use for which the product is not intended;
- To damages or defects exceeding the cost of the product.
Arovast will not be liable for indirect, incidental, or consequential damages in connection with the use of the product covered by this warranty.
This warranty extends only to the original consumer purchaser of the product and is not transferable to any subsequent owner of the product regardless of whether the product is transferred during the specified term of the warranty.
This warranty does not extend to products purchased from unauthorized sellers. Arovast's warranty extends only to products purchased from authorized sellers that are subject to Arovast's quality controls and have agreed to follow its quality controls.
All implied warranties are limited to the period of this limited warranty.
This warranty gives you specific legal rights and you may also have other rights which vary from state to state. Some states do not allow the exclusion or limitation of incidental or consequential damages, so the above limitation or exclusion may not apply to you.
If you discover that your product is defective within the specified warranty period, please contact Customer Support via support@cosori.com. DO NOT dispose of your product before contacting us. Once our Customer Support Team has approved your request, please return the product with a copy of the invoice and order ID.
Extend Your Warranty by 1 Year
Register your product within 14 days of purchase at www.cosori.com/warranty to extend your 1-year warranty by an additional year.
This warranty is made by:
Arovast Corporation 1202 N. Miller St. Suite A Anaheim, CA 92806
If you have any questions or concerns about your new product, please contact our helpful Customer Support Team.
Arovast Corporation
1202 N. Miller St., Suite A
Anaheim, CA 92806
Support Hours
Mon–Fri, 9:00 am–5:00 pm PST/PDT
Email: support@cosori.com
Toll-Free: (888) 402-1684
*Please have your invoice and order ID ready before contacting Customer Support.
NOTES
SHOW US WHAT YOU'RE MAKING
We hope this manual has been helpful. We can't wait to see your beautiful results, and we think you'll want to share glam shots! Our community awaits your uploads—just pick your platform of choice below. Snap, tag, and hashtag away, Cosori chef!
Considering what to cook? Many recipe ideas are available, both from us and the Cosori community.
iCookCosori


@cosoricooks

Cosori Appliances
MORE COSORI PRODUCTS
If you're happy with this smart air fryer toaster oven, the line doesn't stop here. Check out www.cosori.com for a line of all our beautiful and thoughtfully designed cookware. They might be right at home in your kitchen, too!
COSORI®
Questions or Concerns?
support@cosori.com | (888) 402-1684
Mon–Fri, 9:00 am–5:00 pm PST/PDT
- Thank you for your purchase!
- CONTACT OUR CHEFS
- Table of Contents
- Package Contents
- Specifications
- READ AND SAVE THESE INSTRUCTIONS
- IMPORTANT SAFEGUARDS
- Key Safety Points
- General Safety
- While Cooking
- Plug & Cord
- Electromagnetic Fields (EMF)
- GETTING TO KNOW YOUR SMART AIR FRYER TOASTER OVEN
- Control Knob
- Power Button
- Fan/Light Button
- SHAKE Button
- TIME/TEMP Button
- Time Increment Chart
- START/PAUSE Button
- Note:
- Setting Up
- Test Run
- VeSync App Setup
- COOKING WITH YOUR SMART AIR FRYER TOASTER OVEN
- Caution:
- Cooking Functions
- Customizing Cooking Functions
- Convection Fan
- Remote Control
- Cooking Function Customization
- In-App Recipes
- Third-Party Voice Control
- Automatic PreheatVeSync App Fun
- Toast Function ("TOAST")
- Bagel Function ("BAGEL")
- Air Fry Function ("AIRFRY")
- Bake Function ("BAKE")
- Broil Function ("BROIL")
- Roast Function ("ROAST")
- Pizza Function ("PIZZA")
- Cookies Function ("COOKIES")
- Dehydrate Function ("DEHYD")
- Ferment Function ("FERMENT")
- Warm Function ("WARM")
- Shake Reminder
- What to Shake
- How to Shake
- Cleaning the Accessories
- Storage
- Why isn't my oven connecting to the VeSync app?
- My oven is offline.
- ATTRIBUTIONS
- FCC RADIATION EXPOSURE STATEMENT
- TERMS & POLICY
- There is no other express warranty. This warranty does not apply:
- Extend Your Warranty by 1 Year
- Arovast Corporation
- Support Hours
- NOTES
- SHOW US WHAT YOU'RE MAKING
- iCookCosori
- MORE COSORI PRODUCTS
- COSORI®
Brand : Cosori
Model : CS125-AO
Category : Oven