Digital Air Fry Toaster Oven - Oven Beautiful - Free user manual and instructions
Find the device manual for free Digital Air Fry Toaster Oven Beautiful in PDF.


| Product Type | Digital Air Fry Toaster Oven |
| Brand | Beautiful |
| Model | Digital Air Fry Toaster Oven |
| Capacity | Up to 4 lb chicken or 5 lb roast; fits 12-inch pizza |
| Heating Technology | Infrared Quartz with 6 heating elements; 80% faster preheat |
| Preset Functions | 10: Air Fry, Broil, Bake, Toast, Bagel, Pizza, Cookies, Slow Cook, Reheat, Dehydrate |
| Control Type | Touch-activated display control panel with digital time/temp display |
| Convection Fan | Adjustable 3-speed convection fan |
| Temperature Range | 80°F to 450°F (varies by function) |
| Timer Range | 1 minute to 72 hours (varies by function) |
| Display | Digital TIME/TEMP display, hidden when not in use |
| Auto Shut-Off | Yes, automatically turns off when timer expires |
| Voltage | 120V AC, 60Hz |
| Wattage | 1500W (estimated) |
| Plug Type | Polarized plug |
| Accessories Included | Wire rack, air fryer/dehydrator basket, bake/broil pan, crumb tray |
| Cleaning | Dishwasher-safe accessories; wipe exterior with damp cloth; no abrasive cleaners |
| Safety Features | Auto shut-off, polarized plug, caution hot surfaces |
| Warranty | Limited Two-Year Warranty |
| Dimensions (Estimated) | Approx. 18.5 x 14.5 x 13 inches |
Frequently Asked Questions - Digital Air Fry Toaster Oven Beautiful
User questions about Digital Air Fry Toaster Oven Beautiful
0 question about this device. Answer the ones you know or ask your own.
Ask a new question about this device
Download the instructions for your Oven in PDF format for free! Find your manual Digital Air Fry Toaster Oven - Beautiful and take your electronic device back in hand. On this page are published all the documents necessary for the use of your device. Digital Air Fry Toaster Oven by Beautiful.
USER MANUAL Digital Air Fry Toaster Oven Beautiful
Digital Air Fry Toaster Oven
with Infrared Technology
The kitchen is my family's happy place. It's where we cook and eat and bake and laugh and share our most beautiful moments together. That's what inspired the creation of Beautiful, my new collection of easy-to-use kitchenware that you'll want to keep out on your kitchen counter. So whether your kitchen has flour all over the place from a kid's baking session or you're throwing an adult dinner party, I hope every step will be simple, delicious and beautiful!
- Drie J ♥
www.cookwithbeautiful.com
Table of Contents
Section 1: Safety
Important Safeguards 4-6
Additional Important Safeguards 7-8
Notes on the Plug 9
Notes on the Cord 9
Plasticizer Warning 10
Electric Power 10
Section 2: Instructions
Getting to Know Your Digital Air Fryer Toaster Oven....12
Infrared Heating....13
Touch-Activated Display Control Panel 13-17
Shelf Positions 17
Weight/Size Restrictions 18
Cooking Containers.... 18
Before Using for the First Time....19
Operation.... 20-21
Preset Times & Temps....22
Convection Fan Control....23
Pizza, Toast/Bagel, Air Fry 23
Convection Broil / Broil 24
Air Fry / Convection Broil Cooking Chart 24-27
USDA Cooking Guidelines:
Pizza, Toast/Bagel 28-29
Bake, Broil, Cookies, Slow Cook, Reheat, Dehydrate ..... 29-30
Figures 31
Beautiful Function Hints 31-33
User Maintenance Instructions 33
Care & Cleaning Instructions 33-34
Storing Instructions 34
Warranty 35-36
Índice
When using electrical appliances, basic safety precautions should always be followed including the following:
- READ ALL INSTRUCTIONS.
- Do not touch hot surfaces. Use handles or knobs.
- To protect against electrical shock do not immerse cord, plugs, or appliance in water or other liquid.
- This appliance is not intended for use by persons (including children) with reduced physical, sensory or mental capabilities, or lack of experience and knowledge, unless they have been given supervision or instruction concerning use of the appliance by a person responsible for their safety.
- Children should be supervised to ensure that they do not play with the appliance.
- Unplug from outlet when not in use and before cleaning. Allow Toaster Oven to cool before putting on or taking off parts.
- Do not operate any appliance with a damaged cord or plug, or after the appliance malfunctions, or has been damaged in any manner. Contact Consumer Service.
NOTE: DO NOT ATTEMPT TO REPAIR THE UNIT YOURSELF. THIS WILL VOID THE WARRANTY.
-
The use of accessory attachments not recommended by the appliance manufacturer may cause injuries.
-
Do not use outdoors.
- Do not let cord hang over edge of table or counter, or touch hot surfaces.
- Do not place on or near a hot gas or electric burner, or in a heated oven.
- Extreme caution must be used when moving an appliance containing hot oil or other liquids.
- To disconnect, press ⏻ or any illuminated FUNCTION button to turn the Toaster Oven OFF.
- Remove the plug from the wall outlet.
- Do not use appliance for other than intended use.
- Oversize foods or metal utensils must not be inserted in the Toaster Oven as they may create a fire or risk of electric shock.
- A fire may occur if the Toaster Oven is covered or touching flammable material, including curtains, draperies, walls, and the like, when in operation. Do not store any item on top of the appliance when in operation.
- Do not clean with metal scouring pads. Pieces can break off the pad and touch electrical parts involving a risk of electrical shock.
- Extreme caution should be exercised when using containers constructed of other than metal or glass.
-
Do not store any materials, other than manufacturer's recommended accessories, in this Toaster Oven when not in use.
-
Do not place any of the following materials in the Toaster Oven: paper, cardboard, plastic, and the like.
- Do not cover crumb tray or any part of the Toaster Oven with metal foil. This will cause overheating of the Toaster Oven.
- Use extreme caution when removing the crumb tray or disposing of hot grease.
- Do not cover the Toaster Oven with anything that would prevent steam from escaping. This may cause warping, discoloration, malfunction or even fire.
SAVE THESE INSTRUCTIONS
ADDITIONAL IMPORTANT SAFEGUARDS
CAUTION HOT SURFACES: This appliance generates heat and escaping steam during use. Proper precautions must be taken to prevent the risk of burns, fires, or other injury to persons or damage to property.
- A person who has not read and understood all operating and safety instructions is not qualified to operate this appliance. All users of this appliance must read and understand this instruction manual before operating or cleaning this appliance.
- If this appliance falls or accidentally becomes immersed in water, unplug it from the wall outlet immediately. Do not reach into the water!
- When using this appliance, provide adequate air space above and on all sides for air circulation. Do not operate this appliance while it is touching or near curtains, wall coverings, clothing, dishtowels or other flammable materials.
-
To reduce the risk of fire, do not leave this appliance unattended during use.
-
If this appliance begins to malfunction during use, press ⏻ or any illuminated FUNCTION button. Remove the plug from the wall outlet. Do not use or attempt to repair a malfunctioning appliance! Contact Consumer Service
- The cord to this appliance should only be plugged into a 120V AC electrical wall outlet.
- Do not use this appliance in an unstable position.
- To reduce the risk of burns or other injuries, do not touch hot surfaces. Use of protective oven mitts or gloves as well as long-handled utensils is recommended.
- To reduce the risk of injury to persons or property, unplug this appliance before inserting food. Always keep the appliance unplugged from the wall outlet when not in use.
CAUTION: Never leave the Toaster Oven unattended while in use.
NOTES ON THE PLUG
This appliance has a polarized plug (one blade is wider than the other). To reduce the risk of electric shock, this plug will fit in a polarized outlet only one way. If the plug does not fit fully into the outlet, reverse the plug. If it still does not fit, contact a qualified electrician. Do not modify the plug in any way.
NOTES ON THE CORD
a) A short power-supply cord (or detachable power-supply cord) is to be provided to reduce risks resulting from becoming entangled in or tripping over a longer cord.
b) Longer detachable power-supply cords or extension cords are available and may be used if care is exercised in their use.
c) If a long detachable power-supply cord or extension cord is used:
1) The marked electrical rating of the detachable power-supply cord or extension cord should be at least as great as the electrical rating of the appliance;
2) If the appliance is of the grounded type, the extension cord should be a grounding-type 3-wire cord; and
3) The longer cord should be arranged so that it will not drape over the counter top or table top where it can be pulled on by children or tripped over.
PLASTICIZER WARNING
CAUTION: To prevent Plasticizers from migrating to the finish of the counter top or table top or other furniture, place NON-PLASTIC coasters or place mats between the appliance and the finish of the counter top or table top. Failure to do so may cause the finish to darken; permanent blemishes may occur, or stains can appear.
ELECTRIC POWER
If the electrical circuit is overloaded with other appliances, your appliance may not operate properly. It should be operated on a separate electrical circuit from other appliances.
Section 2
Instructions
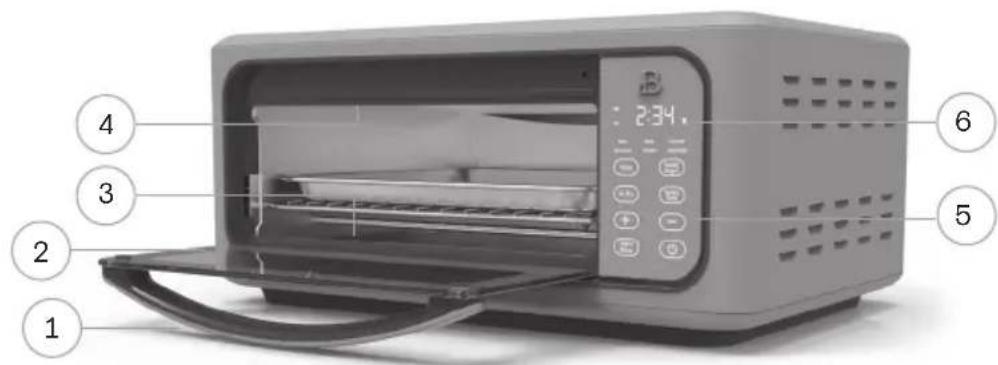
Getting To Know Your Digital Air Fryer Toaster Oven
Product may vary slightly from illustration
-
Door Handle
-
Digital TIME/TEMP Display
-
Glass Door
-
Crumb Tray (not shown)
-
Lower Heating Elements
-
Convection Fan (not shown)
-
Upper Heating Elements
-
Polarized Plug (not shown)
-
Touch-Activated Display Control Panel
Accessories
- Wire Rack
- Air Fryer/Dehydrator Basket
- Bake/Broil Pan
- Crumb Tray

Infrared Heating
6 heating elements with Infrared Quartz technology resulting in a 80% faster preheat time compared to a traditional convectional oven
Touch-Activated Display Control Panel
A screen that only shows up when you need it.
The ⏻ button and any FUNCTION will illuminate when active and vanish when not in use. Besides 10 preset functions with precision TIME / TEMP control, this Beautiful Digital Air Fryer Toaster Oven offers an adjustable-speed convection fan. No need to hover in the kitchen. When TIME expires, the Toaster Oven turns OFF automatically.
- Power Icon
- Digital TIME/TEMP Display
- PIZZA Button
- TOAST/BAGEL Button
- AIR FRY Button
- TIME/TEMP Button
- +/- Selector Buttons
- START/MENU Button
- BAKE
- BROIL
- COOKIES
- SLOW COOK
- REHEAT
- DEHYDRATE

[Non-Text]
- When the Toaster Oven is plugged in, a tone will sound, the control panel will illuminate for 1 second. The ⏻ button will illuminate and then pulse slowly on and off. 12:00 will be displayed. Press TEMP/TIME button and “12” will begin to flash. Use the +, - to adjust hours. Press TEMP/TIME button, “00” minutes will flash. Use the +, - to adjust minutes.
- When ⏻ is pressed, a tone will sound, and the control panel will illuminate and remain active for 3 minutes.
- Press the ⏻ to STOP any operation.
Pizza
- When PIZZA is pressed, a tone will sound. 350 °F and 20 minutes will alternate every 5 seconds on display.
- Press TEMP/TIME, then press (+) to increase or (-) to decrease PIZZA TIME in 1 minute increments.
- Press TEMP/TIME, then press (+) to increase or (-) to reduce PIZZA TEMP in 5 degree increments.
- Press START/MENU to begin operation.
- Press ⏻ to stop PIZZA and return to standby mode.
Toast/ Bagel
- When TOAST/BAGEL is pressed, a tone will sound and TOAST L4 (MEDIUM) toast shade will be displayed.
- Press and hold the TOAST/BAGEL button to change to BAGEL L4 (MEDIUM) toast shade.
- In either TOAST or BAGEL mode, press (+) to increase or (-) to decrease toast shade from L1 LIGHT to L7 DARK.
- Press START/MENU to begin operation.
- Press ⏻ to stop TOAST/BAGEL and return to standby mode.
Air Fry
- When AIR FRY is pressed, a tone will sound. 400 °F TEMP and 25 minutes TIME will alternate every 5 seconds on the display.
- Press TEMP/TIME, then press (+) to increase or (-) to decrease AIR FRY TIME in 1 minute increments.
- Press TEMP/TIME, then press (+) to increase or (-) to reduce AIR FRY TEMP in 5 degree increments.
- Press and hold Temp/Time to adjust fan speed.
- Press START/MENU to begin operation.
- Press ⏻ to stop AIR FRY and return to standby mode.
Bake
- Press START/MENU button
- When BAKE is selected, 350 °F TEMP and 30 minutes TIME will alternate every 5 seconds on the display.
- Press TEMP/TIME, then press (+) to increase or (-) to decrease BAKE TIME in 1 minute increments.
- Press TEMP/TIME, then press (+) to increase or (-) to reduce BAKE TEMP in 5 degree increments.
- Press and hold TEMP/TIME to adjust fan speed.
- Press START/MENU to begin operation.
- Press ⏻ to stop BAKE and return to standby mode.
Broil
- Press START/MENU button, use +/- to select BROIL setting.
- When BROIL is pressed, a tone will sound. 450 °F and 30 minutes will alternate every 5 seconds on display.
- Press TEMP/TIME, then press (+) to increase or (-) to decrease BROIL TIME in 1 minute increments.
- Press and hold TEMP/TIME to adjust fan speed.
- Press START/MENU to begin operation.
- Press ⏻ to stop BROIL and return to standby mode.
Cookies
- Press the START/MENU button a tone will sound. Press +, - until COOKIES is illuminated. 350 °F and 11 minutes will alternate every 5 seconds on display.
- Press TEMP/TIME, then press (+) to increase or (-) to decrease COOKIES TIME in 1 minute increments.
- Press TEMP/TIME, then press (+) to increase or (-) to reduce COOKIES TEMP in 5 degree increments.
- Press START/MENU to begin operation.
- Press ⏻ to stop COOKIES and return to standby mode.
Slow Cook
- Press the START/MENU button a tone will sound. Press +, - until SLOW COOK is illuminated. HI and 4 hours will alternate every 5 seconds on display.
- Press TEMP/TIME, then press (+) to increase or (-) to decrease SLOW COOK TIME in 30 minute increments.
- Press TEMP/TIME, then press (-) to reduce to low setting.
- Press and hold TEMP/TIME buttons to adjust fan speed.
- Press START/MENU to begin operation.
- Press ⏻ to stop SLOW COOK and return to standby mode.
Reheat
- Press the START/MENU button a tone will sound. Press +, - until REHEAT is illuminated. 350 °F and 15 minutes will alternate every 5 seconds on display.
- Press TEMP/TIME, then press (+) to increase or (-) to decrease REHEAT TIME in 1 minute increments.
- Press TEMP/TIME, then press (+) to increase or (-) to reduce REHEAT TEMP in 5 degree increments.
- Press START/MENU to begin operation.
- Press ⏻ to stop REHEAT and return to standby mode.
Dehydrate
- Press the START/MENU a tone will sound. Press +, - until DEHYDRATE is illuminated. 120 °F and 8 hours will alternate every 5 seconds on display.
- Press TEMP/TIME, then press (+) to increase or (-) to decrease DEHYDRATE TIME in 30 minute increments.
- Press TEMP/TIME, then press (+) to increase or (-) to reduce DEHYDRATE TEMP in 5 degree increments.
- Press START/MENU to begin operation.
- Press ⏻ to stop DEHYDRATE and return to standby mode.
Shelf Positions
NOTE: Certain foods may require different shelf positions depending on the recipe, size, amount of food to be cooked and personal taste. Use the following information as a guide only.
- There are 2 height positions that the air fryer/dehydrator basket, wire rack or the bake/broil pan may be inserted.
- Use the upper shelf position for BROIL, AIR FRY, TOAST, BAGEL, COOKIES, DEHYDRATE.
- Use the lower shelf position for BAKE, ROAST, REHEAT and PIZZA.
WARNING: Never set the bake/broil pan directly onto the lower heating elements.
Weight/Size Restrictions
- This Toaster Oven can cook up to a 4 lbs. chicken or turkey and up to a 5 lbs. roast.
- We suggest that you periodically check cooking progress with a meat thermometer.
Cooking Containers
- Both the air fryer/dehydrator basket and the bake/broil pan included with the Toaster Oven are suitable for cooking items such as cookies, rolls, biscuits, nachos and hot appetizers.
- A variety of standard baking dishes, such as an 8" x 12" casserole, any 8" or 9" round or square cake pan, a 12-cup muffin pan, 1 and 2 quart round, square, or rectangular casserole dishes may be used for cooking many different foods.
- Choose bakeware made of either metal or glass/ceramic without lids.
- Dark or dull pans absorb heat faster; foods will bake more rapidly, and crust will brown more easily than in shiny bake pans.
- Check package directions on the container or contact the ovenware manufacturer to determine the container's suitability for use in a Toaster Oven.
- Do not use oven roasting bags in this Toaster Oven, as they may come in contact with the heating elements.
CAUTION: Do not use glass covers on baking pans. If using a glass or glass-ceramic baking container, make sure it is at least 1 inch away from the upper heating element.
Before Using for the First Time
CAUTION: To protect against electric shock, do not immerse the Toaster Oven or allow cord to come into contact with water or other liquids.
- Carefully unpack the Toaster Oven and accessories. Remove all packaging materials from the inside of the Toaster Oven. Remove any labels from the outer surfaces.
- Place your Toaster Oven on a level surface such as a countertop or table. Be sure the sides, back, and top of the Toaster Oven are at least 4 inches away from any walls, cabinets, or objects on the counter or table.
- To avoid scratching, marring, or discoloration, do not store anything on top of the Toaster Oven during operation.
- Wash the air fryer/dehydrator basket, bake/broil pan, wire rack, and crumb tray in warm, soapy water. Rinse and dry thoroughly before placing in the Toaster Oven.
- Do not use abrasive cleaners.
- To ensure that the Toaster Oven is free from oils used in manufacturing, it is necessary to operate the unit once, empty.
- Make sure the crumb tray is in place in the bottom of the Toaster Oven.
- Following the detailed OPERATION instructions, empty Toaster Oven and BAKE for 30 minutes to prepare Toaster Oven for use.
Operation
NOTE: To turn the audible tones OFF, press and hold + & -. The ✕ SOUND OFF icon is displayed next to the TIME on the control panel. Press both buttons again to turn the sound on.
CAUTION: NEVER use plastic containers in the Toaster Oven.
CAUTION: Do not to place anything on top of the Toaster Oven.
- When the Toaster Oven is plugged in, a tone will sound, the ⏻ button will illuminate and then pulse slowly on and off.
- Open the glass door.
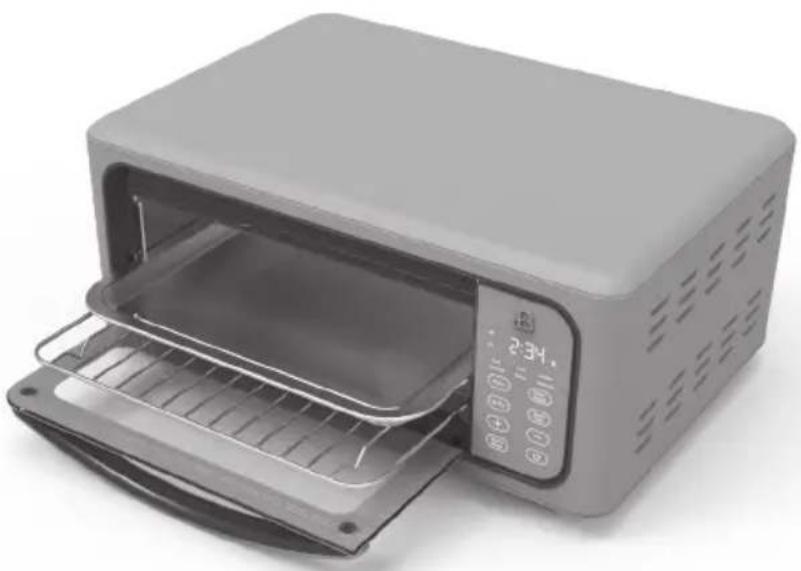
- Before use, always make sure the crumb tray is in place in the bottom of the Toaster Oven. Always use the bake/broil pan assembly to decrease spattering. (Figure 1.)
- Slide the wire rack onto the desired shelf position. Add food. Close the glass door.
- Press the pulsing ⏻. A tone will sound as the control panel illuminates and remains active for 3 minutes.
- Press any FUNCTION button: AIR FRY, PIZZA, or TOAST/BAGEL to activate.
- To access COOKIES, SLOW COOK, REHEAT, DEHYDRATE, BAKE and BROIL FUNCTIONS, Press the START/MENU button a tone will sound. Press +, - until the desired FUNCTION is illuminated.
- To change any default FUNCTION settings, press TEMP/TIME button; then press +, - until the desired TIME and TEMP are displayed.
- Press START/MENU to begin operation. The default TIME and TEMP will alternate on the digital display. TIME will begin to count down.
- When the remaining TIME reaches 0:00, 2 tones will sound and the Digital Air Fryer Toaster Oven will automatically turn OFF.
CAUTION: Do not touch the hot Toaster Oven or any part of the hot Toaster Oven without wearing oven mitts.
- Open the glass door. Use a meat thermometer if necessary to check for doneness. Extend cook TIME if needed.
WARNING: DO NOT LEAVE THE TOASTER OVEN UNATTENDED WHILE USING AIR FRY, BROIL, or TOAST.
- Unplug when not in use and allow the Toaster Oven to cool completely before cleaning.
Preset Times and Temps
| FAN FUNCTION | TEMP TIME CONVECTION FAN | SPEED | |||||||
| Default | Min Max | Default | TIME | Min TIME | Max TIME | Default | Min Max | ||
| * Air fry | 400 °F 20 | 0 °F 450 | °F 25 m | ins 1 min | 1 hour | 3 High 1 | Low 3 | High | |
| * Broil | 450 °F | 30 mins | 1 min | 1 hour | 3 High | OFF | 3 High | ||
| * Bake | 350 °F | 170 °F | 450 °F | 30 mins | 1 min | 2 hrs | OFF | OFF | 3 High |
| Reheat | 350 °F 170 °F 450 °F 15 mins 1 min 1 hour | ||||||||
| Slow Cook | HIGH | Low | High | 4 hrs | 2 hrs | 12 hrs | 3 High | OFF | 3 High |
| Slow Cook | LOW | 6 hrs | 4 hrs | 72 hrs | 3 High | OFF | 3 High | ||
| Toast | L4 | L4 Medium | L1 Light | L7 Dark | |||||
| Bagel | L4 | L4 Medium | L1 Light | L7 Dark | |||||
| Cookies | 350 °F 170 °F 450 °F 11 mins 1 min 1 hr | ||||||||
| Pizza | 350 °F 350 °F 450 °F 20 mins 1 min 1 hr | ||||||||
| Dehydrate | 120 °F | 80 °F | 180 °F | 8 hrs | 1 min | 72 hrs | 3 High | ||
Convection Fan Control
- AIR FRY, BROIL, SLOW COOK and BAKE FUNCTIONS feature a variable 3-speed convection fan.
- To select or change the convection fan speed, press and hold TEMP/TIME for 3 seconds. A tone will sound and FAN SPEED 1, 2, or 3 will appear in the display.
- Press (+) to increase or (-) to decrease SPEED as needed. See Preset TIMES & TEMPS for 3-fan speeds.
Pizza, Toast/Bagel, Air Fry
AIR FRY
NOTE: AIR FRY defaults to Convection Fan Speed 3 HIGH which may be lowered when air frying delicate foods such as fish or some fruits/vegetables.
NOTE: The Convection Fan cannot be turned OFF during AIR FRY.
- ALWAYS use the mesh Air Fryer/Dehydrator Basket when AIR FRYING.
- Intense heat and maximum fan power ensure browned and crispy results with a minimum or no oil.
IMPORTANT! When air frying fatty foods (such as chicken wings or pork ribs), use the roasting pan instead of the air fry/dehydrator basket to prevent oil from dripping onto the heating elements. Discard excess oil as necessary.
NOTE: Always turn food halfway through AIR FRY time. To speed up browning, brush lean cuts of meat, chicken and fish with oil or melted butter.
-
When cooking is finished, always wear protective oven mitts to pull the wire rack out from the Toaster Oven. Be careful when removing foods from the back of the wire rack. The inside of the Toaster Oven is very hot. Close glass door.
-
As a general rule, depending on the food and amount to be cooked, recipe or packaged foods, suggested cook TIMES may have to be reduced slightly. Always check food halfway through cook time to determine final cook TIME and TEMP.
-
Always check cooking progress after TIME has expired.
Convection Broil / Broil
NOTE: BROIL defaults to Convection Fan Speed 3 HIGH. When browning cheeses, breadcrumbs, or sugary marshmallows, use the convection fan control to turn fan OFF if convection BROIL is not needed.
- BROIL tender cuts of meats or marinated meats, chops, poultry or fish, fruits and vegetables. Use the bake pan so that juices and/or fat will drip into the pan to decrease spattering while broiling.
WARNING: NEVER place aluminum foil on top of the bake/broil pan. This traps grease and can cause a fire.
- BROIL TIME is determined by the desired doneness and the distance between the food and the element.
IMPORTANT: Turn and check food halfway through BROIL time.
Air Fry / Convection Broil Cooking Chart
Times are estimated and based on average sizes and weights.
ALWAYS USE A MEAT THERMOMETER TO ENSURE THAT MEAT, POULTRY AND FISH ARE COOKED THOROUGHLY BEFORE SERVING.
NOTE: Frying smaller batches will result in shorter cooking times and higher food quality. Adjust air frying TEMP and TIME as necessary to suit your taste.
NOTE: Unless food is pre-packaged and pre-oiled, for browned and crispy results, all foods should be lightly oiled before air frying.
Vegetables
| FOOD TEMP AIR FRY/BROIL Time | ||
| Asparagus 400 °F 5 - 7 minutes | ||
| Broccoli Florets (roasted) 400 °F 6 - 10 minutes | ||
| Brussels Sprouts 380 °F 12 - 15 minutes | ||
| Cauliflower Florets (roasted) 400 °F 6 - 10 minutes | ||
| Corn on the Cob 390 °F 6 - 8 minutes | ||
| Eggplant, 1-1/2-inch cubes (roasted) 400 °F 15 minutes | ||
| Fennel, fresh, chopped 380 °F 10 - 13 minutes | ||
| French Fries, (fresh, soaked, 1/4 to 1/3-in. thick) | 400 °F 16 - 20 minutes | |
| Mushrooms, sliced 400 °F 5 minutes | ||
| Peppers, bell, 1-inch chunks 380 °F 10 minutes | ||
| Peppers, jalapeno, poblano (roasted) 380 °F 10 minutes | ||
| Potatoes, 1-inch cubes 400 °F 12 - 14 minutes | ||
| Potatoes, whole 400 °F 40 minutes | ||
| Root Vegetables, 1/2-in. chunks (roasted) 400 °F 15 - 20 minutes | ||
| Sweet Potatoes, whole 380 °F 30 - 35 minutes | ||
| Zucchini, 1/4-inch discs 400 °F 12 - 17 minutes |
Beef
| FOOD TEMP AIR FRY/BROIL Time | |
| Hamburgers, 1/4 lb. (up to 4) 360 °F 12 - 16 minutes | |
| Hot Dogs /Sausages 360 °F 10 - 15 minutes | |
| Meatloaf, 1 lb. 360 °F 35 - 40 minutes | |
| Steak 360 °F 8 - 12 minutes | |
| Beef Tenderloin, 1 lb., rare 360 °F 16 minutes | |
| Beef Tenderloin, 1 lb., medium 360 °F 18 minutes |
Chicken
| FOOD TEMP AIR FRY/BROIL Time | ||
| Chicken Breast, boneless, skinless 360 °F 10 | - 15 minutes | |
| Chicken Pieces 360 °F 20 - 30 minutes | ||
| Chicken Tenders/Fingers, battered 360 °F 13 | - 15 minutes | |
| Chicken Wings 360 °F 20 minutes |
Pork and Lamb
| FOOD TEMP AIR FRY/BROIL Time | ||
| Bacon, thick cut 400 °F 8 - 10 minutes | ||
| Ham, precooked, boneless, 3 lb. 300 °F 1 hour | ||
| Lamb Loin Chops, 1-inch thick 400 °F 8 - 12 minutes | ||
| Pork Chops, 1-inch thick | 380 °F 10 - 14 minutes |
Fish and Seafood
| FOOD TEMP AIR FRY/BROIL Time | ||
| Catfish Fingers (thawed, battered) 400 °F 10 - Shrimp (thawed, battered) 320 °F 12 minutes | 15 minutes | |
| Shrimp (thawed, sauced) 320 °F 5 - 8 minutes |
Frozen Foods
| FOOD TEMP AIR FRY/BROIL Time | ||
| Cheese Sticks (frozen) 350 °F 6 - 9 minutes | ||
| Chicken Nuggets (frozen) 360 °F 10 - 15 minutes | ||
| Fish Sticks (frozen) 400 °F 12 - 18 minutes | ||
| French Fries, thick (frozen) 4 cups 400 °F 17 - 21 minutes | ||
| French Fries, thin (frozen) 4 cups 400 °F 15 - 17 minutes | ||
| Meatballs, 1-inch 380 °F 7 - 9 minutes | ||
| Onion Rings (frozen) 360 °F 12 - 16 minutes | ||
| Pizza, frozen, 7-in. x 8-in. 360 °F 12 - 15 minutes |
Desserts
| FOOD TEMP AIR FRY/BROIL Time | ||
| Apple Turnovers 400 °F 10 minutes | ||
| Cake 350 °F 25 minutes |
USDA Cooking Guidelines
The USDA recommends that meats such as beef and lamb, etc. should be cooked to an internal temperature of 145 °F/63 °C. Pork should be cooked to an internal temperature of 160 °F/71 °C and poultry products should be cooked to an internal temperature of 170 °F/77 °C - 180 °F/82 °C to be sure any harmful bacteria has been killed. When reheating meat/poultry products, they should also be cooked to an internal temperature of 165 °F/74 °C.
Pizza
- This Toaster Oven accommodates any 12-inch (or smaller) fresh or frozen pizza.
- When cooking prepared pizza, fresh or frozen, remove all packaging, including cardboard, plastic, paper, or other flammable materials before placing the pizza in the Toaster Oven. When baking fresh pizza, lightly oil bake/broil pan and sprinkle lightly with cornmeal to make removing the baked pizza easier.
- WARNING: Never cook pizzas directly on the wire rack as melted cheese and other ingredients may fall onto the heating elements and create a potential fire risk.
- Depending on the depth of the pizza, slide the wire rack and bake/broil pan onto the center or lower shelf position. Carefully center pizza pan directly on the wire rack.
CAUTION: Make sure the pizza is at least 1 inch away from the upper heating element.
WARNING: NEVER place aluminum foil on top of the bake/broil pan. This traps grease and can cause a fire.
Toast/Bagel
- Press and hold the TOAST/BAGEL button to change to from TOAST to BAGEL and back to TOAST.
-
Slide the wire rack into the center shelf position and arrange bread, muffins, frozen waffles, frozen toaster pastries, prepared toaster foods, etc.
-
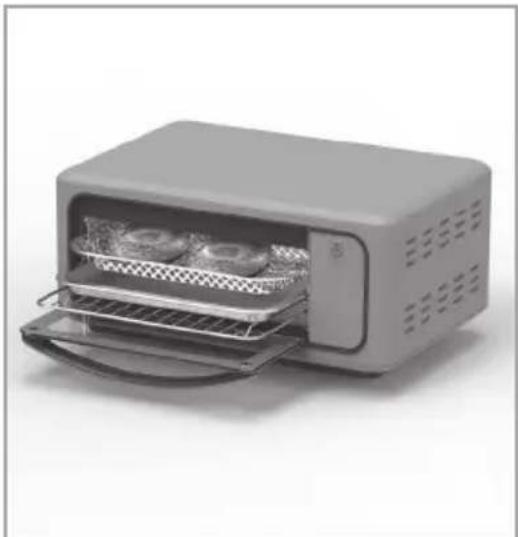
When toasting bagels, English muffins or toaster food, place cut-side-up on the wire rack. (Figure 2.)
- High heat sears the topsides of bagels, while warming the insides. Use BAGEL to toast English muffins or thick sliced specialty breads which require only the top side to be toasted.
NOTE: When toasting frozen breads, bagels, or toaster foods, increase shade setting by 1 Level.
Bake, Broil, Cookies, Slow Cook, Reheat & Dehydrate
- Press the START/MENU button, a tone will sound.
- Press +, - until the desired FUNCTION is illuminated on the display.
Bake
NOTE: BAKE defaults to Convection Fan Speed OFF. If CONVECTION BAKE is needed, use the convection fan control to turn fan to Speed 3 HIGH, 2 MEDIUM, or 1 LOW.
NOTE: ROAST is a term often applied when using the BAKE or CONVECTION BAKE to cook meats.
- Use the convection fan control to turn the fan ON. Use BAKE or CONVECTION BAKE to bake casseroles, cakes, cookies, pies, biscuits, poultry, beef, pork, etc.
- CONVECTION BAKE/ROAST seals in juices, promotes browning and may shorten cook time without turning and basting.
- To ROAST meats or fish, use the bake pan. Place meats or fish onto the bake pan. Juices and/or fat will drip into the pan and decrease spattering while roasting. (Figure 1.)
- Use the bake/broil pan alone to bake foods such as biscuits, cookies, or hot appetizers. When using your own baking dish, slide the wire rack onto the center or lowest shelf position. Carefully center baking dish directly on wire rack and close the glass door.
CAUTION: Make sure any baking dish is at least 1 inch away from the upper heating element.
Cookies
- The Toaster Oven's flexibility and pinpoint accuracy makes it perfect for baking a wide variety of cookie types - scratch-made, fresh, refrigerated or frozen cookie doughs, biscuits, cinnamon or crescent rolls can all be used to produce fabulous results.
NOTE: The amount of dough per cookie or the thickness of the cookie many also vary the cook time.
- Place the bake/broil rack into the center shelf position.
WARNING: NEVER place aluminum foil on top of the bake/broil pan. This traps grease and can cause a fire.
Slow Cook
The Digital Air Fryer Toaster Oven can accommodate up to an 8 x 12-inch casserole dish.
Reheat
The Digital Air Fry Toaster Oven is great for reheating your favorite dishes and leftover meals.
Dehydrate
- ALWAYS use the mesh Air Fryer/Dehydrator Basket when DEHYDRATING. Precise low temperatures dry out foods evenly without cooking or overheating
- DEHYDRATE combines low, steady heat with steady convection fan power.
- Your Toaster Oven's automated drying makes home dehydration both simple and rewarding and ensures healthy, safe, preservative-free results.
NOTE: Turn food halfway or several times during DEHYDRATE time.
Beautiful Function Hints
PIZZA
NOTE: If package directions do not list convection cooking times, lower the TEMP 50°F and monitor cooking progress carefully.
- The versatility of this digital Toaster Oven allows you to cook a wide variety of pizzas: fresh or frozen pizza; thin crust, stuffed or deep dish perfectly every time.
- Use the TIME and TEMP controls for consistent and precision baking results.
TOAST/BAGEL
- WARNING: Use extra caution when toasting pastry items with runny-type frosting or open fillings.
- When toasting more than one bagel, use halves of similar size, thickness and freshness.

- Stale bagels, thin bagels or sweet bread products, such as tea cakes and fruit loaf, brown much more quickly than ordinary bread, so reduce toasting time.
AIR FRY
• Always check food halfway through cooking time to determine final cook time and temperature.
• Always pat food dry before cooking to encourage browning and avoid excess smoke.
- For crispier results, air fry small batches of freshly breaded foods. Create more surface area by cutting food into smaller pieces. Press breading onto food to help it adhere. Refrigerate breaded foods for at least 30 minutes. Spray with oil before air frying.
- Spray olive oil or vegetable oil works best as oil is distributed evenly and less oil is needed.
- Arrange breaded food in the air fryer/dehydrator basket so that food is not touching to allow air flow on all surfaces.
- Do not overfill air fryer/dehydrator basket with food. NEVER fill air fryer/dehydrator basket more than 2/3 full. When air frying fresh vegetables, we do not recommend adding more than 3 cups of food to the air fryer/dehydrator basket.
BAKE
- When using CONVECTION BAKE, lower the bake recipe temperature by 50°F to a minimum of 300°F when baking cakes, pies, cookies, and bread.
- Shelf position will depend on the size of the food being prepared. It is important to place your food as close to the center of the Toaster Oven as possible to ensure even cooking.
- Dark or dull pans absorb heat faster; foods will bake more rapidly, and crust will brown more easily than in shiny bake pans.
- Choose bakeware made of metal, ovenproof glass, and ceramic.
- Check package directions to determine if the container is suitable for use in a conventional or toaster oven.
BROIL/CONVECTION BROIL
• CONVECTION BROIL is used for thinner, tender cuts of meats.
- Dry marinated meats and fish before broiling. ALWAYS pat meat dry to reduce smoke and promote brownness during broiling.
• To speed up browning and add lusciousness, brush lean cuts of meat, chicken and fish with oil or melted butter.
- Trim excess fat from meat and score edges to prevent curling.
- Thaw frozen meats and fish before broiling.
- BROIL TIME is determined by the desired doneness and the distance between the food and the upper heating elements. Always use a meat thermometer.
DEHYDRATE
- Dehydrate fresh, ripe foods to preserve nutrients and enhance flavor.
User Maintenance Instructions
This appliance requires little maintenance. It contains no user serviceable parts. Do not try to repair it yourself. Any servicing that requires disassembly other than cleaning must be performed by a qualified appliance repair technician.
Care & Cleaning Instructions
- Unplug the Toaster Oven and allow the Toaster Oven and all accessories to cool completely before cleaning.
- Clean the outside of the Toaster Oven with a damp cloth and dry thoroughly. A non-abrasive liquid cleaner may be used for stubborn stains. Rinse and dry thoroughly. Do not use metal scouring pads or abrasive cleaners that will scratch the surface.
- Clean the interior with a mild or non-abrasive cleaner and plastic scouring pad after each use to avoid build-up. Do not rub too hard as surface can be scratched.
-
To remove baked-on food, pour a small amount of cooking oil onto the food and allow to stand for 5 to 10 minutes. Remove the softened food with a soft cloth. Do not use steel wool, scouring pads or abrasive cleaners.
-
Rinse and dry thoroughly before closing the glass door. Clean the glass door with a cloth or sponge dampened with warm, sudsy water. Dry thoroughly.
- Wash the air fryer/dehydrator basket, bake/broil pan, wire rack, and crumb tray in soapy water and dry thoroughly. Toaster Oven accessories may be washed in the dishwasher.
- If crumbs and spills have accumulated on the crumb tray, wipe with a damp cloth. Always dry the crumb tray thoroughly before replacing.
- DO NOT use abrasive cleaners or metal scouring pads to clean bake/broil pan, wire rack, wire rack, or crumb tray. For stubborn stains, clean with a nylon or polyester mesh pad and a mild, non-abrasive cleaner. Rinse and dry thoroughly.
CAUTION: DO NOT use spray-on or other oven cleaners. Using these types of cleaners may cause cosmetic and/or electrical damage to the Toaster Oven.
Storing Instructions
- Unplug unit, allow to cool, and clean before storing.
- Slide the bake/broil assembly (wire rack and bake/broil pan) into the lower shelf position.
- Store Toaster Oven in its box in a clean, dry place.
- Never store appliance while it is hot or still plugged in.
- Never wrap cord tightly around the appliance.
Limited Two-Year Warranty
Sensio Inc. dba Made by Gather™ hereby warrants that for a period of TWO YEARS from the date of purchase, this product will be free from mechanical defects in material and workmanship, and for 90 days in respect to non-mechanical parts. At its sole discretion, Sensio Inc. dba Made by Gather™ will either repair or replace the product found to be defective, or issue a refund on the product during the warranty period.
The warranty is only valid for the original retail purchaser from the date of initial retail purchase and is not transferable. Keep the original sales receipt, as proof of purchase is required to obtain warranty validation. Retail stores selling this product do not have the right to alter, modify, or in any way revise the terms and conditions of the warranty.
Exclusions:
The warranty does not cover normal wear of parts or damage resulting from any of the following: negligent use of the product, use of improper voltage or current, improper routine maintenance, use contrary to the operating instructions, disassembly, repair, or alteration by anyone other than qualified Sensio Inc. dba Made by Gather™ personnel. Also, the warranty does not cover Acts of God such as fire, floods, hurricanes, or tornadoes.
Sensio Inc. dba Made by Gather™ shall not be liable for any incidental or consequential damages caused by the breach of any express or implied
warranty. Apart from the extent prohibited by applicable law, any implied warranty of merchantability or fitness for a particular purpose is limited in time to the duration of the warranty. Some states, provinces or jurisdictions do not allow the exclusion or limitation of incidental or consequential damages, or limitations on how long an implied warranty lasts, and therefore, the above exclusions or limitations may not apply to you. The warranty covers specific legal rights which may vary by state, province and/or jurisdiction.
How To Obtain Warranty Service:
You must contact Customer Service at our toll-free number: 1-877-775-3564. A Customer Service Representative will attempt to resolve warranty issues over the phone. If the Customer Service Representative is unable to resolve the problem, you will be provided with a case number and asked to return the product to Sensio Inc. dba Made by Gather™ Attach a tag to the product that includes: your name, address, daytime contact telephone number, case number, and description of the problem.
Also, include a copy of the original sales receipt. Carefully package the tagged product with the sales receipt, and send it (with shipping and insurance prepaid) to SENSIO Inc.'s address. Sensio Inc. dba Made by Gather™ shall bear no responsibility or liability for the returned product while in transit to Sensio Inc. DBA Made by Gather™ Customer Service Center.
Beautiful®
Kitchenware
Sección 1
Seguridad
PRECAUCIONES IMPORTANTES

FREÍR
www.cookwithbeautiful.com
For customer service questions or comments

- TABLE OF CONTENTS
- SECTION 1: SAFETY
- SECTION 2: INSTRUCTIONS
- ÍNDICE
- SAVE THESE INSTRUCTIONS
- ADDITIONAL IMPORTANT SAFEGUARDS
- NOTES ON THE PLUG
- NOTES ON THE CORD
- PLASTICIZER WARNING
- ELECTRIC POWER
- SECTION 2
- INSTRUCTIONS
- GETTING TO KNOW YOUR DIGITAL AIR FRYER TOASTER OVEN
- ACCESSORIES
- INFRARED HEATING
- TOUCH-ACTIVATED DISPLAY CONTROL PANEL
- [NON-TEXT]
- PIZZA
- TOAST/ BAGEL
- AIR FRY
- BAKE
- BROIL
- COOKIES
- SLOW COOK
- REHEAT
- DEHYDRATE
- SHELF POSITIONS
- WEIGHT/SIZE RESTRICTIONS
- COOKING CONTAINERS
- BEFORE USING FOR THE FIRST TIME
- OPERATION
- CONVECTION FAN CONTROL
- PIZZA, TOAST/BAGEL, AIR FRY
- CONVECTION BROIL / BROIL
- AIR FRY / CONVECTION BROIL COOKING CHART
- USDA COOKING GUIDELINES
- TOAST/BAGEL
- BAKE, BROIL, COOKIES, SLOW COOK, REHEAT & DEHYDRATE
- BEAUTIFUL FUNCTION HINTS
- BROIL/CONVECTION BROIL
- USER MAINTENANCE INSTRUCTIONS
- CARE & CLEANING INSTRUCTIONS
- STORING INSTRUCTIONS
- LIMITED TWO-YEAR WARRANTY
- EXCLUSIONS
- HOW TO OBTAIN WARRANTY SERVICE
- BEAUTIFUL®
- SECCIÓN 1
- SEGURIDAD
- PRECAUCIONES IMPORTANTES
- FREÍR
Brand : Beautiful
Model : Digital Air Fry Toaster Oven
Category : Oven