Hypercare T300 TSA0520 - Shaver Teesa - Free user manual and instructions
Find the device manual for free Hypercare T300 TSA0520 Teesa in PDF.


| Product Type | Electric Shaver |
| Model | Hypercare T300 TSA0520 |
| Brand | Teesa |
| Power Consumption | 3 W |
| Rotation Speed | 6000 rpm |
| Run Time | Up to 45 minutes |
| Charging Time | Up to 8 hours |
| Battery | 2.4 V, 2/3 AA 600 mAh x2 |
| Power Supply | 220-240 V, 50/60 Hz |
| Blades | Three floating high-quality steel blades |
| Trimmer | Built-in pop-up trimmer |
| Usage | Cordless, wet or dry (not immersible) |
| Cleaning | Brush cleaning; thorough cleaning monthly |
| Dimensions | 58.2 x 150.9 x 46.8 mm |
| Weight | 165 g |
| Included Accessories | Power cable, protective cap, cleaning brush, user manual |
| Safety Features | Automatic shut-off? Not specified; follow safety instructions |
| Replaceable Shaving Head | Yes, every 18 months |
| Lubrication | Recommended periodically with maintenance oil |
| Country of Origin | Made in China |
Frequently Asked Questions - Hypercare T300 TSA0520 Teesa
User questions about Hypercare T300 TSA0520 Teesa
0 question about this device. Answer the ones you know or ask your own.
Ask a new question about this device
Download the instructions for your Shaver in PDF format for free! Find your manual Hypercare T300 TSA0520 - Teesa and take your electronic device back in hand. On this page are published all the documents necessary for the use of your device. Hypercare T300 TSA0520 by Teesa.
USER MANUAL Hypercare T300 TSA0520 Teesa
| DEENPLROSK | ||||
| Rasierkopf Shaving head Głowica z ostrzami Cap de bărbierit | Holiaca hlavica s frézkami | |||
| Halterahmen Retaining frame | Rama mocująca Cadru de fixare | Pritlačný rám | ||
| Halterahmen-Sperre Retaining frame lock Blokada Blocator | cadru de fixare | Zámok | ||
| Freigabetaste Rasierkopf Shaving head release button | Przycisk zwalniający głowicę z ostrzami | Buton de eliberare cap de bărbierit | Uvolňovacie tlačidlo hlavice s frézkami | |
| Netztaste Power switch Przełącznik zasilania Comutator alimentare | Hlavný vypínač | |||
| Ladeanzeige | Charging indicator | Wskaźnik ładowania | Indicator de încărcare | Indikátor nabijania |
| Trimmer Freigabetaste | Trimmer release slide | Suwak zwalniający trymer | Glisieră dispozitiv de tundere | Posuvný ovládač zastrihávača |
| Stromanschluss | Power socket Gniazdo zasilania | Mufă alimentare | Zásuvka napájania | |
natural_image
Illustration of a person using a handheld device to interact with another person (no text or symbols present)Trimmung:
natural_image
Illustration of a biological structure with arrows indicating movement or force (no text or symbols)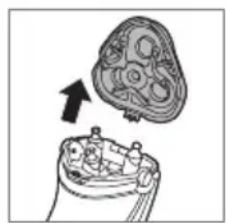
natural_image
Diagram of a mechanical component with an arrow indicating direction, showing internal structure (no text or symbols)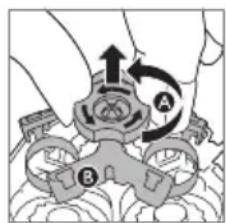
natural_image
Diagram of a mechanical component with three circular holes and a downward arrow indicating motion (no text or symbols)Thank you for purchasing TEESA appliance. Please read this operation instruction carefully before use, and keep it for future use. Producer does not take responsibility for damages caused by inappropriate handling and use of the product.
SAFETY INSTRUCTIONS
In order to reduce the risk of any injury, follow basic safety precautions applied when using any electrical device, including the following:
- Read this instruction manual carefully, even if you are familiar with the appliance.
-
Before connecting the device to power supply socket, make sure the voltage indicated on the appliance corresponds to the voltage in the power supply socket.
-
ALWAYS turn off the device and disconnect it from the mains supply:
• if it's not operating correctly,
- if there's an uncommon voice when using,
• before disassembling the device,
• before cleaning,
• before servicing.
-
When you disconnect the power cord, grasp and pull the plug, not the cord/cable.
-
This appliance may be used by children and by persons with reduced physical, sensory or mental capabilities, or lack of experience and knowledge, if they are supervised and guided by a person who is responsible for their safety in a cautious manner, and all the safety precautions are understood and followed. Children should not play with this device.
-
Use only the included AC charger to charge the device.
-
Do not use this appliance if it's not operating properly or has been dropped into water. Do not attempt to repair this appliance yourself, only authorized and qualified personnel may repair this device. This product has no user serviceable parts.
-
Keep the device and its cord/cable away from heat, water, moisture, sharp edges and any other factor which may damage the appliance or its cord.
-
Do not use the product for purposes/uses different from what displayed in this operating manual.
-
Producer of this product is not responsible for damages caused by inappropriate handling and using of the device.
-
Use only original/authorized accessories.
-
Do not use the appliance in bath or shower.
-
Do not place or store product where it can fall or be pulled onto a tub or sink.
-
Do not reach for a product that has fallen into water. Unplug it from power supply socket immediately.
-
Do not handle the appliance with wet hands.
-
Do not immerse the appliance in water or any other liquids.
-
Product for household use only. Not for commercial use.
-
Clean and store this appliance in accordance to instructions listed in "Cleaning" and "Storage" section.
CHARGING
Notes:
• Make sure the appliance is turned off before connecting it to the power supply.
- It takes about 8 hours to fully charge the device what provides about 45 minutes of shaving time.
• It is recommended to charge the appliance once a week.
- Connect one end of the power cable to the power supply socket, connect the other end to the appliance's power socket.
- When the appliance is charging, red LED is on.
- When charging has finished, disconnect the power cable from power supply and the device.
OPERATION
Shaving:
- Slide Power switch upwards to turn on the appliance.
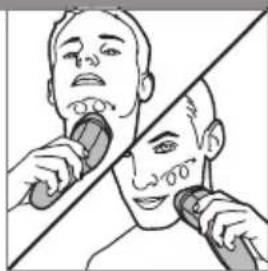
- Move the shaving head against the direction of beard growth using both circular and straight movements.
- Gently press shaver to the skin, so the floating blades can easily follow the contours of your face.
natural_image
Illustration of a person using a handheld device to address teeth (no text or symbols present)- After shaving turn off the appliance by sliding Power switch downwards.
- Clean the shaver according to the instructions included in "Cleaning" section.
- Put the protective cap on the shaving head to protect the blades from any damage.
Trimming
- Push the trimmer release slide downwards to open the trimmer.
- Turn on the appliance.
- Start trimming.
- After trimming, turn off the appliance by sliding Power switch downwards.
- Clean the trimmer according to the instructions included in "Cleaning" section.
- Push the trimmer downwards until it locks in place to close it.
CLEANING
General:
• Do not immerse the appliance in water.
• Do not use any abrasives or chemical agents to clean this product.
- Clean only the casing with a soft and slightly damp cloth.
- Clean the appliance after each use. Regular cleaning guarantees better shaving performance.
Cleaning with cleaning brush:
Cleaning shaving head:
- Make sure the appliance is turned off and disconnected from power supply.
- Clean the outside of the shaving head by brushing out dirt.
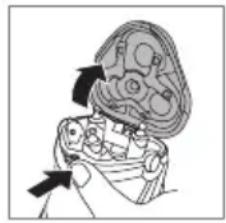
- Press shaving head release button to open shaving head.
- Clean the inside of the shaving head and hair chamber.
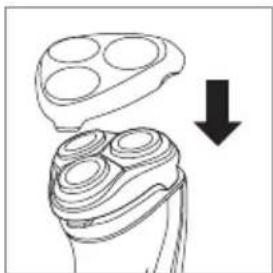
- After cleaning close the shaving head by pushing it downwards until it locks in place.
Cleaning trimmer:
- Make sure the appliance is turned off and disconnected from power supply.
- Push the trimmer release slide downwards to open the trimmer.
- Brush up and down along the trimmer teeth.
- After cleaning, push the trimmer downwards until it locks in place to close it.
Thorough cleaning:
Note: Clean the shaving blades thoroughly once a month to provide optimal performance.
natural_image
Diagram of a mechanical or biological structure with an arrow indicating direction (no text or symbols present)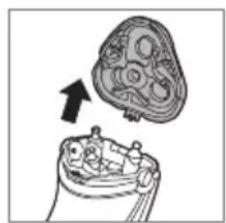
natural_image
Diagram showing a mechanical component with an arrow indicating direction (no text or symbols present)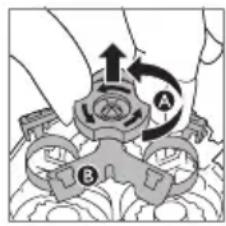
natural_image
Illustration of a hand holding a tray with three circular objects and upward arrows indicating motion (no text or symbols)- Make sure the appliance is turned off and disconnected from power supply.
-
Press the shaving head release button to open the shaving head.
-
Pull the shaving head off the appliance.
-
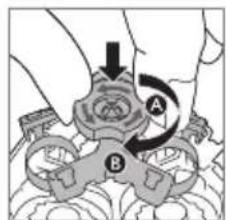
Turn the retaining frame lock counterclockwise and remove the retaining frame.
-
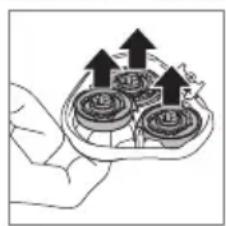
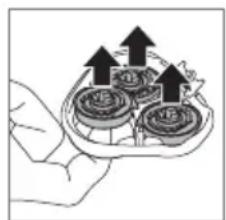
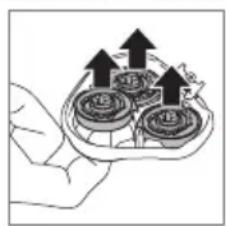
Remove and clean the shaving blade and its guard one by one. Note: Do not clean more than one blade and guard at a time, since they are all matching sets. Shaving performance may deteriorate if blade will be placed in the wrong guard.
natural_image
Illustration of a hand painting a circular object onto a surface with two bowls containing dark liquid, no text or symbols present.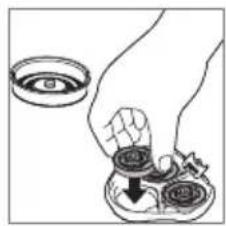
natural_image
Illustration of a hand holding a circular object with a magnified inset showing an eye (no text or symbols)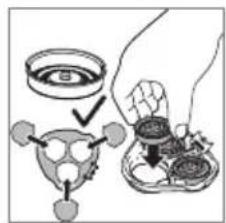
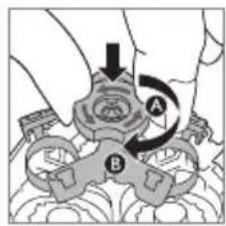
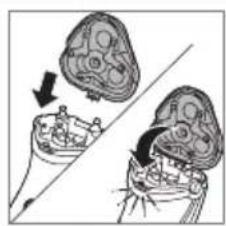
natural_image
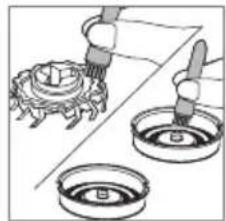
Diagram showing two mechanical components with arrows indicating motion or force direction (no text or symbols)- Remove the blade from the guard and clean it with the included brush. Note: Exercise caution while cleaning the blades as they are sharp!
-
Clean the guard with the brush.
-
Put the blade back into the guard.
- Put the blade back into the corresponding blade holder in the shaving head.
Note: Make sure the notches on both sides of the shaving blades fit exactly onto the notches in the shaving blade holder.
-
Put the retaining frame back into the shaving head and turn the retaining frame lock clockwise.
-
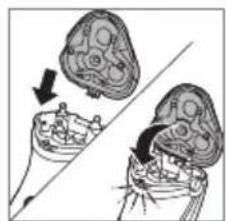
Insert the lug of the shaving head into the slot in the top of the appliance.
- Close the shaving head.
Note: If the shaving head does not close smoothly, check if you have inserted the shaving blades properly and if the retaining frame is locked.
STORAGE
natural_image
Diagram of a hand holding an electric shaver with a downward arrow indicating compression (no text or symbols present)- Before storing the appliance, make sure it is clean, dry and disconnected from the power supply.
• Store the appliance in a dry, cool place, out of the reach of children. - Store the appliance with the protective cap assembled to prevent damage to the blades.
LUBRICATING
Blades has to be lubricated from time to time to provide optimal performance. To do this, place only a few drops of maintenance oil on each guard, allow the oil to permeate and wipe off any excess with a soft cloth. You can do this when the appliance is operating or when it is turned off.
REPLACING SHAVING HEAD
Notes:
• It is recommended to replace shaving head every 18 months.
- Replace damaged shaving blades immediately.
• Always replace the shaving head with the original Teesa shaving head.
• Shaving head is available to be bought from the online store Teesa.pl or Ipelektronik.com.
- Make sure the appliance is turned off and disconnected from power supply.
- Press the shaving head release button to open the shaving head.
- Pull the shaving head off the appliance.
- Insert the lug of the new shaving head into the slot in the top of the appliance. Close the shaving head.
Note: If the shaving head does not close smoothly, check if you have inserted the shaving blades properly and if the retaining frame is locked.
SPECIFICATIONS
Main features
Three floating blades adjusting to all face shapes
Built-in pop-up trimmer perfect for trimming sideburns and moustache
High-quality steel blades
Cordless use
Quiet operation
Easy to clean
Ergonomic design
Technical data
Power: 3 W
Rotation speed: 6000 rpm
Run time: up to 45 min
Charging time: up to 8 h
Battery: 2,4 V ; 2/3 AA 600 mAh x2
Power supply: 220 - 240 V; 50/60 Hz
In set
Power cable, protective cap, cleaning brush, user manual
Physical parameters
Weight: 165 g
Dimensions: 58,2 x 150,9 x 46,8 mm
EN

English
Correct Disposal of This Product
(Waste Electrical & Electronic Equipment)


(Applicable in the European Union and other European countries with separate collection systems) This marking shown on the product or its literature, indicates that it should not be disposed with other household wastes at the end of its working life. To prevent possible harm to the environment or human health from uncontrolled waste disposal, please separate this from other types of wastes and recycle it responsibly to promote the sustainable reuse of material resources. Household users should contact either the retailer where they purchased this product, or their local government office, for details of where and how they can take this item for environmentally safe recycling. Business users should contact their supplier and check the terms and conditions of the purchase contract. This product should not be mixed with other commercial wastes for disposal.
Made in China for Lechpol Electronics Leszek Sp.k., ul. Garwolińska 1, 08-400 Miętne.
natural_image
Illustration of a person using a handheld device to interact with another person (no text or symbols present)Przycinanie:
natural_image
Illustration of a biological structure with arrows indicating movement or force (no text or symbols)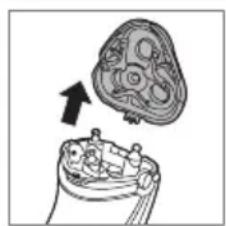
natural_image
Diagram of a mechanical component with an arrow indicating direction (no text or symbols present)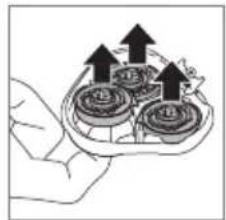
natural_image
Illustration of a hand holding a tray with three circular objects and upward arrows indicating motion (no text or symbols)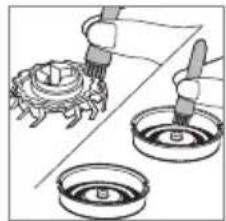
natural_image
Illustration of a cooking step with a ladle, a bowl, and a tray (no text or symbols)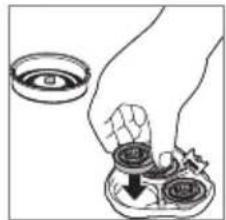
natural_image
Illustration of a hand holding a small object with an eye symbol above, and another object partially visible below (no text or symbols)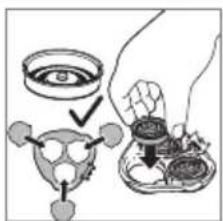
natural_image
Diagram showing two mechanical components with arrows indicating motion or assembly (no text or symbols)natural_image
Diagram of a hand holding a multi-circular object with a downward arrow indicating rotation (no text or symbols)natural_image
Illustration of a person using a handheld device to interact with another person (no text or symbols present)Tundere:
natural_image
Illustration of a biological structure with arrows indicating direction (no text or symbols)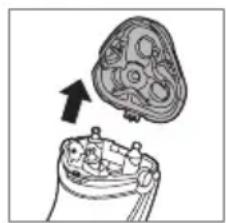
natural_image
Diagram of a mechanical component with an arrow indicating direction, showing internal structure (no text or symbols)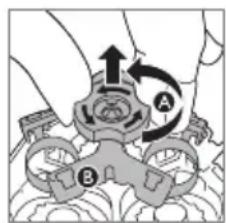
natural_image
Illustration of a hand holding a tray with three circular objects and upward arrows indicating motion (no text or symbols)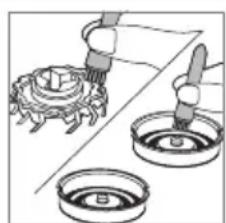
natural_image
Illustration of a hand painting a small boat on a boat, with another boat being painted in a bowl (no text or symbols)natural_image
Diagram of a mechanical component with three circular cavities and a downward arrow indicating motion (no text or symbols)natural_image
Illustration of a person using a handheld device to interact with another person (no text or symbols present)Zastrihávanie:
natural_image
Diagram of a mechanical assembly with arrows indicating direction (no text or labels)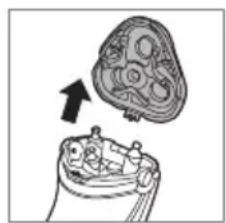
natural_image
Diagram showing a mechanical component with an arrow indicating direction (no text or symbols present)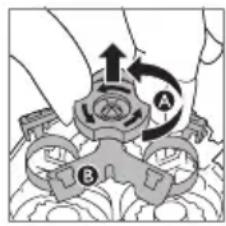
natural_image
Illustration of a hand holding a tray with three circular objects and upward arrows indicating motion (no text or symbols)natural_image
Diagram of a hand holding a multi-layered object with a downward arrow indicating compression or disassembly (no text or symbols present)- Pred uskladnením tohto zariadenia sa uistite, že je čisté, suché a odpojené od zdroja napájania.
• Zariadenie skladujte na suchom, chladnom mieste, mimo dosahu detí. - Ak chcete zabrániť poškodeniu, dajte na zariadenie pri skladovaní ochranný kryt.
MAZANIE
- Trimmung:
- SAFETY INSTRUCTIONS
- CHARGING
- Notes:
- OPERATION
- Shaving:
- Trimming
- CLEANING
- General:
- Cleaning with cleaning brush:
- Cleaning shaving head:
- Cleaning trimmer:
- Thorough cleaning:
- STORAGE
- LUBRICATING
- REPLACING SHAVING HEAD
- SPECIFICATIONS
- Main features
- Technical data
- In set
- Physical parameters
- Przycinanie:
- Tundere:
- Zastrihávanie:
- MAZANIE
Brand : Teesa
Model : Hypercare T300 TSA0520
Category : Shaver