
LE22A451C1 - Uncategorized SAMSUNG - Free user manual and instructions
Find the device manual for free LE22A451C1 SAMSUNG in PDF.


| Product Type | 22-inch LCD TV |
| Screen Size | 22 inches (diagonal) |
| Resolution | 1366 x 768 pixels (HD Ready) |
| Dimensions (without stand) | Approx. 530 x 350 x 80 mm |
| Weight (without stand) | Approx. 4.5 kg |
| Power Consumption | ~50 W (typical) |
| Power Supply | AC 100-240V, 50/60Hz |
| Audio Output | 2 x 5W speakers |
| Connectivity | HDMI, VGA, Component, Composite, USB, Scart |
| Tuner | Analog and DVB-T |
| Remote Control | Included (model AA59-00478A) |
| Energy Efficiency Class | B (depending on region) |
| Cleaning Instructions | Wipe with a soft, dry cloth. Do not use liquids. |
| Safety Features | Standby power <1W; automatic shutdown after 4 hours of inactivity (configurable) |
| Wall Mount Compatibility | VESA 100x100 mm |
| Spare Parts Availability | Remote control, stand, power cord available via Samsung service centers |
| Repairability Index | 5.5/10 (scores may vary by region) |
| Manufacturer | Samsung |
| Model Year | 2009 |
Frequently Asked Questions - LE22A451C1 SAMSUNG
User questions about LE22A451C1 SAMSUNG
0 question about this device. Answer the ones you know or ask your own.
Ask a new question about this device
Download the instructions for your Uncategorized in PDF format for free! Find your manual LE22A451C1 - SAMSUNG and take your electronic device back in hand. On this page are published all the documents necessary for the use of your device. LE22A451C1 by SAMSUNG.
USER MANUAL LE22A451C1 SAMSUNG
If you have any questions or comments relating to Samsung products, please contact the SAMSUNG customer care centre.(See back cover for more information)
Precautions When Displaying a Still Image
A still image may cause permanent damage to the TV screen.
- Do not display a still image on the LCD panel for more than 2 hours as it can cause screen image retention.
This image retention is also known as "screen burn".
To avoid such image retention, reduce the degree of brightness and contrast of the screen when displaying a still image. - Watching the LCD TV in 4:3 format for a long period of time may leave traces of borders displayed on the left, right and center of the screen caused by the difference of light emission on the screen. Playing a DVD or a game console may cause a similar effect to the screen. Damages caused by the above effect are not covered by the Warranty.
- Displaying still images from Video games and PC for longer than a certain period of time may produce partial after-images.
To prevent this effect, reduce the ‘brightness’ and ‘contrast’ when displaying still images.
Contents
CONNECTING AND PREPARING YOUR TV
◆ List of Parts ...... 2
◆ Installing the Stand 2
◆ Installing the Wall Mount Kit ...... 2
◆ Viewing the Control Panel 3
◆ Viewing the Connection Panel ...... 4
◆ Viewing the Remote Control 6
◆ Installing Batteries in the Remote Control ...... 7
◆ Switching On and Off 7
◆ Placing Your Television in Standby Mode...... 7
◆ Viewing the Menus 8
◆ Using the TOOLS Button 8
◆ Plug & Play 9
SETTING THE CHANNELS
◆ Storing Channels Automatically .... 10
◆ Storing Channels Manually .....11
◆ Adding / Locking Channels 12
◆ Sorting the Stored Channels 13
◆ Assigning Channels Names ...... 13
◆ Fine Tuning Channel Reception 14
◆ LNA (Low Noise Amplifier) 14
SETTING THE PICTURE
◆ Changing the Picture Standard 15
◆ Adjusting the Custom Picture 16
◆ Resetting the Picture Settings to the Factory Defaults 17
◆ Changing the Picture Options .... 18
◆ Viewing the Picture In Picture (PIP) ...... 20
SETTING THE SOUND
◆ Sound Features ...... 21
◆ Selecting the Sound Mode 22
◆ Connecting Headphones (Sold separately) ..... 22
SETTING THE TIME
◆ Setting and Displaying the Current Time ...... 23
◆ Setting the Sleep Timer 23
◆ Switching the Television On and Off
Automatically 24


Symbol Press Note One-Touch

Button
FUNCTION DESCRIPTION
◆ Choosing Your Language 24
◆Melody / Energy Saving 25
◆ Selecting the Source 26
◆Editing the Input Source Names 27
SETTING THE PC
◆ Setting up Your PC Software (Based on Windows XP) 28
◆ Display Modes 28
◆Setting up the TV with your PC 29
RECOMMENDATIONS FOR USE
◆Teletext Feature 30
◆ Using the Anti-Theft KENSINGTON LOCK (depending on the model) 31
◆ Securing the TV to the Wall 32
◆ Troubleshooting: Before Contacting Service Personnel 33
◆Technical and Environmental Specifications ... 34
List of Parts
Please make sure the following items are included with your LCD TV. If any items are missing, contact your dealer.
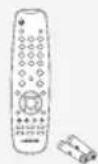

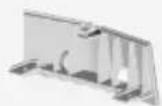

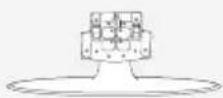

M4XL16
Remote Control & Batteries (AAA x 2)
Power Cord Cover-Bottom Stand Screw X 4 Stand
Cleaning Cloth
◆ Owner's Instructions
♦ Warranty card
♦ Safety Guide
♦ Registration Cards
Warranty card / Safety Guide / Registration Cards (Not available in all locations)
The stand and stand screw may not be included depending on the model.
Installing the Stand
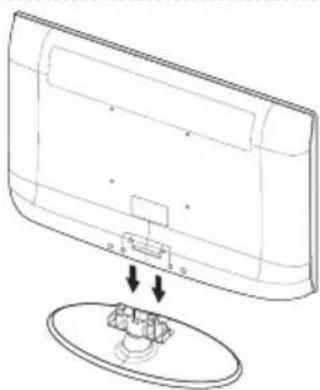
natural_image
Diagram of a device with a component inserted into a circular base, showing internal structure and arrows indicating assembly (no text or symbols)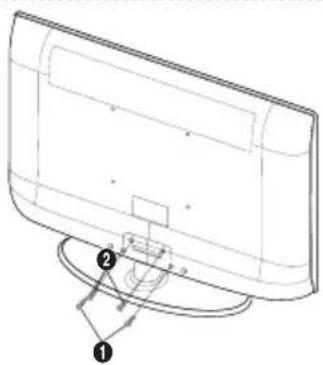
natural_image
Technical line drawing of a monitor with labeled parts (1 and 2), showing no text or symbols beyond labels- Connect your LCD TV and the stand.
Two or more people should carry the TV.
Make sure to distinguish between the front and back of the stand when assembling them.
- Fasten two screws at position ① and then fasten two screw at position ②.
➢ Stand the product up and fasten the screws. If you fasten the screws with the LCD TV placed down, it may lean to one side.
The stand is installed for models with the screen size of 37 inch and above.
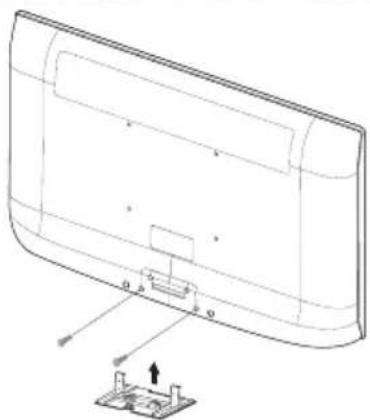
Installing the Wall Mount Kit
natural_image
Technical line drawing of a device rear panel with mounting base and internal components (no text or symbols)Wall mount items (sold separately) allow you to mount the TV on the wall.
For detailed information on installing the wall mount, see the instructions provided with the Wall Mount items. Contact a technician for assistance when installing the wall mounted bracket.
Samsung Electronics is not responsible for any damage to the product or injury to yourself or others if you elect to install the TV on your own.

Do not install your Wall Mount Kit while your TV is turned on. It may result in personal injury due to electric shock.
Remove the stand and cover the bottom hole with a cap and fasten with two screws.
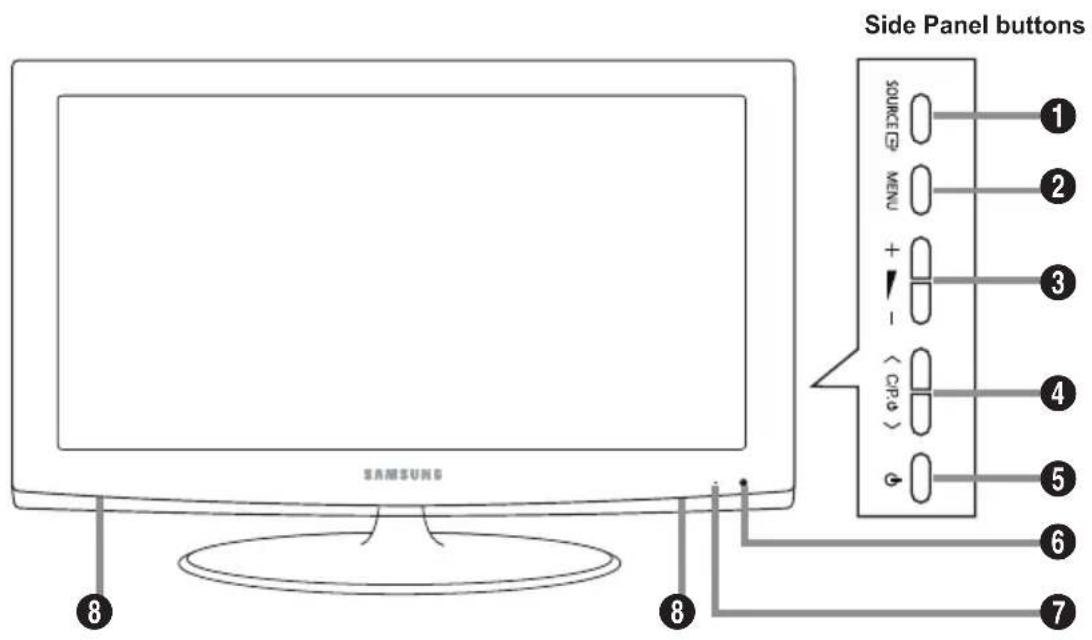
The product colour and shape may vary depending on the model.
① SOURCE
Toggles between all the available input sources (TV, Ext., AV, Component, PC, HDMI). In the on-screen menu, use this button as you use the ENTER button on the remote control.
② MENU
Press to see an on-screen menu of your TV's features.
③ + ▶ -
Press to decrease or increase the volume. In the on-screen menu, use the + - buttons as you use the ◀ and ▶ buttons on the remote control.
4 < C/P.
Press to change channels. In the on-screen menu, use the <buttons as you use the ▲ and ▼ buttons on the remote control. (Without the Remote Control, you can turn on the TV by using the Channel buttons.)
⑤ (Power)
Press to turn the TV on and off.
6 Remote Control Sensor
Aim the remote control towards this spot on the TV.
⑦ Power Indicator
Blinks and turns off when the power is on and lights up in stand-by mode.
8 Speakers
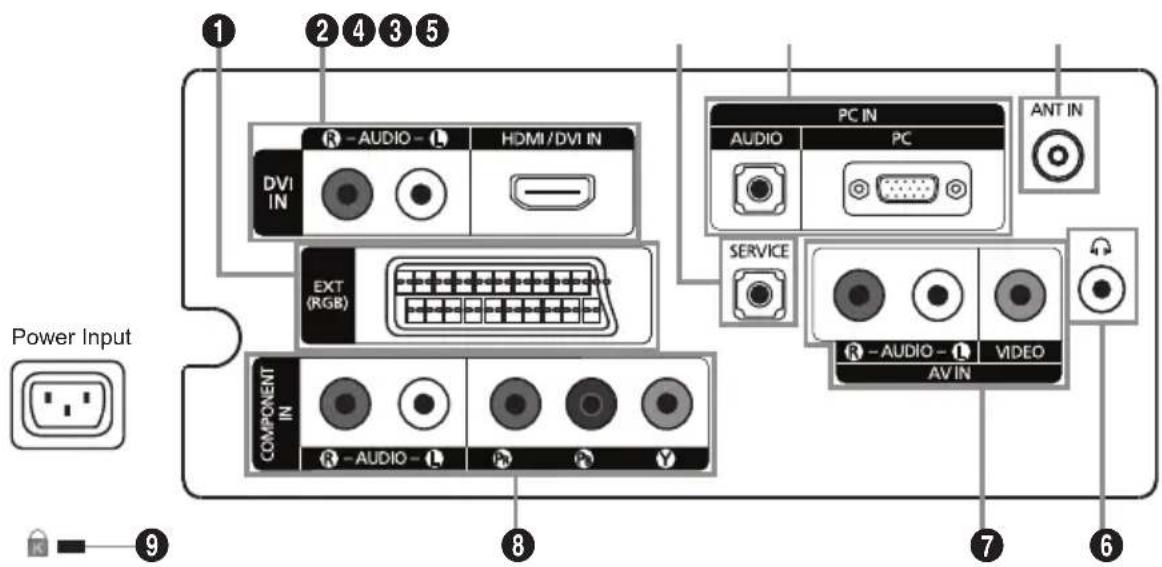
The product colour and shape may vary depending on the model.
Whenever you connect an external device to your TV, make sure that power on the unit is turned off.
When connecting an external device, match the colour of the connection terminal to the cable.
① EXT
| Connector | Input Output | |||
| Video Audio (L/R) RGB Video + Audio (L/R) | ||||
| EXT | 0 0 0 | Only TV output is available. | ||
-Inputs or outputs for external devices, such as VCR, DVD, video game device or video disc players.
② DVI IN [HDMI/DVI IN]
- Supports connections between HDMI-connection-enabled AV devices (Set-Top Boxes, DVD players)
- No additional Audio connection is needed for an HDMI to HDMI connection.
What is HDMI?
- "High Definition Multimedia interface" allows the transmission of high definition digital video data and multiple channels of digital audio.
- The HDMI/DVI terminal supports DVI connection to an extended device with the appropriate cable (not supplied). The difference between HDMI and DVI is that the HDMI device is smaller in size, has the HDCP (High Bandwidth Digital Copy Protection) coding feature installed, and supports multi-channel digital audio.
DVI IN [R-AUDIO-L]
- DVI audio outputs for external devices.
▶ Supported modes for HDMI/DVI and Component
| 480i 480p 576i 576p | 720p 1080i | |||||
| HDMI/DVI 50Hz | X | X | X | O | O | O |
| HDMI/DVI 60Hz | X | O | X | X | O | O |
| Component | O | O | O | O | O | O |
③ SERVICE
- Connector for SERVICE only.
④ PC IN [PC] / [AUDIO]
- Connect to the video and audio output jack on your PC.
⑤ ANT IN
To view television channels correctly, a signal must be received by the set from one of the following sources:
- An outdoor aerial / A cable television network / A satellite network
6 Headphones jack
- Headphone may be connected to the headphone output on your set. While the head phone is connected, the sound from the built-in speakers will be disabled.
⑦ AV IN [VIDEO]/[R-AUDIO-L]
- Connect RCA cable to an appropriate external A/V device such as VCR, DVD or Camcorder.
- Connect RCA audio cables to [R-AUDIO-L] on your set and the other ends to corresponding audio out connectors on the A/V device.
8 COMPONENT IN
- Connect component video cables (optional) to component connector ("P_R", "P_B", "Y") on the rear of your set and the other ends to corresponding component video out connectors on the DVD.
- If you wish to connect both the Set-Top Box and DVD, you should connect the Set-Top Box to the DVD and connect the DVD to component connector ("P_R", "P_B", "Y") on your set.
- The P_R , P_B and Y connectors on your component devices (DVD) are sometimes labeled Y, B-Y and R-Y or Y, Cb and Cr.
- Connect RCA audio cables (optional) to [R - AUDIO - L] on the rear of your set and the other ends to corresponding audio out connectors on the DVD.
⑨ KENSINGTON LOCK (depending on the model)
- The Kensington lock (optional) is a device used to physically fix the system when used in a public place.
- If you want to use a locking device, contact the dealer where you purchased the TV.
- The location of the kensington lock may be different depending on its model.
Viewing the Remote Control
① Television Standby button
② Selects the TV mode directly
③ Number buttons for direct channel access
4 One/Two-digit channel selection
⑤ +: Volume increase : Volume decrease
⑥ Temporary sound switch-off
⑦ Use to quickly select frequently used functions.
⑧ Use to see information on the current broadcast
⑨ Colour buttons : Use these buttons in the Channel list, etc.
Displays the Channel List on screen
⑫ Available source selection
13 Previous channel
14 P: Next channel
P : Previous channel
⑮ Returns to the previous menu
16 Control the cursor in the menu
⑰ Exit the on-screen menu
18 Picture size selection
19 Displays the main on-screen menu
20 Selects the HDMI mode directly.
21 Picture effect selection
Teletext Functions
② Exit from the teletext display
⑦ Teletext size selection
8 Teletext reveal
⑨ Fastext topic selection
⑩ Alternately select Teletext, Double, or Mix.
⑪ Teletext store
⑫ Teletext mode selection (LIST/FLOF)
⑬ Teletext sub page
14 P 📐Teletext next page
P : 📋Teletext previous page
15 Teletext hold
17 Teletext cancel
19 Teletext index
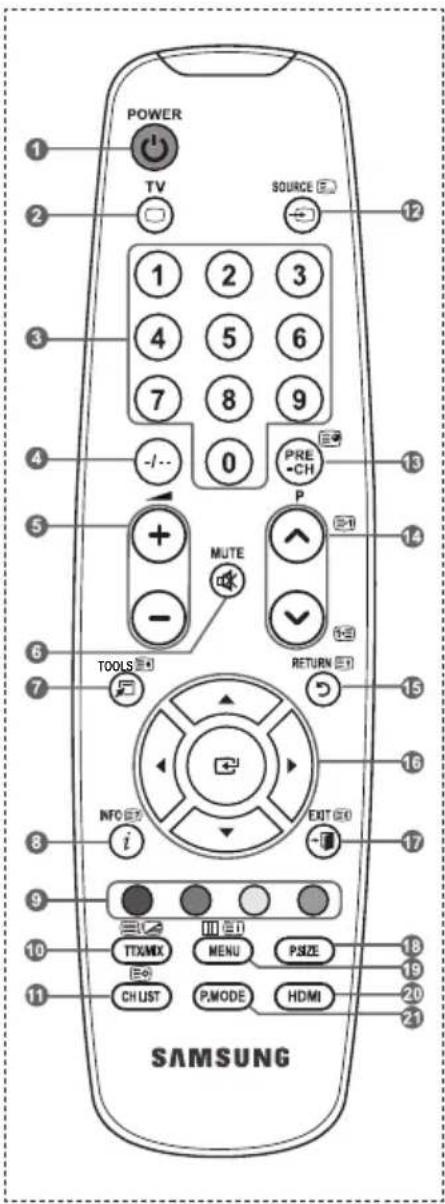
The performance of the remote control may be affected by bright light.
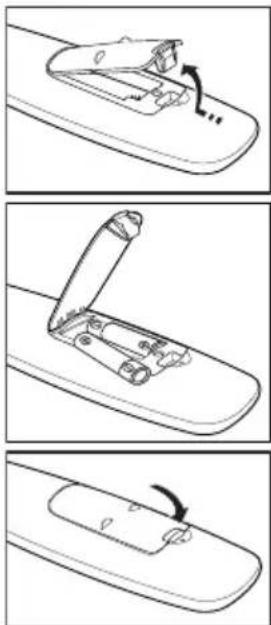
Installing Batteries in the Remote Control
-
Lift the cover at the back of the remote control upward as shown in the figure.
-
Install two AAA size batteries.
Make sure to match the "+" and "-" ends of the batteries with the diagram inside the compartment.
- Replace the cover.
Remove the batteries and store them in a cool, dry place if you won't be using the remote control for a long time.
If the remote control doesn't work, check the following:
- Is the TV power on?
- Are the plus and minus ends of the batteries reversed?
- Are the batteries drained?
- Is there a power outage, or is the power cord unplugged?
- Is there a special fluorescent light or neon sign nearby?
Switching On and Off
The mains lead is attached to the rear of your set.
-
Plug the mains lead into an appropriate socket. ➢ The standby indicator lights up on your set.
-
Press the button on your set.
You also can press the POWER ⏻ button or the TV button on the remote control to turn the TV on.
The channel that you were watching last is reselected automatically.
- Press the numeric button (0\~9) or channel up/down (/@button on the remote control or
button on your set.
When you switch the set on for the very first time, you will be asked to choose language in which the menus are to be displayed.
- To switch your set off, press the POWER button again.
Placing Your Television in Standby Mode
Your set can be placed in standby mode in order to reduce the power consumption. The standby mode can be useful when you wish to interrupt viewing temporarily (during a meal, for example).
- Press the POWER button on the remote control.
The screen is turned off and a red standby indicator appears on your set.
- To switch your set back on, simply press the POWER®, numeric buttons (0\~9), TV button or channel up/down (✗)Button again.
Do not leave your set in standby mode for long periods of time (when you are away on holiday, for example).
It is best to unplug the set from the mains and aerial.
Viewing the Menus
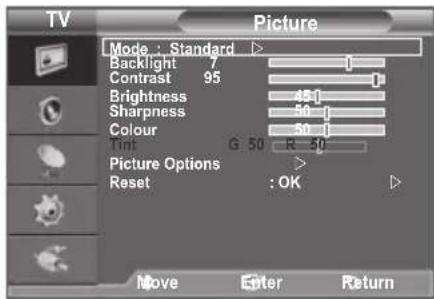
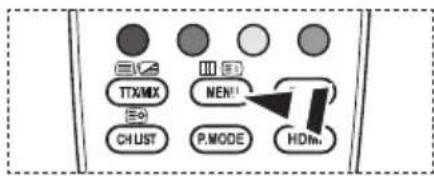
- With the power on, press the MENU button. The main menu appears on the screen. The menu's left side has icons: Picture, Sound, Channel, Setup, Input.
- Press the ▲ or ▼ button to select one of the icons. Then press the ENTER ⬆ button to access the icon's submenu.
- Press the EXIT button to exit.
The on-screen menus disappear from the screen after about one minute.
Using the TOOLS Button
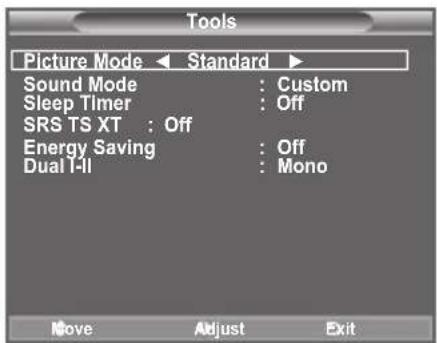
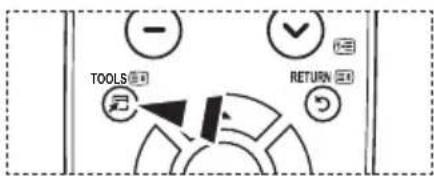
You can use the TOOLS button to select your frequently used functions quickly and easily. The "Tools" menu change depending on which external input mode you are viewing.
- Press the TOOLS button.
The "Tools" menu will appear. - Press the ▲ or ▼ button to select a menu.
- Press the ▲/▼/◄/►/ENTER ➕ buttons to display, change, or use the selected items. For a more detailed description of each function, refer to the corresponding page.
• Picture Mode, see page 15
• Sound Mode, see page 21
- Sleep Timer, see page 23
• SRS TS XT, see page 21
• Energy Saving, see page 25
- Dual I-II, see page 22
- PIP, see page 20
• Auto Adjustment, see page 29
Plug & Play
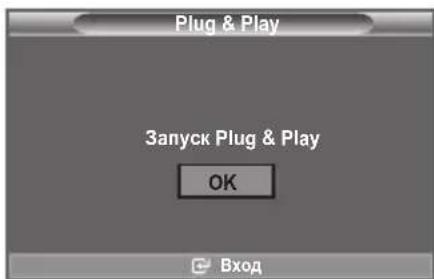
When the TV is initially powered on, several basic settings proceed automatically and subsequently. The following settings are available.
-
Press the POWER button on the remote control. The message "Заныск Plug & Play" is displayed with "OK" selected.
-
Select the appropriate language by pressing the ▲ or ▼ button. Press the ENTER button to confirm your choice.
-
Press the ◀ or ▶ button to select "Store Demo" or "Home Use", then the ENTER ⏻ button. We recommend setting the TV to "Home Use" mode for the best picture in your home environment.
"Store Demo" mode is only intended for use in retail environments.
If the unit is accidentally set to "Store Demo" mode and you want to return to "Home Use" (Standard): Press the Volume button on the TV. When the volume OSD is displayed, press and hold the MENU button on the TV for 5 seconds
- The message "Check antenna input." is displayed with "OK" selected. Press the ENTER button.
Please check that the antenna cable is connected correctly.
-
Select the appropriate country by pressing the ▲ or ▼ button. Press the ENTER 📋 button to confirm your choice.
-
The "Auto Store" menu is displayed with the "Start" selected. Press the ENTER button. The channel search will start and end automatically.
After all the available channels are stored, the "Clock Set" menu appears.
Press the ENTER button at any time to interrupt the memorization process.
- Press the ENTER button. Select the "Month", "Day", "Year", "Hour", or "Minute" by pressing the ◀ or ▶ button.
Set the "Month", "Day", "Year", "Hour", or "Minute" by pressing the ▲ or ▼ button. ➢ You can also set the "Month", "Day", "Year", "Hour" and "Minute" by pressing the number buttons on the remote control.
- Press the ENTER button to confirm your setting. The message "Enjoy your viewing" is displayed. When you have finished, press the ENTER button.
Even if the ENTER button is not pressed, the message will automatically disappear after several seconds.
• Language: Select your language.
- Country: Select your country.
- Auto Store: Automatically scans for and stores channels available in the local area.
- Clock Set: Sets the current time for the TV clock.
If you want to reset this feature...
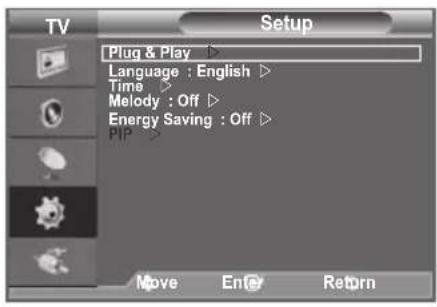
- Press the MENU button to display the menu.
Press the ▲ or ▼ button to select "Setup" then press the ENTER button.
- Press the ENTER button again, to select "Plug & Play".
For further details on setting up options, refer to the page 9.
The "Plug & Play" feature is only available in the TV mode.
Storing Channels Automatically
You can scan for the frequency ranges available to you (and availability depends on your country). Automatically allocated programme numbers may not correspond to actual or desired programme numbers. However, you can sort numbers manually and clear any channels you do not wish to watch.
- Press the MENU button to display the menu.
Press the ▲ or ▼ button to select "Channel", then press the ENTER button.
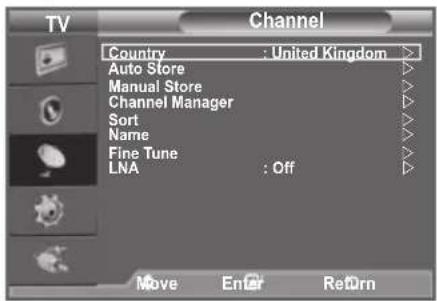
- Press the ENTER button to select "Country".
- Select the appropriate country by pressing the ▲ or ▼ button.
Press the ENTER button to confirm your choice. - Press the ▲ or ▼ button to select "Auto Store", then press the ENTER 📊 button.
- Press the ENTER button.
The TV will begin memorizing all of the available channels.
➢ Press the ENTER button at any time to interrupt the memorization process and return to the "Channel" menu.
- After all the available channels are stored, the "Sort" menu appears. (refer to page 13)
You can store television channels, including those received via cable networks.
When storing channels manually, you can choose:
◆ Whether or not to store each of the channels found.
- The programme number of each stored channel which you wish to identify.
-
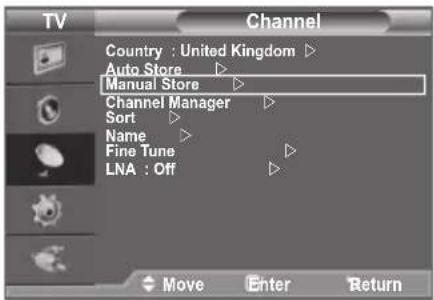
Press the MENU button to display the menu. Press the ▲ or ▼ button to select "Channel", then press the ENTER button.
-
Press the ▲ or ▼ button to select "Manual Store", then press the ENTER button.
-
Select the required option by pressing the ▲ or ▼ button, then press the ENTER button.
-
When you are satisfied with your setting, press the ENTER button.
-
Press the EXIT button to exit.
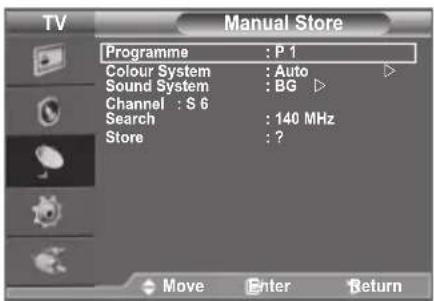
◆ Programme (Programme number to be assigned to a channel)
- Press the ▲ or ▼ button until you find the correct number.
You can also select the channel number directly by pressing the numeric buttons (0\~9).
Colour System: Auto/PAL/SECAM/NTSC4.43
- Press the ▲ or ▼ button to select the required colour standard.
Sound System: BG/DK/I/L
- Press the ▲ or ▼ button to select the required sound standard.
◆ Channel (When you know the number of the channel to be stored)
- Press the ▲ or ▼ button to select C (Air channel) or S (Cable channel).
- Press the ▶ button, then press the ▲ or ▼ button to select the required number.
You can also select the channel number directly by pressing the numeric buttons (0\~9).
If there is abnormal sound or no sound, re-select the sound standard required.
♦ Search (When you do not know the channel numbers)
- Press the ▲ or ▼ button to start the search.
- The tuner scans the frequency range until the first channel or the channel that you selected is received on the screen.
◆ Store (When you store the channel and associated programme number)
- Set to "OK" by pressing the ENTER button.
Channel mode
- P (Programme mode): When completing tuning, the broadcasting stations in your area have been assigned to position numbers from P00 to P99. You can select a channel by entering the position number in this mode.
- C (Air channel mode): You can select a channel by entering the assigned number to each air broadcasting station in this mode.
- S (Cable channel mode): You can select a channel by entering the assigned number for each cable channel in this mode.
- P (Programme mode): When completing tuning, the broadcasting stations in your area have been assigned to position numbers from P00 to P99. You can select a channel by entering the position number in this mode. - C (Air channel mode): You can select a channel by entering the assigned number to each air broadcasting station in this mode. - S (Cable channel mode): You can select a channel by entering the assigned number for each cable channel in this mode.
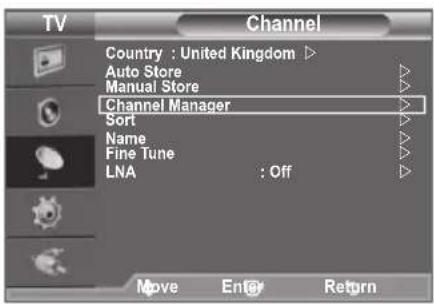
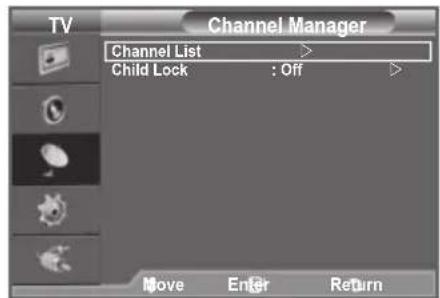
Using the Channel Manager, you can conveniently lock or add channels.
- Press the MENU button to display the menu.
Press the ▲ or ▼ button to select "Channel", then press the ENTER button.
- Press the ▲ or ▼ button to select "Channel Manager", then press the ENTER button.
♦ Adding channels
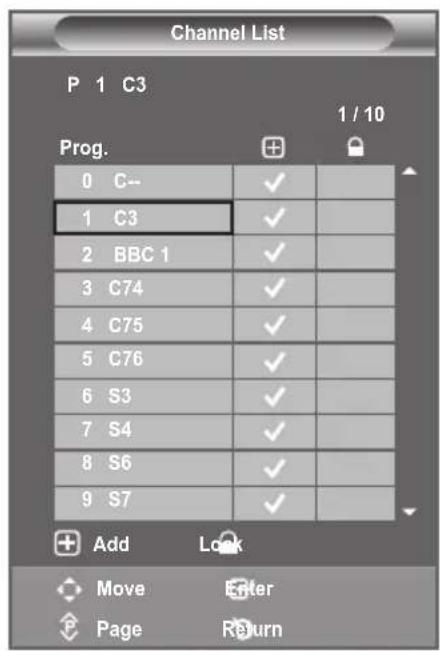
Using the Channel List, you can add channels.
-
Select "Channel List" by pressing the ENTER button.
-
Move to the ( ) field by pressing the ▲, ▼, ◀ or ▶ button, select a channel to be added, and press the ENTER button to add the channel.
If you press the ENTER button again, the (√) symbol next to the channel disappears and the channel is not added.
"> "🔒" is active when "Child Lock" is selected to "On".
♦ Locking channels
This feature allows you to prevent unauthorized users, such as children, from watching unsuitable programmes by muting out video and audio.
- Press the ▲ or ▼ button to select "Child Lock", then press the ENTER 📋 button.
- Select "On" by pressing the ▲ or ▼ button, then press the ENTER button.
- Press the ▲ or ▼ button to select "Channel List", then press the ENTER button.
- Move to the " 🔊" field by pressing the ▲, ▼, ◀ or ▶ button, select a channel to be locked, and press the ENTER button.
If you press the ENTER button again, the √ symbol next to the channel disappears and the channel lock is cancelled.
A blue screen is displayed when "Child Lock" is activated.
- Press the EXIT button to exit.
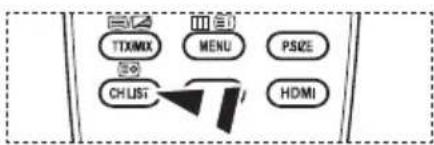
Select "On" or "Off" in "Child Lock" to easily turn the channels which selected on "☐" to be active or inactive.
You can select these options by simply pressing the CH LIST button on the remote control.
Sorting the Stored Channels
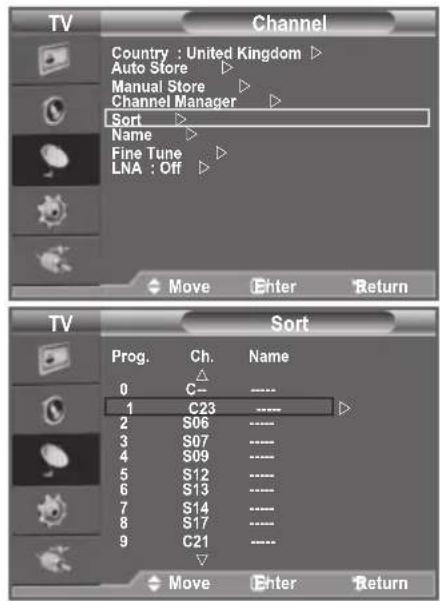
This operation allows you to change the programme numbers of the stored channels.
This operation may be necessary after using the auto store.
- Press the MENU button to display the menu.
Press the ▲ or ▼ button to select "Channel", then press the ENTER button. -
Press the ▲ or ▼ button to select "Sort", then press the ENTER button.
-
Select the channel number that you wish to change by pressing the ▲ or ▼ button.
Press the ENTER button.
The selected channel number and name are moved to right side.
-
Select the number of the programme to which the channel is to be moved by pressing the ▲ or ▼ button.
-
Press the ENTER button. The channel is moved to its new position and all other channels are shifted accordingly.
-
Repeat steps 3 to 5 for another channel to be sorted.
-
Press the EXIT button to exit.
Assigning Channels Names
Channel names will be assigned automatically when channel information is broadcast. These names can be changed, allowing you to assign new names.
-
Press the MENU button to display the menu. Press the ▲ or ▼ button to select "Channel", then press the ENTER button.
-
Press the ▲ or ▼ button to select "Name", then press the ENTER 📊 button.
-
If necessary, select the channel to be assigned to a new name by pressing the ▲ or ▼ button. Press the ENTER button.
The selection bar is displayed around the name box.
| To... | Then... |
| Select a letter, number or symbol | Press the ▲ or ▼ button |
| Move on the next letter | Press the ▶ button |
| Move back the previous letter | Press the ◀ button |
| Confirm the name | Press the ENTER button |
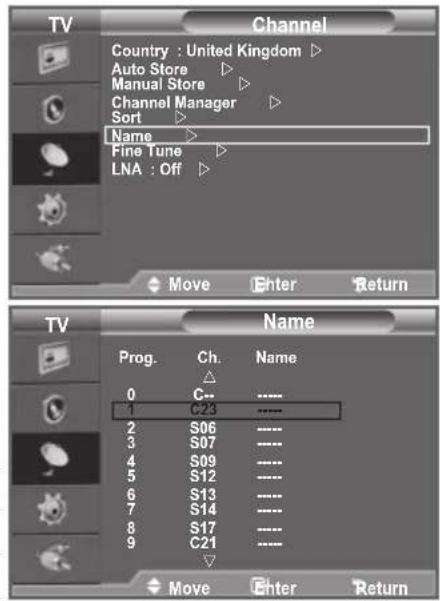
The following characters are available: Letters of the alphabet (A\~Z) / Numbers (0\~9) / Special characters (+, -, *, /, space)
-
Repeat steps 3 to 4 for each channel to be assigned to a new name.
-
Press the EXIT button to exit.
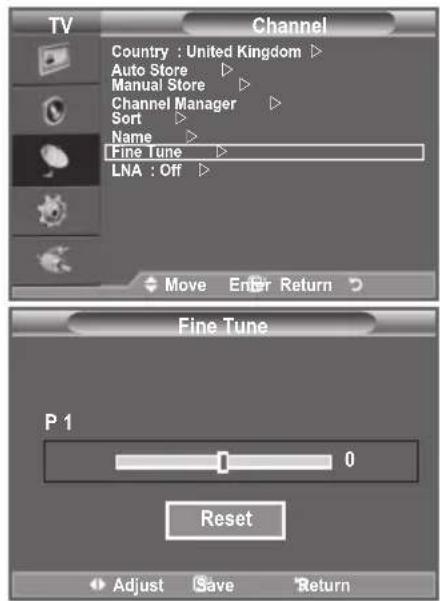
Fine Tuning Channel Reception
Use fine tuning to manually adjust a particular channel for optimal reception.
- Use the number buttons to directly select the channel that you want to fine tune.
-
Press the MENU button to display the menu. Press the ▲ or ▼ button to select "Channel", then press the ENTER button.
-
Press the ▲ or ▼ button to select "Fine Tune", then press the ENTER button.
-
Press the ◀ or ▶ button to adjust the fine tuning. Press the ENTER 📋 button.
-
Press the EXIT button to exit.
Fine tuned channels that have been saved are marked with an asterisk "*" on the right-hand side of the channel number in the channel banner. And the channel number turns red.
To reset the fine-tuning, select "Reset" by pressing the ▲ or ▼ button and then press the ENTER button.
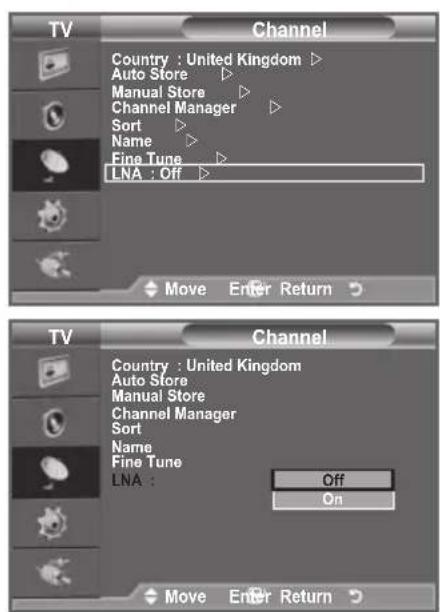
If the TV is operating in a weak-signal area, the LNA function can improve the reception (a low-noise preamplifier boosts the incoming signal).
-
Press the MENU button to display the menu. Press the ▲ or ▼ button to select "Channel", then press the ENTER button.
-
Press the ▲ or ▼ button to select "LNA", then press the ENTER button.
-
Press the ▲ or ▼ button to select "Off" or "On". Press the ENTER 📊 button.
-
Press the EXIT button to exit.
Changing the Picture Standard
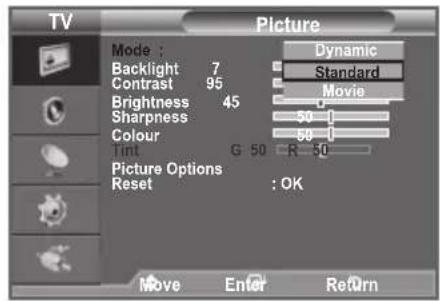
You can select the type of picture which best corresponds to your viewing requirements.
- Press the MENU button to display the menu.
Press the ENTER button, to select "Picture". - Press the ENTER button again, to select "Mode".
- Press the ▲ or ▼ button to select the desired picture effect.
Press the ENTER button. - Press the EXIT button to exit.
◆ Dynamic: Selects the picture for high-definition in a bright room.
Standard: Selects the picture for optimum display in a normal environment.
◆ Movie: Selects the picture for comfortable display in a dark room.
The Picture mode must be adjusted separately for each input source.
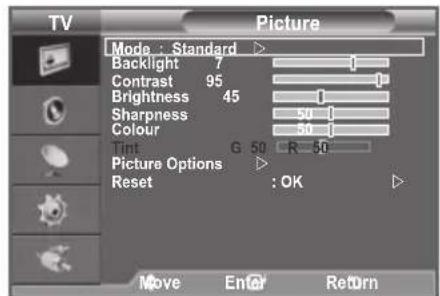
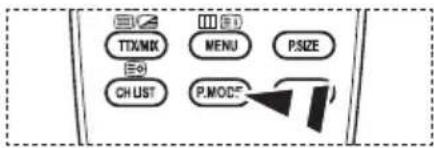
You can also press the P.MODE button on the remote control to select one of the picture settings.
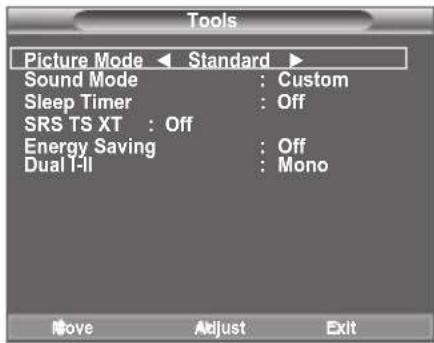
Easy Setting
- Press the TOOLS button on the remote control.
- Press the ▲ or ▼ button to select "Picture Mode".
- Press the ◀ or ▶ button to select the required option.
- Press the EXIT or TOOLS button to exit.
Adjusting the Custom Picture
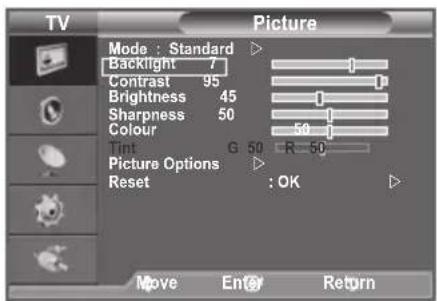
Your set has several settings which allow you to control picture quality.
- To select the desired picture effect, follow the "Changing the Picture Standard" instructions number 1 to 3. (On page 15)
- Press the ▲ or ▼ button to select a particular item. Press the ENTERG button.
- Press the ◀ or ▶ button to decrease or increase the value of a particular item. Press the ENTER button.
- Press the EXIT button to exit.
◆ Backlight: Adjusts the screen brightness by adjusting the LCD backlight brightness. (0\~10)
◆ Contrast: Adjusts the lightness and darkness between objects and the background.
♦ Brightness: Adjusts the brightness of the whole screen.
◆ Sharpness: Adjusts the outline of objects to either sharpen them or make them more dull.
♦ Colour: Adjusts the colours, making them lighter or darker.
♦ Tint: Adjusts the colour of objects, making them more red or green for a more natural look.
The adjusted values are stored according to the selected Picture mode.
In PC mode, you can only make changes to "Backlight", "Contrast" and "Brightness".
In TV, Ext., AV modes of the PAL system, you cannot use the "Tint" Function.
You can return to the factory defaults picture settings by selecting the "Reset".
(Refer to "Resetting the Picture Settings to the Factory Defaults" on page 17)
The energy consumed during use can be significantly reduced if the level of brightness of the picture is reduced, and that this will reduce the overall running cost.
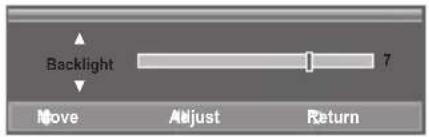
Resetting the Picture Settings to the Factory Defaults
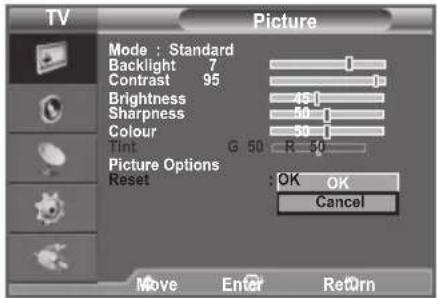
You can return to the factory defaults picture settings.
- To select the desired picture effect, follow the "Changing the Picture Standard" instructions number 1 to 3 on page 15.
- Press the ▲ or ▼ button to select "Reset", then press the ENTER button.
- Press the ▲ or ▼ button to select "OK" or "Cancel". Press the ENTER 📋 button.
- Press the EXIT button to exit.
The "Reset" will be set for each Picture mode.
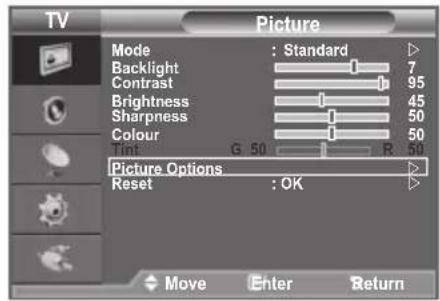
Changing the Picture Options
- Press the MENU button to display the menu. Press the ENTER button, to select "Picture".
- Press the ▲ or ▼ button to select "Picture Options", then press the ENTERG button.
- Select the required option by pressing the ▲ or ▼ button, then press the ENTER ☐ button.
- When you are satisfied with your setting, press the ENTER button.
- Press the EXIT button to exit.
In PC mode, you can only make changes to the "Colour Tone" and "Size" from among the items in "Picture Options".
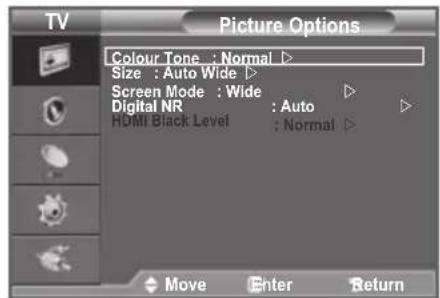
♦ Colour Tone: Cool2/Cool1/Normal/Warm1/Warm2
You can select the most comfortable colour tone to your eyes.
The adjusted values are stored according to the selected Picture mode.
“Warm1” or “Warm2” is only activated when the picture mode is "Movie".
♦ Size: Auto Wide/Wide/16:9/Wide Zoom/Zoom/4:3/Just Scan
You can select the picture size which best corresponds to your viewing requirements.
♦ Auto Wide: Automatically adjusts the picture size to the "16:9" aspect ratio.
♦ Wide: Adjusts the picture size to 16:10 appropriate for DVDs or wide broadcasting.
◆ 16:9: Adjusts the picture size to 16:9 appropriate for DVDs or wide broadcasting.
♦ Wide Zoom: Magnify the size of the picture more than 4:3.
♦ Zoom: Magnifies the 16:9 wide picture (in the vertical direction) to fit the screen size.
◆ 4:3: This is the default setting for a video movie or normal broadcasting.
♦ Just Scan: Use the function to see the full image without any cutoff when HDMI (720p/1080i) or Component (1080i) signals are input.
"Auto Wide" function is available only in "TV", "Ext." and "AV" mode.
In PC Mode, only "Wide" and "4:3" mode can be adjusted.
Settings can be adjusted and stored for each external device you have connected to an input of the TV.
Temporary image retention may occur when viewing a static image on the set for more than two hours.
Wide Zoom: Move the screen up/down using the ▲ or ▼ button after selecting the □ by pressing the ▶ or ENTER□ button.
Zoom: Select by pressing the ◀ or ▶ button.
Use the ▲ or ▼ button to move the picture up and down. After selecting 📄, use the ▲ or ▼ button to magnify or reduce the picture size in the vertical direction.
After selecting "Just Scan" in HDMI (1080i) or Component (1080i) mode:
Select by pressing the ◀ or ▶ button. Use the ▲, ▼, ◀ or ▶ button to move the picture.
Reset: Press the ◀ or ▶ button to select "Reset", then press the ENTER○ button.
You can initialize the setting.
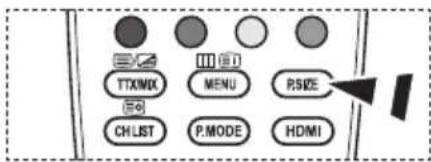
You can select these options by simply pressing the P.SIZE button on the remote control.
Screen Mode : Wide/16:9/Wide Zoom/Zoom/4:3
When setting the picture size to "Auto Wide" in a 16:9 wide TV, you can determine the picture size you want to see the 4:3 WSS (Wide Screen Service) image or nothing. Each individual European country requires different picture size so this function is intended for users to select it.
♦ Wide: Sets the picture to 16:10 wide mode.
◆ 16:9: Sets the picture to 16:9 wide mode.
♦ Wide Zoom: Magnify the size of the picture more than 4:3.
◆ Zoom: Magnify the size of the picture vertically on screen.
◆ 4:3: Sets the picture to 4:3 normal mode.
This function is available in "Auto Wide" mode.
This function is not available in "Component" or "HDMI" mode.
♦ Digital NR: Off/Low/Medium/High/Auto
If the broadcast signal received by your TV is weak, you can activate the Digital Noise Reduction feature to help reduce any static and ghosting that may appear on the screen.
When the signal is weak, select one of the other options until the best picture is displayed.
♦ HDMI Black Level: Normal/Low
You can select the black level on the screen to adjust the screen depth.
This function is active only when the external input connects to HDMI(RGB signals).
Viewing the Picture In Picture (PIP)
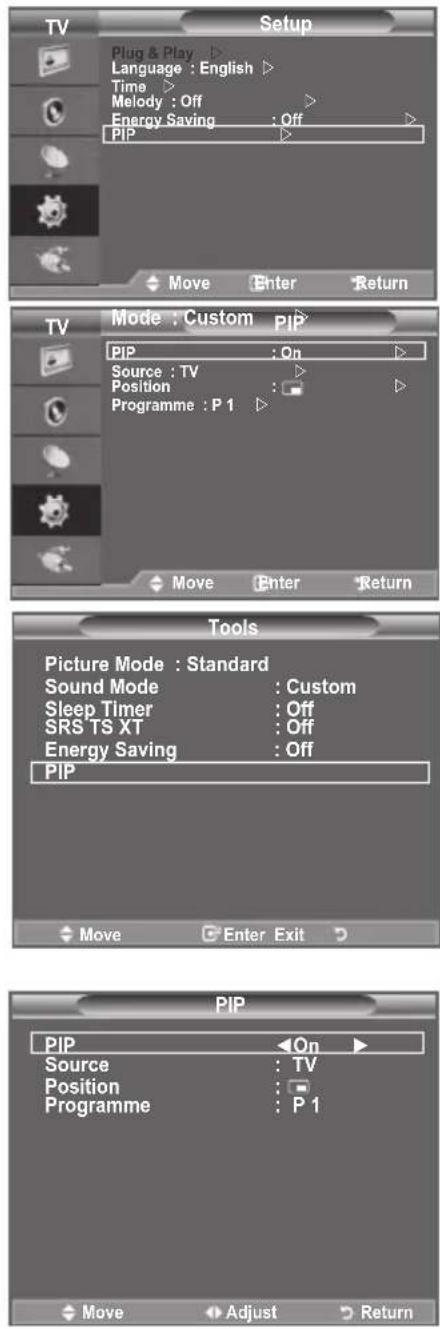
You can display a sub picture within the main picture of set programme or video input. In this way, you can watch the picture of set programme or video input from any connected equipment while watching the main picture.
- Press the MENU button to display the menu.
Press the ▲ or ▼ button to select "Setup", then press the ENTER button. - Press the ▲ or ▼ button to select "PIP", then press the ENTER button.
- Select the required option by pressing the ▲ or ▼ button, then press the ENTER button.
- When you are satisfied with your setting, press the ENTER button.
- Press the EXIT button to exit.
You may notice that the picture in the PIP window becomes slightly unnatural when you use the main screen to view a game or karaoke.
Easy Setting
- Press the TOOLS button on the remote control.
- Press the ▲ or ▼ button to select "PIP", then press the ENTER button.
- Press the ▲ or ▼ button to select a particular item.
- Press the ◀ or ▶ button to select the required option.
- Press the EXIT or TOOLS button to exit.
- PIP: On/Off You can activate or deactivate the PIP function.
Source You can select a source of the sub-picture.
◆ Position: ☐ / ☑ / ☐ You can select a position of the sub-picture.
◆ Programme You can select a channel of the sub-picture only when the "Source" is set to "TV".
- Precautions When Displaying a Still Image
- Contents
- CONNECTING AND PREPARING YOUR TV
- SETTING THE CHANNELS
- SETTING THE PICTURE
- SETTING THE SOUND
- SETTING THE TIME
- FUNCTION DESCRIPTION
- SETTING THE PC
- RECOMMENDATIONS FOR USE
- List of Parts
- Installing the Stand
- Installing the Wall Mount Kit
- ① SOURCE
- ② MENU
- ③ + ▶ -
- < C/P.
- ⑤ (Power)
- Remote Control Sensor
- ⑦ Power Indicator
- Speakers
- DVI IN [R-AUDIO-L]
- ③ SERVICE
- ④ PC IN [PC] / [AUDIO]
- ⑤ ANT IN
- Headphones jack
- ⑦ AV IN [VIDEO]/[R-AUDIO-L]
- COMPONENT IN
- ⑨ KENSINGTON LOCK (depending on the model)
- Viewing the Remote Control
- Teletext Functions
- Installing Batteries in the Remote Control
- Switching On and Off
- Placing Your Television in Standby Mode
- Viewing the Menus
- Using the TOOLS Button
- Plug & Play
- If you want to reset this feature...
- Storing Channels Automatically
- Channel mode
- Sorting the Stored Channels
- Assigning Channels Names
- Fine Tuning Channel Reception
- Changing the Picture Standard
- Easy Setting
- Adjusting the Custom Picture
- Your set has several settings which allow you to control picture quality.
- Resetting the Picture Settings to the Factory Defaults
- Changing the Picture Options
- ♦ Colour Tone: Cool2/Cool1/Normal/Warm1/Warm2
- ♦ Size: Auto Wide/Wide/16:9/Wide Zoom/Zoom/4:3/Just Scan
- Screen Mode : Wide/16:9/Wide Zoom/Zoom/4:3
- ♦ Digital NR: Off/Low/Medium/High/Auto
- ♦ HDMI Black Level: Normal/Low
- Viewing the Picture In Picture (PIP)
Brand : SAMSUNG
Model : LE22A451C1
Category : Uncategorized