
KX-HN1032 - Baby monitor PANASONIC - Free user manual and instructions
Find the device manual for free KX-HN1032 PANASONIC in PDF.


| Product Type | Baby Monitor System |
| Model Number | KX-HN1032 |
| Camera Unit Model | KX-HNC300 |
| Monitor Unit Model | KX-HNM300 |
| Display Size | 3.5 inches |
| Image Sensor | 0.3 megapixel CMOS |
| Minimum Illuminance | 0 lx (infrared LEDs for night vision) |
| Field of View (Horizontal) | Approx. 37° |
| Field of View (Vertical) | Approx. 28° |
| Pan Range | 309° (movable range) |
| Tilt Range | 72° (movable range) |
| Wireless Technology | DECT |
| Frequency Range | 1.92 GHz – 1.93 GHz |
| Maximum Range (Line of Sight) | Up to 457.5 m (1,500 ft) |
| Power Source (Camera) | AC adaptor: Input 100-240 V AC, Output 5.0 V DC, 1,000 mA |
| Power Source (Monitor) | AC adaptor: Input 100-240 V AC, Output 5.0 V DC, 1,000 mA |
| Battery Type (Monitor) | Lithium Ion Polymer (supplied) |
| Battery Life (Continuous Use) | Up to 5 hours |
| Battery Life (Standby) | Up to 13 hours |
| Sensors | Motion (visual), Temperature, Sound |
| Night Vision | Yes (automatic infrared LEDs, black & white image) |
| Audio | Two-way talk, adjustable speaker volume (camera & monitor) |
| Lullabies | 10 built-in lullabies, manual or automatic play |
| Temperature Alert Range | Lower limit: 32-103°F, Upper limit: 33-104°F |
| Warranty (USA) | 1 year parts and labor |
Frequently Asked Questions - KX-HN1032 PANASONIC
User questions about KX-HN1032 PANASONIC
0 question about this device. Answer the ones you know or ask your own.
Ask a new question about this device
Download the instructions for your Baby monitor in PDF format for free! Find your manual KX-HN1032 - PANASONIC and take your electronic device back in hand. On this page are published all the documents necessary for the use of your device. KX-HN1032 by PANASONIC.
USER MANUAL KX-HN1032 PANASONIC
Operating Instructions
Baby Monitor
Model No. KX-HN4001
KX-HN4101
KX-HN4102
KX-HN1032
(Camera Model No. KX-HNC300)
(Monitor Model No. KX-HNM300)
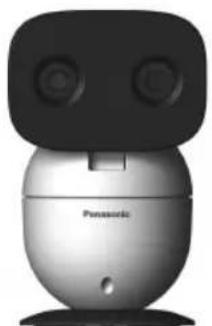
natural_image
Exterior view of a Panasonic air purifier device (no text or symbols visible on body)Model shown is KX-HN4001.
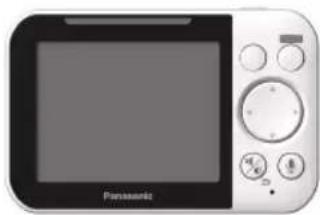
natural_image
Front view of a Panasonic portable kitchen appliance with control buttons (no visible text or symbols on the device body)Before initial use, see "Getting Started" on page 9.
Thank you for purchasing a Panasonic product.
Please read these operating instructions before using the unit and save them for future reference.
For assistance, please visit our Web site:
http://shop.panasonic.com/support for customers in the U.S.A.
Please register your product: http://shop.panasonic.com/support
Table of Contents
Introduction
About the baby monitor 3
Model composition ....3
Accessory information ....3
Important Information
Graphical symbols for use on equipment and
their descriptions 5
About this system 5
For your safety 5
Important safety instructions ....7
For best performance 7
Other information 8
Getting Started
Part names and functions 9
Setting up the camera unit 10
Setting up the monitor unit 14
Turning the power on/off 16
Language setting 16
Smart LED indicator and display icon
colors 16
Display icons 16
Confirming the usage area .....17
Testing the baby monitor system .....17
Using the Baby Monitor
Baby monitor 19
Viewing live camera images 19
Listening/talking to the camera unit .....19
Adjusting the speaker volume .....20
Adjusting the chime/beep volume .....20
Adjusting the brightness of camera
images 20
Adjusting the sleep mode 20
Configuring the temperature sensor .....20
Playing/canceling lullabies manually .....21
Selecting camera units/using auto scan .....21
Programming
Menu list 22
Smart features 25
Sensors 26
Timer 27
Managing camera units 27
Useful Information
Troubleshooting 28
Specifications 30
FCC and other information ....35
Other notices and information (for
Canada) 36
Customer services 37
Limited Warranty (ONLY FOR U.S.A.) .....38
About the baby monitor
The baby monitor system helps you keep an eye on your baby from anywhere in your house. The system consists of a camera unit and a monitor unit that are connected wirelessly using DECT technology.
The system's smart features give you peace of mind to go about your day. For example, you can use auto lullaby (page 25) to play a lullaby automatically when your baby is crying, and smart notification (page 25) to display notifications on the monitor unit when your baby wakes or cries.
Model composition
| Model No. | Monitor unit Camera unit | |||
| Part No. Quantity | Part No. Quantity | |||
| KX-HN4001KX-HN4101 | KX-HNM300 1 KX- | HNC300 1 | ||
| KX-HN4102KX-HN1032 | KX-HNM300 1 KX- | HNC300 2 | ||
Accessory information
Supplied accessories
| No. | Accessory item/Part number | Quantity | |
| KX-HN4001KX-HN4101 | KX-HN4102KX-HN1032 | ||
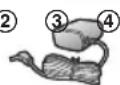
| 1 | AC adaptor for the camera unit/PNWYAC300W00 1 2 | ||
| 2 | AC adaptor for the monitor unit/PNWYAM300W00 1 1 | ||
| 3 | Wall mounting adaptor for the camera unit/PNWYAC300W01 | 1 | 2 |
| 4 | Rechargeable battery for the monitor unit/PNWYBM300W00 | 1 | 1 |




Introduction
Expanding the baby monitor system
Camera unit (optional): KX-HNC301
You can expand your baby monitor system by registering up to the following number of optional camera units (4 units max. in total including the camera unit supplied in KX-HN4001/KX-HN4101/KX-HN4102/KX-HN1032) to the monitor unit.
KX-HN4001/KX-HN4101: 3 optional camera units KX-HN4102/KX-HN1032: 2 optional camera units
Other information
- Design and specifications are subject to change without notice.
- The illustrations in these instructions may vary slightly from the actual product.
Graphical symbols for use on equipment and their descriptions
| Symbol Explanation Symbol Explanation | |||
 | Alternating current (A.C.) Class II  | equipment (equipment in which protection against electric shock relies on Double Insulation or Reinforced Insulation) | |
 | Direct current (D.C.) | ||
 | For indoor use only Stand-by (pow  | ||
About this system
- This system is not designed to provide complete protection from property loss. To the maximum extent permitted by applicable law, Panasonic will not be held responsible for any damage incurred as a result of property loss.
- This product should not be used as substitute for a medical or caregiver's supervision. It is the caregiver's responsibility to stay close enough to handle any eventuality.
- The system's wireless features are subject to interference, therefore functionality in all situations cannot be guaranteed. Panasonic will not be held responsible for injury or damage to property that occurs in the event of wireless communication error or failure.
- If a power failure occurs or the power is disconnected, the temperature will not be accurate for up to an hour.
For your safety
To prevent severe injury and loss of life/property, read this section carefully before using the product to ensure proper and safe operation of your product.
WARNING
Power connection
- Use only the power source marked on the product.
- Do not overload power outlets and extension cords. This can result in the risk of fire or electric shock.
- Completely insert the AC adaptor/power plug into the power outlet. Failure to do so may cause electric shock and/or excessive heat resulting in a fire.
- Regularly remove any dust, etc. from the AC adaptor/power plug by pulling it from the power outlet, then wiping with a dry cloth. Accumulated dust may cause an insulation defect from moisture, etc. resulting in a fire.
- Unplug the product from power outlets if it emits smoke, an abnormal smell, or makes an unusual noise. These conditions can cause fire or electric shock. Confirm that smoke has stopped emitting and contact us at http://shop.panasonic.com/support
- Unplug from power outlets and never touch the inside of the product if its casing has been broken open. Danger of electric shock exists.
- Never touch the plug with wet hands. Danger of electric shock exists.
- Do not connect non-specified devices.
Important Information
Installation
- To prevent the risk of fire or electrical shock, do not expose the product to rain or any type of moisture.
- Do not place or use this product near automatically controlled devices such as automatic doors and fire alarms. Radio waves emitted from this product may cause such devices to malfunction resulting in an accident.
- WARNING: Strangulation Hazard: Children have STRANGLED in cords. Keep this cord out of the reach of children (more than 1 m (3 feet) away).
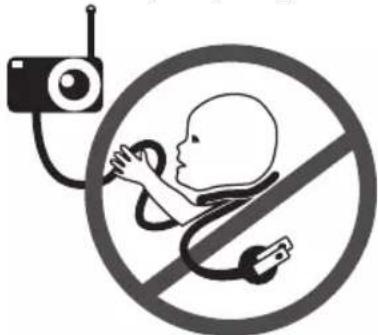
- ☐ not allow the AC adaptor to be excessively pulled, bent or placed under heavy objects.
- Keep small parts, such as screws, out of the reach of children. There is a risk of swallowing. In the event they are swallowed, seek medical advice immediately.
Operating safeguards
- Uplug the product from power outlets before cleaning. Do not use liquid or aerosol cleaners.
- Do not disassemble the product.
- Never put metal objects inside the product. If metal objects enter the product, turn off the circuit breaker and contact an authorized service center.
Medical
- Consult the manufacturer of any personal medical devices, such as pacemakers or
hearing aids, to determine if they are adequately shielded from external RF (radio frequency) energy. DECT features operate between 1.92 GHz and 1.93 GHz with a peak transmission power of 115 mW (max.).
- Do not use the product in health care facilities if any regulations posted in the area instruct you not to do so. Hospitals or health care facilities may be using equipment that could be sensitive to external RF energy.
Lithium Ion (Li-Ion) Polymer battery
- ☑ not open, puncture, crush, or drop the battery. A damaged battery must not be used. This can result in the risk of fire, explosion, overheating, and leaking of the electrolyte.
- Do not touch the terminals and with metal objects.
- If any electrolyte should come into contact with your hands or clothes, wash it off thoroughly with water.
- If any electrolyte should come into contact with your eyes, never rub your eyes. Rinse your eyes thoroughly with water, and then consult a doctor.
CAUTION
Installation and location
- Never install wiring during a lightning storm.
- The AC adaptor is used as the main disconnect device. Ensure that the AC outlet is installed near the product and is easily accessible.
- Mount the product on the stable location where the camera unit can be adequately supported when installing.
- Do not mount the product on soft material. It may fall down, break or cause injury.
- Do not mount the product on the following materials: gypsum board, ALC (autoclaved lightweight cellular concrete), concrete block, plywood less than 25 mm (1 inch) thick, etc.
Lithium Ion (Li-Ion) Polymer battery
• Use only the specified battery.
- Insert the battery correctly.
- Do not leave the battery in an automobile exposed to direct sunlight for a long period of time with the doors and windows closed.
- Remove the battery if you do not use the product for a long period of time. Keep it in a cool, dark area.
- Do not replace a battery with wet hands.
CAUTION:
Risk of explosion if battery is replaced by an incorrect type. Dispose of used battery according to local regulations. - Stop using the battery immediately and keep away from fire if it emits an abnormal smell or leaks electrolyte. Released electrolyte may cause fire or burns.
- Exercise care when handling the batteries. Do not allow conductive materials such as rings, bracelets, or keys to touch the batteries, otherwise a short circuit may cause the batteries and/or the conductive material to overheat and cause burns.
- Do not put any conductive materials such as coins or hairpins onto the battery terminals. This can result in the risk of overheating.
- Charge the battery provided with or identified for use with this product only, in accordance with the instructions and limitations specified in this manual.
Attention:

The lithium ion/polymer battery you have purchased is recyclable.
Please call 1-800-8-BATTERY (1-800-822-8837) for information on how to recycle this battery.
Preventing accidents and injuries
- Do not put your ear(s) near the speaker, as loud sounds emitted from the speaker may cause hearing impairment.
Important safety instructions
When using your product, basic safety precautions should always be followed to reduce the risk of fire, electric shock, and injury to persons, including the following:
- Do not use this product near water for example, near a bathtub, washbowl, kitchen sink, or laundry tub, in a wet basement or near a swimming pool.
- Use only the power cord and batteries indicated in this manual. Do not dispose of batteries in a fire. They may explode. Check with local codes for possible special disposal instructions.
SAVE THESE INSTRUCTIONS
For best performance
Product location/avoiding noise
The monitor unit and camera units use radio waves to communicate with each other.
- For maximum coverage and noise-free communications, place your monitor unit:
- at a convenient, high, and central location with no obstructions between the monitor unit and the camera unit in an indoor environment.
– away from electronic appliances such as TVs, radios, personal computers, wireless devices, or other phones. - facing away from radio frequency transmitters, such as external antennas of mobile phone cell stations. (Avoid putting the product on a bay window or near a window.)
- If the reception for a monitor unit location is not satisfactory, move the monitor unit to another location for better reception.
Environment
- Keep the product away from electrical noise generating devices, such as fluorescent lamps and motors.
Important Information
- The product should be kept free from excessive smoke, dust, high temperature, and vibration.
- Do not expose this product to direct sunlight or other forms of powerful light such as halogen lights for long periods of time. (This may damage the image sensor.)
- Do not place heavy objects on top of the product.
- When you leave the product unused for a long period of time, unplug the product from the power outlet.
- The product should be kept away from heat sources such as heaters, kitchen stoves, etc. It should not be placed in rooms where the temperature is less than 0 °C (32 °F) or greater than 40 °C (104 °F). Damp basements should also be avoided.
- Operating the product near electrical appliances may cause interference. Move away from the electrical appliances.
Other information
Routine care
- Wipe the outer surface of the product with a soft moist cloth.
- Do not use benzine, thinner, or any abrasive powder.
Camera image quality
- Camera images may have the following characteristics.
– Colors in images may differ from the actual colors. - Faces or objects may appear dark when there is light behind the subject (i.e., backlighting).
– Image quality may be reduced in dark locations.
When the subject is lit by sunlight or halogen lights, black areas of the image may appear purplish. This is not a malfunction.
Notice for product disposal, transfer, or return
- Although the monitor unit does not have recording functions, to protect your privacy/confidentiality, we recommend that you reset the registered camera units (page 27) before you dispose of, transfer, or return the product.
Notice:
- This product is designed for use in the United States of America. Sale or use of this product in other countries may violate local laws.
- Cet appareil est conçu pour être utilisé aux États-Unis d'Amérique. La vente ou l'emploi de cet appareil dans certains autres pays peut constituer une infraction à la législation locale.
- Este producto está diseñado para usarse en los Estados Unidos de América. La venta o el empleo de este producto en ciertos países puede constituir violación de la legislación local.
- 本產品專為美國使用而設。若在其他國家銷售或使用,可能會違反當地法例。
- この製品は、日本国外での使用を目的として設計されており、日本国内での使用は法律違反となります。従って、当社では日本国内においては原則として修理などのサービスは致しかねます。
Part names and functions
Camera unit
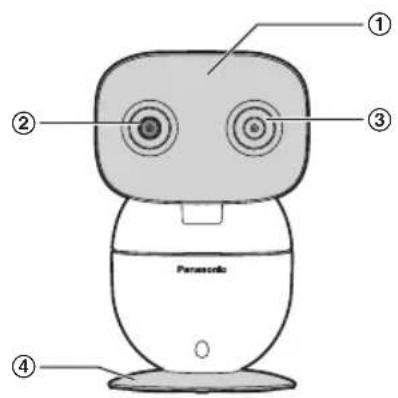
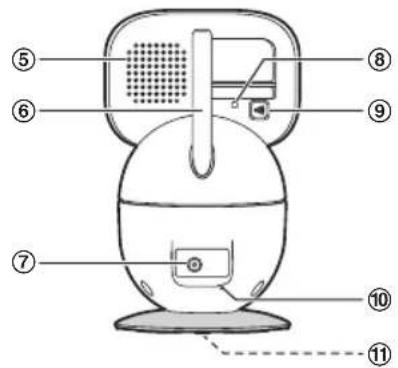
① Light sensor
Allows the camera unit to switch automatically to night vision mode in low-light conditions.
② Camera lens
③ Microphone
④ Camera base
⑤ Speaker
⑥ Antenna
⑦ DC jack
⑧ LED indicator
⑨ 【●】(Pairing button)
⑩ Temperature sensor
⑪ Screw
Used to secure the camera base (page 13) or wall mounting adaptor to the camera unit (page 12).
LED indicator
You can use the LED indicator to confirm the camera unit's status.
Check the color of the LED indicator after connecting the camera unit (page 12).
| Indicator Status | |
| Off No power | |
| Green, lit Normal operation | |
| Green, blinking slowly | Registration mode |
| Green, blinking quickly | Device malfunction |
Getting Started
Monitor unit
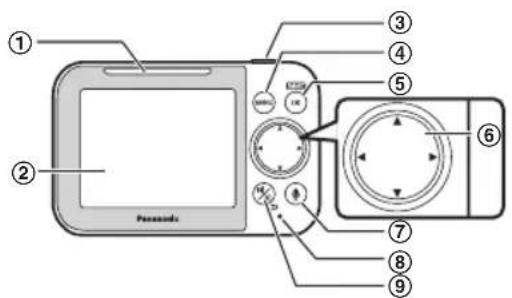
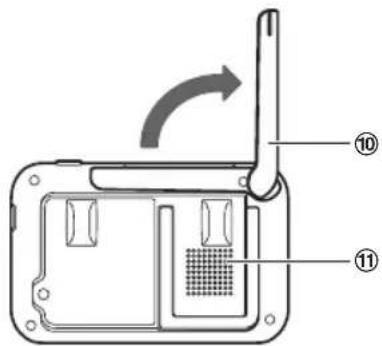
Using the stand
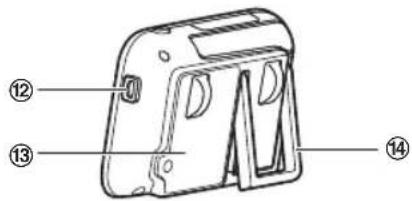
① Smart LED indicator
② Display
③ 【Power】
Press to temporarily turn off the display or press for about 2 seconds to turn on/off the monitor unit (page 16).
- Scroll through various lists and items
- Adjust the pan/tilt range
⑦ 【】(Talk)
⑧ Microphone
⑨ 【%】(Volume/Brightness)
【→】(Back)
⑩ Antenna
⑪ Speaker
⑫ micro-USB connector
⑬ Battery cover
⑭ Stand
Setting up the camera unit
Information about pan/tilt range
The pan/tilt can be used to adjust the area viewable from the camera unit by using [◀], [▶], ▲, or [▼] on the monitor unit. If the area that you wish to view is not visible even after adjusting the pan/tilt, change the location or position of the camera unit so that it can be viewed.
Pan range
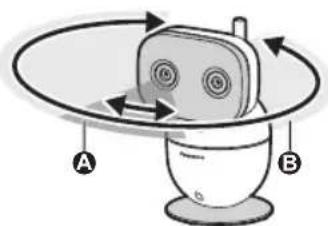
A Range of visibility: 37°
B Range of movement: 309°
Getting Started
Tilt range
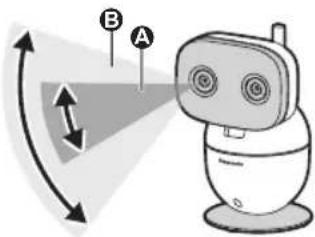
A Range of visibility: 28°
B Range of movement: 72°
Information about sensor features
The camera unit has 3 sensor features: a visual sensor used for motion detection, a temperature sensor, and a sound sensor. Please read the following information about each sensor before deciding where to install the camera unit.
Note:
- The camera unit's sensor features are not designed to be used in situations that require high reliability. We do not recommend use of the sensor features in these situations.
- Panasonic takes no responsibility for any injury or damage caused by the use of the camera unit's sensor features.
Using visible light to detect motion
The camera unit can detect motion by recognizing changes in the brightness of areas that are visible to the camera unit.
Note:
- The motion sensor does not function during and for 5 seconds after pan/tilt operations.
- Movement may be incorrectly detected when the moving object and the background have similar colors.
- Movement may be incorrectly detected when there are sudden changes to the overall brightness level, such as when lights are turned on.
- Detection becomes difficult when the image is dark.
- You can also adjust the sensitivity of the camera unit's motion detection feature and
select which areas of the camera image are monitored for motion detection.
Temperature sensor
The sensor is triggered when the set temperature range is exceeded.
Note:
- The temperature sensor may not detect temperature accurately if the camera unit is exposed to warm or cool breezes from heating/cooling systems.
- If a power failure occurs or the power is disconnected, the temperature will not be accurate for up to an hour.
- You can adjust the temperature setting of the temperature sensor (page 20).
Sound sensor
The sensor is triggered when the set sound level is exceeded.
Note:
- The sound sensor does not function while the camera unit's lullaby feature is playing a lullaby.
- The sound sensor does not function during and for 5 seconds after pan/tilt operations.
- The sound sensor may not function as desired when the camera unit is placed in noisy environments.
- You can adjust the sound level setting of the sound sensor (page 27).
Information about night vision mode
The camera unit features an array of infrared LEDs that light automatically in low-light conditions, allowing camera images to be viewable even when the surrounding area is dark.
Note:
- When night vision mode is active, camera images are displayed in black and white.
- If the camera unit is installed in front of a window and points directly at the window, images may be poor when night vision mode is active.
Getting Started
Connections
① Insert the AC adaptor plug firmly into the DC jack.
② Connect the AC adaptor to the power outlet.
Note:
- Use only the supplied AC adaptor S006AKU0500100.
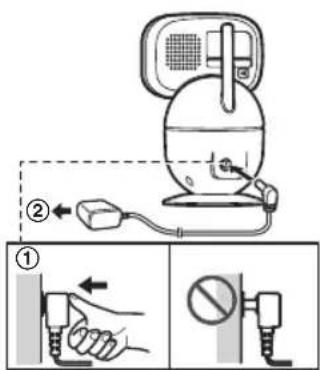
Note about power connections
AC adaptor connection
- The AC adaptor must remain connected at all times. (It is normal for the adaptor to feel warm during use.)
- The AC adaptor should be connected to a vertically oriented or floor-mounted AC outlet. Do not connect the AC adaptor to a ceiling-mounted AC outlet, as the weight of the adaptor may cause it to become disconnected.
Power failure
- The camera unit will not work during a power failure.
Placing the camera unit on a flat surface
The camera unit can be placed on a flat surface, however make sure to choose a stable location.
Wall mounting
- Attach the wall mounting adaptor to the camera unit after making the connections (page 12).
- Only use the supplied screw that is attached to the camera base when attaching the wall mounting adaptor to the camera unit. Do not use user supplied screws. This may cause the camera unit to become loose from the wall mounting adaptor.
- Mount the camera unit on the stable location where the unit can be adequately supported when installing.
- Use a string or wire to prevent the camera unit from falling and causing injury if the camera unit comes off from the wall.
- Do not mount the wall mounting adaptor to a ceiling.
- Do not mount the camera unit on a soft material. It may fall down, break or cause injury.
- Do not mount the camera unit on the following places: plaster board, ALC (autoclaved lightweight cellular concrete), concrete block, plywood less than 25 mm (1 inch) thick, etc.
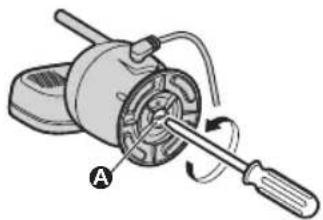
1 Remove the screw and then remove the camera base from the camera unit.
natural_image
Mechanical diagram showing a rotating motor with a screwdriver inserted, labeled A (no text or symbols present)A Supplied screw (page 9)
2 A ttach the wall mounting adaptor to the camera unit.
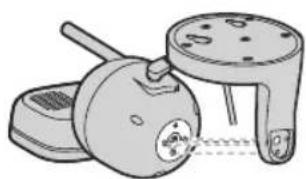
natural_image
Illustration of a portable phone with a handle and keypad (no text or symbols)Getting Started
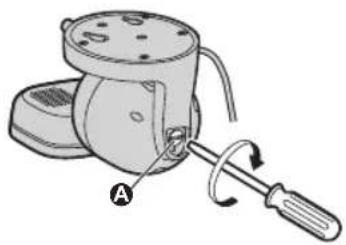
3 D rive the supplied screw into the camera unit.
natural_image
Illustration of a mechanical device with a screwdriver and labeled component A (no text or symbols beyond label)A Supplied screw (page 9)
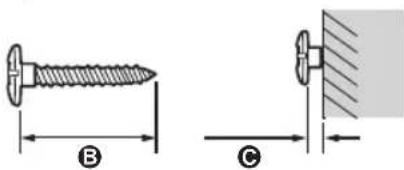
4 D rive the screws (not supplied) into the wall.
B Longer than 20 mm ( ^25/_32 inches)
© Space 1.3 mm (1/32 inches)
Note:
- Use the following template when determining the location of the screw holes.
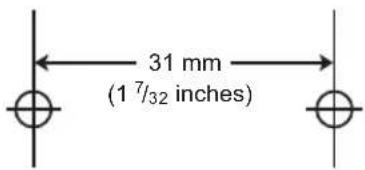
5 M ount the camera unit to the wall.
D Screws
E 31 mm (1 7/32 inches)
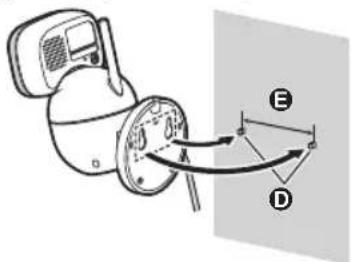
6 A djust the angle of the camera unit by using [◀], [▶], ▲, or [▼] on the monitor unit.
Reattaching the camera base
1 T ake the camera unit off from the wall.
2 Remove the screw and then remove the wall mounting adaptor from the camera unit.
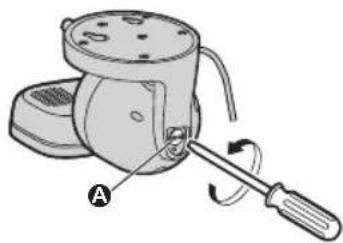
natural_image
Diagram of a mechanical device with a screwdriver and labeled component A (no text or symbols beyond label)A Supplied screw (page 9)
3 A ttach the camera base to the camera unit.
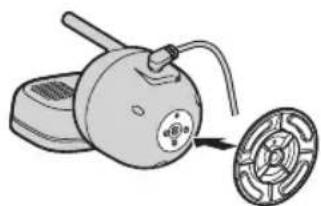
natural_image
Illustration of a mechanical device with a circular component and cable, no text or symbols present4 D rive the supplied screw into the camera unit.
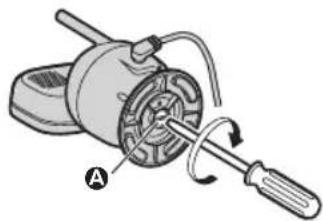
natural_image
Mechanical device with labeled component A, showing a motor and screwdriver assembly (no text or symbols beyond label)A Supplied screw (page 9)
Getting Started
Setting up the monitor unit
Battery installation
• USE ONLY the specified battery.
1 Remove the screw from the battery cover.
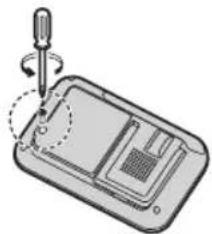
natural_image
Diagram of a device with a pipette inserted into a tray, showing internal components (no text or symbols)2 R remove the battery cover.
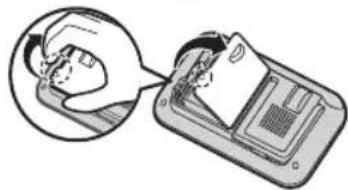
natural_image
Illustration of a hand inserting a card into a device (no text or symbols visible)3 I nsert the battery.
A BLK: black
B RED
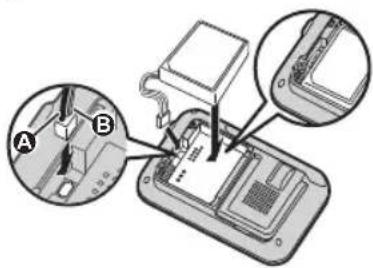
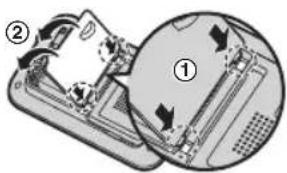
4 I insert the tabs (①) into the slots, and then close the battery cover (②).
5 D rive the screw into the battery cover.
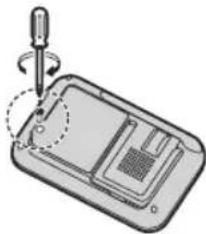
natural_image
Illustration of a screwdriver inserted into a device casing with a highlighted section (no text or symbols)- Allow the directions on the display to set up the unit.
Battery charging
1 I nsert the AC adaptor plug (①) firmly into the monitor unit's micro-USB connector.
2 Connect the AC adaptor (②) to the power outlet.

Charge for about 8 hours.
Note:
- Use only the supplied AC adaptor S006AKU0500100.
- When the AC adaptor plug is connected to the monitor unit's micro-USB connector, is displayed on the screen.
- It is normal for the monitor unit to feel warm during charging.
- The monitor unit resets if the AC adaptor is disconnected when charging.
Getting Started
Replacing the battery
• USE ONLY the specified battery.
1 Remove the screw from the battery cover.
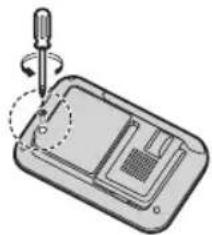
natural_image
Diagram of a device with a screwdriver inserted into a slot, showing internal components (no text or symbols)2 R remove the battery cover.
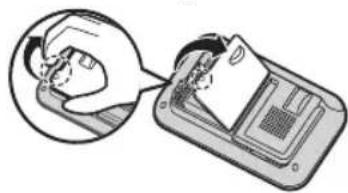
natural_image
Illustration of a hand inserting a card into a device (no text or symbols visible)3 R remove the currently used battery.
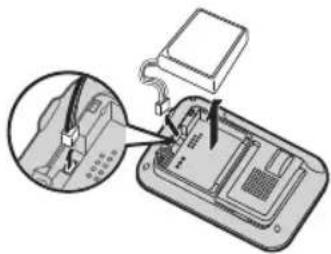
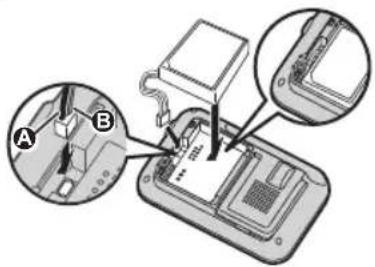
4 A ttach and insert the replacement battery.
A BLK: black
B RED
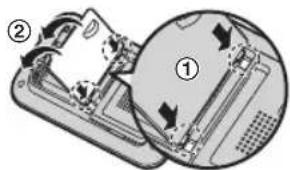
5 I nsert the tabs (①) into the slots, and then close the battery cover (②).
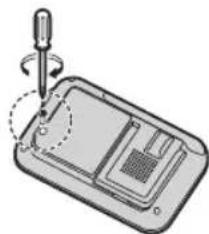
6 D rive the screw into the battery cover.
natural_image
Diagram of a handheld electronic device with a pipette inserted, showing internal components (no text or symbols)Battery level
| Icon Battery level | |
| [SD7H] | High |
| [MTTO] | Medium |
 | Low |
| [BSHO] | Needs charging.* ^1 |
*1 Two beeps sound from the monitor unit every 3 minutes when the battery needs charging.
Lithium Ion (Li-Ion) Polymer battery performance (supplied battery)
| Operation Operating time |
| In continuous use 5 hours max. |
| Not in use (standby) 13 hours max. |
Getting Started
Turning the power on/off
Press [💡] located on the top of the monitor unit (page 10) for about 2 seconds.
- Press ⏻ to enter sleep mode and turn off the display (page 20).
Press any key on the monitor unit to exit sleep mode and turn on the display.
Language setting
1 [M ENU]
2 ▲: "Monitor Settings" → [OK]
3 ▲: "Language" → [OK]
4 [◆]: Select the desired language. → [OK] → [MENU] repeatedly to exit.
Smart LED indicator and display icon colors
The colors of the smart LED indicator and display icons (page 16) indicate the status of the sensors. When sound or motion is detected, the smart notification feature (page 25) lights the smart LED indicator and displays the motion and sound icons according to the level of motion or sound detected. The smart LED indicator also lights when temperature is detected outside of the specified limits (page 20).
| Smart LED indicator color | Display icon color | Status |
| Off Off No detections | ||
| Off White | (only) | Normal operations |
| Smart LED indicator color | Display icon color | Status |
| Green Green | Motion or sound detected at the lower threshold levelExample:When your baby makes small movements or cries quietly. | |
| Amber Amber | ● M | otion or sound detected at the higher threshold levelExample:When your baby makes big movements or cries loudly.● Temperature detected above or below the threshold level |
Display icons
| Item Meaning | |
| Range status:Shows the signal level. | |
| Out of service area | |
| An error occurred on the connected camera unit.*1 | |
| Camera unit number*1 | |
| The battery is charging.(page 14) | |
| The battery is fully charged. | |
| Night vision mode is active.(page 19) | |
| Mute is on. |
Getting Started
| Item Meaning | |
| [WE06] | Timer is set to “Once”. (page 27) |
| [8328] | Timer is set to “Repeat”. (page 27) |
 | Lullaby is set. (page 21) |
| [6HTS] | Displays the temperature detected by the temperature sensor. (page 20) |
| [ATTW] | Auto scan (page 21) |
| [7SA0] | The monitor unit is talking to the camera unit. (page 19) |
| [HCTW] | Camera zoom is on. (page 19) |
| [DB54] | Displayed when motion is detected. (page 26) |
| [XC4S] | Displayed when sound is detected. (page 27) |
*1 The number displayed in the icon changes depending on the number of the connected camera unit.
Confirming the usage area
Wireless communication range
The wireless communication range of the monitor unit from the camera unit is approximately 457.5 m (1,500 feet). Wireless communication may be unreliable when the following obstacles are located between the monitor unit and camera unit.
• Metal doors or screens
- Walls containing aluminum-sheet insulation
- Walls made of concrete or corrugated iron
- Double-pane glass windows
- Multiple walls
- When using the monitor unit and camera unit on separate floors or in different buildings
Note:
- is displayed on the monitor unit when the camera unit is out of range.
Usage area cautions
Using the monitor unit in the following areas may cause deformation, malfunction, or operational failure.
• In direct sunlight
- Areas exposed to grease or steam, such as kitchens
• Near fire or heating devices
- Near magnetic fields (such as near microwaves and magnets)
- Areas subject to extreme temperature changes, such as next to air conditioners
- Areas with reflective objects, such as glass, that can interfere with detection of temperature variation
- Areas where the temperature is affected by strong illuminating objects (such as fluorescent lights)
- Near devices that emit strong radio waves, such as mobile phones
Testing the baby monitor system
Before using your baby monitor system, you should perform a test run to ensure that the system is configured correctly. For example, test the motion sensor, microphone, and speaker.
Testing the motion detection range
After setting up the camera unit and monitor unit, you can use your monitor unit to test the performance of the camera unit's motion detection feature.
1 Move to an area within the camera unit's viewable area.
2 While moving near the camera unit, use your monitor unit to observe where you are in the viewable area when the camera unit's motion detection feature is triggered.
- When the motion detection feature is triggered, 📋 is displayed on the monitor unit screen in green or amber
Getting Started
depending on the level of motion detected.
3 Note the areas of the viewable area where movement is detected, and make adjustments as necessary.
Note:
- You can adjust the area detectable by the motion sensor (page 26).
Testing the camera unit's microphone
To test the camera unit's microphone, speak loudly and clearly into the microphone while a monitor unit user is viewing live images from the camera unit.
Testing the camera unit's speaker
To test the camera unit's speaker, press and hold [1], and talk into the monitor unit while someone is listening to the camera unit.
Note:
- Make sure to adjust the camera unit's speaker volume to a suitable level when testing the speaker (page 20).
Baby monitor
The baby monitor system allows you to listen and view images on a monitor unit from a room where the camera unit is located. With the use of smart features (page 25), the monitor unit notifies you when the camera unit's sensors are triggered, and you can also play lullabies from the camera unit.
Important:
- You should perform a test run of the baby monitor system before using it (page 17).
- The baby monitor system should not be used as a substitute for a medical or caregiver's supervision. It is the caregiver's responsibility to stay close enough to handle any eventuality.
Viewing live camera images
Images from the camera unit are automatically displayed on the monitor unit when the monitor unit is turned on.
If 2 or more camera units have been registered to your monitor unit, you can switch the camera image by selecting the desired camera unit or using auto scan (page 21).
Night vision mode
The infrared LEDs of the camera unit make it possible to view camera images even when the area surrounding the camera unit is dark.
Note:
- When night vision mode is active, camera images are displayed in black and white.
Adjusting camera images from the monitor unit
From the monitor unit, you can adjust the area viewed by the camera unit by using the pan/tilt. While viewing images from the camera unit, press [◀] or [▶] to adjust the pan range and [▼] or ▲ to adjust the tilt range.
Note:
- The sound sensor and motion sensor do not function during and for 5 seconds after pan/tilt operations.
- Only adjust the pan/tilt with operations from the monitor unit. Do not adjust the pan/tilt of the camera unit by hand.
Camera zoom
The camera zoom can be used to zoom in on images displayed on the monitor unit.
1 [SMART]
2 [▼]: Select the desired setting. → [MENU]
- The setting is saved and the screen is switched to the selected setting.
Listening/talking to the camera unit
Listening to the camera unit
Sound from the camera unit is heard on the monitor unit while the monitor unit is turned on, and even when it is in sleep mode and images are not displayed.
Note:
- Sound is not heard on the monitor unit when it is turned off or when it is out of range of the camera unit.
- You can adjust the speaker volume of the monitor unit (page 20).
Talking to the camera unit
While viewing images from the camera unit, press and hold [1] on the monitor unit to talk. Release [2] to finish talking.
Note:
- You can adjust the speaker volume of the camera unit (page 20).
- Sound from the camera unit will not be heard on the monitor unit while talking.
Using the Baby Monitor
- When pressing [☐], make sure to not cover the microphone (page 10) with your fingers.
Adjusting the speaker volume
Monitor unit
1 W hile viewing images from the camera unit, press [%].
2 ▲: Select the desired setting. → [OK]
Camera unit
1 [M ENU]
2 ▲: "Camera Speaker Vol." → [OK]
3 [ ◀▶]: Select the desired setting. → [OK] → [MENU] repeatedly to exit.
Adjusting the chime/beep volume
The monitor unit plays chimes and beeps to indicate the status of the monitor unit and camera unit sensors. You can adjust the volume of chimes/beeps, or turn them off.
1 [MENU]
2 【▲】: "Monitor Settings" → [OK]
3 ▲: "Beep Volume" → [OK]
4 ▲: Select the desired setting. • To turn off chimes/beeps:
5 [OK] → [MENU] repeatedly to exit.
Adjusting the brightness of camera images
1 While viewing images from the camera unit, press [%].
2 [ ◀▶]: Select the desired setting. → [OK]
Adjusting the sleep mode
Sleep mode is used to automatically turn off the display of the monitor unit when the monitor unit has been inactive for a specified period of time. You can select how long the monitor unit is inactive for before it enters sleep mode, or turn off sleep mode.
1 [MENU]
2 ▲: "Monitor Settings" → [OK]
3 ▲: "Sleep Mode" → [OK]
4 ▲: Select the desired setting.
- To turn off sleep mode: ▲: "OFF"
5 [OK] → [MENU] repeatedly to exit.
Configuring the temperature sensor
You can specify how the temperature units (Celsius or Fahrenheit) are displayed on the monitor unit and the alert range.
For the alert range, specify an upper and lower limit. If the temperature of the room where the camera unit is installed goes outside of these limits, the monitor unit will notify you by lighting the smart LED indicator, playing a chime, etc.
Configuring the temperature units
1 [M ENU]
2 ▲: "Sensor Settings" → [OK]
3 ▲: "Temperature Sensor" → [OK]
4 ▲: "Units" → [OK]
5 [◆]: Select the desired setting. → [OK] → [MENU] repeatedly to exit.
Configuring the alert range
1 [M ENU]
2 ▲: “Sensor Settings” → [OK]
3 ▲: "Temperature Sensor" → [OK]
4 ▲: "Alert Range" → [OK]
5 [ ◀]: "Lower Limit"
6 ▲: Specify the desired temperature.
7 [ ◀▶]: "Upper Limit"
8 ▲: Specify the desired temperature.
9 [OK] → [MENU] repeatedly to exit.
Playing/canceling lullabies manually
You can select from a range of lullabies and manually play them from the camera unit, or cancel them.
Note:
- Make sure to check the camera unit's speaker volume before playing lullabies (page 20).
- The auto lullaby feature can be used to play lullabies automatically (page 25).
Selecting a lullaby
1 [M ENU]
2 ▲: "Lullaby" → [OK]
3 ▲: "Sound List" → [OK]
4 ▲: Select the desired lullaby.
• To cancel a lullaby:
5 [OK] → [MENU] repeatedly to exit.
Note:
- Lullabies can also be canceled by pressing [•••] on the camera unit.
- If the monitor unit is turned off while selecting lullabies, the lullaby will continue to play from camera unit for the specified time.
Selecting a lullaby play time
You can specify the time that lullabies play for.
1 [MENU]
2 [♠]: “Lullaby” → [OK]
3 ▲: "Play Time" → [OK]
4 ▲: Select the desired play time.
5 [OK] → [MENU] repeatedly to exit.
Selecting camera units/using auto scan
If there are multiple camera units registered to the monitor unit, you can select which camera unit's images to view, and also use auto scan. Auto scan automatically switches images from each camera unit every 10 seconds. See page 27 for information on adding camera units.
1 [MENU]
2 ▲: "Camera Select" → [OK]
3 To select camera units:
【◀】: Select the desired camera unit.
To select auto scan:
$$
$$
4 [O K]
Note:
- When a camera unit is selected, sound detection, motion detection, and temperature detection notifications are only received from the selected camera unit. Notifications from other camera units will not be received.
Programming
Menu list
Items in the menu list can be configured in the following method.
1 [MENU]
2 Press [▼] or ▲ to select the desired main menu. → [OK]
3 Press [▼] or ▲ to select the desired item from the sub-menus. → [OK]
4 Press [▼], ▲, [◀], or [▶] to select the desired setting. → [OK]
Note:
- To exit the operation, press [MENU] repeatedly.
- In the following table, < > indicates the default settings.
- The number of sub-menus varies depending on the setting.
Display the menu tree
| Main menu Sub-menu 1 Sub-menu 2 Settings Page | ||||
| Camera Select*1 | - | - | <1>(camera 1)2(camera 2)*23(camera 3)*24(camera 4)*25(auto scan)*2 | 21 |
| Camera Zoom | --<( | 1X )>(2X) | 19 | |
| Lullaby*3 | Sound List | -1. Lullabyl -10.Heart beat | 21 | |
| Play Time | -5 min | -120 min<15 min> | 21 | |
| Smart Notification | Sound Notification | --<Screen lit +NotifyScreen lit onlyOFF | -120 min<15 min> | 25 |
| Motion Notification | --<Screen lit +NotifyScreen lit onlyOFF | -120 min<15 min> | 25 | |
| Auto Lullaby Sound List | -1. Lullabyl -10.Heart beatRandom | 25 | ||
Programming
| Main menu Sub-menu 2 Settings Page | ||||
| Auto Lullaby Sound Detect Level*4 | - | High<Normal> | 26 | |
| Detection Time*4 | - | 15 sec30 sec45 sec<60 sec>90 sec | 26 | |
| Play Time*4 | -5 min | -120 min<15 min> | 26 | |
| Timer | - | Once | <1H>2H3H4H5H6H | 27 |
| - | Repeat | <1H>2H3H4H5H6H | 27 | |
| - | OFF | - | 27 | |
| Sensor Settings | Motion Sensor Sensitivity | Level 7 (High)*5Level 6*5Level 5*5*5Level 3*5Level 2*5Level 1 (Low)*5 | 26 | |
| Set Detection Area | - | |||
| Sound Sensitivity | - | High : all soundsLow : all sounds*6High : baby sounds*7Mid : baby sounds*7Low : baby sounds*6, *7 | 27 | |
| Temperature Sensor | Units °C | <°F> | 20 | |
Programming
| Main menu Sub-menu 1 Sub-menu 2 Settings Page | ||||
| Sensor Settings | Temperature Sensor | Alert Range | Upper Limit:33 - 104 °F (1 - 40 °C)<80 °F (27 °C)> | 20 |
| Lower Limit:32 - 103 °F (0 - 39 °C)<60 °F (16 °C)> | 20 | |||
| Camera Speaker Vol. | -- Level 1 | -6 | <3>OFF | 20 |
| Camera Brightness | -- Level 1 | -5 | <3> | 20 |
| Camera Management | Add Camera | -- 27 | ||
| Delete Camera | - | Yes | 27 | |
| Reset | - | Yes | 27 | |
| Monitor Settings | Sleep Mode | - | 1min<3min>5minOFF | 20 |
| Beep Volume | - | 32<1>OFF | 20 | |
| Language | -nglish>Français Español | 16 | ||
| Monitor Speaker Vol. | - Level 1 | -6<3>OFF | 20 | |
| Information*8 | ---- | |||
*1 Can only be selected when there are multiple camera units registered to the monitor unit.
* 2 The number of camera units available for camera selecting or auto scan differs depending on the number registered camera units.
*3 This product uses sound data ("1. Lullaby1" - "5. Lullaby5") which Copyrights Vision Inc. created in 2014. © 2014 Copyrights Vision Inc.
*4 Can only be selected when a lullaby is selected for "Sound List".
*5 Change the settings to higher levels in the following situations. Otherwise, there is a possibility that detections may not be made correctly.
- when your baby and the camera unit are separated
– when monitoring newborn babies
*6 When sound is detected, the smart LED indicator is only lit in amber.
Programming
*7 Reduces false detections from sounds other than your baby's voice by reducing these sounds from the surrounding area.
If your baby's voice is not detected when using these settings, select a baby sounds setting with a higher sensitivity. If your baby's voice is still not detected, select an all sounds setting
*8 Displays customer support Web address.
Smart features
With the use of smart features, you can coordinate the camera unit and monitor unit to respond automatically to detections from the sensors. The smart features settings can be accessed by pressing [SMART] while viewing images from the camera unit.
Smart notification
By using the smart notification feature, you can specify how the monitor unit notifies you when motion or sound is detected by the camera unit, and configure motion detection to match the size of your baby. Depending on the settings, the monitor unit can notify you by lighting the smart LED indicator (page 16), displaying a message, and playing a chime.
Important:
- Depending on factors such as the usage environment, the monitor unit may not be able to notify you of sensor detections.
Note:
- Notifications continue for 1 minute. You can stop the notification by pressing [OK].
Configuring sound notifications
You can specify how the monitor unit notifies you when sound is detected, or turn off notifications.
1 [MENU]
2 ▲: "Smart Notification" → [OK]
3 ▲: "Sound Notification" → [OK]
4 ▲: Select the desired setting.
- To turn off sound notifications:
5 [OK] → [MENU] repeatedly to exit.
Configuring motion notifications
You can specify how the monitor unit notifies you when motion is detected, or turn off notifications.
1 [MENU]
2 [◆]: "Smart Notification" → [OK]
3 ▲: "Motion Notification" → [OK]
4 ▲: Select the desired setting.
- To turn off motion notifications:
5 [OK] → [MENU] repeatedly to exit.
Auto lullaby
You can configure lullabies to be played automatically from the camera unit when sound is detected.
Note:
- Make sure to check the camera unit's speaker volume before playing lullabies (page 20).
- Auto lullaby does not function during the following.
- while using or for 5 seconds after using the pan/tilt
- while talking to the camera unit
- while configuring lullabies to be played
Configuring the sound settings
You can specify which lullaby is played when sound is detected, or turn lullabies off.
1 [MENU]
2 ▲: "Auto Lullaby" → [OK]
3 ▲: "Sound List" → [OK]
4 ▲: Select the desired lullaby.
- To turn off lullabies:
Programming
5 [O K] → [MENU] repeatedly to exit.
Note:
- If the monitor unit is turned off while selecting lullabies, the lullaby will continue to play from the camera unit for the specified time.
Configuring the sound detection level
You can adjust the level at which sound is detected. Increase or decrease the detection level needed to trigger the sound sensor.
1 [MENU]
2 ▲: "Auto Lullaby" → [OK]
3 【◆】: “Sound Detect Level”*1 → [OK]
4 【◆】: Select the desired setting. → [OK] → [MENU] repeatedly to exit.
*1 This feature can only be selected when a lullaby is selected for "Sound List" (page 25).
Configuring the detection time
You can specify how long the sound sensor continually detects sound before the camera unit automatically plays a lullaby.
1 [MENU]
2 ▲: "Auto Lullaby" → [OK]
3 【◆】: "Detection Time"*1 → [OK]
4 【◆】: Select the desired setting. → [OK] → [MENU] repeatedly to exit.
*1 This feature can only be selected when a lullaby is selected for "Sound List" (page 25).
Configuring the play time
You can specify how long the camera unit plays lullabies when sound is detected.
1 [MENU]
2 ▲: "Auto Lullaby" → [OK]
3 ▲: "Play Time"*1 → [OK]
4 【◆】: Select the desired setting. → [OK] → [MENU] repeatedly to exit.
*1 This feature can only be selected when a lullaby is selected for "Sound List" (page 25).
Sensors
You can configure the sensors to match how you want the motion and sound to be detected. The sensor configurations will also affect how the auto lullaby and smart notification features operate.
Configuring the motion sensor
You can specify the sensitivity of the motion sensor, and also which areas of images are used to detect motion.
Configuring the motion sensor sensitivity
Motion sensor sensitivity is configured using a combination of the following.
– the distance from the camera unit to your baby
– the age of your baby in months Change the settings in accordance with the growth of your baby.
1 [MENU]
2 ▲: "Sensor Settings" → [OK]
3 ▲: "Motion Sensor" → [OK]
4 ▲: "Sensitivity" → [OK]
- A message is displayed. Press [OK] to continue.
5 【◆】: Select the desired setting. → [OK] → [MENU] repeatedly to exit.
Configuring the motion sensor detection area
1 [MENU]
2 ▲: "Sensor Settings" → [OK]
3 ▲: "Motion Sensor" → [OK]
4 ▲: "Set Detection Area" → [OK]
- An operation guide is displayed. Press [OK] to continue.
5 Press [▼], ▲, [◀], or [▶] to select a cell to disable detection for. → [OK]
- Repeat for each cell to be disabled.
Programming
- enable detection for a disabled cell, select the disabled cell. [OK]
6 When finished, press [ ➞] → [MENU] repeatedly to exit.
Configuring the sound sensor sensitivity
1 [MENU]
2 ▲: "Sensor Settings" → [OK]
3 ▲: "Sound Sensitivity" → [OK]
4 [◀]: Select the desired setting. → [OK] → [MENU] repeatedly to exit.
Timer
The timer can be used to play sound from the monitor unit after the specified number of hours has passed. The timer can be set to sound once or repeat at specified intervals.
1 [MENU]
2 ▲: "Timer" → [OK]
3 ▲: Select "Once" or "Repeat". → [OK]
4 [◆]: Specify when the timer is set for. → [OK] → [MENU]
Note:
- Timers play for 1 minute. Press [OK] to stop a timer. Press and hold [OK] for 5 seconds to stop timers from repeating.
- If the monitor unit is turned off after setting a timer:
- "Once": The timer will be canceled.
- "Repeat": The timer will be played once the specified time has passed from when the monitor was turned on again.
Managing camera units
Registering a camera unit
Monitor unit:
1 [MENU]
2 ▲: "Camera Management" → [OK]
3 ▲: "Add Camera" → [OK]
- An operation guide is displayed. Press [OK] to continue.
- Complete the following step within 90 seconds.
Camera unit:
1 Press and hold [•••] for 3 seconds until the LED indicator starts blinking.
Note:
- A message is displayed on the monitor unit to show if the registration was successful or not, and a beep sounds.
Resetting a camera unit
The camera unit settings saved on a monitor unit can be reset.
Note:
- All camera unit settings except for registration settings are reset.
- Settings for all camera units registered to the monitor unit are reset.
1 [MENU]
2 ▲: "Camera Management" → [OK]
3 ▲: "Reset" → [OK]
4 [ ◀]: "Yes" → [OK]
- A beep sounds from the monitor unit when resetting is completed.
Canceling a camera unit
Note:
- Only the currently connected camera unit is canceled. To cancel other camera units, select the displayed camera unit (page 21) and then cancel that camera unit.
1 [MENU]
2 ▲: "Camera Management" → [OK]
3 ▲: "Delete Camera" → [OK]
4 [ ◀▶]: "Yes" → [OK]
Troubleshooting
General use
| Problem Cause & Solution | |
| The monitor unit does not work. | Make sure the battery is installed correctly (page 14).Fully charge the battery. |
| The camera unit does not work. | Make sure the AC adaptor is connected to the camera unit and power outlet (page 12). |
| The monitor unit is turned off. | Press [IMAGE] located on the top of the monitor unit for about 2 seconds. |
| Noise is heard, sound cuts in and out. | You are using the monitor unit or camera unit in an area with high electrical interference. Re-position the monitor unit and use the camera unit away from sources of interference. |
| The monitor unit or camera unit does not sound. | The speaker volume is turned off. Adjust the speaker volume (page 20). |
Monitor unit display
| Problem Cause & Solution | |
| The display is in a language I cannot read. | Change the display language setting (page 16). |
| is displayed. | The monitor unit is too far from the camera unit. Move the monitor unit closer to the camera unit.The camera unit's AC adaptor is not properly connected.Reconnect the AC adaptor to the camera unit.The camera unit has not been registered to the monitor unit.Register the camera unit (page 27). |
| The monitor unit display is blank. | The monitor unit is in sleep mode. Press any button on the monitor unit to activate the display.The monitor unit is not turned on. Turn it on (page 16). |
| Images are white or black. | The brightness of the display is not correctly adjusted. Adjust the brightness when images are displayed (page 20).Place the camera unit in a different location or position. |
| Images are flickering. | A C (alternating current) lights such as fluorescent lights may cause flickering in dark environments. (This is not a malfunction.) |
Battery recharge
| Problem Cause & Solution | |
| The monitor unit beeps andDCDD displayed. | Battery charge is low. Fully charge the battery (page 14). |
| The battery is not fully charged. | The temperature for the charging conditions is too low or too high. Charge the battery within the specified charging condition range (page 30).The battery may not be installed. Install the battery (page 14).The battery may be deteriorated. Please visit http://shop.panasonic.com/support |
Useful Information
Specifications
• \$andards
DECT (Digital Enhanced Cordless Telecommunications)
- Frequency range
DECT: 1.92 GHz – 1.93 GHz
• RF transmission power
DECT: 115 mW (max.)
- Power source
Camera unit (AC adaptor):
Input: 100 – 240 V AC, 50/60 Hz
Output: 5.0 V DC, 1,000 mA
Monitor unit (AC adaptor):
Input: 100 – 240 V AC, 50/60 Hz
Output: 5.0 V DC, 1,000 mA
- Power consumption
Camera unit:
Normal operation: 2.8 W
Night vision mode: 4.2 W
Sleep mode: 2.1 W
Monitor unit:
Charging: 3.9 W
- Operating conditions
Camera unit:
0 °C – 40 °C (32 °F – 104 °F)
up to 90 % relative humidity (non-condensing)
Monitor unit:
0 °C – 40 °C (32 °F – 104 °F)
up to 90 % relative humidity (non-condensing)
- Charging conditions (monitor unit)
5 °C – 40 °C (41 °F – 104 °F)
- Transmitting range
Up to 457.5 m (1,500 feet) ^1
• Image sensor
0.3 megapixel CMOS
- Minimum illuminance required
0 lx ^2
- Focal length
Fixed (0.4 m (1.3 feet) – infinity)
- Angular field of view (camera angle)
Horizontal: approx. 37°
Vertical: approx. 28°
- Motion detection method
Visual sensor
- Detection range
Motion sensor:
Horizontal: approx. 37°
Vertical: approx. 28°
- Adjustable mounting angles Horizontal: ±136° Vertical: facing forward - facing down approx. +0° to -44° (movable range with the pan/tilt)
- Dimensions (height × width × depth) Camera unit:
Approx. 123 mm × 77 mm × 69 mm (4 ^13 /16 inches × 3 ^1 /16 inches × 2 ^11 /16 inches)
Monitor unit (flat):
Approx. 37 mm × 125 mm × 81 mm (1 7/16 inches × 415/16 inches × 3 3/16 inches)
Monitor unit (stand):
Approx. 79 mm × 125 mm × 48 mm (3 1/8 inches × 415/16 inches × 17/8 inches) Display: 3.5 inches
- Mass (weight)
Camera unit: Approx. 224 g (0.49 lb)
Monitor unit:
Approx. 208 g (0.46 lb) including the battery
*1 When used in the direction of maximum radiation, in the line of sight, and with no interference. *2 The infrared LEDs that surround the camera lens will illuminate in low-light conditions.
flowchart
graph TD
    A["Device with screwdriver"] --> B["Disassembly with a magnified inset"]
    B --> C["Assembly with labeled parts A, B"]
    C --> D["Final packaging with screwdriver and internal components"]
④ [MENU]
⑤ [SMART]/[OK]
FCC and other information
This device complies with Part 15 of the FCC Rules. Operation is subject to the following two conditions:
(1) This device may not cause harmful interference, and (2) this device must accept any interference received, including interference that may cause undesired operation. Privacy of communications may not be ensured when using this device.
CAUTION:
Any changes or modifications not expressly approved by the party responsible for compliance could void the user's authority to operate this device.
NOTE:
This equipment has been tested and found to comply with the limits for a Class B digital device, pursuant to Part 15 of the FCC Rules. These limits are designed to provide reasonable protection against harmful interference in a residential installation. This equipment generates, uses, and can radiate radio frequency energy and, if not installed and used in accordance with the instructions, may cause harmful interference to radio communications. However, there is no guarantee that interference will not occur in a particular installation. If this equipment does cause harmful interference to radio or television reception, which can be determined by turning the equipment off and on, the user is encouraged to try to correct the interference by one or more of the following measures:
- Reorient or relocate the receiving antenna.
– Increase the separation between the equipment and receiver. - Connect the equipment into an outlet on a circuit different from that to which the receiver is connected.
- Consult the dealer or an experienced radio/TV technician for help.
Some devices operate at frequencies that may cause interference to nearby TVs and VCRs. To minimize or prevent such interference, this device should not be placed near or on top of
a TV or VCR. If interference is experienced, move this device further away from the TV or VCR. This will often reduce or eliminate interference.
FCC RF Exposure Warning:
- This product complies with FCC radiation exposure limits set forth for an uncontrolled environment.
- To comply with FCC RF exposure requirements, the device must be installed and operated 20 cm (8 inches) or more between the product and all person's body.
- This product may not be collocated or operated in conjunction with any other antenna or transmitter.
Notice:
- FCC ID can be found on the rear of the unit.
Charge only mode
The charge only mode is the dedicated mode to charge the battery of the baby monitor. Do not use this mode if it is unnecessary because all functions except the baby monitor's battery charge are disabled with this mode.
■ To activate the charge only mode:
1 Press [ ⏻] (power) for about 2 seconds until the baby monitor shuts down.
2 Connect the charger to the baby monitor. After the LED indicator on the top of the baby monitor illuminates in amber color for about 30 seconds, the LED indicator turns off automatically. Then the baby monitor goes into charge-only mode.
■ To deactivate the charge only mode:
- Press [💡] (power) for about 2 seconds until the LCD display of the baby monitor illuminates.
Appendix
Other notices and information (for Canada)
NOTICE:
This device complies with Innovation, Science and Economic Development Canada licence-exempt RSS standard(s). Operation is subject to the following two conditions: (1) this device may not cause interference, and (2) this device must accept any interference, including interference that may cause undesired operation of the device.
RF Exposure Warning:
- This product complies with ISED radiation exposure limits set forth for an uncontrolled environment.
- To comply with ISED RF exposure requirements, the device must be installed and operated 20 cm (8 inches) or more between product and all person's body.
Customer services
Shop Accessories!
for all your Panasonic gear
Go to
http://shop.panasonic.com/support
Get everything you need to get the most out of your Panasonic products
Accessories & Parts for your Camera, Phone, A/V products, TV, Computers & Networking, Personal Care, Home Appliances, Headphones, Batteries, Backup Chargers & more...
Customer Services Directory
For Product Information, Operating Assistance, Parts, Owner's Manuals, Dealer and Service info go to http://shop.panasonic.com/support
For the hearing or speech impaired TTY: 1-877-833-8855
As of June 2015
Limited Warranty (ONLY FOR U.S.A.)
Panasonic Products Limited Warranty
Limited Warranty Coverage (For USA Only)
If your product does not work properly because of a defect in materials or workmanship, Panasonic Corporation of North America (referred to as “the warrantor”) will, for the length of the period indicated on the chart below, which starts with the date of original purchase (“warranty period”), at its option either (a) repair your product with new or refurbished parts, (b) replace it with a new or a refurbished equivalent value product, or (c) refund your purchase price. The decision to repair, replace or refund will be made by the warrantor.
| Product or Part Name | Parts | Labor |
| Home Network System Products | One (1) Year | One (1) Year |
| microSD card (Included model only) 90 days N/A | ||
During the "Labor" warranty period there will be no charge for labor. During the "Parts" warranty period, there will be no charge for parts. This Limited Warranty excludes both parts and labor for non-rechargeable batteries, antennas, and cosmetic parts (cabinet). This warranty only applies to products purchased and serviced in the United States. This warranty is extended only to the original purchaser of a new product which was not sold "as is".
Mail-In Service--Online Repair Request
Online Repair Request
To submit a new repair request and for quick repair status visit our Web Site at http://shop.panasonic.com/support
When shipping the unit, carefully pack, include all supplied accessories listed in the Owner's Manual, and send it prepaid, adequately insured and packed well in a carton box. When shipping Lithium Ion batteries please visit our Web Site at http://shop.panasonic.com/support as Panasonic is committed to providing the most up to date information. Include a letter detailing the complaint, a return address and provide a daytime phone number where you can be reached. A valid registered receipt is required under the Limited Warranty.
IF REPAIR IS NEEDED DURING THE WARRANTY PERIOD, THE PURCHASER WILL BE REQUIRED TO FURNISH A SALES RECEIPT/PROOF OF PURCHASE INDICATING DATE OF PURCHASE, AMOUNT PAID AND PLACE OF PURCHASE. CUSTOMER WILL BE CHARGED FOR THE REPAIR OF ANY UNIT RECEIVED WITHOUT SUCH PROOF OF PURCHASE.
Limited Warranty Limits and Exclusions
This warranty ONLY COVERS failures due to defects in materials or workmanship, and DOES NOT COVER normal wear and tear or cosmetic damage. The warranty ALSO DOES NOT COVER damages which occurred in shipment, or failures which are caused by products not supplied by the warrantor, or failures which result from accidents, misuse, abuse, neglect, mishandling, misapplication, alteration, faulty installation, set-up adjustments, misadjustment of consumer controls, improper maintenance, power line surge, lightning damage, modification, introduction of sand, humidity or liquids, commercial use such as hotel, office, restaurant, or other business or rental use of the product, or service by anyone other than a Factory Service Center or other Authorized Servicer, or damage that is attributable to acts of God.
THERE ARE NO EXPRESS WARRANTIES EXCEPT AS LISTED UNDER "LIMITED WARRANTY COVERAGE".
THE WARRANTOR IS NOT LIABLE FOR INCIDENTAL OR CONSEQUENTIAL DAMAGES RESULTING FROM THE USE OF THIS PRODUCT, OR ARISING OUT OF ANY BREACH OF THIS WARRANTY.
(As examples, this excludes damages for lost time, travel to and from the servicer, loss of or damage to media or images, data or other memory or recorded content. The items listed are not exclusive, but for illustration only.)
ALL EXPRESS AND IMPLIED WARRANTIES, INCLUDING THE WARRANTY OF MERCHANTABILITY, ARE LIMITED TO THE PERIOD OF THE LIMITED WARRANTY.
Some states do not allow the exclusion or limitation of incidental or consequential damages, or limitations on how long an implied warranty lasts, so the exclusions may not apply to you.
This warranty gives you specific legal rights and you may also have other rights which vary from state to state. If a problem with this product develops during or after the warranty period, you may contact your dealer or Service Center. If the problem is not handled to your satisfaction, then write to:
Consumer Affairs Department
Panasonic Corporation of North America
661 Independence Pkwy
Chesapeake, VA 23320
PARTS AND SERVICE, WHICH ARE NOT COVERED BY THIS LIMITED WARRANTY, ARE YOUR RESPONSIBILITY.
As of June 2015
IMPORTANT!
If your product is not working properly...
① Reconnect the AC adaptor to the camera unit.
② Turn the monitor unit off.
③ Remove and then reinsert the monitor unit's battery.
④ Turn the monitor unit on.
⑤ Read the troubleshooting section in the Operating Instructions.

Visit our Web site: http://shop.panasonic.com/support
- FAQ and troubleshooting hints are available.
For your future reference
We recommend keeping a record of the following information to assist with any repair under warranty.
Serial No. Date of purchase
(found on the rear of the unit) Name and address of dealer
Attach your purchase receipt here.
Panasonic Corporation of North America
Two Riverfront Plaza, Newark, NJ 07102-5490
© Panasonic Corporation 2019
Printed in China
*PNQE1130ZA*
PNQE1130ZA PP0519TY0 (E)
- Operating Instructions
- Before initial use, see "Getting Started" on page 9.
- Table of Contents
- Introduction
- Important Information
- Getting Started
- Using the Baby Monitor
- Programming
- Useful Information
- About the baby monitor
- Accessory information
- Expanding the baby monitor system
- Other information
- Graphical symbols for use on equipment and their descriptions
- About this system
- For your safety
- WARNING
- Power connection
- Installation
- Operating safeguards
- Medical
- Lithium Ion (Li-Ion) Polymer battery
- CAUTION
- Installation and location
- Preventing accidents and injuries
- Important safety instructions
- For best performance
- Product location/avoiding noise
- Environment
- Routine care
- Camera image quality
- Notice for product disposal, transfer, or return
- Notice:
- Part names and functions
- LED indicator
- Setting up the camera unit
- Information about pan/tilt range
- Tilt range
- Information about sensor features
- Note:
- Using visible light to detect motion
- Temperature sensor
- Sound sensor
- Information about night vision mode
- Connections
- Note about power connections
- AC adaptor connection
- Power failure
- Placing the camera unit on a flat surface
- Wall mounting
- Reattaching the camera base
- Setting up the monitor unit
- Battery installation
- Battery charging
- Charge for about 8 hours.
- Replacing the battery
- Lithium Ion (Li-Ion) Polymer battery performance (supplied battery)
- Turning the power on/off
- Language setting
- Smart LED indicator and display icon colors
- Confirming the usage area
- Wireless communication range
- Usage area cautions
- Testing the baby monitor system
- Testing the motion detection range
- Testing the camera unit's microphone
- Testing the camera unit's speaker
- Baby monitor
- Important:
- Viewing live camera images
- Night vision mode
- Adjusting camera images from the monitor unit
- Camera zoom
- [SMART]
- Listening/talking to the camera unit
- Listening to the camera unit
- Talking to the camera unit
- Adjusting the speaker volume
- Monitor unit
- Camera unit
- Adjusting the chime/beep volume
- Adjusting the brightness of camera images
- Adjusting the sleep mode
- Configuring the temperature sensor
- Configuring the temperature units
- Configuring the alert range
- Playing/canceling lullabies manually
- Selecting a lullaby
- Selecting a lullaby play time
- [MENU]
- Selecting camera units/using auto scan
- Menu list
- Smart features
- Smart notification
- Configuring sound notifications
- Configuring motion notifications
- Auto lullaby
- Configuring the sound settings
- Configuring the sound detection level
- Configuring the detection time
- Configuring the play time
- Sensors
- Configuring the motion sensor
- Configuring the motion sensor sensitivity
- Configuring the motion sensor detection area
- Configuring the sound sensor sensitivity
- Timer
- Managing camera units
- Registering a camera unit
- Camera unit:
- Resetting a camera unit
- Canceling a camera unit
- Troubleshooting
- Specifications
- FCC and other information
- CAUTION:
- FCC RF Exposure Warning:
- Charge only mode
- ■ To activate the charge only mode:
- ■ To deactivate the charge only mode:
- Appendix
- Other notices and information (for Canada)
- RF Exposure Warning:
- Customer services
- Shop Accessories!
- Limited Warranty (ONLY FOR U.S.A.)
- Panasonic Products Limited Warranty
- Limited Warranty Coverage (For USA Only)
- Online Repair Request
- Limited Warranty Limits and Exclusions
- THERE ARE NO EXPRESS WARRANTIES EXCEPT AS LISTED UNDER "LIMITED WARRANTY COVERAGE".
- THE WARRANTOR IS NOT LIABLE FOR INCIDENTAL OR CONSEQUENTIAL DAMAGES RESULTING FROM THE USE OF THIS PRODUCT, OR ARISING OUT OF ANY BREACH OF THIS WARRANTY.
- ALL EXPRESS AND IMPLIED WARRANTIES, INCLUDING THE WARRANTY OF MERCHANTABILITY, ARE LIMITED TO THE PERIOD OF THE LIMITED WARRANTY.
- IMPORTANT!
- For your future reference
Brand : PANASONIC
Model : KX-HN1032
Category : Baby monitor