
V5000i - Projector BENQ - Free user manual and instructions
Find the device manual for free V5000i BENQ in PDF.


| Product Type | 4K UHD DLP Laser Video Projector |
| Model | BenQ V5000i |
| Display System | 1-Chip DMD |
| Native Resolution | 3840 x 2160 (4K UHD) |
| Light Source | Laser |
| Brightness Modes | Normal, ECO, SmartEco |
| Dimensions (W x L x H) | 358 x 760 x 164 mm (including foot) |
| Weight | 13.2 kg ± 200 g (29.12 ± 0.44 lbs) |
| Power Supply | AC100-240V, 2.5 A, 50-60 Hz |
| Power Consumption | 180 W (Max); < 0.5 W (Standby) |
| Speaker Output | 15 W x 2 + 5 W x 2 |
| Input Ports | HDMI (HDCP 2.2) x 3 |
| Output Ports | SPDIF, 3.5mm Audio Out, 12V Trigger, RS-232 |
| Wireless Connectivity | Android TV via QS02 dongle (Wi-Fi) |
| Projection Size | 70" - 100" (diagonal) |
| Keystone Correction | 2D Keystone (Auto and Manual) |
| Focus Adjustment | Manual Focus (Remote Control) |
| Operating Temperature | 0°C - 40°C at sea level |
| Storage Temperature | -20°C - 60°C at sea level |
| Safety Rating | Risk Group 2, Class 1 Laser Product |
Frequently Asked Questions - V5000i BENQ
User questions about V5000i BENQ
0 question about this device. Answer the ones you know or ask your own.
Ask a new question about this device
Download the instructions for your Projector in PDF format for free! Find your manual V5000i - BENQ and take your electronic device back in hand. On this page are published all the documents necessary for the use of your device. V5000i by BENQ.
USER MANUAL V5000i BENQ
Warranty and Copyright information
Limited warranty
BenQ warrants this product against any defects in material and workmanship, under normal usage and storage.
Proof of purchase date will be required with any warranty claim. In the event this product is found to be defective within the warranty period, BenQ's only obligation and your exclusive remedy shall be replacement of any defective parts (labor included). To obtain warranty service, immediately notify the dealer from which you purchased the product of any defects.
Important: The above warranty shall be void if the customer fails to operate the product in accordance with BenQ's written instructions, especially the ambient humidity must be in-between 10% and 90%, temperature in-between 0°C and 35°C, altitude lower than 4920 feet, and avoiding to operate the projector in a dusty environment. This warranty gives you specific legal rights, and you may have other rights which vary from country to country.
For other information, please visit www.BenQ.com.
Copyright
Copyright © 2023 by BenQ Corporation. All rights reserved. No part of this publication may be reproduced, transmitted, transcribed, stored in a retrieval system or translated into any language or computer language, in any form or by any means, electronic, mechanical, magnetic, optical, chemical, manual or otherwise, without the prior written permission of BenQ Corporation.
Disclaimer
BenQ Corporation makes no representations or warranties, either expressed or implied, with respect to the contents hereof and specifically disclaims any warranties, merchantability or fitness for any particular purpose. Further, BenQ Corporation reserves the right to revise this publication and to make changes from time to time in the contents hereof without obligation to notify any person of such revision or changes.
*DLP, Digital Micromirror Device and DMD are trademarks of Texas Instruments. Others are copyrights of their respective companies or organizations.
Table of Contents
Warranty and Copyright information ....2
Important safety instructions ....4
Introduction 8
Shipping contents 8
Projector exterior view 11
Controls and functions 12
Positioning your projector 15
Obtaining a preferred projected image size.... 15
Adjusting the projected image 16
Connection 18
Operation 19
Starting up the projector.... 19
QS02 Android TV setup 20
Playing media files on a USB flash drive (Media Reader) 22
Using the menus 23
Securing the projector 24
Switching input signal.... 24
Shutting down the projector 24
Upgrading firmware 25
Menu operation 26
Menu system.... 26
Basic menu 31
Advanced menu 33
Maintenance 44
Care of the projector 44
Light source information 44
Troubleshooting 47
Specifications 48
Projector specifications 48
Dimensions.... 49
Timing chart 49
Important safety instructions
Your projector is designed and tested to meet the latest standards for safety of information technology equipment. However, to ensure safe use of this product, it is important that you follow the instructions mentioned in this manual and marked on the product.
- Please read this manual before you operate your projector. Save it for future reference.
natural_image
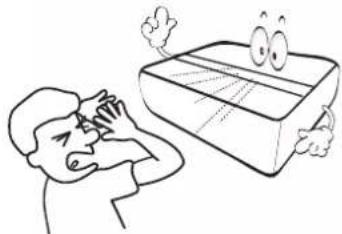
Cartoon illustration of a hand holding a rectangular object with eyes and motion lines (no text or symbols)- Do not look straight at the projector lens during operation. The intense light beam may damage your eyes.
natural_image
Cartoon illustration of a person reacting to surprise from a smiling rectangular object (no text or symbols)- Refer servicing to qualified service personnel.

natural_image
Cartoon illustration of a smiling book character wearing a cap with the word 'benq' and thinking (no text or symbols on the book itself)- Always open the lens shutter (if any) or remove the lens cap (if any) when the projector light source is on.
- The light source becomes extremely hot during operation.

natural_image
Cartoon illustration of a hand holding a fan with steam, no text or symbols present- In some countries, the line voltage is NOT stable. This projector is designed to operate safely within a mains voltage between 100 to 240 volts AC, but could fail if power cuts or surges of ±10 volts occur. In areas where the mains voltage may fluctuate or cut out, it is recommended that you connect your projector through a power stabilizer, surge protector or uninterruptible power supply (UPS).
natural_image
Simple line drawing of a device with a cartoon face and connected to a power outlet (no text or symbols)- Do not block the projection lens with any objects when the projector is under operation as this could cause the objects to become heated and deformed or even cause a fire.
natural_image
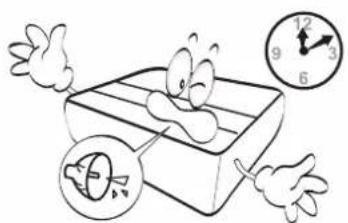
Illustration of a closed book with two floating mice, no text or symbols present- Do not operate light sources beyond the rated light source life.
natural_image
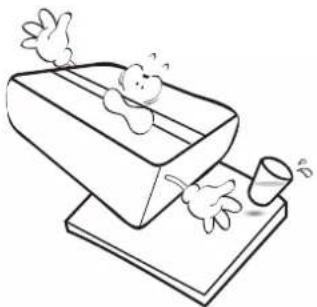
Cartoon illustration of a smiling rectangular object with two hands and three clock faces (no text or symbols)- Do not place this product on an unstable cart, stand, or table. The product may fall, sustaining serious damage.
natural_image
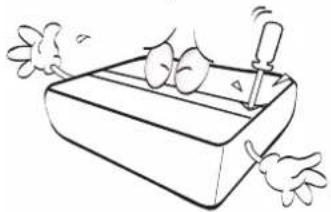
Simple line drawing of a book with floating papers and a cup, no text or symbols present- Do not attempt to disassemble this projector. There are dangerous high voltages inside which may cause death if you should come into contact with live parts. The only user serviceable part is the light source which has its own removable cover.
Under no circumstances should you ever undo or remove any other covers. Refer servicing only to suitably qualified professional service personnel.
natural_image
Cartoon illustration of a box with scissors and two flying gloves (no text or symbols)-
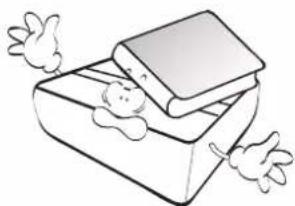
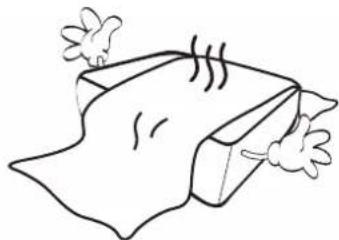
Do not block the ventilation holes.
-
Do not place this projector on a blanket, bedding or any other soft surface.
- Do not cover this projector with a cloth or any other item.
- Do not place inflammables near the projector.
natural_image
Simple line drawing of a folded paper or sheet with steam rising (no text or symbols)If the ventilation holes are seriously obstructed, overheating inside the projector may result in a fire.
- Always place the projector on a level, horizontal surface during operation.
- Do not use if tilted at an angle of more than 10 degrees left to right, nor at angle of more than 15 degrees front to back. Using the projector when it is not fully horizontal may cause a malfunction of, or damage to, the light source.
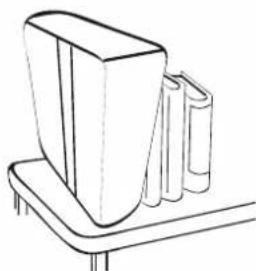
- Do not stand the projector on end vertically. Doing so may cause the projector to fall over, causing injury or resulting in damage to the projector.
natural_image
Line drawing of a bookshelf with two books on top (no text or symbols)- Do not step on the projector or place any objects upon it. Besides probable physical damage to the projector, doing so may result in accidents and possible injury.

natural_image
Simple line drawing of a steaming stack of books or documents (no text or symbols)-
When the projector is under operation, you may sense some heated air and odor from its ventilation grill. It is a normal phenomenon and not a product defect.
-
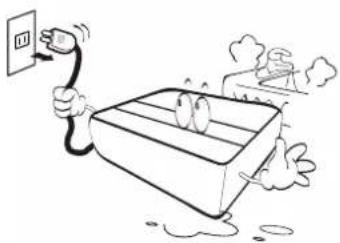
Do not place liquids near or on the projector. Liquids spilled into the projector may cause it to fail. If the projector does become wet, disconnect it from the power supply's power outlet and call BenQ to have the projector serviced.
natural_image
Cartoon illustration of a person using a power cord to clean electrical equipment (no text or symbols)-
This apparatus must be earthed.
-
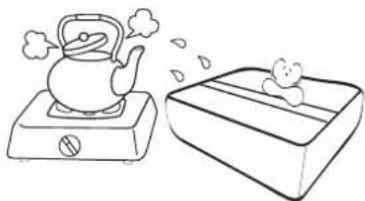
Do not place this projector in any of the following environments.
- Space that is poorly ventilated or confined. Allow at least 50 cm clearance from walls and free flow of air around the projector.
- Locations where temperatures may become excessively high, such as the inside of a car with all windows rolled up.
- Locations where excessive humidity, dust, or cigarette smoke may contaminate optical components, shorten the projector's life span and darken the image.
natural_image
Simple line drawing of a kettle on a stovet and a box with a mouse, no text or symbols present.- Locations near fire alarms - Locations with an ambient temperature above 40^ C / 104^ F - Locations where the altitudes are higher than 3000 m (10000 feet).
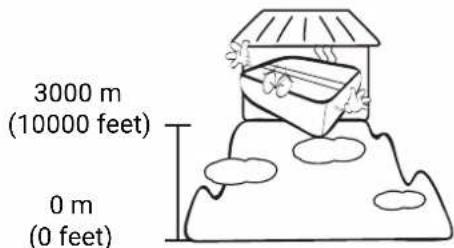

To avoid damaging the DLP chips, never aim a high-power laser beam into the projection lens.
Notice
To ensure safe use of this product, please read the user manual for details before you operate your projector.
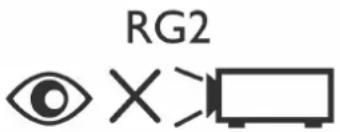
Risk Group 2
- According to the classification of photobiological safety of light sources and light source systems, this product is Risk Group 2, IEC 62471-5:2015.
- Possibly hazardous optical radiation emitted from this product.
- Do not stare at operating light source. May be harmful to the eyes.
- As with any bright source, do not stare into the direct beam.
Laser Caution
This product belongs to CLASS 1 consumer laser product and complies with IEC 60825-1:2014, EN 60825-1:2014/A11:2021 and EN 50689:2021.
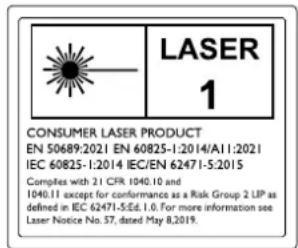
Above laser cautions are located on the bottom of this apparatus.

The projector's light source unit uses a laser.
Caution – Use of controls or adjustments or performance of procedures other than those specified herein may result in hazardous radiation exposure.
- Notice is given to supervise children and to never allow them to stare into the projector beam at any distance from the projector.
- Notice is given to use caution when using the remote control for starting the projector while in front of the projection lens.
- Notice is given to the user to avoid the use of optical aids such as binoculars or telescopes inside the beam.
Introduction
Shipping contents
Carefully unpack and verify that you have all of the items shown below. If any of these items are missing, please contact your place of purchase.
Standard accessories
natural_image
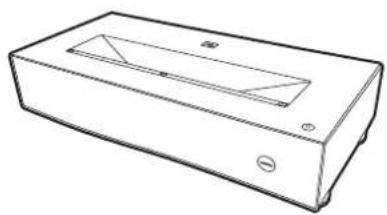
Line drawing of a rectangular electronic device casing with internal compartments and mounting points (no text or symbols)Projector
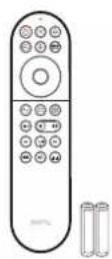
Remote controls with batteries
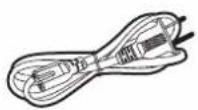
Power cord

QS02 Android TV dongle Installation guide Warranty card*

Regulatory Statements Service QR code sticker

• The supplied accessories will be suitable for your region, and may differ from those illustrated.
- *The warranty card is only supplied in some specific regions. Please consult your dealer for detailed information.
Optional accessories
- BenQ 3D glasses • Universal wall mount
Installing the Android TV dongle
You must first install the Android TV dongle before you can begin to use the projector. To install the dongle:
- Remove the wireless dongle compartment cover.
- Connect the Micro USB cable located in the compartment to the Micro USB port on the dongle.
- Connect the Mini HDMI cable to the Mini HDMI port on the dongle.
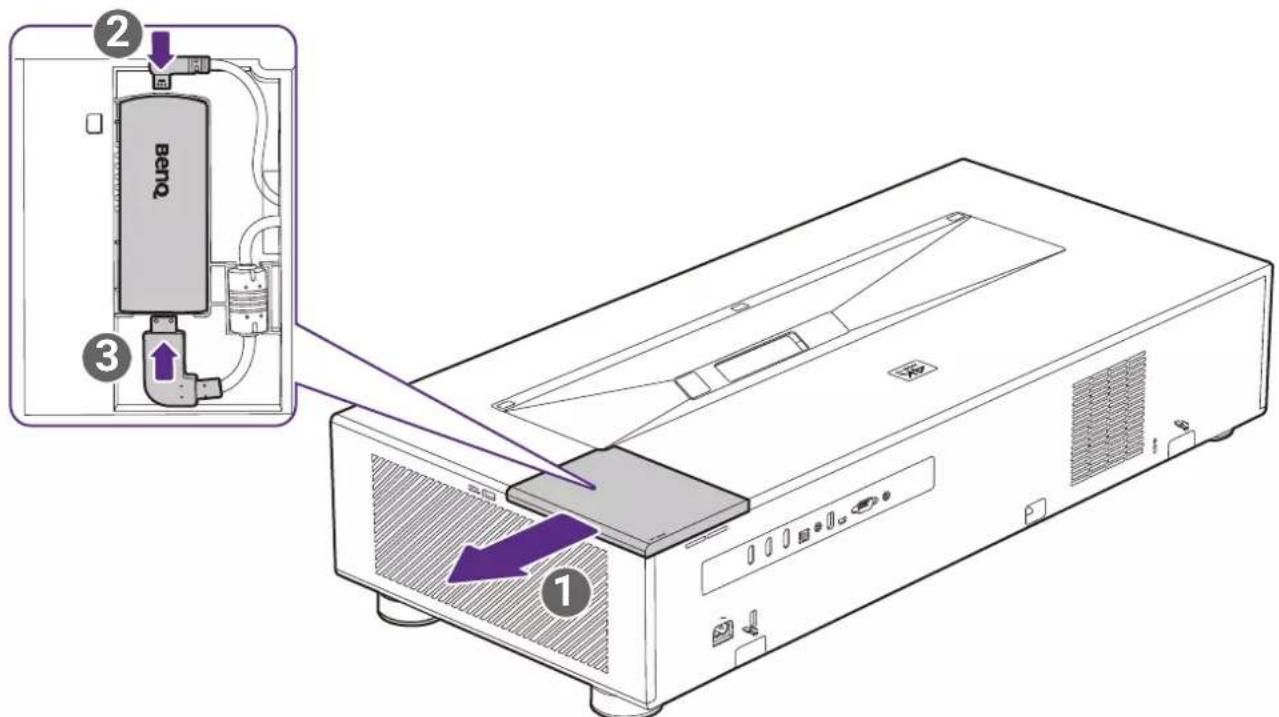
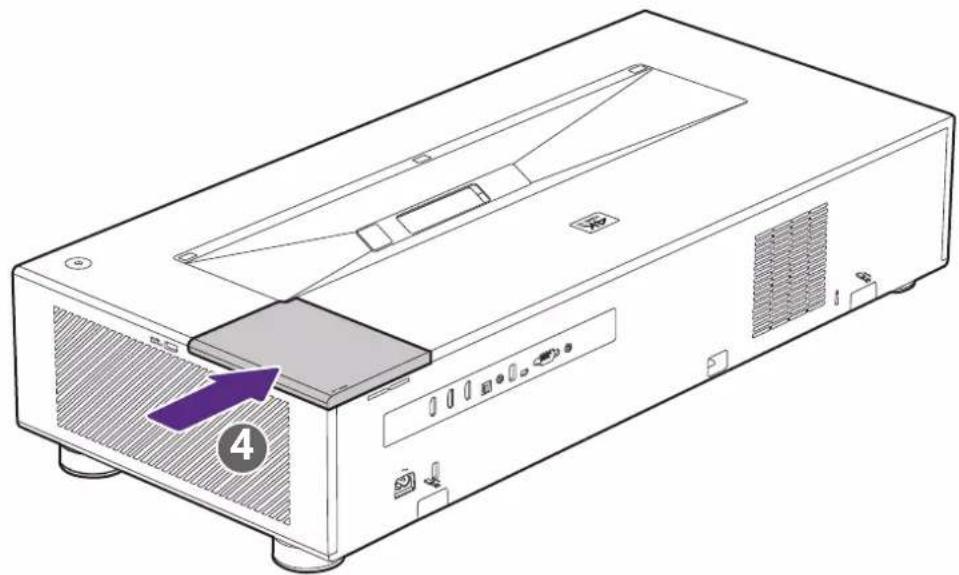
- Place the dongle into the compartment and then re-install the compartment cover.
natural_image
Line drawing of a computer monitor with labeled ports and an arrow pointing to a component (no text or symbols beyond the number 4)Replacing the remote control batteries
Only use the remote control provided with the projector. Do not use the remote control included in the QS02 Android TV dongle packaging.
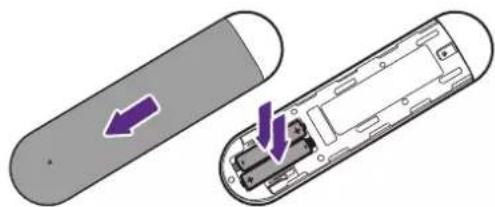
- Push down and open the battery cover, as illustrated.
- Remove the old batteries (if applicable) and install two AAA batteries. Make sure that the positive and negative ends are positioned correctly, as illustrated.
natural_image
Diagram showing two electronic devices with internal components and directional arrows indicating movement (no text or symbols)- Refit the battery cover until it clicks into place.

- Avoid leaving the remote control and batteries in an excessive heat or humid environment like the kitchen, bathroom, sauna, sunroom or in a closed car.
- Replace only with the same or equivalent type recommended by the battery manufacturer.
- Dispose of the used batteries according to the manufacturer's instructions and local environment regulations for your region.
- Never throw the batteries into a fire. There may be danger of an explosion.
- If the batteries are dead or if you will not be using the remote control for an extended period of time, remove the batteries to avoid damage to the remote control from possible battery leakage.
Using the measuring tools
Two rulers can be pulled out from the rear of the projector to measure the projection distance between the projector and the screen, which helps you in positioning the projector.
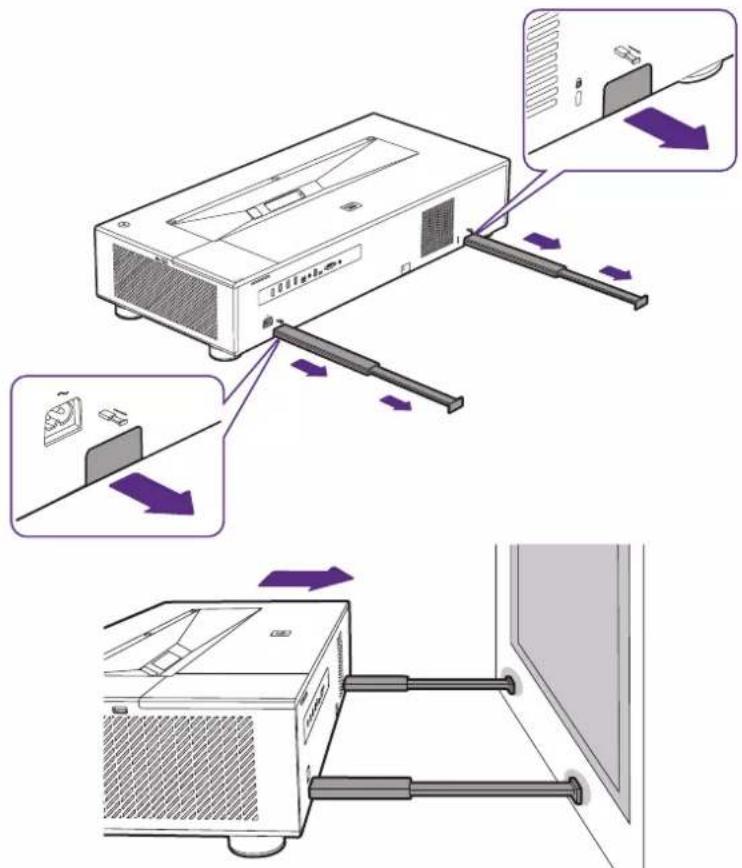

Remember to retract the measuring tools once you have finished using them, otherwise any vibrations due to sound coming from the projector will cause the measuring tools produce sound (due to the power of the projector's sound system).
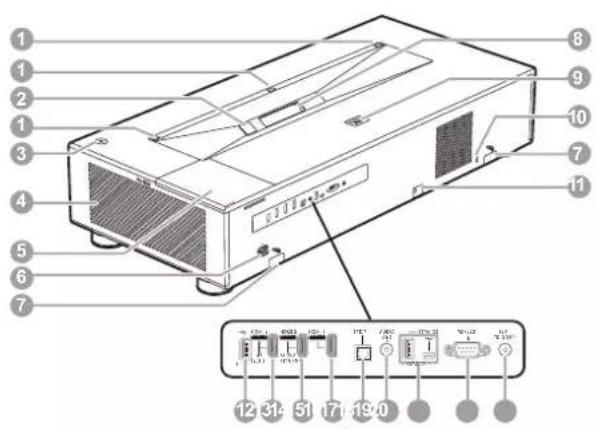
- Eye protection sensors
- Camera (for auto screen adjustments)
- ⏻ Power
Toggles the projector between standby mode and on.
- Air output vent
- Wireless dongle compartment
- AC power jack
- Measuring tools
- Projection lens
- Rear IR remote control sensor
- Kensington anti-theft lock slot
- Security bar
-
USB Type-A port (2.5 A power supply only)
-
HDMI input port (for 4K / 120Hz)
- HDMI input port (with eARC)
- HDMI input port
- SPDIF audio output port
- 3.5" audio out jack
- Service ports (not for use)
- RS-232 control port
- 12 V trigger jack (for electric projection screens)
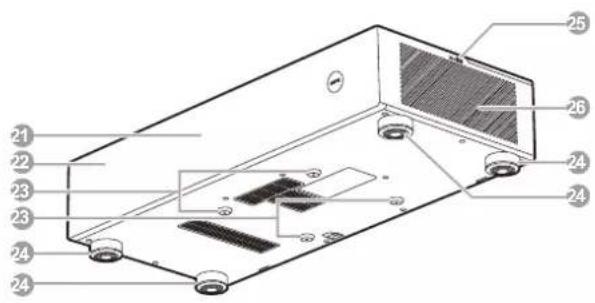
- Front IR remote control sensor
- Speakers (behind the mesh)
- Ceiling mount screw holes
- Adjuster feet
- USB Type-A port (for Media Reader)
- Air intake vent
Controls and functions
Remote control
Only use the remote control provided with the projector. Do not use the remote control included in the QS02 Android TV dongle packaging (availability of the QS02 remote control may vary by country/region).

All the key presses described in this document are available on the remote control.
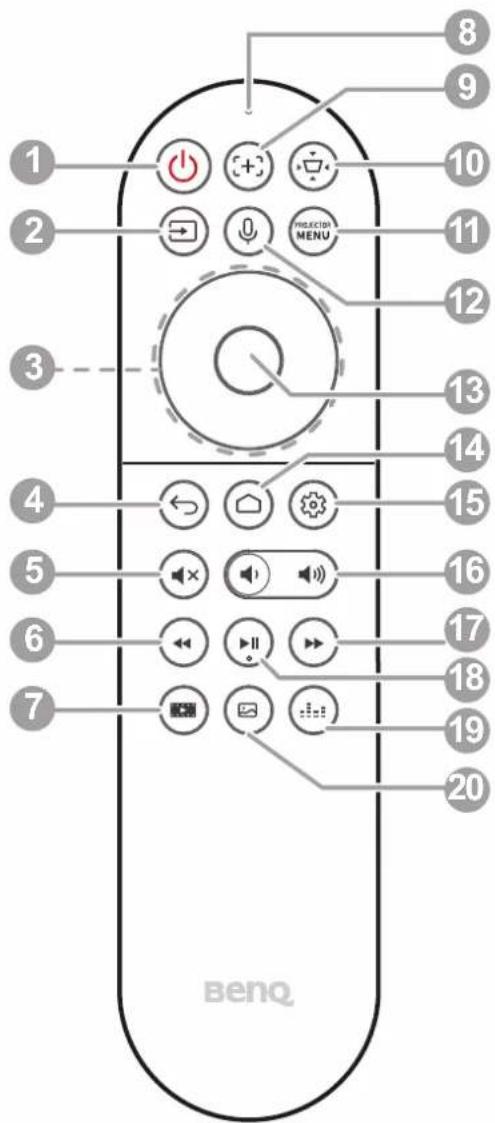
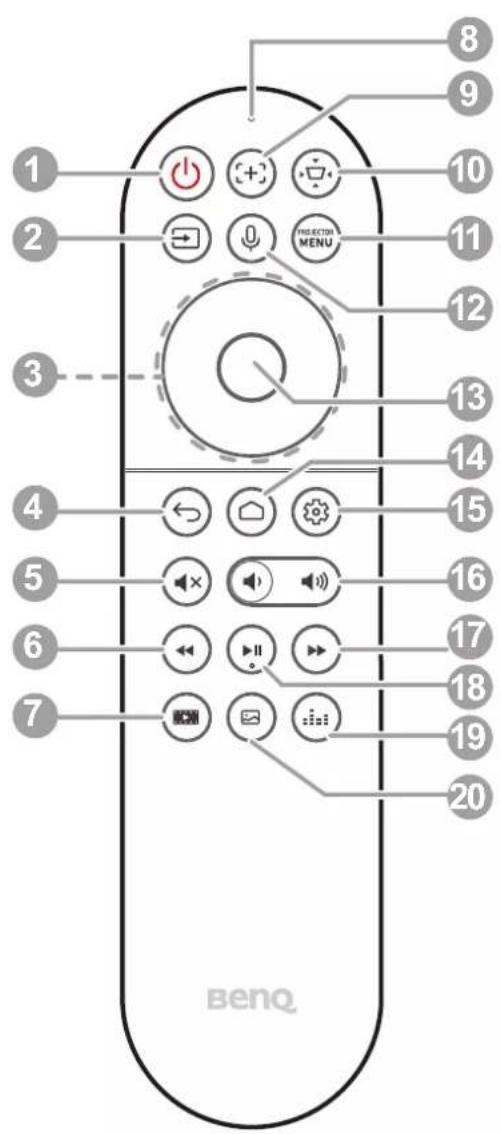
1.

Power
Toggles the projector between standby mode and on.
2.

Source
Displays the source selection bar.
- Arrow keys (▲, ▼) ◀ ▶
Navigates up/down/left/right to select a desired ATV or projector OSD menu item.
4.

Back
When the input source is in ATV, press to go back to the previous ATV option, close an ATV warning or reminder pop-up menu, or exit the current Android application under the ATV source.
When the projector OSD menu is on, press
to go back to the previous projector OSD menu, close a projector warning or reminder pop-up menu, or exit and save projector menu settings.
5.

Mute
Toggles projector audio between on and off.
6.

Rewinds video or audio playback.
7.

Filmmaker
Switches Picture Mode to Filmmaker mode.
- Microphone
Receives voice commands.
9.

Focus
Press to open the focus page. Available on compatible projectors only.
10

Screen adjustment
Displays the Screen Adjustment menu.
11.

Menu
Turns on the On-Screen Display (OSD) menu.
12.

Voice search / Voice assistant
Press and hold the Voice search / Voice assistant button to activate voice assistant. Hold this key and speak to the microphone at the top of the remote control while using voice assistant.
13.0K
Confirms a selected item in the ATV or projector OSD menu.
When the input source is ATV, press OK to play or pause a video or audio file during media playback.
14.

Android TV home screen
Displays Android TV home screen.
15.

Android settings
Displays Android settings.
16.
Volume keys
Decreases or increases the projector volume.
17.

Fast forward
Fast forwards current video or audio playback
18.

Play / Pause
Plays/Pauses a video or audio playback
19.

Sound mode
Displays sound mode menu.
20.

Picture mode
Displays the Picture Mode menu.

Do not block the projection lens from projecting as this could cause the blocking object to become heated and deformed or even cause a fire.
Remote control effective range
Only use the remote control provided with the projector. Do not use the remote control included in the QS02 Android TV dongle packaging.
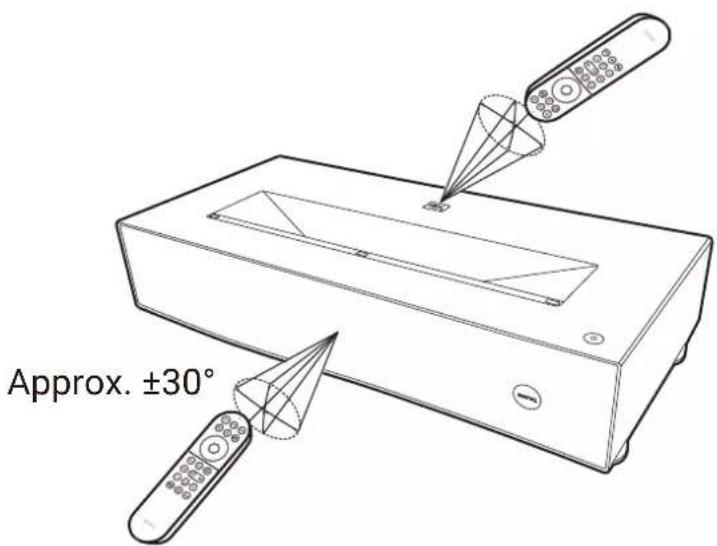
The remote control must be held at an angle within 30 degrees perpendicular to the projector's IR remote control sensor(s) to function correctly. The distance between the remote control and the sensor(s) should not exceed 8 meters (\~ 26 feet).
Make sure that there are no obstacles between the remote control and the IR sensor(s) on the projector that might obstruct the infra-red beam.
Positioning your projector
Obtaining a preferred projected image size
The distance from the projector lens to the screen, the zoom setting, and the video format each factors in the projected image size.
Projection dimensions
- The screen aspect ratio is 16:9 and the projected picture is in a 16:9 aspect ratio
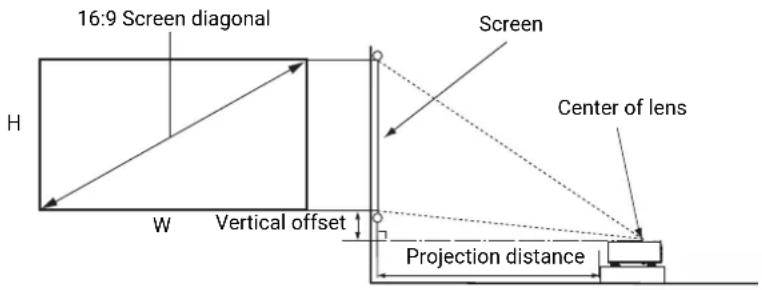
| Image size | Projection distance (mm) Vertical offset (mm)Diagonal | |||
| W (mm) H (mm) | ||||
| Inch mm | ||||
| 70 1778 | 1550 872 103 196 | |||
| 80 2032 | 1771 996 159 224 | |||
| 82 2083 | 1815 1021 170 230 | |||
| 90 2286 | 1992 1121 214 252 | |||
| 100 2540 | 2214 1245 269 280 | |||
For example, if you are using a 100-inch screen, the recommended projection distance is 269 mm.
If your measured projection distance is 230 mm, the closest match in the "Projection distance (mm)" column is 214 mm. Looking across this row shows that a 90" (about 2.3 m) screen is required.

All measurements are approximate and may vary from the actual sizes.
BenQ recommends that if you intend to permanently install the projector, you should physically test the projection size and distance using the actual projector in situ before you permanently install it, so as to make allowance for this projector's optical characteristics. This will help you determine the exact mounting position so that it best suits your installation location. The distance between the ambient light reflection screen and the projector should also be considered during installation.
Adjusting the projected image
Adjusting the projection angle
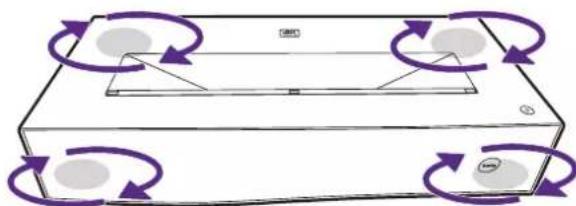
If the projector is not placed on a flat surface or the screen and the projector are not perpendicular to each other, the projected image becomes trapezoidal. You can rotate the adjuster feet to fine-tune the image.
natural_image
Diagram of a rectangular device with four circular components on its sides, surrounded by purple curved arrows indicating rotation or circulation (no text or symbols)To retract the feet, rotate the adjuster feet in a reverse direction.

Do not look into the lens while the light source is on. The strong light from the light source may cause damage to your eyes.
Fine-tuning the image clarity
Press the focus ⏻ button on the remote control to open the Manual Focus menu and then use ↕ to adjust the focus settings.
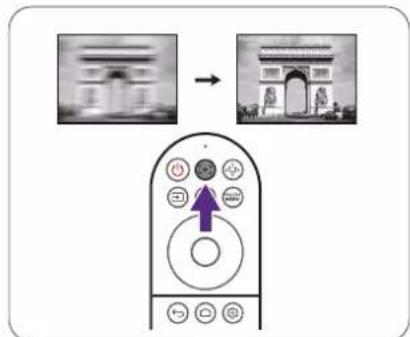

You can also access the Manual Focus menu from the Installation > Screen Adjustment menu in the Advanced settings menu.
Correcting keystone
Keystoning refers to the situation where the projected image becomes a trapezoid due to angled projection.
To correct the distorted image:
- Display the 2D Keystone correction sub-menu from the following menus.
• The setup wizard during the projector initial setup
• The Screen Adjustment menu in the Basic settings menu
- The Installation > Screen Adjustment menu in the Advanced settings menu.
- After the 2D Keystone correction page appears:
• To correct keystoning at the top of the image, use ▼
• To correct keystoning at the bottom of the image, use
• To correct keystoning at the right side of the image, use
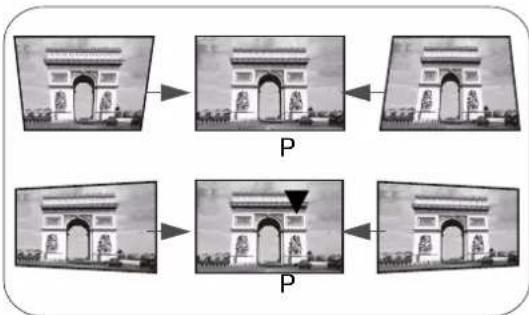
- To correct keystoning at the left side of the image, use ▶
-
To automatically correct the vertical and horizontal sides of the distorted image, press OK for 2 seconds.
-
When done, press to save your changes and exit.
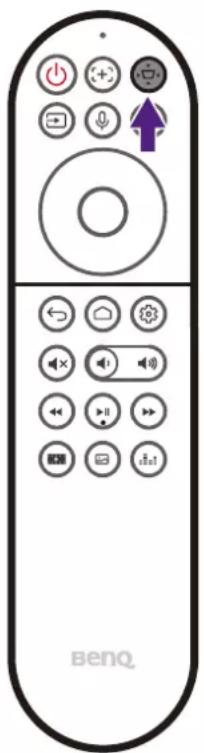
Screen Adjustment
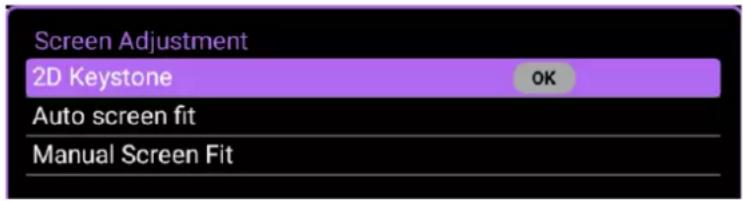
To make manual adjustments to the projected image and correct for any distortions or to fine-tune the image, you can use the Screen Adjustment menu. To access the menu press the Screen Adjustment button on the remote control.
natural_image
Front view of a BenQ remote control with navigation buttons and playback controls (no text or symbols on the device itself)Basic OSD Menu
Advanced OSD Menu
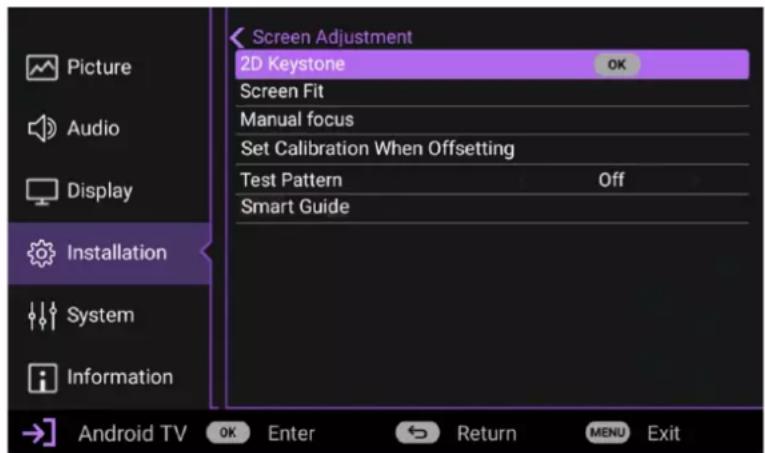
The menu allows you to configure settings such as the screen fit, image focus, and keystone among others. For detailed information on the various settings, see Installation menu on page 39.
Connection
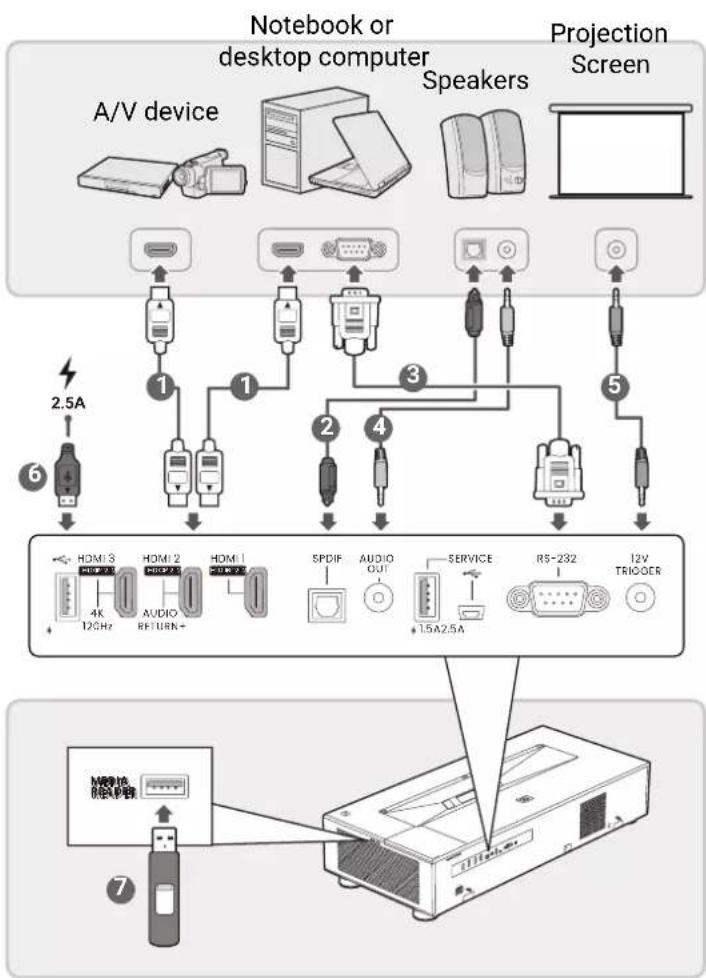
When connecting a signal source to the projector, be sure to:
- Turn all equipment off before making any connections.
- Use the correct signal cables for each source.
- Ensure the cables are firmly inserted.
flowchart
graph TD
    A["A/V device"] -->|2.5A| B["1"]
    C["Notebook or desktop computer"] -->|1| D["2"]
    E[" Speakers"] -->|3| F["4"]
    G["Projection Screen"] -->|5| H["6"]
    B --> I["HDMI 3 HDMI 2 HDMI 1 HDMI 2 HD/7.5 4K 12GHz AUDIO RETURN+"]
    D --> J["SPDIF AUDIO OUT SERVICE 1.5A2.5A"]
    F --> K["R5-232 12V TRICOER"]
    H --> L["7"]
    L --> M["LED Speaker"]
1 HDMI cable
2 SPDIF audio cable
3 RS232 cable
4 3.5" audio cable
5 3.5" cable for trigger signal
6 USB cable (for 2.5A power output only)
7 USB flash drive

- In the connections above, some cables may not be included with the projector (see Shipping contents on page 8). They are commercially available from electronics stores.
- The connection illustrations are for reference only. The rear connecting jacks available on the projector vary with each projector model.
- Many notebooks do not turn on their external video ports when connected to a projector. Usually a key combo like FN + function key, or Windows + F9 with a monitor symbol turns the external display on/off. Press FN and the labeled function key simultaneously. Refer to your notebook's documentation to find your notebook's key combination.
- If the selected video image is not displayed after the projector is turned on and the correct video source has been selected, check that the video source device is turned on and operating correctly. Also check that the signal cables have been connected correctly.
Operation
Starting up the projector
-
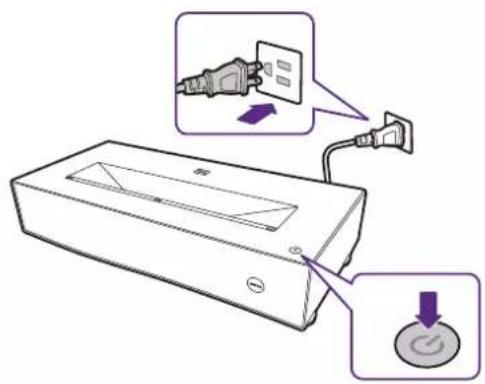
Plug the power cord. Turn on the power outlet switch (if necessary). The power indicator on the projector lights orange after power has been applied.
-
Press on the projector or the remote control to start the projector. The power indicator flashes green and then stays green when the projector is on.
The start up procedure takes about 30 seconds. In the later stage of starting up, a start-up logo is projected.
-
Switch all of the connected equipment on.
-
You can also press 📄 SOURCE to select your desired input signal. See Switching input signal on page 24.


- Please use the original accessories (e.g. power cord) to avoid possible dangers such as electric shock and fire.
- If the projector is still hot from previous activity, it will run the cooling fan for approximately 90 seconds before energizing the light source.
- The Setup Wizard screenshots are for reference only and may differ from the actual design.
- If the frequency/resolution of the input signal exceeds the projector's operating range, you will see the message "Out of Range" displayed on the background screen. Please change to an input signal which is compatible with the projector's resolution or set the input signal to a lower setting. See Timing chart on page 49.
-
If no signal is detected for 3 minutes, the projector automatically enters saving mode.
-
If this is the first time you turn on the projector, the setup wizard appears to guide you through setting up the projector. Follow the on screen instructions.
If you have already done this, skip this step.
QS02 Android TV setup
Before you start
Check that you have:
• A Wi-Fi Internet connection
• A Google Account
Pairing the remote control
If you have not previously paired the projector's remote control to the QS02 Android TV dongle, the Android TV setup process will require that you do so by simultaneously pressing and holding the back and home screen buttons on the remote control.
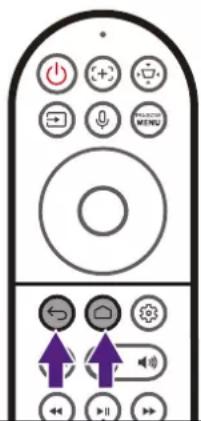
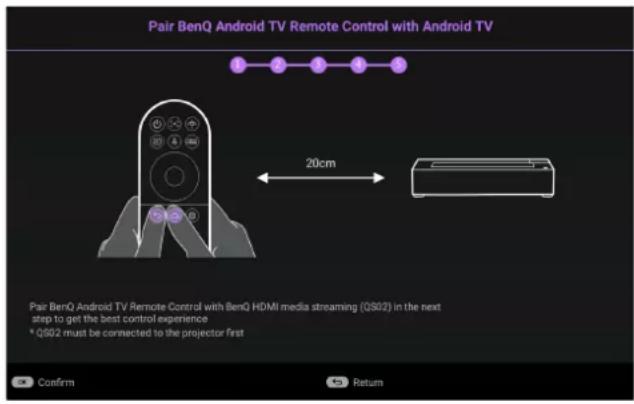

Only pair the remote control provided with the projector. Do not use the remote control included in the QS02 Android TV dongle packaging (availability of the QS02 remote control may vary by regions).
After pressing both buttons, check the flashing pattern of the remote control buttons to see the status of the pairing process using the following information:
- Buttons flashing white: Pre-pairing
- Buttons quick-flashing white: Pairing in progress
- Buttons switch from quick-flashing white to steady white: Pairing successful
Once the remote control is paired to the dongle, the Android TV setup process will begin.
Set up your device
There are 3 options to set up your device
- Quick Setup using an Android phone
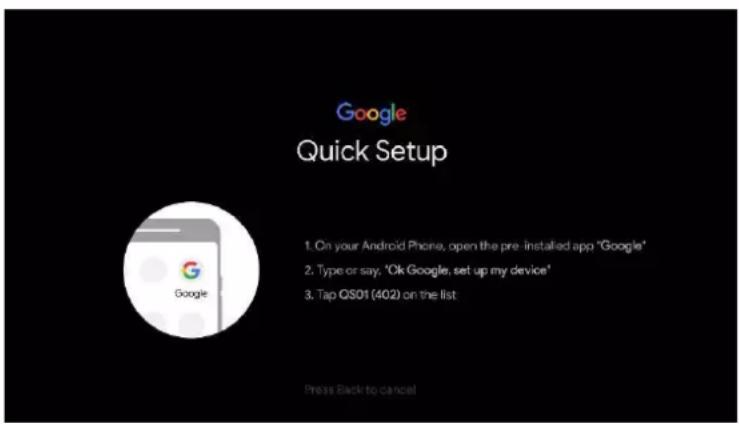
• Using your phone or computer
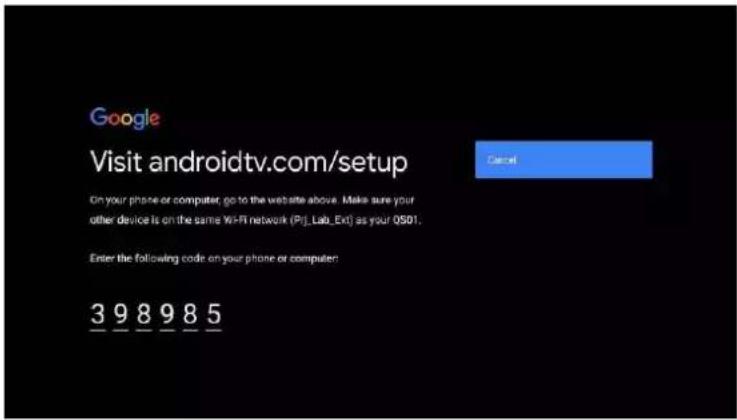
• Using your remote control
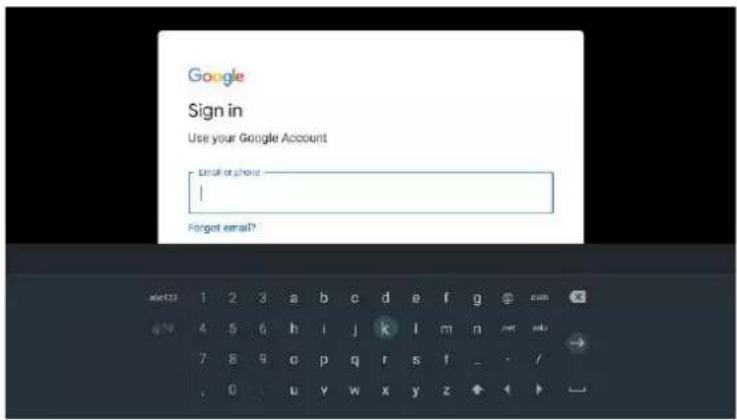

If using the remote select Not Now on the remote control tutorial screen.
Display Android TV home screen
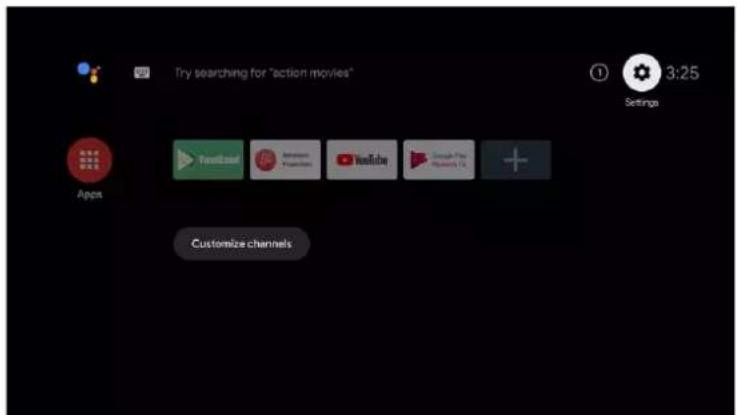

For more information, visit https://support.google.com/androidtv/
Playing media files on a USB flash drive (Media Reader)
To play media files stored on a USB flash drive you must use the Media Reader USB Type-A port on the right side of the projector.
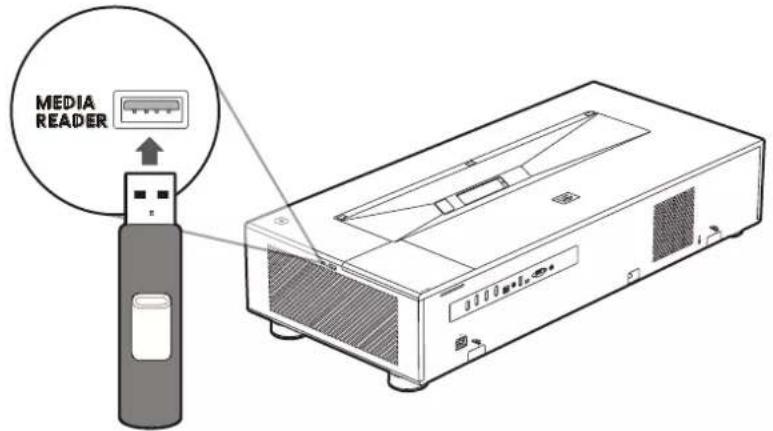

Do not use the USB Type-A port at the rear of the projector to play media files, it does not support data transfer and is only used to supply power.
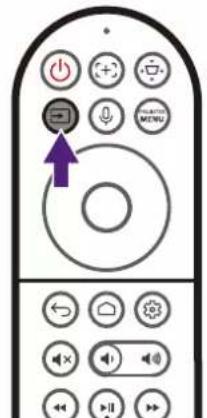
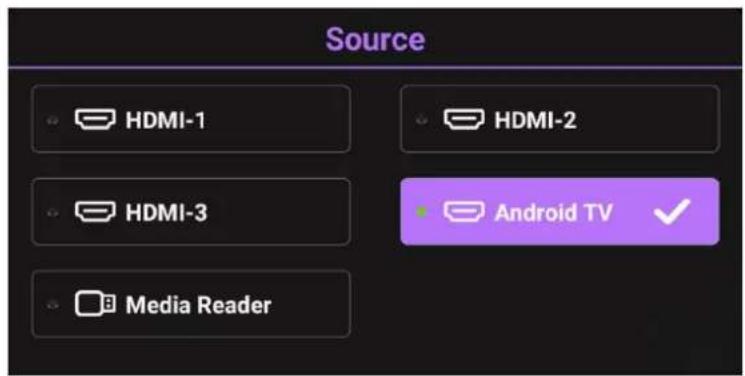
Once you insert the flash drive into the port press the source button on the remote control and select Media Reader in the Source menu. The projector will switch to the Android TV interface.
From the Android TV interface, open a media player or file manager app that supports the format of your media file to begin playing the file.
Using the menus
The projector is equipped with On-Screen Display (OSD) menus for making various adjustments and settings.

The OSD screenshots below are for reference only, and may differ from the actual design.
Below is the overview of the Basic OSD menu.
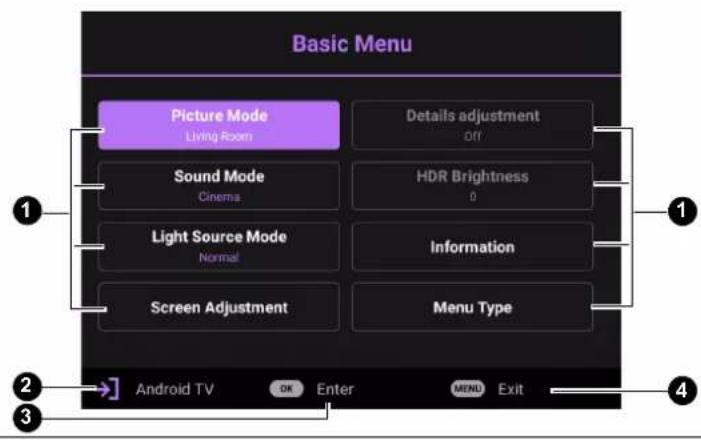
1 Main menus
② Current input signal
③ Press OK to enter view a menu
4 Press MENU to exit the menu
Below is the overview of the Advanced OSD menu.
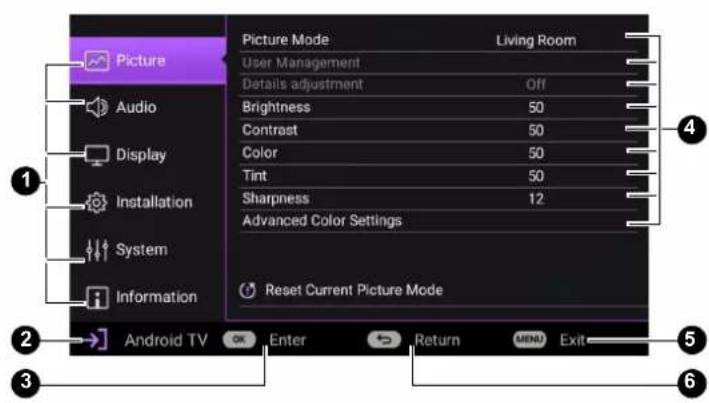
1 Main menus
② Current input signal
3 Press OK to activate a sub-menu
4 Sub-menus
5 Press to exit the
Press ⑦
6 previous page or to exit the menu.
To access this home screen, press the menu button on the remote control.
- Use the arrow keys (▲/▼) on the remote control to move through the menu items.
- Use OK on the remote control to confirm the selected menu item.
Securing the projector
Using a security cable lock
The projector has to be installed in a safe place to prevent theft. Otherwise, purchase a security cable to secure the projector. A security bar is located on the right side of the projector. See item 10 on page 11. Insert a security cable to the opening of the security bar and secure it to a nearby fixture or heavy furniture.
Switching input signal
The projector can be connected to multiple devices at the same time. However, it can only display one full screen at a time. When starting up, the projector automatically searches for the available signals.
Be sure the Display > Auto Source Search menu is On if you want the projector to automatically search for the signals.
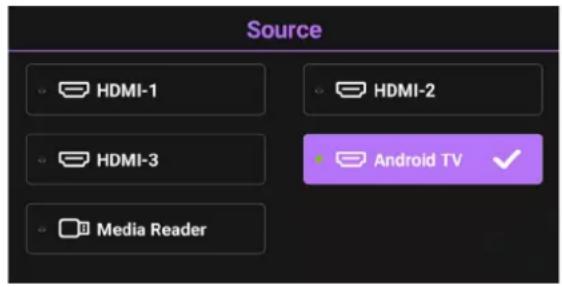
To select the source:
- Press A source selection bar appears.
- Press ▲/▼ until your desired signal is selected and press OK.
Once detected, the picture from the selected source will appear. If there is multiple equipment connected to the projector, repeat steps 1-2 to search for another signal.

- The brightness level of the projected image will change accordingly when you switch between different input signals.
- For best display picture results, you should select and use an input signal which outputs at the projector's native resolution. Any other resolutions will be scaled by the projector depending upon the "aspect ratio" setting, which may cause some image distortion or loss of picture clarity.
Shutting down the projector
- Press and a confirmation message will appear prompting you. If you don't respond in a few seconds, the message will disappear.
- Press a second time. The power indicator flashes white, the projection light source shuts down.
-
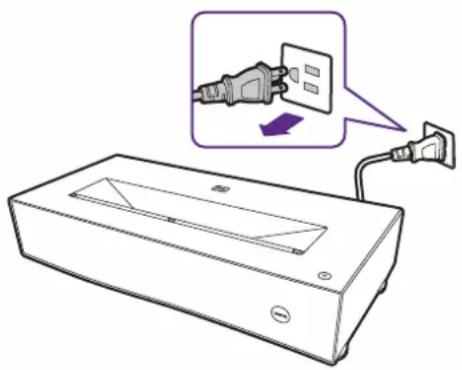
Once the cooling process finishes, the power indicator becomes a steady blue and fans stop. Disconnect the power cord from the power outlet.
-
To protect the light source, the projector will not respond to any commands during the cooling process.
- Avoid turning on the projector immediately after turning it off as excessive heat may shorten light source life.
- Light source life results will vary depending on environmental conditions and usage.
- To protect the light source, the projector will not respond to any commands during the cooling process.
- Avoid turning on the projector immediately after turning it off as excessive heat may shorten light source life.
- Light source life results will vary depending on environmental conditions and usage.

Upgrading firmware

To ensure a smooth process, please perform the following steps before upgrading the firmware.
- Check and write down your firmware version from the Information > Firmware Upgrade menu.
-
Call BenQ service center to provide the version number and verify the projector is free from firmware compatibility problem. Avoid turning on the projector immediately after turning it off as excessive heat may shorten light source life.
-
Go to BenQ website and enter Product page > Support > Software to download the latest firmware file.
- Unzip the downloaded file, find and save the file named "V5000iUpgrade.bin" to a USB flash drive. (It is recommended to use a USB drive in FAT32 format)
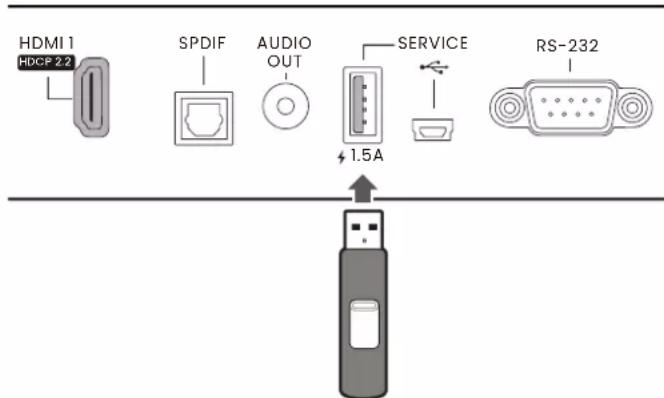
- Plug the USB flash drive into the 1.5A SERVICE USB-A port on the back of the projector.
- Go to the Advanced menu > System > Firmware Upgrade menu, and press OK.
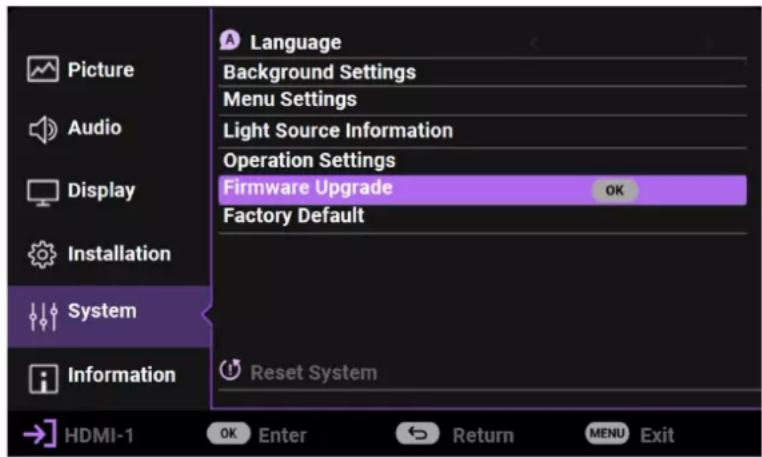
- Select Yes to upgrade the firmware version. Keep the projector power on until the firmware upgrade is finished.
Menu operation
Menu system
Please note that the on-screen display (OSD) menus vary according to the signal type selected and the projector model you are using.
The menu items are available when the projector detects at least one valid signal. If there is no equipment connected to the projector or no signal detected, limited menu items are accessible.
Basic Menu
| Main menu Sub-menu Options | ||
| Picture Mode | Bright | |
| Living Room | ||
| Game | ||
| Bright Cinema | ||
| FILMMAKER MODE | ||
| Cinema (Rec 709) | ||
| 3D | ||
| HDR10 | ||
| HDR10+ | ||
| HDR Game | ||
| FILMMAKER MODE (HDR) | ||
| HLG | ||
| ISF Night | ||
| ISF Day | ||
| User | ||
| Sound Mode Cinema/Music/Game/Sports/User | ||
| Light Source Mode Normal/ECO/SmartEco | ||
| Screen Adjustment | 2D Keystone | H: -30 - 30 |
| V: -30 - 30 | ||
| Auto Screen Fit OK | ||
| Manual Screen Fit | ||
| Details Adjustment On/Off | ||
| HDR Brightness -2/-1/0/1/2 | ||
| Information | Detected Resolution | |
| Source | ||
| Picture Mode | ||
| Light Source Mode | ||
| 3D Format | ||
| Color System | ||
| Dynamic Range | ||
| Light Source Usage Time | ||
| Firmware Version | ||
| 3D Format | ||
| Service Code | ||
| Menu Type Basic/Advanced | ||
Advanced Menu
| Main menu Sub-Menu Options | |||
| Picture | Picture Mode | Bright | |
| Living Room | |||
| Game | |||
| Bright Cinema | |||
| FILMMAKER MODE | |||
| Cinema (Rec 709) | |||
| 3D | |||
| HDR10 | |||
| HDR10+ | |||
| HDR Game | |||
| FILMMAKER MODE (HDR) | |||
| HLG | |||
| ISF Night | |||
| ISF Day | |||
| User | |||
| Details Adjustment Off/On | |||
| User Management | Load Settings From | Living Room | |
| Game | |||
| Bright Cinema | |||
| FILMMAKER MODE | |||
| Cinema (Rec 709) | |||
| Rename User Mode | |||
| Brightness 0 - 100 | |||
| Contrast 0 - 100 | |||
| Color 0 - 100 | |||
| Tint 0 - 100 | |||
| Sharpness 0 - 15 | |||
| Advanced Color Setting | Gamma Selection | 1.8/2.0/2.1/2.2/2.3/2.4/2.5/2.6/BenQ | |
| Color Temperature Tuning | Color Temperature | ||
| R Gain | |||
| G Gain | |||
| B Gain | |||
| R Offset | |||
| G Offset | |||
| B Offset | |||
| Reset | |||
| Advanced Color Temperature Tuning | 5%/10%/20%/30%/40%/50%/60%/70%/80%/90%/100%/Reset | ||
| Color Management R/G/B/C/M/Y/White Balance/Reset | |||
| CinemaMaster | Color Enhancer/Flesh Tone/Pixel Enhancer 4K/Motion Enhancer 4K/Local Contrast Enhancer | ||
| Light Source Mode Normal/ECO/SmartEco | |||
| HDR Brightness -2/-1/0/1/2 | |||
| Picture | Advanced Color Setting | Noise Reduction Off/Low/Middle/High | |
| Reset Current Picture Mode | Reset/Cancel | ||
| Audio | Sound Mode | Cinema | |
| Music | |||
| Game | |||
| Sports | |||
| User | |||
| User EQ | 100Hz -10 – 10 | ||
| 300Hz -10 – 10 | |||
| 1kHz -10 – 10 | |||
| 4kHz -10 – 10 | |||
| 10kHz -10 – 10 | |||
| Audio Output | treVolo | ||
| S/PDIF | |||
| Audio Return+ | |||
| 3.5mm Jack | |||
| Audio Output Format | Auto | ||
| LPCM | |||
| RAW | |||
| RAW+ | |||
| Mute Off/On | |||
| Volume 0 – 20 | |||
| L/R Switch Off/On | |||
| Reset Audio Reset/Cancel | |||
| Display | Aspect Ratio | Auto | |
| 4:3 | |||
| 16:9 | |||
| Auto Source Search Off/On | |||
| Source Rename | HDMI-1 | ||
| HDMI-2 | |||
| HDMI-3 | |||
| 3D 3D Mode | Auto | ||
| Frame Sequential | |||
| Frame Packing | |||
| Top Bottom | |||
| Side by Side | |||
| Off | |||
| HDMI Settings | Auto | ||
| Limited | |||
| Full | |||
| HDMI-1 | |||
| HDMI-2 | |||
| HDMI-3 | |||
| Android TV | |||
| Main menu Sub-Menu Options | |||
| Display | HDMI Settings | HDMI EDID | HDMI-1 |
| HDMI-2 | |||
| HDMI-3 | |||
| Android TV | |||
| HDMI Device Control | Off/On | ||
| HDMI Power On/Off Link | Off/On | ||
| 24P Real Cinema Off/On | |||
| Reset Display Reset/Cancel | |||
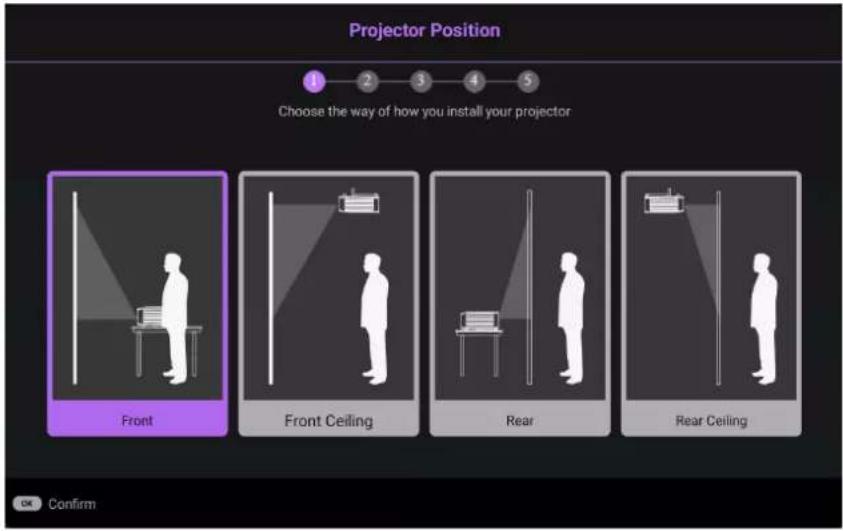
| Installation | Projector Position | Front | |
| Front Ceiling | |||
| Rear | |||
| Rear Ceiling | |||
| Screen Adjustment | 2D Keystone | H: -30 – 30 | |
| V: -30 – 30 | |||
| Screen Fit | Auto Screen Fit | ||
| Manual Screen Fit | |||
| Manual Focus | |||
| Set Calibration | Set Calibration When Offsetting | ||
| When Offsetting | Auto Screen Adjustment Sensitivity | ||
| Test Pattern Off/On | |||
| Smart Guide | |||
| BenQ ALR Screen Off/On | |||
| High Altitude Mode Off/On | |||
| 12V Trigger Off/On | |||
| Baud Rate | 9600/14400/19200/38400/57600/115200 | ||
| System | Language | ||
| Eye Protection Off/On | |||
| Background Settings | Splash Screen | General Mode: BenQ | |
| Black | |||
| Blue | |||
| Menu Settings | Menu Type | Basic | |
| Advanced | |||
| Menu Display Time | 5 sec/ 10 sec/20 sec/30 sec/Always | ||
| Menu Position | Center/Top-Left/Top-Right/Bottom-Right/Bottom-Left | ||
| ISF | |||
| Light Source Information | Light Usage Time In hours | ||
| Normal Mode In hours | |||
| ECO Mode In hours | |||
| SmartEco Mode In hours | |||
| Equivalent Light Hours | In hours | ||
| Refer to UM for detailed formula | |||
| System | Operation Settings | Reminder Message Off/On | |
| LED Indicator Off/On | |||
| Power On/Off Settings | Direct Power On | ||
| Auto Power Off | |||
| BenQ HDMI Media Streaming (QS02) | Off/On | ||
| Firmware Upgrade | |||
| Factory Default Reset/Cancel | |||
| Reset System Reset/Cancel | |||
| Information | Detected Resolution | ||
| Source | |||
| Picture Mode | |||
| Light Source Mode | |||
| 3D Format | |||
| Color System | |||
| Dynamic Range | |||
| Light Source Usage Time | |||
| Firmware Version | |||
| 3D Format | |||
| Service Code | |||
Basic menu
| Picture Mode | The projector is preset with several predefined picture modes so that you can choose one to suit your operating environment and input signal picture type.Bright:Maximizes the brightness of the projected image. This mode is suitable for environments where extra-high brightness is required, such as using the projector in well lit rooms.Living Room:With well-saturated color, fine-tuned sharpness, and a higher brightness level, this mode is suitable for playing movies in rooms where there is a small amount of ambient light, e.g. your living room.Game:This mode is most suitable for playing video games. In game mode, the projector automatically optimizes the input lag to provide the fastest response time. In game mode, the image and sound are tuned for video games, allowing you to have a perfect game-play experience in rooms with ambient light. Please note that some of the image adjustment functions will affect the input lag and are recommended to be turned off for the best gaming experience.Bright Cinema:Complements 100% REC709 color gamut at higher brightness level, Bright Cinema mode is suitable for playing movies in a dim environment like a living room with curtains for ambient light control.FILMMAKER MODE:This mode is best for watching movies with accurate color and the deepest contrast at lower brightness level in rooms with a bit of ambient light, as if in a commercial cinema.Cinema (Rec 709): Complement with accurate color and the deepest contrast at lower brightness level,Cinema (Rec 709)mode is suitable for playing movies in a environment with a bit of ambient light, as if in a commercial cinema.3D:Optimized to bring up 3D effects when watching 3D content.This mode is only available when 3D function is enabled.HDR10:Delivers High Dynamic Range effects with higher contrasts of brightness and colors for HDR Blu-ray movies. After auto-detecting metadata or EOTF info from HDR10 content,HDR10is available for selection.HDR10+:This mode is only available when HDR10+ content is detected. When HDR10+ is selected, HDR Brightness will be grayed out.HDR Game:When the projector detects HDR content andPicture Modeis set toGame,it will automatically switch toHDR Game.FILMMAKER MODE (HDR):Delivers High Dynamic Range effects with higher contrasts of brightness and colors for HDR Blu-ray movies. After auto-detecting metadata or EOTF info from HDR10 contents,FILMMAKER MODE (HDR)are available for selection. |
| Picture Mode | HLG: Delivers Hybrid Long Gamma effects by adding a logarithmic curve with extra brightness over the top of the signal. This mode is only available when HLG is enabled.ISF Night: Only available when ISF is enabled.ISF Day: Only available when ISF is enabled.User: Recalls the settings customized based on the current available picture modes. SeeSound Mode on page 32. |
| Sound Mode | A variety of sound modes enables the user to select and adjust the best mode that matches current environment. |
| Light Source Mode | SeeExtending light source life on page 45. |
| Screen Adjustment | This menu allows you to make manual adjustments to the projected image to correct for any distortions or to fine-tune the image, including configuring the following settings:2D Keystone: SeeCorrecting keystone on page 16.Auto Screen Fit: This function automatically detects the edges of the screen and adjusts the image to fit it. For more information on how to ensure that theAuto Screen Fitfeature works properly, see Auto Screen Fit on page 40.Manual Screen Fit: This function allows you to use the ▲, ▼, ◀, and ▶ buttons on the remote control to manually adjust the sides and edges of the image to fit the screen. For more information on how to ensure that theAuto Screen Fitfeature works properly, see Auto Screen Fit on page 40.Manual Screen Fit: This function allows you to use the ▲, ▼, ◀, and ▶ buttons on the remote control to manually adjust the sides and edges of the image to fit the screen. |
| Details Adjustment | Adjusts the level of detail clarity. The higher the effect, the more details will be shown but with lower black performance. |
| HDR Brightness | The projector can automatically adjust the brightness levels of your image according to the input source. You can also manually select a brightness level to display better picture quality. When the value is higher, the image becomes brighter; when the value is lower, the image becomes darker. |
| Information | Detected Resolution: Shows the native resolution of the input signal.Source: Shows the current signal source.Picture Mode: Shows the selected mode in thePicture Modemenu.Light Source Mode: Shows the selected mode in theLight Source Mode menu.3D Format: Shows the current 3D mode.Color System: Shows the color system used, e.g. YUV444-16bit-BT2020.Dynamic Range: Shows the picture dynamic range, e.g. SDR, HDR10, HLG, etc.Light Source Usage Time: Shows the number of hours the light source has been used.Firmware Version: Shows the firmware version of your projector.Service Code: Shows the projector's serial number. |
| Menu Type | Switches to the Advanced OSD Menu. See Advanced menu on page 33. |
Advanced menu
Picture
| Picture Mode | See Picture Mode on page 31. |
| Details Adjustment | Adjusts the level of detail clarity. The higher the effect, the more details will be shown but with lower black performance. |
| User Management | Load Settings FromThere is one user-definable mode if the current available picture modes are not suitable for your need. You can use one of the picture modes (except the User) as a starting point and customize the settings.Go toPicture>User Management.Press▼to selectLoad Settings Fromand pressOK.Press▼to select a picture mode that is closest to your need.Press to select the sub-menu items you want to change and adjust the values with◀.The adjustments define the selected user mode.Rename User ModeYou can changeUserto a name that is easier to identify or understand by the users of this projector. The new name can be up to 9 characters including English letters (A-Z, a-z), digits (0-9), and space (_).Go toPicture>User Management.Press to selectRename User Modeand pressOK.Use▲/▼, andOKto set desired characters.When done, pressto save the changes and exit. |
| Brightness | The higher the value, the brighter the image. Adjust this control so the black areas of the image appear just as black and that detail in the dark areas is visible. |
| Contrast | The higher the value, the greater the contrast. Use this to set the peak white level after you have previously adjusted the Brightness setting to suit your selected input and viewing environment. |
| Color | A lower setting produces less saturated colors. If the setting is too high, colors on the image will be overpowering, which makes the image unrealistic. |
| Tint | The higher the value, the more greenish the picture becomes. The lower the value, the more reddish the picture becomes. |
| Sharpness | The higher the value, the sharper the picture becomes. |
| Advanced Color Setting | Gamma SelectionGamma refers to the relationship between input source and picture brightness.1.8/2.0/2.1/BenQ: Select these values according to your preference.2.2/2.3: Increases the average brightness of the picture. Best for a lit environment, meeting room or family room.2.4/2.5: Best for viewing movies in a dark environment.2.6: Best for viewing movies which are mostly composed of dark scenes. |
| Color Temperature TuningThere are several preset color temperature settings available. The available settings may vary according to the signal type selected.Color TemperatureSelects a color temperature from among Normal, Cool, or Warm.You can also set a preferred color temperature by adjusting the following options.R Gain/G Gain/B GainAdjusts the contrast levels of Red, Green, and Blue.R Offset/G Offset/B OffsetAdjusts the brightness levels of Red, Green, and Blue.ResetAll of the adjustments you’ve done for the Color Temperature Tuning menu return to the factory preset values. | |
| Advanced Color Setting | Advanced Color Temperature TuningAdvanced color temperature is used for fine-tuning White Balance from the bright parts to the dark parts of the video by different brightness levels which are divided into 11 points signal levels (%). Users can adjust the intensity of Red/Green/Blue in the range of 0 - 200 for the color temperature of selected point at different brightness levels. |
| Color ManagementThis function provides seven sets (R/G/B/C/M/Y and White Balance) of colors to be adjusted. When you select each color, you can independently adjust its range and saturation according to your preference.Primary Color: Selects a color from among Red, Yellow, Green, Cyan, Blue, or Magenta.Hue: Increase in the range will include colors consisted of more proportions of its two adjacent colors. Please refer to the illustration for how the colors relate to each other.For example, if you select Red and set its range at 0, only pure red in the projected picture will be selected. Increasing its range will include red close to yellow and red close to magenta.Saturation: Adjusts the values to your preference. Every adjustment made will reflect to the image immediately. For example, if you select Red and set its value at 0, only the saturation of pure red will be affected.Saturationis the amount of that color in a video picture. Lower settings produce less saturated colors; a setting of "0" removes that color from the image entirely. If the saturation is too high, that color will be overpowering and unrealistic.Gain: Adjusts the values to your preference. The contrast level of the primary color you select will be affected. Every adjustment made will reflect to the image immediately.White BalanceAdjusts the color temperature of white.R Gain/G Gain/B Gain: Adjusts the contrast levels of Red, Green, and Blue.ResetAll of the adjustments you've done for theColor Managementsmenu return to the factory preset values. | |
| Advanced Color Setting | CinemaMaster• Color EnhancerAllows you to fine-tune the saturation of colors with larger flexibility. It modulates complex color algorithms to flawlessly render saturated colors, fine gradients, intermediate hues and subtle pigments.• Flesh ToneProvides a smart adjustment of hue only for calibrating people's skin color, not other colors in the image. It prevents discoloration of skin tones from the light of the projection beam, portraying every skin tone in its most beautiful shade.• Pixel Enhancer 4KA super-resolution technology which radically enhances Full HD content in terms of colors, contrast, and textures. It's also a Detail Enhancement Technology refining surface details for true-to-life images that pop off the screen. Users can adjust levels of sharpness and detail enhancement for optimal viewing.• Motion Enhancer 4KEnhances picture smoothness by motion estimation/motion compensation.• Local Contrast EnhancerDivides video content into different "zones", it can dim the dark parts of the screen without affecting the bright areas. This makes the contrast look great for watching movies, especially in the dark. |
| Light Source ModeSee Extending light source life on page 45. | |
| HDR BrightnessThe projector can automatically adjust the brightness levels of your image according to the input source. You can also manually select a brightness level to display better picture quality. When the value is higher, the image becomes brighter; when the value is lower, the image becomes darker. | |
| Noise ReductionReduces electrical image noise. The higher the setting, the less the image noise. | |
| Reset Current Picture Mode | Returns all of the adjustments you've made for the selected Picture Mode (including the preset mode, User) to the factory preset values.1. Press OK. The confirmation message is displayed.Use ◀/► to select Reset and press OK. The current picture mode returns to the factory preset settings. |
Audio
| Sound Mode | A variety of sound modes enables user to select and adjust the best mode that matches current environment. |
| User EQ | Select desired frequency bands (100Hz, 300Hz, 1kHz, 4kHz, and 10kHz) to adjust the levels according to your preference. The settings made here define the User mode. |
| Audio Output | Selects audio output from internal or external speakers.treVolo: Audio output to internal speakers.S/PDIF: Audio output to external speaker via S/PDIF and mute internal speakers.Audio Return+: Turns on Audio Return(+) function and changes audio output from internal speakers to ARC/eARC soundbar via HDMI-2.3.5mm Jack: Audio out to external speaker via 3.5mm Jack and mute internal speakers. |
| Audio Output Format | Selects the audio format from the source device connected to the HDMI 1, HDMI 2, or HDMI 3 port and passes them to the external device via the SPDIF or AUDIO RETURN+ (HDMI 2) ports of projector.Auto: Detects EDID from input source and set audio format automatically.LPCMRAWRAW+ |
| Mute Temporarily turns off the sound. | |
| Volume Adjusts | the sound level. |
| L/R Switch Switch | the left/right audio channels. |
| Reset Audio | All of the adjustments you’ve done for the Audio menu return to the factory preset values. |
Display menu
| Aspect Ratio | There are several options to set the image's aspect ratio depending on your input signal source.·Auto:Scales an image proportionally to fit the projector's native resolution in its horizontal or vertical width. 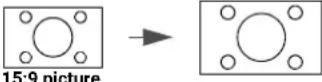 ·4:3:Scales an image so that it is displayed in the center of the screen with a 4:3 aspect ratio. ·4:3:Scales an image so that it is displayed in the center of the screen with a 4:3 aspect ratio. 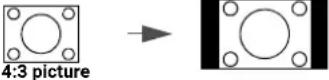 ·16:9:Scales an image so that it is displayed in the center of the screen with a 16:9 aspect ratio. ·16:9:Scales an image so that it is displayed in the center of the screen with a 16:9 aspect ratio. 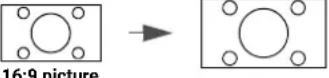 |
| Auto Source Search | Allows the projector to automatically search for a signal. |
| Source Rename | Renames the current input source to your desired name.On theSource Renamepage, use ▲/▼/◄/►, andOKto set the desired characters for the connected source item. When done, press to save the changes and exit. |
| 3D | This projector supports playing three-dimensional (3D) content transferred through your 3D-compatible video devices and contents, such as PlayStation consoles (with 3D game discs), 3D Blu-ray players (with 3D Blu-ray discs), and so on. After you have connected the 3D video devices to the projector, wear the BenQ 3D glasses and make sure the power is on to view 3D contents.When watching 3D content:·The image may seem misplaced; however, this is not a product malfunction.·Take appropriate breaks when watching 3D content.·Stop watching 3D contents if you feel fatigue or discomfort.·Keep a distance from the screen of about three times the effective height of the screen.·Children and people with a history of oversensitivity to light, heart problems, or any other existing medical conditions should refrain from watching 3D content.·The image may seem reddish, greenish, or bluish without wearing 3D glasses. However, you will not notice any color bias when watching 3D contents with 3D glasses.·The 4K source will not be displayed.·3D ModeThe default setting isAutoand the projector automatically chooses an appropriate 3D format when detecting 3D content. If the projector cannot recognize the 3D format, press OKto choose a 3D mode from between Frame Sequential, Frame Packing, Top Bottom, and Side by Side.·3D Sync InvertWhen your 3D image is distorted, enable this function to switch between the image for the left eye and the right eye for more comfortable 3D viewing experience. |
| HDMI Settings | HDMI FormatSelects a suitable RGB color range to correct the color accuracy.·AutoAutomatically selects a suitable color range for the incoming HDMI signal.·LimitedUtilizes the Limited range RGB 16-235.·FullUtilizes the Full range RGB 0-255. |
| HDMI EqualizerSets a suitable value to maintain the HDMI picture quality in long distance data transmission. | |
| HDMI Settings | HDMI EDIDSwitch the HDMI EDID version for each HDMI port betweenEnhanced+, Enhanced, orStandard(depending on the port) in order to solve compatibility issue with certain old players.·Enhanced+: Can switch to EDID that is compatible with 4K 120Hz·Enhanced: Can switch to HDMI 2.0 EDID (support 4K 60Hz HDR/HDR+)·Standard: Can switch to HDMI 1.4 EDID. Use this mode when you experience abnormal display issue with uncertain old players. HDMI1.4 EDID can support up to 1080p 60Hz. |
| HDMI Device ControlWhen you enable this function and connect an HDMI CEC-compatible device to your projector with an HDMI cable, turning on the HDMI CEC compatible device automatically turns on the projector, while turning off the projector automatically turns off the HDMI CEC compatible device. | |
| HDMI Power On/Off Link/Power Off LinkWhen you connect an HDMI CEC-compatible device to your projector with an HDMI cable, you can set the behavior of powering on/off between the device and the projector. | |
| 24P Real Cinema | ·On: The projector will output 48Hz, 50Hz, 60Hz,100Hz, 120Hz, 240Hz depending on different input timing.·Off: The projector will only output 60Hz. |
| Reset Display | Returns all the settings on theDisplaymenu to the factory default values. |
Installation menu
| Projector Position | The projector can be installed on a ceiling behind a screen, or with one or more mirrors. See Obtaining a preferred projected image size on page 15. |
| Screen Adjustment | Allows you to adjust the following settings to fine-tune the projected image. |
| Screen Adjustment | 2D KeystoneSee Correcting keystone on page 16 for details.·Before using 2D Keystone ensure that the auto screen adjustment camera lens is clean and not covered by dust and that there are no obstructions in front of the projection wall/screen. |
| Screen Fit·Auto Screen Fit: Allows the projector to automatically detect the screen and adjust the image to fit the screen.·Before using Auto Screen Fit it is best to ensure that the projected image is initially larger than the projection screen.·If Auto Screen Fit fails please:·Ensure that the auto screen adjustment camera lens is clean and is not covered by dust.·Reduce the ambient brightness for more accurate calibration.·Ensure the projected image extends past the borders of the projection screen.·Ensure there are no obstructions near the borders of the projection screen.·Ensure there is no light-reflecting objects above the projection screen.·Ensure there is no object in the vicinity that might reflect light onto the projection screen (e.g., a nearby object that might emit white light, something near the screen that keeps moving)·Manual Screen Fit: Allows you to manually adjust the various edges/corners of the image to fit the screen. Use ▲/▼/◄/►, and OK to select the edge/corner you want to adjust and then use the same buttons to manually adjust the edge/corner. | |
| Manual FocusAllows you to manually calibrate the focus of the projector lens use ◀/►, and OK to choose the focus level for the image. | |
| Set Calibration When OffsettingWhen enabled allows the projector to automatically re-calibrate the image to fit the screen anytime the projector has been accidentally shifted (for example when it gets bumped).·Auto Screen Adjustment Sensitivity: Sets the level of sensitivity (Normal or High) to any shifts in the projector's position for this function. | |
Test PatternAllows you to check if the projected image is free from distortion.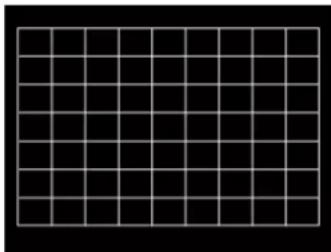 | |
| Screen Adjustment | Smart Guide• Returns to the Screen Adjustment steps in the setup wizard, where you can re-calibrate the image either automatically or manually based on whether you have a projection screen. |
| BenQ ALR Screen | Enabling this feature will optimize the picture mode for BenQ ALR screens. Please ensure that you have installed the ALR screen before turning on this feature. |
| High Altitude Mode | We recommend you use the High Altitude Mode when your environment is between 1500 m–3000 m above sea level, and ambient temperature is between 0°C–30°C.Operation under "High Altitude Mode" may cause a higher decibel operating noise level because of increased fan speed necessary to improve overall system cooling and performance.If you use this projector under other extreme conditions excluding the above, it may display auto shut-down symptoms, which is designed to protect your projector from over-heating. In cases like this, you should switch to High Altitude mode to solve these symptoms. However, this is not to state that this projector can operate under any and all harsh or extreme conditions. Do not use the High Altitude Mode if your altitude is between 0 m and 1500 m and ambient temperature is between 0°C and 35°C. The projector will be over cooled, if you turn the mode on under such a condition. Do not use the High Altitude Mode if your altitude is between 0 m and 1500 m and ambient temperature is between 0°C and 35°C. The projector will be over cooled, if you turn the mode on under such a condition. |
| 12V Trigger | There is a 12V trigger that works independently according to your needs for installation scenarios.• On: If this is selected, the projector will send electronic signal out when it is turned on.• Off: If this is selected, the projector will not send electronic signal out when it is turned on. |
| Baud Rate | Select a baud rate that is identical with your computer's so that you can connect the projector with a suitable RS-232 cable and update or download the projector's firmware. This function is intended for qualified service personnel. |
System menu
| Language | Sets the language for the On-Screen Display (OSD) menus. |
| Eye Protection | Automatically blanks the screen when an object is within 30 cm in front of the projection lens. |
| Background Settings | • Splash ScreenAllows you to select which logo screen will be displayed during projector start-up. |
| Menu Settings | Menu TypeSelects OSD menu type. |
| Menu Display TimeSets the length of time the OSD will remain active after your last key press. | |
| Menu PositionSets the On-Screen Display (OSD) menu position. | |
ISFThe ISF calibration menu is password protected and only accessible by authorized ISF calibrators. The ISF (Imaging Science Foundation) has developed carefully crafted, industry-recognized standards for optimal video performance and has implemented a training program for technicians and installers to use these standards to obtain optimal picture quality from BenQ video display devices. Accordingly, we recommend that setup and calibration be performed by an ISF certified installation technician. For more information, go to www.imagingscience.com or contact the dealer or retailer from whom you purchased the projector. For more information, go to www.imagingscience.com or contact the dealer or retailer from whom you purchased the projector. | |
| Light Source Information | Lists the amount of time (in hours) the projector light has been used for the following parameters:• Light Source Usage Time• Normal Mode• ECO Mode• SmartEco Mode• Equivalent Light Hours |
| Operation Settings | Reminder MessageSets the reminder messages on or off. |
| LED IndicatorYou can turn off the LED warning lights. This is to avoid any light disturbance when viewing images in a dark room. | |
| Power On/Off Settings• Direct Power OnAllows the projector to turn on automatically once the power is fed through the power cord.• Auto Power OffAllows the projector to turn off automatically if no input signal is detected after a set period of time to prevent unnecessary waste of lamp life. | |
| BenQ HDMI Media Streaming (QS02)Enables or disables functions related to Android TV dongle (QS02). | |
| Firmware Upgrade | Updates the projector firmware via the 1.5A SERVICE USB-A port at the rear of the projector. |
| Factory Default | Returns all settings to the factory preset values. The following settings will still remain: 2D Keystone, Projector Position, Light Source Information, Security Settings, Baud Rate, and High Altitude Mode. The following settings will still remain: 2D Keystone, Projector Position, Light Source Information, Security Settings, Baud Rate, and High Altitude Mode. |
| Reset System | Returns all the settings on the System menu to the factory default values. |
Information menu
| Information | See Information on page 32. |
Maintenance
Care of the projector
Cleaning the lens
Clean the lens whenever you notice dirt or dust on the surface. Please be sure to turn off the projector and let it cool down completely before cleaning the lens.
- Use a canister of compressed air to remove dust.
- If there is dirt or smears, use lens-cleaning paper or moisten a soft cloth with lens cleaner and gently wipe the lens surface.
- Never use any type of abrasive pad, alkaline/acid cleaner, scouring powder, or volatile solvent, such as alcohol, benzene, thinner or insecticide. Using such materials or maintaining prolonged contact with rubber or vinyl materials may result in damage to the projector surface and cabinet material.
Cleaning the projector case
Before you clean the case, turn the projector off using the proper shutdown procedure as described in Shutting down the projector on page 24 and unplug the power cord.
- To remove dirt or dust, wipe the case with a soft, lint-free cloth.
- To remove stubborn dirt or stains, moisten a soft cloth with water and a neutral pH detergent. Then wipe the case.

Never use wax, alcohol, benzene, thinner or other chemical detergents. These can damage the case.
Storing the projector
If you need to store the projector for an extended time, please follow the instructions below:
- Make sure the temperature and humidity of the storage area are within the recommended range for the projector. Please refer to Specifications on page 48 or consult your dealer about the range.
- Retract the adjuster feet.
- Remove the battery from the remote control.
- Pack the projector in its original packing or equivalent.
Transporting the projector
It is recommended that you ship the projector with its original packing or equivalent.
Light source information
Getting to know the light source hour
When the projector is in operation, the duration (in hours) of light source usage is automatically calculated by the built-in timer. The method of calculating the equivalent light source hour is as follows:
Light Source Usage Time = (hours used in Normal mode) + (hours used in ECO mode) + (hours used in SmartEco mode)
Total (equivalent) light source hour = 1.0 x (hours used in Normal mode) + 1.0 x (hours used in ECO mode) + 1.0 x (hours used in SmartEco mode)

For time used in each light source mode shown in OSD menu:
- Time used is accumulated and rounded down to an integer in hours.
- When time used is less than 1 hour, it shows 0 hours.

When you calculate Equivalent Light source hour manually, it will probably have deviation from the value shown in OSD menu since projector system calculates time used for each light source mode in "Minutes" then rounds down to an integer in hours shown in OSD.
To obtain the light source hour information:
Go to System > Light Source Information and press OK. The Light Source Usage Time information is displayed.
You can also get the light source hour information on the Information > Light Source Usage Time menu.
Extending light source life
- Setting the Light Source Mode
Go to Picture > Advanced Color Setting > Light Source Mode and press OK. Select a suitable light source power from among the provided modes.
Setting the projector in ECO or SmartEco mode extends light source life.
| Light Source Mode | Description |
| Normal Provides full light source brightness | |
| ECO | Lowers brightness to extend the light source life and decreases the fan noise |
| SmartEco | Adjusts the light source power automatically depending on the content brightness level |
- Setting Auto Off
This function allows the projector to turn off automatically if no input signal is detected after a set period of time to prevent unnecessary waste of light source life.
To set Auto Off, go to System > Operation Settings > Power On/Off Settings > Auto Power Off and press ◀. ▶
Indicator
| Light | Status & Description |
| POWER indicator (lights up constantly or flashes repeatedly) | |
| Power events | |
| Stand-by mode | |
| Powering up | |
| Normal operation | |
 |  | Normal power-down cooling |
 |  | Download TI |
 | Burn-in ON | |
 | Burn-in OFF | |
 | CW failed | |
 | PW failed | |
| Light source events | ||
 |  | Light source error in normal operation |
 |  | Light source is not lit up |
| Thermal events | ||
 |  | Temperature 1 error (over limited temperature) |
 |  | Fan 1- fan 6 error (the actual fan speed is outside the desired speed) |
Light source events
Thermal events
 |  |  |  |  |  |
Troubleshooting

The projector does not turn on.
| Cause Remedy | |
| There is no power from the power cord. | Plug the power cord into the AC power jack on the projector, and plug the power cord into the power outlet. If the power outlet has a switch, make sure that it is switched on. |
| Attempting to turn the projector on again during the cooling process. | Wait until the cooling down process has completed. |

No picture
| Cause Remedy | |
| The video source is not turned on or connected correctly. | Turn the video source on and check that the signal cable is connected correctly. |
| The projector is not correctly connected to the input signal device. | Check the connection. |
| The input signal has not been correctly selected. | Select the correct input signal with the SOURCE key. |
| The lens cover is still closed. Open the lens cover. | |

Blurred image
| Cause Remedy | |
| The projection lens is not correctly focused. Adjust the focus settings. | |
| The projector and the screen are not aligned properly. | Adjust the projection angle and direction as well as the height of the projector if necessary. |
| The lens cover is still closed. Open the lens cover. | |

Remote control does not work.
| Cause Remedy | |
| The batteries are out of power. Replace both of the batteries with new ones. | |
| There is an obstacle between the remote control and the projector. | Remove the obstacle. |
| You are too far away from the projector. | Stand within 8 meters (26 feet) of the projector. |
Specifications
Projector specifications

All specifications are subject to change without notice.
Optical
Resolution
4K UHD 3840 x 2160
Display system
1-CHIP DMD
Lens
F = 2.0, f = 2.403mm
Clear focus range
70" - 100"
Light source
Laser
Electrical
Power supply
AC100-240V, 2.5 A, 50-60 Hz
Power consumption
180 W (Max); < 0.5 W (Standby)
Mechanical
Weight
13.2 Kg ± 200 g (29.12 ± 0.44 lbs)
Output terminals
Speaker
15 watt x 2
5 watt x 2
Audio signal output
Audio Line-Out (3.5") x 1
S/PDIF x 1
Control
USB
Type-A x 3 (1.5A/2.5A power supply)
RS-232 serial control
9 pin x 1
DC 12V trigger x 1
IR receiver x 2
Input terminals
Video signal input
Digital
HDMI (HDCP 2.2) x 3
Environmental Requirements
Operating temperature
0°C-40°C at sea level
Storage temperature
-20°C-60°C at sea level
Operating/Storage relative humidity
10%-90% (without condensation)
Operating altitude
0-1499 m at 0°C-35°C
1500–3000 m at 0°C–30°C (with
High Altitude Mode on)
Repairing
Please visit below website and choose your country to find your service contact window.
http://www.benq.com/welcome
Transporting
Original packing or equivalent is recommended.
Dimensions
358 (W) x 760 (L) x 164 (H) (including foot)
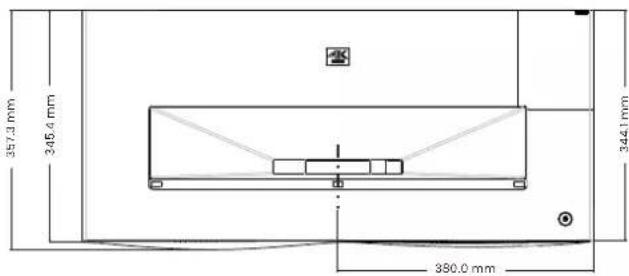
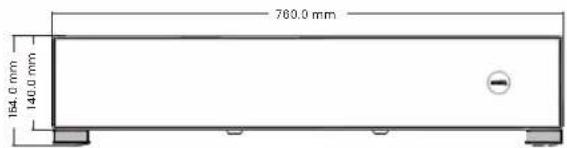
Timing chart
Supported timing for HDMI (HDCP) input
- PC timings
| Resolution Mode | Refresh rate (Hz) | H-frequency (kHz) | Clock (MHz) | 3D Field Sequential | over- under 3D | by-side side- 3D | ||
| 640 x 480 | VGA_60 59.9 | 431.469 25 | .175 XXX XXX | |||||
| VGA_72 72.8 | 809 37.861 3 | 1.5 | ||||||
| VGA_75 75 | 37.5 31.5 | |||||||
| VGA_85 85.0 | 008 43.269 36 | |||||||
| 720 x 400 720x400_70 70.087 | 31.469 | 28.3221 | ||||||
| 800 x 600 | SVGA_60 | 60.317 37 | .879 40 | XXX XXX | ||||
| SVGA_72 | 72.188 48 | .077 50 | ||||||
| SVGA_75 75 | 46.875 49.5 | |||||||
| SVGA_85 | 85.061 53 | .674 | 56.25 | |||||
| SVGA_120(Reduce Blanking) | 119.854 | 77.425 83 | ||||||
| 1024 x 768 | XGA_60 60.0 | 004 48.363 65 | XXX XXX | |||||
| XGA_70 70.0 | 69 56.476 75 | |||||||
| XGA_75 75.0 | 29 60.023 | 78.75 | ||||||
| XGA_85 84.9 | 97 68.667 94.5 | |||||||
| XGA_120(Reduce Blanking) | 119.989 | 97.551 | 115.5 | |||||
| 1152 x 864 | 1152 x 864_75 | 75 | 67.5 | 108 | ||||
| 1024x576 | BenQ Notebook Timing | 60 35.82 | 46.996 | |||||
| Resolution Mode | Refresh rate (Hz) | H-frequency (kHz) | Clock (MHz) | 3D Field Sequential | over- under | 3D by-side | 3D side- by-side | |
| 1024x600 | BenQ Notebook Timing | 64.995 41 | .467 51.419 | |||||
| 1280x720 1280 x 720_60 60 45 74.25 XXX X XXXX | ||||||||
| 1280 x 768 1280 x 768_60 59.87 47.776 79.5 XXX | XXX | |||||||
| 1280 x 800 | WXGA_60 | 59.81 49 | .702 83.5 XXX | XXX | ||||
| WXGA_75 | 74.934 62 | .795 106.5 | ||||||
| WXGA_85 | 84.88 71 | .554 122.5 | ||||||
| WXGA_120 (Reduce Blanking) | 119.909 | 101.563 | 146.25 | |||||
| 1280 x 1024 | SXGA_60 | 60.02 | 63.981 | 108 | XXX | XXX | ||
| SXGA_75 | 75.025 79 | .976 135 | ||||||
| SXGA_85 | 85.024 91 | .146 157.5 | ||||||
| 1280 x 960 | 1280 x 960_60 60 60 | 108 | XXX | XXX | ||||
| 1280 x 960_85 | 85.002 85 | .938 148.5 | ||||||
| 1360 x 768 1360 x 768_60 60.015 47.71 2 85.5 XXX | XXX | |||||||
| 1440 x 900 | WXGA+_60 | 59.887 | 55.935 | 106.5 | XXX | XXX | ||
| 1400X1050 | SXGA+_60 | 59.978 | 65.317 | 121.75 | XXX | XXX | ||
| 1600x1200 UXGA 60 75 | 162 | XXX | ||||||
| 1680x1050 | 1680x1050_60 | 59.954 65 | .29 146.25 | XXX | XXX | |||
| 640x480 @67Hz | MAC13 | 66.667 | 35 30.24 | |||||
| 832x624 @75Hz | MAC16 | 74.546 49 | .722 57.28 | |||||
| 1024x768 @75Hz | MAC19 75.02 60.241 | 80 | ||||||
| 1152x870 @75Hz | MAC21 75.06 68.68 100 | |||||||
| 1920x1080 @60HZ | 1920X1080_60 (CEA-861) | 60 | 67.5 | 148.5 | XXX | XXXX | XXXX | |
| 1920x1200@60HZ | 1920X1200_60 (Reduce Blanking) | 59.95 74 | .038 154 | |||||
| 1920x1080@1 20HZ | 1920X1080_1 20 | 120 | 135 | 297 | ||||
| 1920x1200@1 20HZ | 1920X1200_1 20 (Reduce Blanking) | 119.909 | 152.404 | 317 | ||||
| 1920x1080@2 40HZ | 1920X1080_2 40 | 240 | 270 | 594 | ||||
| 3840x2160 | 3840x2160_3 0 For 4K2K model | 30 | 67.5 297 | |||||
| Resolution Mode | Refresh rate (Hz) | H-frequency (kHz) | Clock (MHz) | 3D Field Sequential | under over 3D | by-side side-3D | |
| 3840x2160 | 3840x2160_60 For 4K2K model | 60 135 | 594 | ||||
| 3840x2160 | 3840x2160_120 For 4K2K model | 120 270 | 1188 | ||||
- 'XXXX: Support auto-detect 3D and manually set 3D format. If source can output CEA861 720p/1080p and color space is RGB with 3D info frame then 3D auto detect function is also workable.
- XXX: Support manually set 3D format.
- XX: Support manually set 3D format (HDMI receiver or scaler down scaling 4K content to 1080p).
• X: 2160/120P Only HDMI 3 support

The timings showing above may not be supported due to EDID file and VGA graphics card limitations. It is possible that some timings cannot be chosen.
- Video timings
| Timing Resolution | H frequency (KHz) | V frequency (Hz) | Dot clock frequency (MHz) | 3D Field Sequential | 3D frame | 3D frame under over- 3D | by-side side- 3D | |
| 480i | 720(1440) x 480 | 15.73 59.94 | 27 | |||||
| 480p 720 | x 480 31.47 59 | .94 | 27 | |||||
| 576i | 720(1440) x 576 | 15.63 50 | 27 | |||||
| 576p 720 | x 576 31.25 50 | 27 | ||||||
| 720/50p | 1280 x 720 | 37.5 | 50 | 74.25 | XXXX | XXXX | XXXX | |
| 720/60p | 1280 x 720 | 45 | 60 | 74.25 | XXX | XXXX | XXXX | XXXX |
| 1080/24P | 1920 x 1080 | 27 | 24 | 74.25 | XXXX | XXXX | XXXX | |
| 1080/25P | 1920 x 1080 | 28.13 25 | 74.25 | |||||
| 1080/30P | 1920 x 1080 | 33.75 30 | 74.25 | |||||
| 1080/50i | 1920 x 1080 | 28.13 | 50 | 74.25 | XXXX | |||
| 1080/60i | 1920 x 1080 | 33.75 | 60 | 74.25 | XXXX | |||
| 1080/50P | 1920 x 1080 | 56.25 | 50 | 148.5 | XXXX | |||
| 1080/60P | 1920 x 1080 | 67.5 | 60 | 148.5 | XXX | XXXX | XXXX | |
| 1080/120p | 1920x1080 | 135 120 297 | ||||||
| 1080/240p | 1920x1080 | 270 240 594 | ||||||
| 2160/24P | 3840 x 2160 | 54 | 24 | 297 | ||||
| 2160/25P | 3840 x 2160 | 56.25 25 | 297 | |||||
| 2160/30P | 3840 x 2160 | 67.5 | 30 | 297 | ||||
| 2160/50P | 3840 x 2160 | 112.5 50 | 594 | |||||
| 2160/60P | 3840 x 2160 | 135 | 60 | 594 | ||||
| ##2160/120 P | 3840 x 2160 | 270 120 | 1188 | |||||
- XXXX: Support auto-detect 3D and manually set 3D format. If source can output CEA861 720p/1080p and color space is RGB with 3D info frame then 3D auto detect function is also workable.
- XXX: Support manually set 3D format.
- XX: Support manually set 3D format (HDMI receiver or scaler down scaling 4K content to 1080p).
-
: 2160/120P Only HDMI 3 support.
- Warranty and Copyright information
- Limited warranty
- Copyright
- Disclaimer
- Table of Contents
- Warranty and Copyright information ....2
- Important safety instructions ....4
- Introduction 8
- Positioning your projector 15
- Connection 18
- Operation 19
- Menu operation 26
- Maintenance 44
- Troubleshooting 47
- Specifications 48
- Important safety instructions
- Notice
- Risk Group 2
- Laser Caution
- Introduction
- Shipping contents
- Regulatory Statements Service QR code sticker
- Optional accessories
- Installing the Android TV dongle
- Replacing the remote control batteries
- Using the measuring tools
- Controls and functions
- Remote control
- Power
- Source
- Back
- Mute
- Filmmaker
- Focus
- Screen adjustment
- Menu
- Voice search / Voice assistant
- 13.0K
- Android TV home screen
- Android settings
- Volume keys
- Fast forward
- Play / Pause
- Sound mode
- Picture mode
- Remote control effective range
- Positioning your projector
- Obtaining a preferred projected image size
- Projection dimensions
- Adjusting the projected image
- Adjusting the projection angle
- Fine-tuning the image clarity
- Correcting keystone
- Connection
- Operation
- Starting up the projector
- QS02 Android TV setup
- Before you start
- Pairing the remote control
- Set up your device
- Display Android TV home screen
- Playing media files on a USB flash drive (Media Reader)
- Using the menus
- Securing the projector
- Using a security cable lock
- Switching input signal
- Shutting down the projector
- Upgrading firmware
- Menu operation
- Menu system
- Basic menu
- Advanced menu
- Display menu
- Information menu
- Maintenance
- Care of the projector
- Cleaning the lens
- Cleaning the projector case
- Storing the projector
- Transporting the projector
- Light source information
- Getting to know the light source hour
- Extending light source life
- Indicator
- Troubleshooting
- Specifications
- Projector specifications
- Optical
- Electrical
- Mechanical
- Output terminals
- Control
- Input terminals
- Environmental Requirements
- Repairing
- Transporting
- Dimensions
- Timing chart
- Supported timing for HDMI (HDCP) input
- : 2160/120P Only HDMI 3 support.
Brand : BENQ
Model : V5000i
Category : Projector