LEDW160 - Uncategorized Reflexion - Free user manual and instructions
Find the device manual for free LEDW160 Reflexion in PDF.


| Product Type | TFT-LED-TV with DVB-T/T2HD, DVB-S/S2, DVB-C, CI+ Slot |
| Model Number | LEDW160 |
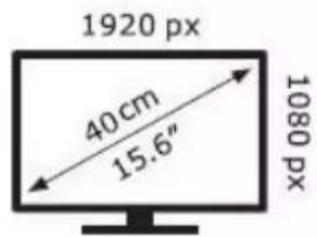
| Screen Diagonal | 40 cm / 15.6 inches |
| Resolution | 1920 x 1080 pixels (Full HD) |
| Aspect Ratio | 16:9 |
| Refresh Rate | 60 Hz |
| Contrast Ratio | 3000:1 |
| Brightness | 200 cd/m² |
| Viewing Angle | Horizontal: 178°, Vertical: 178° |
| Dimensions (without stand) | 374 x 48 x 244 mm (WxDxH) |
| Dimensions (with stand) | 374 x 120 x 274 mm (WxDxH) |
| Weight (without stand) | 2.40 kg |
| Weight (complete) | 2.75 kg |
| Power Supply Input | 100 - 240 V ~ 50/60 Hz |
| Power Supply Output | 12 V DC, 3 A |
| Power Consumption (On) | 11 W (default SD) / 36 W max |
| Power Consumption (Standby) | 0.4 W |
| Power Consumption (Off) | 0 W |
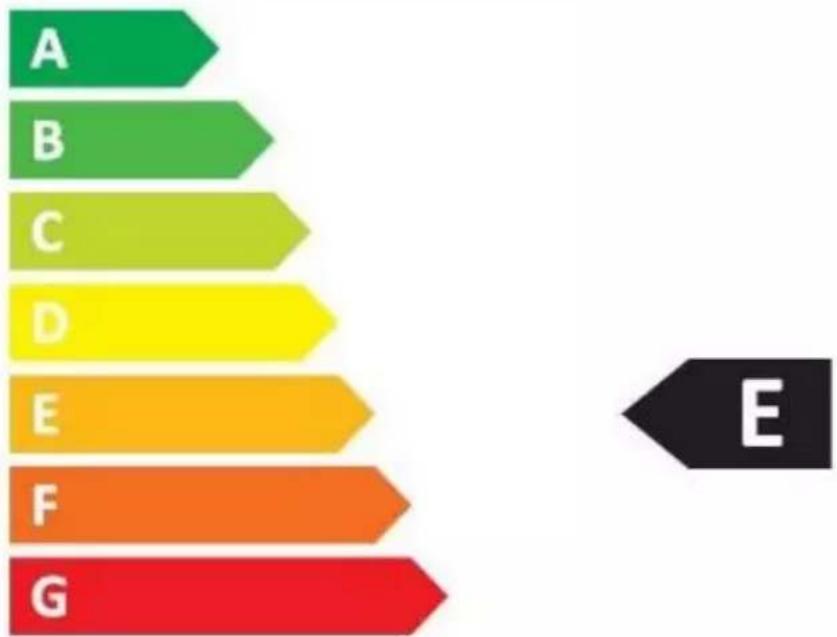
| Energy Efficiency Class | E (default SD) |
| Annual Energy Consumption | 11 kWh/1000 h |
| Audio Output | 2 x 3 W |
| Connections | 1 x HDMI (CEC/ARC), 1 x VGA, 1 x SCART, 1 x TV1 (S2), 1 x TV2 (T2HD/C), 1 x COAX, 2 x USB (5V/500mA), 1 x CI+ Slot, 1 x Mini YPbPr, 1 x Mini AV, 1 x DC IN, 1 x PC Audio, 1 x Headphone |
| VESA Mount | 75 x 75 mm |
| Spare Parts & Repairability | No user-serviceable parts. Repairs only by qualified personnel. 24-month warranty covers material and production defects. For repairs, contact customer support. |
| Care & Cleaning | Use a soft, lightly moistened cloth. Never use solvents or liquids. Unplug before cleaning. |
Frequently Asked Questions - LEDW160 Reflexion
User questions about LEDW160 Reflexion
0 question about this device. Answer the ones you know or ask your own.
Ask a new question about this device
Download the instructions for your Uncategorized in PDF format for free! Find your manual LEDW160 - Reflexion and take your electronic device back in hand. On this page are published all the documents necessary for the use of your device. LEDW160 by Reflexion.
USER MANUAL LEDW160 Reflexion
natural_image
Front view of a black CRT television monitor with a control panel on the right side (no visible text or symbols)natural_image
Technical line drawing of a computer monitor chassis with ventilation grilles and mounting feet (no text or labels)
| VGA | PCAuto | SCART | TV 1(50) | TV 2(TINHD) | COAX |
| English | German |
| CI+ Slot | CI+ Steckplatz |
| CAM | CAM |
| Smart Card | Smart Card |
Surround Sound: Ein, Aus.
HINWEIS:
TFT-LED-TV with DVB-T/T2HD, DVB-S/S2, DVB-C, CI+ SLOT
Model No.: LEDW160
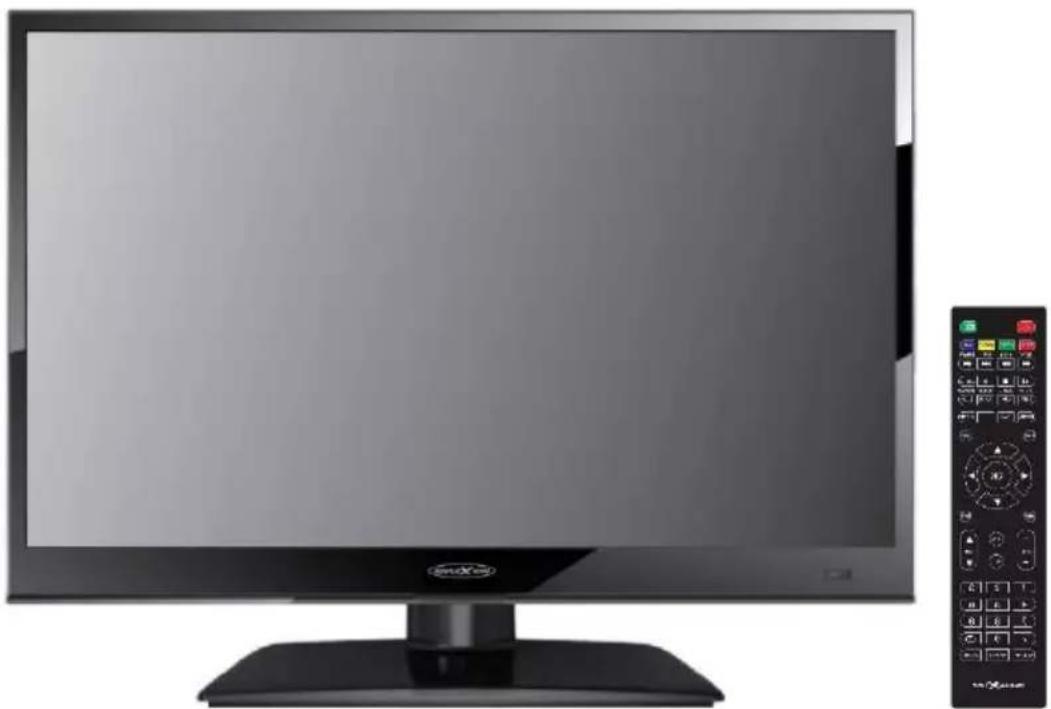
natural_image
Front view of a black CRT television monitor with a remote control panel on the right (no visible text or symbols)Read the entire instructions for the TV carefully before using the device. Keep the manual for further use.
IMPORTANT SAFETY INSTRUCTIONS - PLEASE READ CAREFULLY BEFORE USE.
Follow the safety instructions on the back of the TV.

Warning to Prevent Electric Shock. Do not remove the covers. No user-serviceable parts in the device. Have the device serviced by qualified personnel.

This symbol indicates important operating / maintenance instructions of this device in the operating instructions.

This symbol indicates the risk of electrical shock due to life-threatening voltage in this device.
Follow these instructions:
- Do not use this TV near water.
- Use a lightly moistened cloth for cleaning.
- Do not cover any of the ventilation holes.
- Set up the unit according to the supplied Quick Start Guide and this manual.
- Be careful not to pinch or run the power cord, especially when plugged into the power outlet and DC input.
- Avoid routing the power cord over sharp edges.
- Disconnect the TV from the mains during thunderstorms or prolonged periods of non-use.

Be careful not to expose the unit to rain or moisture to reduce the risk of fire or electrical shock. The TV should be kept away from spray and dripping water and no objects filled with liquids should be placed on the TV.
Note:
Do not place any open heat sources (stoves, candles, etc.) near or on the TV.
IMPORTANT SAFETY INSTRUCTIONS
This device complies with all current safety regulations. The following safety tips are intended to protect the user from reckless use and the resulting dangers.
- Although this instrument has been manufactured with the utmost care and subjected to a rigorous final inspection before it leaves the factory, there is the possibility, as with any other electrical device, that problems may arise. Immediately disconnect the device from the mains in case of smoke, excessive heat or any other unnatural appearance.
- Ensure adequate ventilation of the device! Never place the device near or under a curtain!
- The mains plug or device plug is used to disconnect the device from the mains and should be easily accessible at any time.
- The device may only be connected to a power supply that corresponds to the power supply specified on the rating plate located on the back of the device. Never connect the device to any other type of power supply.
- The power outlet should be near the device and easy to reach.
- Do not attach too many other devices to avoid overloading the AC outlet to which the TV is connected.
- Keep rodents away from the device. Rodents love to nibble on the power cord.
- Unplug the power cord from the power outlet. Never pull on the power cord itself, it could be damaged and cause a short circuit.
- Position the device so that nobody can trip over the power cord.
- Never place heavy objects on the power cord as this could damage it.
- To prevent injury, be careful not to reach or pull out the power cord from a small child.
- Do not place the device near sources of heat. The case and power cord could be damaged by the heat.
- The screen is made of plastic, which may flake off if damaged. To prevent injury, carefully collect sharp-edged plastic splinters.
- Avoid placing the unit on surfaces that are not solid or level.
- To protect the unit from lightning, disconnect it from the mains and disconnect the antenna. Warning: Do not touch the RF antenna connector.
- For safety reasons disconnect the device from the mains if you leave your flat for a longer period of time.
- When switched on, the device heats up. To avoid overheating, never place covers or blankets on the device. Never cover the ventilation holes. Never place the device near sources of heat. Avoid direct sunlight on the device. Keep a 5 cm (2") clearance to the environment when placing it on a shelf.
SAFETY INSTRUCTIONS
- Keep water or moisture away from the unit. Do not use the device in a wet or damp environment such as a bathroom, a steam room or near a swimming pool.
- Do not use the device if moisture condensation may occur.
- Any repairs may only be carried out by qualified personnel.
- Never open the device. Repairs not carried out by qualified personnel may be the cause of a fire.
- Liquids that have entered the device can be a cause of serious damage. Turn the unit OFF and disconnect it from the mains. Contact your dealer or customer service.
- Never remove the safety covers. There are neither usable nor maintainable components inside the device. You would lose your warranty claim. The device may only be serviced by manufacturer.
- Never hit or shake the screen as this could damage the internal circuitry. Gently handle the remote control and do not drop it.
• Never place hot objects or naked flames in the immediate vicinity of the TV. - Clean the appliance with a soft cloth. Never use solvents or liquids on Oil Basic. For stubborn stains you can use a damp cloth with diluted detergent.
Headphone Warning
Loud music listening can lead to permanent hearing loss. Therefore, do not set too loud a volume level when listening to music with headphones, especially when listening to music for a long time.
About the installation site
Place the TV in a location away from direct sunlight or strong light sources. For a comfortable look, soft, indirect light is recommended. To prevent direct sunlight from entering the screen, use curtains or roller blinds / blinds. Place the TV on a firm and level surface. This serves as a prevention against falling down of the device. Place the TV so that objects can not get into the unit. Make sure that nothing on the device and the monitor acts as this may cause damage.
PRODUCT DESCRIPTION
Front of device
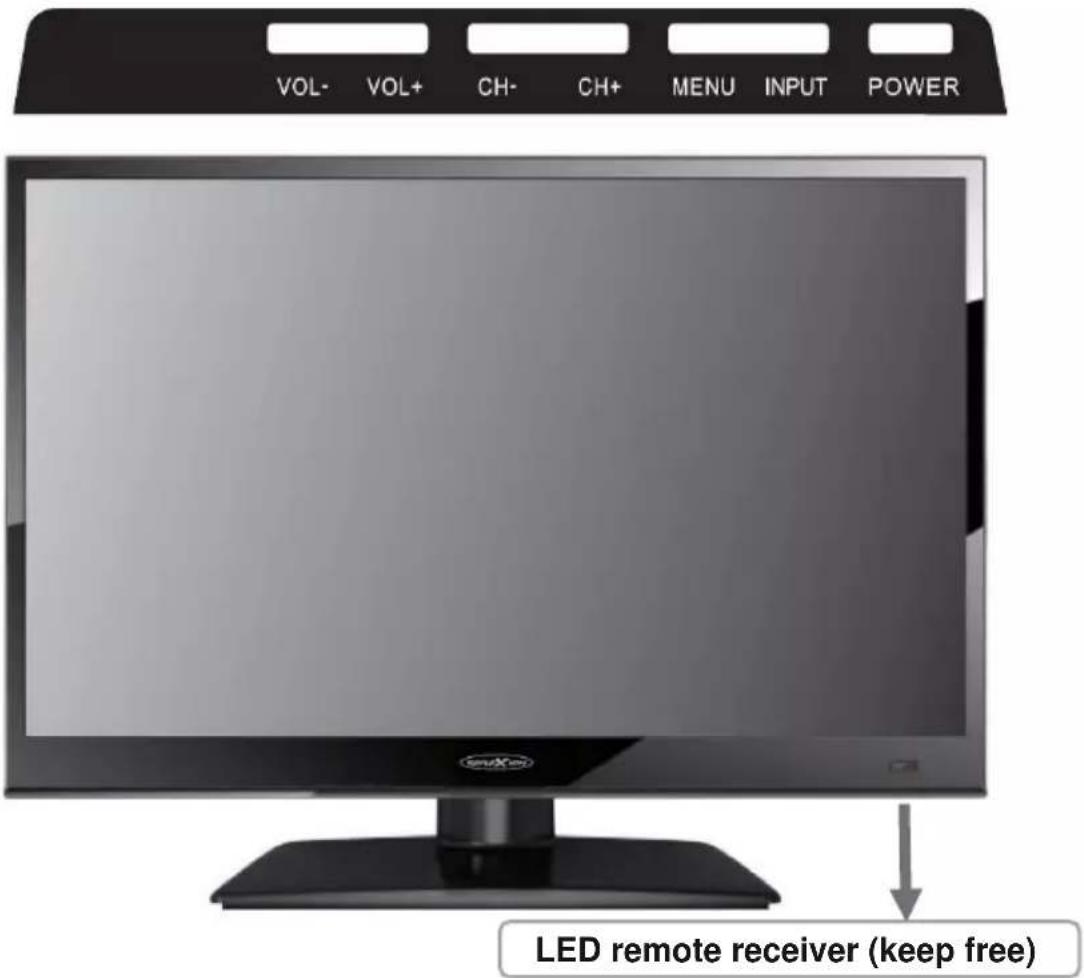
Description of the buttons and their function on the TV:
INPUT: Displays the input sources.
MENÜ: Open / Close the OSD on-screen menu.
CH+/-: Switch programs back and forth.
VOL+/-: Vol. Up / Down
POWER: Turns the TV on / off (standby).
Back of the device
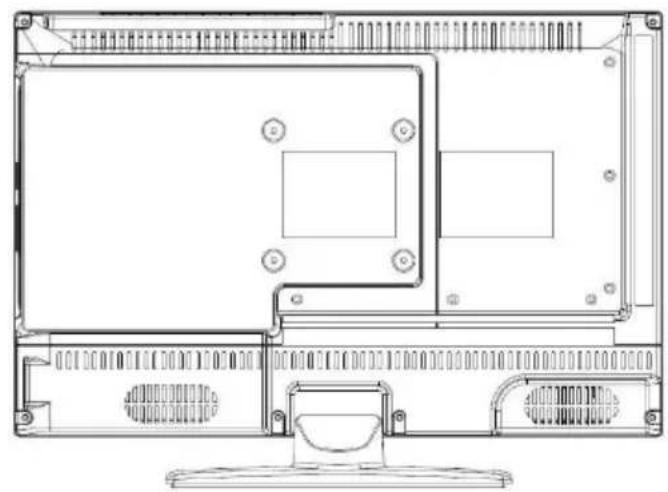
natural_image
Technical line drawing of a computer monitor rear panel with ventilation grilles and mounting feet (no text or labels)
| VGA | PCAuto | SCART | TV 1(M) | TV 2(T3HD/C) | COAX |
| DC: | Power connection for the power supply. |
| VGA: | Connection to use the TV as a PC monitor. Connect the D-Sub 15Pin analog plug of your PC. |
| PC AUDIO | Connection for the PC audio output. Only usable in combination with the VGA connection. |
| TV1 (S2) Satellite | Connection of the satellite antenna. |
| TV2 (T2HD/C) Cabel Antenna | Connection of the DVB-T antenna or cable system. |
| COAX-S/PDIF | Digital output for external audio devices (such as AV receivers, soundbars). |
| HDMI | Connecting an external HDMI device (Blu-ray player, etc.) |
| USB Jack | Connection for USB sticks and hard disks. |
| Ω EARPHONE | Connection for headphones. |
| MINI YPbPr | Connection of external AV device via adapter. Inputs are shared with MINI AV. |
| MINI AV | Connection of external AV devices via adapter. |
| CI+ SLOT | Slot for CI + modules for decrypting locked TV programs. Module is not included. |
REMOTE CONTROL
The remote uses infrared (IR). Hold the remote control in the direction of the front of the LED TV. If the remote control is out of reach or angle, the remote control may not operate properly.
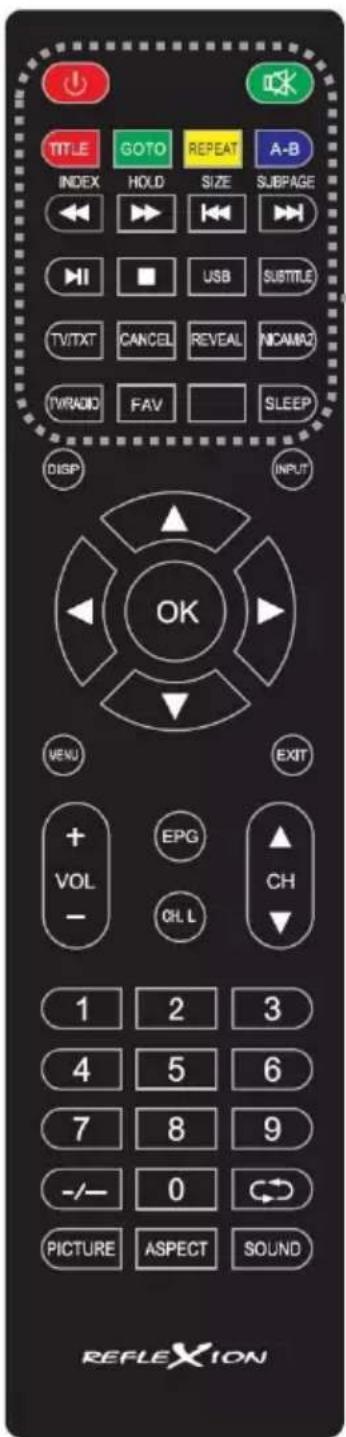
• Power: On / Off- switching
- MUTE: Mute TV
• COLORED BUTTONS: Shortcut keys
TITLE (red): USB menu
GOTO (green): Select title / chapter / track
REPEAT (yellow): Repeat chapter / title.
A-B (blue): Start and end point for A-B playback.
• / Fast Backward: USB
• ▶▶ / Fast Forward: USB
• / Skip Backward: USB
• / Skip Backward: USB
• ▶II PLAY / PAUSE: USB
• /STP:USB
• USB: USB Media menu
• SUBTITLE: Subtitle Enable / Disable
• TV/TXT: Teletext On / Off
• NICAM/A2: Select audio track.
• TV/RADIO: TV / Radio mode (DVB-S/T/C)
FAV: Open Favorites list
• SLEEP: Sleepmode On / Off
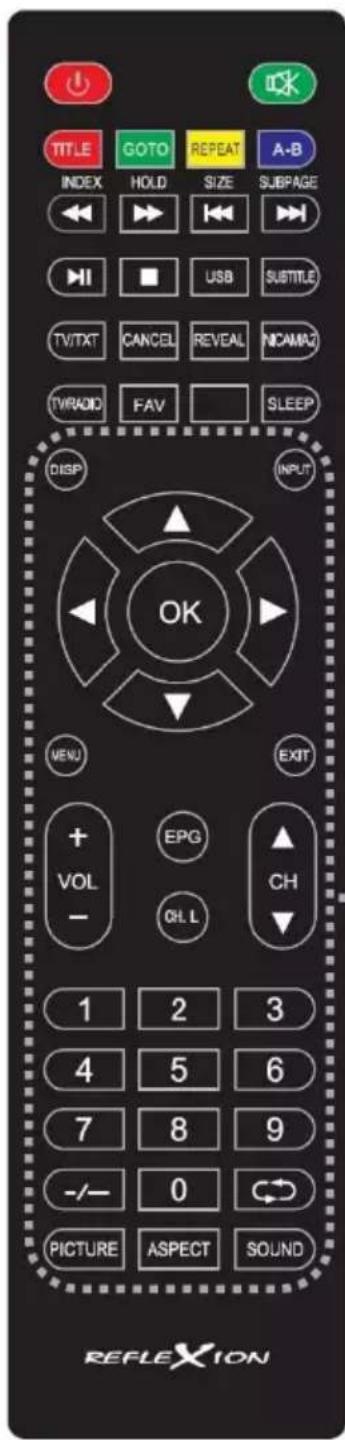
• DISP: Displays display information
• INPUT: Open input sources
• NAVIGATION KEYS:
▲ UP
▼ DOWN
LEFT
▶ RIGHT
• OK: Confirm menu entries
• MENÜ: Open the Settings menu.
• EXIT: Close the Settings menu
• VOL (+ / -): Vol. Up / Down
• EPG: Displays program information
• CH.L: Open program list
• CH ▲ / ▼: Switch program back and forth
• NUMERICAL (0-9): Enter program number
- -/--: Adjust the number of digits when selecting a program
• Zum Letzen Sender zurückkehren
• PICTURE: Switch picture modes
• ASPECT: Change aspect ratio
• SOUND: Switch tone modes
REFLEXION
COMMON INTERFACE / CI - SLOT
This TV is equipped with a CI + slot and supports the following digital standards: DVB-T / T2HD,
DVB-S / S2 and DVB-C
Common Interface / Slot
The CI slot (CI +) is designed to accept conditional access modules (CAM) and smart cards to access pay-TV and other services. Contact your pay-TV service provider for more information about modules and subscriptions.
Note:
- Conditional Access modules and smart cards are sold separately.
- Turn off your TV before inserting modules into the CI slot.
Then insert the smart card into the module.
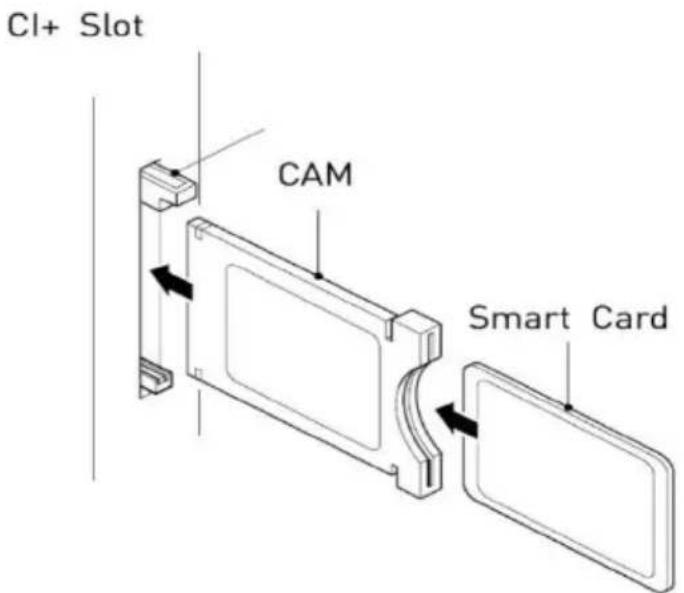
- Turn on the TV and make sure source DTV is selected.
- When the CAM is detected, the following text is displayed on the screen: "CI module inserted". Wait a few seconds for the card to activate.
- Now select the desired pay-TV program.
- Detailed information about the used smart card is displayed.
- Press the [OK] key to enter the CI menu. See the module manual for details about the settings.
- When the module is removed, the following text appears on the screen: "CI module removed".
| English | German |
| CI+ Slot | CI+ Steckplatz |
| CAM | CAM |
| Smart Card | Smart Card |
TURN TV ON / OFF
• Make sure the power cord is plugged in and the toggle switch is pressed.
- Turn on the unit by pressing the [POWER] button (RED button on the left side of the remote control) on the unit or remote control.
Note:
The device has a toggle switch with which the device can be completely de-energized. To operate the unit, make sure that the toggle switch is set to On.
FIRST INSTALLATION
- Press the [POWER] button on the unit or remote control to turn on the unit.
- Press the [▲▼] key to navigate the menu.
- Press the [◀▶] button to change the menu settings.
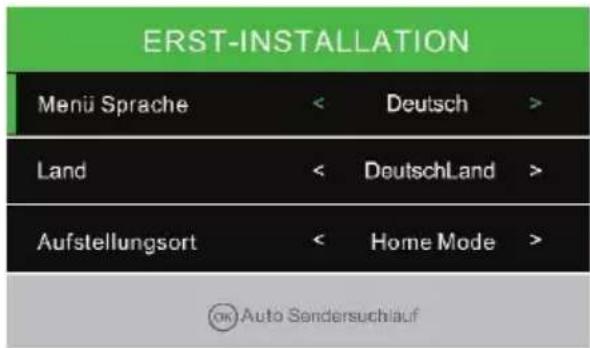
- Select the menu language; the country and the site.
- Press the [OK] key to confirm the entry and enter the tuner selection.
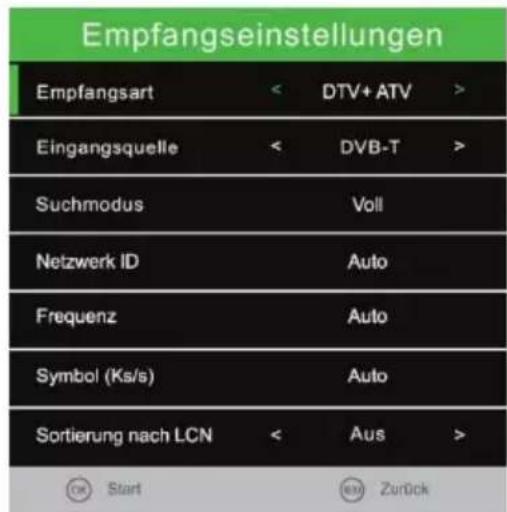
- If you have selected Satellite / DVB-S for the "input source". After the confirmation, you can load the "Standard sender list".
-
Set the "LCN" function to "Off" for the DVB-T / C station search. If the setting is "On", this prevents the stations from being sorted and assigns each station a fixed program slot.
-
Set the "LCN" function to "Off" for the DVB-T / C station search. If the setting is "on", this prevents the stations from being sorted and assigned to each other.
- You can change the settings with the [▲ / ▼ / ◀ / ▶] buttons.
FIRST INSTALLATION
For different input sources, the following setting options are available:
DVB-C
Tune Type: DTV / ATV
Scan Type: Full / Network Scan
Netzwork ID: The menu item is only active if network search is selected.
Frequency: The menu item is only active if network search is selected.
Symbol (ks/s): The menu item is only active if network search is selected.
Sorting by LCN: On / Off (Turn the option off because otherwise the station sorting will not work).
DVB-T
Tune Type: DTV / ATV
Scan Type: The menu item is fixed and can not be edited.
Netzwork ID: The menu item is fixed and can not be edited.
Frequency: The menu item is fixed and can not be edited.
Symbol (ks/s): The menu item is fixed and can not be edited.
Sorting by LCN: On / Off (Turn the option off because otherwise the station sorting will not work).
SATELLITE
Satellite: Select the satellite. Astra 19,2E is the default.
Scan Mode: Default / Blind Scan / Network Scan
Cannel Type: All Channels / FTA Channels
Service Type: All / DTV / Radio
- If you have selected "DVB-C" or "DVB-T" and confirmed the settings with the [OK] key Starts the automatic search.
- When the scan is complete, the unit enters TV mode and the initial installation is complete.
- If you have selected "Satellite" and confirmed the settings with the [OK] button, you will be asked to load the standard station list.
Do you want to load presat channel list?
If you have selected satellite as the input source, after confirming the settings you will be asked to load the standard station list. It is recommended to confirm the setting with "Yes". The station list is adapted and pre-sorted for the German TV reception and can be further processed afterwards.
YES: Go to "Yes" to load the standard station list.
NO: Go to "No" to start the channel search normally.
- Select "Yes" or "No" and press the [OK] key to confirm.
- The search is started now or the default sender list is loaded. The process can take some time.
- Afterwards, the TV set switches to TV mode and the initial installation is complete.
CHANNEL MENU (DVB-C / T / T2HD)
Channel Menu DVB-C/ T
- Press the [INPUT] key.
- Use the [▲▼] buttons to navigate in the menu.
- Select "DTV" and confirm your entry with the [OK] key.
- Press the [MENU] key and navigate to "Sender".
- Confirm the entry with the [OK] key.
The following menu items are available in the "Channel" menu:
Antenna / Auto Tuning / ATV Manual Tuning / CADTV Manual Tuning /
Programme Edit / Signal Information / CI Information / 5V antenna power
- In the station menu, navigate with the [▲▼] buttons
- Some settings can be made using the [◀▶] buttons.
- Confirm the entry with the [OK] key and proceed to the next menu item.
- Use the [MENU] key to return to the last menu item.
- Press the [EXIT] key to exit the menu settings.
Note:
In the "Channel" menu, set the "5V antenna power" option to "On" when the supplied active antenna or other active antenna is used.
Antenna:
Choose between: DVB-T / DVB-C
Auto Tuning:
Calls up the menu for the automatic station search.
ATV Manual Tuning:
Calls up the menu for the manual analogue search.
CADTV Manual Tuning:
Calls up the menu for Manual DVB-T / DVB-C Search.
Programme Edit:
Opens the menu to edit the channel list.
Signal Information:
Shows transmitter / transponder and signal information.
CI Information:
Displays information about the inserted CI module and the smart card.
5V antenna power:
Turn the 5V Active Antenna output "On" or "Off".
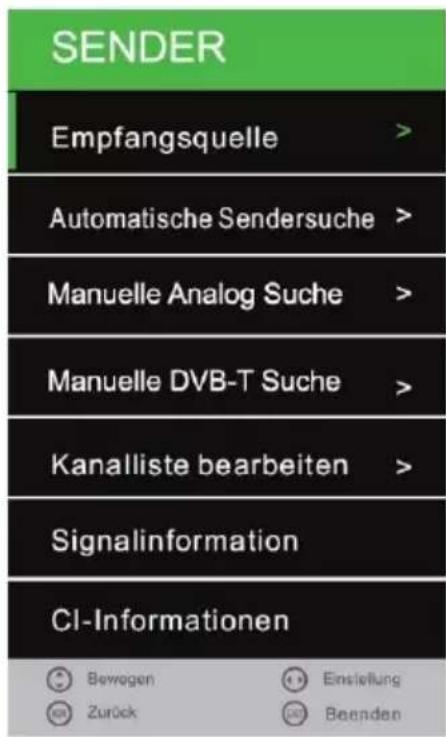
- Select the menu item "Receive Source" and press the [OK] key.
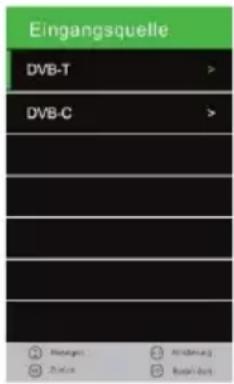
- Use the [▲ / ▼] buttons to choose between "DVB-T" (aerial) and "DVB-C" (cable).
- Confirm with the [OK] key to select the respective "Reception source".
- You will now return to the station menu.
DVB-T: Select DVB-T to enter the Antenna Settings menu.
DVB-C: Select DVB-C to enter the cable setup menu.
Auto Tuning
- Select the menu item "Automatic station search" and press the [OK] key.
- Use the [▲ ▼ ◀▶] buttons to select the various setting options.
- Confirm the entry with the [OK] key.
- The search starts.
- To pause the station search, press the [EXIT] key.
The following setting options and menu items are available:
DVB-C Auto Tuning
Tune Type: DTV / ATV
Scan Type: Full / Network
Scan
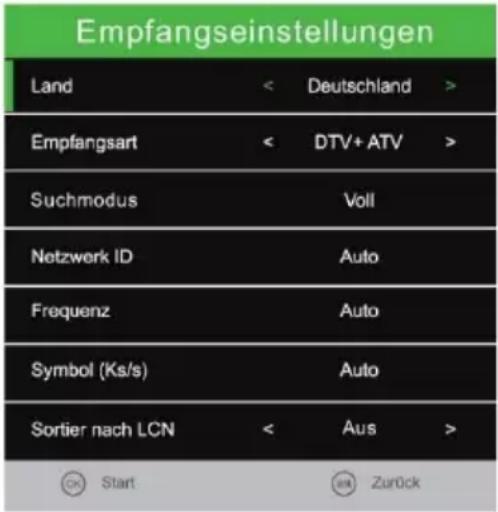
Netzwork ID: The menu item is only active if network search is selected.
Frequency: The menu item is only active if network search is selected.
Symbol (ks/s): The menu item is only active if network search is selected.
Sorting by LCN: On / Off (Turn the option off because otherwise the station sorting will not work).
DVB-T Auto Tuning
Tune Type: DTV / ATV
Scan Type: The menu item is fixed and can not be edited.
Netzwork ID: The menu item is fixed and can not be edited.
Frequency: The menu item is fixed and can not be edited.
Symbol (ks/s): The menu item is fixed and can not be edited.
Sorting by LCN: On / Off (Turn the option off because otherwise the station sorting will not work).
Note:
- The Network ID / Frequency / Icon (ks / s) settings are only available for DVB-C.
- Manual entry will only be experienced by users.
CHANNEL MENU (DVB-C / T / T2HD)
ATV Manual Tuning
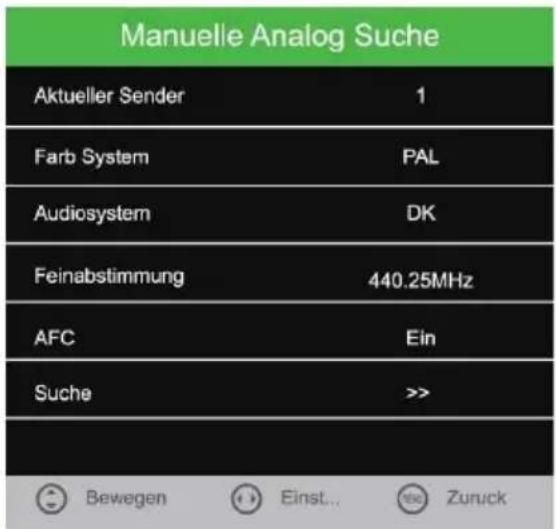
- Select the menu item "Manual Analogue Search" and press the [OK] key.
- Use the [▲▼◄►] buttons to select the various setting options.
- Go to "Search" and press the [OK] button to confirm the settings and start the search.
Current Channel:
Select the station to be adapted.
Colour System:
PAL / NTSC / SECAM / NTSC-44 / PAL-M / PAL-N / PAL-60
Sound System:
DK/MN/I/BG
Fine-Tune:
Press the [◀ / ▶] button to fine-tune.
AFC:
On / Off
Search:
Go to "Search" and press the [OK] key to start the search.
CADTV Manual Tuning (DVB-C / T / T2HD)
- Select the menu item "Manual DVB (T / C) Search" and press the [OK] key.
- Use the [▲▼◀▶] buttons to select the various setting options.
- Confirm the entry with the [OK] key.
- The search starts.
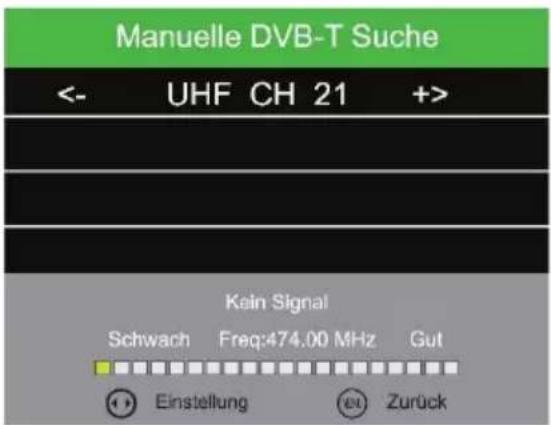
DVB-T Manual Search
- Press the [◀▶] buttons to select the different frequency channels.
- Once you have found the desired frequency, press the OK button to start the search.
Note:
The signal bar shows you the strength of the selected frequency.
CHANNEL MENU (DVB-C / T / T2HD)
DVB-C Manuell Tuning
Frequency:
Enter the frequency using the [0-9] buttons.
Symbol (ks/s):
Enter the symbol rate keys [0-9].
QAM Type:
Select the QAM type: 16 QAM / 32 QAM / 64 QAM / 128 QAM / 256 QAM
Note:
The setting is only recommended for experienced users.
Programme Edit
- Select the menu item "Edit channel list" and press the [OK] key.
- Use the [▲▼] buttons to navigate in the menu item.
Note:
A detailed description can be found in the operating instructions under the item "Programme Edit".
Signal Information
The menu item is only available in DTV (DVB-C / T) / satellite mode.
The signal information includes:
Transmitter / Quality / Signal / Network / Modulation
- Select the menu item "Signal Information" and press the [OK] key.
- Use the [MENU] key to return to the "Station" menu.
- Using the [EXIT] key
Note:
The menu item can only be selected when a signal is present.
CI Information
The menu item gives you information about the inserted CI module and the card.
- Select the "CI Information" item and press the [OK] key.
- Use the [▲ ▼ ◀▶] buttons to select the various menu items.
- Confirm the entry with the [OK] key.
- To exit the menu, press the [EXIT] key.
Note:
The following types of reception are supported: DVB-C, DVB-T / T2HD, DVB-S / S2.
5V antenna power
Use the [◀▶] buttons to set the "On" or "Off" setting.
Switch the menu item to "On" to activate the 5V power supply for active antennas. For passive antennas, switch the setting to off.
Note:
Please note the details of your DVT-T antenna.
CHANNEL MENU (SATELLITE)
Sender Menu Satellite
- Press the [INPUT] key.
- Use the [▲ ▼] buttons to navigate in the menu.
- Select "Satellite" and confirm your entry with the [OK] key.
- Press the [MENU] key and navigate to "Sender".
- Confirm the entry with the [OK] key.
The following menu items are available in the "Channel" menu:
Auto Tuning / Programme Edit / Signal Information
/ CI Information / Dish Setup
Auto Tuning
- Select the menu item "Automatic station search" and press the [OK] key.
- Use the [▲ ▼ ◀▶] buttons to select the various setting options.
- Confirm the entry with the [OK] key.
- The search starts.
- To pause the station search, press the [EXIT] key.
The following setting options and menu items are available:
Country: Select the country.
Satellite: Select the satellite. Astra 19.2E is set as default.
Scan Mode: Default / blind Scan / Network Scan
Channel Type: All Channels / FTA Channels
Service Type: All / DTV / Radio
Programme Edit
- Select the menu item "Edit channel list" and press the [OK] key.
- Use the [▲▼] buttons to navigate in the menu item.
Note:
A detailed description can be found in the operating instructions under the item "Programme Edit".
Signal Information
The menu item is only available in DTV (DVB-C / T) / satellite mode.
The signal information includes:
Transmitter / Quality / Signal / Network / Modulation
- Select the menu item "Signal Information" and press the [OK] key.
- Use the [MENU] key to return to the "Station" menu.
- Using the [EXIT] key
Note:
The menu item can only be selected when a signal is present.
CI Information
The menu item gives you information about the inserted CI module and the card.
- Select the "CI Information" item and press the [OK] key.
- Use the [▲ ▼ ◀▶] buttons to select the various menu items.
- Confirm the entry with the [OK] key.
- To exit the menu, press the [EXIT] key.
Note:
The following types of reception are supported: DVB-C, DVB-T / T2HD, DVB-S / S2.
Dish Setup
- Select the menu item "Sat configuration" and press the [OK] key.
- Use the [▲ ▼ ◀▶] buttons to navigate in the menu.
- Use the [MENU] key to return to the "Station" menu.
- With the [EXIT] key
In the "Dish Setup" menu, you have three menu columns to choose from.
- In the satellite and transponder list you will see a list of all satellites and the associated transponders.
- In the right column you will find the LNB settings.
The following options for editing satellites and transponders are available in the "Sat configuration" menu:
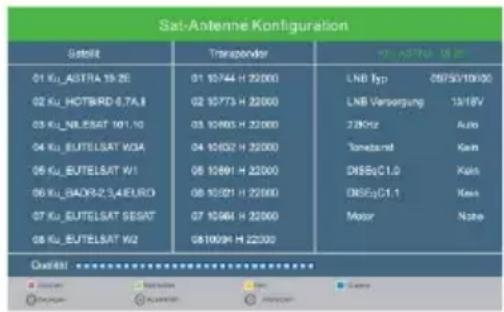
Delete (red) / Edit (green) / Add (yellow) / Scan (blue)
Delete [Red]:
- Select a satellite or transponder to be deleted with the [▲ ▼ ◀▶] buttons.
-
Press the [OK] key to mark the satellite or transponder.
-
Press the [RED] key to delete the selected satellite / transponder.
-
Confirm the entry with the [OK] key.
-
A confirmation prompt appears. [OK]: Press the [OK] key to confirm the deletion. [EXIT]: Press the [EXIT] key to cancel the deletion.
![Reflexion LEDW160 - Delete [Red]: - 1](/content/2026/05/896307/images/0ed4de7c16c815b1f110f5d43ec47bc86dc5b211175297d98714fc6386978ec1.jpg)
- Select a satellite or transponder you want to edit with the [▲ ▼ ◀▶] buttons.
- Press the [OK] key to mark the satellite or transponder.
- Press the [Green] button to enter the satellites and transponder settings.
- Press the [OK] button when you have made all the settings to apply the setting.
Settings for editing satellites and transponders.
Satelite editing:
Satellite Name: Edit the name of the satellite. Longitude Direction: East / West Longitude Angle: Enter a new longitude angle. Band: Ku / C
Transponder edit:
Frequency: Enter a new frequency.
Symbol (ks/s): Enter a new symbol rate.
Polarity: H (Horizontal) / V (Vertical)
Add [Yellow]
- In the transponder or satellite list, press the [Yellow] key to manually add a satellite or transponder.
- Press the [OK] button when all settings have been made to apply the setting.
Satellite Name: Edit the name of the satellite.
Longitude Direction: East / West
Frequency: Enter a new frequency. Symbol (ks/s): Enter a new symbol rate. Polarity: H (Horizontal) / V (Vertical)
![Reflexion LEDW160 - Add [Yellow] - 1](/content/2026/05/896307/images/3932b73f39dab93be8496e4056a20db88074107aa13d385658fc86f1b5ff816c.jpg)
- Use the [▲▼◄►] buttons to select a satellite or transponder that you want to scan.
- Press the [OK] key to mark the satellite or transponder.
- A red rake marks the selection.
- Now press the [Blue] key to open the search settings.
- Press [OK] when all the settings have been made to start the search.
The following setting options are available:
Scan Mode: Default / Network / FastScan
Channel Type: All Channels / FTA Channels
Service Type: All / DTV / Radio
Note:
The found channels are appended to the list.
LNB SETTINGS
The LNB settings on the right side of the menu usually do not need to be changed and are only required for multi-switch configurations or if a motorized SAT system is used without its own control unit. The following setting options should only be changed by experienced persons or by qualified personnel.
- Navigate in the menu with the [▲ ▼] buttons.
- Use the [◀▶] button to adjust the settings.
- Use the [OK] key to confirm the entry.
- Press the [MENU] key to return to the previous menu.
- Use the [EXIT] key to close the menu display.
| KU ASTRA 19.2E | |
| LNB Typ | 09750/10600 |
| LNB Versorgung | 13/18V |
| 22KHz | Auto |
| Toneburst | Kein |
| DISEqC1.0 | Kein |
| DISEqC1.1 | Kein |
| Motor | None |
LNB Type: 9750/10600, 9750/10750, 5150/5750, 05150, 05750, 09750, 10600, 10750, 11300, 11475, User Single, User Dual, Unicable
LNB Power: 13/18V, 13V, 18V, Aus
22KHz: Auto, Off, On
Toneburst: Kone, BurstA, BurstB
FastScan is a provider based search with automatic update of the transmitter data.
- Press the [MENU] button and use the [▲ ▼ ◀▶] buttons to move to "Station".
- Press the [OK] button and use the [▲▼] buttons to navigate "Satellite configuration".
- Confirm the entry with the [OK] key.
- Use the [▲ ▼ ◀▶] buttons to select a satellite.
- Press the [OK] button to highlight the satellite.
- Press the [BLUE] key to enter the search setting.
- In "Search mode, select FastScan" and press the [OK] key.
- Use the [◀▶] buttons to select a FastScan provider.
- Then press the [OK] key to confirm the setting and start the search.
PROGRAMME EDIT
- Press the [MENU] key and use the [▲ ▼ ◀▶] keys to move to "Channel".
- Press the [OK] key.
- Use the [▲▼] buttons to navigate to "Edit channel list".
- Confirm with the [OK] key.
- Use the [▲ ▼] buttons to navigate in the menu.
The following options for editing the station list are available:
Delete [RED] / Move [YELLOW] / SKIP [BLUE] / FAV [FAV]
Delete [RED]: Delete channels.
- Select a station to be deleted using the [▲▼] buttons.
- Press the [RED] button to delete the station.
- The following stations slip up the list.
- Repeat steps 1 and 2 until all desired stations have been deleted.
Move [YELLOW]: Move channels.
- Select a station to be moved using the [▲▼] buttons.
- Press the [YELLOW] button to highlight the selected station.
- Press the [▲ ▼] button to move the station up or down.
-
Press the [OK] button to store the station to the desired slot.
-
Repeat step 1-4 until the desired station order is reached.
![Reflexion LEDW160 - Move [YELLOW]: Move channels. - 1](/content/2026/05/896307/images/8a7617161e9a0526ed94c20a554e0a63762364881e31d1ed2f5c393c871c1ccc.jpg)
Skip [BLUE]: Mark stations that should be skipped.
- Select a channel to be skipped using the [▲▼] buttons.
- Press the [BLUE] key to highlight a channel for skipping.
- An icon indicates that a station will skip when switching.
- To stop skipping a station, select a station that is highlighted and press the [BLUE] button.
- The icon disappears. The station will not be skipped anymore.
EPG
- Press the [EPG] button on the remote control to open the EPG menu.
- Use the [▲ ▼ ◀▶] buttons to navigate in the menu.
- The EPG menu shows the stations and the programs with start and end time. The information is displayed up to 7 days in the future.
- The following settings and selection options are available in the menu.
Recording: Press the [Red] button to program a recording.
Remind: Press the [Green] button to set a reminder timer. The TV set automatically switches to the TV program at the time shown.
Last day: Press the [Yellow] button to display the previous EPG page.
Next day: Press the [Blue] button to go to the next EPG Page.
Details: Press the [DISP] button to see the full details of the TV show.
Exit: Press the [EXIT] button to close the EPG menu.
Note:
- The company TV Grawe Service GmbH has no influence on the displayed information. The information given comes directly from the broadcasters.
- EPG is only available for DVB-S / T / C
PVR RECORDING FUNCTION
-
Insert an empty USB stick or hard drive into the USB socket of the device.
-
Press the [MENU] button and navigate to "Configuration".
-
Press the [OK] button and select the menu item PVR file system.
-
Press the [OK] button to open the menu.
-
The following menu items are available in the menu.
Select disc: Select the storage location.
Check PVR file system: Press the OK button to check the USB medium.
Format: Press the OK button to prepare the USB medium for recording.
Time Shift Size: Shows the maximum file size for the time shift function.
Speed: Displays the USB medium recording speed.
Remaining recording time: Displays the remaining recording time in hours.
Note:
- While a USB medium is being prepared for recording, all data from the USB medium is deleted.
• You cannot switch during recording. - The recording function is only available for non-encrypted TV channels / programs.
Programming EPG recording
-
Press the EPG button.
-
Use the [▲▼] buttons to select a TV program.
-
Press the [▶] button to switch to the TV programs.
-
Use the [▲▼] buttons to navigate and search for the desired TV show.
-
Press the [Red] button to mark the TV show for recording.
-
By repeatedly pressing, you can change the recording function or delete the recording again.
R: Starts a one-time recording
D: Starts a daily recording for programs daily at the same time be broadcast.
W: Starts a weekly recording for broadcasts once a week be broadcast.
Programming manual recording
-
Press the [MENU] button and navigate to "Transmitter".
-
Press the [OK] button and go to "Timer list".
-
Press the [OK] button to open the menu.
-
Existing timers are displayed in the menu or new timers can be set. The timers made in the EPG menu are also displayed here.
-
The following settings are available in the menu.
Delete: Press the [Red] button to delete a highlighted timer.
New: Press the [Yellow] button to create a new timer.
Program: Select current program.
Type: Reminder / RECORDER
Mode: Once / Daily / Weekly
Start time: Set the time and date.
End time: Set the time and date.
Edit: Press the [Blue] button to edit an existing timer.
Exit: Press the [Exit] button to exit the menu.
Start recording immediately
- Press the [EMPTY] button on the remote control to start recording.
- To stop recording, press the [STOP] button.
- Press the [◀] or [▶] key to stop or continue recording.
HDMI CEC / ARC
To activate the HDMI CEC control press connect an HDMI CEC compatible device to the HDMI port of the device.
- Press the [Menu] button and go to the "Configuration" menu.
- Select the menu item "HDMI CEC".
- You have the following setting options in the menu:
HDMI CEC: On / Off
Activate / deactivate the HDMI CEC control.
HDMI ARC: On / Off
Audio transmission via HDMI cable. Only possible with ARC compatible devices.
Auto Power: On 7 Off
Compatible devices connected via HDMI are automatically switched "On" or "Off" when the TV is switched on..
Device Menü:
Displays the device menu. Only possible with compatible devices.
PICTURE MENU
- Press the [MENU] key on the remote control.
- Press the [▲ ▼ ◀▶] buttons to navigate in the menu.
- Select the "PICTURE" menu item and press the [OK] key.
- In the menu, use the [◀▶ ▲ ▼] buttons to navigate.
- Confirm the entry with the [OK] key.
- Press the [MENU] key to return to the previous menu.
- Close the menu with the [EXIT] key.
Note: Contrast, Brightness, Color, and Sharpness are only available in the "PERSONAL" picture setting.
PICTURE MENU
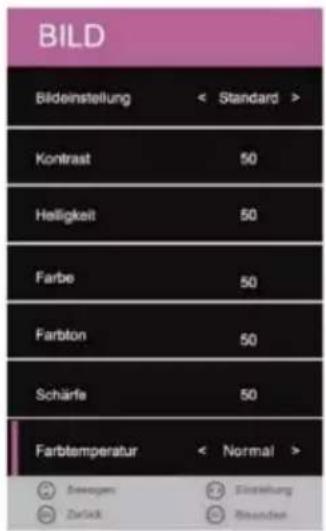
The following selection and setting options are available in the menu:
Picture Mode:
Standard / Dynamic / Personal / Mild
Contrast: Regulates the difference between the brightest and the darkest Areas of the picture.
Brighness: Regulates the overall brightness of the picture.
Colour: Regulates the color.
Sharpness: Set the sharpness value of the TV set.
Tint: Adjust hue (only if an NTSC signal is present).
Colour Temp: Warm / Cold / Normal:
Nois Reduction: Off / Low / Medium / High.
Screen: The menu item in only active if a PC via the VGA Input is connected.
Dynamic CR: On / Off
Face Colour: Adjust the thickness of the facial colors to your senses.
Note:
- The menu items "Contrast / Brightness / Color / Sharpness" are only available in the "Picture setting" "Personal".
-
The "Hue" menu item is only available if an NTSC signal is present.
-
Press the [MENU] key on the remote control.
- Press the [▲ ▼ ◀▶] buttons to navigate in the menu.
- Select the menu item "SOUND" and press the [OK] key.
- In the menu, use the [◀▶ ▲ ▼] buttons to navigate.
- Confirm the entry with the [OK] key.
- Press the [MENU] key to return to the previous menu.
- Close the menu with the [EXIT] key.
Note:
- Treble and bass are only available in the sound profile "PERSONAL".
- If an audio device is plugged into the headphone jack, the integrated loudspeakers are muted.
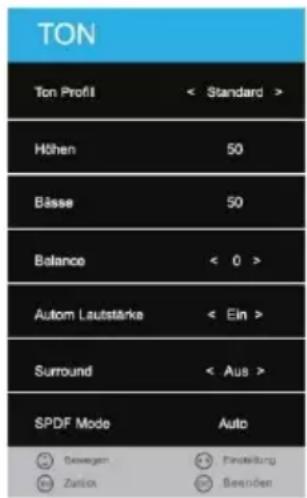
The following selection and setting options are available in the menu:
Sound Mode: Standard / Music / Movie / Sports / Personal
Treble: Change the value to adjust the heights to your listening needs. The menu item is only available in the "Sound Mode Personal".
Bass: Change the value to adjust the bass to your listening needs. The menu item is only available in the "Sound Mode Personal".
Balance: Regulates the audio output of the left and right speakers. The left or right speaker can also complet be switched off.
Auto Volume: On / Off.
Surround Sound: Off / TruSuround
SPDIF-Mode: Off / Auto / PCM
AD Switch: Off / On
AD Volume: Adjust the volume for the AD settings.
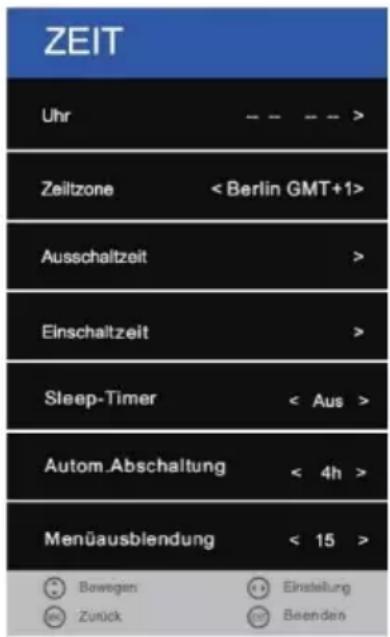
TIME MENU
- Press the [MENU] key on the remote control.
- Press the [▲ ▼ ◀▶] buttons to navigate in the menu.
- Select the menu item "TIME" and press the [OK] key.
- In the menu, use the [◀▶ ▲ ▼] buttons to navigate.
- Confirm the entry with the [OK] key.
- Press the [MENU] key to return to the previous menu.
- Close the menu with the [EXIT] key.
Note:
The menu item Clock adjusts itself automatically and if a cable / satellite / antenna signal is present.
The following selection and setting options are available in the menu:
Clock: Automatic adjustment when
an input signal is present
Time Zone: Set the time zone according to your whereabouts.
Off Time: Set the automatic switch-off time "On" or "Off".
On Time: Set the automatic switch-on time "On" or "Off".
The following settings can be made for the switch-on time in the
menu: Hour / Minute / Source / Channel / Volume
Sleep-Timer: Set the time after which the unit automatically switches to standby mode.
240min (Details in minutes)
Auto Stanby: Set the time after which the device should switch to standby mode when there is no signal or no operation.
Off / 3H / 4H / 5H (Details in hours)
OSD Off Timer: Set the time after which the menu displays will be automatically hidden when no operation is taking place.
Off / 5 /10 / 15 / 20 / 25 / 30 / 35 (Details in seconds)
SETUP MENÜ
- Press the [MENU] key on the remote control.
- Press the [▲ ▼ ◀▶] buttons to navigate in the menu.
- Select the "CONFIGURATION" menu item and press the [OK] key.
- In the menu, use the [◀▶ ▲ ▼] buttons to navigate.
- Confirm the entry with the [OK] key.
- Press the [MENU] key to return to the previous menu.
- Close the menu with the [EXIT] key.
- The following selection and setting options are available in the menu:
German / English / French / Dutch / Italian etc.
TT Language:
Select the character set for teletext.
Audio Language:
Select the audio language one and two.
Subtitle Language:
Select the subtitle language one and two.
Hearing Impaired:
Select Deafness Aid to turn On or Off auto subtitle. Only if supported by the channel.
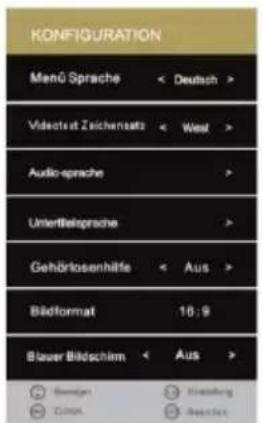
Set the picture aspect ratio:
16:9 / Zoom2 / Zoom1 / Auto / 4:3
SETUP MENU
Blue Screen:
Enable this option if you want to display a blue image when there is no signal. Turn off the option "On" or "Off".
First Time Installation:
Select the setting to go to the first installation menu.
Energy Mode:
Choose between the "Home Mode" (for the buyer) and the "Store Mode" (for the dealer).
Reset:
Start the factory setting. All tuner / picture and sound settings are reset. The device turns off. After the next switch on, the device starts with the first installation.
Software Update (USB):
Start a software update via USB stick.
VERSION:
Displays the "Model", the "Panel Type" and the "Software Version".
Sat Channel Import (USB):
Import a Satellite Channel List Exported to a USB Stick.
Sat Channel Export (USB):
- Press the [MENU] key on the remote control.
- Press the [▲ ▼ ◀▶] buttons to navigate in the menu.
- Select the "PROTECTION" menu item and press the [OK] key.
- In the menu, use the [◀▶ ▲ ▼] buttons to navigate.
- Confirm the entry with the [OK] key.
- Press the [MENU] key to return to the previous menu.
- Close the menu with the [EXIT] key.
The following selection and setting options are available in the menu:
System Lock:
Select the menu item to change the password. There is a password request.
Activate the "Lock System" menu item to access the following menu items:
Parental Guidance / Key Lock / Hotel Mode
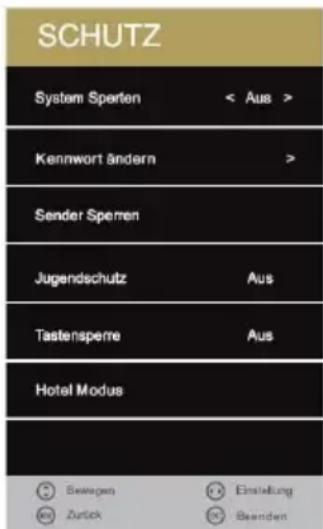
Adjust the password in this menu.
- „Please enter old password“ Enter the current password.
- „Please enter new password“ Enter a new password.
- „Confirm new password“ Enter the new password again to confirm the new password.
Note:
- Press the [◀] key to clear the entry. Press the [▶] key to cancel the password change.
- The default password for the TV settings is [0000]
Channel Lock:
Lock channels to provide them with a password prompt. The password query is only active if "lock system" is activated.
- Select the menu item "Lock transmitter" and press the [▶] key.
- Use the [▲▼] buttons to select a channel that is to be locked / unlocked.
- Use the [Green] key to lock / unlock the selected station.
- Use the [MENU] key to return to the "PROTECTION" menu.
- Use the [EXIT] key to close the menu display.
Parental Guidance:
Press the [◀▶] buttons to select the different parental levels.
The following settings are available:
Off / 4 / 5 / 6 / 7 / 8 / 9 / 10 / 11 / 12 / 13 / 14 / 15 / 16 / 17 / 18
Key Lock:
Activate the key lock to deactivate the control buttons on the device. The following settings are available.
On / Off
HOTEL MODE
- Press the [MENU] key on the remote control.
- Press the [▲ ▼ ◀▶] buttons to navigate in the menu.
- Select the menu item "PROTECTION".
- Press the [OK] key to confirm.
- Navigate to the menu item "Lock System" and press the [▶] key.
- Enter the four-digit password.
- Press the [◀▶] button and set the item to "On".
- Use the [▲▼] buttons to navigate to "Hotel mode" and confirm with the [▶] button.
- Press the [MENU] key to return to the previous menu.
- Use the [EXIT] key to close the menu display.
- The following settings are available in the menu:
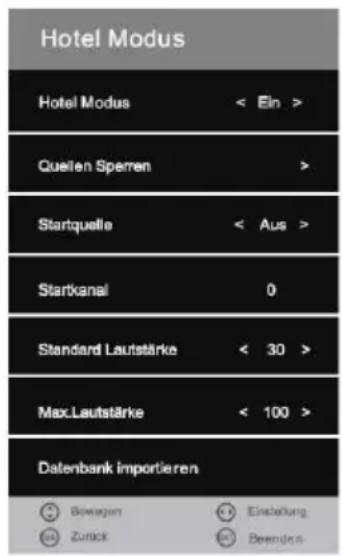
Press the [◀▶] button to switch the "On" or "Off" setting.
If the menu item "On" is switched, you have access to the following menu items:
Lock Source / Start Source / Start Channel / Default Volume / Max Volume / Import Database / Export Database / Reset Settings
Source Lock:
In this menu item you can block access to the input sources.
- Select the menu item with the [▶] key.
- Navigate in the menu with the [▲ ▼] buttons.
- To turn an input source "On" or "Off", press the [◀▶] buttons.
Note:
If a source is locked, you can no longer select the input source via the INPUT key.
HOTEL MODE
Default Source:
Press the [◀▶] buttons to select the various sources as the start source.
The following options are available:
Off / Satellit / DTV / ATV / AV / SCART / YPbPr / DVD / PC / HDMI / USB
Example:
If you have set satellite as the start source, the device automatically starts with the input source satellite.
Note:
If you have selected Satellite / DTV / ATV as the start source you can select a "Start channel".
Default Prog.:
Use the [◀▶] buttons to select a start channel with which the device should start when switching on.
Note:
The menu item is only active if "Satellite / DTV / ATV" was selected for "Start source".
Default Volume:
Set a default volume with which the device should start.
The value can be set with the [◀▶] buttons.
Max Volume:
Set the maximum volume that can be set on the device. The value can be set with the [◀▶] buttons.
Import Database:
Import the exported database.
- Insert the USB stick with the exported data into the USB socket on the back of the device.
- Press the menu item with the [▶] button.
- The exported data will now be exported from the USB stick to the device.
- The device switches off and on again after a short time.
- The database is now imported.
Export Database:
Export your settings: Sound / Picture / Satellite / DTV / Time etc.
- Insert an empty USB stick into the USB socket on the back of the device.
- Press the menu item with the [▶] key to export the database.
- The device now displays "Database exported successfully".
- The database has been exported and can now be used to import to a device with the same device type and software version.
Clear Lock:
Reset the hotel mode settings to the default settings.
- Press the [▶] button to reset all settings made in Hotel mode.
-
The "Hotel Mode" is then set to "Off" and the "Hotel Mode" settings are no longer selectable.
-
Press the [Input] button on the remote control
- Press the [▲▼] key to navigate in the menu.
- Select the menu item "USB".
- Press the [OK] key to confirm.
Note:
USB hard disks up to 1TB are supported.
- In the menu, use the [◀▶ ▲ ▼] buttons to navigate.
- Press the [OK] key to confirm the entry and select files for playback.
- Use the [▶] (play / pause) button to start or pause full-screen playback.
- Close the menu with the "EXIT" key.
| PHOTO | Select the menu item to select photo files from your USB device play. |
| MUSIC | Select the menu item to get audio files from your USB device play. |
| MOVIE | Select the menu item to capture video files from your USB device play. |
| TEXT | Select the menu item to save text files from your USB device play. |
Example: Movie
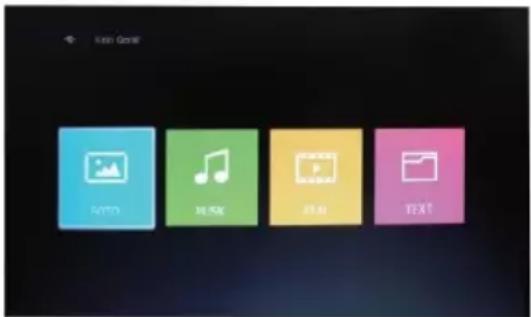
- Press the [◀▶] buttons and navigate to the Movie menu item.
- Press the [OK] key to confirm the entry
- Select the folder containing the video files with the [▲▼◀▶] buttons.
- Confirm the entry with the [OK] key.
- Now select the file to be played back using the [▲ ▼ ◀▶] buttons.
- Confirm the entry with the [▶] key.
- Playback now starts in full screen view.
- To select several files for playback, mark the files with the [OK] key.
- Then start playback with the [▶] key.
| ▲▼◀▶ | Navigation keys |
| OK | Confirm, Mark |
| ■ (STOP) / EXIT | End playback / return to menu. |
| ▶II (PLAY / PAUSE) | Start / pause playback |
| ▶▶ / FAST FORWARD | Multiple pressure to select forward speed |
| ◀◀ / FAST BACKWARD | Multiple pressure to select return speed. |
| ▶▶/ SKIP FORWARD | Next play file. |
| ◀◀/ SKIP BACKWARD | Previous play file. |
For USB playback, a menu bar is also displayed:
Example:
- Music playback
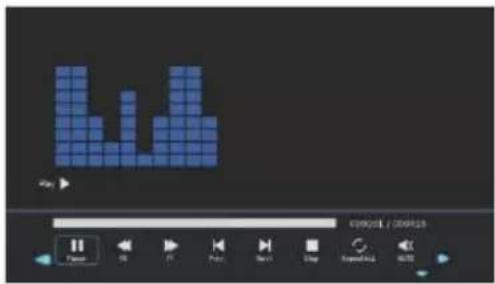
- Example photo playback:

- Example movie playback:

NOTE:
Press the [OK] key to display the control bar.
Press the [EXIT] button to fade out the menu.
Press the [▲ ▼ ◀▶] buttons to navigate in the menu.
Press the [OK] key to confirm the entry.
SPECIFICATIONS USB CONNECTION
USB output voltage: 5V/500mA / Smartphones and devices that need to be installed are not detected.
USB Stick: max. 1TB
External hard drive (HDD): max. 1TB
Formatting: FAT and NTSF
Supported USB formats:
| Media | Format | Codec | Remark | |
| Video | Audio | |||
| FILM | .avi | MJPEG | MP3, WMA AAC, PCM | Max. Resolution: 1280x720 Max. Frame rate: 30fps Max. data rate: 20Mbps |
| Xvid, MPEG-4, H.265 WMV9/VC-1 | Max. Resolution: 1920x1080 Max. Frame rate: 30fps Max. data rate: 20Mbps | |||
| .mp4.MPEG4 | MPEG-2, MPEG-4, H265, 265, Xvid, MJPEG | MP3 AAC, PCM | ||
| .ts / .trp | MPEG-1, MPEG-2, H.265, VC-1 | MP1, MP2 MP3, AAC | ||
| .mpg.mpeg | MPEG-1, MPEG-2 | MP1, MP2 MP3, AAC PCM | ||
| .mkv | MPEG-2/4, H.265, Xvid, RV30, RV40, VC-1 | MP3, AAC, PCM, COOK | ||
| .mov | MPEG-4, H.265, MJPEG | MP3, AAC, PCM, AMRNB | ||
| .dat | MPEG-1 | MP1 | ||
| .vob | MPEG-2 | MP1, MP2, MP3, PCM | ||
| .rmrmvb | RV30RV40 | AAC, COOK | Max. Resolution: 800x600 Max. Resolution:1280x720 | |
| FOTO | .jpg | Progressive DCT | Max. Resolution: 1920x1080 | |
| .jpeg | Baseline DCT | Max. Resolution: 7680x4320 | ||
| .bmp | --- | Max. Resolution: 1920x1080 Pixel depth: 8/24/32 bit | ||
| .png | --- | Max. Resolution: 1920x1080 | ||
| MUSIK | .mp3 | --- | MP3 | Sample Rate: 32K ~ 48KHz Bit Rate: 32K ~320 Kbps Channel: Mono / Stereo |
| .wmv | --- | PCM | ||
| .mp4.aac.m4a | --- | AAC | Sample Rate: 8K ~ 48KHz Bit Rate: 24K ~ 384Kbps Kanal: Mono / Stereo | |
| TEXT | .txt | ANSI/UNICODE GB/UTF8 | File Size: Max. 10MB | |
Errors and technical changes reserved.
EASY TROUBLESHOOTING
If the screen goes down or the power goes down greatly, check the screen according to the following instructions: Also, check connected equipment to identify the source of the problem. If the screen still does not work as expected, contact Customer Support.
No electricity
- Check the connections on the TV and on the external devices.
- Check if the toggle switch is set to On.
No picture or no sound
- Make sure the TV is plugged in and turned on.
- Check if the antenna is connected correctly.
- Switch to another program.
Bad picture quality
- Check if the antenna cable is connected correctly.
- Make sure that the channel is tuned correctly.
- Change the picture settings: Brightness, Colour, Sharpness, Contrast, Hue.
- Make sure the TV is away from other electrical appliances that may cause radio frequency interference.
No colour
- Adjust the colour settings.
- Check if the selected program is broadcast in colour.
- Make sure that the channel is tuned correctly.
The TV does not respond to the remote control
- Make sure there are no obstacles between the remote control and the TV.
- Make sure the remote control is within range.
- Make sure that the batteries in the remote control are not empty.
This TV is intended for home use and classified as harmless with respect to electromagnetic waves. Therefore, you can use the device anywhere, including residential areas.
DATA SHEET LEDW160
| Model | LEDW160 | |
| Manufacture | Reflexion | |
| Energy efficiency (default SD) | E | |
| Power consumption „On“ (default SD) | 11W | |
| Power consumption „Off“ | OW | |
| Power consumption „Standby“ | 0,4W | |
| Type of electrical display / panel technology | TV / LCD/LED (Pixel Class 1) | |
| Aspect ratio | 16:9 | |
| Screen resolution (Pixel) | 1920x1080 | |
| Screen diagonal (cm / Inch) | 40cm / 15,6" | |
| Visible screen area | 6,66dm2 | |
| Refresh rate | 60Hz | |
| Type of power supply | Name of the power supply | WTA36-1203000-G |
| Input voltage | 100 - 240V ~ 50/60Hz | |
| Output voltage | 12V 3A | |
| Input voltage device | 12V 3A / 24V 1,5A | |
| Average annual consumption (kWh/1000h) | 11kWh / 1000h | |
| Contrast | 3000:1 | |
| Brightness (cd/m2) | 200 cd/m2 | |
| Colours | 262K colours | |
| Viewing angle | Horizontal: 178° / Vertical: 178° | |
| TV function | TV Standard | BG, DK, I, L/L |
| Channels (ATV/DVB-T/C/S) | 100 / 1000 (T+C) / 5000 (S) | |
| Teletext (ATV/DTV) | 1000 / 1000 Seiten | |
| Connections | VGA | 1 |
| PC Audio (Input) | 1 | |
| SCART | 1 | |
| TV1 (S2) Satellite | 1 | |
| TV2 (T2HD/C) Terrestrial / Cable | 1 | |
| COAX (Digital audio output) | 1 | |
| HDMI (CEC /ARC) | 1 | |
| USB (5V/500mA) | 2 | |
| CI+Slot | 1 | |
| Mini YPbPr / Mini AV | 1 / 1 | |
| DC IN (12V/24V) | 1 | |
| OSD Language | English / Deutsch/ French etc.. | |
| AUDIO Music output | 2x3 Watt | |
| Weight complete | 2,75KG | |
| Weight device only (with stand) | 2,40KG | |
| Power consumptions max. | 36W | |
| Peak luminance ratio (%) | <75% | |
| Mercury content contained in mg / lead | 0,0mg / No | |
| VESA | 75 x 75 mm | |
| Dimensions only device without stand: (W/D/H) in mm | 374 x 48 x 244 mm | |
| Dimensions with stand: (W/D/H) in mm | 374 x 120 x 274 mm | |
NOTE: Design and specifications are subject to change without notice.
STORAGE AND OPERATION INFORMATION
| Humidity storage and operation | < 80% |
| Storage temperature | -10°C to +60°C |
| Use temperature | 0°C to +40°C |
SIMPLIFIED EU DECLARATION OF CONFORMITY
Hereby, UltraMedia GmbH & Co. Handels KG declares that the radio equipment type LEDW160 is in compliance with Directive 2014/53 / EU.
The full text of the EU Declaration of Conformity can be requested at the following email address.
info@ultramedia.de
We hope you enjoy using the device.
Your UltraMedia team


ENERG
LEDW160
Reflexion
bar
| Category | Value | |---|---| | A | 10 | | B | 20 | | C | 30 | | D | 40 | | E | 50 | | F | 60 | | G | 70 |11 kWh/1000h
2019/2013
Warranty
Dear Customer,
Thank you for choosing one of our products. Our products undergo precise quality control during production. If one of our devices gives you cause for complaint or you have questions about one of our devices, please call our customer support.
We give a warranty of 24 months on this device from the date of purchase.
Outside of the warranty, we offer you a repair that is subject to a charge and a cost estimate.
Please contact our customer support before submitting.
Please understand that the warranty can only be taken into account for devices that we receive within the warranty period.
The warranty relates to material and production defects. Your device will be repaired or replaced during the warranty. A reimbursement of the purchase amount by the company UltraMedia is unfortunately not possible. Damage caused by improper use, the use of third-party accessories, fall, dust, water damage and wear and tear (e.g. scratches, optical wear and tear) caused by the customer or external influences are excluded from the warranty.
In order to assert the warranty claims, send the device with all accessories, a copy of the invoice and the description of the error to the address below. Unfortunately, no guarantee can be taken into account for devices that do not have a proof of guarantee. Please do not forget to specify for any questions your full address, a phone number / email address.
Shipping to us takes place at your own expense. Parcels that are not prepaid cannot be accepted and are returned to the sender.
Please pack the device sufficiently for transport. UltraMedia assumes no liability for transport damage that occurs on the way to us. After receiving your submission, we will process your device as quickly as possible and send it back to you.
Please contact our customer support or your specialist dealer before sending in your device, as many problems can also be solved by telephone.
Electronic and electrical equipment as well as batteries contain materials, components and substances that may be detrimental to you and your environment if the waste materials (discarded and waste electronic equipment and batteries) are not handled correctly.
Electrical and electronic equipment as well as batteries are marked with the crossed-out wheelie bin, as shown. This symbol means that old electrical and electronic equipment and batteries must not be disposed of with the trash and must be disposed of separately.
As an end user, it is necessary that you deliver your depleted batteries to the appropriate collection points. In this way you ensure that the batteries are recycled according to the legislation and do not cause any environmental damage.
Cities and municipalities have set up collection points where electrical and electronic waste and batteries can be returned free of charge for recycling, alternatively pickup is also provided. Further information can be obtained directly from your city administration.
- HINWEIS:
- IMPORTANT SAFETY INSTRUCTIONS - PLEASE READ CAREFULLY BEFORE USE.
- Note:
- IMPORTANT SAFETY INSTRUCTIONS
- SAFETY INSTRUCTIONS
- Headphone Warning
- About the installation site
- PRODUCT DESCRIPTION
- REMOTE CONTROL
- COMMON INTERFACE / CI - SLOT
- Common Interface / Slot
- TURN TV ON / OFF
- FIRST INSTALLATION
- DVB-C
- DVB-T
- SATELLITE
- Do you want to load presat channel list?
- CHANNEL MENU (DVB-C / T / T2HD)
- Channel Menu DVB-C/ T
- Antenna:
- Auto Tuning:
- ATV Manual Tuning:
- CADTV Manual Tuning:
- Programme Edit:
- Signal Information:
- CI Information:
- 5V antenna power:
- Auto Tuning
- DVB-C Auto Tuning
- DVB-T Auto Tuning
- ATV Manual Tuning
- Current Channel:
- Colour System:
- Sound System:
- Fine-Tune:
- AFC:
- Search:
- CADTV Manual Tuning (DVB-C / T / T2HD)
- DVB-T Manual Search
- DVB-C Manuell Tuning
- Programme Edit
- Signal Information
- CI Information
- 5V antenna power
- CHANNEL MENU (SATELLITE)
- Sender Menu Satellite
- Auto Tuning / Programme Edit / Signal Information
- / CI Information / Dish Setup
- Dish Setup
- Delete (red) / Edit (green) / Add (yellow) / Scan (blue)
- Delete [Red]:
- Satelite editing:
- Transponder edit:
- Add [Yellow]
- LNB SETTINGS
- Delete [RED] / Move [YELLOW] / SKIP [BLUE] / FAV [FAV]
- Delete [RED]: Delete channels.
- Move [YELLOW]: Move channels.
- EPG
- PVR RECORDING FUNCTION
- Programming EPG recording
- Programming manual recording
- Start recording immediately
- HDMI CEC / ARC
- PICTURE MENU
- Picture Mode:
- TIME MENU
- SETUP MENÜ
- TT Language:
- Audio Language:
- Subtitle Language:
- Hearing Impaired:
- SETUP MENU
- Blue Screen:
- First Time Installation:
- Energy Mode:
- Reset:
- Software Update (USB):
- VERSION:
- Sat Channel Import (USB):
- Sat Channel Export (USB):
- System Lock:
- Channel Lock:
- Parental Guidance:
- Key Lock:
- HOTEL MODE
- Source Lock:
- Default Source:
- Example:
- Default Prog.:
- Default Volume:
- Max Volume:
- Import Database:
- Export Database:
- Clear Lock:
- Example: Movie
- SPECIFICATIONS USB CONNECTION
- EASY TROUBLESHOOTING
- No electricity
- No picture or no sound
- Bad picture quality
- No colour
- The TV does not respond to the remote control
- STORAGE AND OPERATION INFORMATION
- SIMPLIFIED EU DECLARATION OF CONFORMITY
- ENERG
- Warranty
Brand : Reflexion
Model : LEDW160
Category : Uncategorized