
MLC 8440 BK - Oven TEKA - Free user manual and instructions
Find the device manual for free MLC 8440 BK TEKA in PDF.


| Product Type | Electric Built-in Oven |
| Brand | Teka |
| Model | MLC 8440 BK |
| Color | Black |
| Dimensions (WxHxD) | 595 x 595 x 568 mm |
| Weight | 35 kg |
| Power Supply | 230 V, 50 Hz, 3 kW |
| Energy Class | A |
| Capacity | 70 L |
| Heating Methods | Convection, Grill, Fan Forced, Bottom Heat, Top Heat |
| Control Type | Electronic Touch & Rotary Knobs |
| Display | Digital LED |
| Cleaning System | Pyrolytic Self-Cleaning |
| Safety Features | Child Lock, Cool Touch Door, Auto Shut-off |
| Number of Functions | 8 |
| Temperature Range | 50°C - 250°C |
| Door Type | Triple Glazed Cool Touch |
| Interior Light | Yes |
| Timer | Digital Timer with End Cooking Time |
| Accessories Included | 2 Oven Racks, 1 Drip Tray, 1 Baking Tray |
| Warranty | 2 Years |
| Spare Parts Availability | Available from Teka Official Service |
Frequently Asked Questions - MLC 8440 BK TEKA
User questions about MLC 8440 BK TEKA
0 question about this device. Answer the ones you know or ask your own.
Ask a new question about this device
Download the instructions for your Oven in PDF format for free! Find your manual MLC 8440 BK - TEKA and take your electronic device back in hand. On this page are published all the documents necessary for the use of your device. MLC 8440 BK by TEKA.
USER MANUAL MLC 8440 BK TEKA
natural_image
Modern kitchen interior with glossy black cabinets and stainless steel ovens, featuring a 'TEKA' logo in the top right corner (no other text or symbols)Installation and Maintenance
EN PT ES FRDE
AR
Contents
Safety Information....3
Children and Vulnerable People Safety.3
General Safety......4
Microwaves Safety Instructions......4
Avoid damaging the Microwave oven or other dangerous situations by following these instructions....6
Installation....8
Cleaning and Maintenance....8
Service and Repair....9
INSTALLATION....10
Before installation....10
Electrical connection....10
Oven installation....10
ENVIRONMENTAL INFORMATION......11
Oven functions 11
Product disposal....11
BEFORE FIRST USE....11
OTHER IMPORTANT INSTRUCTIONS....11
ACCESSORIES....12
CLEANING AND MAINTENANCE......12
Cleaning the oven exterior and oven accessories....12
Cleaning the oven interior....12
Cleaning the oven door 13
Steam oven specific cleaning....13
Changing the oven light bulb....14
TROUBLE SHOOTING....14
TECHNICAL SPECIFICATIONS......15
FIGURES......89
Safety Information
⚠️ Before the installation and use of the appliance, carefully read the supplied instructions. The manufacturer is not responsible if an incorrect installation and use causes injuries and damages. Always keep the instructions with the appliance for future reference.
Children and Vulnerable People Safety
Warning! Risk of suffocation, injury or permanent disability.
- This appliance can be used by children aged from 8 years and above and persons with reduced physical, sensory or mental capabilities or lack of experience and knowledge if they are supervised by an adult or a person who is responsible for their safety.
- Children should be supervised to ensure that they do not play with the appliance.
- Keep all packaging away from children.
- WARNING: The appliance and its accessible parts become hot during use. Care should be taken to avoid touching heating elements. Children less than 8 years of age shall be kept away unless continuously supervised.
- WARNING: When the appliance is operated in the combination mode, children should only use the oven under adult supervision due to the temperatures generated.
- If the appliance has a child safety device, we recommend that you activate it. Children under 3 years must not be left unsupervised in the vicinity of the appliance.
- Cleaning and user maintenance shall not be made by children without supervision.
General Safety
- This appliance is intended to be used in household applications and not in hotels, shops, offices and other similar environments.
- Internally the appliance becomes hot when in operation. Do not touch the heating elements that are in the appliance. Always use oven gloves to remove or put in accessories or ovenware.
- When heating food in plastic or paper containers, keep an eye on the appliance due to the possibility of ignition.
- The appliance is intended for heating food and beverages. Drying of food or clothing and heating of warming pads, slippers, sponges, damp cloth and similar may lead to risk of injury, ignition or fire.
- If smoke is emitted, switch off or unplug the appliance and keep the door closed in order to stifle any flames.
- Make sure you never catch the power cables of other electrical appliances in the hot door or the oven. The cable insulation may melt. Danger of short-circuiting!
- Warning! Please cover the socket inside the cavity if you are not using the food probe. Failure to cover the socket will cause damages to the oven.
- Only use the food probe recommended for this oven.
- The tray and rack have a system for easy partial removal and handling of food. Always place these accessories inside the oven, as indicated in the Accessories section.
Microwaves Safety Instructions
- WARNING: Do not heat liquids and other foods in sealed containers. They are liable to explode.
- Only use utensils that are suitable for use in microwave ovens.
- Warning! The oven cannot be used if:
- The door is not closed correctly;
– The door hinges are damaged; - The surfaces of the contact between the door and the oven front are damaged;
- The door window glass is damaged;
- There is frequent electrical arcing inside the oven even though there is no metal object inside.
The oven can only be used again after it has been repaired by a Technical Assistance Service technician.
- Microwave heating of beverages can result in delayed eruptive boiling. Care must be taken when handling the container.

natural_image
Two glass bowls: one with a spoon inside, the other with a black 'X' symbol (no text or labels)• Take care when heating liquids!
When liquids (water, coffee, tea, milk, etc.) are nearly at boiling point inside the oven and are taken out suddenly, they may spurt out of their containers.
DANGER OF INJURIES AND BURNS!
To avoid that type of situation when heating liquids, put a teaspoon or glass rod inside the container.
- The contents of feeding bottles and baby food jars shall be stirred or shaken and the temperature checked before consumption, in order to avoid burns.
- Eggs in their shell and whole hard-boiled eggs should not be heated in the appliance since they may explode, even after microwave heating has ended.
- Warning! Do not heat pure alcohol or alcoholic drinks in the microwave. FIRE RISK!
- Beware! To avoid food overheating or burning it is very important not to select long time periods or power levels that
are too high when heating small quantities of food. For example, a bread roll can burn after 3 minutes if the power selected is too high.
- For toasting, use just the grilling function and watch the oven all the time. It you use a combined function to toast bread it will catch fire in a very short time.
- To achieve the best results when warming up small loads (such as a glass of water, a milk mug or a popcorn bag) it is suggested that they are placed in the following way:
- Insert the glass tray or the rectangular rack on the highest possible level, considering the dimensions of the food or drink to be heated;
- Place the food or drink on the left side of the glass tray or the rectangular rack.
- The popcorn bags cannot be placed directly over the rack; place the popcorn bag on a glass or ceramic dish and then place the dish on the left side of the rectangular rack.
- Turn or stir the food at regular intervals to improve heating uniformity.
- To achieve the best cooking results with microwaves, place the food on the rack or on the glass tray and insert them on the highest possible level.
- Do not place the food directly over the bottom of the oven cavity. The heating performance will be poor and there is the risk of damaging the oven.
- Do not cover the bottom of the oven cavity with aluminium or tin foil sheets as there is the risk of damaging the oven.
Avoid damaging the Microwave oven or other dangerous situations by following these instructions
- Never switch on the microwave when it is empty. If there is no food inside there may be an electrical overcharge and the oven could be damaged. RISK OF DAMAGE!
- For carrying out oven programming tests put a glass of water inside the oven. The water will absorb the microwaves and the oven will not be damaged.
- Do not cover or obstruct the ventilation openings.
- Place correctly the oven accessories on the side racks (see the section “Accessories”.)
- Use only dishes suitable for microwaves. Before using dishes and containers in the microwave, check that these are suitable (see the section on types of dishes).
- Never remove the mica cover on the ceiling of the oven interior! This cover stops fat and pieces of food damaging the microwave generator.
- Do not keep any inflammable object inside the oven as it may burn if the oven is switched on.
- Do not use the oven as a pantry.
- Do not use the oven for frying as it is impossible to control the temperature of oil heated by microwaves.
- Do not lean or sit on the open oven door. This may damage the oven, especially in the hinge zone. The door can bear a maximum weight of 8 kg.
- The base and the grills can bear a maximum load of 8 kg. To avoid damaging the oven, do not exceed this load.
- Failure to secure tightly the support with the nuts may lead to overheating and damages.

natural_image
Diagram showing a rotating mechanical component with an arrow indicating rotational motion (no text or symbols)Installation
- The electrical installation is to be set up so that the appliance can be isolated from the mains with a minimum 3mm all-pole contact separation. Suitable separation devices include e.g. cutouts, RCD's and contactors. This installation must comply with current regulations.
- If the electrical connection is done through a plug and this remains accessible after installation, then it is not necessary to provide the mentioned separation device.
- The installation must comply with current regulations.
- Protection against electric shock must be provided by the electrical installation.
- WARNING! The oven must be earthed.
- WARNING! The appliance is intended to be built in. Please refer to the last pages of this user manual for detailed information on the installation dimensions.
Cleaning and Maintenance
- WARNING! Cut the power supply before cleaning and maintenance.
- The appliance should be cleaned regularly and any food deposits removed.
- Failure to maintain the appliance in a clean condition could lead to deterioration of the surface that could adversely affect the life of the appliance and possibly result in a hazardous situation.
- Do not use harsh abrasive cleaners or sharp metal scrapers to clean the glass door since they can scratch the surface, which may result in shattering of the glass.
- Do not use a steam cleaner to clean the appliance.
- The door contact surfaces (the front of the cavity and the inside part of the doors) must be kept very clean in order to ensure the oven functions correctly.
- Please follow the instructions regarding cleaning in the section "Oven Cleaning and Maintenance".
- WARNING: Ensure that the appliance is switched off before replacing the lamp to avoid the possibility of electric shock. Please refer to the chapter "CHANGING THE OVEN LIGHT BULB".
Service and Repair
- WARNING! Cut the power supply before repair.
- WARNING! Only a competent person can carry out any service or repair operation that involves the removal of a cover which gives protection against exposure to microwave energy.
- WARNING! If the door or door seals are damaged, the appliance must not be operated until it has been repaired by a competent person.
- If the power cable is damaged it should be substituted by the manufacturer, authorized agents or technicians qualified for this task in order to avoid dangerous situations.
- Repair and maintenance work, especially of current carrying parts, can only be carried out by technicians authorized by the manufacturer.

INFORMATION
This manual describes general oven characteristics, and so they may not correspond in full to those of your oven. Consult the User's guide accompanying this manual to learn about the specific features and equipment of your oven.
The manufacturer reserves the right to change the product characteristics in order to improve its operation.
This information is exclusively for the installer who is responsible for assembly and electrical connection. The manufacturer will not accept liability for possible damage caused if you install the oven yourself.
BEFORE INSTALLATION
- To handle the oven, use the grips at the sides. Do not use the door handle to lift the oven.
- Do not install the oven behind decorative doors. This can cause it to overheat.
- When installing the oven under a counter, follow the instructions for installing it.
- In general, protruding elements (furniture reinforcements, pipes, socket bases, etc.) at the back of the unit must be avoided.
- When the base of the main power socket is inside the unit in which the oven is installed, this must be done in the shaded area. Figure 2.
- The unit in which the oven is installed and adjacent units must withstand temperatures higher than 85 °C.
- The installation instructions must be adhered to strictly. If not, the oven's ventilation circuit may become blocked, causing high temperatures that could damage the kitchen unit and the appliance itself.
- For this purpose, check the unit measurements and those of the holes to be drilled in the units, as shown in the following figures:
Column installation.
45cm oven: Figure 7
Undercounter installation.
45cm oven: Figure 8
ELECTRICAL CONNECTION
The fitter must ensure that:
- The mains power voltage and frequency correspond to what is marked on the identification plate.
- The domestic wiring system can withstand the maximum power marked on the identification plate.
• After connecting the power supply, check that all electrical parts of the oven are working correctly.
OVEN INSTALLATION
For all ovens. After the electrical connection has been done:
- Position the oven inside the unit and ensure that the feed cable is not trapped or in contact with parts of the oven that heat up.
- Make sure that the body of the oven is not in contact with the walls of the unit and that there is a minimum space of 2 mm between adjacent units.
- Centre the oven in the unit so that there is a minimum space of 5mm between the oven and the doors of the furniture that surrounds it. Figure 3.
- Open the door and insert the plastic plugs supplied with the oven into their respective housings. Figure 9.
- Fasten the oven to the unit with the screws supplied, screwing them into the unit through the stops.

WARNING
Do not lean on the open door of the oven while executing steps 4 and 5, as the open is not secured to the unit and it could move forwards and fall to the floor.
Environmental information
OVEN FUNCTIONS
The packaging is made from totally recyclable materials which can be put to other uses. Consult your local council regarding the necessary procedures for disposing of these materials.
PRODUCT DISPOSAL

WARNING
The symbol on the product or packaging indicates that this appliance cannot
be disposed of as normal household waste. It should be taken to an electrical and electronic equipment collection point for recycling. In this way, any negative consequences for the environment and public health from incorrect handling can be avoided.
Contact your local council, household waste disposal service or the establishment where you bought the
Before first use
There may be traces of fat and other substances in the oven as a result of the manufacturing process. These should be removed using the following procedure:
- Remove all the packaging from your oven, including the protective plastic, if any.
- Turn your oven to 📁, or if this setting is not available to ⚙, at 200 °C for 1 hour.
Consult the User's guide accompanying this manual on how to do this.
- Cool the oven with the door open so that it ventilates and no odors remain inside it.
- Once cold, clean the oven and the accessories.
During this first operation, smoke and smells will be produced. The kitchen should therefore be well ventilated.
Other important instructions
Do not cover the bottom of the oven with aluminum foil as this may affect cooking performance and damage the enamel inside the oven and the interior of your kitchen unit.
Do not pour water on the bottom surface when in use; this may damage the enamel.
It is normal for condensation to occur on the
oven door when cooking food with a high liquid content.
When closing the oven door during cooking, the sound of the air inside it can be heard. This effect is normal due to the pressure exerted by the door when it is closed, guaranteeing the sealing of the cavity.
Accessories
Do not leave any containers or food on the oven floor. Always use the trays and racks supplied with the oven.
To prepare yoghurt, place the jars on the oven floor.
To cook any other food, insert the tray or rack into the runners inside the oven.
-
Between two rails of the side supports or on any of the extractable runners, if the oven has them.
-
The rack and some of the trays have retention grooves to prevent them from accidentally being removed. Place these grooves towards the back of the oven, facing upwards Figure 4.
-
The surface of the rack on which the container will rest must be below the side rails. This prevents the container from accidentally sliding. Figure 5.
Cleaning and maintenance

WARNING
Disconnect the appliance from the mains power supply before any operation.
CLEANING THE OVEN EXTERIOR AND OVEN ACCESSORIES
Clean the outside of the oven and accessories with warm soapy water or with a mild detergent.
Take great care when cleaning stainless steel or painted surfaces. Use only sponges or cloths that do not scratch.
CLEANING THE OVEN INTERIOR
Clean the oven interior regularly to remove traces of fat or food, which can later give off smoke and odors and cause stains to appear. Use nylon brushes or sponges with warm soapy water to clean enameled surfaces such as the bottom of the oven. Clean when the oven is cold. Use oven cleaning products only on enameled surfaces and always follow the manufacturer's instructions.

WARNING
Do not clean the oven interior with steam or pressurized-water cleaning equipment.
Do not use metal scouring pads, wire brushes or any utensil that can scratch the enamel.
Over time, certain types of food such as tomatoes, vinegar and salt-baked dishes may cause the enamel to change color. This is normal and does not affect the functioning of the oven. Do not try to remove these stains using aggressive methods such as those described, as this could cause permanent damage to the surface.
Clean the oven seal regularly to eliminate all traces of fat or food. This will prevent the seal from becoming damaged and breaking during subsequent cooking operations.
It is advisable to clean this seal without removing it.
Dismantling the side supports
- Remove all accessories from inside the oven.
- Completely loosen the nut at the front of the fastening element (A), pull the supports forward (B) and remove them. Figure 10.
Assembling the supports
- Insert the rear notch into the rear fastening nut.
-
Fix the front fastening nut (C) in the front notch of the support. Figure 11.
-
Secure the support with the nut (D) and turn until it is fully adjusted (E). Figure 11.

WARNING
Failure to secure tightly the support with the nuts may lead to overheating and damages.
CLEANING THE OVEN DOOR
Dismantling/assembling the interior glass of the door

WARNING
If dismantling the glass panes with the door fitted in the oven, always do it with the hinge in the locked position. If not, the door will close and the unmounted glass panes could break and cause injury.
Depending on the model, your oven may have 1 or 3 panes of glass. Follow the instructions for the type of door your oven has.
- Using your fingers, press the buttons located at the top of both sides of the oven door. Figure 12.
- Keep them pressed and pull on the plastic seal above the door. Figure 13.
- Remove the glass panes from the door. Clean them with a glass cleaner or soap and water and a soft cloth.

WARNING
Pay attention to the order and position of the glass panes when removing them as they must be reassembled in the same order and position when you have finished cleaning them.
-
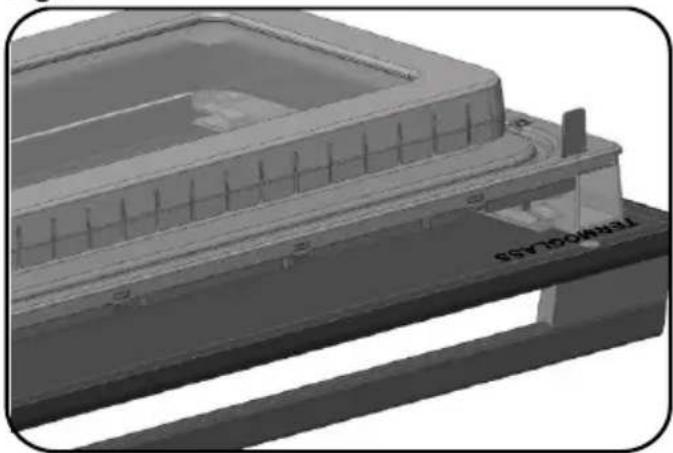
Once clean, insert pane no. 3 into the same position so that the TERMOGLASS indication printed on it is visible as shown in Figure 14.
-
Reattach the top seal of the door, making sure that the side tabs fit into their housings.

WARNING
Never switch the oven on if any of the glass panes on the door are missing.
STEAM OVEN SPECIFIC CLEANING
Descaling
Whenever steam is produced, irrespective of the hardness of the local water supply (i.e. the limescale content of the water), limescale is deposited inside the steam generator.
The time interval between descaling depends on the hardness of the water and frequency of use. If steaming 4×30 minutes per week, the appliance must be descaled (depending on water hardness) roughly as follows:
| Water hardness | Descale after about |
| Very soft | 18 months |
| Medium | 9 months |
| Very hard | 6 months |
The appliance automatically detects when descaling is necessary as described on the user's guide booklet.
IMPORTANT NOTE: Failure to descale the appliance will likely impair the functioning of or cause damage to the appliance.
Suitable descaling solutions
For descaling, use the descaling solution "durgol®".
This solution allows a professional and careful descaling of your appliance. Available at Customer Care Centers.
Warning! Do not use vinegar or vinegar-based products as they can cause damage to the oven's internal circuit.
Traditional descaling solutions are not appropriate because they can contain foaming agents.
CHANGING THE OVEN LIGHT BULB

WARNING
Make sure the oven has been disconnected from the mains before changing the bulb.
The replacement bulb must withstand temperatures up to 300 °C. You can order them from the Technical Assistance Service Department.
Changing the upper bulb
To substitute the light bulb, proceed as follows:
Trouble shooting
This section describes some of the most frequent problems that can affect your oven,
- Disconnect the oven from the power supply. Take the plug out of the socket or switch off the oven's power circuit.
- Loose and remove the glass light cover (1).
- Remove the bulb (2). Warning! The bulb may be very hot.
- Fit a new G9 230V / 25W bulb. Warning! Do not touch the light bulb surface directly with your fingers because you may damage the bulb. Follow the lamp manufacturer's instructions.
- Tighten the glass light cover into place (1).
- Connect the oven again to the power supply.
along with the most common causes and possible solutions.
The oven stops working
- Check the power connection.
- Check the fuses and the circuit breaker of your installation.
- Make sure the timer is either in the manual or programmed setting.
- Check the position of the control and temperature dial.
The inside light does not go on
- Change the bulb.
- Check it has been properly installed as set out in the Installation Instructions.
Nothing happens when the keys are pressed
- Check if the Safety Block is active.
The heating pilot light does not turn on
- Select a temperature.
- Select a setting.
- It should only come on while the oven is heating up to the selected temperature.
Oven smoking during use
• Normal during first use.
- Clean the oven regularly.
- Reduce the amount of fat or oil in the tray.
- Do not cook at temperatures higher than those indicated in the cooking chart.
The expected cooking results are not achieved
- Check the cooking charts for guidance on how your oven operates.
My accessories and shelf supports are damaged
- You must replace them and remove them during subsequent cleaning cycles.
The enamel color has changed or stains have appeared
- The chemical composition of some food-stuffs may cause changes in the enamel.
- This is normal and does not damage the properties of the enamel.
If the oven is operating and there are some irregular noises
- Check if there is any electrical arcing inside the oven caused by foreign metallic objects (see the "Ovenware" chapter on the Cooking guide booklet).
- Check if the ovenware is touching the oven walls.
- Check if there are any loose items of cutlery or cooking tools inside the oven.
The food doesn't heat up or heats very slowly
- Check if inadvertently metal ovenware has been used.
- Check if the correct operating times and power level has been selected
- Check if the food inside the oven is a larger amount or colder than it usually is
The food is too hot, dried out or burnt
- Check if the correct operating time and power level has been selected.
There are some noises after the cooking process is finished
- This is not a problem. The cooling fan keeps on working for some time. When the temperature has dropped sufficiently, the fan will switch itself off.
There is a vibrating noise, "PUMP" is flashing and no functions work
- The removal of residual liquids was interrupted, and the pump is now running dry. Let the process finish and the oven should be ready to use.
Technical specifications

WARNING
If these problems persist despite these tips, contact the Technical Service Department.
Inform the Technical Service Department of the kind of problem you are experiencing and give the:
- Serial Number (S-No)
- Model of Appliance (Mod.)
This information is on the oven identification plate which is on one side of the opened door.
Indice
natural_image
Two glass bowls: one with a spoon inside, the other with a black X symbol (no text or labels)natural_image
Diagram of a mechanical pulley system with rotational motion arrow (no text or symbols)Instalação
natural_image
Two glass bowls: one with a spoon inside, the other with a black X symbol (no text or labels)natural_image
Diagram showing a rotating mechanical component with curved arrows indicating motion (no text or symbols)Instalación
natural_image
Two glass bowls: one with a spoon inside, the other with a black 'X' symbol (no text or labels)natural_image
Diagram showing a pulley mechanism with a curved arrow indicating rotational motion (no text or symbols)Installation
INSTALLATION DU FOUR
UMWELTINFORMATIONEN....71
natural_image
Two glass bowls: one with a spoon inside, the other with a black 'X' symbol (no text or labels)natural_image
Diagram showing a rotating mechanical component with curved arrow indicating rotation (no text or symbols)Installation
natural_image
Two glass bowls: one with a spoon inside, the other with a black 'X' symbol (no text or labels)• لسوائل!
natural_image
Diagram showing a rotating mechanical component with a curved arrow indicating rotation (no text or symbols)ال ترك يب
natural_image
Technical line drawing of a symmetrical mechanical or architectural component with a central rectangular section and a 90-unit dimension label (no text or symbols beyond the dimension marker)Fig. 3

Fig. 4

natural_image
3D rendering of a mechanical assembly with internal components and a close-up inset showing a detailed detail (no text or symbols)Fig. 5

natural_image
Technical diagram of a mechanical assembly with two magnified views showing internal pipe connections (no text or symbols)Fig. 6

natural_image
Interior view of a microwave oven with a central dish and a downward arrow indicating airflow or flow (no text or symbols)Fig. 7

Fig. 8

Fig. 9

natural_image
Close-up of a mechanical component with a black connector and directional arrow indicating rotation (no text or symbols)Fig. 10

Fig. 11

Fig. 12

natural_image
3D diagram of a rectangular electronic component with mounting base and side supports, showing internal structure and directional arrows (no text or symbols)Fig.13

natural_image
Technical diagram of a mechanical assembly with directional arrows indicating force or movement (no text or symbols present)Fig.14
natural_image
3D architectural model of a building structure with visible foundation and window (no text or symbols)Fig. 15
natural_image
Close-up of a mechanical component with a rotating shaft and handle, showing no visible text or symbols.TEKA

natural_image
World map silhouette showing continents and countries with no text or labels- Contents
- Safety Information....3
- Microwaves Safety Instructions......4
- INSTALLATION....10
- ENVIRONMENTAL INFORMATION......11
- BEFORE FIRST USE....11
- OTHER IMPORTANT INSTRUCTIONS....11
- ACCESSORIES....12
- CLEANING AND MAINTENANCE......12
- TROUBLE SHOOTING....14
- TECHNICAL SPECIFICATIONS......15
- FIGURES......89
- Safety Information
- Children and Vulnerable People Safety
- General Safety
- Microwaves Safety Instructions
- Avoid damaging the Microwave oven or other dangerous situations by following these instructions
- Installation
- Cleaning and Maintenance
- Service and Repair
- INFORMATION
- BEFORE INSTALLATION
- Column installation.
- Undercounter installation.
- ELECTRICAL CONNECTION
- OVEN INSTALLATION
- WARNING
- Environmental information
- OVEN FUNCTIONS
- PRODUCT DISPOSAL
- Before first use
- Other important instructions
- Accessories
- CLEANING THE OVEN EXTERIOR AND OVEN ACCESSORIES
- CLEANING THE OVEN INTERIOR
- Dismantling the side supports
- Assembling the supports
- CLEANING THE OVEN DOOR
- Dismantling/assembling the interior glass of the door
- STEAM OVEN SPECIFIC CLEANING
- Descaling
- Suitable descaling solutions
- CHANGING THE OVEN LIGHT BULB
- Changing the upper bulb
- Trouble shooting
- The oven stops working
- The inside light does not go on
- Nothing happens when the keys are pressed
- The heating pilot light does not turn on
- Oven smoking during use
- The expected cooking results are not achieved
- My accessories and shelf supports are damaged
- The enamel color has changed or stains have appeared
- If the oven is operating and there are some irregular noises
- The food doesn't heat up or heats very slowly
- The food is too hot, dried out or burnt
- There are some noises after the cooking process is finished
- There is a vibrating noise, "PUMP" is flashing and no functions work
- Technical specifications
- Indice
- Instalação
- Instalación
- INSTALLATION DU FOUR
- UMWELTINFORMATIONEN....71
Brand : TEKA
Model : MLC 8440 BK
Category : Oven