
Viva Collection HD9530 - Deep fryer PHILIPS - Free user manual and instructions
Find the device manual for free Viva Collection HD9530 PHILIPS in PDF.


| Type de produit | Air fryer (Nonfryer Plus) |
| Modèle | Viva Collection HD9530 |
| Marque | Philips |
| Alimentation | 220-240 V, 50/60 Hz, 1420 W |
| Capacité du panier | Jusqu'à 800 g (max 500 g recommandé pour frites) |
| Plage de température | 80 °C à 200 °C |
| Minuterie | Jusqu'à 60 minutes avec arrêt automatique |
| Dimensions (L x P x H) | 350 x 300 x 350 mm (environ) |
| Poids | 5 kg (environ) |
| Fonctions principales | Friture à air chaud, Rapid Air, écran tactile, préréglages, mode préchauffage |
| Matériaux | Plastique résistant à la chaleur, panier et cuve antiadhésifs |
| Entretien et nettoyage | Panier, cuve et couvercle lavables au lave-vaisselle ; essuyer l'extérieur avec un chiffon humide |
| Sécurité | Arrêt automatique, poignée froide, protection contre la surchauffe |
| Pièces détachées et réparabilité | Pièces disponibles sur shop.philips.com ; réparation par centre agréé |
| Informations générales | Livré avec couvercle multifonction, recettes ; usage domestique uniquement |
Frequently Asked Questions - Viva Collection HD9530 PHILIPS
User questions about Viva Collection HD9530 PHILIPS
0 question about this device. Answer the ones you know or ask your own.
Ask a new question about this device
Download the instructions for your Deep fryer in PDF format for free! Find your manual Viva Collection HD9530 - PHILIPS and take your electronic device back in hand. On this page are published all the documents necessary for the use of your device. Viva Collection HD9530 by PHILIPS.
USER MANUAL Viva Collection HD9530 PHILIPS
natural_image
Black Philips air fryer with digital display showing 185°F temperature and control buttons (no text-heavy elements)フィリップ スノンフライヤープラス
品番 HD9530/22
取扱説明書
保証書付
保証書は、この取扱説明書の最
終ページについておりますので
販売店で記入を受けてください。
natural_image
Simple line drawing of a blank rectangular sheet or document (no text or symbols)取扱説明書
natural_image
Line drawing of a cylindrical container with internal compartments and a square slot (no text or symbols)
レシピブック
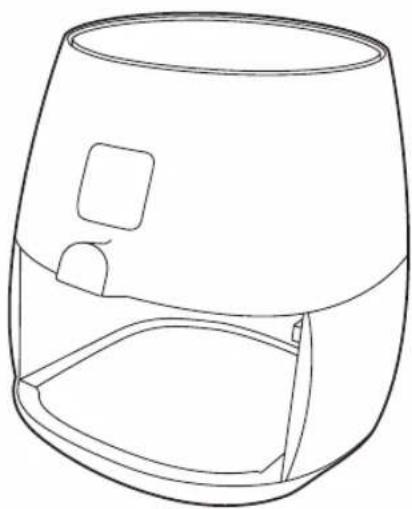
本体
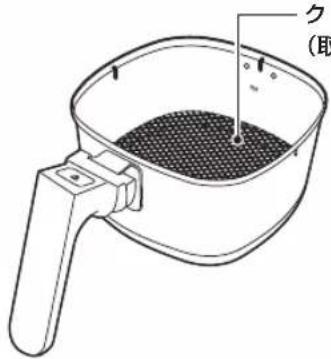
クッキングネット (取り外し可能)
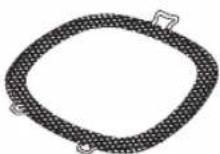
natural_image
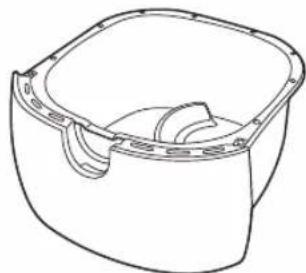
Line drawing of a square container with internal compartments and side slots (no text or symbols)Guidance in English 20\~30
● 保 証
保証とアフターサービス 32
natural_image
Line drawing of a cylindrical object with two angled lines extending outward, no text or symbols presentnatural_image
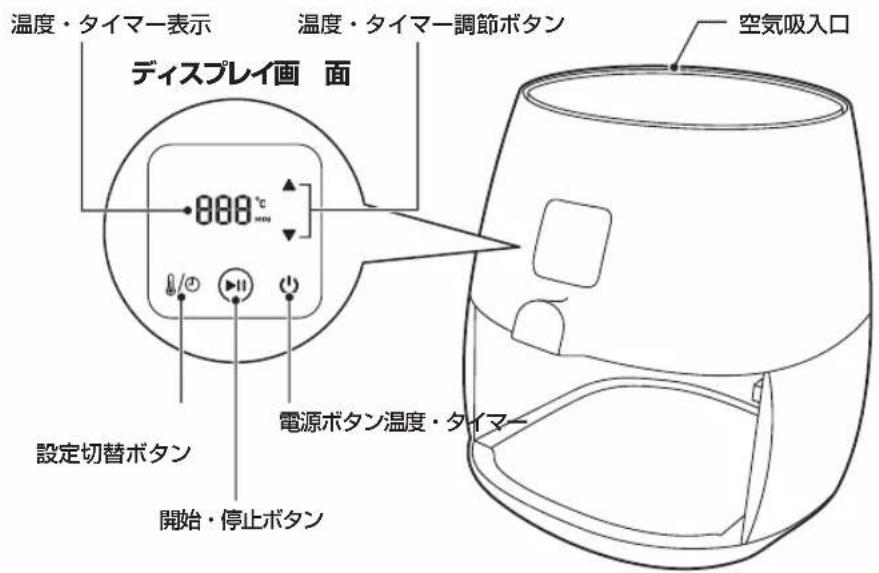
Line drawing of a square container with side handles and internal compartments (no text or symbols)本体
正面
natural_image
Simple line drawing of a bowl with a handle and arrow indicating direction (no text or symbols)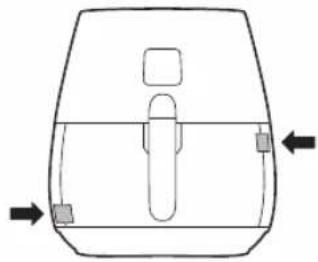
natural_image
Simple line drawing of a car interior with arrows indicating movement or force (no text or symbols)natural_image
Line drawing of a cooking pan with liquid and a handle (no text or symbols)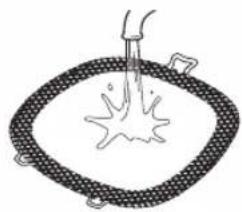
natural_image
Simple line drawing of a hand pouring liquid into a circular container with a spike (no text or symbols)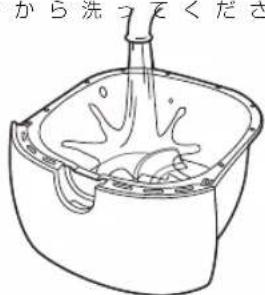
natural_image
Line drawing of a hand cleaning a small object inside a container (no text or symbols)準備する

注意
バスケットカバーの取り外し方
バスケット前面から
飛び出しているバス
ケットカバー先端の
ツメを上に持ち上げ
て、取り外しま
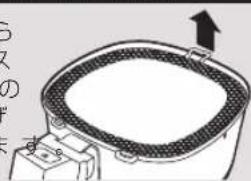
natural_image
Diagram of a mechanical component with a circular top and internal mesh structure, no visible text or symbolsnatural_image
Line drawing of a kettle with a handle and a screwdriver inserted, showing an arrow pointing right (no text or symbols)調理する

注意
natural_image
Illustration of a person using a cooking pan to clean food, no text or symbols present3 バスケットに食材をセットします。
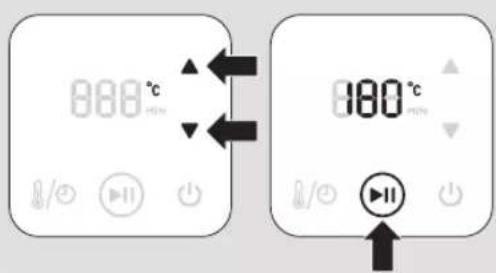
●予熱方法
natural_image
Illustration of a hand using a tool to lift a basket filled with food, with an upward arrow indicating growth (no text or symbols)natural_image
Illustration of a hand holding a bowl with chopsticks and a downward arrow, no text or symbols presentnatural_image
Illustration of a hand using a tool to fill or spread dough into a steaming container (no text or symbols)natural_image
Line drawing of a kettle with a handle and power cord, showing a left-side arrow indicating direction (no text or symbols)故障かな?と思ったら、お調べください。
故障かな? と思ったら
ノンフライヤープラスが作動しない
Congratulations on your purchase and welcome to Philips! To fully benefit from the support that Philips offers, register your product at www.philips.com/welcome.
Your new nonfryer plus allows you to prepare your favourite ingredients and snacks in a healthier way. The nonfryer plus uses hot air in combination with high-speed air circulation (Rapid Air) and a top grill to prepare a variety of tasty dishes in a healthy, fast and easy way. Your ingredients are heated from all sides at once and there is no need to add oil to most of the ingredients.
For more inspiration for recipes and information about the nonfryer plus, visit www.philips.com/kitchen.
General description (Fig. 1)
1 Basket
2 Basket release button
3 Basket handle
4 Non-stick removable mesh
5 Basket cover
6 Pan
7 Air inlet
8 Touch screen control panel
9 Air outlet openings
10 Cord storage compartment
11 Mains cord
Important
Read this user manual carefully before you use the appliance and save it for future reference.
Danger
- Never immerse the housing, which contains electrical components and the heating elements, in water nor rinse it under the tap.
- Do not let any water or other liquid enter the appliance to prevent electric shock.
- Always put the ingredients to be fried in the basket, to prevent it from coming into contact with the heating elements.
- Do not cover the air inlet and the air outlet openings while the appliance is operating.
- Do not fill the pan with oil as this may cause a fire hazard.
- Never touch the inside of the appliance while it is operating.
Warning
- Check if the voltage indicated on the appliance corresponds to the local mains voltage before you connect the appliance.
- Do not use the appliance if the plug, the mains cord or the appliance itself is damaged.
- If the mains cord is damaged, you must have it replaced by Philips, a service centre authorised by Philips or similarly qualified persons in order to avoid a hazard.
- This appliance is not intended for use by persons (including children) with reduced physical, sensory or mental capabilities, or lack of experience and knowledge, unless they have been given supervision or instruction concerning use of the appliance by a person responsible for their safety.
- Children should be supervised to ensure that they do not play with the appliance.
- Keep the appliance and its mains cord out of the reach of children younger than 8 when the appliance is switched on or is cooling down.
- Keep the mains cord away from hot surfaces.
- Do not plug in the appliance or operate the control panel with wet hands.
- Only connect the appliance to a wall socket. Always make sure that the plug is inserted into the wall socket properly.
- This appliance is not intended to be operated by means of an external timer or a separate remote-control system.
- Do not place the appliance on or near combustible materials such as a tablecloth or curtain.
- Do not place the appliance against a wall or against other appliances. Leave at least 10cm free space on the back and sides and 10cm free space above the appliance. Do not place anything on top of the appliance.
- Do not use the appliance for any other purpose than described in this manual.
- Do not let the appliance operate unattended.
- During hot air frying, hot steam is released through the air outlet openings. Keep your hands and face at a safe distance from the steam and from the air outlet openings. Also be careful of hot steam and air when you remove the pan from the appliance.
- Immediately unplug the appliance if you see dark smoke coming out of the appliance. Wait for the smoke emission to stop before you remove the pan from the appliance.
- The baking tray becomes hot all over when it is used in the nonfryer plus. Always use oven gloves when handling the baking tray.
Caution
- Place the appliance on a horizontal, even and stable surface.
- This appliance is intended for normal household use only. It is not intended for use in environments such as staff kitchens of shops, offices, farms or other work environments. Nor is it intended to be used by clients in hotels, motels, bed and breakfasts and other residential environments.
- If the appliance is used improperly or for professional or semi-professional purposes or if it is not used according to the instructions in the user manual, the guarantee becomes invalid and Philips refuses any liability for damage caused.
- Always return the appliance to a service centre authorised by Philips for examination or repair. Do not attempt to repair or open the appliance yourself, otherwise the guarantee becomes invalid.
- Always unplug the appliance after use.
- Let the appliance cool down for approx. 30 minutes before you handle or clean it.
- Make sure the ingredients prepared in this appliance come out golden-yellow instead of dark or brown. Remove burnt remnants. Do not fry fresh potatoes at a temperature above 180^ C (to minimise the production of acrylamide).
Electromagnetic elds (EMF)
This Philips appliance complies with all standards regarding electromagnetic fields (EMF). If handled properly and according to the instructions in this user manual, the appliance is safe to use based on scientific evidence available today.
Before first use
1 Remove all packaging material.
2 Remove any stickers or labels from the appliance.
3 Thoroughly clean the basket, pan and basket cover with hot water, some washing-up liquid and a non-abrasive sponge.
Note: You can also clean these parts in the dishwasher.
4 Wipe the inside and outside of the appliance with a moist cloth.
This is a nonfryer plus that works on hot air. Do not fill the pan with oil or frying fat.
Place the appliance on a stable, horizontal and level surface.
Do not place the appliance on non-heat-resistant surfaces.
Place the removable mesh properly (Fig. 1).
Place the basket in the pan properly (Fig. 2).
Pull the mains cord out of the cord storage compartment in the bottom of the appliance.
Do not'll the pan with oil or any other liquid.
Do not put anything on top of the appliance. This disrupts the airflow and affects the hot air frying result.
The nonfryer plus can prepare a large range of ingredients. The recipe booklet included helps you get to know the appliance. You can find more recipes at www.philips.com/kitchen.
Hot air frying
Put the mains plug in a wall socket (Fig. 3) and press the power on/off button (Fig. 4).
Carefully pull the pan out of the nonfryer plus (Fig. 5).
Put the ingredients in the basket (Fig. 6).
Note: Never fill the basket beyond the MAX indication or exceed the amount indicated in the table (see section 'Settings' in this chapter), as this could affect the quality of the end result.
Slide the pan back into the nonfryer plus (Fig. 7).
Never use the pan without the basket in it.
Caution: Do not touch the pan during and some time after use, as it gets very hot. Only hold the pan by the handle.
Choose the temperature control to set the required temperature. See section ‘Settings’ in this chapter to determine the right temperature (Fig. 8, 9).
Choose the timer control to set the required time. See section ‘Settings’ in this chapter (Fig. 10, 11).
To switch on the appliance, press the start button (Fig. 12).
Add 3 minutes to the preparation time when the appliance is cold.
Note: If you want, you can also let the appliance preheat without any ingredients inside. In that case, after turn on the power, please set the temperature with control button (Fig. 2). After 3 minutes, the preheat is completed. Then fill the basket and set the timer to the required preparation time.
, The timer starts counting down the set preparation time.
, During the hot air frying process, the heating-up light comes on and goes out from time to time. This indicates that the heating element is switched on and off to maintain the set temperature.
, Excess oil from the ingredients is collected on the bottom of the pan.
Some ingredients require shaking halfway through the preparation time (see section ‘Settings’ in this chapter). To shake the ingredients, pull the pan out of the appliance by the handle and shake it. Then slide the pan back into the nonfryer plus (Fig. 13).
Caution: Do not press the basket release button during shaking (Fig. 14).
Tip: To reduce the weight, you can remove the basket from the pan and shake the basket only. To do so, pull the pan out of the appliance, place it on a heat-resistant surface and press the basket release button.
Tip: If you set the timer to half the preparation time, you hear the timer bell when you have to shake the ingredients. However, this means that you have to set the timer again to the remaining preparation time after shaking.
When you hear the alarm sound, the set preparation time has elapsed. Pull the pan out of the appliance and place it on a heat-resistant surface (Fig. 15, 16).
Note: You can also switch off the appliance manually. To do this, turn off power button.
Check if the ingredients are ready.
If the ingredients are not ready yet, simply slide the pan back into the appliance and set the timer to a few extra minutes.
To remove small ingredients (e.g. fries), press the basket release button (1) and lift the basket out of the pan (2). (Fig. 17)
Do not turn the basket upside down with the pan still attached to it, as any excess oil that has collected on the bottom of the pan will leak onto the ingredients.
After hot air frying, the pan and the ingredients are hot. Depending on the type of ingredients in the nonfryer plus, steam may escape from the pan.
Empty the basket into a bowl or onto a plate. (Fig. 18)
Tip: To remove large or fragile ingredients, use a pair of tongs to lift the ingredients out of the basket (Fig. 19).
Please do not touch the mesh directly as it gets extremely hot after its usage. Always use oven gloves when handling the removable mesh (Fig 20).
When a batch of ingredients is ready, the nonfryer plus is instantly ready for preparing another batch.
Multi functional lid
For easy cleaning and more versatile cooking, Nonfryer plus comes with multi functional lid.
Place multi functional lid into the basket (Fig 21).
To remove the lid, lift the lid out of the pan (1 and 2). Always use oven gloves when handling the lid after its usages (Fig 22).
Settings
This table below helps you to select the basic settings for the ingredients you want to prepare.
Note: Keep in mind that these settings are indications. As ingredients differ in origin, size, shape as well as brand, we cannot guarantee the best setting for your ingredients.
Because the Rapid Air technology instantly reheats the air inside the appliance, pulling the pan briefly out of the appliance during hot air frying barely disturbs the process.
Tips
- Smaller ingredients usually require a slightly shorter preparation time than larger ingredients.
-
A larger amount of ingredients only requires a slightly longer preparation time, a smaller amount of ingredients only requires a slightly shorter preparation time.
-
Shaking smaller ingredients halfway through the preparation time optimises the end result and can help prevent unevenly fried ingredients.
- Add some oil to fresh potatoes for a crispy result. Fry your ingredients in the nonfryer plus within a few minutes after you added the oil.
- Do not prepare extremely greasy ingredients such as sausages in the nonfryer plus.
- Snacks that can be prepared in an oven can also be prepared in the nonfryer plus.
- The optimal amount for preparing crispy fries is 500 grams.
- Use pre-made dough to prepare filled snacks quickly and easily. Pre-made dough also requires a shorter preparation time than home-made dough.
- You can also use the nonfryer plus to reheat ingredients. To reheat ingredients, set the temperature to 150^ C for up to 10 minutes.
*When using basket cover, please add extra 5-7 minutes to cook the food.
Potatoes & fries
Thin frozen fries 300-700 12-16 200 Shake
Thick frozen fries 300-700 12-20 200 Shake
Home-made fries 300-800 18-25 180 Shake add 1/2 tbsp of oil (8x8mm)
Home-made 300-800 18-22 180 Shake add 1/2 tbsp of potato wedges oil
Home-made potato cubes 300-750 12-18 180 Shake add 1/2 tbsp of oil
Rosti 250 15-18 180
Potato gratin 500 18-22 180
Meat & Poultry
| Steak | 100-500 8-12 | 180 |
| Pork chops | 100-500 10-14 180 | |
| Hamburger | 100-500 7-14 | 180 |
| Sausage roll | 100-500 13-15 200 | |
| Drumsticks 100-500 | 18-22 180 | |
| Chicken breast | 100-500 10-15 180 |
Snacks
| Spring rolls | 100-400 8-10 | 200 Shake Use oven-ready | ||
| Frozen chicken nuggets | 100-500 6-10 | 200 Shake Use oven-ready | ||
| Frozen fish fingers | 100-400 | 6-10 | 200 | Use oven-ready |
| Min-max Amount (g) | Time (min.) | Temperature (°C) | Shake Extra information | |
| Frozen | 100-400 | 8-10 | 180 Use oven-ready | |
| breadcrumbed cheese snacks | ||||
| Stuffed vegetables | 100-400 | 10 | 160 | |
| Baking | ||||
| Cake 300 | 20-25 | 160 | Use baking tray | |
| Quiche | 400 | 20-22 | 180 Use baking tray/ | oven dish |
| Mufins | 300 | 15-18 | 200 Use baking tray | |
| Sweet snacks | 400 | 20 | 160 Use baking tray/ | oven dish |
Note: When you use ingredients that rise (such as with cake, quiche or muffins) the baking tray should not be filled more than halfway.
Note: Add 3 minutes to the preparation time when you start frying while the nonfryer plus is still cold.
Making home-made fries
For the best results, we advise to use pre-baked (e.g. frozen) fries. If you want to make home-made fries, follow the steps below.
1 Peel the potatoes and cut them into sticks.
2 Soak the potato sticks in a bowl for at least 30 minutes, take them out and dry them with kitchen paper.
3 Pour 12 tablespoon of olive oil in a bowl, put the sticks on top and mix until the sticks are coated with oil.
4 Remove the sticks from the bowl with your fingers or a kitchen utensil so that excess oil stays behind in the bowl. Put the sticks in the basket.
Note: Do not tilt the bowl to put all the sticks in the basket in one go, to prevent excess oil from ending up on the bottom of the pan.
5 Fry the potato sticks according to the instructions in this chapter.
Cleaning
Clean the appliance after every use.
1 Remove the mains plug from the wall socket and let the appliance cool down.
Note: Remove the pan to let the nonfryer plus cool down more quickly.
2 Wipe the outside of the appliance with a moist cloth.
3 Clean the inside of the appliance with hot water and a non-abrasive sponge.
4 Clean the heating element with a cleaning brush to remove any food residues.
Storage
1 Unplug the appliance and let it cool down.
2 Make sure all parts are clean and dry.
3 Push the cord into the cord storage compartment. Fix the cord by inserting it into the cord fixing slot.
Ordering accessories
To purchase accessories for this appliance, please visit our online shop at www.shop.philips.com/service. If the online shop is not available in your country, go to your Philips dealer or a Philips service centre. If you have any difficulties obtaining accessories for your appliance, please contact the Philips Consumer Care Centre in your country. You find its contact details in the worldwide guarantee leaflet.
Environment
- Do not throw away the appliance with the normal household waste at the end of its life, but hand it in at an official collection point for recycling. By doing this, you help to preserve the environment (Fig. 23).
Guarantee and service
This product is designed for use only in Japan and cannot be used in any other country. No service is available outside of Japan.
Troubleshooting
Problem Possible cause Solution
| The nonfryer plus does not work. | The appliance is not plugged in. | Put the mains plug in a wall socket. |
| You have not set the timer. | Set the timer to the required preparation time to switch on the appliance. | |
| The ingredients fried withthe nonfryer plusare not done. | The amount of ingredientsin the basket is too big. | Put smaller batches of ingredients in the basket. Smaller batches are fried more evenly. |
| The set temperature is too low. | Set the temperature control to the required temperature setting (see section 'Settings' in chapter 'Using the appliance'). | |
| The preparation time is too short. | Set the timer control to the required preparation time (see section 'Settings' in chapter 'Using the appliance'). | |
| The ingredientsare fried unevenlyin the nonfryerplus. | Certain types ofingredients need to be shaken halfway throughthe preparation time. | Ingredients that lie on top of or across each other (e.g. fries) need to be shaken halfway through the preparation time. See section 'Settings' in chapter 'Using the appliance'. |
Problem Possible cause Solution
| Fried snacks are not crispy when they come out of the nonfryer plus. | You used a type of snacks meant to be prepared in a traditional deep fryer. | Use oven snacks or lightly brush some oil onto the snacks for a crispier result. |
| I cannot slide the pan into the appliance properly. | There are too much ingredients in the basket. | Do not ill the basket beyond the MAX indication. |
| The basket is not placed in the pan correctly. | Push the basket down into the pan until you hear a click. | |
| The handle of the baking tray is obstructing the pan. | Push the handle to a horizontal position, so it does not stick out on top of the basket. | |
| White smoke comes out of the appliance. | You are preparing greasy ingredients. | When you fry greasy ingredients in the nonfryer plus, a large amount of oil will leak into the pan. The oil produces white smoke and the pan may heat up more than usual. This does not affect the appliance or the end result. |
| The pan still contains grease residues from previous use. | White smoke is caused by grease heating up in the pan. Make sure you clean the pan properly after each use. | |
| Fresh fries are fried unevenly in the nonfryer plus. | You did not soak the potato sticks properly before you fried them. | Soak the potato sticks in a bowl for at least 30 minutes, take them out and dry them with kitchen paper. |
| You did not use the right potato type. | Use fresh potatoes and make sure they stay ☐rm during frying. | |
| Fresh fries are not crispy when they come out of the nonfryer plus. | The crispiness of the fries depends on the amount of oil and water in the fries. | Make sure you dry the potato sticks properly before you add the oil. |
| Cut the potato sticks smaller for a crispier result. |
Cut the potato sticks smaller for a crispier result.
Add slightly more oil for a crispier result.
- 取扱説明書
- 本体
- 正面
- 準備する
- 注意
- バスケットカバーの取り外し方
- 調理する
- ●予熱方法
- 故障かな? と思ったら
- ノンフライヤープラスが作動しない
- General description (Fig. 1)
- Important
- Danger
- Warning
- Caution
- Electromagnetic elds (EMF)
- Before first use
- Hot air frying
- Add 3 minutes to the preparation time when the appliance is cold.
- Multi functional lid
- Settings
- Tips
- Potatoes & fries
- Cleaning
- Storage
- Ordering accessories
- Environment
- Guarantee and service
- Troubleshooting
Brand : PHILIPS
Model : Viva Collection HD9530
Category : Deep fryer