
Chassis Cab (2024) - Automotive RAM - Free user manual and instructions
Find the device manual for free Chassis Cab (2024) RAM in PDF.


| Product Type | Chassis Cab Truck |
| Brand | RAM |
| Model Year | 2024 |
| Cab Configuration | Regular Cab / Crew Cab (varies by trim) |
| Engine Options | 6.4L HEMI V8 (gas) or 6.7L Cummins I6 (diesel) – depending on variant |
| Horsepower | 410 hp (gas) / 370-420 hp (diesel) |
| Towing Capacity | Up to 37,090 lbs (diesel) |
| GVWR (Gross Vehicle Weight Rating) | Up to 14,000 lbs |
| Transmission | 8-speed automatic (gas) / 6-speed automatic (diesel) |
| Fuel Type | Gasoline or Diesel |
| Fuel Tank Capacity | 32 gallons (gas) / 31 gallons (diesel) |
| Drive Type | Rear-Wheel Drive or 4x4 (optional) |
| Overall Length | Varies by wheelbase (approx. 230-260 in) |
| Overall Width | Approx. 85 in |
| Overall Height | Approx. 78-80 in |
| Wheelbase Options | 140-170 in |
| Curb Weight | Approx. 6,500-7,500 lbs |
| Brakes | Four-wheel disc brakes with ABS |
| Suspension | Front coil springs / rear leaf springs |
| Tire Size | 225/70R19.5 (standard) |
| Safety Features | Airbags, stability control, backup camera, parking sensors |
| Maintenance Intervals | Oil change every 10,000 miles (diesel) or 7,500 miles (gas) |
| Warranty | 3-year/36,000-mile basic; 5-year/100,000-mile powertrain |
| Repairability | Spare parts readily available through RAM dealerships |
Frequently Asked Questions - Chassis Cab (2024) RAM
User questions about Chassis Cab (2024) RAM
0 question about this device. Answer the ones you know or ask your own.
Ask a new question about this device
Download the instructions for your Automotive in PDF format for free! Find your manual Chassis Cab (2024) - RAM and take your electronic device back in hand. On this page are published all the documents necessary for the use of your device. Chassis Cab (2024) by RAM.
USER MANUAL Chassis Cab (2024) RAM
natural_image
Black Ram-I pickup truck unloading hay bales in a field, surrounded by trees (no visible text or symbols)ROADSIDEASSISTANCE
24 HOURS, 7 DAYS A WEEK AT YOUR SERVICE. CALL 1-800-521-2779 OR VISIT CHRYSLER.RSAHELP.COM (USA)CALL 1-800-363-4869 OR VISIT FCA.ROADSIDEAID.COM (CANADA)SERVICES: Flat Tire Service, Out Of Gas/Fuel Delivery, Battery Jump Assistance, Lockout Service and Towing Service Please see the Customer Assistance chapter in this Owner's Manual for further information.
FCA US LLC reserves the right to modify the terms or discontinue the Roadside Assistance Program at any time. The Roadside Assistance Program is subject to restrictions and conditions of use, that are determined solely by FCA US LLC.
Vehicle images are for illustration purposes only. Actual products sold may vary.
WARNING: Operating, servicing and maintaining a passenger vehicle or off-highway motor vehicle can expose you to chemicals including engine exhaust, carbon monoxide, phthalates, and lead, which are known to the State of California to cause cancer and birth defects or other reproductive harm. To minimize exposure, avoid breathing exhaust, do not idle the engine except as necessary, service your vehicle in a well-ventilated area and wear gloves or wash your hands frequently when servicing your vehicle. For more information go to www.P65Warnings.ca.gov/passenger-vehicle.

This Owner's Manual illustrates and describes the operation of features and equipment that are either standard or optional on this vehicle. This manual may also include a description of features and equipment that are no longer available or were not ordered on this vehicle. Please disregard any features and equipment described in this manual that are not on this vehicle. FCA US LLC reserves the right to make changes in design and specifications, and/or make additions to or improvements to its products without imposing any obligation upon itself to install them on products previously manufactured.
With respect to any vehicles sold in Canada, the name FCA US LLC shall be deemed to be deleted and the name FCA Canada Inc. used in substitution therefore.
TABLEOFCONTENTS
1 INTRODUCTION 8
2 GETTING TO KNOW YOUR VEHICLE.... 15
3 GETTING TO KNOW YOUR INSTRUMENT PANEL 67
4 STARTING AND OPERATING 97
5 MULTIMEDIA 165
6 SAFETY 223
7 IN CASE OF EMERGENCY 265
8 SERVICING AND MAINTENANCE.... 278
9 TECHNICAL SPECIFICATIONS 333
10 CUSTOMER ASSISTANCE.... 342
11 INDEX 347
INTRODUCTION
SYMBOLSKEY. 9
VANCONVERSIONS/CAMPERS. 9
VEHICLEMODIFICATIONS/ALTERATIONS.....9
SYMBOLGLOSSARY. 9
REMOTESTART—IFEQUIPPED(GASOLINE)....19
How To Use Remote Start
To Exit Remote Start Mode
Remote Start Front Defrost Activation —
If Equipped 20
Remote Start Comfort Systems - If Equipped
Remote Start Windshield Wiper De-Icer
Activation — If Equipped
Remote Start Abort Message
REMOTESTART—IFEQUIPPED(DIESEL)....21
How To Use Remote Start
VEHICLE SECURITY SYSTEM — IF EQUIPPED ..... 21
To Arm The System
To Disarm The System 22
Rearming Of The System
Security System Manual Override 22
DOORS. 22
Manual Door Locks
Power Door Locks — If Equipped
Keyless Enter 'n Go™ — Passive Entry
(If Equipped) 23
Automatic Unlock Doors On Exit — If Equipped
Automatic Door Locks - If Equipped . .
Child-Protection Door Lock — If Equipped
STEERINGWHEEL 25
Tilt Steering Column
Heated Steering Wheel — If Equipped
UCONNECTVOICERECOGNITION-IFEQUIPPED..26
Introducing Voice Recognition
Basic Voice Commands
Get Started
1.8 Additional Information
DRIVERMEMORYSETTINGS—IFEQUIPPED. . . . 2 7
- 9 Programming The Memory Feature .....
2 Linking And Unlinking The Remote Keyless
Entry Key Fob To Memory
Memory Position Recall
S E ^20 A T S 2
Manual Adjustment Front Seats — If Equipped
2 Manual Adjustment Rear Seat - If Equipped
20 Power Adjustment Front Seats — If Equipped
Heated Seats — If Equipped
2Vântilated Seats — If Equipped
Head Restraints
DRIVERADJUSTABLEPEDALS—IFEQUIPPED...33
RRORS. 34
2 Inside Rearview Mirror 34
Illuminated Vanity Mirror — If Equipped ..... 36
Outside Mirrors 36
2 2 Outside Automatic Dimming Mirror — If Equipped
Power Mirrors - If Equipped
Power Folding Mirrors — If Equipped
Automatic Power Folding Mirrors - If Equipped . . 39
Power Convex Mirror Switch - If Equipped . . . 3
Forward Utility Lights and Rear Guidance
Lights4 - If Equipped 40
Til2 4Side Mirrors In Reverse - If Equipped
Heated Mirrors — If Equipped 40
UniversalGarageDoorOpener(HomeLink®)—
IfEquipped....4 1
Before You Begin Programming HomeLink® . . 41
Erasing All The HomeLink® Channels ..... 4 1
Identifying Whether You Have A Rolling Code Or
Non-Rolling Code Device 41
Programming HomeLink® To A Garage Door
Opener 42
Programming HomeLink® To A Miscellaneous
Device 42
Reprogramming A Single HomeLink® Button . . 42
Canadian/Gate Operator Programming ..... 4 3
Security 43
Troubleshooting Tips 43
EXTERJQRLIGHTS 4 4
Headlight Switch 4 4
Multifunction Lever 4 4
Daytime Running Lights (DRLs) 44
High/Low Beam Switch 45
Automatic High Beam Headlamp Control —
If Equipped 45
Flash-To-Pass 45
Automatic Headlights - If Equipped ..... 4 5
Directional LED Headlamp System — If Equipped . 45
Parking Lights 45
Headlights On With Wipers 46
Headlight Delay 46
Lights-On Reminder 4 \$HOOD 6 6 Yellow Indicator Lights 9 3
Front Fog Lights - If Equipped To Open The Hood 66 Green Indicator Lights 94
Turn Signals 46 To Close The Hood 6 White Indicator Lights 94
Lane Change Assist - If Equipped 46 Blue Indicator Lights 95
Cargo Lights/Rear Guidance Lights - If Equipped GETTING TO KNOW YOUR ONBOARD DIAGNOSTIC SYSTEM—ORDII 9.5
Battery Saver 4 INSTRUMENT PANEL Onboard Diagnostic System (OBD II)
INTERIORLIGHTS. 47 MIDLINEINSTRUMENTCLUSTER—GASOLINE. 67 Cybersecurity 95
Courtesy Lights 47 Midline Instrument Cluster Descriptions . . . . 6 EMISSIONSINSPECTIONANDMAINTENANCE
WINDSHIELDWIPERSANDWASHERS. 49 HIGHLINEINSTRUMENTCLUSTER—GASOLINE...69 PROGRAMS. 95
Windshield Wiper Operation 49 Highline Instrument Cluster Descriptions .... 70
Rain Sensing Wipers - If Equipped 4.9 PREMINIMINSTRUMENTCLUSTER_CASOLINE 71 STARTING AND OPERATING
CLIMATECONTROLS. . . . . . . . . . . . . . . . 5 0 Premium Instrument Cluster Descriptions — STARTINGTHEENGINE—GASOLINEENGINE . . . 9 7
Automatic Climate Control Descriptions And Gasoline 72 Automatic Transmission 97
Functions 50 MIDI INFINSTRUMENTCLIISTER—DISEFI 73 AutoPark — Rotary Shifter and 8-Speed
Manual Climate Control Descriptions Diesel Instrument Cluster 74 Transmission Only 97
And Functions 53 WICH INFINSTRUMENTO LISTED DIESEI 75 Tip Start Feature 9
Automatic Temperature Control (ATC) 54 Diesel Instrument Cluster 76 Keyless Enter 'n Go™ - Ignition . . . . . .
Climate Voice Recognition - If Equipped . . . 5 5 Normal Starting Using ENGINE START/STOP
Operating Tips 5 5 FREMIOMINSTRUMENTOCLUSTER—DIESEL....71 Button 98 Premium Instrument Cluster
INTERIORSTORAGEANDEQUIPMENT. . . . . . . 5 6 Descriptions - Diesel 7 R Cold Weather Operation
Storage 56 Developments Steel (Below -22°F Or -30°C) 1
USB/AUX Control 60 INSTRUMENTCLOSTERDISFLAT 78 After Starting 10
Electrical Power Outlets 61 Instrument Cluster Display Location and STARTINGTHEENGINE—DIESELENGINE ..... 100
Power Inverter - If Equipped 6 2 _0,11,12,13 Continuous 7.6 Automatic Transmission 100
Wireless Charging Pad - If Equipped . . . . . . 63.1110000000000000000000000000000000000000000000000000000000000000000000000000000
WINDOWS. 64 Drapay Medicine, And Warnings Extreme Cold Weather 1
Power Windows - If Equipped 6 4 Battery Saver On/Battery Saver Mode Normal Starting Procedure - Engine Manifold
Automatic Window Features - If Equipped . . . 64 MScade - Electrical Load Reduction Actions - Air Temperature Above 66°F (19°C) . . . . . 1
Reset Auto-Up - If Equipped 6f5_4equipped R7 Starting Procedure - Engine Manifold Air
Window Lockout Switch - If Equipped . . . . . 6.5 Temperature 0°F To 66°F (-18°C to 19°C)
Power Sliding Rear Window - If Equipped . . .65 Starting Procedure - Engine Manifold Air
Manual Sliding Rear Window - If Equipped . 65. Hot Warming Lights Temperature Below 0°F (-18°C) . . . . . . . 1 0
WindBuffeting 65 following warning lights Starting Fluids 10
NORMALOPERATION—DIESELENGINE. ..... 1 0 4
Cold Weather Precautions....104
Engine Idling 105
Noise
Stopping The Engine....106
Idle Shutdown....107
Programmable Maximum Vehicle Speed . . . . 1 0 7
Operating Precautions....107
Cooling System Tips 107
Diesel Particulate Filter (DPF) Manual
Regeneration — If Equipped ..... 1 0 7
ENGINEBLOCKHEATER—IFEQUIPPED.....108
ENGINEBREAK-INRECOMMENDATIONS—
GASOLINEENGINE. 108
ENGINEBREAK-INRECOMMENDATIONS—
DIESELENGINE. 108
PARKINGBRAKE. 108
DIESELEXHAUSTBRAKE(ENGINEBRAKING)...109
AUTOMATICTRANSMISSION. 1 1 0
IgnitionParkInterlock .....
Brake/Transmission Shift Interlock
(BTSI) System 1 1 1
8-Speed Automatic Transmission
If Equipped....111
6-Speed Automatic Transmission —
If Equipped....1 1 4
AUXILIARYSWITCHES—IFEQUIPPED. . . . . . . 1 1 7
FOUR-WHEELDRIVEOPERATION-IFEQUIPPED.117
Electronically Shifted Transfer Case (8-Speed
Transmission) — If Equipped ..... 118
Electronically Shifted Transfer Case (6-Speed
Transmission) — If Equipped ..... 1 2 0
Manually Shifted Transfer Case — If Equipped . 122
LIMITED-SLIPDIFFERENTIAL. 123
Adaptive Cruise Control (ACC)....126
PARKSENSEFRONT/REARPARKASSIST—
IFEQUIPPED 133
ParkSense Sensors 133
ParkSense Warning Display....133
ParkSense Display 133
Enabling And Disabling ParkSense 136
Service The ParkSense Park Assist System .. 136
Cleaning The ParkSense System ..... 1 3 6
ParkSense System Usage Precautions ..... 1 3 6
LANESENSE-IFEQUIPPED. 137
LaneSense Operation 137
Turning LaneSense On Or Off 137
LaneSense Warning Message 138
Changing LaneSense Status ..... 1 3 9
Turn Signal Activated Blind Spot Assist —
If Equipped....139
PARKVIEWREARBACKUPCAMERA. . . . . . . 1 3 9
SURROUNDVIEWCAMERASYSTEM—
IFEQUIPPED. 141
TRAILERCAMERAS—IFEQUIPPED. . . . . . . . 1 4 5
Trailer Surround View Camera System —
If Equipped.... 145
AUX Camera — If Equipped.... 1 4 7
ENGINEERUNAWAY. 147
REFUELING THEVEHICLE—GASOLINEENGINE ..148
Loose Fuel Filler Cap Message 148
REFUELINGTHEVEHICLE—DIESELENGINE. . . . 1 4 8
Diesel Exhaust Fluid 149
VEHICLELOADING 151
Gross Vehicle Weight Rating (GVWR) ..... 1 5 1
Payload 151
Gross Axle Weight Rating (CAWR) ..... 151
TireSize 151
R i m S i z e 151
Inflation Pressure 151
Curb Weight 151
Loading 151
TRAILERTOWING. 152
CommonTowingDefinitions .....
Trailer Hitch Type and Maximum Trailer
Weight 154
Trailer Towing Weights (Maximum Trailer
Weight Ratings) 155
Trailer And Tongue Weight 155
Towing Requirements 155
TowingTips 159
SNOWPLOW-IFEQUIPPED 160
BeforePlowing 16
Snowplow Prep Package Model Availability .. 160
Over The Road Operation With Snowplow
Attached 160
Operating Tips 161
General Maintenance....161
RECREATIONALTOWING(BEHINDMOTORHOME).161
Towing This Vehicle Behind Another Vehicle
Recreational Towing — Two-Wheel Drive
Models
Recreational Towing — Four-Wheel Drive
Models
DRIVINGTIPS. 164
Driving On Slippery Surfaces
Driving Through Water
MULTIMEDIA
UCONNECTSYSTEMS. 165
CYBERSECURITY....165
UCONNECTSETTINGS. 165
Customer Programmable Features
UCONNECTINTRODUCTION. 182
System Overview
Safety And General Information
UCONNECTMODES 185
Steering Wheel Audio Controls
Radio Mode 185
MediaMode
Phone Mode 193
CONNECTEDVEHICLESERVICES—IFEQUIPPED. 200
Is My Vehicle Connected?
Introduction To Connected Vehicle Services
Getting Started With Connected Vehicle
Services
Using SiriusXM Guardian™
Manage My SiriusXM Guardian™ Account
CONNECTEDSERVICESFAQs. 211
Connected Services SOS FAQs — If Equipped
Connected Services Remote Door Lock/
162 UnlockFAQs
Connected Services Roadside Assistance
162 FAQs
Connected Services Send & Go FAQs
1 6lf4 Equipped 2
1 6 Connected Services Vehicle Finder FAQs
Connected Services Stolen Vehicle
Assistance FAQs — If Equipped
Connected Services Remote Vehicle Start
F A Q s
Connected Services Remote Horn & Lights
E A Q s
Connected Services Account FAQs —
If Equipped
8 2 Data Collection & Privacy 2
184 RADIOOPERATIONANDMOBILEPHONES. . . . 2 1 5
Regulatory And Safety Information
185 OFF-ROADPAGES—IEEQUIPPED 2.1.6
Off-Road Pages Status Bar
191 Vehicle Dynamics
Accessory Gauge
Pitch&Roll
2 0.0 Suspension 2 1
. 204 ForwardFacingCamera .....
TRAILERTOW-IFEQUIPPED. 220
f ^2 trailerinfo 220
203 Cameras 221
211 Light Check 2 2 2
Setup 222
SAFETY
211 SAFETYFEATURES. 2 2 3
Anti-Lock Brake System (ABS) 2 2 3
Rear Seat Reminder Alert (RSRA) 2 2 3
Electronic Brake Control (EBC) System ..... 2 2 4
AUXILIARYDRIVINGSYSTEMS. 2 2 9
Blind Spot Assist Cameras - If Equipped ... 229
Forward Collision Warning (FCW) With
Mitigation - If Equipped 2 2 9
Tire Pressure Monitoring System (TPMS) . . . 231
212 OCCUPANTRESTRAINTSYSTEMS 237
Occupant Restraint Systems Features ..... 2 3 7
Important Safety Precautions 237
Seat Belt Systems 238
Supplemental Restraint Systems (SRS) ..... 2 4 4
Child Restraints 250
SAFETYTIPS 262
Transporting Passengers 262
Transporting Pets 262
Connected Vehicles 262
Safety Checks You Should Make Inside
The Vehicle 2 €
Periodic Safety Checks You Should Make
Outside The Vehicle 264
Exhaust Gas 264
Carbon Monoxide Warnings 264
INCASEOFEMERGENCY
Preparations For Jacking 268
Jacking Instructions 4500 And 5500 Series
To Stow The Flat Or Spare — If Equipped
Hub Caps/Wheel Covers — If Equipped ...
JUMPSTARTING. 271
Preparations For Jump Start ....
Jump Starting Procedure ....
IFYOURENGINEOVERHEATS. 273
GEARSELECTOROVERRIDE. 273
6-Speed Transmission — If Equipped ..... 273
MANUALPARKRELEASE. 274
8-Speed Transmission — If Equipped .....
Two-Wheel Drive Models 276
Four-Wheel Drive Models 2
Emergency Tow Hooks — If Equipped ...
ENHANCEDACCIDENTRESPONSESYSTEM
(EARS) 277
EVENTDATARECORDER(EDR)....277
SERVICINGANDMAINTENANCE
SCHEDULEDSERVICING. 278
Maintenance Plan — Gasoline Engine ..... 279
Maintenance Plan — Diesel Engine .....
ENGINECOMPARTMENT. 284
6.4L Gasoline Engine 28 4Tire Safety Information 315
6.7L Diesel Engine 285 Tires - General Information 321
Checking Oil Level 28 Fire Types 324
Adding Washer Fluid 286 Spare Tires - If Equipped 324
Maintenance-Free Battery 286 Wheel And Wheel Trim Care 3 2 5
Pressure Washing 28 Snow Traction Devices 326
209 HICLEMAINTENANCE. 287 Tire Rotation Recommendations 327
Engine Oil 2 8 DEPARTMENT OF TRANSPORTATION UNIFORM
Engine Oil Filter 28TIREQUALITYGRADES. 328
Engine Air Cleaner Filter 288 Treadwear 329
Air Conditioner Maintenance 289 Traction Grades 329
2 Accessory Drive Belt Inspection 291 Temperature Grades 3 2 9
Draining Fuel/Water Separator Filter ..... 292 STORINGTHEVEHICLE ..... 3 2 9
Engine Mounted Fuel Filter Replacement . . . B 203 D Y W O R K 3 3 0
Underbody Mounted Fuel Filter Replacement . 293 Protection From Atmospheric Agents ..... 3 30
Priming If The Engine Has Run Out Of Fuel .Body294 And Underbody Maintenance ..... 3 3 0
Intervention Regeneration Strategy — Preserving The Bodywork 330
Message Process Flow 29 INTERIORS 3 3 1
Diesel Exhaust Fluid (DEF) 2 Seats And Fabric Parts 33 1
Body Lubrication 295 Plastic And Coated Parts 331
Windshield Wiper Blades 29 Feather Surfaces 331
Exhaust System 297Glass Surfaces 332
Cooling System 297
Charge Air Cooler - Inter-Cooler ..... 300 TECHNICALSPECIFICATIONS
Brake System 300 VEHICLE IDENTIFICATION NUMBER (VIN) 333
Automatic Transmission 300
Rear Axle And 4x4 Front Driving Axle Fluid Level BRANESTEM. 333 Hydroulie Brake Assist If Equipped 2-2
Transfer Case 303 Hydraulic Brain Assist - II Equipped 5.5
Noise Control System Required WHEEL AND TIRE TORQUE SPECIFICATIONS . . . 333
Maintenance & Warranty 3.0 Torque Specifications 333
8 1 Fuses 305
Bulb Replacement 311
FUELREQUIREMENTS—GASOLINEENGINE. . . 3 3 4 WARRANTYINFORMATION. . . . . . . . . . . . . . 3 4 4
6.4L Engine 3 3MOPAR® PARTS 344
Reformulated Gasoline 3 3 ^4 REPORTINGSAFETYDEFECTS 3 4 4
Materials Added To Fuel 3 In4 The 50 United States And
Gasoline/Oxygenate Blends 3 3 5 Washington, D.C. 3 44
Do Not Use E-85 In Non-Flex Fuel Vehicles . In 335 Canada 345
CNG And LP Fuel System Modifications .... 3.3.5 PUBLICATIONORDERFORMS.... 34.5
Methylcyclopentadienyl Manganese PUBLICATION NUMBER FORMS: 111111111107 CHANGE OF OWNERSHIP OR ADDRESS 34.5
Tricarbonyl (MMT) In Gasoline 335
Fuel System Cautions 3 3 5 GENERALINFORMATION. 3 4 6
FUELREQUIREMENTS-DIESELENGINE. . . . . 3 3 6
Fuel Specifications 3 3 6
Biodiesel Fuel Requirements 336
FLUIDCAPACITIES. 3 3 7
ENGINEFLUIDSANDLUBRICANTS. 3 3 8
CHASSISFLUIDSANDLUBRICANTS. . . . . . . 3 4 0
CUSTOMERASSISTANCE
SUGGESTIONSFOROBTAININGSERVICEFOR
YOURVEHICLE. 342
Prepare For The Appointment 342
Prepare A List 342
Be Reasonable With Requests 342
IFYOUNEEDASSISTANCE. 342
Roadside Assistance 342
FCA US LLC Customer Center 343
FCA Canada Inc. Customer Center 343
Mexico 343
Puerto Rico And US Virgin Islands 34 3
Customer Assistance For The Hearing Or
Speech Impaired (TDD/TTY) 343
Service Contract 344
INTRODUCTION
Dear Customer,
Congratulations on the purchase of your new Ram. Be assured that it represents precision workmanship, distinctive styling, and high quality.
This is a specialized utility vehicle. It can go places and perform tasks that are not intended for conventional passenger vehicles. It handles and maneuvers differently from many passenger vehicles both on-road and off-road, so take time to become familiar with your vehicle. If equipped, the two-wheel drive version of this vehicle was designed for on-road use only. It is not intended for off-road driving or use in other severe conditions suited for a four-wheel drive vehicle. Before you start to drive this vehicle, read the Owner's
Manual. Be sure you are familiar with all vehicle controls, particularly those used for braking, steering, transmission, and transfer case shifting. Learn how your vehicle handles on different road surfaces. Your driving skills will improve with experience. When driving off-road, or working the vehicle, don't overload the vehicle or expect the vehicle to overcome the natural laws of physics. Always observe federal, state, provincial and local laws wherever you drive. As with other vehicles of this type, failure to operate this vehicle correctly may result in loss of control or a page 64.
This Owner's Manual has been prepared with the assistance of service and engineering specialists to acquaint you with the operation and maintenance of your vehicle. It is supplemented by customer-oriented documents. Within this information, you will find a description of the services that FCA US LLC offers to its customers as well as the details of the terms and conditions for maintaining its validity. Please take the time to read all of these publications carefully before driving your vehicle for the first time. Following the instructions, recommendations, tips, and important warnings in this manual will help ensure safe and enjoyable operation of your vehicle.
This Owner's Manual describes all versions of this vehicle. Options and equipment dedicated to specific markets or versions are not expressly indicated in the text. Therefore, you should only consider the information that is related to the trim level, engine, and version that you have purchased. Any content introduced throughout the Owner's Information, which may or may not be applicable to your vehicle, will be identified with the wording "If Equipped". All data contained in this publication are intended to help you use your vehicle in the best possible way. FCA US LLC aims at a constant improvement of the vehicles produced. For this reason, it reserves the right to make changes to the model described for technical and/or commercial reasons. For further information, contact an authorized dealer.
When it comes to service, remember that authorized dealers know your Ram best, have factory-trained technicians, genuine Mopar® parts, and care about your satisfaction.
SYMBOLSKEY
| WARNING!These statements apply to operating procedures that could result in a collision, bodily injury and/or | |
| CAUTION! | These statements apply to procedures that could damage to your vehicle. |
| NOTE:A suggestion which | will improve installation, operation, and reliability. If not followed, may result age. |
| TIP:General ideas/solutions/suggestions on easier use of the product or functionality. | |
| PAGEREFERENCEARROW ➔ page | Follow this reference for additional information particular feature. |
| FOOTNOTE ✗ | Supplementary and relevant information pertaining the topic. |
If you do not read the entire Owner's Manual, you may miss important Observe all Cautions and Warnings.
VANCONVERSIONS/CAMPERS
The New Vehicle Limited Warranty does not apply to body modifications for equipment installed by van conversion/camper manufacturers/body builders. US dents refer to the Warranty Information, Section 2.1.C. Canadian residents refer "What Is Not Covered" section of the Warranty Information. Such equipment video monitors, DVD/Blu-Ray™, heaters, stoves, refrigerators, etc. For warranty age and service on these items, contact the applicable manufacturer.
Operating instructions for the special equipment installed by the conversion/camper manufacturer should also be supplied with your vehicle. For any addition, please contact your conversion/camper manufacturer.
To obtain dimensional and technical specifications for your vehicle, refer to the Builder's Guide at
https://www.ramtrucks.com/ram-commercial/body-builders-guide.html. result in
VEHICLEMODIFICATIONS/ALTERATIONS
in dam-
| WARNING! |
| Any modifications or alterations to this vehicle could seriously affectiness and safety and may lead to a collision resulting in serious in |

SYMBOLGLOSSARY
Some car components have colored labels with symbols indicating precautions to observed when using this component. It is important to follow all warnings whe calling your vehicle. See below for the definition of epage symbol
NOTE:
Warning and Indicator lights are different based upon equipment options and cu vehicle status. Some telltales are optional and may not appear.
| Information. | RedWarningLights | |
 | Air Bag Warning Light page 88 | |
| orUS reently cover- |  he he | Battery Charge Warning Light page 88 |
| RedWarningLights | |
 | Brake Warning Light page 88 |
 | Door Open Warning Light page 89 |
 | Electronic Throttle Control (ETC) Warning Light page 89 |
 | Engine Coolant Temperature Warning Light page 89 |
 | Hood Open Warning Light page 89 |
 | Oil Pressure Warning Light page 89 |
| RedWarningLights | |
 | Oil Temperature Warning Light page 90 |
 | Seat Belt Reminder Warning Light page 90 |
 | Trailer Brake Disconnected Warning Light page 90 |
 | Transmission Temperature Warning Light page 90 |
 | Vehicle Security Warning Light page 90 |
| YellowWarningLights | |
 | Adaptive Cruise Control (ACC) Fault Warning Light page 90 |
 | Anti-Lock Brake System (ABS) Warning Light page 90 |
 | Cruise Control Fault Warning Light page 90 |
 | Engine Check/Malfunction Indicator Warning Light (MI page 90 |
 | Electronic Stability Control (ESC) Active Warning Light page 91 |
 | Electronic Stability Control (ESC) OFF Warning Light page 91 |
| YellowWarningLights | |
 | LaneSense Warning Light page 91 |
 | Low Washer Fluid Warning Light page 91 |
 | Low Fuel Warning Light page 91 |
 | Low Coolant Level Warning Light page 91 |
 | Loose Fuel Filler Cap Warning Light page 92 |
 | Service Forward Collision Warning (FCW) Light page 92 |
| Service LaneSense Warning Light page 92 | |
| Service 4WD Warning Light page 92 | |
| Tire Pressure Monitoring System (TPMS) Warning Li page 92 | |
| YellowIndicatorLights | |
| Cargo Indicator Light page 93 | |
| Cold Ambient Derate Mode Indicator Light page 93 | |
| Diesel Exhaust Brake Indicator Light page 93 | |
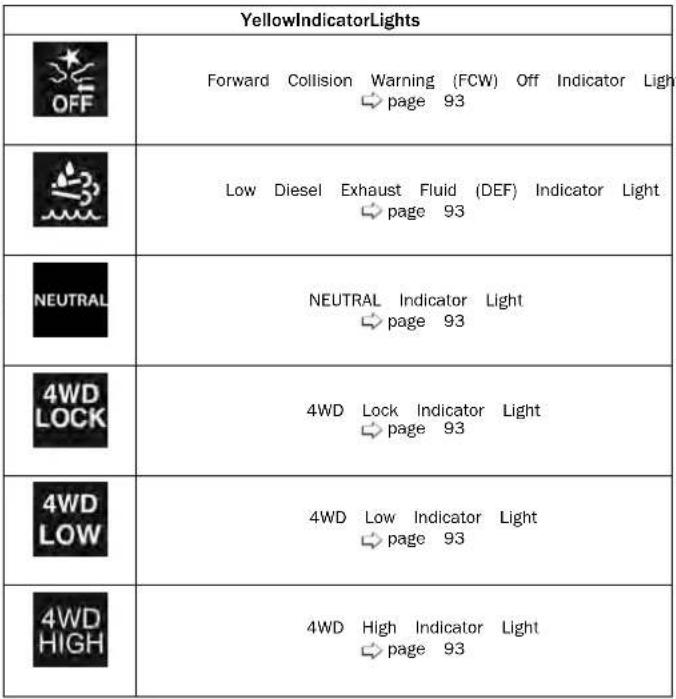 | |
| YellowIndicatorLights | |
 | Snowplow Mode Indicator Light page 93 |
 | TOW/HAUL Indicator Light page 93 |
 | Trailer Merge Assist Indicator Light page 93 |
 | Wait To Start Indicator Light page 93 |
 | Water In Fuel Indicator Light page 94 |
| GreenIndicatorLights | |
 | Adaptive Cruise Control (ACC) Set With Target Indicat page 94 |
 | Adaptive Cruise Control (ACC) Set With No Target Dete Light page 94 |
 | Automatic Diesel Exhaust Brake Indicator Light page 94 |
 | Cruise Control Set Indicator Light page 94 |
 | ECO Mode Indicator Light page 94 |
 | Front Fog Indicator Light page 94 |

Light
The Ground Truth image displays a single, solid horizontal line. According to Rule 2 (UNDERSCORE & LINE RULES), this is a stylistic or background line, not a placeholder underscore. Therefore, the OCR result must ignore it and output nothing or only meaningful text. The provided OCR content is "____", which consists of four underscores. This is an incorrect interpretation of the line as a placeholder, violating the rule that stylistic lines must be ignored. The OCR has hallucinated underscores where none should exist based on the GT's visual context. Hence, the OCR result is inconsistent with the Ground Truth.
[Non-Text]
[Non-Text]
[Non-Text]
[Non-Text]
In the
Indicat
[Non-Text]
[Non-Text]
[Non-Text]
[Non-Text]
[Non-Text]
[Non-Text]
[Non-Text]
[Non-Text]
[Non-Text]
[Non-Text]
[Non-Text]
[Non-Text]
[Non-Text]
[Non-Text]
[Non-Text]
[Non-Text]
[Non-Text]
[Non-Text]
[Non-Text]
[Non-Text]
[Non-Text]
[Non-Text]
[Non-Text]
[Non-Text]
[Non-Text]
[Non-Text]
[Non-Text]
[Non-Text]
[Non-Text]
[Non-Text]
[Non-Text]
[Non-Text]
[Non-Text]
[Non-Text]
| GreenIndicatorLights | |
| LaneSense Indicator Light page 94 | |
| Parking/Headlights On Indicator Light page 94 | |
| Turn Signal Indicator Lights page 94 | |
| WhiteIndicatorLights | |
| Adaptive Cruise Control (ACC) Ready Indicator Light page 94 | |
| Cruise Control Ready Indicator Light page 94 | |
| WhiteIndicatorLights | |
| LaneSense Indicator Light page 95 | |
| Set Speed Display Indicator Light page 95 | |
| BlueIndicatorLights | |
| High Beam Indicator Lightpage 95 | |
Your vehicle is equipped with a key fob which supports Remote Keyless Entry (if equipped) and Keyless Enter 'n Go™ (if equipped).
If the vehicle is equipped with remote power door locks, the key fob allows you to lock or unlock all doors, as well as activate the Panic Alarm, from distances up to approximately 66 ft (20 m). The key fob does not need to be pointed at the vehicle to activate the system.
NOTE:
- The key fob's wireless signal may be blocked if the key fob is located next to a mobile phone, laptop, or other electronic device. This may result in poor performance.
- If your vehicle is equipped with a Wireless Charging Pad, the key fob may not be detected if it is placed within 6 inches (15 cm) of the page 63.
• In the ON/RUN position, all key fob buttons until the vehicle reaches 2 mph (4 km/h).
Charging t1 is locked 2 is placed 3 - Lock 4 - Remote Start (If Equipped) 5 +P &Work 5 - Emergency Key
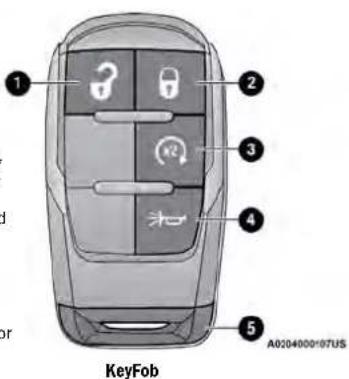
ToLock/UnlockTheDoors
If the vehicle is equipped with remote power push and release the unlock button on the
2
to unlock the driver's door. Push the unlock button twice within five seconds to unlock all doors. If the vehicle is equipped with remote power door locks, pus and release the lock button on the key fob to lock doors.
When the doors are unlocked, the turn signals will fla and the illuminated entry features will be activated. When the doors are locked, the turn signals will flash and the horn will chirp.
All doors can be programmed to unlock on the first push of the unlock button. The horn chirp when the button is pushed can be programmed on/off within Uconnect Settings page 165.
UsingThePanicFeature
To turn the Panic feature on or off, push the Panic ton on the key fob. When the Panic feature is active, the turn signals will flash, the horn may pulse on an off (if equipped with horn alarm), and the interior light will turn on.
The Panic feature will stay on for three minutes unless you turn it off by either pushing the Panic button a bond the time or driving the vehicle at a speed of 15 m by 24 or km/hly or greater.
In case the ignition switch does not change push of a button, the key fob may have a depleted battery. A low key fob battery can by referring to the instrument cluster, which directions to follow page 346.
with on the time or driving the vehicle at a speed of 15 n low 24 or km/hly or greater.
NOTE:
- The interior lights will turn off if you place tion in the ON/RUN position while the Panic is activated. However, the exterior lights and (if equipped with horn alarm) will remain on
- You may need to be less than 35 ft (11 vehicle when using the key fob to turn off feature due to the radio frequency noises e the system.
KeyLeftVehicleFeature
If a valid key fob is no longer detected inside while the vehicle's ignition system is in the ON, START position, the message "Key Fob Has Left
Vehicle" will be shown in the instrument cluster along with an interior chime. An exterior audible visual alert will also be activated to warn the
The vehicle's horn will rapidly chirp three times a with a single flash of the vehicle's exterior lights.
NOTE:
- The doors have to be open and then closed in order for the vehicle to detect a key fob. The Key Left Vehicle feature will activate when the first door is closed and no key fob is detected in the vehicle. the warning has been activated, and the other doors are closed, no other warnings will be issued.
- These alerts will not be activated in situations where either the vehicle's engine is left running with the key fob inside, or the key fob's wireless signals are blocked.
ReplacingTheBatteryInTheKeyFob
The image battery model is one CR2032 feature NOTE:
- Customers are recommended to use a battery (m) obtained from Mopar®. Aftermarket coin battery
the dimensions may not meet the original OEM tted battery dimensions. - Perchlorate Material — special handling may See www.dtsc.ca.gov/hazardouswaste/perchlorate for further information.
the vehicle RUN or the back housing or the printed circuit board.
dispramove the emergency key (1) by pushing and holding the release button (2) located on the side of the drivey fob while pulling the emergency key out with
along your other hand.
S.
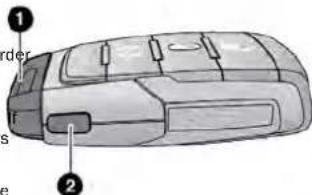
A0204000040US
EmergencyKeyRemoval
1 - Emergency Key
2 — Emergency Key Release Button
- Hold the key fob with the button side facing dow and locate the small rectangular gap on the left s between the housing and the back cover of the k fob. Use a small screwdriver (or similar tool) to pr open the left side of the fob cover while applying y pressure until the cover snaps open.
- Next, locate the gap on the right side of the key, which is positioned farther to the edge than the left side gap. Pry open the right side, and remove the applyback cover.
- Remove the battery by using a suitable tool, such a screwdriver, to slide the battery downward and onboard toward the key ring.
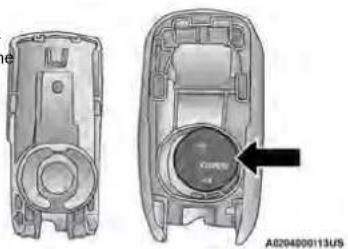
natural_image
Technical illustration of a car body panel showing front and side views with a central component (no text or symbols)KeyFobBatteryLocation
NOTE:
When replacing the battery, ensure the (+) sign on the battery is facing upward. Avoid touching the new battery with your fingers. Skin oils may cause battery deterioration. If you touch a battery, clean it with rubbing alcohol.
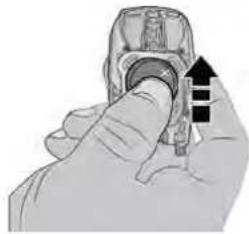
- Replace the battery by using your thumb to down and slide the battery under the small the top edge of the opening.
natural_image
Illustration of a hand holding a mechanical component with an arrow indicating direction (no text or symbols)A0204000143U5
KeyFobBatteryReplacement
| push lip on | WARNING! |
| If you think a battery may have been placed inside any part of the body, seek medical attention.Keep new and used batteries away from child battery compartment does not close securely, using the product and keep it away from c | |
NOTE:
- When having the Sentry Key Immobilizer system wallowed serviced, bring all vehicle keys with you to an auto-immediate dealer.
Emergency keys must be ordered to the dren. If cut the to match the vehicle locks.
stop • It is not mandatory to replace the key f children. emergency key is needed, and vice versa.

ProgrammingAndRequesting AdditionalKeyFobs
Programming the key fob may be performed by authorized dealer.
NOTE:
SENTRYKEY
The Sentry Key Immobilizer system prevents unauthorized vehicle operation by disabling the engine. The system does not need to be armed or activated. Operati is automatic, regardless of whether the vehicle is locked or unlocked.
- To assemble the key fob case, line up the of the back cover with the top of the fob, the edges into the interlocking hinges until a snap together with no large visual gaps.
- Reinsert the emergency key until it locks in
• Oncedge key fob is programmed to a vehicle, and repurposed and reprogrammed to another vehicle.
- edges
- Only key fobs that are programmed to the electronics can be used to start and operate to vehicle.
The system uses a key fob, keyless push button ignit and a Radio Frequency (RF) receiver to prevent unauthorized vehicle operation. Therefore, only key fobs that vehicle are programmed to the vehicle can be used to start operate the vehicle. The system cannot reprogram a key fob obtained from another vehicle.
After placing the ignition in the ON/RUN position, the Vehicle Security Light will turn on for three seconds for bulb check. If the light remains on after the bulb check, and indicates that there is a problem with the electronics. In addition, if the light begins to flash after the bulb check indicates that someone attempted to start the engine with an invalid key fob. If a valid key fob is used to start engine but there is an issue with the vehicle electronics, the engine will start and shut off after two seconds.
If the Vehicle Security Light turns on during normal an auto-operation (vehicle running for longer than 16 seconds), it indicates that there is a fault in the korey. It should this occur, have the vehicle serviced as soon as possible by an authorized dealer.
NOTE:
The key fob battery should only be replaced by technicians. If the battery requires replacement, it is authorized dealer.
WARNING!
- The integrated key fob contains a coin cell. Do not ingest the battery; there is a chemihazard. If the coin cell battery is swallowed, cause severe internal burns in just two hours can lead to death.
(Continued)
| qualified | WARNING! |
| ● Always remove the key fobs from the veh lock all doors when leaving the vehicle unattended. | |
| ● For vehicles equipped with Keyless Enter Ignition, always remember to place the lg patte OFF position when exiting the vehicle. | |
it can Duplication of key fobs may be performed at ized dealer. This procedure consists of program
blank key fob to the vehicle electronics. A bla is one that has never been programmed.
10 seconds), it indicates that there is a fault in the kromex. Should this occur, have the vehicle serviced as soon as possible by an authorized dealer.
CAUTION!
The Sentry Key Immobilizer system is not of with some aftermarket Remote Start systems, these systems may result in vehicle starting and loss of security protection.
compatible Use of problems
All of the key fobs provided with your new vehicle have been programmed to the vehicle electronics page 346.
NOTE:
A key fob that has not been programmed is also considered an invalid key.
IGNITIONSWITCH
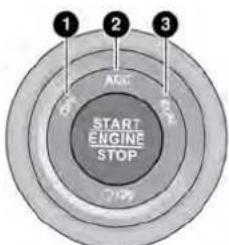
A0205000015US
KeylessPushButtonIgnition
1 - OFF
2 - ACC (Accessory)
3 - ON/RUN
KEYLESS ENTER 'N GO™ IGNITION-
This feature allows the driver to operate the ignition push button ignition can be placed in the switch with the push of a button as long as the remote Keyless Entry key fob is in the passenger compartment.
The Keyless Push Button Ignition has four operating The engine is stopped. positions; three of which are labeled and will illuminate some electrical devices (e.g. power locks, when in position. The three positions are OFF, ACC, etc.) and are still available. ON/RUN. The fourth position is START. During START RUN will illuminate.
NOTE:
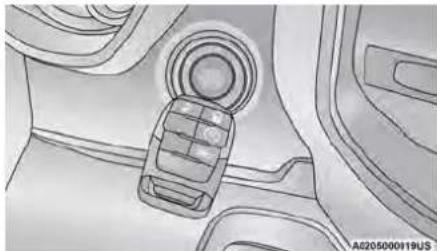
In case the ignition switch does not change with the inplots, etc.), of a button, the key fob may have a low or depleted battery. In this situation, a backup method can be used to operate the ignition switch. Put the nose side (side opposite of the emergency key) of the key fob against the START/STOP ignition button, with your foot applied on the brake pedal, and push to operate the ignition switch.
RUN
- Driving position.
- All electrical devices are available (e.g. climate controls, heated seats, etc.).
• The engine will start.
START
WARNING!
- When exiting the vehicle, always remove the key fob from the vehicle and lock your vehicle.
- Never leave children alone in a vehicle, or with access to an unlocked vehicle.
- Allowing children to be in a vehicle unattended is dangerous for a number of reasons. A child or others could be seriously or fatally injured. Children should be warned not to touch the parking brake, brake pedal or the gear selector.
- Following not leave the key fob in or near the vehicle, in a location accessible to children, and do not leave the Keyless Enter 'n Go™ Ignition in the ON/RUN position. A child could operate power windows, other controls, or move the vehicle.
Do not leave children or animals inside parked vehicles in hot weather. Interior heat buildup may cause serious injury or death.
CAUTION!
An unlocked vehicle is an invitation for thieves. Always remove key fob from the vehicle and lock all doors when leaving the vehicle unattended.
In case the ignition switch does not change will push of a button, the key fob may have a lo depleted battery. In this situation, a backup met be used to operate the ignition switch. Put the side (side opposite of the emergency key) of the against the START/STOP ignition button and push operate the ignition switch.
natural_image
Interior view of a car showing a car's seatbelt and dashboard (no text or symbols visible)BackupStartingMethod
NOTE:
- The key fob may not be detected by the less Enter 'n Go™ system if it is located mobile phone, laptop or other electronic device these devices may block the key fob's wire nal and prevent the Keyless Enter 'n Go™ from starting the vehicle.
- For more information on the engine starting dure, see page 97.
REMOTESTART—IFEQUIPPED(GASOLINE)

This system uses the key fob to start conveniently from outside the vehicle with maintaining security. The system has a approximately 328 ft (100 m).
Remote Start is used to defrost windows in weather, and to reach a comfortable climate ent conditions before the customer enters the
NOTE:
Obstructions between the vehicle and key fob reduce this range page 346.
WARNING!
- Do not start or run an engine in a clo confined area. Exhaust gas contains carbon oxide which is odorless and colorless. Can oxide is poisonous and can cause serious death when inhaled.
- Keep key fobs away from children. Operation vehicle Key-Start system, windows, door locks or controls could cause serious injury or death.
HOW TO USE REMOTE START
Push and release the Remote Start button or fab twice within five seconds. The parking light flash, vehicle doors will lock, and the horn twice (if programmed). Once the vehicle has the engine will run for 15 minutes.
Pushing the Remote Start button a third time engine off.
To drive the vehicle, push the unlock button, and place the ignition in the ON/RUN position.
NOTE:
- With Remote Start, the engine will only run for the engine minutes.
still Remote Start can only be used twice.
- If an engine fault is present or fuel level 2 - vehicle will start and then shut down in 10 seconds all ambi- - The parking lights will turn on and remain on during Remote Start mode.
- For security, power window operation is disabled by when the vehicle is in the Remote Start mode.
- The ignition must be placed in the ON/RUN position before the Remote Start sequence can be repeated for a third cycle.
gallagyouor power door locks were unlocked. Remote on- Start will automatically lock the doors.
Amon of the following conditions must be met before the engine will remote start:
• Gear selector in PARK of the • Doors closed other
- Hazard switch off
- Brake switch inactive (brake pedal not pressed)
- Battery at an acceptable charge level
Panic button not pushed
- Fuel meets minimum requirement - System not disabled from previous Remote Start event
● Vehicle Security system not active
- Malfunction Indicator Light (MIL) is not illuminated
TO EXIT REMOTE START MODE REMOTE START COMFORT To drive the vehicle after starting the Remote Start System — IF EQUIPPED
To drive the vehicle after starting the Remote tem, push and release the START/STOP ignition while pressing the brake pedal prior to the e 15 minute cycle.
The Remote Start system will turn the engine Remote Start button on the key fob is pushed if the engine is allowed to run for the entire cycle. Once the ignition is placed in the ON/F tion, the climate controls will resume the previ operations (temperature, blower control, etc.).
button When Remote Start is activated, the front and defroster will automatically turn on in cold wea ditions. The heated steering wheel and driver of the seat feature will turn on if programmed in the mean screen within Uconnect Settings page 165. In wath weather, the driver vented seat feature naturally turn on when Remote Start is ad-ly set Programmed in the Comfort menu screen. The will adjust the climate control settings depending on the outside ambient temperature.
NOTE:
These features will stay on through the duration of Remote Start, or until the ignition is placed in the QoY/RUN position. The climate control settings will change and exit the automatic defaults, if manually adjusted by the driver while the vehicle is in Remote Steam/rude. This includes turning the climate controls off using the OFF button.
will REMOTE START WINDSHIELD WIPER DE-ICER ACTIVATION — IF EQUIPPED
NOTE:
- For vehicles equipped with the Keyless Enter - Passive Entry feature, the message "Remo Active - Push Start Button" will display in ment cluster display until you push the STA ignition button.
- To avoid unintentional shutdowns, the system disable for two seconds after receiving a va Remote Start request.
NOTE: In GO ^TM
If the vehicle is equipped with a rear climate: remain off to allow for optimal front row perform AutomaticTemperatureControl(ATC)—IfEquipped
The climate controls will automatically adjust to optimal temperature and mode settings dependin
the outside ambient temperature. This will occur the ignition is placed in the ON/RUN position climate controls will resume their previous settir
When Remote Start is active and the outside ambient temperature is less than 33^ F (0.6°C), the Windshield Wiper De-Icer will activate. Exiting Remote Start will continue its previous operation. If the Windshield Wiper De-Icer was active, the timer and operation will be true.
REMOTE START ABORT MESSAGE
where the One of the following messages will display in the inst ment cluster display if the vehicle fails to remote sta or exits Remote Start prematurely:
REMOTE START FRONT DEFROST ManualTemperatureControl(MTC)—IfEquipped ACTIVATION — IF EQUIPPED • In ambient temperatures of 40°F (
When Remote Start is active, and the outside temperature is 40^ F ( 4.5^ C) or below, the system automatically activate front defrost for 15 minutes. The timing is dependent on the ambient time. Once the timer expires, the system will call adjust the settings depending on ambient conditions. See “Remote Start Comfort Systems — If Equipped” in the next section for detailed
- In ambient temperatures of 40^ (4.5°C) or the climate settings will default to maximum
mbill with fresh air entering the cabin. If the fire will then expires, the vehicle will enter Mix mo of in ambient temperatures from 40°F (4.5°C) temperature F (26°C), the climate settings will be obtained the last settings selected by the driver.
• In ambient temperatures of 78^ F ( 26^ C) or the climate settings will default to MAX A/C mode, with Recirculation on.
below Remote Start Canceled — Door Open
heat Remote Start Canceled - Hood Open
e. Remote Start Canceled — Fuel Low
o• Remote Start Canceled — Time Expired
sed Remote Start Canceled — System Fault
- Remote Start Disabled — Start Vehicle to Reset the instrument cluster display message stays active
BiLevel until the ignition is placed in the ON/RUN position.
For more information on ATC, MTC, and climate control settings, see page 50.
REMOTESTART—IFEQUIPPED(DIESEL)

This system uses the key fob to start engine conveniently from outside the veh while still maintaining security. The syste
a range of approximately 328 ft (100
Remote Start is used to defrost windows in co weather, and to reach a comfortable climate in ent conditions before the driver enters the vehic
NOTE:
- Obstructions between the vehicle and the key may reduce this range.
- The Remote Start system will wait for the V Start Light page 93 to extinguish before cra ing the engine. This allows time for the inta to preheat the incoming air, and is normal in cold weather page 346.
HOW TO USE REMOTE START
Push and release the Remote Start button on the twice within five seconds. The vehicle doors will look parking lights will flash, and the horn will chirp tw grammed). Then, the engine will start, and the vehicle remain in the Remote Start mode for a 15 minute
Pushing the Remote Start button a third time engine off.
To drive the vehicle, push the unlock button, the ignition in the ON/RUN position.
All of the following conditions must be met engine will remote start:
• Gear selector in PARK
- Doors closed
- Hood closed
- Hazard switch off - Brake switch inactive (brake pedal no
the Battery at an acceptable charge level
- Battery at an acceptable charge level - Paris battery not probed
- Panic button not pushed has
• Fuel meets minimum requirement
Water In Fuel Indicator Light is not
●AllWaitnbTo Start Light is not illuminated
- Malfunction Indicator Light (MIL) is not
Main function Indicator: Light (MIE) is not. For additional functions of the Remote
For additional to see → page 20.
fob
WARNING!
- Do not start or run an engine in a clos - confined area. Exhaust gas contains carbon - heater - oxide which is odorless and colorless. Carb - oxide is poisonous and can cause serious - death when inhaled. - Keep key fobs away from children. Operati - Remote Start system, windows, door locks - key fobs - controls could cause serious injury or death
VEHICLESECURITYSYSTEM— IFEQUIPPED
and place The Vehicle Security system monitors the vehicle and ignition for unauthorized operation. When the vehicle the Security system is activated, interior sw
for door locks are disabled. If something triggers the alarm, the Vehicle Security system will provide the following audible and visible signals:
• The horn will pulse
The turn signals will flash
- The Vehicle Security Light in the instrument cluster will flash
TO ARM THE SYSTEM
Follow these steps to arm the Vehicle Security system:
- Make sure the vehicle's ignition is placed in the system position.
For vehicles equipped with Keyless Entry, make sure the vehicle's keyless ignition system is OFF.
- Perform one of the following methods to lock the vehicle:
garage or O-Push the lock button on the interior power door on-lock switch with the driver and/or passenger mon-door open.
ory of Push the lock button on the exterior Passive Entry door handle with a valid key fob available of the in the same exterior 20page 23.
other ○ Push the lock button on the key fob.
- If any doors are open, close them.
The Vehicle Security system will set when you use the power door locks, or use the key fob to lock the d After all the doors are locked and closed, the Vehicle Security Light, in the instrument panel cluster, will flas rapidly for about 16 seconds to indicate that the alar
is being set. After the alarm is set, the Vehicle Secu
Light will flash at a slower rate to indicate that the item is armed.
the
ne fol-
[Non-Text]
TO DISARM THE SYSTEM
The Vehicle Security system can be disarmed of the following methods:
- Push the unlock button on the key fob.
- Grab the Passive Entry door handle with fob within 5 ft (1.5 m) of the Passive handle (if equipped) page 23.
- Cycle the ignition out of the OFF position.
The Vehicle Security system is designed to protect vehicle. However, you can create conditions where system will give you a false alarm. If one of usly described arming sequences has occurred, the Vehicle Security system will arm regardless of what you are in the vehicle or not. If you remain in and open a door, the alarm will sound. If this disarm the Vehicle Security system.
If the Vehicle Security system is armed and the battery becomes disconnected, the Vehicle Security system will remain armed when the battery is reconnected; the exterior lights will flash, and the horn will sound. If this occurs, disarm the Vehicle Security system.
REARMING OF THE SYSTEM
If something triggers the alarm, and no action is taken to disarm it, the Vehicle Security system will turn the horn off after a 29 second cycle (with five seconds between cycles and up to eight cycles if the trigger remains active), and then rearm itself.
SECURITY SYSTEM MANUAL OVERRIDE
The Vehicle Security system will not arm if you doors using the manual door lock.

MANUAL DOOR LOCKS
The power door locks can be manually locked inside the vehicle by using the door lock knob, each door, push the door lock knob on each panel downward. To unlock the front doors, pull inside the door handle to the first detent. To unlock the vehicle door, put the door lock knob on the door trip upward. If the lock knob is down when the door closed, the door will lock. Therefore, make sure battery not inside the vehicle before closing the
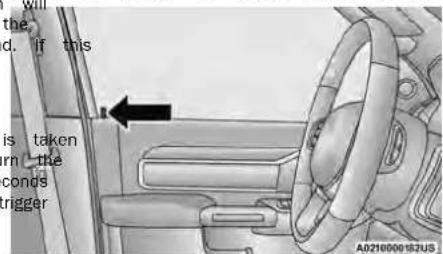
DoorLockKnob
WARNING!
- Do not leave children or animals inside parked loach, the in hot weather. Interior heat buildup may cause serious injury or death.
- For personal security and safety in the event of a collision, lock the vehicle doors as you drive as was when you park and leave the vehicle.
- Before exiting a vehicle, always shift the automatic transmission into PARK, apply the parking brake, from turn the vehicle OFF, remove the key fobs from Toehlotsk and lock your vehicle.
do you've ever leave children alone in a vehicle, or with the access to an unlocked vehicle. Leaving children in the vehicle unattended is dangerous for a number of reasons. A child or others could be seriously or fairly injured. Children should be warned not to touch the parking brake, brake pedal or the gear detector. - Allowing children to be in a vehicle unattended is dangerous for a number of reasons. A child or others could be seriously or fatally injured. Children should be warned not to touch the parking brake, brake pedal or the gear selector.
- Do not leave the key fob in or near the vehicle, in a location accessible to children, and do not leave the Keyless Enter 'n Go™ Ignition in the AC or ON/RUN position. A child could operate power windows, other controls, or move the vehicle.
POWER DOOR LOCKS — IF EQUIPPED
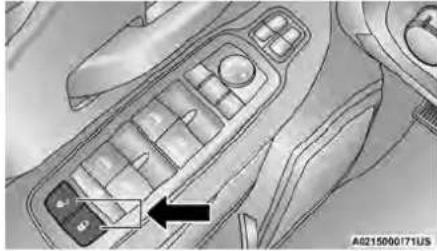
The power door lock switches are located on door panel. Push the switch to lock or unlock
natural_image
Close-up of a car interior showing a keypad and control panel with an arrow pointing to a button (no text or symbols visible)PowerDoorLockSwitches
KEYLESS ENTER 'N GO™ — PASSIVE ENTRY (IF EQUIPPED)
the Positive Entry system is an enhancement vehicle door Remote Keyless Entry system and a Keyless Enter 'n Go™. This feature allows you and unlock the vehicle's door(s) without having the key fob lock or unlock buttons.
ToUnlockFromTheDriverorPassengerSide:
With a valid Passive Entry key fob within 5 ft (1.5 the door handle, grab the handle to unlock the vehicle Grabbing the driver's door handle will unlock the driv-
aulse door automatically. Grabbing the passenger to handlek will unlock all doors automatically. The talogruspanel lock knob will raise when the do unlocked.
2
NOTE:
- Passive Entry may be programmed on/off within Uconnect Settings→page 165.
- If wearing gloves, if it has been raining/snowing, or if there is salt/dirt covering the Passive Entry door handle, the unlock sensitivity can be affected, resulting in a slower response time.
- The doors may unlock when water is sprayed. Passive Entry door handles if the key fob is keyside of the vehicle within 5 ft (1.5 m) c
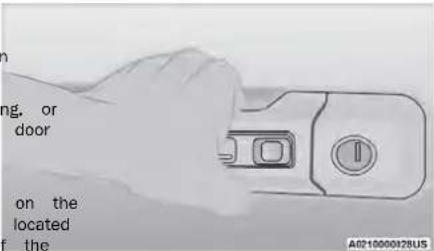
GrabTheDoorHandleToUnlock
The driver's door will unlock automatically if the is detected inside the vehicle when the door lock on the front door panel is used to lock the occur for two attempts. Upon the third attempt, doors will lock even if the key fob is inside.
door. This will be the vehicle is unlocked by Passive Entry and no door is opened within 60 seconds, the vehicle will relock and if equipped will arm the security alarm.
• The Vehicle Security system can be armed/
one, disappeared, by pushing the Passive Entry key fob ay unlock buttons (if equipped).
Either the driver's door only or all doors will unlock when you grab hold of the front driver's door hand depending on the selected setting in the Uconnect system → page 165.
NOTE:
If the key fob is located next to a mobile p or other electronic device, the wireless signal n blocked, and the driver's door may not unlock automatically.
- The key fob may not be detected by the vel sive Entry system if it is located next to a nitition is, in laptop or other electronic device; these
If all doors will unlock when the front passenger door handle is grabbed regardless of the driver's door unlock preference setting.
If the door lock switch is pushed while the ig ACC or ON/RUN and the driver's door is open, will not lock.
devices may block the key fob's wireless signal and prevent the Passive Entry door handle from locking/unlocking the vehicle.
PreventingInadvertentLockingOfPassiveEntryKey FobInVehicle:
To minimize the possibility of unintentionally locking a Passive Entry key fob inside your vehicle, the Passive Entry system is equipped with an automatic door unlock feature which will function if the ignition switch is in the OFF position.
If one of the vehicle doors is open and the door passwitch is used to lock the vehicle, once all open doohave been closed the vehicle checks the inside andoutside of the vehicle for any valid Passive Entry keyfobs. If one of the vehicle's Passive Entry key fobs isdetected inside the vehicle, and no other valid PassiveEntry key fobs are detected outside the vehicle, the
Passive Entry system automatically unlocks all vehicle doors and chirps the horn three times (on the third attempt ALL doors will lock and the Passive EntNOTE by fob can be locked in the vehicle).
ToLockTheVehicle'sDoors:
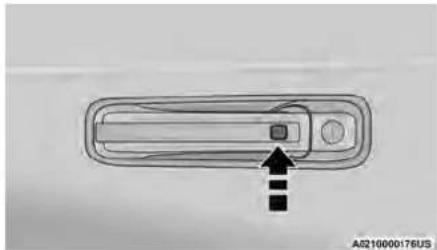
With one of the vehicle's Passive Entry key fobs (1.5 m) of the driver or passenger front door h the door handle lock button to lock all doors.
natural_image
Diagram of a device handle with an arrow pointing to a button (no text or symbols present)PushTheDoorHandleButtonToLock
Do NOT grab the door handle when pushing handle lock button. This could unlock the do
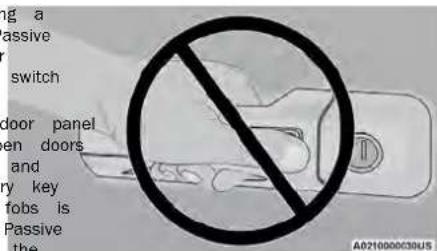
DoNOTGrabTheDoorHandleWhenLocking
- After pushing the door handle lock button, you must go door lock feature default condition is enabled with two seconds before you can lock or unknown enabled, the door locks will lock automatically. Doors, if using either Passive Entry door handle, where the vehicle speed exceeds 15 mph (24 km/h). Is done to allow you to check if the vehicle does not lock door lock feature is enabled/disabled in the by pulling the door handle, without the vehicle connect Settings page 165. unlocking.
- The Passive Entry system depends on a key job that is not fully discharged of its coin battery capacity. - When the key job battery is low, the instrument provides a safer environment for children riding in a ter will display a message indicating that there are you see the rear doors (if equipped) of your vehicle battery is low page 15. have the Child-Protection Door Lock system.
The vehicle doors can also be locked by using Tahauskey the system, open each rear door, use a flat fob lock button or the lock button located on blade vehrewdriver (or emergency key) and rotate the cicle's interior door page 346. dial to engage and disengage the Child-Protection
AUTOMATIC UNLOCK DOORS ON EXIT — IF EQUIPPED
The doors will unlock automatically on vehicles with power door locks after the following sequence of actions:
- The Automatic Unlock Doors On Exit feature is enabled.
- All doors are closed.
- The gear selector was not in PARK, then is place PARK.
- Any door is opened.
AUTOMATIC DOOR LOCKS — IF EQUIPPED
The motor door lock feature default condition is enabled when the disabled, the door locks will lock automatically when the vehicle speed exceeds 15 mph (24 km/h). The is a blocked door lock feature is enabled/disabled in the kconnect Settings page 165.
CHILD-PROTECTION DOOR LOCK — facility.EQUIPPED
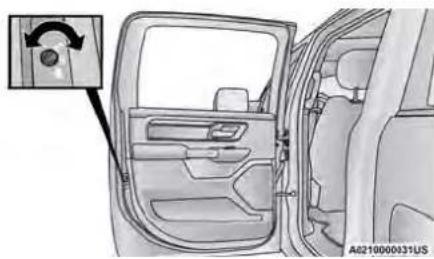
The rent provide a safer environment for children riding in the rear key seat the rear doors (if equipped) of your vehicle have the Child-Protection Door Lock system.
To thus key the system, open each rear door, use a flat blade vekrewdriver (or emergency key) and rotate the dial to engage and disengage the Child-Protection locks. When the system on a door is engaged, that can only be opened by using the outside door handle even if the inside door lock is in the unlocked posit
natural_image
Interior view of a car showing the door, side seats, and dashboard (no text or symbols visible)ChildLockControl
WARNING!
Avoid trapping anyone in the vehicle in a collision. Remember that the rear doors cannot be opened from the inside door handle when the Child Protection Door Locks are engaged.
STEERINGWHEEL
TILT STEERING COLUMN
This feature allows you to tilt the steering column upward or downward. The tilt lever is located or steering column, below the multifunction lever.
Pull the lever toward the steering wheel to ur steering column. With one hand firmly on the wheel, move the steering column up or down, desired. Release the lever to lock the steering firmly in place.
HEATED STEERING WHEEL — IF EQUIPPED

The steering wheel contains a heating element that helps warm your hands in cold weather. The heated steering wheel has one temperature setting. Once the he
steering wheel has been turned on, it will stay on a ok the operator turns it off. The heated steering wheel n teering not turn on when it is already warm.
The heated steering wheel button is located within the Uconnect system and, if equipped, on the instrument pane below the radio. You can access the button through the Climate or Controls menu of the touchscreen.
- Press the heated steering wheel button once to turn the heating element on.
- Press the heated steering wheel button a second time to turn the heating element off.
NOTE:
The engine must be running for the heated steering wheel to operate.
For information on use with the Remote Start system, see ➔ page 20.
NOTE:
- After setting the Child-Protection Door Lock sy always test the door from the inside to ma it is in the desired position.
- For emergency exit with the system engaged, the door lock switch to the unlock position, the window, and open the door with the or door handle.
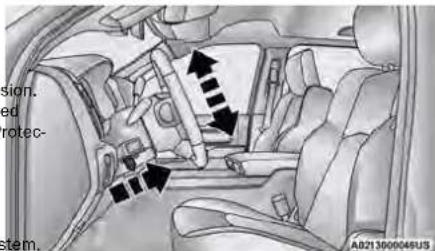
TiltSteeringLever
move
lower
She not adjust the steering column while driving. Adjusting the steering column while driving or driving with the steering column unlocked, could cause driver to lose control of the vehicle. Failure to this warning may result in serious injury or dea
WARNING!
- Persons who are unable to feel pain to because of advanced age, chronic illness, the skin diabe-
tes, spinal cord injury, medication, alcohol use, exhaustion, or other physical conditions must exer- the cise care when using the steering wheel heater. It follow may cause burns even at low temperatures, especially if used for long periods.
(Continued)
WARNING!
- Do not place anything on the steering wheel insulates against heat, such as a blanket of ing wheel covers of any type or material. Cause the steering wheel heater to overheat.
UCONNECTVOICERECOGNITION—IFEQUIPPED
INTRODUCING VOICE RECOGNITION
Start using Uconnect Voice Recognition with these full quick tips. It provides the key Voice Comma tips you need to know to control your vehicle's Recognition (VR) system.
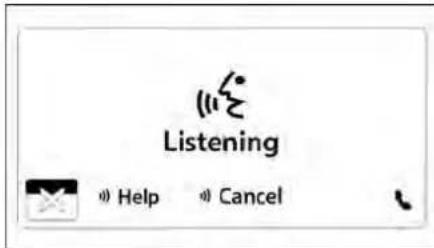
Uconnect3With5-InchDisplay
If you see the NAV icon on the bottom bar menus of your 8.4-inch touchscreen, you have Uconnect 5 NAV system. If not, you have a 5 with 8.4-inch display system.
BASIC VOICE COMMANDS
The following basic Voice Commands can be that any point while using your Uconnect system.
Rushmaythe VR buttonor for the Uconnect 5/5 say the vehicle's "Wake Up" word "Hey Ucon
After the beep, say:
- "Cancel" to stop a current voice session
• " Help" to hear a list of suggested Voice - " Repeat" to listen to the system prompts
Notice the visual cues that inform you of your ognition system's status. Cues appear on the touchscreen.
NOTE:
ns Uconnect 5 systems, the factory default "Wake voice is set to "Hey, Uconnect" and can be reprogrammed through the Uconnect Settings.
GET STARTED
All you need to control your Uconnect system voice are the buttons on your steering wheel. Helpful hints for using Voice Recognition:
- Reduce background noise. Wind and passenger conversations are examples of noise that may impact recognition.
- Speak clearly at a normal pace and volume facing straight ahead.
- Each time you give a Voice Command, first push the VR button, wait until after the beep, then say your Voice Command. You can also say the vehicle "Wake
or "Up" the word and state your command. Some examples of "Wake Up" words include "Hey, Uconnect" or "connect", "Hey, Ram".
- A passenger can press the VR button shortcut on the radio status bar to also issue a command. - you can interrupt the help message or system prompts by pushing the VR button and saying a V. Voice Command from the current category.
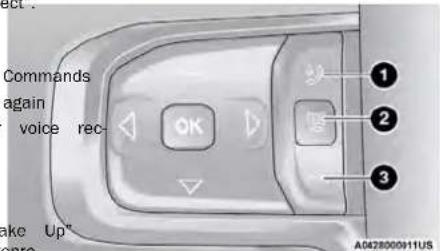
UconnectVoiceCommandButtons
1 - For The Uconnect 5/5 NAV System Vehicles
Equipped With Navigation: Push The Phone Button To
Begin Radio, Media, Navigation, Climate, Start Or
Answer A Phone Call, And Send Or Receive A Text
1 - For The Uconnect 5/5 NAV System Vehicles Not Equipped With Navigation: Push The Phone Button To Answer An Incoming Phone Call
2 - Push To Access The Tile Feature
3 — Push The Hang Up Button To End A Call Curre Progress
1 — For The Uconnect 5/5 NAV System Vehicles
Equipped With Navigation: Push The Phone Button To
Begin Radio, Media, Navigation, Climate, Start Or
Answer A Phone Call, And Send Or Receive A Text
1 — For The Uconnect 5/5 NAV System Vehicles Not
Equipped With Navigation: Push The Phone Button To
Answer An Incoming Phone Call
2 — Push To Access The Tile Feature
3 — Push The Hang Up Button To End A Call Curre
Progress
ADDITIONAL INFORMATION
NOTE:
© 2023 FCA US LLC. All rights reserved. Mopar and equipped with power convex mirrors, these Uconnect are registered trademarks and Mopar Owned positions will not set as part of a memory Connect is a trademark of FCA US LLC. SiriusXM® and You# vehicle is equipped with two key fobs, all related marks and logos are trademarks of the SariusXM® Radio Inc.
Uconnect System Support:
• US residents visit www.DriveUconnect.com or 1-877-855-8400 (24 hours a day 7 days a
- Canadian residents visit www.DriveUconnect.ca or call: 1-800-465-2001 (English) or 1-800-387-9983 (French)
SiriusXM Guardian™ services support:
• US residents visit
www.driveuconnect.com/sirius-xm-guardian or call:
1-844-796-4827
- Canadian residents visit https://www.driveuconnect.ca/en/sirius-xm-guardian or call: 1-877-324-9091
DRIVERMEMORY SETTINGS— IFEQUIPPED
This feature allows the driver to save up to two different memory profiles for easy recall through a memory switch. Each memory profile saves desired position settings for the following features:
- Driver seat position
- Easy Entry/Exit seat operation (if equipped)
- Side mirrors
- Adjustable pedals (if equipped)
• A set of desired radio station presets
DriverMemorySettingsButtons
wodifferent PROGRAMMING THE MEMORY FEATURE
To create a new memory profile, perform the
- Place the vehicle's ignition in the ON/RUN (do not start the engine).
-
Adjust all memory profile settings to desires ences (i.e., driver's seat, outside mirrors, and pedals (If equipped), and radio station pres
-
Push the set (S) button on the memory switch, a then push the desired memory button (1 or 2) with five seconds. The instrument cluster display will display which memory position has been set.
each can NOTE:
Memory profiles can be set without the vehicle in PAL driver
LINKING AND UNLINKING THE REMOTE KEYLESS ENTRY KEY FOB MEMORY
Your key fob can be programmed to recall one of tv saved memory profiles.
NOTE:
Before programming your key fob you must select the "Personal Settings Linked to Key Fob" feature through the Uconnect Settings page 165.
To program your key fob, perform the following:
- Place the vehicle's ignition in the OFF position.
- Select a desired memory profile 1 or 2.
- Once the profile has been recalled, push and release the set (S) button on the memory switch.
- Push and release button (1) or (2) accordingly. "Memory Profile Set" (1 or 2) will display in the instrument cluster.
- Push and release the lock button on the key fob following: within 10 seconds.
osition NOTE:
Your key fob can be unlinked from your memory set-prefer- things by pushing the set (S) button, and within 10 s table, pushing the unlock button on the key fob.
MEMORY POSITION RECALL
NOTE:
The vehicle speed must be lower than 5 mph to recall memory positions. If a recall is attempt when the vehicle speed is greater than 5 mph
a message will be displayed in the instrument display.
To recall the memory settings for driver one of push the desired memory button number (1 or unlock button on the key fob linked to the d memory position.
A recall can be canceled by pushing any of the buttons during a recall (S, 1, or 2). When a r celed, the driver's seat and the adjustable pedals (if equipped) stop moving. A delay of one second occur before another recall can be selected.
SEATS
Seats are a part of the Occupant Restraint the vehicle.
WARNING!
- It is dangerous to ride in a cargo area, outside of a vehicle. In a collision, people these areas are more likely to be seriously or killed.
- Do not allow people to ride in any area vehicle that is not equipped with seats and belts. In a collision, people riding in these are more likely to be seriously injured or
- Be sure everyone in your vehicle is in a using a seat belt properly.
MANUAL ADJUSTMENT FRONT SEATS — IF EQUIPPED
(8 km/h) ManualFrontSeatForward/Rearward ed Adjustment
cluster front seats are adjustable forward or rea
The manual seat adjustment handle is located there, seat cushion at the front edge of each
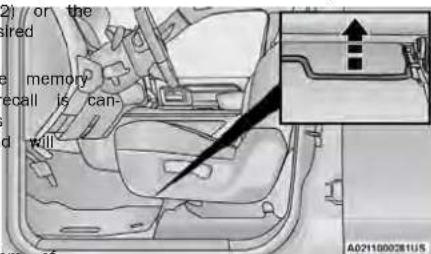
ManualSeatAdjustmentBar
While sitting in the seat, pull up on the hat the seat forward or rearward. Release the back have reached the desired position. Then, using pressure, move forward and rearward on the side of the sure that the seat adjusters have latched.
| of your | WARNING! |
| seat areas killed seat | Adjusting a seat while driving may be da Moving a seat while driving could result control which could cause a collision and injury or death. |
(Continued)
WARNING!
- Seats should be adjusted before fastening the seat belts and while the vehicle is parked. Serious injury of death could result from a poorly adjusted seat belt.
ManualFrontSeatReclineAdjustment
under recline lever is located on the outboard side of seat. To recline the seat, lean forward slightly, lift the lever, lean back to the desired position and release 1 lever. To return the seatback to its normal upright portion, lean forward and lift the lever. Release the level once the seatback is in the upright position.
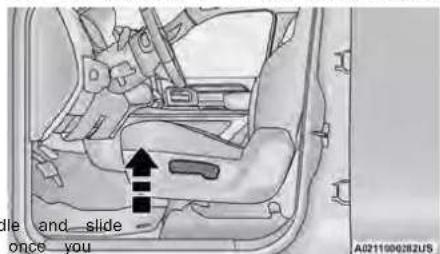
ManualReclineLever
WARNING!
- Do not stand or lean in front of the seat while atting the handle. The seatback may swing forward and hit you causing injury.
- To avoid injury, place your hand on the seatback and actuate the handle, then position the seatback in the desired position.


- ROADSIDEASSISTANCE
- TABLEOFCONTENTS
- INTRODUCTION
- RECREATIONALTOWING(BEHINDMOTORHOME).161
- DRIVINGTIPS. 164
- MULTIMEDIA
- UCONNECTSYSTEMS. 165
- CYBERSECURITY....165
- UCONNECTSETTINGS. 165
- UCONNECTINTRODUCTION. 182
- UCONNECTMODES 185
- CONNECTEDVEHICLESERVICES—IFEQUIPPED. 200
- CONNECTEDSERVICESFAQs. 211
- RADIOOPERATIONANDMOBILEPHONES. . . . 2 1 5
- OFF-ROADPAGES—IEEQUIPPED 2.1.6
- TRAILERTOW-IFEQUIPPED. 220
- SAFETY
- SAFETYFEATURES. 2 2 3
- AUXILIARYDRIVINGSYSTEMS. 2 2 9
- OCCUPANTRESTRAINTSYSTEMS 237
- SAFETYTIPS 262
- INCASEOFEMERGENCY
- SERVICINGANDMAINTENANCE
- CUSTOMERASSISTANCE
- SUGGESTIONSFOROBTAININGSERVICEFOR
- VANCONVERSIONS/CAMPERS
- VEHICLEMODIFICATIONS/ALTERATIONS
- SYMBOLGLOSSARY
- NOTE:
- ToLock/UnlockTheDoors
- UsingThePanicFeature
- KeyLeftVehicleFeature
- ReplacingTheBatteryInTheKeyFob
- ProgrammingAndRequesting AdditionalKeyFobs
- SENTRYKEY
- WARNING!
- CAUTION!
- IGNITIONSWITCH
- KEYLESS ENTER 'N GO™ IGNITION-
- RUN
- START
- REMOTESTART—IFEQUIPPED(GASOLINE)
- HOW TO USE REMOTE START
- TO EXIT REMOTE START MODE REMOTE START COMFORT To drive the vehicle after starting the Remote Start System — IF EQUIPPED
- will REMOTE START WINDSHIELD WIPER DE-ICER ACTIVATION — IF EQUIPPED
- NOTE: In GO TM
- REMOTE START ABORT MESSAGE
- REMOTE START FRONT DEFROST ManualTemperatureControl(MTC)—IfEquipped ACTIVATION — IF EQUIPPED • In ambient temperatures of 40°F (
- REMOTESTART—IFEQUIPPED(DIESEL)
- VEHICLESECURITYSYSTEM— IFEQUIPPED
- TO ARM THE SYSTEM
- TO DISARM THE SYSTEM
- REARMING OF THE SYSTEM
- SECURITY SYSTEM MANUAL OVERRIDE
- MANUAL DOOR LOCKS
- POWER DOOR LOCKS — IF EQUIPPED
- KEYLESS ENTER 'N GO™ — PASSIVE ENTRY (IF EQUIPPED)
- ToUnlockFromTheDriverorPassengerSide:
- PreventingInadvertentLockingOfPassiveEntryKey FobInVehicle:
- ToLockTheVehicle'sDoors:
- AUTOMATIC UNLOCK DOORS ON EXIT — IF EQUIPPED
- AUTOMATIC DOOR LOCKS — IF EQUIPPED
- CHILD-PROTECTION DOOR LOCK — facility.EQUIPPED
- STEERINGWHEEL
- TILT STEERING COLUMN
- HEATED STEERING WHEEL — IF EQUIPPED
- move
- lower
- UCONNECTVOICERECOGNITION—IFEQUIPPED
- INTRODUCING VOICE RECOGNITION
- BASIC VOICE COMMANDS
- GET STARTED
- ADDITIONAL INFORMATION
- DRIVERMEMORY SETTINGS— IFEQUIPPED
- DriverMemorySettingsButtons
- wodifferent PROGRAMMING THE MEMORY FEATURE
- LINKING AND UNLINKING THE REMOTE KEYLESS ENTRY KEY FOB MEMORY
- MEMORY POSITION RECALL
- SEATS
- MANUAL ADJUSTMENT FRONT SEATS — IF EQUIPPED
- (8 km/h) ManualFrontSeatForward/Rearward ed Adjustment
- ManualFrontSeatReclineAdjustment
Brand : RAM
Model : Chassis Cab (2024)
Category : Automotive