
Chassis Cab (2023) - Automotive RAM - Free user manual and instructions
Find the device manual for free Chassis Cab (2023) RAM in PDF.


| Product Type | Automobile - Chassis Cab |
| Brand | RAM |
| Model | Chassis Cab (2023) |
| Year | 2023 |
| Engine | 6.7L Cummins Turbo Diesel |
| Transmission | 8-speed Automatic |
| Drivetrain | Rear-Wheel Drive / Four-Wheel Drive (available) |
| Dimensions (L x W x H) | Approx. 249.9 x 79.4 x 79.3 in |
| Wheelbase | 169 in |
| GVWR (Gross Vehicle Weight Rating) | 14,000 lbs (Class 4) |
| Payload Capacity | Up to 7,840 lbs |
| Towing Capacity | Up to 37,090 lbs (gooseneck) |
| Fuel Tank Capacity | 52 gallons (diesel) |
| Battery | 12V, 850 CCA |
| Safety Features | Airbags, Anti-lock Brakes, Electronic Stability Control, ParkSense |
| Maintenance | Oil change every 10,000 miles, filter replacement, tire rotation |
| Cleaning | Hand wash with mild soap, avoid abrasive cleaners |
| Spare Parts | Genuine RAM parts recommended |
| Reparability | Authorized dealer service required for warranty |
| General Info | User manual covers operation, safety, maintenance |
Frequently Asked Questions - Chassis Cab (2023) RAM
User questions about Chassis Cab (2023) RAM
0 question about this device. Answer the ones you know or ask your own.
Ask a new question about this device
Download the instructions for your Automotive in PDF format for free! Find your manual Chassis Cab (2023) - RAM and take your electronic device back in hand. On this page are published all the documents necessary for the use of your device. Chassis Cab (2023) by RAM.
USER MANUAL Chassis Cab (2023) RAM
natural_image
Exterior view of a Dendros truck on a waterfront promenade with city skyline and bridge in background (no signage)2023 CHASSIS CAB OWNER'S MANUAL
This Owner's Manual illustrates and describes the operation of features and equipment that are either standard or optional on this vehicle. This manual may also include a description of features and equipment that are no longer available or were not ordered on this vehicle. Please disregard any features and equipment described in this manual that are not on this vehicle. FCA US LLC reserves the right to make changes in design and specifications, and/or make additions to or improvements to its products without imposing any obligation upon itself to install them on products previously manufactured.
With respect to any vehicles sold in Canada, the name FCA US LLC shall be deemed to be deleted and the name FCA Canada Inc. used in substitution therefore.
ROADSIDEASSISTANCE
24 HOURS, 7 DAYS A WEEK AT YOUR SERVICE.
CALL 1-800-521-2779 OR VISIT CHRYSLER.RSAHELP.COM (USA)
CALL 1-800-363-4869 OR VISIT FCA.ROADSIDEAID.COM (CANADA)
SERVICES: Flat Tire Service, Out Of Gas/Fuel Delivery, Battery Jump Assistance, Lockout Service and Towing Service
Please see the Customer Assistance chapter in this Owner's Manual for further information.
FCA US LLC reserves the right to modify the terms or discontinue the Roadside Assistance Program at any time. The Roadside Assistance Program is subject to restrictions and conditions of use, that are determined solely by FCA US LLC.

WARNING: Operating, servicing and maintaining a passenger vehicle or off-highway vehicle can expose you to chemicals including engine exhaust, carbon monoxide, phthalates, lead, which are known to the State of California to cause cancer and birth defects or other productive harm. To minimize exposure, avoid breathing exhaust, do not idle the engine except necessary, service your vehicle in a well-ventilated area and wear gloves or wash your hands frequently by servicing your vehicle. For more information go to www.P65Warnings.ca.gov/passenger-vehicle.


TABLE OF CONTENTS
1 INTRODUCTION....9
2 GETTING TO KNOW YOUR VEHICLE ....15
3 GETTING TO KNOW YOUR INSTRUMENT PANEL ....78
4 STARTING AND OPERATING 113
5 MULTIMEDIA 199
6 SAFETY 270
7 IN CASE OF EMERGENCY 325
8 SERVICING AND MAINTENANCE 342
9 TECHNICAL SPECIFICATIONS 411
10 CUSTOMER ASSISTANCE 422
11 INDEX 428
INTRODUCTION
SYMBOLS KEY....10
VAN CONVERSIONS/CAMPERS.... 10
VEHICLE MODIFICATIONS/ALTERATIONS...... 10
SYMBOL GLOSSARY.... 10
GETTING TO KNOW YOUR VEHICLE
KEYS 15
Key Fob 15
SENTRY KEY 18
IGNITION SWITCH 18
Keyless Enter 'n Go™ Ignition ....18
REMOTE START — IF EQUIPPED (GASOLINE) ... 20
How To Use Remote Start....20
To Exit Remote Start Mode....21
Remote Start Front Defrost Activation —
If Equipped....21
Remote Start Comfort Systems —
If Equipped....21
Remote Start Windshield Wiper De-Icer
Activation - If Equipped 22
Remote Start Abort Message 22
REMOTE START — IF EQUIPPED (DIESEL) ...... 22
How To Use Remote Start....22
VEHICLE SECURITY SYSTEM — IF EQUIPPED..... 23
To Arm The System ....23
To Disarm The System 23
Rearming Of The System 23
Security System Manual Override....23
DOORS 24
Manual Door Locks 24
Power Door Locks - If Equipped ....24
Keyless Enter 'n Go™ — Passive Entry
(If Equipped) 25
Automatic Unlock Doors On Exit —
If Equipped....26
Automatic Door Locks —If Equipped....27
Child-Protection Door Lock —If Equipped .....27
STEERING WHEEL 27
Tilt Steering Column....27
Heated Steering Wheel – If Equipped......28
Introducing Voice Recognition....28
Basic Voice Commands 29
Get Started 29
Additional Information 30
DRIVER MEMORY SETTINGS — IF EQUIPPED.....30
Programming The Memory Feature ....30
Linking And Unlinking The Remote Keyless
Entry Key Fob To Memory....31
Memory Position Recall 31
SEATS.... 31
Manual Front Seat Adjustment —
If Equipped 32
Power Adjustment (Front Seats) —
If Equipped ....33
Heated Seats — If Equipped....34
Ventilated Seats – If Equipped ......35
Head Restraints 36
DRIVER ADJUSTABLE PEDALS —
IF EQUIPPED 38
MIRRORS 39
Inside Rearview Mirror....39
Illuminated Vanity Mirror — If Equipped .....41
Outside Mirrors 42
Outside Automatic Dimming Mirror —
If Equipped 43
Power Mirrors — If Equipped ....43
Power Folding Outside Mirrors For Standard
And Trailer Tow — If Equipped....44
Automatic Power Folding Mirrors —
If Equipped 44
Power Convex Mirror Switch —
If Equipped 45
Forward Utility Lights and Rear Guidance
Lights — If Equipped....46
Heated Mirrors — If Equipped....46
Tilt Side Mirrors In Reverse —
If Equipped....46
UNIVERSAL GARAGE DOOR OPENER
(HOMELINK®) — IF EQUIPPED 47
Before You Begin Programming HomeLink® ...47
Erasing All The HomeLink® Channels .....47
Identifying Whether You Have A Rolling Code
Or Non-Rolling Code Device....47
Programming HomeLink® To A Garage Door
Opener 48
Programming HomeLink® To A Miscellaneous
Device 49
Reprogramming A Single HomeLink® Button ..49
Canadian/Gate Operator Programming .....49
Security 50
Troubleshooting Tips....50
EXTERIOR LIGHTS....51
Headlight Switch....51
Multifunction Lever 51
Daytime Running Lights (DRLs) 52
High/Low Beam Switch....52
Automatic High Beam Headlamp Control —
If Equipped....52
Flash-To-Pass 52
Automatic Headlights – If Equipped ....52
Directional LED Headlamp System —
If Equipped....53
Parking Lights....53
Headlights On With Wipers....53
Headlight Illumination On Approach....53
Headlight Delay 53
Lights-On Reminder 54
Front Fog Lights — If Equipped ....54
Turn Signals....54
Lane Change Assist — If Equipped....54
Cargo Lights/Rear Guidance Lights —
If Equipped....54
Battery Saver....55
INTERIOR LIGHTS ....55
Courtesy Lights....55
WINDSHIELD WIPERS AND WASHERS......57
Windshield Wiper Operation ....57
Rain Sensing Wipers – If Equipped .....58
CLIMATE CONTROLS ....58
Automatic Climate Control Descriptions
And Functions....59
Manual Climate Control Descriptions
And Functions....62
Automatic Temperature Control (ATC)......64
Climate Voice Recognition —If Equipped......64
Operating Tips 64
INTERIOR STORAGE AND EQUIPMENT.... 65
Storage 65
USB/AUX Control 70
Electrical Power Outlets....71
Power Inverter — If Equipped 72
Wireless Charging Pad —If Equipped .....74
WINDOWS 74
Power Windows — If Equipped .....74
Automatic Window Features —If Equipped.....75
Reset Auto-Up 75
Window Lockout Switch — If Equipped......76
Power Sliding Rear Window —If Equipped .....76
Manual Sliding Rear Window —
If Equipped 76
Wind Buffeting 76
HOOD....77
To Open The Hood 77
To Close The Hood 77
GETTING TO KNOW YOUR
INSTRUMENT PANEL
MIDLINE INSTRUMENT CLUSTER — GASOLINE.....78
Midline Instrument Cluster Descriptions.....79
HIGHLINE INSTRUMENT CLUSTER — GASOLINE...80
Highline Instrument Cluster Descriptions.....81
PREMIUM INSTRUMENT CLUSTER — GASOLINE ..82
Premium Instrument Cluster Descriptions — Gasoline ....83
BASE INSTRUMENT CLUSTER — DIESEL ..... 84
Diesel Instrument Cluster 85
MIDLINE INSTRUMENT CLUSTER — DIESEL ..... 86
Diesel Instrument Cluster 87
PREMIUM INSTRUMENT CLUSTER — DIESEL .... 88
Premium Instrument Cluster Descriptions — Diesel 89
INSTRUMENT CLUSTER DISPLAY 89
Instrument Cluster Display Location and Controls....90
Oil Life Reset 92
Display Menu Items 93
Diesel Messages And Warnings....98
Battery Saver On/Battery Saver Mode
Message — Electrical Load Reduction
Actions — If Equipped 101
WARNING LIGHTS AND MESSAGES ...... 102
Red Warning Lights.... 103
Yellow Warning Lights.... 105
Yellow Indicator Lights.... 108
Green Indicator Lights 109
White Indicator Lights 110
Blue Indicator Lights 111
ONBOARD DIAGNOSTIC SYSTEM — OBD II ..... 111
Onboard Diagnostic System
(OBD II) Cybersecurity 111
EMISSIONS INSPECTION AND MAINTENANCE
PROGRAMS.... 112
STARTING AND OPERATING
STARTING THE ENGINE—GASOLINE ENGINE.. 113
Automatic Transmission 113
AutoPark — Rotary Shifter and 8-Speed
Transmission Only.... 113
Tip Start Feature 115
Keyless Enter 'n Go™ — Ignition.... 115
Normal Starting Using ENGINE START/STOP
Button 115
Cold Weather Operation
(Below -22°F Or -30°C) 117
After Starting 117
STARTING THE ENGINE — DIESEL ENGINE.....117
Automatic Transmission 117
Keyless Enter 'n Go™ — Ignition .... 117
Extreme Cold Weather.... 119
Normal Starting Procedure — Engine Manifold
Air Temperature Above 66°F (19°C) ..... 119
Starting Procedure — Engine Manifold
Air Temperature 0°F To 66°F
(-18°C to 19°C).... 120
Starting Procedure — Engine Manifold Air
Temperature Below 0°F (-18°C) ..... 121
Starting Fluids 121
NORMAL OPERATION — DIESEL ENGINE .....122
Cold Weather Precautions.... 122
Engine Idling 124
Noise.... 124
Stopping The Engine.... 125
Idle Shutdown 125
Programmable Maximum Vehicle Speed .... 126
Operating Precautions.... 126
Cooling System Tips.... 126
Diesel Particulate Filter (DPF) Manual
Regeneration — If Equipped 127
ENGINE BLOCK HEATER — IF EQUIPPED......127
ENGINE BREAK-IN RECOMMENDATIONS—
GASOLINE ENGINE ....127
ENGINE BREAK-IN RECOMMENDATIONS —
DIESEL ENGINE ....128
PARKING BRAKE 128
DIESEL EXHAUST BRAKE (ENGINE BRAKING) .. 129
AUTOMATIC TRANSMISSION....130
Ignition Park Interlock.... 131
Brake/Transmission Shift Interlock (BTSI)
System 131
8-Speed Automatic Transmission
If Equipped 132
6-Speed Automatic Transmission —
If Equipped 135
AUXILIARY SWITCHES — IF EQUIPPED .....139
Electronically Shifted Transfer Case
(8-Speed Transmission) — If Equipped ..... 140
Electronically Shifted Transfer Case
(6-Speed Transmission) —
If Equipped.... 143
Manually Shifted Transfer Case —
If Equipped.... 145
LIMITED-SLIP DIFFERENTIAL ....147
Service The ParkSense Park Assist System ...162
Cleaning The ParkSense System 162
ParkSense System Usage Precautions...... 162
LANESENSE — IF EQUIPPED 163
LaneSense Operation 163
Turning LaneSense On Or Off.... 164
LaneSense Warning Message.... 164
Changing LaneSense Status 166
Turn Signal Activated Blind Spot Assist — If Equipped.... 166
PARKVIEW REAR BACK UP CAMERA.... 166
VEHICLE LOADING ....180
Gross Vehicle Weight Rating (GVWR) ..... 180
Payload 180
Gross Axle Weight Rating (GAWR).... 180
Tire Size 181
Rim Size.... 181
Inflation Pressure.... 181
Curb Weight.... 181
Loading 181
TRAILER TOWING ....181
Common Towing Definitions.... 181
Trailer Hitch Type and Maximum Trailer
Weight.... 185
Trailer Towing Weights (Maximum Traile
r Weight Ratings) 186
Trailer And Tongue Weight 186
Towing Requirements 186
Towing Tips 192
SNOWPLOW — IF EQUIPPED....192
Before Plowing 192
Snowplow Prep Package Model Availability....193
Over The Road Operation With Snowplow
Attached.... 193
Operating Tips 193
General Maintenance 193
RECREATIONAL TOWING
(BEHIND MOTORHOME)....194
Towing This Vehicle Behind Another Vehicle...194
Recreational Towing — Two-Wheel
Drive Models.... 195
Recreational Towing — Four-Wheel
Drive Models.... 195
DRIVING TIPS ....197
Driving On Slippery Surfaces 197
Driving Through Water 198
MULTIMEDIA
UCONNECT SYSTEMS ....199
CYBERSECURITY 199
UCONNECT SETTINGS ....199
Customer Programmable Features...... 200
UCONNECT INTRODUCTION....221
System Overview 221
Safety And General Information.... 223
UCONNECT MODES 224
Steering Wheel Audio Controls.... 224
Radio Mode 224
Media Mode 232
Phone Mode 234
CONNECTED VEHICLE SERVICES —
IF EQUIPPED 244
Is My Vehicle Connected? 244
Introduction To Connected Vehicle
Services 244
Getting Started With Connected Vehicle
Services 246
Using SiriusXM Guardian™ 247
Manage My SiriusXM Guardian™ Account .. 258
CONNECTED SERVICES FAQs 258
Connected Services SOS FAQs —
If Equipped 259
Connected Services Remote Door Lock/
Unlock FAQs 259
Connected Services Roadside Assistance
FAQs 259
Connected Services Send & Go FAQs —
If Equipped 259
Connected Services Vehicle Finder FAQs ... 260
Connected Services Stolen Vehicle Assistance
FAQs — If Equipped 260
Connected Services Remote Vehicle
Start FAQs 260
Connected Services Remote Horn &
Lights FAQs.... 261
Connected Services Account FAQs —
If Equipped.... 261
Data Collection & Privacy 263
Anti-Lock Brake System (ABS) 270
Rear Seat Reminder Alert (RSRA)...... 271
Electronic Brake Control (EBC) System ..... 271
AUXILIARY DRIVING SYSTEMS ....277
Blind Spot Assist Cameras —
If Equipped 277
Forward Collision Warning (FCW) With
Mitigation — If Equipped.... 278
Tire Pressure Monitoring System (TPMS) ... 280
OCCUPANT RESTRAINT SYSTEMS ....288
Occupant Restraint Systems Features ..... 288
Important Safety Precautions 288
Seat Belt Systems 289
Supplemental Restraint Systems (SRS) ..... 296
Child Restraints.... 305
SAFETY TIPS 321
Transporting Passengers.... 321
Transporting Pets 322
Connected Vehicles.... 322
Safety Checks You Should Make Inside The
Vehicle 322
Periodic Safety Checks You Should Make
Outside The Vehicle 323
Exhaust Gas.... 324
Carbon Monoxide Warnings 324
IN CASE OF EMERGENCY
HAZARD WARNING FLASHERS ....325
ASSIST AND SOS SYSTEM — IF EQUIPPED .....326
JACKING AND TIRE CHANGING....329
4500/5500 Models.... 329
Preparations For Jacking 329
Jacking Instructions 4500 And
5500 Series.... 330
To Stow The Flat Or Spare — If Equipped ... 332
Hub Caps/Wheel Covers —If Equipped...... 332
JUMP STARTING 333
Preparations For Jump Start.... 333
Jump Starting Procedure 334
IF YOUR ENGINE OVERHEATS ....335
GEAR SELECTOR OVERRIDE ....336
6-Speed Transmission — If Equipped ..... 336
MANUAL PARK RELEASE.... 337
8-Speed Transmission — If Equipped...... 337
FREEING A STUCK VEHICLE 338
TOWING A DISABLED VEHICLE 339
Two-Wheel Drive Models 340
Four-Wheel Drive Models 340
Emergency Tow Hooks — If Equipped...... 341
ENHANCED ACCIDENT RESPONSE SYSTEM
(EARS) 341
EVENT DATA RECORDER (EDR) 341
SERVICING AND MAINTENANCE
SCHEDULED SERVICING 342
Maintenance Plan — Gasoline Engine ..... 344
Maintenance Plan — Diesel Engine ..... 346
ENGINE COMPARTMENT.... 350
6.4L Gasoline Engine 350
6.7L Diesel Engine 351
Checking Oil Level 352
Adding Washer Fluid 352
Maintenance-Free Battery 352
Pressure Washing 353
VEHICLE MAINTENANCE 353
Engine Oil 353
Engine Oil Filter 354
Engine Air Cleaner Filter 355
Air Conditioner Maintenance 357
Accessory Drive Belt Inspection.... 359
Draining Fuel/Water Separator Filter ...... 360
Engine Mounted Fuel Filter Replacement... 361
Underbody Mounted Fuel Filter
Replacement 362
Priming If The Engine Has Run Out Of Fuel ...363
Intervention Regeneration Strategy —
Message Process Flow 364
Diesel Exhaust Fluid (DEF) 364
Body Lubrication 364
Windshield Wiper Blades 365
Exhaust System 367
Cooling System 368
Charge Air Cooler — Inter-Cooler 370
Brake System 371
Automatic Transmission 372
Rear Axle And 4x4 Front Driving Axle
Fluid Level 374
Transfer Case 374
Noise Control System Required
Maintenance & Warranty 374
Fuses....377
Bulb Replacement 384
TIRES 389
Tire Safety Information 389
Tires – General Information 397
Tire Types.... 400
Spare Tires – If Equipped 401
Wheel And Wheel Trim Care 403
Snow Traction Devices 404
Tire Rotation Recommendations 405
DEPARTMENT OF TRANSPORTATION UNIFORM
TIRE QUALITY GRADES 406
Treadwear.... 406
Traction Grades.... 407
Temperature Grades.... 407
STORING THE VEHICLE 407
BODYWORK....407
Protection From Atmospheric Agents ..... 407
Body And Underbody Maintenance...... 408
Preserving The Bodywork 408
INTERIORS 409
Seats And Fabric Parts.... 409
Plastic And Coated Parts 409
Leather Surfaces...... 410
Glass Surfaces 410
TECHNICAL SPECIFICATIONS
VEHICLE IDENTIFICATION NUMBER (VIN) .....411
BRAKE SYSTEM 411
Hydraulic Brake Assist —If Equipped ...... 411
WHEEL AND TIRE TORQUE SPECIFICATIONS.. 411
Torque Specifications 411
FUEL REQUIREMENTS—GASOLINE ENGINE ... 413
6.4L Engine 413
Reformulated Gasoline 413
Materials Added To Fuel.... 413
Gasoline/Oxygenate Blends.... 414
Do Not Use E-85 In Non-Flex Fuel Vehicles ....414
CNG And LP Fuel System Modifications ..... 414
Methylcyclopentadienyl Manganese
Tricarbonyl (MMT) In Gasoline.... 414
Fuel System Cautions 415
FUEL REQUIREMENTS - DIESEL ENGINE ..... 415
Fuel Specifications 416
Biodiesel Fuel Requirements 416
FLUID CAPACITIES 418
ENGINE FLUIDS AND LUBRICANTS 419
CHASSIS FLUIDS AND LUBRICANTS .... 421
CUSTOMER ASSISTANCE
SUGGESTIONS FOR OBTAINING SERVICE FOR
YOUR VEHICLE 422
Prepare For The Appointment 422
Prepare A List 422
Be Reasonable With Requests.... 422
IF YOU NEED ASSISTANCE 422
Roadside Assistance.... 422
FCA US LLC Customer Center 424
FCA Canada Inc. Customer Center 424
Mexico....424
Puerto Rico And US Virgin Islands 424
Customer Assistance For The Hearing Or
Speech Impaired(TDD/TTY)...... 424
Service Contract 424
WARRANTY INFORMATION......425
MOPAR® PARTS 425
REPORTING SAFETY DEFECTS 425
In The 50 United States And
Washington, D.C. 425
In Canada 426
PUBLICATION ORDER FORMS 426
GENERAL INFORMATION......427
CHANGE OF OWNERSHIP OR ADDRESS......427
INTRODUCTION
Dear Customer,
Congratulations on the purchase of your new Ram. Be assured that it represents precision workmanship, distinctive styling, and high quality.
This is a specialized utility vehicle. It can go places and perform tasks that are not intended for conventional passenger vehicles. It handles and maneuvers differently from many passenger vehicles both on-road and off-road, so take time to become familiar with your vehicle. If equipped, the two-wheel drive version of this vehicle was designed for on-road use only. It is not intended for off-road driving or use in other severe conditions suited for a four-wheel drive vehicle. Before you start to drive this vehicle, read the Owner's Manual. Be sure you are familiar with all vehicle controls, particularly those used for braking, steering, transmission, and transfer case shifting. Learn how your vehicle handles on different road surfaces. Your driving skills will improve with experience. When driving off-road, or working the vehicle, don't overload the vehicle or expect the vehicle to overcome the natural laws of physics. Always observe federal, state, provincial and local laws wherever you drive. As with other vehicles of this type, failure to operate this vehicle correctly may result in loss of control or a collision ➤ page 197
This Owner's Manual has been prepared with the assistance of service and engineering specialists to acquaint you with the operation and maintenance of your vehicle. It is supplemented by customer-oriented documents. Within this information, you will find a description of the services that FCA US LLC offers to its customers as well as the details of the terms and conditions for maintaining its validity. Please take the time to read all of these publications carefully before driving your vehicle for the first time. Following the instructions, recommendations, tips, and important warnings in this manual will help ensure safe and enjoyable operation of your vehicle.
This Owner's Manual describes all versions of this vehicle. Options and equipment dedicated to specific markets or versions are not expressly indicated in the text. Therefore, you should only consider the information that is related to the trim level, engine, and version that you have purchased. Any content introduced throughout the Owner's Information, which may or may not be applicable to your vehicle, will be identified with the wording "If Equipped". All data contained in this publication are intended to help you use your vehicle in the best possible way. FCA US LLC aims at a constant improvement of the vehicles produced. For this reason, it reserves the right to make changes to the model described for technical and/or commercial reasons. For further information, contact an authorized dealer.
When it comes to service, remember that authorized dealers know your Ram best, have factory-trained technicians, genuine Mopar® parts, and care about your satisfaction.
SYMBOLS KEY
| WARNING! | These statements apply to operating procedures that could result in a collision, bodily injury and/or death. |
| CAUTION! | These statements apply to procedures that could result in damage to your vehicle. |
| NOTE: | A suggestion which will improve installation, operation, and reliability. If not followed, may result in damage. |
| TIP: | General ideas/solutions/suggestions on easier use of the product or functionality. |
PAGE REFERENCE ARROW | Follow this reference for additional information on a particular feature. |
FOOTNOTE | Supplementary and relevant information pertaining to the topic. |
If you do not read the entire Owner's Manual, you may miss important information. Observe all Cautions and Warnings.
VAN CONVERSIONS/CAMPERS
The New Vehicle Limited Warranty does not apply to body modifications or special equipment installed by van conversion/camper manufacturers/body builders. US residents refer to the Warranty Information, Section 2.1.C. Canadian residents refer to the "What Is Not Covered" section of the Warranty Information. Such equipment includes video monitors, DVD/Blu-Ray™, heaters, stoves, refrigerators, etc. For warranty coverage and service on these items, contact the applicable manufacturer.
Operating instructions for the special equipment installed by the conversion/camper manufacturer should also be supplied with your vehicle. For any additional instructions, please contact your conversion/camper manufacturer. To obtain dimensional and technical specifications for your vehicle, refer to the Body Builder's Guide at https://www.ramtrucks.com/ram-commercial/body-builders-guide.html.
VEHICLE MODIFICATIONS/ALTERATIONS
| WARNING! |
| Any modifications or alterations to this vehicle could seriously affect its roadworthiness and safety and may lead to a collision resulting in serious injury or death. |
SYMBOL GLOSSARY
Some car components have colored labels with symbols indicating precautions to be observed when using this component. It is important to follow all warnings when operating your vehicle. See below for the definition of each symbol ↩ page 102.
NOTE: Warning and Indicator lights are different based upon equipment options and current vehicle status. Some telltales are optional and may not appear.
| Red Warning Lights | |
 | Air Bag Warning Light ➔ page 103 |
 | Battery Charge Warning Light ➔ page 104 |
 | Brake Warning Light ➔ page 103 |
 | Door Open Warning Light ➔ page 105 |
 | Electronic Throttle Control (ETC) Warning Light ➔ page 104 |
 | Electric Power Steering (EPS) Fault Warning Light ➔ page 105 |
 | Engine Coolant Temperature Warning Light ➔ page 104 |
| Red Warning Lights | |
 | Hood Open Warning Light ☑ page 104 |
 | Oil Pressure Warning Light ☑ page 104 |
 | Oil Temperature Warning Light ☑ page 104 |
 | Seat Belt Reminder Warning Light ☑ page 103 |
 | Trailer Brake Disconnected Warning Light ☑ page 105 |
 | Transmission Temperature Warning Light ☑ page 105 |
 | Vehicle Security Warning Light ☑ page 104 |
| Yellow Warning Lights | |
 | Adaptive Cruise Control (ACC) Fault Warning Light ➔ page 105 |
 | Anti-Lock Brake System (ABS) Warning Light ➔ page 108 |
 | Cruise Control Fault Warning Light ➔ page 108 |
 | Engine Check/Malfunction Indicator Warning Light (MIL) ➔ page 105 |
 | Electronic Stability Control (ESC) Active Warning Light ➔ page 106 |
 | Electronic Stability Control (ESC) OFF Warning Light ➔ page 106 |
 | LaneSense Warning Light ➔ page 106 |
 | Low Washer Fluid Warning Light ➔ page 106 |
| Yellow Warning Lights | |
 | Low Fuel Warning Light⇨ page 107 |
 | Low Coolant Level Warning Light⇨ page 107 |
 | Loose Fuel Filler Cap Warning Light⇨ page 107 |
 | Service Forward Collision Warning (FCW) Light⇨ page 108 |
 | Service LaneSense Warning Light⇨ page 108 |
 | Service 4WD Warning Light⇨ page 108 |
 | Tire Pressure Monitoring System (TPMS) Warning Light⇨ page 107 |
| Yellow Indicator Lights | |
 | Cargo Indicator Light ➔ page 108 |
 | Cold Ambient Derate Mode Indicator Light ➔ page 109 |
 | Diesel Exhaust Brake Indicator Light ➔ page 109 |
 | Forward Collision Warning (FCW) Off Indicator Light ➔ page 108 |
 | Low Diesel Exhaust Fluid (DEF) Indicator Light ➔ page 109 |
 | NEUTRAL Indicator Light ➔ page 109 |
 | 4WD Lock Indicator Light ➔ page 109 |
 | 4WD Low Indicator Light ➔ page 109 |
| Yellow Indicator Lights | |
 | 4WD High Indicator Light⇨ page 109 |
 | Snowplow Mode Indicator Light⇨ page 109 |
 | TOW/HAUL Indicator Light⇨ page 108 |
 | Trailer Merge Assist Indicator Light⇨ page 108 |
 | Wait To Start Indicator Light⇨ page 109 |
 | Water In Fuel Indicator Light⇨ page 109 |
| Green Indicator Lights | |
 | Adaptive Cruise Control (ACC) Set With Target Indicator Light ➔ page 109 |
 | Adaptive Cruise Control (ACC) Set With No Target Detected Indicator Light ➔ page 110 |
 | Automatic Diesel Exhaust Brake Indicator Light ➔ page 110 |
 | Cruise Control Set Indicator Light ➔ page 110 |
 | ECO Mode Indicator Light ➔ page 110 |
 | Front Fog Indicator Light ➔ page 110 |
 | LaneSense Indicator Light ➔ page 110 |
 | Parking/Headlights On Indicator Light ➔ page 110 |
| Green Indicator Lights | |
| Turn Signal Indicator Lights page 110 | |
| White Indicator Lights | |
| Adaptive Cruise Control (ACC) Ready Indicator Light ↩ page 110 | |
| Cruise Control Ready Indicator Light ↩ page 110 | |
| LaneSense Indicator Light ↩ page 110 | |
| XXX MPH | Set Speed Display Indicator Light ↩ page 110 |
| Blue Indicator Lights | |
 | High Beam Indicator Light ↘ page 111 |
GETTING TO KNOW YOUR VEHICLE
KEYS
KEY FOB
Your vehicle is equipped with a key fob which supports Remote Keyless Entry (RKE) (if equipped) and Keyless Enter 'n Go™ (if equipped).
If the vehicle is equipped with remote power door locks, the key fob allows you to lock or unlock all doors, as well as activate the Panic Alarm, from distances up to approximately 66 ft (20 m). The key fob does not need to be pointed at the vehicle to activate the system.
NOTE:
- The key fob's wireless signal may be blocked if the key fob is located next to a mobile phone, laptop, or other electronic device. This may result in poor performance.
- The key fob should not be placed next to the wireless charging pad (if equipped).
- In the ON/RUN position, all key fob buttons will work until the vehicle reaches 2 mph (4 km/h).
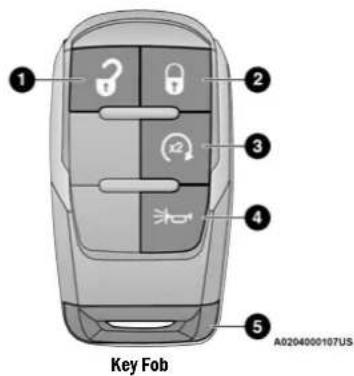
1 – Unlock
2 - Lock
3 – Remote Start (If Equipped)
4-Panic
5 – Emergency Key
In case the ignition switch does not change with the push of a button, the key fob may have a low or fully depleted battery. A low key fob battery can be verified by referring to the instrument cluster, which will display directions to follow → page 427.
To Lock/Unlock The Doors
If the vehicle is equipped with remote power door locks, push and release the unlock button on the key fob once to unlock the driver's door. Push the unlock button twice within five seconds to unlock all doors. If the vehicle is equipped with remote power door locks, push and release the lock button on the key fob to lock all doors.
When the doors are unlocked, the turn signals will flash and the Illuminated Entry system will be activated. When the doors are locked, the turn signals will flash and the horn will chirp.
All doors can be programmed to unlock on the first push of the unlock button. The horn chirp when the lock button is pushed can be programmed on/off within Uconnect Settings page 199.
Using The Panic Feature
To turn the Panic feature on or off, push the Panic button on the key fob. When the Panic feature is activated, the turn signals will flash, the horn may pulse on and off (if equipped with horn alarm), and the interior lights will turn on.
The Panic feature will stay on for three minutes unless you turn it off by either pushing the Panic button a second time or driving the vehicle at a speed of 15 mph (24 km/h) or greater.
NOTE:
The interior lights will turn off if you place the ignition in the ON/RUN position while the Panic feature is activated. However, the exterior lights and horn (if equipped with horn alarm) will remain on.
You may need to be less than 35 ft (11 m) from the vehicle when using the key fob to turn off the Panic feature due to the radio frequency noises emitted by the system.
Key Left Vehicle Feature
If a valid key fob is no longer detected inside the vehicle while the vehicle's ignition system is in the ON/RUN or START position, the message "Key Fob Has Left The Vehicle" will be shown in the instrument cluster display along with an interior chime. An exterior audible and visual alert will also be activated to warn the driver.
The vehicle's horn will rapidly chirp three times along with a single flash of the vehicle's exterior lights.
NOTE:
The doors have to be open and then closed in order for the vehicle to detect a key fob; the Key Left Vehicle feature will not activate until all of the doors are closed.
These alerts will not be activated in situations where the vehicle's engine is left running with the key fob inside.
Replacing The Battery In The Key Fob
The replacement battery model is one CR2032 battery.
NOTE:
Customers are recommended to use a battery obtained from Mopar®. Aftermarket coin battery dimensions may not meet the original OEM coin battery dimensions.
Perchlorate Material — special handling may apply. See www.dtsc.ca.gov/hazard-ouswaste/perchlorate for further information.
Do not touch the battery terminals that are on the back housing or the printed circuit board.
- Remove the emergency key (1) by pushing and holding the release button (2) located on the side of the key fob while pulling the emergency key out with your other hand.
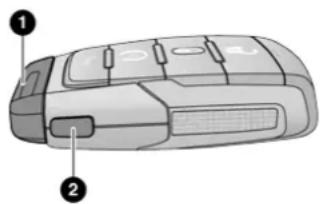
Emergency Key Removal
A0204000040US
1 — Emergency Key
2 — Emergency Key Release Button
-
Hold the key fob with the button side facing down, and locate the small rectangular gap on the left side between the housing and the back cover of the key fob. Use a small screwdriver (or similar tool) to pry open the left side of the fob cover while applying pressure until the cover snaps open.
-
Next, locate the gap on the right side of the key fob, which is positioned farther to the edge than the left side gap. Pry open the right side, and remove the back cover.
- Remove the battery by using a suitable tool, such as a screwdriver, to slide the battery downward and back toward the key ring.
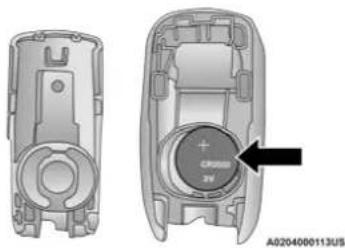
natural_image
Two views of a device casing showing internal components and a central button labeled 'CPB0033V' with an arrow pointing to it (no text or symbols beyond labels)Key Fob Battery Location
NOTE: When replacing the battery, ensure the (+) sign on the battery is facing upward. Avoid touching the new battery with your fingers. Skin oils may cause battery deterioration. If you touch a battery, clean it with rubbing alcohol.
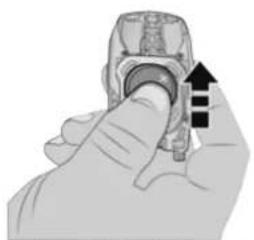
- Replace the battery by using your thumb to push down and slide the battery under the small lip on the top edge of the opening.
natural_image
Illustration of a hand holding a mechanical component with an arrow indicating direction (no text or symbols)A0204000043US
Key Fob Battery Replacement
- To assemble the key fob case, line up the top edge of the back cover with the top of the fob, and press the edges into the interlocking hinges until all edges snap together with no large visual gaps.
- Reinsert the emergency key until it locks into place.
NOTE:
The key fob battery should only be replaced by qualified technicians. If the battery requires replacement, see an authorized dealer.
WARNING!
- The integrated key fob contains a coin cell battery. Do not ingest the battery; there is a chemical burn hazard. If the coin cell battery is swallowed, it can cause severe internal burns in just two hours and can lead to death.
- If you think a battery may have been swallowed or placed inside any part of the body, seek immediate medical attention.
- Keep new and used batteries away from children. If the battery compartment does not close securely, stop using the product and keep it away from children.
Programming And Requesting Additional Key Fobs
Programming the key fob may be performed by an authorized dealer.
NOTE:
- Once a key fob is programmed to a vehicle, it cannot be repurposed and reprogrammed to another vehicle.
- Only key fobs that are programmed to the vehicle electronics can be used to start and operate the vehicle.
WARNING!
- Always remove the key fobs from the vehicle and lock all doors when leaving the vehicle unattended.
- For vehicles equipped with Keyless Enter 'n Go™ Ignition, always remember to place the ignition in the OFF position when exiting the vehicle.
Duplication of key fobs may be performed at an authorized dealer. This procedure consists of programming a blank key fob to the vehicle electronics. A blank key fob is one that has never been programmed.
NOTE:
- When having the Sentry Key Immobilizer system serviced, bring all vehicle keys with you to an authorized dealer.
- Keys must be ordered to the correct key cut to match the vehicle locks.
SENTRY KEY
The Sentry Key Immobilizer system prevents unauthorized vehicle operation by disabling the engine. The system does not need to be armed or activated. Operation is automatic, regardless of whether the vehicle is locked or unlocked.
The system uses a key fob, keyless push button ignition and a Radio Frequency (RF) receiver to prevent unauthorized vehicle operation. Therefore, only key fobs that are programmed to the vehicle can be used to start and operate the vehicle. The system cannot reprogram a key fob obtained from another vehicle.
After placing the ignition in the ON/RUN position, the Vehicle Security Light will turn on for three seconds for a bulb check. If the light remains on after the bulb check, it indicates that there is a problem with the electronics. In addition, if the light begins to flash after the bulb check, it indicates that someone attempted to start the engine with an invalid key fob. In the event that a valid key fob is used to start the engine but there is an issue with the vehicle electronics, the engine will start and shut off after two seconds.
If the Vehicle Security Light turns on during normal vehicle operation (vehicle running for longer than 10 seconds), it indicates that there is a fault in the electronics. Should this occur, have the vehicle serviced as soon as possible by an authorized dealer.
CAUTION!
The Sentry Key Immobilizer system is not compatible with some aftermarket Remote Start systems. Use of these systems may result in vehicle starting problems and loss of security protection.
All of the key fobs provided with your new vehicle have been programmed to the vehicle electronics → page 427.
NOTE:
A key fob that has not been programmed is also considered an invalid key.
IGNITION SWITCH
KEYLESS ENTER 'N GO™ IGNITION
This feature allows the driver to operate the ignition switch with the push of a button as long as the Remote Keyless Entry key fob is in the passenger compartment.
The Keyless Push Button Ignition has four operating positions; three of which are labeled and will illuminate when in position. The three positions are OFF, ACC, and ON/RUN. The fourth position is START. During START, RUN will illuminate.
NOTE:
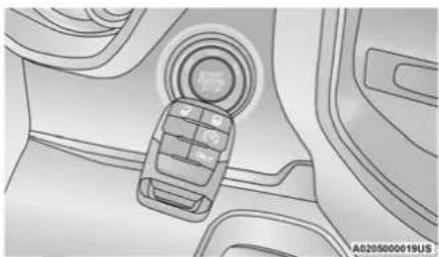
In case the ignition switch does not change with the push of a button, the key fob may have a low or depleted battery. In this situation, a backup method can be used to operate the ignition switch. Put the nose side (side opposite of the emergency key) of the key fob against the START/STOP ignition button, with your foot applied on the brake pedal, and push to operate the ignition switch.
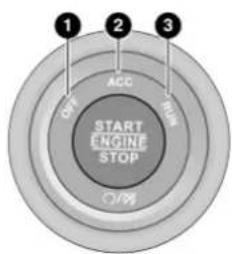
Keyless Push Button Ignition
A0205000015US
1-OFF
2 - ACC (Accessory)
3-ON/RUN
The push button ignition can be placed in the following modes:
OFF
• The engine is stopped.
- Some electrical devices (e.g. power locks, alarm, etc.) are still available.
ACC
- Engine is not started.
- Some electrical devices are available (e.g. power windows, etc.).
RUN
- Driving position.
- All electrical devices are available (e.g. climate controls, heated seats, etc.).
START
• The engine will start.
WARNING!
- When exiting the vehicle, always remove the key fob from the vehicle and lock your vehicle.
- Never leave children alone in a vehicle, or with access to an unlocked vehicle.
- Allowing children to be in a vehicle unattended is dangerous for a number of reasons. A child or others could be seriously or fatally injured. Children should be warned not to touch the parking brake, brake pedal or the gear selector.
- Do not leave the key fob in or near the vehicle, or in a location accessible to children, and do not leave the Keyless Enter 'n Go™ Ignition in the ON/RUN position. A child could operate power windows, other controls, or move the vehicle.
- Do not leave children or animals inside parked vehicles in hot weather. Interior heat buildup may cause serious injury or death.
GETTING TO KNOW YOUR VEHICLE 19
CAUTION!
An unlocked vehicle is an invitation for thieves. Always remove key fob from the vehicle and lock all doors when leaving the vehicle unattended.
In case the ignition switch does not change with the push of a button, the key fob may have a low or depleted battery. In this situation, a backup method can be used to operate the ignition switch. Put the nose side (side opposite of the emergency key) of the key fob against the START/STOP ignition button and push to operate the ignition switch.
natural_image
Interior view of a car showing a keypad and control panel (no text or symbols visible)Backup Starting Method
NOTE:
- The key fob may not be detected by the vehicle Keyless Enter 'n Go™ system if it is located next to a mobile phone, laptop or other electronic device; these devices may block the key fob's wireless signal and prevent the Keyless Enter 'n Go™ system from starting the vehicle.
- For more information on the engine starting procedure, see ➤ page 113.
REMOTE START — IF EQUIPPED (GASOLINE)

This system uses the key fob to start the engine conveniently from outside the vehicle while still maintaining security.
The system has a range of approximately
300 ft (91 m).
Remote Start is used to defrost windows in cold weather, and to reach a comfortable climate in all ambient conditions before the driver enters the vehicle.
NOTE:
Obstructions between the vehicle and the key fob may reduce this range ➤ page 427.
WARNING!
- Do not start or run an engine in a closed garage or confined area. Exhaust gas contains carbon monoxide (CO) which is odorless and colorless. Carbon monoxide is poisonous and can cause serious injury or death when inhaled.
- Keep key fobs away from children. Operation of the Remote Start system, windows, door locks or other controls could cause serious injury or death.
How To Use REMOTE START
Push and release the Remote Start button on the key fob twice within five seconds. The parking lights will flash, vehicle doors will lock, and the horn will chirp twice (if programmed). Once the vehicle has started, the engine will run for 15 minutes.
Pushing the Remote Start button a third time shuts the engine off.
To drive the vehicle, push the unlock button, and place the ignition in the ON/RUN position.
NOTE:
- With Remote Start, the engine will only run for 15 minutes.
-
Remote Start can only be used twice.
-
If an engine fault is present or fuel level is low, the vehicle will start and then shut down in 10 seconds.
- The parking lights will turn on and remain on during Remote Start mode.
- For security, power window operation is disabled when the vehicle is in the Remote Start mode.
- The ignition must be placed in the ON/RUN position before the Remote Start sequence can be repeated for a third cycle.
- If your power door locks were unlocked, Remote Start will automatically lock the doors.
All of the following conditions must be met before the engine will remote start:
• Gear selector in PARK
- Doors closed
- Hood closed
- Hazard switch off
● Brake switch inactive (brake pedal not pressed)
- Battery at an acceptable charge level
- Panic button not pushed
- Fuel meets minimum requirement
- System not disabled from previous Remote Start event
● Vehicle Security system not active
- Malfunction Indicator Light (MIL) is not illuminated
To Exit Remote Start Mode
To drive the vehicle after starting the Remote Start system, push and release the START/STOP ignition button while pressing the brake pedal prior to the end of the 15 minute cycle.
The Remote Start system will turn the engine off if the Remote Start button on the key fob is pushed again, or if the engine is allowed to run for the entire 15 minute cycle. Once the ignition is placed in the ON/RUN position, the climate controls will resume the previously set operations (temperature, blower control, etc.).
NOTE:
- For vehicles equipped with the Keyless Enter 'n Go™ — Passive Entry feature, the message "Remote Start Active — Push Start Button" will display in the instrument cluster display until you push the START/STOP ignition button.
- To avoid unintentional shutdowns, the system will disable for two seconds after receiving a valid Remote Start request.
REMOTE START FRONT DEFROST ACTIVATION — IF EQUIPPED
When Remote Start is active, and the outside ambient temperature is 40^ F ( 4.5^ C) or below, the system will automatically activate front defrost for 15 minutes or less. The time is dependent on the ambient temperature. Once the timer expires, the system will automatically adjust the settings depending on ambient conditions. See "Remote Start Comfort Systems — If Equipped" in the next section for detailed operation.
REMOTE START COMFORT SYSTEMS — IF EQUIPPED
When Remote Start is activated, the front and rear defrost will automatically turn on in cold weather. The heated steering wheel and driver heated seat feature will turn on if programmed in the Comfort menu screen within Uconnect Settings page 199. In warm weather, the driver vented seat feature will automatically turn on when Remote Start is activated, if programmed in the Comfort menu screen. The vehicle will adjust the climate control settings depending on the outside ambient temperature.
Automatic Temperature Control (ATC) — If Equipped
The climate controls automatically adjust to an optimal temperature and mode, dependent on the outside ambient temperature. When the ignition is placed in the ON/RUN position, the climate controls will resume their previous settings.
Manual Temperature Control (MTC) — If Equipped
- In ambient temperatures of 40^ F ( 4.5^ C) or below, the climate settings will default to maximum heat, with fresh air entering the cabin. If the front defrost timer expires, the vehicle will enter Mix Mode.
- In ambient temperatures from 40^ F ( 4.5^ C) to 78^ F ( 26^ C), the climate settings will be based on the last settings selected by the driver.
- In ambient temperatures of 78°F (26°C) or above, the climate settings will default to MAX A/C, Bi-Level mode, with Recirculation on.
For more information on ATC, MTC, and climate control settings, see ↘ page 58.
NOTE:
These features will stay on through the duration of Remote Start, or until the ignition is placed in the ON/RUN position. The climate control settings will change, and exit the automatic defaults, if manually adjusted by the driver while the vehicle is in Remote Start mode. This includes turning the climate controls off using the OFF button.
REMOTE START WINDSHIELD WIPER DE-ICER ACTIVATION — IF EQUIPPED
When Remote Start is active and the outside ambient temperature is less than 33^ F ( 0.6^ C), the Windshield Wiper De-Icer will activate. Exiting Remote Start will resume its previous operation. If the Windshield Wiper De-Icer was active, the timer and operation will continue.
REMOTE START ABORT MESSAGE
One of the following messages will display in the instrument cluster display if the vehicle fails to remote start or exits Remote Start prematurely:
- Remote Start Canceled — Door Open
- Remote Start Canceled — Hood Open
- Remote Start Canceled — Fuel Low
- Remote Start Canceled — System Fault
- Remote Start Disabled – Start Vehicle to Reset
The instrument cluster display message stays active until the ignition is placed in the ON/RUN position.
REMOTE START — IF EQUIPPED (DIESEL)

This system uses the key fob to start the engine conveniently from outside the vehicle while still maintaining security.
The system has a range of approximately 300 ft (91 m).
Remote Start is used to defrost windows in cold weather, and to reach a comfortable climate in all ambient conditions before the driver enters the vehicle.
NOTE:
- Obstructions between the vehicle and the key fob may reduce this range.
- The Remote Start system will wait for the Wait To Start Light ↩ page 109 to extinguish before cranking the engine. This allows time for the intake heater to preheat the incoming air, and is normal operation in cold weather ↩ page 427.
How To Use Remote Start
Push and release the Remote Start button on the key fob twice within five seconds. The vehicle doors will lock, the parking lights will flash, and the horn will chirp twice (if programmed). Then, the engine will start, and the vehicle will remain in the Remote Start mode for a 15 minute cycle.
Pushing the Remote Start button a third time shuts the engine off.
To drive the vehicle, push the unlock button, and place the ignition in the ON/RUN position.
All of the following conditions must be met before the engine will remote start:
- Gear selector in PARK
- Doors closed
- Hood closed
- Hazard switch off
● Brake switch inactive (brake pedal not pressed)
● Battery at an acceptable charge level - Panic button not pushed
- Fuel meets minimum requirement
● Water In Fuel Indicator Light is not illuminated - Wait To Start Light is not illuminated
- Malfunction Indicator Light (MIL) is not illuminated
For additional functions of the Remote Start system, see ↗ page 21.
WARNING!
- Do not start or run an engine in a closed garage or confined area. Exhaust gas contains carbon monoxide (CO) which is odorless and colorless. Carbon monoxide is poisonous and can cause serious injury or death when inhaled.
(Continued)
WARNING!
- Keep key fobs away from children. Operation of the Remote Start system, windows, door locks or other controls could cause serious injury or death.
VEHICLE SECURITY SYSTEM — IF EQUIPPED
The Vehicle Security system monitors the vehicle doors and ignition for unauthorized operation. When the Vehicle Security system is activated, interior switches for door locks are disabled. If something triggers the alarm, the Vehicle Security system will provide the following audible and visible signals:
- The horn will pulse
• The turn signals will flash - The Vehicle Security Light in the instrument cluster will flash
TO ARM THE SYSTEM
Follow these steps to arm the Vehicle Security system:
- Make sure the vehicle's ignition is placed in the OFF position.
For vehicles equipped with Keyless Entry, make sure the vehicle's keyless ignition system is OFF.
- Perform one of the following methods to lock the vehicle:
-
Push the lock button on the interior power door lock switch with the driver and/or passenger door open.
○ Push the lock button on the exterior Passive Entry door handle with a valid key fob available in the same exterior zone ➕ page 25.
O Push the lock button on the key fob. -
If any doors are open, close them.
The Vehicle Security system will set when you use the power door locks, or use the key fob to lock the doors. After all the doors are locked and closed, the Vehicle Security Light, in the instrument panel cluster, will flash rapidly for about 16 seconds to indicate that the alarm is being set. After the alarm is set, the Vehicle Security Light will flash at a slower rate to indicate that the system is armed.
To Disarm The System
The Vehicle Security system can be disarmed using any of the following methods:
- Push the unlock button on the key fob.
- Grab the Passive Entry door handle with a valid key fob within 5 ft (1.5 m) of the Passive Entry door handle (if equipped) ↩ page 25.
- Cycle the ignition out of the OFF position.
The Vehicle Security system is designed to protect your vehicle. However, you can create conditions where the system will give you a false alarm. If one of the previously described arming sequences has occurred, the Vehicle Security system will arm regardless of whether you are in the vehicle or not. If you remain in the vehicle and open a door, the alarm will sound. If this occurs, disarm the Vehicle Security system.
If the Vehicle Security system is armed and the battery becomes disconnected, the Vehicle Security system will remain armed when the battery is reconnected; the exterior lights will flash, and the horn will sound. If this occurs, disarm the Vehicle Security system.
REARMING OF THE SYSTEM
If something triggers the alarm, and no action is taken to disarm it, the Vehicle Security system will turn the horn off after a 29 second cycle (with five seconds between cycles and up to eight cycles if the trigger remains active), and then rearm itself.
SECURITY SYSTEM MANUAL OVERRIDE
The Vehicle Security system will not arm if you lock the doors using the manual door lock.
DOORS
MANUAL DOOR LOCKS
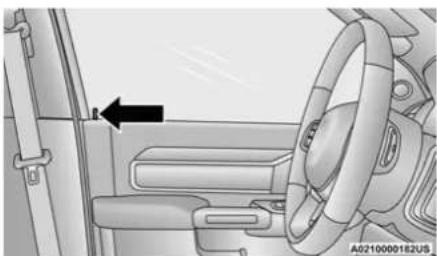
The power door locks can be manually locked from inside the vehicle by using the door lock knob. To lock each door, push the door lock knob on each door trim panel downward. To unlock the front doors, pull the inside door handle to the first detent. To unlock the rear doors, pull the door lock knob on the door trim panel upward. If the lock knob is down when the door is closed, the door will lock. Therefore, make sure the key fob is not inside the vehicle before closing the door.
natural_image
Interior view of a car showing steering wheel, dashboard, and seatbelt (no text or symbols visible)Door Lock Knob
WARNING!
- Do not leave children or animals inside parked vehicles in hot weather. Interior heat buildup may cause serious injury or death.
- For personal security and safety in the event of an collision, lock the vehicle doors as you drive as well as when you park and leave the vehicle.
- Before exiting a vehicle, always shift the automatic transmission into PARK, apply the parking brake, turn the vehicle OFF, remove the key fobs from vehicle, and lock all doors. and lock your vehicle.
- Never leave children alone in a vehicle, or with access to an unlocked vehicle. Leaving children in a vehicle unattended is dangerous for a number of reasons. A child or others could be seriously or fatally injured. Children should be warned not to touch the parking brake, brake pedal or the gear selector.
- Allowing children to be in a vehicle unattended is dangerous for a number of reasons. A child or others could be seriously or fatally injured. Children should be warned not to touch the parking brake, brake pedal or the gear selector.
WARNING!
- Do not leave the key fob in or near the vehicle or in a location accessible to children, and do not leave the Keyless Enter 'n Go™ Ignition in the ACC or ON/RUN position. A child could operate power windows, other controls, or move the vehicle.
POWER DOOR LOCKS — IF EQUIPPED
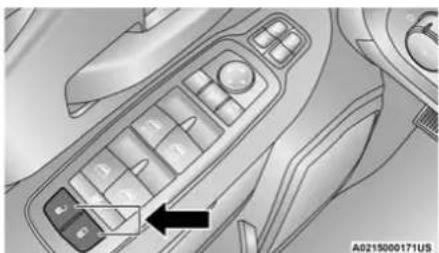
The power door lock switches are located on each front door panel. Push the switch to lock or unlock the doors.
natural_image
Interior view of a car dashboard with control panel and keypad (no visible text or symbols)Power Door Lock Switches
(Continued)
The driver's door will unlock automatically if the key fob is detected inside the vehicle when the door lock button on the front door panel is used to lock the door. This will occur for two attempts. Upon the third attempt, the doors will lock even if the key fob is inside.
NOTE:
If the key fob is located next to a mobile phone, laptop, or other electronic device, the wireless signal may get blocked, and the driver's door may not unlock automatically.
If the door lock switch is pushed while the ignition is in ACC or ON/RUN and the driver's door is open, the doors will not lock.
KEYLESS ENTER 'N GO™ — PASSIVE ENTRY (IF EQUIPPED)
The Passive Entry system is an enhancement to the vehicle's Remote Keyless Entry system and a feature of Keyless Enter 'n Go™. This feature allows you to lock and unlock the vehicle's door(s) without having to push the key fob lock or unlock buttons.
NOTE:
- Passive Entry may be programmed on/off within Uconnect Settings → page 199.
- If wearing gloves, if it has been raining/snowing, or if there is salt/dirt covering the Passive Entry door handle, the unlock sensitivity can be affected, resulting in a slower response time.
- The doors may unlock when water is sprayed on the Passive Entry door handles if the key fob is located outside of the vehicle within 5 ft (1.5 m) of the handle.
- If the vehicle is unlocked by Passive Entry and no door is opened within 60 seconds, the vehicle will relock and if equipped will arm the security alarm.
- The Vehicle Security system can be armed/disarmed by pushing the Passive Entry key fob lock/unlock buttons (if equipped).
- The key fob may not be detected by the vehicle Passive Entry system if it is located next to a mobile phone, laptop or other electronic device; these devices may block the key fob's wireless signal and prevent the Passive Entry door handle from locking/unlocking the vehicle.
To Unlock From The Driver or Passenger Side:
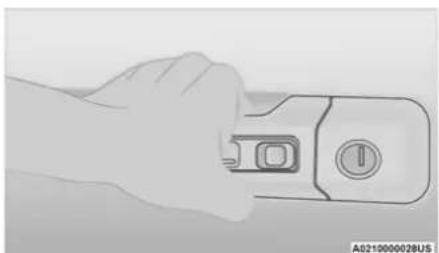
With a valid Passive Entry key fob within 5 ft (1.5 m) of the door handle, grab the handle to unlock the vehicle. Grabbing the driver's door handle will unlock the driver's door automatically. Grabbing the passenger door handle will unlock all doors automatically. The interior door panel lock knob will raise when the door is unlocked.
natural_image
Hand holding a handheld device with a circular button and indicator lights (no text or symbols visible)Grab The Door Handle To Unlock
NOTE:
- Either the driver's door only or all doors will unlock when you grab hold of the front driver's door handle, depending on the selected setting in the Uconnect system ↩ page 199.
- All doors will unlock when the front passenger door handle is grabbed regardless of the driver's door unlock preference setting.
Preventing Inadvertent Locking Of Passive Entry Key Fob In Vehicle:
To minimize the possibility of unintentionally locking a Passive Entry key fob inside your vehicle, the Passive Entry system is equipped with an automatic door unlock feature which will function if the ignition switch is in the OFF position.
If one of the vehicle doors is open and the door panel switch is used to lock the vehicle, once all open doors have been closed the vehicle checks the inside and outside of the vehicle for any valid Passive Entry key fobs. If one of the vehicle's Passive Entry key fobs is detected inside the vehicle, and no other valid Passive Entry key fobs are detected outside the vehicle, the Passive Entry system automatically unlocks all vehicle doors and chirps the horn three times (on the third attempt ALL doors will lock and the Passive Entry key fob can be locked in the vehicle).
To Lock The Vehicle's Doors:
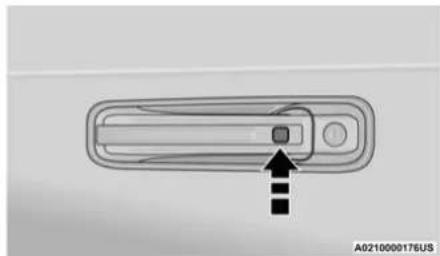
With one of the vehicle's Passive Entry key fobs within 5 ft (1.5 m) of the driver or passenger front door handles, push the door handle lock button to lock all doors.
natural_image
Diagram of a device handle with an arrow pointing to a button (no text or symbols present)Push The Door Handle Button To Lock
Do NOT grab the door handle when pushing the door handle lock button. This could unlock the door(s).
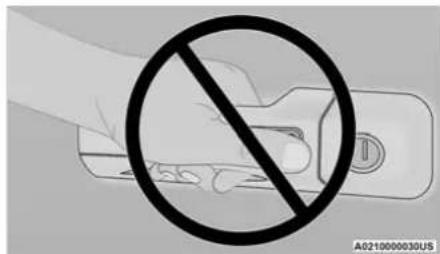
Do NOT Grab The Door Handle When Locking
NOTE:
- After pushing the door handle lock button, you must wait two seconds before you can lock or unlock the doors, using either Passive Entry door handle. This is done to allow you to check if the vehicle is locked by pulling the door handle, without the vehicle unlocking.
- The Passive Entry system depends on a key fob that is not fully discharged of its coin battery capacity.
- When the key fob battery is low, the instrument cluster will display a message indicating that the key fob battery is low ▷ page 15.
The vehicle doors can also be locked by using the key fob lock button or the lock button located on the vehicle's interior door panel ▶ page 427.
AUTOMATIC UNLOCK DOORS ON EXIT — IF EQUIPPED
The doors will unlock automatically on vehicles with power door locks after the following sequence of actions:
- The Automatic Unlock Doors On Exit feature is enabled.
- All doors are closed.
- The gear selector was not in PARK, then is placed in PARK.
- Any door is opened.


- CHASSIS CAB OWNER'S MANUAL
- ROADSIDEASSISTANCE
- TABLE OF CONTENTS
- INTRODUCTION
- GETTING TO KNOW YOUR VEHICLE
- UNIVERSAL GARAGE DOOR OPENER
- GETTING TO KNOW YOUR
- INSTRUMENT PANEL
- STARTING AND OPERATING
- ENGINE BREAK-IN RECOMMENDATIONS —
- RECREATIONAL TOWING
- MULTIMEDIA
- CONNECTED VEHICLE SERVICES —
- IN CASE OF EMERGENCY
- SERVICING AND MAINTENANCE
- VAN CONVERSIONS/CAMPERS
- VEHICLE MODIFICATIONS/ALTERATIONS
- SYMBOL GLOSSARY
- KEYS
- KEY FOB
- NOTE:
- To Lock/Unlock The Doors
- Using The Panic Feature
- Key Left Vehicle Feature
- Replacing The Battery In The Key Fob
- WARNING!
- Programming And Requesting Additional Key Fobs
- SENTRY KEY
- CAUTION!
- IGNITION SWITCH
- KEYLESS ENTER 'N GO™ IGNITION
- OFF
- ACC
- RUN
- START
- REMOTE START — IF EQUIPPED (GASOLINE)
- How To Use REMOTE START
- To Exit Remote Start Mode
- REMOTE START FRONT DEFROST ACTIVATION — IF EQUIPPED
- REMOTE START COMFORT SYSTEMS — IF EQUIPPED
- Automatic Temperature Control (ATC) — If Equipped
- Manual Temperature Control (MTC) — If Equipped
- REMOTE START WINDSHIELD WIPER DE-ICER ACTIVATION — IF EQUIPPED
- REMOTE START ABORT MESSAGE
- REMOTE START — IF EQUIPPED (DIESEL)
- VEHICLE SECURITY SYSTEM — IF EQUIPPED
- TO ARM THE SYSTEM
- To Disarm The System
- REARMING OF THE SYSTEM
- SECURITY SYSTEM MANUAL OVERRIDE
- DOORS
- MANUAL DOOR LOCKS
- POWER DOOR LOCKS — IF EQUIPPED
- KEYLESS ENTER 'N GO™ — PASSIVE ENTRY (IF EQUIPPED)
- Preventing Inadvertent Locking Of Passive Entry Key Fob In Vehicle:
- To Lock The Vehicle's Doors:
- AUTOMATIC UNLOCK DOORS ON EXIT — IF EQUIPPED
Brand : RAM
Model : Chassis Cab (2023)
Category : Automotive