
MJ-DJ31 - Juicer PANASONIC - Free user manual and instructions
Find the device manual for free MJ-DJ31 PANASONIC in PDF.


| Product Type | Juicer / Blender (Household Use) |
| Model | Panasonic MJ-DJ31 |
| Power Supply | 220 - 240 V ~ 50 - 60 Hz |
| Power Consumption | 240 - 270 W |
| Switch | 2 Speed |
| Dimensions (W x D x H) - Juicer | 216 mm x 305 mm x 384 mm |
| Weight - Juicer | 4.4 kg |
| Juice Jug Capacity | Approx. 1.5 L |
| Pulp Container Capacity | Approx. 2.0 L |
| Operation Rating (Juicer) | Continuous: 2 min ON, 2 min OFF |
| Safety Features | Circuit breaker protection, safety lock on blender/dry mill |
| Materials | Plastic container, stainless steel spinner and blades |
| Cleaning | Hand wash with sponge; do not use abrasive cleaners or dishwasher |
| Accessories Included | Food pusher, juice jug with cup cover, pulp container, blender container with cover, dry mill container |
| Not Recommended Ingredients | Soft fruits (banana, peach), low-juice leaves, hard ingredients (sugarcane, coconut), seeds (pomegranate) |
Frequently Asked Questions - MJ-DJ31 PANASONIC
User questions about MJ-DJ31 PANASONIC
0 question about this device. Answer the ones you know or ask your own.
Ask a new question about this device
Download the instructions for your Juicer in PDF format for free! Find your manual MJ-DJ31 - PANASONIC and take your electronic device back in hand. On this page are published all the documents necessary for the use of your device. MJ-DJ31 by PANASONIC.
USER MANUAL MJ-DJ31 PANASONIC
Operating Instructions
Juicer / Blender (Household Use)
natural_image
Line drawing of a four-step food blender setup with no text or symbolsThank you for purchasing this Panasonic product.
• This product is intended for household use only.
- Please read these instructions carefully in order to use this product correctly and safely.
- Before using this product please give your special attention to the section "SAFETY PRECAUTIONS" (Page 2-3).
- Please keep these Operating Instructions for future use.
SAFETY PRECAUTIONS 2-3
PART NAMES 4
DISASSEMBLY 5
CIRCUIT BREAKER PROTECTION 6
SAFETY LOCK....6
HOW TO USE....7-9
AFTER USE 10-11
SPECIFICATION 12
مندرجات
13-15......بکات ايمنی
- نام قطعات
(Make sure to follow these instructions)
In order to prevent accidents or injuries to the user, other people, and damage to property, please follow the instructions below.
■ The following indication indicate the degree of damage caused by incorrect operation.

WARNING
CAUTION Indicates serious injury or death.

Indicates risk of injury or property damage.
■ The symbols are classified and explained as follows.

This symbol indicates prohibition.

This symbol indicates requirement that must be followed.
WARNING

● Do not damage the Cord or the Plug.
(It may cause electric shock, or fire caused by short circuit.)
- Do not use the appliance if the Cord or the Plug is damaged or the Plug is loosely connected to the outlet.
(It may cause electric shock, or fire caused by short circuit.)
If the Cord is damaged, it must be replaced by the manufacturer, its service center or similarly qualified person in order to avoid a hazard.
● Do not plug or unplug the Plug with wet hands.
(It may cause electric shock.)
- Do not operate the appliance when the Cord is in wound condition.
(It may cause electric shock or fire.)
- Do not exceed outlet voltage or use an alternate current other than that specified on the appliance.
(It may cause electric shock or fire.)
Make sure the voltage supplied to the appliance is the same as your local supply.
- Plugging other devices into the same outlet may cause over-heating.
- Do not immerse the Motor Housing in water or splash it with water.
(It may cause electric shock or fire caused by short circuit.)
- Do not dismantle, repair or modify the appliance.
(It may cause fire, electric shock or injury.)
→ Please contact your service center for repairing.
- Do not insert any objects in the vent or the gap.
(It may cause electric shock or malfunction.)
Especially metal objects such as pins or wires.
- Do not replace any parts of appliance with non-genuine spare parts.
(It may cause injury, electric shock or fire.)
- Do not use hot water (over 60°C) for cleaning purpose or fire to dry the appliance.
(It may cause burning or malfunction.)
- Do not put your finger or utensils such as spoon, fork etc into the Feeding Tube during operation. If food becomes clogged in the Feeding Tube, use the Food Pusher or another piece of fruit or vegetable to push it down.
- Do not remove the Pulp Container when the appliance is operating.
- Do not use the appliance if the Spinner or the Container Cover is damaged or has visible cracks.
(It may cause injury.)
- Do not put your finger or utensils such as spoon, fork etc into the Blender Container during operation.
- Do not place hot ingredients (over 60°C) into the Blender Container. If hot liquid is poured into the Blender Container as it can be ejected out of the appliance due to sudden steaming.
- Do not operate without the Blender Container and the Cover Unit in place correctly.
- Do not try to remove the Blender Container when the appliance is still operating.
- Do not process hard foods (frozen food, dried food, hard meat or meat with bones) or viscous materials.
(It may cause injury or malfunction.)
WARNING
!
● This appliance is not intended for use by persons (including children) with reduced physical, sensory or mental capabilities, or lack of experience and knowledge, unless they have been given supervision or instruction concerning use of the appliance by a person responsible for their safety. Children should be supervised to ensure that they do not play with the appliance.
(It may cause burning, injury or electric shock.)
- Insert the Plug firmly.
(Otherwise it may cause electric shock and fire caused by the heat that may generate around the Plug.)
● Clean the Plug regularly.
(A soiled Plug may cause insufficient insulation due to moisture, and may cause fire.)
- When abnormal operation or breaking down occurs, discontinue the appliance operation immediately and unplug.
(It may cause smoke, fire or electric shock.)
e.g. for abnormal operation or breaking down.
• The Plug and the Cord becomes abnormally hot.
• The Cord is damaged or there has been a power failure.
• The Motor Housing is deformed or abnormally hot.
→ Please unplug the appliance immediately and contact the service centre for advice or a repair.
● Care should be taken when handling and cleaning the Spinner, the Spout, the Blender Cutting Blades and the Mill Cutting Blades.
(It may cause injury.)
● Handle carefully when emptying the Blender Container.
(It may cause injury.)
- Do not push the safety lock pins with any instruments, stick etc as the appliance might be ON.
(It may cause injury.)
● Make sure to hold the Plug when unplugging the Plug, ie. never pull on the Cord. (Otherwise it may cause electric shock, or fire caused by short circuit.)
CAUTION
(no text)
- Do not leave the appliance unattended when it is in operation. (It may cause fire or burns.)
- When leaving the appliance unattended, turn the power off.
- Do not use the appliance in the following places.
- Any uneven surface, on non-heat resistant carpet or table cloth etc. (It may cause fire or injury.)
- In a location where there is risk of the appliance being splashed with water, or near a heat source. (It may cause electric shock or current leakage.)
- Do not assemble the Spinner when there is food residue left around the Container Unit. (It may cause unpleasant odour and the Spinner to work improperly.)
- Do not continue operation for a long time.
(It may cause over-heating.)
- For the Blender, it is recommended to rest the appliance for at least 1 minute after 3 minutes operation.
- For the Juicer and the Dry Mill, it is recommended to rest the appliance for at least 2 minutes after 2 minutes of Juicer operation or 1 minute of Dry Mill operation.
- Do not place the Juice Jug, the Blender Container or the Mill Container in microwave, or near a heat source.
(It may cause fire or injury.)
!
● Unplug the Plug when the appliance is not in use.
(Otherwise it may cause electric shock, or fire caused by current leakage.)
- When carrying the appliance, be sure to hold the Motor Housing with both hands. (It may cause injury.)
- Switch off the appliance and disconnect it from power supply before changing accessories or approaching parts that are moving during operation.
(It may cause injury.)
PART NAMES

① Food Pusher
② Feeding Tube
③ Container Cover
④ Spinner Pad
⑤ Spinner
⑥ Container Unit
⑦ Rotatable Container
⑧ Spout
⑨ Pulp Container
⑩ Cup Cover
⑪ Juice Jug
⑫ Cover Unit
⑬ Inner Cap
⑭ Cover
⑮ Blender Container
⑯ Gasket
⑰ Blender Cutting Blades
⑱ Blender Container Base
⑲ Mill Container
⑳ Mill Cutting Blades
②1 Mill Container Base
⑳ Clamps
②3 * Plug
⑳ Cord
⑳ Switch
②6 Motor Housing
*The shape of the Plug may be different from illustration.
DISASSEMBLY
JUICER
1

natural_image
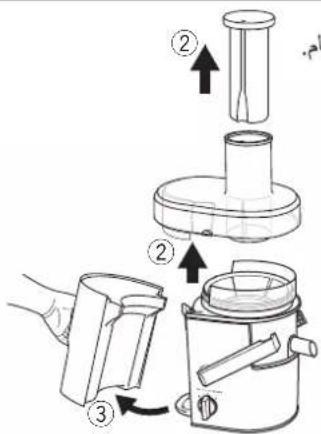
Illustration of hands holding a container with a handle, showing a rotating mechanism (no text or symbols)① Release the Clamps.
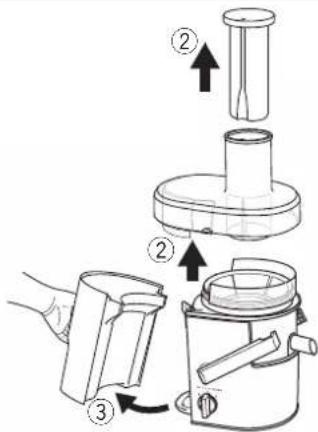
② Lift up the Container Cover and the Food Pusher.
③ Detach the Pulp Container.
2
natural_image
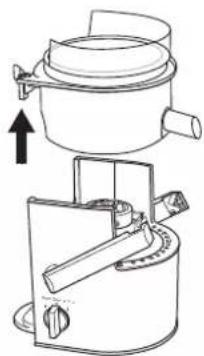
Technical line drawing of a mechanical device with an upward arrow indicating motion (no text or symbols)Lift up the Container Unit.
3

① Lift up the Spinner.
② Remove the Spinner Pad.
Note: If difficult to wash the Container Unit, it can be detached.

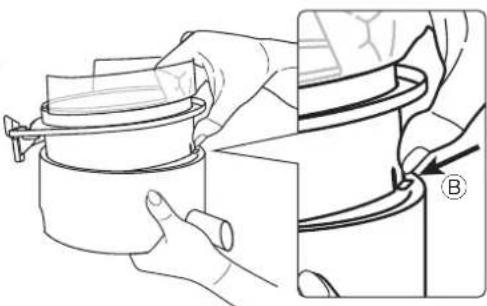
① Pull upper part Ⓐ of the Rotatable Container until the hook part Ⓑ is as illustrated.
natural_image
Illustration of hands holding a container with a lid, alongside a close-up of the lid being inserted (no text or symbols)② Press the hook part Ⓑ as illustrated and pull upwards to detach it.
Parts ©

③ To attach the Container Unit again by insert Parts © first thus reversing steps ① to ②.
CIRCUIT BREAKER PROTECTION
When circuit breaker automatically stops motor due to overloading, turn off the Switch to "0" position and follow the instruction below.
JUICER
- Remove accumulated food residue from the Spinner and the Container Cover. Then cut ingredients into smaller pieces.
- Attach parts again (refer to page 7) and resume operation. Push them gently into the Feeding Tube using the Food Pusher.
BLENDER / DRY MILL
- Reduce ingredients to less than half. Resume operation.
- If it still does not start, turn off the Switch to "0" position again, then resume.
SAFETY LOCK
● The safety lock has been designed to prevent the Blender or the Dry Mill from switching on when the Blender Container or the Mill Container is not properly in place.
- Do not push the safety lock pins with any instrument, stick etc.
- Attach the Blender Container or Mill Container to each container base properly.
- After setting, make sure the bottom of each container base is as shown in the √ illustration.


natural_image
Technical line drawing of a circular mechanical component with three circular features (no text or symbols)
None of the three pins sticks out.

If pin stick out.
→ Reattach the container again.
HOW TO USE
Wash all detachable parts and dry well before using the appliance for the first time, refer to page 10-11. Unplug when assembling the unit. Before plugging in, ensure the Switch is switched to off.
JUICER
1

natural_image
Line drawing of a mechanical device with a downward arrow indicating compression or disassembly (no text or symbols present)Place the Container Unit onto the Motor Housing.
● Make sure the Spout and the Clamps positioned same direction as illustrated.
● Make sure the Container Unit sits properly on the Motor Housing.

① Attach the Pulp Container and make sure it is fully aligned with the body.
② Place the Spinner in the Container Unit and fix it into position.
③ Place the Container Cover onto the Container Unit.
3
natural_image
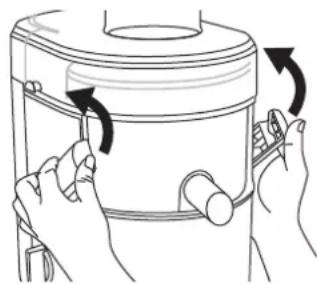
Illustration of hands operating a cylindrical device with rotating arrows indicating rotation (no text or symbols)Push the Clamps as shown until a locking sound is heard.
- If the Clamps are not clamped correctly, the motor will not operate.
4

Place the Juice Jug as shown.
● Make sure the Spout is in the downward position when juicing.
Note:
* The Spout can be rotated freely for 120° when the Spout is in the upward position.
5
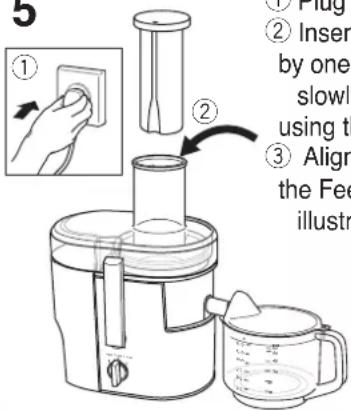
① Plug in and switch on.
② Insert the ingredients one by one and push them slowly into the Feeding Tube using the Food Pusher.
③ Align the Food Pusher into the Feeding Tube as illustrated.
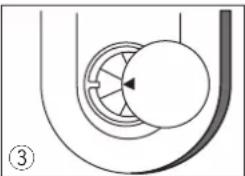
natural_image
Pure mechanical diagram showing a circular component inside a U-shaped housing, with no text or symbols present.6
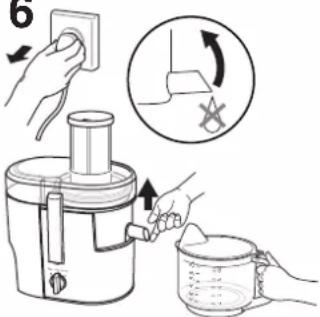
After use, switch off and unplug.
● While removing the Juice Jug, ensure the Spout is pulled up to prevent juice from dripping.
- Ensure the Spinner is fully stopped before release the Clamps.
● Some pulp might be hard to collect in the Pulp Container and stick on the Container Cover depending on the ingredients and amount.
Note:
- Ingredients that are not recommended:
Soft fruits that produce puree and can clog the Spinner – e.g. bananas, peaches, apricots etc.
Low juice ingredients which can block the product – e.g. fresh basil leaf etc.
Hard ingredients which can cause product malfunction – e.g. sugarcane, coconut etc. - Please remove hard seeds and stones from fruit before juicing such as guava etc. Hard seeds that difficult to remove from such as pomegranate is prohibited for juicing.
- During initial usage, the appliances might have some unpleasant smell (slight burn smell) but this condition is normal.
- Some ingredients may produce a lot of pulps accumulate to the Container Cover that cause operation stop. (CIRCUIT BREAKER PROTECTION: refer to page 6)
- Make sure all parts are correctly mounted before you switch on the appliance.
- Please use the Juice Jug with the Cup Cover to avoid juice splashing. Make sure to align the Juice Jug opening to the Spout when juicing.
- Speed 2 is suitable for hard type fruits e.g. apples, carrots etc. while speed 1 is suitable for softer type fruits e.g. watermelons.
BLENDER
1

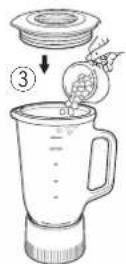
① Place the Gasket to the Blender Container Base.
② Attach the Blender Container to the Blender Container Base and tighten it clockwise.
③ Place the ingredients into the Blender Container and attach the Cover Unit.
2
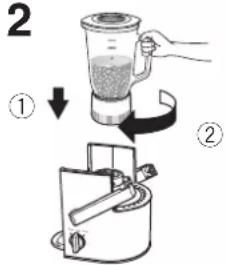
① Place the Blender on the Motor Housing.
② Twist the Blender clockwise as shown until a locking sound is heard.

① Plug in.
② Support the Blender Container and switch on.
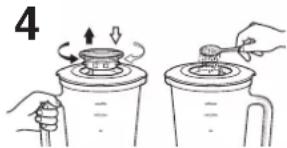
When adding ingredients or seasonings, remove the Cap when adding ingredients or seasonings. Be sure to attach the Cap again.

① After use, switch off and unplug.
② Twist the Blender anticlockwise to remove it from the Motor Housing.
6

① Push the Cover Unit up to open and remove the ingredients.
② Turn the Blender Container anticlockwise to remove it from the Blender Container Base.
Note:
• Maximum capacity: 1 L.
- Prohibited ingredients: meat, fish, solid food, sticky foods, ingredients with low water content, or ice cubes alone.
- Do not operate with the empty Blender Container.
- For smoother operation, dice food into smaller pieces (1 \~ 2 cm), and blend with liquid.
- Do not operate the Blender more than 3 minutes at a time. Stop for 1 minute, then resume.
- Reduce ingredients when appliance makes abnormal sounds or vibrates during operation.
- Never place the Blender Container Base on the Motor Housing without the Blender Container attached.
- Please ensure the Blender Container Base is adequately tightened to avoid leaking.
- Be sure to support the Blender Container along the operation until motor stops completely.
- Be sure that the Switch is off and the Cover Unit is attached properly before attaching the Blender to the Motor Housing.
- Do not attach or remove the Blender Container after the Blender Container Base is placed on the Motor Housing.
DRY MILL
1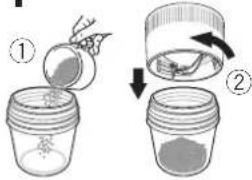 | 1 Place ingredients in the Mill Container.2 Attach the Mill Container Base to the Mill Container and tighten it clockwise. | 2 | 1 Place the Mill Container on the Motor Housing.2 Twist the Mill Container clockwise as shown until a locking sound is heard. |
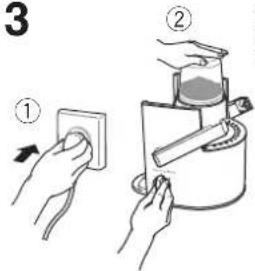 | 1 Plug in.2 Support the Mill Container and switch on. | 4 | 1 After use, switch off and unplug.2 Turn the Dry Mill anticlockwise to remove it from the Motor Housing. |
5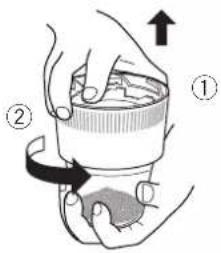 |  | 1 Turn the Dry Mill upside down.2 Turn the Mill Container Base anticlockwise to remove it from the Mill Container.3 Remove ingredients. | |
Note:
• Maximum capacity: 50 g.
• Prohibited ingredients: wet ingredients, liquids or solid ingredients such as turmeric.
- Do not operate with an empty Mill Container.
- Do not operate more than 1 minute at a time.
- Reduce ingredients when appliance makes abnormal sound or vibrates during operation.
- Be sure to support the Mill Container along the operation until motor stops completely.
- Do not attach or remove the Mill Container after the Mill Container Base is placed on the Motor Housing.
AFTER USE
Before detaching parts, make sure the motor has stopped completely, then disconnect the Plug from the outlet. (DISASSEMBLY: refer to page 5)
Note: ● Do not use benzene, thinner, alcohol, bleach, polishing powder or metal brush; otherwise the surface will be damaged.
● Do not put in the dishwasher.
- Some discolouration of the Spinner, the Container Cover, the Pulp Container, the Cup Cover, the Cover, the Blender Container Base, the Mill Container Base or the interior of the Container Unit may occur upon usage.
● Handle the Spinner, the Spout, the Blender Cutting Blades and the Mill Cutting Blades carefully during cleaning. This may cause injury.
CLEANING
All parts must be cleaned immediately. Left-over food particles may cause unpleasant odours, stains or malfunction of the appliance.
Note: Sponge and brush are not provided.
JUICER
Wash both sides of the spinner filter mesh with a sponge under running water. If necessary use a brush.

natural_image
Line drawing of a hand pouring liquid into a container with a handle (no text or symbols)Wash each part in cold or lukewarm water with a soft sponge. Rinse and dry thoroughly before storing.

natural_image
Line drawings of kitchen utensils including a blender, pot, and container with hands (no text or symbols)BLENDER

Wash carefully with a brush under running water.

Wash each part in cold or warm water with a soft sponge.
DRY MILL
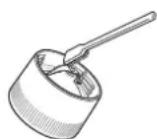
Remove food residue with a brush. Do not use water.

Wash in cold or warm water with a soft sponge. Rinse and dry thoroughly.
MOTOR HOUSING

natural_image
Line drawing of hands using a tool to cut or adjust a cylindrical object (no text or symbols)Wipe off with a damp cloth.
STORING
Plug and Cord
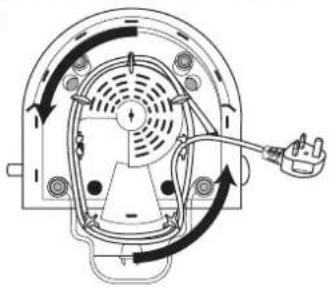
1) Turn over the Motor Housing and wind the Cord two turns as illustrated.
natural_image
Technical diagram of a mechanical device with internal components and directional arrows (no text or labels)2) Insert the Cord into the cord clamp to fix the Cord in position.

natural_image
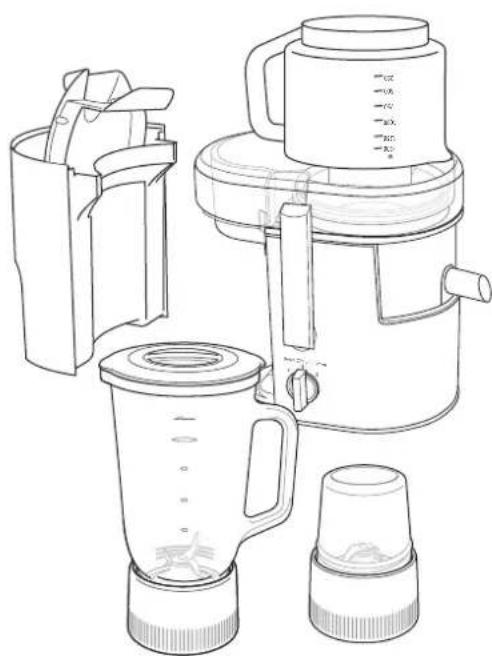
Pure electrical circuit lines without any symbols1) Turn over the Juice Jug and place it on the Feeder Tube.
2) Keep the Cup Cover inside the Pulp Container.
natural_image
Line drawing of a blender with three different parts (butter, blender, and blender) shown in line art style without any text or symbols.SPECIFICATION
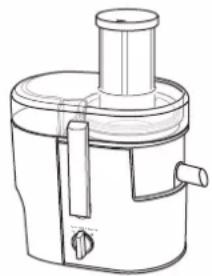
Juicer Blender Dry Mill
natural_image
Line drawing of a mechanical device with a cylindrical top and side ports (no text or symbols)
natural_image
Line drawing of a blender with handle and control knob (no text or symbols)
| Power Supply | 220 - 240 V ~ 50 - 60 Hz | ||
| Power Consumption | 240 - 270 W | ||
| Switch | 2 Speed | ||
| Operation Rating | Continuous(Repetition 2 min ON then,2 min OFF) | Continuous(Repetition 3 min ON then,1 min OFF) | Continuous(Repetition 1 min ON then,2 min OFF) |
| Dimension (Approx.)(W x D x H) | 216 mm x 305 mm x 384 mm | 216 mm x 229 mm x 392 mm | 216 mm x 229 mm x 284 mm |
| Mass (Approx.) | 4.4 kg | 3.9 kg | 3.1 kg |
| Capacity (Approx.) | 1.5 L Juice Jug2.0 L Pulp Container | 1.0 L | Maximum 50 g |
Note
You can identify the date of manufacturing by production number which is marked on bottom side of the unit. Production number X XX xxxxxxx
Second and third digits : month (in number) 01-- January, 02--February, ...12--December First digit: year (last digit of the year in number) 1 - 2011, 2 - 2012, 3 - 2013
This Operating Instructions should be kept because they contain important information.
In case of failure or damage
Do not operate any appliance with a damaged Cord, Plug, after the appliance malfunctions, is dropped, damaged in any manner. Return appliance to the nearest authorized service facility for examination, repair or electrical or mechanical adjustment.
natural_image
Illustration of hands holding a container with a handle, showing a rotating mechanism (no text or symbols)natural_image
Technical line drawing of a mechanical device with an upward arrow indicating motion (no text or symbols)natural_image
Illustration of hands holding a container with a lid, alongside a close-up of the lid being inserted (no text or symbols)natural_image
Top-down schematic of a circular mechanical component with three circular features and concentric rings (no text or symbols)
natural_image
Technical line drawing of a mechanical device with an arrow indicating downward motion (no text or symbols)① ظرف تقاله را نصب
و اطمینان حاصل کنید
natural_image
Line drawing of hands operating a cylindrical device with rotating arms (no text or symbols)

natural_image
Simple line drawing of a jar pouring granular material into a bowl (no text or symbols)natural_image
Line drawing of a hand pouring liquid into a container with a handle (no text or symbols)natural_image
Line drawings of kitchen utensils including a blender, pot, and jar with hands (no text or symbols)مخلوطكن

natural_image
Line drawing of hands using a tool to adjust or install a mechanical component (no text or symbols present)natural_image
Technical diagram of a mechanical device with internal components and directional arrows (no text or labels)natural_image
Pure electrical circuit lines without any symbolsnatural_image
Line drawing of a blender with various shades and accessories (no text or symbols)مشخصات فنى
natural_image
Illustration of hands holding a container with a handle, showing a rotating mechanism (no text or symbols)① حRR الماسكات.
natural_image
Technical line drawing of a mechanical device with an upward arrow indicating motion (no text or symbols present)natural_image
Illustration of hands holding a container with a lid, alongside a close-up of the lid being inserted (no text or symbols)natural_image
Top-down schematic of a circular mechanical component with three circular features (no text or symbols)
natural_image
Diagram of a mechanical device with a downward arrow indicating force or direction (no text or symbols present)natural_image
Line drawing of hands operating a cylindrical device with rotating buttons (no text or symbols)natural_image
Pure mechanical diagram showing a circular component with internal gear and curved housing, no text or symbols present6

• demands you should go to be in the most busy. For how you want to go to your home. Then I'm going to go to your home.
ملاحظة:

natural_image
Simple line drawing of a jar pouring granular material into a bowl (no text or symbols)natural_image
Line drawing of a hand pouring liquid into a bowl (no text or symbols)natural_image
Line drawing of a kitchen appliance setup with six different kitchenware items (no text or symbols)الخライト

natural_image
Line drawing of hands operating a mechanical device with a cylindrical component (no text or symbols)natural_image
Technical diagram of a mechanical device with internal components and directional arrows (no text or labels)natural_image
Pure electrical circuit lines without any symbolsnatural_image
Line drawing of a blender with three different parts (butter, blender, and blender) shown in line art style without any text or symbols.المواصفات
No. 3, Jalan Sesiku 15/2, Section 15, Shah Alam Industrial Site, 40200 Shah Alam, Selangor Darul Ehsan, Malaysia.
Website: http://panasonic.net/
- Operating Instructions
- مندرجات
- (Make sure to follow these instructions)
- WARNING
- !
- CAUTION
- (no text)
- PART NAMES
- DISASSEMBLY
- JUICER
- CIRCUIT BREAKER PROTECTION
- BLENDER / DRY MILL
- SAFETY LOCK
- HOW TO USE
- Note:
- BLENDER
- DRY MILL
- AFTER USE
- CLEANING
- MOTOR HOUSING
- STORING
- Plug and Cord
- SPECIFICATION
- Note
- In case of failure or damage
- مخلوطكن
- مشخصات فنى
- المواصفات
Brand : PANASONIC
Model : MJ-DJ31
Category : Juicer