
BXRA43017GB - Heating BLACK & DECKER - Free user manual and instructions
Find the device manual for free BXRA43017GB BLACK & DECKER in PDF.


| Type | Smart Digital Oil Free Radiator |
| Model | BXRA43017GB |
| Brand | Black & Decker |
| Power Input | 2500 W |
| Voltage | 230 V~ |
| Frequency | 50-60 Hz |
| Weight | 6 kg |
| Heat Settings | Low (H1), Medium (H2), High (H3) |
| Temperature Range | 5-35 °C |
| Timer | 24-hour programmable automatic shut-off |
| WiFi Function | Smart WiFi remote control via BLACK+DECKER Home app |
| Anti-Frost Mode | Yes (FR mode) |
| Overheat Protection | Automatic thermal cutout |
| Tip-Over Protection | Automatic shut-off when tilted beyond 30° |
| Controls | LED display, Mode button dial, Start/Pause/WiFi button, Power On/Off button |
| Castor Wheels | Yes (included) |
| Memory Function | Remembers last settings (except timer) |
| Cleaning | Wipe with soft damp cloth; do not use detergents or immerse |
| Safety Features | Overheat protection, tip-over switch, cool-touch surface (partial) |
| Guarantee | 2 years from date of purchase |
Frequently Asked Questions - BXRA43017GB BLACK & DECKER
User questions about BXRA43017GB BLACK & DECKER
0 question about this device. Answer the ones you know or ask your own.
Ask a new question about this device
Download the instructions for your Heating in PDF format for free! Find your manual BXRA43017GB - BLACK & DECKER and take your electronic device back in hand. On this page are published all the documents necessary for the use of your device. BXRA43017GB by BLACK & DECKER.
USER MANUAL BXRA43017GB BLACK & DECKER

natural_image
Line drawing of a black+ decker electric heater with wheels and ventilation slots (no text or symbols)This product is only suitable for well-insulated
spaces or occasional use.
BXRA43017GB www.blacka
EN


What's in the box
Instruction Manual Oil Free Radiator 2 x Castor Brackets
Features
- Fins
- Castor Wheels
- LED Display
- Mode Button Dial
- Start/Pause/WiFi button
- Power On/Off button
Intended Use
Your BLACK+DECKER BXRA43017GB 2.5KW Smart Digital Oil Free Radiator has been designed for heating small and medium spaces.
This appliance is intended for indoor household use only.
Thank you for choosing BLACK+DECKER. We hope that you will enjoy using this product for many years.
Safety Instructions
WARNING: Read all safety warnings and all instructions. Failure to follow the warnings and instructions listed below may result in electric shock, fire and/or serious injury.
◆ Read this manual carefully before using the appliance.
◆ The intended use is described in this manual.
- The use of any accessory or attachment or the performance of any operation with this appliance other than those recommended in this instruction manual may present a risk of personal injury.
◆ Retain this manual for future reference.
♦ WARNING: When using mains-powered appliances, basic safety precautions, including the following, should always be followed to reduce the risk of fire, electric shock, personal injury and material damage.
Using Your Appliance
Please read the operating instructions carefully before using your oil-free radiator for the first time.
◆ Check that the voltage of the main circuit corresponds with the rating of the appliance before operating.
- The heater must not be located immediately below a socket outlet.
- Do not use this heater in the immediate surroundings of a bath, a shower or a swimming pool.
- WARNING: In order to avoid overheating, do not cover the heater.
- Do not use this heater if it has been dropped.
- Do not use if there are any visible signs of damage to the appliance.
◆ Use this heater on a horizontal and stable surface.
WARNING: To reduce the risk of fire, keep textiles, curtains, or any other flammable material a minimum distance of 1m from the air outlet
◆ Children of less than 3 years should be kept away unless continuously supervised.
Children between the ages of 3 and 8 years old should only switch the appliance on or off when it has been placed and installed in its intended, normal operating position and when they have been given adequate supervision or instruction concerning safe use of
ENGLISH
(Original instructions)
the appliance and understand the hazards involved. Children between the ages of 3 and 8 years old should not plug in, regulate, clean or perform user maintenance on the appliance.
- This appliance can be used by children aged from 8 years and above and persons with reduced physical, sensory or mental capabilities or lack of experience and knowledge if they have been given supervision or instruction concerning use of the appliance in a safe way and understand the hazards involved. Children shall not play with the appliance. Cleaning and user maintenance shall not be made by children without supervision.
♦ WARNING: Do not use this appliance in small rooms when they are occupied by persons not capable of leaving the room on their own, unless constant supervision is provided.
♦ AUTION: Some parts of this product can become very hot and cause burns. Particular attention has to be given where children and vulnerable people are present.
◆ Children shall not play with the appliance.
- Do not let the cable hang over the edge of a table or counter or let it come into contact with any hot surfaces.
◆ The use of accessory attachments is not recommended by the
appliance manufacturer, apart from those supplied with this product.
- Do not pull the plug out by the cable as this may damage the plug and/or the cable.
- Do not use this product for anything other than its intended use.
- This appliance is for household use only.
- Do not carry the appliance by the power cable.
♦ Do not use the appliance outdoors.
♦ Do not operate with wet hands.
Use of an extension cable with this appliance is not recommended. However, if it is necessary to use an extension lead, ensure that the lead is suited to the power consumption of the appliance to avoid overheating of extension cable, appliance or plug point. Do not place the extension cable in a position where it can be pulled on by children or animals or tripped over.
◆ Always unplug the unit when not in use or before cleaning. - The manufacturer does not accept responsibility for any damage or injury caused by improper or incorrect use, or for repairs carried out by unauthorised personnel.
Safety Of Others
◆ Close supervision is necessary when any appliance is used by or near children.
◆ Take care when any appliance is used near pets.
- Do not allow the cord to become twisted or come into contact with children.
After Use
♦ Keep this unit clean.
◆ Check all inlets and outlets from time to time for accumulated dust.
- Do not allow objects to enter the ventilation opening as this may cause electric shock, or damage to the unit.
- Switch off at the wall socket then remove the plug from the socket when not in use, before relocating or before cleaning.
◆ Switch off, remove the plug from the socket and let the appliance cool down before leaving it unattended and before changing, cleaning or inspecting any parts of the appliance.
- While cleaning, DO NOT use a wet cloth or use water on any part of the unit, as this may cause a short circuit or electrical shock.
- When not in use, the appliance should be stored in a dry place. Children should not have access to stored appliances.
Inspections And Repairs
Do not attempt to dismantle, repair or remould any part of the unit. This should only be done by a qualified
BLACK+DECKER service facility. Even the change of power cable should be done by a qualified person.
In the unlikely event the appliance develops a fault, stop using it immediately and seek advice from qualified BLACK+DECKER service facility.
In case of technical problems, switch off the product and do not attempt to repair it yourself. Return the appliance to an authorised BLACK+DECKER service facility for examination, adjustment or repair. Always insist on the use of original spare parts. Failure to comply with the above mentioned precautions and instructions, could affect the safe operation of this product. Further information about authorised BLACK + DECKER service facilities can be found on www.2helpu.com
Additional Safety Instructions for This Appliance
◆ Always operate the appliance on a smooth, even, stable surface. Do not place the unit on a hot surface.
◆ Ensure that the unit is switched off after use.
- Do not immerse cables, plugs or any part of the appliance in water or any other liquid.
◆ Operate the unit only at the voltage specified.
ENGLISH
(Original instructions)
- Do not use the unit near open windows, as contact with rain and other natural elements could cause an electrical hazard.
- Do not put heavy objects on the appliance.
♦ Do not tip the unit on its side. - Never insert any other object into the unit body to avoid any hazard or unit failure.
- Do not put the unit close to heat-generating devices or near flammable and dangerous materials.
- If the supply cable is damaged, it must be replaced by the manufacturer or its service agent or a similarly qualified person in order to avoid a hazard.
- For optimal airflow circulation, leave a distance of at least 1 metre around the appliance on every side.
◆ Always direct the airflow in order to optimise heating. Avoid corners, small objects and other surfaces or objects which may impede the airflow.
◆ The appliance must be positioned so that the plug is accessible.
◆ Always turn the heater off and unplug it from the mains before attempting to move it.
♦ WARNING: Do not place the unit on or near a hot gas electric burner.
Labels on Appliance
◆ The following pictograms along with the date code are shown on the appliance:
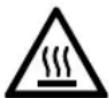
WARNING: Hot surface

WARNING: Do not cover
⚠ WARNING: Before assembling, switch the appliance off and remove the plug from the socket.
Electrical safety
⚠ WARNING: Before use, check that the mains voltage corresponds to the voltage on the rating plate.
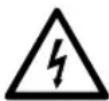
This product must be earthed.
◆ Appliance plugs must match the outlet. Never modify the plug in any way.
◆ Do not use any adapter plugs with earthed (Class 1) appliances. Unmodified plugs and matching outlets will reduce the risk of electric shock.
◆ To avoid the risk of electric shock, do not immerse the cord, plug or appliance in water or other liquid.
Extension cables
◆ Up to 30m (100 ft) can be used without loss of power.
If the supply cord is damaged, it must be replaced by the manufacturer or an authorised BLACK+DECKER Service Centre in order to avoid a hazard.
WARNING: Before assembling, switch the appliance off and remove the plug from the socket.
Mains plug replacement
⚠ WARNING: The above section on mains plug replacement is for authorized service centre persons.
If a new mains plug needs to be fitted:
◆ Safely dispose of the old plug.
◆ Connect the brown lead to the live terminal in the new plug.
◆ Connect the blue lead to the neutral terminal.
◆ This product is class I (earthed), connect the green/yellow lead to the earth terminal.
Features
- Fins
- Castor Wheels
- LED Display
- Mode Button Dial
- Start/Pause/WiFi button
- Power On/Off button

natural_image
Illustration of a hand holding a device with a stylized hammer and arrow (no text or symbols)
natural_image
Simple line drawing of a mechanical or electrical component with three spherical objects on a base, no text or symbols present.◆ To use the unit, start by attaching the castors.
◆ Turn the heater upside down.
♦ Align the mounting holes of each castor bracket assembly with the corresponding notches on the base of the unit, as shown in the figure above.
When each bracket is correctly aligned with the corresponding notches, secure the bracket to the unit with the provided screws, as shown in the figure above.
◆ Once the screws are tightened turn the appliance upright on to the castors.
◆ The unit is now ready for normal use.
Use
About the Controls
◆ Adjustable thermostat
◆ 3 heat settings
◆ Programmable 24 hour timer
◆ Smart WiFi function
Turning the Unit On or Off
◆ To power the unit on, begin by plugging it into the mains.
Once the unit has been plugged in, press the Power On/Off button to enter working mode. There will be a sound prompt and the unit's LED screen will come on and display '- -'.
⚠ WARNING: DO NOT touch any part of the heater other than the front panel while it is in operation, as it will be very hot and there will be a risk of burns.
Once the unit is on, press the Start/Pause/WiFi key to bring it out of Standby. The control panel will display the current working temperature.
◆ Press the Power On/Off key again while the unit is in operation to turn it off. The LED screen will go out, and the unit will stop working.
⚠ WARNING: DO NOT store the unit directly after turning it off. Allow for time for the fins to cool down before storing.
Heat Setting Selection
◆ This heater is equipped with 3 heat settings (Low, Medium and High).
When the unit is powered on, press the Mode button dial once to enter Heat Setting selection mode, then turn the dial to cycle between the available heat settings. The LED screen will display the currently selected heat setting as follows.
H1 for Low heat setting.
H2 for Medium heat setting.
H3 for High heat setting.
Note: The unit will store to memory the setting before being switched off (except as a result of power failure). It does not store the timing settings.
ENGLISH
(Original instructions)
Temperature Selection
- This heater is equipped with an adjustable thermostat, which allows for temperature control within each of the 3 heat settings.
♦ Turn the Mode button dial to increase/ decrease in increments of 1 degree. Turn this dial clockwise to increase the temperature, or counter-clockwise to decrease it. The LED display will show the current operating temperature.
◆ The temperature range available is 5-35°C.
Note: When the temperature drops below 5irc C, turn the mode button anti-clockwise to select FR. The oil free radiator will enter anti-frost mode.
Note: Once the temperature has been manually set, it will be stored in the unit's internal memory. If the unit is put into standby mode, when it is next turned on, it will automatically default to the most recently selected settings.
Activating the Shut Off Timer
◆ The unit is equipped with a programmable 24 hour automatic shut-off timer.
When the unit is in working mode, long-press the Mode button dial to activate the timer. The LED screen will display '00H'
Once the timer has been activated, turn the Mode button dial to pre-set the duration of the heating cycle by increments of 1, from 0 to 24 hours. Turn this dial clockwise to increase the time, or counterclockwise to decrease it.
◆ The ‘H’ icon will flash whilst a time is being selected.
When no further adjustment is made, after 5 seconds, the setting will automatically be stored to memory, and the LED display will go back to displaying the target temperature and timer shut-off.
◆ The unit will switch off to stand-by mode once the set time has elapsed.
Memory Function
When the appliance is re-activated it will operate according to the status before the last standby.
Over Heating Safety Protection Function
The heater is fitted with an overheat protection switch (thermal cutout) that will power off the heater automatically in case of overheating. If this occurs, follow the steps below to resolve the problem:
- Unplug the heater and allow it to cool fully.
- Check and remove the source of the overheating such as poor ventilation and item covering the heater.
- Follow the operation instructions to restart the heater.
- The heater should function normally again. If the problem persists, contact our Customer Service for advice.
Tip over function
When the angle between the unit and a horizontal position is less than 30 ± 5 degrees, the unit will automatically turn itself off.
When the unit is righted and the angle between the unit and the horizontal position is greater than 70 ± 5 degrees, the unit will resume working in the state before tip over.
Connecting to WiFi/Downloading The App
To start using the 'BLACK+DECKER Home' app, begin by downloading it from the Apple App store or the Google Play store. Scan the QR Codes shown below to download the app directly from either store.
◆ Follow the instructions in the app to create an account and connect the radiator to a WiFi network.
Note: Other app and device instructions are also available in the app.
Once the app is downloaded, carry out the following steps to control the unit remotely through the corresponding smart device.



Connecting the App to the Unit
◆ Install the "BLACK+DECKER Home" app and create a user account, as detailed above.
◆ Plug the appliance in and long-press the Start/Pause/WiFi button to activate the WiFi function.
◆ Place the appliance within 5 metres of your router.
As long as the Start/Pause/WiFi button has been pressed, the WIFI indicator flashes. If you need to re-connect to WIFI, long press the Start/pause/wifi button for 5 seconds to start the network configuration. The WIFI indicator flashes again.
WIFI Connection
To connect the unit to the BLACK+DECKER Home app via WiFi, carry out the following steps:
◆ Activate the Bluetooth and WiFi functions in the corresponding smart phone or tablet device.
◆ Activate the WiFi function on the unit. The WiFi indicator will flash.
When the WIFI indicator flashes, select 'Add Device' and follow the instructions on the display.
◆ Check the status of the WIFI indicator and choose the correct status.
◆ If the WIFI indicator flashes rapidly, the unit can be connected.
Configuring Different SSD Bands for 2.4Ghz
If your router supports both the 2.4 GHz, but only one Wi-Fi name is displayed on the Wi-Fi search page of your mobile phone, perform these steps:
- Go to the Wireless page of the router. (The entry address is usually provided on the label attached to the back of the router).
- Go to the 2.4 GHz setting page, and set the Wi-Fi name (SSID) to XXX—2.4G, where xxx indicates the Wi-Fi name. Save setting.
When the preceding settings are complete, the new Wi-Fi names will Appear on the Wi-Fi settings page of your mobile phone.
Note: After the Wi-Fi names are changed, you need to reconnect the devices that use this wireless router. The password remains the same if it has not been changed.
Using the App
Once the app is downloaded, carry out the following steps to control the unit remotely through the corresponding smart device.
◆ Tap the Power On/Off key on the app's main screen to turn the unit On or Off.
- Tap the + and – keys on the app's main screen to increase or decrease the temperature levels. The current temperature level is displayed above the two keys.
◆ Tap the Timer key on the app’s main screen to access the timer screen. In the new screen, click
◆ Add Timer to program and set a timer.
♦ Tap the Mode key.
Cleaning and maintenance
WARNING: Before cleaning and maintenance, switch the appliance off and remove the plug from the socket, to prevent electric shock.
- Do not immerse any part of the appliance, power cord or plug in liquids.
◆ Clean the appliance regularly to aid radiating efficiency.
◆ Use a soft damp cloth to wipe the surface. Avoid using detergent, spray or chemicals or sharp, abrasive tools as these may cause damage to the appliance.
Storing the Unit
⚠ WARNING: Ensure the unit has fully cooled down before storing.
◆ Store in a cool, dry place, out of the reach of children.
ENGLISH
(Original instructions)
Protecting the environment

Separate collection. Products and batteries marked with this symbol must not be disposed of with normal household waste.
Products and batteries contain materials that can be recovered or recycled, reducing demand for raw materials. Please recycle electrical products and batteries according to local provisions. Further information is available at www.2helpU.com.
Technical data
| BXRA43017GB | ||
| Input voltage V AC 230~ | ||
| Frequency Hz 50-60 | ||
| Power input W 2500 | ||
| Weight KG 6 | ||
Product Guarantee
This product comes with a 2 Year guarantee from the original date of purchase. If any defect arises due to faulty materials of workmanship, the faulty products must be returned to the place of purchase. Refund or replacement is at the discretion of the retailer. This guarantee is in addition to and in no way prejudices your statutory rights.
The Following Conditions Apply:
The product must be returned to the retailer with proof of purchase or a receipt within the 1st year of purchase. For any product related issues after 12 months please contact our customer services team.
◆ The product must be installed and used in accordance with the instructions contained in this instruction guide.
- It must be used only for domestic purposes.
- It does not cover wear and tear, damage, misuse or consumable parts.
◆ This guarantee is valid in the UK and Republic of Ireland.
For all customer service enquires please contact us below;
RKW,
Sutton House,
Berry Hill Road,
Stoke-on-Trent,
ST4 2NL
Email blackanddecker@rkwltd.com
Tel 0333 220 6089
Black & Decker® and BLACK+DECKER™ and the Black & Decker® and BLACK+DECKER™ logos are registered trademarks of The Black & Decker® Corporation and are used under licence. All rights reserved. Imported and Distributed by RKW LTD, Sutton House, Berry Hill Industrial Estate, Berry Hill Road, Stoke-on-Trent, ST4 2NL
| Model Identifier(s): BXRA43017GB | |||||
| Item Symbol Value | Unit Item Unit | ||||
| Heat Output | Type of heat input for electric storage, local space heaters only (select one) | ||||
| Nominal heat output | Pnom 2.5 kW | Manual heat charge with integrated thermostat | No | ||
| Minimum heat output (indicative) | Pmin 1.2 kW | Manual heat charge control with room and/or outdoor temperature feedback | No | ||
| Maximum continuous heat output | Pmax, c 2.4 kW | Electronic heat charge control with room and/or outdoor temperature feedback | No | ||
| Auxiliary electricity consumption | Fan assisted heat output No | ||||
| At nominal heat output | elmax 0.000 kW | Type of heat output/room temperature control (select one) | |||
| At minimum heat output | elmin 0.000 kW | Single stage heat output and no room temperature control | No | ||
| In standby mode | eISB 0.002 kW | Two or more manual stages, no room temperature control | No | ||
| Heat output | With mechanic thermostat room temperature control | No | |||
| Nominal heat output | Pnom | N/A | kW | With electronic room temperature control | Yes |
| Minimum heat output (indicative) | Pmin | N/A | Electronic room temperature control plus day timer | No | |
| Maximum continuous heat output | Pmax, c N/A | Electronic room temperature control plus week timer | No | ||
| Auxiliary electricity consumption | Other control options (multiple selections possible) | ||||
| At nominal heat output | elmax | N/A | Room temperature control with presence detection | No | |
| At minimum heat output | elmin N/A | Room temperature control with open window detection | No | ||
| In standby mode | eISB | N/A | With distance control option | No | |
| With adaptive start control | No | ||||
| With working time limitation | Yes | ||||
| With black bulb sensor | No | ||||
| Contact Details: | RKW LTD, Sutton House, Berry Hill Industrial Estate, Berry Hill Road, Stoke-on-Trent, ST4 2NL | ||||


08/2023


- What's in the box
- Features
- Intended Use
- Safety Instructions
- Using Your Appliance
- ENGLISH
- (Original instructions)
- Safety Of Others
- After Use
- Inspections And Repairs
- Additional Safety Instructions for This Appliance
- Labels on Appliance
- Electrical safety
- Extension cables
- Mains plug replacement
- Use
- Turning the Unit On or Off
- Heat Setting Selection
- Temperature Selection
- Activating the Shut Off Timer
- Memory Function
- Over Heating Safety Protection Function
- Tip over function
- Connecting to WiFi/Downloading The App
- Connecting the App to the Unit
- WIFI Connection
- Configuring Different SSD Bands for 2.4Ghz
- Using the App
- Cleaning and maintenance
- Storing the Unit
- Protecting the environment
- Product Guarantee
- The Following Conditions Apply:
- For all customer service enquires please contact us below;
Brand : BLACK & DECKER
Model : BXRA43017GB
Category : Heating