TSA8021 - Fan Teesa - Free user manual and instructions
Find the device manual for free TSA8021 Teesa in PDF.


| Product Type | Standing Fan |
| Model | TSA8021 |
| Brand | Teesa |
| Power Supply | 220-240 V, 50/60 Hz |
| Power Consumption | 45 W |
| Fan Speed Settings | 3 (Low, Medium, High) |
| Timer | Up to 2 hours |
| Oscillation | Yes, 80° automatic |
| Tilt Adjustment | Yes, adjustable angle |
| Height Adjustment | Yes, 105-125 cm |
| Blade Diameter | 36 cm |
| Grill Diameter | 43 cm |
| Power Cord Length | 1.8 m |
| Blade Guard Material | Metal |
| Control Type | Button (speed) + Knob (timer) |
| Indoor Use Only | Yes |
| Cleaning Instructions | Wipe with soft damp cloth, dry after |
| Safety Features | Overheat protection via guard; do not insert objects |
| Included Accessories | Base, pipe, blade, guards, screws, knob |
| Warranty | Refer to manufacturer |
Frequently Asked Questions - TSA8021 Teesa
User questions about TSA8021 Teesa
0 question about this device. Answer the ones you know or ask your own.
Ask a new question about this device
Download the instructions for your Fan in PDF format for free! Find your manual TSA8021 - Teesa and take your electronic device back in hand. On this page are published all the documents necessary for the use of your device. TSA8021 by Teesa.
USER MANUAL TSA8021 Teesa
Standing fan with timer
TSA8021
Bedienungsanleitung
DE
Owner's manual
EN
Instrukcja obsługi
PL
Manual de utilizare
RO
Návod na použitie
SK
natural_image
Diagram of two intersecting rectangular rods with a labeled dimension (16) and no text or symbols beyond the numberMONTAGE
BEDIENUNG
Thank you for purchasing TEESA appliance. Please read this operation instruction carefully before use, and keep it for future use.
Distributor does not take responsibility for damages caused by inappropriate handling and use of the product.
SAFETY INSTRUCTIONS
In order to reduce the injuries or damages, follow basic safety precautions applied when using any electrical device, including the following:
- Read this instruction manual carefully, even if you are familiar with the appliance. Keep the manual for future reference.
- Before connecting the device to power supply socket, make sure the voltage indicated on the appliance corresponds to the voltage in the power supply socket.
- Place the device on flat, stable surface.
- Protect this device from shock and being dropped.
- Clean this device in accordance to instructions listed in "Cleaning and Maintenance" section.
- ALWAYS turn off the device and disconnect it from the mains supply:
• if it's not operating correctly,
- if there's an uncommon voice when using,
• before disassembling the device,
• before cleaning,
• when not in use.
- When you disconnect the power cord of the device, grasp and pull the plug, not the cord/cable.
- This appliance may be used by children who are above 8 years old and by persons with reduced physical, sensory or mental capabilities, or lack of experience and knowledge, if they are supervised and guided by a person who is responsible for their safety in a cautious manner, and all the safety precautions are understood and followed. Children should not play with this device. Children should not perform cleaning and servicing of the device unsupervised.
- Fixed power cable may only be replaced in an authorized service point.
- Keep the device and its cord/cable away from heat, water, moisture, sharp edges and any other factor which may damage the appliance or its cord.
- Do not place the appliance in water or any liquid; nor handle/use it with wet or moist hands.
- Do not use the product for purposes different from displayed in this operating manual.
-
Do not use unauthorized accessories.
-
Appliance for home use; do not use it for commercial or industrial purposes. Device for indoor use only.
- DO NOT use this device if the cord or the plug is damaged, or the appliance is broken.
- Do not attempt to repair this appliance yourself. Only authorized and qualified personnel may repair this device. Never disassemble this device.
- Never place the fan near any gas appliances, fire or flammable liquids.
- Do not turn on the device if the guard is not mounted properly.
- Do not plug the device to power mains before completing the installation.
- Never insert fingers, pencils, or any other object through the guard when the fan is running.
- Never cover or obstruct the air inlet or outlet to prevent overheating.
- Improper installation may result in the risk of fire, electric shock, or injury to persons.
PRODUCT DESCRIPTION
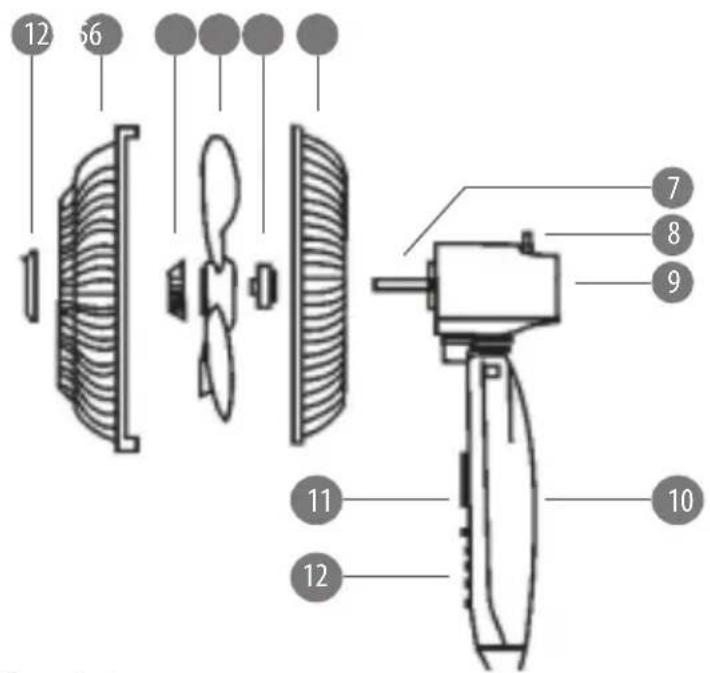
- Front plate
- Front guard
- Blade screw (Left spin)
- Blade
- Rear guard screw
- Rear guard
- Fan axle
- Oscillation button
- Motor unit
- Motor unit holder
- Timer
- Speed buttons
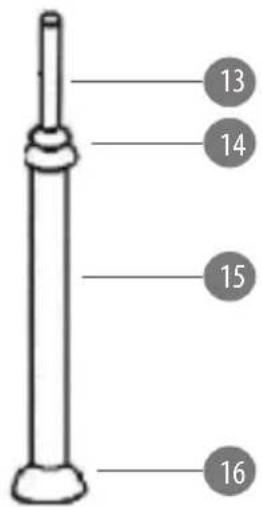
- Height adjustment pipe
- Height adjustment knob
- Stand
- Base cover
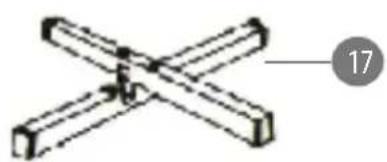
- Cross base
natural_image
Pure mechanical cross diagram without any text, numbers, or symbolsMOUNTING
- Cross the two parts of cross base so that the cut-outs slide into each other and secure with the screws.
- Remove the Height adjustment knob from the Height adjustment pipe by turning it counterclockwise.
- Slide the cover down to the cross base so that the connections are covered and place the knob back in place.
- Slide out the height adjustment pipe to the set the desired length and secure it in place using height adjustment knob.
- Remove the bolt from the bottom of the motor unit holder then place
the unit on the inner pipe and place the bolt back in place to secure it. - Fix the rear guard on the motor housing with rear guard screw.
- Screw down the blade onto the fan axle with blade screw.
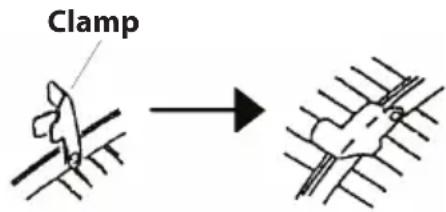
- Fasten the front guard and rear guard with the clamp.
OPERATION
Note: Make sure the product is fully assembled before plugging it into power supply socket.
- Place the fan on a flat stable surface.
- Make sure the timer knob is set to OFF position.
- Plug the fan into power mains.
- Set the timer knob to ON position.
- Press one of the speed buttons to control air outlet: 1 - low, 2 - medium, 3 - high. Press 0 button to turn the fan off.
- Set timer using the timer knob (up to 2 h).
- To control oscillation press/pull the oscillation button.
- To adjust the tilt angle, grab and tilt the motor housing up or down to the desired angle.
- When you want to adjust the height of the fan you can loosen the height adjustment knob and adjust the pipe to the desired height and then fasten it.
CLEANING AND MAINTENANCE
• Prior to cleaning, disconnect the device from power mains.
- Clean this device with soft, slightly damp cloth. Do not use any chemical agents to clean the fan.
• Dry the fan with a dry cloth after cleaning.
SPECIFICATION
FUNCTIONS
3 speed modes
Timer: up to 2 h
Automatic oscillation: 80°
Adjustable height: 105-125 cm
Adjustable tilt angle
Metal blade guard
TECHNICAL DATA
Power: 45 W
Grill diameter: 43 cm
Blade diameter: 36 cm
Power cable length: 1,8 m
Power supply: 220 \~ 240 V, 50/60 Hz
EN

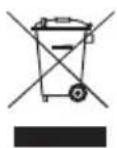
It is forbidden to place equipment waste marked with the symbol of a crossed-out trash bin together with other waste. This equipment is subject to collection and recycling. The harmful substances it contains can cause environmental pollution and pose a threat to human health.
natural_image
Diagram of two intersecting 3D rectangular rods with a numbered label '17' pointing to one rod (no text or symbols on the rods themselves)MONTAŻ
natural_image
Pure mechanical cross diagram without any text, numbers, or symbolsMONTARE
natural_image
Pure mechanical cross diagram without any text, numbers, or symbolsMONTÁŽ
natural_image
Diagram showing a hand holding a bird-like object before and after an arrow, with no text or symbols present.POUŽITIE
Brand : Teesa
Model : TSA8021
Category : Fan