
EFG660X - Cooker EAS Electric - Free user manual and instructions
Find the device manual for free EFG660X EAS Electric in PDF.


| Product Type | Freestanding Cooker |
| Brand | EAS Electric |
| Model | EFG660X |
| Dimensions (H x W x D) | 850 x 600 x 600 mm |
| Weight | 55 kg |
| Power Supply | 220-240V, 50/60Hz, 16A |
| Hob Type | Gas (4 burners) |
| Oven Type | Electric |
| Oven Functions | Bake, grill, rotisserie, fan-assisted |
| Energy Class | A |
| Safety Features | Flame failure device, triple-glazed door, child lock |
| Cleaning | Easy-clean enamel interior, removable door |
| Spare Parts Availability | Available through authorized service centers |
| Adjustable Feet | Yes |
| Electronic Timer | Yes, with display |
| Door Type | Drop-down, removable inner glass |
| Included Accessories | Grill pan, baking tray, rotisserie spit |
Frequently Asked Questions - EFG660X EAS Electric
User questions about EFG660X EAS Electric
0 question about this device. Answer the ones you know or ask your own.
Ask a new question about this device
Download the instructions for your Cooker in PDF format for free! Find your manual EFG660X - EAS Electric and take your electronic device back in hand. On this page are published all the documents necessary for the use of your device. EFG660X by EAS Electric.
USER MANUAL EFG660X EAS Electric
natural_image
Line drawing of a simple kitchen appliance with a front panel and side grilles (no text or symbols)EFG555X
EFG556W
EFG660X
EFG660W
EFG660C
EFG660N
natural_image
Technical line drawing of a mechanical assembly with gears and shafts (no text or symbols)natural_image
Illustration of two children playing with tools, one holding a hammer and the other lying on the floor (no text or symbols)natural_image
Silhouette of a person pushing a large object with an arrow, no text or symbols present
natural_image
Diagram showing a mechanical assembly with labeled components, no readable text or symbols presentConexión de NG (gas natural)

natural_image
Close-up of two metallic pipe fittings with threaded ends, labeled 'Figura 7' (no other text or symbols)natural_image
Two identical cooking pots with crossed-out handles, one on a flat surface and the other on a flat surface (no text or symbols)natural_image
Technical diagram showing a mechanical assembly and its corresponding fire extinguisher illustration (no text or labels)natural_image
Line drawing of a tool with multiple clamps and a handle, no text or symbols present2- Introduzca la hora co alaterlas (+) -o ( ).(Ej. 5
natural_image
Five gray circular shapes with varying shapes and directional arrows, no text or symbols presentnatural_image
Simple line drawing of a circle with internal geometric lines and a small arrow pointing to the top-right corner (no text or symbols)
natural_image
Simple diagram with a circle labeled 1, 2, 3 and a small square icon (no text or symbols beyond labels)| Conmutador Posición | ∅145 1000W | ∅145 RAPi T 1500W | ∅180 1500W | ∅180 RAPi T 2000W | |||||
| 1 | 250 | W | 400 | W | 400 | W | 750 | W | |
| 2 | 750 | W | 11 | 00 | W | 1 | 100 | W | 1250 W |
| 3 | 100 | 0 | W | 15 | 00 | W | 1 | 500 W | 2000 W |


natural_image
Simple line drawing of a cooking pot with arrows indicating direction (no text or symbols)natural_image
Simple line drawing of a cooking pot with steam rising and cooling (no text or symbols)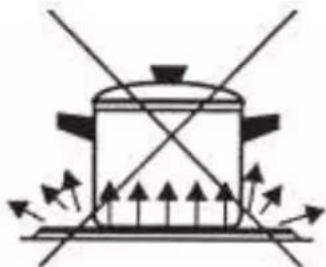
natural_image
Diagram of a heat exchanger with directional arrows indicating flow or movement (no text or labels)natural_image
Simple line drawing of a cooking pot with upward arrows indicating heating or cooling process (no text or symbols)natural_image
Simple line drawing of a disc with a base and top, no text or symbols presentnatural_image
Illustration of hands pressing down on a circular object (no text or symbols)

natural_image
Diagram of a mechanical lever system with labeled components A, B, C, D and an arrow indicating motion (no text or symbols present)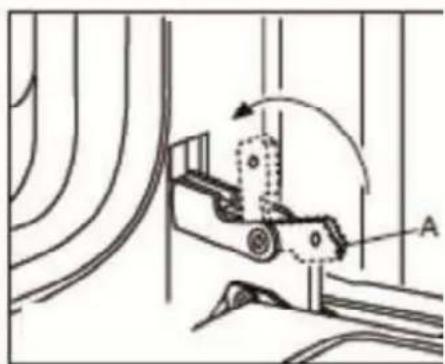
natural_image
Technical line drawing of a mechanical device with rotating components and labeled point A (no text or symbols beyond label)natural_image
Line drawing of a simple kitchen appliance with a front panel and six side monitors (no text or symbols)EN
FREE STANDING COOKER INSTRUCTION MANUAL
Please read this manual first!
Dear Customer,
We wish you get the most out of our products which are produced at modern facilities and subject to meticulous quality control procedures.
For this reason, please read this manual thoroughly prior to use of the product and keep it as a reference. If you transfer this product anybody else, give this manual along with it well.
User manual helps you use the product quickly and safely.
- Read the manual first prior to installation and operation of the product.
• Always observe the instructions related to safety. - Keep the manual handy so that you may refer to it when it is required subsequently.
- Read other documents given together with the product as well.
Remember this user manual may also apply for other versions.
Differences between the versions are clearly indicated.
Symbols and Description:
The following symbols take place in the user manual.
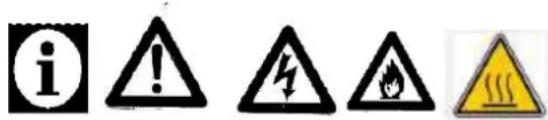
1- Important information and useful hinds about usage
2- Warning against dangerous situations in terms of life and property
3- Warning against electric shock
4- Warning against fire risk
5- Warning against hot surfaces
Contents
1) Your Product 3
√ General Appearance 3
√ Technical Specifications 3
√ Accessories 4
2) Important Safety Instructions 5
√ Safety Overall 5-6-7
√ Safety for Children 7
√ Safety regarding electric operations 8
√ Intended use 8
3) Installation 8
√ Prior to installation 8-9
√ Installation and Connections 10
√ Electric-Gas connection 10-11-12
√ Leakage control 12
√ Disposal of the product – Destruction of the packaging 13
√ Future handling operations 13
√ Disposal of the old product 13-14
4) Preliminary Preparation
√ Things required to be done for energy saving
√ First use – First cleaning – First heating 15
5) Use of the Furnace
√ General information about cooking, frying and grilling in the furnace 15-16
√ Use of electric furnace 17-18
√ Description of use of the gas stove 19-20
√ Description of use of gas furnace 20-21
√ Description of the grill sheet 21
√ Description of chicken roasting 21-22
√ Operating modes 23-24
√ Use of furnace timer 24-30
√ Cooking periods table 31-32
√ Operation of the grill – Table of grill cooking periods 32
6) Use of the electric stove part
7) Maintenance and cleaning
√ General information 35
√ Cleaning of the control panel 35-36
√ Cleaning of the furnace 36
√ Replacement of the furnace light 37
8) Proposed solutions for problems
37-38
GENERAL APPEARANCE

flowchart
graph TD
    A["Normal burner"] --> B["Button"]
    C["Strong burner"] --> B
    D["Tray"] --> E["Control panel"]
    F["Handle"] --> G["Front cover glass"]
    H["Lower cabinet cover"] --> I["Control panel"]
Technical Specifications
| Voltage/frequency | 220-240 V 50-60 Hz |
| Total power consumption | Min. 0.006 KW – Max 5.6 kW |
| Fuse to be used | Min. 16 A – Max 25 A |
| Cable type/section | 3 X 0.75 PVC – 3 X 1 PVC – 3 X 1.5 PVC – 3 X2.5 PVCH05VV-F..... |
| Cable length | Max 1.5 m |
| Outer sizes (height/weight/depth) | (60 x 60) 890x600x600mm(57x57) 890x570x570mm(50x60) 880x500x585mm(50x55)(50x50) |
| Furnace | Static furnace (optional) |
| Energy efficiency class | B |
| Internal lighting | 25 X |
| Grill power consumption | 2000 X |
| Usable volume of the furnace | 50x50x |50x60 |60x60 | |
Essential: In case of domestic furnace, information on the energy label is given as per the standard EN 50304. The values are determined according to the functions of standard load and lower-upper heater or fan-supported heating (if any).
The company may make any modifications to improve product quality without prior advice.
The figures in the manual are given schematically and they may not exactly match with your product.
The declared values on the markings of the products or in other printed documents provided together with the product are values obtained in laboratory as per the respective standards. These values may vary depending on the use and environment of the product.
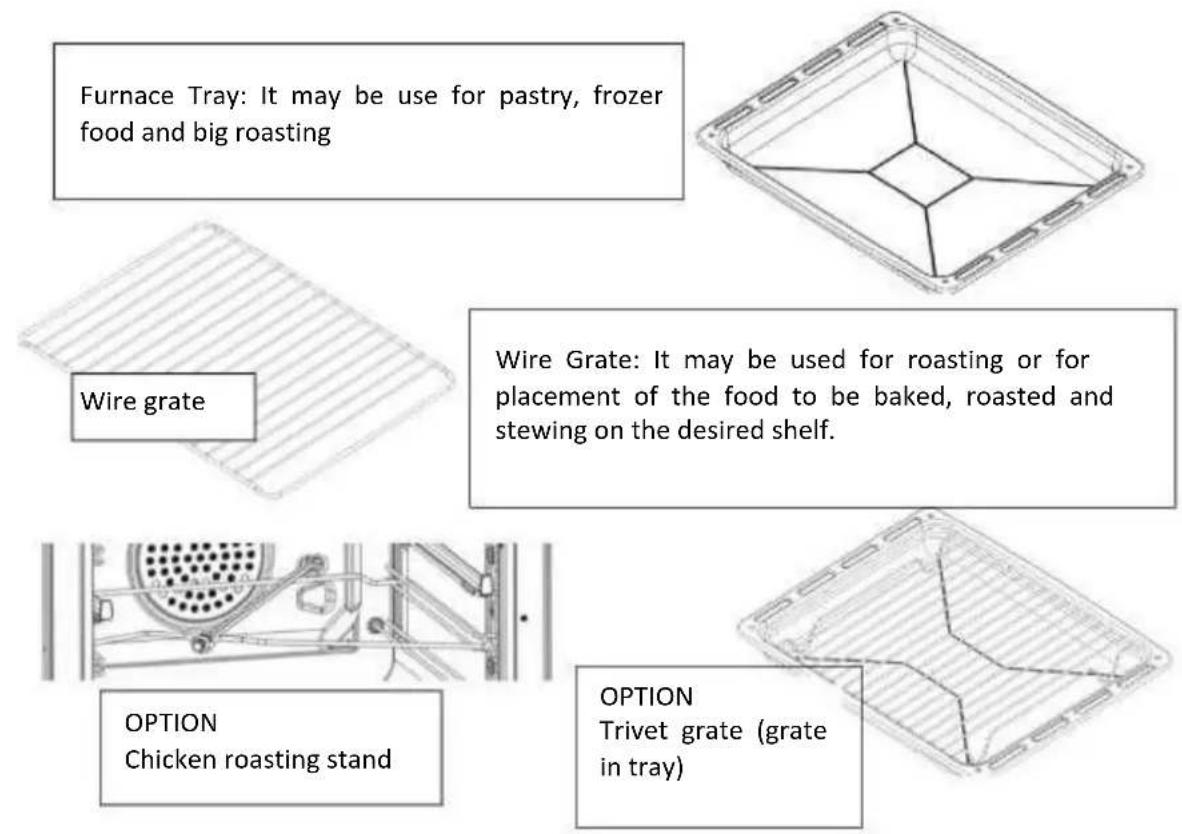
ACCESSORIES
Accessories provided vary according to the version of the product. All accessories described in this user manual may not be available with your product.
2) Important safety instructions
This section contains safety instructions that may help prevent risks of personal injury or property damage. If you fail to observe these instructions, the warranty will become invalid.
General Safety
- The appliance is not be used by persons(including children) with reduced physical,sensory or mental capabilities,or lack of experience and knowledge,unless they have given supervision or instruction.Children being supervised not to play with appliance.
- Connect the product to a grounding outlet/mains protected by a fuse suitable to the values given in the table "Technical Specifications".
In case of use with or without transformer, do not ignore to have the installation done by a qualified electrician. In case the product is used before it is grounded properly according to the local regulations, our company will not assume any responsibility for any resulting damage.
- If the supply cord is damaged, it must be replaced by the manufacturer, its service agent or similarly qualified persons in order to avoid a hazard.
• If the product is damaged or has any visible defect, do not operate the product.
- Do not perform any repair or modification on the product. However, you may eliminate some problems; see proposed solutions for the problems; page 37-38.
• Never wash the product by spraying or pouring water on the product! Risk of electric shock!
- Do not use the product when your discernment is impaired due to taking drugs and/or alcohol.
- Disconnect the product electrically during installation, maintenance, cleaning and repair operations.
- Always call authorized service center for installation and repair operations. The manufacturing company may not be kept responsible for any damage that may arise as a result of operations by unauthorized persons and the warranty will become invalid as a result of it.
- Be careful when using alcohol in your food. Alcohol evaporates at high temperature and when it come into contact with hot surfaces, it blazes up and cause fire risk.
- Do not heat the closed tin cans and glass jars. Pressure to develop may cause burst of the jar.
- Do not bring flammable materials near when the product operates because its sides may be hot.
- Do not put the furnace trays, plates or aluminum folio directly on the base of the furnace. Accumulating heat may give damage to the furnace base.
- Keep all ventilation channels unobstructed around them.
- The product may get hot when operating. Do hot the hot departments, inner parts and heating parts of the furnace.
- When placing and taking the food out of the furnace, always use thermally-resistant furnace gloves.
- Do not use the products with its front cover glass removed or broken.
- Back side of the furnace gets heated when operating. Electric connections should not contact with the back part, otherwise the connection elements may be damaged.
- Do not clinch the connection cables with the furnace cover and do not run them over the food. Otherwise, the cable will melt and cause short circuit of the furnace, resulting in fire risk.
• Make sure the product is closed after easy use.
• Product and accessible parts of the product is hot during operation. - Do not touch the product when it operates.
- Do not use sharp and piercing materials to clean inside and glass of the product; such materials may give damage to your product.
- As hot oil may cause fire risk, always be alert when the product operations.
- In case of any possible fire, do not attempt to extinguish the fire with water; immediately cut off the power connection of the product and cover the burning part by help of a wet blanket.
- Never make available any flammable or consumable materials in the product.
- Do not use steam cleaning agent.
-
Do not use aggressive cleaning materials or sharp metal scrapers that may destroy the surface and cause break of the glass to clean the furnace cover (glass).
-
CAUTION: Prior to replacement of the furnace light, disconnect the power and allow it to cool down in order to eliminate electric shock.
- 1^st shelf of the furnace is the lowest one.
• Do not product the product any nylon, flammable and heat sensitive materials.
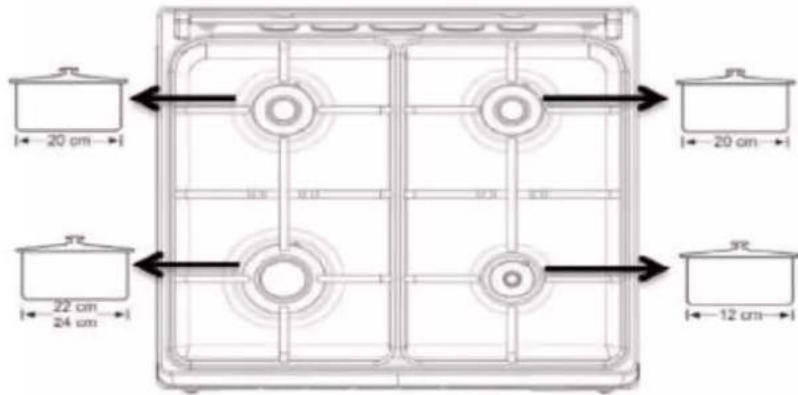
• Pans to be placed on the furnace heaters should be in proper sizes.
Safety for children
During and after operation of the product, the exposed parts of the product will remain hat until it gets cool; keep the children away from it.
- Caution: During operation of the grill, the accessible parts may be hot. Keep small children away from it.
- It is risky that children below 8 years old to contact with the product when they are not attended by an adult person.
- This product may be used by the children above 8 years old and/or by any physically, sensually or mentally handicapped people if they are informed about the risks and proper operation of the product is shown to them.
- Children should not play with the product. Cleaning and maintenance of the product may not be performed by the children not supervised by the adult people.
- Packaging materials may be risky for the children. Keep them at such places out of reach of the children and sort them out according to the waste instructions and dispose them.
•

natural_image
Silhouette of a person pushing a large block with arrows indicating motion (no text or symbols)When the cover is open, do not put any heavy object on it or do not allow the children to sit on the cover. It may cause overturn of the furnace and give damage to the cover hinges.

Safety regarding electric operations
- All operations on the electric equipment and systems should be performed by the authorized and qualified persons.
• This product is not for use by remote control system. - In case of any damage, switch off the product and disconnect the power. For this purpose, switch off the fuse.
• Make sure the fuse current complies with that of the product.
Intended use
This product is designed for domestic use. It is not allowed for commercial use. "CAUTION: This product may be used only for cooking. It should not be used to heat the room or any other purpose."
This product should not be used for heating plate under the grate, drying up towel or clothing on the handle or for general heating.
The manufacturer may not be held responsible for any damage that may occur as a result of improper use or during handling. The furnace part of the product may be used for de-icing, baking, roasting and grilling the food.
Service life of the product you have purchased is 10 years. This is the period during which the manufacturer will make available the replacement parts if the product is used as specified.
3) Installation
Prior to use of the product

Make sure the electric and/or gas installation is proper. If not, call a qualified electrician and installer for the required operations.
Electric and/or gas installation of the place where the product will be used should be done by the customer.
Observe the local standards related to electric and/gas during installation of the product.
Control the product prior to use for any damage on it. If the product has any damage, do not allow installation. Damaged products would cause risk for your safety.
Any operations on the gas equipment and systems should be performed by qualified and authorized persons.
The product has no system to discharge the gases that form as a result of combustion. The product should be installed and connected as per the applicable installation regulations. Show attention to the requirements concerning ventilation.
Air necessary for combustion is taken out of the room air and the resulting gases are directly given into the room.
It is essential that the room should be ventilated well for safe operation of the product. If there is no window or door that may be used for ventilation of the room, extra ventilation should be installed.
Footprint o the kitchen should be bigger than 8m^2 . Kitchen volume should be bigger than 20m^3 .
Kitchen outlet should be in height of 1.80m from the floor and should have an opening in diameter of 150mm to the atmosphere.
Ventilation grill should be minimum 75cm^2 , near the kitchen floor, opening to the outer atmosphere.

Installation and connections
i Property damage!
Do not use the cover and/or handle to carry and move the product.
• The product should be carried by at least two persons.
Foot assembly
When the product is installed for the first time, its feet are not on the product. The feed of the product is in a bag inside the furnace.
Assembly the feet of your product and adjust the distance related to the kitchen counter. In case of gas versions, if the feet are not assembled, the furnace may not take sufficient amount of oxygen, resulting in combustion problem.

Power connection
The product should definitely have a grounded line! If the product is used without grounding, the manufacturing company may not be held responsible for any resulting damage.

Electric shock, short-circuiting and fire risk may arise due to installation by unprofessional people! Mains connection of the product may only be done by authorized and qualified persons and the warranty of the product starts when it is properly installed.

Electric shock, short-circuiting and fire risk may arise due to defective power cable! The power cable should not be crushed, folded or pinched and should not contact with hot parts of the product. If the power cable gets damaged, it should be replaced by a qualified electrician.
- Power supply data should comply with those indicated on the nameplate. The nameplate is on the rear of the product.
- Connection cable of the product should comply with the technical specifications and power consumption.

Electric shock risk! Please disconnect the power prior to any operation on the electric installation.

Gas connection

Any operations on the gas equipment and systems should be performed by authorized and qualified persons.
Prior to installation, control that the local distribution (gas type and gas pressure) conditions comply with the product settings.
LPG connection
Show great care that the gas hose and gas relief valve you will use on your furnace are safe. Fix the gas supply hose on the hose nozzle on the rear of the furnace and tighten it by a sheet clamp and screwdriver (Figure 6). Make sure it is tightened well.
Length of the furnace gas hose should not be longer than 1500m. Pressure of the relief valve to be used for LPG should be 300mmSS and certificated.

Gas supply hose should not run through the hot part at the rear of the furnace. Gas hose should not exceed 90^ (degrees).
Prior to use, make sure the system is leakage proof.

natural_image
Pure mechanical component diagram without any text, numbers, or symbolsFigure 6
NG (natural gas) connection
natural_image
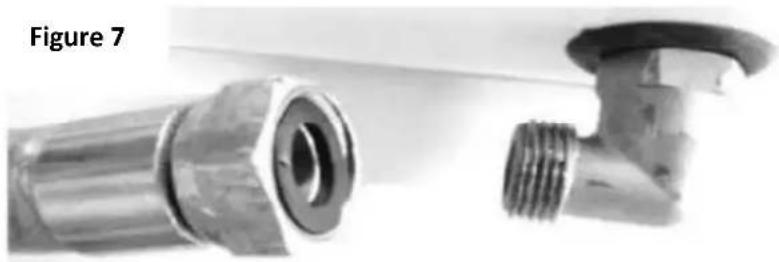
Close-up of two metallic pipe fittings, one with a flange and the other a valve (no text or symbols visible)If your equipment has natural gas setting, have it connected by the concerning natural gas supply company. Natural gas connection of your product is 12 . When you desire to convert your equipment from LPG to natural gas or from natural gas to LPG, apply to the nearest service center and have the gas conversion settings done.
Leakage control
Open the relief valve or natural gas valve and control with highly foamed soap water for any gas leakage on the connection you have made.
Never control it with flame.
Final control
1- Plug the power cable to the outlet and activate the fuse of the equipment.
2- Control the functions
Disposal of the product
Destruction of the packaging
Packaging materials are dangerous for the children. Keep the packaging materials at a place out of reach of the children.
Packaging of the product is produced by recyclable materials. Sort them out according to the waste instructions and dispose. Do not throw them together with the domestic waste.
Future handling operations
- Keep the product in its original box and carry the product inside this box. Comply with the instructions given on the box. If its original cartoon is not available, wrap it by use of bubble packaging material or a thick cardboard and band it tightly.
- Put the wire grill and tray inside the furnace in the inner part of the furnace cover to prevent them from giving damage to the furnace cover and place c cartoon strip aligned with these trays. And band the furnace cover to the side walls.
• Band and fix the heads and pan supports tightly.
- Do not use the cover or handle to carry or move the product.

Do not put any article on the product. The product should be carried upright.

Control the product visually against any damage that may have occurred during the handling.
Disposal of the old product

The european directive 2012/19 /UE on wasted electrical and electronic equipments (WEEE), requires that household electrical appliances must not be disposed of in the normal unsorted municipal waste stream. appliances must be collected separately in order to optimize the recovery and recycling of the materials they contain, and reduce the impact on human health and the environment. The crossed out “wheeled bin” symbol on the product reminds you of your obligation, that when you disposed of the appliances, it must be separately collected. Consumers should contact their local authority or retailer for information concerning the correct disposal of their old appliance.
You should comply with the Directive 2002/96/EC in order to recycle or divide into part for
minimization of its possible effect on the environment. For further details please apply to the local or regional authorities.
Electronic products not subject to the controlled collection operation would constitute potential risk for both environment and human health due to the harmful materials they contain.
You may contact your dealer or the garbage collection department of the municipality.
Prior to disposal of the product, cut the power cable and break the cover lock in order to prevent any risk against the children.
4) Preliminary Preparation
Things required to be done for energy saving
The following information will help you use the product ecologically by making energy saving:
- Use containers dark in color or enamel covered with good heat transmission in he furnace.
- When cooking the food, preheat the furnace if it is specified so in the recipe or user manual.
- Do not open the furnace cover frequently during the cooking process.
- Try to operate more than one dish in the furnace simultaneously. You may cook two cooking containers on the wire shelf at the same time.
• Cook more than one food successively. Thus the heat will not lose its heat. - Switch of the furnace several minutes before the cooking time expires. In such case, do not open the furnace cover.
• Thaw the frozen food before baking.
First use
First cleaning

Some detergents or cleaning agents may give damage to the surface.
- Remove all packaging materials.
- Wipe clean the surface of the product with a damp cloth or sponge and them wipe it dry with a cloth.
First Heating
Heat the product about 30 minutes and then switch it off. In this manner, any residuals and layers that might have left during the manufacturing process will be incinerated and removed.

Hot surfaces may cause burns! Do not touch the hot surfaces of the unit. Keep the children away from the product and use furnace gloves.
Electric furnace
- Remove all baking trays and wire grill out of the furnace.
- Close cover of the furnace.
- Bring it to the static position.
- Choose the highest temperature; see Use of the electric furnace
- Operate it about 30 minutes.
- Switch off the furnace; see Use of the electric furnace.

Smell and smoke form during the first heating. Ensure good ventilation.
5) Use of the furnace
General information about baking, roasting and grilling in the furnace.

Burning risk due to hot steam. Show care when opening the furnace cover as it may emit steam.
Hints about baking in the furnace
- Use non-sticking, covered plates of suitable metal plates or aluminum containers or heat-resistant silicone forms
- Use the area on the shelf in an optimum way as far as you can.
-
Place the cooking form at the centre of the shelf in the furnace.
-
Select the proper shelf position prior to operation of the furnace or grill. Do not change the shelf position when the furnace is hot.
- Keep the furnace cover closed.
Hints about roasting
- When you cook whole chicken, turkey an big meat part, it will improve the baking performance if you cook them by marinating them with lemon juice and black pepper.
- Roasting the bony meat ill last 15-30 minutes more than roasting meats without bones.
• You should consider about 4-5 minutes per centimeter of the meat thickness. - After the baking period is off, keep the meat in the furnace for about 10 minutes. This meat stock will distribute better to the roasted meat an when the meat is cut, it does not come out.
- First should be placed in flameproof plate and positioned on the medium or lower shelf.
Hints about grilling
When you grill red meat, fish and poultry, it becomes brown quickly and have a good shell and does not dry up. Flatten meats, skewer meats and sausages/sujuks and stews (e.g. tomatoes, onion) are particularly suitable for grilling.
- Place the arts to be grilled on the wire grill or tray with wire grill in such a way that they will not exceed size of the heater.
- Drive the grill wire or furnace tray to the level you desire in the furnace.
• If you put a little water in the furnace, then you can clean it easily later on.

Fire risk from the food not proper for grilling
Grill only the food proper for intensive roasting heat. Do not place the food much behind the wire. Here is the hottest zone and the oily food may catch fire.
Use of the electric furnace
Selection of the temperature and operating mode Pool versions:

flowchart
graph TD
    A["1"] --> B["2"]
    C["3"] --> D["4"]
    E["5"] --> F["6"]
    G["7"] --> H["8"]
    I["9"] --> J["3"]
    style A fill:#cce5ff,stroke:#333
    style C fill:#cce5ff,stroke:#333
    style E fill:#cce5ff,stroke:#333
    style G fill:#cce5ff,stroke:#333
    style I fill:#cce5ff,stroke:#333
    style B fill:#cce5ff,stroke:#333
    style D fill:#cce5ff,stroke:#333
    style F fill:#cce5ff,stroke:#333
    style H fill:#cce5ff,stroke:#333
    style J fill:#cce5ff,stroke:#333
1 Electric temperature button
2 Electric function button
3 Timer button
4 Light and chicken roasting switch
5 Lighter button
6 Button lighter symbol
7 Electric heater button
8 Gas thermostat furnace button
9 Gas stove button
Pipe versions:

flowchart
graph TD
    A["Step 1: Initial state"] --> B["Step 2: Process steps"]
    B --> C["Step 3: Final state"]
    C --> D["Step 4: Final state"]
    D --> E["Step 5: Final state"]
    style A fill:#f9f,stroke:#333
    style B fill:#ccf,stroke:#333
    style C fill:#cfc,stroke:#333
    style D fill:#fcc,stroke:#333
1 Electric temperature button
2 Electric function button
3 Timer button
4 Light and kitchen roasting switch
5 Lighter button
6 Electric heater button
7 Gas stove button
Description of the gas stove operation
flowchart
graph TD
    A[" "] --> B[" "]
    B --> C[" "]
    C --> D[" "]
    D --> E[" "]
    E --> F[" "]
    F --> G[" "]
    G --> H[" "]
    H --> I[" "]
    I --> J[" "]
    J --> K[" "]
    K --> L[" "]
    L --> M[" "]
    M --> N[" "]
    N --> O[" "]
    O --> P[" "]
    P --> Q[" "]
    Q --> R[" "]
    R --> S[" "]
    S --> T[" "]
    T --> U[" "]
    U --> V[" "]
    V --> W[" "]
    W --> X[" "]
    X --> Y[" "]
    Y --> Z[" "]
    Z --> A
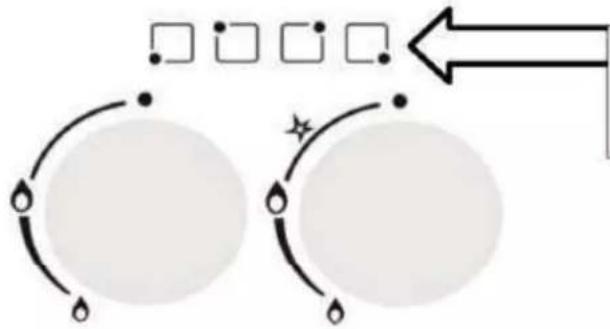
On the control panel, the screen prints on the button show position of the button.
1: Push the gas stove button and turn anticlockwise and bring it to thigh flame position.
2: Switch on the lighter depending on the version of your product.
3: Bring it to the desired flame position.
4: Bring the stove button to the upper point clockwise in order to close the heater burner when the desired cooking time expires.

Gas flow is cut of.

High flame.

Low flame.

natural_image
Pure diagram of a circular mechanical or electrical component with internal structure and directional arrows, no text or symbols present.| Caractéristiques | Injector (LPG G30mBar) | Injector (NG G20mBar) | LPG (G30 30mBar) | LPG (G30 30mBar) | LPG (G30 30mBar) | NG (G20 20mBar) | NG (G20 20mBar) | NG (G20 20mBar) | ||||||||
| Brûleur â gaz wok | 0,98 | mm | 1,45 | mm | 4,6 | kW | 4,6 | kW | 4,6 | kW | 4,3 | kW | 4,3 | kW | 4,3 | kW |
| Brûleur â gaz wok | 0,82 | mm | 1,15 | mm | 2,5 | kW | 2,5 | kW | 2,5 | kW | 2,3 | kW | 2,3 | kW | 2,3 | kW |
| Brûleur â gaz fort | 0,8 | mm | 1,2 | mm | 2,5 | kW | 1,85 | kW | 1,8 | kW | 2,6 | kW | 2,7 | kW | 2,6 | kW |
| Brûleur â gaz normal | 0,65 | mm | 0,92 | mm | 1,65 | kW | 1,7 | kW | 1,65 | kW | 1,55 | kW | 1,65 | kW | 1,75 | kW |
| Brûleur â gaz normal | 0,65 | mm | 0,92 | mm | 1,65 | kW | 1,7 | kW | 1,65 | kW | 1,55 | kW | 1,65 | kW | 1,75 | kW |
| Brûleur â gaz assistive | 0,5 | mm | 0,7 | mm | 0,9 | kW | 1,15 | kW | 1,1 | kW | 0,9 | kW | 1 | kW | 1 | kW |

natural_image
Two identical cooking pots with crossed x-bracing, one on a surface and the other on a side (no text or symbols)
Set the gas flame in such a way it will not protrude the container base.
Put the container in the center of the pan support.
V. 3
Gas breaker safety mechanism (versions with thermal element)

natural_image
Technical diagram showing a mechanical assembly and its corresponding schematic of a heating element (no text or labels)Thermal element cuts gas immediately by engagement of the safety mechanism in case of liquid overflow on the upper burners.
- Pus the gas stove button and turn anticlockwise and bring it to the high flame position.
- Switch on the lighter depending on the version of the stove.
- After combustion, keep the button pressed for 3-5 seconds engage the safety mechanism.
- If the combustion cannot be achieved after you press it, repeat the same procedure b keeping the button pressed for 15 seconds.
- Bring it to the desired flame position.
- When the desired cooking expires, bring the button of the stove clockwise to the highest point in order to switch on the stove burner.
Use of the gas furnace
Screen prints on the button on the control panel indicate the position of the button.

1- Push the button of the gas furnace anticlockwise and bring it to high flame and / or the heat position on the panel.
2- If, as shown in the Figure 11, the furnace cock is controlled by the upper heater burner, then push on the button and turn clockwise and bring it to the letter grill or flame sign.
3- Switch on the lighter depending on the characteristic of your furnace.
Manual firing

| Furnace injector and power table | ||
| Fuel | LPG Injector | NG Injector |
| Upper burner | ∅ 0.70 | ∅ 0.92 |
| Lower burner | ∅ 0.75 | ∅ 1.10 |
4- In the versions with thermal element, keep the button pressed for 3-5 seconds more after the combustion and ensure the safety mechanism engage.
5- If combustion does not occur after release of the button, repeat the same procedure by keeping it pressed for 15 seconds.
6- Set it to the desired flame position.
7- Bring the furnace button to the highest point clockwise in order to switch off the furnace head when the baking is over.
Use of the grill sheet (if grill sheet is available with your product)
- For the gas furnaces, the furnace cover is opened as shown in Figure 12 when using the upper burner.
- Fix the grill sheet to the grills on the cover and push the cover forward to ensure it to contact with the frame.

Use of the Chicken roasting (optional)
- If your product has chicken roasting accessories, take the shish out of the accessories and loose the screw of the V-shaped sheet on the shish.
- After you fix the chicken on the shish, fix V-shaped sheet in such a way that the chicken will not place and tighten the screw.
- Bakelite part at the end of the shish helps you carry the part conveniently. This part should be removed during cooking.
- Connect a chicken weighing maxi. 2.5 kg on the shish.

natural_image
Technical line drawing of a mechanical tool with three clamps and a handle (no text or symbols)Use of the electric furnace
Operating mode of the electric furnace is selected by the function button. Temperature setting is made by the temperature button. All furnace functions are switched off by bringing the respective button to off (upper) position.
- Set the baking period by help of the furnace timer; see Use of the furnace timer.
- Bring the temperature button to the desired operating mode.
- Bring the function button to the desired operating mode.
<
Switching off the electric furnace.
Bring the furnace timer to off position.

In case the timer is set to a certain time, the timer will automatically switch off; see. Use of the furnace timer.
Bring the furnace button and temperature button to 'off' (upper) position.
Operating modes
Sequence of the operating modes indicated here may vary according to the arrangement on your version.
Upper and Lower Heating

Upper and lower heating is on. Food is headed from up and down simultaneously. For example, it is suitable for pastries, cakes or cakes in the baking forms and stews. Bake it by help of a single tray.
Upper Heating


Only upper heating is on. For example, it is suitable for cakes with shining surface and food which you desire to become brown on the top.
Lower Heating

Only lower heating is on. For example, it is suitable for pizza and food which you desire to become brown on the bottom.
Lower + upper + turbo fan (optional)

Upper + lower and turbo engine is open. It ensures more homogenous heating for the food thanks to its turbo motor. For example, it is suitable for cakes, yoghurt and pastries or cakes in the baking forms and casseroles. Bake it by help of a single tray.
Grill (option)

Grill operates under the furnace ceiling. It is suitable for grilling meat.
- For grilling, put the food portions on the correct shelf position under the grill heater.
- Bring the temperature to the maximum point.
• Turn the food halfway of the grill time.
High Grill (optional)

Grill operates under the furnace ceiling. It is suitable for grilling meat.
- For grilling, put the food portions on the correct shelf position under the grill heater.
- Bring the temperature to the maximum point.
• Turn the food halfway of the grill time.
Turbo motor (optional)

Feature of turbo motor is used for thawing.
Turbo resistant + turbo fan (optional)

Turbo resistant and turbo motor heating is on. It ensures more homogenous heating
for the food thanks to its turbo motor. For example, it is suitable for cakes, yoghurt and pastries or cakes in the baking forms and casseroles. Bake it by help of a single tray.
Grill + chicken roasting (optional)

It is suitable for cooking by help of the grill and chicken roasting motor.
- It ensures uniform roasting and cooking of the meat, chicken and similar food arranged on the shish.
- Bring the temperature to the maximum level.
High grill + turbo fan (optional)

High grill (upper and grill resistant) and turbo motor heating is on. It ensures more
homogenous heating for the food thanks to its turbo motor. For example, it is suitable for casserole. Bake it by help of a single tray.
Use of the furnace timer

Model 2
MECHANICAL CLOCK (model 2)
If the timer shown in the Version 2 is available, turn the timer setting button clockwise and set the baking time.

Model 4
ANALOGUE TIMER (model 4)
1- SETTING THE TIMER
Push the button to set the timer and keep it pressed and turn anticlockwise.
2- SETTING THE COOKING TIME
It is possible to set the cooking time up to 180 minutes by help of the analogue timer. Alarm beep starts automatically and starts when the set time is over. In order to silence the alarm, turn the button anticlockwise again without pushing and continue to turn it till the symbol ( 🔍) appears on the screen. When the alarm is in this position, it will close.
Digital timer


Digital timer is an electronic timing module ensuring that the food you place in the furnace will be read for service at any time you desire. For this purpose, simple program the baking time of the food and the time you want your food to be ready.
Furthermore, it may also be used independently as an alarm clock set by minute.
WHEN THE POWER RESUMES
When the power resumes, the timer and auto statements flash on the display. When it is in this position, you cannot make any baking program. Timer on the display is not correct and required to be set (see timer setting). You should switch it to the manual mode for programming the baking (see Manual mode).
MANUAL MODE
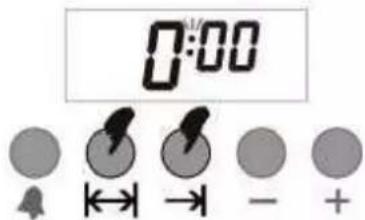
Switching to the manual mode is performed by pressing and releasing both and keys at the same.
Press two buttons at the same time
TIMING
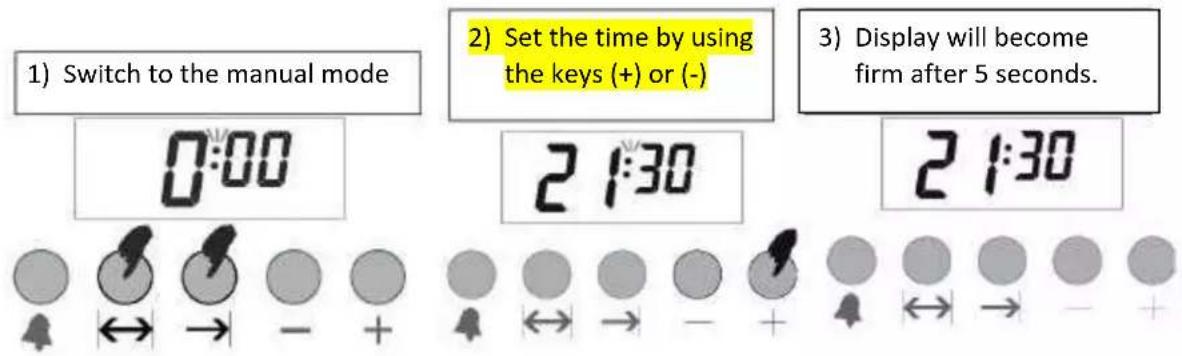
Timing may be performed when there is no current baking program. Switch to the manual mode. Two points start to flash between hour and minute on the display.
You may set the timer forward by (+) and reverse by (-). Long press of these keys will change the time more quickly.
SETTING THE ALARM TIME
This function allows that the alarm of your timer beeps as much as you have set.

SILENCING AN OPERATING ALARM

2) When the alarm time you set expires, the alarm starts to beep.

1) You may silence the alarm by pressing the key 🔒.
AUTOMATIC BAKING PROGRAM
If you will immediately start to bake the food you have put in the furnace, simply you should enter the baking time.
26
For example: You have put your food in the furnace and you want to bake it for 2 hours 15 minutes.
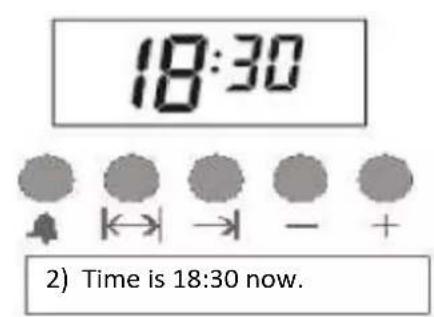

1) Switch to the setting mode of the baking time.

4) Enter the time by use of the keys (+) and (-).
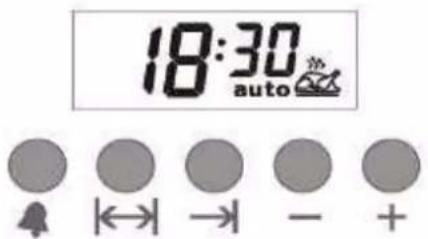
3) After several seconds, the display will show the current time, indicating that it bakes the food.
The furnace timer has been programmed to cook your food starting from the current time for 2 hours and 15 minutes. Remember to bring other control buttons on the furnace to the proper positions according to the baking function and temperature.
Note: When making the baking program or when the program executes, it is possible to cancel the program by switching to the Manual Mode.

In the example given above, we have entered the cooking time and the baking process started immediately. And it is also possible to see the time (completion of baking) by pressing the key and to set the same. In the following example, the food is set to be ready at 21:30.

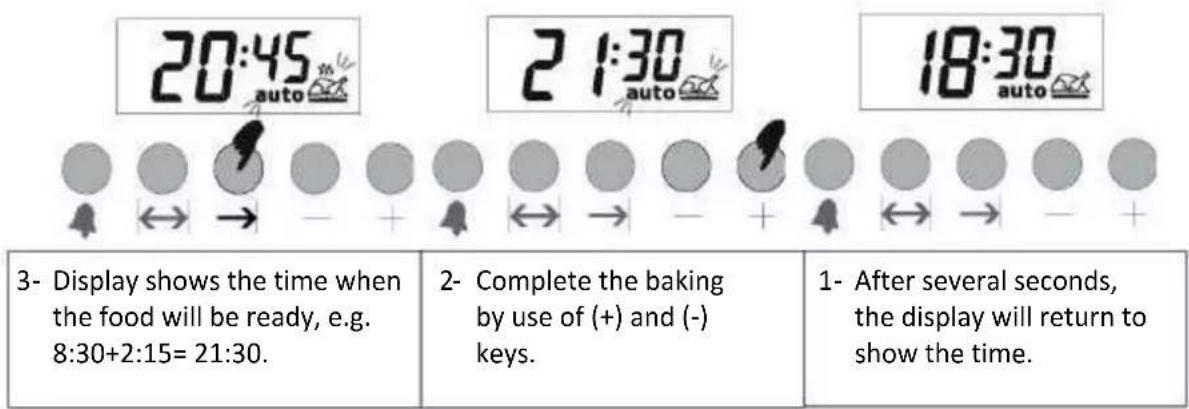
As it is, we have programmed the furnace in such a way that the food will be ready at 21:30. Previously, we had programmed the baking time as 45 minutes. And in this case, the furnace will start at 19:15 and bake the food for 2 hours 15 minutes and baking program will stop at 21:30.

When the baking program is over, audio alarm will activate and it will ring for 7 minutes unless it is silenced.
In the example given above, the baking time was entered and the automatically calculated baking completion time was changed by us in the second step. If you desire, it is also possible to end the completion time of the baking; in such case, the baking time will be automatically calculated and changed in the second step, if desired.
IN CASE OF POWER FAILURE
In case the mains power fails, the furnace will deactivate for safety. This situation will be expressed by the flashing time and auto statements on the display. If there is current program at the moment, it will delete. The display will show the time as 0:00 and the timer is required to be set. First switch to the Manual Mode (see Manual Mode). And then you may set the timer by help of + or – keys. (Note. In case of power failure for seconds, the system will keep the position.)
Note: If you do not intend to operate the furnace, remember to bring the button on the furnace to 'off' position.
THE 'auto' WORD SHOWS THAT THE FURNACE IS DEACTIVATED AND YOU SHOULD SWITCH TO 'MANUAL MODE" TO RESUME NORMAL POSITION.
CHILD LOCK FUNCTION
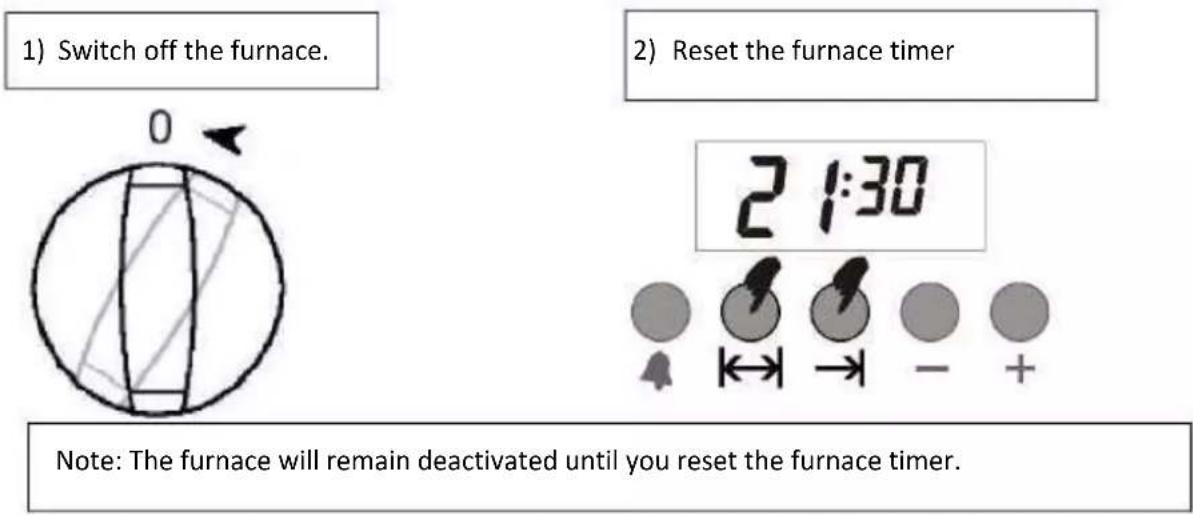
This function is to prevent change of your settings on the furnace timer inadvertently. When the child lock is activated, no key will activate. If the key lock is activated when there is a current program, then only the keys will be locked; and if the lock key is activated when it is in the manual position, then both the keys will be locked and the furnace will be deactivated.
Note: If the key lock is activated when there is no current baking program, then the furnace will be deactivated for safety. When the key lock is cancelled, the furnace can be used again.
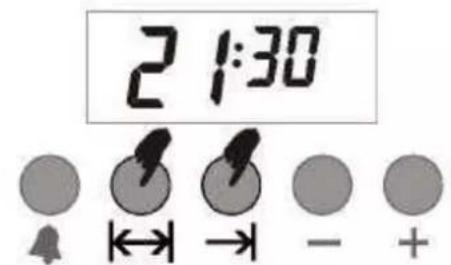
2- Keep the manual mode keys pressed for 3 seconds.

Note: To unlock, you should keep Manual Mode keys pressed for 3 seconds.
Note: If the alarm sounds when the child lock is engaged, you may silence the alarm by pressing Manual Mode keys. The lock will remain locked.
TIMER MODE (12/24 HOUR)
Thanks to this feature, you may change appearance of your timer according to 12-hour or 24-hour format.

1- Now your timer is in 24-hour format. Keep (+) key pressed for 3 seconds.

2- Now the timer is according to 12-hour format.
To return to 24-hour format again, keep (+) key pressed for 3 seconds again.
Note: Default format is 24-hour. In case mains failed an extended time and timer appearance changed, it will return to the default format again.
ALARM VOLUME SETTING
Thanks to this setting, you may change audio volume you hear when the alarm sounds.
1) You may hear audio volume by keeping (-) key pressed.
2) You may hear and select the next volume by releasing and pressing again (-) key (3 levels)
3) Now your alarm will sound in the volume you heard last.
Note: Default format is the highest level. In case mains failed an extended time and volume changed, it will return to the default format again.
Start of the cooking process

To operate the furnace, you should also set the time when selecting the cooking mode and
temperature you desire. Otherwise, the furnace will not operate.
-
Set the cooking time by turning the timer setting button clockwise.
-
Put the food into the furnace.
-
Select the operating mode and temperature; see. Use of the electric furnace. The furnace will heat up to the temperature you set and maintain that temperature till the end of the cooking duration you selected.
-
When the cooking time is over, the timer button will automatically return anticlockwise. An alarm audio is heard indicating the time is power and the power is cut off.

If you do not desire to use timer function, turn the button anticlockwise toward the nual hand symbol.
- Switch off the furnace by use of the timer setting button, function button and temperature button.
Switching off the furnace earlier than the time you select
Turn the timer setting button anticlockwise to the stop point.
Cooking periods table

The lowest shelf of the furnace is the 1^st shelf.


- The specified values have been determined at the laboratory environment. Values suitable for your taste may differ from these values.
- Switch off the furnace by use of the function button and temperature button.
| Food Baking container | Shelf position Temperature ( | °C) | Baking duration (min)(approximately) | |
| Cake in tray Furnace tray | 24...26cm | 2 170...180 | 25-35 | |
| Cake in form Cake form | 18-22cm 1...2 170...180 | 30-40 | ||
| Cookies Furnace tray 2 | 170...190 25-35 | |||
| Crisp mille-feuille Furnace | cray 2 180...190 25-35 | |||
| Donut Furnace tray 2 | 170...180 25-35 | |||
| Flan Furnace tray | 1...2 | 200 | 40-50 | |
| Leavened dough | Roasting tray | 1...2 | 200 | 35-45 |
| Pastry Furnace tray | 1...2 180...190 25-35 | |||
| Phyllo dough pastry | Furnace tray | 1...2 180...190 | 40-50 | |
| Pizza | Furnace tray | 1...2 200...220 | 15-20 | |
| Beef | Furnace tray | 1...2 | 15 minutes max>> | 100-110 |
| Lamb's quarter | Furnace tray | 1...2 | 90-100 | |
| Roast chicken | Furnace tray 1 | 60-70 | ||
| Turkey part | Furnace tray | 1 | 25 min.220>> | 180-240 |
| Fish | Furnace tray | 1...2 | 200 | 15-25 |
| Switch to 150°C after max. minutes | ||||
Operation of the grill

Hot surface may cause burns. Close the furnace's cover during grilling.
When grilling, bring the timer button to the hand symbol, if any.
Switching on the grill
1) Bring the function button on the symbol of of grill you select.
2) And set it to the desired grill temperature.
3) If required, preheat about 5 minutes
Temperature light is on.
Switching off the grill
- Bring the function button to 'off' position (upper)
Table on the cooking periods in the grilling position
| Food | Shelf position | Grilling period (approximately) |
| Fish | 3 | 30-40 minutes* |
| Chicken chops | 3 | 40-50 minutes* |
| Lamb chops | 3 | 25-35 minutes* |
| Steak | 3 | 25-35 minutes* |
| Veal chops | 3 | 25-35 minutes* |
| *depends on thickness | ||
6) Use of the electric stove part
If your product is equipped with electric stove, the switching system is optionally as shown below:
| Switch Position | ∅145 1000W | ∅145 RAPID 1500W | ∅180 1500W | ∅180 RAPID 2000W |
| 1 | 100 W | 156 W | 155 W | 200 W |
| 2 | 165 W | 210 W | 185 W | 250 W |
| 3 | 255 W | 285 W | 330 W | 330 W |
| 4 | 510 W | 820 W | 390 W | 930 W |
| 5 | 750 W | 1070 W | 731 W | 1250 W |
| 6 | 1000 W | 1500 W | 1500 W | 2000 W |


| Switch Position | ∅145 1000W | ∅145 RAPID 1500W | ∅180 1500W | ∅180 RAPID 2000W |
| 1 | 250 W | 400 W | 400 W | 750 W |
| 2 | 750 W | 1100 W | 1100 W | 1250 W |
| 3 | 1000 W | 1500 W | 1500 W | 2000 W |
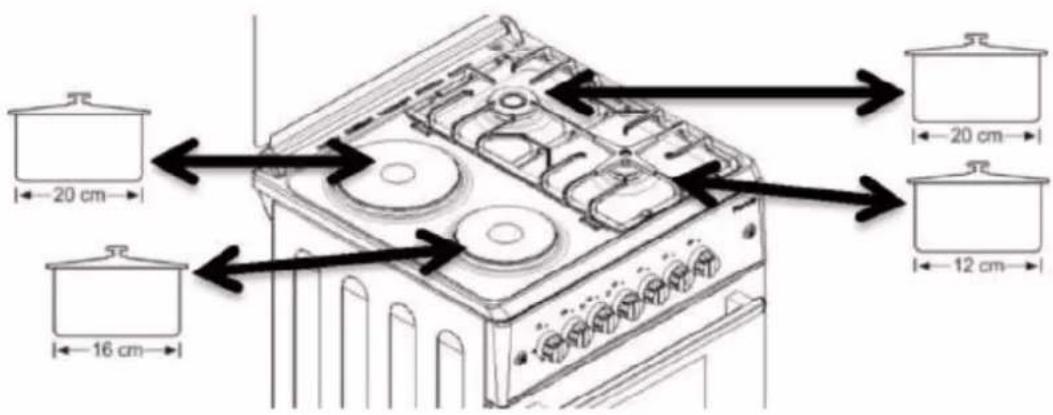

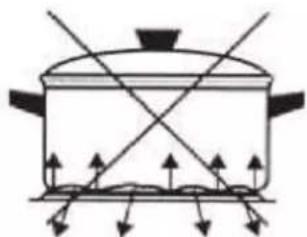
In order to get the most of the electric stove; it is recommended to use pant in diameter of 16-20cm.
natural_image
Diagram of a cooking pot with arrows indicating direction and pressure lines (no text or labels)If the pan base does not touch the heater surface completely, it causes high energy consumption and the heat does not distribute equally.
natural_image
Simple line drawing of a cooking pot with steam rising from its side (no text or symbols)
natural_image
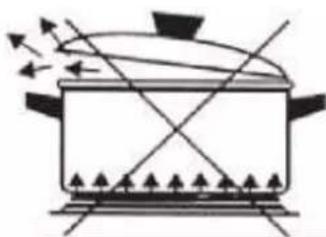
Simple line drawing of a cooking pot with directional arrows indicating flow or movement (no text or symbols)Pan or container is very large or very small. If the flame exceeds the heat-resistant glass edges, it may be broken. Pans with small pan diameter are not cost-effective, as they consume much energy.
natural_image
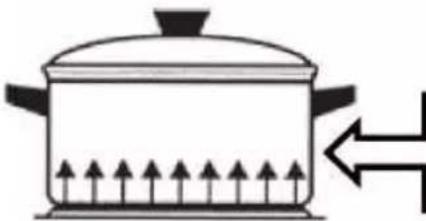
Simple line drawing of a cooking pot with arrows indicating heating direction (no text or symbols)Proper manner of use.
natural_image
Simple line drawing of a lid placed on a circular base (no text or symbols)
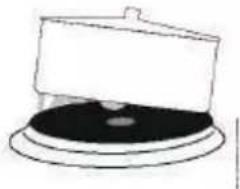
Use pans with dry base on the stove. Do not place the pan covered, especially if it is wet, on the stove.
After use of the stove, allow it to cool down and wipe it off with damp cloth. If it is very dirty, clean it thoroughly with detergent water.

After cleaning the stove, heat it several minutes to dry it up.
If you will not use it for an extended time, oil he upper part by machine oil to form a thin layer of oil.
Stainless steel around the electric stoves may change color over time due to heat. It does not pose any problem for use.
7) Maintenance and cleaning
General information
If the product is regularly cleaned, its service time will be extended and frequently encountered problems will be reduced.

Electric shock risk!
Before you do the cleaning, switch the product off to avoid electric shock risk.

Hot surfaces may cause burns!
Allow the product to cool down before you clean the product.
- The product should be cleaned thoroughly after each use. Thus the food deposits are easily cleaned off and thus such deposits are prevented from burning in the subsequent use of the product.
- No special cleaning agent is required to clean the product. Clean the product with the washing liquid, lukewarm water and soft cloth or sponge and wipe it dry.
- Make sure that no liquids left after the cleaning process and you immediately clean any splash of food during the cooking.
- Do not use any cleaning agent containing acid or chlorine to clean the stainless or inox surfaces and handle. Clean by wiping in one direction by help of soft cloth soapy and liquid (no-scratch) detergent.

Some detergents or cleaning agents may give damage to the surface. Do not use aggressive
detergents, cleaning powder/cream or sharp objects.

Do not use steam cleaning products for cleaning purpose.
Cleaning of the control panel
Clean the control panel and control buttons with a damp cloth and wipe it with a dry cloth.

Control panel may be damaged! Do not remove the control switch to clean the control panel.
Cleaning the furnace
No furnace cleaning agent or other special cleaners to clean the furnace. It is recommended to wipe the furnace when it is still lukewarm by using a damp cloth.

Cleaning and removal of the furnace cover
Do not use aggressive cleaning agents or metal scrapers to clean the furnace's cover; these materials may scratch the surface and give damage to the glass.
natural_image
Diagram of a conveyor belt system with directional arrows indicating motion (no text or labels)

natural_image
Mechanical diagram showing a lever mechanism with pivot point C and directional arrow (no text or labels)
natural_image
Technical diagram of a mechanical assembly with labeled component A (no readable text or symbols)Removal of the furnace's cover
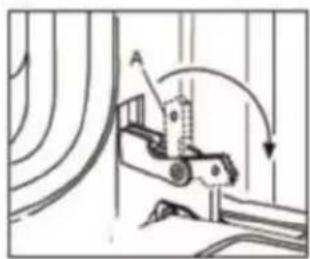
Turn Part A shown in the Figure 1 in direction of the arrow.
Insert Part A into Part B as shown in the Figure 2.
Push the furnace's cover forward in direction of the arrow and push to yourself as shown in the Figure 3.

Hot surfaces may cause burns!
- Open the furnace's cover.
Prior to replacement of the furnace's light, switch off the power and allow it to cool down to prevent risk of electric shock.

Furnace's light is a special electric lamp resistant to heat up to 300 °C. For specifications of
the lamp, see Technical specifications, page 3.
You may have the furnace lamps from the Authorized Service Centers.

Lamp position may be different from the position shown in the figure.
If your furnace has a round lamp:
- Switch off the power of the product.
- Remove the glass cover by turning anticlockwise.
- Remove the furnace lamp by turning anticlockwise and replace it with a new one.
- Replace the glass cover in place.
8) Proposed solutions for the problems
Product does not operate.
√ Plug (grounded) of the product may not be connected. Make sure it is plugged.
√ Insurance may be defective or burnt. Control the fuses in the fuse box. If the fuse disengaged, engage it again.
√ Mains voltage may be fluctuation. Unplug and plug again.
Steam comes out from the furnace when it operates.
√ Steam coming out during operation of the product is normal. It is not a failure.
Metal sounds are hard when the product heats up and cools down
√ Metal parts expands when they are heated, resulting in audible sounds. It is not a cause of failure.
Furnace does not heat.
√ No power. Control whether power is available at home and check the fuses in the fuse box. If required, engage the fuses again.
√ May be timer has not been set in case of versions with timer. Set the timer or bring it to the manual (hand) sign.
√ Possibly function and/or temperature button has not been set.
Set the function and/or temperature button.
Furnace light is not on.
√ No power. Control whether power is available at home and check the fuses in the fuse box. If required, engage the fuses again.
√ Possibly the furnace light is broken. Replace the furnace lamp.
If the problem persists although you have observed the instructions given in this section, then contact your dealer or authorized service center. Never attempt to repair the product yourself.
COMMERCIAL GUARANTEE CONDITIONS FOR WHITE PRODUCTS
This appliance has a two-year repair guarantee, from the date of sale, against all malfunctions originating from manufacturing, including labor and spare parts. To justify the purchase date, it will be mandatory to present the invoice or purchase receipt. This guarantee will only be effective in Spain.
GUARANTEE EXCLUSIONS
- Remote controls, drain intake rubbers, dockings and door seals, weather stripping.
- Damage to enamels, paints, nickel plating, chrome plating, oxidation or other types of aesthetic parts or components that do not affect the internal functioning of the appliance.
- Damage to wear parts due to use, corrosion or oxidation, whether caused by normal use of the appliance or accelerated deterioration due to unfavorable environmental or climatic circumstances. Not suitable for outdoor use.
- Damage to fragile pieces of glass, glass ceramic, plastics, handles, baskets, doors or light bulbs when their failure or breakage is not attributable to a manufacturing defect.
- Faults produced by fortuitous causes or accidents of force majeure, or as a consequence of abnormal, negligent or inappropriate use of the device.
- Civil liabilities of any nature.
- Consequential damage to the appliance as long as it has not been caused by an internal malfunction.
- Maintenance or upkeep of the appliance: periodic reviews, adjustments and greases.
- Faults that accessories and complements, adapters, external cables, bags, spare parts of all kinds, lamps, as well as any part considered consumable by the manufacturer, may suffer.
- Faults caused by incorrect or illegal installation, inadequate ventilation, lack of grounding in the home, power disturbances, inappropriate modifications or use of non-original spare parts.
- Appliances used in industrial applications or for commercial purposes.
- Appliances with illegible or altered serial number.
-
Defects or breakdowns produced as a result of fixes, repairs, modifications, or disassembly of the installation of the device by the user or by a technician not authorized by the manufacturer, or as a result of manifest non-compliance with the manufacturer's instructions for use and maintenance.
-
During the warranty period it is essential to keep all manuals together with the equipment. If the equipment is sold, donated or given away, the manual and all related documents must be given to the new user. If any of these are lost, their replacement cannot be claimed.
-
Faults that have their origin or are a direct or indirect consequence of: contact with liquids, chemicals and other substances, as well as conditions derived from the climate or the environment: earthquakes, fires, floods, excessive heat or any other external force, such as insects, rodents and other animals that may have access to the interior of the machine or its connection points.
-
Damages derived from terrorism, riot, riot or popular tumult, legal or illegal demonstrations and strikes; facts of actions of the Armed Forces or the State Security Forces in times of peace; armed conflicts and acts of war (declared or not); nuclear reaction or radiation or radioactive contamination; vice or defect of the goods; facts classified by the Government of the Nation as "national catastrophe or calamity".
Design and specifications are subject to change without prior notice for product improvement.

EAS ELECTRIC
SMART TECHNOLOGY
www.easelectric.es


- Please read this manual first!
- Contents
- 1) Your Product 3
- 2) Important Safety Instructions 5
- 3) Installation 8
- 4) Preliminary Preparation
- 5) Use of the Furnace
- 6) Use of the electric stove part
- 7) Maintenance and cleaning
- 8) Proposed solutions for problems
- ACCESSORIES
- 2) Important safety instructions
- General Safety
- Safety for children
- Safety regarding electric operations
- 3) Installation
- Installation and connections
- i Property damage!
- Foot assembly
- Power connection
- Gas connection
- LPG connection
- NG (natural gas) connection
- Leakage control
- Final control
- Disposal of the product
- Destruction of the packaging
- Future handling operations
- Disposal of the old product
- Things required to be done for energy saving
- First use
- First cleaning
- First Heating
- Electric furnace
- Hints about baking in the furnace
- Hints about roasting
- Hints about grilling
- Fire risk from the food not proper for grilling
- Use of the electric furnace
- Gas breaker safety mechanism (versions with thermal element)
- Use of the gas furnace
- Use of the grill sheet (if grill sheet is available with your product)
- Use of the Chicken roasting (optional)
- Switching off the electric furnace.
- Operating modes
- Upper and Lower Heating
- Upper Heating
- Lower Heating
- Lower + upper + turbo fan (optional)
- Grill (option)
- High Grill (optional)
- Turbo motor (optional)
- Turbo resistant + turbo fan (optional)
- Grill + chicken roasting (optional)
- High grill + turbo fan (optional)
- Use of the furnace timer
- MECHANICAL CLOCK (model 2)
- ANALOGUE TIMER (model 4)
- WHEN THE POWER RESUMES
- MANUAL MODE
- TIMING
- SETTING THE ALARM TIME
- SILENCING AN OPERATING ALARM
- AUTOMATIC BAKING PROGRAM
- 26
- IN CASE OF POWER FAILURE
- CHILD LOCK FUNCTION
- TIMER MODE (12/24 HOUR)
- ALARM VOLUME SETTING
- Start of the cooking process
- Switching off the furnace earlier than the time you select
- Cooking periods table
- Operation of the grill
- Switching on the grill
- Switching off the grill
- General information
- Cleaning of the control panel
- Cleaning the furnace
- Cleaning and removal of the furnace cover
- Removal of the furnace's cover
- If your furnace has a round lamp:
- 8) Proposed solutions for the problems
- Product does not operate.
- Steam comes out from the furnace when it operates.
- Metal sounds are hard when the product heats up and cools down
- Furnace does not heat.
- Furnace light is not on.
- COMMERCIAL GUARANTEE CONDITIONS FOR WHITE PRODUCTS
- GUARANTEE EXCLUSIONS
- EAS ELECTRIC
- SMART TECHNOLOGY
Brand : EAS Electric
Model : EFG660X
Category : Cooker