
LED Color Curtain - LED Lighting Eurolite - Free user manual and instructions
Find the device manual for free LED Color Curtain Eurolite in PDF.


| Product Type | LED Decorative Curtain Light |
| Brand | Eurolite |
| Model | LED Color Curtain |
| Number of LEDs | 300 |
| LED Color | RGB (multi-color) |
| Dimensions (W x H) | 2.5 m x 3 m |
| Weight | 1.2 kg |
| Power Supply | DC 5V, 2A (USB powered) |
| Power Consumption | 10 W |
| Control Modes | Remote control, manual button, music sync |
| Lighting Modes | Static, fading, flashing, color cycling |
| Brightness Levels | 8 levels adjustable |
| Timer Function | Yes, 4/6/8 hours auto-off |
| Waterproof Rating | IP44 (indoor and outdoor use) |
| Material | Copper wire, PVC coating |
| Connection | Multiple units can be linked |
| Warranty | 2 years |
| Package Contents | LED curtain, remote control, USB power adapter |
| Cleaning Instructions | Wipe with a dry cloth; do not use water or solvents |
| Safety Certifications | CE, RoHS |
| Operating Temperature | -10°C to 40°C |
| Repairability | Non-repairable; replace entire unit |
Frequently Asked Questions - LED Color Curtain Eurolite
User questions about LED Color Curtain Eurolite
0 question about this device. Answer the ones you know or ask your own.
Ask a new question about this device
Download the instructions for your LED Lighting in PDF format for free! Find your manual LED Color Curtain - Eurolite and take your electronic device back in hand. On this page are published all the documents necessary for the use of your device. LED Color Curtain by Eurolite.
USER MANUAL LED Color Curtain Eurolite
eurolite® LED COLOR CURTAIN

Bedienungsanleitung
User Manual
eurolite®
LED Color Curtain
LED curtain with 4 high-performance RGBW LEDs and QuickDMX





No. 42110500
www.eurolite.de
SAFETY INSTRUCTIONS....14
NDESCRIPTION OF THE NEVICE 16
INSTALLATION 17
ПМХ512 CONTROL 17
Wireless DMX transmission with QuickDMX 17
MAINS CONNECTION 17
OPERATION 18
Menu structure 18
Stand-alone mode....19
Interconnecting several devices (master/slave operation).... 20
DMX operation 20
CLEANING ANI MAINTENANCE 21
PROTECTING THE ENVIRONMENT 21
TECHNICAL SPECIFICATIONS....22
Accessories 22
You can find the latest update of this user manual in the Internet under:
www.eurolite.de
BEDIENUNGSANLEITUNG
eurolite®
LED Color Curtain
ПANGER! Electric shock caused by short-circuit
Be careful with your operations. With a dangerous voltage you can suffer a dangerous electric shock when touching the wires. Never open the housing. Keep the device away from rain and moisture.

Read these instructions carefully before using the product. They contain important information for the correct use of the product.
Every person involved with the installation, operation and maintenance of this device has to
- be qualified
- follow the instructions of this manual
- consider this manual to be part of the total product
- keep this manual for the entire service life of the product
- pass this manual on to every further owner or user of the product
- download the latest version of the user manual from the Internet
INTRONUCTION
Thank you for having chosen one of our products. If you follow the instructions given in this manual, we are sure that you will enjoy this device for a long period of time.
Product features
White LEP curtain with 4 high-power RGBW LEPs and QuickPMX support
- Elegant white design
• 4 high-power 30 W ΠGBW LEDs (QCL)
• Auto, music, master/slave and DMX mode
• Built-in auto and music show programs - Direct color selection for 15 preset colors
- Stepless ΠGB color blend, color change, color fade, dimmer and strobe effect
- Addressing and setting via control panel with 4-digit LED display
• Sound-control via built-in microphone with adjustable microphone sensitivity - Suited for installation on stands or trussing
- Cutout for cable inlet
• Supports QuickDMX - the wireless DMX system from Eurolite
• Built-in phantom-powered USB port for QuickDMX receivers (accessories) - DMX512 control possible via any commercial DMX controller
- 4 or 8 DMX channels selectable for various applications
- P-Con terminals for power linking up to 8 units
SAFETY INSTRUCTIONS
WARNING!
Please read the safety warnings carefully and only use the product as described in this manual to avoid accidental injury or damage.
Intended use
- This device is a spotlight for creating decorative lighting effects. This device is designed for professional use in the field of event technology, e.g. on stage. It is not suitable for household lighting.
- Only use the device according to the instructions given herein. Damages due to failure to follow these operating instructions will void the warranty! We do not assume any liability for any resulting damage.
- We do not assume any liability for material and personal damage caused by improper use or non-compliance with the safety instructions. In such cases, the warranty will be null and void.
- Unauthorized rebuilds or modifications of the device are not permitted for reasons of safety and render the warranty invalid.
Panger due to electricity
- The device is suitable for indoor use only. Do not use it outdoors. Never expose it to rain or moisture. Do not store it in rooms exposed to moisture.
- To reduce the risk of electric shock, do not open any part of the device. There are no serviceable parts inside the device.
- Only connect the device to a properly installed mains outlet. The outlet must be protected by residual current breaker (ΠCD). The voltage and frequency must exactly be the same as stated on the device. If the mains cable is equipped with an earthing contact, then it must be connected to an outlet with a protective ground. Never deactivate the protective ground of a mains cable. Failure to do so could possibly injure the user.
- The mains outlet must be easily accessible so that you can unplug the device quickly if need be.
- Never touch the mains plug with wet or damp hands. There is the risk of potentially fatal electric shock.
- The mains cable must not be bent or squeezed. Keep it away from hot surfaces or sharp edges.
- Never pull the mains cable to disconnect the mains plug from the mains outlet, always seize the plug.
- Unplug the device during lightning storms, when unused for long periods of time or before cleaning.
- Do not expose the device to any high temperatures, direct sunlight, dripping or splashing water, strong vibrations or heavy mechanical stress.
- Do not place any objects filled with liquids on the device.
- Do not place any open sources of fire, such as burning candles, on or directly next to the device.
- Make sure that objects cannot fall into the device, in particular metal parts.
- Only have repairs to the device or its mains cable carried out by qualified service personnel. Pepairs are required when the device or the mains cable is visibly damaged, liquid has been spilled or objects have fallen into the device; when the device has been exposed to rain or moisture, has been dropped or malfunctions occur.
- Cleaning of the device is limited to the surface. Make sure that moisture does not come into contact with any areas of the terminal connections or mains voltage control parts. Only wipe off the product with a soft lint-free and moistened cloth. Never use solvents or aggressive detergents.
Panger to children and people with restricted abilities
- This product is not a toy. Keep it out of the reach of children and pets. Do not leave packaging material lying around carelessly. Never leave this device running unattended.
- This device may be used only by persons with sufficient physical, sensorial, and intellectual abilities and having corresponding knowledge and experience. Other persons may use this device only if they are supervised or instructed by a person who is responsible for their safety.
English
Warning – risk of burns and fire
- The admissible ambient temperature range (Ta) is -5 to +45°C. Do not operate the device outside of this temperature range.
- The housing temperature (Tc) can be up to 60°C during use. Avoid contact by persons and materials.
- Do not illuminate surfaces within 10 cm of the device. This value is indicated on the device by the symbol.
- Do not use the device near highly flammable materials. Always place the device at a location where sufficient air circulation is ensured. Leave 50 cm of free space around the device. Never cover the air vents of the housing.
Warning – risk of injuries
- Do not look directly at the light source. Persons with light-sensitive epilepsy may suffer from epileptic seizures or fall unconscious.
- Make sure that the product is set up or installed safely and expertly and prevented from falling down. Comply with the standards and rules that apply in your country, in particular EN 60598-2-17.
- If you lack the qualification, do not attempt the installation yourself, but instead use a professional installer. Improper installation can result in bodily injury and or damage to property.
- The manufacturer cannot be made liable for damages caused by incorrect installations or insufficient safety precautions.
- For overhead use, always secure the device with a secondary safety attachment such as a safety bond or safety net.
- Make sure that the area below the installation place is blocked when rigging, derigging or servicing the device.
- For commercial use the country-specific accident prevention regulations of the government safety organization for electrical facilities must be complied with at all times.
Caution – material damage
- This device must not be connected to the mains voltage by means of a dimmer.
- Lighting effects are not designed for permanent operation. Consistent operation breaks will ensure that the device will serve you for a long time without defects.
- Never switch the device on and off in short intervals. This will considerably reduce the service life of the device.
- If the device has been exposed to drastic temperature fluctuation, do not switch it on immediately. The resulting condensation may destroy the device. Allow the device to reach room temperature before connecting it. Wait until the condensation has evaporated.
- Please use the original packaging to protect the device against vibration, dust and moisture during transportation or storage.
- If a serial number label is affixed to the device, do not remove the label as this would make the warranty void.
ΠESCRIPTION OF THE ΠEVICE
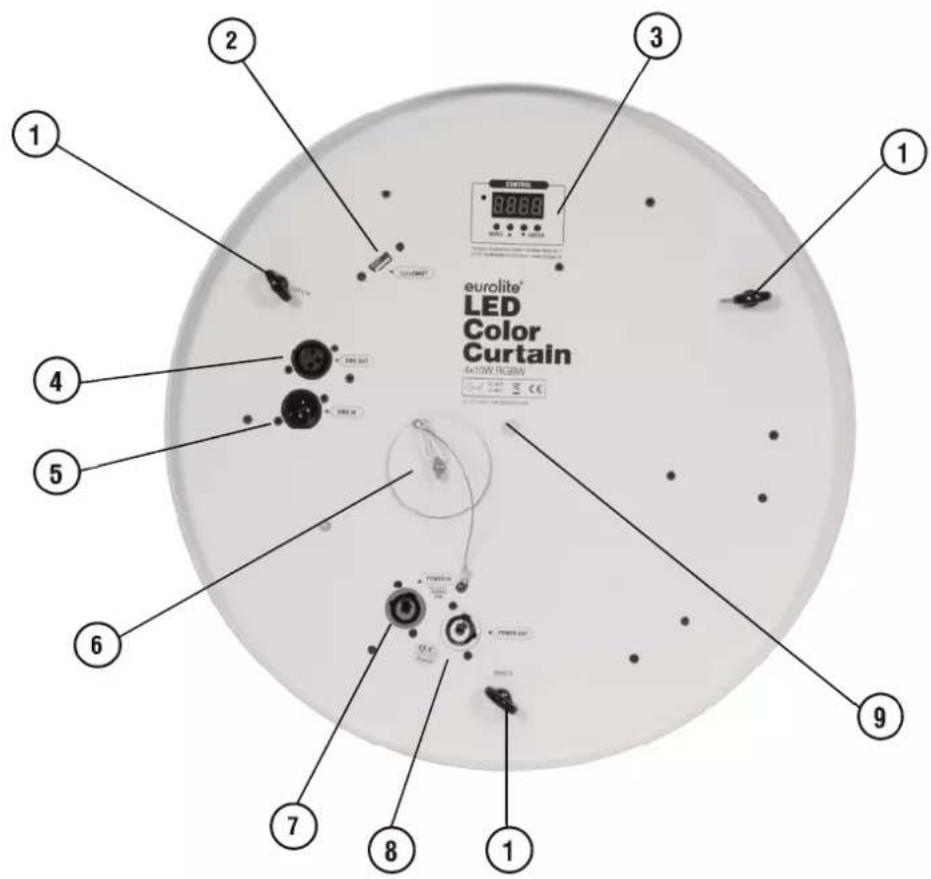
1) Safety eyelets
2) USB port for QuickDMX receiver
3) LED display with operating buttons
4) DMX output
5) DMX input
6) Cutout for cable inlet (with cover plate)
7) Power input
8) Power feed-through output
9) Mounting device with M10 thread
INSTALLATION
WARNING! Risk of injury caused by falling objects
Devices in overhead installations may cause severe injuries when crashing down. Make sure that the device is installed securely and cannot fall down. The installation must be carried out by a specialist who is familiar with the hazards and the relevant regulations.
The device may be fastened to a truss or similar rigging structure. The device must never be fixed swinging freely in the room.
1 The rigging structure must support at least 10 times the weight of all fixtures to be installed on it.
2 Block access below the work area and work from a stable platform when installing the device.
3 Use rigging hardware that is compatible with the structure and capable of bearing the weight of the device. Please refer to the "Accessories" section for a list of suitable rigging hardware.
4 The device may be mounted onto a stand via the M10 thread in the center. A matching stand adapter is available as accessory.
5 After installation, the device requires inspections periodically to prevent the possibility of corrosion, deformation and looseness.
ПМХ512 CONTROL
A DMX512 data link is required in order to control the device via DMX. The device provides 3-pin XLΠ connectors for DMX connection.
1 Connect the output of your DMX controller to the DMX input DMX IN of the device with a DMX cable.
2 Connect the DMX output DMX OUT of the device to the DMX input of the next unit in the chain. Always connect one output to the input of the next unit until all units are connected.
3 At the last unit, the DMX cable has to be terminated. Plug the terminator with a 120 Ω resistor between Signal (−) and Signal (+) in the DMX output of the last unit.
4 If the cable length exceeds 300 m or the number of DMX devices is greater than 32, it is recommended to insert a DMX level amplifier to ensure proper data transmission.
XLΠ connection:
DMX-output
XLR mounting-socket:

DMX-input
XLR mounting-plug:

Wireless PMX transmission with QuickPMX
The device features an alternative DMX input for a QuickDMX receiver (sold separately). This connector allows for wireless transmission of DMX control signals to the device. The connector is designed as a USB port which provides the required 5 V operating voltage for the receiver. With QuickDMX devices, extensive cabling between the DMX controller and the device is not required.
USB port connection:
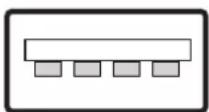
+5V D- D+ GND
MAINS CONNECTION
The device uses an auto-range power supply that accepts input voltages between 100 und 240 volts.
English
1 Connect the device via the mains cable to a grounded mains socket. Thus the unit is switched on.
2 To switch off the unit, disconnect the power plug.
3 Do not connect the unit to the mains voltage via a dimmer. For a more convenient operation, use a mains outlet which is switchable.
4 The jack POWER OUT allows for power supply of further devices. To interconnect several devices, connect the jack POWER OUT to the input POWER IN of the next unit until all units are connected. Matching power cables are available as accessories. In this manner, up to 8 devices can be linked at 230/240 input voltage and up to 4 devices at 110/115 input voltage.
OPERATION
After connecting the device to the mains it is ready for operation. The display indicates the last operating mode. The operating modes can be selected by means of the display and the control buttons. All settings remain stored even if the device is disconnected from the mains. The device can be operated in stand-alone mode via the control board or in DMX-controlled mode via any commercial DMX controller.
Menu structure
| Mode | Pisplay | Function | |
| ПМХ operation | Addr d001-5 | 12 Set starting address | |
| ChПд | 4 CH 4-channel mode | ||
| 8 CH 8-channel mode | |||
| Master/slave mode SL | Пд | SLAU Slave mode | |
| ПАSt Master mode | |||
| Color mixing | Паун | r000-255 Red 0-100% | |
| g000-255 Green 0-100% | |||
| b000-255 Blue 0-100% | |||
| U000-255 White 0-100% | |||
| Color mode | Пode | Co1-15 | Constant light in 1 of 15 colors |
| Au00-99 Color change, slow > fast | |||
| FA00-99 Color fade, slow > fast | |||
| SU00-99 | Sound control with adjustable microphone sensitivity, low > high | ||
| Strobe effect | Stro | SU00-99 | Strobe effect, slow > fast |
Stand-alone mode
Color mode
In the color mode Paun each of the quadcolor LEDs can be individually adjusted for brightness. The device will constantly emit the color adjusted.
1 Press the MENU button so many times until aun is indicated in the display. Confirm with the ENTER button.
2 Now the display indicates the letter R for the color and the corresponding brightness value. Use the UP and DOWN keys to adjust the desired brightness.
3 Confirm with the ENTER button. Now the color green can be adjusted; then blue and white.
Static colors
In the Node Stat mode the device will constantly emit one of 15 preset colors. Press the MENU button so many times until Mode is indicated in the display. Confirm with the ENTER button. Now the display indicates the first menu option Co. Confirm with the ENTER button and select the desired color with the UP and DOWN keys.
| Display Color Display Color | |||
| 1 White 9 | Turquoise | ||
| 2 | Ped | 10 | Light green |
| 3 | Green | 11 | Cold white + blue |
| 4 | Blue | 12 | Cold white + green |
| 5 | Warm white | 13 | Magenta |
| 6 | Yellow | 14 | Turquoise |
| 7 | Magenta | 15 | Cold white + yellow |
| 8 | Orange | ||
Color change effect
In Node Au mode, the device automatically fades the color at an adjustable speed. Press the MENU button repeatedly until the display shows Mode. Confirm by pressing the ENTER button. Use the UP or DOWN keys to select FA. Confirm again with ENTER and then select the desired running speed with the UP and DOWN buttons (00 = slow, 99 = fast).
Sound control
In Node SU mode, the device will change the color to the rhythm of the music (sufficient bass provided). Press the MENU button repeatedly until the display shows Mode. Confirm by pressing the ENTER button. Use the UP or DOWN button to select SU. Confirm again with ENTER and then select the desired microphone sensitivity (00 = low, 99 = high) using the UP and DOWN buttons.
Strobe effect
The Stro mode activates a strobe effect. Press the MENU button repeatedly until the display shows Stro mode. Confirm by pressing the ENTER key. Then set the flash speed with the UP or DOWN buttons (00 = slow, 99 = fast).
English
Interconnecting several devices (master/slave operation)
Several devices may be interconnected (max. 32). Then all slave units can be synchronized and controlled with the master unit without the need for a DMX controller. The devices must be set to the corresponding operating modes.
1 Configure all slave units before connecting the master unit: Press the MENU button so many times until SLNd is indicated on the display. Confirm with the ENTER button and select the option SLAU with the UP or DOWN button.
2 Connect the DMX output of the master unit to the DMX input of the first slave unit. Then connect the DMX output of the first slave unit to the DMX input of the second slave unit, etc. until all units have been connected in a chain. Make sure the master unit is the first in the chain. Do not connect a DMX controller to the DMX input of the master unit.
3 Set the master unit in menu SLNd to the option PAS; then select the desired operating mode. The interconnected devices will now operate synchronously.
DMX operation
Setting the number of DMX channels and the DMX starting address
For operation with a controller with DMX512 protocol, the device is equipped with 8 control channels. However, it can also be switched to a mode with 4 channels if different functions are required. To be able to operate the device with a DMX controller, the DMX starting address must be set. The starting address depends upon which DMX controller is being used. Please refer to the controller's documentation.
1 Press the MENU button so many times until Addr is indicated in the display. Confirm with the ENTER button. Now the display indicates the DMX start address d***. Use the buttons UP and DOWN to set the address. Confirm with the ENTER button.
2 Press the MENU button so many times until the display indicates the option ChPd. Confirm with the ENTER button. The display indicates 4 CH (4 DMX channels) or 8 CH (8 DMX channels). Use the buttons UP and DOWN to select the desired number of DMX channels. Confirm with the ENTER button.
3 A dot will light up when DMX signals are being received. If no control signals are available, the display will flash.
Note: Please make sure that you do not have any overlapping channels in order to control each device correctly and independently from any other fixture on the DMX chain. If several devices are addressed similarly, they will work synchronically.
Functions in 4-channel mode
| Channel Value Function | ||
| 1 | 000 – 255 | Ped (0-100%) |
| 2 | 000 – 255 | Green (0-100%) |
| 3 | 000 – 255 | Blue (0-100%) |
| 4 | 000 – 255 | White (0-100%) |
Functions in 8-channel mode
| Channel Value | Function | |
| 1 | 000 – 255 | Ped (0-100%) |
| 2 | 000 – 255 | Green (0-100%) |
| 3 | 000 – 255 | Blue (0-100%) |
| 4 | 000 – 255 | White (0-100%) |
| 5Master Pimmer | 000 – 255 | Total brightness 0-100% |
| 6Strobe | 000 – 255 | Strobe effect, slow > fast |
| 7Color mode | 000 – 008 | No function |
| 009 – 088 | Static light (color selection via channel 8) | |
| 089 – 168 | Color change (speed adjustment via channel 8) | |
| 169 – 249 | Color fade (speed adjustment via channel 8) | |
| 250 – 255 | Sound control (adjustment of microphone sensitivity via channel 8) | |
| 8 | 000 – 255 | Settings for functions of channel 7 |
CLEANING ANN MAINTENANCE
The outside of the device should be cleaned periodically to remove contaminants such as dust etc. The lenses, in particular, should be clean to ensure that light will be emitted at maximum brightness.
1 Disconnect the device from power and allow it to cool before cleaning.
2 Clean the surface with a soft lint-free and moistened cloth. Never use alcohol or solvents as these may damage the surface. Make sure that no liquids can enter the device.
3 The device must be dry before reapplying power.
There are no serviceable parts inside. Do not open the housing. Do not try to repair the device by yourself as this may result in damage. Maintenance and service operations are only to be carried out by authorized dealers. Should you need any spare parts, please use genuine parts. Should you have further questions, please contact your dealer.
PROTECTING THE ENVIRONMENT

Pisposal of old equipment
When to be definitively put out of operation, take the product to a local recycling plant for a disposal which is not harmful to the environment. Devices marked with this symbol must not be disposed of as household waste. Contact your retailer or local authorities for more information. Remove any inserted batteries and dispose of them separately from the product.

You as the end user are required by law (Battery Ordinance) to return all used batteries/rechargeable batteries. Disposing of them in the household waste is prohibited. You may return your used batteries free of charge to collection points in your municipality and anywhere where batteries/rechargeable batteries are sold. By disposing of used devices and batteries correctly, you contribute to the protection of the environment.
TECHNICAL SPECIFICATIONS
| Power supply: 100-240 V AC, 50/60 Hz | |
| Power consumption: 125 W | |
| IP classification: IP20 | |
| Power connection: Mains input P-Con (blue), mounting version | |
| Power output: 1 x P-Con (gray), mounting version | |
| DMX control channels: 4; 8 | |
| DMX input: 1 x 3-pin XLΠ (M) mounting version | |
| DMX output: 1 x 3-pin XLΠ (F) mounting version | |
| LED type: QCL ΠGBW | |
| LED number: 4 | |
| Flash rate: 0-20 Hz | |
| Control: DMX, stand-alone, QuickDMX via USB, sound control via microphone, master/slave function | |
| Case color: | White |
| Height: | 130 cm |
| Diameter : | 40 cm |
| Weight: | 4.6 kg |
Accessories
| No. 50301612 EUPOLITE Link Chain 4mm, WLL 80kg, 33cm | |
| No. 50301655 EUPOLITE Quick Link Type B-90 | |
| No. 59007073 EUPOLITE SPA-10L Adapter | |
| No. 70064704 EUPOLITE Quick DMX USB Wireless Transmitter/Perceiver | |
| No. 70064703 EUPOLITE Quick DMX Wireless Transmitter/Perceiver | |
| No. 3022785H | EUPOLITE DMX cable XLΠ 3pin 3m bk |
| No. 30227810 PSSO DMX cable XLΠ 3pin 3m bk Neutrik | |
| No. 3023503Π | PSSO PowerCon Connection Cable 3x1.5 3m |
| No. 30235030 PSSO PowerCon Power Cable 3x1.5 1.5m H07ΠN-F | |
All information is subject to change without prior notice. © 20.12.2019


- EUROLITE® LED COLOR CURTAIN
- BEDIENUNGSANLEITUNG
- USER MANUAL
- SAFETY INSTRUCTIONS....14
- NDESCRIPTION OF THE NEVICE 16
- INSTALLATION 17
- ПМХ512 CONTROL 17
- MAINS CONNECTION 17
- OPERATION 18
- CLEANING ANI MAINTENANCE 21
- PROTECTING THE ENVIRONMENT 21
- TECHNICAL SPECIFICATIONS....22
- EUROLITE®
- LED COLOR CURTAIN
- ПANGER! ELECTRIC SHOCK CAUSED BY SHORT-CIRCUIT
- INTRONUCTION
- PRODUCT FEATURES
- WHITE LEP CURTAIN WITH 4 HIGH-POWER RGBW LEPS AND QUICKPMX SUPPORT
- SAFETY INSTRUCTIONS
- WARNING
- INTENDED USE
- PANGER DUE TO ELECTRICITY
- PANGER TO CHILDREN AND PEOPLE WITH RESTRICTED ABILITIES
- ENGLISH
- WARNING – RISK OF BURNS AND FIRE
- WARNING – RISK OF INJURIES
- CAUTION – MATERIAL DAMAGE
- ΠESCRIPTION OF THE ΠEVICE
- INSTALLATION
- WARNING! RISK OF INJURY CAUSED BY FALLING OBJECTS
- ПМХ512 CONTROL
- WIRELESS PMX TRANSMISSION WITH QUICKPMX
- MAINS CONNECTION
- OPERATION
- STAND-ALONE MODE
- COLOR MODE
- STATIC COLORS
- COLOR CHANGE EFFECT
- SOUND CONTROL
- STROBE EFFECT
- INTERCONNECTING SEVERAL DEVICES (MASTER/SLAVE OPERATION)
- DMX OPERATION
- SETTING THE NUMBER OF DMX CHANNELS AND THE DMX STARTING ADDRESS
- CLEANING ANN MAINTENANCE
- PROTECTING THE ENVIRONMENT
- PISPOSAL OF OLD EQUIPMENT
- TECHNICAL SPECIFICATIONS
- ACCESSORIES
Brand : Eurolite
Model : LED Color Curtain
Category : LED Lighting