
PJ WUL5860 - Projector RICOH - Free user manual and instructions
Find the device manual for free PJ WUL5860 RICOH in PDF.


| Product Type | Video Projector |
| Model | RICOH PJ WUL5860 |
| Display Technology | DLP 0.48" DMD |
| Native Resolution | WUXGA (1920 x 1200) |
| Aspect Ratio | 16:10 |
| Light Source | Laser |
| Laser Life | 20,000 hours |
| Projection Lens | F# 1.94 - 2.23, f=12.82-16.74mm, 1.3x zoom |
| Throw Ratio | 1.21 - 1.59 (distance/width) |
| Focus | Manual |
| Zoom | Manual, 1.3x |
| Lens Shift | Vertical (manual) |
| Keystone Correction | Vertical and Horizontal (digital) |
| Projection Distance | 1.0 - 7.9 m (3.28 - 25.92 ft) |
| Image Size (Diagonal) | 29" - 303" (0.74 - 7.70 m) |
| Weight | Approx. 4.6 kg (10.1 lbs) |
| Dimensions (W x D x H) | 265 x 337 x 122.5 mm (with feet) |
| Power Consumption | 300W (Normal), 230W (Eco) @110Vac |
| Standby Power | 0.5W or less |
| Speaker Output | 8W x 2 |
| Noise Level | 32 dBA (Normal), 31 dBA (Eco) |
| Input Terminals | HDMI 1, HDMI 2/MHL, Video, Computer In (D-sub 15), Audio In (3.5mm), Microphone In (3.5mm), LAN, RS-232, USB 5V/1.5A |
| Output Terminals | Monitor Out (D-sub 15), Audio Out (3.5mm) |
| Network Control | Yes (Web browser, Crestron, PJLink) |
| 3D Support | Yes (requires compatible 3D source and glasses) |
| Package Contents | Projector, Remote Control (with batteries), HDMI Cable, Power Cord, Documentation |
| Safety Certifications | FCC Class B, CE, UKCA, Laser Class 1 (RG-2) |
Frequently Asked Questions - PJ WUL5860 RICOH
User questions about PJ WUL5860 RICOH
0 question about this device. Answer the ones you know or ask your own.
Ask a new question about this device
Download the instructions for your Projector in PDF format for free! Find your manual PJ WUL5860 - RICOH and take your electronic device back in hand. On this page are published all the documents necessary for the use of your device. PJ WUL5860 by RICOH.
USER MANUAL PJ WUL5860 RICOH
natural_image
Abstract composition of five colored circles (orange, blue, pink, green, cyan) arranged in a scattered pattern on white background (no text or symbols)-
Usage Notice
-
Introduction
-
Basic Operations
-
User Settings
-
LAN Control
-
Troubleshooting
-
Appendices

natural_image
Gradient background transitioning from dark purple to white (no text or symbols)Table of Contents
Usage Notice......2
Precautions....2
Safety Labels of This Machine......11
Regulation & Safety Notices......13
Other Information....18
Introduction......19
Product Features 19
Package Overview....20
Product Overview 21
Connection Ports....22
Control Panel 23
Remote Control....24
Remote Control ID Setup 26
Remote Control Battery Installation..... 27
Remote Control Operating Range......28
Installing the Projector 29
Basic Operations....30
Connecting the Projector ....30
Connect to Computer/Notebook......30
Connect to AV Equipment 31
Powering On/Off the Projector......32
Powering On the Projector 32
Powering Off the Projector 33
Warning Indicator 33
Adjusting the Projected Image......35
Adjusting the Position of Projector Image 35
Adjusting the Projector Zoom, Focus, and Lens Shift 36
Adjusting Projection Image Size...... 37
User Settings ......39
Using the On Screen Display (OSD) 39
How to operate....39
PICTURE 40
SCREEN 44
SETTINGS 49
AUDIO 53
OPTIONS 54
3D....58
LAN Control 60
Controlling this Device with Web
Browser....60
Connecting to the device....60
Log in.... 61
System Status 62
General Setup 63
Projector Control 64
Network Setup....66
Alert Setup.... 67
Crestron.... 68
Crestron Tools 69
Crestron Info.... 69
Contacting the IT administrator of Crestron.... 70
Reset to Default.... 70
Reboot System....71
License Information....71
LAN FW Update 72
Troubleshooting 73
Appendices ......77
List of Compatible Signals .....77
Configurations of Terminals ......81
Terminal: Computer In (Mini D-sub 15 pin) [Monitor Out].... 81
Terminal: PC Control (D-sub 9 pin) ..... 81
Terminal: Microphone 81
Specifications......82
Cabinet Dimensions....83
Copyrights 85
Trademarks......85
Precautions

Follow all warnings, precautions and maintenance as recommended in this user's guide to maximize the life of your unit.
■ Warning-
Indicates a potentially hazardous situation which, if instructions are not followed, could result in death or serious injury.
Caution-
Indicates a potentially hazardous situation which, if instructions are not followed, may result in minor or moderate injury or damage
■Warning- Do not use flammable sprays or solvents in the vicinity of this machine. Also, avoid placing these items in the vicinity of this machine. Doing so could result in fire or electric shock.
■Warning- Do not place vases, plant pots, cups, toiletries, medicines, small metal objects, or containers holding water or any other liquids, on or close to this machine. Fire or electric shock could result from spillage or if such objects or substances fall inside this machine
■Warning- Keep the machine and attachments out of the reach of children. If the machine is near children, it may cause injury.
■Warning- Plastic bags can be dangerous, please do not leave near babies and young children. To avoid the threat of suffocation, please keep away from their nose and mouth.
■ Warning- Do not use any power sources other than those that match the specifications shown in this manual. Doing so could result in fire or electric shock.
■ Warning- Do not damage, break, or modify the power cord. Also, do not place heavy objects on the power cord, or pull the cord or bend it severely. Doing so could result in fire or electric shock.
- Warning- Touching the prongs of the power cable's plug with anything metallic constitutes a fire and electric shock hazard.
■ Warning- The supplied power cord is for use with this machine only. Do not use it with other appliances. Doing so could result in fire or electric shock.
Usage Notice
■ Warning- It is dangerous to handle the power cord plug with wet hands. Doing so could result in electric shock.
■ Warning- Be sure to disconnect the plug from the wall outlet at least once a year and check for the following:
■There are burn marks on the plug.
■The prongs on the plug are deformed.
If any of the above conditions exist, do not use the plug and consult your dealer or service representative. Use of the plug could result in fire or electric shock.
■ Warning- Be sure to disconnect the power cord from the wall outlet at least once a year and check for the following:
The power cord's inner wires are exposed, broken, etc.
- The power cord's coating has a crack or dent.
■When bending the power cord, the power turns off and on.
■ Part of the power cord becomes hot.
■The power cord is damaged.
If any of the above conditions exist, do not use the power cord and consult your dealer or service representative. Use of the power cord could result in fire or electric shock.
■ Warning- Do not use the connection cable if it is deformed, cracked, or damaged. Doing so could result in fire or electric shock. If the connection cable is deformed, cracked, or damaged, contact your service representative to request a replacement cable.
■ Warning- When using an extension cord or power strip, only connect equipment whose total power consumption is within the power rating for the extension cord or power strip. If the power rating is exceeded, it may cause heat buildup and result in fire.
■ Warning- If the machine emits smoke or odours, or if it behaves unusually, you must turn off its power immediately. After turning off the power, be sure to disconnect the power cord plug from the wall outlet. Then contact your service representative and report the problem. Do not use the machine. Doing so could result in fire or electric shock.
■ Warning- If metal objects, or water or other fluids fall inside this machine, you must turn off its power immediately. After turning off the power, be sure to disconnect the power cord plug from the wall outlet. Then contact
Usage Notice
your service representative and report the problem. Do not use the machine. Doing so could result in fire or electric shock.
■ Warning- Never operate this unit on AC power during a thunderstorm. If you see lightning or hear thunder, never touch the unit, cables and/or peripherals. An electric surge caused by the storm, may result in an electrical shock or damage to the unit.
■ Warning- If the machine topples, or if a cover or other part gets broken, you must turn off its power immediately. After turning off the power, be sure to disconnect the power cord plug from the wall outlet. Then contact your service representative and report the problem. Do not use the machine. Doing so could result in fire or electric shock.
■ Warning- Never push objects of any kind into this product through openings as they may touch dangerous voltage points or short-out parts that could result in a fire or electric shock. Never spill liquid of any kind on the product.
■ Warning- Do not remove any covers or screws. There are high voltage components inside the machine that may cause electric shock. Contact your service representative if any of the machine's internal components require maintenance, adjustment, or repair.
■ Warning- Do not disassemble or modify the machine. Doing so may cause injury or malfunction.
■ Warning- Installing the Projector on a Wall or Ceiling:
a) Do not attempt to clean or replace parts for a machine that is installed in a high location on a wall or ceiling. Doing so may cause it to fall down, resulting in an injury.
b) Contact your sales or service representative to clean or replace parts for a machine that is installed on a wall or ceiling.
c) If a machine is incorrectly installed on a wall or ceiling, it may fall down and cause an injury. Contact your sales or service representative if you want to install a machine on a wall or ceiling.
d) Do not obstruct the machine's vents. Doing so risks fire caused by overheated internal components.
e) For users, do not install the projector by yourself.
Usage Notice
Contact your sales or service representative if you want to install the projector on a wall or ceiling. f) For sales or service representatives:
- Use brackets that are strong enough to support the projector. WXL5860/ WUL5860 Series weights less than 5.0 kg.
- The projector must be installed in a location that is sturdy enough to support the full weight of the projector and brackets.
- Use only the screws (M4 screws). Use all three of the projector's screw holes to attach the brackets.
g) Do not use the projector in oil-mist or smoke environment. Doing so may cause the projector case to crack and fall from its ceiling mount. This may cause serious injury.
■ Warning- Do not use lens cap when projector is powered on.
■ Caution- Keep the machine away from humidity and dust. Otherwise a fire or an electric shock might occur.
■ Caution- Do not place any objects on the machine. Doing so may cause the machine to topple over, possibly resulting in injury.
■ Caution- Do not place the machine on an unstable or tilted surface. If it topples over, an injury might occur.
■ Caution- Do not place the machine or use it in an environment where it might get wet such as from snow, rain, or being near water. Doing so could result in fire or electric shock.
■ Caution- Do not put your face or hand near the exhaust vents. Doing so could result in burns or an accident due to hot air coming from the exhaust vents.
■ Caution- Do not use the machine on soft material such as paper or cloth that might get sucked into the intake vents. Doing so may cause heat buildup inside the machine, resulting in malfunction, burns, or fire.
■ Caution- Do not place the machine in a location where air flow is poor. Doing so may cause fire due to internal components becoming overheated.
■ Caution- Do not place or store the machine in a location where direct sunlight or heat generation might occur. The heat may deform or wear out the exterior parts or negatively affect internal parts. Doing so could result in fire.
Usage Notice
■ Caution- Do not place low heat resistant material near the exhaust vents. Hot air may come from the exhaust vents, resulting in damage to the machine or an accident.
- Caution- Do not obstruct the machine's vents. Doing so risks fire caused by overheated internal components.
■ Caution- Push the power plug all the way into the power outlet. Do not use a power outlet with a loose connection. Doing so may result in heat buildup. Plug the power cord in the correct direction into the base. If they are not plugged in correctly, it could result in smoke, fire, or electric shock.
■ Caution- If this machine is not going to be used for several days or longer at a time, disconnect its power cord from the wall outlet.
■ Caution- When disconnecting the power cord from the wall outlet, always pull the plug, not the cord. Pulling the cord can damage the power cord. Use of damaged power cords could result in fire or electric shock.
■ Caution- Be sure to disconnect the plug from the wall outlet and clean the prongs and the area around the prongs at least once a year. Allowing dust to build up on the plug constitutes a fire hazard.
■ Caution- When performing maintenance on the machine, always disconnect the power cord from the wall outlet.
■ Caution- Do not place the power cord and connection cable in a way that might cause someone to trip and fall. The machine might fall over and cause an injury.
■ Caution- The machine may be very hot after it is turned off, especially the vents.
■ Caution- Do not place the machine on other equipment or vice versa. Doing so may cause heat buildup inside the machine or cause the other equipment to malfunction.
■ Caution- Do not increase the volume unless you are listening while increasing the volume. Also, lower the volume before turning off the power, because a loud sound may be emitted when the power is turned on and cause hearing damage.
- Caution- If the machine's interior is not cleaned regularly, dust will accumulate. Fire and breakdown can result from heavy accumulation of dust inside this machine. Contact your sales or service representative for details about and charges for cleaning the machine's interior.
Usage Notice
■ Caution- Unplug the power cord from the wall outlet before you move the machine. While moving the machine, take care that the power cord is not damaged under the machine. Failing to take these precautions could result in fire or electric shock.
■ Caution- Do not use attachments not recommended by RICOH. Use of an incompatible attachments could cause hazards or damage to the product.
■ Caution- Unplug this product from the wall outlet and take the product to qualified service personnel if you encounter any of the following conditions: a) The power supply cord or plug is damaged. b) Liquid has been spilled, or objects have fallen into the product. c) The product has been exposed to rain or water. d) The product does not operate normally when following the operating instructions. Adjust only those controls that are covered by the operating instructions. e) The product has been dropped or damaged in any way. (If the cabinet should break, please handle with care to avoid injury.)
■ Caution- This product incorporates glass components, including a lens. If this should break, please handle with care to avoid injury and contact your sales representative for repair service. Avoid any broken pieces of glass since they may cause injury.
■ Caution- Do not place anything in front of the lens while the projector is operating. Things placed in front of the lens may overheat and burn or start a fire.
■ Caution- Unauthorized substitutions may result in fire, electric shock, or other hazards. Upon completion of any service or repairs to this product, ask the service technician to perform safety checks to verify that the product is in proper operating condition.
■ Caution- Do not use the product in a closed installation location. Do not place the product in a box or in any other closed installation location. Otherwise it may overheat, which could result in a risk of fire.
Usage Notice
■ Caution- Leave more than 30 cm of space between the intake vent and the partition or more than 60 cm of space between the exhaust vent and the partition.
Partition
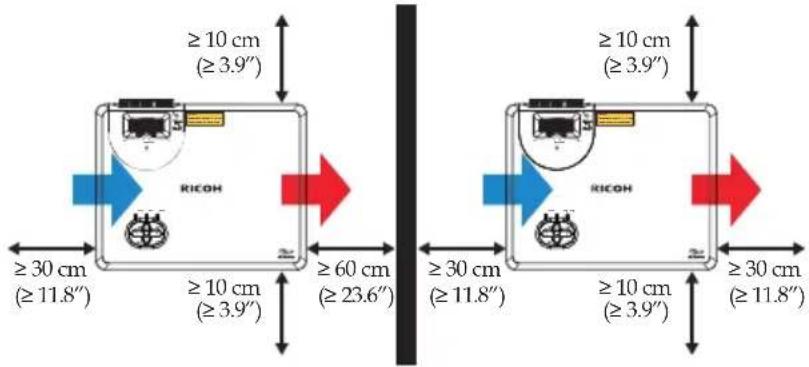
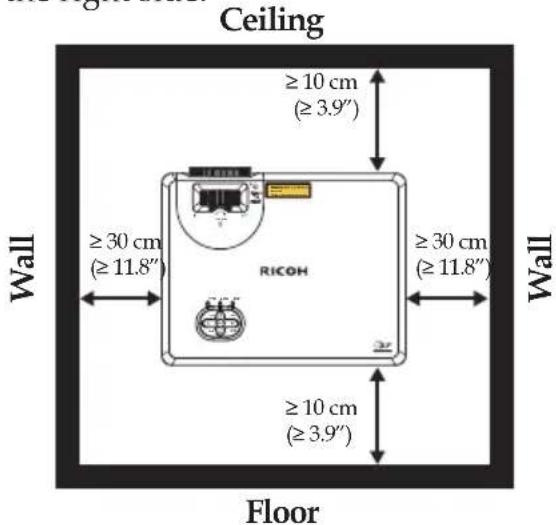
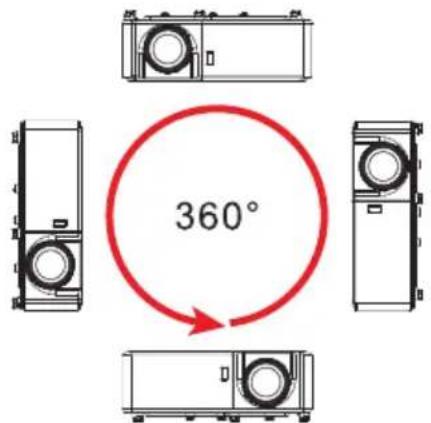
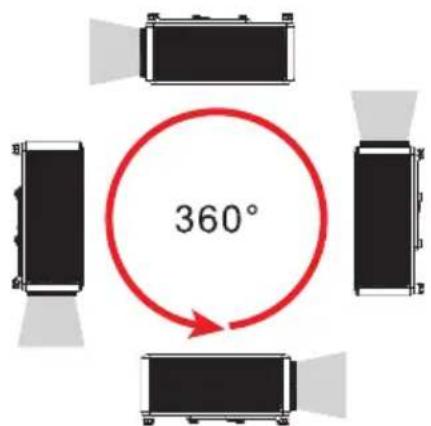
■ Caution- For 360° installation, install the projector more than 10 cm away from the ceiling or the floor and more than 30 cm away from the wall on the left side or on the right side.
■ Caution- When installing the projector on the right side (preferred) or left side, leave a space of at least 30 cm between the intake vent and the surface or 60 cm between the exhaust vent and the surface.
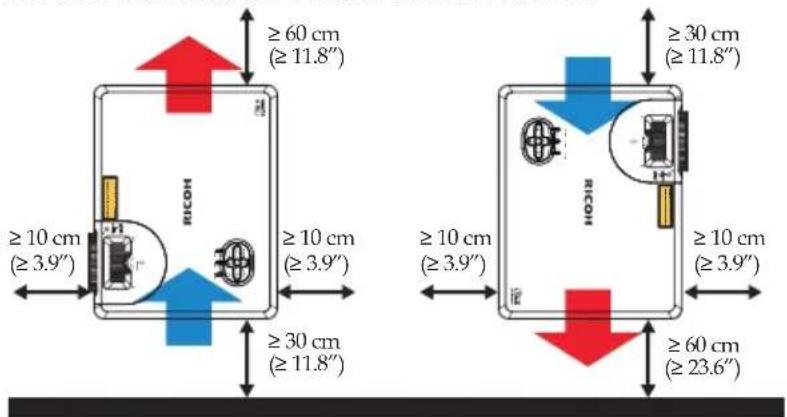
Floor
ABOUT THE LASER LIGHT SOURCE
■ Warning- Do not look into the lens or vent when the product is on. The bright light may damage your eyes. Be especially careful in an environment with children.
■ Caution- Never allow children to stare into the projector beam at any distance from the projector.
■ Caution- Do not start the projector by the remote controller while in front of the lens.
■ Caution- Do not use optical aids such as binoculars or telescopes inside the beam.
■ Caution- This projector has built-in laser module. Possibly hazardous optical radiation emitted from this product. Do not stare into the beam. May be harmful to the eyes.
■ Caution- Use of controls or adjustments or performance of procedures other than those specified herein may result in hazardous radiation exposure.
■ Caution- Do not block the projection light when it is on. If you do so, the part that is blocking the projection light may get quite hot and deform, deteriorate or cause a burn or fire. The reflected light may make the lens hot and cause a product failure. To temporarily suspend projection, select the mute function. To suspend longer, turn off the product.
REMOTE CONTROL BATTERY
Warning
- Never throw batteries into a fire.
Using the batteries improperly may cause them to explode or leak and may result in serious injury. If battery-leaking fluid contacts skin, wash the fluid off immediately with clean water and consult a doctor. If the fluid spills on an instrument, avoid contact and wipe it off using tissue paper. Then dispose of the used tissue paper as flammable garbage after moistening the tissue with water.
- Keep new and used batteries away from children.
If the battery compartment does not close securely, stop using the product and keep it away from children. If you think batteries might have been swallowed or placed inside any part of the body, seek immediate medical attention.
Notes
- Be sure to use AAA (R03) size batteries.
- Dispose of batteries in a designated disposal area.
- Attention should be drawn to the environmental aspects of battery disposal.
- If the remote control does not operate correctly, or if the operating range becomes reduced, replace the batteries.
- Avoid contact with water or liquid.
- Do not expose the remote control to moisture or heat.
- Do not drop the remote control.
- If the batteries have leaked in the remote control, carefully wipe the case clean and install new batteries.
- Dispose of used batteries according to the instructions.
- The remote control may fail to operate if the infrared remote sensor is exposed to bright sunlight or fluorescent lighting.
Important:
Contents of this manual are subject to change without prior notice. In no event will the company be liable for direct, indirect, special, incidental, or consequential damages as a result of handing or operating this product.
Safety Labels of This Machine
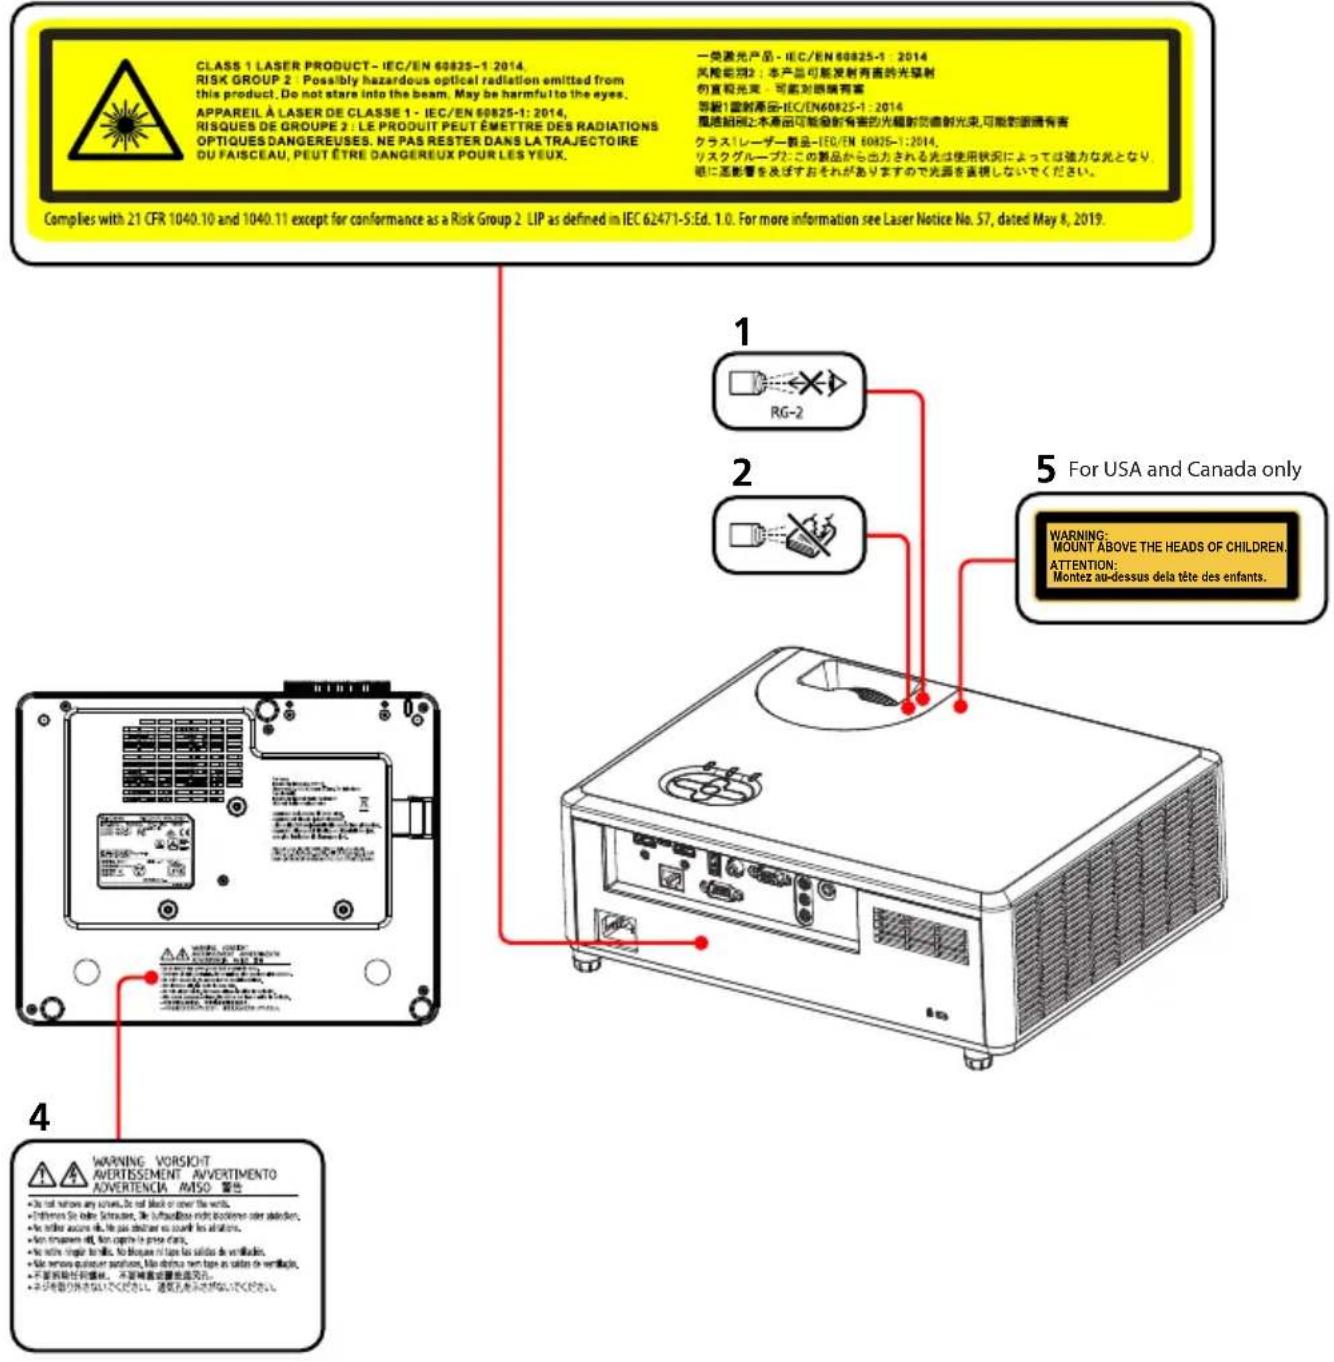
- Do not look into the lens while the light source is on. The strong light from the light source may cause damage to your eyesight.
- Do not place anything in front of the lens while the projector is operating. Things placed in front of the lens may overheat and burn or start a fire. If you want to temporarily stop the projected image, use the AV mute on the remote control or the keypad.
- Laser aperture warning:
• CLASS 1 LASER PRODUCT - RISK GROUP 2
- Do not stare into the beam, maybe harmful to the eyes.
- Do not look into the light source light using optical instruments (such as magnifying glasses and mirrors). Visual impairment could result.
- When turning on the projector, make sure no one within projection range is looking at the lens.
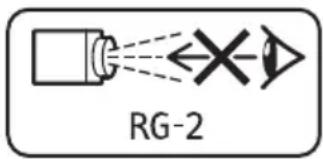
- Keep any items (magnifying glass etc.) out of the light path of the projector. The light path being projected from the lens is extensive, therefore any kind of abnormal objects that can redirect light coming out of the lens, can cause an unpredictable outcome such as a fire or injury to the eyes.
- Do not remove any screws. Do not block or cover the vents.
- WARNING: MOUNT ABOVE THE HEADS OF CHILDREN. (For USA and Canada only)
The use of a ceiling mount is recommended with this product to place it above the eyes of children.
Usage Notice
3
Power Switch Symbols
The meaning of the symbols for the switches on this machine as follows:
On/Standby (Off)
Regulation & Safety Notices
This appendix lists the general notices of your Projector.
Notice: Users in the United States of America FCC notice
MODEL NAME: RICOH PJ WXL5860/WUL5860
TRADE NAME: PROJECTOR
MODEL NAME: RICOH PJ WXL5860/WUL5860
Tested To Comply
With FCC Standards
FOR HOME OR OFFICE USE
This device complies with Part 15 of the FCC Rules. Operation is subject to the following two conditions:
- This device may not cause harmful interference and
- This device must accept any interference received, including interference that may cause undesired operation.
This device has been tested and found to comply with the limits for a Class B digital device pursuant to Part 15 of the FCC rules. These limits are designed to provide reasonable protection against harmful interference in a residential installation. This device generates, uses and can radiate radio frequency energy and, if not installed and used in accordance with the instructions, may cause harmful interference to radio communications.
However, there is no guarantee that interference will not occur in a particular installation. If this device does cause harmful interference to radio or television reception, which can be determined by turning the device off and on, the user is encouraged to try to correct the interference by one or more of the following measures:
■ Reorient or relocate the receiving antenna.
■ Increase the separation between the device and receiver.
■ Connect the device into an outlet on a circuit different from that to which the receiver is connected.
Consult the dealer or an experienced radio/television technician for help.
■ Caution- Changes or modifications not expressly approved by the party responsible for compliance could void the user's authority to operate the equipment.
RESPONSIBLE PARTY: PFU America, Inc.
3900 Freedom Circle, Suite 240, Santa Clara, CA 95054, USA
Telephone number: (408)992-2900
Notice: Shielded cables
All connections to other computing devices must be made using shielded cables to maintain compliance with FCC regulations.
Caution
Changes or modifications not expressly approved by the manufacturer could void the user's authority, which is granted by the Federal Communications Commission, to operate this projector.
Notes to Users in the State of California
Perchlorate Material - special handling may apply, See www.dtsc.ca.gov/hazardouswaste/perchlorate.
Declaration of Conformity for EU countries
EMC Directive 2014/30/EU (including amendments)
Low Voltage Directive 2014/35/EU
Notice: Users in EU countries
CE Marking Traceability Information (For EU Countries Only)
Manufacturer:
Ricoh Co., Ltd.
3-6 Nakamagome 1-chome, Ohta-ku, Tokyo. 143-8555, Japan
Importer:
PFU (EMEA) LIMITED Viale Monza 259, 20126 Milano (MI) Italy
Notice: Users in UK
UKCA Marking Traceability Information (For UK Only)
Manufacturer:
Ricoh Co., Ltd.
3-6 Nakamagome 1-chome, Ohta-ku, Tokyo. 143-8555, Japan
Importer:
PFU (EMEA) LIMITED Belmont, Belmont Road, Uxbridge UB8 1HE England
User Information on Electrical and Electronic Equipment
Users in the countries where this symbol shown in this section has been specified in national law on collection and treatment of E-waste.
Usage Notice
Our Products contain high quality components and are designed to facilitate recycling.
Our products or product packaging are marked with the symbol below.
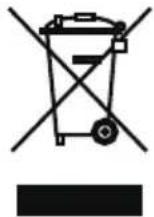
This product contains substances which are harmful to humans and the environment.
The symbol indicates that the product must not be treated as municipal waste. It must be disposed of separately via the appropriate return and collection systems available. By following these instructions you ensure that this product is treated correctly and help to reduce potential impacts on the environment and human health, which could otherwise result from inappropriate handling. Recycling of products helps to conserve natural resources and protect the environment.
For more detailed information on collection and recycling systems for this product, please contact the shop where you purchased it, your local dealer or sales/service representatives.
Notice: Users in Turkey
If you wish to discard this product, please contact your local authorities, the shop where you bought this product, your local dealer or sales/service representatives.
Laser Notice
IEC 60825-1:2014: CLASS 1 LASER PRODUCT - RISK GROUP 2.
The product's intended use as a consumer laser product and compliant with EN 50689:2021.
CLASS 1 CONSUMER LASER PRODUCT
EN 50689:2021
Notice: Users in the EU
Note for the Battery and/or Accumulator Symbol

In accordance with the Battery Directive 2006/66/EC Article 20 Information for end-users Annex II, the above symbol is printed on batteries and accumulators. This symbol means that in the European Union, used batteries and accumulators should be disposed of separately from your household waste. In the EU, there are separate collection systems for not only used electrical and electronic products but also batteries and accumulators. Please dispose of them correctly at your local community waste collection/recycling centre.
COMMISION REGULATION (EU) 2019/2020
The light source of this product is not intended for applications other than image projection.
Usage Notice
Other Information
Copyrights to Images
When projecting images using the projector, be careful not to infringe the copyright of protected materials.
The following are examples that may infringe the copyright of protected materials.
- Broadcasting images or movies for commercial purposes
- Modifying images or movies using functions such as freeze, magnify, or zoom to broadcast images for commercial purposes or public viewing
- Varying the aspect ratio of images or movies using a function that changes the screen size to broadcast images for commercial purposes or public viewing
Note to Users Viewing 3D Images
Pay attention to the following points when viewing images using 3D glasses with projector:
- How 3D images are viewed may vary according to the individual.
- Do not use 3D glasses for viewing any material other than 3D images.
- Before viewing 3D images, make sure to read the manuals provided with your 3D glasses and 3D compatible content.
- Avoid viewing 3D images for a long period of time. Take a break of 15 minutes or longer after every hour of viewing.
- If you feel sick while viewing 3D images, stop viewing them. If you continue to feel sick, consult a doctor.
- When viewing 3D image in a room where on LED lighting system or fluorescent lights are used, you may feel that the light in the room flickers. If this is the case, dim the lights until you do not notice any flickers, or turn off the lights.
- If you or any member of your family has a history of light-sensitive seizures, consult a doctor before viewing 3D images.
Product Features
Outstanding features include:
■ Native resolution WXGA (1280x800), WUXGA (1920x1200)
■ Maximum resolution HDMI 1920x1200 @ 60Hz
■ Light weight 11.02 lbs (5 kg)
■ Manual focus projection 1:1.36 (WXL5860) or 1:1.3 (WUL5860) zoom lens
■ Built-in full screen NTSC / PAL / SECAM video capability with S-video / Composite / component through D-sub terminals
■ WUXGA / 1080P / UXGA / WXGA / Quad VGA / SXGA+ / SXGA / XGA / SVGA / VGA / MAC compatibility
■ User friendly multilingual on screen display
■ Automatic image resizing to WXGA (1280x800), WUXGA (1920x1200) full screen
■ The projector supports 360 degree free orientation operation (refer to page 29)
Introduction
Package Overview
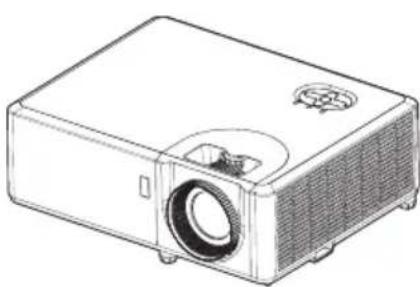
This projector comes with all the items shown below. Check to make sure your unit is complete. Contact your dealer immediately if anything is missing.
Due to the difference in applications for each country, some regions may have different accessories.
natural_image
Line drawing of a projector with a circular vent and speaker grille (no text or symbols)Projector Remote Control
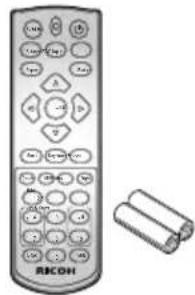
natural_image
Illustration of a remote control with keypad and battery pack (no text or symbols)(with Batteries, please see page 27)
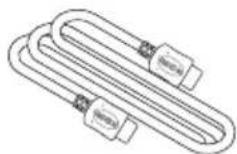
HDMI Cable
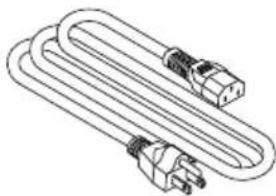
natural_image
Line drawing of a U-shaped electrical plug with two connectors (no text or symbols)Power Cord
*Models for Europe are packed with two different codes, one for EU and one for UK.
Documentation:

Read This First
Product Overview
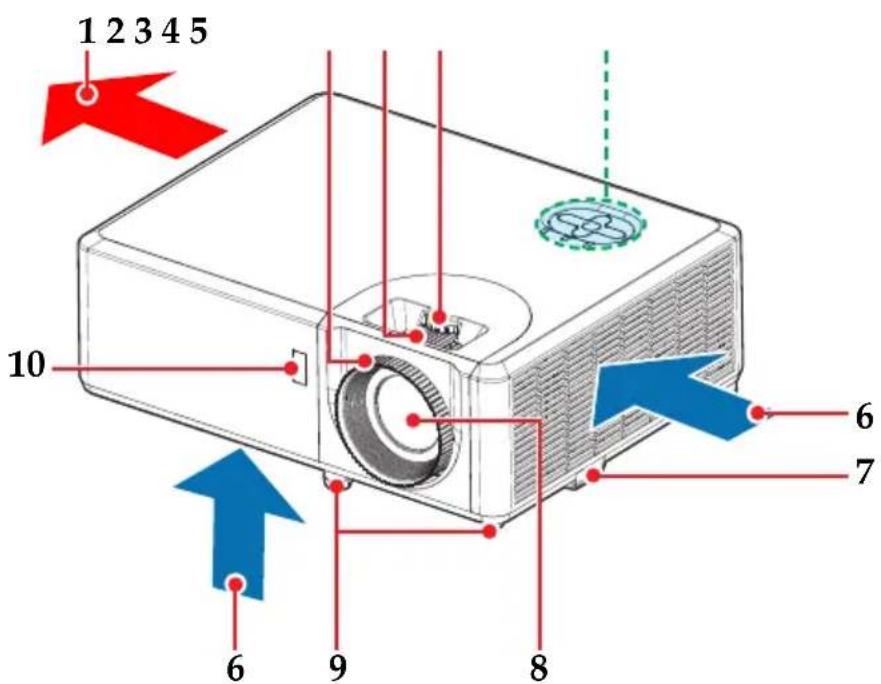
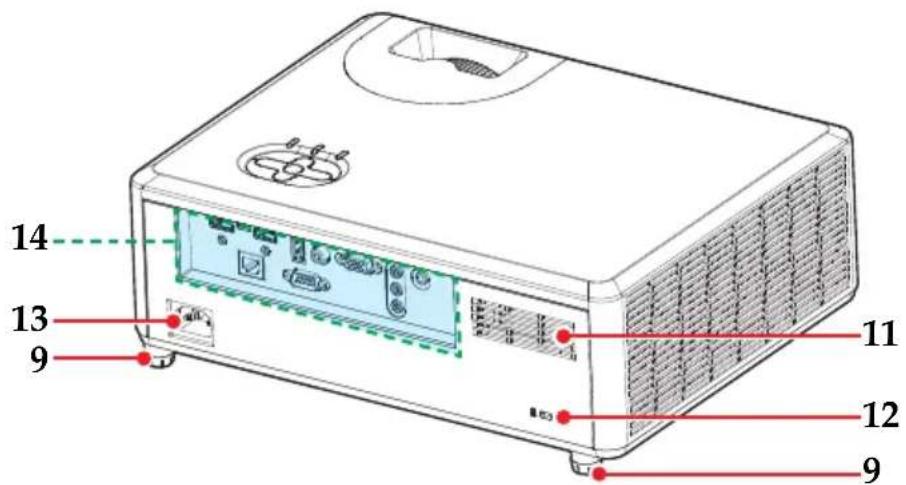
- Ventilation (outlet)
- Focus ring
- Zoom lever
- Lens shift dial
- Control panel
- Ventilation (inlet)
- Security bar
-
Lens
-
Adjustable feet
- Remote receiver
- Speaker
- Anti-theft lock hole (Kensington™ lock)
- AC In socket
- Connection ports
Connection Ports
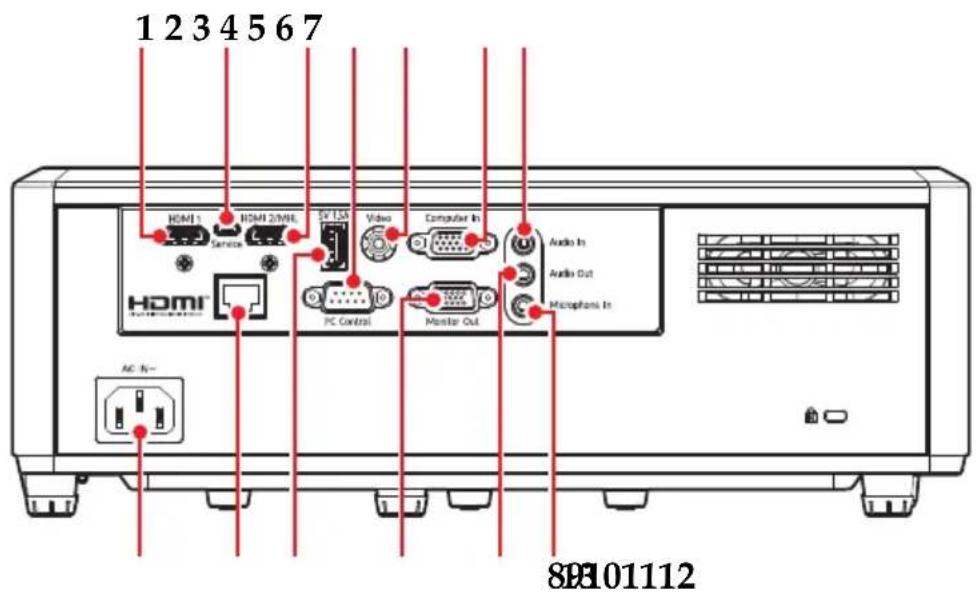
Note
Compatible with MHL version 2.0, the charging current 5V@0.9A.
- HDMI 1 In terminal
- Serviceterminal
- HDMI 2/MHL terminal (supports HDMI / MHL dongle)
- PC Control terminal
- Video terminal
-
Computer In terminal
-
Audio In terminal
- Microphone In terminal
- Audio Out terminal
- Monitor Out terminal
- 5V/1.5A terminal
- LAN terminal
- AC In socket
Control Panel
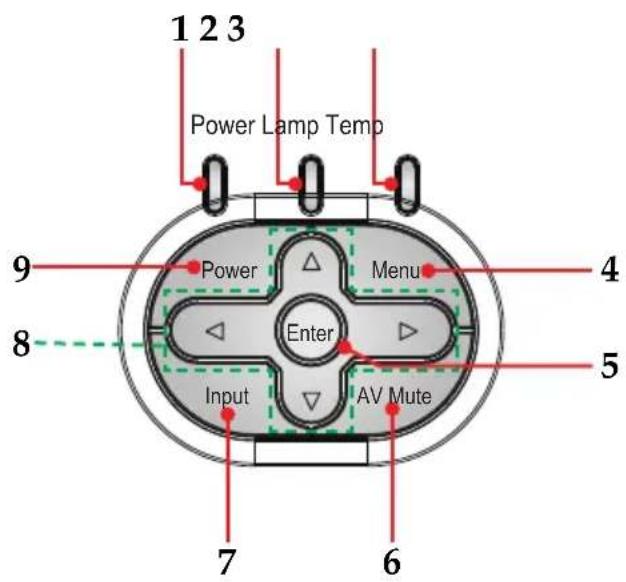
| 1 Power indicator Indicate the projector's power status. | |
| 2 Lamp indicator Indicate the projector's laser status. | |
| 3 Temp indicator Indicate the inside of the projector's temperature status. | |
| 4 Menu Press "Menu" to launch the on screen display (OSD), or go back to the previous menu. (See page 39) | |
| 5 Enter Select or confirm settings. | |
| 6 AV Mute Momentarily turn off/on the audio and video. | |
| 7 Input Select an input source. | |
| 8 Four Directional Select Keys | Use ▲, ▼or◀to ▶lect items or make adjustments to your selection. |
| 9 Power Refer to the "Power On/Off the Projector" section. (pages 32~33) | |
Remote Control
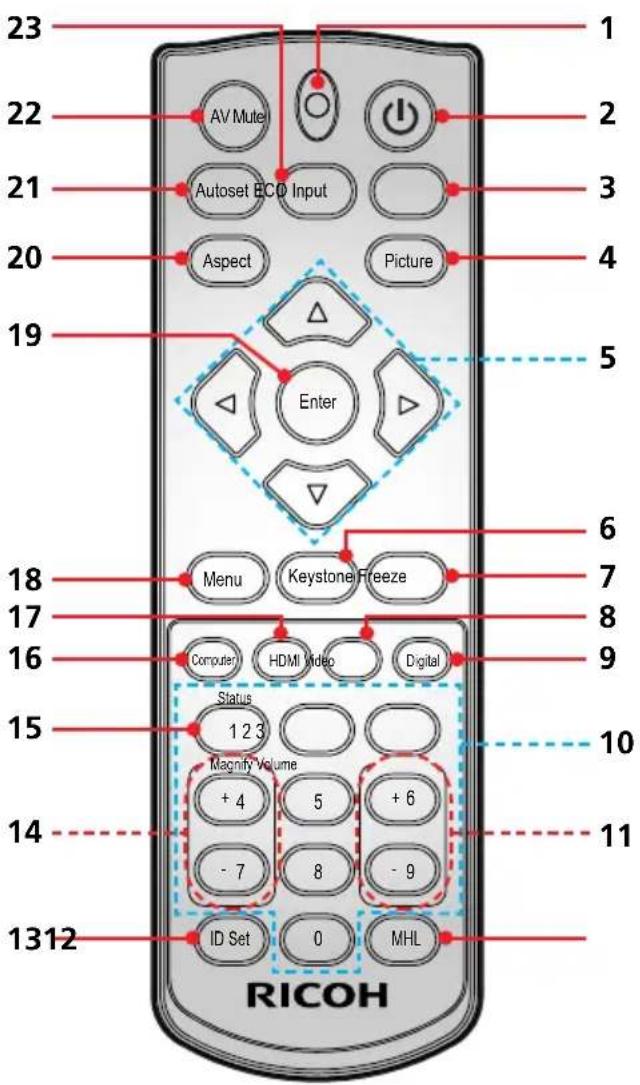
| 1 Indicator Blinks when remote code is sent. | |
| 2 Power Refer to the “Power On/Off the Projector” section. (See pages 32~33) | |
| 3 Input Press “Input” to choose your desired input source. | |
| 4 Picture Select the preset picture mode. | |
| 5 Four Directional Select Keys | Use ▲, ▼or◀to ▶lect items or make adjustments to your selection. |
| 6 Keystone Display menu “Keystone”. | |
| 7 Freeze Pause the screen image. Press again to resume the screen image. | |
| 8 Video Choose a signal from Video terminal. | |
| 9 Digital This function is not supported. | |
| 10 Number (0~9) Input numbers. | |
| 11 Volume +/- Increase or decrease speaker volume. | |
| 12 MHL Press “MHL” to control your MHL device. | |
| 13 ID Set Change ID setting of remote control.(See page 26) | |
| 14 Magnify +/- Zoom in/out the projector display.Magnified area can be moved after pressing [Enter] key. (See page 47) | |
| 15 Status Display menu “Information”. | |
| 16 Computer Choose a signal from Computer In terminal. | |
| 17 HDMI Choose a signal from HDMI1/HDMI2 terminal. | |
| 18 Menu Press “Menu” to launch the On Screen Display (OSD), back to the top level of OSD for the OSD main menu operation. (See page 39) | |
| 19 Enter Confirm your section of items in sub menu operation. | |
| 20 Aspect Use this function to choose your desired aspect ratio. | |
| 21 Autoset Automatically synchronize the projector to the input source. | |
| 22 AV Mute Momentarily turn off/on the audio and video. | |
| 23 ECO Display menu “Laser Power Mode”. | |
Remote Control ID Setup
The IR remote allows individual addressing of projectors. The projector can be set with a specific number from “1” to “99” as its address, and it only responds to the IR remote set to the same ID code. ID code “0” is the default value of the IR remote, and all projectors will respond to the IR remote set to “0”.
Follow below methods to set up the IR remote:
| ID Code | Change Method |
| 1 | Press “ID Set” for 3 seconds, and press “0” then “1” within 2 seconds. |
| 2 | Press “ID Set” for 3 seconds, and press “0” then “2” within 2 seconds. |
| 3 | Press “ID Set” for 3 seconds, and press “0” then “3” within 2 seconds. |
| ... ... | |
| 10 | Press “ID Set” for 3 seconds, and press “1” then “0” within 2 seconds. |
| 11 | Press “ID Set” for 3 seconds, and press “1” then “1” within 2 seconds. |
| ... ... | |
| 98 | Press “ID Set” for 3 seconds, and press “9” then “8” within 2 seconds. |
| 99 | Press “ID Set” for 3 seconds, and press “9” then “9” within 2 seconds. |
To have the IR remote return to default state where all projectors can be controlled, press “ID Set” for “3” seconds, and press “0” twice within 2 seconds.
Remote Control Battery Installation
① Push the clip to release the battery cover.
2 Install new batteries (AAA/R03). Ensure that you have the batteries' polarity (+/-) aligned correctly.
3 Close the battery cover and press it down until it clicks into place. Do not mix different types of batteries or new and old batteries.
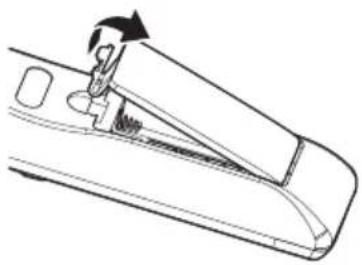
natural_image
Line drawing of a mechanical component with an arrow indicating direction (no text or symbols)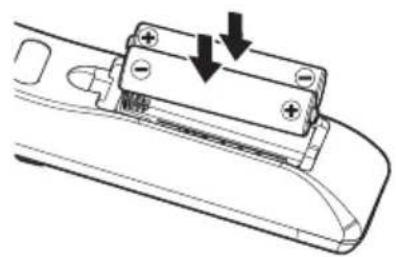
natural_image
Diagram of a device with two arrows pointing to a component on top, showing no text or symbols.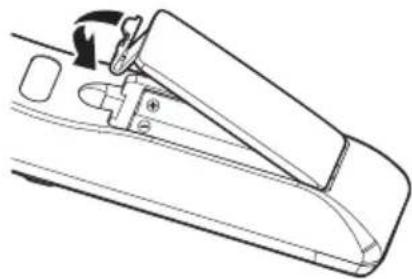
natural_image
Line drawing of a mechanical component or bracket with no visible text or symbols
To ensure safe operation, please observe the following precautions :
■ Use AAA/R03 type battery.
■ Avoid contact with water or liquid.
■ Do not expose the remote control to moisture or heat.
■ Do not drop the remote control.
■ If the battery has leaked in the remote control, carefully wipe the case clean and install new battery.
■ Risk of an explosion if battery is replaced by an incorrect type.
■ Dispose of used battery according to the instructions.
■ Remove batteries from remote control when not using for extended periods.
■ The remote control may fail to operate if the infrared remote sensor is exposed to bright sunlight or fluorescent lighting.
Remote Control Operating Range
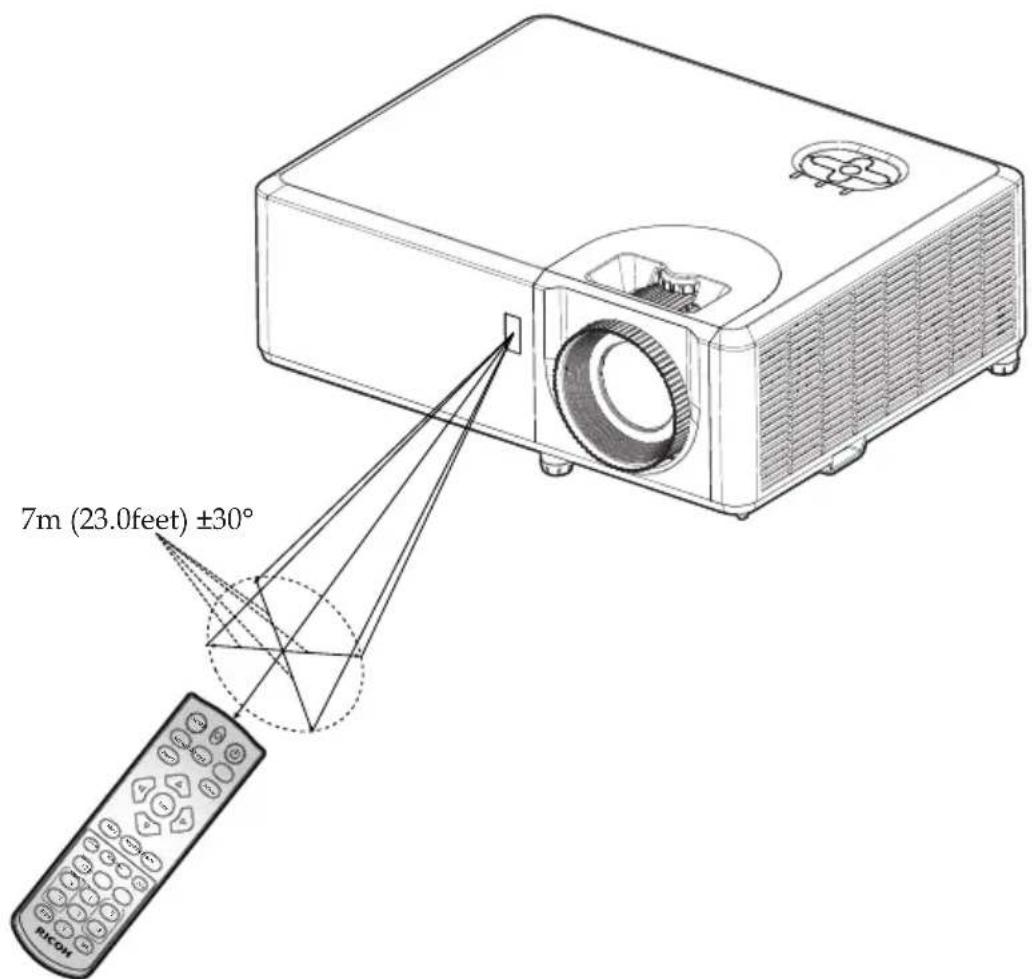
Point the remote control toward the projector (Remote Receiver) when pressing any button.
Maximum operating range for the remote control is about 7m (23.0 feet) and ±30^ in front of the projector.
Installing the Projector
When you select a position for the projector, consider the size and shape of your screen, the location of your power outlets, and the distance between the projector and the rest of your equipment. Follow these general guidelines:
Position the projector on a flat surface at a right angle to the screen.
Position the projector to the desired distance from the screen. The distance from the lens of the projector to the screen, the zoom setting, and the video format determine the size of the projected image.
360 degree free orientation operation:
Basic Operations
Connecting the Projector
Connect to Computer/Notebook
Note
Make sure that the power plug is fully inserted into both the projector AC inlet and the wall outlet.
The AC outlet must be near this equipment and must be easily accessible.
Due to the difference in applications for each country, some regions may have different accessories.
When HDMI input is selected, only audio signal with HDMI can be output.
When Audio Out is connected, Built-in speaker doesn't sound.
To ensure the projector works well with your computer, please make sure the timing of the display mode is compatible with your projector. (See pages 77\~80)
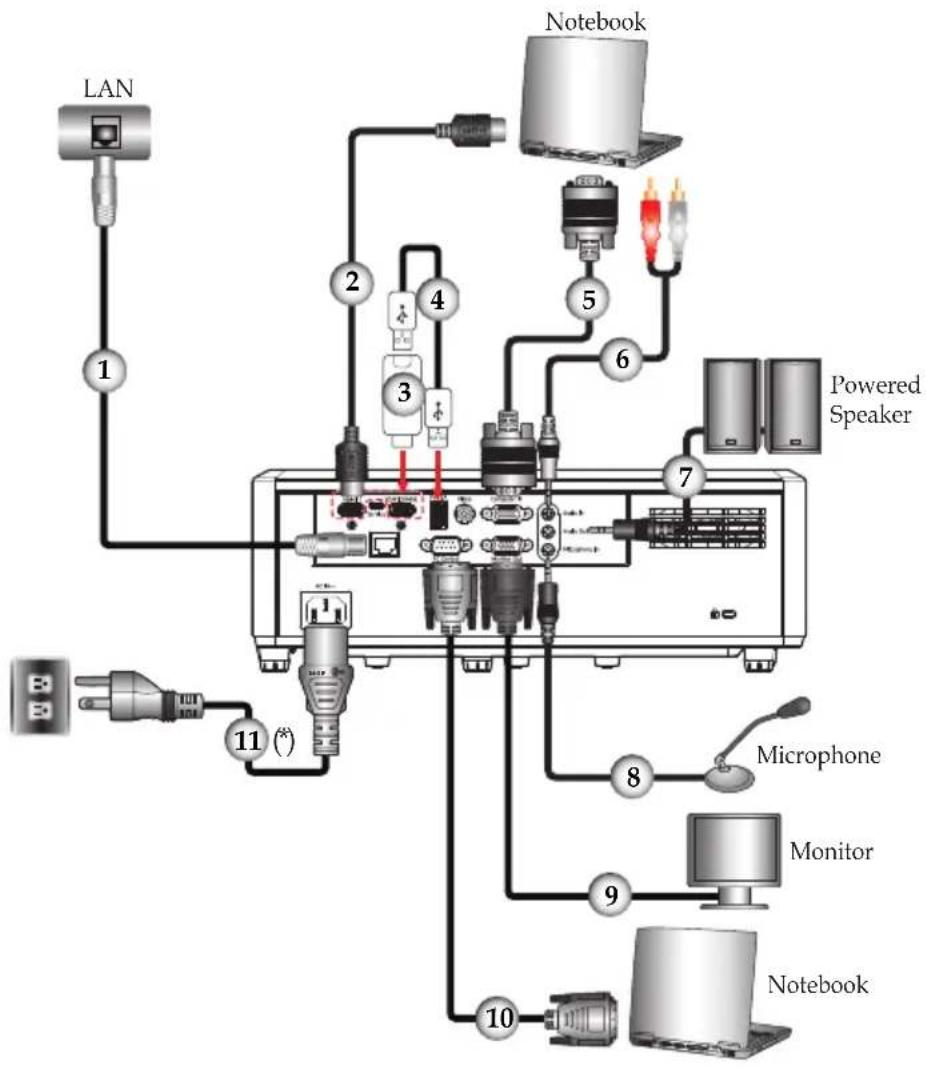
Use the cables that come with the projector. (*)
flowchart
graph TD
    LAN --> 1
    1 --> 2
    2 --> 3
    3 --> 4
    4 --> 5
    5 --> 6
    6 --> 7
    7 --> 8
    8 --> 9
    9 --> 10
    10 --> Notebook
    Notebook --> 11
    Notebook --> 12
    Notebook --> 13
    Notebook --> 14
    Notebook --> 15
    Notebook --> 16
    Notebook --> 17
    Notebook --> 18
    Notebook --> 19
    Notebook --> 20
    Notebook --> 21
    Notebook --> 22
    Notebook --> 23
    Notebook --> 24
    Notebook --> 25
    Notebook --> 26
    Notebook --> 27
    Notebook --> 28
    Notebook --> 29
    Notebook --> 30
    Notebook --> 31
    Notebook --> 32
    Notebook --> 33
    Notebook --> 34
    Notebook --> 35
    Notebook --> 36
    Notebook --> 37
    Notebook --> 38
    Notebook --> 39
    Notebook --> 40
    Notebook --> 41
    Notebook --> 42
    Notebook --> 43
    Notebook --> 44
    Notebook --> 45
    Notebook --> 46
    Notebook --> 47
    Notebook --> 48
    Notebook --> 49
    Notebook --> 50
    Notebook --> 51
    Notebook --> 52
    Notebook --> 53
    Notebook --> 54
    Notebook --> 55
    Notebook --> 56
    Notebook --> 57
    Notebook --> 58
    Notebook --> 59
    Notebook --> 60
    Notebook --> 61
    Notebook --> 62
    Notebook --> 63
    Notebook --> 64
    Notebook --> 65
    Notebook --> 66
    Notebook --> 67
    Notebook --> 68
    Notebook --> 69
    Notebook --> 70
    Notebook --> 71
    Notebook --> 72
    Notebook --> 73
    Notebook --> 74
    Notebook --> 75
    Notebook --> 76
    Notebook --> 77
    Notebook --> 78
    Notebook --> 79
    Notebook --> 80
    Notebook --> 81
    Notebook --> 82
    Notebook --> 83
    Notebook --> 84
    Notebook --> 85
    Notebook --> 86
    Notebook --> 87
    Notebook --> 88
    Notebook --> 89
    Notebook --> 90
    Notebook --> 91
    Notebook --> 92
    Notebook --> 93
    Notebook --> 94
    Notebook --> 95
    Notebook --> 96
    Notebook --> 97
    Notebook --> 98
    Notebook --> 99
1.....LAN cable (Cat5 cable)
2...... HDMI cable (supplied)
3...... HDMI dongle
4....USB cable
5.... RGB cable
6. Audio cable
7...... Audio cable
8......Microphone cable
9...... RGB cable
10.... RS-232 cable
11.....Power cord (supplied)
Connect to AV Equipment
Note
Make sure that the power plug is fully inserted into both the projector AC inlet and the wall outlet.
The AC outlet must be near this equipment and must be easily accessible.
Due to the difference in applications for each country, some regions may have different accessories.
When HDMI input is selected, only audio signal with HDMI can be output.
When Audio Out is connected, Built-in speaker doesn't sound.
Use the cables that come with the projector. (*)
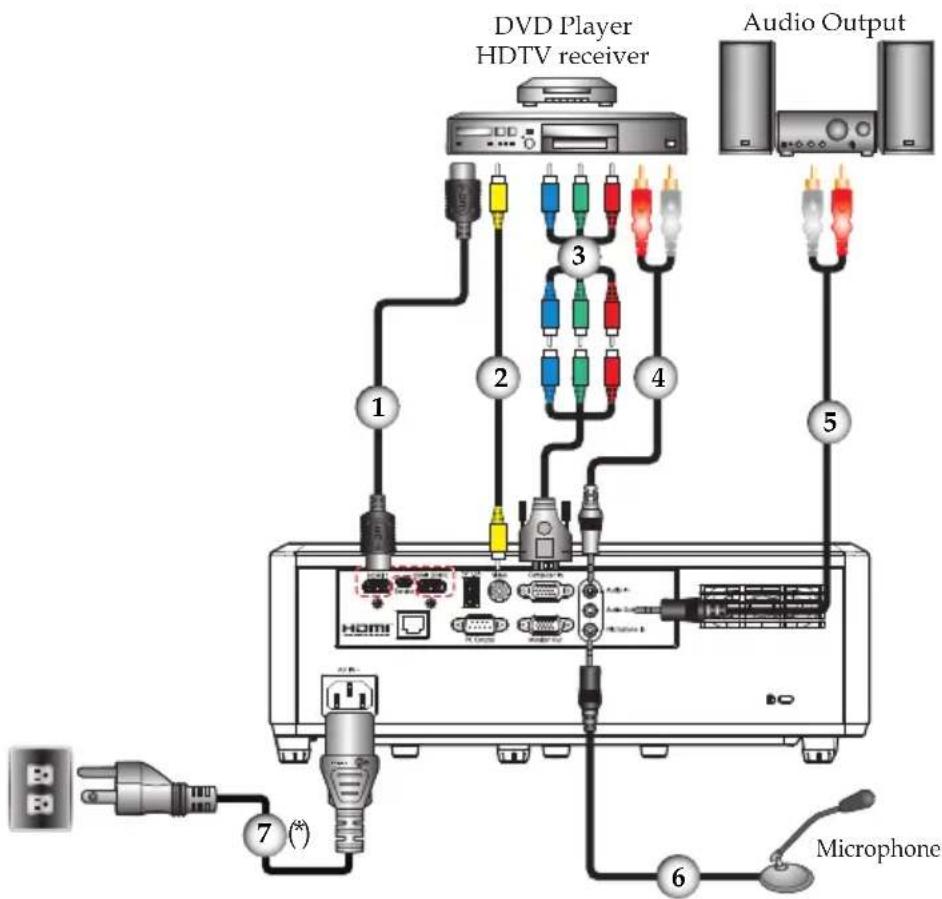
1......HDMI cable (supplied)
2......Video cable
3....Component-RGB cable
4. Audio cable
5. Audio cable
6......Microphone cable
7....Power cord (supplied)
Basic Operations
Note
If you connect multiple sources at the same time, press "Input" on the control panel or the desired source button on the remote control to switch inputs.
Turn on the projector first and then the signal sources.
Powering On/Off the Projector Powering On the Projector
- Ensure that the power cord and signal cable are securely connected. The Power indicator will turn red.
- Remove the lens cap (if applicable).
- Turn on the projector by pressing the "Power" button on the control panel or the ⏻ button on the remote control. The Power indicator will flash blue.
The startup screen will display and the Power indicator will turn blue.
- Turn on your source (computer, notebook, video player, etc.) The projector will detect your source automatically. Make sure that the "Auto Source" has been set to "On".
CAUTION:
- Do not look into the lens while the laser is on. The strong light from the laser may cause damage to your eyesight.
- Do not block the air intake or exhaust. Doing so could cause a fire due to internal overheating.
- Do not place your hands, face, or other objects near the air exhaust, or the bottom of the unit. Doing so could result in injury and/or damage the object.
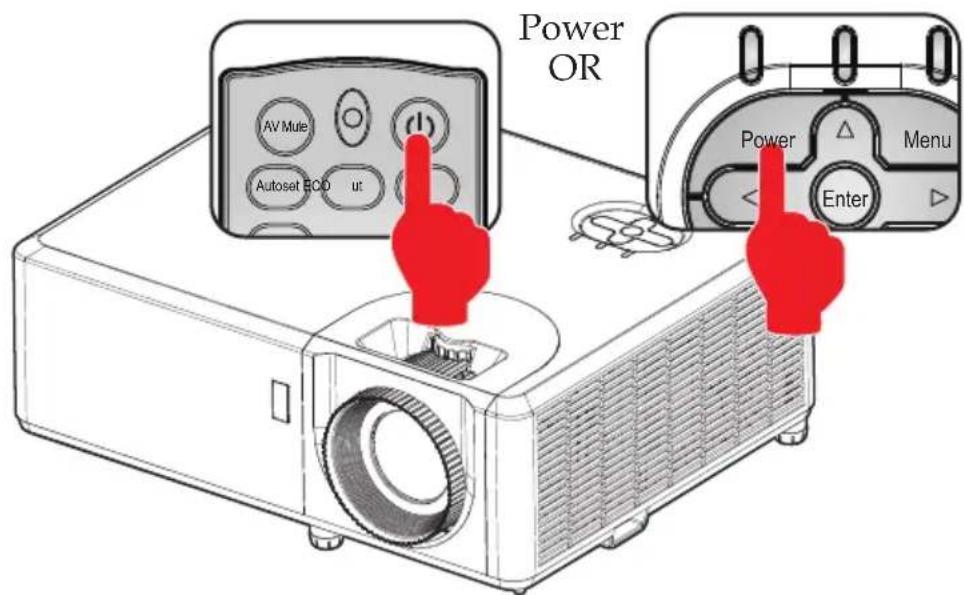
Powering Off the Projector
- Press the button and you will see a message as below on the on-screen display.
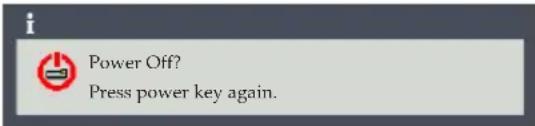
- Press the ⏻ button to turn off the projector. If you do not press the ⏻ button again, the warning message will disappear after 5 seconds.
- The cooling fan continues to operate for about 5 seconds for cooling cycle and the Power indicator will flash red. After cooling down, the light stops flashing, and then the projector will enter the standby mode.
- Disconnect the power cord from the electrical outlet and the projector.
Warning Indicator
When the “Temp” indicator lights red and the “Power” indicator lights blue, it indicates the projector has overheated. The projector will automatically shut itself down.
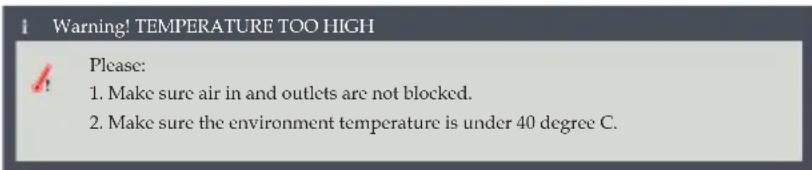
Basic Operations
When the “Temp” indicator flashes red and the “Power” indicator lights blue and the message below displays, it indicates the cooling fan failed (FAN1: 1 sec on, 1 sec off; FAN2: 2 sec on, 2 sec off; FAN3: 3 sec on, 3 sec off). Stop using the projector and disconnect the power cord from the electrical outlet, then contact your local dealer or our service center.

For more information of the warning indicator, please see page 76.
Adjusting the Projected Image
Adjusting the Position of Projector Image
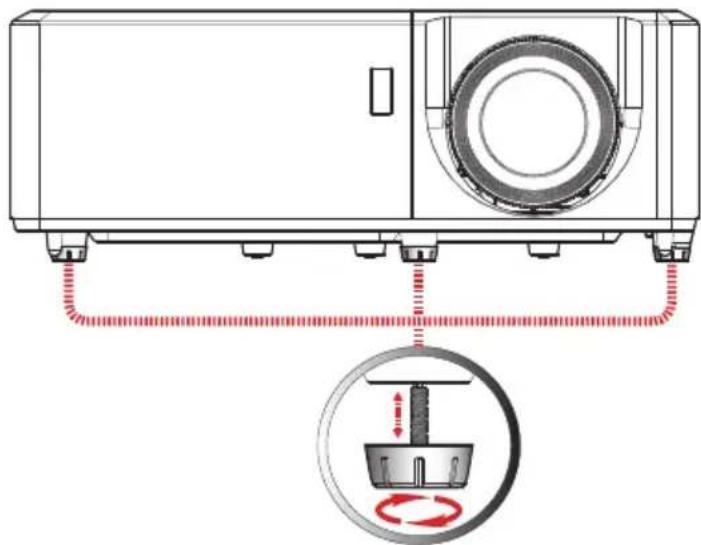
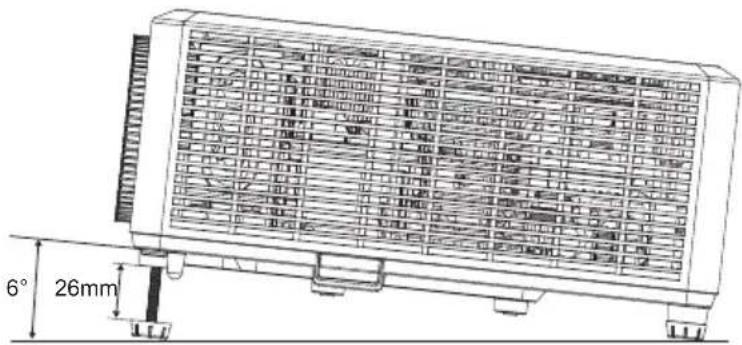
The projector is equipped with rear and front adjustable feet to raise and lower the image to fill the screen.
-
Locate the adjustable foot you wish to modify on the underside of the projector.
-
Rotate the adjustable ring clockwise to raise the projector or counter clockwise to lower it. Repeat with the remaining feet as necessary.
natural_image
Diagram of a projector unit with red dotted lines indicating connection points and a circular inset showing a mechanical component with red rotation arrows (no text or symbols)Note
The projector has one adjustable foot in the front and two adjustable feet on the rear. The maximum length of the feet is 26 mm. The tilt angle is up to 6^ .
Basic Operations
Adjusting the Projector Zoom, Focus, and Lens Shift

The image is not stable immediately after the projector is turned on. Adjust the image at least 30 minutes after the projector is turned on.
The projected image becomes unsharp when Keystone correction is enabled. This is a limitation of digital correction.
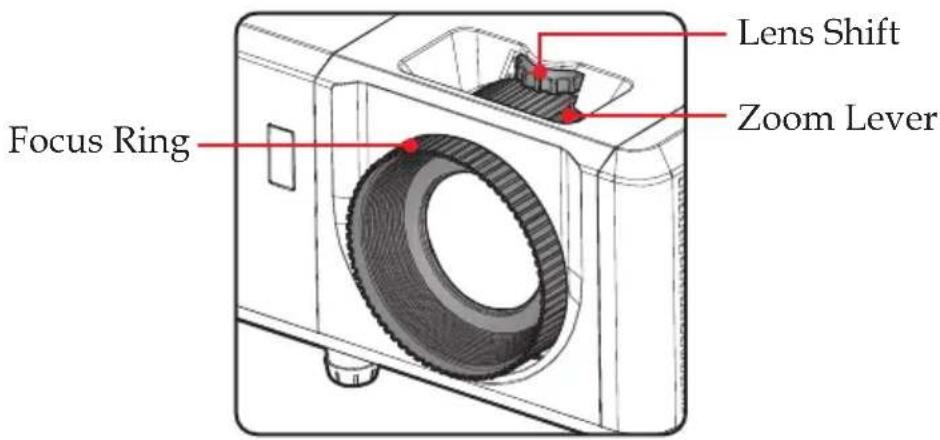
You may turn the zoom lever to zoom in or out. To focus the image, turn the focus ring clockwise or counterclockwise until the image is clear. To adjust the image position, turn the lens shift dial clockwise or counterclockwise to adjust the position of the projected image vertically.
Focus Distances (lens to wall):
RICOH PJ WXL5860 (WXGA): from 1.0m to 7.2m (from 3.28 feet to 23.62 feet)
RICOH PJ WUL5860 (WUXGA): from 1.0m to 7.9m (from 3.28 feet to 25.92 feet)
Adjusting Projection Image Size
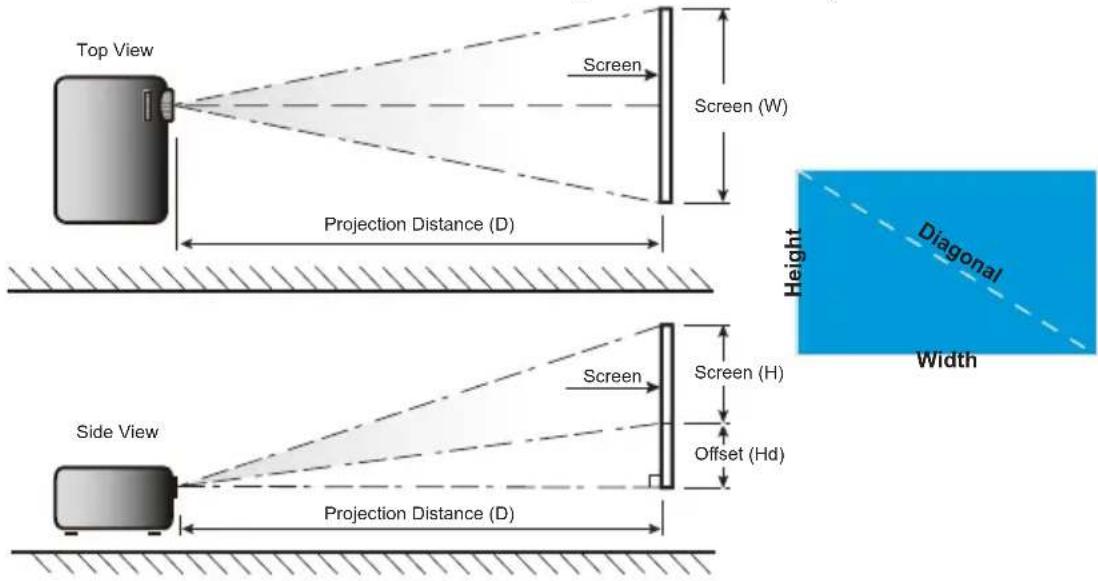
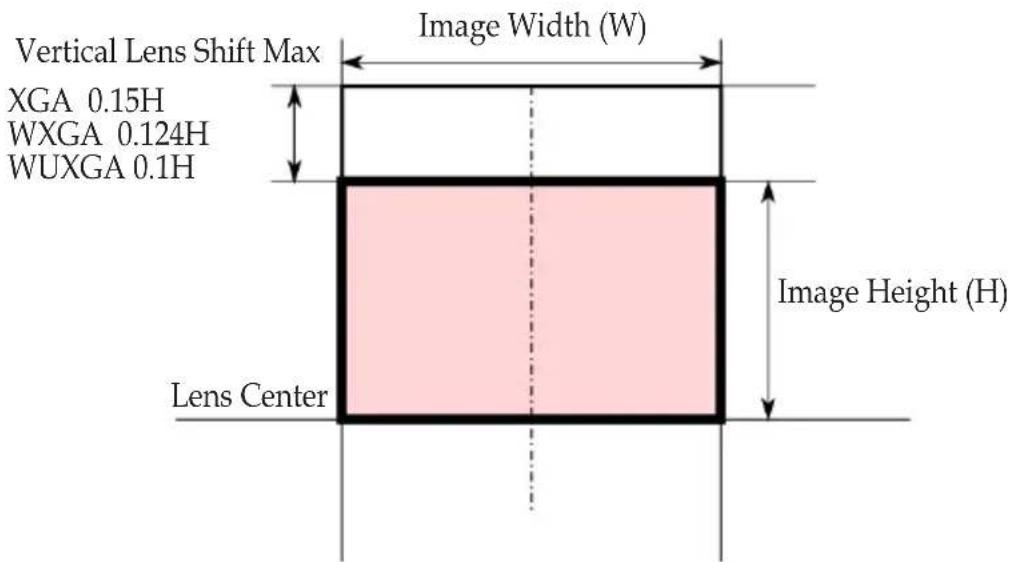
Projection Image Size (Diagonal) for:
WXGA (WXL5860):
WUXGA (WUL5860):
Basic Operations
RICOH PJ WXL5860 (WXGA)
| Diagonal Length Size of (16:10) Screen | Screen Size WxH Projection Distance | Offset (Hd) | |||||||||||
| (m) (inch) (m) (feet) (m) (inch) | |||||||||||||
| Width Height Width Height Wide Tele Wide Tele Min Max Min Max | |||||||||||||
| 30 0.65 | 0.40 | 25 | 4 | 15.9 | -- | 0.98 | -- | 3.2 | 0.00 | 0.05 | 0.0 | 2.0 | |
| 42 0.90 | 0.57 | 35 | 6 | 22.3 | 1 | 01 | 1.38 | 3.3 | 4.5 | 0.00 | 0.07 | 0.0 | 2.8 |
| 60 1.29 | 0.81 | 50 | 9 | 31.8 | 1 | 44 | 1.97 | 4.7 | 6.5 | 0.00 | 0.10 | 0.0 | 3.9 |
| 70 1.51 | 0.94 | 59 | 4 | 37.1 | 1 | 68 | 2.30 | 5.5 | 7.5 | 0.00 | 0.12 | 0.0 | 4.6 |
| 80 1.72 | 1.08 | 67 | 8 | 42.4 | 1 | 92 | 2.62 | 6.3 | 8.6 | 0.00 | 0.13 | 0.0 | 5.3 |
| 90 1.94 | 1.21 | 76 | 3 | 47.7 | 2 | 16 | 2.95 | 7.1 | 9.7 | 0.00 | 0.15 | 0.0 | 5.9 |
| 100 2.15 | 1.35 | 84 | 8 | 53.0 | 2 | 40 | 3.28 | 7.9 | 10.8 | 0.00 | 0.17 | 0.0 | 6.6 |
| 120 | 2.58 | 1.62 | 101.8 | 63.6 | 2.88 | 3.94 | 9.4 | 12.9 | |||||
| 150 | 3.23 | 2.02 | 127.2 | 79.5 | 3.60 | 4.92 | 11.8 | 16.1 | |||||
| 180 | 3.88 | 2.42 | 152.6 | 95.4 | 4.32 | 5.90 | 14.2 | 19.4 | |||||
| 200 | 4.31 | 2.69 | 169.6 | 106.0 | 4.79 | 6.56 | 15.7 | 21.5 | |||||
| 219 | 4.72 | 2.95 | 185.7 | 116.1 | 5.25 | 7.18 | 17.2 | 23.6 | |||||
| 300 | 6.46 | 4.04 | 254.4 | 159.0 | 7.19 | -- | 23.6 | -- | |||||
This table is for user's reference only.
Zoom ratio is 1.36x.
RICOH PJ WUL5860 (WUXGA)
| Diagonal Length Size of (16:10) Screen | Screen Size WxH Projection Distance | Offset (Hd) | |||||||||||
| (m) (inch) (m) (feet) (m) (inch) | |||||||||||||
| Width Height Width Height Wide Tele Wide Tele Min Max Min Max | |||||||||||||
| 29 0.62 | 0.39 | 24.6 | 15.4 | -- | 0.99 | -- | 3.3 | 0.00 | 0.04 | 0.0 | 1.5 | ||
| 38 0.82 | 0.51 | 32.2 | 20.1 | 0 | 99 | 1.30 | 3.2 | 4.3 | 0.00 | 0.05 | 0.0 | 2.0 | |
| 60 1.29 | 0.81 | 50.9 | 31.8 | 1 | 56 | 2.05 | 5.1 | 6.7 | 0.00 | 0.08 | 0.0 | 3.2 | |
| 70 1.51 | 0.94 | 59.4 | 37.1 | 1 | 82 | 2.40 | 6.0 | 7.9 | 0.00 | 0.09 | 0.0 | 3.7 | |
| 80 1.72 | 1.08 | 67.8 | 42.4 | 2 | 08 | 2.74 | 6.8 | 9.0 | 0.00 | 0.11 | 0.0 | 4.2 | |
| 90 1.94 | 1.21 | 76.3 | 47.7 | 2 | 35 | 3.08 | 7.7 | 10.1 | 0.00 | 0.12 | 0.0 | 4.8 | |
| 100 2.15 | 1.35 | 84.8 | 53.0 | 2.61 | 3.42 | 8.6 | 11.2 | 0.00 | 0.13 | 0.0 | 5.3 | ||
| 120 | 2.58 | 1.62 | 101.8 | 63.6 | 3.13 | 4.11 | 10.3 | 13.5 | 0.00 | ||||
| 150 | 3.23 | 2.02 | 127.2 | 79.5 | 3.91 | 5.14 | 12.8 | 16.9 | 0.00 | ||||
| 180 | 3.88 | 2.42 | 152.6 | 95.4 | 4.69 | 6.16 | 15.4 | 20.2 | 0.00 | ||||
| 200 | 4.31 | 2.69 | 169.6 | 106.0 | 5.21 | 6.85 | 17.1 | 22.5 | 0.00 | ||||
| 231 | 4.98 | 3.11 | 195.9 | 122.4 | 6.02 | 7.91 | 19.8 | 26.0 | 0.00 | ||||
| 303.1 | 6.53 | 4.08 | 257.0 | 160.6 | 7.90 | -- | 25.9 | -- | 0.00 | ||||
This table is for user's reference only.
Zoom ratio is 1.3x.
Using the On Screen Display (OSD)
The Projector has a multilingual On Screen Display that allows you to make image adjustments and change a variety of settings.
How to operate
- To open the OSD, press "Menu" on the Control Panel or Remote Control.
- When OSD is displayed, use ▲▼ keys to select any item in the main menu. While making a selection on a particular page, press "Enter" key to enter sub menu.
- Use ▲▼ keys to select the desired item in the sub menu and press "Enter" key to view further settings. Adjust the settings by using ◀key or ▲key.
- Select the next item to be adjusted in the sub menu and adjust as described above.
- Press "Enter", and the screen will return to the previous menu.
- Press "Menu" key to return to the main menu.
- To exit, press "Menu" again. The OSD menu will close and the projector will automatically save the new settings.
Note
If no button operation is made for approximately 10 seconds, the OSD will be closed automatically.
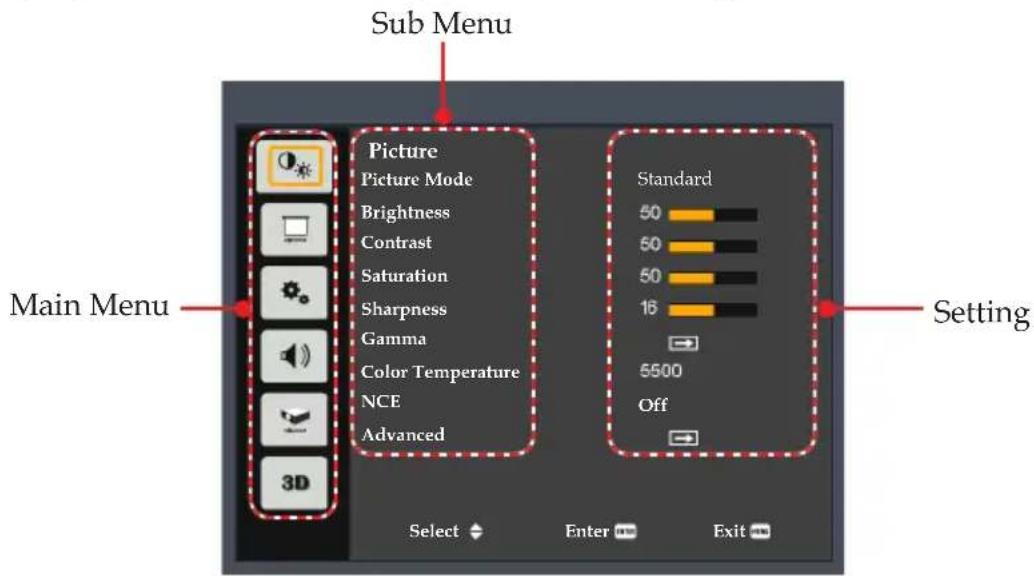
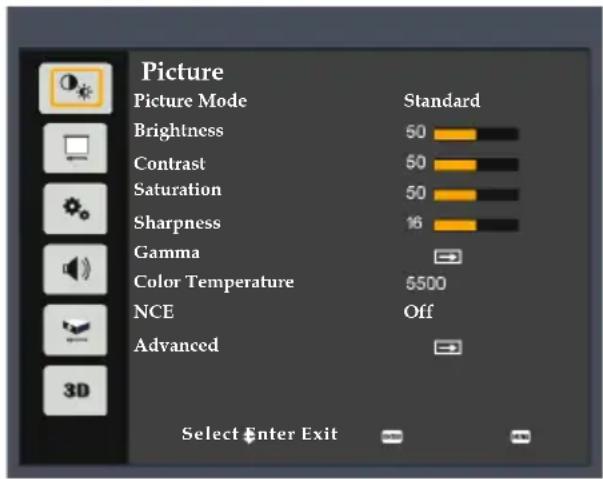
Picture
Picture Mode
There are factory presets optimized for various types of images. The available options:
Note
✿ Picture Mode, Color Temperature, NCE, and advanced picture functions are grayed out in 3D mode.
| Picture Mode | Bright Standard sRGBVivid DICOM SIM. |
Bright: Mode for emphasizing brightness.
Standard: Mode for optimizing the balance between brightness and color reproduction.
▶ Vivid: Mode for emphasizing color.
sRGB: Standard color values.
DICOM SIM.: This mode is suitable for projecting a monochrome medical image such as an X ray radiography, MRI, etc.
Brightness
Adjust the brightness of the image.

Press the ◀ key to darken image.
Press the ▶key to lighten the image.
Contrast
The contrast controls the degree of difference between the lightest and darkest parts of the picture. Adjusting the contrast changes the amount of black and white in the image.

Press the ◀ key to decrease the contrast.
Press the ▶key to increase the contrast.
Saturation
Adjust the color saturation of the image.

Note
- “Saturation” function is only supported if the input signal is Video.
Press the key to decrease the amount of color in the image.
Press the ▶key to increase the amount of color in the image.
Sharpness
Adjust the sharpness of the image.

Press the ◀ key to decrease the sharpness.
Press the ▶key to increase the sharpness.
Gamma
Use this function to optimize the image output.
The available options: 1.8 / 2 / Standard(2.2) / 2.4 / Shine.

User Settings
Color Temperature
Use this function to select the preset color temperature. The available options: 5500/6500/7500/Native.
| Color Temperature | 5500 | 6500 | 7500 | Native |
NCE (Natural Color Enhancer)
Use this function to enhance color and reproduce vivid colors.

On: Enable NCE.
Off: Disable NCE.
Advanced
Configure the advanced image settings.
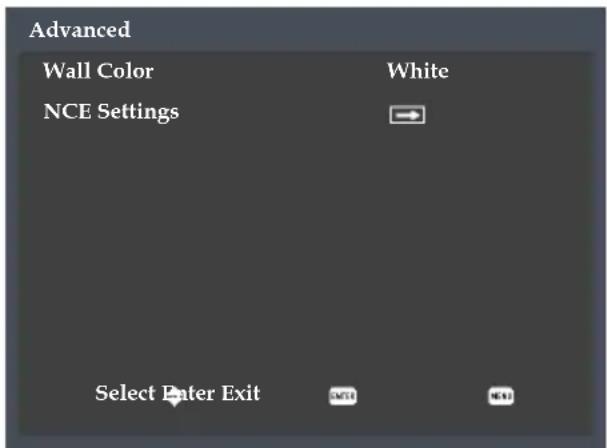
WallColor: Use this function to obtain an optimized screen image according to the wall color. The available options: White/ Light Yellow/ Light Blue/ Pink / Dark Green.
Wall Color
White Light Yellow Light Blue Pink Dark Green
NCE Settings: Configure the image color settings.
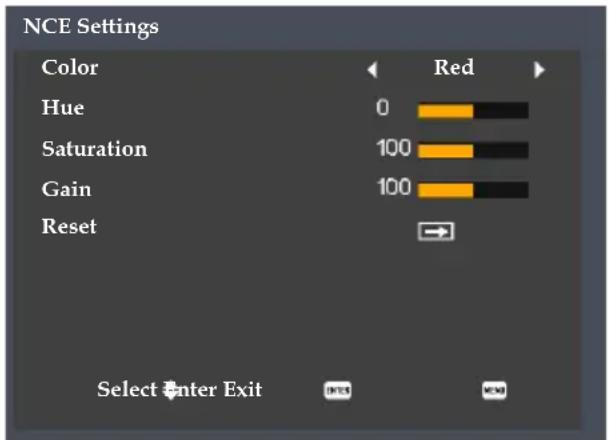
- Color: Use the ◀ or ▶ key to select the red, green, blue, cyan, yellow, magenta, and white.
When Red / Green / Blue / Cyan / Yellow / Magenta is selected in Color:
- Hue: Use the or key to adjust the color balance.
- Saturation: Use the ◀ or ▶ key to adjust the color saturation.
- Gain: Use the ◀ or ▶ key to adjust the color brightness.
- Reset: Return the NCE settings to the factory default values.
When White is selected in Color:
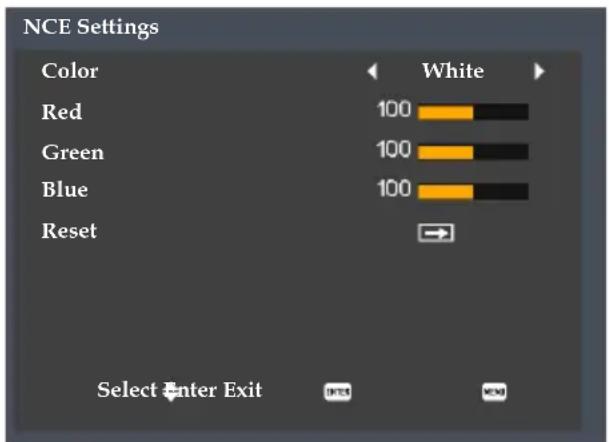
- Red: Use the or key to adjust the gain of red.
- Green: Use the ◀ or ▶ key to adjust the gain of green.
- Blue: Use the or key to adjust the gain of blue.
- Reset: Return the NCE settings to the factory default values.
User Settings
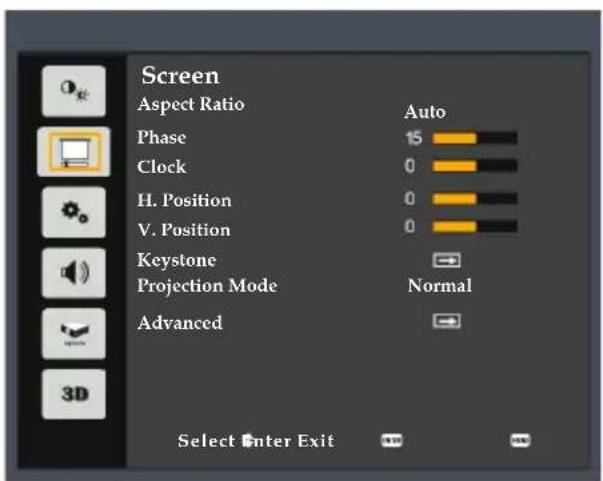
Screen
Aspect Ratio
Use this function to choose your desired aspect ratio.

Auto: Automatically selects the appropriate display format.
4:3: Displays 4:3 aspect ratio.
16:9: Displays 16:9 aspect ratio.
16:10: Displays 16:10 aspect ratio.
Phase
Eliminate flicker from the image displayed. Use the ◀ or ▶ key to adjust the value.
“Phase” and “Clock” functions are only supported under Computer Signal source.

Clock
Adjust the number of total dots in one horizontal period. Use the ◀ or ▶key to adjust number to match your PC image.

User Settings
Note
“H. Position” and “V. Position” functions are only supported under Computer Signal source.
H. Position (Horizontal Position)
Shift the projected image position horizontally.

Press the ◀ key to move the image left.
Press the ▶key to move the image right.
V. Position (Vertical Position)
Shift the projected image position vertically.

Press the ◀ key to move the image down.
Press the ▶key to move the image up.
Note
The projected image becomes unsharp when Keystone correction is enabled.
Keystone
Adjust image distortion caused by tilting the projector.
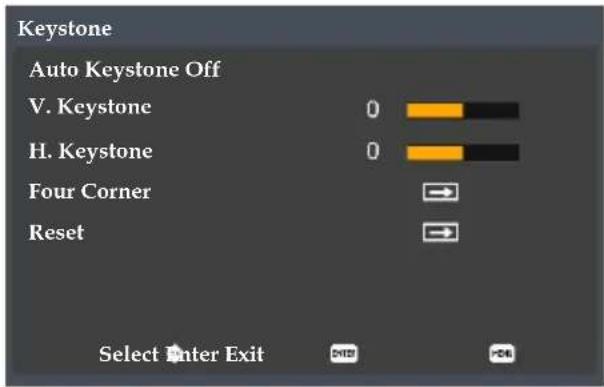
Auto Keystone: Adjust image distortion caused by tilting the projector.

- On: Automatically adjust vertical image.
- Off: Manually adjust vertical image.
V. Keystone: Adjust the vertical keystone.

User Settings
H. Keystone: Adjust the horizontal keystone.

Four Corner: Compensate for image distortion by adjusting one corner at a time.
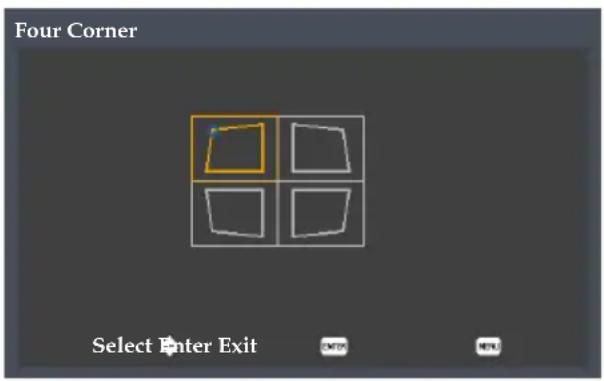
Reset: Return the keystone settings to the factory default values.
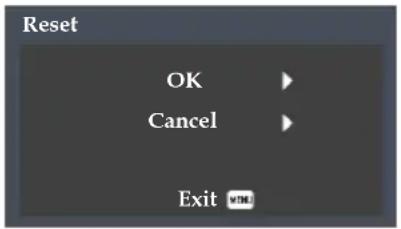
Projection Mode
Use this function to select the projector mode, depending upon how the projector is mounted.
| Projection Mode Normal | Ceiling | Rear Rear Ceiling |
Normal: This is the default selection. The image is projected directly onto the screen.
Ceiling: When selected, the image will appear upside down.
Rear: When selected, the image will appear reversed.
Rear Ceiling: When selected, the image will appear reversed in upside down position.
Advanced
Configure the advanced screen settings.
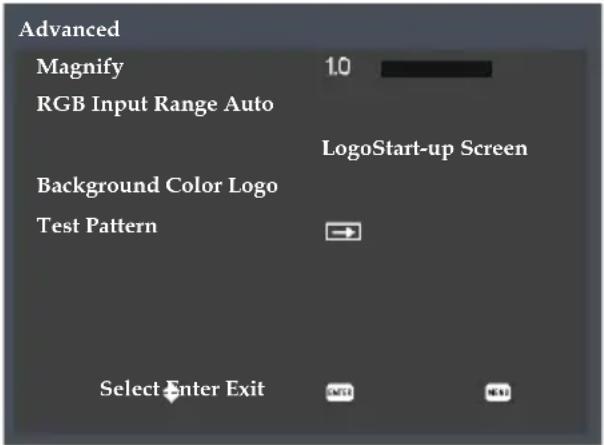
"RGB Input Range" function is only supported under HDMI source.
Magnify: Use the <or key to zoom in or zoom out the image. In magnified mode, press [Enter] to erase magnify scale display.

And press [Enter] again to enter moving magnified area mode. 4 triangles are displayed and magnified area can be moved by 4 direction keys.
Method of operation using a remote control:
- Use the [Magnify] key on the remote control to enlarge the screen.
- Press the [Enter] key. The magnification display disappears.
- Press the [Enter] key again. 4 triangles are displayed to indicate that you can move.
- Press the ▲/ ▼ / ◀key to move the part to be enlarged.
RGB Input Range: Adjust the color range of the HDMI image data.
RGB Input Range Auto Limited Range Full Range
- Auto: Automatically detect RGB range.
- Limited Range: Process the input image with a limited RGB range.
- Full Range: Select this mode when computer signal or full range signal from AV equipment is input.
User Settings
▶ Start-upScreen:Set the start-up screen.
Start-up Screen Logo Off
- Logo: Set the logo screen for start up screen.
- Off: Set the black screen for start up screen.
BackgroundColor:Set the background color.
Background Color Logo Blue Black
- Logo: Display logo screen when no signal is available.
- Blue: Display blue screen when no signal is available.
- Black: Display black screen when no signal is available.
Test Pattern: Use this function to choose your desired test pattern between grid and white. Choose "Off" to disable this function.
Test Pattern Off Grid White
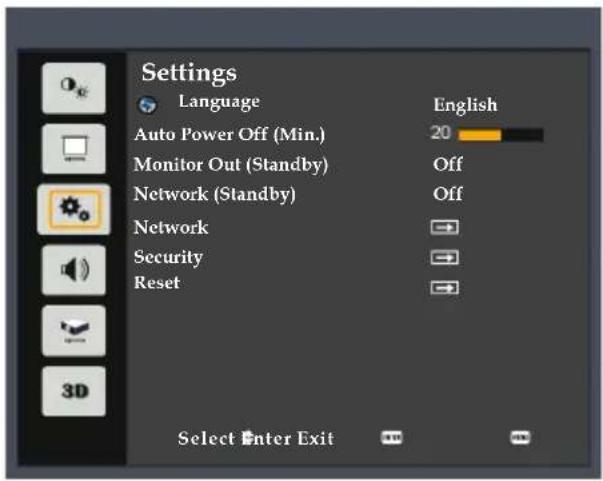
Settings
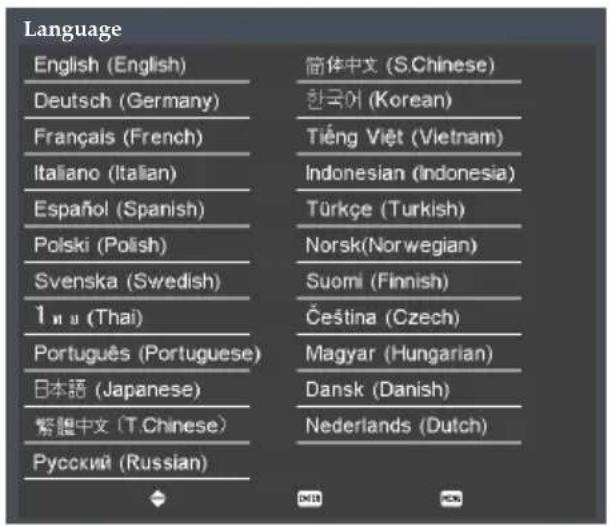
Language
Choose the multilingual OSD. Press "Enter" to open the sub menu and then use the ▲ or ▼ or ◀key▶to select your preferred language. Press "Enter" to finalize the selection.
User Settings
Note
Default value of "Auto Power Off (Min.)" is 20 min.
Auto Power Off (Min.)
Set the countdown timer interval (in minutes). The countdown timer will start, when there is no signal being sent to the projector. The projector will automatically power off when the countdown has finished. When countdown timer is selected to "0", auto power off is disabled.

Monitor Out (Standby)
Enable/Disable the Monitor output function.
Monitor Out (Standby)
On Off
On: Enable the Monitor Out function at projector standby status.
Off: Disable the Monitor Out function at projector standby status.
Network (Standby)
Enable/Disable the network function.
Note
Consult network administrator for network settings.
Network (Standby) On Off
On: Enable the network function at projector standby status.
Off: Disable the network function at projector standby status.
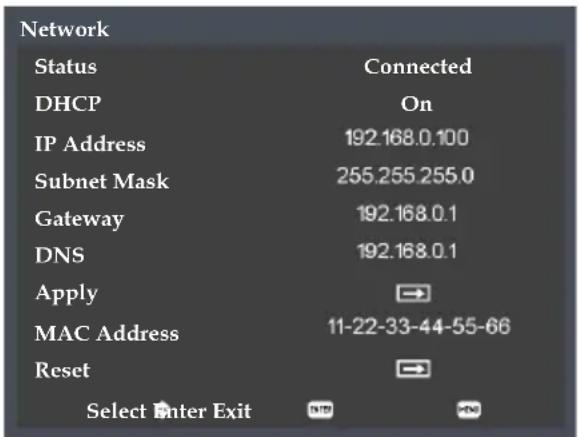
Network
Configure the network settings.
User Settings
Status: Display the network connection status.
DHCP: Select "On" to allow the projector to obtain an IP address automatically from your network. Select "Off" to manually assign IP, Subnet Mask and Gateway configuration.
DHCP On Off
IP Address: Set an IP address or display IP address provided from server.
IP Address IP Address 5 2 5 5 2 5 5 2 5 5
Subnet Mask: Set subnet mask number or display subnet mask number provided from server.
Subnet Mask Subnet Mask 255.255.255
Gateway: Set the default gateway of the network connected to the projector or display the default gateway of the network provided from server.
Gateway Gateway 55.255.255.255
DNS: Display the IP address of the domain name system (DNS) server.
DNS DNS 255.255.255.255
Apply: Select "Yes" to apply the changes made in network configuration settings.
Apply Yes No
MAC Address: Display MAC address.
Reset: Clean current webpage password and new webpage password need to be set again.
User Settings
Security
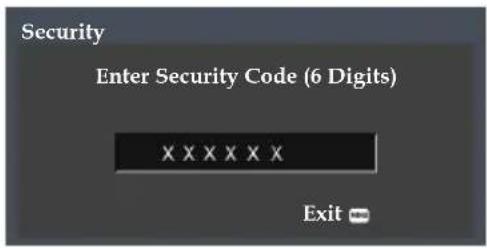
The default security code is "123456".
Configure the security settings.
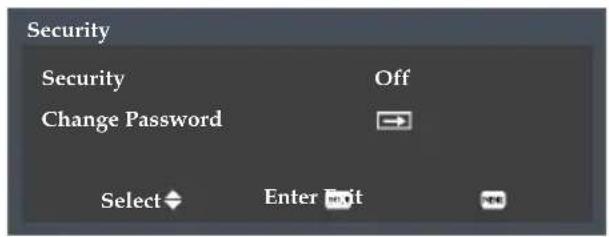
▶ Security:Select"On" to use the security verification when the turning on the projector. Select "Off" to be able to switch on the projector without a password verification.

Change Password: Set the password.
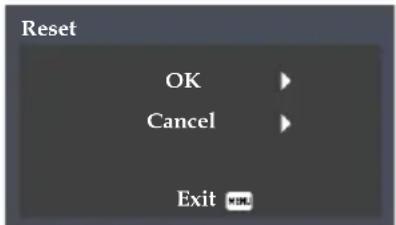
Reset
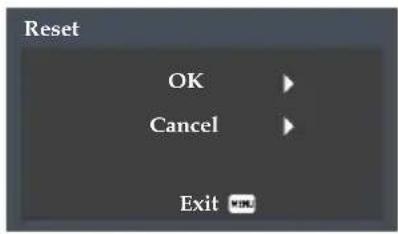
Reset adjustments and settings to factory defaults. Selecting "OK" will return all menu item settings to their factory defaults. However, laser usage time, language, network (standby), remote control ID will not return to the default settings.
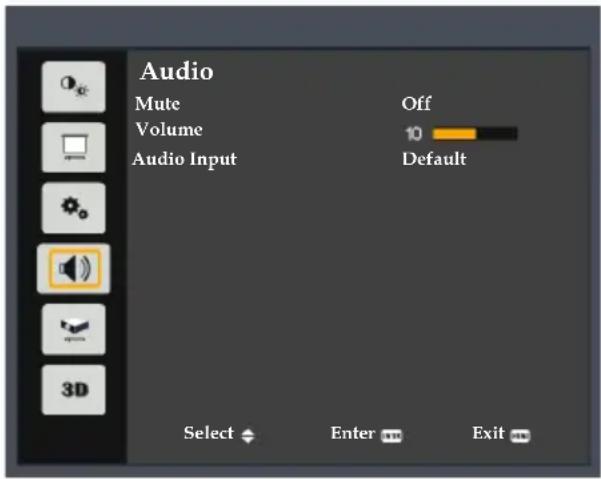
Audio
Mute
Temporarily turn off the sound.
Note
“Mute” function affects both internal and external speaker volume.

Choose "On" to mute the sound.
Choose "Off" to turn mute off.
Volume
Adjust the volume level.

Press the ◀ key to decrease the volume.
Press the key to increase the volume.
Audio Input
Set the audio input source.
Audio Input Default Audio In MIC In
Default: Automatically outputs audio.
Audio In: Only outputs audio from "Audio Input" connector.
MIC In: Only outputs audio from "MIC In" connector.
User Settings
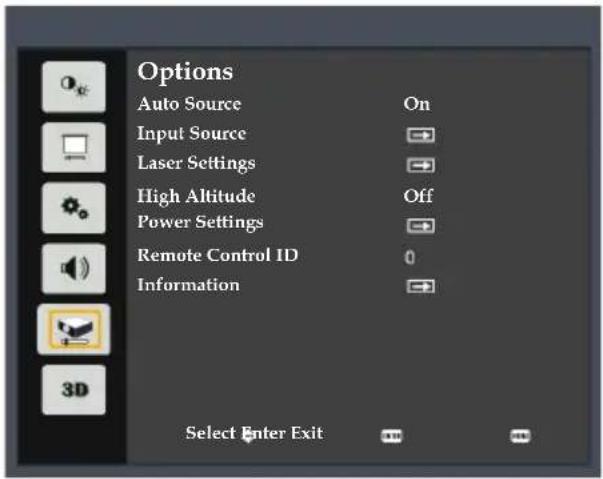
Options
Auto Source
When this function is turned "On", the projector will search for other signals if the current input signal is lost. When this function is turned "Off", it will only search a specified connection port.

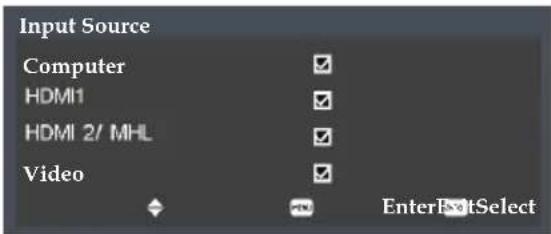
Input Source
Use this option to enable/disable input sources. Press the ▶ key to enter the sub menu and select which sources you require. Press "Enter" to finalize the selection. The projector will only search for inputs that are enabled.
Laser Settings
Use this option to view the laser diode usage status and configure the laser settings. Press the “Enter” key to enter the sub menu and configure the desired settings.
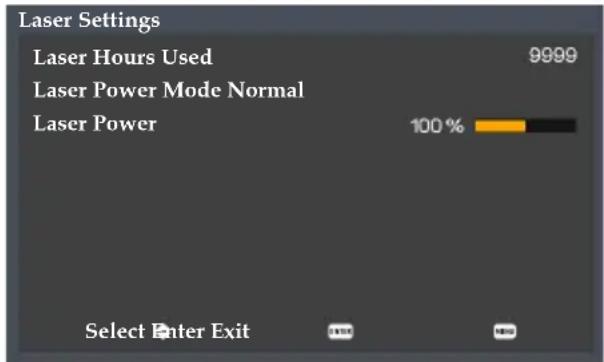
▶ Laser Hours Used: Display the projection time.
▶ Laser Power Mode: Set the brightness mode. Choose “Normal” to increase the brightness, “Eco.” to dim the projector laser diode which will lower power consumption and extend the laser diode life, and “Image ECO” to adjust power consumption dynamically.
Laser Power Mode Normal Eco. Image ECO
▶ Laser Power: Adjust 50%\~100% power for Normal mode.

High Altitude
When “On” is selected, the fans will spin faster. Set High Altitude mode to “On” when the projector is used over 2500ft (750m) elevation.
High Altitude On Off
Power Settings
Use this option to configure the power settings. Press the “Enter” key to enter the sub menu and configure the desired settings. If changes are made, they will take effect the next time the projector is powered on.
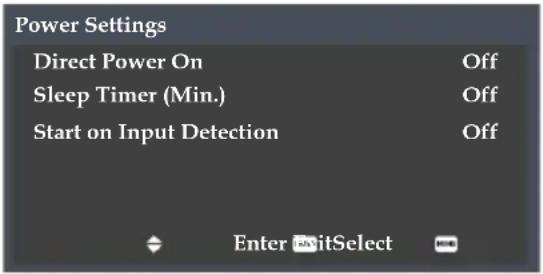
Direct Power On: Select "On" to automatically power on the projector when the AC power is supplied. If this option is set to "Off", user needs to press the "Power" button on the control panel or the "Button" button on the remote control to power on the projector.
Direct Power On On Off
Sleep Timer (Min.): Set the countdown timer interval. The projector will shut down automatically after the countdown has reached 0.
Sleep Timer (Min.) Off
10
20
30
60
120
Note

"Start on Input Detection" is only available for HDMI device.
Start on Input Detection: Select "On" to automatically power on the projector when the AC power is supplied. If this option is set to "Off", user needs to press the "Power" button on the control panel or the "Button" button on the remote control to power on the projector.
Start on Input Detection On Off
- On: Automatically power on the projector if HDMI device is available in standby.
- Off: Manually power on the projector even if HDMI device is available in standby.

The ID range is from 00\~99.
Remote Control ID
Adjust remote customer code after setting "ID Set" and Number (0\~9) key in remote. (See page 26)

Information
Display the projector information.
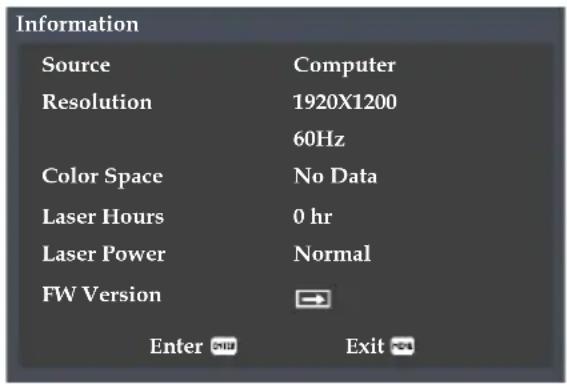
Source: Display the current source.
▶ Resolution: Display the related information of the current source.
Color Space: Display the color space of the current source.
▶ LaserHours: Display the laser diode hours.
▶ Laser Power: Display the power mode of the laser diode.
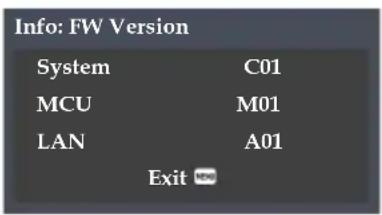
FWVersion: Display the firmware version for System, MCU, and LAN.
User Settings
3D

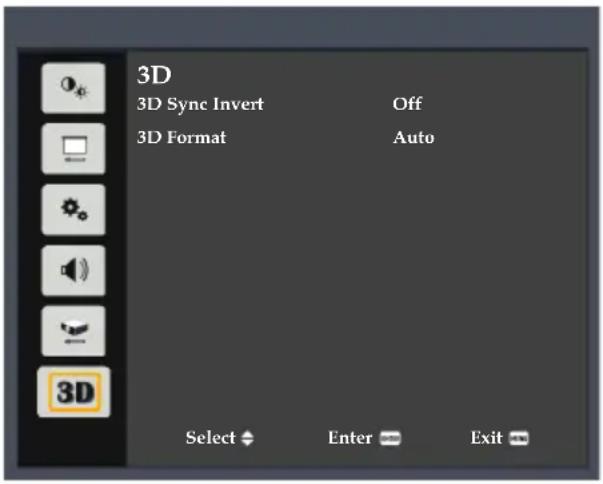
◆ Compatible 3D source, 3D content and Optical 3D glasses are required for 3D viewing.
- “3D Sync Invert” is only available when 3D is enabled.
This setting may need to change when re-start running 3D movie.
✿ 3D function is turned on automatically when Blu-ray 3D source is input.
3D Sync Invert
Use this option to enable/disable the 3D sync invert function.
3D Sync Invert On Off
Off: Choose "Off" for default frame contents.
On: Choose "On" to invert left and right frame contents.
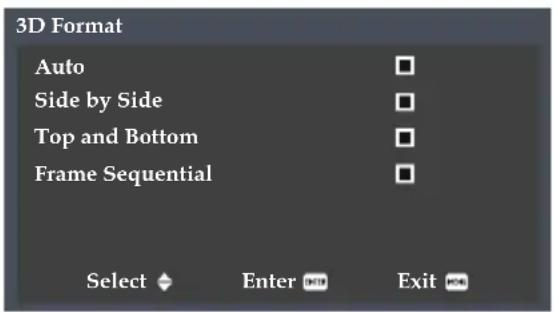
3D Format
Use this option to select the appropriate 3D format content.
User Settings
Auto: Use this mode to let the system to automatically select the appropriate 3D format content.
Side by Side: Use this mode for "Side by Side" format 3D content.
Top and Bottom: Use this mode for "Top and Bottom" format 3D content.
Frame Sequential: Use this mode for "Frame Sequential" format 3D content.

When you are connecting the device to an existing network, set according to the instructions of the network administrator.
Controlling this Device with Web Browser
You can control this device from a PC by using a web browser.
Connecting to the device
1. Confirmation of the IP address of the device
Select the "Settings" "Network" in the menu of this device, and verify the IP address. (See pages 50\~51 on the projector user's manual).

This web page uses Java Script. Turn on and use the Java Script with the settings of the browser you intend to use.
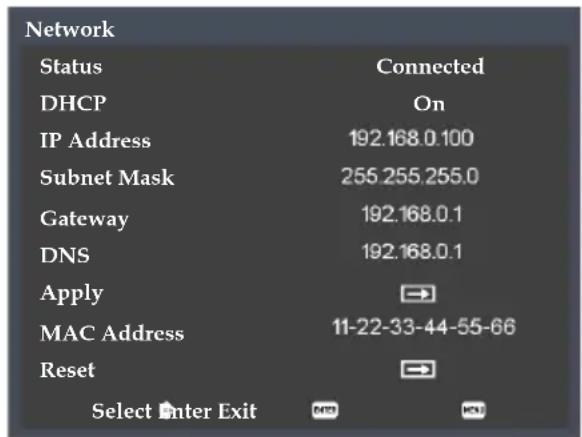
2. Connection
Enter the IP address that was verified by opening the web browser.
For example, enter http://192.168.0.100/ if the IP address is displayed as shown above.
Log in
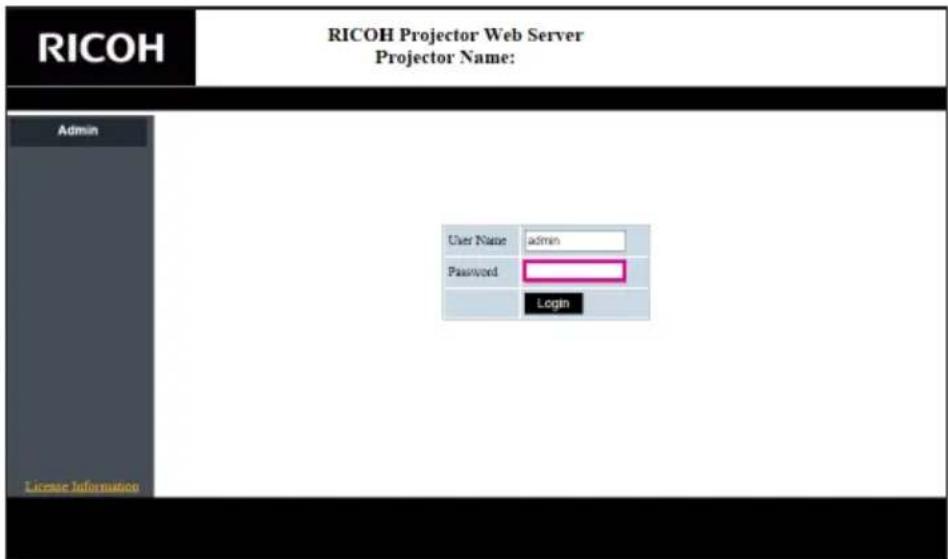
- When you open the web page for the first time, you will see a screen like the one below. Please enter valid user password.
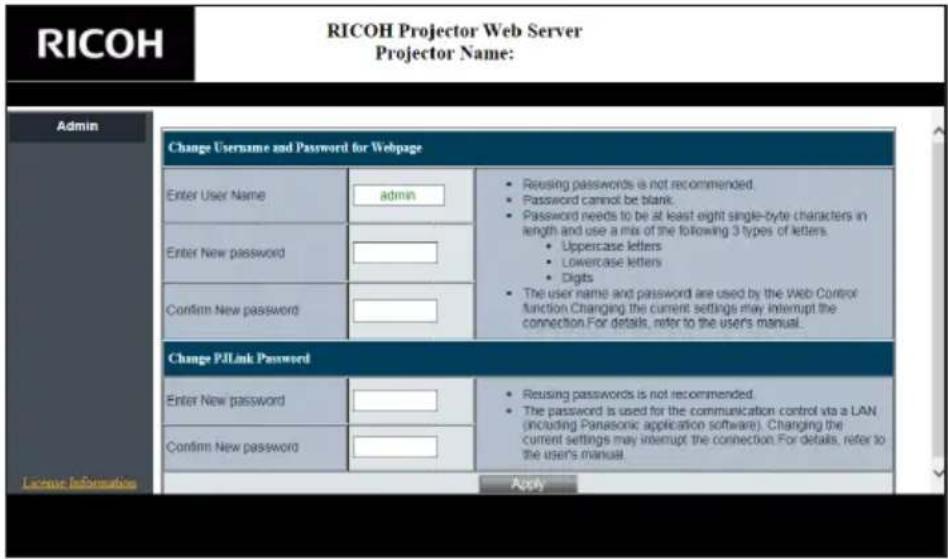
- When you open the web page after entering valid password, you will see a screen like the one below. Enter the password in the "Password" field.
LAN Control
System Status
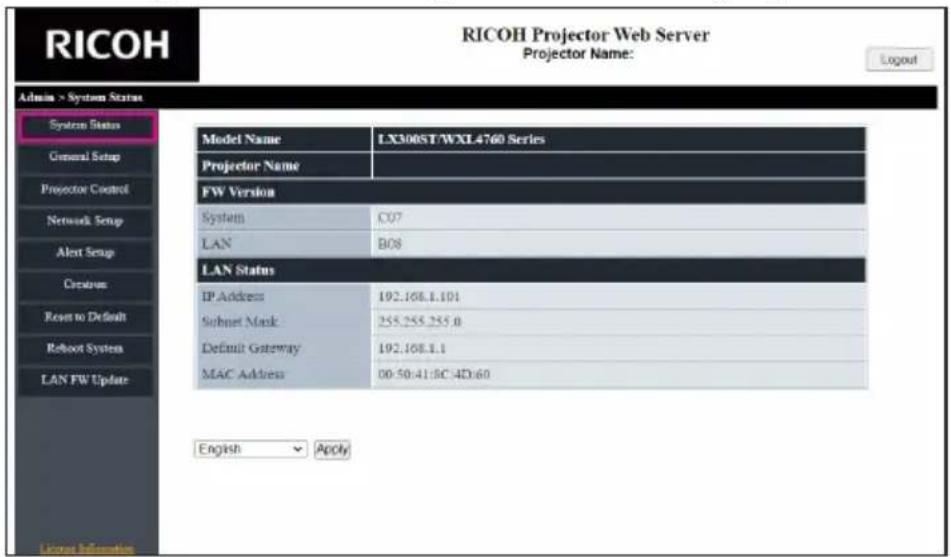
The current status of the projector is displayed.
You can check projector model name, firmware version, current LAN configuration, and change the interface language if needed.
The version name displayed on the web page in the diagram may differ from the actual display.
General Setup
You can change the projector name and password with this item.

The projector name set here is also used in PJLink control.
If the characters of new password and the characters of confirm (new) password do not match, error message will be displayed. In this case, re-enter the password.
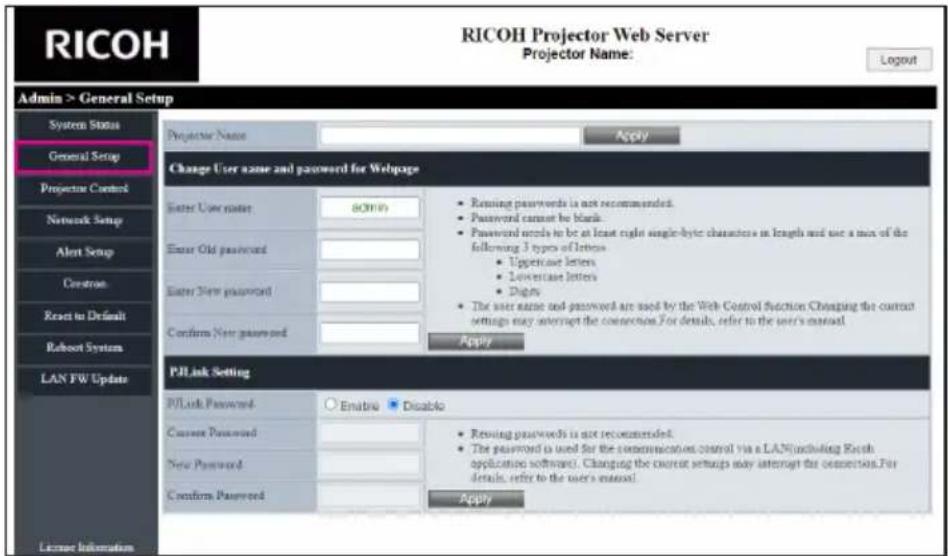
Changing projector name.
Enter the new projector name in the "Projector Name" field. Click "Apply".
Changing the password for Webpage (Web Control).
Enter the current password in the "Enter Old Password" field. Enter the new password in both the "Enter New Password" field and "Confirm New Password" field.
Click "Apply".
Changing the password for PJLink.
Click "Enable" to enable password.
Enter the current password in the "Current Password" field. Enter the new password in both the "New Password" field and "Confirm Password" field.
Click "Apply".
Projector Control
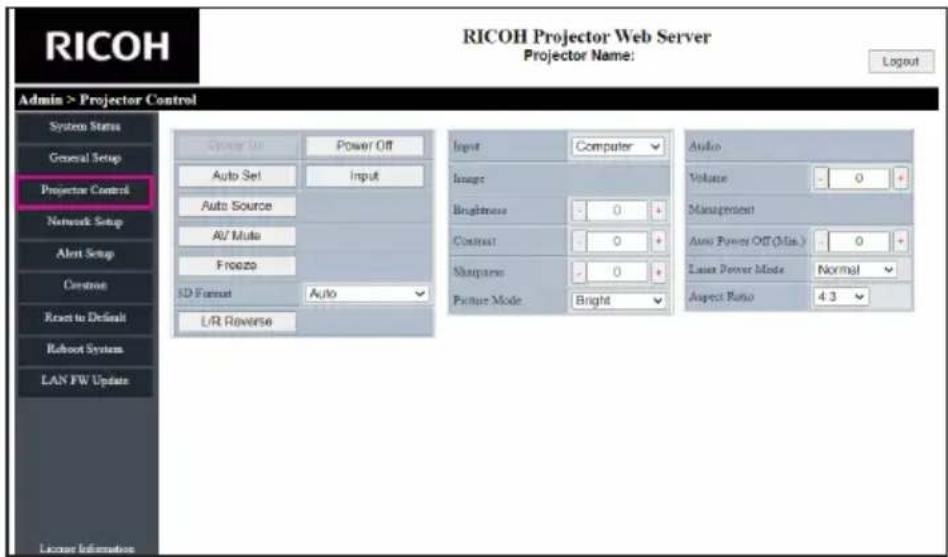
You can control the projector with this item.
The items for control are described in this section.
Control button: When you click a button, the corresponding function will be performed.
| Power On The power of the projector turns on.To turn ON, choose "Settings" → "Network (Standby)" to "On". | |
| Power Off Turns | OFF the power of the projector. |
| Auto Set Resync | the current source. |
| Input Toggle through the input sources (Computer->HDMI1->HDMI2/MHL->Video->Computer...). | |
| Auto Source Turn off/on the function of "Auto Source". | |
| AV Mute Turn off/on the audio and video. | |
| Freeze Freeze/unfreeze the image. | |
| L/R Reverse Turn off/on the function of "3D Sync Invert". | |
LAN Control
Adjustment button: Projector can be adjusted by +/ - button.
| Auto Power Off (Min.) | Set the countdown timer interval in minutes. |
| Brightness Adjust | brightness by ± - button.Value will return to the initial value when you click the Reset button. |
| Contrast Adjust | contrast by ± - button.Value will return to the initial value when you click the Reset button. |
| Sharpness Adjust | sharpness by ± - button.Value will return to the initial value when you click the Reset button. |
| Volume Adjust | volume by ± - button. |
Adjust the projector by selecting a value from the pull-down menu.
| Laser Power Mode | Select the desired power mode between “Normal”, “Eco.”, and “Image ECO”. |
| Input “Computer” | ”, “HDMI1”, “HDMI 2/MHL”, and “Video”. |
| Picture Mode Select | the desired picture mode between “Bright”, “Standard”, “Vivid”, “sRGB”, and “DICOM SIM.”. |
| Aspect Ratio Select | the desired aspect ratio between “Auto”, “4:3”, “16:9”, and “16:10”. |
| 3D Format Select | the desired 3D format between “Auto”, “Side by Side”, “Top and Bottom”, and “Frame Sequential”. |
Network Setup
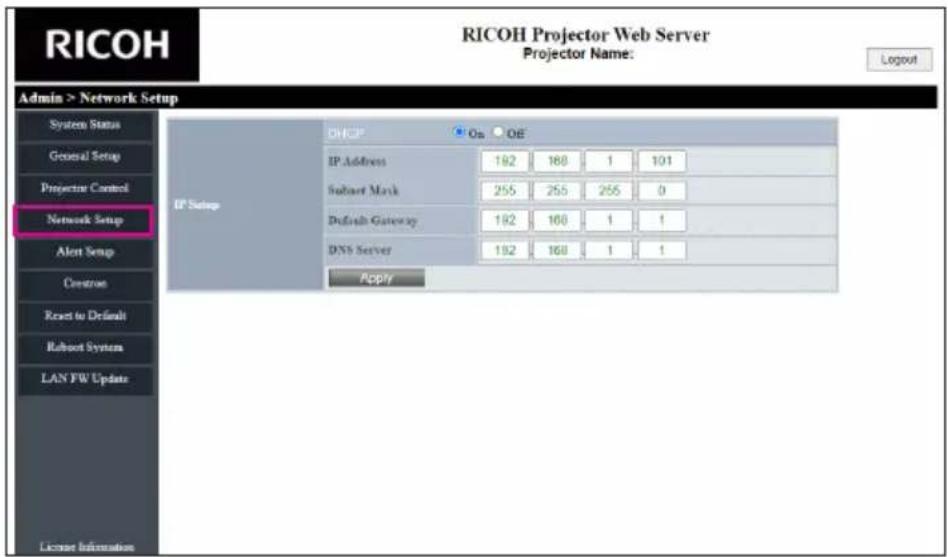
Note
- IPV6 cannot be used in this device.
Set the network of the projector.
Automatically configuring the network settings from DHCP. Check automatic setting and then click "Apply".
Configuring the network settings manually. Check manual setting, enter appropriate values in the IP address, Subnet Mask, Default Gateway (Gateway) and DNS Server fields, and then click "Apply".
Alert Setup
You can send email alerts when an error occurs.
You can carry out settings for alert mail in this section.
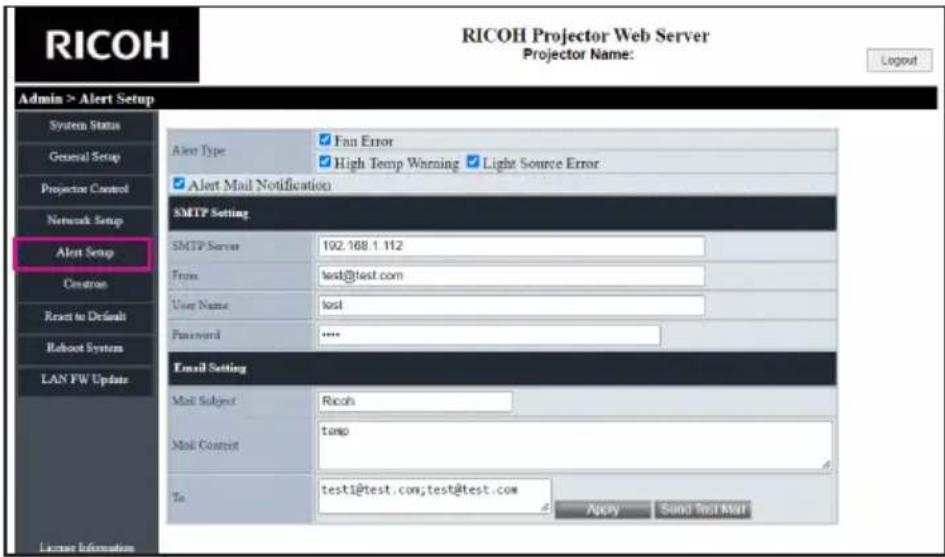
Note
When you have changed the settings, verify that the e-mail settings are done correctly. It is recommended that you send a test mail.
E-mail transmission protocol supports only SMTP. Other protocols cannot be used.
When Japanese or Chinese characters are used in an e-mail content, the e-mail may be received with unreadable characters. In such case, please use English characters for the e-mail content.
Alert types
Check the type of error for which you want to send alert mail.
Alert mail notification
Check and perform the following settings.
SMTP Setting
Set the following:
- SMTP Server: Server address (server name) (SMTP server)
• From: e-mail address of the sender - User Name: User name of the mail server
- Password: Mail server password
Email Setting
- Mail Subject
- Mail Content
• To: Enter the e-mail address of the sender. - Click "Apply" to fix the value.
Enter the IP address of projector in *xxx.xxx.xxx.xxx.
Send Test Mail
When you click [Send Test Mail], test email will be sent.
The text will be "Email Test xxx.xxx.xxx.xxx *".
LAN Control
Crestron
You can use the control of projectors that uses Crestron.
When projector is in standby mode, only the "Power" button will work.
Crestron is valid while the browers supports adobe flash player.
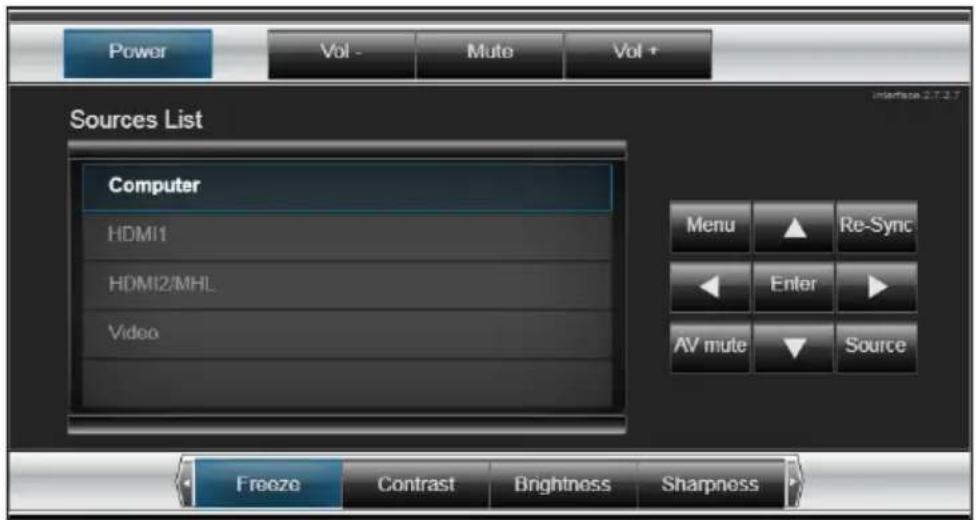
Power: Switch ON/OFF the power.
Source List: Correspondence between the input display and input terminal of the device is as follows.
- Computer
- HDMI1
- HDMI2/MHL
- Video
Other buttons work in the same manner as Projector Control.
Note
After setting the user password, you will be able to access Crestron's page by entering the password.
After enabling the Admin password, you will be able to access the page of Crestron tool only upon entering the Admin password.
Crestron Tools
You can perform settings of the projector network and Crestron Room View.
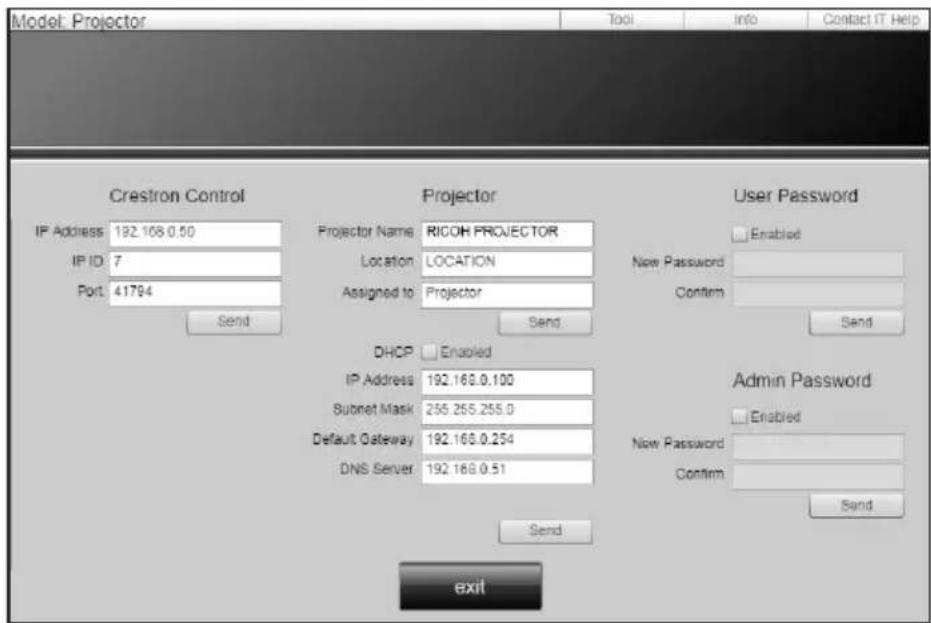
Crestron Info
You can display information about the firmware version of the projector and status of the laser.
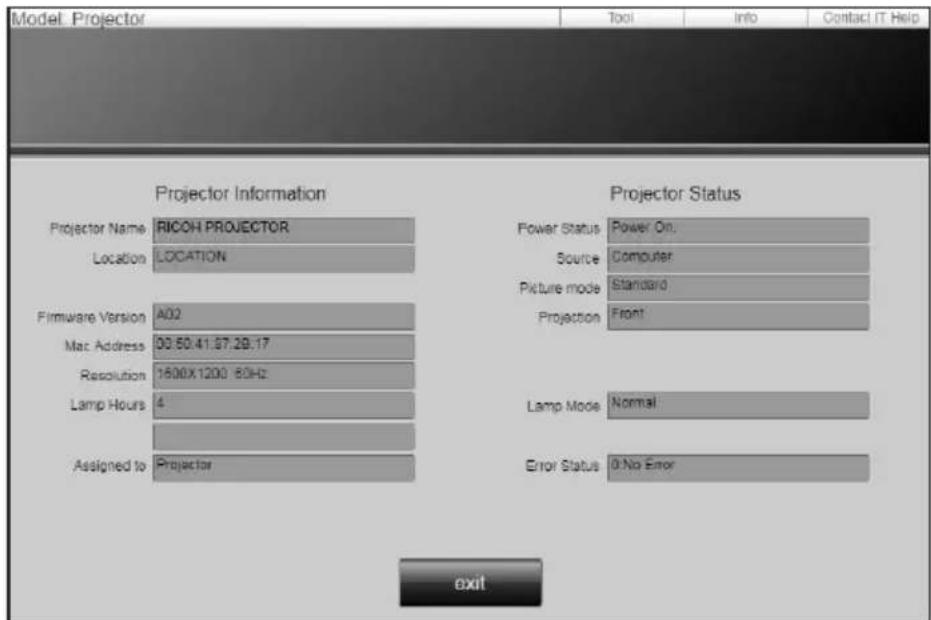
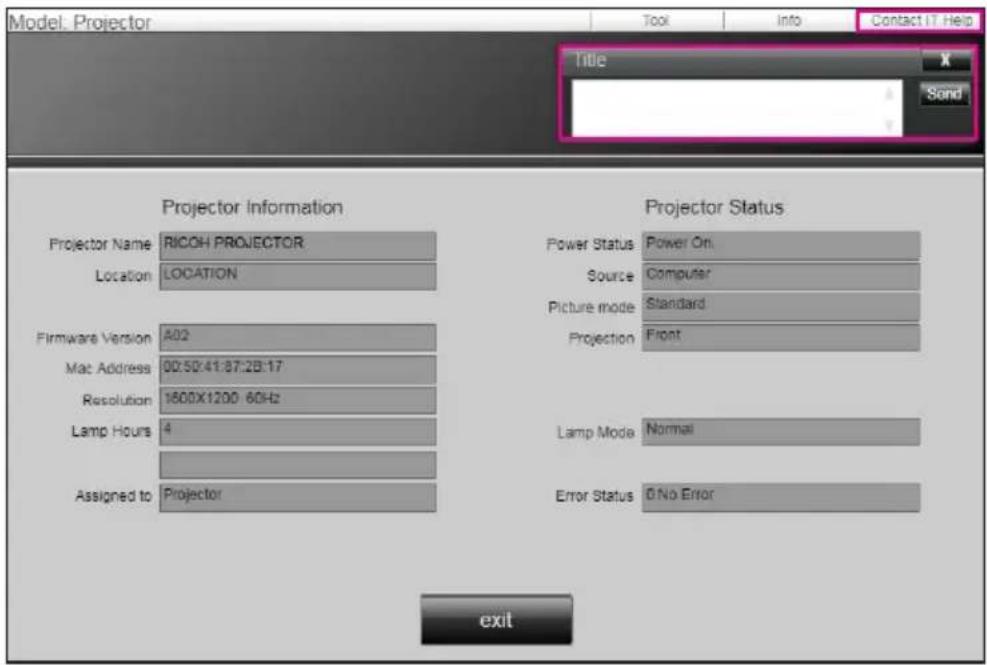
Contacting the IT administrator of Crestron
You can contact the IT administrators who are using X-Panel.
Crestron offers Xpanel.exe.
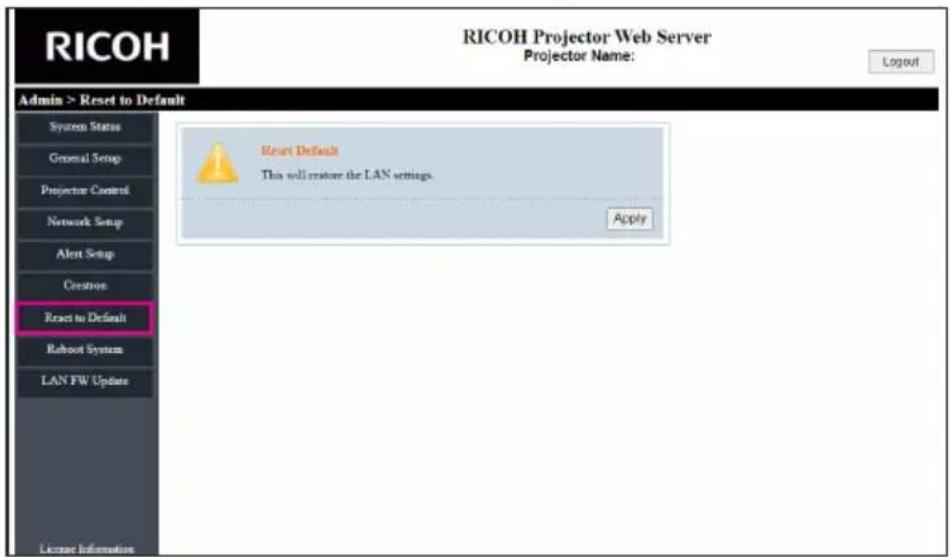
Reset to Default
You can reset the network to factory settings.
Press the Apply button. Webpage password will be cleaned and new webpage password need be set again.
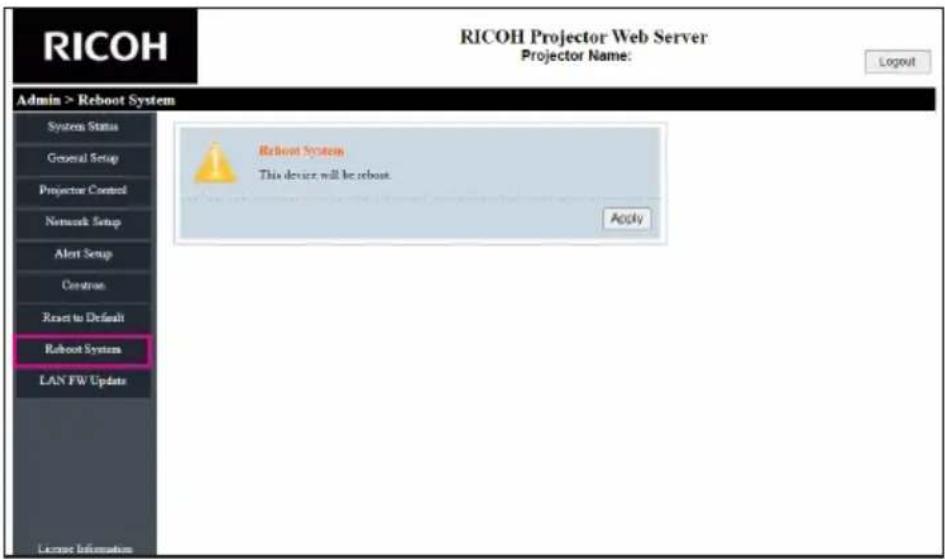
Reboot System
You can restart the system.
Press the Apply button.
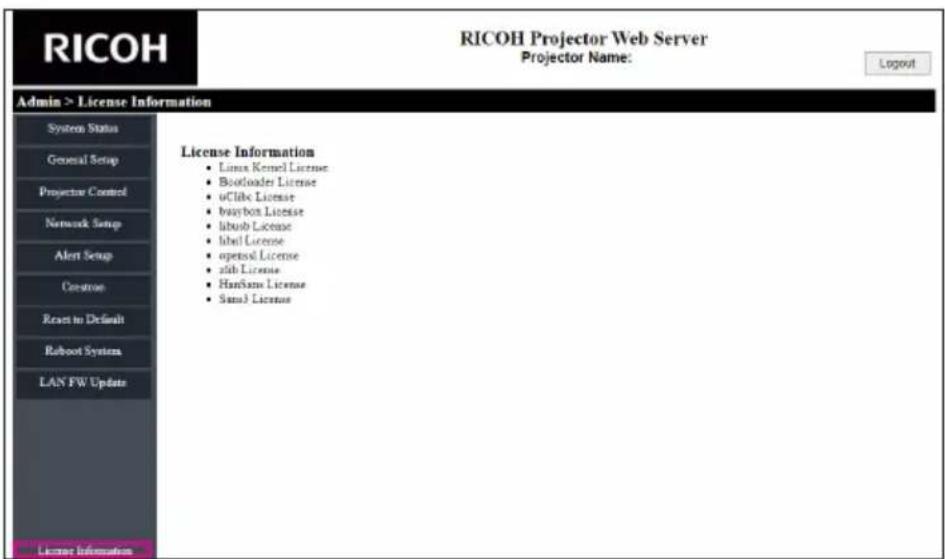
License Information
Display supported licenses.
LAN Control
LAN FW Update
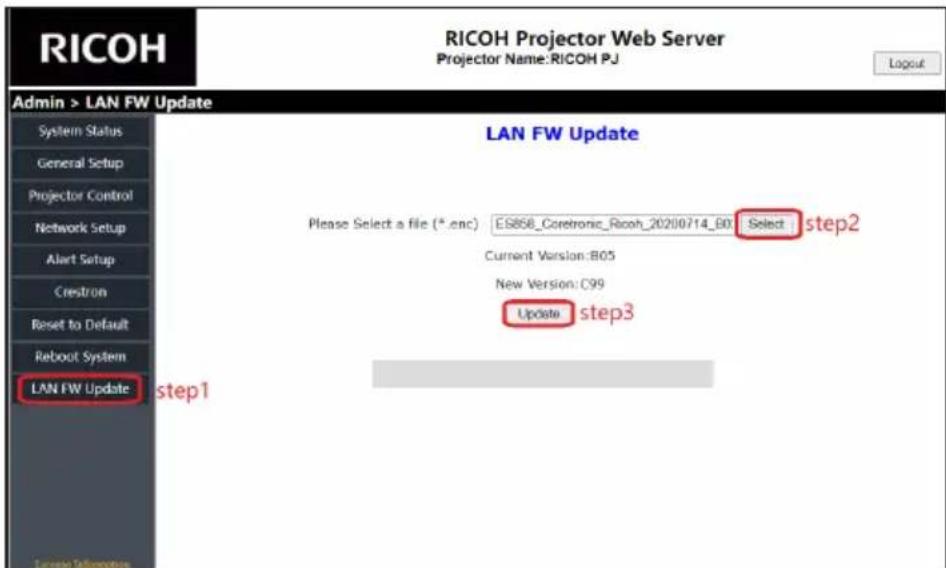
You can update LAN firmware.
Click "Select" and select the path where the LAN firmware update file is saved. Then click "Update" to start updating the firmware.
The updated LAN firmware could be downloaded from RICOH's home page.
It is the customer's responsibility to update the firmware. If the firmware update fails due to a power outage or communication error, repair costs may be charged.
Use the software that corresponds to the product you are using.
Do not touch the software and the projector during the firmware update. You may not be able to update the firmware normally.
Please note the following during the firmware update:
- Do not disconnect the network communication.
- Do not turn off the projector.
- Do not close the web browser.
- Do not turn off the PC.
If you experience trouble with the projector, refer to the following information. If the problem persists, please contact your local dealer or service center.
Problem: No image appears on screen
Ensure all the cables and power connections are correctly and securely connected as described in the “Connecting the Projector” section.
▶ Ensure the pins of terminals are not crooked or broken.
Make sure the projector is switched on.
Ensure that the "AV Mute" feature is not turned on.
Make sure you have removed the lens cap and the projector is switched on.
Problem: Partial, scrolling or incorrectly displayed image
Press "Autoset" on the remote control.
Adjust the computer display settings. Verify the resolution setting is less than or equal to 1600 x 1200 (3840 x 2160 for HDMI) resolution. See your operating system's Help file.
If you are using a Notebook:
-
First, follow the steps above to adjust resolution of the computer.
-
Press the toggle output settings. For example: [Fn]+[F3]
PANASONIC, NEC => Fn+F3
HP, SHARP, TOSHIBA => Fn+F5
IBM, SONY => Fn+F7
DELL, EPSON => Fn+F8
FUJITSU => Fn+F10
APPLE => F7
If you experience difficulty changing resolutions or your monitor freezes, restart all equipment including the projector.
Problem: The screen of the Notebook computer is not displaying a presentation
If you are using a Notebook PC:
Some Notebook PCs may deactivate their own screens when a second display device is in use. Each has a different way to be reactivated. Refer to your computer's documentation for detailed information.
Problem: Image is unstable or flickering
Adjust the "Phase" or "Clock" to correct it. Refer to the "H. Position" or "V. Position" section for more information.
▶ Check and reconfigure the display mode of your graphic card to make it compatible with the product.
Problem: Image is out of focus
Adjust the Focus Ring on the projector lens.
Make sure the projection screen is between the required distance. (refer to page 36)
The projected image becomes unsharp when keystone correction is enabled. This is a limitation of digital correction.
Problem: The image is stretched when displaying 16:9 DVD
Change the aspect ratio by pressing the "Aspect" button on the remote control or select "Screen > Aspect Ratio" from the OSD menu to show image with proper aspect ratio.
Problem: Image is too small or too large
Adjust the Zoom lever on the top of the projector.
Move the projector closer to or further from the screen.
Press the “Aspect” button on the remote control or press the “Menu” button on the projector panel, go to “Screen > Aspect Ratio” and try the different settings.
Troubleshooting
Problem: Image is reversed
Select "Screen > Projection Mode" from the OSD menu to adjust the image.
Problem: Indicator lighting message
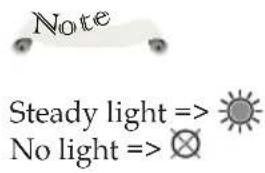
| Status Condition | Power indicator | Temp indicator | Status indicator | ||
| Red Blue | |||||
| Standby |  |  | [4T72] | [8641] | |
| Power On | [0407] |  | [4W77] | [54C8] | |
| Standby LAN On |  |  | [6B02] |  | |
| Warming Up | [OWISO] | Flashing* 0.  | [30BX] |  | |
| Cooling Down | Flashing* 0.5 sec On/Off | ∅ |  | [55K2] | |
| Download Mode |  |  |  | | |
| Error Status | |||||
| Over Heat | ∅ | ∅ | ∅ | [27W2] | |
| CW Breakdown | Flashing* 0.5 sec On/Off | ∅ | ∅ |  | |
| Laser Fail* Laser hour(H) | [0, 100) | ∅ | Flashing* 5 sec On/Off | ∅ |  |
| [100, 1000) | ∅ | ∅ | ∅ |  | |
| [1000, 20000) | ∅ | ∅ | ∅ |  | |
| Fan Lock | ∅ | ∅ | Flashing* Fan1: 1 sec On/Off* Fan2: 2 sec On/Off* Fan3: 3 sec On/Off | [5085] | |
Problem: Message Reminders
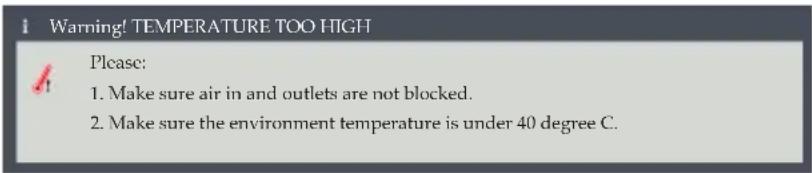
Temperature Error - the projector is overheat inside. Check the environmental condition.
Fan Error - the cooling system fan is not working.

List of Compatible Signals
| A. VGA Analog | ||||
| (1) PC Signal | ||||
| Modes Resolution | V.Frequency (Hz) | H.Frequency (kHz) | Clock [MHz] | |
| VGA | 640x480 60.0 31.5 | 25.2 | ||
| 640x480 67.0 35.0 | 26.8 | |||
| 640x480 72.0 37.9 | 31.5 | |||
| 640x480 75.0 37.5 | 31.5 | |||
| 640x480 | 85.0 43.3 36.0 | |||
| SVGA | 800x600 56.0 35.1 | 36.0 | ||
| 800x600 60.0 37.9 | 40.0 | |||
| 800x600 72.0 48.1 | 50.0 | |||
| 800x600 75.0 46.9 | 49.5 | |||
| 800x600 85.0 53.7 | 56.3 | |||
| MAC | 832x624 | 75.0 49.1 57.3 | ||
| XGA | 1024x768 60.0 48.4 | 65.0 | ||
| 1024x768 70.0 56.5 | 75.0 | |||
| 1024x768 75.0 60.0 | 78.8 | |||
| 1024x768 85.0 68.7 | 94.5 | |||
| 1024x768 120.0 99.0 137.8 | ||||
| MAC | 1152x864 75.0 67.5 108.0 | |||
| SXGA | 1280x1024 60.0 64.0 | 108.0 | ||
| 1280x1024 72.0 77.0 | 133.0 | |||
| 1280x1024 75.0 80.0 | 135.0 | |||
| QVGA 1280x9 | 60 60.0 60.0 101.3 | |||
| SXGA+ 1400x | 1050 60.0 65.3 121.8 | |||
| UXGA | 1600x1200 60.0 75.5 162.0 | |||
| 1920x1080 60.0 67.5 148.5 | ||||
| WUXGA 1920x | 1200(RB) 60.0 74.0 154.0 | |||
Appendices
| A. VGA Analog | ||||
| (2) Extended Wide Timing | ||||
| Modes Resolution | V.Frequency (Hz) | H.Frequency (kHz) | Clock [MHz] | |
| WXGA | 1280x720 60.0 | 44.8 | 74.2 | |
| 1280x800 60.0 | 49.6 | 83.5 | ||
| 1366x768 60.0 | 47.7 | 84.8 | ||
| 1440x900 60.0 | 59.9 | 106.5 | ||
| WSXGA+ 1680x1050 60.0 65.3 | 146.3 | |||
| (3) Component Signal | ||||
| 480p 720x480 59.94 31.5 | 27.0 | |||
| 576p 720x576 50.0 31.3 | 27.0 | |||
| 720p | 1280x720 60.0 | 45.0 | 74.25 | |
| 1280x720 50.0 | 37.5 | 74.25 | ||
| 1080i | 1920x1080 60.0 | 33.8 | 74.25 | |
| 1920x1080 50.0 | 28.1 | 74.25 | ||
| 1080p | 1920x1080 23.98/24.0 27.0 | 74.25 | ||
| 1920x1080 60.0 | 67.5 | 148.5 | ||
| 1920x1080 | 50.0 56.3 148.5 | |||
| (4) 3D | ||||
| SVGA 800x600 120.0 77.4 83.0 | ||||
| XGA 1024x768 120.0 98.9 137.75 | ||||
| WXGA 1280x720 120.0 92.9 162.0 | ||||
| WXGA 1280x800 120.0 101.6 146.25 | ||||
| B. HDMI Digital | ||||
| (1) PC Signal | ||||
| Modes Resolution | V.Frequency (Hz) | H.Frequency (kHz) | Pixel CLK [MHz] | |
| VGA | 640x480 60.0 | 31.5 | 25..2 | |
| 640x480 67.0 | 35.0 | 26.8 | ||
| 640x480 72.0 | 37.9 | 31.5 | ||
| 640x480 75.0 | 37.5 | 31.5 | ||
| 640x480 85.0 | 43.3 36.0 | |||
| SVGA | 800x600 56.0 | 35.1 | 36.0 | |
| 800x600 60.0 | 37.9 | 40.0 | ||
| 800x600 72.0 | 48.1 | 50.0 | ||
| 800x600 75.0 | 46.9 | 49.5 | ||
| 800x600 85.0 | 53.7 | 56.3 | ||
| MAC | 832x624 75.0 | 49.1 57.3 | ||
| XGA | 1024x768 60.0 | 48.4 | 65.0 | |
| 1024x768 70.0 | 56.5 | 75.0 | ||
| 1024x768 75.0 | 60.0 | 78.8 | ||
| 1024x768 85.0 | 68.7 | 94.5 | ||
| MAC 1152x864 75.0 67.5 108.0 | ||||
| SXGA | 1280x1024 60.0 | 64.0 | 108.0 | |
| 1280x1024 72.0 | 77.0 | 133.0 | ||
| 1280x1024 75.0 | 80.0 | 135.0 | ||
| QVGA 1280x960 60.0 60.0 | 101.3 | |||
| SXGA+ 1400x1050 60.0 65.3 | 121.8 | |||
| UXGA | 1600x1200 60.0 | 75.0 | 162.0 | |
| 1920x1080 60.0 | 67.5 148.5 | |||
| WUXGA 1920x1200 (RB) 60.0 74.0 | 154.0 | |||
| 4k | 3840x2160 30.0 | n/a n/a | ||
| 3840x2160 60.0 | n/a n/a | |||
| (2) Extended Wide Timing | ||||
| WXGA | 1280x720 60.0 | 44.8 | 74.2 | |
| 1280x800 60.0 | 49.6 | 83.5 | ||
| 1366x768 60.0 | 47.7 | 84.8 | ||
| 1440x900 60.0 | 59.9 | 106.5 | ||
| WXGA+ | 1680x1050 60.0 | 65.3 | 146.3 | |
| (3) Component Signal | ||||
| Modes Resolution | V.Frequency (Hz) | H.Frequency (kHz) | Pixel CLK [MHz] | |
| 480p 720x480 59.94 31.5 | 27.0 | |||
| 576p 720x576 50.0 31.3 27.0 | ||||
| 720p | 1280x720 60.0 45.0 74.25 | |||
| 1280x720 50.0 37.5 74.25 | ||||
| 1080i | 1920x1080 60.0 33.8 74.25 | |||
| 1920x1080 50 28.1 74.25 | ||||
| 1080p | 1920x1080 23.98 /24 27.0 74.25 | |||
| 1920x1080 60.0 67.5 148.5 | ||||
| 1920x1080 50.0 56.3 148.5 | ||||
| (4) 3D | ||||
| SVGA 800x600 120.0 77.4 83.0 | ||||
| XGA 1024x768 120.0 98.9 137.75 | ||||
| WXGA 1280x720 120.0 92.9 162.0 | ||||
| WXGA 1280x800 120.0 101.6 146.25 | ||||
| 720p | 1280x720 50.0 37.5 Frame Packing | |||
| 1280x720 60.0 45.0 Frame Packing | ||||
| 1080p | 1920x1080 24.0 27.0 Frame Packing | |||
| 720p | 1280x720 50.0 37.5 Top and Bottom | |||
| 1280x720 60.0 45.0 Top and Bottom | ||||
| 1080i | 1920x1080 | 50.0(25) 28.13 | Top and Bottom | |
| 1920x1080 | 60.0(30) | 33.75 | Top and Bottom | |
| 1080p | 1920x1080 24.0 28.13 Top and Bottom | |||
| 1920x1080 50.0 28.13 Top and Bottom | ||||
| 1920x1080 60.0 28.13 Top and Bottom | ||||
| 720p | 1280x720 | 60.0 | 45.0 | Side by Side (Half) |
| 1080i | 1920x1080 | 50.0(25) | 28.13 | Side by Side (Half) |
| 1920x1080 | 60.0(30) | 33.75 | Side by Side (Half) | |
| 1080p | 1920x1080 | 50.0 | 56.26 | Side by Side (Half) |
| 1920x1080 60.0 67.5 Side by Side (Half) | ||||
| (5) Input signal frequency range:Analog: fh=15kHz~100kHz, fv=24Hz~60Hz, Max. pixel rate: 162.5MHz.Digital (HDMI): fh=15kHz~100kHz, fv=24Hz~60Hz, Max. pixel rate: 200MHz. | ||||
Configurations of Terminals
Terminal: Computer In (Mini D-sub 15 pin) [Monitor Out]
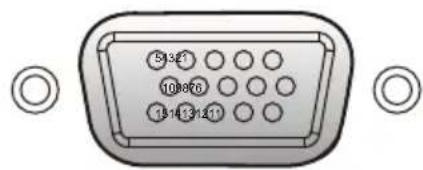
| 1 | Red (R/Cr) Input [R Output] | 9 | DDC 5V [NC*] |
| 2 | Green (G/Y) Input [G Output] | 10 | Ground (Ver. sync.) |
| 3 | Blue (B/Cb) Input [B Output] | 11 | NC* |
| 4 | NC* | 12 | DDC Data [NC*] |
| 5 | Ground (Horiz.sync.) | 13 | Horiz. sync. Input [Output] (Composite H/V sync. Input) |
| 6 | Ground (Red) | ||
| 7 | Ground (Green) | 14 | Vert. sync. Input [Output] |
| 8 | Ground (Blue) | 15 | DDC CLK [NC*] |
* Do not connect anything.
Terminal: PC Control (D-sub 9 pin)
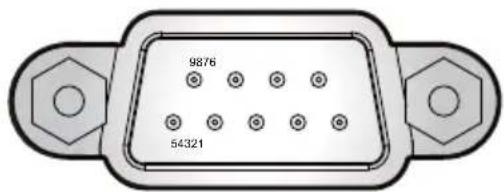
| 1 | NC* | 6 | NC* |
| 2 | TXD (Sending Data) | 7 | NC* |
| 3 | RXD (Receiving Data) | 8 | NC* |
| 4 | NC* | 9 | NC* |
| 5 | GND * Do not connect anything. | ||
Terminal: Microphone

Plug-in power is not supported.
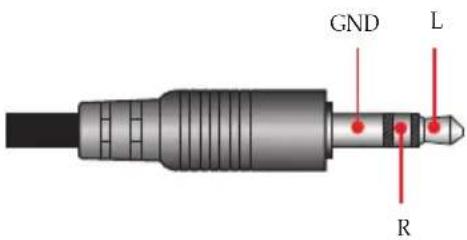
Specifications
■ List of general specifications
| Item | WXL5860 WUL5860 | |
| DLP chip 0.65" DMD | WXGA 0.48" DMD WUXGA | |
| Projection Lens | F# 2.51 - 2.93, f=15.99-21.42mm, 1.36x Zoom Lens | F# 1.94 - 2.23, f=12.82-16.74mm, 1.3x Zoom Lens |
| Projection Distance (focus range) | 1.0 - 7.2m (3.28 - 23.62 feet) | 1.0 - 7.9m (3.28 - 25.92 feet) |
| Throw Ratio (distance/width) | 1.113 - 1.523 1.21 - 1.59 | |
| Dimension (WxDxH) | 265 x 337 x 108 (w/o feet) | |
| 265 x 337 x 122.5 (w feet) | ||
| Weight Approx. 4.3kg(9.5lbs) Approx. 4.6kg(10.1lbs) | ||
| I/O Terminal | HDMI 1 In (HDCP ver1.1)Service (Micro-USB)HDMI 2/MHL (HDMI ver2.0/HDCP ver2.2/MHL ver2.0)PC Control (RS232C)VideoComputer In (D-sub 15pin) | Monitor Out (D-sub 15pin)Audio In (3.5mm stereo mini jack)Microphone In (3.5mm stereo mini jack)Audio Out (3.5mm stereo mini jack)5V/1.5A (USB type-A)LANAC In |
| Speaker 8W x2 | ||
| Laser diode life 20,000h | ||
| Noise Level | Normal (100%): Typ. 32dBA /Max. 34dBAECO: Typ. 31dBA /Max. 33dBA | |
| Environment | Operational Temperatures: 0° to 40°C (32° to 104°F); up to 85% humidity (non-condensing)Storage Temperatures: -10° to 60°C (14° to 140°F); up to 85% humidity (non-condensing) | |
| Power Consumption | Eco mode: 230W Max. @110VacNormal (100%): 300W Max. @110VacEco mode: 225W Max. @220VacNormal (100%): 300W Max. @220Vac | |
| Standby Power 0.5W | or less | |
Note
- This model complies with the above specifications.
- Designs and specifications are subject to change without notice.
- This model may not be compatible with features and/or specifications that may be added in the future.
Cabinet Dimensions
Unit: mm
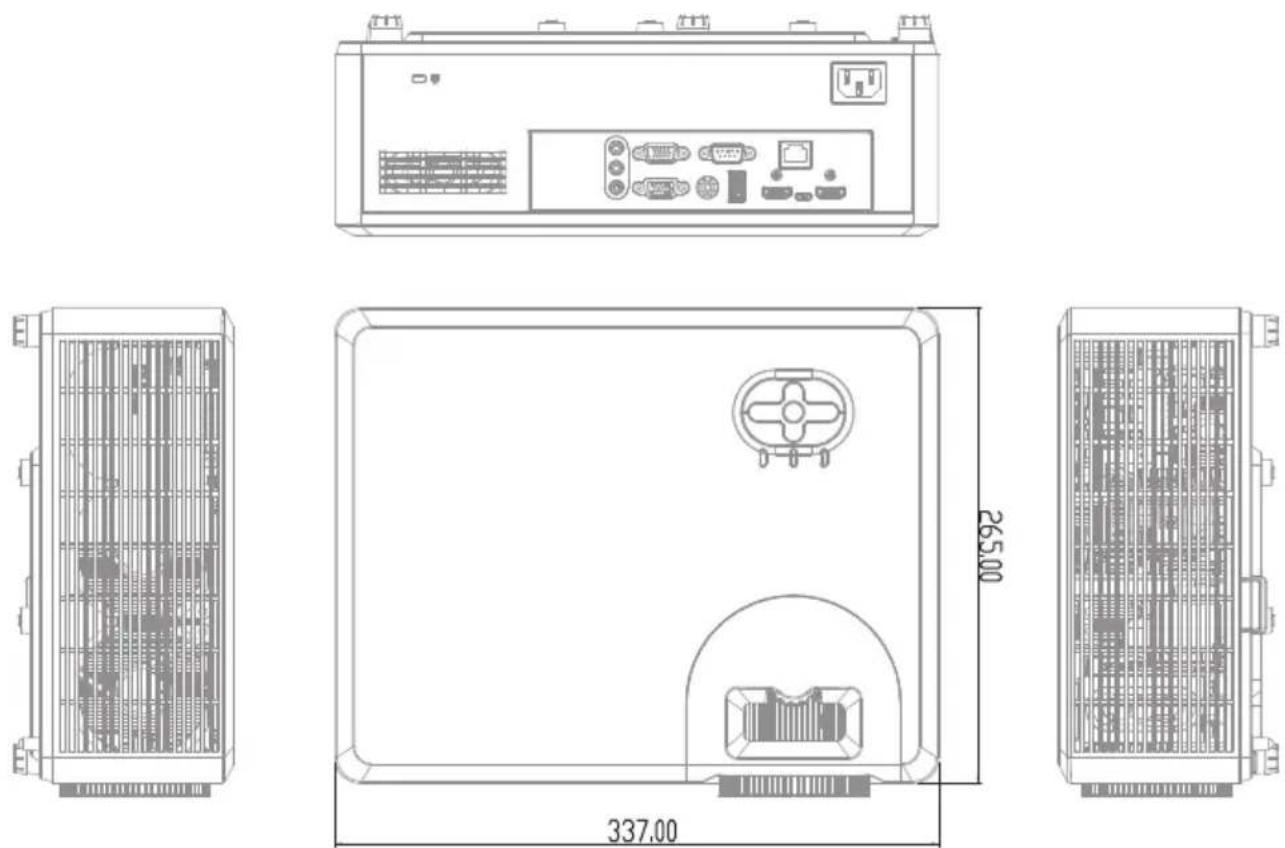
Appendices
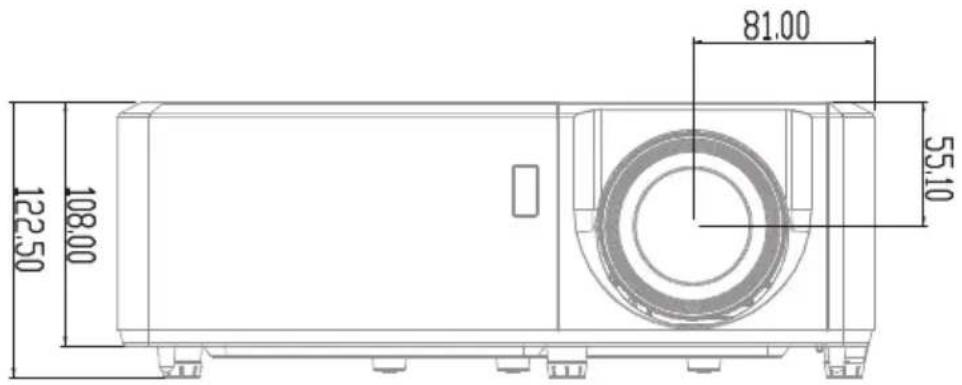
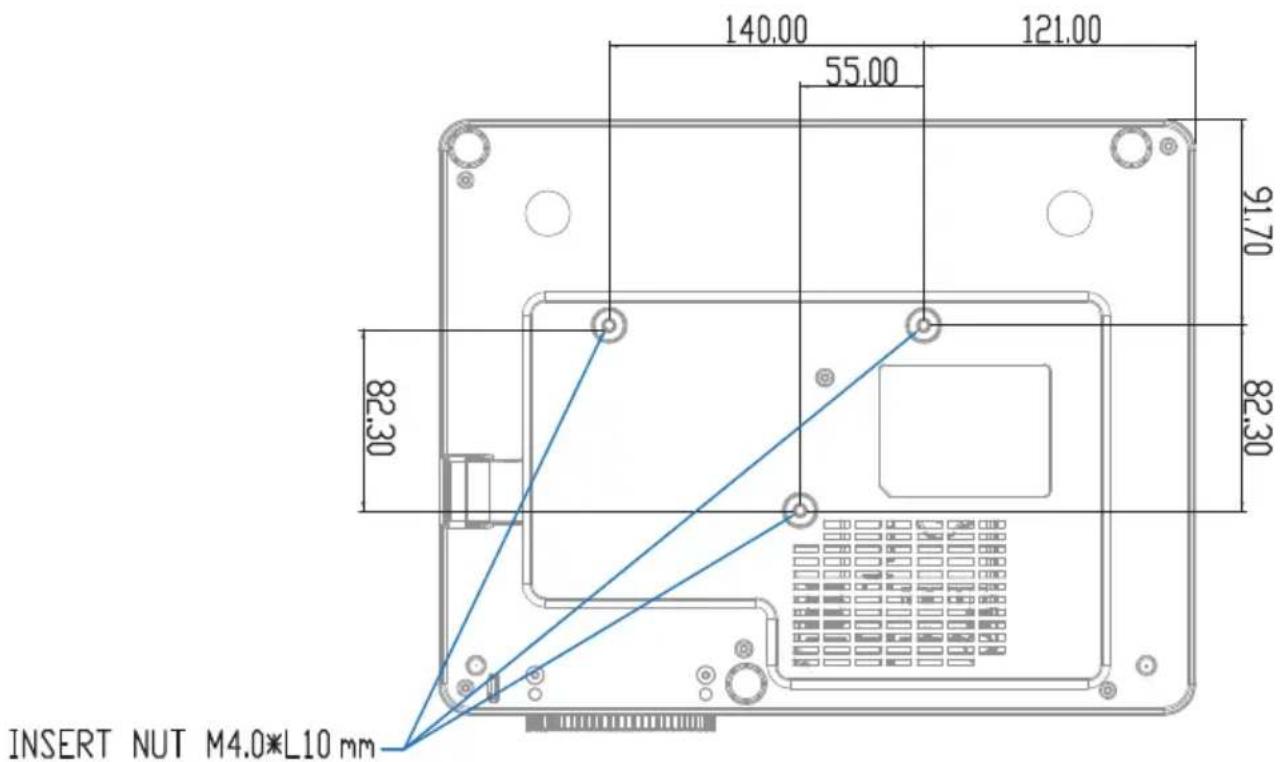
Holes for ceiling mount
Screw size and max. length:
(3) M4-10 mm
Copyrights
Information concerning copyrights, etc. of installed software.
Open-source software and third-party software are used in this product.
Information on the copyrights of such software can be found on the License Information page on the web page of this device.
(See "Controlling this Device with Web Browser" on page 60.)
You can also view and download the source code from the following URL
http://www.support-download.com/bb/html/dr_ut_e/oss/index.htm
Trademarks
- DLP is trademarks or registered trademark of Texas Instruments.
- Microsoft, Windows, Windows Vista, Internet Explorer and PowerPoint are either a registered trademark or trademark of Microsoft Corporation in the United States and/or other countries.
- HDMI, the HDMI Logo and High-Definition Multimedia Interface are trademarks or registered trademarks of HDMI Licensing Administrator, Inc.
- MHL, Mobile High-Definition Link, and MHL Logo are trademarks or registered trademarks of MHL, LLC.
- Kensington is a trademark or registered trademark of ACCO Brands.
- Blu-ray is a trademark of Blu-ray Association.
- Other product and company names mentioned in this user's manual may be the trademarks or registered trademarks of their respective holders.


- Table of Contents
- Usage Notice......2
- Introduction......19
- Basic Operations....30
- User Settings ......39
- LAN Control 60
- Troubleshooting 73
- Appendices ......77
- Precautions
- Usage Notice
- ABOUT THE LASER LIGHT SOURCE
- REMOTE CONTROL BATTERY
- Warning
- Notes
- Important:
- Safety Labels of This Machine
- Power Switch Symbols
- Regulation & Safety Notices
- Notice: Users in the United States of America FCC notice
- Notice: Shielded cables
- Caution
- Notes to Users in the State of California
- Declaration of Conformity for EU countries
- Notice: Users in EU countries
- CE Marking Traceability Information (For EU Countries Only)
- Notice: Users in UK
- UKCA Marking Traceability Information (For UK Only)
- User Information on Electrical and Electronic Equipment
- Notice: Users in Turkey
- Laser Notice
- Notice: Users in the EU
- Note for the Battery and/or Accumulator Symbol
- COMMISION REGULATION (EU) 2019/2020
- Other Information
- Copyrights to Images
- Note to Users Viewing 3D Images
- Product Features
- Introduction
- Package Overview
- Documentation:
- Product Overview
- Connection Ports
- Note
- Control Panel
- Remote Control ID Setup
- Remote Control Battery Installation
- Remote Control Operating Range
- Installing the Projector
- Basic Operations
- Connecting the Projector
- Connect to Computer/Notebook
- Connect to AV Equipment
- Powering On/Off the Projector Powering On the Projector
- CAUTION:
- Powering Off the Projector
- Warning Indicator
- Adjusting the Projected Image
- Adjusting the Position of Projector Image
- Adjusting the Projector Zoom, Focus, and Lens Shift
- Adjusting Projection Image Size
- Using the On Screen Display (OSD)
- How to operate
- Picture Mode
- Brightness
- Contrast
- Saturation
- Sharpness
- Gamma
- User Settings
- Color Temperature
- NCE (Natural Color Enhancer)
- Advanced
- Screen
- Aspect Ratio
- Phase
- Clock
- Position (Horizontal Position)
- Position (Vertical Position)
- Keystone
- Projection Mode
- RGB Input Range Auto Limited Range Full Range
- Start-up Screen Logo Off
- Background Color Logo Blue Black
- Settings
- Language
- Auto Power Off (Min.)
- Monitor Out (Standby)
- Network (Standby)
- Network (Standby) On Off
- Network
- Security
- Reset
- Audio
- Mute
- Volume
- Audio Input
- Audio Input Default Audio In MIC In
- Options
- Auto Source
- Input Source
- Laser Settings
- High Altitude
- Power Settings
- Direct Power On On Off
- Sleep Timer (Min.) Off
- Start on Input Detection On Off
- Remote Control ID
- Information
- 3D
- 3D Sync Invert
- 3D Sync Invert On Off
- 3D Format
- Controlling this Device with Web Browser
- Connecting to the device
- Confirmation of the IP address of the device
- Connection
- Log in
- LAN Control
- System Status
- General Setup
- Projector Control
- Network Setup
- Alert Setup
- Crestron
- Crestron Tools
- Crestron Info
- Contacting the IT administrator of Crestron
- Reset to Default
- Reboot System
- License Information
- LAN FW Update
- Problem: No image appears on screen
- Problem: Partial, scrolling or incorrectly displayed image
- Problem: The screen of the Notebook computer is not displaying a presentation
- Problem: Image is unstable or flickering
- Problem: Image is out of focus
- Problem: The image is stretched when displaying 16:9 DVD
- Problem: Image is too small or too large
- Troubleshooting
- Problem: Image is reversed
- Problem: Message Reminders
- Appendices
- Configurations of Terminals
- Terminal: Computer In (Mini D-sub 15 pin) [Monitor Out]
- Terminal: PC Control (D-sub 9 pin)
- Terminal: Microphone
- Specifications
- Cabinet Dimensions
- Copyrights
- Trademarks
Brand : RICOH
Model : PJ WUL5860
Category : Projector