Silver Line SC-VC80RW01 - Robot vacuum Scarlett - Free user manual and instructions
Find the device manual for free Silver Line SC-VC80RW01 Scarlett in PDF.


| Product Type | Robot Vacuum Cleaner |
| Brand | Scarlett |
| Model | Silver Line SC-VC80RW01 |
| Color | Silver / White |
| Dimensions (L x W x H) | 330 × 330 × 80 mm |
| Weight | 2.8 kg |
| Power Source | 14.4V Li-ion rechargeable battery |
| Battery Capacity | 2200 mAh |
| Runtime | Up to 90 minutes |
| Charging Time | Approx. 4–5 hours |
| Suction Power | 1800 Pa |
| Dustbin Capacity | 300 ml |
| Noise Level | ≤ 65 dB |
| Cleaning Modes | Auto, Spot, Edge, Schedule |
| Sensors | Anti-drop, anti-collision, cliff |
| Remote Control | Yes (included) |
| App Control | No |
| Scheduling | 7-day programmable |
| Self-Charging | Automatic return to charging dock |
| Filter Type | Washable HEPA filter |
| Brush System | Side brush + main roller brush |
| Suitable Floor Types | Hard floors, low-pile carpet |
| Included Accessories | Remote control, charging dock, power adapter, user manual |
| Maintenance | Empty dustbin after each use; clean filter every 2 weeks; replace filter every 3 months |
| Safety Features | Automatic shutoff when lifted or stuck; overcharge protection |
Frequently Asked Questions - Silver Line SC-VC80RW01 Scarlett
User questions about Silver Line SC-VC80RW01 Scarlett
0 question about this device. Answer the ones you know or ask your own.
Ask a new question about this device
Download the instructions for your Robot vacuum in PDF format for free! Find your manual Silver Line SC-VC80RW01 - Scarlett and take your electronic device back in hand. On this page are published all the documents necessary for the use of your device. Silver Line SC-VC80RW01 by Scarlett.
USER MANUAL Silver Line SC-VC80RW01 Scarlett
natural_image
Black circular robotic vacuum cleaner with 'SCARLETT Silver Size' branding and 'HOME SMART' logo (no additional text or symbols)HOME
intellect


GET IT ON
ВАШ ДОМ
НА СВЯЗИ
YOUR HOME
IS ONLINE

Before the first use
EN 1. Install side brushes
• Install the side brush marked R in the hole marked R.
• Install the side brush marked L in the hole marked L.
1
natural_image
Technical diagram showing a mechanical assembly with internal components and a close-up view of the component (no text or labels)EN 2. Turn on the device:
- Hold button for 5 seconds
natural_image
User interface button with home icon, Wi-Fi signal, and power button (no text or symbols)
natural_image
Technical line drawing of a circular mechanical component with a cable and three mounting holes (no text or symbols)natural_image
Illustration of a hand connecting an electrical outlet to a device with wires and a tripod (no text or symbols)RU 5. Используйте ткань для влажной уборки (см. пункт «Использование ткани для мытья пола»)
EN 5. Use the fabric for wet cleaning (See "Fabric for wet cleaning")
KZ 5. Ылғал шуберекті пайдаланыңыз («Еденді тазалау үшін шуберекті пайдалану» бөлімін караңыз).

natural_image
Diagram of a device interior with labeled components and directional arrows, no readable text or symbols present.EN Your device is ready to go!
Use the Wi-Fi application and the control panel of the device (see "Installing the application")
natural_image
Line drawing of a hand pressing down on a circular object with a handle, labeled 'A' at the bottom (no text or symbols on the object itself)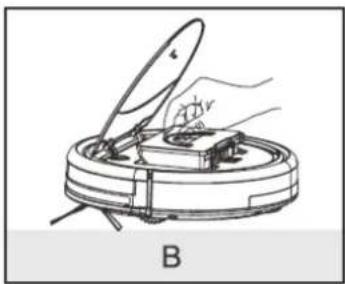
natural_image
Illustration of a robotic vacuum cleaner with open lid and handle, labeled B (no text or symbols on the diagram itself)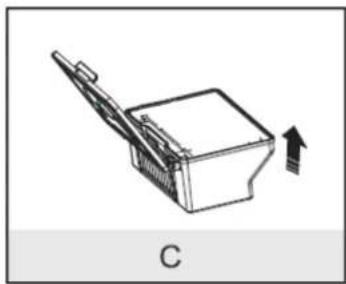
natural_image
Diagram of a mechanical device with an arrow indicating direction, labeled 'C' at the bottom (no text or symbols on the diagram itself)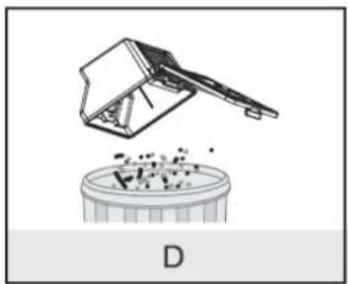
natural_image
Illustration of a hammer crushing a trash bin with particles (no text or symbols)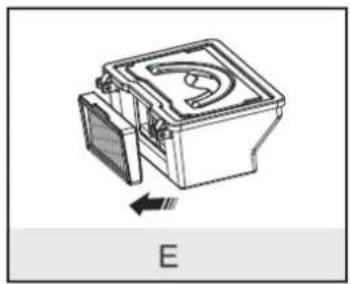
natural_image
Technical line drawing of a mechanical component with a labeled section E (no text or symbols on the object itself)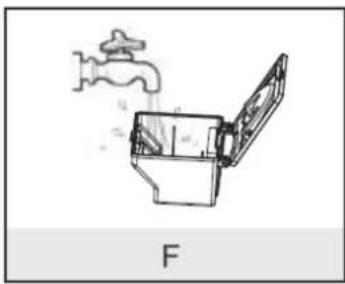
natural_image
Diagram of a toilet with faucet and water drop, labeled 'F' (no text or symbols on diagram itself)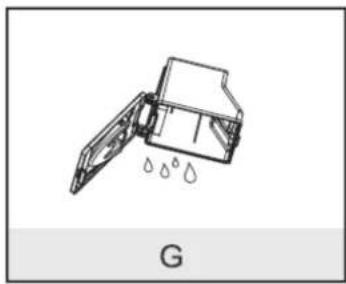
natural_image
Diagram of a mechanical device with water droplets and label 'G' (no text or symbols on the diagram itself)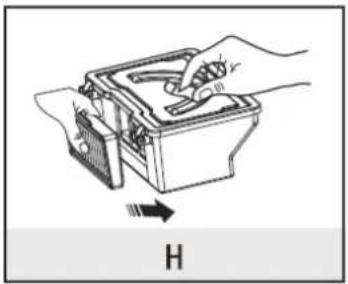
natural_image
Illustration of hands using a tool to adjust or install an electronic device into a box, with no visible text or symbols.
- Почистите щетки (см. пункт «Чистка щёток»)
- Clean the brushes (see "cleaning of brushes")
- Щеткаларды тазалаңыз («Щеткаларды тазалау» тармағын караңыз)

natural_image
Line drawing of a hand using a tool to adjust or install a car engine component (no text or symbols visible)
- Чистка НЕРА фильтра (см. пункт «Чистка НЕРА фильтра»)
- HEPA filter cleaning (see «Cleaning of HEPA filter»)
- НЕРА сүзгісін тазалау («НЕРА сүзгісін тазалау» бөлімін қараңыз)


natural_image
Technical line drawing of a circular device with internal components and blue bounding boxes highlighting specific areas (no text or symbols present)- Body
- Control button
- Indicator light
- Upper cover
- Upper cover hand
- Adapter plug outlet
- Anti-drop sensor
- Front small wheel
- Battery cabinet
- Intake
- Side brush holes
- Inner dust bin
- Filter
- Rechargeable battery
- Adapter and power cord
- Side brushes 4 pcs.
- Base
- Dusting cloth
- Velcro for attaching fabric
natural_image
Hand pointing at a white square icon with Wi-Fi signal symbol (no text or numbers)natural_image
Hand pressing a button with an 'Power' symbol (no text or numbers visible)natural_image
Blue Wi-Fi signal icon inside a white rounded square (no text or symbols)- Before the first use 25
- Installation of Wi-Fi application 27
- Alice voice assistant.... 32
- After use 35
Dear customer!
Thank you for the good choice and purchase of robot-vacuum cleaner Scarlett SC-VC80RW01. In order to use it effectively and safely, read the instruction manual before use.
Technical characteristics
| Type of the device | Robot-vacuum cleaner |
| Fall protection | Yes |
| Types of working surfaces | Linoleum/Parquet/laminate/tile/carpet |
| Battery type, power, capacity | Li-ion 7.4 V 2600 mAh |
| Operating time | 70 min |
| Charging time | 2-3 h |
| Cloth for wet cleaning | Yes |
| Operation modes | edge cleaning, spot cleaning |
| Climbing ability | 1.0 cm |
| Noise level | <65 dB(A) |
| Obstacle avoidance | Yes |
IMPORTANT SAFEGUARDS
- Read this instruction manual carefully to prevent any unit damage or injure when using.
- When using this appliance, basic precautions should always be followed:
- Before the first use of the appliance check that the voltage indicated on the rating label corresponds to the mains voltage in your home.
- For home use only. Do not use for industrial purposes.
- To reduce the risk of electric shock, do not use outdoors or on wet surfaces. Do not immerse unit or cord in any liquids.
- To avoid deforming of plastic components of the appliance or fire accident, never leave the appliance exposed to direct sun light or near any heater.
- This appliance is not intended for use by persons (including children) with reduced physical, sensory or mental capabilities, or lack of experience and knowledge, unless they have been given supervision or instruction concerning use of the appliances by a person responsible for their safety.
- This appliance may be used by children aged 8 years and over, or persons with reduced physical, sensory or mental capabilities, if they have been supervised or instructed in the safe use of the appliance and if they understand the dangers involved. Cleaning and maintenance of the appliance must not be made by children without supervision.
- Children should be supervised to ensure that they do not play with the appliance.
- Never use the vacuum cleaner without filters.
- Do not attempt to repair, adjust or replace parts in the appliance. Repair the malfunctioning appliance in the nearest service center.
- If the power cord is damaged, it must be replaced with a special cord obtained from the manufacturer or a service center.
- Do not sit on top of this product or attach an object on the top of it. Beware of children or pets while the product is in operation.
- Never use the product to clean up combustible or highly volatile liquids such as gasoline.
- Charging adaptor is for indoors use only.
IM022
- Do not recharge the product if the battery cord or plug is damaged.
- Never touch the charger, plug or cable with damped hands.
- Please take out the battery when it is not in use for a long time.
- The battery is to be disposed of safety.
- The device should only be used with the power supply supplied with the device.
- The appliance must only be powered by safety extra low voltage marked on the appliance.
- Do not pull on the power cord. Be careful not to pinch the cord with objects, as this may damage it or cause a fire.
- Keep the power cord away from sharp edges and hot surfaces.
- Do not use flammable substances to clean the device. Do not bring cigarettes, lighters or matches near the appliance. This could ignite the device.
- Unplug and turn off the device while transporting.
- The appliance is not suitable for cleaning long pile carpets.
- While the product is in operation, make sure all doors leading outside are closed.
- If the product has been exposed to temperatures below 0^ C for some time it should be kept at room temperature for at least 2 hours before turning it on. This device must be used in the temperature range from +5^ C to +40^ C.
- The manufacturer reserves the right to introduce minor changes into the product design without prior notice, unless such changes influence significantly the product safety, performance, and functions.
- The production date is indicated on the product and / or on the packaging, as well as in the accompanying documentation, in the XX.XXXX format, where the first two digits "XX" are the month of production, the next four digits "XXXX" are the year of production.
Proper use
- This device is designed for vacuuming up normal house dust.
1. BEFORE THE FIRST USE
Preparation
- Remove all objects which may get inside the appliance or cause an obstruction from the floor before work starting.
- Check no wires, cables, curtain brushes, or bags are one the way of the device.
- Remove all items that may be dropped by the appliance (e.g. vases, small table lamps, decorative items)
- The device can pass the way between two objects if the distance between them is at least 40 cm.
- The appliance may get stuck under pieces of furniture if they have a low fit. Block his way with a pot of flower (for example) to avoid it.
- Make sure the filter is in place. Using the device without a filter may cause the vacuum cleaner to malfunction.
Before first use
- Unpack the product contents and remove all transport and packaging elements
• Install the side brushes - Set up the charging station
- Charge the device's rechargeable battery.

Side brushes assembling (Fig. 2)
- Place the device upside down on the floor or table
• Install the side brush marked R in the hole marked R.
• Install the side brush marked L in the hole marked L. - If the brushes are properly installed, a click should sound
Switching on the instrument (Fig.

2
- Hold the ⏻ button on the panel pressed for 5 seconds, a beep will sound, the device will turn on and go into standby mode, while the operation indicator light will turn blue.
- Press the ⏻ button, the vacuum cleaner will start working in the standard mode.
- To pause the vacuum cleaner, press the button again.
- You can forcibly return the vacuum cleaner to the base by pressing the button
NOTE:
If the device is not used for 5 minutes, it will turn off.

Connecting the Base (Fig.
)
- The charging contacts on the instrument and base must always be kept clean so that the battery can be charged. To do this, periodically wipe them with a dry soft cloth.
- Place the base on a clean, level floor with its back against a wall, near a power outlet. There should be no obstacles on the way of the device to the base. There should be 1.5-2 meters of free space in front of the base, without furniture and other items. Behind the base there should be no reflective surfaces (for example, mirrors).
- Connect the adapter to the base, insert the adapter plug into the mains, the indicator light of the base will light up.
- Make sure that the base body is not obstructed by foreign objects.
Charging from the base (Fig.

Manual recharge
Place the device on the base for recharging by connecting the charging contacts of the base and the robot.
You can also press the

on to have the device automatically head to the charging base
Automatic recharging
- As soon as the battery runs out, the device will automatically go to the base, where the battery will be recharged automatically. To do this, the base must be connected to the electrical network.
When the device is fully charged, the indicator will be solid blue. - If the instrument cannot detect the base on its own (for example, if the room is too large or there is an obstacle in its path), use the direction buttons on the mobile app to direct the instrument to the base, or place it directly on the base manually.
- Press the ⏻ button on the control panel - the device will leave the base and start working in automatic mode.
Charging from adapter
Plug one end of the adapter cord into the power socket on the vacuum cleaner and the other end into a power outlet, the charging indicator light will flash blue. When the battery is fully charged, the indicator will turn solid blue.
Accumulator charging
- Fully discharge the battery every few months and recharge. (To increase its service life)
IM022
- Before switching on for the first time, or if the device has not been used for a long time, it will take approximately 12 hours to charge the battery; in the future it will take about 2-3 hours. The battery will be fully charged after 2-3 full charge and discharge cycles. The device works without recharging up to 70 minutes.
Using a Floor Cleaning Cloth (Fig.

- The vacuum cleaner kit includes a cloth that is designed for wet cleaning of the floor.
- Attach the Velcro included in the scope of delivery of the device to its base according to Figure 5
- Attach a pre-moistened floor cloth to the Velcro described above to the bottom of the appliance.
- Follow all the steps above to turn on the instrument.
2. INSTALLATION OF WI-FI APPLICATION


1.1. Go to the Home Intellect website using the links above.
1.2. Install the Home Intellect app on your mobile device or tablet.
1.3. Make sure your smartphone or tablet is connected to 4G internet or Wi-Fi.
1.4. Make sure your smartphone or tablet is running iOS 8.0 (or higher) or Android 4.4 (or higher).
1.5. Make sure your router's signal is in the 2.4GHz band.
1.6. Make sure robot vacuum cleaner is fully charged and base is connected to the network.
1.7. Make sure your mobile device and vacuum cleaner are on the same wireless local area network (WLAN).
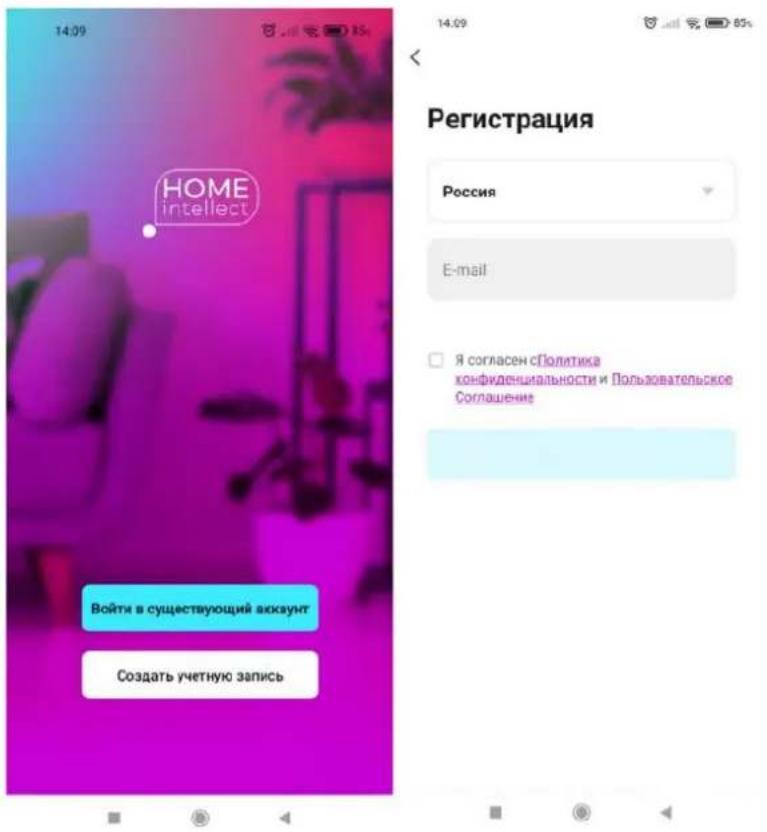
2. Create an account in the mobile application:
2.1. Open the application and create a new account in it:
Enter your email address
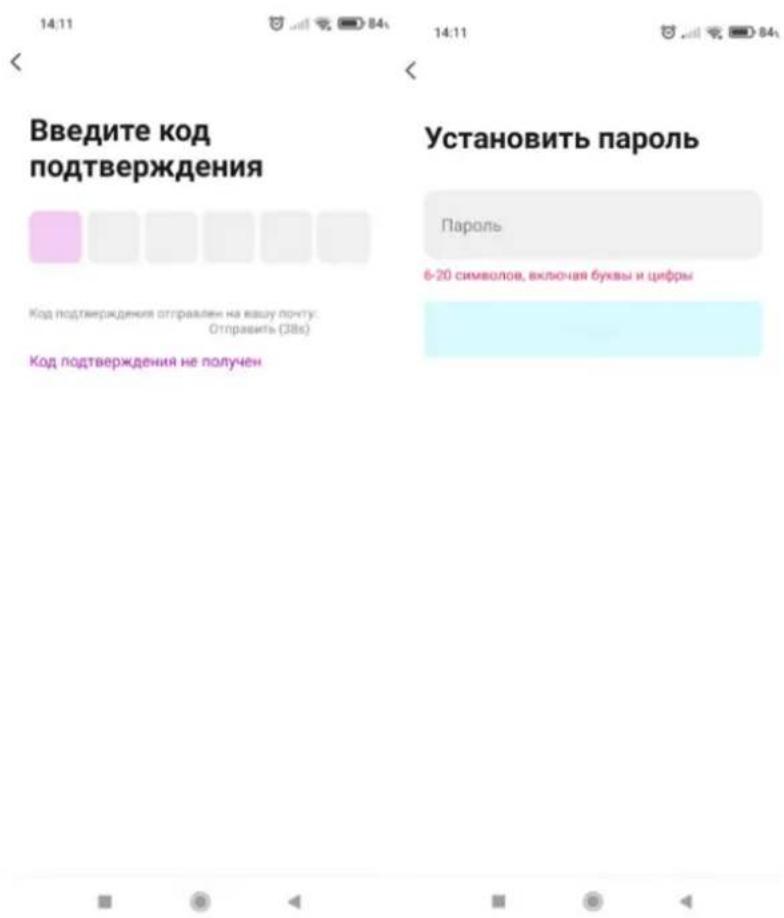
An automatic email with a confirmation code will be sent to the entered email address, enter this code in the field that appears
2.2. Set the desired password for your account
Your new account will consist of an email and a password you created
3. Connect the device to the mobile application
Press and hold the button on the instrument panel for 5-6 seconds, there will be two beeps and the indicator on the instrument panel will flash quickly - the device is ready to be paired with the HOME INTELLECT mobile application.
Place the device at a distance of no more than 5 meters from the water heater.
3.1. Make sure geolocation is enabled on your device.
3.2. Click on the plus icon in the top corner of the screen.
3.3. Select "Add Device"
3.4. Next, you need to select "Robot-vacuum cleaner"
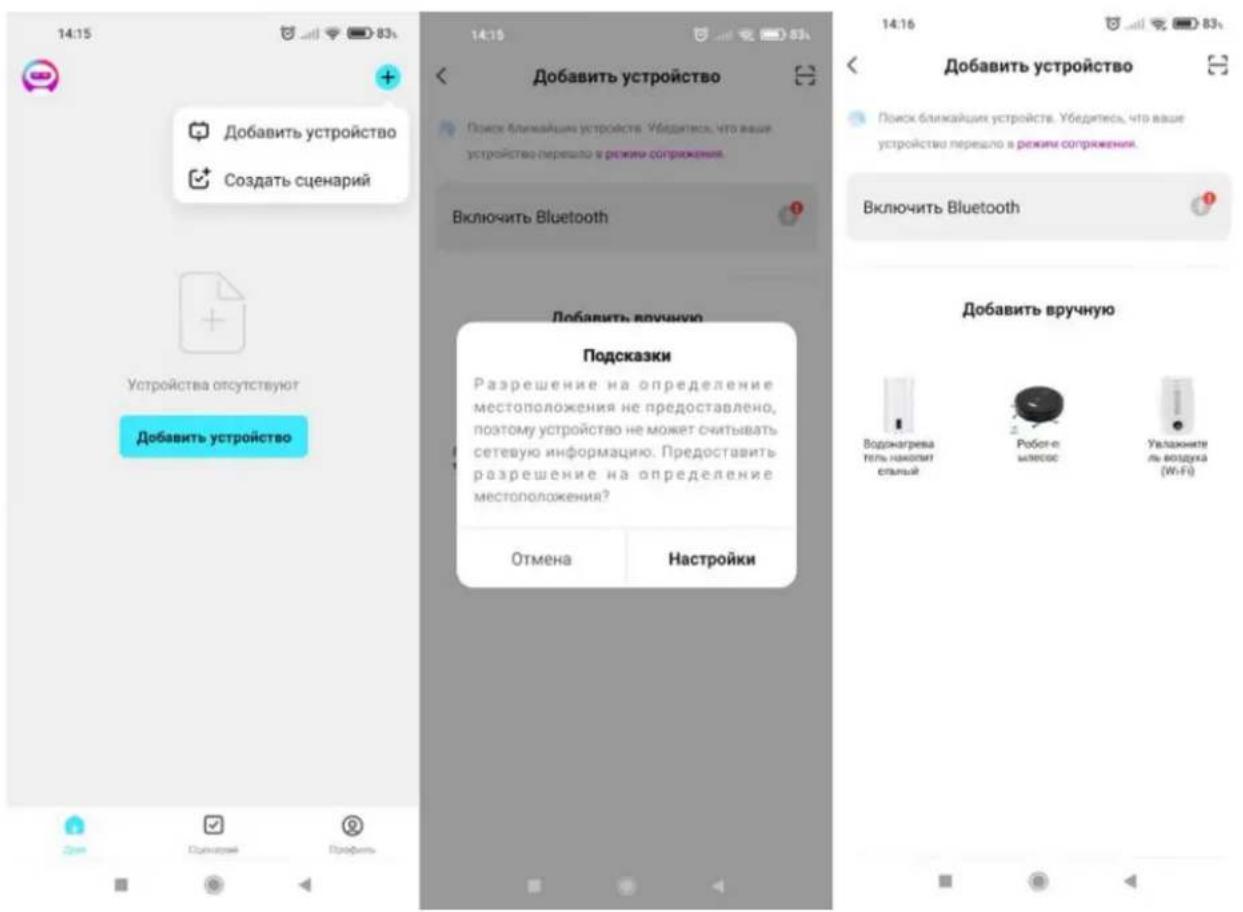
3.5. If the location feature on your mobile device is enabled, the app will locate the nearest Wi-Fi hotspot.
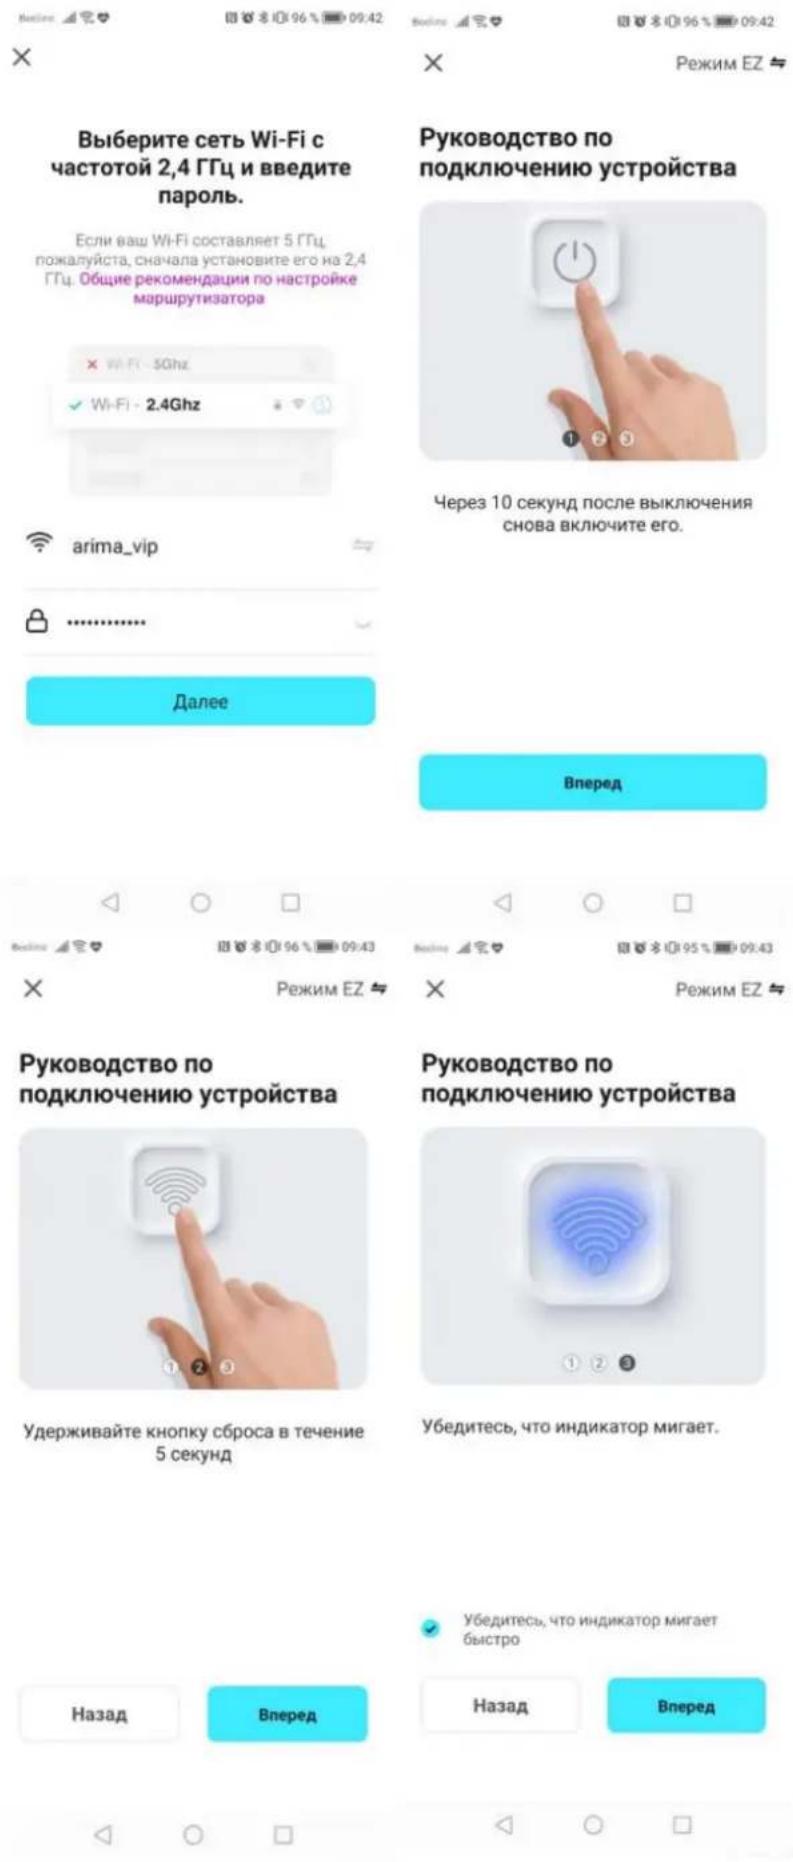
3.6. Enter the password for this Wi-Fi (make sure the password is correct)
3.7. Follow the instructions on the screen of your device.
3.8. Specify the status of the indicator light and click "Go to connection" to connect Wi-Fi with the article number of your device.
3.9. The application will take no more than 2 minutes to detect the device
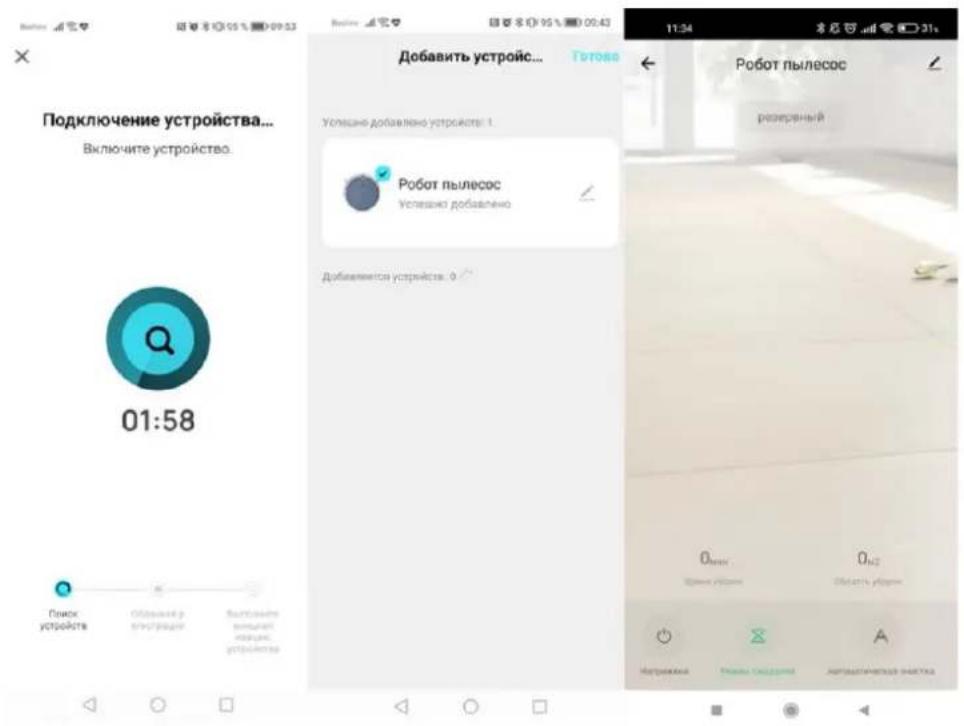
- The HOME INTELLECT mobile application contains all the functions of the device available on the control panel
Main features of Wi-Fi application:
Power Off Button

- Press "Power Off" Button, to turn off the robot.
Stand by

- Press the "standby", pause the robot into standby mode
Auto Button

- Press "Auto", buzzer rings once, the robot will enter to auto cleaning mode.
Edge Button

- Press "Edge", buzzer rings once, the robot will enter to edge cleaning mode to clean along the edge of the wall.
Spot Button

- Press "Spot" button, buzzer rings once, the robot will enter to spot cleaning mode to start cleaning specific areas.
Auto Charging Button

- Press "Auto Charging", buzzer rings once, enter to auto recharging mode.
Manual mode (You can choose to withdraw)

- Press manual button into human operation
Start/Pause II
• To start cleaning.
• To stop current cleaning mode.
Direction button

- The robot will move according to selected direction (press the let/right for once, choose the direction you want robot move, then press the forward/back)
Schedule Button

Select the "Timer" function, then "Add Schedule"
Select start time
Select the day of the week on which the action will be repeated
Select the mode of operation of the vacuum cleaner (automatic cleaning, cleaning along walls, spot cleaning, return to base for recharging)
Click the "Save" button in the upper right corner.
The appearance of the mobile application, its interface, icons and the location of functions may change without prior notice to improve its performance.
WHAT TO DO IF THE APP DOES NOT DETECT THE DEVICE:
1) Make sure the device is ready to be connected to the app. Press and hold the button on the
instrument panel for 5-6 seconds, there will be two beeps and the indicator on the instrument panel will flash quickly. On the mobile app, select EZ Mode.
2) Make sure your Wi-Fi is 2.4 Hhz.
3) Make sure that password to Wi-Fi is correct
3. ALICE VOICE ASSISTANT
With help of the Home Intellect system, you can easily control your smart home appliances from your smartphone, as well as using the Yandex Alice voice assistant. Connect your equipment to the program and control it from anywhere in the world. To control the device using the voice assistant Alice, in addition to the main Home Intellect application, you need to install the Home with Alice application and link accounts.
QR for downloading Home Intellect application:

QR for downloading the application Smart Home with Alice to control the voice functions of the device:

Connection procedure, linking Home Intellect application accounts and skill:
- Download Home Intellect app from the App Store or Google Play
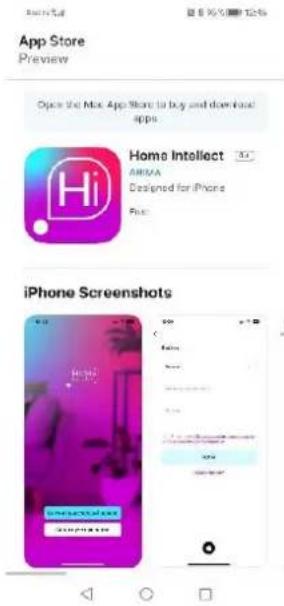
- Log into the app with your Home Intellect account or register as a new user
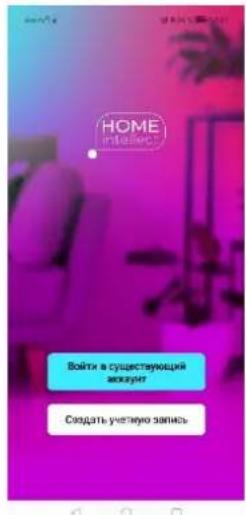
- Add your compatible devices to the Home Intellect app menu
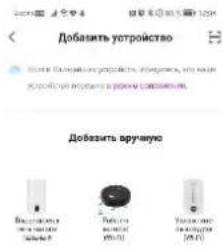
- Download the House with Alice app from the App Store or Google Play
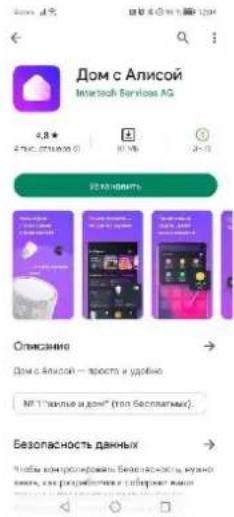
- In the House with Alice application, log in with your Yandex account or register as a new user. Add a new device through the "Devices" menu
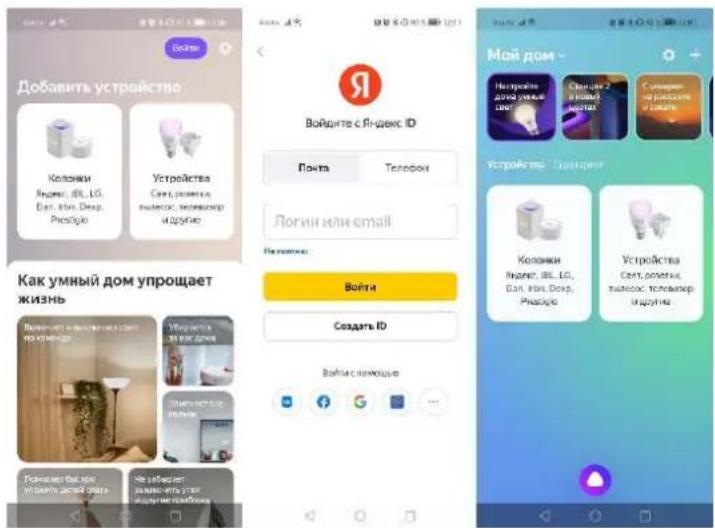
- Select the Home Intellect skill from the list of manufacturers, click the "Link to Yandex" button and enter the registration data for the Home Intellect application from step 2. Link devices for this application account, enter the login, password for Home Intellect from step 2. Pass authorization from Yandex.
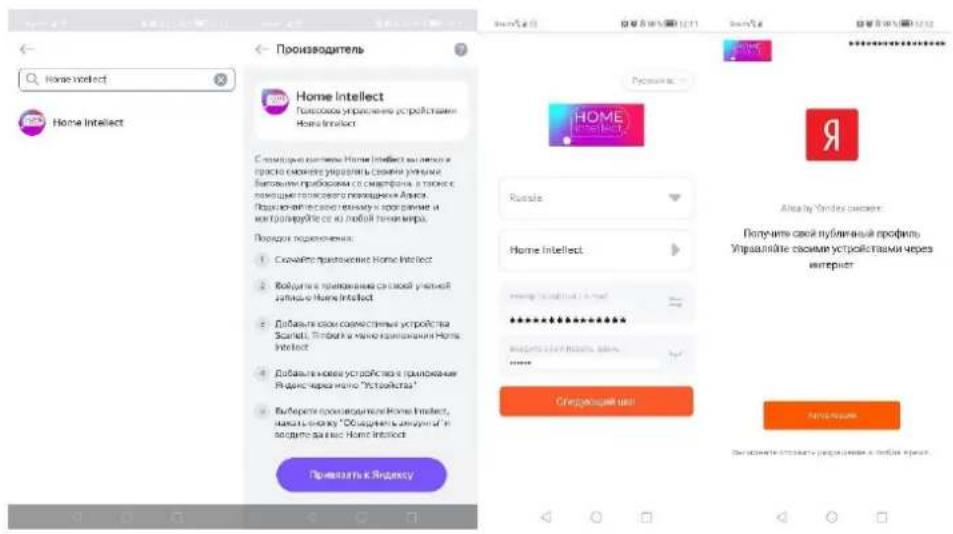
- Click the "Update device list" button, check the settings of the detected devices, change the name as necessary and specify the room, click "Finish setup". Now you can control smart devices using Alice. The list of voice commands is available in the "Voice commands" tab
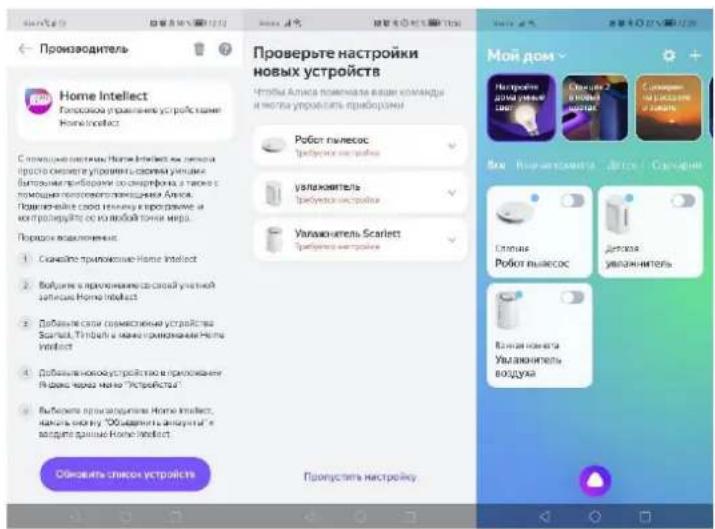
The number of voice commands to control smart technology with Alice is limited. When adding new devices in the Home Intellect application, it is necessary to update the list of devices in Alice. To do this, press the + button in the DEVICES interface, then ADD DEVICE, select Home Intellect in the list, then click UPDATE DEVICE LIST.
4. AFTER USE
Cleaning and care
- ATTENTION! Any care actions can only be performed with the device turned off and disconnected from the mains!
IM022
- If necessary, wipe the housing with a damp cloth.
- Only the dust container may be rinsed with water. The device itself, filters, must not be immersed in water or any other liquids. Before replacing the dust container, make sure that all parts of the appliance are dry.
- No parts or accessories of the vacuum cleaner are suitable for washing in a washing machine or dishwasher!
- When cleaning the instrument, do not use corrosive or abrasive products. They may damage the surface.
Cleaning the dust container (Fig.

A. Open the lid of the vacuum cleaner by pulling the lid open handle.
B. Pull the dust box out of the body
C. Release the latch on the dust box cover
D. Open the lid, empty the contents into the trash can
E. Remove the HEPA filter from the dust container.
F. Rinse the dust box with running water
G. Dry the dust box
H. Replace the HEPA filter
NOTE:
- If you use the vacuum cleaner regularly, dust and dirt may accumulate around the air intake port. To ensure maximum efficiency and uniform air intake, periodically clean this hole.
- Do not wash the container in a washing machine, dishwasher or similar.
- Periodically clean the filter with a soft toothbrush.
- Be sure to empty the container after every cleaning.
- Never operate the appliance without a filter installed if the filter is damaged or dirty. Otherwise, dust will enter the motor and cause damage to the device.
- Do not use the device if the container is full. When the container is full, dirty air clogs the filter of the vacuum cleaner, as a result, the engine overheats and fails.
- Do not use the device for removing construction debris (cement, whitewash, plaster, metal shavings, etc.). These particles lead to engine failure.

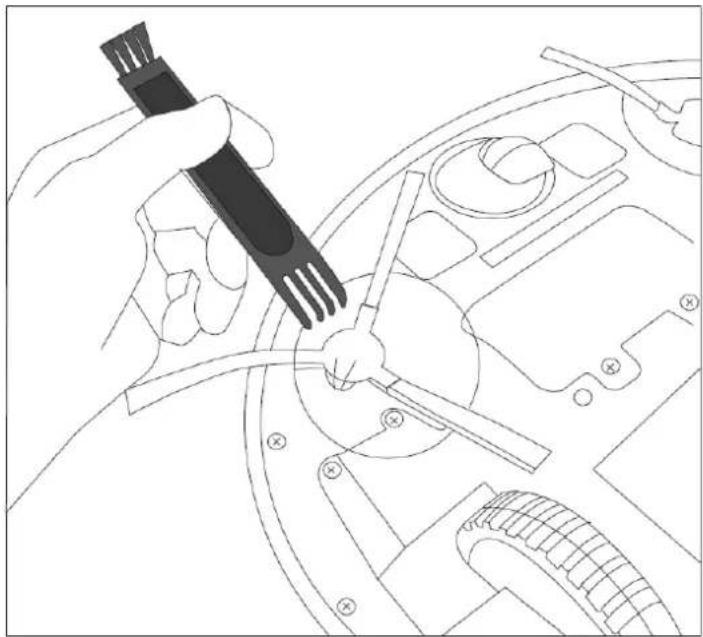
CLEANING BRUSHES (Fig. 1)
- The debris that has stuck to the brushes and the hair that has wound up must be removed from time to time. It is recommended to clean them after 4-5 cycles of operation.
- Turn off the appliance. Gently clean the rotating brushes with the hard end of the cleaning brush that comes with the kit.
- If there is a lot of hair on the brushes, use scissors to remove them.

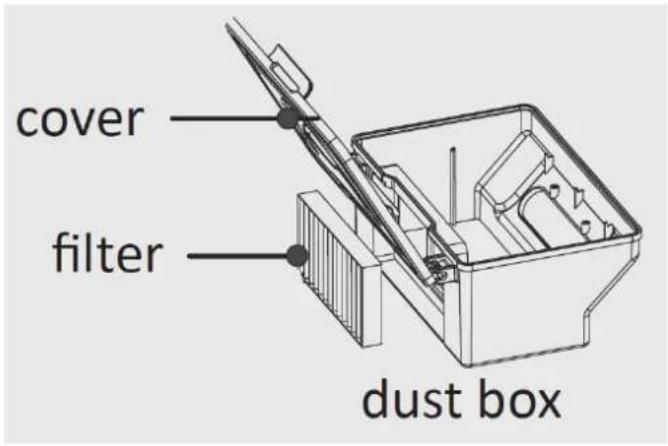
HEPA filter cleaning (Fig. 2)
Take out the dust bin, open the filter cover, take out the filter. Shake it to clean, it is also possible to vacuum this filter with another vacuum cleaner
NOTE: It is not recommended to wash HEPA filter in order not to damage it.
Fall sensors cleaning
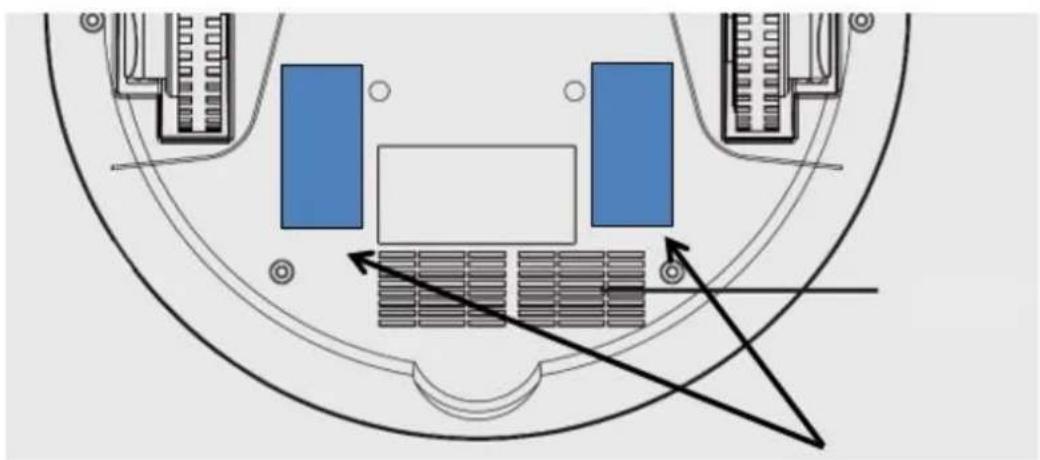
Unplug the device, empty the dust bin. Put the device upside down on a flat surface. Use slightly wet cloth to wipe the sensors (Fig. 2)

BATTERY REMOVAL
- The battery must be removed from the appliance before its disposal.
- When removing the battery, the appliance must be disconnected from power supply.
STORAGE
- Fulfil all the steps from parts CARE AND CLEANING.
- Store the unit in dry cool place or in the original box.
TROUBLESHOOTING
- If all solutions given above don't work for you, please re-set the robot by switching on the power button
| Problem | Possible Cause | Solution |
| Red LED stays after power on | 1. Battery Low condition2. Main body is picked up | 1. Recharge the battery2. Re-place the robot on the floor |
| Vacuum on but can not collect dirt and hair | 1. The dust bin is full2. The filter is not installed correctly | 1. Clean the dust bin2. Re-install the filter correctly |
| The product is moving backwards after being started | 1. The product is on dark color floor2. Anti-drop sensor light was covered | 1. Put the robot on light color floor.2. Clean anti-drop sensor light. |
| LED indicators flash in blue after 2hrs charging | Power supply might been cut off during charging | The robot can be operated if the battery has been fully charged for 2hrs |
| The side brushes crooked, not good to sweep | Being used for a long time | If it becomes crooked, please scald it in hot water to recover it to its original shape |
| The product cannot start | 1. Battery is not installed properly2. Battery low3. The robot is under protection status | 1. To install the battery correctly2. To have the battery fully charged(turn off the cleaner first)3. To re-set the robot |

The symbol on the unit, packing materials and/or documentations means used electrical and electronic units should not be toss in the garbage with ordinary household garbage. These units should be pass to special receiving point.

The symbol on the unit, packing materials and/or documentations means the battery used in this product not be toss in the garbage with ordinary household garbage.
For additional information about actual system of the garbage collection, address to the local authority.
Valid utilization will help to save valuable resources and avoid negative work on the public health and environment which happens with incorrect using garbage
Мазмуны
- Before the first use
- EN 1. Install side brushes
- EN 2. Turn on the device:
- Dear customer!
- Technical characteristics
- IMPORTANT SAFEGUARDS
- IM022
- Proper use
- BEFORE THE FIRST USE
- Preparation
- Before first use
- Side brushes assembling (Fig. 2)
- Switching on the instrument (Fig.
- NOTE:
- Connecting the Base (Fig.
- Charging from the base (Fig.
- Manual recharge
- Automatic recharging
- Charging from adapter
- Accumulator charging
- Using a Floor Cleaning Cloth (Fig.
- INSTALLATION OF WI-FI APPLICATION
- Create an account in the mobile application:
- Open the application and create a new account in it:
- Set the desired password for your account
- Connect the device to the mobile application
- Main features of Wi-Fi application:
- Power Off Button
- Stand by
- Auto Button
- Edge Button
- Spot Button
- Auto Charging Button
- Manual mode (You can choose to withdraw)
- Start/Pause II
- Direction button
- Schedule Button
- WHAT TO DO IF THE APP DOES NOT DETECT THE DEVICE:
- ALICE VOICE ASSISTANT
- QR for downloading Home Intellect application:
- Connection procedure, linking Home Intellect application accounts and skill:
- AFTER USE
- Cleaning and care
- Cleaning the dust container (Fig.
- CLEANING BRUSHES (Fig. 1)
- HEPA filter cleaning (Fig. 2)
- Fall sensors cleaning
- BATTERY REMOVAL
- STORAGE
- TROUBLESHOOTING
- Мазмуны
Brand : Scarlett
Model : Silver Line SC-VC80RW01
Category : Robot vacuum