
GL5 - Instant and Storage Water Heaters Gleamous - Free user manual and instructions
Find the device manual for free GL5 Gleamous in PDF.


| Product Type | Instantaneous Water Heater & Storage Cumulus |
| Brand | Gleamous |
| Model | GL5 |
| Dimensions (H x W x D) | Approximately 50 x 30 x 25 cm |
| Weight | Approximately 15 kg |
| Energy Source | Electricity (230 V, 50 Hz) |
| Power Consumption | Approximately 3.5 kW |
| Storage Capacity | 5 liters |
| Flow Rate | Approximately 3 L/min |
| Temperature Range | 30°C to 60°C |
| Functions | Instantaneous heating, storage mode, temperature control |
| Installation | Wall-mounted, horizontal or vertical |
| Safety Features | Thermal cut-off, overheat protection, pressure relief valve |
| Materials | Stainless steel tank, plastic exterior |
| Maintenance | Descaling every 6 months, check anode rod annually |
| Spare Parts | Heating element, thermostat, anode rod, pressure valve |
| Repairability | User-replaceable parts, professional service recommended |
| Certifications | CE, RoHS |
| Warranty | 2 years |
Frequently Asked Questions - GL5 Gleamous
User questions about GL5 Gleamous
0 question about this device. Answer the ones you know or ask your own.
Ask a new question about this device
Download the instructions for your Instant and Storage Water Heaters in PDF format for free! Find your manual GL5 - Gleamous and take your electronic device back in hand. On this page are published all the documents necessary for the use of your device. GL5 by Gleamous.
USER MANUAL GL5 Gleamous
Instant Hot Water Heater
For proper operation and maintenance please Read the instruction manual before installation.
Instant Hot Water Heater

natural_image
Abstract geometric logo with a white letter 'G' inside a white circle on black background (no text or symbols)Gleamous®
www.gleamoushotwater.com.au
Thankyou for choosing the GL5-15 complete home instant hot water unit.
Your safety is very important!
This manual provides many important safety points. Please read carefully and follow the instruction.
WARNING

It is dangerous and may cause injury if you don't follow safety instructions.
Consumers Responsibilities'
This manual helps you to gain a better understanding of the installation, operation, and maintenance of your electric water heater. It provides key safety information.
We urge you to read all of the instructions thoroughly before installation or operation. We highly recommend keeping this manual for future reference.
The manufacturer will not be liable for any damages caused by failure to follow installations instructions and operating procedures.
This unit should only be installed by a fully qualified electrical contractor.
This heater is not intended to be operated by children, or mentally impaired personnel, unless under adult supervision and guidance.
Children are not allowed to play with the water unit.
Retain your original receipt as the proof of purchase.
Main Features
- Adjustable water temperature settings from 30^ to 50^
- New die-cast heating tank,
- Clear LCD screen displays the actual outlet water temperature
• Memory function, automatically sets to the last selected temperature. -
Safety precautions:
-
Protects against dry heating and overheating;
- ELCB test device to prevent electric shocks.
- Flow switch as safety device;
- Automatic malfunction checking.
Part Identifications

Installation Manual
Opening the Packing Materials
Attention: Do not remove any of the permanent instructions and labels. Dismantle the exterior packing and place all components aside.
- Inspect all parts prior to installation and start-up. Make sure there is no visible damage.
- Carefully read all instructions before install.
• After installation, dispose of packaging material in the proper manner.
Location Requirements
Select a suitable location near point of use.
Hot water pipe should be kept as short as possible to prevent excessive heat loss.
Gleamous®
Note:
- For the best installation, make sure there is at least 1.8 meters distance between the hook of water heater and the floor. (Refer to installation drawing for more details, Please see page **)
- Power switch must be away from the water outlet, or make sure there is at least 1.2 meters distance between them. It can be dangerous when water splashes to the power.
- The water heater must be installed indoors, it should be located in an area not subject to freezing temperatures.
- The material of water heater cover is ABS, so require there is no heat source or combustibles (Cabinet, curtain, carton ect.) near water heater.
- Water outlet must be connected to normal water faucet or connecting point.
Electrical Requirements
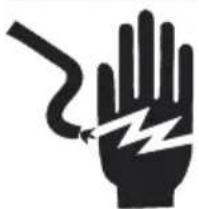
WARNING

natural_image
Black-and-white illustration of a hand with a lightning bolt and smoke trail (no text or symbols)Electric Shock Hazard
Disconnect power before servicing.
Replace all parts and panels before operating.
No following instruction may result in death or electric shock.
We highly recommend you to get a qualified electrician to install the water heater instead of performing by yourself, unless you are qualified for electrical installation.
In process to the electrical connections, make sure to follow points as following:
A. A separate switch is required to be installed.
B. The use of a plug and socket is NOT recommended.
And choose the RCCB(Air-break switch) or junction box according to the table of technical parameters.
C. The water heater and electrical supply must be earthed.
D. The water heater should the independent wiring, not probably use in common a line with other electric appliances.
E. All wiring MUST meet the local regulations. Any interrogations, please consult a qualified electrician. A type connections is shown in Picture
F. Correct size of wire conductor corresponds to different electrical loading should be used. The following table provides a reference for selection the best type of wire conductor.
| Voltage (V) | Power (KW) | Amperes (A) | Recommended Conductor Size (Copper Core Cable) | Fuse/MCB (A) | ON/OFF Switch (A) | Ammeter | Max operating Pressure | Dimensions |
| 415V50/60Hz | 14 | 4*2.5mm ^2 | 3pole 20amp | 13.75 / 20r Phase | 10(40)A | 700KPa | 250 x 75 x 400mm |
Heater Fixing
Fig. 1

Heater Fixing for GL5, Three Phase
Fig. 2

- The unit should be wall-mounted installed.
- Determine the right position of installation for the unit; According to Figure 1 and Figure 2.
- Fix the hook on the wall and position unit accordingly.
- Connect the unit to main water pipe.
- Install a Non-Return Isolating valve only if needed by local standards.
- When installing on plastic outlet fittings. DO NOT USE TEFLON TAPE
- The unit shall not be powered up unless you make sure that it is filled with water and all pipe lines are well installed without leakage and the power supply is installed correct.
Electrical Connection
Always reference the wiring diagram located on Instruction Manual for the correct electrical connections.
When installing the electrical wiring to the water heater, please make sure: The power is shut off to the water heater.
Schematic Wiring Diagram
Schematic Wiring Diagram for Three Phase

flowchart
graph TD
    A["L"] --> B["Thermal Controller"]
    C["L"] --> B
    D["E"] --> B
    E["N"] --> B
    B --> F["Transformer"]
    F --> G["Power PCB Control PCB"]
    G --> H["Heating Element"]
    H --> I["Relay"]
    G --> J["Heating Element"]
    J --> K["Relay"]
    G --> L["Heating Element"]
    L --> M["Relay"]
    G --> N["Heating Element"]
    N --> O["Relay"]
    style A fill:#f9f,stroke:#333
    style C fill:#f9f,stroke:#333
    style D fill:#f9f,stroke:#333
    style E fill:#f9f,stroke:#333
    style F fill:#ccf,stroke:#333
    style G fill:#ccf,stroke:#333
    style H fill:#cfc,stroke:#333
    style I fill:#fcc,stroke:#333
    style J fill:#fcc,stroke:#333
    style K fill:#fcc,stroke:#333
    style L fill:#fcc,stroke:#333
    style M fill:#fcc,stroke:#333
Methods of Operation
GL5

A. Outlet water temp. & Malfunction code display B. Water flow status C. Sliding touch area D. Setting temp. & Water Flow E. Regulating key + F. ON/OFF G. Regulating key – H. Sliding status display I. Mode change key
Before operating the water heater, perform the following:
- Make sure the water heater has been properly installed.
- Completely fill the tank with water. (After piping has been properly connected to the water heater, open the inlet valve and allow the tank to completely fill with water to purge excess air. Then close the tap and check all connections for leaks.
- Turn power on to the water heater only after the tank is completely filled with water.
- The minimum water flow rate for operation is at least 2 L/Min.
Gleamous®
Operation Instructions:
-
Switch on the power, The buzzer is with long sound and the power indicator "G" lightens, the system enters in standby mode.
-
Switch on the water heater by press “”. The display screen will display the setting temperature & real outlet water temperature.
-
The user can set the desired temperature by touch the control button "+", "-".Press the "+" or "-"button each time.the temperature will increase or decrease 1°C.
-
The user can also set temperature by slide the touch aera. Slide touch slowly from left to right or from right to left each time, the temperature will increase or decrease 5°C.
-
Press button“...”can shift display mode among water flow & the setting temperature of outlet water.
-
In some case, when the incoming water temperature is too low, if water is not heat enough for shower even though you already set on max power, you can reduce the water inflow by adjusting the regulator valve to get your desired temperature.
-
If the product you get is with a shower set, you can choose several selections of spray types by turning the shower head.
Notice:
A. When you are showering, do not spray water to the water heater.
B. When you taking shower, if close the water valve and open again in very short time, the water temperature will probably be higher than your previous setting temperature because of excess heat, please be careful to avoid scalding.
C. Power off: After use, press “*” to switch off the water heater FIRST, then turn off the water inlet valve.
D. If this heater will not be used for a long period of time, disconnect the main power( air -break switch or RCCB). Shall the unit is to be left unused for an extended period of time in a cold region, drain off the water inside it to avoid freezing.
Water Temperature Regulation
The product highest outlet water temperature can up to 50°C. When you are showering, the outlet water temperature should be not higher than 45°C.


In order to prevent scalding, please experience the water temperature by hand before bathing or showering.
Maintenance instruction
Clean the appliance with a damp cloth. It is ok to clean the cover with mild detergent, but DO NOT use turpentine, alcohol, petrol or any other corrosive solutions.
Clean the hand-shower regularly.
Clean the filter regularly: Disconnect the shower head from the hose. Remove the filter mesh washer and flush it with water to remove any trapped sediments. Connect the shower head to the hose in its original position.
Trouble Shooting
| Trouble | Caused | Solution |
| Water leakage from water inlet or outlet | The water pipe not be connected well or rubber gasket damaged | Reconnected the water pipe or change the gasket |
| Power indicator is not light | No power to water heater | Turn on power switch. Check for blown fuses or tripped breaker |
| Power indicator is damaged Change the power indicator | ||
| Water output is not normal or no water output | No water supply or water inlet valve shut off | Wait for water supply or open the inlet valve |
| Wrong connection of water inlet and outlet | Change to the correct connection. | |
| Water pressure is lower than 2L/min | Use when the water pressure is normal. | |
| The filter mesh in the water inlet is jammed | Clean the filter mesh | |
| Shower head is jammed Clean the shower head | ||
| Water temp. is too high Temperature set too high Set temperature to desired setting | ||
| Water temp. is too low | Temperature set too low Set temperature to desired setting | |
| Water flow rate is too high Decrease water flow | ||
Gleamous®
Operation Instructions:
- Switch on the power, The buzzer is with long sound and the power indicator "G" lightens, the system enters in standby mode.
- Switch on the water heater by press “”. The display screen will display the setting temperature & real outlet water temperature.
- The user can set the desired temperature by touch the control button "+", "-".Press the "+" or "-"button each time, the temperature will increase or decrease 1°C.
- The user can also set temperature by slide the touch aera. Slide touch slowly from left to right or from right to left each time, the temperature will increase or decrease 5^ C.
- Press button“...”can shift display mode among water flow & the setting temperature of outlet water.
- In some case, when the incoming water temperature is too low, if water is not heat enough for shower even though you already set on max power, you can reduce the water inflow by adjusting the regulator valve to get your desired temperature.
- If the product you get is with a shower set, you can choose several selections of spray types by turning the shower head.
Notice:
A. When you are showering, do not spray water to the water heater.
B. When you taking shower, if close the water valve and open again in very short time, the water temperature will probably be higher than your previous setting temperature because of excess heat, please be careful to avoid scalding.
C. Power off: After use, press “” to switch off the water heater FIRST, then turn off the water inlet valve.
D. If this heater will not be used for a long period of time, disconnect the main power( air-break switch or RCCB). Shall the unit is to be left unused for an extended period of time in a cold region, drain off the water inside it to avoid freezing.
Water Temperature Regulation
The product highest outlet water temperature can up to 50^ C. When you are showering, the outlet water temperature should be not higher than 45^ C.

In order to prevent scalding, please experience the water temperature by hand before bathing or showering.
Maintenance instruction
Clean the appliance with a damp cloth. It is ok to clean the cover with mild detergent, but DO NOT use turpentine, alcohol, petrol or any other corrosive solutions.
Clean the hand-shower regularly.
Clean the filter regularly: Disconnect the shower head from the hose. Remove the filter mesh washer and flush it with water to remove any trapped sediments. Connect the shower head to the hose in its original position.
Trouble Shooting
| Trouble | Caused | Solution |
| Water leakage from water inlet or outlet | The water pipe not be connected well or rubber gasket damaged | Reconnected the water pipe or change the gasket |
| Power indicator is not light | No power to water heater | Turn on power switch. Check for blown fuses or tripped breaker |
| Power indicator is damaged Change the power indicator | ||
| Water output is not normal or no water output | No water supply or water inlet valve shut off | Wait for water supply or open the inlet valve |
| Wrong connection of water inlet and outlet | Change to the correct connection. | |
| Water pressure is lower than 2L/min | Use when the water pressure is normal. | |
| The filter mesh in the water inlet is jammed | Clean the filter mesh | |
| Shower head is jammed Clean the shower head | ||
| Water temp. is too high Temperature set too high Set temperature to desired setting | ||
| Water temp. is too low | Temperature set too low | Set temperature to desired setting |
| Water flow rate is too high | Decrease water flow | |
| Sliding touch fail | The speed of sliding touch is too fast | Slow down the speed of sliding touch |
| Malfunction code “E1” | Current leakage | Contact the service centre for repair |
| Malfunction code “E2” | Water Flow switch is open or short circuit | Contact the service centre for repair |
| Malfunction code “E3” | The temp. sensor of outlet is short circuit or open circuit | |
| Malfunction code “E4” | The temperature of outlet water is higher than 60 degrees | Check the cause of so high temperture |
If the solution instruction we provided can not solve the problems, please contact professional maintenance man.
Other key notices:
The water heater must be earthed. The earth wire and zero line shall be strictly isolated.
When abnormal occurrence happens, make sure power dump immediately and contact maintenance man as soon as possible. It is dangerous to fix it by yourself.
DO NOT turn on the power switch when water in the tank is frosted.
DO NOT use plump cement on connecting. If necessary, use only thread or seal-tape.
Shut off the power immediately if there is a large amount water flowing out from the water heater.
Have a service life of any product, please use the period stipulated by the state scrapped, due either scrapped or abandoned half-way updating, should be sent to the local waste collection stations.
INSTANT HOT WATER SOLUTIONS

natural_image
Abstract geometric logo with a stylized 'G' inside a circle (no text or symbols)www.gleamoushotwater.com.au
- Instant Hot Water Heater
- Your safety is very important!
- WARNING
- Consumers Responsibilities'
- Main Features
- Part Identifications
- Installation Manual
- Opening the Packing Materials
- Location Requirements
- Gleamous®
- Note:
- Electrical Requirements
- Heater Fixing
- Electrical Connection
- Schematic Wiring Diagram
- Methods of Operation
- Before operating the water heater, perform the following:
- Operation Instructions:
- Notice:
- Water Temperature Regulation
- Maintenance instruction
- Other key notices:
- INSTANT HOT WATER SOLUTIONS
Brand : Gleamous
Model : GL5
Category : Instant and Storage Water Heaters