
TXA-820 - Receiver Monacor - Free user manual and instructions
Find the device manual for free TXA-820 Monacor in PDF.


| Product Type | Active Speaker System with Integrated Receiver |
| Brand | Monacor |
| Model | TXA-820 |
| Amplifier Rated Power | 50 W |
| Amplifier Music Power | 80 W |
| Speaker Configuration | 8" (20 cm) bass driver + 1" (2.5 cm) tweeter |
| Frequency Response | 70 – 17,000 Hz |
| Input Sensitivity (Mic) | 6 mV |
| Input Sensitivity (Line) | 300 mV |
| Line Output Level | 1 V |
| Microphone Inputs | 2 (MIC 1: combo XLR/6.3 mm balanced, switchable Mic/Line; MIC 2: 6.3 mm balanced) |
| Line/Aux Inputs | LINE IN (RCA), AUX IN (3.5 mm) |
| Audio Outputs | LINE OUT (RCA), AUX OUT (3.5 mm) |
| Tone Controls | Bass ±10 dB @ 100 Hz, Treble ±10 dB @ 10 kHz |
| Bluetooth | Yes, compatible with A2DP protocol |
| Wireless Receiver | UHF 863.1–864.9 MHz, 16 channels, diversity |
| Wireless Range | Approx. 30 m |
| Power Supply | Mains 230 V/50 Hz (130 VA) or internal rechargeable lead-gel batteries (2 × 12 V/4.5 Ah) |
| Battery Operating Time | 4 – 6 hours |
| Dimensions (W × H × D) | 305 × 510 × 265 mm |
| Weight | 12.5 kg |
| Operating Temperature | 0 °C to 40 °C |
| Mounting | Stand sleeve for 35 mm tube |
| Transport | Telescopic handle and 2 castors |
| Cleaning | Dry soft cloth only; no water or chemicals |
| Safety | Indoor use only; avoid liquids; disconnect if damaged; repair by skilled personnel |
| Conformity | CE, EU Directive 2014/53/EU |
Frequently Asked Questions - TXA-820 Monacor
User questions about TXA-820 Monacor
0 question about this device. Answer the ones you know or ask your own.
Ask a new question about this device
Download the instructions for your Receiver in PDF format for free! Find your manual TXA-820 - Monacor and take your electronic device back in hand. On this page are published all the documents necessary for the use of your device. TXA-820 by Monacor.
USER MANUAL TXA-820 Monacor
TXA-820
2
3
a

b

4
5

These instructions are intended for users without any specific technical knowledge. Please read the instructions carefully prior to operation and keep them for later reference.
All control elements and connections described can be found on the fold-out page 3.
1 Applications
This active speaker system of the series TXA-820 is a combination of a two-way speaker system and an amplifier and is especially designed for mains-independent operation. For power supply, the unit is equipped with lead gel batteries that are charged when the unit is connected to the mains. Thus, the unit is ideally suited for mobile PA applications, e. g. at events and lectures.
The active speaker system provides controllable inputs for the connection of microphones and audio sources with line signal level (e.g. CD / MP3 player) and line outputs (e.g. for connection of another active speaker system). Audio data from a Bluetooth audio source (e.g. smartphone) can be reproduced via the integrated Bluetooth receiver. The models TXA-...CD additionally provide an audio player for the reproduction of CDs, USB storage media and memory cards.
Each model is supplied with a multifrequency receiver module that uses the UHF frequency range 863.1–864.9 MHz:
- Models TXA-820 and TXA-820CD with a 1-channel receiver module (16 channels) for operation with a single wireless transmitter
- Modell TXA-822CD with a 2-channel receiver module (2 × 16 channels) for operation with two wireless transmitters
The transmitters TXA-800HT, TXA-800HSE or TXA-800ST, for example, can be used.
The model TXA-822CD additionally provides a multifrequency transmitter module (16 channels in the same frequency range) for wireless transmission of the output signal to other active speaker systems of the series TXA-820 / -1020
1.1 Conformity and approval
Herewith, MONACOR INTERNATIONAL declare that the bluetooth module and the receiver module of the units TXA-820, TXA-820CD, TXA-822CD and the transmitter module of the unit TXA-822CD comply with the directive 2014/53/EU. The EU declarations of conformity are available on the Internet:
www.monacor.com
The modules are generally approved for operation in EU and EFTA countries; they are licence-free and require no registration.
2 Safety Notes
The unit corresponds to all relevant directives of the EU and is therefore marked with C.€
WARNING

The unit uses dangerous mains voltage. Leave servicing to skilled personnel and do not insert anything into the openings of the cabinet; inexpert handling may result in electric shock.
- The unit is suitable for indoor use only. Protect it against dripping water and splash water, high air humidity and heat (admissible ambient temperature range 0–40°C).
- Do not place any vessel filled with liquid on the unit, e. g. a drinking glass.
- Do not operate the unit and immediately disconnect the mains plug from the socket
-
if the unit or the mains cable is visibly damaged,
-
if a defect might have occurred after the unit was dropped or suffered a similar accident,
-
if malfunctions occur.
In any case the unit must be repaired by skilled personnel.
- Never pull the mains cable to disconnect the mains plug from the socket, always seize the plug.
- For cleaning only use a dry, soft cloth; never use water or chemicals.
- No guarantee claims for the unit and no liability for any resulting personal damage or material damage will be accepted if the unit is used for other purposes than originally intended, if it is not correctly connected or operated, or if it is not repaired in an expert way.

If the unit is to be put out of operation definitively, take it to a local recycling plant for a disposal which is not harmful to the environment.
3 Overview
1 Mains jack for connection to a mains socket (230 V/ 50 Hz) via the mains cable provided
2 Main control panel (fig. 2)
3 Receiver modul
a 1-channel receiver module (fig. 3a)
b 2-channel receiver module (fig. 3b)
4 CD / MP3 player (fig. 4)
5 Transmitter module (fig. 5)
3.1 Main control panel
6 Tone controls: TREBLE for high frequencies and BASS for low frequencies
7 Volume control for the input signal of the jacks LINE IN
8 Volume control for the input signal of the jack AUX IN and for the integrated Bluetooth receiver
9 Volume control for the input signal of the jack MIC 2
10 Volume control for the input signal of the jack MIC 1
11 Control MASTER for the total volume
12 Button VOICE PRIORITY with LED indicator for the microphone priority function: When the button is pressed (LED illuminated), the volume of the other audio sources will be substantially reduced during microphone announcements.
13 Inputs LINE IN (RCA jacks) and AUX IN (3.5 mm jack) to connect audio sources with line signal level, e. g. CD / MP3 player
14 Outputs LINE OUT (RCA jacks) and AUX OUT (3.5 mm jack) to feed the mixed signal of the audio sources used to another active speaker system or to a recorder, for example
Note: The tone controls and the control MASTER will not have any effect on the output signals at these jacks.
15 Button *to switch the Bluetooth receiver on (keep pressed for a longer period of time) or off (press briefly) ( chapter 7.3) Button flashes: no connection to the Bluetooth audio source Button continuously illuminated: connection to Bluetooth audio source established
16 Input MIC 2 (6.3 mm jack) to connect a microphone
17 Input MIC 1 (combined 6.3 mm/XLR jack) to connect a microphone or a mono audio source with line signal level (e.g. mixer)
18 Selector switch for the input MIC 1: set the switch to "MIC" or "LINE", depending on the audio source connected to the input MIC 1
19 LEDs BATTERY for the rechargeable batteries In case of battery operation: The LEDs indicate the charge level of the batteries. When the LED "20 %" starts flashing, recharge the batteries as soon as possible.
In case of mains connection: The four LEDs light up continuously one after the other while the batteries are being recharged (only the two upper LEDs will light up when the charge level of the batteries is >50% ). When the batteries have been recharged, only the LED “FULL” will light up.
20 POWER switch, will light up during operation
3.2 Receiver module
1-channel receiver module
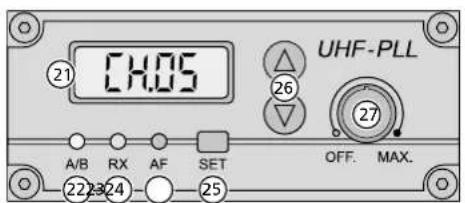
21 Display to indicate the transmission channel
22 Diversity LED A / B: will light up in red or green to indicate which of the two internal reception antennas A or B is presently active
23 Reception LED RX: will light up when the transmitter is switched on and set to the radio frequency of the receiver module
24 LED AF for the audio signal received: will light up when an audio signal is received
25 Button SET to call up the adjusting mode for the transmission channel and to confirm the channel selection
26 Arrow buttons
- in the adjusting mode for channel selection "upward" (△) and "downward" (∇)
- to switch over the display (21) to briefly indicate the radio frequency: as long as Δ or is kept pressed, the display will indicate the frequency instead of the channel
27 On-off switch and volume control
2-channel receiver module
28 Display: indicates the transmission channel and, by means of a segment bar, the strength of the radio signal received (left: receiver unit A, right: receiver unit B)
29 Power switch and volume control, for receiver unit A and receiver unit B of the 2-channel receiver module
30 Buttons to set the receiver module: ☐ chapter 7.2
3.3 CD / MP3 player with remote control
| [IMAGE] | Display |
| MP3 Media "M3" Audio CDs "CD"Replay ▶Pause : #number of the title in the folder and time played of the title (keeps flashing in the pause mode)When the player is stopped: When the player number of folders and titles, e. g.10 - 57 10 folders, 57 titles | Replay ▶Pause : #number of the title and time played of the title (keeps flashing in the pause mode)is stopped:number of titles, e. g.20 - 0000 20 titles |
| "REP1" repeat of the title"REP1 F" repeat of the folder"ALL" repeat of all titles"RAN" random replay"A→B" starts flashing when the start of a loop has been defined and is always indicated while the loop is replayed"PROG" while a title sequence is programmed,"MEMO" while the title sequence is replayed | |
31 POWER button to switch the player on/off
32 IR sensor for the signals of the remote control
| Control element | Function | |||
| on the remote control | ||||
| on the player | ||||
| 23 Volume | ||||
 | ✓ | to set the volume | ||
| 34 Selecting the replay medium | ||||
 | ✓ | to switch between CD, USB storage medium and memory card | ||
| MODE | ✓ | |||
 | Replay/Pause | |||
| PLAY | ✓ | to start the replay and to switch between replay and pause | ||
 | ✓ | |||
| 36 Stop mode / Ejecting the CD | ||||
 | ✓ | to stop the replay; in the stop mode: to eject the CDWhen the CD has been ejected and has not been removed, press this button to retract the CD again. | ||
| EJECT | ✓ | |||
 | ✓ to stop the replay | |||
| 37 Selecting folders | ||||
 | ✓ | to go to the next folder (▶) or to the previous folder (◀◀) | ||
 | ✓ to go to the next folder | |||
| 38 Skipping titles/ Fast forward/reverse | ||||
 | ✓ | ▶▶I: to go to the next title, I◀◀: to go to the beginning of the title; each time the button is pressed again, the player will go back one title at a timefastforward/reverse:keep ▶▶or I◀◀pressed | ||
 | ▶▶I: to go to the next title, I◀◀: to go to the beginning of the title; each time the button is pressed again, the player will go back one title at a time | |||
 | fast forward/reverse: briefly press ▶▶ or ◀◀. At the desired spot, press ▶II. | |||
Notes
- Selecting folders and titles during replay/pause:
Select the folder (brief indication of folder number and time 00:00): the replay of title 1 in the folder will start. If required, go to another title.
Selecting folders and titles in the stop mode:
Select the folder and go to the desired title in the folder (indication of folder number and title number in the folder). Start the replay.
- Button ◀◀: When this button is pressed while the player is in the pause mode (during CD operation) or within a programmed title sequence, the player will immediately go back one title.
| Control element | Function | ||
| on the remote control | |||
| on the player | |||
| [GYTS] Continuous repeat/ ID3 tag feature | |||
 | √ | to switch between: - repeat of the title ("REP1") - repeat of the folder ("REP1 F")* - repeat of all titles ("ALL") - no repeat To activate the ID3 tag feature*, keep the button pressed for 2 seconds during the replay: File name ("FILE"), title name ("TITLE"), artist ("ARTIST") and album ("ALBUM") will scroll through the display. To deactivate the feature, keep the button pressed again for 2 seconds. The feature will automatically be deactivated when the next title is reached or when a button is pressed.* for MP3 media only | |
 | √ | ||
 Continuous random replay/ Confirming the title selection Continuous random replay/ Confirming the title selection | |||
| RANENT | √ | to replay all titles in random order ("RAN"): on/off to confirm the title selection: see position (4) | |
 | √ | to replay all titles in random order ("RAN"): on/off | |
| LNILR | √ | to confirm the title selection: see positions (4) and (4) | |
 Programming a title sequence Programming a title sequence | |||
 | √ | 1. Press PROG ("PROG" will be indicated). 2. Select the first title: - press I◄◄/►►I to go to the title; select the folder before selecting the title, if required or - use the numerical keys to enter the title number* and press RAN/ENT. or ENTER to confirm the title selection. 3. Proceed in the same way to program all other titles (10 max.). 4. Press ►II to start the title sequence ("MEMO" will be indicated). 5. Press PROG to return to the normal replay mode: the title sequence will be deleted. If no repeat function has been activated ("REP1" and "ALL" are available), the player will stop when the title sequence has been replayed and the title sequence will be deleted. * for MP3 media with several folders: The number of the title on the medium, not the number in the folder! | |
 | |||
 | √ | ||
 Muting the sound Muting the sound | |||
| MUTE | √ | to mute/unmute the sound | |
 | √ | ||
| 43 Changing the speed (and the pitch) | |||
 | √ | HI(GH): to increase the speed in 10 steps LOW: to reduce the speed in 10 steps NOR: to return to normal speed Press HI(GH) or LOW repeatedly until the desired speed is reached. The display will briefly indicate the setting, e.g. | |
 | √ | PH-05 normal speed increased by 5 steps PH-02 normal speed reduced by 2 steps | |
 Selecting a title via the title number Selecting a title via the title number | |||
1  | √ | Enter the title number* and press ENTER to confirm. * for MP3 media with several folders: The number of the title on the medium, not the number in the folder! | |
| 45 Repeating a section within a title (continuous loop) | |||
| [BKK3] | √ | Press the button at the start and at the end of the section. To exit the loop, press the button once again. | |
A CD slot: insert the CD until it is retracted automatically
B USB port to connect a USB flash drive or a USB hard disk with separate power supply
C Slot for an SD/SDHC memory card
3.4 Transmitter module
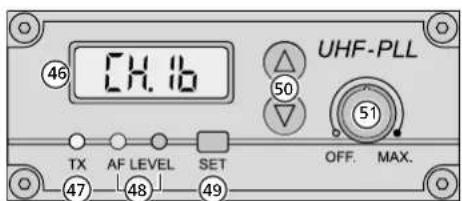
46 Display to indicate the transmission channel
47 Transmitting LED TX: will light up when the transmitter module is switched on
48 Level LEDs AF LEVEL for the input signal of the transmitter module: yellow = minimum level, red = maximum level (also see chapter 7.5, operating step 4)
49 Button SET to call up the adjusting mode for the transmission channel and to confirm the channel selection
50 Arrow buttons
- in the adjusting mode for channel selection "upward" (△) and "downward" (∇)
- to switch over the display (46) to briefly indicate the radio frequency: as long as or is kept pressed, the display will indicate the frequency instead of the channel
51 On-off switch and volume control
4 SettingUp/Transporting
Place the unit as desired or mount it, via the stand sleeve on its lower side, onto a PA speaker stand with a tube diameter of 35 mm. To avoid overheating, set up the unit in such a way that air will be able to flow freely through the cooling fins located in the lower section at the front side of the unit and through the openings of the cabinet.
For transporting, the unit is provided with two castors and a telescopic handle. To extract / retract the handle, press the unlock button on the handle.
5 Power Supply
5.1 Mainsoperation/Recharging the batteries
To operate the unit via the mains and /or to recharge the internal batteries, connect the mains cable provided to the mains jack (1) and to a mains socket (230 V / 50 Hz). The batteries will be automatically recharged when the unit is connected to the mains: while the batteries are being recharged, the four LEDs BATTERY (19) will light up continuously one after the other (only the two upper LEDs will light up when the charge level of the batteries is >50 %). Once the recharging process has been completed, only the LED "FULL" will light up.
It is not necessary to switch on the unit for recharging; however, it can be operated during the recharging process.
After recharging the batteries, disconnect the unit from the mains to avoid unnecessary power consumption.
5.2 Battery operation
In battery operation, the charge level of the batteries will be indicated by the appropriate LED BATTERY (19): "FULL" (charged) → "80%" → "50%" → "20%" (almost discharged).
Important: To prevent damage to the batteries due to deep discharge and to prevent a reduction of their lifetime, please observe the following notes:
- Always fully recharge the batteries prior to initial operation and after longer storage.
- When the LED "20%" starts flashing, the batteries are almost discharged and should be recharged as soon as possible.
– Fully recharge the batteries prior to longer storage and at least every two months during storage.
6 Audio Connections
Switch off the unit prior to making any connection.
6.1 Inputs
Two microphones can be connected:
- to the jack MIC 1 (17) via an XLR plug or a 6.3 mm plug; set the selector switch (18) above the input to "MIC"
– to the jack MIC 2 (16) via a 6.3 mm plug
Audio sources with line signal level (e.g. CD/MP3 player, mixer, tape deck, tuner) can be connected to the inputs LINE IN (RCA jacks) and AUX IN [3.5 mm jack] (13). It is possible to connect both mono units and stereo units to these inputs; for stereo signals, the left channel and the right channel will be combined to a mono signal.
Instead of a microphone, a mono audio source with line signal level (e.g. mono output of a mixer) can be connected to the input MIC 1. Set the selector switch above the input to "LINE".
6.2 Outputs
Additional audio units such as a recorder or another active speaker system can be connected to the outputs LINE OUT and AUX OUT (14). At both outputs, the mixed signal of the audio sources will be available, unaffected by the tone controls (6) and the control MASTER (11). At each output jack – the two RCA jacks and the 3.5 mm jack – a mono signal is available.
7 Operation
CAUTION
Never adjust the active speaker system to a very high volume. Permanent high volumes may damage your hearing!

Your ear will get accustomed to high volumes which do not seem to be that high any more after some time. Therefore, do not further increase a high volume after getting used to it.
1) Prior to switching on the unit, set the control MASTER (11) to "MIN".
2) To switch the unit on and off, use the POWER switch (20). The switch will be illuminated when the unit is switched on. The LEDs BATTERY (19) will indicate the charge level of the batteries.
To prevent damage to the batteries by deep discharge during battery operation, a discharge protection will automatically switch off the unit when required. However, due to self-discharge of the batteries, a deep discharge may also occur when the unit is not operated for a longer period of time. Therefore, always observe the box "Important" in chapter 5.2.
3) Turn up the control MASTER (11) according to the total volume desired; switch on the audio sources and then use the corresponding controls to adjust their volume:
– for the 1-channel receiver module, use the volume control (27)
for the two receiver units of the 2-channel receiver module, use the corresponding volume control (29), CH.A or CH.B operation: see chapter 7.1 or 7.2
– for the integrated audio player, use the volume control VOL (33)
operation: see chapters 3.3 and 7.4
– for the Bluetooth receiver, use the volume control AUX (8)
operation: see chapter 7.3
– for the audio sources at the inputs LINE IN and AUX IN (13), use the corresponding volume controls (7 or 8)
– for the audio sources at the inputs MIC 1 (17) and MIC 2 (16), use the corresponding volume controls (10 or 9)
Switch unused sources off or set their volume to minimum.
Note: When the Bluetooth receiver and a unit at the input AUX IN are used at the same time, the control AUX will define the volume of the mixed signal of both sources.
4) To operate the transmitter module: see chapter 7.5.
5) Use the high-frequency control TREBLE and the low-frequency control BASS (6) to adjust the tone of the active speaker system.
6) Use the button VOICE PRIORITY (12) to activate the microphone priority function. When the button is pressed (LED beneath the button illuminated), the volume of the music currently played will be substantially reduced while announcements via a microphone connected or a wireless microphone are being made. The function will also apply to the output signal of the jacks LINE OUT and AUX OUT (14), and, for the model TXA-822CD, to the signal of the transmitter module.
To deactivate the function, disengage the button again.
Note: When the function is activated and an audio source with line signal level is connected to the input MIC 1 instead of a microphone, the audio signal of this source will also trigger volume attenuation of the music currently played.
7.1 Operating the 1-channel receiver module
1) To switch on the receiver module, advance the on-off switch and volume control (27) from the position OFF. The diversity LED A/B (22) will light up in red or green depending on the internal receiving antenna A or B currently active.
Diversity technology: The transmitting signal is received by two antennas and checked for its quality. The signal of the highest quality will be used.
2) Leave the transmitter switched off for the time being. First set the receiver module to a transmission channel which is free and interference-free:
- Press the button SET (25). The channel indication on the display (21) will start flashing.
- As long as the channel indication keeps flashing (for approx. 10 seconds), the channel can be selected with the buttons and (26): button for channel selection "upward"; button for channel selection "downward".
- Confirm the channel selection with the button SET. (If the selection is not confirmed within 10 seconds with the button SET, the receiver module will return to the channel previously adjusted.)
If the LED RX (23) lights up after channel selection when the transmitter is switched off, interference signals or signals of other transmitters are received on this channel. In this case, set the receiver module to a different channel.
3) It is possible to briefly indicate the radio frequency for the channel adjusted: as long as the button or is kept pressed, the display will indicate the frequency instead of the channel.
4) If the transmitter is switched on and set to the same channel as the receiver module, the LED RX (23) will light up to indicate reception of a radio signal. The LED AF (17) will light up if the transmitter transmits an audio signal of sufficient level on the radio frequency adjusted.
5) Use the control (27) to adjust the desired volume for the audio signal received.
7.2 Operating the 2-channel receiver module
1) The receiver units A and B of the module provide a control (29), CH.A and CH.B respectively, to adjust the volume and to switch them on and off. To switch a receiver unit on, advance the corresponding control from the position "OFF". The left half of the display (28) applies to receiver unit A, the right half applies to receiver unit B. When a receiver unit has been switched on, the corresponding half of the display will indicate the transmission channel. To indicate the radio frequency, press an arrow button ( for unit A, for unit B). The previous indication will reappear after 2 seconds.
2) Use the buttons (30) of the module to set the transmission channels, either manually or by means of an automatic scan. Leave the corresponding transmitters switched off for the time being.
Channel scan:
Keep the buttons and simultaneously pressed for approx. 1 second until SCRn appears on the display. The scan will start: The receiver units will be set to free channels without mutual interference. If no free channels are found, the channels set will be kept.
Manual channel selection:
If both receiver units A and B are switched on:
- Keep the button SET pressed until the channel indication for receiver unit A starts flashing on the display.
- Select the channel for receiver unit A with the button or and then confirm with the button SET.
- The channel indication for receiver unit B starts flashing on the display. Select the channel for receiver unit B with the button or and then confirm with the button SET.
If only one receiver unit A or B is switched on: Keep the button SET pressed until the channel indication starts flashing on the display. Select the channel with the button Δ or and then confirm with the button SET.
If a channel is not confirmed within 10 seconds with the button SET, the setting mode will be exited and the channel previously set will be kept.
Note: The receiver units cannot be set to the same channel.
If, with the transmitter switched off, the respective segment bar A or B on the display indicates reception, interference signals or signals from other transmitters are being received. In this case, select a different channel.
3) Switch the transmitters on and set them to the channels of the receiver module: Set one transmitter to the channel of receiver unit A and set the second transmitter to the channel of receiver unit B. The respective segment bars on the display will indicate the strength of the radio signals received. Use the controls (29) to adjust the desired volume for each receiver unit.
If no reception is indicated or if the reception is poor, check if:
– the batteries of the transmitter are discharged.
– the reception is disturbed by metal objects or other high-frequency sources.
– the distance between the transmitter and the receiver module is too long.
- the threshold value for interference suppression (squelch) is too high (see chapter 7.2.2).
7.2.1 Changing the group setting
(for operation with 2 receiver modules)
The unit can be extended by another 2-channel receiver module (available as article TXA-1822MR). To set the four transmission channels via channel scan, change the group setting of both receiver modules:
1) Switch off the receiver units A and B. Then keep the button SET pressed while switching on a receiver unit. The display will indicate the current group setting F(with the number flashing).
2) Use the button or to switch to F2
3) Press the button SET to exit the group setting mode. The squelch setting mode will be activated; to exit the mode, press the button SET.
Note: The setting modes will be automatically exited after 5 seconds if no button is pressed. Any settings made will be saved.
Perform the channel scan for the first receiver module, switch on the appropriate two transmitters and set them accordingly. Leave the two transmitters switched on so that channels already used will be skipped during the channel scan for the second receiver module. Then perform the channel scan for the second receiver module, switch on the two appropriate transmitters and set them accordingly.
7.2.2 Setting the squelch
The squelch function will mute the respective receiver unit when the level of the radio signal falls below the threshold value adjusted. Thus, interference signals will not cause noise when the transmitter is switched off or when its radio signal is insufficient: If the levels of the interference signals are below the threshold value, the receiver unit will be muted.
A high threshold value offers high interference resistance, but it will also reduce the transmission range. Thus, when the reception is good, a high threshold value can be used; however, when the transmitter and the receiver are far apart, a low threshold value is recommended.
1) Switch off the receiver units A and B. Then keep the button SET pressed while switching on a receiver unit. The display will indicate the group setting (Fdr, with the number flashing).
2) Press the button SET to exit the group setting mode and to activate the squelch setting
mode: 5for "Squelch") and the current value (flashing) will appear on the display.
3) Use the button or to set the value (level 7 = highest threshold value). Press the button SET to exit the squelch setting mode.
Note: The setting modes will be automatically exited after 5 seconds if no button is pressed. Any settings made will be saved.
7.3 Operating the Bluetooth receiver
The Bluetooth receiver can be used to establish a wireless connection to a Bluetooth audio source (e.g. smartphone, tablet PC, MP3 player) which allows the amplifier system to replay audio data.
Note: The Bluetooth source must be compatible with the A2DP protocol (Advanced Audio Distribution Profile); otherwise, no wireless connection will be possible.
1) To switch on the Bluetooth receiver, keep the button * (15) pressed for approx. 2 seconds. The button will start flashing to indicate that there is no connection to the Bluetooth source and that the Bluetooth receiver is ready for "pairing" (linking the Bluetooth source to the Bluetooth receiver).
2) At the Bluetooth source, switch on the Bluetooth function and perform the "pairing" process (see the instructions of the Bluetooth source, if required). On the display of the Bluetooth source, the Bluetooth receiver is indicated as "TXA SERIES". The button * will be continuously illuminated once the linkage has been established.
3) At the Bluetooth source, start the replay of audio data. The Bluetooth source can be operated as desired (title selection, volume adjustment, pause, etc.).
4) At the active speaker system, use the control AUX (8) to adjust the volume.
Note: The volume control will also apply to the unit that is connected to the input AUX IN (13); therefore, do not use this input during Bluetooth operation. Otherwise, both audio sources will be reproduced at the same time.
5) When the Bluetooth connection is disconnected (e.g. when the Bluetooth source is moved outside of the range of the wireless connection), the button will restart flashing. The connection must be re-established.
6) To switch off the Bluetooth receiver, briefly press the button *. The button will not be illuminated anymore.
7.4 Operating the CD / MP3 player
The player allows to replay not only standard audio CDs but also CDs, USB storage media and SD/SDHC memory cards with MP3 files.
Notes
- Depending on the CD type, the CD burner and the burning program used, problems may occur when CD-RWs are replayed.
- The player also supports the reproduction of WMA files.
- Due to the large number of storage device manufacturers and device drivers, it cannot be guaranteed that all storage media are compatible with this player.
-
Cigarette smoke and dust will easily penetrate through all openings of the player and also settle on the optics of the laser sampling system. If this deposit causes reading errors and sound interruptions, the player must be cleaned by skilled personnel. Please note that there will be a charge on cleaning, even during the warranty period!
-
The anti-shock memory of the player will be able to compensate temporary shocks or vibrations occurring during CD sampling; however, it will not be able to compensate continuous, severe vibrations. For CD operation, the unit must therefore always be used in a stationary way, i.e. it must be placed on a solid, immobile surface.
A 3 V button cell of the type CR2025 supplies the IR remote control with power. If the remote control is delivered with the battery inserted, remove the protective film (used to prevent the battery from discharging during storage and transport) from the battery support. The remote control will then be ready for operation When pressing a button, always direct the remote control to the infrared sensor (32) of the player. There must be no obstacles between the sensor and the remote control.
If the remote control is not used for a longer time, remove the battery as a precaution so that the remote control will not be damaged in case the battery should leak.
Inserting/Replacing the battery:
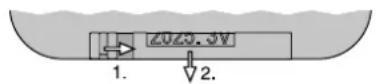
1) Push the latch of the battery holder to the right (arrow 1) and remove the holder (arrow 2).
2) When replacing the battery, remove the discharged battery.
3) Insert the new battery into the holder with the positive pole pointing upwards. Push the holder back into the remote control.

Batteries must not be placed in the household waste. Always take them to a special waste disposal (e.g. collection container at your retailer).
To switch the player on /off, use the POWER button (31).
Inserting a replay medium:
- Insert a CD with the lettering showing upwards into the CD slot (A) until it is retracted automatically.
- Connect a USB storage medium (USB flash drive or USB hard disk with separate power supply) to the USB port (B).
- Insert a memory card (notched corner upward and contacts to the right) into the slot SD / SDHC (C) until it engages.

To remove the card, slightly push it into the slot until it disengages.
To switch between the replay media, use the button MODE (34). When a medium has been read in, it will be replayed automatically. If a USB storage medium or a memory card has been selected and is then removed, the player automatically switches over to the CD player mechanism. The same happens when a new CD is retracted.
Control options and information on the display indications can be found in chapter 3.3.
7.5 Operating the transmitter module
Via the transmitter module of an active speaker system TXA-822CD (master unit), its output signal can be transmitted to the receiver modules of other active speaker systems (slave units) of the series TXA-820 or TXA-1020; the control MASTER (11) and the tone controls (6) of the master unit will have no effect on the signal transmitted.
1) To switch on the transmitter module, advance the on-off switch and volume control (51) from the position OFF. The LED TX (47) will light up to indicate transmission of a radio signal.
2) At the receiver modules of the slave units, adjust the transmission channel and set the transmitter module of the master unit to the same channel:
- Press the button SET (49). The channel indication on the display (46) will start flashing.
- As long as the channel indication keeps flashing (for approx. 10 seconds), the channel can be selected with the buttons and (50): button for channel selection "upward"; button for channel selection "downward".
- Confirm the channel selection with the button SET. (If the selection is not confirmed within 10 seconds with the button SET, the transmitter module will return to the channel previously adjusted.)
Important: At the master unit, the receiver module and the transmitter module must be set to different channels; otherwise, there will be feedback.
3) It is possible to briefly indicate the radio frequency for the channel adjusted: as long as the button or is kept pressed, the display will indicate the frequency instead of the channel.
4) The LEDs AF LEVEL (48) will indicate the level of the audio signal fed to the transmitter module:
- The yellow LED will light up when the input signal of the transmitter module has reached a certain minimum level.
- The red LED will light up when the input signal of the transmitter module has reached the maximum level where it is close to overload. The LED should not light up or light up only shortly with signal peaks; if it lights permanently, the signal is overloaded. In this case, reduce the volume of the corresponding audio source/sources accordingly.
5) Use the control (51) to adjust the desired volume for the audio signal transmitted.
8 Specifications
Amplifier power
Rated power: 50W Music power: 80W
Speakers: 20 cm (8") bass speaker and 2.5 cm (1") tweeter
Frequency range: 70–17 000 Hz
Input sensitivity: .... 6 mV (Mic), 300 mV (Line)
Level LINE /AUX OUT: .... 1V
Connections
MIC 1:.... combined XLR jack/6.3mm jack(bal.), switchable Mic/Line
MIC 2:....6.3 mm jack (bal.)
LINEIN/OUT:.... RCA jacks
AUX IN/OUT: 3.5 mm jacks
Tone control: ......±10dB/100Hz(BASS) ±10dB/10kHz(TREBLE)
Ambient temperature: 0–40°C
Power supply:
Mains voltage: ..... 230V/50Hz Power consumption: . 130 VA
Battery operation: .... internal rechargeable lead gel batteries (2×12V/4.5Ah)
Operating time: ..... 4 – 6 hours approx.
Dimensions (W × H × D): 305 × 510 × 265 mm
Weight:
Model TXA-820: ..... 12.5 kg
Model TXA-820CD: . . . 13.5 kg
Model TXA-822CD: . . . 13.7 kg
8.1 Wireless transmission
Range: .... approx. 30 m
Transmitting power of
the transmitter module*: . ≤ 10 mW (EIRP)
*for model TXA-822CD
| Radio frequencies | |||
| Channel | Frequency | Channel | Frequency |
| 01 | 863.1 MHz | 09 | 863.2 MHz |
| 02 | 864.1 MHz | 10 | 864.2 MHz |
| 03 | 863.6 MHz | 11 | 863.7 MHz |
| 04 | 864.6 MHz | 12 | 864.7 MHz |
| 05 | 863.3 MHz | 13 | 863.4 MHz |
| 06 | 864.3 MHz | 14 | 864.4 MHz |
| 07 | 863.8 MHz | 15 | 863.9 MHz |
| 08 | 864.8 MHz | 16 | 864.9 MHz |
Note concerning multichannel operation:
The number of channels to be used in parallel depends on the conditions at the place of application (e.g. on interference due to other wireless systems or high-frequency sources such as fluorescent lamps). In ideal conditions, up to four channels can be operated at the same time without mutual interference. Two examples of a suitable channel selection for four wireless transmission paths:
Example 1:
channel 01 – channel 03 – channel 06 – channel 12
Example 2:
channel 06 – channel 09 – channel 15 – channel 16
Subject to technical modification.
All rights reserved by MONACOR® INTERNATIONAL GmbH & Co. KG. No part of this instruction manual may be reproduced in any form or by any means for any commercial use.
- 1 APPLICATIONS
- 1.1 CONFORMITY AND APPROVAL
- 2 SAFETY NOTES
- 3 OVERVIEW
- 3.1 MAIN CONTROL PANEL
- 3.2 RECEIVER MODULE
- 1-CHANNEL RECEIVER MODULE
- 2-CHANNEL RECEIVER MODULE
- 3.3 CD / MP3 PLAYER WITH REMOTE CONTROL
- 31 POWER BUTTON TO SWITCH THE PLAYER ON/OFF
- NOTES
- 3.4 TRANSMITTER MODULE
- 4 SETTINGUP/TRANSPORTING
- 5 POWER SUPPLY
- 5.1 MAINSOPERATION/RECHARGING THE BATTERIES
- 5.2 BATTERY OPERATION
- 6 AUDIO CONNECTIONS
- 6.1 INPUTS
- 6.2 OUTPUTS
- 7 OPERATION
- CAUTION
- 7.1 OPERATING THE 1-CHANNEL RECEIVER MODULE
- 7.2 OPERATING THE 2-CHANNEL RECEIVER MODULE
- CHANNEL SCAN
- MANUAL CHANNEL SELECTION
- 7.2.1 CHANGING THE GROUP SETTING
- 7.2.2 SETTING THE SQUELCH
- 7.3 OPERATING THE BLUETOOTH RECEIVER
- 7.4 OPERATING THE CD / MP3 PLAYER
- INSERTING/REPLACING THE BATTERY
- INSERTING A REPLAY MEDIUM
- 7.5 OPERATING THE TRANSMITTER MODULE
- 8 SPECIFICATIONS
- 8.1 WIRELESS TRANSMISSION
- NOTE CONCERNING MULTICHANNEL OPERATION
Brand : Monacor
Model : TXA-820
Category : Receiver