
CCD001 - Drill G-TECHNOLOGY - Free user manual and instructions
Find the device manual for free CCD001 G-TECHNOLOGY in PDF.


| Product Type | Cordless Combi Drill |
| Brand | G-Technology |
| Model | CCD001 |
| Voltage | DC 20V Max |
| Chuck Capacity | 13 mm |
| No-Load Speed | 0-450 / 0-1,700 RPM |
| Max Torque | 530 in-lb |
| Chuck Type | Keyless All-Metal |
| Operating Modes | Drilling, Hammer Drilling, Screw Driving |
| Speed Settings | 2 (Low for high torque, High for fast drilling) |
| Torque Adjustment | 21 levels |
| LED Light | Yes, auto on/off |
| Forward/Reverse Switch | Yes, with centre lock |
| Belt Clip | Attachable on either side |
| Battery | Li-Ion, sold separately |
| Charger | Sold separately |
| Warranty | 2 years from date of purchase |
| Safety Compliance | ANSI Z87.1 eye protection, hearing protection recommended |
| Maintenance | Clean with dry cloth, avoid solvents |
| Customer Support | www.gtech.co.uk/support |
Frequently Asked Questions - CCD001 G-TECHNOLOGY
User questions about CCD001 G-TECHNOLOGY
0 question about this device. Answer the ones you know or ask your own.
Ask a new question about this device
Download the instructions for your Drill in PDF format for free! Find your manual CCD001 - G-TECHNOLOGY and take your electronic device back in hand. On this page are published all the documents necessary for the use of your device. CCD001 by G-TECHNOLOGY.
USER MANUAL CCD001 G-TECHNOLOGY
Cordless Combi Drill
Model number: CCD001
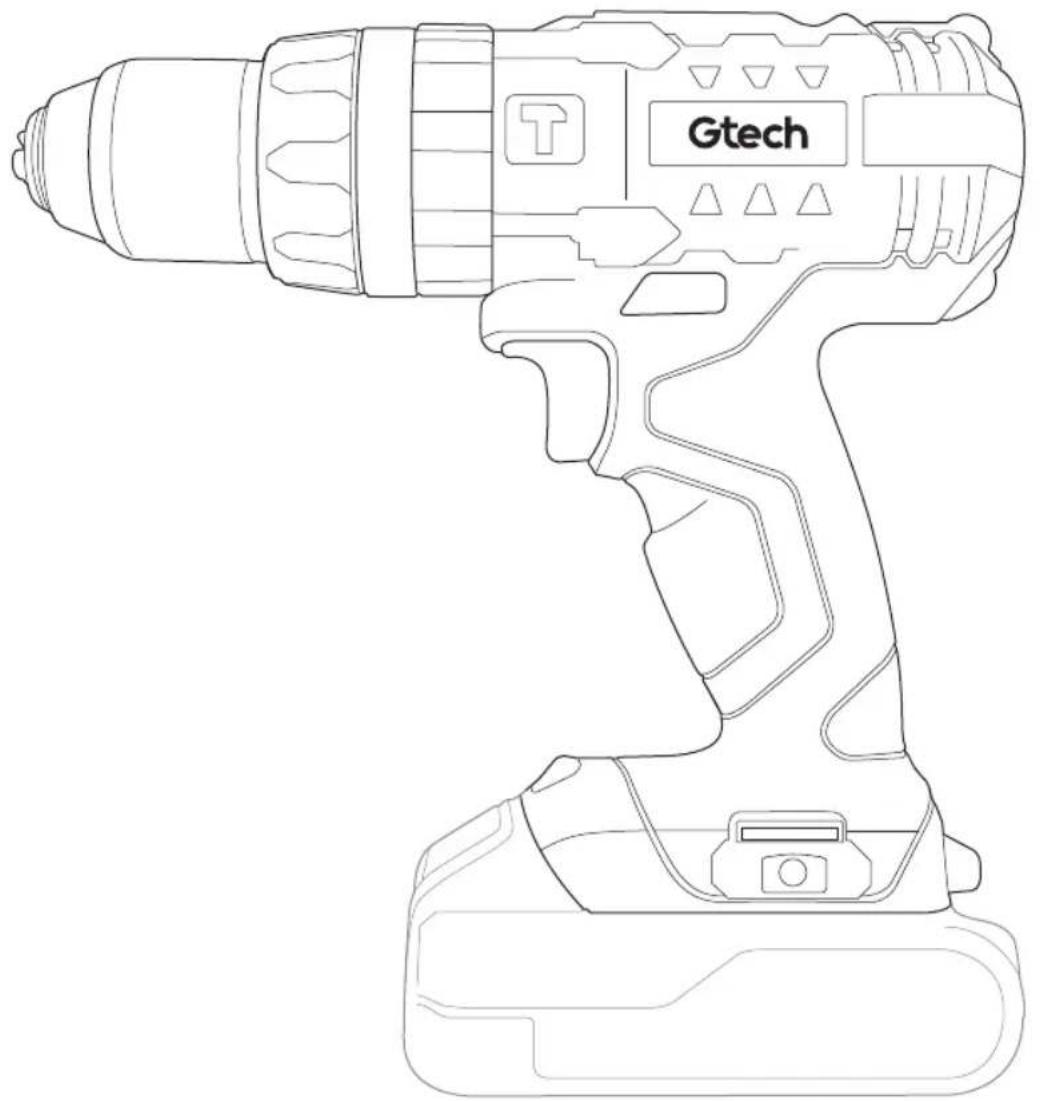
natural_image
Line drawing of a Gtech electric drill with handle and base (no text or symbols on the device itself)OPERATING MANUAL
IMPORTANT SAFEGUARDS:

IMPORTANT: To avoid serious personal injury, do not attempt to use this product until you read the manual thoroughly and understand it completely. Save this manual and review frequently for safe operation and instructing others who may use this tool. Keep this manual for the safety warnings, precautions, operations, inspections and maintenance information. Store this manual and the receipt in a safe and dry place for future reference.

WARNING: The warnings and precautions discussed in this manual cannot cover all possible conditions and situations that may occur. Please be aware of the potential hazards, and take all necessary precautions to avoid risk of injuries.
Work area:
- Keep the work area clean and well lit. Cluttered benches and dark areas increase the risk of accidents.
- Do not operate the tool in explosive atmospheres, such as in the presence of flammable liquids, gases or dust. The tool could create a spark which may ignite flammable liquids, gases or dust.
- Keep bystanders, children, and others away while operating the tool. Distractions could result in improper use and cause injury.
• Always Keep proper footing and balance. Proper footing and balance enable better control of the tool in unexpected situations. - Do not use on a ladder or unstable supports. Stable footing on a solid surface enables better control of the tool in unexpected situations.
Personal safety:
- Always wear eye protection. Operator and others in the work area should always wear ANSI-Z87 .1 approved safety goggle with side shields. Eye protection is used to guard against flying debris, which may cause severe eye injury.
• Always hearing protection when using the tool. Prolonged exposure to high intensity noise may cause hearing loss. - Dress properly. Do not wear loose clothing or jewellery. Keep your hair,
clothing, and gloves away from moving parts. Loose clothes, jewellery or long hair can be caught in moving parts.
- Stay alert. Do not use tool while tired or under the influence of drugs, alcohol, or medication. A moment of inattention while operating the tool may cause serious injury.
- Avoid prolonged use. The tool's repetitive motion and vibration can cause harm to your hands or arms. The user can use gloves for extra cushion, take frequent breaks and limit daily use to prevent this issue.
- This tool vibrates with use. Continuous operation can be harmful to your hands and arms. Stop using the tool if you feel tingling or pain. Resume work after recovery. Seek medical advice if serious symptoms occur.
- Make sure there are no hidden electrical cables, gas pipes, etc. while working on the work piece. These hazards could harm the user if damaged while using this tool.
- Wash hands after handling this product or its power cord. They may contain chemi cals known to the State of California to cause cancer and birth defects or other reproductive harm.
Electrical safety:
- The charger's power plug must match the outlet. Never modify the plug or try to plug the tool into an outlet that does not match the plug.
- Avoid contact with grounded elements such as metal tables, pipes, ranges or refrigerators. Contact with these elements can put you at risk of electrical shock.
- When operating the tool keep tool away from wet conditions. Wet tools can cause electrical shock.
• Always inspect electrical cord for damage before and after use. A damaged cord can cause electrical shock.
Tool use and care:
- Know this tool. Read this manual carefully, learn its applications and limitations, as well as the specific potential hazards related to this tool.
• Always have a firm footing and grip on the tool to counteract any force that may be enacted during the operation of the tool.
• Practice safe working practices and ensure all relevant legal requirements are being followed when using this tool. - The tool should not be forced, use the correct tool for your application. The correct tool will do the job better and safer at the rate for which the tool is being used.
- Before adjusting, changing accessories, or storing the tool disconnect the tool from the battery. This will reduce the risk of injury from the power tool.
- Check for misalignment or binding of moving parts, breakage of parts and any other condition that may affect the tool's operation. If damaged, have the tool serviced before using.
- Many accidents are caused by poorly maintained tools. Maintain tool with care. A properly maintained tool will function more smoothly and prevent
binding, making it easier to use.
- Do not use the tool for anything other than its intended use.
- Do not use the tool if the trigger does not actuate properly. Any tool that cannot be controlled with the trigger is dangerous and must be repaired.
- Keep the tool and its handle dry, clean and free of oil and grease. Always use a clean cloth when cleaning. Never use brake fluids, gasoline, petroleum-based products, or any strong solvents to clean your tool.
- Never use gasoline or other flammable liquids to clean the tool. Never use the tool in the presence of flammable liquids or gases. Vapours could ignite by a spark and cause an explosion which will result in death or serious injury.
- Do not use the tool as a hammer.
- Never press the trigger of the tool when it is not intended to be used.
- Do not drop or throw the tool. Dropping or throwing the tool can result in damage that will make the tool unusable or unsafe. If the tool has been dropped or thrown, examine the tool closely for bent, cracked or broken parts. STOP and repair before using or serious injury could occur.
Battery and charger use and care:
- Only use batteries that are recommended for this tool by the manufacturer. Use of any other battery may cause risk of injury or fire.
- When the battery is not in use, keep it away from metal objects that could connect one terminal to another. If the terminals are connected the battery could cause fire or burns.
- Keep the battery free of abusive situations, if a battery is damaged it can eject battery liquid. If you encounter the battery liquid flush the contact area with water. If your eye encounters the battery
liquid flush with water and seek medical help. Battery liquid can cause irritation or burns.
- Do not store batteries in areas that can reach or exceed 105^ . (Such as outside sheds or metal buildings in the summer).
- Only charge the battery with a charger recommended by the manufacturer. Use of any other charger may cause risk of injury or fire.
- Do not use chargers for anything other than charging manufacturer recommended batteries, otherwise electric shock could occur.
- Do not expose the charger to rain or snow. Make sure the charger's cord is in an area where it will not be damaged.
- Extension cords should not be used unless necessary. Improper use of an extension cord can result in electric shock.
- Do not place an object on top of the charger. This could block ventilation slots and cause excessive internal heat.
- Do not use the charger if it has been subjected to a hard blow, has been dropped, or damaged otherwise. Take the charger to an authorized repair centre.
- Do not disassemble the charger. If the charger needs to be repaired take it to an authorized repair centre.
- Before cleaning the charger make sure to unplug it from any power source. This will reduce the risk of an electrical shock.
Tool service:
- Only use accessories that are identified by the manufacturer for the specific tool model.
- Use of unauthorized parts or failure to follow maintenance instructions may create a risk of injury.
- Tool service must only be performed by a qualified repair personnel.

natural_image
Portrait of a smiling man in a collared shirt (no text or symbols visible)Thank you for choosing Gtech
"Welcome to the Gtech family. I started Gtech to create sensible, easy to use products that do a great job, and hope you get many years of trouble-free performance from your new product."

Nick Grey – Inventor, owner of Gtech
Make a note of your product serial number code for future reference. You can find this on the underside of the product once the battery has been removed.


natural_image
Top-down view of a mechanical component with a green circular highlight on its side (no text or symbols)About your product
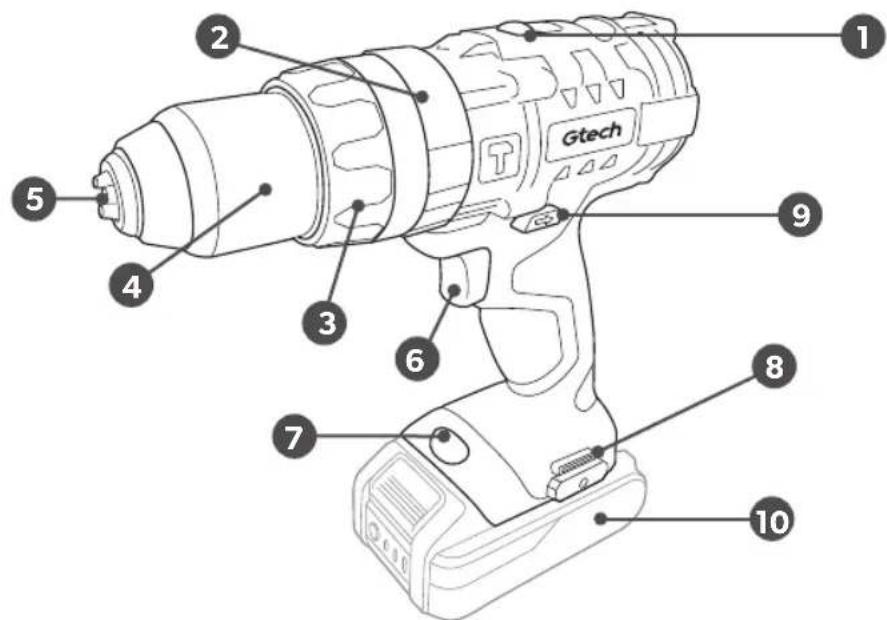
1 Speed Selector
2 Mode Selector
3 Torque Adjustment
4 Metal Chuck Sleeve
5 Chuck Jaws
6 Variable Speed Switch
7 LED Light
8 Belt Clip point
9 Forward/Reverse Switch
10 Battery (sold separately)
Installing and removing the battery

natural_image
Illustration of a hand holding a Gtech electric drill, with a green arrow indicating the action (no text or symbols on the drill itself)To install, simply insert the battery pack.

natural_image
Line drawing of a hand holding a Gtech electric drill, no text or symbols presentMake sure the latch on the battery snaps in place and battery pack is secured to the tool.
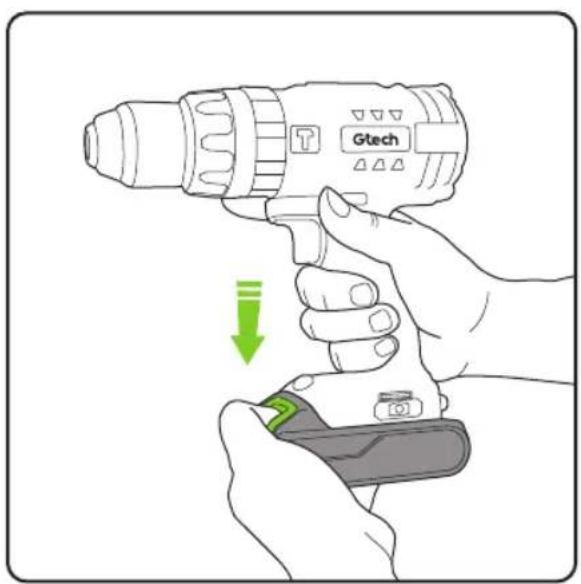
To remove, depress the latch...

natural_image
Illustration of a hand holding a Gtech electric drill, with a green directional arrow indicating action (no text or symbols on the diagram itself)...and pull out the battery pack.
Variable speed trigger Forward/reverse switch

natural_image
Line drawing of a hand holding a Gtech electric drill (no text or symbols on the device itself)The variable speed trigger (6) delivers higher speed with increased trigger pressure and lower speed with decreased trigger pressure. To turn on the tool, depress the trigger. To turn it off, release the trigger and allow the tool to come to a complete stop.

natural_image
Diagram of a mechanical device with green directional arrows indicating movement or force (no text or symbols)Set the forward/reverse switch (9) in the OFF (Centre lock) position to lock the trigger and help prevent accidental starting when not in use.

Push the forward/reverse switch (9) to the left of the trigger for forward operation. Push the switch to the right to reverse the direction. The tool will not run unless the direction of rotation switch is pushed fully to the left or right.
LED light
natural_image
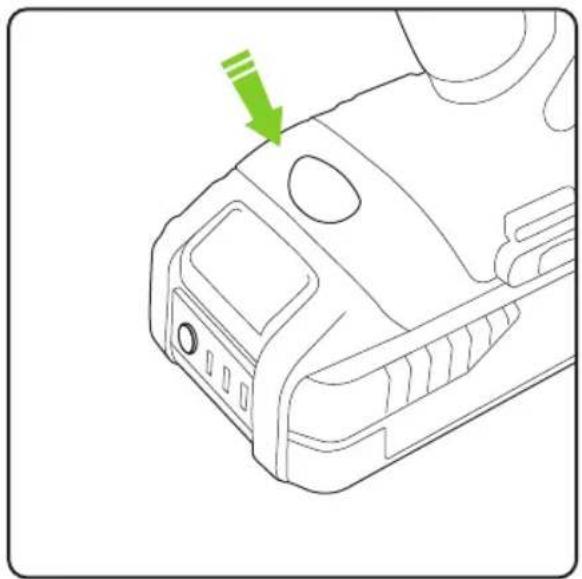
Line drawing of a device rear panel with a green arrow pointing to a specific component (no text or symbols present)The LED light (7) will illuminate when the trigger is depressed. It will automatically shut off the light when the tool is not in use. The light will stay on for a few seconds after the product is switched off.
Installing and removing drill bit

natural_image
Illustration of a hand using a drill bit to interact with a green circular motion indicator (no text or symbols)Turn the chuck sleeve (4) counterclockwise (as viewed from the front) to open the chuck jaws. Place the driver/ drill bit into the chuck as far as it goes. Turn the sleeve clockwise to tighten the chuck.

natural_image
Line drawing of hands using a drill bit to draw a twist drill (no text or symbols)To remove the bit, turn the chuck sleeve clockwise to release.
Caution: Do not touch a drill bit just after use as it is likely to be very hot.
Speed selector

natural_image
Top-down line drawing of a car interior with green seating and no visible text or symbolsThe speed of the drill can be changed for various applications. Press the speed selector (1) button to change to the desired speed.
1
Select low speed (1) for applications requiring higher power and torque such as screws driving and drilling in metal.
2
Select high speed (2) for fasting drilling or driving such as drilling in wood or masonry.
Never change the speed while the tool is running. Doing so may result in serious damage to the tool.
8
Mode selector
natural_image
Line drawing of a hand holding a handheld device with a highlighted section (no text or symbols)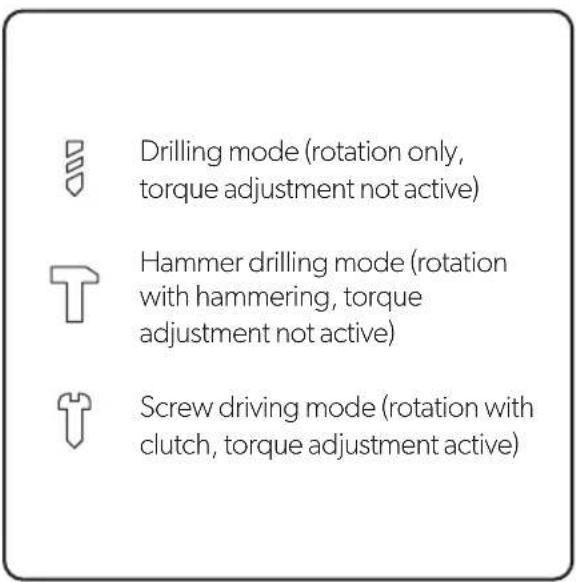
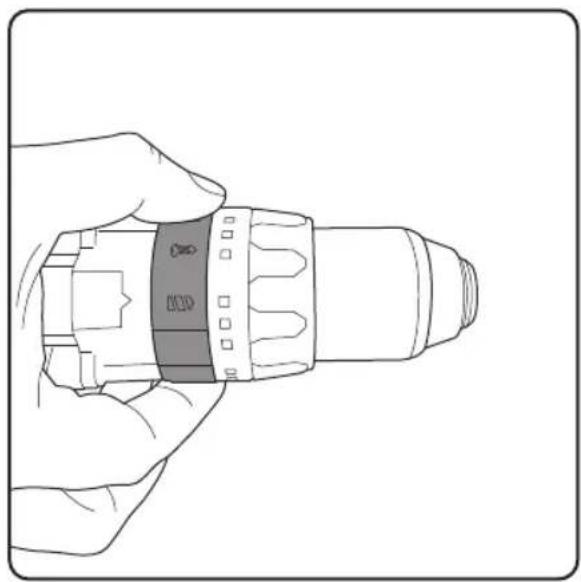
The tool is equipped with three modes for different applications. Turn the mode selector ring (2) to select the desired mode. Drill mode should be used for drilling and other heavy-duty applications. Hammer mode should be used for hammer drilling. Drive mode should be used for driving screws.
Torque adjustment
natural_image
Line drawing of a hand holding a cylindrical object with a textured interior (no text or symbols)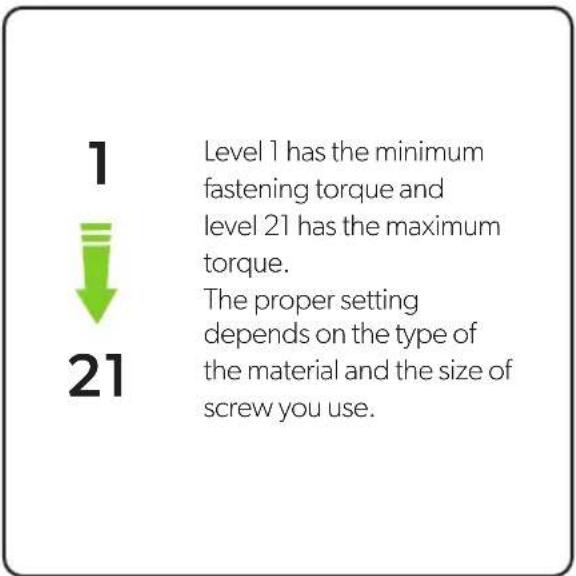
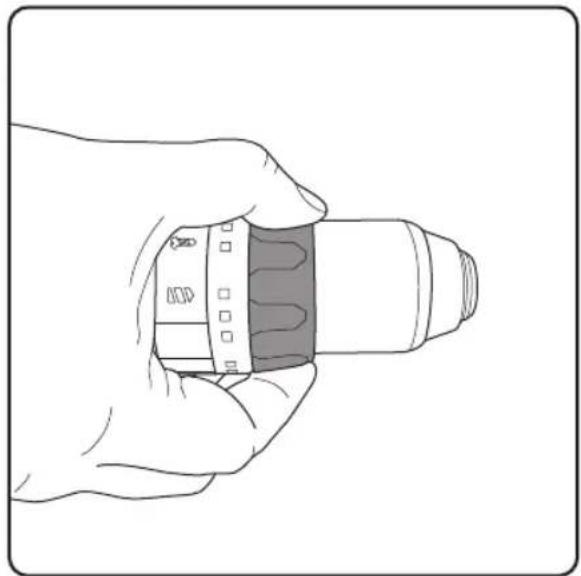
When use screwdriving mode, proper torque setting helps prevent the possibility of damaging screw heads, threads and workpiece. The fastening torque can be adjusted by turning the torque adjustment ring (3).
NOTE: Drive a trial screw into the workpiece to determine which torque level is needed.
Charging the battery

natural_image
Illustration of a hand inserting a plug into a socket with a cable (no text or symbols)To charge the battery, line up the slot of the battery with the slot of the charger and slide into place. The charger is sold separately.

natural_image
Technical line drawing of a vehicle front panel with no visible text or symbolsThe battery indicator light should turn from green to red when the battery is charging. When the indicator light has turned green the battery should be fully charged.
Battery state of charge indicator

natural_image
Line drawing of a vehicle front panel with three green indicator lights (no text or symbols)The state of charge of the battery can be tested by pressing the button. Three bars indicates a full charge, two bars a partial charge, one bar low charge.
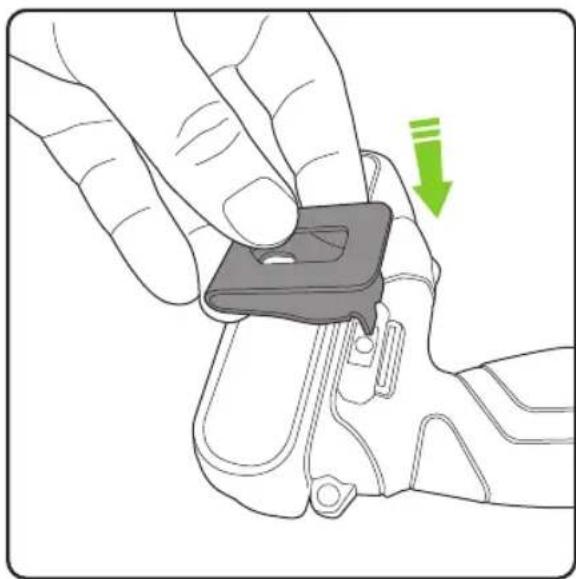
Attaching the belt clip
natural_image
Illustration of a hand holding a black plastic clip attached to a shoe, with a green arrow indicating the motion (no text or symbols present)The belt clip (8) may be installed on either side of the tool.

natural_image
Technical line drawing of a mechanical assembly with a tool inserted into a component (no text or symbols)To install, insert the clip into the groove in the housing and fasten it with screw. To remove, simple remove the screw and then remove the belt clip.
WARNING:
Allow battery to cool down before charging if the battery is hot after continuous use.
BATTERY
All batteries wear out over time due to normal wear and tear. Do not attempt to disassemble and repair the battery, as this could cause serious burns especially when wearing rings and jewellery. For the longest possible battery life, we suggest the following:
- Remove the battery from the charger once fully charged.
- Store the battery away from moisture and at a temperature below 80^ .
- Store the battery with at least a 30% - 50% charge.
- If a battery has been stored for six months or more, charge the battery as normal.
Maintenance
Avoid using solvents when cleaning plastic parts. Most plastics are susceptible to damage from various types of commercial solvents and maybe damaged by their use. Use clean cloth to remove dirt, dust, oil, grease, etc.
WARNING:
Remove the battery from the tool for any inspection, maintenance, and cleaning.
Troubleshooting
| The product isn’t working The battery may have cut out due to excessive use to prevent overheating. Allow the product to cool down before re-using. |
| The product is getting hot During intensive use, this is normal, but it is advisable to allow the product to cool down regularly to prevent damage of the motor. |
| The battery heats up during use This is normal. Allow the battery to cool down regularly to prevent damage of the battery. |
| The battery and charger heat up during charging This is normal. It is advisable to remove the battery from the charger once it is fully charged. |

Product support
If these initial tips do not solve your problem we please visit our support area where you can find troubleshooting help including online manuals, FAQs and how-to-videos, as well as genuine spares and replacement parts compatible with your product.
Visit: www.gtech.co.uk/support




support@gtech.co.ukLive chat supportOnline How to Videos
TECHNICAL SPECIFICATION
| Voltage DC 20V Max | |
| Chuck Capacity 13mm | |
| No-Load Speed 4 0-450 / 0-1, 700 RPM | |
| Max Torque 530 in-lb | |
| Chuck Keyless All-Metal | |
WARRANTY - REGISTRATION
Visit www.gtech.co.uk/warrantyregistration to register your product to ensure that we have all the information required to provide you with quick and efficient support.
You will need your product's serial code.

If you purchased directly from Gtech, your details are already registered and your 2-year warranty will start automatically.

natural_image
Top-down view of a mechanical component with a highlighted central section (no text or symbols)If you purchased from an authorised Gtech retailer, please register your warranty within 3 months. You will need to provide proof of purchase to support any claim(s) against your warranty.
WARRANTY - TERMS AND CONDITIONS
If your product is within its warranty and has a fault that cannot be resolved from the troubleshooting section or online support, please do the following:
- Contact our Gtech Customer Care Helpline on UK: 08000 308 794, who will go through any troubleshooting with you to identify the fault.
- If your fault can be resolved by a replacement part, this will be sent to you free of charge.
- Following troubleshooting, if your product needs to be replaced, we will arrange collection of your faulty product for inspection, and delivery of a replacement product free of charge.
Your product is guaranteed against material or manufacturing faults for 2 years from the date of purchase (or the delivery date if this is later) subject to the following terms and conditions:
WHAT ISN'T COVERED SUMMARY
The guarantee becomes effective at the date of purchase (or the date of delivery if this is later). If a product is repaired or replaced during the warranty period, the warranty period is not started again.
- You must provide proof of delivery/purchase before any work can be carried out on the product. Without this proof, any work carried out will be chargeable. Please keep your receipt or delivery note.
- All work will be carried out by Gtech or its authorised agents.
- Any parts which are replaced will become the property of Gtech.
- The repair or replacement of your product is under guarantee and will not extend the period of guarantee.
- The guarantee provides benefits which are additional to and do not affect your statutory rights as a consumer.
Gtech does not guarantee the repair or replacement of a product as a result of:
• Normal wear and tear (e.g. batteries).
• Use of consumables
- Accidental damage, faults caused by negligent use or lack of care and maintenance, misuse, neglect, careless operation or handling of the product which is not in accordance with operating manual.
- Use of the product for anything other than the normal domestic household purposes.
- Use of parts and accessories which are not Gtech genuine components.
- Faulty installation (except where installed by Gtech)
- If it is modified in any way.
- Repairs or alterations carried out by parties other than Gtech or its authorised agents.
• Purchasing your product from an unofficial third party (i.e not from Gtech or an official Gtech retailer.
- If you are in doubt as to what is covered by your guarantee, please call the Gtech Customer Care Helpline on UK: 08000 308 794
International orders are subject to a delivery charge for both faulty and non faulty products.
The symbol indicates that this product is covered by legislation for waste electrical and electronic products (2012/19/EU)
When the product has reached the end of its life, it and the Li-Ion battery it contains should not be disposed of with general household waste. The battery should be removed from the product and both should be disposed of properly at a recognised recycling facility.
Call your local council, civic amenity site, or recycling centre for information on the disposal and recycling of electrical products. Alternatively visit www.recycle-more.co.uk for advice on recycling and to find your nearest recycling facilities.

Notes


Notes


Gtech
Grey Technology Limited
Brindley Road, Warndon, Worcester WR4 9FB
email: support@gtech.co.uk
telephone: 08000 308 794
www.gtech.co.uk
CPN4614

- Cordless Combi Drill
- IMPORTANT SAFEGUARDS:
- Work area:
- Personal safety:
- Electrical safety:
- Tool use and care:
- Battery and charger use and care:
- Tool service:
- Thank you for choosing Gtech
- About your product
- Variable speed trigger Forward/reverse switch
- LED light
- Mode selector
- Torque adjustment
- Attaching the belt clip
- WARNING:
- BATTERY
- Maintenance
- Product support
- WARRANTY - REGISTRATION
- WARRANTY - TERMS AND CONDITIONS
- WHAT ISN'T COVERED SUMMARY
- Notes
- Gtech
Brand : G-TECHNOLOGY
Model : CCD001
Category : Drill