
Revo RC101 - Media player ACER - Free user manual and instructions
Find the device manual for free Revo RC101 ACER in PDF.


User questions about Revo RC101 ACER
0 question about this device. Answer the ones you know or ask your own.
Ask a new question about this device
Download the instructions for your Media player in PDF format for free! Find your manual Revo RC101 - ACER and take your electronic device back in hand. On this page are published all the documents necessary for the use of your device. Revo RC101 by ACER.
USER MANUAL Revo RC101 ACER
RevoCenter Series User Guide
Copyright © 2011 All Rights Reserved.
RevoCenter Series
User Guide
Model Name : ____
Part Number: ____
Purchase Date: ____
Place of Purchase: ____
Safety instructions
Read these instructions carefully. Keep this document for future reference. Follow all warnings and instructions marked on the product.
Turning the product off before cleaning
Unplug this product from the wall outlet before cleaning. Do not use liquid cleaners or aerosol cleaners. Use a damp cloth for cleaning.
CAUTION for plug as disconnecting device
Observe the following guidelines when connecting and disconnecting power to the power supply unit:
Install the power supply unit before connecting the power cord to the AC power outlet.
Unplug the power cord before removing the power supply unit from the computer.
If the system has multiple sources of power, disconnect power from the system by unplugging all power cords from the power supplies.
CAUTION for Accessibility
Be sure that the power outlet you plug the power cord into is easily accessible and located as close to the equipment operator as possible. When you need to disconnect the power, be sure to unplug the power cord from the electrical outlet.
CAUTION for Listening
To protect your hearing, follow these instructions.
- Increase the volume gradually until you can hear clearly and comfortably.
- Do not increase the volume level after your ears have adjusted.
- Do not listen to music at high volumes for extended periods.
- Do not increase the volume to block out noisy surroundings.
- Decrease the volume if you can't hear people speaking near you.
Warnings
- Do not use this product near water.
- Do not place this product on an unstable cart, stand or table. If the product falls, it could be seriously damaged.
- Slots and openings are provided for ventilation to ensure reliable operation of the product and to protect it from overheating. These openings must not be blocked or covered. The openings should never be blocked by placing the product on a bed, sofa, rug or other similar surface. This product should never be placed near or over a radiator or heat register, or in a built-in installation unless proper ventilation is provided.
- Never push objects of any kind into this product through cabinet slots as they may touch dangerous voltage points or short-out parts that could result in a fire or electric shock. Never spill liquid of any kind onto or into the product.
- To avoid damage of internal components and to prevent battery leakage, do not place the product on a vibrating surface.
- Never use it under sporting, exercising, or any vibrating environment which will probably cause unexpected short current or damage rotor devices, HDD, Optical drive, and even exposure risk from lithium battery pack.
- The bottom surface, areas around ventilation openings and AC adapter may get hot. To avoid injury, ensure they do not come in contact with yourskin or body.
- Your device and its enhancements may contain small parts. Keep them out of the reach of small children.
Using electrical power
- This product should be operated from the type of power indicated on the marking label. If you are not sure of the type of power available, consult your dealer or local power company.
- Do not allow anything to rest on the power cord. Do not locate this product where people will walk on the cord.
- If an extension cord is used with this product, make sure that the total ampere rating of the equipment plugged into the extension cord does not exceed the extension cord ampere rating. Also, make sure that the total rating of all products plugged into the wall outlet does not exceed the fuse rating.
- Do not overload a power outlet, strip or receptacle by plugging in too many devices. The overall system load must not exceed 80% of the branch circuit rating. If power strips are used, the load should not exceed 80% of the power strip's input rating.
- This product's power supply is equipped with a three-wire grounded plug. The plug only fits in a grounded power outlet. Make sure the power outlet is properly grounded before inserting the power supply plug. Do not insert the plug into a non-grounded power outlet. Contact your electrician for details.

Warning! The grounding pin is a safety feature. Using a power outlet that is not properly grounded may result in electric shock and/or injury.

Note: The grounding pin also provides good protection from unexpected noise produced by other nearby electrical devices that may interfere with the performance of this product.
- The system can be powered using a wide range of voltages; 100 to 240 V AC. The power cord included with the system meets the requirements for use in the country/region where the system was purchased. Power cords for use in other countries/regions must meet the requirements for that country/region. For more information on power cord requirements, contact an authorized reseller or service provider.
Product servicing
Do not attempt to service this product yourself, as opening or removing covers may expose you to dangerous voltage points or other risks. Refer all servicing to qualified service personnel.
Unplug this product from the wall outlet and refer servicing to qualified service personnel when:
- the power cord or plug is damaged, cut or frayed
- liquid was spilled into the product
• the product was exposed to rain or water - the product has been dropped or the case has been damaged
- the product exhibits a distinct change in performance, indicating a need for service
- the product does not operate normally after following the operating instructions

Note: Adjust only those controls that are covered by the operating instructions, since improper adjustment of other controls may result in damage and will often require extensive work by a qualified technician to restore the product to normal condition.
Disposal instructions
Do not throw this electronic device into the trash when discarding.
To minimize pollution and ensure utmost protection of the global environment, please recycle. For more information on the Waste from Electrical and
Electronics Equipment (WEEE) regulations, visit
http://global.acer.com/about/sustainability.htm
natural_image
Symbol of a trash bin crossed with two crossed lines, no text or numbers presentRegulations and safety notices
FCC statement
This device has been tested and found to comply with the limits for a Class B digital device pursuant to Part 15 of the FCC rules. These limits are designed to provide reasonable protection against harmful interference in a residential installation. This device generates, uses, and can radiate radio frequency energy and, if not installed and used in accordance with the instructions, may cause harmful interference to radio communications.
However, there is no guarantee that interference will not occur in a particular installation. If this device does cause harmful interference to radio or television reception, which can be determined by turning the device off and on, the user is encouraged to try to correct the interference by one or more of the following measures:
- Reorient or relocate the receiving antenna
- Increase the separation between the device and receiver
- Connect the device into an outlet on a circuit different from that to which the receiver is connected
- Consult the dealer or an experienced radio/television technician for help
Notice: Shielded cables
All connections to other computing devices must be made using shielded cables to maintain compliance with FCC regulations.
Notice: Peripheral devices
Only peripherals (input/output devices, terminals, printers, etc.) certified to comply with the Class A limits may be attached to this equipment. Operation with noncertified peripherals is likely to result in interference to radio and TV reception.
Caution
Changes or modifications not expressly approved by the manufacturer could void the user's authority, which is granted by the Federal Communications Commission, to operate this server.
Notice Canadian users
This Class B digital apparatus complies with Canadian ICES-003.
viii
Compliant with Russian regulatory certification

ME61
Acer Incorporated
333 West San Carlos St. San Jose,
CA 95110, U.S.A.
Tel: 254-298-4000
Fax: 254-298-4147
www.acer.com

Federal Communications Commission Declaration of Conformity
This device complies with Part 15 of the FCC Rules. Operation is subject to the following two conditions: (1) This device may not cause harmful interference, and (2) This device must accept any interference received, including interference that may cause undesired operation.
The following local Manufacturer/Importer is responsible for this declaration:
Product: Server
Model number: RevoCenter Series
Name of responsible party: Acer America Corporation
Address of responsible party: 333 West San Carlos St.
San Jose, CA 95110
U.S.A.
Contact person: Acer Representative
Tel: 254-298-4000
Fax: 254-298-4147
Acer Incorporated
8F, 88, Sec.1, Hsin Tai Wu Rd., Hsichih
Taipei Hsien 221, Taiwan
Declaration of Conformity
We,
Acer Computer (Shanghai) Limited
8F, 88, Sec.1, Hsin Tai Wu Rd., Hsichih, Taipei Hsien 221, Taiwan
Contact Person: Mr. Easy Lai
Tel: 886-2-8691-3089 Fax: 886-2-8691-3120
Hereby declare that:
Product: Server
Trade Name: Acer
Model Number: RevoCenter Series
Is compliant with the essential requirements and other relevant provisions of the following EC directives, and that all the necessary steps have been taken and are in force to assure that production units of the same product will continue comply with the requirements.
EMC Directive 2004/108/EC as attested by conformity with the following harmonized standards:
• EN55022: 2006, AS/NZS CISPR22: 2006, Class B
•EN55024: 1998 + A1: 2001 + A2:2003
- EN55013:2001 + A1:2003 + A2:2006 (Applicable to product built with TV tuner module)
• EN55020:2007 (Applicable to product built with TV tuner module)
• EN61000-3-2: 2006, Class D
•EN61000-3-3: 1995 + A1: 2001+A2: 2005
Low Voltage Directive 2006/95/EC as attested by conformity with the following harmonized standard:
•EN60950-1: 2001 + A11: 2004
- EN60065: 2002 + A1: 2006 (Applicable to product built with TV tuner module)
Council Decision 98/482/EC (CTR21) for pan-European single terminal connection to the Public Switched Telephone Network (PSTN).
RoHS Directive 2002/95/EC on the Restriction of the Use of certain Hazardous Substances in Electrical and Electronic Equipment
The standards listed below are applied to the product if built with WLAN module or wireless keyboard and mouse.
R&TTE Directive 1999/5/EC as attested by conformity with the following harmonized standard:
• Article 3.1(a) Health and Safety
• EN60950-1:2001 + A11:2004
• EN50371:2002
• Article 3.1(b) EMC
• EN301 489-1 V1.6.1
- EN301 489-3 V1.4.1 (Applicable to non-bluetooth wireless keyboard mouse set)
• EN301 489-17 V1.2.1
• Article 3.2 Spectrum Usages
- EN300 440-2 V1.1.2 (Applicable to non-bluetooth wireless keyboard mouse set)
• EN300 328 V1.7.1
• EN301 893 V1.4.1 (Applicable to 5GHz high performance RLAN)
Year to begin affixing CE marking 2009.
Easy Lai
Easy Lai, Manager
Regulation Center, Acer Inc.
2011/01
Date
xii
1 Introduction 1
Features 2
Specifications 3
Overview 4
Front view 4
Rear view 5
System LED indicators 6
2 Setting up the system 11
Check package contents 12
Select a location 13
Recommended environment 14
Connect the power cord 15
Connect to the home network 16
Power on the system 17
Install the Windows Home Server Connector on the first computer 18
Install the Windows Home Server Connector on the client computers 31
Connect to the Home Server Console 34
3 Windows Home Server Console 37
Computers & Backup 38
User Accounts 39
Shared Folders 40
Server Storage 42
Lights Out 43
McAfee Total Protection 44
System Information 45
Network Health 47
Settings 49
General 50
Backup 51
Passwords 52
Media Sharing 53
Remote Access 54
Add-ins 54
Hardware Health and Performance Monitor 55
IP Configuration 56
Lights Out 57
McAfee Total Protection Service 58
Settings for DMS 59
Settings for iTunes Server 60
Resources 61
Shut Down 61
4 Managing the server 63
Create user accounts 64
Add a shared folder 69
Configure backup for home computers 71
Back up the home server 72
Configure the home server for remote access 76
Access the RevoCenter Series home page 79
Access the shared folders on the home server 81
Enable media sharing 84
Enable Digital Media Server 85
Enable iTunes service 87
Stream audio 88
Using the one-touch USB backup feature 91
Set up Wake On LAN on the home server 93
Set the home server uptime and down time 96
Monitor server health and performance 99
Set up email alerts 100
Explore the Windows Home Server icon 105
5 Configuring the hard disk drive 107
Adding a hard disk drive 107
Removing a hard disk drive 112
Replacing a failed hard disk drive 114
6 Troubleshooting 117
First steps checklist 117
Recovering or restoring the home server 118
Restoring a home computer 123
Restoring files from a backup 125
Update your home server with RevoCenter Series
Software Update 126
Specific problems and corrective actions 131
1 Introduction
Thank you for choosing RevoCenter Series.
The RevoCenter Series is a data storage and digital media content server for your digital home. Featuring an Intel® Atom™ processor, up to 2 GB memory, four-drive hot-swap bay*, Gigabit Ethernet, eSATA and four USB ports for extended storage, a USB backup port for backing up data from a USB storage device, and a recovery/reset button to recover from a system failure or reset the system to factory default.
RevoCenter Series can store and share all your important data while simultaneously streaming digital media content to multiple applications including Apple iTunes or any Universal Plug and Play (UPnP) Audio/Video and Digital Living Network Alliance™ (DLNA) compliant device, such as PS3 or Xbox 360. It allows you to consolidate your content library yet maintain instant access to digital media.
* Only hard disk drives installed in the drive bays 2, 3, and 4 are hot-swappable. The system hard drive located on the 1st drive bay is not hot-swappable. See "Front view" on page 4 for the location of the drive bay.
Features
- Powerful processor with excellent file sharing performance.
- Fast network performance in the home is delivered through a Gigabit Ethernet connection.
- Equipped with Microsoft's Windows Home Server operating system to help you centralize and connect your digital assets.
- Back up home computers daily. See "Configure backup for home computers" on page 71 for more information.
- Easily access your music, photos, and videos from virtually any Internet connected computer on a home network or while away from home. See “Access the shared folders on the home server” on page 81 for more information.
- One-touch USB backup feature enables quick and easy backup of your data from a USB storage device. See "Using the one-touch USB backup feature" on page 91 for more information.
- Easily add storage space to the home server. See “Adding a hard disk drive” on page 107 for more information.
- Windows Media Player and iTunes streaming support. See "Stream audio" on page 88 for more information.
- Remotely wakeup the home server. See "Set up Wake On LAN on the home server" on page 93.
Specifications
Processor Intel® Atom™ Processor
Chipset Intel 945GC Express Chipset and ICH7R
Drive storage Up to four 3.5-inch hot-swappable SATA hard disk drives (HDD)
Memory Up to 2 GB DDR2 MHz unbuffered SDRAM
Ethernet High performance (10/100/1000) Gigabit Ethernet port
I/O ports USB 2.0 ports (1 front and 4 rear), Gigabit Ethernet port, eSATA port, recovery/reset button
Power 200 W, 100-240 V AC
Server operating system (OS) support Windows Home Server
Home computer OS support Windows Vista 32-bit and 64-bit Edition Windows XP 32-bit and 64-bit Edition
Digital media player support Any DLNA certified device
Digital media file support Music: MP3, WMA, WAV, AAC, AC3, FLAC, APE, OGG, VOC, AIFF, AU, MID Video: WMV, ASF, MOV, AVI, MPEG, 3GP, SWF, FLV, RMVB, RM, RA, RAM, MP4, MPG, MPE, M2V, TP, TS, MLV, MKV, DIVX Photos: GIF, PNG, BMP, JPG, JEPG, ICO, TIFF, DXF, WMF, EMF, PICT, EPS, CDR
Physical dimensions WxHxD: 200 x 180 x 212 mm Weight (without HDD): 4.5 kg (with 1 HDD): 5.1 kg
Overview
Front view
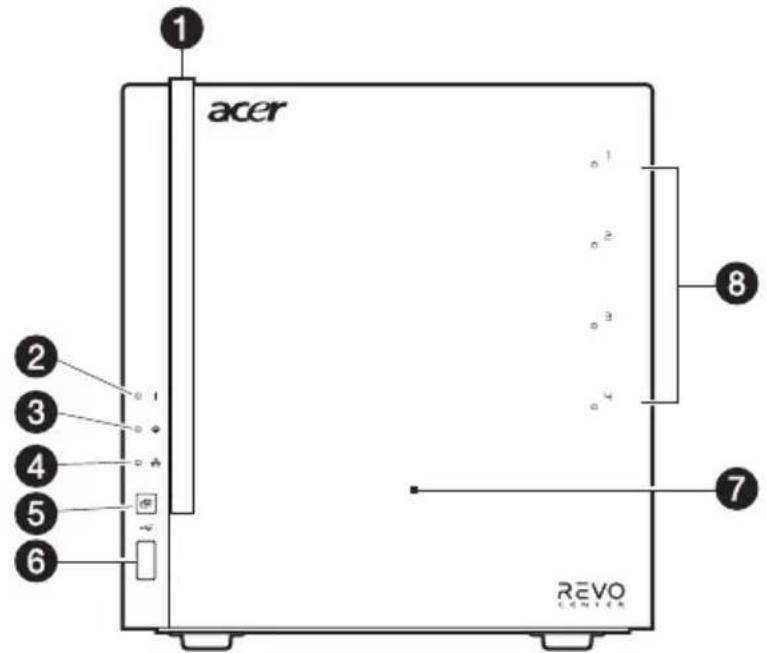
text_image
1 acer 2 3 4 5 6 7 8 REVO CENTERNo. Icon Component
1 Power button/power indicator
2 System status indicator
3 Hard disk drive (HDD) status indicator
4 Network indicator
5 USB backup button/USB backup indicator
6 USB 2.0 port
7 Front door
Open the door to access the hot-swappable HDDs
8 HDD access indicators
Rear view
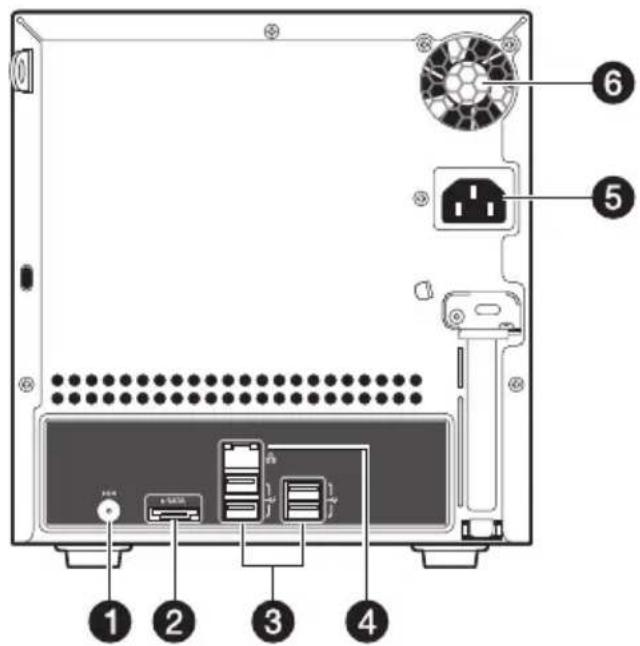
text_image
Diagram of a computer rack with labeled components including drive, socket, and portsNo. Icon Component
1 Recovery/reset button
2 eSATA port eSATA
3 USB port
4 Gigabit Ethernet port
5 Power connector
6 System fan
System LED indicators
Front panel LED indicators
The LED indicators mounted on the front panel provide information about the status of the system, its hard drives, and network connection.

text_image
1 acer 2 3 4 5 3 4 6 REVO CENTERNo. Indicator Color State Description
| 1 | P o button | wWhiteOn System is connected to the power supply and turned on and ready for use | |
| Random blink | System is bootingSystem is in S3 sleep state (suspend to memory) | ||
| Off | System is not powered onSystem initialize operation in progress | ||
| No. | Indicator | Color | State | Description |
| 2 System status White Random | blink | System is bootingSystem is shutting down | ||
| On System initialize operation completed. | ||||
| Purple On May indicate the following states:System failureHDD failureSATA controller failureUSB controller failureLAN controller failureFAN failureMemory failureBoot device not foundIf your network status is at risk | ||||
| Random System recovery or reset is in progressblink progress | ||||
3 HDD status(4) | Purple On • System not initialized• HDD is not mounted into the drive bay | |||
| Random blink | • HDD is mounted into the drive bay and is in the process of being manually added into the server storage• HDD is in the process of being removed from the server storage.For detailed instructions on how to add or remove a drive from the server storage, see “5 Configuring the hard disk drive” on page 107. | |||
| White On HDD is mounted into the drive bay and added into the server storage For detailed instructions on how to add a drive into the server storage, see “Adding a hard disk drive” on page 107. | ||||
| White & Purple | Random blink | • HDD failure• Windows Home Server cannot find HDD | ||
| None Off No HDD mounted in the drive bay. | ||||
| 4 Network White On Link between system and network | ||||
| Random blink | Network access | |||
| Off Network disconnected | ||||
| 5 | U S backup | B | White On • USB storage device is connected to the USB port• Backup completed | |
| USB BACKUP | ||||
| Random blink | System is backing up files from a USB storage deviceFor detailed instructions on how to back up files from a USB storage device, see “Using the one-touch USB backup feature” on page 91. | |||
| Off USB storage device unmounted | ||||
| 6 HDD access White Blink HDD is in use | ||||
Gigabit Ethernet port LED indicators
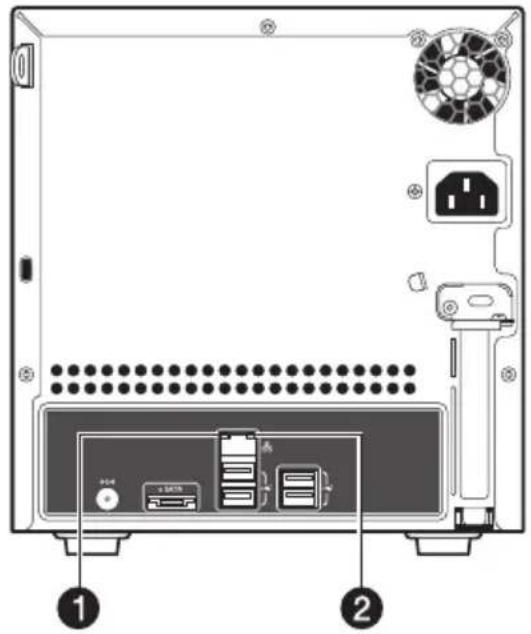
text_image
Diagram of a computer rack with labeled components and numbered parts, showing front panel, rear panel, and internal storage areas.No. Indicator Color State Description
| 1 Speed indicator | None Off 10 Mbps connection | ||
| Green On 100 Mbps connection | |||
| Amber On 1000 Mbps connection | |||
| 2 | L i activity indicator | Green On Network link is detected | |
| Random blink | Transmit or receive activity | ||
| Off No network connection | |||
2 Setting up the system
Follow these steps to set up RevoCenter Series to run in your home network.
- Check package contents
- Select a location for the home server
- Recommended environment
- Connect the power cord
- Connect to the home network
- Power on the system
• Install the Windows Home Server Connector on the first computer
• Install the Windows Home Server Connector on the client computers - Connect to the Home Server Console
Check package contents
Check the following items from the package:
• RevoCenter Series system
- Power er cord
- Network capable
• RevoCenter Series Installation discs
- Software Installation Disc
Use this disc to do the following:
-Install the Windows Home Server Connector software. Refer to "Install the Windows Home Server Connector on the first computer" on page 18 for detailed instructions.
-Install the Lights Out Client. Refer to "Set up Wake On LAN on the home server" on page 93.
-Update system driver, BIOS, and add-in softwares. Refer to "Update your home server with RevoCenter Series Software Update" on page 126.
- Server Recovery Disc - Use this disc to recover your home server after a system failure or restore the home server to its factory default. Refer to “Recovering or restoring the home server” on page 118 for detailed instructions.
- PC Recovery Disc - Use this disc restore a home computer from a backup stored on your home server. Refer to "Restoring a home computer" on page 123 for detailed instructions.
- Quick Start Guide
- Warranty card
If any of the above items are damaged or missing, contact your reseller or retailer from which you purchased this product.
Select a location
Before unpacking and installing the system, select a suitable site for the system for maximum efficiency. Consider the following factors when choosing a site for the system:
- Near a grounded power outlet
- Clean and dust free
- Stable surface free from vibration
• Well-ventilated and away from sources of heat - Secluded from electromagnetic fields produced by electrical devices such as air conditioners, radio, TV transmitters, etc.
Recommended environment
For best results, your computer should meet the following hardware and software requirements:
- Processor
• 1 GHz Pentium 3, Pentium 4, AMD x64, or newer processor
- System memory
- 512 MB or above
- Hard drives
- 80 GB internal (ATA, SATA, or SCSI) as primary drive
- Operating system
- Windows Vista Home Basic
- Windows Vista Home N (EU only)
• Windows Vista Home Premium - Windows Vista Business
• Windows Vista Business N (EU only) - Windows Vista Enterprise
- Windows Vista Ultimate
- Windows XP Home with Service Pack 2 (SP2)
- Windows XP Professional with SP2
- Windows XP Media Center Edition 2005 with SP2 and Rollup 2
• Windows XP Media Center Edition 2004/2005 with SP2 - Windows XP Tablet Edition with SP2
- Web browsers
- Internet Explorer version 6.0, 7.0, or above
- Mozilla Firefox 1.5 or above
- Internet connection
• 100 Mbps to 1000 Mbps Gigabit Ethernet connection
- Broadband connection (DSL or cable)
- Broadband router (DHCP enabled and meets UPnP standards.)
• Digital media player for streaming media files
- iTunes 7.1 or later
- Windows Media Player 10 or later
Connect the power cord
Plug the power cord into the power connector and the other end into an electrical outlet.
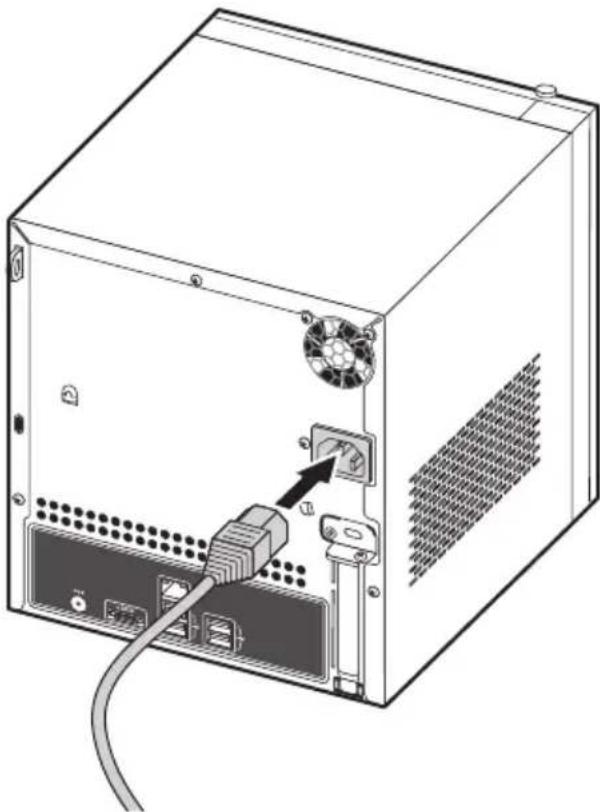
natural_image
Line drawing of a computer tower rear panel with cable and socket, showing internal components like fan, socket, and power connector (no text or labels)Connect to the home network

Important: Connect the RevoCenter Series to your broadband router with a network cable. Wireless connection to your broadband router is not supported. However, home computers that are connected through a wireless connection is supported.
Connect one end of the network cable into the network port and the other end to a Gigabit Ethernet port on a broadband router.
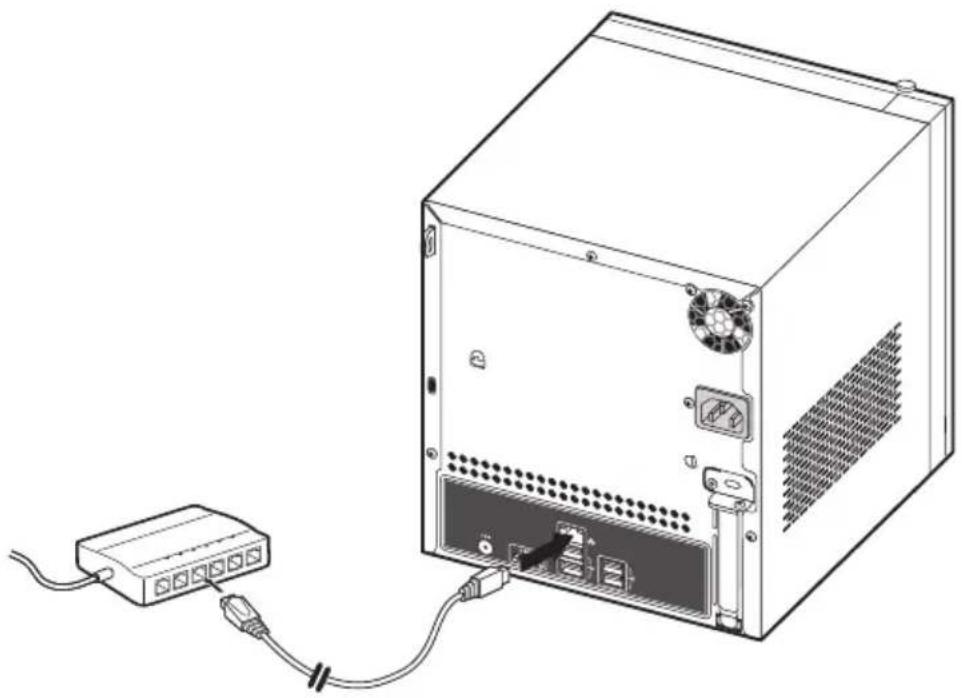
natural_image
Line drawing of a computer tower with power connector and cable, no text or symbols presentPower on the system
After making sure that you have set up the system properly and connected all the required cables, you can now power on the system.
Press the power button to turn system on. The LED indicators on the front panel will flash, change colors and turn to solid blue after startup.

Note: During initial startup, the system status indicator i on the front panel will flash red and turn to solid blue. This is a normal power-up sequence. Wait for all the LED indicators to turn solid blue before proceeding to the next section.
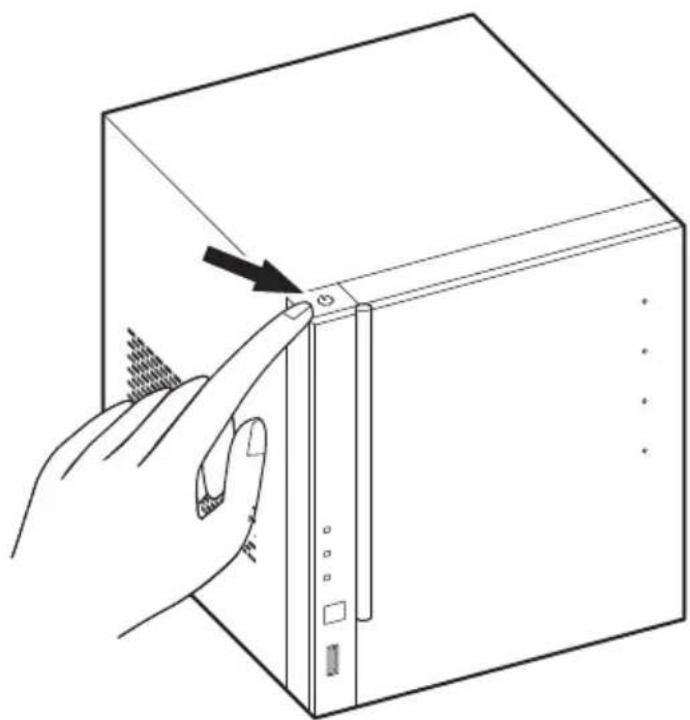
natural_image
Line drawing of a hand pressing a button on a computer tower (no text or symbols)To power down the system, press and hold the power button down for at least four seconds.
Install the Windows Home Server Connector on the first computer
After setting up your RevoCenter Series, you must install the Windows Home Server Connector on your computer.

Note: Prior to installing the Windows Home Server Connector, make sure you have administrator privileges. Refer to the Windows Help for more details on changing your user account settings.
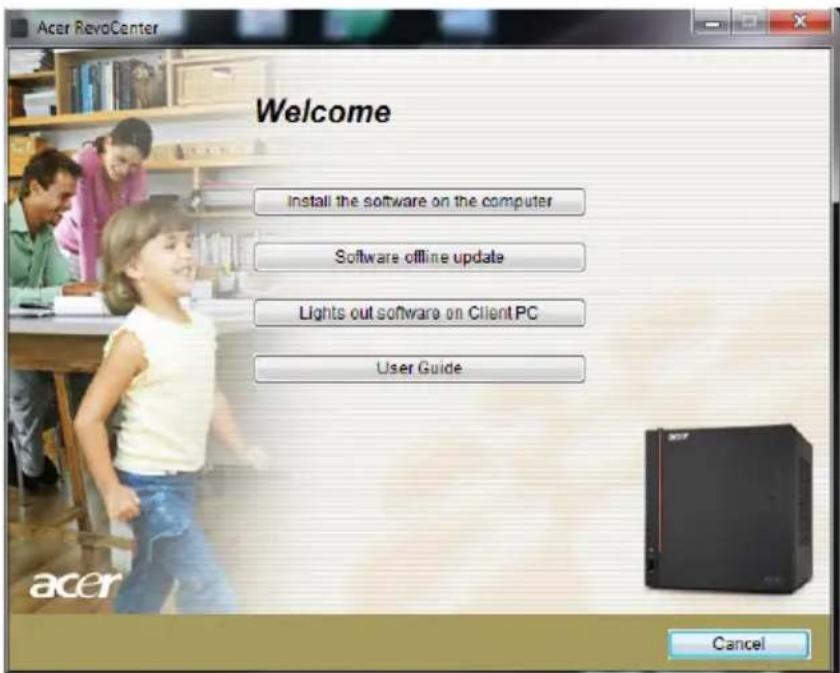
1 Place the RevoCenter Series Software Installation Disc in the optical drive of the first home computer. The installation wizard starts.
Or, double-click on the Client Installation.exe file to begin installation. The Welcome window appears.
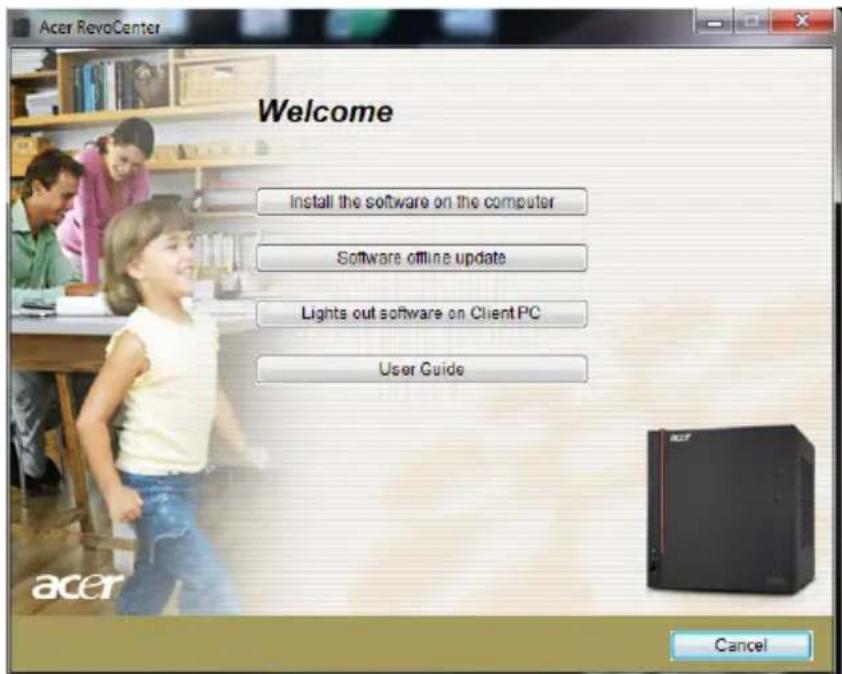
text_image
Acer RevoCenter Welcome Install the software on the computer Software offline update Lights out software on Client PC User Guide Cancel2 Click Install the software on the computer and then click Next.
text_image
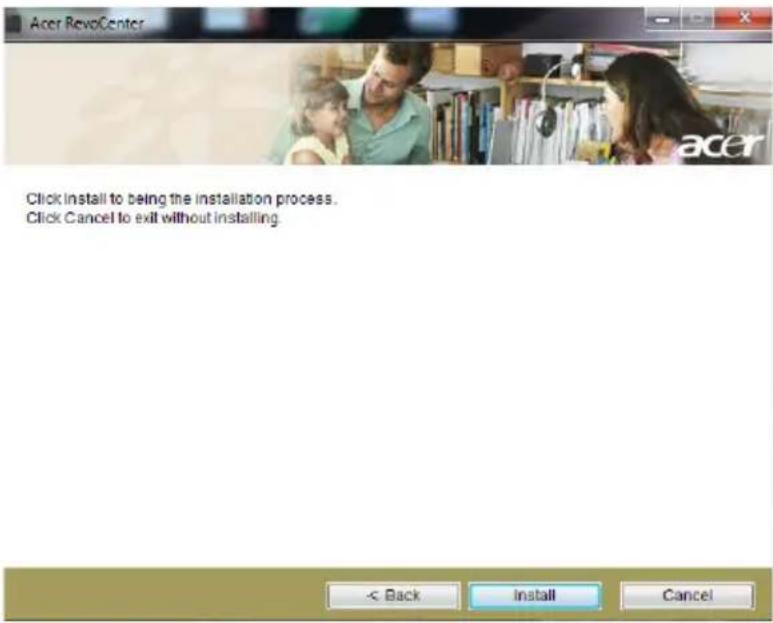
Acer Revocenter Click install to being the installation process. Click Cancel to exit without installing. < Back Install Cancel3 Click Install to begin the installation process. The Microsoft .Net Framework 2.0 and Windows Installer 3.1 components are installed.
text_image
Acer RevoCenter acerMicrosoft .NET Framework 2.0 ... installed Windows Installer 3.1 ... installed

text_image
< Back Install CancelAfter the components are installed, the Windows Home Server Connector installation starts to find and connect to your RevoCenter Series.
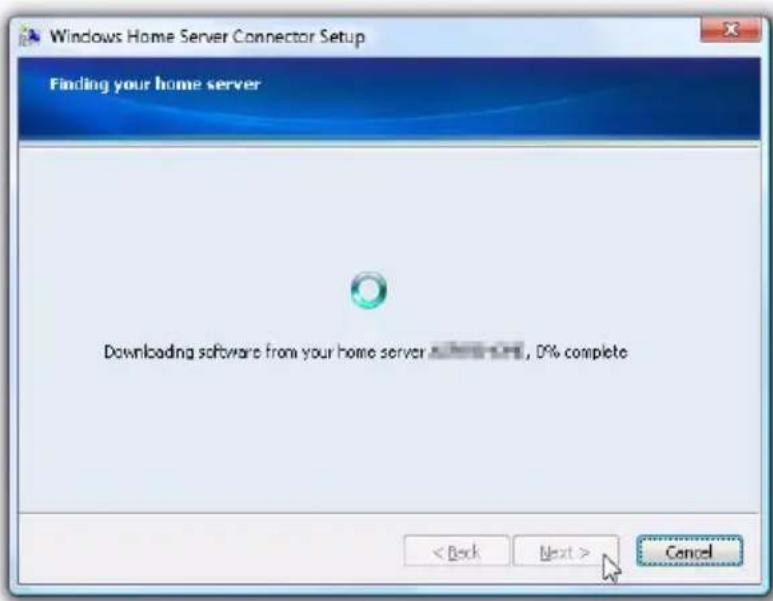
text_image
Windows Home Server Connector Setup Finding your home server Downloading software from your home server 0%, 0% complete < Back Next > CancelOnce the server is found, the Welcome window appears.
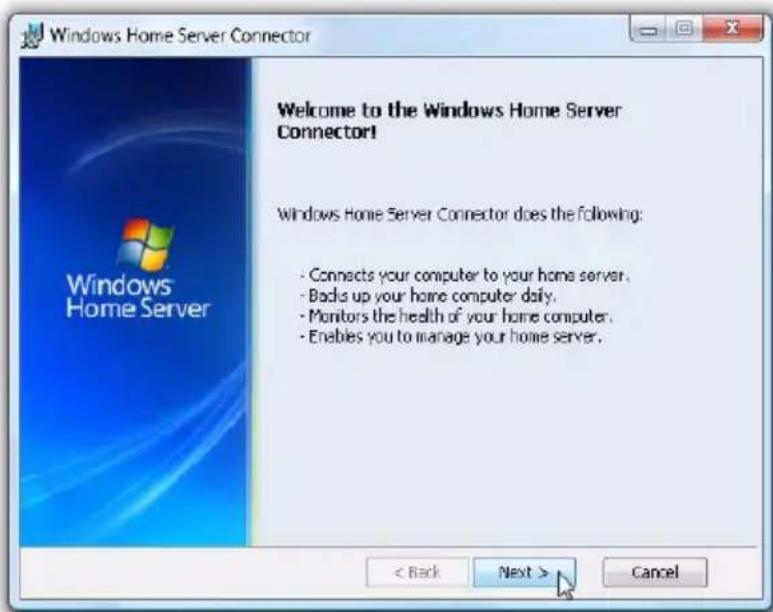
text_image
Windows Home Server Connector Welcome to the Windows Home Server Connector! Windows Home Server Connector does the following: - Connects your computer to your home server. - Backs up your home computer daily. - Monitors the health of your home computer. - Enables you to manage your home server.4 Click Next.
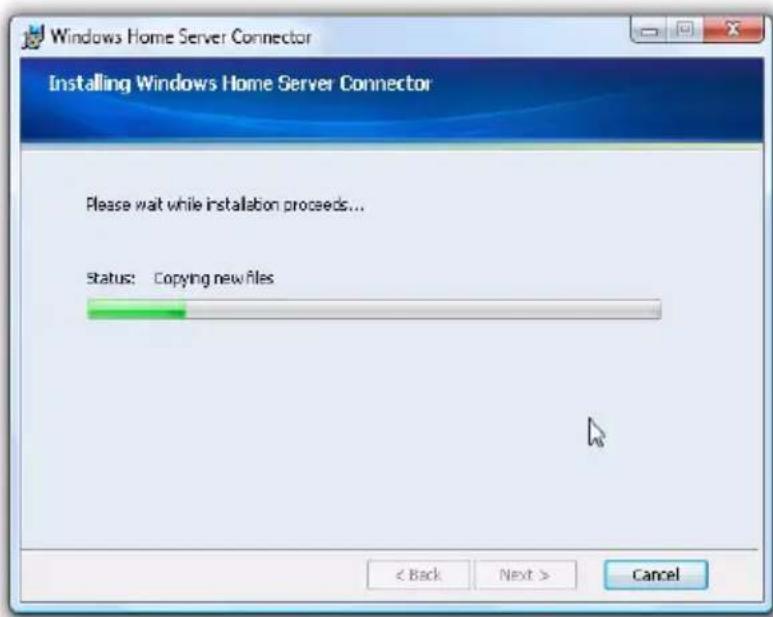
text_image
Windows Home Server Connector Installing Windows Home Server Connector Please wait while installation proceeds... Status: Copying new files < Back Next > Cancel5 Click Next.
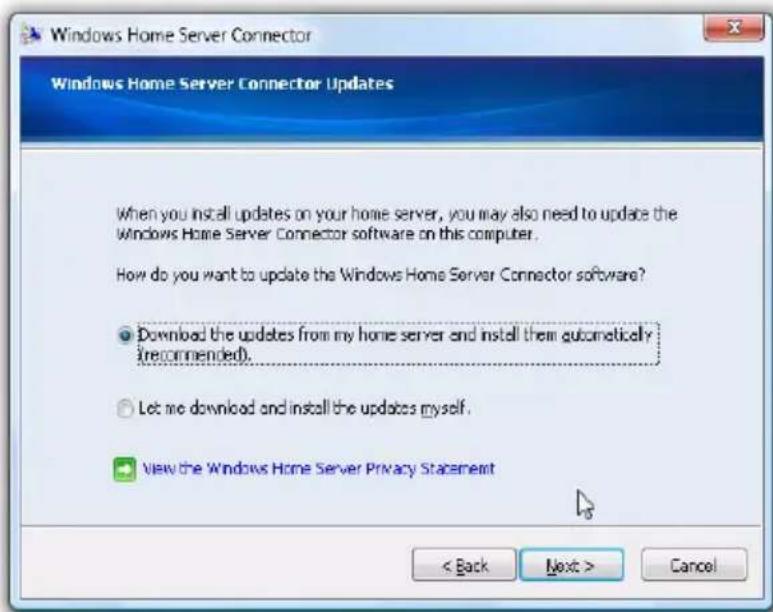
text_image
Windows Home Server Connector Windows Home Server Connector Updates When you install updates on your home server, you may also need to update the Windows Home Server Connector software on this computer. How do you want to update the Windows Home Server Connector software? Download the updates from my home server and install them automatically (recommended). Let me download and install the updates myself. View the Windows Home Server Privacy Statement < Back Next > Cancel6 Select the "Download the updates from my home server and install them automatically" option button if you want to download the updates for the Connector.

Note: Performing the initial Windows Update automatically may take up to one hour. You may select Let me download and install the updates myself to speed up the process.
7 Click Next.
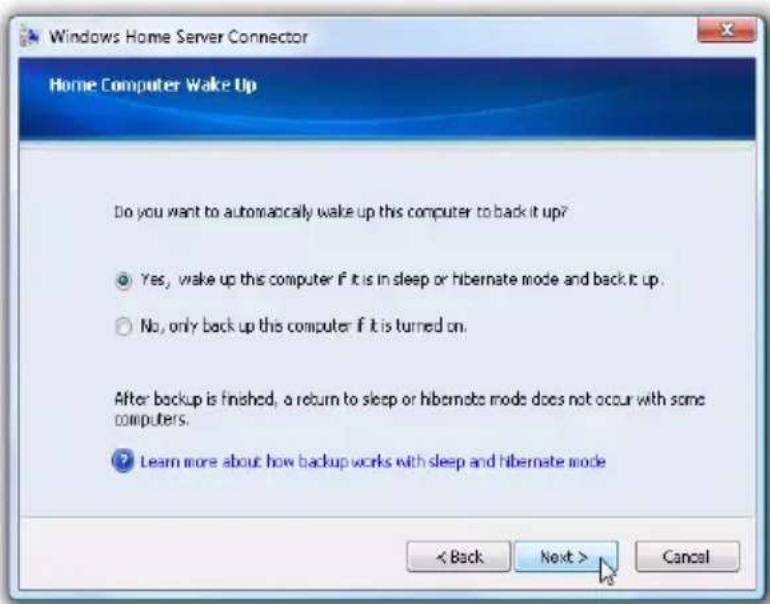
text_image
Windows Home Server Connector Home Computer Wake Up Do you want to automatically wake up this computer to back it up? Yes, wake up this computer if it is in sleep or hibernate mode and back it up. No, only back up this computer if it is turned on. After backup is finished, a return to sleep or hibernate mode does not occur with some computers. Learn more about how backup works with sleep and hibernate mode < Back Next > Cancel8 Select the "Yes, wake up this computer if it is in sleep or hibernate mode and back it up" option button if you want Windows Home Server to wake up your sleeping computer to back it up.
9 Click Next.
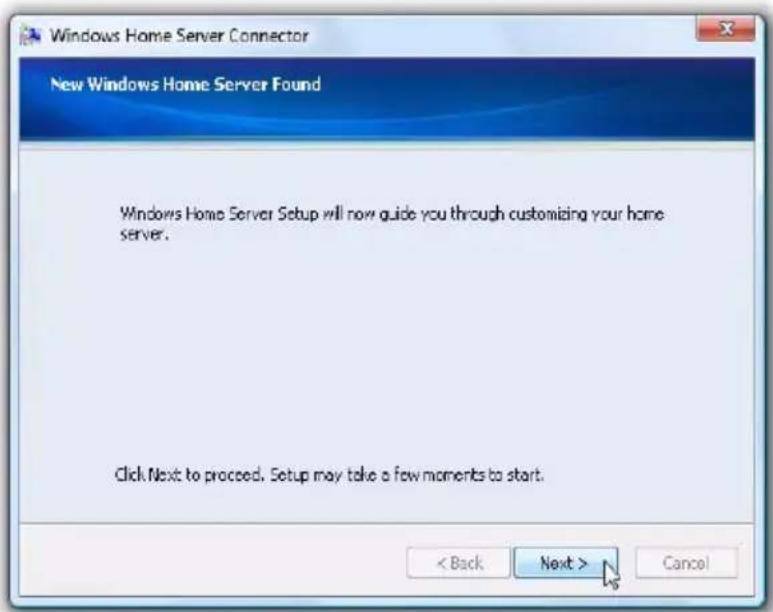
text_image
Windows Home Server Connector New Windows Home Server Found Windows Home Server Setup will now guide you through customizing your home server. Click Next to proceed. Setup may take a few moments to start. < Back Next > Cancel10 Click Next to perform an initial configuration of the home server.

Note: The initial configuration of the home server is performed once on the first home computer.
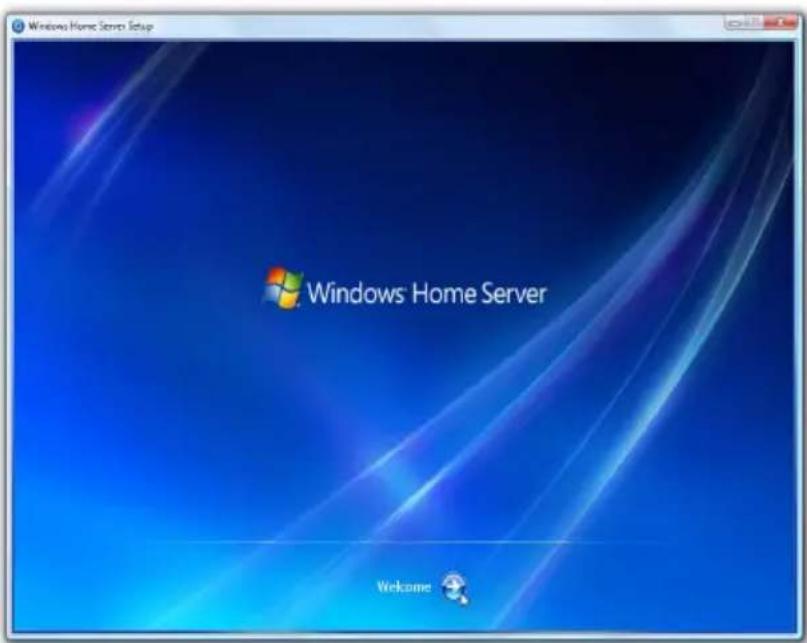
text_image
Windows Home Server Setup Windows Home Server Welcome
Note: You will not be able to perform the initial configuration on a default resolution of 1024 x 600. You will need to switch to a higher resolution before doing the initial configuration.
11 Click the Next arrow. The Windows Home Server initialization begins and could take several hours depending on your hardware.
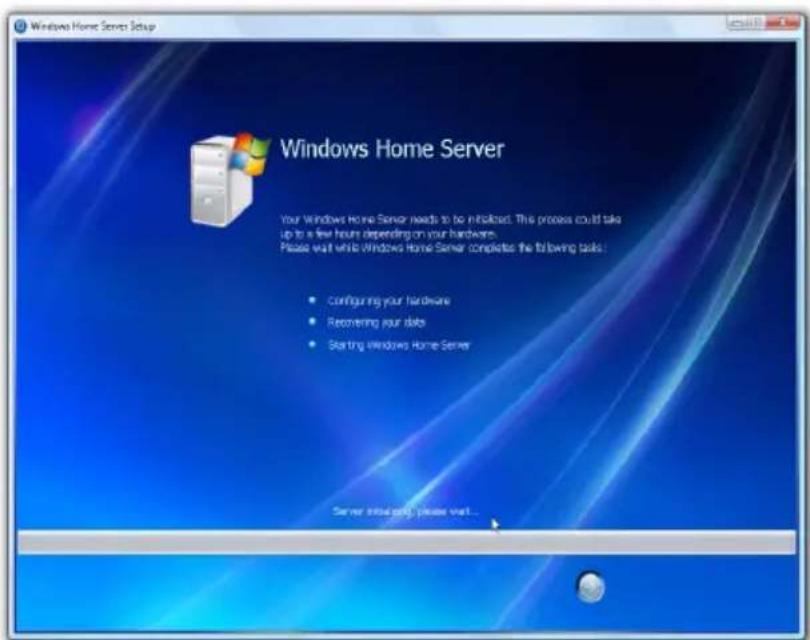
text_image
Windows Home Server Setup Windows Home Server Your Windows Home Server needs to be initiated. This process could take up to a few hours depending on your hardware. Please wait while Windows Home Server completes the following tasks: • Configuring your hardware • Recovering your slots • Starting Windows Home Server Server Initial only, please wait...12 Once the initialization is completed, click the Next arrow.
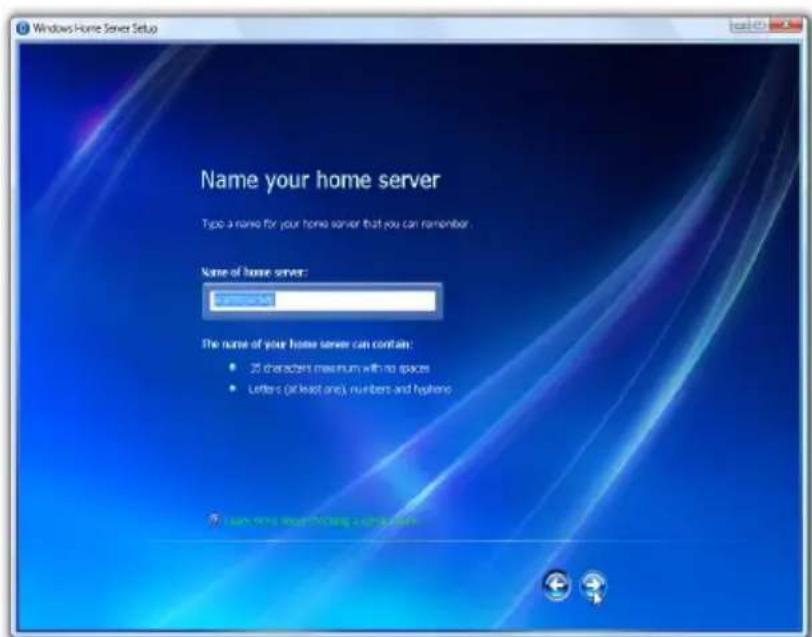
text_image
Windows Home Server Setup Name your home server Type a name for your home server that you can remember. Name of home server: 100 percent The name of your home server can contain: • 25 characters maximum with no spaces • Letters (all least one), numbers and hyphen • Learn your home server to access your home server.13 Enter a name for your home server.
The name of your home server can contain a maximum of 15 characters (includes letters, numbers or hyphens) with no spaces.
14 Click the Next arrow.
15 Enter a strong Windows Home Server administrator password, confirmation password, and a password hint. This is the password that you can use to manage your home server from the Windows Home Server Console.
The strong password must be at least 7 characters and must contain at least three of the following four categories:
- Uppercase letters
- Lowercase letters
- Numbers
- Symbols (such as !, @, #, etc.)
An example of a strong password is Acer123.
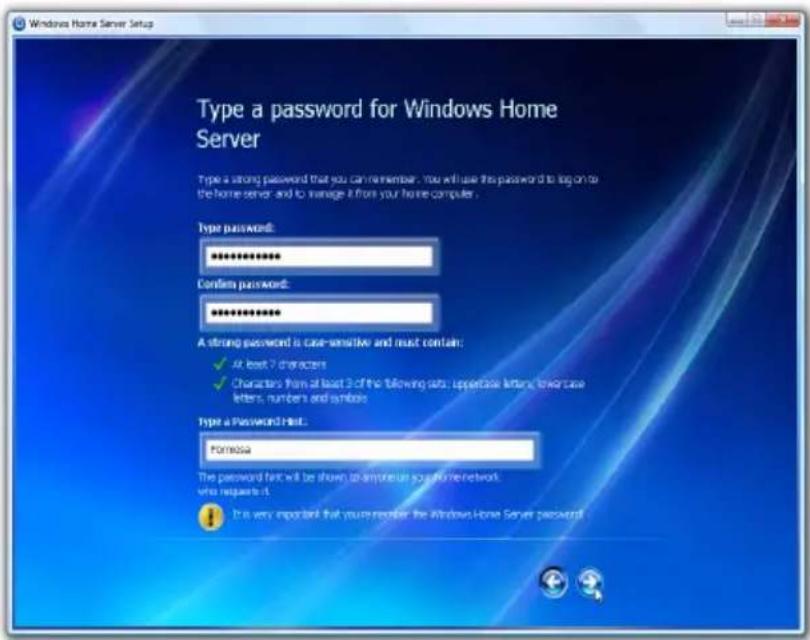
text_image
Windows Home Server Setup Type a password for Windows Home Server Type a strong password that you can remember. You will use this password to log on to the home server and to manage it from your home computer. Type password: ****** Confirm password: ****** A strong password is case-sensitive and must contain: ✓ At least 2 characters ✓ Characters from at least 3 of the following sets: uppercase letters, lowercase letters, numbers and symbols Type a Password List: Portosa The password list will be shown to anyone or your home network, who requests it. It is very important that you remember the Windows Home Server password.
Caution:
- Keep the administrator password for the server in a safe place. You will not be able to log on to the server if you enter a wrong password. If you forget the password, you will have to restore the server, and all system settings, user accounts and data will be lost.
- Restoring the server requires a wired connection between the
server and client PC. Connect the two and insert the Server Recovery Disc into the client PC's optical drive to start the process.
16 Click the Next arrow.
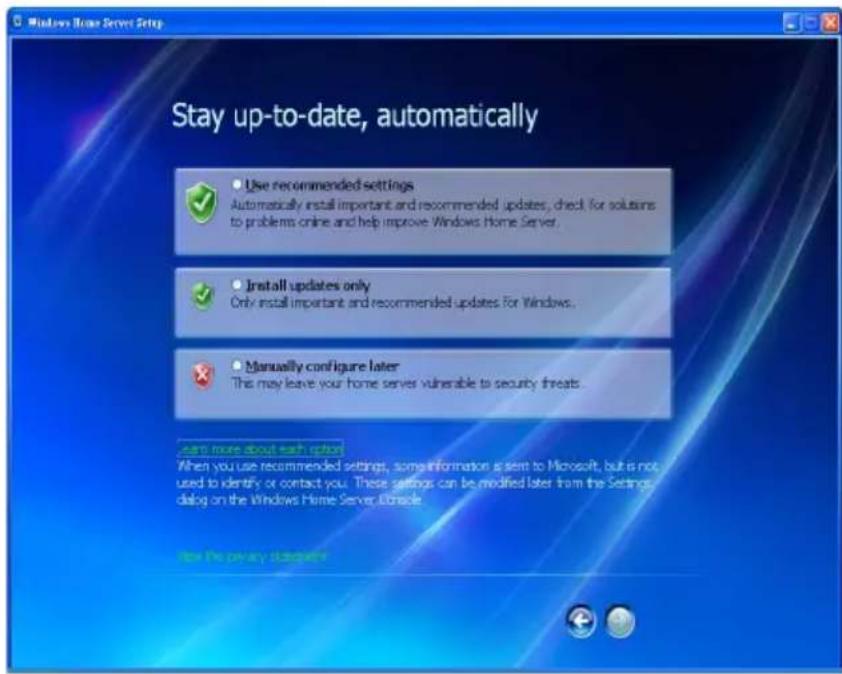
text_image
Windows Home Server Setup Stay up-to-date, automatically Use recommended settings Automatically install important and recommended updates, check for solutions to problems online and help improve Windows Home Server. Install updates only Only install important and recommended updates For Windows. Manually configure later This may leave your home server vulnerable to security threats. Can more about each other When you use recommended settings, some information is sent to Microsoft, but is not used to identify or contact you. These settings can be modified later from the Settings dialog on the Windows Home Server Oracle. Now the primary database17 Select the "User recommended settings" option button if you want to use Windows Update to automatically download and install updates for Windows Home Server, then click the Next arrow.
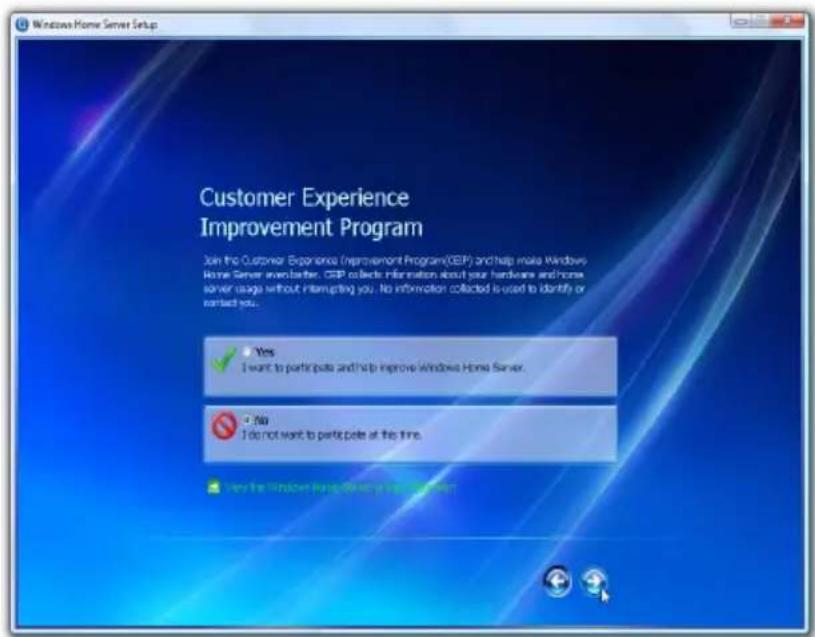
text_image
Windows Home Server Setup Customer Experience Improvement Program Join the Customer Experience (Improvement Program(CEP) and help make Windows Home Server even better. CEP collects information about your hardware and home server usage without interrupting you. No information collected is used to identify or contact you. Yes I want to participate and help improve Windows Home Server. No I do not want to participate at this time. View the Windows Help for your project.18 Choose if you want to participate in the Customer Experience Improvement program, then click the Next arrow.
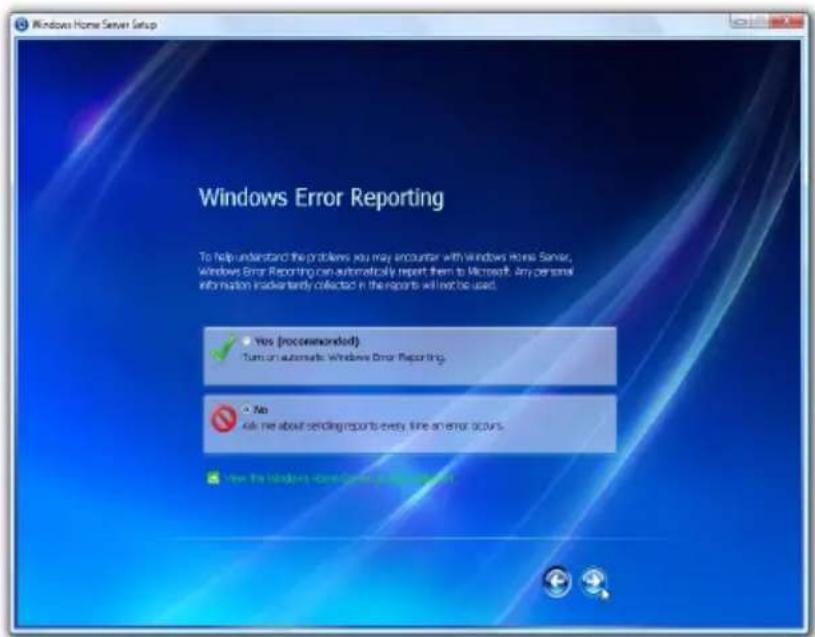
text_image
Windows Home Server Setup Windows Error Reporting To help understand the problems you may encounter with windows Home Server, Windows Error Reporting can automatically report them to Microsoft. Any personal information inadvertently defecated in the reports will not be used. Yes (recommended) Turn on automatic Windows Error Reporting. No Ask me about sending reports every time an error account. View the Windows Home Server 2019 Version19 Choose if you want to participate in the Windows Error Reporting program, then click the Next arrow.
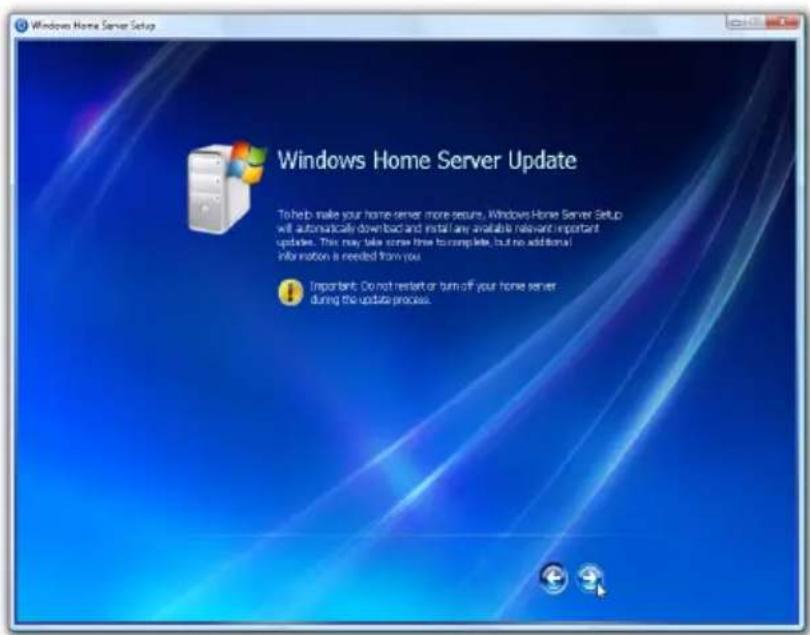
text_image
Windows Home Server Setup Windows Home Server Update To help make your home server more secure, Windows Home Server Setup will automatically download and install any available relevant important updates. This may take some time to complete, but no additional information is needed from you Important: Do not restart or turn off your home server during the update process.20 Click the Next arrow to automatically download and install available Windows Home Server updates. This could take some time to complete but will not need additional information from you.

Important: Do not restart or turn off your home server during the update process.
21 Once installation is complete the Windows Home Server windows displays.
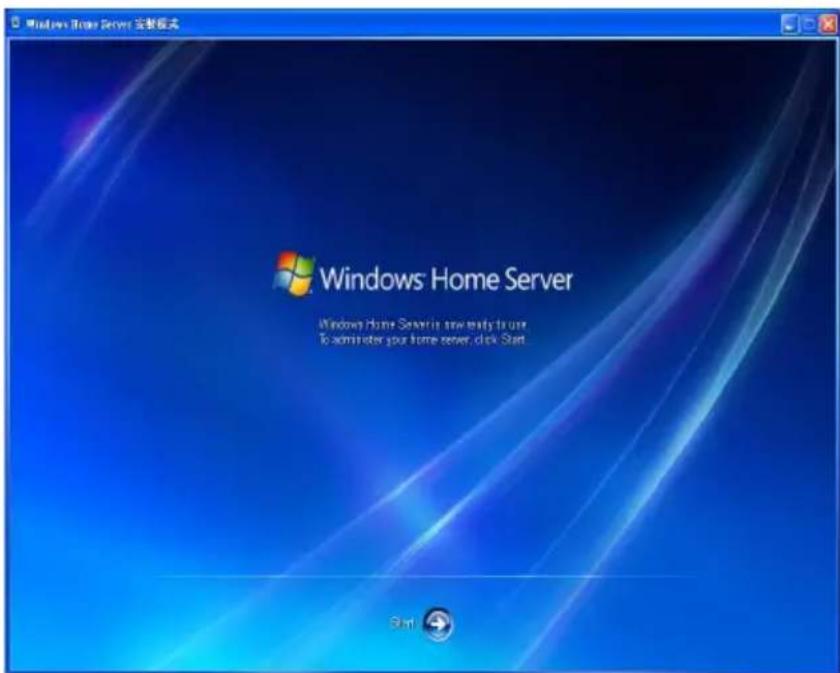
text_image
Windows Home Server 安装模式 Windows Home Server 新安全方式将使用 To administer your home server, click Start.22 Click the Next arrow. The Windows Home Server log in window displays. You can now manage the home server through the remote admin console.
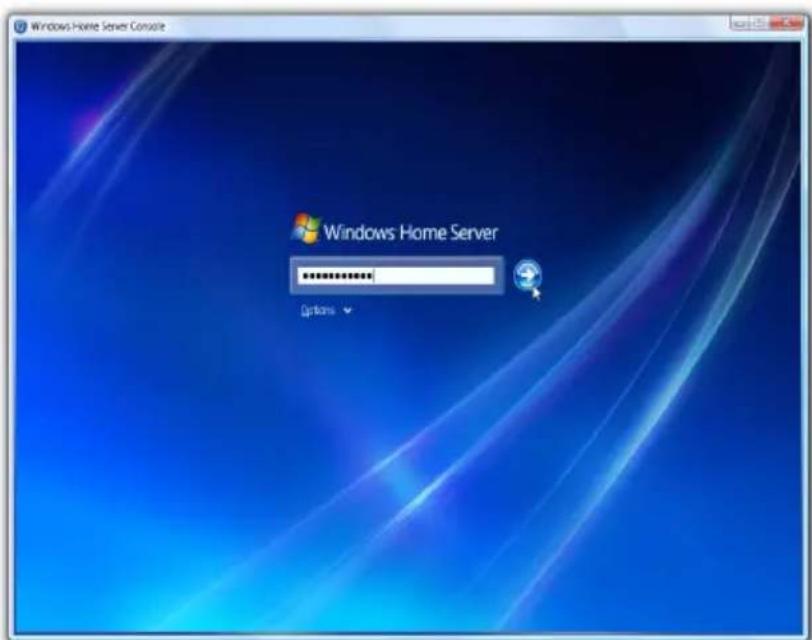
text_image
Windows Home Server Console Windows Home Server Options23 Enter the administrator password, then click the Next arrow. The Setting Password dialog box appears.
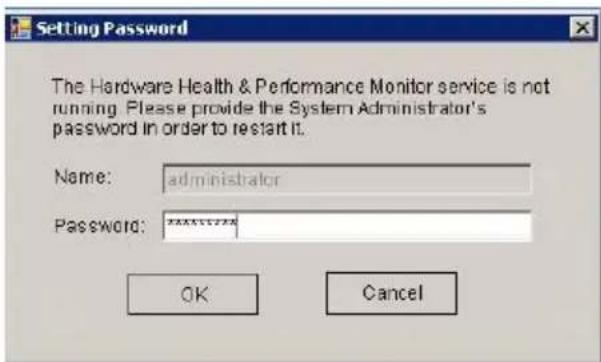
text_image
Setting Password The Hardware Health & Performance Monitor service is not running. Please provide the System Administrator's password in order to restart it. Name: administrator Password: ********** OK Cancel24 Enter the administrator password to start the hardware health and performance monitor service, then click OK. The Windows Home Server Console window appears.
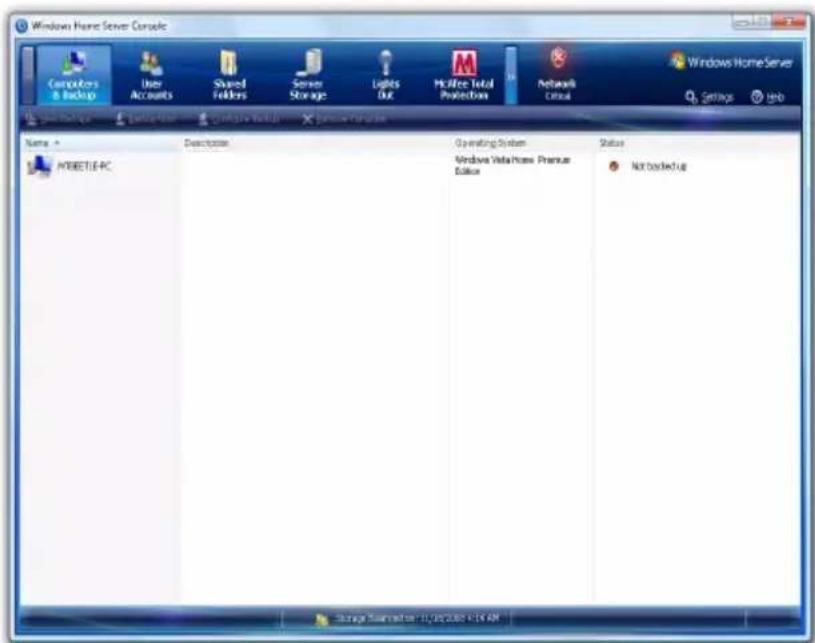
text_image
Windows Home Server Console Computers & Backup User Accounts Shared Folders Server Storage Lights Out McKfee Total Protection Network Critical Windows Home Server Settings Web Name * MYBETIE-PC Description Operating System Windows Malta Home Premium Edition Status Not backed up Storage System: 10 December 2014 AMThe Windows Home Server icon also appears in the system
task tray and the Shared Folders desktop shortcut 📄 appears on your desktop.
The Windows Home Server icon displays the current health and status of the home server as well as all the computers connected to your home network. Right-clicking on the icon allows access to the Windows Home Server. For more information about the system tray icon refer to “Explore the Windows Home Server icon” on page 105.
You can also use Shared Folders to store and organize files on the home server.
Install the Windows Home Server Connector on the client computers
After installing the Windows Home Server Connector on the first computer, use the RevoCenter Series Software Installation Disc to install the Windows Home Server Connector on the computers you want to connect to your home server.
If you have misplaced the disc, you can install the Windows Home Server Connector via the home server. Refer to page 33 for detailed instructions.
To install the Windows Home Server connector from the RevoCenter Series Software Installation Disc
1 Place the RevoCenter Series Software Installation Disc in the optical drive of the client computer. The installation wizard starts.
Or, double-click on the Client Installation.exe file to begin installation. The Welcome window appears.
text_image
Acer RevoCenter Welcome install the software on the computer Software offline update Lights out software on Client PC User Guide Cancel2 Click Next.
3 Click Install to begin the installation process. The Microsoft .Net Framework 2.0, Windows Installer 3.1, and Acer Update, and RevoCenter Series components are installed.
4 After the components are installed, the Windows Home Server Connector installation starts to find and connect to your home server.
Once the home server is found, the Welcome window appears.
5 Click Next.
6 Read the End-User License Agreement. If you agree with the terms of the agreement, then select the "I accept the terms of the license agreement" option button.
7 Click Next. The installation status window appears.
8 Click Next.
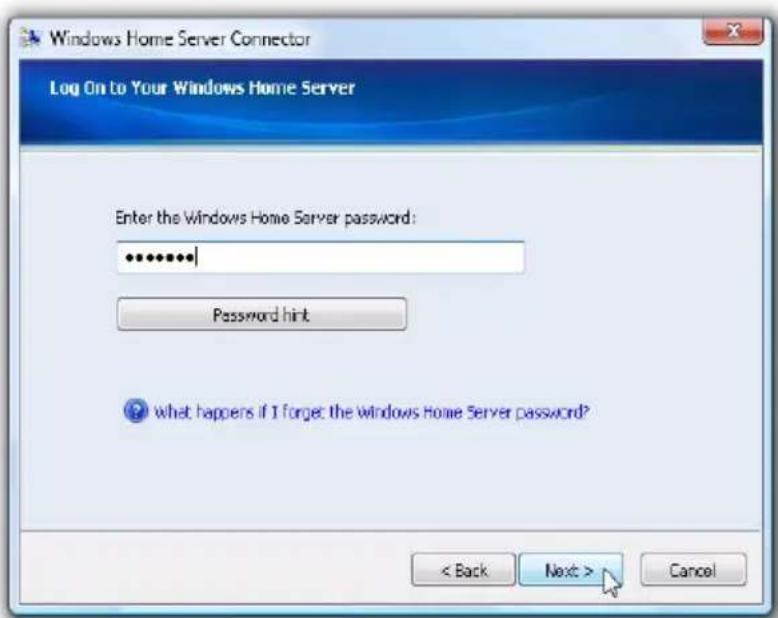
9 Enter the Windows Home Server administrator password.
text_image
Windows Home Server Connector Log On to Your Windows Home Server Enter the Windows Home Server password: ****** Password hint what happens if I forget the Windows Home Server password? < Back Next > Cancel10 Click Next and follow all onscreen instructions until you finish installation.
11 Once installation is complete the Windows Home Server icon appears in the system task tray and the Shared Folders desktop shortcut 📋 appears on your desktop.

To install the Windows Home Server connector directly from the home server
1 Open a Web browser.
2 In the address bar, enter http://RevoCenter:55000/, where "RevoCenter" is the name of the home server.
3 Under Windows Home Server Connector Setup, click Download Now.
4 In the File Download dialog box, click Run.
5 Follow all onscreen installation instructions until you finish installation.
Connect to the Home Server Console
In order to remotely administer the home server, you need to log onto the Windows Home Server Console.

Note: Make sure you have the administrator password to the home server.
There are three ways to launch Windows Home Server Console - Windows Start menu, double-clicking the Windows Home Server icon, or right-clicking the Windows Home Server icon.
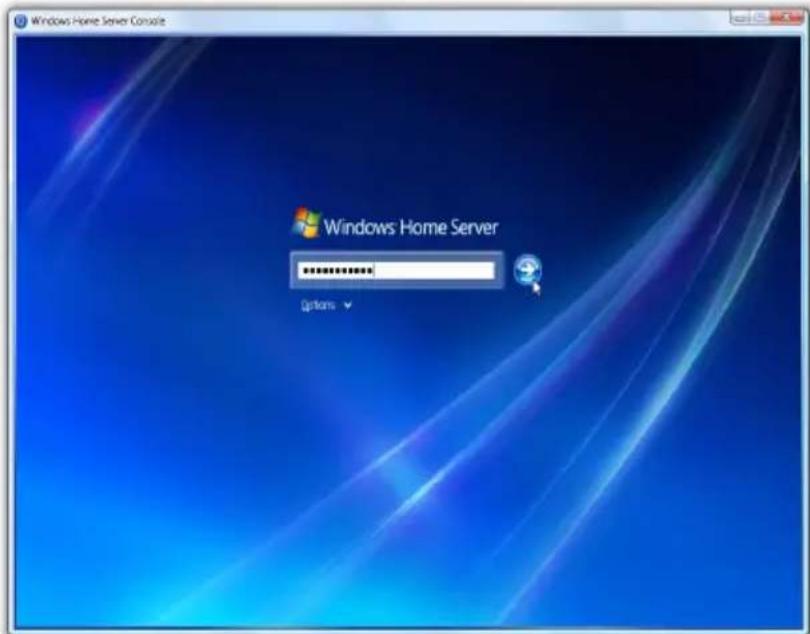
To log onto the home server using Windows Start menu:
1 On your computer, click Start > Programs > Windows Home Server Console.
text_image
Windows Home Server Console Windows Home Server Options2 Enter the administrator password, then click the Next arrow.
To log onto the home server using Windows Home Server icon:
1 Right-click on the Windows Home Server icon in the system tray, then select Windows Home Server Console from the pop-up menu.
Or,
Double-click the Windows Home Server icon in the system tray.
2 Enter the administrator password, then click the Next arrow.
3 Windows Home Server Console
The Windows Home Server Console is a tool that provides remote management of the home server and allows you to monitor and backup computers on the home network. It allows you to remotely administer your home server from anywhere on the home network. Once logged in, you can monitor the health of the home server and connected computers on the network, create backup schedules connected to the computers, backup computers, and manage user accounts, shared folders on the server.
Windows Home Server Console provides access to the following tabs:
• Computers and Backup
- User Accounts
- Shared Folders
- Server Storage
- Lights Out
• McAfee Total Protection
- System Information
• Network Health
- Settings
To learn more about configuring the Windows Home Server, click Help on the console to open the Windows Home Server Console Help.
Computers & Backup
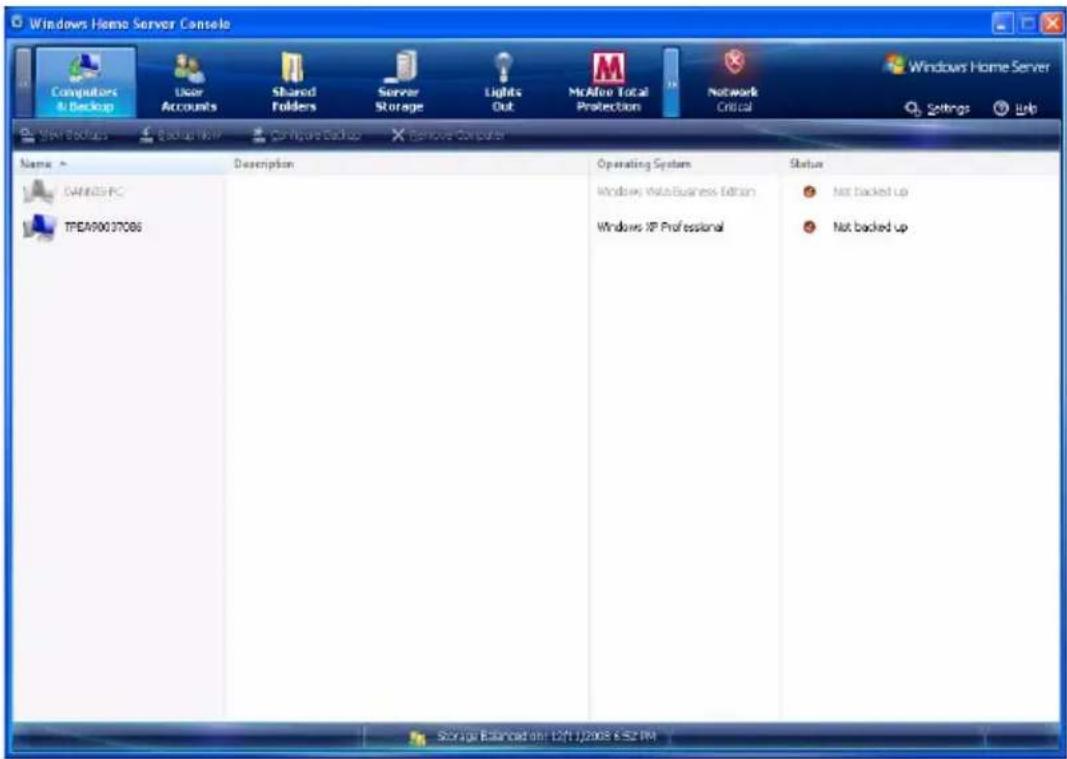
You can use the Computers & Backup tab on the Windows Home Server Console to view the home computers connected to the home server and monitor the health status of the home computers and administer backups. After you install Windows Home Server Connector on each of your home computers, they are automatically backed up on each night to your home server.
text_image
Windows Home Server Console Computers & Backup User Accounts Shared Folders Server Storage Lights Out McAfee Total Protection Network Critical Windows Home Server Settings Help MAY Backups Backup Now Configure Backup Remove Computer Name: Description Operating System Status C:\WINDOWS\PC TPEA90037086 Windows MutoBusiness Edition Windows XP Professional Not backed up Not backed up Storage Balanced on 12/1/2008 E:52 PMThe options on the Computers & Backup tab allow you to:
• View Backups - Browse the existing backups of a home computer.
- Backup Now - Initiate manual backup of a home computer.
- Configure Backup - Change the backup settings of a home computer.
- Remove Computer - Delete computer and backups from the home server.
For more information, see Computers & Backup in the Windows Home Server Console Help.
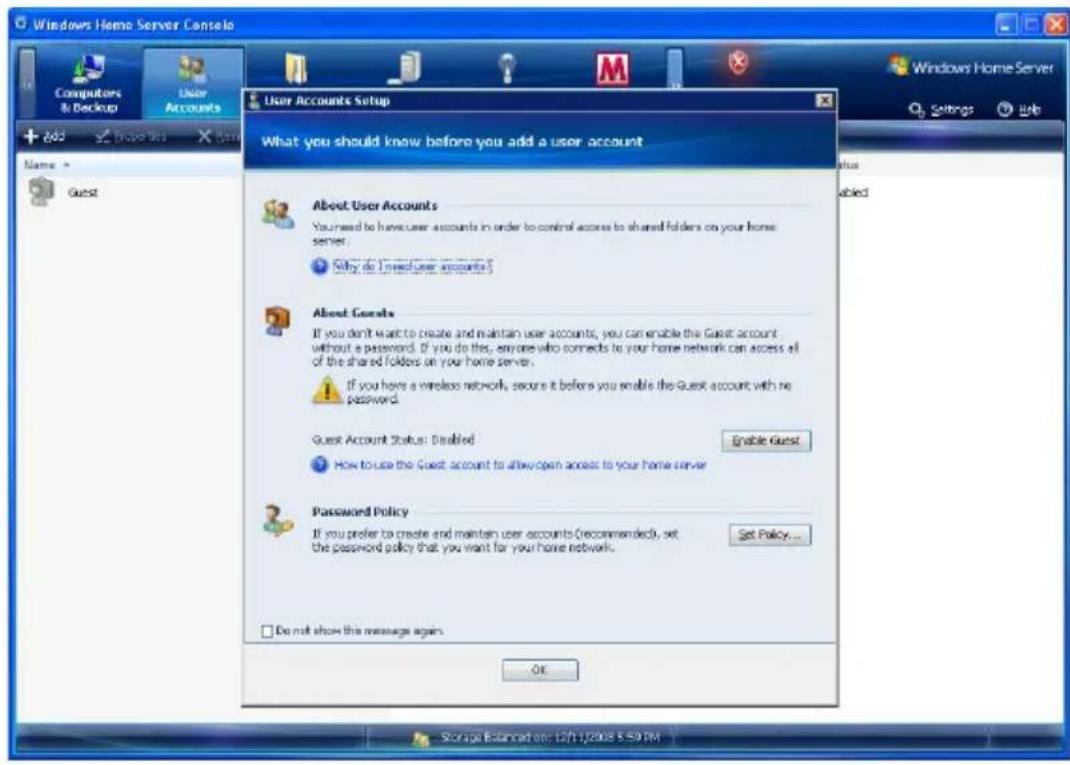
User Accounts
You can use the User Accounts tab on the Windows Home Server Console to create a personal user account, enable a guest account, and maintain user accounts on the home server.
text_image
Windows Home Server Caspelo Computers & Backup User Accounts User Accounts Setup Windows Home Server + Add Remove Web Name Guest What you should know before you add a user account About User Accounts You need to have user accounts in order to control access to shared folders on your home server. Reply do I need user accounts? About Google If you don't want to create and maintain user accounts, you can enable the Guest account without a password. If you do this, anyone who connects to your home network can access all of the shared folders on your home server. If you have a wireless network, secure it before you enable the Guest account with no password. Guest Account Status: Disabled Enable Guest How to use the Guest account to allow open access to your home server Password Policy If you prefer to create and maintain user accounts (Recommended), set the password policy that you want for your home network. Set Policy... Do not show this message again. OK Storage Balance on: 12/11/2008 5:59 PMThe options on the User Accounts tab allow you to:
- Add - Create a new user account on the home server and set access rights for the user.
- Properties - View and change user account properties.
- Remove - Delete a user account from the home server.
For more information, see User Accounts in the Windows Home Server Console Help.

Note:
- You can only have full access to the shared media folders (Video/Photo/Music) after creating user accounts. Otherwise, you can only read files but not save files to the home server.
- A personal shared folder is created each time you add a new user account. By default, only this user account has access to the personal shared folder. Users can store personal files in their personal shared folder. This is true even if the guest account is enabled.
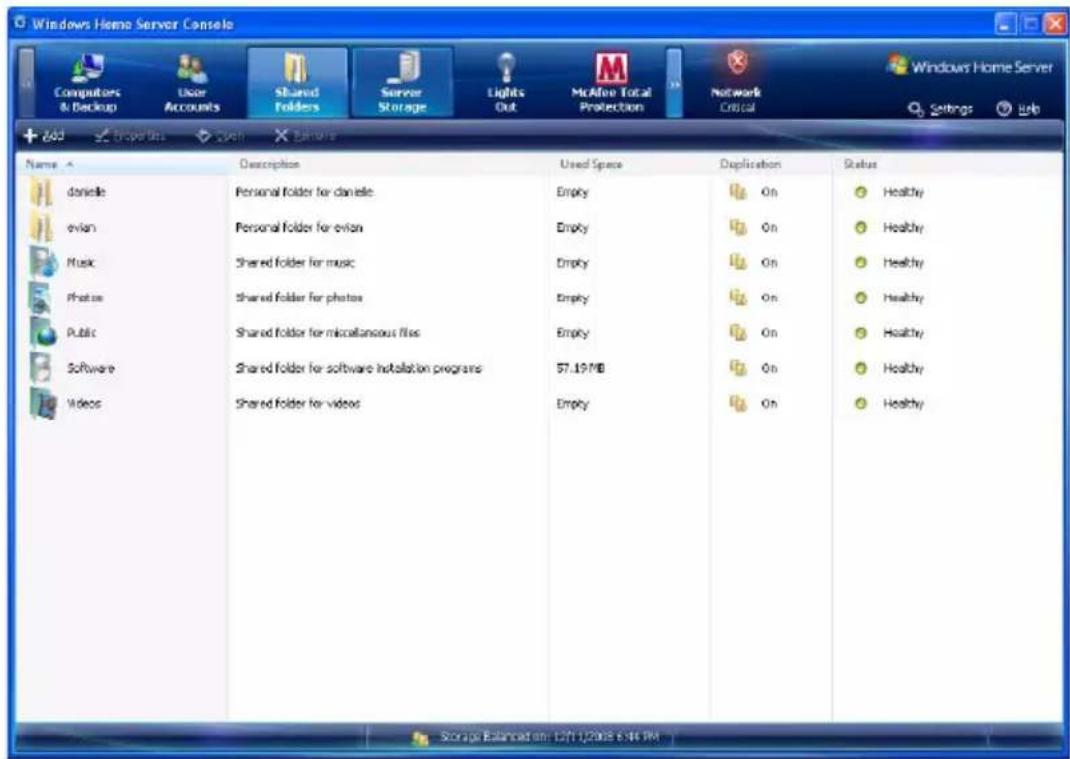
Shared Folders
You can use the Shared Folders tab on the Windows Home Server Console to add, open, remove, and view shared folders on the home server. With Shared Folders you can centrally store files on your home server so that you can share with other people on your home network.
text_image
Windows Home Server Console Computers & Backup User Accounts Shared Folders Server Storage Lights Out McAfee Total Protection Network Critical + Add Properties View Barrow Name Description Used Space Displacement Status donelle Personal folder for danelle Empty On Healthy evian Personal folder for evian Empty On Healthy Music Shared folder for music Empty On Healthy Photex Shared folder for photos Empty On Healthy Public Shared folder for miscellaneous files Empty On Healthy Software Shared folder for software installation programs 57.19 MB On Healthy Videos Shared folder for videos Empty On Healthy Storage Balanced on: 12/11/2008 6:46 PMThe following shared folders are created automatically on the home server:
- Music
• P h o t o s - P u b l i c
- S o f t w a r e
• V i d e o s
- A personal shared folder for each personal user account that is added. By default, no other user account can access this personal shared folder
The options on the Shared Folders tab allow you to:
- ADD - Create a new shared folder on the home server.
- VIEW/CHANGE - View and change shared folder properties.
- OPEN - Browse files and folders in the shared folder.
- REMOVE - Delete an existing folder from the home server.
For more information, see Shared Folders in the Windows Home Server Console Help.
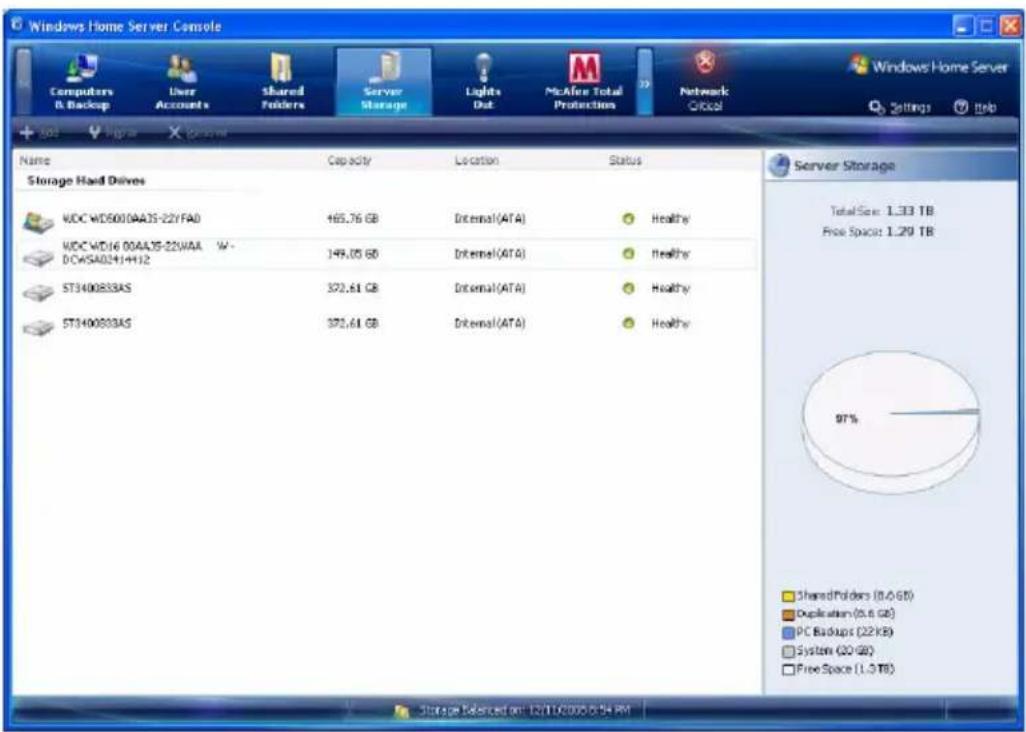
Server Storage
The Server Storage tab on the Windows Home Server Console displays all the hard drives installed on your home server. You can use Server Storage to view, add, repair, and remove hard drives from the home server.
pie
| Category | Value | | :--- | :--- | | SharedFolders (0.6 GB) | 97% | | Duplication (0.6 GB) | 97% | | PC Backups (22 KB) | 97% | | System (20 GB) | 97% | | Free Space (1.0 TB) | 97% |The options on the Server Storage tab allow you to:
- Add - You can add hard drives of various sizes to the home server and set the hard drives for the following usage:
- Server storage - This option gives you more space to store home computer backups and more space for your shared folders.
- Server Backup - This option allows you to back up all your home server shared folders. If you use an external hard drive for your home server backups, you can store the hard drive in a separate location. When you select this option, your home server appears in the Computers & Backup tab. You can use Back up Now to back up your shared folders to the hard drive.
- Repair - Fix errors on an unhealthy hard drive.
- Remove - Delete a hard drive from the home server.
For more information, see Server Storage in the Windows Home Server Console Help.
Lights Out
Lights Out is a power management add-in software that allows you to set the home server into suspend mode or wake the system at a chosen time with the aid of a calendar event.

bar
Uptime | Day | TPEA90037086 (Time of day) | DAMNIS-PC (Time of day) | |---|---|---| | December 65 | 12:00 AM | 12:00 AM | | December 06 | 12:00 AM | 12:00 AM | | December 07 | 12:00 AM | 12:00 AM | | December 08 | 12:00 AM | 12:00 AM | | December 09 | 12:00 AM | 12:00 AM | | December 30 | 12:00 AM | 12:00 AM | | December 31 | 12:00 AM | 12:00 AM |The Lights Out tab include the following options:
- Refresh - Ensures you have the most resent version of the uptime diagram.
- Update diagram - Displays a chart showing recorded uptimes in the home server, such as when a backup took place, which home computer was active, or when the home server woke up from sleep mode.
- Calendar - Displays the calendar window and allows you to add, edit, delete a calendar entry.
- Settings - Displays the Windows Home Server Settings dialog box For more information on how to configure the Lights Out settings, see page 57.
- About - Displays version number and copyright information.
For more information, click Help in the Lights Out window.
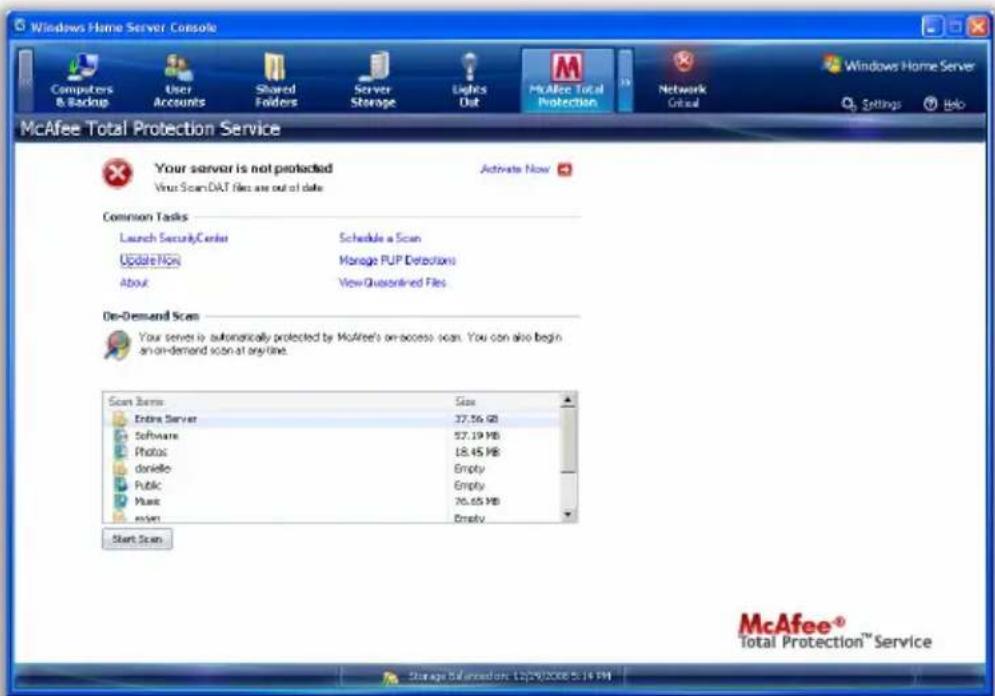
McAfee Total Protection
McAfee Total Protection is an add-in software for Windows Home Server. It is a comprehensive security management solution that checks for viruses, spyware, unwanted programs, and other potential threats on the home server.
text_image
Windows Home Server Console Computers & Backup User Accounts Shared Folders Server Storage Lights Dot McAfee Total Protection Network Critical Windows Home Server Settings Help McAfee Total Protection Service Your server is not protected Virus Scan.D&T files are out of date Activate Now Common Tasks Launch Security Center Schedule a Scan UpdateNow Manage PUP Detecisions About View Quasified Files On-Demand Scan Your server is automatically protected by McAfee's on-access scan. You can also begin an on-demand scan at any-line. Scan Items Size Extra Server 37.56 GB Software 57.19 MB Photos 18.45 MB danello Empty Public Empty Music 70.65 MB admin Empty Start Scan McAfee® Total Protection™ Service
Note: Before you can schedule a scan or have the home server virus pattern updated, you must activate the McAfee Total Protection Service
You can perform the following tasks in the McAfee Total Protection tab:
- Launch SecurityCenter
- Update Now
- About
- Schedule a Scan
- Manage PUP Detections
• View Quarantined Files
For more information, click Help in the McAfee Total Protection window.
System Information
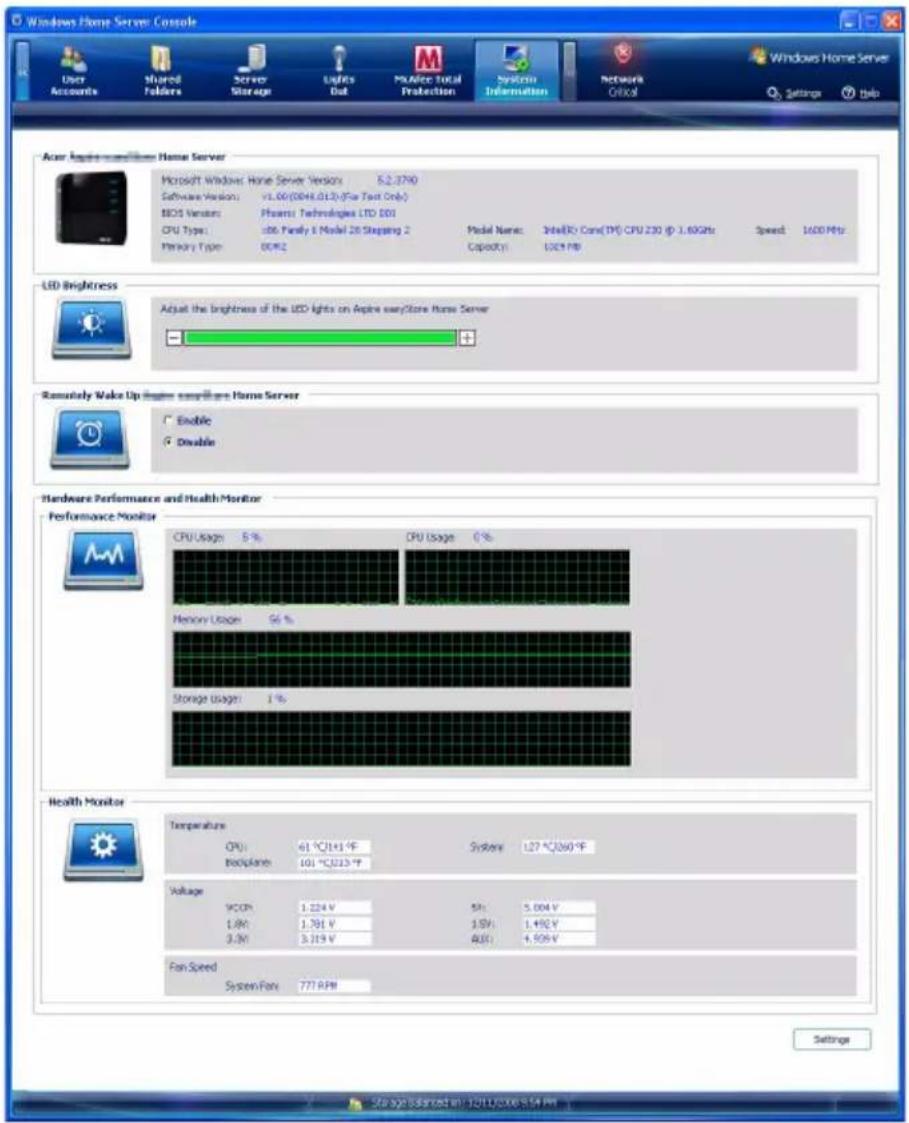
The System Information tab on the Windows Home Server Console provides an all around monitoring mechanism to help you keep an eye on the home server's health and performance details.
text_image
Windows Home Server Console User Accounts Shared Tenders Server Storage Lights Out Make Total Protection System Information Network Critical Windows Home Server Settings Help Acme Appar Home Server Microsoft Windows Home Server Version 5.2.0740 Software Version: V1.06(00H,01:2) (Fix Text Only) BIOS Version: Phoors Technologies LTD 001 CPU Type: i86 Family II Model 28 Shipping 2 Primary Type: OCE2 Model Name: Intel(X) Cons(TM) CPU 230 @ 1.60GHz Speed 1600 MHz Capacity: 100% MB LCD Brightness Adjust the Brightness of the UDD lights on Apache everyStore Home Server Remotely Wake Up Home Home Server Enable Disable Hardware Performance and Health Monitor Performance Monitor CPU Usage 5 % CPU Usage 0 % Memory Usage 56 % Storage Usage 1 % Health Monitor Temperature CPU 61 °C/14 °F System 127 °C/260 °F Pack plane 101 °C/213 °F Voltage 9CCP 1.224 V 5% 1.8V 1.781 V 1.5V 1.492 V 3.3V 3.219 V 4.0V 4.906 V Fan Speed System Fast 777 RPM Settings Storage Service in 12711/2016:5:54 PMSystem Information supports the following features:
- Acer RevoCenter Home Server - Displays basic information about the home server, such as the specification of the processor and memory currently installed in the home server, BIOS version, and operating system version.
-
LED Brightness - Allows you to adjust the brightness of the LED indicators on the home server.
-
Remotely Wake Up RevoCenter Home Server - Allows you to enable or disable remote wakeup feature.
- Hardware Performance and Health Monitor - Allows you to view the performance data of the home server, and monitor the temperature, voltage and fan speed.
To adjust the LED brightness of the home server:
On the LED Brightness field, drag the slider in a horizontal manner to a desired position.

Note: When you restart the Home Server, the LED brightness will revert back to its default settings.
To enable or disable the remote wake up feature:
1 On the Remotely Wake Up RevoCenter Home Server field, click the "Enable" check box to wake the home server from sleep mode. It allows users, who want to upload files, to wake the system from sleep mode.
2 Click the "Disable" check box to disable this feature.
For more information, refer to Network Health in the Windows Home Server Console Help.
Network Health
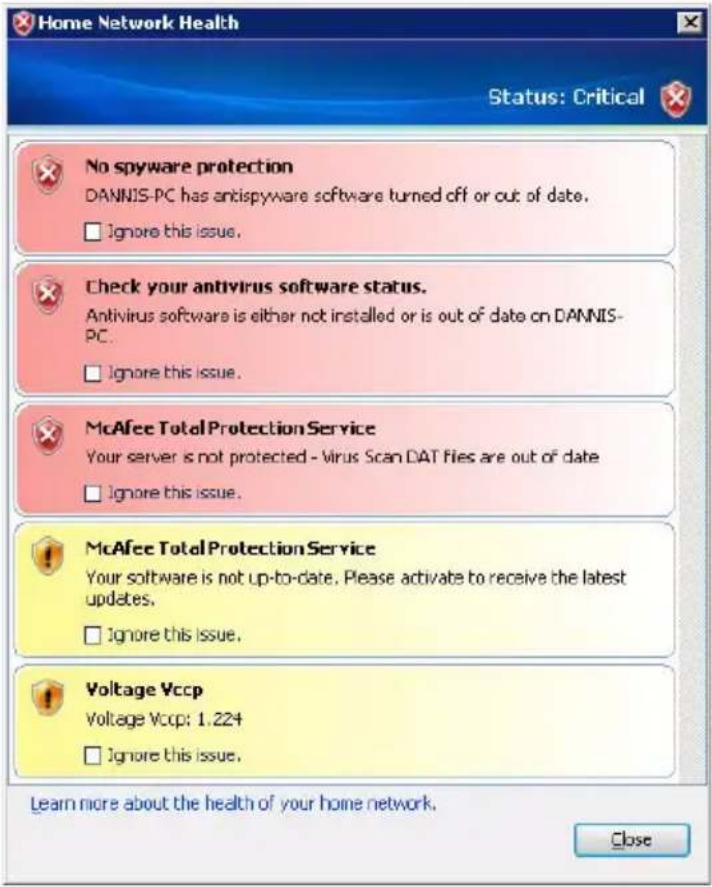
The Network Health tab displays health notifications from your home server and your home computers. You can view the health of your entire network from one convenient location so you can take the necessary actions to correct any problems.
text_image
Home Network Health Status: Critical No spyware protection DANNIS-PC has antispyware software turned off or out of date. Ignore this issue. Check your antivirus software status. Antivirus software is either not installed or is out of date on DANNIS-PC. Ignore this issue. McAfee Total Protection Service Your server is not protected - Virus Scan DAT files are out of date Ignore this issue. McAfee Total Protection Service Your software is not up-to-date. Please activate to receive the latest updates. Ignore this issue. Voltage Vccp Voltage Vccp: 1.224 Ignore this issue. Learn more about the health of your home network. Close
Note: Health notifications are also displayed in the Windows Home Server icon on home computers that have the Windows Home Server Connector software installed.
The possible health states are as follows:
Color Status

Indicates a healthy network.
Color Status
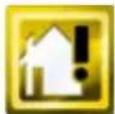
Indicates an at-risk issue that you must attend soon.
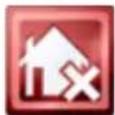
Indicates a critical issue that you must attend to immediately.
For more information, right-click the Windows Home Server icon, click Help.
Settings
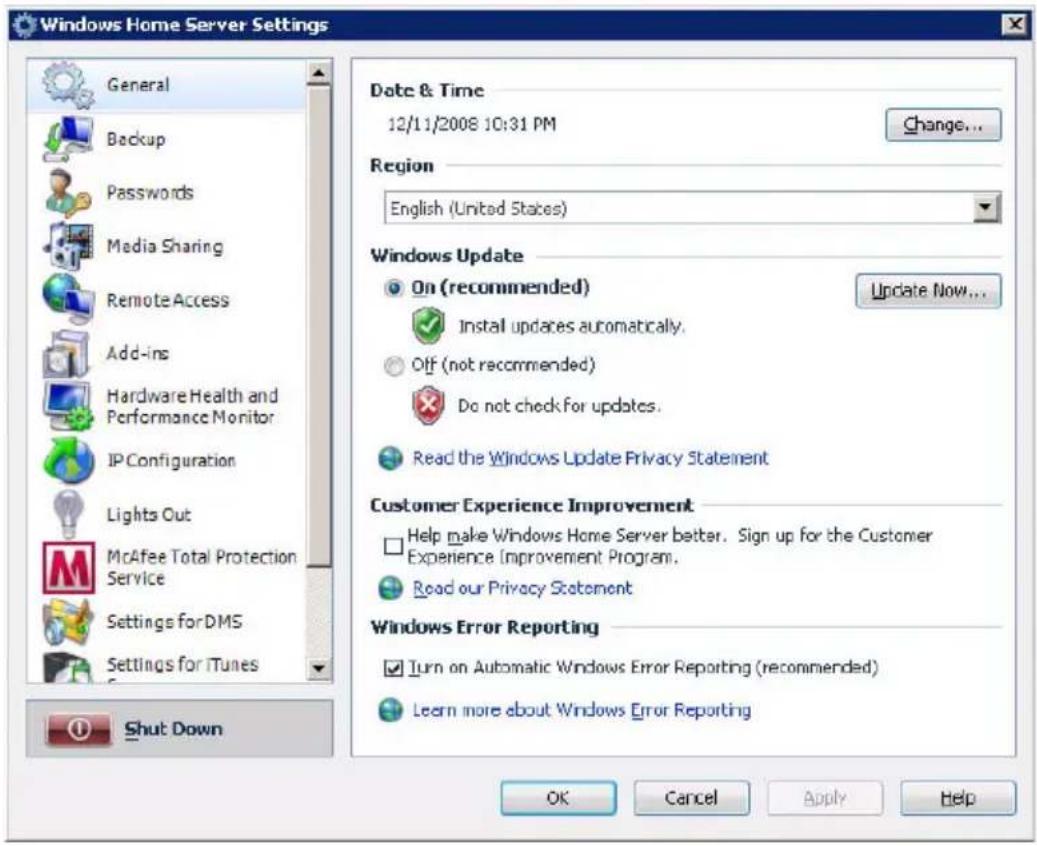
The Settings button on the upper right hand corner of the Windows Home Server Console window allows you to configure your home server settings. The Settings window provides a variety of administrative options.
text_image
Windows Home Server Settings General Backup Passwords Media Sharing Remote Access Add-ins Hardware Health and Performance Monitor IP Configuration Lights Out McAfee Total Protection Service Settings for DMS Settings for iTunes Shut Down Date & Time 12/11/2008 10:31 PM Change... Region English (United States) Windows Update On (recommended) Install updates automatically. Off (not recommended) Do not check for updates. Read the Windows Update Privacy Statement Update Now... Customer Experience Improvement Help make Windows Home Server better. Sign up for the Customer Experience Improvement Program. Read our Privacy Statement Windows Error Reporting Turn on Automatic Windows Error Reporting (recommended) Learn more about Windows Error Reporting OK Cancel Apply HelpIn the Settings window you can configure the settings for the following categories:
- General
- Back up
- Passwords
• Media Sharing - Remote Access
- Add-ins
• Hardware Health and Performance Monitor - IP Configuration
-
Lights Out
• McAfee Total Protection Service -
Settings for DMS
- Settings for iTunes Server
• R e s o u r c e s
General
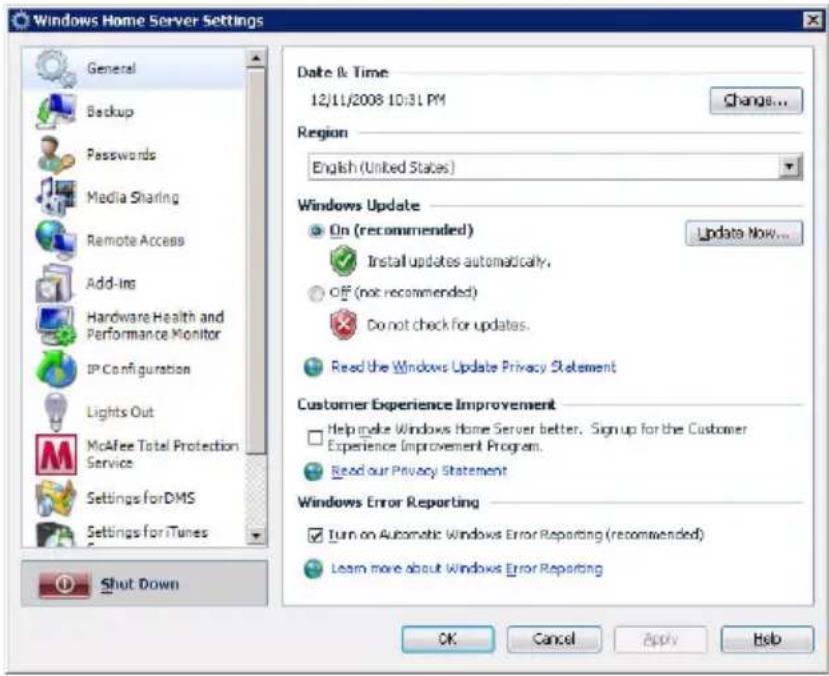
The General settings page allows you to modify the date and time, language selection, Windows Update settings, Customer Experience Improvement program, and enable or disable Windows error reporting.
text_image
Windows Home Server Settings General Backup Passwords Media Sharing Remote Access Add-ins Hardware Health and Performance Monitor IP Configuration Lights Out McAfee Total Protection Service Settings for DMS Settings for iTunes Shut Down Date & Time 12/11/2008 10:31 PM Change... Region English (United States) Windows Update On (recommended) Install updates automatically. Off (not recommended) Do not check for updates. Read the Windows Update Privacy Statement Customer Experience Improvement Help make Windows Home Server better. Sign up for the Customer Experience Improvement Program. Read our Privacy Statement Windows Error Reporting Turn on Automatic Windows Error Reporting (recommended) Learn more about Windows Error Reporting OK Cancel Apply HelpFor information about the tasks that you can perform on the General settings page, click the Help button on the lower right hand corner of the General page.
Backup
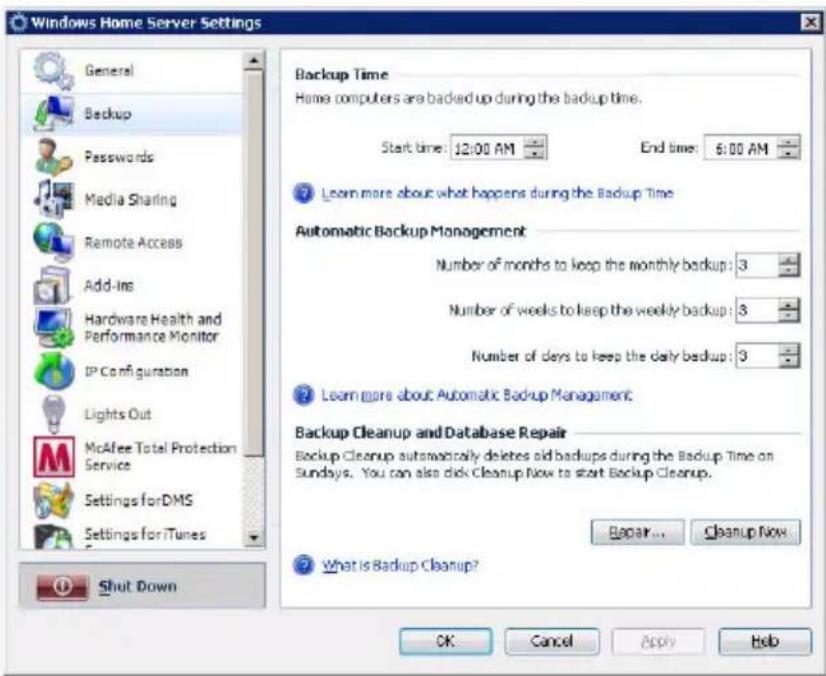
The Backup settings page allows you to configure the start and end time for backing up computers on the home network, specify the number of months, weeks, and days to keep backups on the home server, and manually clean up old backups.
text_image
Windows Home Server Settings General Backup Passwords Media Sharing Remote Access Add-ins Hardware Health and Performance Monitor IP Configuration Lights Out McAfee Total Protection Service Settings for DMS Settings for iTunes Shut Down Backup Time Home computers are backed up during the backup time. Start time: 12:00 AM End time: 6:00 AM Learn more about what happens during the Backup Time Automatic Backup Management Number of months to keep the monthly backup: 3 Number of weeks to keep the weekly backup: 3 Number of days to keep the daily backup: 3 Learn more about Automatic Backup Management Backup Cleanup and Database Repair Backup Cleanup automatically deletes old backups during the Backup Time on Sundays. You can also pick Cleanup Now to start Backup Cleanup. Repair... Cleanup Now What is Backup Cleanup? OK Cancel Apply HelpFor information about the tasks that you can perform on the Backup settings page, click the Help button on the lower right hand corner of the Backup page.
Passwords
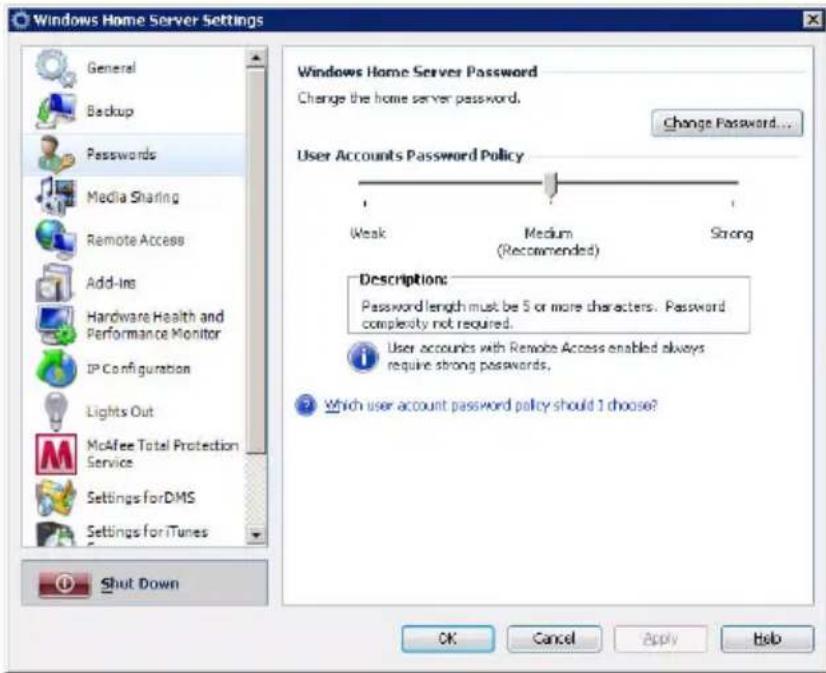
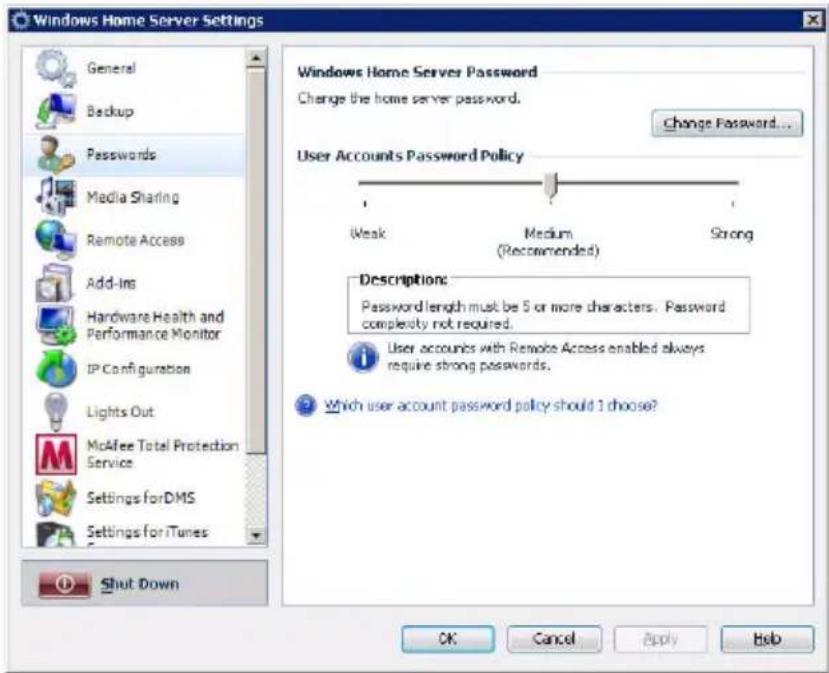
Use the Password settings page to change the home server password and modify the user accounts password policy.
text_image
Windows Home Server Settings General Backup Passwords Media Sharing Remote Access Add-ins Hardware Health and Performance Monitor IP Configuration Lights Out McAfee Total Protection Service Settings for DMS Settings for iTunes Shut Down Windows Home Server Password Change the home server password. Change Password... User Accounts Password Policy Weak Medium Strong (Recommended) Description: Password length must be 5 or more characters. Password complexity not required. User accounts with Remote Access enabled always require strong passwords. Which user account password policy should 1 choose? OK Cancel Apply HelpFor more information, click the Help button on the lower right hand corner of the Passwords page.
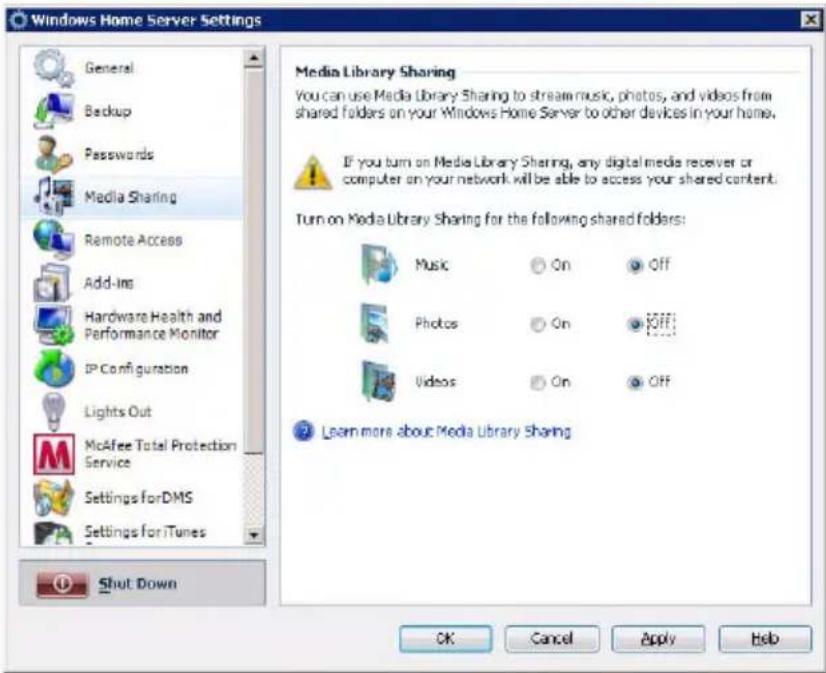
Media Sharing
The Media Sharing settings page allows you to enable or disable Windows Home Server media sharing capabilities.
text_image
Windows Home Server Settings General Backup Passwords Media Sharing Remote Access Add-ins Hardware Health and Performance Monitor IP Configuration Lights Out McAfee Total Protection Service Settings for DMS Settings for iTunes Shut Down Media Library Sharing You can use Media Library Sharing to stream music, photos, and videos from shared folders on your Windows Home Server to other devices in your home. If you turn on Media Library Sharing, any digital media receiver or computer on your network will be able to access your shared content. Turn on Media Library Sharing for the following shared folders: Music On Off Photos On Off Videos On Off Learn more about Media Library Sharing OK Cancel Apply HelpFor information, click the Help button on the lower right hand corner of the Media Sharing page.
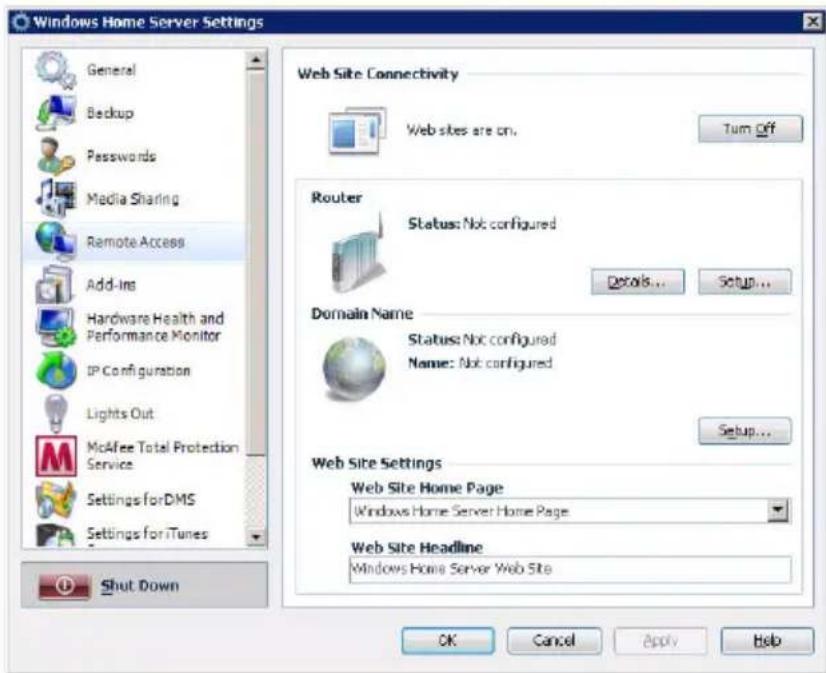
Remote Access
The Remote Access settings page helps you configure everything you need to access the RevoCenter Series home page from the Internet. To get remote access up and running, you must turn on Web Site Connectivity, configure your router, configure a domain name for your home server, and set the RevoCenter Series home page.
text_image
Windows Home Server Settings General Backup Passwords Media Sharing Remote Access Add-Ins Hardware Health and Performance Monitor IP Configuration Lights Out McAfee Total Protection Service Settings for DMS Settings for iTunes Shut Down Web Site Connectivity Web sites are on. Turn Off Router Status: Not configured Details... Setup... Domain Name Status: Not configured Name: Not configured Setup... Web Site Settings Web Site Home Page Windows Home Server Home Page Web Site Headline Windows Home Server Web Site OK Cancel Apply HelpFor more information, click the Help button on the lower right hand corner of the Remote Access page.
Add-ins
The Add-ins settings page allows you to configure the add-in software that you have installed or want to install on your home server.
For information on how to install an add-ins, click the Help button on the lower right hand corner of the Add-ins page.
Hardware Health and Performance Monitor
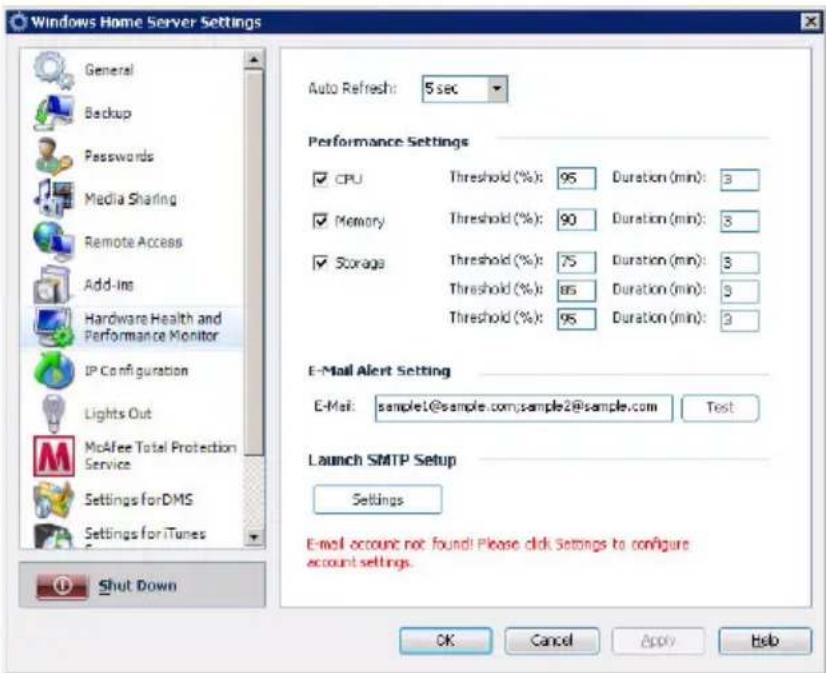
Use the Hardware Health and Performance Monitor settings page to set a refresh interval for monitoring data, configure performance threshold settings, specify email destinations to which alerts should be sent when temperature, voltage, and fan speed abnormality is detected or the pre-configured threshold is exceeded.
text_image
Windows Home Server Settings General Backup Passwords Media Sharing Remote Access Add-ins Hardware Health and Performance Monitor IP Configuration Lights Out McAfee Total Protection Service Settings for DMS Settings for iTunes Shut Down Auto Refresh: 5 sec Performance Settings CPU Threshold (%): 95 Duration (min): 3 Memory Threshold (%): 90 Duration (min): 3 Storage Threshold (%): 75 Duration (min): 3 Threshold (%): 85 Duration (min): 3 Threshold (%): 95 Duration (min): 3 E-Mail Alert Setting E-Mail: sample1@sample.com;sample2@sample.com Test Launch SMTP Setup Settings Email account not found! Please click Settings to configure account settings. OK Cancel Apply HelpIn the Hardware Health and Performance Monitor page, you can configure the following settings:
- Auto Refresh - Sets the refresh interval to tell Windows Home Server how frequent the monitoring data should be performed.
- Performance settings - Sets the performance threshold of the CPU, Memory and Storage.
- E-Mail alert setting - Specify an email address to which alerts should be sent.
- Launch SMTP setup - Configure the Simple Mail Transport setup.
To validate the email alert feature, it is required that you properly configure email destinations and SMTP setup. Refer to "Set up email alerts" on page 100 for more details.
For more information, click the Help button on the lower right hand corner of the Hardware Health and Performance Monitor page.
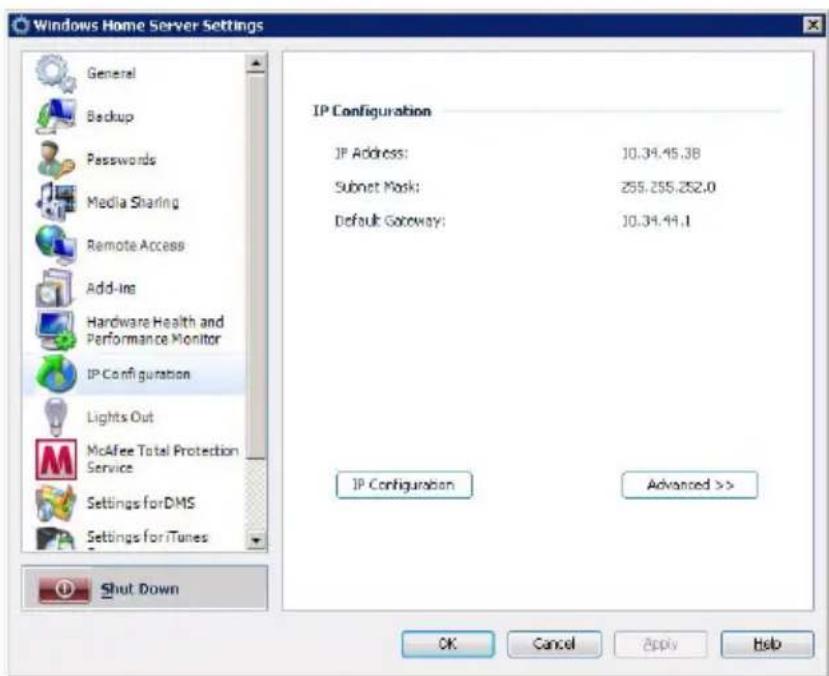
IP Configuration
The IP Configuration settings page allows you to view the home server's current IP configuration settings or change the IP configuration manually.
text_image
Windows Home Server Settings General Backup Passwords Media Sharing Remote Access Add-ins Hardware Health and Performance Monitor IP Configuration Lights Out McAfee Total Protection Service Settings for DMS Settings for iTunes Shut Down IP Configuration IP Address: 10.34.45.38 Subnet Mask: 255.255.252.0 Default Gateway: 10.34.44.1 IP Configuration Advanced >> OK Cancel Apply HelpFor more information, click the Help button on the lower right hand corner of the IP Configuration page.
Lights Out
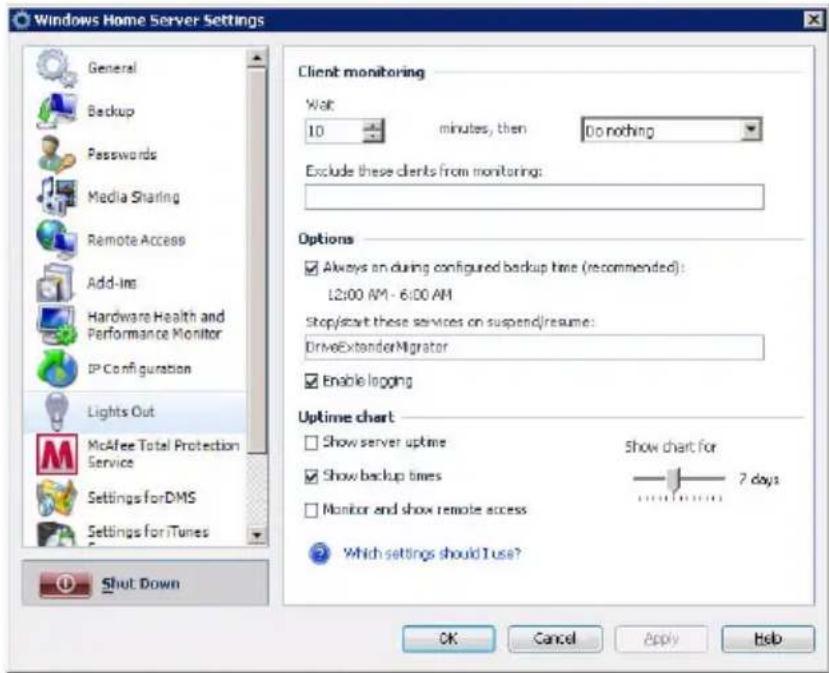
Use the Lights Out page to define times where the home server has to go to suspend or resume mode.
text_image
Windows Home Server Settings General Backup Passwords Media Sharing Remote Access Add-ins Hardware Health and Performance Monitor IP Configuration Lights Out McAfee Total Protection Service Settings for DMS Settings for iTunes Shut Down Client monitoring Wait 10 minutes, then Do nothing Exclude these clients from monitoring: Options ✓ Always an during configured backup time (recommended): L2:00 AM - 6:00 AM Stop/start these services on suspend/resume: DriveExtanderMigrator ✓ Enable logging Uptime chart Show server uptime Show chart for ✓ Show backup times 7 days Monitor and show remote access Which settings should I use? OK Cancel Apply HelpIn the Lights Out page, you can configure the following settings:
- Client computer monitoring - Client computer monitoring is used to check periodically for active clients. When no active clients are detected, the selected action will be executed after the wait time. You can choose to disable client monitoring, put your server to suspend or hibernate mode, or shut down the server.
- Options - You can set Lights Out to wake up your home server on a configured backup time. You should enable this option when you run regular backups.
- Uptime diagram - Recorded uptimes are visualized in the uptime chart. You can choose between a history range of 2 to 14 days. When your server is always up, you can exclude the server from the chart. In the same way you can configure the display of backup times.
When the monitoring for remote access is enabled, the default action is disabled as long as a remote user is logged in. The default timeout from the home server is set to 20 minutes. Lights Out waits 3 additional minutes after timeout.
For more information, click the Help button on the lower right hand corner of the Lights Out page.
McAfee Total Protection Service
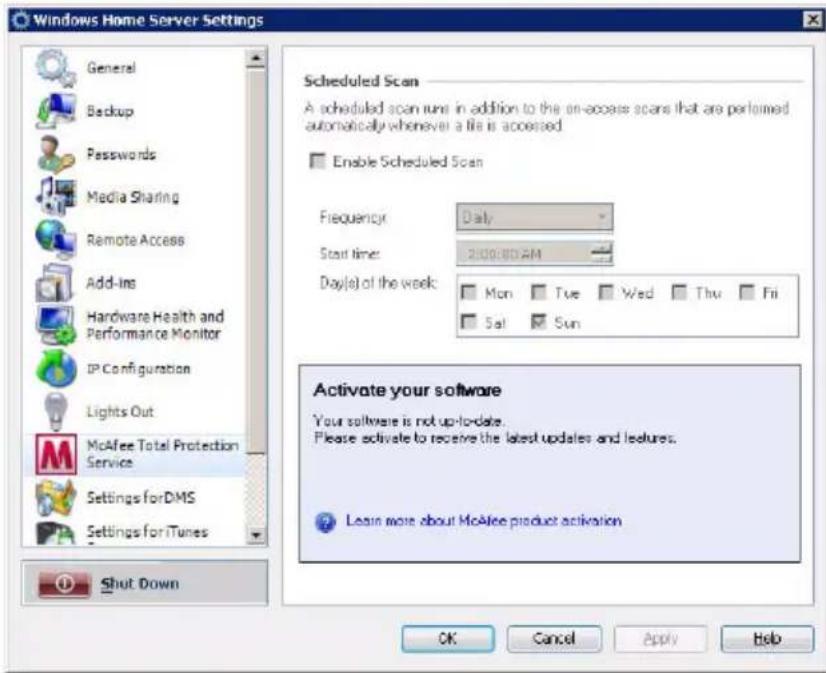
Use the McAfee Total Protection Service page to manage security for your home server.
text_image
Windows Home Server Settings General Backup Passwords Media Sharing Remote Access Add-ins Hardware Health and Performance Monitor IP Configuration Lights Out McAfee Total Protection Service Settings for DMS Settings for iTunes Shut Down Scheduled Scan A scheduled scan run in addition to the on-ocoon scans that are performed automatically whenever a file is accessed. Enable Scheduled Scan Frequency: Daily Start time: 2000:00:AM Day(s) of the week: Mon Tue Wed Thu Fri Sat Sun Activate your software Your software is not up-to-date. Please activate to receive the latest updates and features. ? Learn more about McAfee product activation OK Cancel Apply HelpFor more information, click the Help button on the lower right hand corner of the McAfee Total Protection Service page.
Settings for DMS
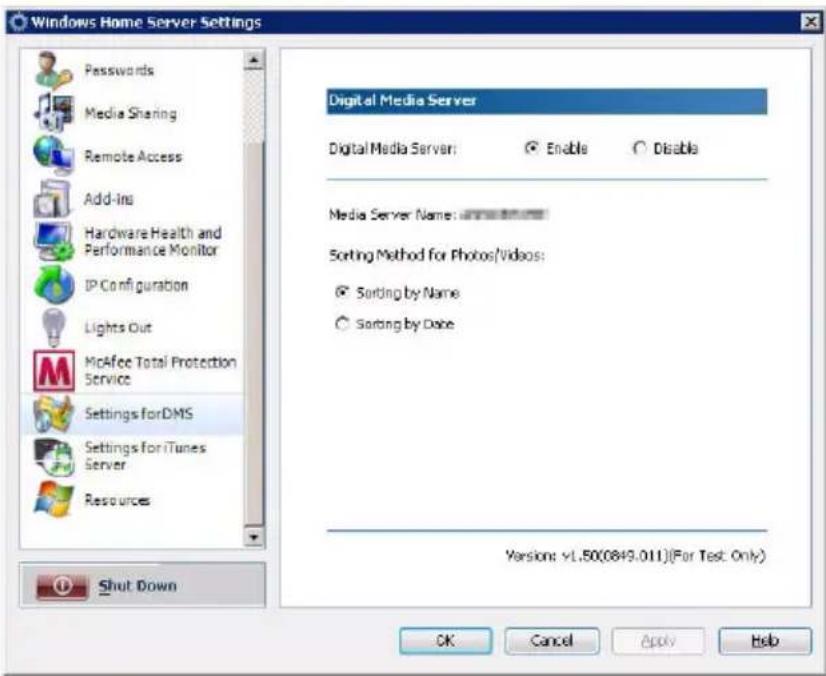
The Settings for DMS (Digital Media Server) page allows you to enable or disable digital media server function and customize the sorting method of photos and videos.
With DMS enabled, digital media controllers and digital media players using UPnP (Universal Plug'n Play) protocol, will automatically discover, access, and play media files on the home server. It also makes possible for iTunes, PS3, or Xbox 360 users to share media files on Windows Home Server.
text_image
Windows Home Server Settings Passwords Media Sharing Remote Access Add-ins Hardware Health and Performance Monitor IP Configuration Lights Out McAfee Total Protection Service Settings for DMS Settings for iTunes Server Resources Digital Media Server Digital Media Server: Enable Disable Media Server Name: Sorting Method for Photos/Videos: Sorting by Name Sorting by Date Versions: v1.50(0849.011)(For Test: Only) Shut Down OK Cancel Apply HelpIn the Settings for DMS, you can configure the following settings:
• Digital Media Server - Enables or disables the digital media server.
- Sorting method - Select a sorting method to organize digital files under the photos or videos shared folders.
For more information, click the Help button on the lower right hand corner of the Settings for DMS page.
Settings for iTunes Server
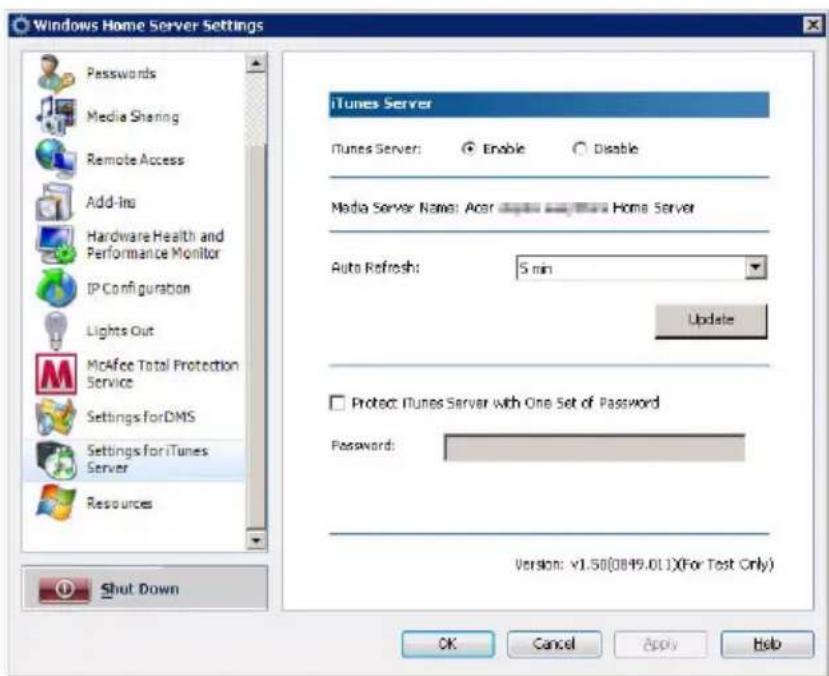
The Settings for iTunes Server page allows you to enable or disable the iTunes server function, specify how often the music library is updated, set a password to secure the iTunes Server access.
text_image
Windows Home Server Settings Passwords Media Sharing Remote Access Add-ins Hardware Health and Performance Monitor IP Configuration Lights Out McAfee Total Protection Service Settings for DMS Settings for iTunes Server Resources Shut Down iTunes Server iTunes Server: Enable Disable Media Server Name: Asar Home Server Auto Refresh: 5 min Update Protect: iTunes Server with One Set of Password Password: Version: v1.50(0849.01)(For Test Only) OK Cancel Apply HelpFor more information, click the Help button on the lower right hand corner of the Settings for iTunes Server page.
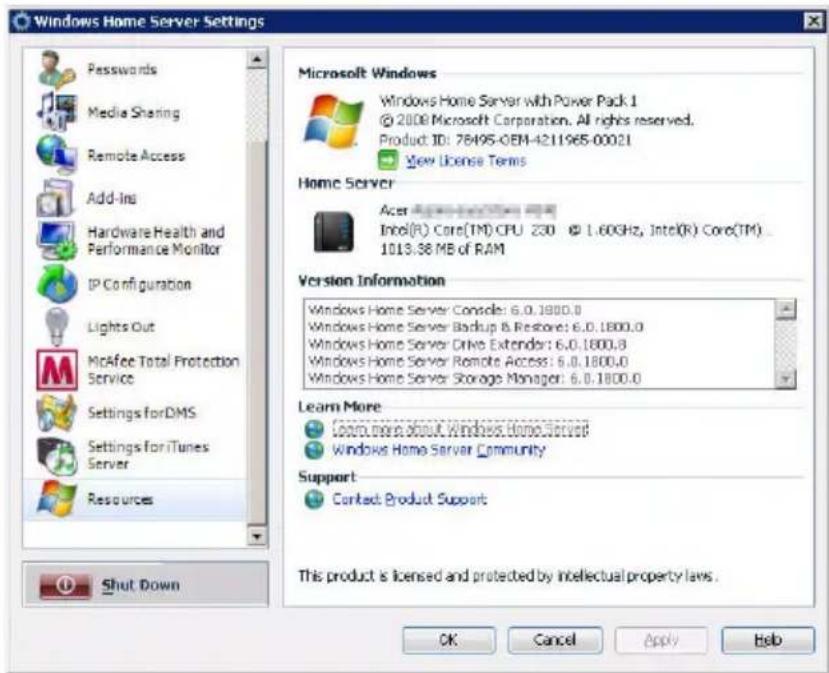
Resources
You can use the Resources page to view the following information about your home server:
- Microsoft Windows - Activates Windows Home Server and allows you to view the Microsoft Software License Terms.
• Home Server - Displays information about your home server hardware. - Version Information - Displays the version of the Windows Home Server services that are running on your home server.
- Learn More - Displays additional Windows Home Server links.
- Support - Displays the Product Support link.
text_image
Windows Home Server Settings Passwords Media Sharing Remote Access Add-ins Hardware Health and Performance Monitor IP Configuration Lights Out McAfee Total Protection Service Settings for DMS Settings for iTunes Server Resources Microsoft Windows Windows Home Server with Power Pack 1 © 2008 Microsoft Corporation. All rights reserved. Product ID: 76495-OEM-4211965-00021 View License Terms Home Server Acer Intel(R) Core(TM) CPU 230 © 1.60GHz, Intel(R) Core(TM) 1013.38 MB of RAM Version Information Windows Home Server Console: 6.0.1800.0 Windows Home Server Backup & Restore: 6.0.1800.0 Windows Home Server Drive Extender: 6.0.1800.0 Windows Home Server Remote Access: 6.0.1800.0 Windows Home Server Storage Manager: 6.0.1800.0 Learn More Learn more about Windows home servered Windows Home Server Community Support: Contact Product Support This product is licensed and protected by intellectual property laws. Shut Down OK Cancel Apply HelpShut Down
The Shut Down button on the left pane allows you to shut down Windows Home Server so that you can safely turn off power or start Windows Home Server again.
4 Managing the server
After you complete the Windows Home Server Setup and install the Windows Home Server Connector software on all of your home computers, you can now perform the following tasks:
- Create user accounts
- Add a shared folder
- Configure backup for home computers
- Back up the home server
- Configure the home server for remote access
- Access the RevoCenter Series home page
- Access the shared folders on the home server
- Enable media sharing
- Enable Digital Media Server
- Enable iTunes service
- Stream audio
• Using the one-touch USB backup feature - Set up Wake On LAN on the home server
- Set the home server uptime and down time
• Monitor server health and performance - Set up email alerts
• Explore the Windows Home Server icon
To learn more about using the Windows Home Server Console to configure the home server, refer to "3 Windows Home Server Console" on page 37.
Create user accounts
After you complete Windows Home Server Setup and install the Windows Home Server Connector software on all of your home computers, you are ready to set up your user accounts for the people in your household.
There are two types of user accounts that you can set up for the home server:
- Guest account - If you want everybody to use the same user account to access the home server, you must enable the guest account feature in the console.
- Personal user account - If you want an individual to access the home server with their own personal user account, you must add matching user accounts on Windows Home Server and give access privileges to individual shared folders.
To enable the guest account:
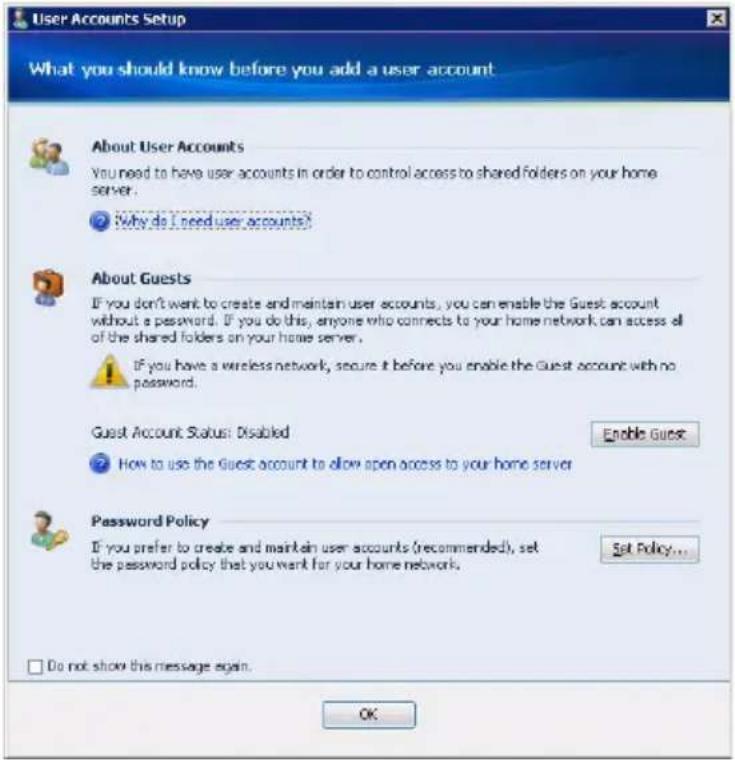
The guest account can be used to give access to shared folders for users that do not have their own user account for Windows Home Server. Enabling the guest account will provide default Read permission to the shared folders: Music, Photos, Videos, Public, and Software.

Caution: If you enable the guest account, your home server is open to anyone who connects to your home network. They can access all of the shared folders and other resources on your home server.
1 Double-click the Windows Home Server icon 📋 in the system tray.
2 Log on to the Windows Home Server Console.
3 Click the User Accounts tab.
text_image
User Accounts Setup What you should know before you add a user account About User Accounts You need to have user accounts in order to control access to shared folders on your home server. Why do I need user accounts? About Guests If you don't want to create and maintain user accounts, you can enable the Guest account without a password. If you do this, anyone who connects to your home network can access all of the shared folders on your home server. If you have a wireless network, secure it before you enable the Guest account with no password. Guest Account Status: Disabled Enable Guest How to use the Guest account to allow open access to your home server Password Policy If you prefer to create and maintain user accounts (recommended), set the password policy that you want for your home network. Set Policy... Do not show this message again. OK4 Under About Guests, click Enable Guest.

Caution: If you have a wireless network, secure it before you enable the guest account with no password. For more information, see the documentation for your wireless device.
5 Click OK.
To add a personal user account:

Note: A personal shared folder is created each time you add a new user account. By default, only this user account has access to the personal shared folder. Users can store personal files in this personal shared folder.
1 Double-click the Windows Home Server icon 📋 in the system tray.
2 Log on to the Windows Home Server Console.
3 Click the User Accounts tab.
4 Click Add.
5 On the User Accounts Setup window, click Set Policy to set a user accounts password policy.
text_image
Windows Home Server Settings General Backup Passwords Media Sharing Remote Access Add-ins Hardware Health and Performance Monitor IP Configuration Lights Out McAfee Total Protection Service Settings for DMS Settings for iTunes Shut Down Windows Home Server Password Change the home server password. Change Password... User Accounts Password Policy Weak Medium Strong (Recommended) Description: Password length must be 5 or more characters. Password complexity not required. User accounts with Remote Access enabled always require strong passwords. Which user account password policy should I choose? OK Cancel Apply Help6 Click OK.
7 Click Add.
text_image
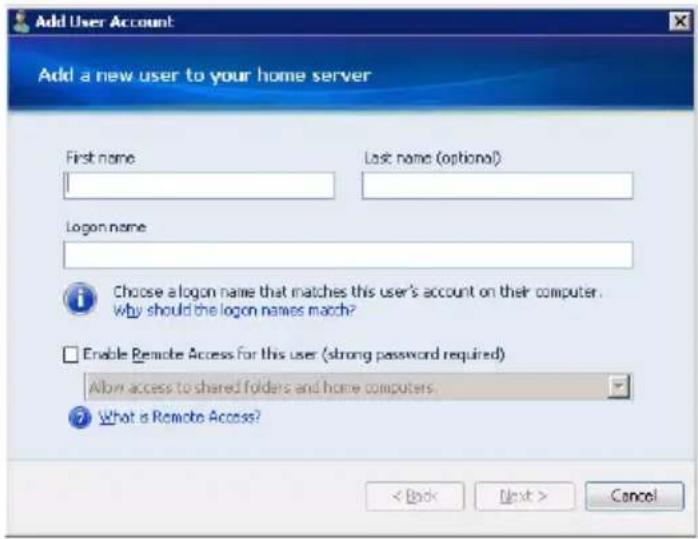
Add User Account Add a new user to your home server First name Last name (optional) Login name Choose a login name that matches this user's account on their computer. why should the login names match? Enable Remote Access for this user (strong password required) Allow access to shared folders and home computers. What is Remote Access? < Back Next > Cancel8 Enter the user's name.

Note: When you create user accounts on Windows Home Server, use logon names that match the logon names of your existing user accounts on your home computers. Also, use the same password that you use for your existing user accounts. If the user accounts and passwords do not match, you will be prompted for a user name and a password when you open the Shared folders.
9 Select the "Enable Remote Access for this user" check box if you want to allow the user to remotely access the home server.
10 Click Next.
text_image
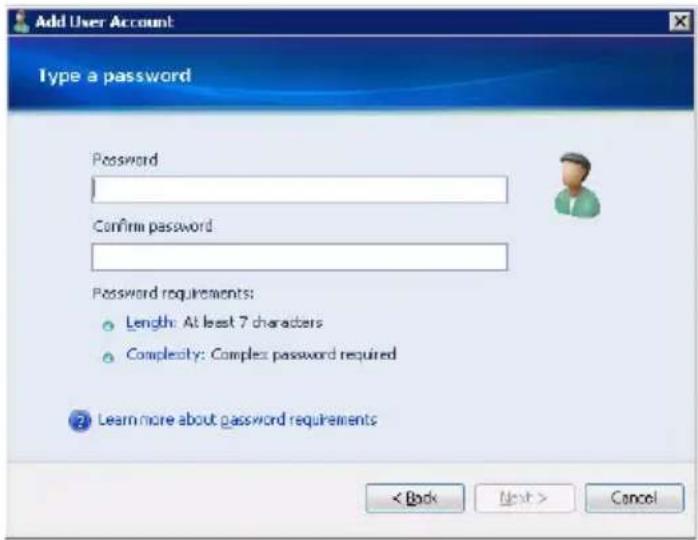
Add User Account Type a password Password Confirm password Password requirements: Length: At least 7 characters Complexity: Complex password required Learn more about password requirements < Back Next > Cancel11 Enter a password which must be at least 7 characters, then re-enter it in the Confirm password field.
12 Click Next.
text_image
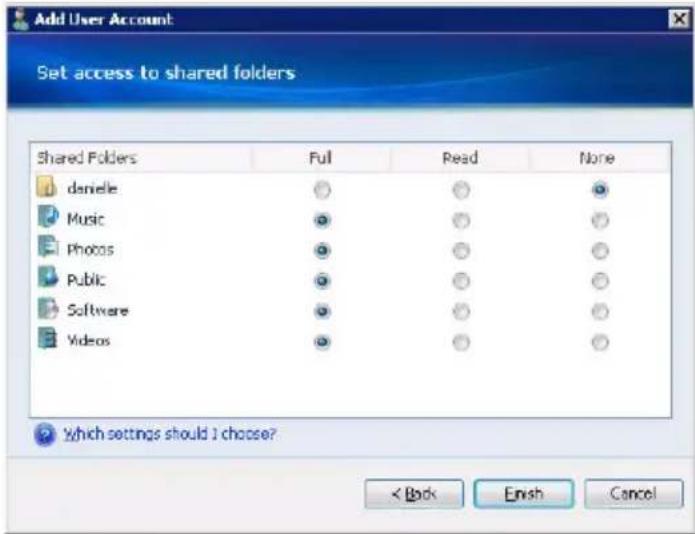
Add User Account Set access to shared folders Shared Folders Full Read None daniele ○ Music ○ ○ Photos ○ ○ ○ Public ○ ○ ○ ○ Software ○ ○ ○ ○ Videos ○ ○ ○ Which settings should I choose? < Back Finish Cancel13 Assign user rights to the shared folders on the home server.
- Full - The user can view, add, modify, and delete files in the shared folder.
- Read - The user can view files in the shared folder, but cannot add, modify, or delete files.
- None - The user cannot view, add, modify, or delete files in the shared folder.
14 Click Finish.
15 Click Done to exit the wizard.

Note:
- You can only have full access to the shared media folders (Video/Photo/Music) after creating user accounts. Otherwise, you can only read files but not save files to the home server.
- A personal shared folder is created each time you add a new user account. By default, only this user account has access to the personal shared folder. Users can store personal files in their personal shared folder. This is true even if the guest account is enabled.
Add a shared folder
Shared folders are places for you to organize and store files on the home server so that you can share them with other people on your home network.
1 Double-click the Windows Home Server icon in the system tray.
2 Log on to the Windows Home Server Console.
3 Click the Shared Folders tab.
4 Click Add.
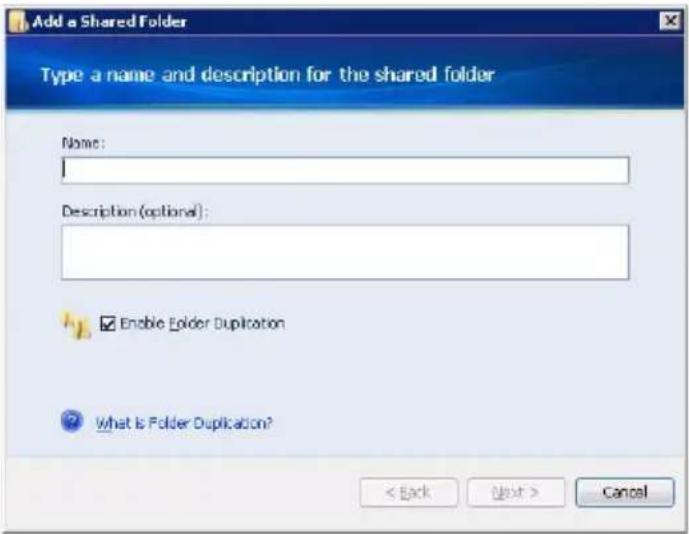
text_image
Add a Shared Folder Type a name and description for the shared folder Name: Description (optional): Enable Folder Duplication What is Folder Duplication? < Back Next > Cancel5 Enter a name and description for the shared folder.
6 Select the "Enable Folder Duplication" check box if you want folders and files in the share folder to be duplicated across multiple hard drives.

Note: The home server must have more than one hard drive added to the server storage before you can enable Folder Duplication and there must be enough storage space available for duplication to take place.
7 Click Next.
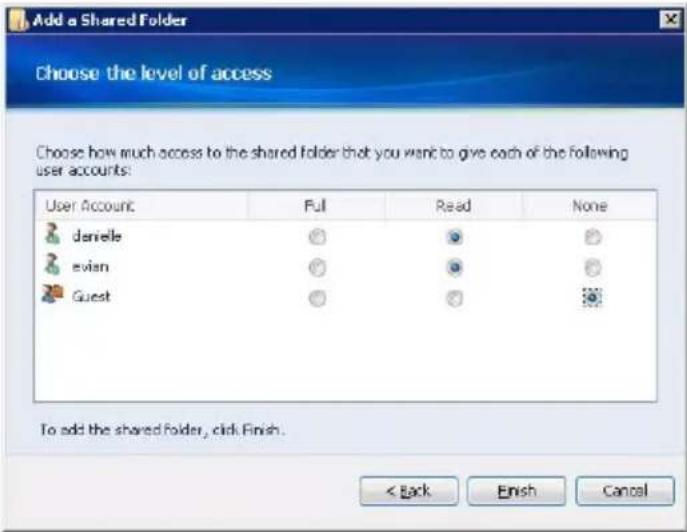
text_image
Add a Shared Folder Choose the level of access Choose how much access to the shared folder that you want to give each of the following user accounts: User Account Full Read None darielle ○ ● ○ evian ○ ● ○ Guest ○ ○ ○ To add the shared folder, click Finish. < Back Finish Cancel8 Assign user rights to the new share folder, then click Finish.
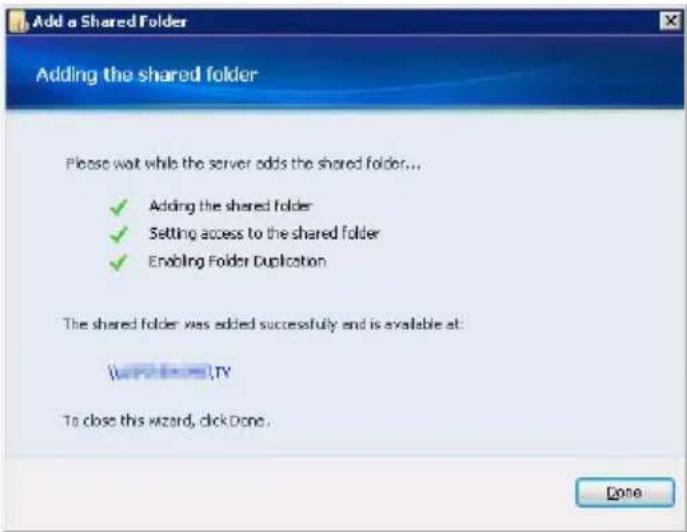
text_image
Add a Shared Folder Adding the shared folder Please wait while the server adds the shared folder... ✓ Adding the shared folder ✓ Setting access to the shared folder ✓ Enabling Folder Duplication The shared folder was added successfully and is available at: [1] TV To close this wizard, click Done. Done9 Click Done to exit the wizard.
Configure backup for home computers
You can customize the backup of each of your home computers from the Windows Home Server Console.

Note: After you install the Windows Home Server Connector to the home computer all hard drive volumes on the home computer are automatically backed up each night.
To configure backup for a computer:
1 Double-click the Windows Home Server icon 📋 in the system tray.
2 Log on to the Windows Home Server Console.
3 Click the Computers & Backup tab.
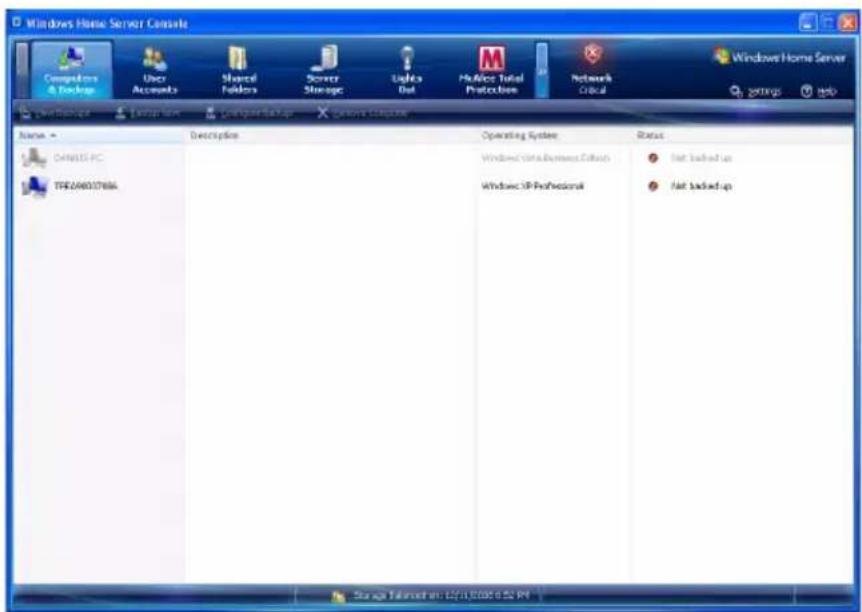
text_image
Windows Home Server Console Computers & Packages User Accounts Shared Folders Server Strategic Lights Out Maintenance Total Protection Network Critical Windows Home Server Settings Help Windowless Extension Computer Setup Custom Setup Name - Description Operating System: Windows Core Business Cells Windows XP Professional Status Fast backed up Fast backed up C:\WINDOWS-PC TRE24003766A Storage Bar Movement: 125.15.000 0.52 PK4 Complete the Backup Configuration Wizard to choose the volumes you want to back up and the folders you want to exclude from the backup.
You can adjust the period of time when automatic backups and maintenance are performed. The period of time that you choose should be a time when your home computers are normally not being used. The time period must be a least one hour long and can be up to 23 hours long. The default settings are Start Time: 12:00 AM and End Time: 6:00 AM.
Back up the home server
You can back up your home server to ensure that you have backup copies of important files that are located in your Windows Home Server shared folders and application folders. You can add hard drives to your home server to use for server backups by using the Server Storage tab.
To back up the home server:
1 Install a new hard drive to the home server. See step 1 of "Adding a hard disk drive" on page 107.
2 Double-click the Windows Home Server icon tray.
3 Log on to the Windows Home Server Console.
4 Click the Server Storage tab.
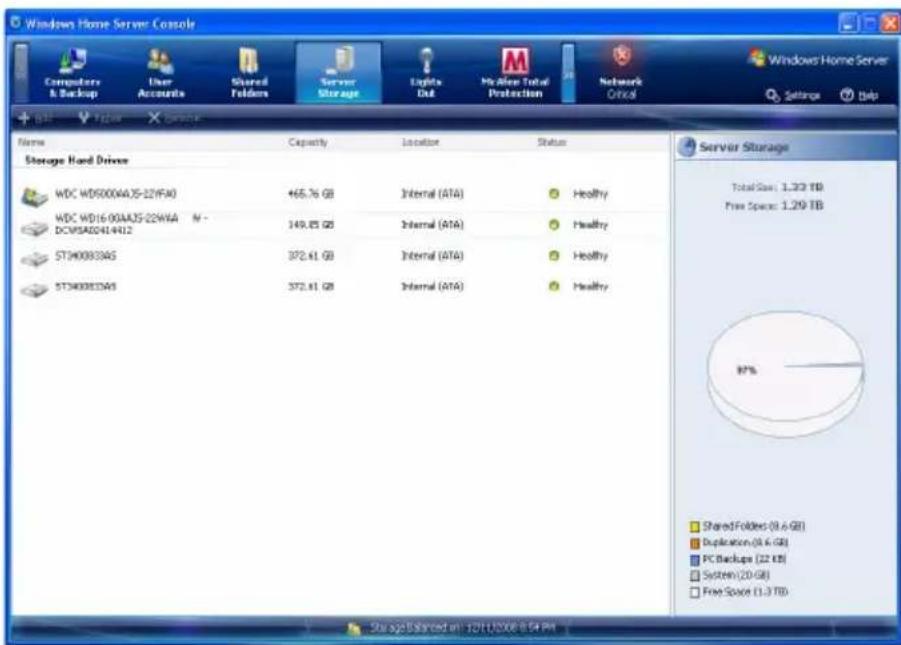
pie
| Storage Type | Total Size (TB) | | :--- | :--- | | Shared Folders | 8.6 GB | | Duplicated | 8.6 GB | | PC Backup | 22 KB | | System | 20 GB | | Free Space | 1.3 TB | | Total Size: 1.22 TB Free Space: 1.29 TB Storage Based on: 12/11/2006 8:54 PM5 Select the newly installed hard drive (either internal or external), then click Add to run the Add a Hard Drive Wizard.
6 Click Next.
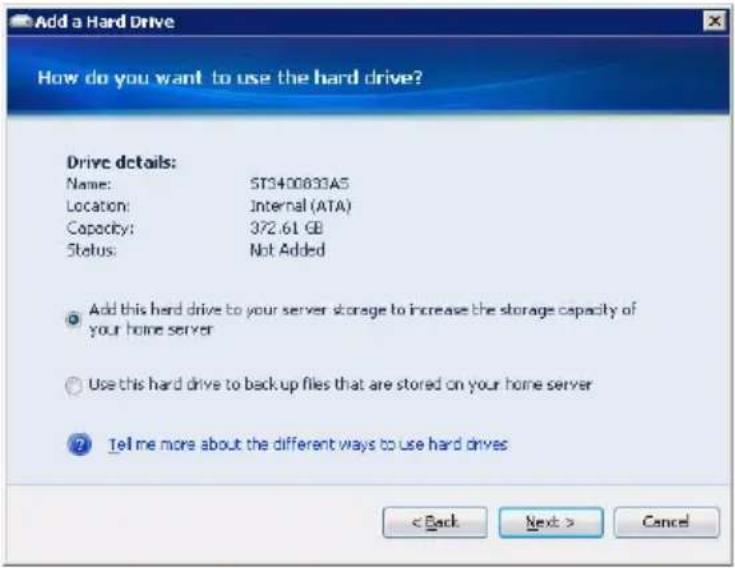
text_image
Add a Hard Drive How do you want to use the hard drive? Drive details: Name: ST3400833A5 Location: Internal (ATA) Capacity: 372.61 GB Status: Not Added Add this hard drive to your server storage to increase the storage capacity of your home server Use this hard drive to backup files that are stored on your home server Tell me more about the different ways to use hard drives < Back Next > Cancel7 Select the "Use this hard drive to back up files that are stored on your home server" option button.
8 Click Next.
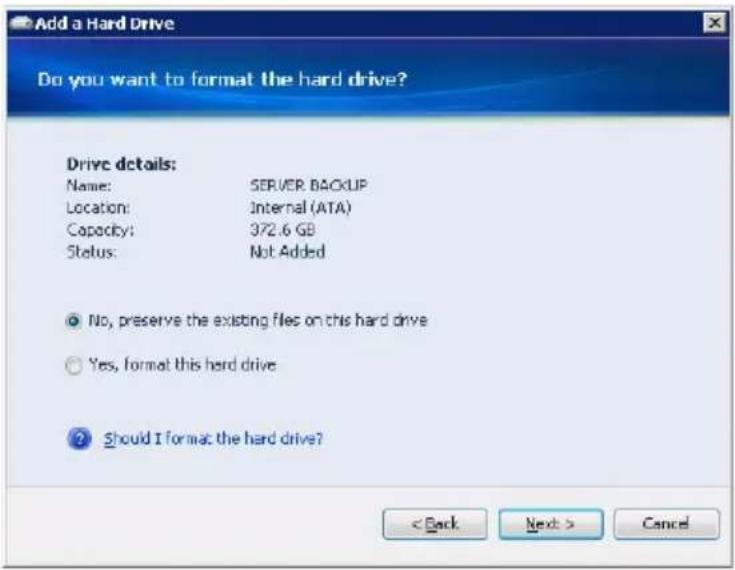
text_image
Add a Hard Drive Do you want to format the hard drive? Drive details: Name: SERVER BACKUP Location: Internal (ATA) Capacity: 372.6 GB Status: Not Added No, preserve the existing files on this hard drive Yes, format this hard drive Should I format the hard drive? < Back Next > Cancel9 Select if you want to preserve or format the hard drive, then click Next.
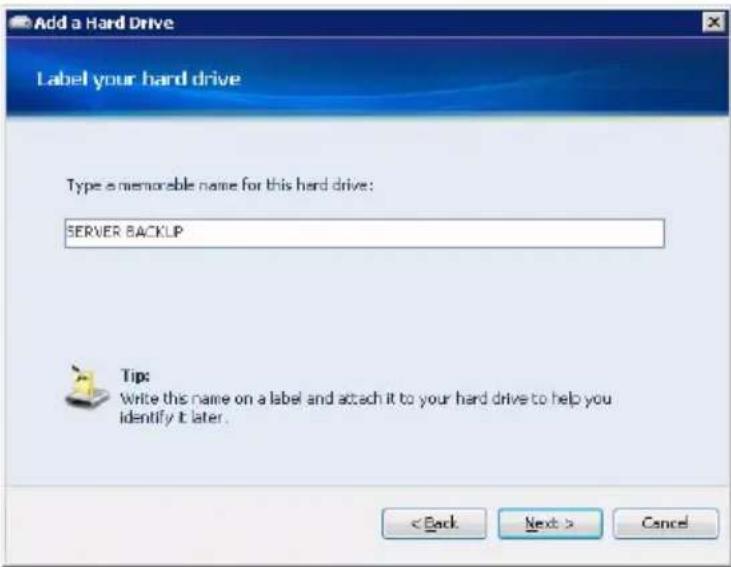
text_image
Add a Hard Drive Label your hard drive Type a memorable name for this hard drive: SERVER BACKUP Tip: Write this name on a label and attach it to your hard drive to help you identify it later. < Back Next > Cancel10 Enter a name for the hard drive, then click Next.

Note: You can write this name on a label and attach it to your hard drive to help you identify it later.
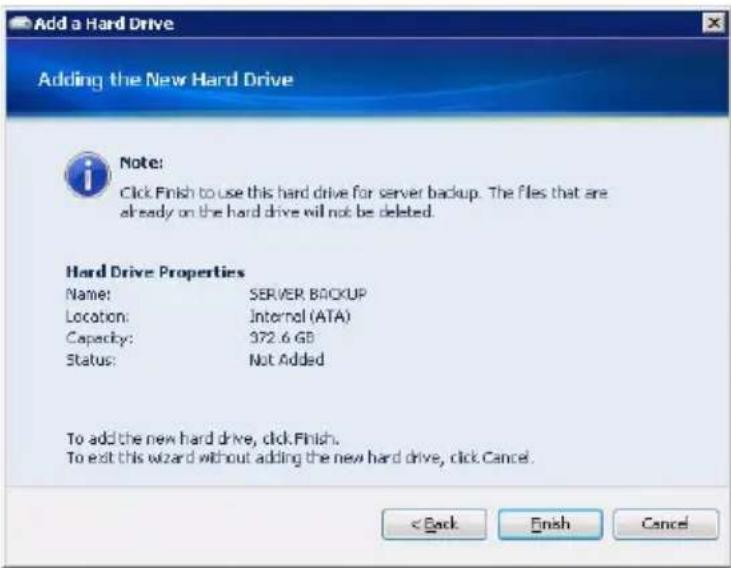
text_image
Add a Hard Drive Adding the New Hard Drive Note: Click Finish to use this hard drive for server backup. The files that are already on the hard drive will not be deleted. Hard Drive Properties Name: SERVER BACKUP Location: Internal (ATA) Capacity: 372.6 GB Status: Not Added To add the new hard drive, click.Finish. To exit this wizard without adding the new hard drive, click.Cancel. < Back Finish Cancel11 Click Finish.
12 Click Done.
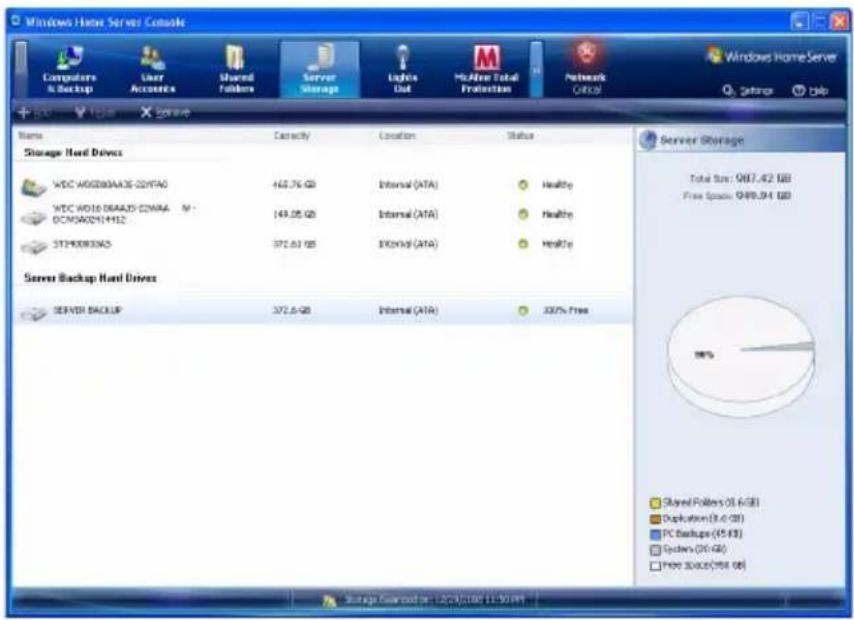
text_image
Windows Home Server Console Computers & Backup User Accounts Shared Followers Server Storage Lights Out McNew Total Protection Networks (WEC) Windows Home Server +/- <+/- <+/- <+/- <+/- <+/- <+/- <+/- <+/- <+/- <+/- <+/- <+/- <+/- <+/- <+/- <+/- <+/- <+/- <+/- <+/- <+/- <+/- <+/- <+/- <+/- Name Capacity Location Status Storage Head Drives WDC W02805A36-02YFAO 142.76 GB Internal (ATA) Healthy WDC W016-06AADY-DWANA N: DCN5A02914412 143.05 GB Internal (ATA) Healthy STP000835K5 372.63 GB ENOMID (ATA) Healthy Server Backup Head Drives SERVER BACKUP 372.6 GB Internal (ATA) 300% Free Server Storage Total Size: 987.42 GB Free Space: 989.94 GB Shared Followers (3.6 GB) Duplication (3.6 GB) PC Backups (45 KB) Systems (20 GB) Free Space(984 GB) Storage Downloaded on: 12/24/2006 11:30 PM13 Click the Computers & Backup tab.
14 Select the Server Backup Hard Drive you want to use to back up your shared folders and application folders.
15 Click Back up Now.
16 Select a destination hard drive for each shared folder.
17 Click Back up Now.
18 Click Close.
Configure the home server for remote access
You must configure your home server for remote access to easily access your files and home computers from anywhere with an Internet connection. You can download files, upload files, connect to your home computers, and administer the home server.
To configure the home server for remote access:

Important: Only personal user accounts with remote access permissions can log on to the RevoCenter Series home page.
1 Double-click the Windows Home Server icon 📋 in the system tray.
2 Log on to the Windows Home Server Console.
3 Click Settings.
4 In the navigation pane, select RemoteAccess.
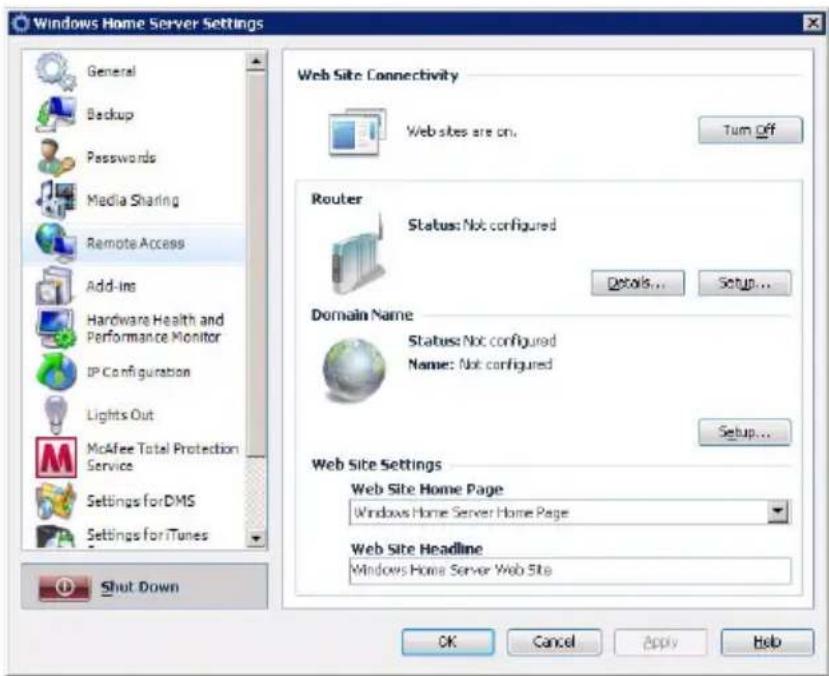
text_image
Windows Home Server Settings General Backup Passwords Media Sharing Remote Access Add-ins Hardware Health and Performance Monitor IP Configuration Lights Out McAfee Total Protection Service Settings for DMS Settings for iTunes Shut Down Web Site Connectivity Web sites are on. Turn Off Router Status: Not configured Details... Setup... Domain Name Status: Not configured Name: Not configured Setup... Web Site Settings Web Site Home Page Windows Home Server Home Page Web Site Headline Windows Home Server Web Site OK Cancel Apply Help5 Under Web Site Connectivity, click Turn On to allow remote connection to the home server.
6 Under Router, click Setup to configure your broadband router. Make sure your router supports UPnP standards and the UPnP
setting must be enabled on your router for Windows Home Server to automatically configure it.
In this step, Windows Home Server configures the persistent port forwarding from your UPnP certified router to your home server, as follows:
- Port 80 - Connects over your home network to the RevoCenter Series home page using the HTTP protocol.
- Port 443 - Connects over your home network to the RevoCenter Series logon page using HTTPS, an encrypted Secure Sockets Layer protocol.
- Port 4125 - Connects to your home computers via the remote desktop proxy.

Note: To learn more about router configuration, click Help on the Remote Access page.
7 Under Domain Name, click Setup to set a personalized domain name for your home server (For example, smithfamily.homeserver.com).
A domain name uniquely identifies your home server on the Internet. It is used to connect to your home server while you are away from home. Even if your Internet IP address changes, you can still connect to your home network with your personalized domain name. For example, you could register the name smithfamily.homeserver.com and then use that name to connect to your RevoCenter Series Web site.

Note: You need a Windows Live ID to set up a domain name for your home server.
8 Click Next.
9 Enter your Windows Live ID email address and password to begin setting up the domain name.
Windows Home Server includes a built-in dynamic DNS client feature that binds your personalized domain name to the external IP address that is assigned by your ISP (Internet service provider).
10 Click Next.
11 Click the "I accept" option, then click Next.
12 Enter the domain name and select a subdomain name.
13 Click Confirm to make sure the subdomain is available.
14 Click Finish.
15 Under Web Site Settings, you can choose a default home page and the Web site headline that appears on the RevoCenter Series Web page.
16 Click OK.
17 After you configure remote access, test the remote connectivity from outside of your home. Refer to "Access the RevoCenter Series home page" on page 79.
Access the RevoCenter Series home page
After you configure a user account for remote access, you can use a Web browser on a computer that is outside your home to remotely access your home server and home computer.
On the RevoCenter Series home page, you can perform the following:
- Remotely access the Windows Home Server Console.
- Remotely access your home computers.
- Remotely download or upload files to shared folders.

Important: Use Internet Explorer to access and remotely administer your home server over the Web. Some features, such as accessing the home computers or the Windows Home Server Console, are not available when you use other Web browsers.
To access the RevoCenter Series home page:

Note: You cannot use the guest or administrator account to access the home page. You must log on with a personal user account that is enabled for Remote Access.
1 Make sure the home server is configured for remote access. See "Configure the home server for remote access" on page 76.

Note: You may need to add services from your broadband provider to use the remote access features in Windows Home Server. For more information, refer to the Windows Home Server Console Help.
2 Open the Internet Explorer Web browser.
3 Enter the Internet domain name assigned to you during the remote access setup procedures. For example https://SmithFamily.HomeServer.com., where SmithFamily.HomeServer is the domain name that is assigned to the home server.
4 Click Log On on the upper right hand corner.
5 Enter your home server user name and password.
6 Click Log On.
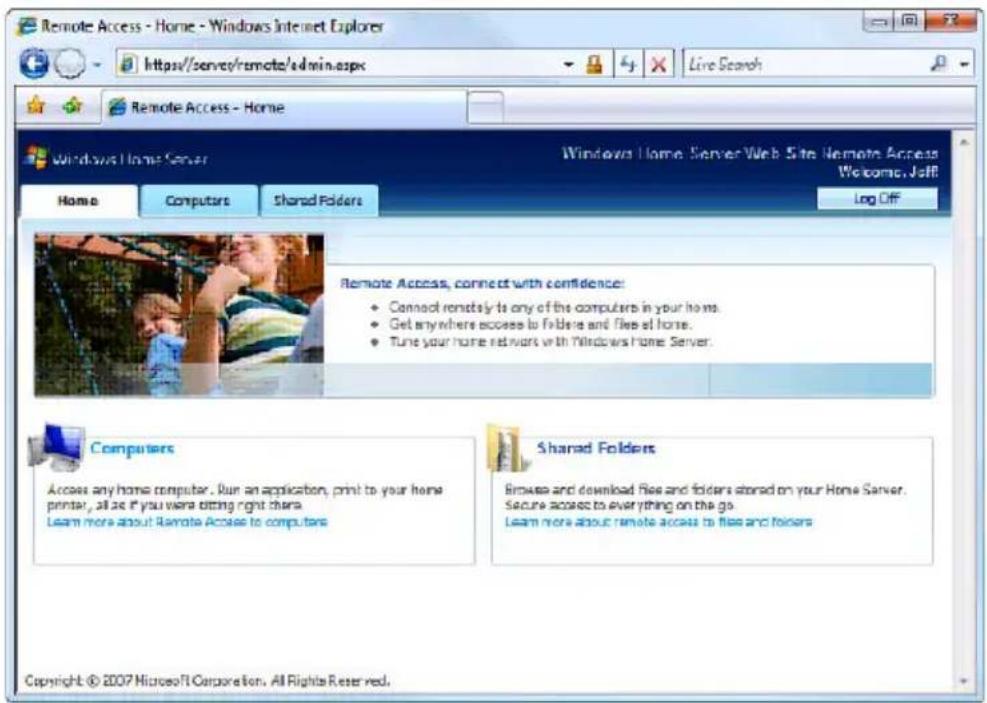
text_image
Remote Access - Home - Windows Internet Explorer https://servers/remote/admin.aspx Live Search Remote Access - Home Windows Home Server Windows Home Server Web Site Remote Access Welcome, Jeff Home Computers Shared Folders Log Off Remote Access, connect with confidence: Connect remotely to any of the computers in your home. Get anywhere access to folders and files at home. Tune your home networks with Windows Home Server. Computers Access any home computer. Run an application, print to your home printer, all as if you were biting right there. Learn more about Remote Access to computers Shared Folders Browse and download files and folders stored on your Home Server. Secure access to everything on the go. Learn more about remote access to files and folders Copyright © 2007 Microsoft Corporation. All Rights Reserved.The home page include three tabs:
• Home - This page appears every time you log on to the Web page.
• Computers - Allows you to perform remote administration on the home server and the home computers.
To access your home server, click Connect to your Home Server on the Computers tab and enter the administrator password. The Windows Home Server Console interface opens.
To access your home computers, click the name of the home computer under the Remote Access to Computers field on the Computers tab.

Note: Make sure that the home computer is configured to allow remote access. For detailed instructions about how to complete this configuration, see "Can't connect to some computers on the RevoCenter Series Remote Access page" on page 133.
- Shared Folders - Allows you to access the shared folders you have access privileges over the Internet.
Access the shared folders on the home server
There are several ways you can access your shared folders on the home server.
To access the shared folders using the desktop shortcut:
1 Double-click the Shared Folders desktop shortcut to see the shared folders that are on your home server.
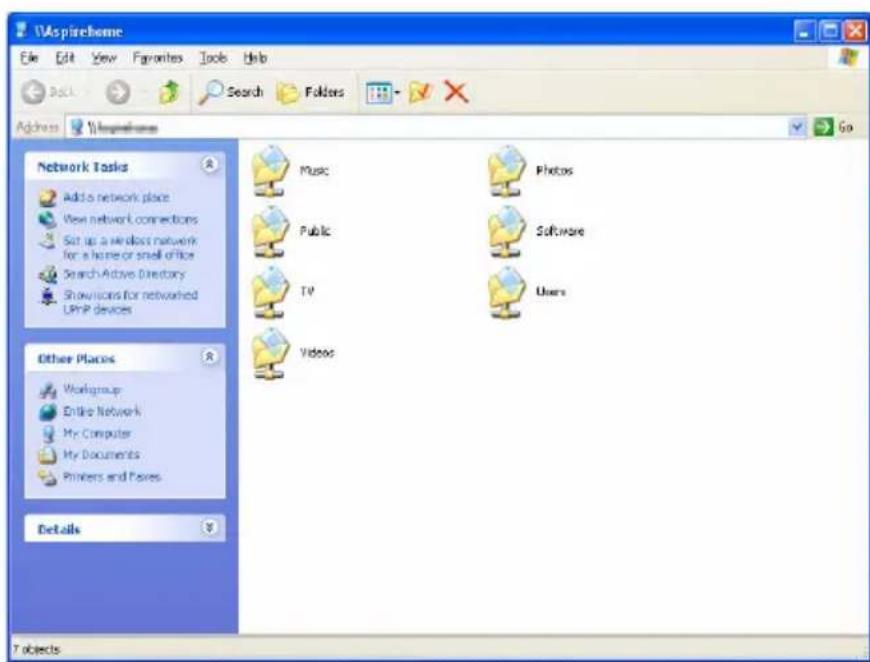
text_image
Waspirehome File Edit View Favorites Tools Help Back Search Folders Address Waspirehome Go Network Tasks Add a network place View network connections Set up a wireless network for a home or small office Search Active Directory Show icons for networked UPMP devices Music Photos Public Software TV Users Videos Other Places Workgroup Entire Network My Computer My Documents Printers and Boxes Details T objects2 Double-click a shared folder to open it.
To access the shared folders using the Windows Home Server icon:
1 Right-click the Windows Home Server icon .

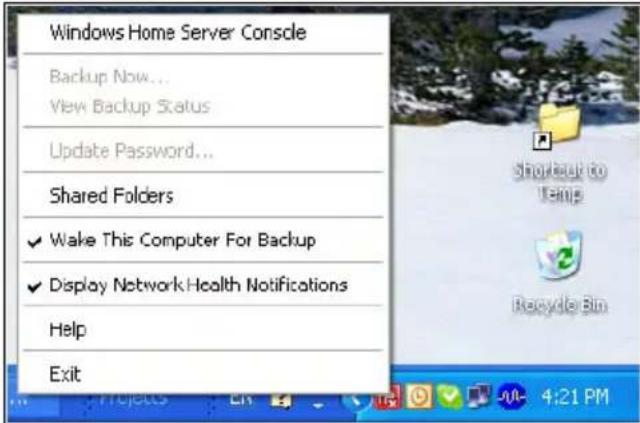
text_image
Windows Home Server Console Backup Now... View Backup Status Update Password... Shared Folders ✓ Wake This Computer For Backup ✓ Display Network Health Notifications Help Exit2 Click Shared Folders.
3 Double-click a shared folder in the window to open it.
To access the shared folders using the Windows Start Menu:
- In Windows Vista, click Start, then type \homeservername in the Start Search text box, where the homeservername (i.e. RevoCenter) is the name of your home server. Double-click a shared folder in the window to open it.
- In Windows XP, click Start, click Run, and then type \homeservername in the Open text box, where the homeservername (i.e. RevoCenter) is the name of your home server. Double-click a shared folder in the window to open it.
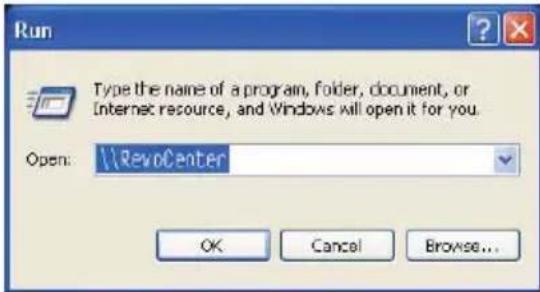
text_image
Run Type the name of a program, folder, document, or Internet resource, and Windows will open it for you. Open: \Revocenter OK Cancel Browse...To access the shared folders using the Internet:
1 Log on to the RevoCenter Series home page. See "Access the RevoCenter Series home page" on page 79.
2 Click the Shared Folders tab.
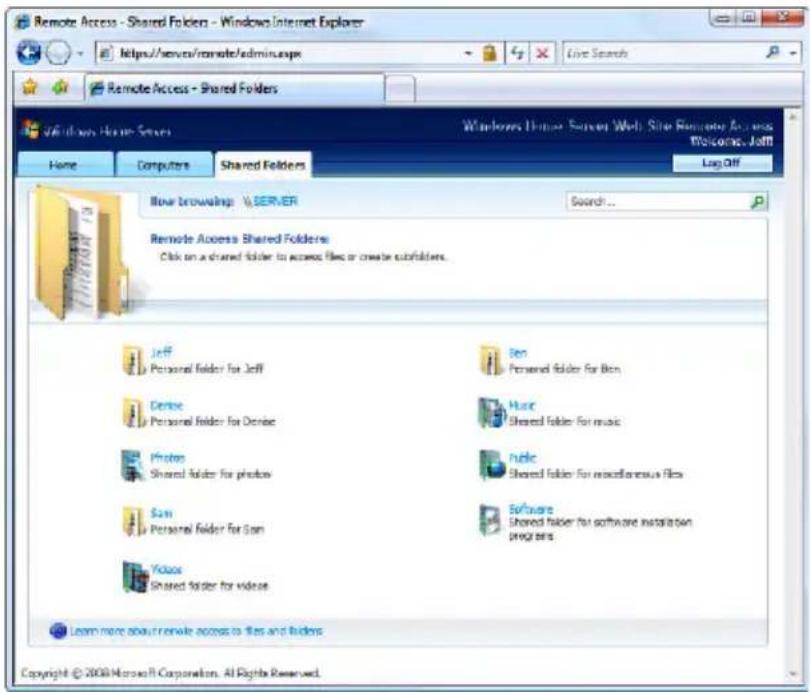
text_image
Remote Access - Shared Folders - Windows Internet Explorer https://servers/remote/admin.aspx Live Searches Remote Access - Shared Folders Windows Home Server Home Computers Shared Folders Log Off Now browsing SERVER Search... Remote Access Shared Folders Click on a shared folder to access files or create subfolders. Jeff Personal folder for Jeff Denise Personal folder for Denise Photo Shared folder for photo Sun Personal folder for Sun Video Shared folder for video Ben Personal folder for Ben Host Shared folder for music noble Shared folder for miscellaneous files Software Shared folder for software installation programs Learn more about remote access to files and videos Copyright © 2008 Microsoft Corporation. All Rights Reserved.3 You can navigate to a particular shared folder, then download or upload files to your home server.
Enable media sharing
The Windows Home Server allows you to stream music, photos, and videos from the home server to any supported digital media receiver, such as PlayStation 3, or to a supported digital media player, such as Windows Media Player 11.
To enable media sharing:
1 Double-click the Windows Home Server icon 📋 in the system tray.
2 Log on to the Windows Home Server Console.
3 Click Settings.
4 In the navigation pane, select Media Sharing.
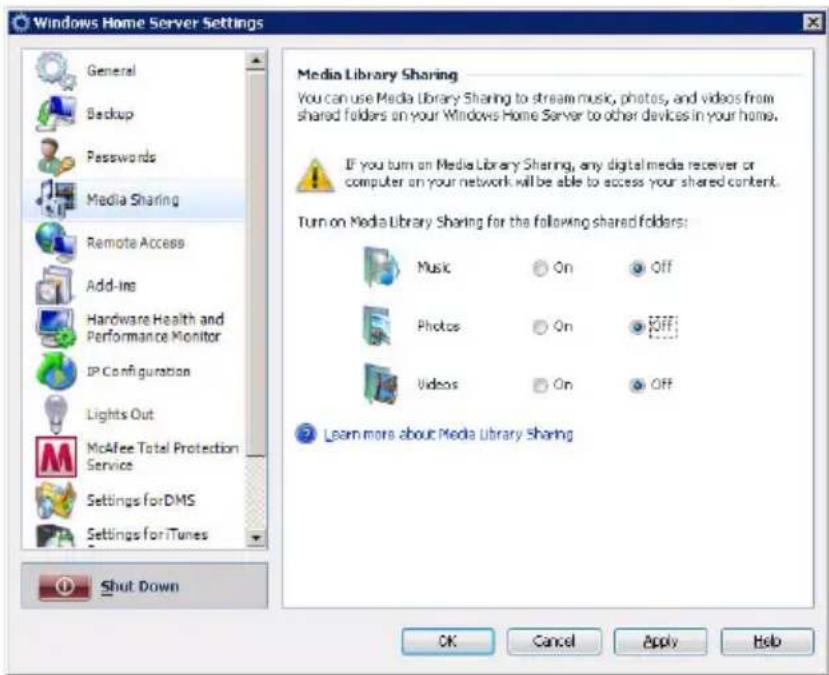
text_image
Windows Home Server Settings General Backup Passwords Media Sharing Remote Access Add-ins Hardware Health and Performance Monitor IP Configuration Lights Out McAfee Total Protection Service Settings for DMS Settings for iTunes Shut Down Media Library Sharing You can use Media Library Sharing to stream music, photos, and videos from shared folders on your Windows Home Server to other devices in your home. If you turn on Media Library Sharing, any digital media receiver or computer on your network will be able to access your shared content. Turn on Media Library Sharing for the following shared folders: Music On Off Photos On Off Videos On Off Learn more about Media Library Sharing OK Cancel Apply Help5 Select a folder, then click On.
6 Click OK.
Enable Digital Media Server
The Digital Media Server feature allows you to browse, access and play media contents on the home server. It makes possible for iTunes and PlayStation 3 users to share media files on the home server.
The home server supports the following digital media files:
• Music: MP3, WMA, WAV, AAC, AC3, FLAC, APE, OGG, VOC, AIFF, AU, MID
• Video: WMV, ASF, MOV, AVI, MPEG, 3GP, SWF, FLV, RMVB, RM, RA, RAM, MP4, MPG, MPE, M2V, TP, TS, MLV, MKV, DIVX
- Photos: GIF, PNG, BMP, JPG, JEPG, ICO, TIFF, DXF, WMF, EMF, PICT, EPS, CDR
To enable digital media server:
1 Double-click the Windows Home Server icon in the system tray.
2 Log on to the Windows Home Server Console.
3 Click Settings.
4 In the navigation pane, select Settings for DMS.
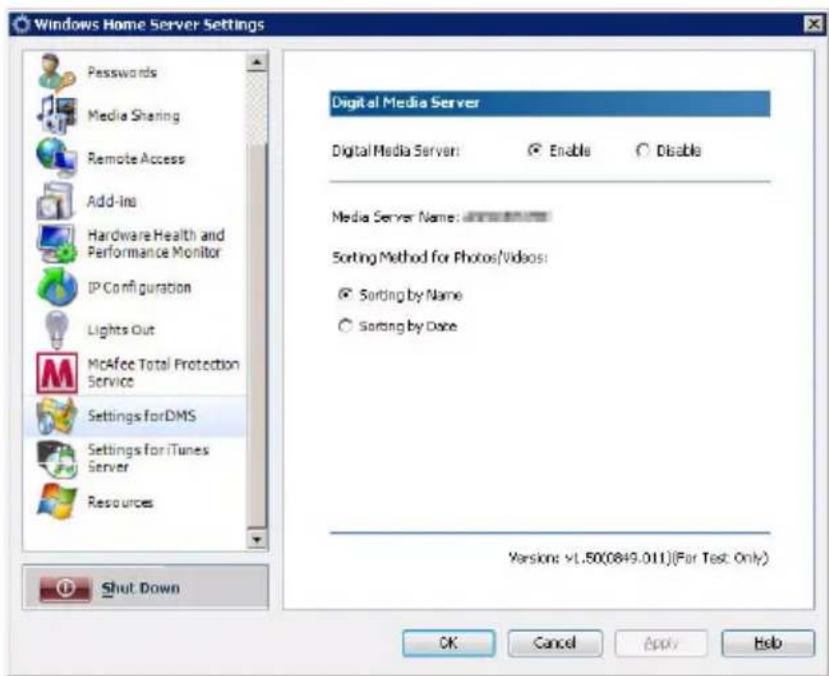
text_image
Windows Home Server Settings Passwords Media Sharing Remote Access Add-ins Hardware Health and Performance Monitor IP Configuration Lights Out McAfee Total Protection Service Settings for DMS Settings for iTunes Server Resources Digital Media Server Digital Media Server: Enable Disable Media Server Name: Sorting Method for Photos/Videos: Sorting by Name Sorting by Date Shut Down Versions: v1.50(0849.011)(For Test Only) OK Cancel Apply Help5 Under Digital Media Server, click the "Enable" option button.
6 Select a sorting method for the Photos and Videos shared folders.
- Sorting by Name - Photos and videos are arranged according to the original organization, which is the default option.
- Sorting by Date - Digital Media Server auto checks the latest modification dates of files and creates different virtual folders by year and subfolders by month.
7 Click OK.
Enable iTunes service
The Digital Media Server feature allows you to enable or disable the iTunes server function, specify how often the music library is updated, set a password to secure the iTunes Server access.
To enable iTunes service:
1 Double-click the Windows Home Server icon in the system tray.
2 Log on to the Windows Home Server Console.
3 Click Settings.
4 In the navigation pane, select Settings for iTunes Service.
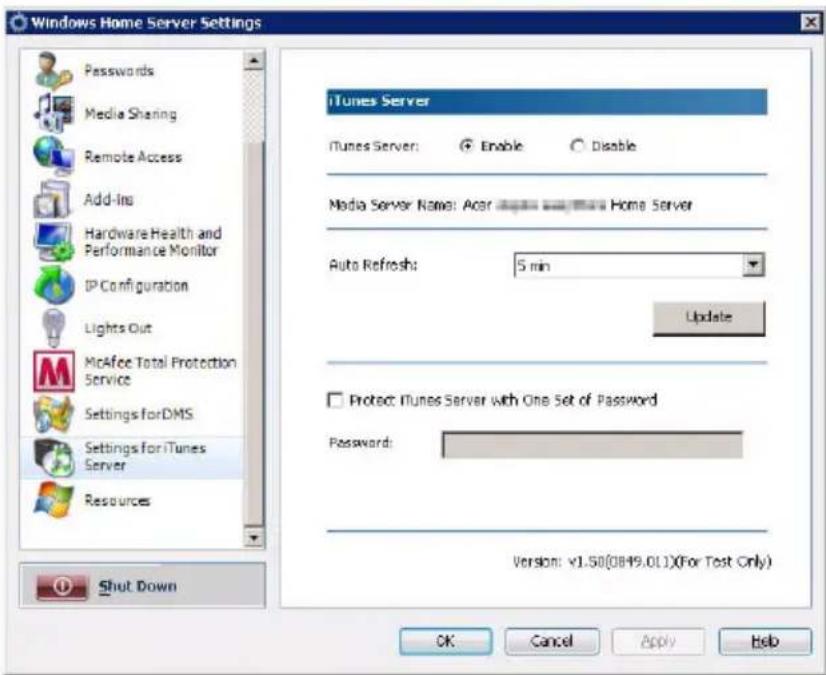
text_image
Windows Home Server Settings Passwords Media Sharing Remote Access Add-ins Hardware Health and Performance Monitor IP Configuration Lights Out McAfee Total Protection Service Settings for DMS Settings for iTunes Server Resources iTunes Server iTunes Server: Enable Disable Media Server Name: Acer Home Server Auto Refresh: 5 min Update Protect iTunes Server with One Set of Password Password: Version: v1.50(0849.01)(For Test Only) OK Cancel Apply Help5 Under iTunes Server, click the "Enable" option button.
6 Specify how often iTunes can scan the home server for new music files.
7 Enter a password to protect iTunes server.
8 Click OK.
Stream audio
You can use Windows Media Player 11 or iTunes to play music files stored on the home server to your computer.
To stream audio in Windows Media Player 11:
1 Make sure that media sharing is enabled. Refer to "Enable media sharing" on page 84 for more information.
2 Make sure Digital Media Server is enabled. Refer to "Enable Digital Media Server" on page 85 for more information.
3 Open the Windows Media Player.
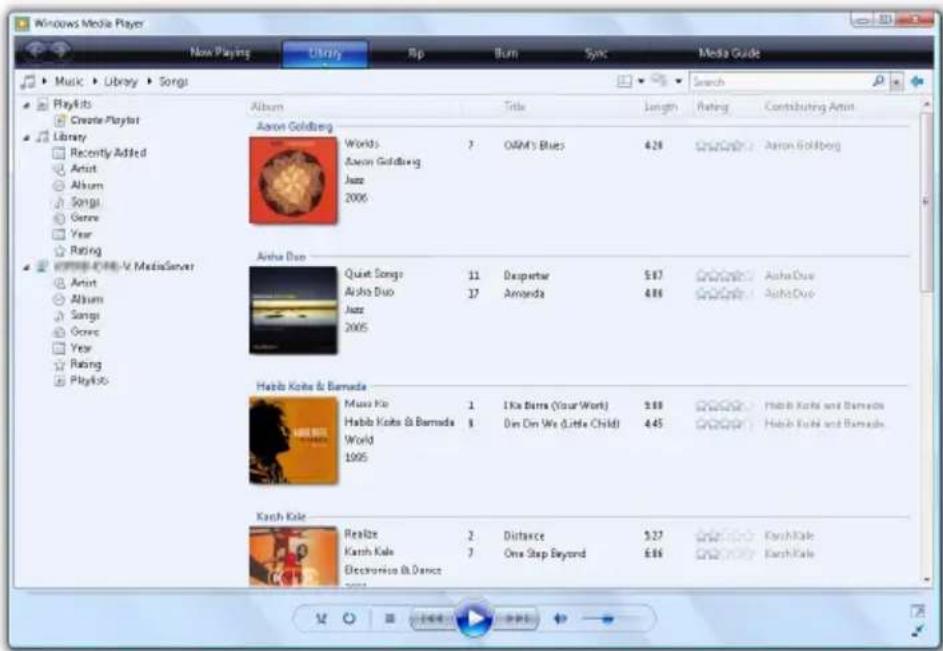
text_image
Windows Media Player Now Playing Library Sp Burn Sync Media Guide Music > Library > Songs Search PlayHits Create/PlayIt Library Recently Added Artot Album Songs Genre Year Rating PlayHits - V. MediaServer Artist Album Songs Genre Year Rating PlayHits Album Title Length Rating Contributing Artist Aaron Goldberg Worlds 7 O&M's Blues 4.28 Aaron Goldberg Aaron Goldberg Aaron Goldberg Jason Goldberg Jazz 2006 Anha Duo Quiet Songs 11 Despartar 5.97 Aisha Duo Aisha Duo 17 Amanda 4.86 Aisha Duo Habib Krahe & Barnada Musa Kio 1 Ika Barra (Your Work) 5.88 Habib Krahe & Barnada 8 Din Din We Little Child 4.45 Habib Krahe and Barnada Habib Krahe and Barnada World 1995 Karch Kale Realize 2 Distance 5.27 Karch Kale 7 One Step Beyond 6.86 Karch Kale4 Click the Library tab. The Acer RevoCenter Series appears in the navigation pane.
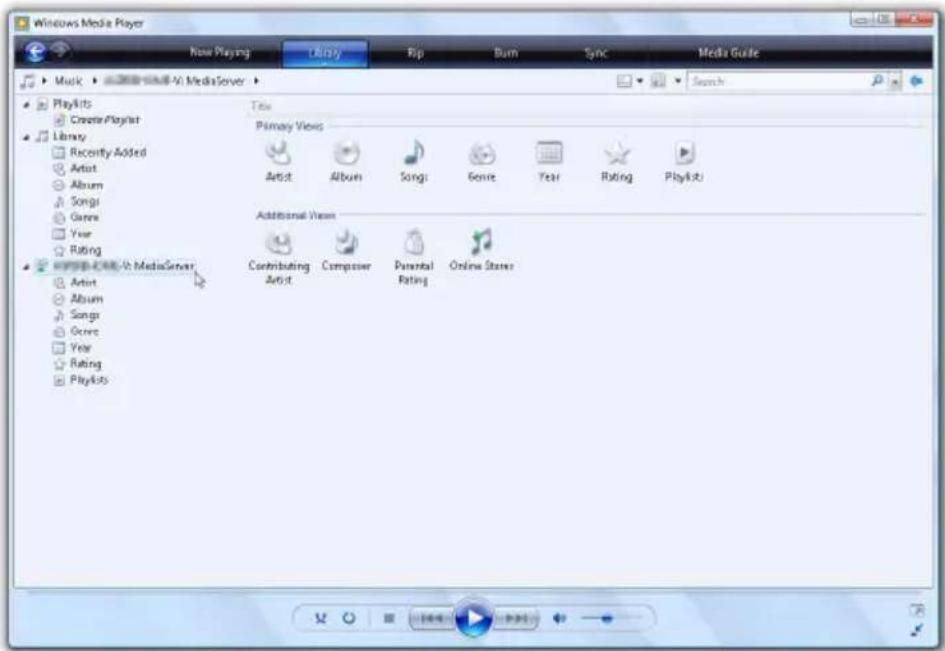
text_image
Windows Media Player New Playing Library Rip Burn Sync Media Guide Music > 2000-1997 MediaServer > Search PlayHits Creator/Playlist Library Recently Added Artist Album Songs Genre Year Rating Primary Views Artist Album Songs Genre Year Rating Playlists Additional Views Contributing Artist Composer Parental Rating Online Stores5 Browse or search for the item you want to play, then click the Play button.
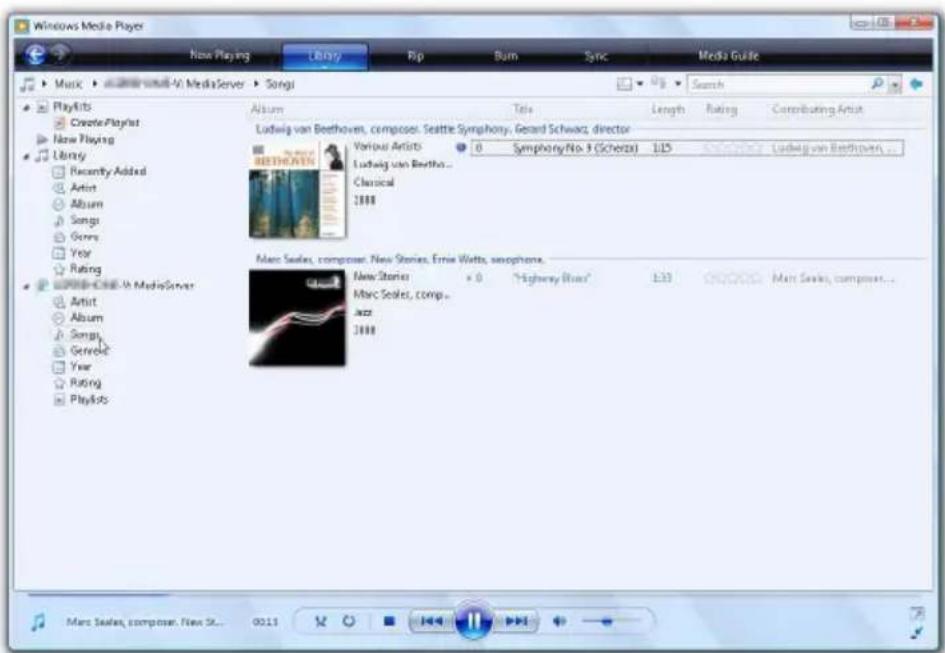
text_image
Windows Media Player New Playing Library Rip Burn Sync Media Guide Music > 100% MediaServer > Songs Search PlayKits Creator/PlayKits New Playing Library Recently Added Artist Album Songs Songs Year Rating Music - Child - MediaServer Artist Album Songs Gesrelet Year Rating PlayKits Album Title Length Rating Contributing Artist Ludwig van Beethoven, composer: Seattle Symphony, Gerard Schwarz, director Various Artists 0 Symphony-No. 9 (Scherich) 1/25 Ludwig van Beethoven ... Classical 1888 Marc Seales, composer: New Stories, Ernie Watts, saxophone. New Stories 0 "Highway Blues" 1:33 Marc Seales, comp.. Jazz 1888 Marc Seales, composer... 0213To stream audio in iTunes:
1 Make sure that media sharing is enabled. Refer to "Enable media sharing" on page 84 for more information.
2 Make sure iTunes Service is enabled. Refer to "Settings for iTunes Server" on page 60 for more information.
3 Open the iTunes. The Acer RevoCenter Series appears under Shared on the left of the iTunes window.
Audio files are streamed in iTunes and displayed under the Shared list.
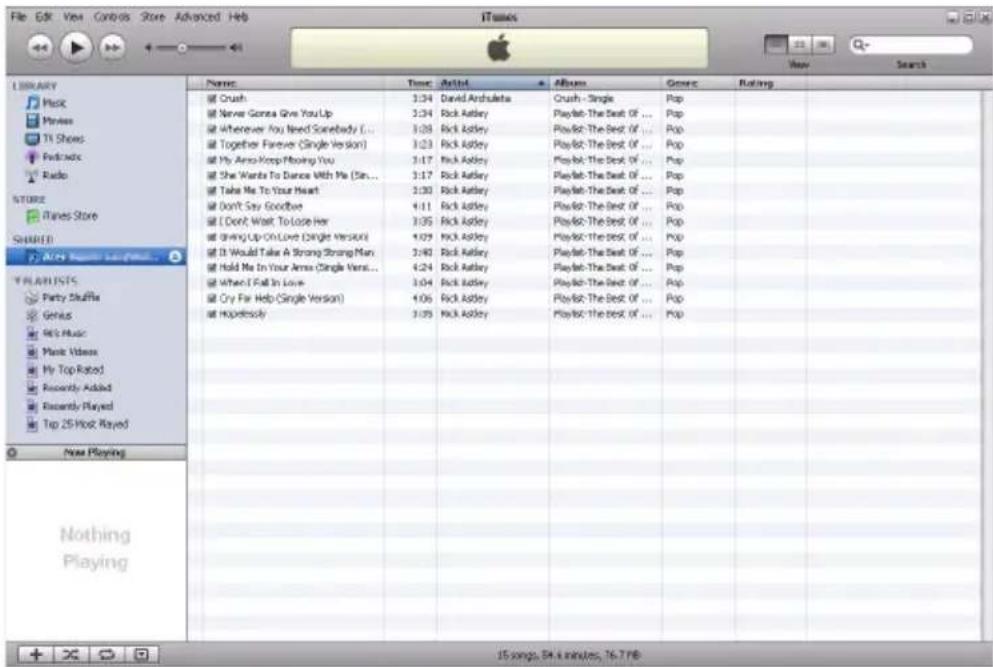
text_image
File Edit View Controls Store Advanced Help Name Time Artist Albums Genre Rating Crush 3:34 David Archuleta Crush - Single Pop Never Gomes Give You Lip 3:34 Rick Ashley Playbk-The Best Of ... Pop Wherever You Need Somebody (... 3:38 Rick Ashley Playbk-The Best Of ... Pop Together Forever (Single Version) 3:23 Rick Ashley Playbk-The Best Of ... Pop My Anno-Keep Floating You 3:17 Rick Ashley Playbk-The Best Of ... Pop She Warts To Dance With Me (Sin... 3:17 Rick Ashley Playbk-The Best Of ... Pop Take Me To Your Heart 3:30 Rick Ashley Playbk-The Best Of ... Pop Don't Say Goodbye 4:11 Rick Ashley Playbk-The Best Of ... Pop I Don't Wait To Lose Her 3:35 Rick Ashley Playbk-The Best Of ... Pop Giving Up On Love (Single Versus) 4:29 Rick Ashley Playbk-The Best Of ... Pop It Would Take A Strong Strong Man 3:40 Rick Ashley Playbk-The Best Of ... Pop Hold Me In Your Anno (Single Versu... 4:24 Rick Ashley Playbk-The Best Of ... Pop When I Fall In Love 3:34 Rick Ashley Playbk-The Best Of ... Pop Cry Far Help (Single Version) 4:06 Rick Ashley Playbk-The Best Of ... Pop Hypersely 3:35 Rick Ashley Playbk-The Best Of ... Pop Nothing Playing 15 songs, 54 minutes, 76.7 PB4 Browse or seach for the item you want to play, then click the Play button.
Using the one-touch USB backup feature
The USB backup button on the front panel allows you to back up data from a USB storage device to the home server. Windows Home Server copies all files into the Publics shared folder first then classifies the files according to media type into their corresponding shared folders, namely Music, Videos, Photos. When Windows Home Server cannot determine file type, the file is automatically stored into the Others folder.

Important: Only the front USB port supports the backup feature.
To use one-touch USB backup to back up data from a USB storage device:
1 Plug the USB device into the front USB port.
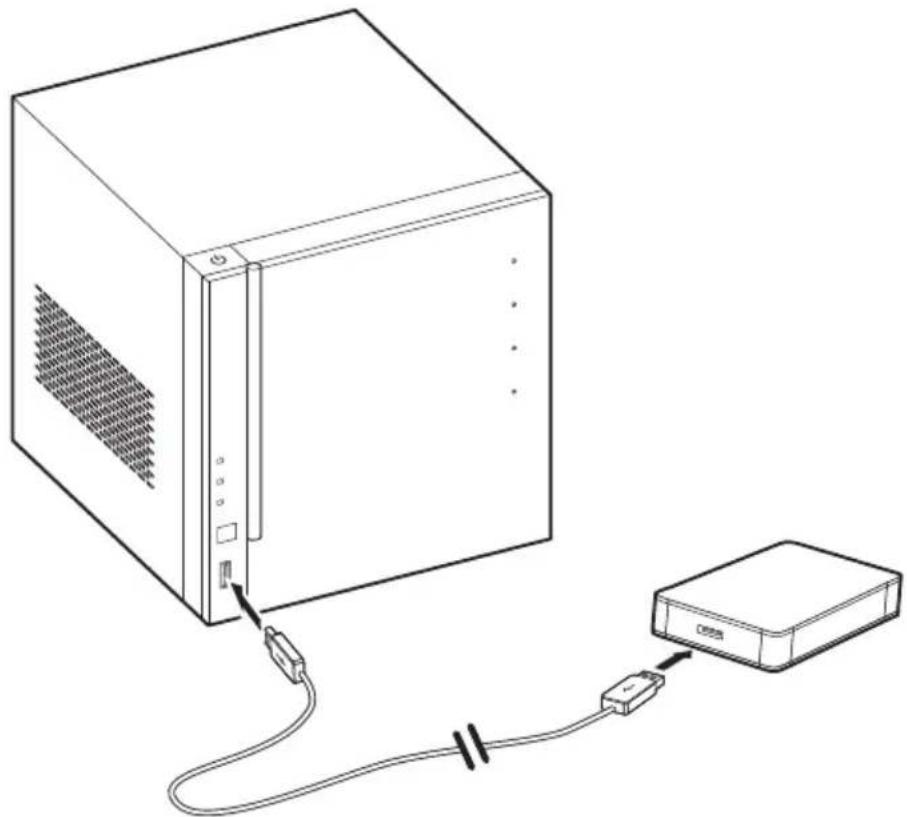
natural_image
Line drawing of a server unit connected to an external device via cable (no text or symbols)2 Press the USB backup button. The USB backup indicator blinks blue.

natural_image
Illustration of a hand inserting a button into a server unit (no text or symbols visible)3 All files on the USB storage device are copied into the Publics shared folder.

Note: During the copy process, Windows Home Server checks the file properties including time, size, and file name to verify whether a file of the same name or exactly the same file exists in the folder. If there is a conflicting file name, the data will be copied but will be assigned a serial number on the file name. If the file of exactly the same properties already exists in the Publics shared folder, the file will be filtered out of from the copy process.
4 Afterwards, Windows Home Server automatically copies and classifies the newly copied files according to their file type.
5 You can find files of different types in their corresponding shared folders (Music, Videos and Photos). Files other than music, videos and photos are accommodated in the Others folder.
6 When the back up process is completed, the USB backup indicator turns solid blue.
Set up Wake On LAN on the home server
The home server includes a Lights Out client software that allows the home computer to control the power state of the home server and wake up the home server from stand by. The Lights Out Client Service runs in the background. The utility does not have any user interface. You don't have to configure any address. Every time the client computer (that has the Windows Home Server Connector software installed) is started or comes out of standby, a WOL (Wake On LAN) magic packet is sent to the server.
To set up Wake On LAN on the home server:
1 Place the RevoCenter Series Software Installation Disc in the optical drive of the home computer. The installation wizard starts. Or, double-click on the Client Installation.exe file to begin installation. The Welcome window appears.

text_image
Acer RevoCenter Welcome Install the software on the computer Software offline update Lights out software on Client PC User Guide acer Cancel2 Click Lights out.

Note: The Lights Out Client installer checks if the home computer has the Windows Home Server Connector. If no connector is found, the installation is aborted.
3 Select a language.
text_image
Select Setup Language Select the language for this installation from the choices below. English OK Cancel4 Click OK. The Welcome window appears.
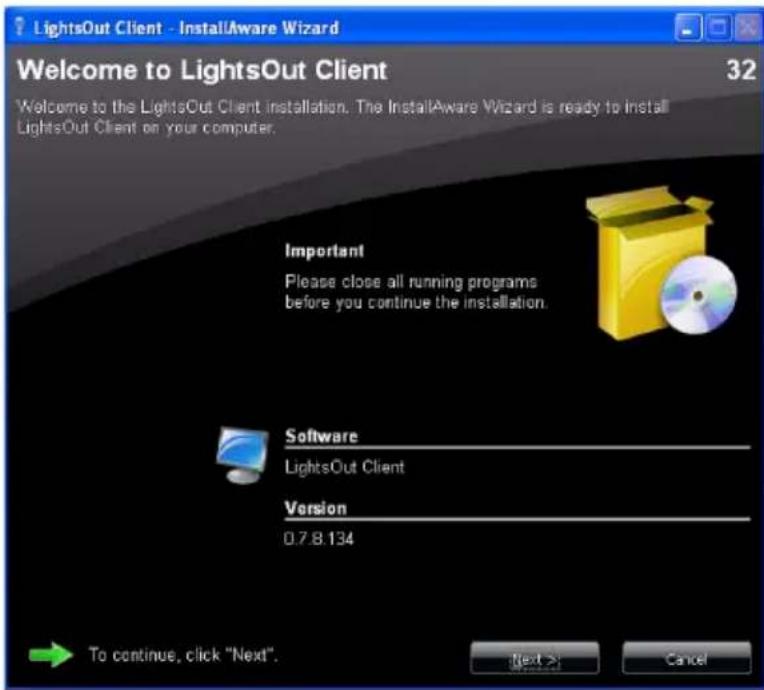
text_image
LightsOut Client - InstallAware Wizard Welcome to LightsOut Client 32 Welcome to the LightsOut Client installation. The InstallAware Wizard is ready to install LightsOut Client on your computer. Important Please close all running programs before you continue the installation. Software LightsOut Client Version 0.7.8.134 To continue, click "Next". Next > Cancel5 Click Next.
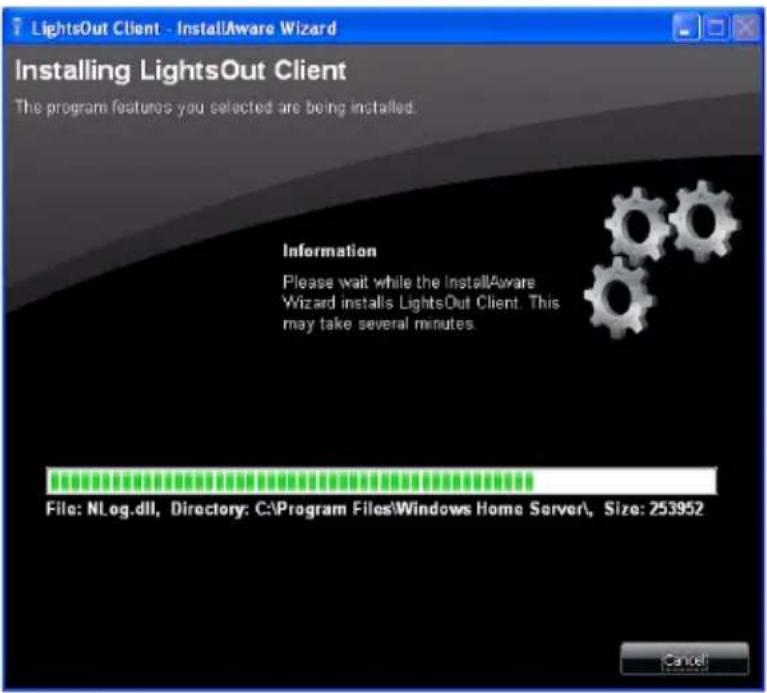
text_image
LightsOut Client - InstallAware Wizard Installing LightsOut Client The program features you selected are being installed. Information Please wait while the InstallAware Wizard installs LightsOut Client. This may take several minutes. File: NLog.dll, Directory: C:\Program Files\Windows Home Server\, Size: 253952 Cancel6 Click Finish.
Set the home server uptime and down time
You can define times when the home server has to be up and running or define services where the server is never put into sleep mode during an active backup operation to reduce the risk of data loss.

Note: When creating an uptime you must enter a start and end time. The uptime end action can be created as a standalone action or in combination with an uptime.
To set the home server uptime and downtime:
1 Double-click the Windows Home Server icon 📋 in the system tray.
2 Log on to the Windows Home Server Console.
3 Click the Lights Out tab.
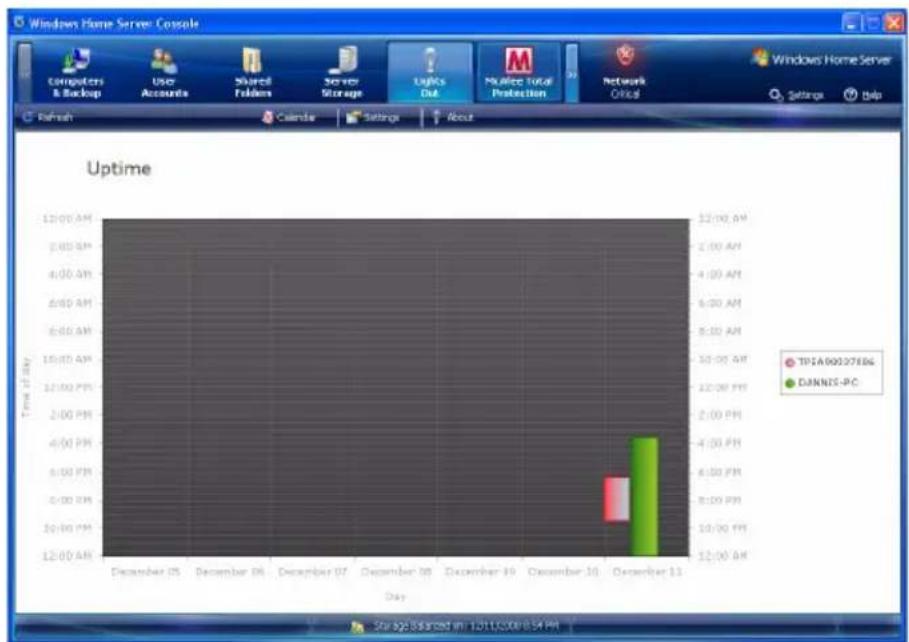
bar
Uptime | Day | Time of Day (TP5A 0002786L) | Time of Day (DJNNIS-PC) | |---|---|---| | December 05 | 12:00 AM | 12:00 AM | | December 06 | 12:00 AM | 12:00 AM | | December 07 | 12:00 AM | 12:00 AM | | December 08 | 12:00 AM | 12:00 AM | | December 09 | 12:00 AM | 12:00 AM | | December 10 | 12:00 AM | 12:00 AM | | December 11 | 12:00 AM | 12:00 AM |Home computers are indicated by color blocks in the diagram. When you have more than 6 computers, the colors will be duplicated. The diagrams are created from left to right in the same order as the legend from top to bottom.
4 Click Calendar.
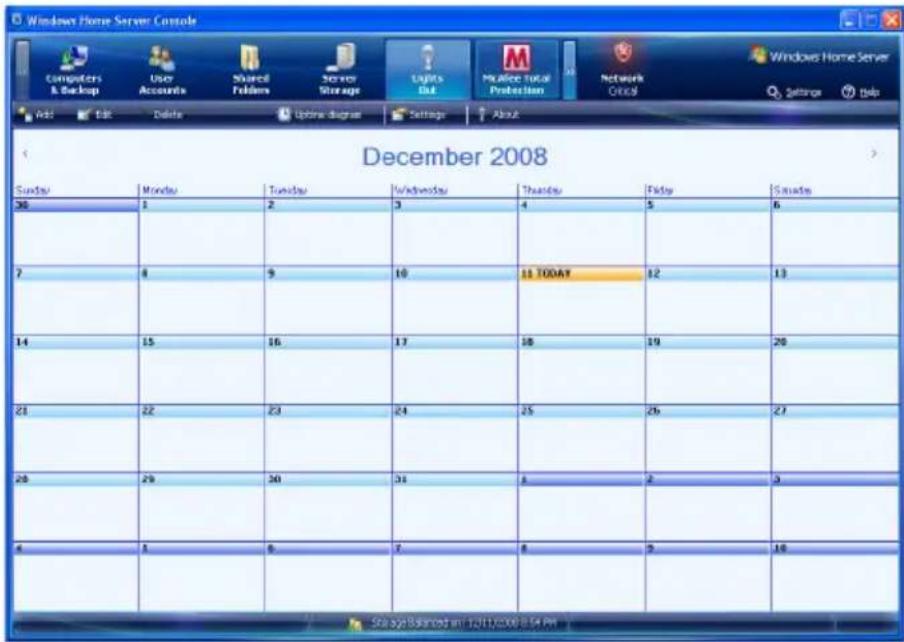
text_image
Windows Home Server Console Computers & Backup User Accounts Shared Patterns Server Storage Lights Out M Police Total Protection Network Group Settings Options Edit Delete Upgrade degree Settings About December 2008 Sunday Monday Tuesday Wednesday Thursday Friday Sometimes 30 1 2 3 4 5 6 7 8 9 10 11 TODAY 12 13 14 15 16 17 18 19 20 21 22 23 24 25 26 27 28 29 30 31 32 33 34 35 36 37 38 39 40 41 42 43 44 45 46 47 48 49 50 51 52 53 54 55 56 57 58 59 60 61 62 63 64 65 66 67 68 69 70 71 72 73 74 75 76 77 78 79 80 81 82 83 84 85 86 87 88 89 90 91 92 93 94 95 96 97 98 99 1005 Select a day or days in the Calendar, then click Add.
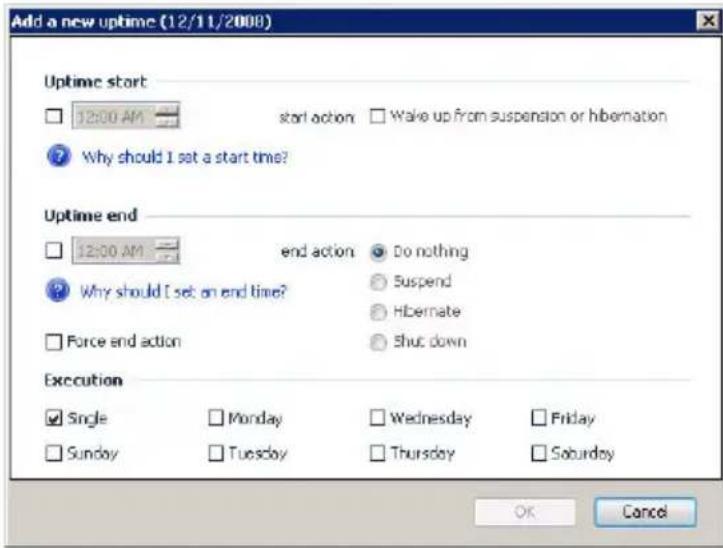
text_image
Add a new uptime (12/11/2008) Uptime start □ 12:00 AM —— start action □ Wake up from suspension or hibernation ? Why should I set a start time? Uptime end □ 12:00 AM —— end action ● Do nothing ? Why should I set an end time? ○ Suspend ○ Hibernate □ Force end action ○ Shut down Execution ✓ Single □ Monday □ Wednesday □ Friday □ Sunday □ Tuesday □ Thursday □ Saturday OK Cancel6 Under Uptime start, set a start time to keep the server running.
7 Enable the "Wake up from suspension" option if you want to bring the home server out of standby on the defined time.
8 Under Uptime end, set an end time to disable the server.
9 Select from the following end actions:
- Do nothing - This is not useful for a standalone end action.
- Suspend - Puts your server into suspend mode.
- Shut down - Shuts down and powers off the server.
10 Enable the "Force end action" option if you want to immediately disable the server even when client monitoring detects active clients.
11 Select a day or days when to execute the command you selected in uptime start and uptime end parameter.
12 Click OK.
Monitor server health and performance
Your system includes a Hardware Health and Performance Monitor feature to help you keep a close eye on the system health of the home server. You can view graphical representations of a performance counter for CPU usage, memory usage, and storage usage and view the status of the home server's fans, voltage, and temperature.

Note: To start the monitoring service successfully, it is required that you have administrator privileges on the home server.
To monitor the hardware health and performance data of the home server:
1 Double-click the Windows Home Server icon 📋 in the system tray.
2 Log on to the Windows Home Server Console.
3 Click the System Information tab.
4 Scroll down to the Hardware Performance and Health Monitor field.
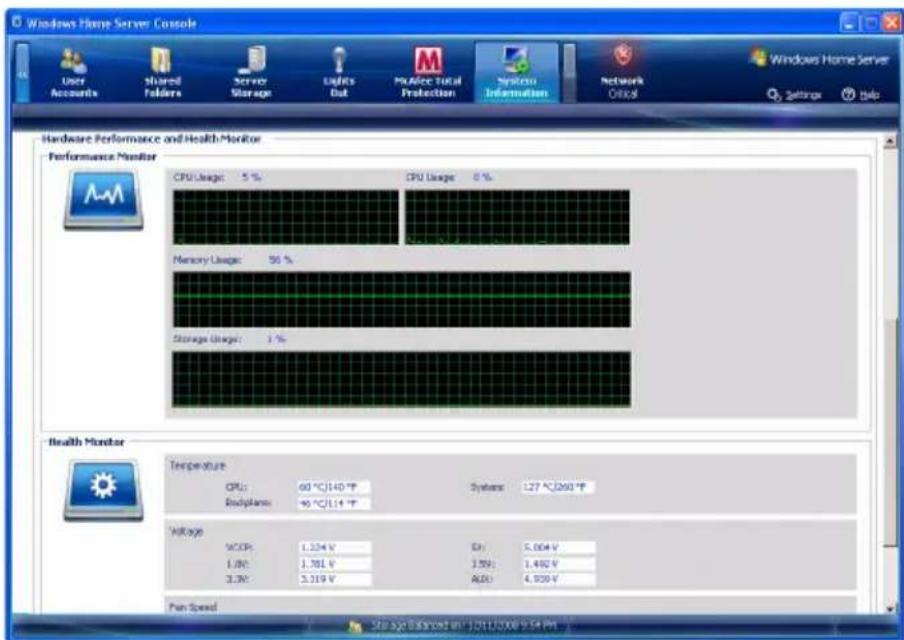
text_image
Windows Home Server Console User Accounts Shared Folders Server Storage Lights Out Make Total Protection System Information Network Options Hardware Performance and Health Monitor Performance Monitor CPU Usage: 5 % CPU Usage: 0 % Memory Usage: 56 % Storage Usage: 1 % Health Monitor Temperature CPU: 60 °C/140 °F Systems: 127 °C/260 °F Bodyplane: 90 °C/114 °F Voltage SCOP: 1.324 V Ch: 5.004 V 1.8V: 1.701 V 1.5V: 1.492 V 3.3V: 3.219 V AOS: 4.909 V Fan Speed Site Size & Spaced on: 120112308-9:34 PMSet up email alerts
You can set up an automatic email notification to provide alerts in the event of warnings or errors related to temperatures, fan speeds, or hard drive. To validate the email alert feature, you must also configure SMTP setup.
To set up automatic email notifications:
1 Double-click the Windows Home Server icon 📋 in the system tray.
2 Log on to the Windows Home Server Console.
3 Click Settings.
4 In the navigation pane, select Hardware Health and Performance Monitor.
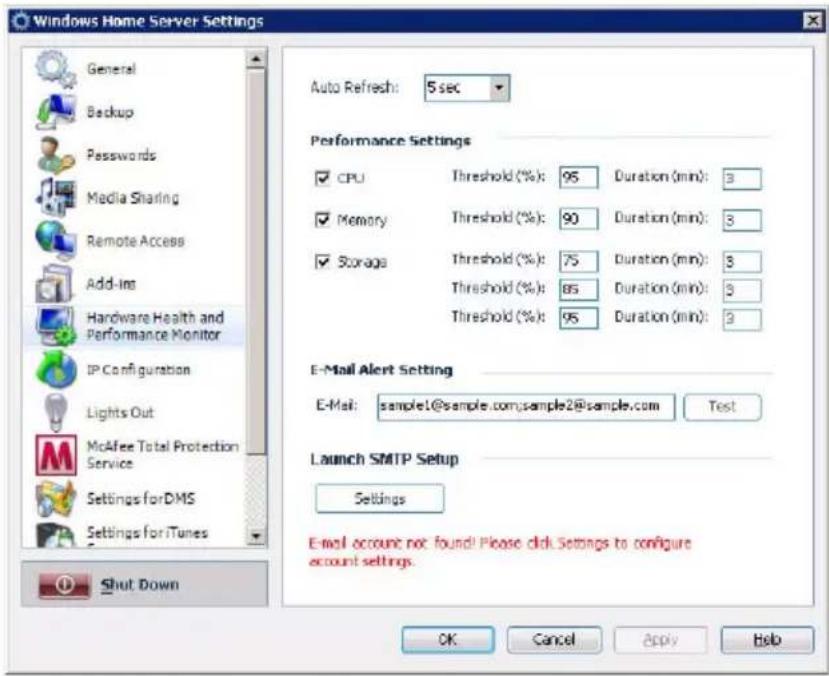
text_image
Windows Home Server Settings General Backup Passwords Media Sharing Remote Access Add-Ins Hardware Health and Performance Monitor IP Configuration Lights Out McAfee Total Protection Service Settings for DMS Settings for iTunes Shut Down Auto Refresh: 5 sec Performance Settings CPU Threshold (%): 95 Duration (min): 3 Memory Threshold (%): 90 Duration (min): 3 Storage Threshold (%): 75 Duration (min): 3 Threshold (%): 85 Duration (min): 3 Threshold (%): 95 Duration (min): 3 E-Mail Alert Setting E-Mail: sample1@sample.com;sample2@sample.com Test Launch SMTP Setup Settings E-mail account not found! Please click Settings to configure account settings. OK Cancel Apply Help5 In the E-Mail Alert Setting, type an email address to which email alerts will be sent. If there are more than one addresses, use a semicolon to separate different addresses.
6 Under Launch SMTP Setup, click Settings.
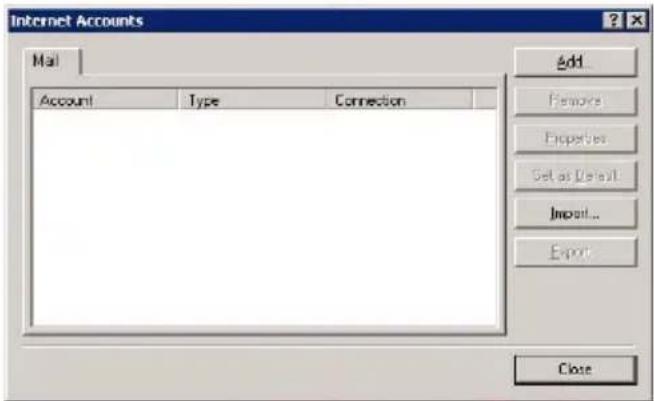
text_image
Internet Accounts Mail Account Type Connection Add... Remove Properties Set as Default Import... Export CloseThe Internet Accounts dialog box include the following options:
- Remove - Deletes an Internet Mail Account.
- Properties - Displays the Properties dialog box. This dialog box lets you configure the properties of established connections.
- Set as Default - Sets an Internet Mail Account as the primary account.
- Import - Imports your Internet Mail Account settings to an Internet Account (.iaf) file format.
- Export - Exports an Internet Mail Account settings.
- Close - Exits the Internet Accounts dialog box.
7 Click Add to add an Internet connection.
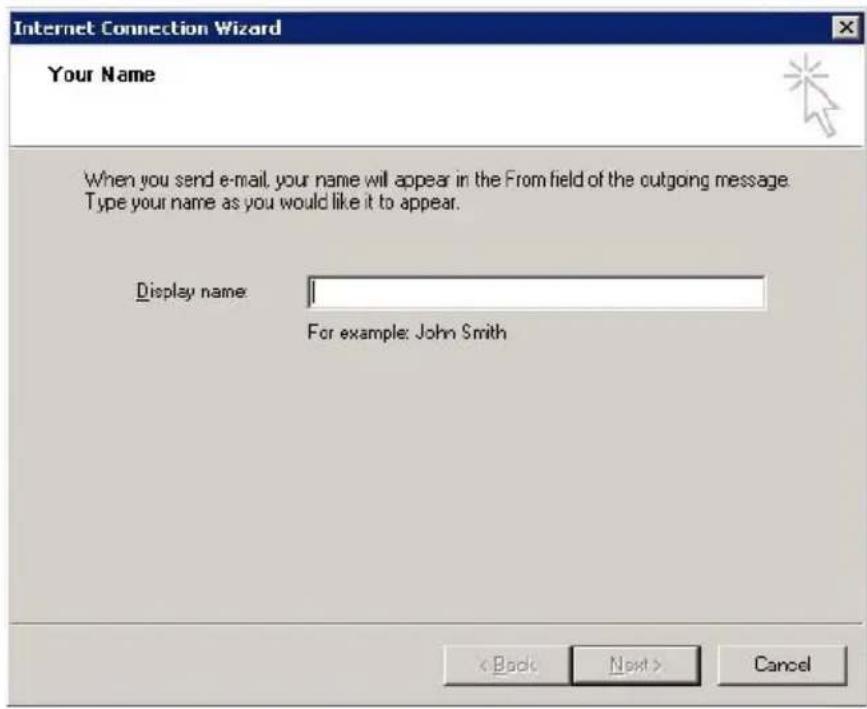
text_image
Internet Connection Wizard Your Name When you send e-mail, your name will appear in the From field of the outgoing message. Type your name as you would like it to appear. Display name: For example: John Smith < Back Next > Cancel8 Enter your name, then click Next.
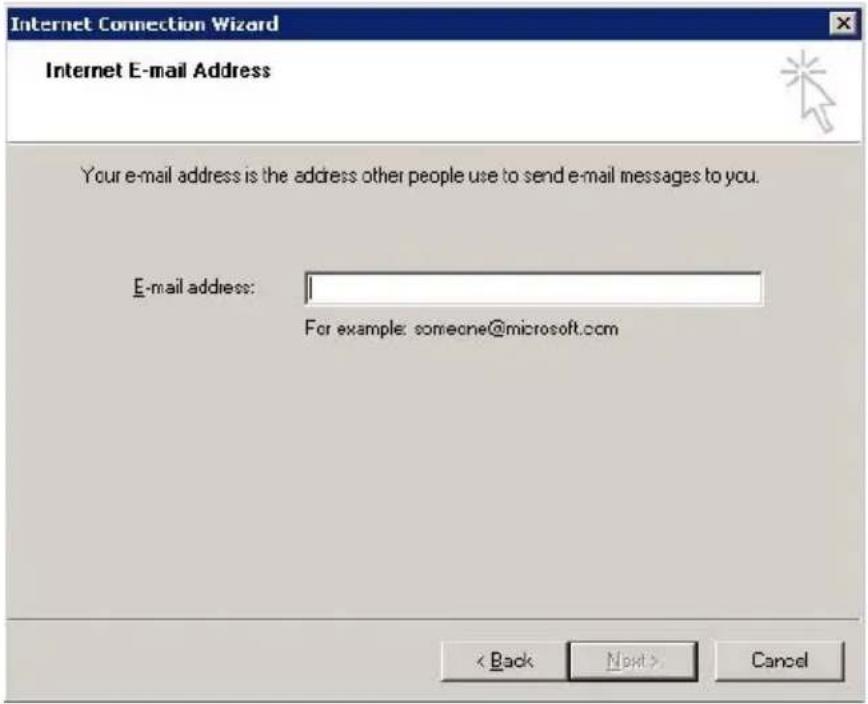
text_image
Internet Connection Wizard Internet E-mail Address Your e-mail address is the address other people use to send e-mail messages to you. E-mail address: For example: someone@microsoft.com < Back Next > Cancel9 Enter your email address, then click Next.
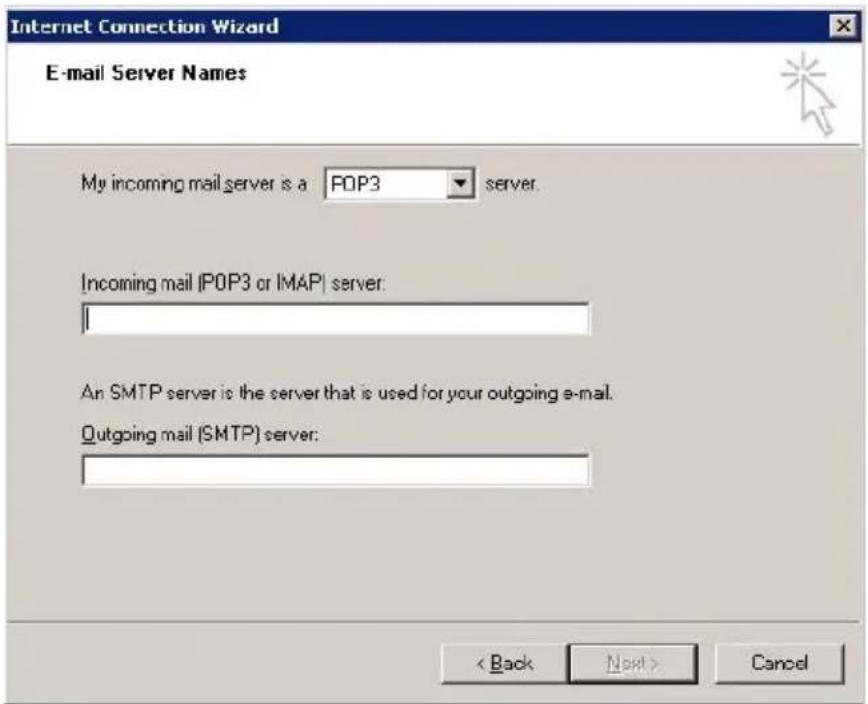
text_image
Internet Connection Wizard E-mail Server Names My incoming mail server is a POP3 server. Incoming mail (POP3 or IMAP) server: An SMTP server is the server that is used for your outgoing e-mail. Outgoing mail (SMTP) server: < Back Next > Cancel10 Enter the SMTP server information, then click Next.

Note: If you do not know your incoming and outgoing SMTP server name, contact your ISP (Internet service provider).
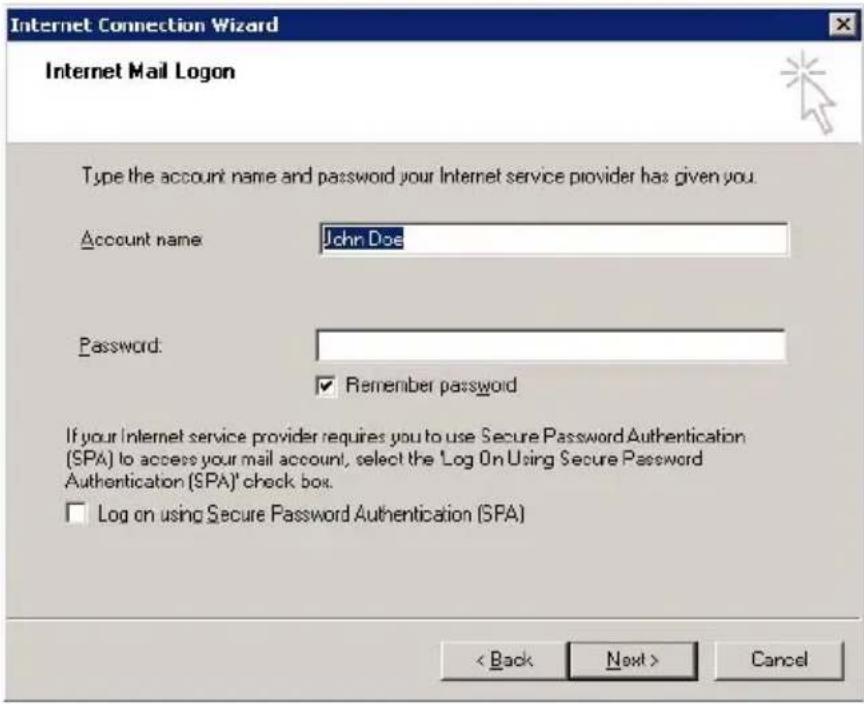
text_image
Internet Connection Wizard Internet Mail Logon Type the account name and password your Internet service provider has given you. Account name: John Doe Password: ✓ Remember password If your Internet service provider requires you to use Secure Password Authentication (SPA) to access your mail account, select the 'Log On Using Secure Password Authentication (SPA)' check box. □ Log on using Secure Password Authentication (SPA) < Back Next > Cancel11 Enter the account name and password your ISP has given you, then click Next.

Note: Select the "Log On Using Secure Password Authentication (SPA)" check box if your ISP requires you to use Secure Password Authentication to access your mail account.
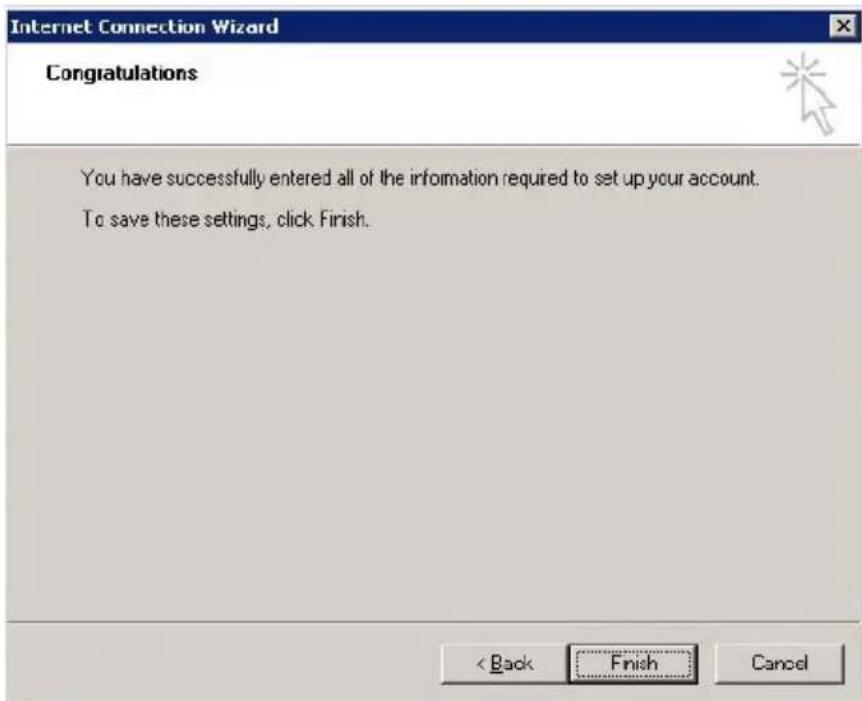
text_image
Internet Connection Wizard Congratulations You have successfully entered all of the information required to set up your account. To save these settings, click Finish. < Back Finish Cancel12 Click Finish.
13 On the Hardware Health and Performance Monitor page, click Test to send testing mails to the email addresses specified in order to verify whether notification can arrive smoothly.
14 Click OK.
Click Help in the Hardware Health and Performance Monitor page for more information.
Explore the Windows Home Server icon
The Windows Home Server icon notifies you about the health and status of the home server and your home computers. This includes notifications about user account password mismatches, software upgrades, and backup status. The icon also provides quick access to the Windows Home Server Connector software via a right-click menu.
The color of the Windows Home Server icon represents the status of the home server:
Color Status
Indicates a healthy network
Indicates an issue that you must attend to soon
Indicates an issue that you must attend to immediately

Indicates that a backup is in progress
Indicates that your home computer cannot contact Windows Home Server
For more information, right-click the Windows Home Server icon, click Help.
5 Configuring the hard disk drive
The system supports up to four 3.5-inch hot-swappable SATA hard disk drives.

Warning: The first hard drive, located on the bottom of the HDD bay, is not hot-swappable.
Adding a hard disk drive

Caution: Hard drives are formatted before they are added to the server storage. Make sure that you back up any important files that are on the hard drive before you add it to server storage. Formatting a hard drive deletes all files on the hard drive.
1 Install the new HDD to the home server.
(1) Open the door of the home server.
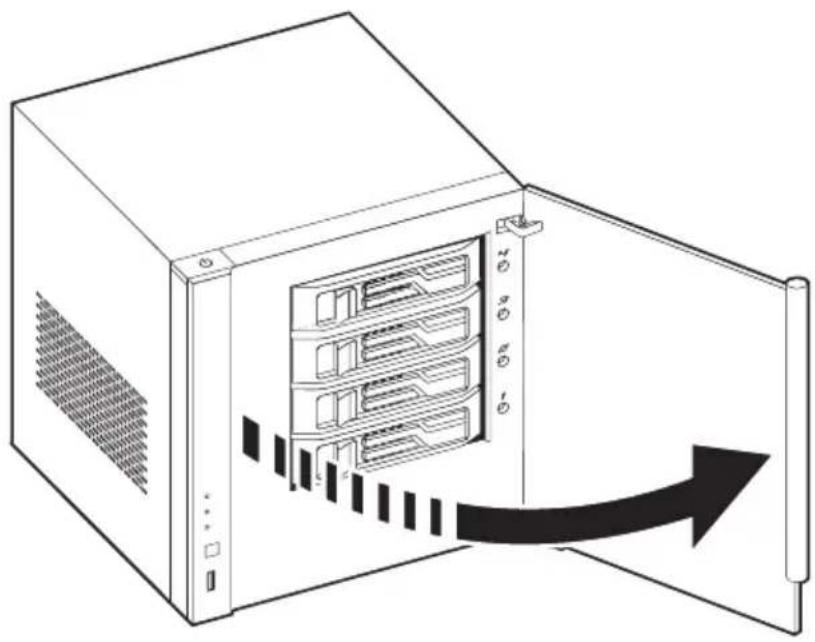
natural_image
Diagram of a server rack with an open door and black arrow indicating data transfer (no text or symbols present)(2) Remove the HDD carrier by pressing the HDD carrier latch (1).
(3) Pull the lever (2) and slide the HDD carrier from the chassis (3).
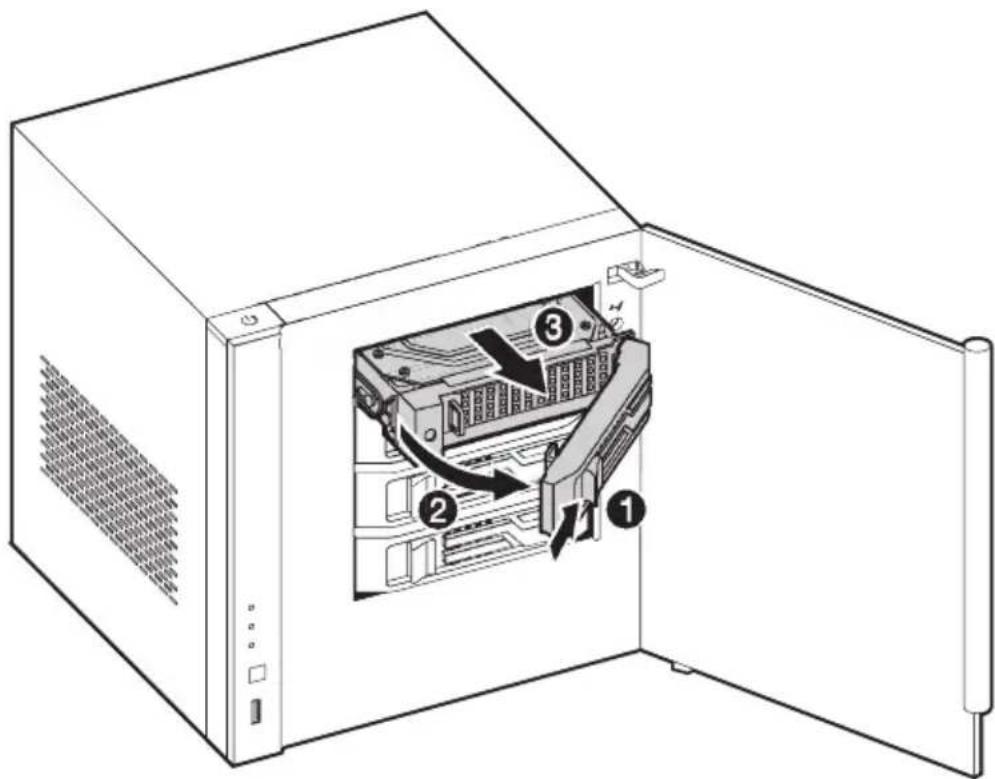
text_image
Diagram of an open computer tower case with numbered components indicating internal structure and ventilation flow(4) Insert the new drive into the right side of the carrier aligning the pins into the HDD's mounting holes (1).
(5) Slightly bend the left side rail and insert the pins into the HDD's mounting holes (2).
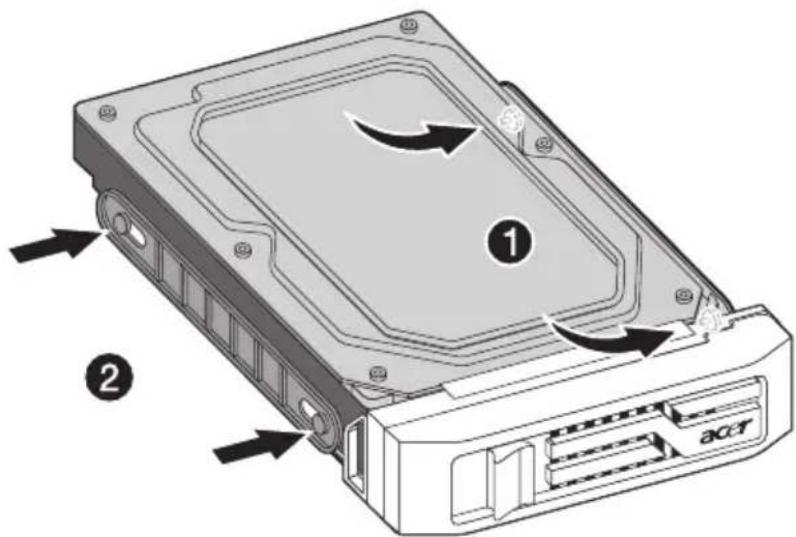
text_image
Diagram of a macOS drive showing internal components and labeled parts, with numbered annotations.(6) With the lever still extended, slide the carrier all the way into the drive bay (1). Do not push on the lever until it begins to close by itself.
(7) Use the lever to push the carrier until it docks into place, then close the lever (2).
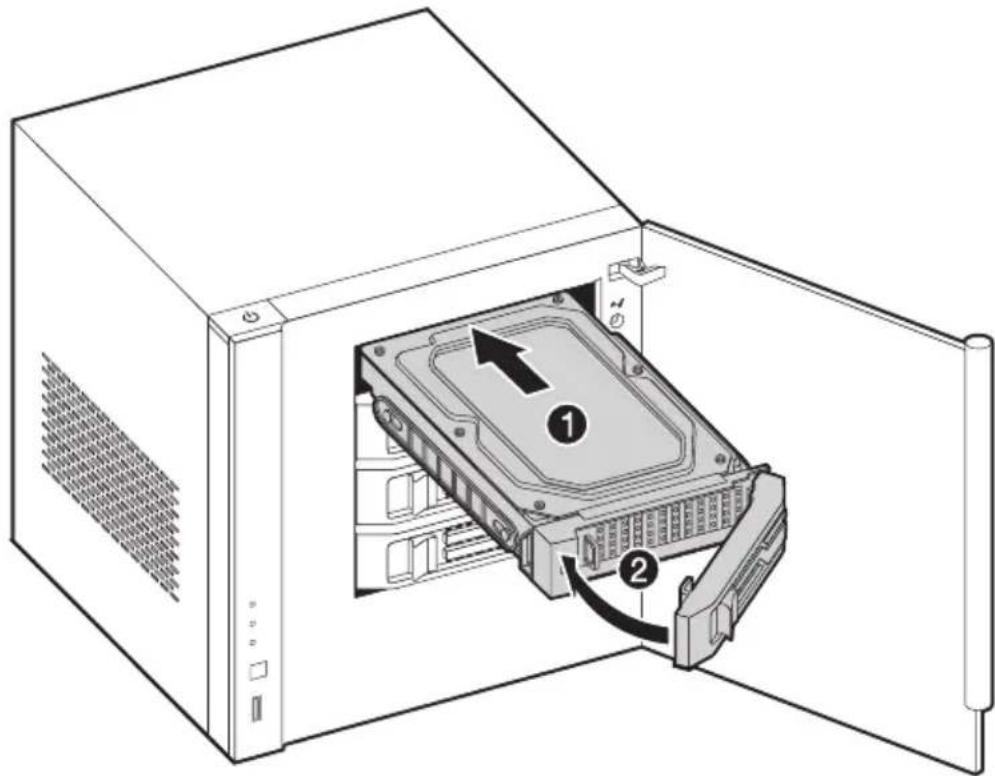
text_image
Diagram of an open computer case showing internal components with numbered labels and directional arrows indicating movement or flow.(8) Close the door of the home server.
2 Add the hard drive to the server storage on Windows Home Server Console.
(1) Double-click the Windows Home Server icon tray.
(2) Log on to the Windows Home Server Console.
(3) Click the Server Storage tab.
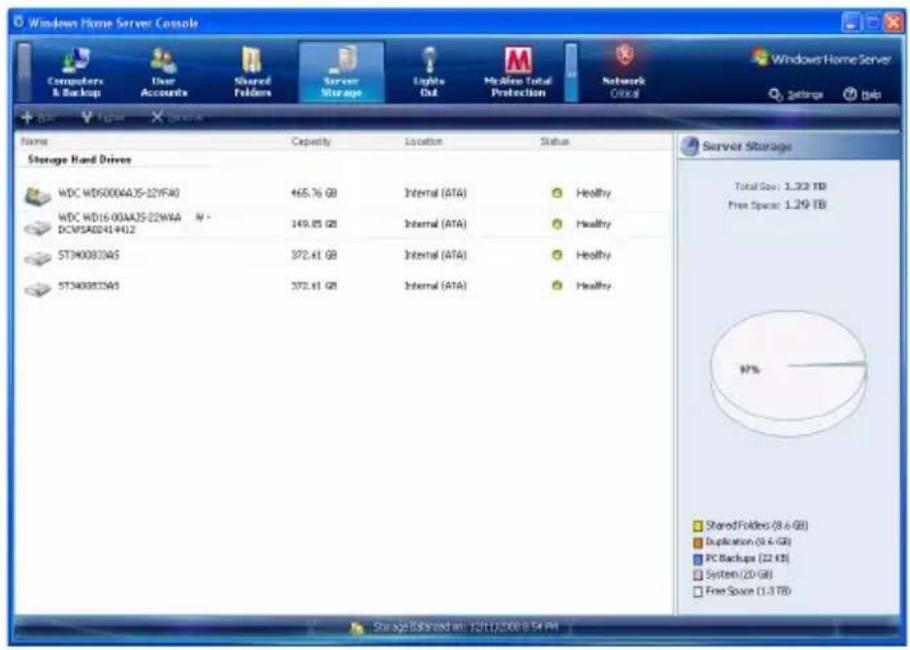
pie
| Category | Value | |---|---| | Stored Folders (8-6 GB) | 97% | | Duplication (5-6 GB) | 0% | | PC Backup (22 KB) | 0% | | System (20 GB) | 0% | | Free Space (1.3 TB) | 0% |(4) Select the newly installed hard drive (either internal or external), then click Add to run the Add a Hard Drive Wizard.
(5) Click Next.
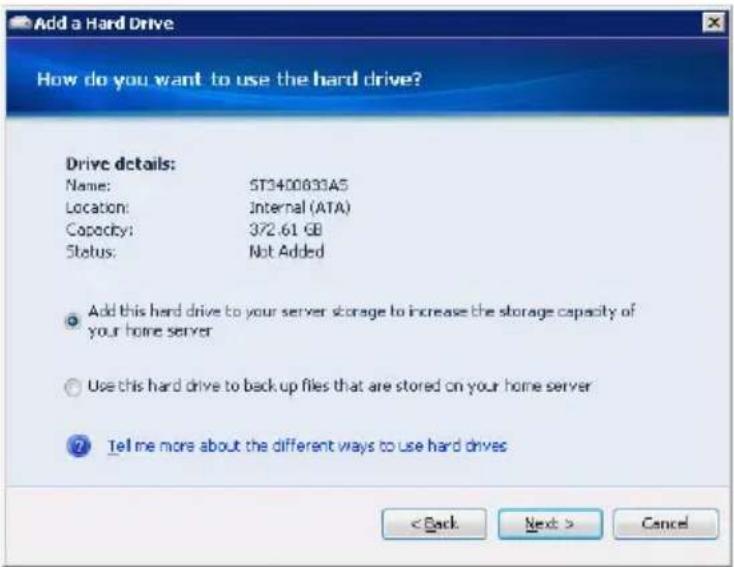
text_image
Add a Hard Drive How do you want to use the hard drive? Drive details: Name: 5T3400833A5 Location: Internal (ATA) Capacity: 372.61 GB Status: Not Added Add this hard drive to your server storage to increase the storage capacity of your home server Use this hard drive to back up files that are stored on your home server Tell me more about the different ways to use hard drives < Back Next > Cancel(6) Select from the following options:
-Add this hard drive to your server storage to increase the storage capacity of your home server. This option gives you more space to store home computer backups and more space for your shared folders.
-Use this hard drive to back up files that are stored on your home server. This option allows you to back up all your home server shared folders.
(7) You can refer to the Windows Home Server Console Help for detailed instructions.

Important: When you add a hard drive to your server storage, you commit it to be part of your total server-storage space. Do not disconnect the hard drive to use it for other purposes. If you want to use the hard drive for other purposes, you should first select the hard drive and click Remove.

Caution: When you add a hard disk drive to the server storage, the hard disk drive will be formatted. Make sure to back up any important files that are on the hard disk drive before adding it to the server storage. Formatting a hard disk drive deletes all files on the hard disk drive.
Removing a hard disk drive

Caution: Always remove the hard drive from the Windows Home Server Console before removing an HDD from the home server. You will lose all files on a hard drive if you physically disconnect the HDD from your home server without running the Remove a Hard Drive Wizard and you can no longer find the hard drive in order to connect it again.
1 Safely remove hard drive from the Windows Home Server Console.
(1) Double-click the Windows Home Server icon tray.
in the system
(2) Log on to the Windows Home Server Console.
(3) Click the Server Storage tab.

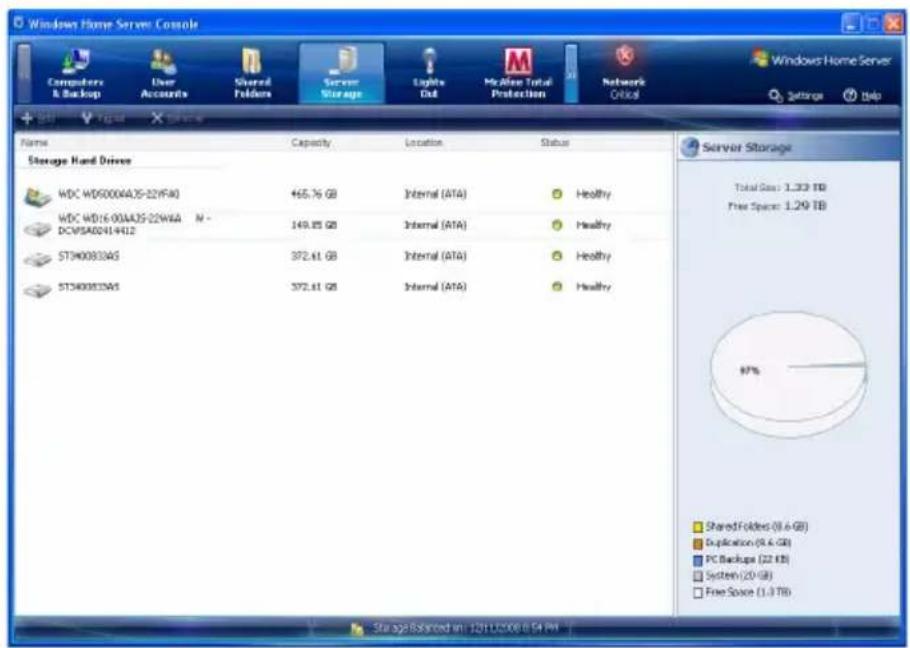
pie
| Category | Value | |---|---| | Shared Folders (0.6 GB) | 17% | | Duplication (0.4 GB) | 17% | | PC Backup (22 KB) | 17% | | System (20 GB) | 17% | | Free Space (1.3 TB) | 17% | | Total Size: 1,333 TB Free Space: 1,29 TB(4) Select the hard drive you want to remove, then click Remove to run the Remove a Hard Drive Wizard.
(5) Click Next.
(6) Click Finish.
(7) The HDD indicator of the selected drive lights purple.
2 Remove the HDD from the home server.

Note: Before removing the HDD, make sure the HDD indicator on the front panel lights purple.
(1) Open the door of the home server.

natural_image
Diagram of a server rack with an open storage unit and a black arrow indicating data flow (no text or symbols present)(2) Press the HDD carrier latch (1).
(3) Pull the lever (2) and slide the HDD carrier from the chassis (3).
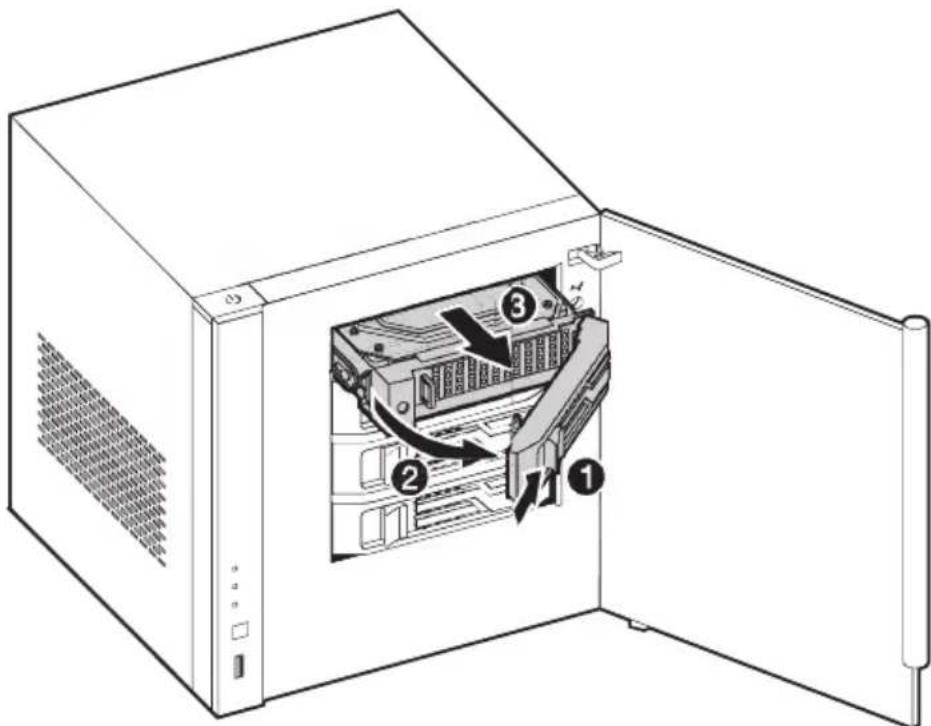
text_image
Diagram of an open computer tower case with numbered components indicating internal structure and data flow(4) Close the door of the home server.
Replacing a failed hard disk drive
1 Follow steps 1 and 2 of the "Removing a hard disk drive" section.
2 Remove the HDD from the carrier.
(1) Gently pry open the left side rail (1, 2), as shown.
(2) Remove the drive from the carrier (3).

text_image
Diagram of a macOS drive showing labeled components and directional arrows indicating rotation or movement.3 Install the new HDD into the carrier.
(1) Insert the new drive into the right side of the carrier aligning the pins into the HDD's mounting holes (1).
(2) Slightly bend the left side rail and insert the pins into the HDD's mounting holes (2).
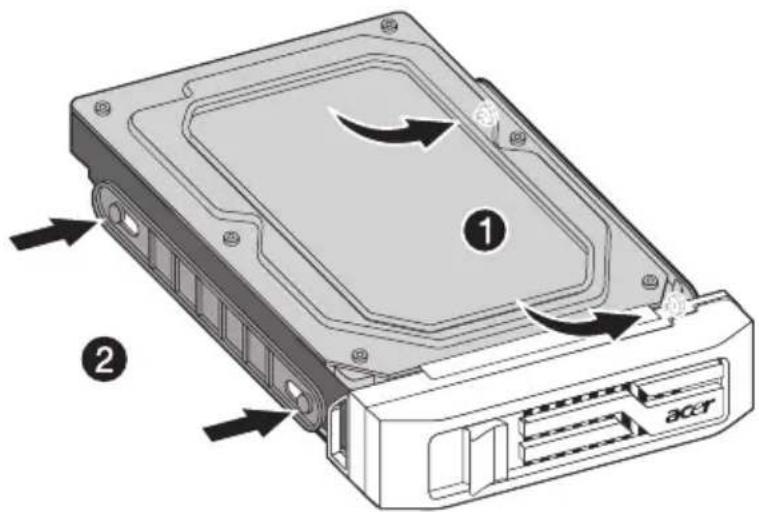
text_image
Diagram of a macOS drive showing labeled components and directional arrows indicating motion or movement.4 Install the new HDD to the home server.
6 Troubleshooting
This chapter describes a list of possible situations that may arise during the use of your home server.
If you are unable to resolve problems on your own, contact your dealer or local Acer representative for assistance.
First steps checklist
- Is the AC power available at the wall outlet?
- Are the power supplies plugged in? Check the AC cable(s) on the back of the chassis and at the AC source.
- Are all cables correctly connected and secured?
- Are all peripheral devices correctly installed?
- Are all device drivers properly installed?
- Did you press the system power button on the front panel to turn the system on (power indicator should be lit)?
- Is the system power cord properly connected to the system and plugged into an outlet for 100-127 V or 200-240 V?
Recovering or restoring the home server
RevoCenter Series includes a Server Recovery DVD that allows you to recover your home server after a system failure (i.e., the operating system is corrupted, the main system hard drive failed). You can also use this disc to restore the home server to its factory default.
In Server Recovery, the home server's system settings and user accounts will be lost. When you select the Factory Reset option, all data on the home server's hard drives will be lost.
To recover the home server:
1 Place the RevoCenter Series Server Recovery DVD in the DVD drive of a computer connected to the network.
Or, double-click on the Acer ServerRecovery Utility.exe file to begin installation. The Server Recovery window appears.
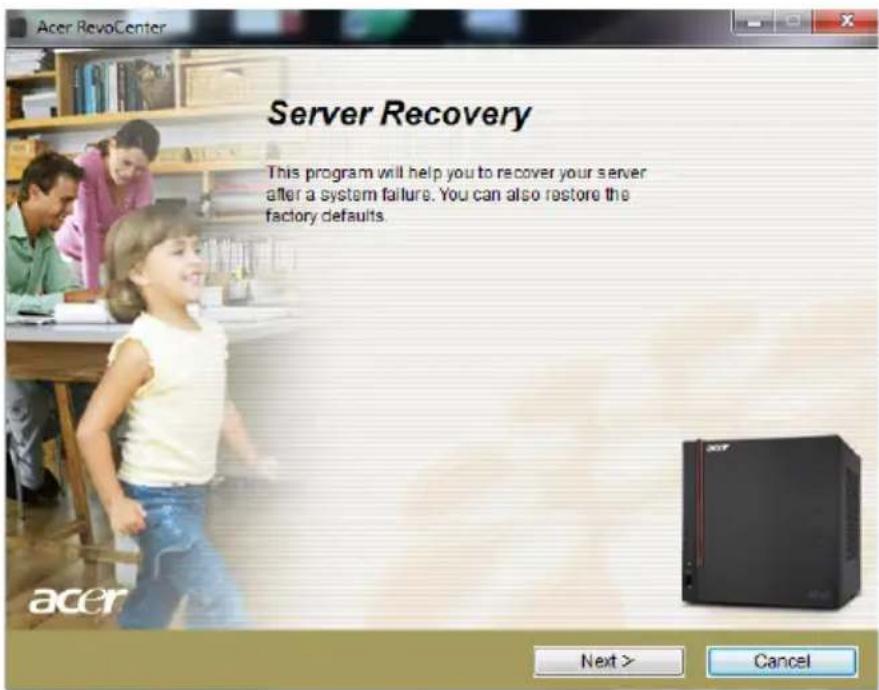
text_image
Acer RevoCenter Server Recovery This program will help you to recover your server after a system failure. You can also restore the factory defaults. acer Next > Cancel2 Click Next.
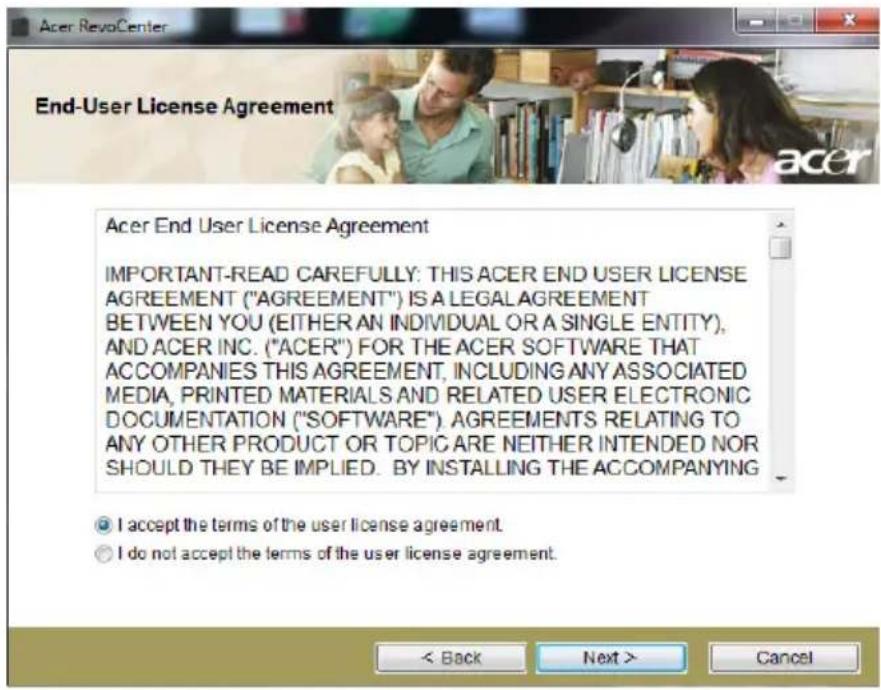
text_image
Acer Revocenter End-User License Agreement Acer End User License Agreement IMPORTANT-READ CAREFULLY: THIS ACER END USER LICENSE AGREEMENT ("AGREEMENT") IS A LEGAL AGREEMENT BETWEEN YOU (EITHER AN INDIVIDUAL OR A SINGLE ENTITY), AND ACER INC. ("ACER") FOR THE ACER SOFTWARE THAT ACCOMPANIES THIS AGREEMENT, INCLUDING ANY ASSOCIATED MEDIA, PRINTED MATERIALS AND RELATED USER ELECTRONIC DOCUMENTATION ("SOFTWARE"). AGREEMENTS RELATING TO ANY OTHER PRODUCT OR TOPIC ARE NEITHER INTENDED NOR SHOULD THEY BE IMPLIED. BY INSTALLING THE ACCOMPANYING I accept the terms of the user license agreement. I do not accept the terms of the user license agreement. < Back Next > Cancel3 Read the End-User License Agreement. If you agree with the terms of the agreement, then select the "I accept the terms of the user license agreement" option button.
4 Click Next.
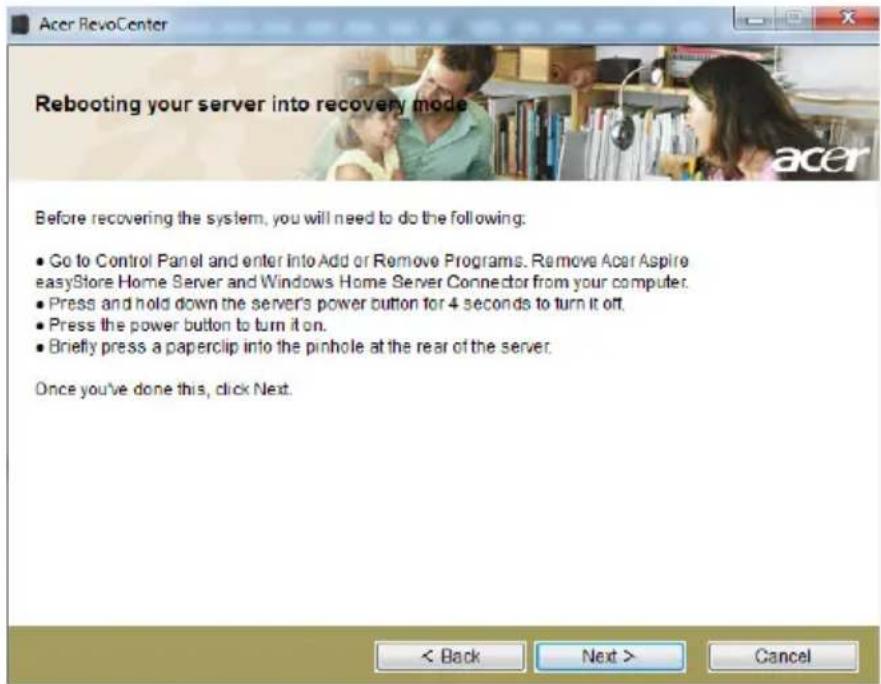
text_image
Rebooting your server into recovery mode Before recovering the system, you will need to do the following: • Go to Control Panel and enter into Add or Remove Programs. Remove Acar Aspire easyStore Home Server and Windows Home Server Connector from your computer. • Press and hold down the server's power button for 4 seconds to turn it off. • Press the power button to turn it on. • Briefly press a paperclip into the pinhole at the rear of the server. Once you've done this, click Next. < Back Next > Cancel5 Uninstall the Acer RevoCenter Series and Windows Home Server Connector from your computer.
6 Recover the home server.
(1) Hold down the power button for 4 seconds to turn off the home server.
(2) Press the power button to turn it on.
(3) Turn the system around so that you have access to the back of the unit.
(4) Insert the end of an unfolded paperclip into the opening, and then press and hold the recovery/reset button with the paperclip end.
7 C l i c k Next.
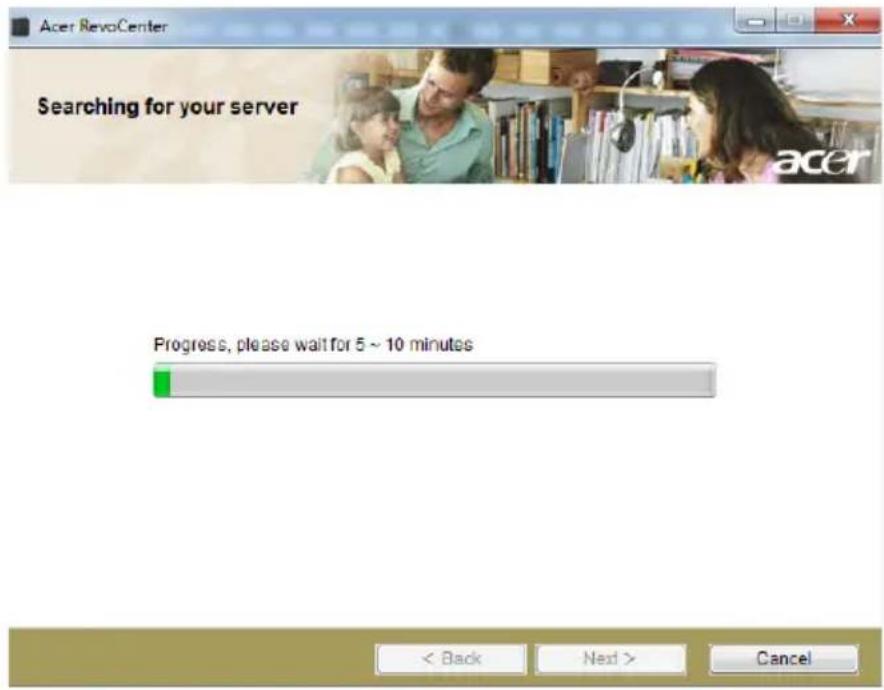
text_image
Acer RevoCenter Searching for your server Progress, please wait for 5 ~ 10 minutes < Back Next > Cancel8 Select the "Server Recovery: Use this option to recover from a system failure. You will lose your system settings and user accounts. Data recovery will be attempted. (Recommended)" option button.
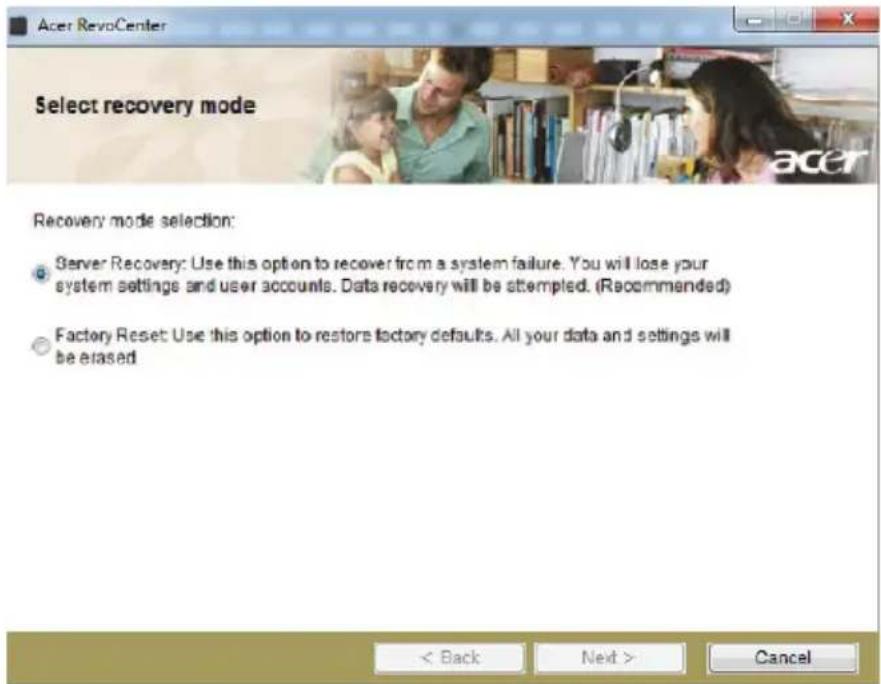
text_image
Acet RevoCenter Select recovery mode Recovery mode selection: • Server Recovery: Use this option to recover from a system failure. You will lose your system settings and user accounts. Data recovery will be attempted. (Recommended) • Factory Reset: Use this option to restore factory defaults. All your data and settings will be erased < Back Next > Cancel9 Click Next and follow all onscreen instructions until you finish recovery process.
To restore the home server to factory default setting:
1 Place the Server Recovery DVD in the DVD drive of a computer connected to the network.
Or, double-click on the Acer ServerRecovery Utility.exe file to begin installation. The Server Recovery window appears.
2 Click Next.
3 Read the End-User License Agreement. If you agree with the terms of the agreement, then select the "I accept the terms of the user license agreement" option button.
4 Click Next.
5 Uninstall the Acer RevoCenter Series and Windows Home Server Connector from your computer.
6 Recover or reset the home server:
(1) Hold down the power button for 4 seconds to turn off the home server.
(2) Press the power button to turn it on.
(3) Turn the system around so that you have access to the back of the unit.
(4) Insert the end of an unfolded paperclip into the opening, and then press and hold the recovery/reset button with the paperclip end.
7 Click Next.
8 Select the "Factory Reset: Use this option to restore factory defaults. All your data and settings will be erased" option button.
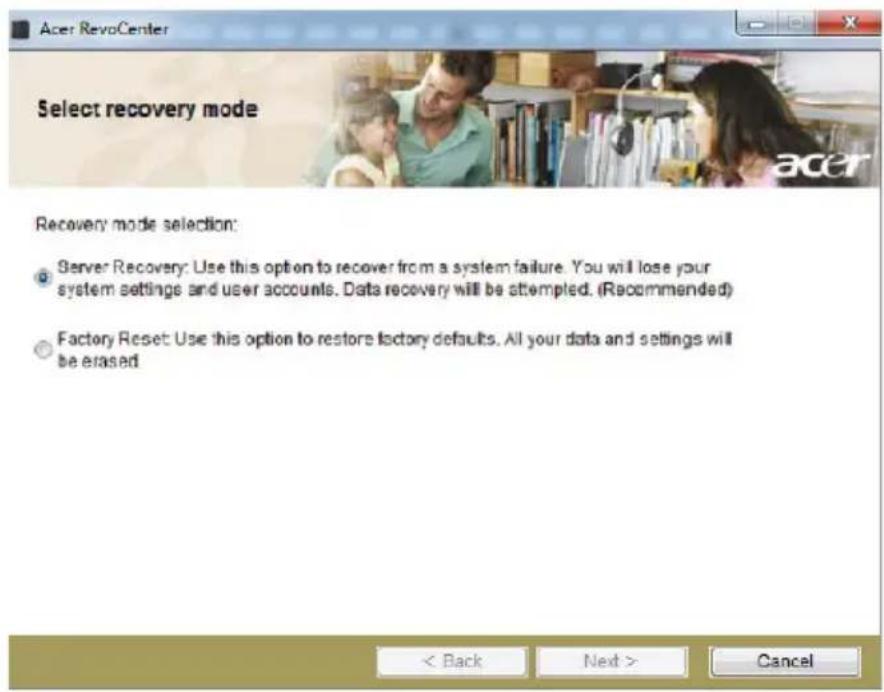
text_image
Acer RevoCenter Select recovery mode Recovery mode selection: • Server Recovery: Use this option to recover from a system failure. You will lose your system settings and user accounts. Data recovery will be attempted. (Recommended) • Factory Reset: Use this option to restore factory defaults. All your data and settings will be erased < Back Next > Cancel9 Click Next and follow all onscreen instructions until you finish restore process.
Restoring a home computer
You can easily restore any of your home computers to a previous point in time with a backup stored on your home server. You can do this by using the PC Recovery Disc. This CD can be used to restore all of the files on your home computer from a backup, including the Windows operating system and applications.
To restore a home computer:

Important: You need the Windows Home Server administrator password to restore a home computer.
1 Place the RevoCenter Series PC Recovery Disc in the CD drive of the computer that you want to restore.
2 Restart the computer and boot from CD.
3 Follow the instructions in the Restore Computer Wizard to restore the hard drives on your home computer.

Note: Your home computer must be connected to the home network with an Ethernet network cable before you begin the restore. Wireless connection is not supported.
When you boot the home computer to the PC Recovery Disc, it lists the NIC (network interface card) and storage devices it has found and it provides an option to load drivers, as shown in the screenshot below. It can also search USB flash or USB floppy drives for driver files and load any found Windows drivers.
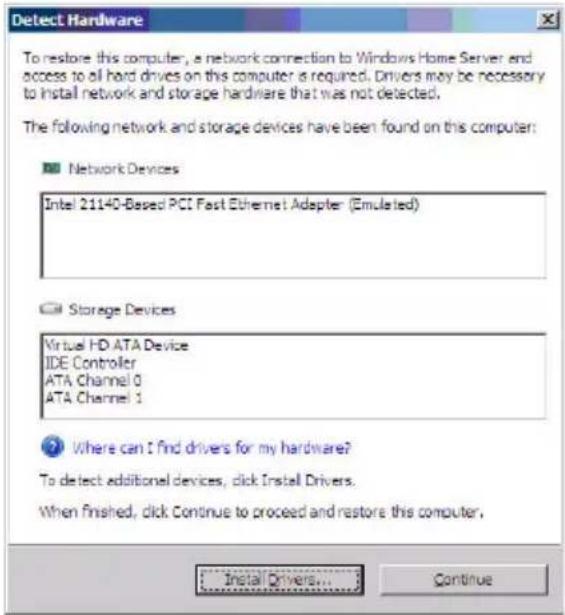
text_image
Detect Hardware To restore this computer, a network connection to Windows Home Server and access to all hard drives on this computer is required. Drivers may be necessary to install network and storage hardware that was not detected. The following network and storage devices have been found on this computer: ■ Network Devices Intel 21140-Based PCI Fast Ethernet Adapter (Emuleted) ■ Storage Devices Virtual HD ATA Device IDE Controller ATA Channel 0 ATA Channel 1 ? Where can I find drivers for my hardware? To detect additional devices, click Install Drivers. When Finished, click Continue to proceed and restore this computer, Install Drivers... ContinueIf the drivers did not load or the NIC driver cannot be found during computer recovery, you can perform the options listed below to install the drivers, otherwise the home computer will not be able to connect to the home server to get your backup.
- You can use a Vista-compatible NIC driver, which is fully compatible with computers running Windows Vista or Windows XP. Download and install the Vista-compatible NIC driver from a USB flash or USB floppy drive.
- On the Detect Hardware dialog box, click "Where can I find drivers for my hardware?" to bring up an online help file for detailed instructions on how to find and load drivers.
- Go to http://www.microsoft.com/windows/products/winfamily/windowshomeserver/support.mspx for more information.
4 Every time Windows Home Server backs up a home computer, it saves the drivers for the home computer in the backup that is stored on the home server. When you use the PC Recovery Disc, you will be prompted if the home computer requires drivers for any of your home computers, you can open a backup for that home computer and copy the drivers to a USB flash or USB floppy drive.
Restoring files from a backup
You can browse and restore lost files from any client computer on your home network that has been backed up with Windows Home Server.
To restore files and folders from a backup:
1 Open the Windows Home Server Console.
2 Click the Computers & Backup tab.
3 Select a home computer, then click View Backups.
4 Select a backup, then click Open.
5 Select a volume to open, then click Open.

Note: The Opening Backup status window appears while the backup opens. If you are prompted to restart your computer after the virtual volume driver is installed, ignore this message, you do not need to restart your computer.
6 Drag the backup files and folders that you want to restore to a folder on your home computer.
7 Close the window when you are done copying the files and folders that you want to restore.
Update your home server with RevoCenter Series Software Update
The RevoCenter Series Software Update is a tool which allows you to easily update the home server BIOS, drivers, and add-in software.
To install the RevoCenter Series Software Update utility:
1 Place the RevoCenter Series Software Installation Disc in the optical drive of the home computer. The installation wizard starts.
Or, double-click on the Client Installation.exe file to begin installation. The Welcome window appears.
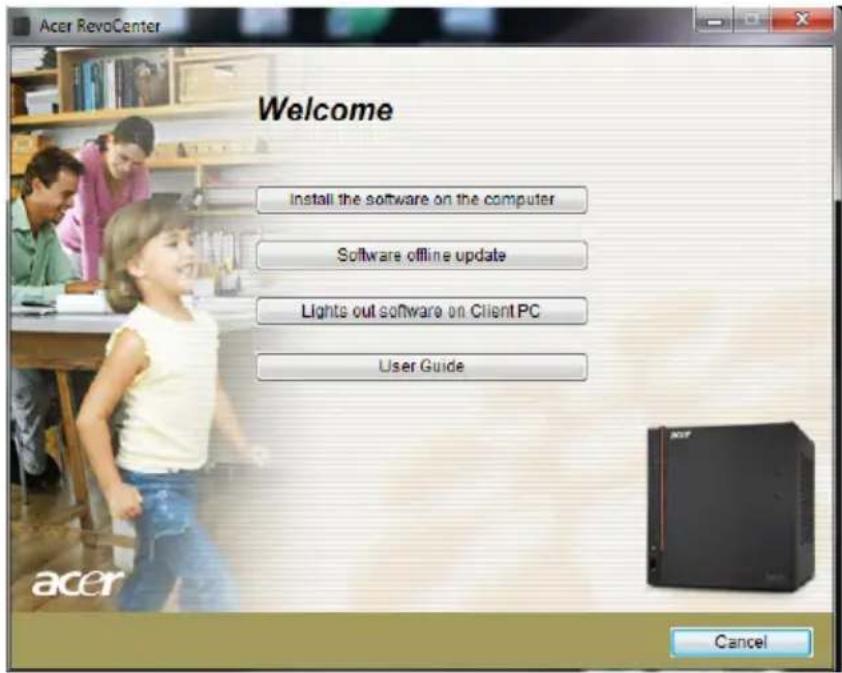
text_image
Acer RevoCenter Welcome Install the software on the computer Software offline update Lights out software on Client PC User Guide Cancel2 Click Software Update. The Welcome window displays.
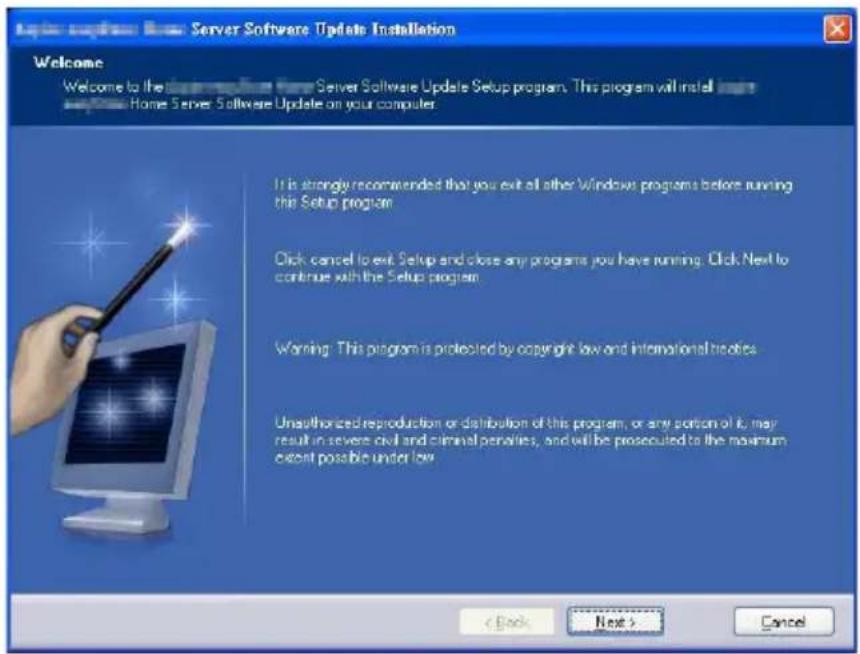
text_image
Logic support: New Server Software Update Installation Welcome Welcome to the Home Server Software Update Setup program. This program will install a Home Server Software Update on your computer. It is strongly recommended that you exit all other Windows programs before running this Setup program. Click cancel to exit Setup and close any programs you have running. Click Next to continue with the Setup program. Warning: This program is protected by copyright law and international treaties. Unauthorized reproduction or distribution of this program, or any portion of it may result in severe civil and criminal penalties, and will be prosecuted to the maximum extent possible under low. < Back Next > Cancel3 Click Next.
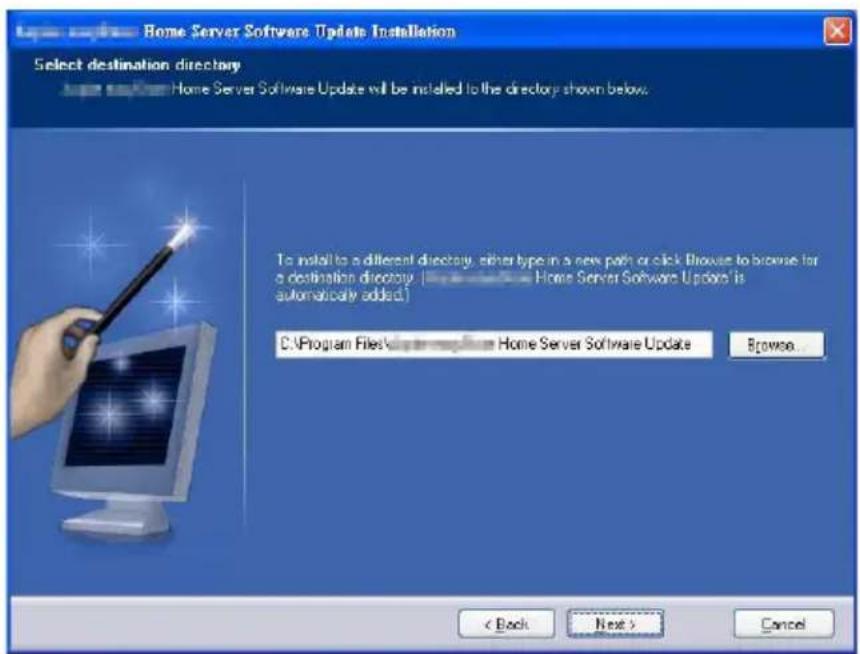
text_image
Home Server Software Update Installation Select destination directory Home Server Software Update will be installed to the directory shown below. To install to a different directory, either type in a new path or click Browse to browse for a destination directory (https://www.homeServerSoftwareUpdate/Is automatically added.) C:\Program Files\Home Server Software Update Browse... < Back Next > Cancel4 Select a destination directory, then click Next.
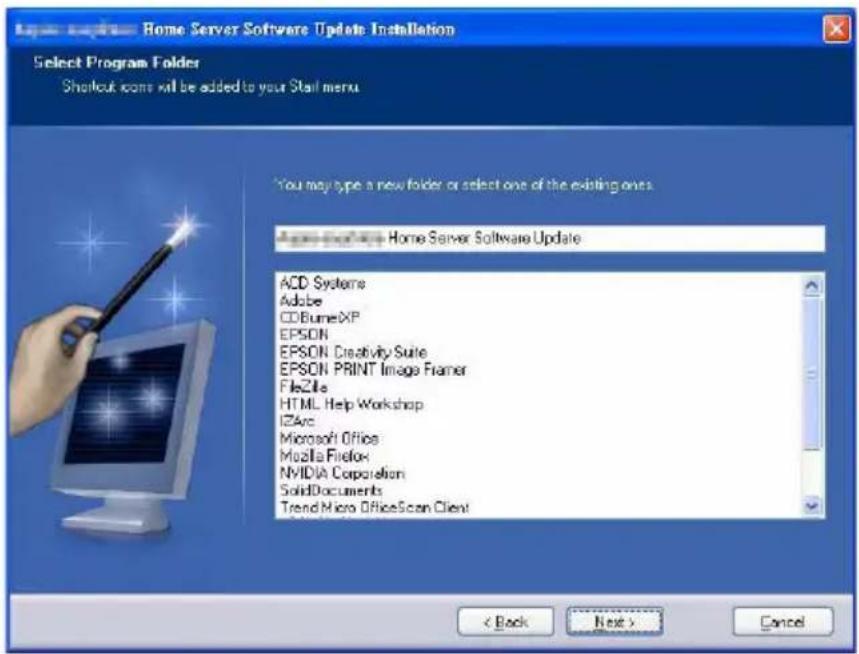
text_image
Home Server Software Update Installation Select Program Folder Shortcut icons will be added to your Stall menu. You may type a new folder or select one of the existing ones. ACD Systems Adobe CCBumeXP EPSON EPSON Civivity Suite EPSON PRINT Image Framer File2lte HTML Help Workshop IZArc Microsoft Office Mozilla Firefox NVIDIA Corporation SolidDocuments Trend Micro OfficeScan Client < Back Next > Cancel5 Select a program folder or enter a new folder, then click Next.
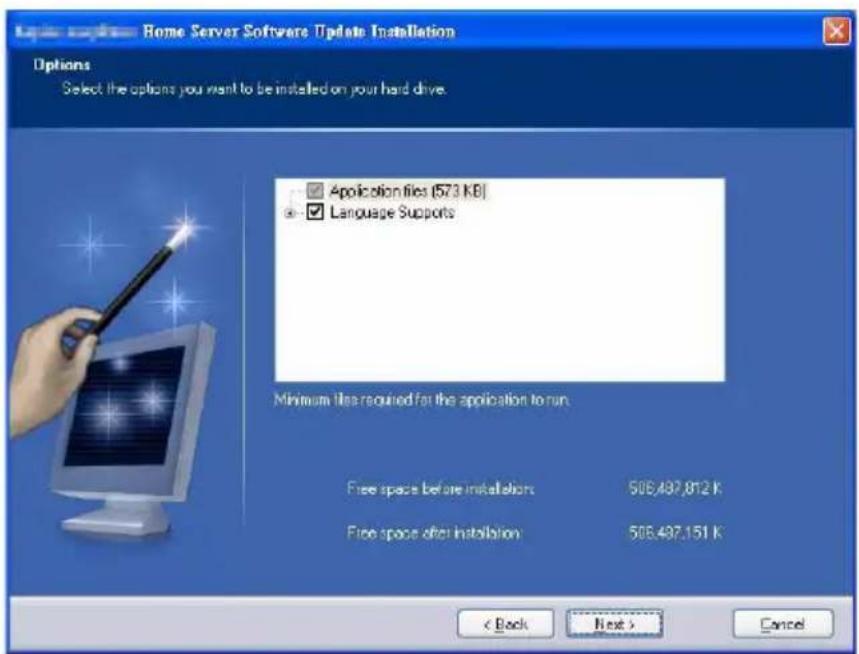
text_image
Home Server Software Update Installation Options Select the options you want to be installed on your hard drive. Application files (573 KB) Language Supports Minimum file required for the application to run. Free space before installation: 506.497.812 K Free space after installation: 506.497.151 K < Back Next > Cancel6 Select the options you want installed on your hard drive, then click Next.
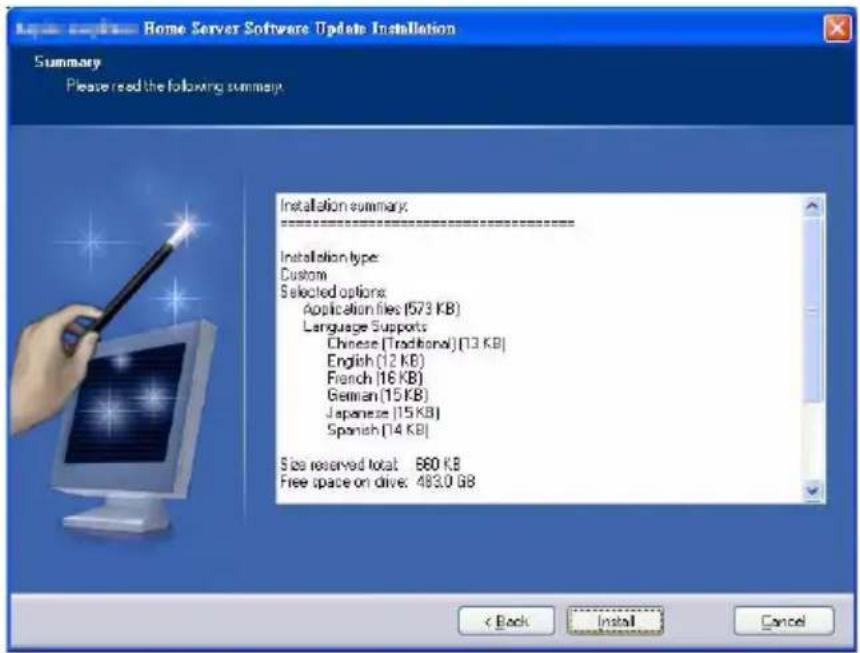
text_image
Home Server Software Update Installation Summary Please read the following summary. Installation summary: ------------------------ Installation type: Custom Selected options: Application files (573 KB) Language Supports Chinese (Traditional) [13 KB] English (12 KB) French (16 KB) German (15 KB) Japanese (15 KB) Spanish (14 KB) Size reserved total: 680 KB Free space on drive: 483.0 GB < Back Install Cancel7 Click Install.

text_image
Home Server Software Update Installation Finished Home Server Software Update installation successful Click Finish to end the installation < Back Finish Cancel8 Click Finish.
To update your home server with Software Update utility:
1 Make sure the RevoCenter Series Software Update utility is installed on the computer. Refer to previous section for detailed instruction.
2 On your computer, click Start > Programs > RevoCenter Series Software Update > Software Update.
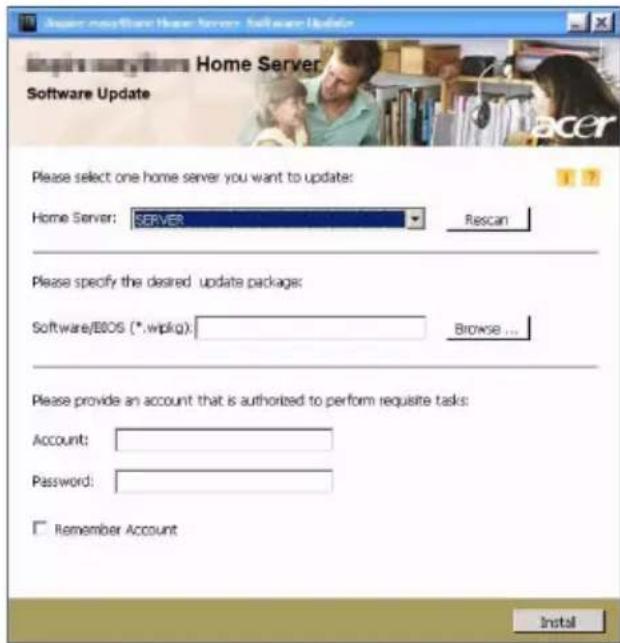
text_image
Home Server Software Update Please select one home server you want to update: Home Server: SERVER Rescan Please specify the desired .update package: Software/BOOS (*.wipkg): Browse ... Please provide an account that is authorized to perform requisite tasks: Account: Password: Remember Account Install3 In the Home Server field, select the home server you want to update. You can click Rescan to refresh the list.
4 In the Software\BIOS field, click Browse to specify the software/ BIOS package which will be updated to the home server.
5 Enter your name and password.
6 Select the "Remember Account" check box if you want the account you entered to be shown the next time you perform software update.
7 Click Install and follow onscreen instructions to complete updates.
Specific problems and corrective actions
The following contains specific problems that may arise during the use of your server. Possible solutions are listed for each problem.
Power indicator does not light.
- Make sure the power button on the front panel is turned on.
- Make sure the power cord is connected correctly.
- Make sure that the wall outlet has power. Test it by plugging another device.
HDD status indicator does not light.
Make sure the hard drive is compatible.
If the drives are pre-installed, contact technical support.
Home server cannot connect to a network and the network indicator on the front panel does not light.
- Make sure the network cable is securely attached to the correct connector at the system rear panel.
- Try a different network cable.
- Make sure the broadband router has power.
Home computer cannot connect to the home server
- Make sure the power button on the front panel is turned on.
- Make sure the network indicator on the front panel lights blue.
- Make sure the broadband router has power.
- Make sure a firewall is not blocking the connection. Refer to the Windows Home Server Console Help for more information.
- Shutdown and restart your home server.
- Reset the home server.
To soft reset the home server:
(1) Launch Windows Home Server Console.
(2) Click Options.
(3) Select "Reset the Windows Home Server Console" from the drop-down menu.
(4) Click OK.
Backup service is not running
If you see the "If backup service is not running, please restart the console." error message, try resetting the home server.
1 Launch Windows Home Server Console.
2 Click Options.
3 Select "Reset the Windows Home Server Console" from the dropdown menu.
4 Click OK.
How do I save the Windows Home Server backup database
For detailed instructions on how to copy the backup database from your Windows Home Server, go to http://www.microsoft.com/windows/products/winfamily/windowshomeserver/support.mspx
Web browser cannot display the RevoCenter Series Remote Access page when accessing through URL
- Make sure the Web Site Connectivity in Settings is turned on.
- Make sure JavaScript is enabled on your browser.
To enable JavaScript in Internet Explorer 7:
(1) From the Internet Explorer menu, go to Tools, then select Internet Options.
(2) Choose the Security tab, then click Custom Level.
(3) Scroll down to Active Scripting, then select Enable.
(4) Click OK.
Can't connect to some computers on the RevoCenter Series Remote Access page
Make sure the home computer is configured to allows remote desktop connection.
To configure computers that are running Windows XP:
1 Log on to the computer with a user account that has administrator privileges.
2 Click Start, right-click My Computer, then click Properties.
3 On the System Properties page, click the Remote tab.
4 Make sure that the "Allow users to connect remotely to this computer" check box is selected.
5 Click Select Remote Users. User accounts with administrator privileges are automatically allowed to connect. If you want to allow additional user accounts to remotely access this computer, click Add to enter those user accounts.
6 If you use Windows Firewall, open Control Panel, and then double-click Windows Firewall. Verify that Windows Firewall is on. Click the Exceptions tab, and then verify that Remote Desktop is selected.
7 Restart your computer.
To configure computers that are running Windows Vista:
1 Log on to the computer with a user account that has administrator privileges.
2 Click Start, right-click Computer, then click Properties.
3 Click Remote settings, click Continue.
4 Make sure that the "Allow connections from computers running any version of Remote Desktop (less secure)" check box is selected.

Important: If you select Allow connections only from computers running Remote Desktop with Network Level Authentication (more secure), you cannot connect to this computer via Windows Home Server Remote Access, and the connection status for this computer is Disabled.
5 Click Select Users. User accounts with administrator privileges are automatically allowed to connect. If you want to allow additional user accounts to remotely access this computer, click Add to enter those user accounts.
6 If you use Windows Firewall, open Control Panel, then click Security. Click Windows Firewall. Verify that Windows Firewall is on. Click Change Settings, and then click Continue. Click the Exceptions tab, then verify that Remote Desktop is selected.
7 Restart your computer.
I forgot the Windows Home Server password
If you don't remember the password, you must reset the home server. Refer to "Recovering or restoring the home server" on page 118 for more information.