T7200K - Tumble drier Cylinda - Free user manual and instructions
Find the device manual for free T7200K Cylinda in PDF.


| Product Type | Tumble Dryer |
| Brand | Cylinda |
| Model | T7200K |
| Capacity | 7.0 kg |
| Dimensions (H x W x D) | 85 x 60 x 60 cm |
| Weight | 42 kg |
| Energy Class | B |
| Annual Energy Consumption | 504 kWh |
| Drying System | Condenser |
| Noise Level | 65 dB(A) |
| Number of Programs | 15 |
| Display | LED |
| Delay Start | Up to 24 hours |
| Child Lock | Yes |
| Reverse Tumbling | Yes |
| Filter Indicator | Yes |
| Water Tank Full Indicator | Yes |
| Cleaning | Clean lint filter after each cycle; empty water tank regularly |
| Safety | Overheat protection, auto shut-off |
| Spare Parts Availability | 5 years after discontinuation |
Frequently Asked Questions - T7200K Cylinda
User questions about T7200K Cylinda
0 question about this device. Answer the ones you know or ask your own.
Ask a new question about this device
Download the instructions for your Tumble drier in PDF format for free! Find your manual T7200K - Cylinda and take your electronic device back in hand. On this page are published all the documents necessary for the use of your device. T7200K by Cylinda.
USER MANUAL T7200K Cylinda
natural_image
Simple line drawing of a kitchen appliance with oven, refrigerator, and washing machine (no text or symbols)T7200K
Innehåll
Introduktion .... 3
Snabbguide 4
Allmänt

natural_image
Line drawing of a front-loading washing machine with a side-mounted door open (no text or symbols)
INFORMATION!
natural_image
Line drawing of a washing machine with a circular vent and base (no text or symbols)Friståendeapparat
Torktumlarenkanplacerasbredvidentvättmaskin.
5
natural_image
Illustration showing a hand holding a tool inside a circular device and a close-up of a mechanical component with a curved arrow indicating motion (no text or symbols)1
Öppnaluckanhelt.
natural_image
Diagram showing a mechanical assembly with a tool inserted into a circular component, before and after a process (no text or symbols present)2
Lossaskruvarnaochtabortluckan.
natural_image
Two identical diagrams showing a screwdriver inserted into a circular component, with no text or symbols present.3
natural_image
Diagram showing a hand holding a circular object with directional arrows indicating rotation or movement (no text or symbols)4
natural_image
Two circular diagrams showing a screwdriver inserted into a ring, with no text or symbols present.5

INFORMATION!
Tvättensomskatorkasitorktumlarenskacentrifugerasiminst1000v/min.Högre centrifugeringshastigheterspararenergiochreducerartorktiden.

INFORMATION!
natural_image
Front view of a computer monitor with control buttons and a blank screen (no text or symbols)Slåpå
Tryckpåpå/av-knappen.
Avstängning
Tryckpåpå/av-knappen.
natural_image
Three illustrations of a washing machine with one opening the door, showing hand placement and clothing disposal (no text or symbols)natural_image
Front view of a remote control panel with a circular button and directional arrows (no text or symbols)natural_image
Front view of a computer monitor with control buttons and a play button (no text or symbols)natural_image
Diagram of a mechanical component with motion lines indicating movement (no text or symbols)1
natural_image
Diagram of a device with a grid panel and directional arrow, no text or symbols present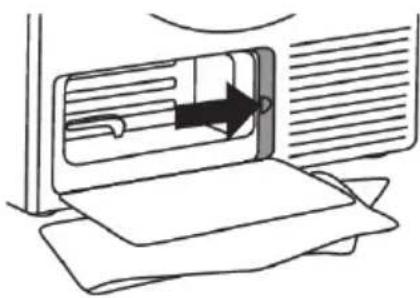
natural_image
Diagram of a door opening with a black arrow indicating direction, showing internal components and airflow (no text or symbols)8
natural_image
Illustration of a computer monitor with two control knobs and a scroll, no text or symbols present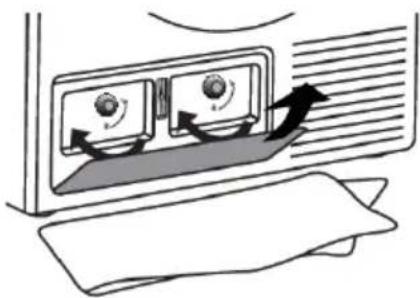
natural_image
Diagram of airflow around a wall-mounted air vent with directional arrows indicating flow direction (no text or symbols)9
natural_image
Line drawing of a front-loading washing machine with front panel and circular vent (no text or symbols)
INFORMATION!
natural_image
Line drawing of a front-loading washing machine with open door and side panel (no text or symbols)WARNING!
Installation and connection 59
59
Advices before drying 68
68
Drying process, step by step 71
71
Settings 76
76
Cleaning and maintenance 78
78
Errors – what to do? 84
84
Service 88
88
Technical information 89
89
Program chart 90
90
Disposal 91
91
Introduction
DearCylindacustomer!
WelcometothefamilyofCylindacustomers.
Wehopethatyouwillhavemanyyearsofusefromyournewmachine.
Themachinehasmanyfeatures.Tomakethemostofitsfunctions,werecommendthatyoureadthe operatinginstructionsbeforeusingthemachine.Theoperatinginstructionsincludeinformationon howyoucanhelpprotecttheenvironment.
The following symbols are used throughout the manual and they have the following meanings:

INFORMATION!
Information, advice, tip, or recommendation

WARNING!
Warning-general danger

ELECTRICSHOCK!
Warning-dangerofelectricshock

HOTSURFACE!
Warning-dangerofhotsurface

DANGEROFFIRE!
Warning-dangeroffire
Originalinstructions
Quickguide

- Sortthefabrics Sortthefabricbytypeandbyhowheavilysoiledthelaundryis. Observethedryingsymbolsonthelaundrylabels.Closethe zippers,hook-and-loopfastenersandbuttons.
- SwitchonthemainON/OFFswitch
- Openthedryerdoorandinsertthelaundry. Beforedoingso,makesurethedrumisempty.
- Choosethedryingprogram Turntheprogramselectorknobtothedesireddryingprogram.
- Choosetheprogramsettings Programsettingscanbesetforsomeprograms.Seechapter: SETTINGS
- ClosethedryerdoorandpresstheStart/PauseBUTTON. Anticipateddryingtime,inhoursandminutes,willbeindicated onthedisplay.
- Endofprogram Openthedoorandremovethelaundryfromthedryer. Cleanthefilters.Seechapter"CLEANINGANDMAINTENANCE". Closethedoor. Switchoffthemainon/offswitch. Unplugthedryerpowercordfromthepoweroutlet(unlessyou haveatumbledryerwitha3phaseconnection)
Safetyprecautions

General

Pleasereadtheinstructionmanualandsaveitforfuture reference.
- Pleasedonotusethetumbledryerifyouhavenotread andunderstoodtheseinstructionsorusefirst.
- Failuretoobservetheinstructionsforuseorinappropriate useofthetumbledryermayresultindamagetothelaundry orappliance,orinjurytotheuser.
- Instructionsforuseareavailableonourwebsiteat www.cylinda.se.
- Applianceisintendedtobeusedinanareaopentothe public.
- Beforeconnectingthedryertothepowermains, pleaseread carefullytheinstructionsforusethatdescribethdryerand itscorrectandsafeuse.Theinstructionsapplytoseveral appliancetypesormodels;thus,settingsorequipmentmay bedescribedhereinwhichisnotavailableinyourdryer.
-
Leaveanyrepairsandsimilartasksonthedryertoanexpert. Unprofessionalrepairmayresultinanaccidentormajor malfunction.
-
Afterinstallation,thedryershouldstandstillfortwohours beforeitisconnectedtothepowermains.
- Atleasttwopersonsarerequiredtoinstallthetumbledryer ontopofawashingmachine.
- Thedryershallnotbeconnectedtothepowermainsusinganextensioncord.
- Donotconnectthetumbledryertoanelectricaloutlet intendedforanelectricshaverorhairdryer.

WARNING!
Ifthepowercordisdamaged,ithastobereplaced by themanufacturer,anaauthorizedservicetechnician,ora similarlyqualifiedperson,inordertoavoidanyhazards.

WARNING!
Theapplianceshallnotbesuppliedthroughanexternal switchingdevice,suchasatimer,orconnectedtoa circuitthatisregularlyswitchedonandoffbyautility.
- Afterthedryingprocess,unplugthedryerpowercord fromthepoweroutlet.
If you have atumbled dryer with a 3-phase connection, do not pull the plug out of the power outlet.
- Theapplianceshallbedisconnectedfromthepowersource duringservicingandreplacementofparts.Removalofthe plughastobesuch,thatanoperatorcancheck,fromany ofthepointstowhichhehasaccessthattheplugremains removed.
- Incaseofincorrectapplianceconnection,incorrectuse,or servicingbyanunauthorizedperson,theusershallbearthe costofanydamage.
- Airinthedryerenvironmentshouldnotcontainindustparticles. Theairwherethedryerisinstalledshouldbethoroughly ventilatedtopreventreverseflowofgasesreleasedfromthe gasapplianceswithopenfire(e.g.fireplaces).
- Donotevacuata theairfromthedryerthroughchannelsused forappliancesordevicesthatusenaturalgasorotherfuels fortheiroperation(onlyappliestotheevacuationdryer).
- Cleanthedoornetfilteraftereachdryingcycle.
- Donotdryunwashedlaundryinthedryer.
- Laundrystainedwithoil,acetone,alcohol,oilderivatives, stainremovers,turpentine,wax,andwaxremoversshould bewashedinawashingmachinewithhotwaterand detergentbeforeitisdriedinthedryer.
- Clothingthatincludeslatex,rubberparts,showerandbathing caps,andlaundryorcoverswithrubberfoamshallnotbedriedinthedryer.
- Uselaundryconditionersorsimilarproductsincompliance withmanufacturer'sinstructions.
- Donotuseanysolvents, abrasivecleaners, glasscleaners, orall-purposecleaners.
- Donotplacethedryerbehindlockableorslidingdoor,or doorwithahingeontheoppositesideofthedryerdoor hinge.Installthedryerinsuchwaythatthedoorcanalways befreelyopened.
- Neverblocktheairvents.
- Donotplacethedryeronacarpetwithlongfibresasthis mayimpedeaircirculation.
- Theairintheroomwherethedryerisinstalledmaynot containindustparticles.
- Makesurethefibresdonotaccumulatearoundthedryer.
• DANGEROFFIRE!
Removeallobjectssuchaslightersandmatchesfrom thepockets.
- Afterinstallation, waitfor24hoursbeforeusingtheappliance. Ifthedryerhastobelaiddownoneofthesidesduring transportorservicing, placeitwithitsleftside, viewingfrom theappliancefront, downwards(onlyappliestodryerswith aheatpump).
- Theapplianceshallnotbeincontactwithawalloradjacent furniture.
- Ifthedryerisconnectedtoanairexhaustsystemalready usedforanotherappliance,anon-returnvalvemustbe installed.Reverseflowintothedryercoulddamagethe appliance,andthenon-returnvalvepreventssuchreverse flow(onlyappliestotheevacuationdryer).
- Afloatwillswitchchofftheapplianceifthecondensedwater pipeiscloggedorifthereisariskofooverflowingofthe condensedwateraccumulatedinthecondensedwatertank (onlyappliestotheevacuationdryer).
- Ifyouwishtomovethedryerorstoreitinanon-heatedroom duringwinter,itisessentialthatyoufirstemptythe condensedwatertank(onlyappliestothecondenserdryers and dryerswithaheatpump).
- Maximumdryingcapacityinkgisindicatedontherating plate.
Safety
• DANGEROFFIRE!
Onlyusethedryertodrylaundrythatwaswashedwith water.Donotdryanylaundrythatwaswashedorcleaned withflammablecleanersorsubstances(suchasgasoline, trichloroethyleneetc.)asthismayresultinanexplosion.
- If you have cleaned your clothes with industrial cleaners or chemicals substances, donot dry them in the dryer.
- Iftheairexhausthoseisconnectedtoanopeninginthewall, influxofcoolairmaybepreventedbyinstallingaventilation grille.(Onlyappliestoevacuationdryer.).
-
Theairexhausthosheshallnotbeconnectedtoanactive chimneyusedtoevacuatesmokeorwastegases;intoa shaftintendedforventilatingroomswithcombustion equipment;orintoachimneyusedbythirdparties.Ifsmoke orwastegasesreturntotheroomwherethedryerisinstalled, thereisadangerofpoisoning(onlyappliestoevacuation dryer).
-
Thedryerisprotectedwithanautomaticswitch-offsystem incaseofoverheating.Thesystemswitchesofftheheater ifthetemperatureistoohigh(onlyappliestoevacuationand condenserdryer).
- Ifthenetfilterisclogged, the automaticheaterswitch-off device can be triggered. See chapter "CLEANING AND MAINTENANCE" (only appliestoevacuation and condenser dryer).
• HOTSURFACE!
WARNING!Thebackofthedryermaygetveryhot duringoperation.Waitforthedryertocooldown completelybeforetouchingitsbackside.(Observe theinstructionsinthechapter"INSTALLATIONAND CONNECTION")
• HOTSURFACE!
Neverstopadryingcycleordonotopenthedoorbefore theendoftheprogram.Ifyoudosoforanyreason,be carefulwhentakingthelaundryfromthedrumasitcan stillbeveryhotandthereisariskofburning.
Quicklyremovethelaundryfromthedrumandspreadit toallowittocooldownasquicklyaspossible.
Childsafety
- Donotallowthechildrentoplaywiththedryer.
-
Preventyourchildrenandpetsfromenteringthedryerdrum.
-
Beforeclosingthedryerdoorandrunningtheprogram,make surethereisnothingexceptlaundryinthedrum(e.g.ifa childclimbedintothedryerdrumandclosedthedoorfrom theinside).
- Activatethechildlock.Seechapter:SETTINGS
- Donotletchildrenyoungerthanthreeyearstocome nearthedryer, unless they are under constant supervision.
- Thedryerismadeincompliancewithallrelevantsafety standards. This dryermaybeusedbychildrenaged8years and aboveandbypersonswithreducedphysical,sensory ormentalcapabilitiesorlackofexperienceandknowledge, butonlyiftheyaresupervisedduringtheuseofthe appliance,iftheyhavebeenprovidedrelevantinstructions regardingsafeuseofthedryer,andiftheyunderstandthe hazardsofinappropriateuse.Makesurechildrendonotplay withtheappliance.Makesurethechildrendonotcleanthe dryerorperformanymaintenancetaskswithoutsupervision.
SAVETHESEINSTRUCTIONSFORFUTUREREFERENCE!
Dryerdescription
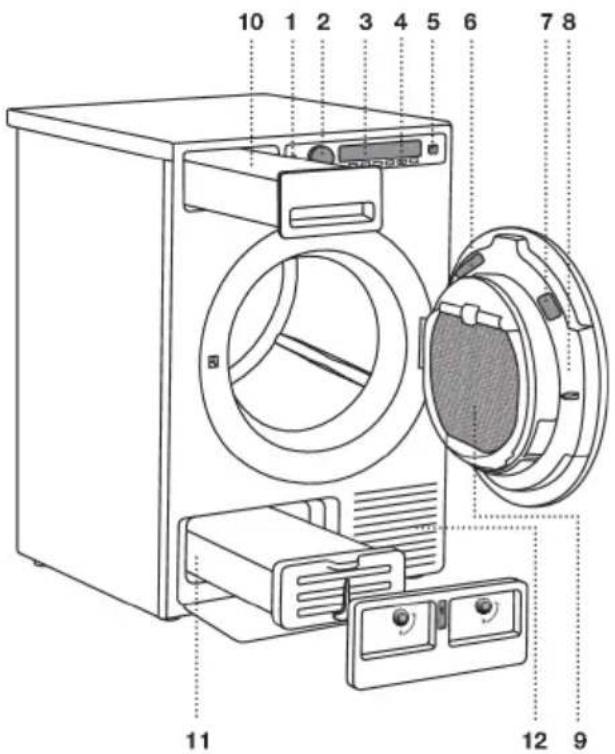
- Mainswitch(ON/OFF)
2.Programselectorknob - Display
- Programselectorbuttons
- Button(start/pause)
- Ratingplate within information about the dryer (onthe inside of the drying machinedoor)
- QRandAUIDcode(ontheinsideofthedryingmachinedoor)
8.Dryerdoor
9.Doornetfilter
10.Condensatetank(dependingonthemodel)
11.Condenserunit
12.Airvents
Beforeusingtheapplianceforthefirsttime
Packaging
Removeallpackaging.
Pleasesortthematerialsincompliancewithlocalrecommendations(seechapter"Disposal").
Cleaning
Disconnectthedryerfromthepowermainsandopenthedoortowardsyou.Beforeusingthedryerforthefirsttime,cleanthedryerdrumusingasoftdampcottonclothandwater.
Inthecaseofa3phaseconnectionoftheappliance,switchoffthemainsocketswitch.
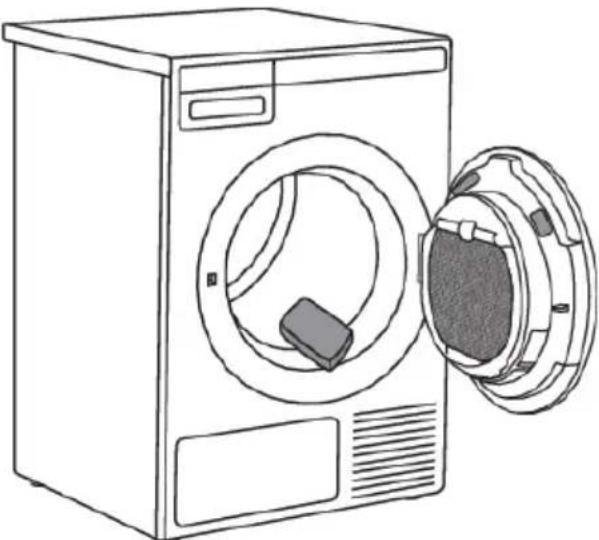
natural_image
Line drawing of a washing machine with its side door open, showing internal components (no text or symbols)
INFORMATION!
Noprogramcanbestartedwhilethedoorisopen.
Choosingthelanguage
Whenthedryerisconnected(seechapter"Installationandconnection")andswitchedonforthefirst time,choosethepreferredlanguage.
For further drying process, see chapter "DRYING PROCESS, STEP BY STEP".

INFORMATION!
When your unthedryer for the first time, or if the dryer has been out of use for a long time, slight hitting noisemay appear. This is normal and it will disappear after a few drying cycles.
Installationandconnection
Dryerplacement
Thedryercanbeeeitherfreestandingorinstalledontopofawashingmachine.

INFORMATION!
Atleasttwopersonsarerequiredtoinstallthetumbledryerontopofawashingmachine.
Thedryeremitsheat. Therefore, donotplaceitinaverysmallroom, asthedryingprocess maybe longerduetolimitedamountofambientair.

INFORMATION!
Donotplacethedryerinaroomwheretemperaturecandropbelow0°C,asthemachinemay notoperatecorrectlyatsuchlowtemperatures,orfreeze,whichinturncanresultindamageto themachine.
Foroptimumdryeroperation, installitinaroomwithadequateventilationandatemperature between15°Cand25°C.

WARNING!
Donotplacethedryerbehindlockableorslidingdoor, ordoorwithahingeontheoppositeside ofthedryerdoorhinge.Installthedryerinsuchwaythatthedoorcanalwaysbefreelyopened.

INFORMATION!
Neverblocktheairvents.

WARNING!
Donotplacethedryeronacarpetwithlongfibresasthismayimpedeaircirculation.

INFORMATION!
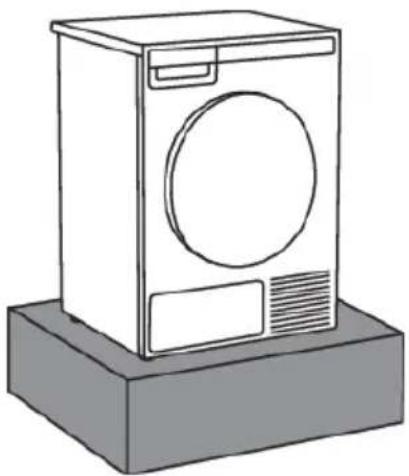
If the appliance is installed on a plinthor as similar structure, then the appliance must be fixed to it, to avoid the riskoffalling. Original accessories are available for this purpose, complete with fixing instructions.
natural_image
Line drawing of a washing machine with front panel and base (no text or symbols)Free-standing appliance
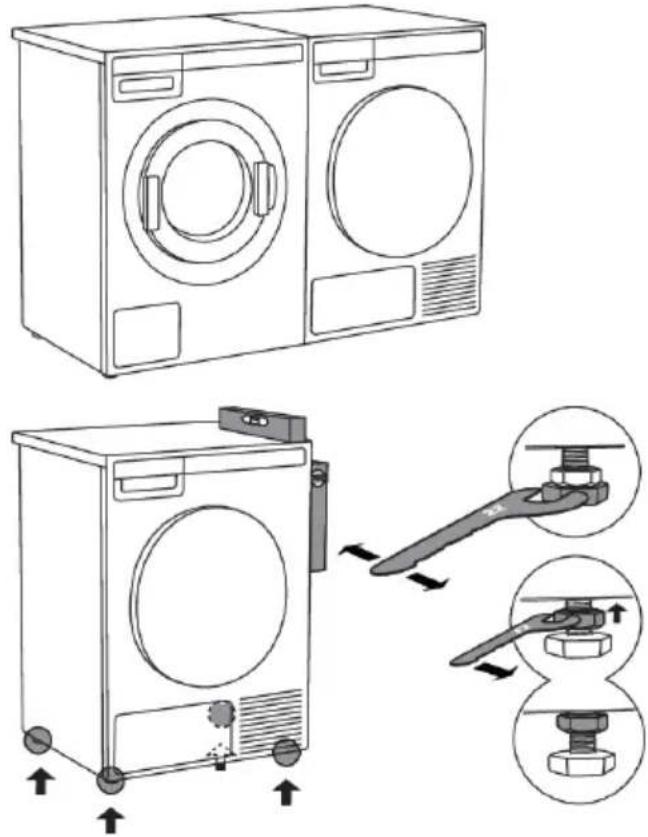
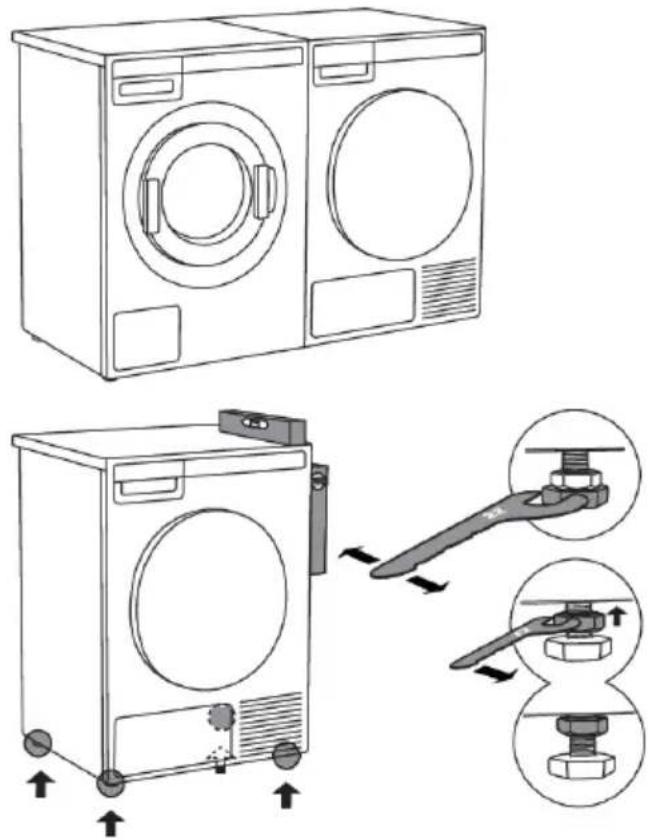
Thedryermaybeplacedadjacenttoawashing machine.
If the friction between the dryer feet and the floor is not sufficient, the dryermay moved during operation. Toprevents sliding, use anon-slimerator install the supplied vacuum feet to both front feet.
Placethedryersothatisstable.Useaspirit leveltolevelthedryerinlongitudinalandtraverse directionbyrotatingtheadjustablefeetusinga No.22spanner(max.15mm).Then,firmlytighten thejamnuts(counternuts)byrotatingthemtowardstheappliancebottomusingaNo.17 spanner.↑
Clearancearoundthedryerforoptimumoperation
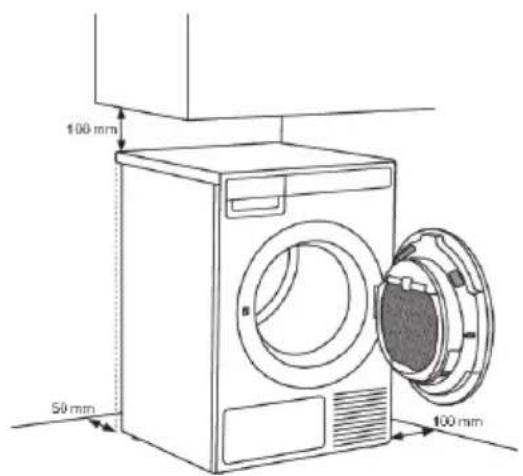

INFORMATION!
Theapplianceshallnotbeincontactwith awalloradjacentfurniture. For optimum dryeroperation, observetheclearance from thewallasshowninFig.
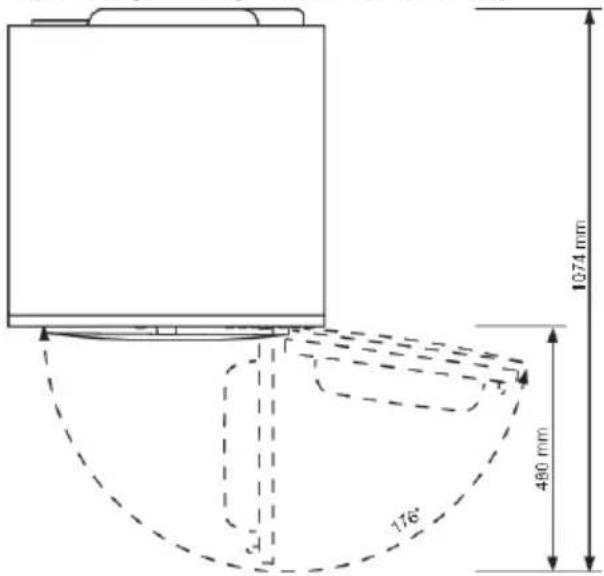
Openingthedryerdoor(topview)
Stackingontopofawashingmachine
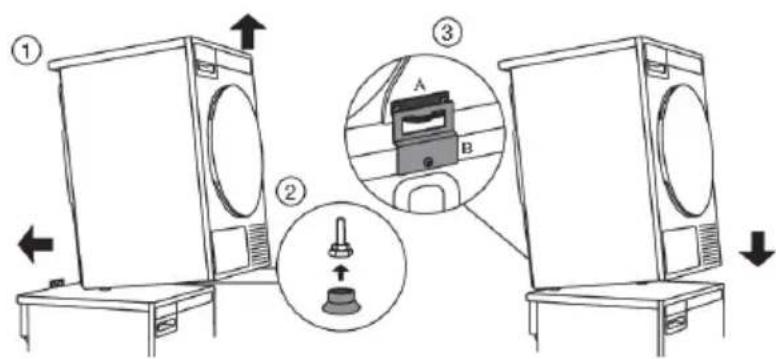
Tostackthedryerontopofawashingmachine,usetheextravacuumfeetandthetippingguard (A+B),suppliedinthecardboardboxinthedryerdrum.TippingguardpartBisdesignedtofiton CYLINDAwashingmachinesanditmaybehardorimpossibletomountonappliancesofotherbrands. Ifthewashingmachineanddryerarenotofmatchingdimensionsorifyouhaveinstalledahidden helperbetweenthetwoappliances,thenbindingplatesareavailableasoptionalaccessoriesatthe service center (... available only for HH (accessory Hidden Helpers) and TD75 stacked on top of WM80 orWM85;notintendedforanyothercombinations).
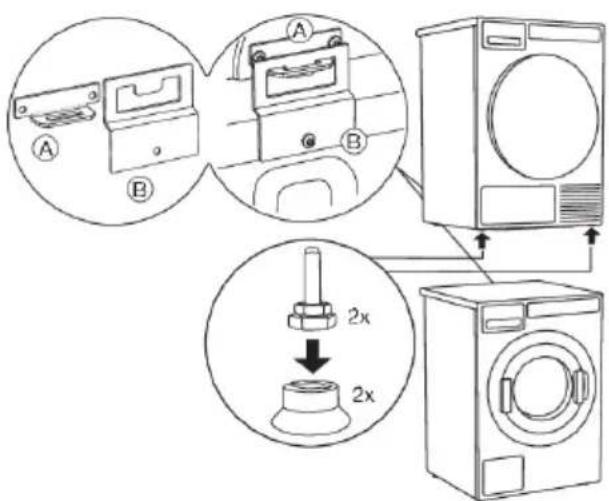
AllCYLINDAwashingmachinescanbeartheweightofthedryer.

INFORMATION!
Washingmachineonwhichyouwishtoinstallthedryermustbeabletobeartheweightofthe dryer(seewashingmachine'sratingplateortechnicalinformation).
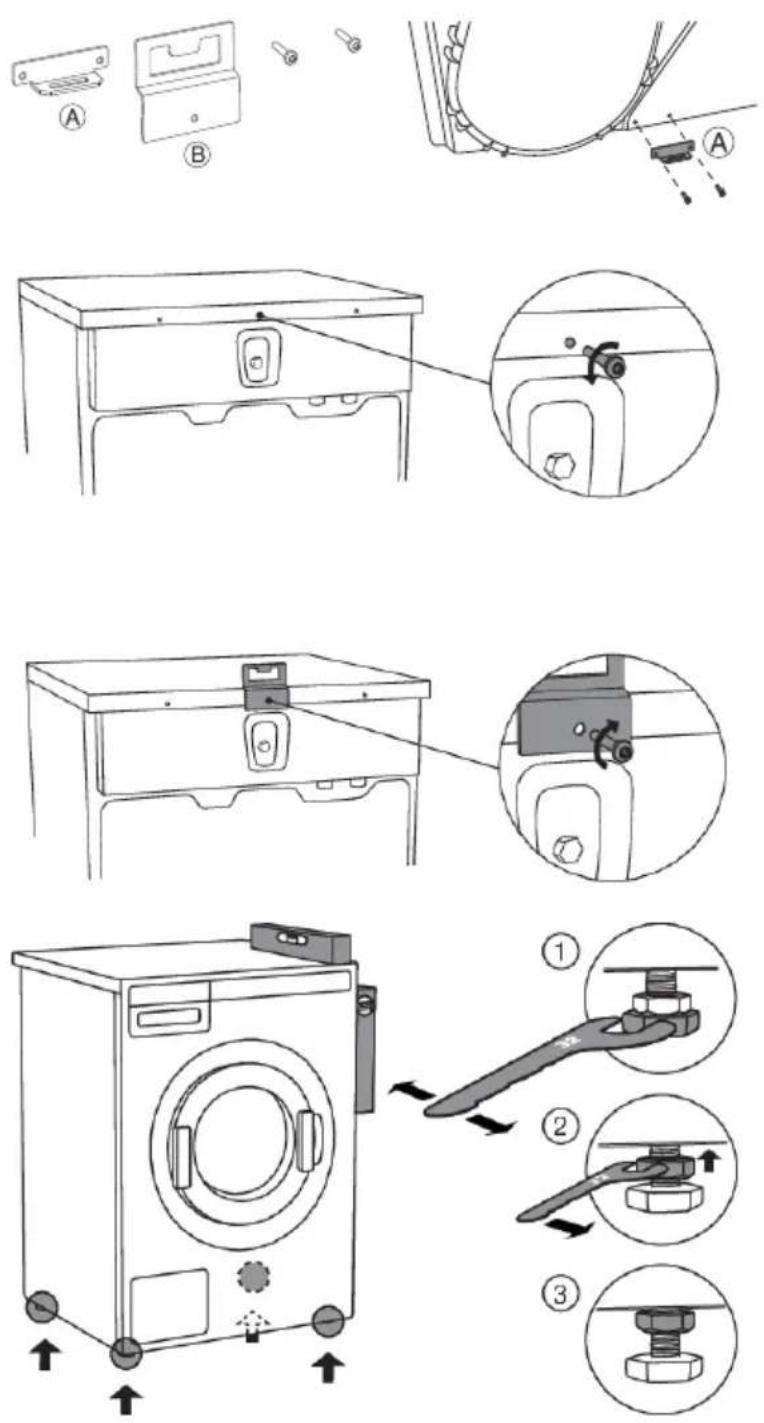
Howtostackadryerontothewashingmachine(CYLINDA):
Thereisacardboardboxinthedryerdrum, containingthevacuumfeetandthetippingguard.
1
Thetippingguardconsistsoftwo metalparts(A+B).
UsetwoscrewstoattachtheApartto thebackofthedryer.
2
Undothescrewonthebacksideof thewashingmachine.
3
Usethescrewtoattachthetipping guard(Bpart)tothebackofthe washingmachine.
4
Levelthewashingmachinesothatit isstable.
- Levelthewashingmachineinlongitudinalandtraversedirectionby rotatingtheadjustablefeetusing aNo.32spanner.Thefeetallow levellingby+/-1cm.
- Afteradjustingtheheightofthe feet, firmlytightenthejamnuts (counternuts)usingaspannerNo 17, byturningthemtowardsthe bottomofthewashingmachine.
- Tightenthejamnuts(counternuts).
Tablecontinuedfromlastpage
5
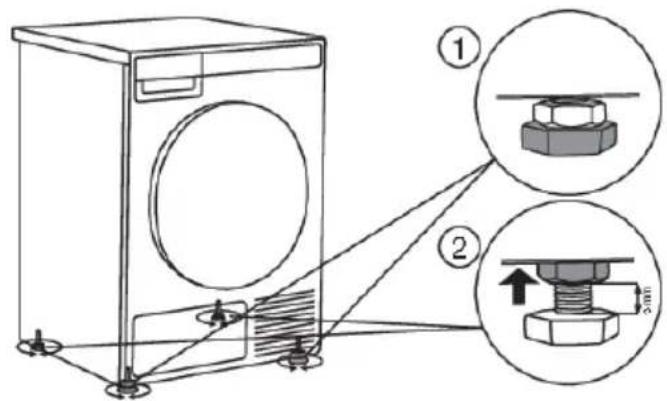
Setthedryerfeet:
- Tightenthefronttwofeetallthe wayin.
- Undothebackfeetby3.5turnsor 5mm;then,fastenthejamnuts towardsthebottomoftheappliance.↑
6
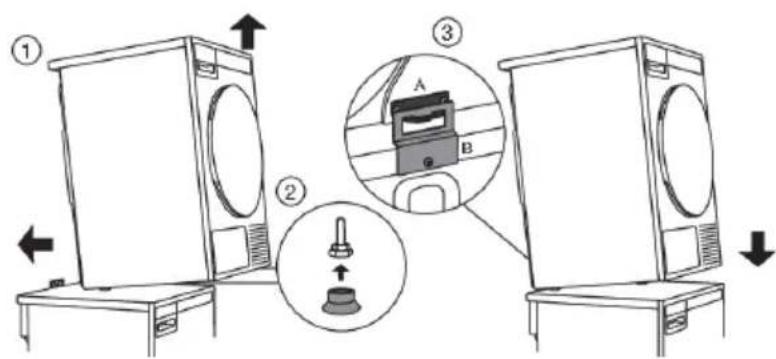
Placethedryerontothewashingmachine:
- Liftthefrontpartofthedryerby5 to10cm.
- Attach the vacuum feet onto the front feet of the dryer.
- Pushthedryerintothetipping guard(sothattheBpartisinserted intotheApart)andreleaseit(See figureonpreviouspage).

INFORMATION!
Makesurethetippingguardis "locked"!
Changingthedooropeningdirection
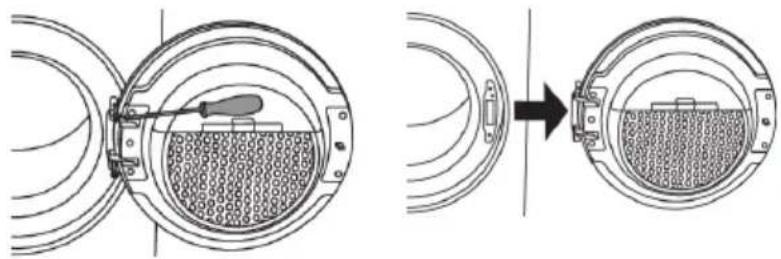
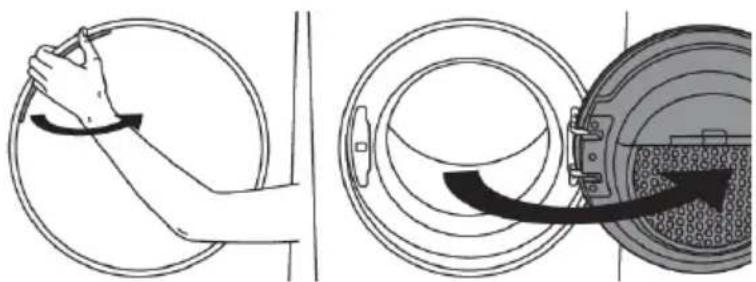
Tochangethedirectionofdooropening,proceedasfollows:
natural_image
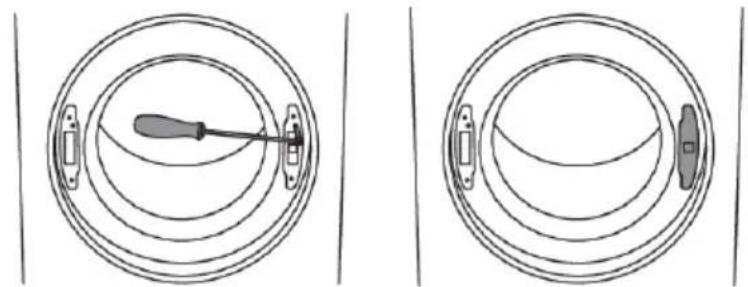
Illustration showing a hand holding a tool inside a circular device and a close-up of a mechanical component with a curved arrow indicating motion (no text or symbols)1
Openthedoorfully.
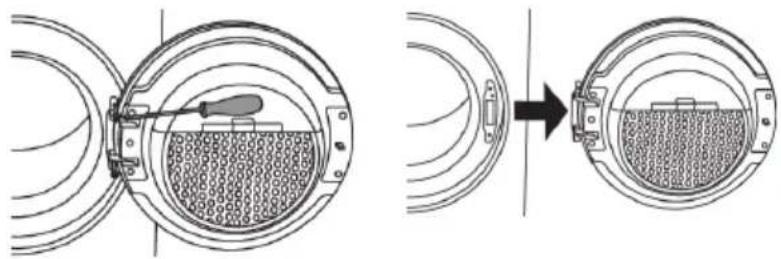
natural_image
Diagram showing a mechanical assembly with a tool inserted into a circular component, before and after a process (no text or symbols present)2
Undothescrewsandremovethedoor.
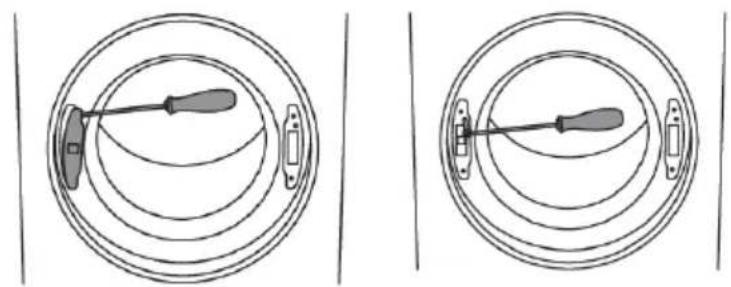
natural_image
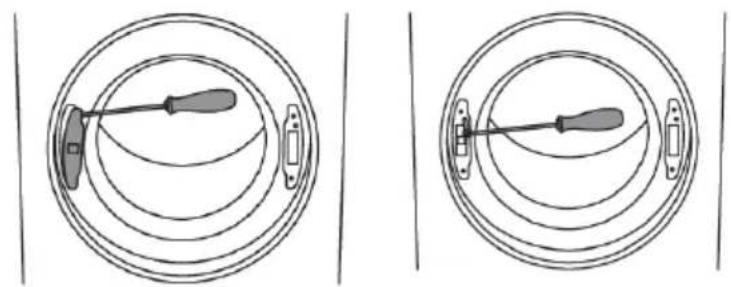
Two identical diagrams showing a screwdriver inserted into a circular component, with no text or symbols present.3
Useascrewdrivertoremovethedoor lockcoverandundothescrewonthe doorlock.
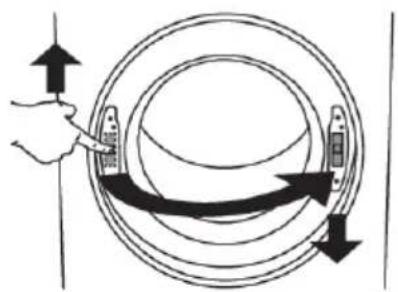
natural_image
Diagram showing a hand holding a circular object with directional arrows indicating rotation or movement (no text or symbols)4
Pushthedoorlockupwardsandremoveit.Moveittotheothersideand pushhitdownwards.
natural_image
Two circular diagrams showing a screwdriver inserted into a ring, with no text or symbols present.5
Fastenthescrewonthedoorlock. Replacethedorlockcover.
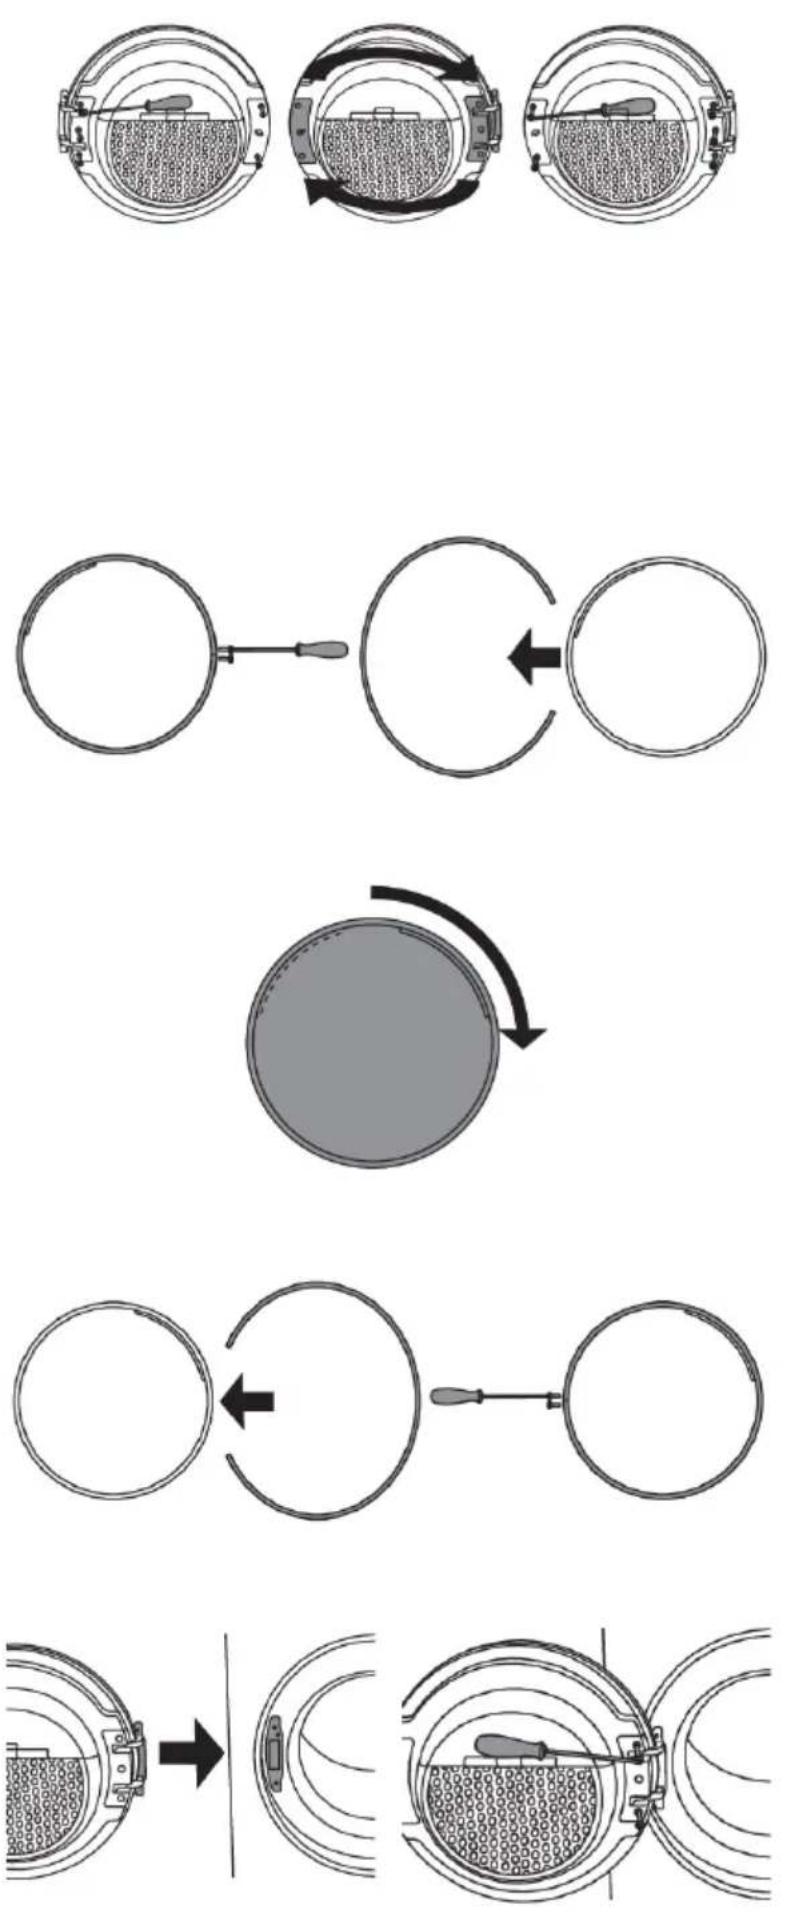
6
Undothedoorhingeassembly(left) andthedoorlatchassembly(right), switchtheirpositions, andreplace the screws (doorhingeassembly to the right-handside, doorlatchassembly to the left-handside).

INFORMATION!
Useascrewdrivertoremovethe plasticpartmoreeasily.
7
Undothedoorringandremoveittemporarily.
8
Rotatethedoorcoverby90°sothat thesignindicatingtheopeningofthe doorisontheotherside.
9
Rotatethedoorringby180°, installit ontothedoor, and fastenit with screws.
10
Installthedoortothefrontandscrew thedoor.
Drainingthecondensate
Themoisturefromthelaundryisextractedinthecondenserunitandaccumulatedinthecondensate tank. Condensate tank has to be emptied regularly (see chapter "Cleaning and maintenance").
Tosimplified and avoid emptying and interruption of the drying cycle to full condensatetank, run the condensated discharge targetubelocated at the back of the appliance directly into a drain (see chapter "Settings/Condensed water").
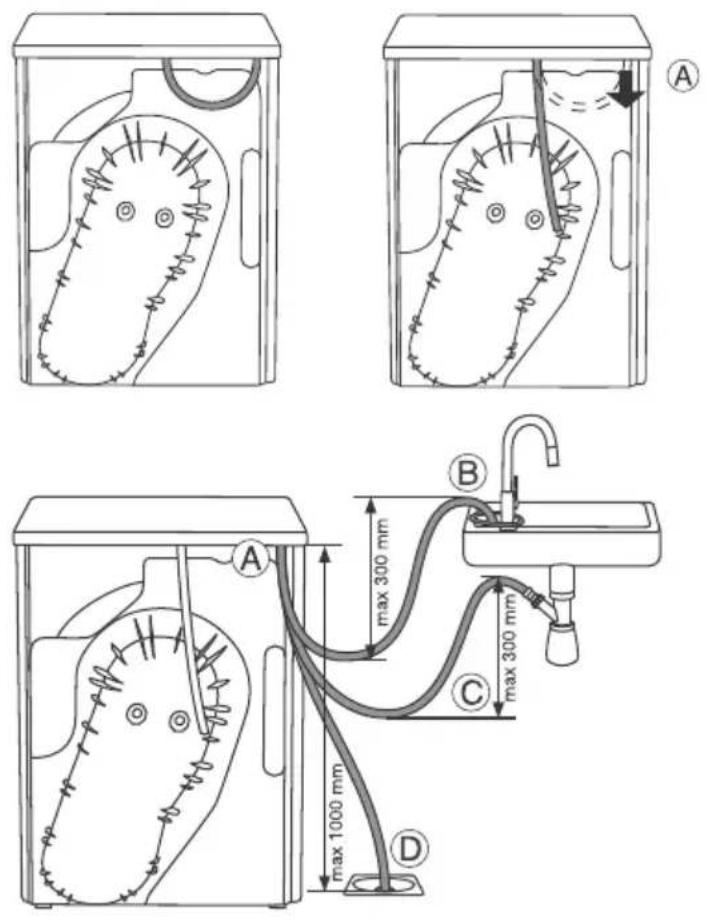
1
Removethesmallshorthosefromthe attachment(A).
2
Connectthesupplieddrainhosetothe sameattachment(A).
Runthecondensatedrainhoseintoa drain.Tiethehoseontoatap(B)so thatitcannotslipduringuse.
Thedrainhosecanalsobefedintothe washbasinsiphon(C)ordirectlyinto thefloordrain(D).
Then, the water is pumped directly into awashbasin, asiphon, orafloordrain.

INFORMATION!
Donotpullthedrainhose, and makesureitis not undertension, clamped, orbent.

WARNING!
If you decide torun the condensated rain hose into a drain, siphon, or wash basin, makes sure the hose is securely fastened. This will prevent any waterspillag that could result in unexpected damage.

WARNING!
Alwaysusehosesthataresuppliedwiththeappliance.

WARNING!
Ifthedryerisconnectedtoanairexhaustsystemalreadyusedforanotherappliance,anon-return valvemustbeinstalled.Returnflowintothedryercoulddamagetheapplianceandthenon-return valvepreventssuchflow.
Connectingtothepowermains

ELECTRICSHOCK!
Afterinstallation, the dryers should stand still for two hours before it is connected to the power mains.
Connect the appliancetoanearthedpoweroutlet. After installation, the wall outlet should be freely accessible. The outlet should be fitted with an earth contact (in compliance with therelevant regulations).
If you have a tumbled dryer with a 3 phase connection, the connection must be carried out by a qualified and authorized specialist.
Connectionupondelivery
TYPE: TDXX.XXXXX MODEL: XXXXXX.X
Art.No.:XXXXXX/XX Ser.No.:XXXXXXXX

IPX4 XX Hz
Informationaboutyourdryerisindicatedontherating(type)plate.
UsethetypeAdifferentialcurrentprotectionswitch.

WARNING!
Thedryershallnotbeconnectedtothepowermainsusinganextensioncord.

INFORMATION!
Donotconnectthetumbledryertoanelectricaloutletintendedforanelectricshaverorhair dryer.

INFORMATION!
Anyrepairandmaintenancepertainingtosafetyorperformanceshouldbedonebytrained experts.
Advicesbeforedrying
Thischapterincludesseveraladvicesonhowtopreparethelaundryfromdrying.
Laundrysorting
Sortthelaundryaccordingto:
•type,
- fabricthickness.
Forthemostevendrying,makesurethelaundryismadeofasimilarmaterial.
Clothing
- Closethebuttons, zips, andhook-and-loopfasteners, so that they donot damagethefabric.
2.Turnthepocketsinsideout. - Placevery sensitive clothes in a special-purpose laundry bag.
(Thespecialpurposelaundrybagisavailableleasanoptionalaccessoryingeneralstores.)
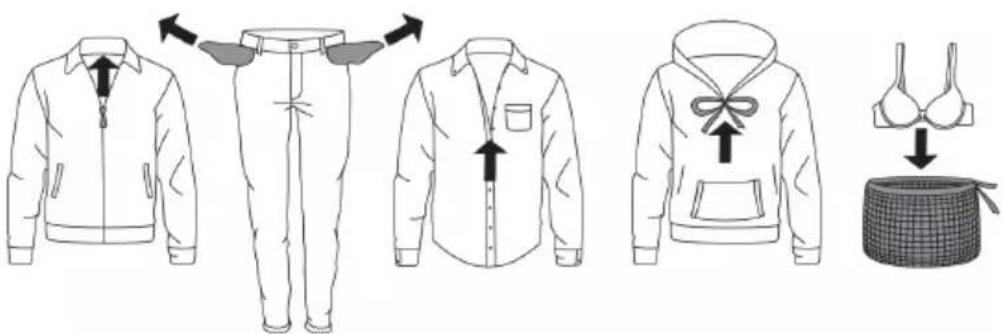

INFORMATION!
Laundrytobedriedinthedryershouldbespunataminimumof1000rpm.Higherspinning speedswillsaveenergyandcutdryingtime.

INFORMATION!
If you decide dry only on large item, were recommend drying it separately from smaller items of laundry.
Laundrysymbols
Observethelaundrysymbols.
Textilemaintenancesymbols:
| Washing | ||
| DelicateNormal | ||
| Max.washingtemperature90°C | ||
| Max.washingtemperature60°C | ||
| Max.washingtemperature40°C | ||
| Max.washingtemperature30°C | ||
| Handwashonly | ||
| Donotwash | ||
Tablecontinuedfromlastpage
| △ Bleaching | |
| △ | Bleachingincoolwater |
| ⊗ | Bleachingnotallowed |
| ○ Drycleaning | |
| A | Drycleaningwithallagents |
| P | PerchloroethyleneR11,R113,petroleum |
| F | Drycleaninginkerosene,purealcohol,andR113 |
| ⊗ | Drycleaningnotallowed |
| □ Ironing | |
| — | Ironingwithahotironwithamaximumtemperatureof200°C |
| — | Ironingwithahotironwithamaximumtemperatureof150°C |
| — | Ironingwithawarmironwithamaximumtemperatureof110°C |
| ⊗ | Ironingnotallowed |
| □ Naturaldrying | |
| — | Dryingonaflatsurface |
| ■■ | Dryingwithoutpriorspinning |
| □ | Dryingonaclotheslineorahanger |
| ○ Tumbledrying | |
| ● | Dryingathightemperatures |
| ● | Dryingatlowtemperatures |
| ⊗ | Tumbledryingnotallowed |
Materials(fabrics)suitablefordryinginatumbledryer


Materialissuitablefortumbledrying.Clothesdriedinatumbledryerwillbesofterand
lighterthanair-driedclothes.

INFORMATION!
The dryer does not cause any considerable wear of the fabric. The lint collected in the lint filter consists of dust and fabric fragments collected during the use of the laundry.
Materials(fabrics)thatmaynotbedriedinatumbledryer

Thissymbolmeansthatthematerialisnotsuitablefordryinginatumbledryer.
Nevertumbledrythefollowing:
- clothingthatwaschemicallycleaned(ordry-cleaned)athome,
- foam,
- glassfibres.
Dryingprocess,stepbystep
STEP1:Sortthefabrics
Seechapter"Advicesbeforedrying"
STEP2: Turnonthemainswitch.

natural_image
Front view of a computer monitor with control buttons and a blank screen (no text or symbols)Turningon
Presstheon/offbutton.
Switchingoff
Presstheon/offbutton.
STEP3: Openthedryerdoorandinsertthelaundry.
Openthedryerdoortowardsyou.
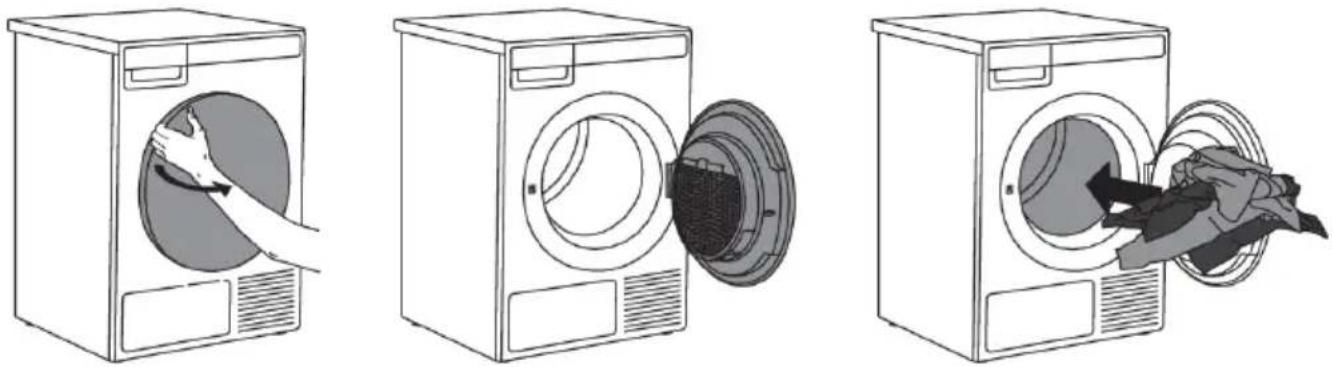
natural_image
Illustration of three different washing machines, showing hand placement and clothing disposal (no text or symbols)Placethelaundryintotheemptydryerdrum.Makesuretherearen'tanyotherobjectsamongthe laundry,suchadetergentball.
Suchobjectscouldmeltandcausedamagetothedryeroryourlaundry.
Donotoverloadthedrum!(Seeprogramtableandobserveyournominalloadasindicatedonthe ratingplate.)
Ifthedryerdrumisoverloaded,thelaundrywillbemorewrinkledandperhapsunevenlydried.
STEP4: Choosethedryingprogram.
Choosetheprogrambyrotatingtheprogramselectorknobineitherdirection.Confirmtheprogram selectionbypassingthebuttonundertheprogram.

natural_image
Front view of a remote control interface with a circular button and directional arrows (no text or symbols)Select the program based on the type and remaining moisture of the laundry you wish to dry.
Anticipatedprogramdurationisindicatedonthedisplay.
Choosebetweenthefollowingprograms:
(owner/distributorcanchangeparametersandrenametheprogram)
| Programe(factoryde-faultprogram) | kg | DescriptionMx | |
| + | Normaltemp | 6AUTOEXTRPA,ogramfornon-sensitivecottonlaundry.After drying,itwillbecompletelydryandreadytobestoredin thecupboard. | |
| A | Normaltemp | 6AUTOEXTRPA,programfornon-sensitivecottonlaundry.After drying,itwillbecompletelydryandreadytobestoredin thecupboard. | |
| ☀ | Normaltemp | 6AUTOEXTRPA,Programfornon-sensitivecottonlaundryofapproximatelythesamethickness.Afterdrying,itwillbedry. | |
| a | Normaltemp | 6AUTOEXTRPA,Programfornon Fort cottonlaundry.Afterdrying,hand ironingsrequired. | |
| a | Normaltemp | 6AUTOEXTRPA,Programfornon Fort cottonlaundry.Afterdrying,machine ironingsrequired. | |
| ☒ | Normaltemp | 3,5MIXTRPA,Programisusedforsyntheticormixedfibrefabrics,suchasmulti-functionalsportclothes.Afterdrying,ironing isnotrequired. | |
| ☒ | Normaltemp | 3,5MIXTRPA,Programisusedforsyntheticormixedfibrefabrics.Afterdrying,ironingisrequired. | |
| ☐ | Normaltemp | 4TIME60rewillstopwhensettimeisreached.Thetimeprogram issuitableforsmallloads. | |
| ☐ | Normaltemp | 4TIME60rewillstopwhensettimeisreached.Thetimeprogram issuitableforsmallloads. | |
| ☐ | Normaltemp | 4TIME60rewillstopwhensettimeisreached.Thetimeprogram issuitableforsmallloads. | |
| ☒ | Normaltemp | 4TIME60rewillstopwhensettimeisreached.Thetimeprogram issuitableforsmallloads. | |
*Max.kgdryload

INFORMATION!
If your laundry is not dried to the desired dryness level, use amoresuitable programme.
STEP5: Choosing the program settings
Using the program settings, the drying program can be further adjusted to your wishes. See chapter: SETTINGS.
Onlyapplianceowner/distributormaychangethesettings!
Someprogramsettingsmaynotbeavailableforyourselectedprogram.
DelayStart
In the submenu of these selected program, you can set the start delay when you want the drying program to start after a certain time (from 1 hour to 100 hours, from the time you press the Start / Pause button). The estimated time until the end of drying will be displayed.
Usetheprogramselectorknobtosetfrom1hto100hoursin1-hoursteps.
Pressthebuttonundertheselectedtime/durationtoconfirmthesetting.
Press the Startbutton to start. When the countdown reaches zero, the selected drying program will startautomatically.
Tocancelthestartdelay, pressthebuttonCancel.
ThenpresstheStartbuttontostarttheprogram.
During the count downtothedelayed start, the display will switch off after 5 minutes.
Usetheprogramselectorknoborpressanybutton,toreactivateit.Thecountdowntothestartofthe dryingcyclewillbedisplayed.
Displaywillswitchon1 minutebeforethestartofthedryingcycle.
Afterthecountdown, dryingtimewillbeindicatedonthedisplayunit.
STEP6: Closethedoorandstartthedryingprocess.
ClosethedryerdoorandpresstheStart/Pausebutton.

natural_image
Front view of a computer monitor with control buttons and a play button (no text or symbols)Start(pressedbriefly-start/resume)
II Pause(shortpressofthebutton-pause)
Stop(pressandholdfor3seconds-stoporcancel)
Remainingtime
Depending on these selected program and load, anticipated drying time will be displayed in hours and minutes.
Actualdryingtimewilldependontheslectedprogram,load,typeoflaundry,spinningrateetc.
Actualdryingtimemaybelongerorshorterthaninitiallydisplayed.
Pausing, stopping or changing the program
Topauseaprogram, briefly press the Start/Pause button.
Toresumetheprogram, presstheStart/Pausebuttonagain.
Thedryingprogrammayalsobepausedbyopeningthedryerdoor.
Toresumetheprogramme, simplyclosethedoorandpresstheStart/Pausebutton.
Tostopandcancelthedryingprogram, presstheStart/Pausebuttonandholditfor3seconds.
Theselectedprogramwillbestoppedandthecoolingstagewillbegin.Coolingtimedependsonthe selectedprogram.
Onlyafterthecoolingiscomplete,canyouusetheprogramselectorknobtoselectanewprogram andpresstheStart/Pausebutton.
WARNING!
Thefinaldryingcycleincludesacoolingdownstagewithoutheateroperation.Itmakessurethe laundryisofsuitabletemperatureattheendoftheprogramandthatitcanbetakenfromthe dryerwithouttriskoftouchhotclothes.
AdryingprogramcanbepausedusingtheON/OFFbutton.
Thetumbledryerwillswitchoff.
STEP7:Endofprogram
Aftertheendofthedryingprogram, the display will indicate that the drying has been finished.
If you have selected the "anti-crease" option, the dryer will continue to operate after the end of the drying cycle.
Openthedoortowardsyouandremovethelaundryfromthedryer.
Cleanthenetfilterinthedoor(seechapter"Cleaningandmaintenance").
Makesurethedryerdrumisempty,thenclosethedoor.
5minutesaftertheendoftheprogramorlastactivation, thedisplaywillswitchofftostandbymode inordertosavepower.
ThedisplaywilllightupagainifyoupresstheON/OFFbuttonoropenthedryerdoor.

INFORMATION!
Aftereachdryingcycle,cleanthenetfilterinthedoorandemptythecondensatetank.See chapter"Cleaningandmaintenance".

HOTSURFACE!
Acloggednetfilterandheatpumpfiltermayresultinactivationoftheautomaticoverheating switch-offdevice.Cleanthefilter,waitforthemachinetocooldown,andtryrunningitagain.If thedryerstillfailstostart,callaservicetechnician.

WARNING!
Afterthedryingprocess,unplugthedryerpowercordfromthepoweroutlet.
If you have atumbled dryer with a 3-phase connection, donot pull the plug out of the power outlet.
Settings
Onlyapplianceowner/distributormaychangethesettings!
(owner/distributorshouldcheckServicemanual)
| DescriptionSettingOndisplay | ||
| On/OffCleaningthefilter | ||
| door | 0-->10Cleaningthedoorfilterinthe | |
| (step10)10-->100Cleaningofwate | ||
| Drain/TankCondensedwater | ||
| On/OffPaymentsystem | ||
| On/OffHeater2activation | ||
| Changeprogram | Oneachprogram(someset- tingscannotbesetonsome programs) | Bychangingsettingsitispos- sibletocreateandcustomize yourownprogram. Programecanberenamed. |
| •Extradry | 0-->3 | |
| •Anti-crease | Switchingoff,(1h-->4h) | |
| •Saveprogram | Overrideexisting/Saveasnew | |
| Timeprogram | ||
| •Timeprogram80min | 20-->240min | |
| •Timeprogram60min | 20-->240min | |
| •Timeprogram40min | 20-->240min | |
| •Timeprogram20min | 20-->240min | |
| Overrideexisting/Saveasnew•Saveprogram | ||
| On/OffChildLock | ||
| Programmes |  | Selectedprogramwillbeshown ondisplay |
| SetLanguage | Selectyourlanguage-press thebuttonundertheflag | •Selectlanguage:byrotating theprogramselectorknob•Confirmlanguage:bypress-ingbuttonunderthecountry flag |
Tablecontinuedfromlastpage
| DescriptionSettingOndisplay | ||
| tionYoucanselectupto5lan- | (from0to5)On/OffTemporarylangguages,whichwillbeavailableinthemainmenu. | |
| 0-->5Soundsetting | ||
| Displaysettings: | ||
| •Brightness | 1-->5 | |
| •Displaythelogo | On/Off | |
| Normal/NostandbyStandbymode | ||
| On/OffDetailedview | ||
| On/OffDemomode | ||
| 1h-->100hOn/OffStartdelay | ||
| Time/IconTime/Iconmode | ||
| 0-->xxxIDmachine | ||
| WiFisettings | ByturningWiFimoduleOn,theenergyconsumptionwillin-creaseinstandbymode. |
SOUNDS
(dependingonthemodel)

INFORMATION!
In the initial stage of drying during drying, the compressor and the pump may cause noise which, however, does not affect the dryer operation.
Hummingsound: this is the sound of the compressor unit. The level of noised depends on the program and the drying stage.
Whirringsound:fromtimetotime, thecompressorunitisventilated.
Pumpingorliquidflowingsound: thepumpispumpingthecondensateintothecondensatetank.
Clickingsound: clickingnoiseiscausedbyautomaticcleaningoftheheatexchanger(compressor).
Rustlingwatersound: can be heard during automatic cleaning.
Rattlingsound: can be heard during drying if laundry has any hard parts (buttons, zippers etc.)
Cleaningandmaintenance

INFORMATION!
Beforecleaning, makesuretoswitchofftheapplianceanddisconnectitfromthepowermains (unplugthepowercordfromtheoutlet).
Cleaningthedoornetfilterinthedoor
Beforecleaning, makesuretoswitchofftheapplianceanddisconnectitfromthepowermains(unplug thepowercordfromtheoutlet).
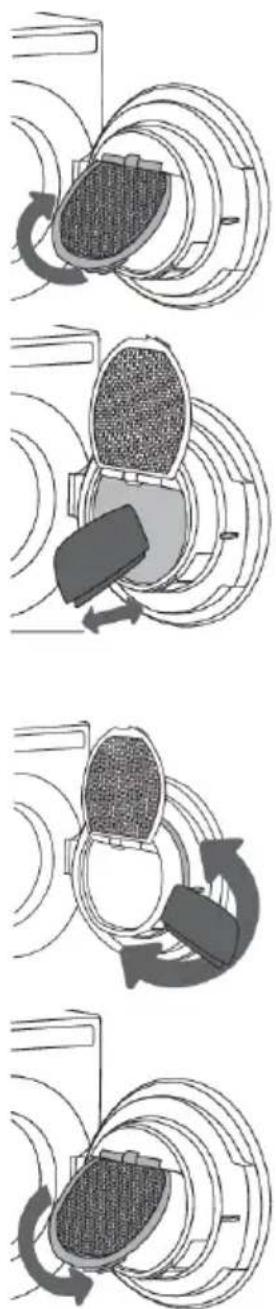
flowchart
graph TD
    A["Initial State"] --> B{Particle Rotation}
    B -->|Circular Flow Path| C["Intermediate Stage"]
    C --> D["Final Process"]
    D --> E["Final Output"]
1
Liftthenetfiltercover.
2
Byhandoraclothdragthenetfiltertoremovethe liningoffibersandthreads.

NOTE!
The doornetfilter may feel quiteloose when cleaning/removing fibers and threads. This is normal because of largenet filter are in combination with high working temperatures insidethetumbledryer.
3
If necessary, clean then filter housing and door gasket as well.
4
Closethenetfiltercover.
Tablecontinuedfromlastpage
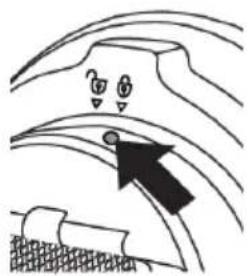
natural_image
Diagram showing a curved surface with arrows pointing to a point, no text or symbols present5
Ifitisnecessarytocleanthenetfilterfromtheback, unscrewthescrewandturnthefilterfromthe lockedtotheunlockedposition.Pullouttheentire filterunitandcleanitthoroughly,andreturnthe filterunittoitsoriginalpositionaftercleaning.Turn thefilterfromtheunlockedtothelockedposition andtightenthescrew.

INFORMATION!
Makesureyoudonotpinchyourfingerswiththefiltercover.

INFORMATION!
Cleanthedoornetfilteraftereachdryingcycle.

INFORMATION!
Neveroperatewithoutadoornetfilterorifthedoornetfilterisdamaged.
Emptyingthecondensatetank

INFORMATION!
Emptythecondensatetankaftereachdryingcycle.
If the condensatetankis overflowing the drying program will be paused automatically.
Awarningwillappearonthedisplayunitthatthecondensatetankhastobeemptied.
(Disregard this warning if you fed the condensated discharge hose into a drain, siphon, orasink.)
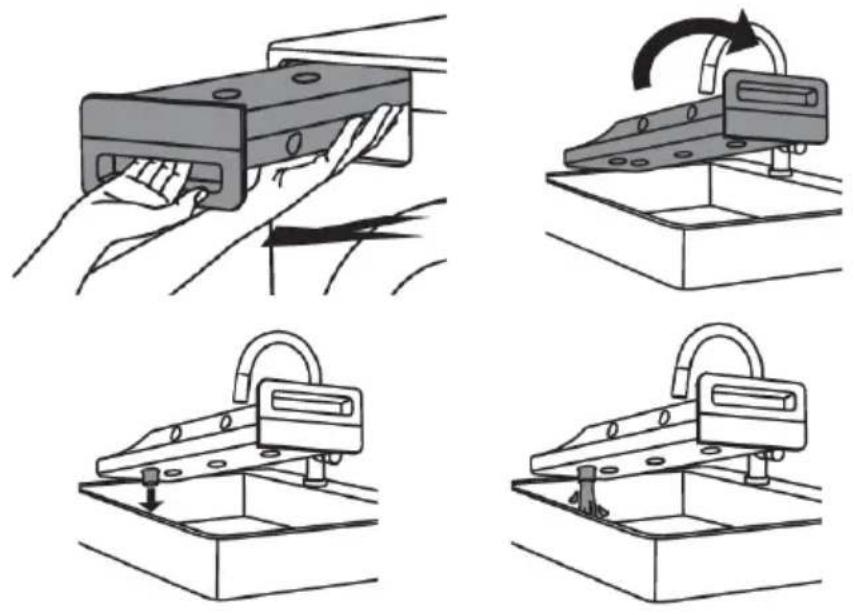
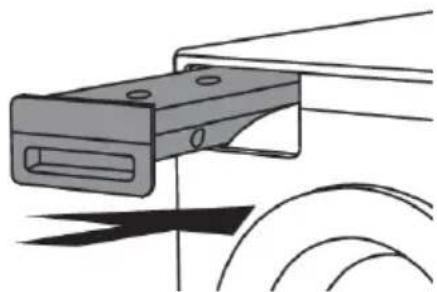
1
Pulloutthecondensatetank fromthedryer,thenturnit upsidedownovera washbasin,sink,orany suitablysizedvessel.
2
Dischargethewaterthrough thecondensatedrainopening. Tomakedrainingthetank easier, pulloutthenozzleat thecondensatedrain.

NOTE!
Somewaterwillstill remaininthecondensate tank,afteremptyingthe water.
Tablecontinuedfromlastpage
natural_image
Technical illustration of a mechanical clamp or bracket with mounting holes and a curved base (no text or symbols)3
Replacethecondensatetank intothedryerhousing.

INFORMATION!
Waterfromthecondensatetankisnotdrinkable.Ifthoroughlyfiltered,itcanbeusedforironing.

WARNING!
Neveraddchemicalsorfragrancesintothecondensatetank.

INFORMATION!
Condensatetankdoesnotrequiredrainingifthedrainhoseisconnecteddirectlytoawashbasin or a bathroom floor drain (see chapter "Installation and connection/Draining the condensate").

INFORMATION!
Beforemovingthedryerorbeforestoringitinanon-heatedroomduringthewinter,the condensatetankhastobeemptied.
Watercondensercleaning

INFORMATION!
Cleanthecondenserwhenwarningappearsonthedisplay.

INFORMATION!
Beforecleaning, makesuretoswitchofftheapplianceanddisconnectitfromthepowermains (unplugthepowercordfromtheoutlet).
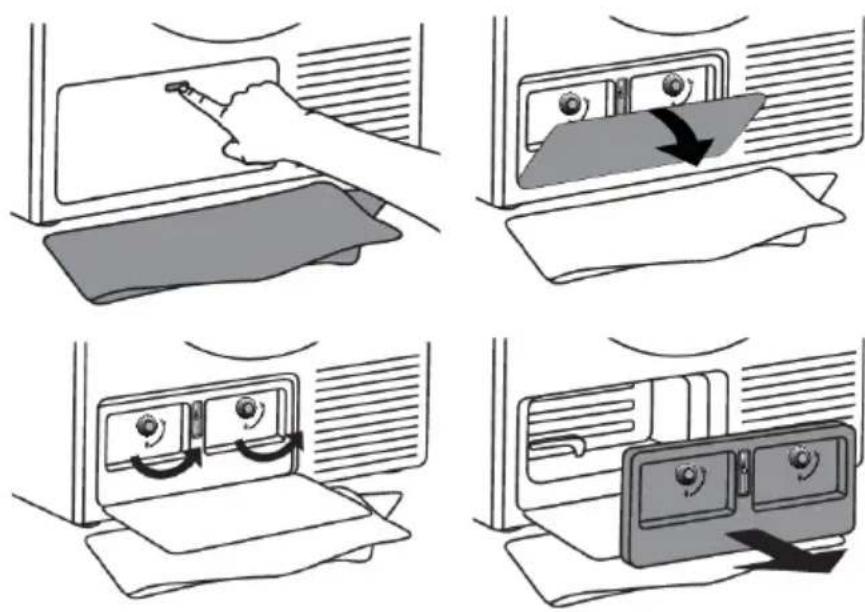
1
Duringcleaning,somewater maybespilled.Itistherefore recommendedtoplacean absorbentclothonthefloor. Opentheoutercover.
2
UseanM13screwdriverto turnattachmentstotheun-lockedposition.Removethe insidecover.
Tablecontinuedfromlastpage
natural_image
Diagram of a printer or printer with a paper airplane inside, showing internal components and airflow direction (no text or symbols)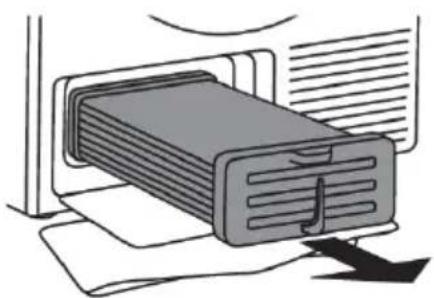
natural_image
Illustration of a file organizer with a folder labeled 'J' inserted, no text or symbols present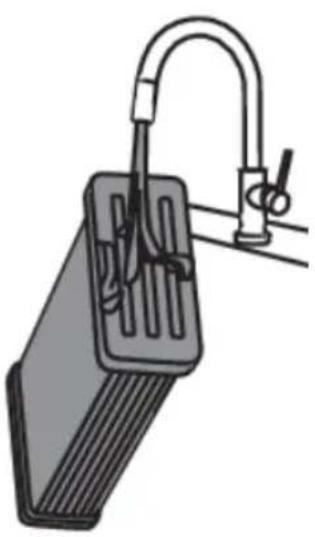
natural_image
Illustration of a mechanical device with a curved handle and internal components (no text or symbols)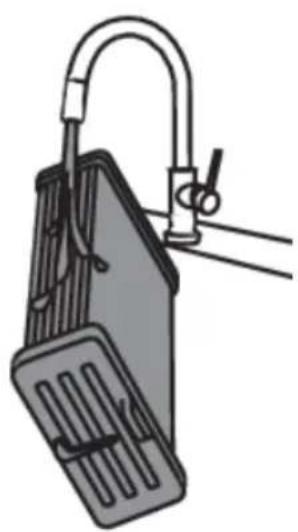
natural_image
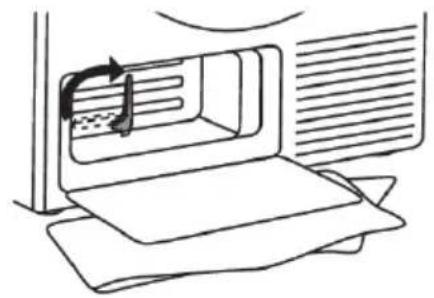
Illustration of a portable device with a curved handle and attached cable (no text or symbols)3
Rotatethecondenserunit leverup.
Usethehandletopullout thecondenserunit.
4
Rinsethecondenserunit withajetoflukewarmwater onbothsides,anddrain well.

INFORMATION!
Donotpokeintothe openingsbetweenthe condenserunitribsas thismaydamagethe condenserunit.

INFORMATION!
Donotwashthecondenserunitinadish-washer.
natural_image
Simple line drawing of a computer monitor with an open screen and a gray cover, no text or symbols present.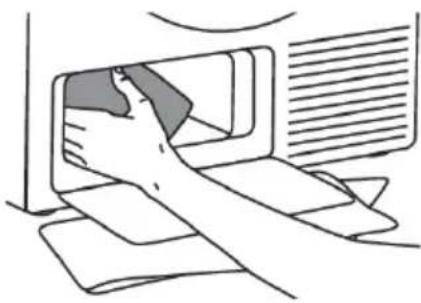
natural_image
Line drawing of a person inserting a device into a device (no text or symbols)5
Useasoftdampclotho clean:
-theareainfrontofthe condenserunitwherewater usuallyaccumulates,
-theareabehindthewater condenserunit(reachdeep intotheopeningalltheway totherearwall),
-condenserunithousing,
-allgasketsandsealing areasonthecondenserunit housinganddoor.
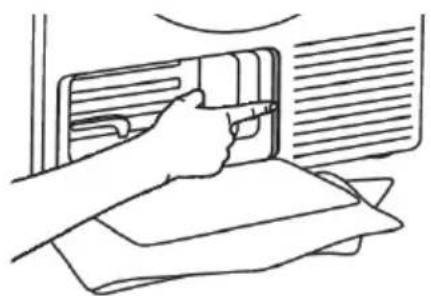
natural_image
Line drawing of a hand inserting a component into an air vent (no text or symbols)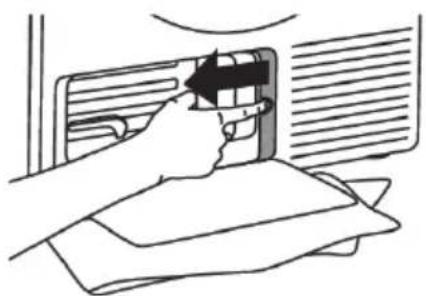
natural_image
Illustration of a hand inserting a card into an air conditioner unit (no text or symbols visible)6
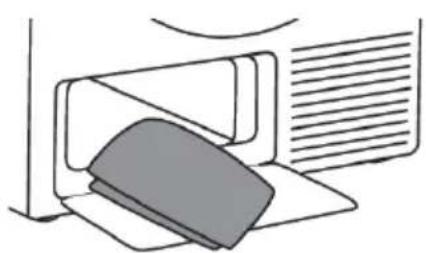
Pressontheedgeofthefilterandpullitout.
Tablecontinuedfromlastpage
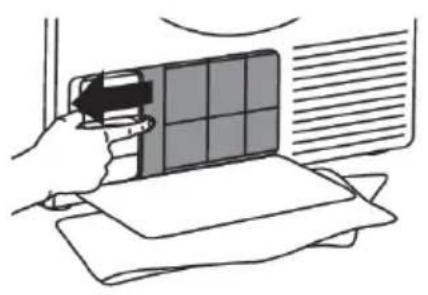
natural_image
Illustration of a hand holding a smartphone next to a grid device on a document (no text or symbols visible)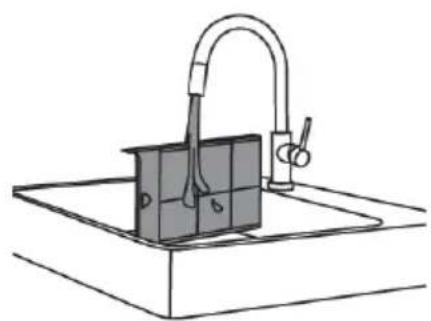
natural_image
Line drawing of a kitchen sink with faucet and drain (no text or symbols)7
Rinsethefilterunderrunning waterandthendryit.
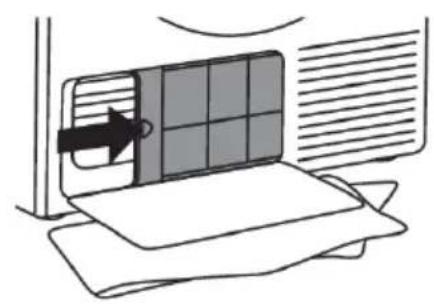
natural_image
Diagram of a solar panel installation with a directional arrow, showing components on a sheet (no text or symbols)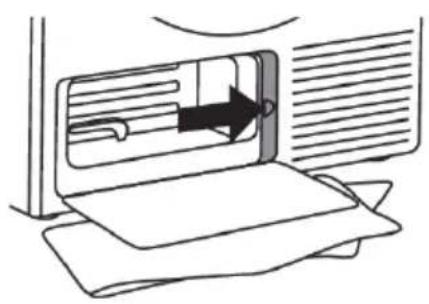
natural_image
Diagram of a printer or printer with an arrow indicating the paper direction (no text or symbols present)8
Insertthefiltertotheoriginal position.
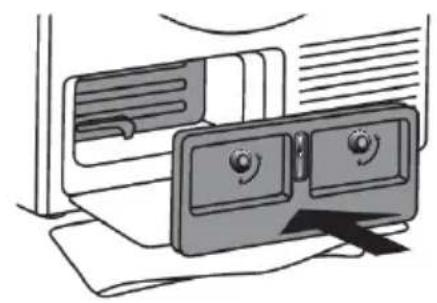
natural_image
Diagram of a refrigerator with two rotary switches and a handle, no text or symbols present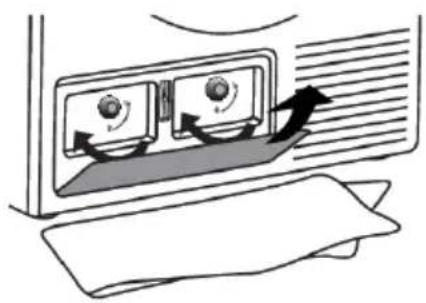
natural_image
Diagram of a door with two switches and directional arrows indicating motion (no text or symbols)9
Replacecondenserunit intothehousing.Rotate the condenserunitleverdown. Reinstalltheinsidecover andturnattachmentstothe lockedposition. Closetheoutercover.

INFORMATION!
Theheatpumpfilterhastobecorrectlyplacedintoitsslot. Otherwise, theheatexchanger installedinsidethedryermaybeclogged.
Cleaningtheapplianceexterior
Clean the appliance exterior and the display unit using a soft damp cotton cloth and water. Do not usesolventsorabrasivecleanersthatcoulddamagetheappliance(pleaseobservethercommendationsandwarningsprovidedbythemanufacturersofthecleaningagents).
Wipeallpartsofthedryerwithasoftclothuntildry.

INFORMATION!
Keep the area around the dry erclean and cool. Dust, heat, and humidity will extend the drying time.
natural_image
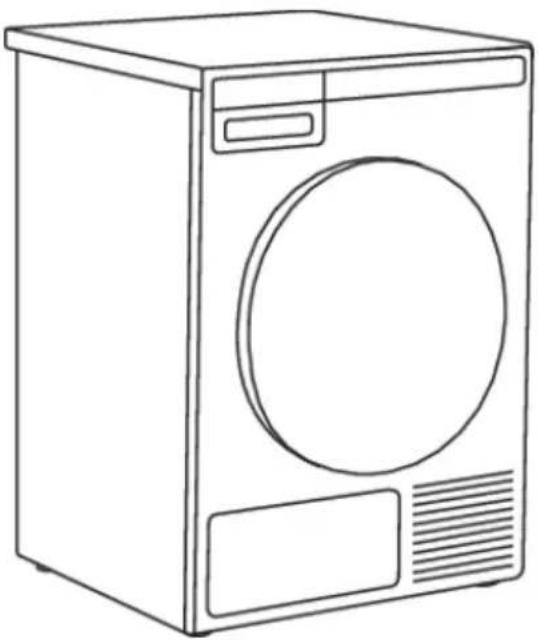
Line drawing of a front-loading washing machine with front panel and circular vent (no text or symbols)
INFORMATION!
Always disconnect the dryer from the power mains before cleaning.
Inthecaseofa3phaseconnectionoftheappliance,switchoffthemainsocketswitch.
Errors-whattodo?
Disturbancesfromtheenvironment(e.g.thepowergrid)mayresultinvariouserrorreports(see Troubleshootingtable).Insuchcase:
- Switch off the appliance, wait for 1 minute, switch the appliance back on, and repeat the drying program.
- If the error persists, call an authorized service center.
- You will be able to solve most of the problems in appliance operation by yourself (see below Troubleshootingtable).
- Repairsmayonlybecarriedoutbyanadequatelytrainedperson.
- Repair or any warranty claim resulting from incorrect connection or use of the dryer shall not be covered by the warranty. In such cases, the cost of repair shall be charged to the user.

INFORMATION!
Thewarrantydoesnotcovertheerrorsofailuresresultingfromdisturbancesfromtheenvironment (lightningstrike,powergridfailures,naturaldisastersetc.).
| Whattodo?CauseProblem/error | ||
| Themachine willnotstart. | on. | •Checkwhetherthemainswitchison.Themainswitchisr |
| There is no voltage in the power outlet.•Checkifthepowercordplug | • Check the fuse.iscorrectlyinsertedintothepoweroutlet. | |
| Thereis voltageinthe outlet,butthe drumdoes notspin... Thedryer doesnot work. | cordancewiththeinstructions. | •Re-readtheinstructionsforuseagain.Programwasnot |
| •Checkifthedoorisclosedproperly.Doormightbeopen. | ||
| Thecondensatetankisfull(only appliestocondensationdryer andthedryerwithaheatpump). | •Emptythecondensatetank(seesection "CLEANINGANDMAINTENANCE") (onlyappliestocondensationdryerand thedryerwithaheatpump). | |
| Delayedstartmightbeactivated. | •TocanceltheDelayedStartoption, press5theSkipbutton. | |
| Themachine stopsoperatingcompletelyduring aprogram. | •Thedoornetfiltermaybe clogged.Asaresult,thetemperatureinthedryerrises,whichin turncausesoverheating,andthe dryerswitchesoff. | •Cleanthedoornetfilter(seechapter "CLEANINGANDMAINTENANCE").•Waitforthemachinetocooldown,and tryrunningitagain.Ifthedryerstillfails tostart,callservicecentre. |
Tablecontinuedfromlastpage
| Whattodo?CauseProblem/error | ||
| Laundrynot driedordryingtakestoolong. | Filtersarenotclean. | •Cleanthefilters(seechapter"CLEAN-INGANDMAINTENANCE"). |
| Dryerisplacedinaclosedroom; roomthatistooocold;orroom thatistoosmallandtheair overheatsasaresult.•Checkifthetemperatureintheroom wherethedryerisinstalledistoohigh ortoolow. | •Makesurethereisadequatesupplyof freshairtothedryer;forexample,open thedoorand/orwindow. | |
| Laundrywasnotsufficiently wrungorspun. | •Iftheloadisstillwetaftercompleted dryingcycle,anappropriatedryingprogramshouldberunagain(aftercleaning filters). | |
| Amountoflaundrydriedinthe applianceistoolargeorinsuffi-cient. | •Useasuitableprogramoreextrafunc-tions. | |
| •Laundry(suchasbedding)gets tangledintolargeballs. | •Closethebuttonszippersonthe laundrybeforedrying.Selectasuitable program.•Afterthedryingprocess,loosenthe laundryandselectanadditionaldrying program(e.g.timeddryingprogram). | |
| Unevenly driedlaundry. | Laundryofvaryingtypesand thickness,andexcessiveamount oflaundry. | •Makesureyouhavesortedthelaundry bytypeandthickness,whetheryou haveaddedasuitableamountoflaun-drytothedrum,andwhetheryouhave selectedasuitableprogram. |
| Aslighthitting noiseap-pears. | Ifthedryerisoutofusefora longperiodoftime,thesame pointsofload-bearingelements orcomponentsareunderstress foralongtime,causingtempor-arydeformation. | •Thenoisewillsubsidewithoutanyinter-vention. |
| Thedoor opensduring drying. | muchlaundryinthedrum). | •Reducetheamountoflaundry.Excessiveload |
Failuredisplay
Incaseofafailurewhileaprogramisinprogress,therelevantErrorXisindicatedonthedisplayunit.
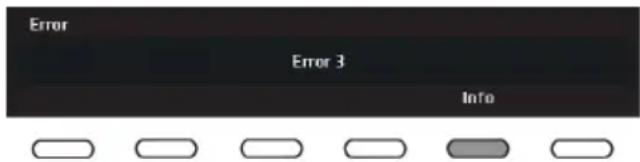
PressandholdtheINFObuttontodisplaythe errordescription.
Switchoffthedryerandturnitbackon.
Errorsindicatedonthedisplayunit(dependingonthemodel)mayincludethefollowing:
| Whatodo?ErrorindicationonthedisplayProble | ||
| Controlunitfailure.E0 | Controlunitfailure. Callservicecentre. | |
| Thermistorerror.E1 | Temperaturesensorfailure. Callservicecentre. | |
| Communicationerror.E2 | Communicationerror. Callservicecentre. | |
| Pumperor.E3 | Failureonthepumpforpumpingthe condensateintothecondensatetank Callservicecentre. | |
| Relayfailure.E6 | Controlunitfailure. Callservicecentre. | |
| Doorfailure.E7 | Controlunitfailure. Callservicecentre. | |
| Buttonfailure.E8 | Controlunitfailure. Callservicecentre. | |
| E9 | patible. | Callservicecentre.PB/Ulsoftwareversionsarenotc |
| Callservicecentre.EADBScommunicationerror.E1 | ||
| Callservicecentre.Motorcommunicationerror.E11 |
INFORMATIONbefore,during,andaftertheprogram (dependingonthemodel)
| Whattodo?Errorindicationonthedisplay | |
| EN:Pleaseclosethedoorbeforepressingstart. | Closethedryerdoorbeforestartingorresuming theprogram. |
| EN:Optionnotavailableatthisphaseofcycle. | Thisoptionisnotavailable.Selectanoptionthat isstillavailable. |
| EN:Cyclewasinterruptedbypowerfailure.Pleaseresume. | PresstheStart/Pausebuttontorestartorresume theprogram. |
| cycle. | Seechapter"CLEANINGANDMAINTENANCE".EN:Pleaseem |
| Seechapter"CLEANINGANDMAINTENANCE".EN:Cleandoo | |
| Seechapter"CLEANINGANDMAINTENANCE".EN:Cleanthed | |
| filter. | Seechapter"CLEANINGANDMAINTENANCE".EN:Pleaseem |
| unlock. | Seechapter"SETTINGS".EN:Childlockison.Pressbuttonsfor |
Service
Beforecallingaservicetechnician
See the chapters "Troubleshooting and "Cleaning and maintenance" and see if you can resolve the problemyourself.
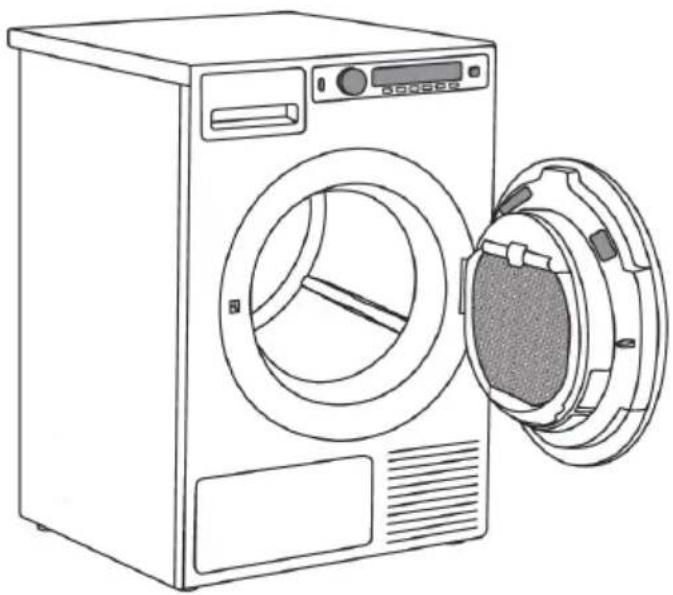
Whenyoucontactaservicecentre, pleasestatethemodel(1), type(2), andserialnumber(3) of your dryer.
Model,type,andserialnumberareindicatedontherating(type)platelocatedontheinteriorsideof thedryerdoor.
QRandAUIDcodearelocatedontheinsideofthedryingmachinedooraswell.
natural_image
Line drawing of a front-loading washing machine with its side door open, showing internal components and control panel (no text or symbols)
WARNING!
Incaseofafailure, only use approved spare parts by authorized manufacturers.

WARNING!
Repairoranywarrantyclaimresultingfromincorrectconnectionoruseofthedryershallnotbe coveredbythewarranty.Insuchcases,thecostsofrepairshallbechargedtotheuser.
TYPE: TDXX.XXXXX MODEL: XXXXXX.X
Art.No.:XXXXXX/XX Ser.No.:XXXXXXXX

IPX4 XX Hz
Kontaktadress
CylindaService
0771-252500
Dubetalarendastlokaltelefontaxa
www.cylinda.se
Technicalinformation
Technicalinformation
| 850mmHeight | |
| 595mmWidth | |
| 654mmDepth | |
| 45,0kgWeight(net) | |
| 117IDrumvolume | |
| SeeratingplateMaximumdryingload | |
| SeeratingplateRatedpower | |
| StainlesssteelDrummaterial | |
| Housingmaterial | Hot-dipgalvanizedandpowdercoatedsheetmetal, orstainlesssteelsheet. |
Programchart
Thetableindicate the power consumption and time values for drying of fast batch of laundry with various loads and afterspinning at various rates, consistently with the EN61121.
The following requirements apply to the consumption value specified below.
| roomtemperatureInletairtemperature | |
| 50–60%Inletairhumidity | |
| Wouldcreateanambiguitywith2020181Dryingtemperature |
T7200K
| AurRogSpinningspeed (rpm) | Energyconsumption, approximately (kWh)* | Programduration, approximately (min)* | |
| Normaltemp | ⊖ | 1454,051400AUTOEXTRA, | |
| Normaltemp | ⊖ | 1203,501400AUTODRY, | |
| Normaltemp | ⊖ | 1053,151400AUTONORMA | |
| ⊖ | 1153,751000 | ||
| Lowtemp | ⊖ | 1703,351400AUTONORMA | |
| Normaltemp | ⊖ | 1002,951400AUTOHANDIF | |
| Normaltemp | ⊖ | 852,301400AUTOMACHIN | |
| ⊖ | 1002,901000 | ||
| ⊖ | 751,901200MIXDRY | ||
| ⊖ | 551,501000MIXIRON |
| ⊖ | fullload(6kg) |
| ⊖ | partialload |
* Duetodeviationsintermsoftypeandamountoflaundry,spinning,powersupplyoscillation,and environmenttemperatureandhumidity,thevaluesmeasuredattheusermaydifferfromtheonestated inthetable.
Disposal
Disposal/recyclingofpackaging
Ourproductpackagingismadeofenvironmentallyfriendlymaterialsthatcanberecycled, disposedof,ordestroyedwithoutanyhazardtotheenvironment.Tothisend,packagingmaterials arelabelledappropriately.
Thesymbolontheproductoritspackagingindicatesthattheproductshouldnotbetreatedasnormal householdwaste. Taketheproducttoanauthorizedcollectioncentreforwasteelectricandelectronic equipmentprocessing.
Whendisposingofanappliance,attheendofitsusefullife,removeallpowercordsanddestroythe doorlatchandswitchtopreventthedoorfromlockingorlatching(childsafety).
Correctdisposaloftheproductwillhelppreventanynegativeeffectsontheenvironmentandhealth ofpeoplewhichcouldoccurincaseofincorrectproductremoval. Fordetailedinformationonremoval andprocessingoftheproduct,pleasecontacttherelevantauthorityinchargeofwastemanagement, yourwastedisposalservice,orthestorewhereyouboughttheproduct.
Service
Vi har service i hela Sverige/ Nationwide service in Sweden
Besök www.cylinda.se / Visit www.cylinda.se
Ring 0771-25 25 00 (endast lokaltaxa) / Call 0771-25 25 00
Uppge / Declare
Maskintyp / Model code
Serienummer / Serial number
Inköpsdatum / Purchase date
Problembeskrivning / Problem description
- Innehåll
- Allmänt
- INFORMATION!
- Friståendeapparat
- 5
- Slåpå
- Avstängning
- 1
- 8
- 9
- WARNING!
- Introduction
- ELECTRICSHOCK!
- HOTSURFACE!
- DANGEROFFIRE!
- Quickguide
- Safetyprecautions
- General
- • DANGEROFFIRE!
- Safety
- Childsafety
- SAVETHESEINSTRUCTIONSFORFUTUREREFERENCE!
- Dryerdescription
- Beforeusingtheapplianceforthefirsttime
- Packaging
- Cleaning
- Choosingthelanguage
- Installationandconnection
- Dryerplacement
- Free-standing appliance
- Clearancearoundthedryerforoptimumoperation
- Stackingontopofawashingmachine
- Howtostackadryerontothewashingmachine(CYLINDA):
- 2
- 3
- 4
- Tablecontinuedfromlastpage
- Setthedryerfeet:
- 6
- Changingthedooropeningdirection
- 7
- 10
- Drainingthecondensate
- Connectingtothepowermains
- Connectionupondelivery
- Advicesbeforedrying
- Laundrysorting
- Clothing
- Laundrysymbols
- Materials(fabrics)suitablefordryinginatumbledryer
- Materials(fabrics)thatmaynotbedriedinatumbledryer
- Dryingprocess,stepbystep
- STEP1:Sortthefabrics
- Turningon
- Switchingoff
- STEP3: Openthedryerdoorandinsertthelaundry.
- STEP4: Choosethedryingprogram.
- STEP5: Choosing the program settings
- Onlyapplianceowner/distributormaychangethesettings!
- DelayStart
- STEP6: Closethedoorandstartthedryingprocess.
- Remainingtime
- Pausing, stopping or changing the program
- STEP7:Endofprogram
- Settings
- SOUNDS
- Cleaningandmaintenance
- Cleaningthedoornetfilterinthedoor
- NOTE!
- Emptyingthecondensatetank
- Watercondensercleaning
- Cleaningtheapplianceexterior
- Errors-whattodo?
- Failuredisplay
- Service
- Beforecallingaservicetechnician
- Kontaktadress
- Technicalinformation
- Programchart
- Disposal
- Disposal/recyclingofpackaging
- Uppge / Declare
Brand : Cylinda
Model : T7200K
Category : Tumble drier