IHI9161S - Cooker Cylinda - Free user manual and instructions
Find the device manual for free IHI9161S Cylinda in PDF.


| Product Type | Induction Hob |
| Brand | Cylinda |
| Model | IHI9161S |
| Power Supply Voltage | 220-240 V ~, 230 V 2N~, 380-415 V 3N~ |
| Adjustable Power Levels | 2.5 kW, 4.0 kW, 6.0 kW, 7.2 kW |
| Number of Cooking Zones | 4 |
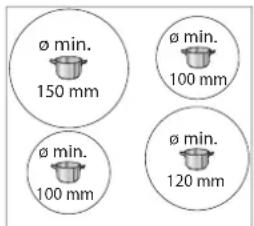
| Minimum Pan Diameter per Zone | 150 mm (front left), 100 mm (front right), 100 mm (rear left), 120 mm (rear right) |
| Booster Function | Yes, for rapid heating (power level 'P') |
| Timer | Yes, with countdown and automatic switch-off per zone |
| Control Panel Lock | Yes, press timer/key lock button for 3 seconds |
| Residual Heat Indicator | Yes, displays 'H' when zone is hot |
| Pan Detection | Yes, automatic off if no suitable pan detected within 30 seconds |
| Safety Features | Child lock, automatic shut-off, overheat protection, power management |
| Cleaning Instructions | Use soft cloth or special hob cleaner; avoid abrasive sponges; remove sugar spills immediately |
| Energy Saving Tips | Use residual heat, match pan size to zone, use lids, flat bottom pans |
| Compatible Cookware | Ferromagnetic (enamelled steel, cast iron, induction-compatible stainless steel) |
| Installation | Requires qualified electrician; must be earthed; disconnect before installation |
| After-Sales Service | Contact Cylinda (www.cylinda.se or phone 0771-25 25 00 in Sweden) |
Frequently Asked Questions - IHI9161S Cylinda
User questions about IHI9161S Cylinda
0 question about this device. Answer the ones you know or ask your own.
Ask a new question about this device
Download the instructions for your Cooker in PDF format for free! Find your manual IHI9161S - Cylinda and take your electronic device back in hand. On this page are published all the documents necessary for the use of your device. IHI9161S by Cylinda.
USER MANUAL IHI9161S Cylinda
natural_image
Simple line drawing of a kitchen appliance with oven, refrigerator, and washing machine (no text or symbols)SAFETY INSTRUCTIONS
IMPORTANT TO BE READ AND OBSERVED
Download the complete instruction manual on http://cylinda.se or call the phone number shown on the warranty booklet.
Before using the appliance, read these safety instructions. Keep them nearby for future reference. These instructions and the appliance itself provide important safety warnings, to be observed at all times. The manufacturer declines any liability for failure to observe these safety instructions, for inappropriate use of the appliance or incorrect setting of controls.
⚠ WARNING: The appliance and its accessible parts become hot during use. Care should be taken to avoid touching heating elements.
Children less than 8 years of age shall be kept away unless continuously supervised.
⚠ WARNING: If the hob surface is cracked, do not use the appliance - risk of electric shock.
⚠ WARNING: Danger of fire: Do not store items on the cooking surfaces.
⚠️ CAUTION: The cooking process has to be supervised. A short cooking process has to be supervised continuously.
⚠ WARNING: Unattended cooking on a hob with fat or oil can be dangerous - risk of fire. NEVER try to extinguish a fire with water: instead, switch off the appliance and then cover flame e.g. with a lid or a fire blanket.
⚠ Do not use the hob as a work surface or support. Keep clothes or other flammable materials away from the appliance, until all the components have cooled down completely - risk of fire.
⚠ Metallic objects such as knives, forks, spoons and lids should not be placed on the hob surface since they can get hot.
⚠️ Very young children (0-3 years) should be kept away from the appliance. Young children (3-8 years) should be kept away from the appliance unless continuously supervised. Children from 8 years old and above and persons with reduced physical, sensory or mental capabilities or lack of experience and knowledge can use this appliance only if they are supervised or have been given instructions on safe use and understand the hazards involved. Children must not play with the appliance. Cleaning and user maintenance must not be carried out by children without supervision.
⚠️ After use, switch off the hob element by its control and do not rely on the pan detector.
PERMITTED USE
⚠️ CAUTION: the appliance is not intended to be operated by means of an external switching device, such as a timer, or separate remote controlled system. This appliance is intended to be used in household and similar applications such as: staff kitchen areas in shops, offices and other working environments; farm houses; by clients in hotels, motels, bed & breakfast and other residential environments.
⚠️ No other use is permitted (e.g. heating rooms).
⚠ This appliance is not for professional use. Do not use the appliance outdoors.
INSTALLATION
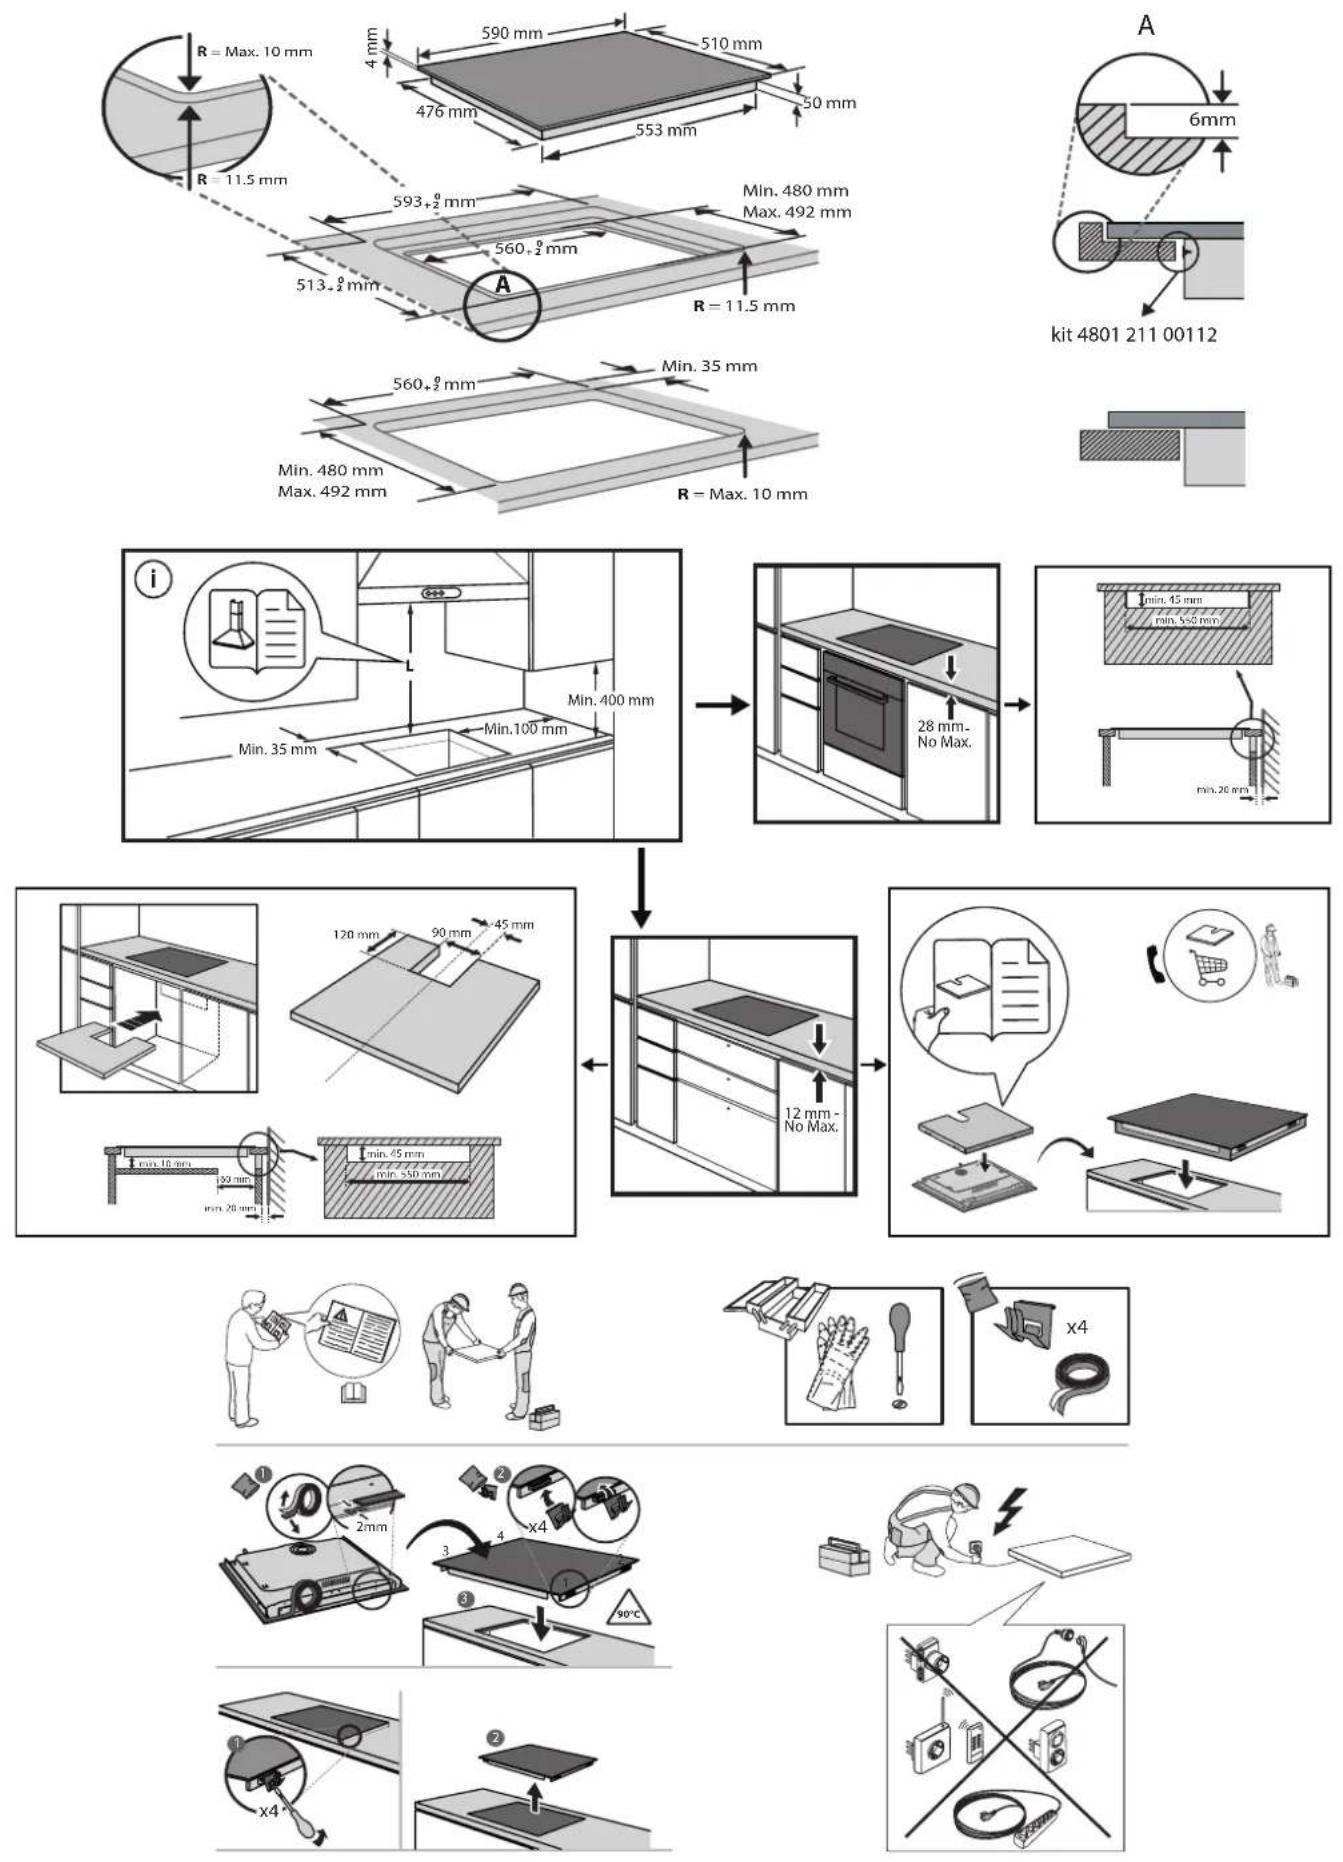
⚠ The appliance must be handled and installed by two or more persons - risk of injury. Use protective gloves to unpack and install - risk of cuts.
⚠️ Installation, including water supply (if any), electrical connections and repairs must be carried out by a qualified technician. Do not repair or replace any part of the appliance unless specifically stated in the user manual. Keep children away from the installation site. After unpacking the appliance, make sure that it has not been damaged during transport. In the event of problems, contact the dealer or your nearest After-sales Service. Once installed, packaging waste (plastic, styrofoam parts etc.) must be stored out of reach of children - risk of suffocation. The appliance must be disconnected from the power supply before any installation operation - risk of electric shock. During installation, make sure the appliance does not damage the power cable - risk of fire or electric shock. Only activate the appliance when the installation has been completed.
⚠️ Carry out all cabinet cutting operations before fitting the appliance and remove all wood chips and sawdust.
⚠️ If the appliance is not installed above an oven, a separator panel (not included) must be installed in the compartment under the appliance.
ELECTRICAL WARNINGS
⚠ It must be possible to disconnect the appliance from the power supply by unplugging it if plug is accessible, or by a multi-pole switch installed upstream of the socket in accordance with the wiring rules and the appliance must be earthed in conformity with national electrical safety standards.
⚠ Do not use extension leads, multiple sockets or adapters. The electrical components must not be accessible to the user after installation. Do not use the appliance when you are wet or barefoot. Do not operate this appliance if it has a damaged power cable or plug, if it is not working properly, or if it has been damaged or dropped.
⚠️If the supply cord is damaged, it must be replaced with an identical one by the manufacturer, its service agent or similarly qualified persons in order to avoid a hazard - risk of electric shock.
CLEANING AND MAINTENANCE
⚠ WARNING: Ensure that the appliance is switched off and disconnected from the power supply before performing any maintenance operation; never use steam cleaning equipment - risk of electric shock.
⚠ Do not use abrasive or corrosive products, chlorine-based cleaners or pan scourers.
DISPOSAL OF PACKAGING MATERIALS
The packaging material is 100% recyclable and is marked with the recycle symbol 🌐
The various parts of the packaging must therefore be disposed of responsibly and in full compliance with local authority regulations governing waste disposal.
DISPOSAL OF HOUSEHOLD APPLIANCES
This appliance is manufactured with recyclable or reusable materials. Dispose of it in accordance with local waste disposal regulations. For further information on the treatment, recovery and recycling of household electrical appliances, contact your local authority, the collection service for household waste or the store where you purchased the appliance. This appliance is marked in compliance with European Directive 2012/19/EU, Waste Electrical and Electronic Equipment (WEEE).
By ensuring this product is disposed of correctly, you will help prevent negative consequences for the environment and human health.
The symbol on the product or on the accompanying documentation indicates that it should not be treated as domestic waste but must be taken to an appropriate collection center for the recycling of electrical and electronic equipment.
ENERGY SAVING TIPS
Make the most of your hot plate's residual heat by switching it off a few minutes before you finish cooking.
The base of your pot or pan should cover the hot plate completely; a container that is smaller than the hot plate will cause energy to be wasted. Cover your pots and pans with tight-fitting lids while cooking and use as little water as possible. Cooking with the lid off will greatly increase energy consumption.
Use only flat-bottomed pots and pans.
DECLARATION OF CONFORMITY
This appliance meets the Ecodesign requirements set out in European Regulation n. 66/2014, in conformity to the European standard EN 60350-2.
NOTE
People with a pacemaker or similar medical device should use care when standing near this induction cooktop while it is on. The electromagnetic field may affect the pacemaker or similar device. Consult your doctor, or the manufacturer of the pacemaker or similar medical device for additional information about its effects with electromagnetic fields of the induction cooktop.
INSTALLATION
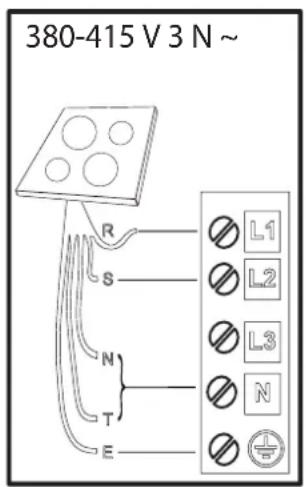
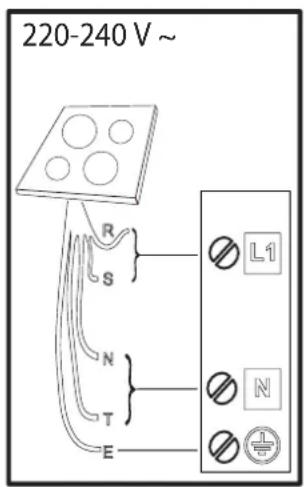
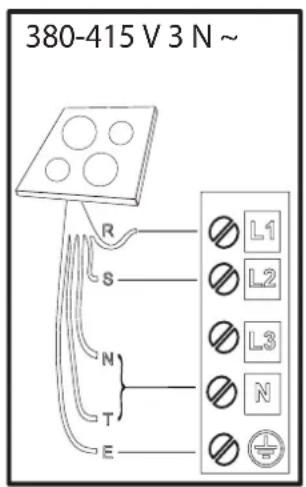
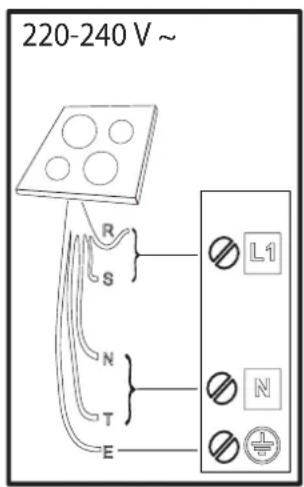
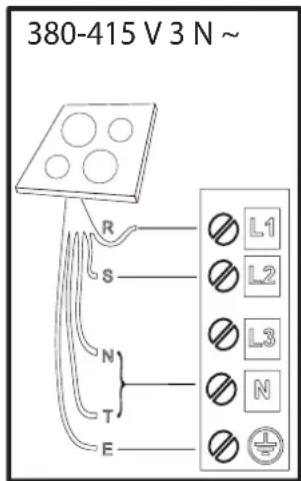
ELECTRICAL CONNECTION
Electrical connection must be made before connecting the appliance to the electricity supply.
Installation must be carried out by qualified personnel who know the current safety and installation regulations. Specifically, installation must be carried out in compliance with the regulations of the local electricity supply company.
Make sure the voltage specified on the data plate located on the bottom of the appliance is the same as that of the home.
Regulations require that the appliance be earthed: use conductors (including the earth conductor) of the appropriate size only.
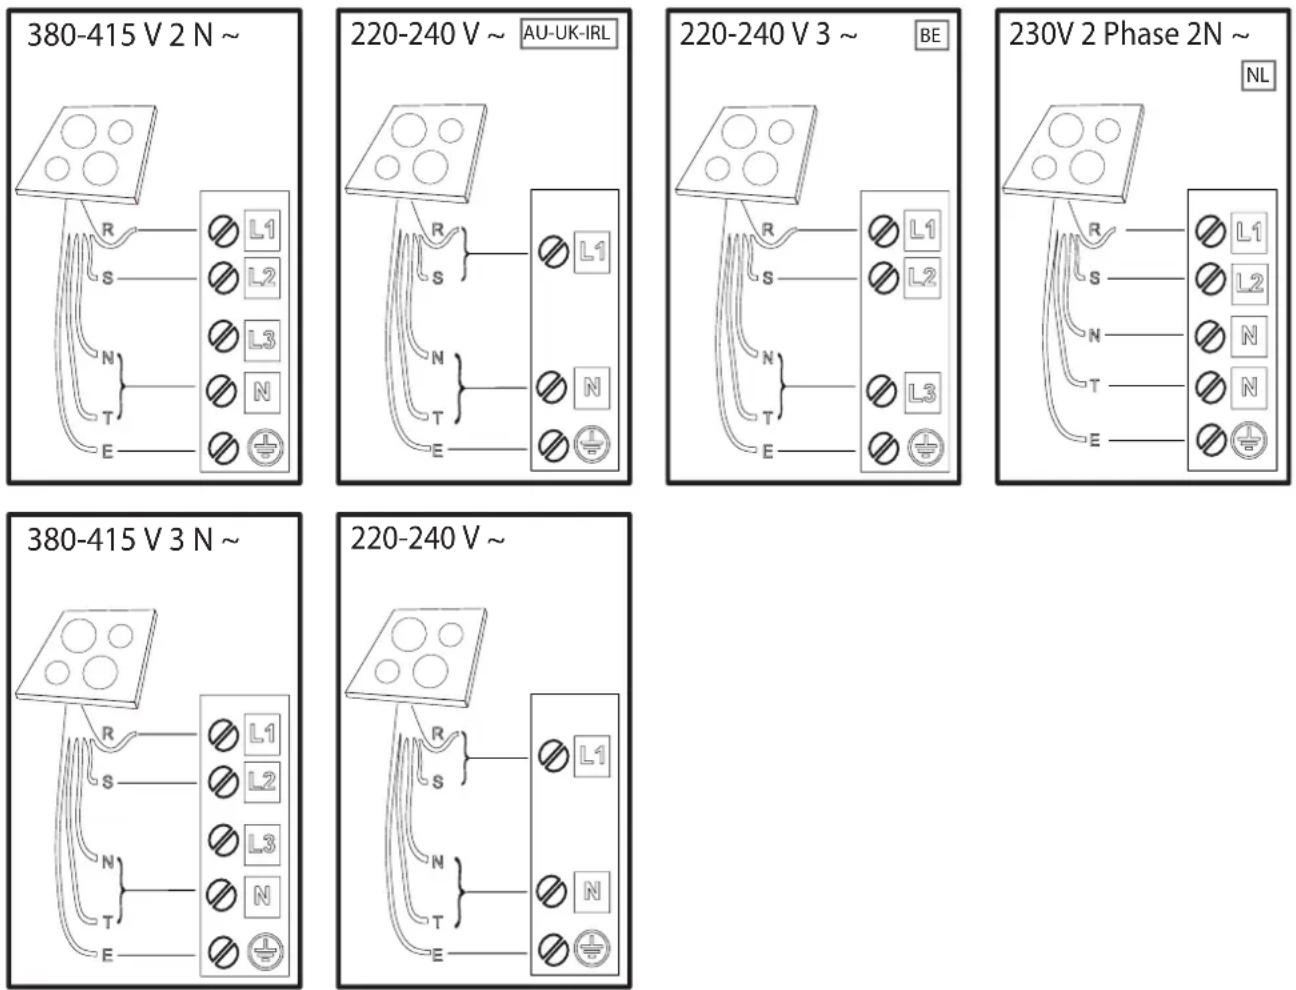
R
black-nero-negro-preto-μαύροσ-must-melns-juodas-czarny-schwarz-noir-zwart-negru-черно-црн- črna-crno-черный-чорний-қара-černá-čierna-fekete-svart-musta-svart-sort-siyah-dubh
S
brown-marrone-marrón-marrom-kafé-pruun-brūns-rudas-brazowy-braunen-brun-bruin-maro-kaфяв-браon-rjava-smed-korичневый-korичневий-коңыр-hnědý-hnedý-barna-brunt-ruskea-brunt-brunkahverengi-donn
T
blue (gray)-blu (grigio)-azul (gris)-azul (cinza)-μπλε (γκρι)-sinine (hall)-zila (pelēka)-mėlyna (pilkas)-niebieski (szary)-blau (grau)-bleu (gris)-blauw (grijs)-albastru (gri)-синьо (сиво)-плавa (сива)-modro (sivo)-plava (siva)-синий (серый)-синій (сірий)-көк (сүр)-modrý (šedá)-modrý (sivá)-kék (szürke)-blå (grå)-sininen (harmaa)-blå (grå)-blåt (gråt)-mavi (gri)-gorm (liath)

yellow/green-giallo/verde-amarillo/verde-amarelo/verdekítrivo/πράσινο-kollane/roheline-dzeltens/zalš-geltona/žalia-žółty/zielony-gelb/grün-jaune/vert-geel/groen-galben/verde-jълто/зелено-жуто/зелena-rumeno/zeleno-žuto/zelena-желтый/зеленый-жовтий/зелений-жасыл/сары-žlutá/zelená-žltá/zelená-sárga/zöld-gul/grønn-keltainen/vihreä-gul/grön-gul/grøn-sari/yeşil-buí/glas
N
blue-blu-azul-azul-μπλε-sinine-zila-mélyna-niebieski-blau-bleu-blauw-albastru-cinho-плавa-modroplava-cinih-cinih-kek-modry-modry-kék-blå-sininen-blå-blåt-mavi-gorm
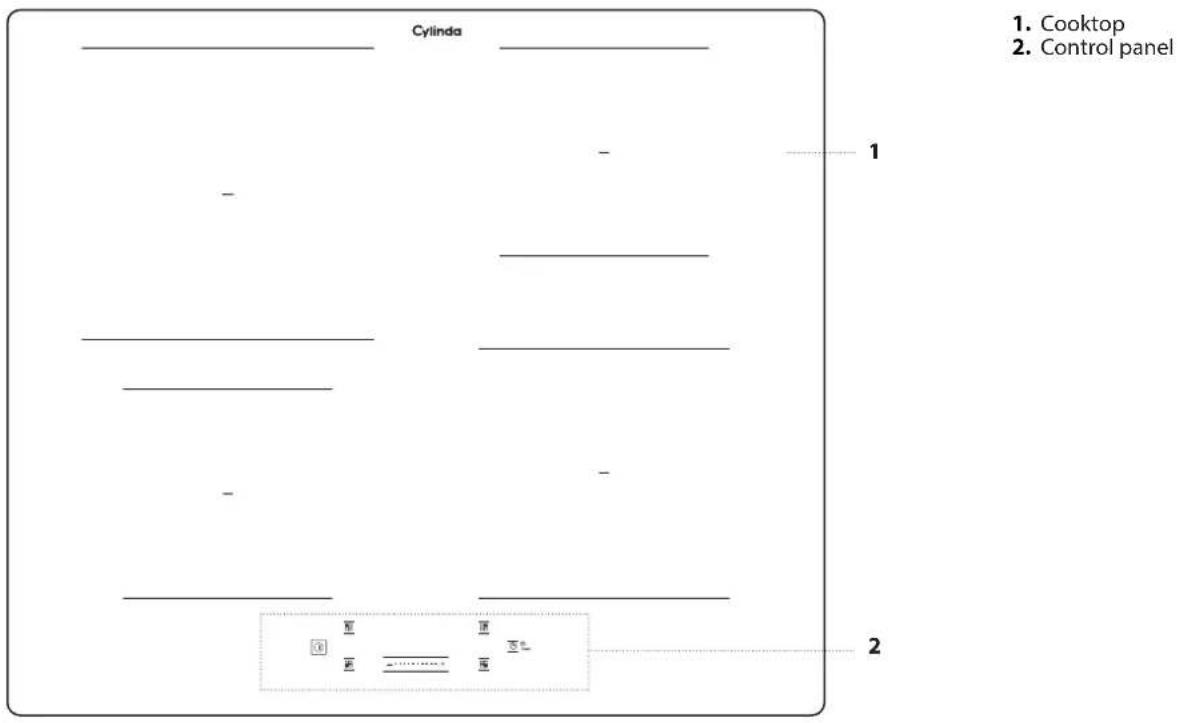
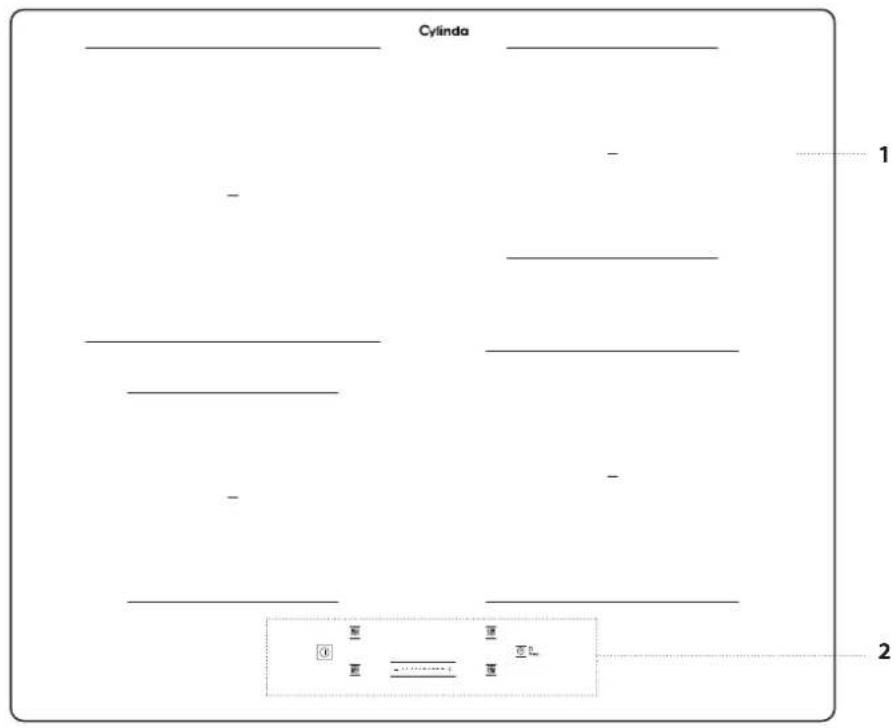
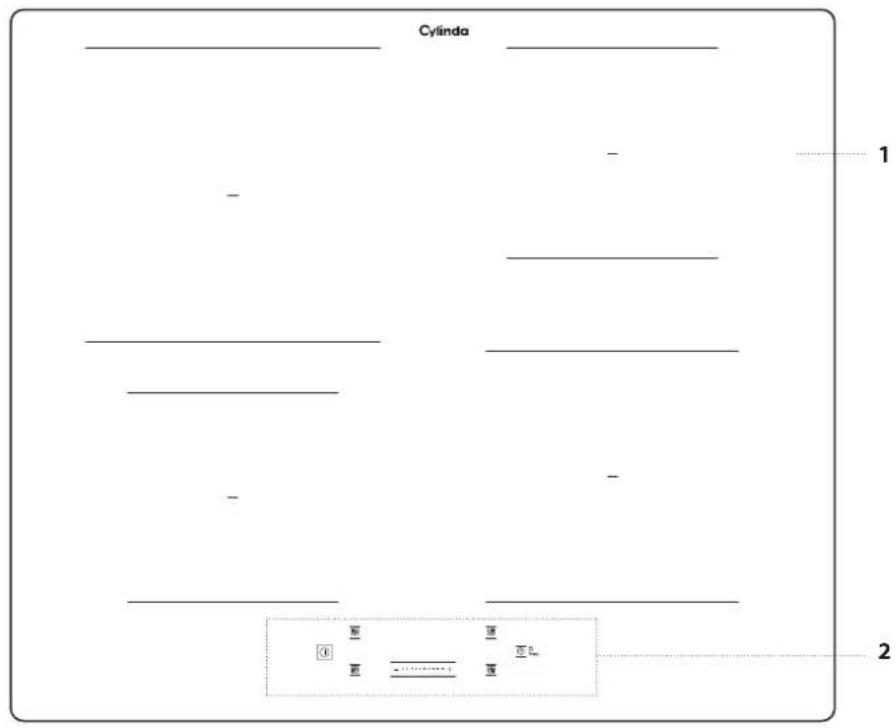
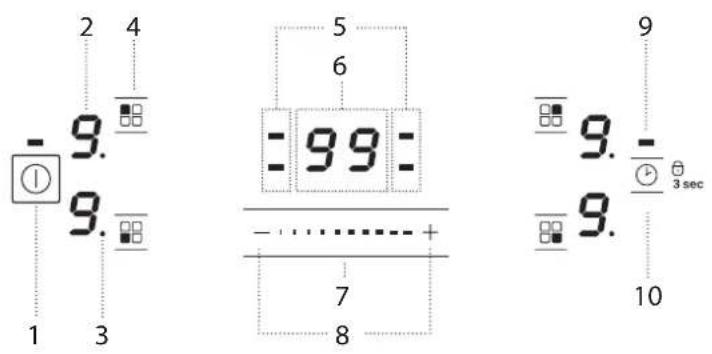
CONTROL PANEL
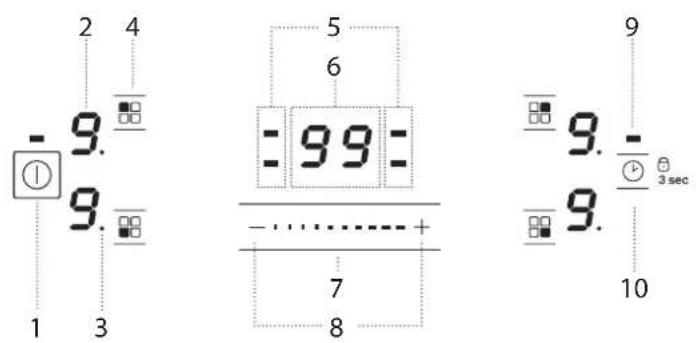
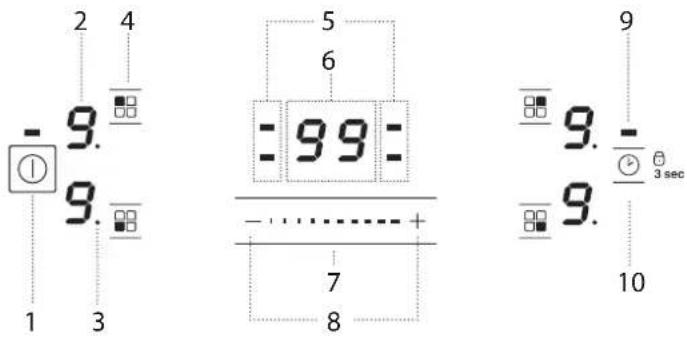
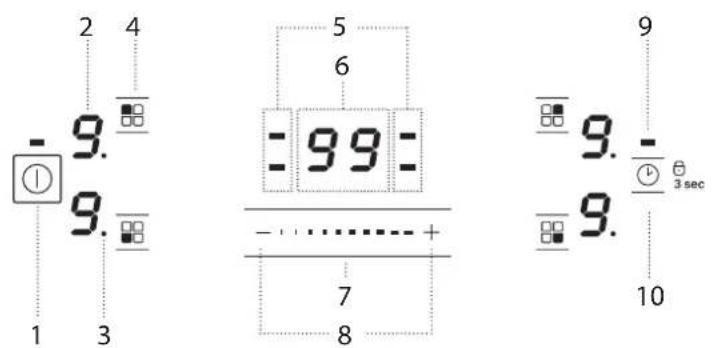
- On/Off button
- Cooking level selected
- Zone selection indicator
-
Cooking zone selection button
-
Timer indicators active for the selected zone
- Cooking time indicator
- Scroll keypad
-
Power and cooking time adjustment buttons
-
Indicator light – function active
- Timer activation/Key lock button - 3 seconds
ACCESSORIES
POTS AND PANS
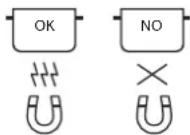
Only use pots and pans made from ferromagnetic material which are suitable for use with induction hobs: - enamelled steel
- cast iron
- special pots and pans in stainless steel, suitable for induction cooking
To determine whether a pot is suitable, check for the symbol (usually stamped on the bottom). A magnet may be used to check whether pots are magnetic.
The quality and the structure of the pot base can alter cooking performance. Some indications for the diameter of the base do not correspond to the actual diameter of the ferromagnetic surface.
Some pots and pans have only a part of the bottom in ferromagnetic material, with parts in another material that is not suitable for induction cooking. These areas may heat up at different levels or with lower temperatures. In certain cases, where the bottom is made mainly of non-ferromagnetic materials, the hob might not recognise the pan and therefore not switch on the cooking zone.
natural_image
Illustration of three kitchen utensils: a pan, a microwave oven, and a grater (no text or symbols)To ensure optimum efficiency, always use pots and pans with a flat bottom that distributes the heat evenly. If the bottom is uneven, this will affect power and heat conduction.
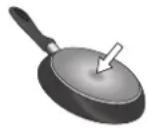
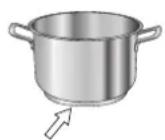
Empty pots or pots with a thin base
Do not use empty pots or pans when the hob is on. The hob is equipped with an internal safety system that constantly monitors the temperature, activating the "automatic off" function where high temperatures are detected. When used with empty pots or pots with thin bases, the temperature may rise very quickly, and the "automatic off" function may not be triggered immediately, damaging the pan or the hob surface. If this occurs, do not touch anything, and wait for all components to cool down.
If any error messages appear, call the service centre.
Minimum diameter of pot/pan base for the different cooking areas
To ensure that the hob functions properly, use pots of a suitable minimum diameter (refer to the drawing below).
Always use the cooking zone that best corresponds to the minimum diameter of the bottom of the pot.
Place the pot making sure it is well centered on the cooking zone in use. It is recommended not to use pots that exceed the perimeter of the cooking zone in use.
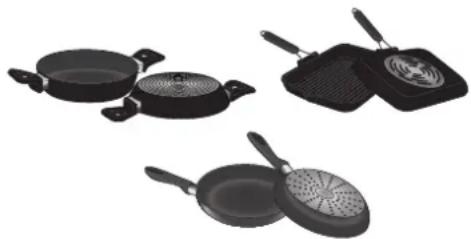
ADAPTER FOR POTS/PANS UNSUITABLE FOR INDUCTION
Using this accessory makes it possible to use pots and pans that are not suitable for induction hobs. It is important to bear in mind that using it affects efficiency and consequently the time needed to heat food. Its use should be limited because the temperatures reached on its surface depend significantly on the pot/pan used, its flatness and the type of food being cooked. Using a pot or pan with a smaller diameter than the adapter disc may cause heat to build up that is not transmitted to the pot or pan and this could blacken both the hob and the disc. Adapt the diameter of your pots/pans and the hob to the diameter of the adapter.
FIRST TIME USE
POWER MANAGEMENT
At the time of purchase, the hob is set to the maximum possible power. Adjust the setting in relation to the limits of the electrical system in your home as described in the following paragraph.
N.B: Depending on the power selected for the hob, some of the cooking zone power levels and functions (e.g. boil or quick reheating) could be automatically limited, in order to prevent the selected limit from being exceeded.
To set the power of the hob:
Once you have connected the device to the mains power supply, you can set the power level within 60 seconds.
Press the "+" button for at least 3 seconds. The display shows "PL".
Confirm by pressing 3 sec
Use the "+" and "-" buttons to select the desired power level.
The power levels available are: 2.5 kW – 4.0 kW – 6.0 kW – 7.2 kW.
Confirm by pressing 3 sec.
The power level selected will stay in the memory even if the power supply is interrupted.
To change the power level, disconnect the appliance from the mains for at least 60 seconds, then plug it back in and repeat the steps above.
If an error occurs during the setting sequence, the "EE" symbol will appear, and you will hear a beep. If this happens, repeat the operation.
If the error persists, contact the After-Sales Service.
ACOUSTIC SIGNAL ON/OFF
To switch the acoustic signal on/off:
- Connect the hob to the power supply;
• Wait for the switch-on sequence; - Within 60 seconds, press the buttons "+" and simultaneously for at least 5 seconds.
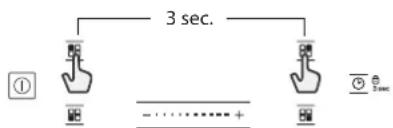
DEMO MODE (reheating deactivated, see section on "Troubleshooting")
To switch the demo mode on and off:
- Connect the hob to the power supply;
• Wait for the switch-on sequence; - Within 60 seconds, press the cooking zone selection buttons in the top left and top right simultaneously for at least 3 seconds (as shown below);
• "DE" will show on the display.
SWITCHING THE HOB ON/OFF
To turn the hob on, press the power button for around 1 second. To turn the hob off, press the same button again, and all cooking zones will be deactivated.
POSITIONING
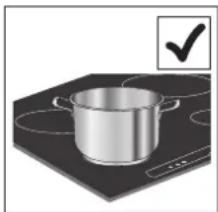
Locate the desired cooking zone by referring to the position symbols. Do not cover the control panel symbols with the cooking pot.
Please note: In the cooking zones close to the control panel, it is advisable to keep pots and pans inside the markings (taking both the bottom of the pan and the upper edge into consideration, as this tends to be larger). This prevents excessive overheating of the keypad. When grilling or frying, please use the rear cooking zones wherever possible.
natural_image
Illustration of a cooking pot on an induction cooktop with a checkmark above (no text or symbols)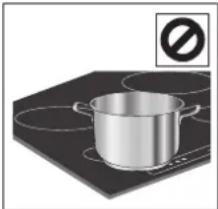
natural_image
Illustration of a cooking pot on an induction cooktop with a prohibition symbol (no text or labels)
ACTIVATING/DEACTIVATING JUSTING POWER LEVELS
COOKING
ZONES
AND
To activate the cooking zones:
Select the pre-selected cooking zone by pressing the corresponding zone selection button. The display will show level "0".
Use the scroll device to select the required power level (from min. 0 to max. 9). To increase the power level, swipe your finger over the slider from left to right (or from right to left if you want to reduce the level). Alternatively, use the "+" and "-" buttons.
Some cooking areas have a quick heating function (Booster). To activate this function, swipe your finger over the scroll device several times from left to right until the display shows "P".
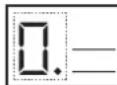
Power indicator display Selected cooking zone indicator
INDICATORS

RESIDUAL HEAT
If "H" appears on the display, this means that the cooking zone is hot. The indicator lights up even if the zone has not been activated but has been heated due to the use of the adjacent zones, or because a hot pot has been placed on it.
When the cooking zone has cooled down, the "H" disappears.
To deactivate the cooking zones:
Select the cooking zone to be switched off by pressing the corresponding zone selection button (a dot will light up on the display, to the bottom right of the power level indicator). Press the "-" to set the level to "0". Alternatively, swipe your finger over the slider several times from right to left until the display shows "0".
To switch off immediately, press and hold the zone selection button for 3 seconds. The cooking zone is deactivated and the residual heat indicator "H" appears on the display.

#
CONTROL PANEL LOCK
To lock the settings and prevent it being switched on accidentally, press and hold the Timer activation/Key lock button for 3 seconds. A beep and a warning light above the symbol indicate that this function has been activated. The control panel is locked except for the switching off function (☐). To unlock the controls, repeat the activation procedure.

[NO TEXT]
TIMER
The timer enables a cooking time to be set for all of the zones.
To activate the timer:
Select and activate the cooking zone for which you wish to set the timer. Press the button with the clock icon and set the desired time, using the "+" and "-" buttons. The timer LED for the zone in use will be illuminated.
A few seconds after the last touch, the timer will start the countdown and the dot on the display that indicates that the seconds are passing will flash. When the set time is up, an acoustic signal will sound and the cooking zone will switch off automatically.
After selecting the zone and the clock icon, the time can be changed at any point, and several timers can be activated simultaneously.
The timer always shows the time set for the selected area, or the shortest remaining time.
When more than one timer is active, the flashing LED indicates the zone for which the cooking time is visible on the display.
To set the timer for another zone, repeat the above steps.
To deactivate the timer:
Select the cooking zone for which you wish to deactivate the timer. Press the button with the clock icon ( ①)
Press and hold the "-" button, or swipe your finger over the slider several times from right to left until the display shows "0:0".

POT INCORRECTLY POSITIONED OR MISSING
This symbol appears if the pot is not suitable for induction cooking, is not positioned correctly or is not of an appropriate size for the cooking zone selected. If no pot is detected within 30 seconds of making the selection, the cooking zone switches off.
COOKING TABLE
| POWER LEVEL TYPE OF COOKING | LEVEL USE(indicating cooking experience and habits) | ||
| Maximum power | P Fast heating | Ideal for rapidly increasing the temperature of food to fast boiling in the case of water or rapidly heating cooking liquids. | |
| 8 – 9 Frying – boiling Ideal for browning, starting to cook, frying deep frozen products, fast boiling. | |||
| High power | 7 – 8 | Browning – sautéing – boiling – grilling | Ideal for sautéing, maintaining a lively boil, cooking and grilling (for a short period of time, 5-10 minutes). |
| 6 – 7 | Browning – cooking – stewing – sautéing – grilling | Ideal for sautéing, maintaining a light boil, cooking and grilling (for a medium period of time, 10-20 minutes), preheating accessories. | |
| Medium power | 4 – 5 | Cooking – stewing – sautéing – grilling | Ideal for stewing, maintaining a gentle boil, cooking (for a long period of time). Creaming pasta. |
| 3 – 4 | Cooking – simmering – thickening – creaming | Ideal for long-cooking recipes (rice, sauces, roasts, fish) with liquids (e.g. water, wines, broth, milk), creaming pasta. | |
| 2 – 3 | Ideal for long-cooking recipes (less than a litre in volume: rice, sauces, roasts, fish) with liquids (e.g. water, wines, broth, milk). | ||
| Low power | 1 – 2 | Melting – defrosting – keeping food warm – creaming | Ideal for softening butter, gently melting chocolate, thawing small products and keeping just-cooked food warm (e.g. sauces, soups, minestrone). |
| 1 | Ideal for keeping just-cooked food warm, for creaming risottos and for keeping serving dishes warm (with induction-suitable accessory). | ||
| Zero power 0 | Support surface | Hob in stand-by or off mode (possible end-of-cooking residual heat, indicated by an "H"). | |
MAINTENANCE AND CLEANING

WARNING
• Do not use steam cleaning equipment.
• Before cleaning, make sure the cooking zones are switched off and that the residual heat indicator ("H") is not displayed.
Important:
- Do not use abrasive sponges or scouring pads as they may damage the glass.
• After each use, clean the hob (when it is cool) to remove any deposits and stains from food residue. - A surface that is not kept suitably clean may reduce the sensitivity of control panel buttons.
-
Use a scraper only if residues are stuck to the hob. Follow the scraper manufacturer's instructions to avoid scratching the glass.
-
Sugar or foods with a high sugar content can damage the hob and must be immediately removed.
• Salt, sugar and sand could scratch the glass surface. - Use a soft cloth, absorbent kitchen paper or a special hob cleaner (follow the Manufacturer's instructions).
• Spills of liquid in the cooking zones can cause the pots to move or vibrate.
• After cleaning the hob, dry thoroughly.
TROUBLESHOOTING
• Check that the electricity supply has not been shut off.
- If you are unable to turn the hob off after using it, disconnect it from the power supply.
- If alphanumeric codes appear on the display when the hob is switched on, consult the following table for instructions.
Please note: The presence of water, liquid spilled from pots or any objects resting on any of the hob buttons can accidentally activate or deactivate the control panel lock function.
| DISPLAY CODE DESCRIPTION POSSIBLE CAUSES SOLUTION | |||
| F0E1 | Cookware is detected but it is not compatible with requested operation. | The cookware is not well positioned on the cooking zone, or it is not compatible with one or more cooking zones. | Press On/Off button twice to remove the F0E1 code and restore the functionality of the cooking zone. Then, try to use the cookware with a different cooking zone, or use different cookware. |
| F0E7 | Wrong power cord connection. The power supply connection is not exactly as indicated in "ELECTRICAL CONNECTION" paragraph. | Adjust the power supply connection according to "ELECTRICAL CONNECTION" paragraph. | |
| F0EA | The control panel switches off because of excessively high temperatures. | The internal temperature of electronic parts is too high. | Wait for the hob to cool down before using it again. |
| F0E2, F0E4, F0E6, F0E8, F0EC, F1E1, F6E1, F7E5, F7E6 | Disconnect the hob from the power supply.Wait a few seconds then reconnect the hob to the power supply.If the problem persists, call the service centre and specify the error code that appears on the display. | ||
| d E [when the hob is off] | The hob does not switch heat up.The functions do not come on. | DEMO MODE on. | Follow the instructions in the "DEMO MODE" paragraph. |
| e.g. P → S [Power level lower than level requested] | The hob automatically sets a minimum power level to ensure that the cooking zone can be used. | The power regulator limits the power levels in accordance with the maximum value set for the hob. | See paragraph "Power management". |
SOUNDS PRODUCED DURING OPERATION
Induction hobs may whistle or creak during normal operation. These noises actually come from the cookware and are linked to the characteristics of the pan bottoms (for example, when the bottoms are made from different layers of material or are irregular).
These noises may vary according to the type of cookware used and to the amount of food it contains and are not the symptom of something wrong.
AFTER-SALES SERVICE
BEFORE CALLING THE AFTER-SALES SERVICE:
- See if you can solve the problem by yourself with the help of the suggestions given in the TROUBLESHOOTING.
- Switch the appliance off and back on again to see if the fault persists.
IF AFTER THE ABOVE CHECKS THE FAULT STILL OCCURS, GET IN TOUCH WITH THE NEAREST AFTER-SALES SERVICE.
To receive assistance, call the number shown on the warranty booklet or follow the instructions on the website www.cylinda.se.
When contacting our Client After sales service, always specify:
• a brief description of the fault;
• the type and exact model of the appliance;
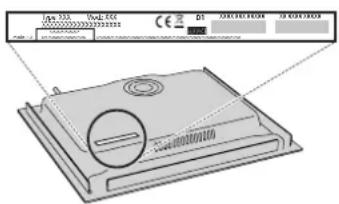
- the service number (number after the word Service on the rating plate). The service number is also indicated on the guarantee booklet;
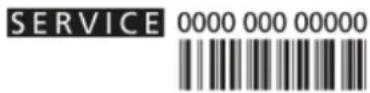
- your full address;
- your telephone number.
If any repairs are required, please contact an authorized after-sales service (to guarantee that original spare parts will be used and repairs carried out correctly).
In the case of flush-mounted installation, call the After Sales Service to request assembly of screws kit 4801 211 00112.
HUSHOLDNINGSAPPARATER
| R | black-nero-negro-preto-μαύροσ-must-melns-juodas-czarny-schwarz-noir-zwart-negru-черно-црн-črna-crno-черный-чорний-қара-černá-čierna-fekete-svart-musta-svart-sort-siyah-dubh |
| S | brown-marrone-marrón-marrom-καφέ-pruun-brūns-rudas-brązowy-braunen-brun-bruin-maro-кафяв-браон-rjava-smed-korичневый-коричневий-қоңыр-hnědý-hnedý-barna-brunt-ruskea-brunt-brunkahverengi-donn |
| T | blue (gray)-blu (grigio)-azul (gris)-azul (cinza)-μπλε (укрі)-sinine (hall)-zila (pelēka)-mėlyna (pilkas)-niebieski (szary)-blau (grau)-bleu (gris)-blauw (grijs)-albastru (gri)-синьо (сиво)-плава (сива)-modro (sivo)-plava (siva)-синий (серый)-синій (сірий)-көк (сүр)-modrý (šedá)-modrý (sivá)-kék (szürke)-blå (grå)-sininen (harmaa)-blå (grå)-blát (gråt)-mavi (gri)-gorm (liath) |
| ≡=E | yellow/green-giallo/verde-amarillo/verde-amarelo/verdekítrpivo/тряσινο-kollane/roheline-dzeltens/załš-geltona/žalia-žółty/zielony-gelb/grün-jaune/vert-geel/groen-galben/verde-жълто/зелено-жуто/зелena-rumeno/zeleno-žuto/zelena-желтый/зеленый-жовтий/зелений-жасыл/сары-žlutá/zelená-žltá/zelená-sárga/zöld-gul/grønn-keltainen/vihreä-gul/grön-gul/grøn-sari/yeşil-bui/glas |
| N | blue-blu-azul-azul-μπλε-sinine-zila-mėlyna-niebieski-blau-bleu-blauw-albastru-синьо-плава-modro-plava-синий-синій-көк-modrý-modrý-kék-blå-sininen-blå-blát-mavi-gorm |
- Kogesektion
- Betjeningspanel
BETJENINGSPANEL
natural_image
Three black cooking utensils: a pan with a side panel, a flat pan with a griddle, and a perforated pan (no text or symbols visible)natural_image
Two-panel image showing a cooking pot on an induction cooktop, one checked with a checkmark and the other without it (no text or symbols)
AKTIVERING/INAKTIVERING AF KOGEZONER OG JUSTERING FFEKTNIVEAUERNE
3 sec LÅSNING AF TASTATURET
natural_image
Three black cooking panes with different designs and handles, arranged on a white background (no text or symbols visible)natural_image
Two-panel illustration showing a cooking pot on an induction cooktop, one with a checkmark and the other without it (no text or symbols)
AKTIVERING/DEAKTIVERING AV KOKESONENE OG REGULERING KTNIVÄER
| R | black-nero-negro-preto-μαύροσ-must-melns-juodas-czarny-schwarz-noir-zwart-negru-черно-црн-črna-crno-черный-чорний-қара-černá-čierna-fekete-svart-musta-svart-sort-siyah-dubh |
| S | brown-marrone-marrón-marrom-καφέ-pruun-brūns-rudas-brązowy-braunen-brun-bruin-maro-кафяв-браон-rjava-smed-korичневый-коричневий-қоңыр-hnědý-hnedý-barna-brunt-ruskea-brunt-brunkahverengi-donn |
| T | blue (gray)-blu (grigio)-azul (gris)-azul (cinza)-μπλε (укрі)-sinine (hall)-zila (pelēka)-mėlyna (pilkas)-niebieski (szary)-blau (grau)-bleu (gris)-blauw (grijs)-albastru (gri)-синьо (сиво)-плава (сива)-modro (sivo)-plava (siva)-синий (серый)-синій (сірий)-көк (сүр)-modrý (šedá)-modrý (sivá)-kék (szürke)-blå (grå)-sininen (harmaa)-blå (grå)-blát (gråt)-mavi (gri)-gorm (liath) |
| ≡=E | yellow/green-giallo/verde-amarillo/verde-amarelo/verdekítrpivo/тряσινο-kollane/roheline-dzeltens/załš-geltona/žalia-žółty/zielony-gelb/grün-jaune/vert-geel/groen-galben/verde-жълто/зелено-жуто/зелena-rumeno/zeleno-žuto/zelena-желтый/зеленый-жовтий/зелений-жасыл/сары-žlutá/zelená-žltá/zelená-sárga/zöld-gul/grønn-keltainen/vihreä-gul/grön-gul/grøn-sari/yeşil-bui/glas |
| N | blue-blu-azul-azul-μπλε-sinine-zila-mėlyna-niebieski-blau-bleu-blauw-albastru-синьо-плава-modro-plava-синий-синій-көк-modrý-modrý-kék-blå-sininen-blå-blát-mavi-gorm |
- Spishäll
- Kontrollpanel
KONTROLLPANEL
natural_image
Three kitchen utensils: three frying panes and one flat-coated plate with a decorative pattern (no text or symbols visible)natural_image
Two identical illustrations of a cooking pot on a stovetop, one checked and the other without a prohibition sign (no text or symbols)
AKTIVERA/AVAKTIVERA KOKZONERNA OCH JUSTERA
EFFEKTINIVÄER
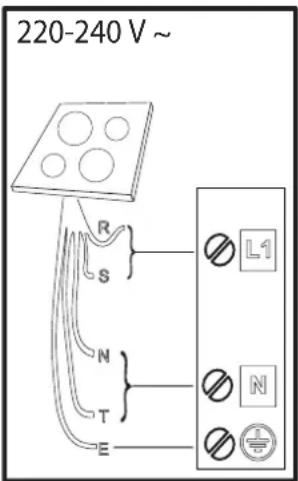
R
black-nero-negro-preto-μαύροσ-must-melns-juodas-czarny-schwarz-noir-zwart-negru-черно-црн- črna-crno-черный-чорний-қара-černá-čierna-fekete-svart-musta-svart-sort-siyah-dubh
S
brown-marrone-marrón-marrom-kafé-pruun-brüns-rudas-brazowy-braunen-brun-bruin-maro-kaфяв-браon-rjava-smeđ-korичневый-korичневий-коңыр-hnědý-hnedý-barna-brunt-ruskea-brunt-brunkahverengi-donn
T
blue (gray)-blu (grigio)-azul (gris)-azul (cinza)-μπλε (γκρι)-sinine (hall)-zila (pelēka)-mėlyna (pilkas)-niebieski (szary)-blau (grau)-bleu (gris)-blauw (grijs)-albastru (gri)-синьо (сиво)-плава (сива)-modro (sivo)-plava (siva)-синий (серый)-синій (cipий)-көк (сүр)-modrý (šedá)-modrý (sivá)-kék (szürke)-blå (grå)-sininen (harmaa)-blå (grå)-blåt (gråt)-mavi (gri)-gorm (liath)

yellow/green-giallo/verde-amarillo/verde-amarelo/verdekítrivo/πράσινο-kollane/roheline-dzeltens/zalš-geltona/žalia-žółty/zielony-gelb/grün-jaune/vert-geel/groen-galben/verde-jkýlto/зелено-жуто/зелena-rumeno/zeleno-žuto/zelena-желтый/зеленый-жовтий/зелений-жасыл/сары-žlutá/zelená-žltá/zelená-sárga/zöld-gul/grønn-keltainen/vihreä-gul/grön-gul/grøn-sari/yeşil-buí/glas
N
blue-blu-azul-azul-μπλε-sinine-zila-mélyna-niebieski-blau-bleu-blauw-albastru-cinho-плавo-modroplava-cinih-cinih-kek-modry-modry-kék-blå-sininen-blå-blåt-mavi-gorm
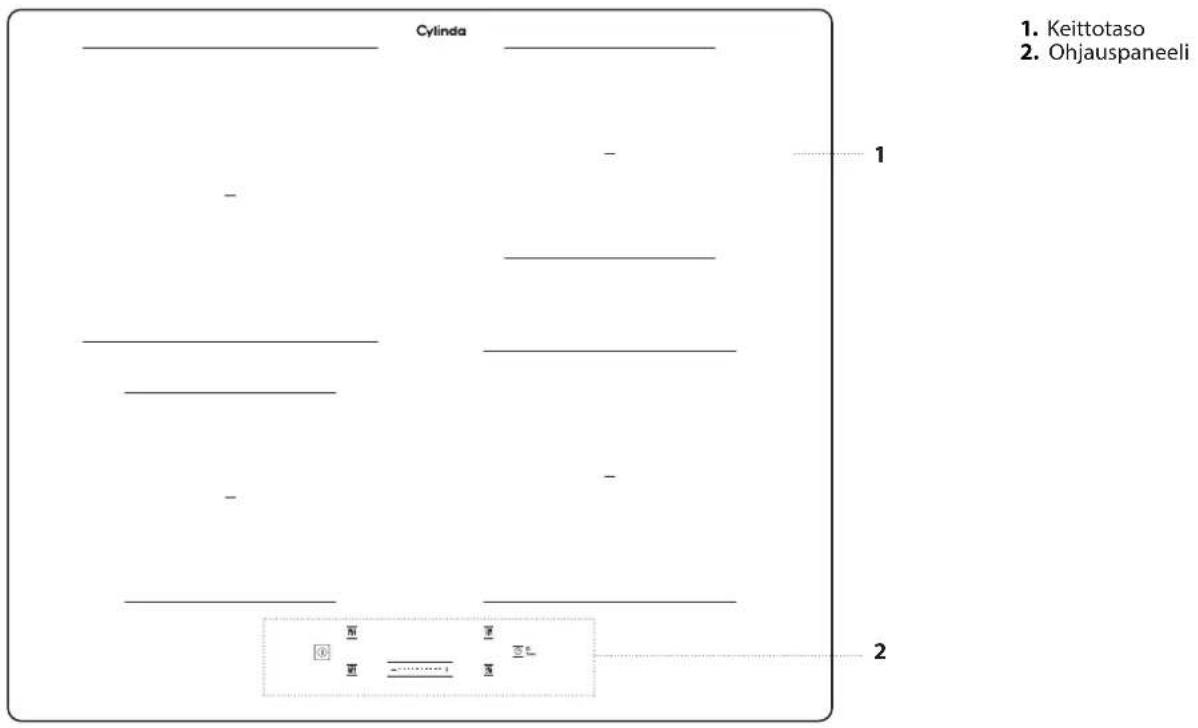
OHJAUSPANEELI
natural_image
Three black cooking utensils: a frying pan, a side dish with a griddle, and a perforated pan (no text or symbols visible)natural_image
Illustration of a cooking pot on an induction cooktop with a checkmark icon (no text or symbols)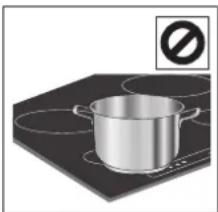
natural_image
Illustration of a cooking pot on an induction cooktop with a prohibition symbol (no text or labels)
KEITTOALUEIDEN KYTKEMINEN TOIMINTAAN/POIS MINNASTA SEKÄ SÄÄTÄMINEN TEHOTASOT
Service: Nationwide service in
Sweden
Visit www.cylinda.se
Ca|0771-25 25 00
Declare: Model code, Serial number, Purchase date, Problem description, Name and address, Phone number
Contact us:
www.cylinda.se
Cylinda
år efter år
- SAFETY INSTRUCTIONS
- IMPORTANT TO BE READ AND OBSERVED
- PERMITTED USE
- INSTALLATION
- ELECTRICAL WARNINGS
- CLEANING AND MAINTENANCE
- DISPOSAL OF PACKAGING MATERIALS
- DISPOSAL OF HOUSEHOLD APPLIANCES
- ENERGY SAVING TIPS
- DECLARATION OF CONFORMITY
- NOTE
- ELECTRICAL CONNECTION
- ACCESSORIES
- POTS AND PANS
- Empty pots or pots with a thin base
- Minimum diameter of pot/pan base for the different cooking areas
- ADAPTER FOR POTS/PANS UNSUITABLE FOR INDUCTION
- FIRST TIME USE
- POWER MANAGEMENT
- To set the power of the hob:
- ACOUSTIC SIGNAL ON/OFF
- SWITCHING THE HOB ON/OFF
- POSITIONING
- ACTIVATING/DEACTIVATING JUSTING POWER LEVELS
- To activate the cooking zones:
- INDICATORS
- RESIDUAL HEAT
- To deactivate the cooking zones:
- CONTROL PANEL LOCK
- TIMER
- To activate the timer:
- To deactivate the timer:
- POT INCORRECTLY POSITIONED OR MISSING
- COOKING TABLE
- MAINTENANCE AND CLEANING
- WARNING
- Important:
- TROUBLESHOOTING
- SOUNDS PRODUCED DURING OPERATION
- AFTER-SALES SERVICE
- BEFORE CALLING THE AFTER-SALES SERVICE:
- IF AFTER THE ABOVE CHECKS THE FAULT STILL OCCURS, GET IN TOUCH WITH THE NEAREST AFTER-SALES SERVICE.
- HUSHOLDNINGSAPPARATER
- AKTIVERING/INAKTIVERING AF KOGEZONER OG JUSTERING FFEKTNIVEAUERNE
- sec LÅSNING AF TASTATURET
- AKTIVERING/DEAKTIVERING AV KOKESONENE OG REGULERING KTNIVÄER
- AKTIVERA/AVAKTIVERA KOKZONERNA OCH JUSTERA
- EFFEKTINIVÄER
- OHJAUSPANEELI
- KEITTOALUEIDEN KYTKEMINEN TOIMINTAAN/POIS MINNASTA SEKÄ SÄÄTÄMINEN TEHOTASOT
Brand : Cylinda
Model : IHI9161S
Category : Cooker