
Rangemaster CRF 3500.COM - Rangefinder LEICA - Free user manual and instructions
Find the device manual for free Rangemaster CRF 3500.COM LEICA in PDF.


| Product Type | Laser Rangefinder |
| Model | Leica Rangemaster CRF 3500.COM |
| Magnification | 7x |
| Lens Diameter | 24 mm |
| Exit Pupil | 3.4 mm |
| Eye Relief | 15 mm |
| Field of View (at 1000 m/yds) | 115.6 m |
| Measuring Range | Up to 3200 m / 3500 yds (max.), min. 10 m / 11 yds |
| Measuring Accuracy | 10–200 m: ±0.5 m; 200–400 m: ±1 m; 400–800 m: ±2 m; above 800 m: 0.5% |
| Laser Type | Class 3R, invisible, eye safe |
| Laser Beam Divergence | Approx. 0.85 x 1.28 mrad |
| Measuring Modes | Single measurement, Scan mode |
| Ballistic Functions | 12 pre-programmed ballistic curves, ABC (EHR, Holdover, Click adjustment), Kestrel/LR+ support |
| Other Features | Inclination sensor, temperature and pressure measurement, Bluetooth 5.0, Leica Hunting App remote control |
| Display | 4-digit seven-segment LED with icons; adjustable brightness (Auto, br1–br5) |
| Units | Meters/yards, centimeters/inches (selectable) |
| Power Supply | 1x 3V lithium cell (type CR2) |
| Battery Life | Approx. 1700 measurements at 20°C |
| Dimensions (W x H x D) | 75 x 34 x 113 mm |
| Weight (with battery) | Approx. 185 g |
| Operating Temperature | -20 to 55°C |
| Storage Temperature | -40 to 85°C |
| Waterproofing | IPX7? (waterproof to 1 m for 30 min) |
| Housing Material | Carbon fiber reinforced plastic, softcoated / die-cast magnesium |
| Scope of Delivery | Rangefinder, CR2 battery, carry strap, Cordura case, Quick Start Guide, test certificate |
| Care and Cleaning | Remove coarse dirt with soft brush; clean lenses with damp cloth and dry with lint-free cloth; avoid alcohol/chemicals |
| Safety Warnings | Never point laser at eyes/people/animals; do not disassemble; use only specified battery; keep away from children |
Frequently Asked Questions - Rangemaster CRF 3500.COM LEICA
User questions about Rangemaster CRF 3500.COM LEICA
0 question about this device. Answer the ones you know or ask your own.
Ask a new question about this device
Download the instructions for your Rangefinder in PDF format for free! Find your manual Rangemaster CRF 3500.COM - LEICA and take your electronic device back in hand. On this page are published all the documents necessary for the use of your device. Rangemaster CRF 3500.COM by LEICA.
USER MANUAL Rangemaster CRF 3500.COM LEICA
we wish you a great deal of enjoyment and every success with your new Leica product.
Please read this manual to familiarize yourself with the full scope of functions your product has to offer.
Please use this product only as described in this manual. Only then can safe and easy operation be guaranteed.
Your Leica Camera AG
The device uses an invisible laser beam. Please read the chapters "Safety Remarks" and "Important Information" before using the product for the first time. Knowledge of the content will prevent inadvertent damage to the product, possible injuries and other risks.
SCOPE OF DELIVERY
The standard scope of delivery* contains the following:
- Leica Rangemaster
- 3 V lithium cell (type CR2)
- Carry strap
- Cordura case
- Quick Start Guide
- Test certificate
REPLACEMENT PARTS/ACCESSORIES
Contact Leica Customer Care or your specialist Leica retailer for details on the latest spare parts/accessory range:
https://en.leica-camera.com/Stores-Dealers/Leica-dealer-locator
*The actual scope of delivery may vary depending on model.
LEGAL INFORMATION
REGULATORY INFORMATION
You will find the manufacturing date of your product on the stickers on the packaging. The date format is year/month/day.
This product is manufactured under license by Leupold & Stevens, Inc.
CE MARK
The CE mark on our products documents compliance with the fundamental requirements of applicable EU guidelines.
| English Declaration of Conformity (DoC) Leica Camera AG herewith confirms that this product complies with basic requirements and other relevant standards included in the directive 2014/53/EU. Customers can download a copy of the original DoC regarding our RF products from our DoC server here; www.cert.leica-camera.com Please contact The Leica Camera AG Product Support in case of any further questions: Am Leitz Park 5, 35578 Wetzlar, Germany Depending on product (see technical data) | ||
| Type | Frequency range [center frequency] | Max. output (dBm E.I.R.P.) |
| WLAN | 2412-2432/5180-5240 MHz/ 5260-5320/5500-5700 MHz | 20 |
| Bluetooth * Wireless Technology | 2402-2430 MHz 20 | |
With the exception of the characteristics permitted under Variance Number IEC 60825-1 Ed. 3, effective May 8, 2019, this product complies with the performance standards for laser products under 21 CFR 1040.10 and 1040.11.
DISPOSAL OF ELECTRICAL AND ELECTRONIC EQUIPMENT
(Applies within the EU and for other European countries with segregated waste collection systems.)
This device contains electric and/or electronic components which must not be disposed of in general household waste! Instead, it should be disposed of at a recycling collection point provided by your local authority.
This service is free of charge. Any standard or rechargeable batteries used in this device must be removed and disposed of separately in accordance with local regulations.
Please contact your local authorities, waste disposal collection point or the retailer, from whom you purchased the device for more information on correct waste disposal.
SAFETY REMARKS
WARNING
Non-compliance with the following points may result in serious injury or death.
LASER
- The use of any operations not described in this manual or any alterations on the device may result in hazardous radiation exposure.
- The laser device is active and emitting an invisible laser beam as long as the display in the eyepiece is active. Never point the laser focusing optics at a person or animal.
- Do not depress any of the two buttons while aiming at a human eye or while looking into the optics from the lens side.
- Never aim the laser at an eye.
- Do not aim the laser at people or animals.
GENERAL INFORMATION
- Avoid looking directly at bright light sources with your Leica Rangemaster to prevent eye injury.
CAUTION
Non-compliance with the following points may result in personal injury or damage to the device.
LASER
- Avoid touching any of the two buttons while the distance measurement function is not in use to prevent an accidental activation of the laser beam.
- Do not attempt to disassemble, reassemble or repair the Leica Rangemaster yourself. Emitting laser radiation may pose a serious health risk. The manufacturer warranty is void, once a device was disassembled, reassembled or repaired.
- Remove the battery immediately and stop using the device if the device housing is damaged or if it emits a strange sound after being dropped or behaves unexpectedly for any other reason.
GENERAL INFORMATION
- Keep the device out of the reach of small children.
- Do not use the device while walking! You might trip and fall.
- Do not combine the operation of your Leica Rangemaster with other optical components, e.g. lenses or binoculars. Using the Leica Rangemaster in conjunction with another optical device increases the danger of damaging your eyes.
- Do not attempt to disassemble or modify the device; exposing the internal electronics may cause damage, injury or electric shock.
BATTERY
- Only the battery type stated and described in this manual must be used. Any improper use of the batteries or the use of unapproved battery types may result in an explosion!
- Do not expose the battery to sunlight, heat, humidity or moisture for prolonged periods of time. It must not be placed in a microwave oven or a high-pressure container as this would pose a fire or explosion hazard!
- Never dispose of batteries in fire and never attempt to heat, recharge, dismantle or break open a battery.
- Batteries must always be stored out of the reach of children. Do not leave batteries lying around, as they could be swallowed by children or pets.
CARRY STRAP
- Carry straps are usually made of very robust material. You should therefore keep it out of the reach of children. A carry strap is not a toy and poses a strangulation risk.
- Use the carry strap only for its intended purpose on a camera or on binoculars. Any other use poses the risk of injury and may possibly result in damage to the carry strap and is therefore not permitted.
- Carry straps should also not be used for cameras/binoculars during sports activities that pose a risk of entanglement (e.g. when mountain climbing and similar outdoor activities).
IMPORTANT INFORMATION
GENERAL INFORMATION
- Do not attempt to take the device apart yourself. Repairs must only be carried out in authorized workshops.
- Remove the battery from the housing if you will not be using the product for an extended period of time.
- Low temperatures impair battery performance. Carry the range-finder close to the body in low ambient temperatures and insert a fresh battery.
- Make sure to store the batteries in a cool, dry place.
- Depleted batteries must never be disposed of in household waste as they contain toxic materials that are harmful to the environment. Battery collection points are provided at most large retail outlets; alternatively, you can dispose of old batteries at a local special waste collection point to ensure correct recycling.
- Do not touch the glass surfaces with your fingers, especially if you have previously applied hand cream, insect repellent, etc. These substances may contain chemicals that damage or destroy the coatings on the glass surfaces.
MEASURING VALUES
- The influence of all ballistically relevant influencing factors is greatly increased at longer ranges and considerable variations may occur. The ballistic values displayed should therefore only be viewed as a guideline.
- Regardless of whether this information is used, you are responsible for assessing the relevant hunting situation.
- Leica Camera AG does not accept liability for the accuracy of values transmitted from third-party devices.
- Powerful electric fields, e.g. emanating from radar systems, may cause errors and/or faulty values.
- The geomagnetic field can similarly cause value deviations.
WARRANTY
In addition to your statutory warranty rights from your dealer, Leica Camera AG offers a 2-year warranty for this Leica product in accordance with the conditions started below. The Leica warranty does not impact on any statutory consumer rights in accordance with relevant national law or any consumer rights vis-a-vis the retailer arising from the purchase contract concluded between them.
WARRANTY CONDITIONS
By purchasing this Leica accessory, you have acquired a rangefinder that is manufactured in compliance with special quality standards, and which was thoroughly tested at each individual production step by experienced specialists. We offer a two-year warranty for this product from the date of sale by an authorized dealer under the following conditions:
- Any claims related to manufacturing defects during the warranty period will be remedied free of charge at our discretion by repairing the defect, replacing defective parts or by replacing the faulty product with a product of perfect function. All other claims of any kind and on whatever legal basis shall not be accepted in connection with this warranty.
- Wear parts like eyecups, leather details, armoring, carry straps and accessories are exempt from the warranty. The same applies for surface damage.
- Any warranty claims become void if the defect in question is a result of improper handling - which also includes the use of third-party accessories - or if the product was manipulated by unauthorized persons or workshops or if the serial number of the product was rendered illegible.
- Warranty claims can be submitted only in conjunction with the original proof of purchase - complete with the date of pur-
chase, as well as the address and signature of an authorized retailer.
- In case of a warranty claim, please send the Leica product, the original proof of purchase and a description of the fault to Leica Camera AG Customer Care or a Leica regional subsidiary.
PICK-UP SERVICE FOR REPAIR SUBMISSIONS
(Applies for EU only)
We will organize the shipping of your device to our Customer Care department if you should notice a problem with your device during the warranty period. Please contact our service hotline to make the necessary arrangements (+49 (0)6441 2080 189). Our pick-up service will collect your Leica product at the agreed time from your premises free of charge and transport it to our Customer Care location for evaluation.
Contact:
en.leica-camera.com/Contact
TABLE OF CONTENT
FOREWORD 2
SCOPE OF DELIVERY 2
REPLACEMENT PARTS/ACCESSORIES 2
LEGAL INFORMATION 3
REGULATORY INFORMATION ....3
SAFETY REMARKS 4
WARNING....4
CAUTION ....5
IMPORTANT INFORMATION......6
WARRANTY....7
TABLE OF CONTENT 8
PART DESIGNATIONS 10
PREPARATION 12
ATTACHING THE CARRY STRAP....12
INSERTING/CHANGING THE BATTERY....12
SETTING THE EYECUP.... 13
DIOPTER SETTINGS.... 13
SETTINGS AND OPERATION....14
ACTIVATING THE RANGEFINDER....14
MENU CONTROL.... 14
MENU OVERVIEW 15
SETTING THE DISPLAY BRIGHTNESS 16
SETTING THE ZEROING DISTANCE....16
METERING OPERATION 17
DISTANCE MEASUREMENT MADE EASY 17
SCAN MODE....17
METERING RANGE/ACCURACY....18
DISPLAYING ATMOSPHERIC CONDITIONS 19
BALLISTICS....20
DETERMINING THE BALLISTIC CURVE....20
SETTING THE BALLISTIC CURVE....21
OUTPUT FORMATS (ABC) 21
EQUIVALENT HORIZONTAL RANGE (EHR) 22
HOLDOVER (HOLD)....22
IMPACT POINT CORRECTION 23
KESTREL CORRECTION VALUES (LHT) 23
LEICA HUNTING APP 24
CONNECTION....24
REMOTE CONTROL....25
FIRMWARE UPDATES 25
CARE/CLEANING 25
TECHNICAL DATA....26
LEICA CUSTOMER CARE....27
APPENDIX....28
Definition of the various categories of information found in this manual
Note
- Additional Information
Caution
- Non-compliance may result in damage to the device and accessories - Non-compliance may result in personal injury
Warning
- Non-compliance may result in serious injury or death
PART DESIGNATIONS
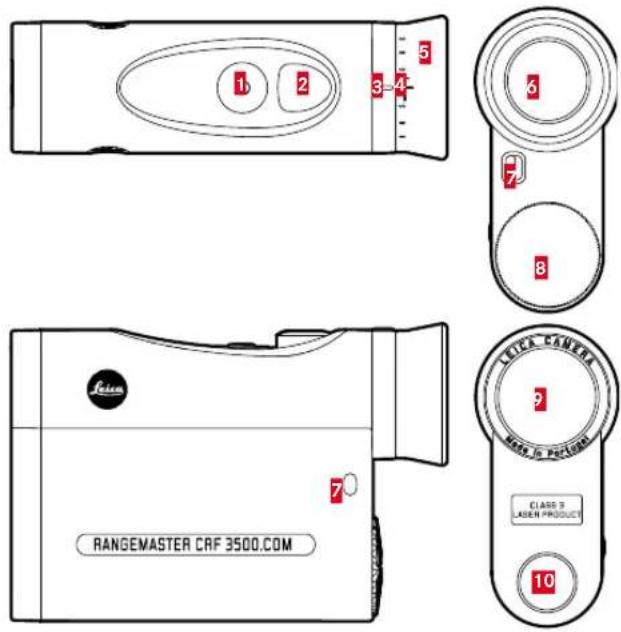
1 Menu Selection Button
EUUS (meter/yard display), b† (Bluetooth), bALL (ballistic curve), SId (zeroing distance), AbC (ballistic output formats), brtn (display brightness)
2 Main switch
Activation and deactivation of the rangefinder
3 Index for diopter setting
4 Diopter scale
5 Eyecups (rotating)
Use without eye glasses: turn in counter-clockwise direction
6 Eyepiece
7 Strap lugs
8 Battery compartment
3 V lithium cell (type CR2)
9 Lens
10 Laser transmission lens
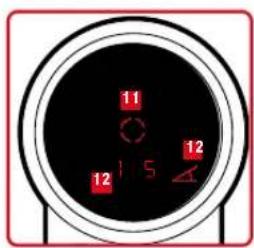
11 Target mark
C
12 Display
0 0 (value)/BALL (menu item)/M, Y (unit of measure)/
* (Bluetooth)/ (inclination)
Caution
Never look directly at the sun or other bright sources of light through your Leica optics! Doing so may seriously damage your eyes!
Warning
Make sure the weapon is not loaded before doing any work or changing settings on the rifle scope and before changing batteries.
PREPARATION
ATTACHING THE CARRY STRAP
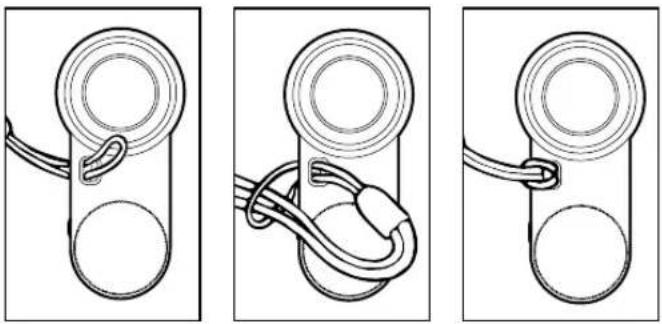
natural_image
Three sequential diagrams showing a mechanical or electrical component with no text or symbolsThread the small loop of the carry strap through the strap lug
Thread the strap through the small loop
▶ Pull tight
- The loop created should lie tightly around the strap lug.
Caution
- Check the correct attachment of the carry strap by pulling at it with some force. The length of the carry strap must not change.
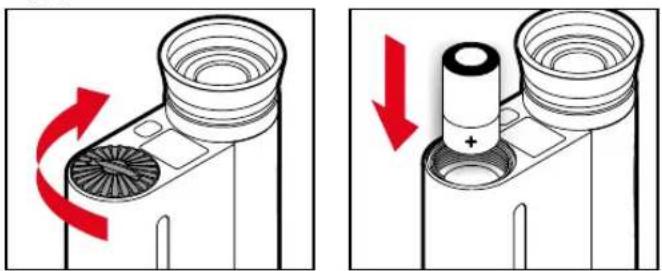
INSERTING/CHANGING THE BATTERY
A cylindrical 3 V lithium cell (type CR 2) is required for power supply.
natural_image
Technical illustration of a mechanical component with red arrows indicating rotation and change (no text or symbols)▶ Turn the lid over the battery compartment in anti-clockwise direction
Remove the lid
▶ Insert the battery with the plus contact first
▶ Attach the lid
▶ Tighten the lid by turning it in clock-wise direction
BATTERY CHARGE LEVEL
The measured value and reticule display will flash when the battery nears depletion. You will still have enough power for another 50 measurements - but with a gradually reducing range - once the display begins flashing.
SETTING THE EYECUP
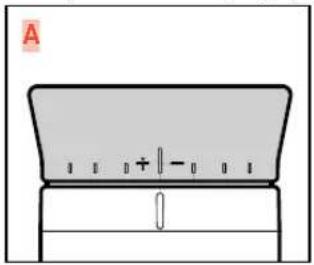
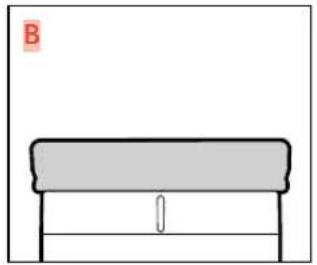
The position of the eyecups will depend on whether you wear eyeglasses or not. Contact lens wearers can make the settings just like anyone not wearing any eyeglasses.
natural_image
Simple line drawing of a bench or bench with a handle and seat, no text or symbols presentFOR USE WITHOUT EYE GLASSES
▶ Fold eyecup out (Fig. A)
FOR USE WITH EYE GLASSES
▶ Fold eyecup down (Fig. B)
DIOPTER SETTINGS
Diopter compensation is available for vision defects of up to ± 3.5 diopters to allow the use of this product without eyeglasses.
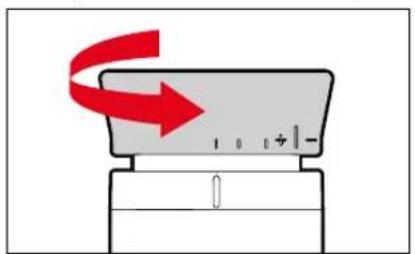
Diopter compensation allows you to adjust the sharpness of the reticule to a value that is best for your vision.
▶ Switch on the device
- The reticule appears.
▶ Aim at a distant object
▶ Turn the eyecup until the target mark is in sharp focus
- Check the set value on the diopter scale.
SETTINGS AND OPERATION
ACTIVATING THE RANGEFINDER
▶ Press the main switch
- The device switches on and the target mark appears.
Note
- The device deactivates automatically after a few minutes.
MENU CONTROL
ACCESSING THE MAIN MENU
▶ Press and hold the menu selection button ( ≥ 3 s)
• EU.US appears.
NAVIGATING IN THE MAIN MENU
▶ Press the menu selection button repeatedly (<2 s each time) until the desired menu item appears
| EUUS | Meter/Yard display |
| bt | Bluetooth®-ready |
| bALL | Ballistic curve |
| Sld | Zeroing distance |
| AbC | Ballistic output formats |
| brtn | Display brightness |
SELECTING SETTINGS
▶ Press the main switch 2 repeatedly (<2 s each time) until the desired menu item appears
▶ Press the menu selection button briefly
- The selected setting is initially lit continuously as confirmation, then the display switches to the next menu item and then disappears if no further settings are made.
MENU OVERVIEW
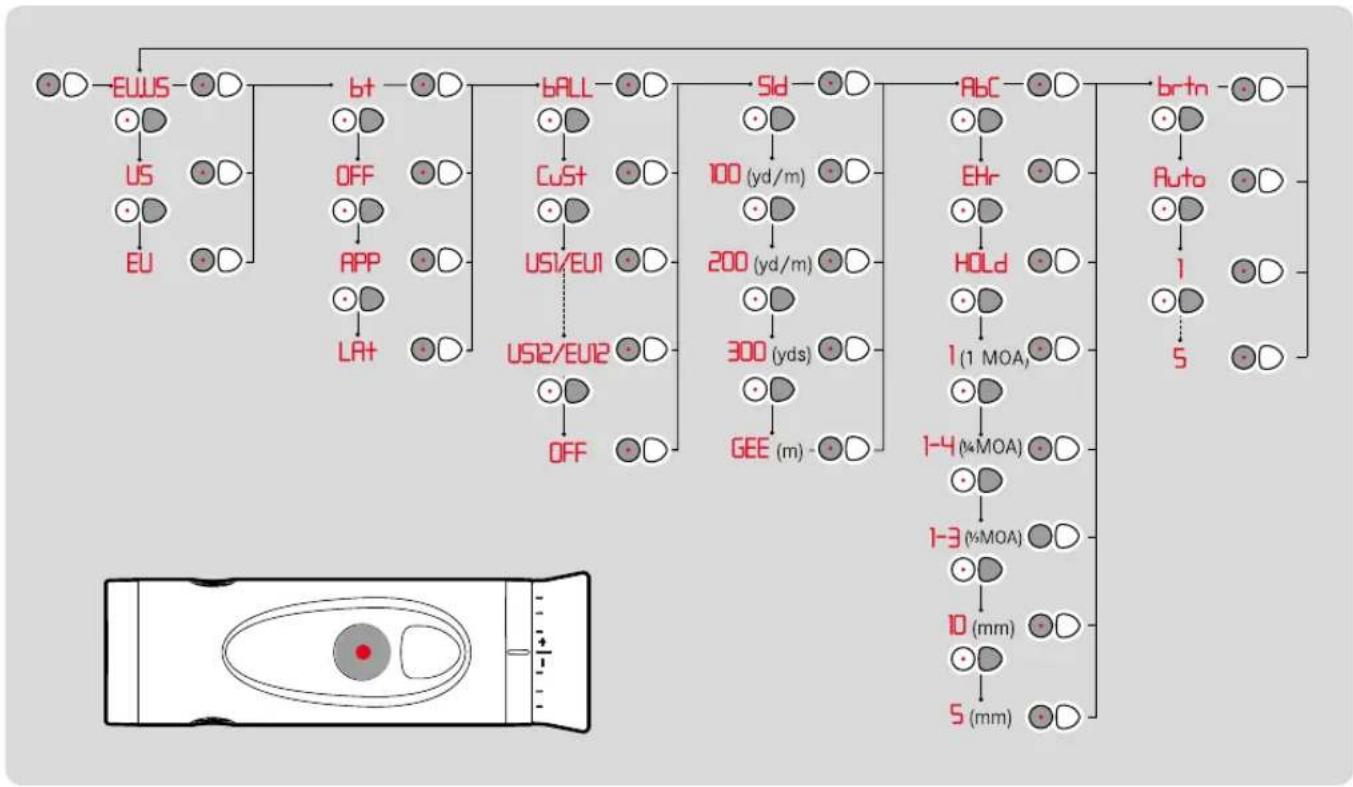
flowchart
graph TD
    A["EU"] --> B["US"]
    B --> C["EU"]
    D["EU"] --> E["US"]
    F["EU"] --> G["US"]
    H["EU"] --> I["US"]
    J["EU"] --> K["US"]
    L["EU"] --> M["US"]
    N["EU"] --> O["US"]
    P["EU"] --> Q["US"]
    R["EU"] --> S["US"]
    T["EU"] --> U["US"]
    V["EU"] --> W["US"]
    X["EU"] --> Y["US"]
    Z["EU"] --> AA["US"]
    AB["EU"] --> AC["US"]
    AD["EU"] --> AE["US"]
    AF["EU"] --> AG["US"]
    AH["EU"] --> AI["US"]
    AJ["EU"] --> AK["US"]
    AL["EU"] --> AM["US"]
    AN["EU"] --> AO["US"]
    AP["EU"] --> AQ["US"]
    AR["EU"] --> AS["US"]
    AT["EU"] --> AU["US"]
    AV["EU"] --> AW["US"]
    AX["EU"] --> AY["US"]
    AZ["EU"] --> BA["US"]
    BB["EU"] --> BC["US"]
    BD["EU"] --> BE["US"]
    BF["EU"] --> BG["US"]
    BH["EU"] --> BI["US"]
    BJ["EU"] --> BK["US"]
    BL["EU"] --> BM["US"]
    BN["EU"] --> BO["US"]
    BP["EU"] --> BQ["US"]
    BR["EU"] --> BS["US"]
    BT["EU"] --> BU["US"]
    BV["EU"] --> BW["US"]
    BX["EU"] --> BY["US"]
    BZ["EU"] --> CA["US"]
    CB["EU"] --> CD["US"]
    CE["EU"] --> CF["US"]
    DG["EU"] --> DH["US"]
    DI["EU"] --> DJ["US"]
    DK["EU"] --> DL["US"]
    DV["EU"] --> DW["US"]
    DX["EU"] --> DXB["US"]
    DXB --> DXC["US"]
    DXC --> DXD["US"]
    DXD --> DXE["US"]
    DXE --> DXF["US"]
    DXF --> DXG["US"]
    DXG --> DXH["US"]
    DXH --> DXI["US"]
    DXI --> DXJ["US"]
    DXJ --> DXK["US"]
    DXK --> DXL["US"]
    DXL --> DXM["US"]
    DXM --> DXN["US"]
    DXN --> DXO["US"]
    DXO --> DXP["US"]
    DXP --> DXQ["US"]
    DXQ --> DXR["US"]
    DXR --> DXS["US"]
    DXS --> DXT["US"]
    DXT --> DXU["US"]
    DXU --> DXV["US"]
    DXV --> DXW["US"]
    DXW --> DXX["US"]
    DXX --> DXY["US"]
    DXY --> DXZ["US"]
SETTING THE DISPLAY BRIGHTNESS
The brightness sensor can regulate the display brightness automatically or can be set manually in several increments.
▶ Press and hold the menu selection button
▶ Press the menu selection button 5x briefly
- brtn appears.
▶ Press the main switch several times briefly until the desired setting appears
- Auto = automatic
- br1-br5 = fixed brightness values
▶ Press the menu selection button briefly
▶ Press and hold the menu selection button
▶ Press the menu selection button 3x briefly
- Std appears.
▶ Press the main switch several times until the desired zeroing distance is displayed
(100 [m], 200 [m], GEE [m], 100 [y], 200 [y], 300 [y])
▶ Press the menu selection button briefly
METERING OPERATION
DISTANCE MEASUREMENT MADE EASY
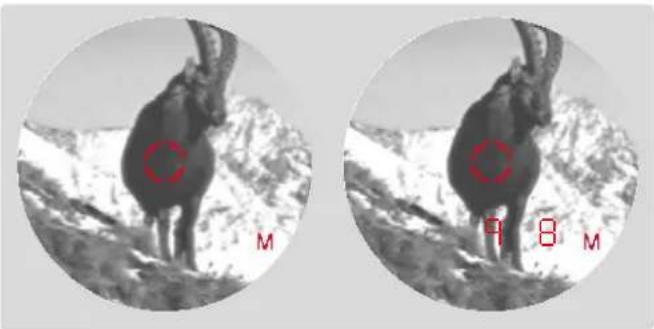
natural_image
Two circular grayscale images showing a deer in snowy mountain terrain, each with a red circle highlighting its head (no text or symbols present)▶ Press the main switch briefly
▶ Aim the target mark at the object
▶ Press the main switch again
- The target mark disappears briefly and the measured value is displayed.
- You can do another measurement at any time by pressing the main button while the target mark remains lit.
- - - will appear in the following scenarios:
- Distance to the object is less than 10 meters
- Range capability is exceeded
- Object is not sufficiently reflective
SCAN MODE (OBJECT TRACKING)
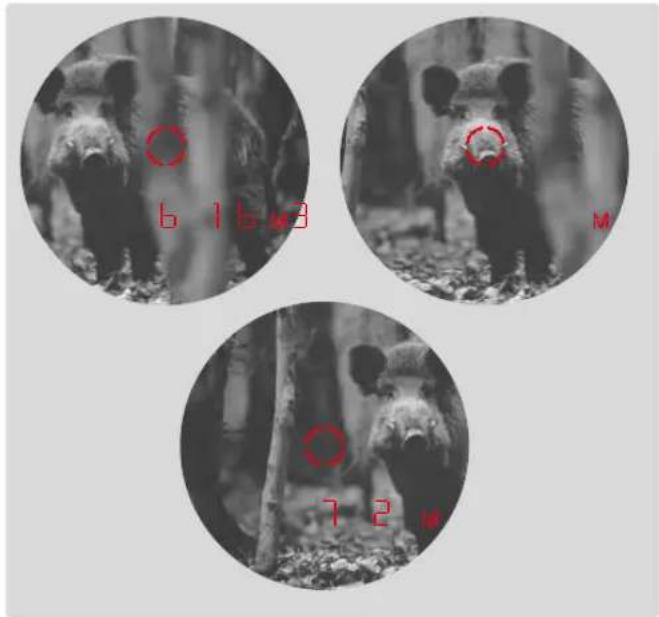
▶ Press the main switch briefly
▶ Aim at the object while target mark is lit
▶ Press and hold main switch for approx. 2.5 seconds
- The device switches to scan mode and will then measure continuously. Scan mode is indicated by a change in the display. A new measured value appears after approx. 0.5 seconds.
METERING RANGE/ACCURACY
Maximum range is achieved in the following scenarios.
- Highly reflective target objects
- At a visual range of around 10 km
Long ranges can be reliably measured or achieved by holding the rangefinder very steady and/or placing it on a solid surface.
Maximum ranges are:
- on highly reflective targets = approx. 2900 m/3170 yds
- Trees = approx. 1850 m/2020 yds
- Game = approx. 1200 m/1310 yds
The measuring range is influenced by the following factors:
| Range longer shorter | ||
| Color | white black | |
| Angle to lens | perpendicular acute | |
| Object size | large small | |
| Sunlight | low light(cloudy) | high light(midday sun) |
| Atmospheric conditions | clear hazy | |
| Object structure | homogeneous(house wall) | inhomogeneous(underbrush, tree) |
The following range/accuracy applies in sunlight and with good visibility:
| Range (in meters) | Accuracy (1σ) Normal Operation | Accuracy (1σ) Scan mode |
| 10–200 | ± 0.5 ± 1.5 | |
| 200–400 | ± 1 ± 2 | |
| 400–800 | ± 2 ± 3 | |
| Above 800 | 0.5 % 0.5 % |
Note
- Distances below 200 m are displayed with an accuracy of one decimal place, e.g. 645.
DISPLAYING ATMOSPHERIC CONDITIONS
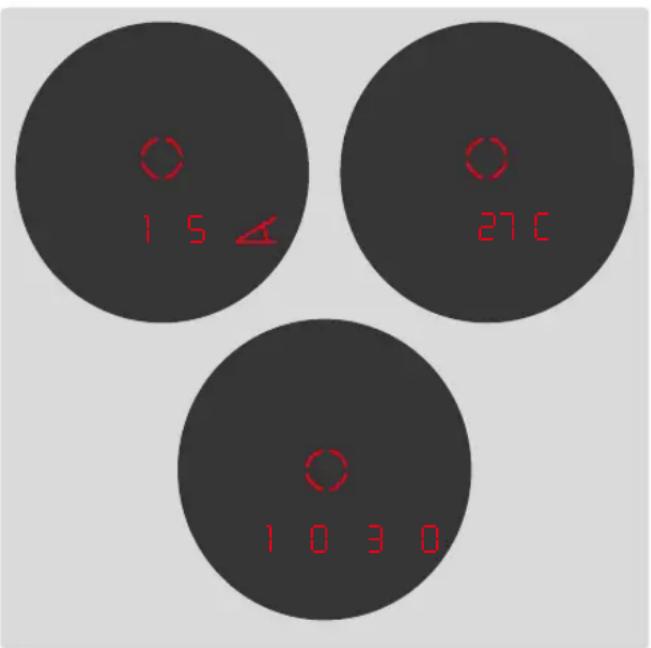
The device determines three crucial pieces of additional information during range measurement to accurately calculate the point of impact:
- The inclination of the device
- Temperature
- atmospheric pressure
These values can be displayed at any time:
▶ Press the menu selection button briefly
- The reticule appears. Then the inclination angle, the temperature and atmospheric pressure are displayed in quick succession for around 2 seconds each.
Note
- If the housing of the device initially has a significantly different temperature than the surroundings, for example when moving from inside to outside, it can take up to 30 minutes before the internal sensor can display the correct ambient temperature again.
BALLISTICS
DETERMINING THE BALLISTIC CURVE
For the precise determination of the impact point correction, the DEVICE includes the bullet trajectory on the basis of the used caliber, as well as the bullet type and weight in the calculation. This can optionally include the calculation adjustment for the equivalent horizontal distance (Ehr, see p. 22) the holdover (HOLd, see p. 22) or the elevation adjustment (1/1-4/1-3/10/5, see p. 23). 12 fixed, pre-programmed ballistic curves are available for selection, which are listed in the tables included in the appendix.
▶ Find the ballistics curve that is closest to the point of impact specified by the ammunition manufacturer in the relevant table.
▶ Setting the selected curve
Example
The rifle scope is zeroed to 100 meters, which means that Table 1 is applicable. The specified point of impact for the ammunition used is -15.0 cm at 200 m. In the relevant column, this is closest to the value 14.5 cm in row EU7 – and is therefore the correct ballistic curve.
We recommend determining ballistic data in practical tests to select an appropriate curve when using the ballistic function at distances longer than 300 m/yds and/or ammunition types that are not included in the internal device settings. Alternatively, you can calculate a curve using the Leica ballistics calculator and then transfer the information to the device via Bluetooth ^® .
Alternatively, ballistic data can be transferred to your Leica device via Bluetooth® using a relevantly equipped Nielsen-Kellermann/Kestrel device (Elite models or similar, with software by Applied Ballistics).
SETTING THE BALLISTIC CURVE
▶ Press and hold the menu selection button
▶ Press the menu selection button 2x
- BALL appears.
▶ Press the main switch repeatedly, until the desired ballistic curve is displayed
| Cust | use a previously saved curve from the Leica Hunting app |
| EUI - EUI2 / US1 - US12 | select a ballistic curve from the tables included in the appendix |
| OFF | distance display without point of impact correction (AbC). |
| LAT | use ballistic correction values by Applied Ballistics (see p. 23). |
▶ Press the menu selection button briefly
Note
- Once a ballistic curve is set, the device will display the range value for 2 s and then the calculated correction values for 6 s after each distance measurement.
OUTPUT FORMATS (ABC)
Advanced Ballistics Compensation (ABC) allows the display of the following ballistic values after a measurement is taken.
▶ Press and hold the menu selection button
▶ Press the menu selection button 4x briefly
- ABC appears.
▶ Press the main switch repeatedly, until the desired setting is displayed
- equivalent horizontal range (EHR)
- relevant holdover (HOLD)
- The number of clicks required on the reticle quick adjustment
- 1 (1 MOA, display in absolute values)
- 1-4 (1/4 MOA, display in clicks)
- 1-3 (1/3 MOA, display in clicks)
- 10mm
- 5mm
▶ Press the menu selection button briefly
The values EH and holdover (HOLD) both take into consideration the following factors.
- measured distance to the target
- inclination angle of the weapon
– measured temperature and atmospheric values - set zeroing distance
Notes
- The calculation of the above values is based on the currently set ballistic curve. That curve must be selected first.
- For safety reasons, ballistic output values are only specified up to a range of 800 m/yds. The actual measured range is also specified.
EQUIVALENT HORIZONTAL RANGE (EH-)
Shots at higher or lower elevation targets are subject to changed ballistic conditions. They require knowledge of the equivalent horizontal range, which is relevant for hunting. Knowledge of the equivalent horizontal range is important, for example when using ballistic reticles. EH values are indicated by the additional EH display.
Note
- Horizontal EH measurements can also result in values that differ from the "straight line" measured distance, e.g. if the temperature and/or the atmospheric pressure vary from pre-programmed values.
HOLDOVER (HOLD)
Holdover is defined as the point that you aim at with the weapon instead of the actual target point to compensate for the variation caused by the trajectory of the bullet (e.g. when using classic hunting reticles). By displaying the holdover, the rangefinder can provide valuable support in achieving the most accurate shots possible when hunting. In addition to distance, the ballistic settings and the ballistic curve you have selected are the basis for calculation.
Note
- Each shot correction always refers to the distance between the shooter and the target. Example: You would have to aim 30 cm higher on the object than without compensation if 300 m 30 is displayed.
IMPACT POINT CORRECTION (USING ELEVATION ADJUSTMENT)
(Click/MoA adjustment)
Variations in the point of impact can be compensated by adjusting the reticle on your rifle scope accordingly.
The rangefinder can display the number of clicks needed by taking into consideration the ballistic curve and the zeroing distance.
You can additionally set for various elevations, on which basis the click stops should be displayed:
- based on the international standard MOA (minutes of angle) graduation
- in 5 or 10 millimeter increments
KESTREL CORRECTION VALUES (LA+)
The LR+ setting allows the use of ballistic correction values by Applied Ballistics as an alternative for ABC ballistics (ABC, see p. 21). This requires a relevantly equipped Nielsen-Kellermann device (Kestrel models). The device connects to the Leica rangemaster via Bluetooth® to receive data like the measured distance, the angle and the target direction. The Nielsen-Kellermann/Kestrel device will include the received data in its calculation of the ballistic values to return the right correction values.
▶ Configuring a Nielsen-Kellermann/Kestrel device
▶ Press and hold the menu selection button
▶ Press the menu selection button 1x briefly
- bt appears.
▶ Press the main switch 3x briefly
- LAH appears.
▶ Press the menu selection button briefly
- Bluetooth® is activated and a connection is established.
Notes
- Comply with the ranges of the relevant Nielsen-Kellermann device.
- Read the manual for using Nielsen-Kellermann devices.
DISPLAYING THE CORRECTION VALUES
The displays in LA+ mode consist of the following:
| U (up) Upward correction | |
| d (down) Downward correction | |
| L (left) Correction to the left | |
| r (right) Correction to the right |
LEICA HUNTING APP
The Leica Hunting app allows the setting and storing of personal ballistics profiles. Install the Leica Hunting app on the mobile device.
▶ Scan the following QR code with the mobile device
for iOS: for Android:
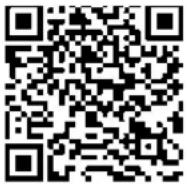
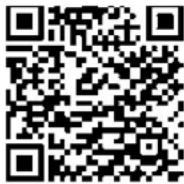
or
The app is available from Apple App Store™/Google Play Store™
CONNECTION
ESTABLISHING A CONNECTION
IN THE RANGEFINDER
▶ Press and hold the menu selection button
▶ Press the menu selection button 1x briefly
- bt appears.
▶ Press the main switch 2x briefly
- APP appears.
▶ Press the menu selection button briefly
- Bluetooth ^30 is activated and a connection is established (✗ appears).
ON THE MOBILE DEVICE
▶ Activate Bluetooth
▶ Launch the Leica Hunting app
▶ Select the relevant device
DISCONNECT THE CONNECTION
▶ Press and hold the menu selection button
▶ Press the menu selection button 1x briefly
- bt appears.
▶ Press the main switch 1x briefly
- OFF appears.
▶ Press the menu selection button briefly
- Bluetooth® is deactivated and the connection disconnects.
REMOTE CONTROL
All functions and settings of the Leica Rangemaster can be done via the remote control.
▶ Establishing a connection
▶ Operate the desired functions via the app
FIRMWARE UPDATES
Leica is continuously working on the further improvement and optimization of their products. Some of these improvements and expansions of the functional scope can be installed at a later time. Leica releases so-called firmware updates at irregular intervals for that purpose. These updates are handled via the Leica Hunting app.
The information contained in this manual references the most current firmware version at the time of market launch.
▶ Establishing a connection
▶ Follow in-app instructions
Caution
- Do not switch off the device during the update process!
CARE/CLEANING
- Your Leica rangefinder requires no special care.
- Coarse dirt particles like sand should be removed with a soft brush or simply blown off.
- Do not use excessive force when cleaning a severely soiled lens surface. The coating is abrasion resistant, but not impervious to sand or salt crystals.
- Always rinse off any traces of salt water! Dried salt crystals could damage the surfaces.
- Fingerprints, etc. on front lenses and eyepiece lenses can be pre-cleaned with a damp cloth and then wiped dry with a clean leather or lint-free cloth.
- The rangefinder should be stored in a well-ventilated, dry and cool place to prevent fungal growth (particularly important in humid climates).
- Do not use alcohol or chemical cleaning solutions on the optics or housing.
TECHNICAL DATA
| Device designation | LEICA RANGEMASTER CRF 3500.COM |
| Type | 9418 |
| Magnification | 7x |
| Lens diameter | 24 mm |
| Exit pupil | 3.4 mm |
| Twilight factor | 13 |
| Relative brightness | 11.8 |
| Field of view (at 1,000 m/yds) | 115.6 m |
| Subjective viewing angle | 6.6° |
| Eye relief | 15 mm |
| Prism system | Roof |
| Coating | on lenses: high Durable Coating (HDC ^TM ) and hydrophobic Aqua-Dura ^® coating on external lenses on prisms: phase correction coating P 40 |
| Diopter adjustment | ± 3.5 dpt. |
| Operating temperature range | -20 to 55°C |
| Storage temperature | -40 to 85°C |
| Waterproofing | for 30 min: waterproof to 1 m deep |
| Housing/chassis material | Carbon fiber reinforced plastic, softcoated / die-cast magnesium |
| Range | Maximum range approx. 3200 m/3500 yds, equivalent horizontal distance approx. to 1,100 m/1203 yds, ballistic output values approx. to 800 m/875 yds, minimum range approx. 10 m/11 yds |
| Metering methods | Single measurement, scan mode |
| Measuring accuracy | 10-200: ± 0.5, 200-400: ± 1, 400-800: ± 2, above 800: 0.5% |
| Display/Unit of measure | 4 seven-segment LEDs plus additional icons, optional display setting in yard/inch or meter/centimeter |
| Laser | Invisible, safe for eyes in compliance with EN and FDA Class 3R, laser beam divergence approx. 0.85 x 1.28 mrad |
| Interfaces | Bluetooth® 5.0 (Low Energy), frequency range: 2402-2480 MHz, max. output: 4 dBm |
| Max. measurement time | 0.3 s |
| Battery | 3 V lithium cell (type CR2) |
| Battery life | approx. 1,700 measurements at 20°C |
| Dimensions (W x H x D) | approx. 75 x 34 x 113 mm |
| Weight (with battery) | approx. 185 g |
Subject to changes in design, production, and scope of delivery.
LEICA CUSTOMER CARE
Please contact Leica Camera AG Customer Care for the maintenance of your Leica equipment and for help and advice regarding Leica products and how to order them. You can also contact the Customer Care department or the repair service provided by your regional Leica subsidiary for repairs or warranty claims.
Leica Camera AG
Leica Customer Care
Am Leitz-Park 5
35578 Wetzlar
Germany
Phone: +49 (0)6441 2080-189
Fax: +49 (0)6441 2080-339
Email: customer.care@leica-camera.com
www.leica-camera.com
APPENDIX
Conditions: atmospheric pressure 1013 mbar, Temperature 20°C, horizontal shots.
ZEROING DISTANCE AZD (m) (AZD = Advantageous Zeroing Distance)
| Bullet drop (cm) | ||||||||||||
| EU1EU2 | EU3EU4EU5 | EU6EU7EU8 | EU9EU10 | EU11EU12 | ||||||||
| GEE222 | 208 195 185 | 179 170 163 | 157 154 148 | 147 144 | ||||||||
| Distance (m) | 0 | -5.0 -5.0 -5.0 | -5.0 -5.0 -5.0 | -5.0 -5.0 -5.0 | -5.0 -5.0 -5.0 | |||||||
| 25 | -2.1 -2.0 -1.7 | -1.5 -1.5 -1.3 | -1.1 -1.0 -0.9 | -0.7 -0.7 -0.7 | ||||||||
| 50 | 0.2 0.4 0.8 1 | 2 1.3 1.5 1.7 | 1.9 2.0 2.3 | 2.3 2.3 | ||||||||
| 75 | 2.0 2.3 2.7 3 | 0 3.1 3.2 3.5 | 3.6 3.7 3.8 | 3.8 3.9 | ||||||||
| 100 | 3.3 3.5 3.8 3 | 9 4.0 4.0 4.1 | 4.0 4.0 3.9 | 3.9 3.9 | ||||||||
| 125 | 4.0 4.0 4.0 3 | 9 3.9 3.7 3.4 | 3.1 3.0 2.6 | 2.6 2.4 | ||||||||
| 150 | 4.0 3.8 3.4 3 | 0 2.8 2.1 1.5 | 0.9 0.5 -0.3 | -0.5 -1.0 | ||||||||
| 175 | 3.3 2.7 1.9 1 | 1 0.5 -0.7 -1 | 7 -2.8 -3.4 -4 | 8 -5.4 -6.4 | ||||||||
| 200 | 1.9 0.8 -0.6 - | -1.9 -3.1 -4.8 | 6.4 -7.9 -8.9 | -11.1 -12.2 - | 3.8 | |||||||
| 225 | -0.3 -2.0 -4.0 | -6.0 -7.9 -10.3 | -12.5 -14.5 | -16.3 -19.3 | -21.2 -23.5 | |||||||
| 250 | -3.4 -5.8 -8.5 | -11.4 -14.1 - | 17.2 -20.0 -22 | 2.9 -25.7 -29 | 6 -32.4 -35.5 | |||||||
| 275 | -7.4 -10.7 -14 | -1 -17.9 -21.7 | -25.5 -29.3 | -33.4 -37.2 | -41.9 -45.8 -49.8 | |||||||
| 300 | -12.3 -16.9 -2 | 1.1 -25.8 -30 | -7 -35.6 -40.6 | -45.9 -50.9 | -56.4 -61.5 -66.5 | |||||||
| 325 | -18.2 -24.4 -2 | 9.3 -35.0 -4 | -6 -47.7 -53.9 | -60.5 -66.8 | -73.0 -79.6 -86.1 | |||||||
| 350 | -25.3 -33.3 -3 | 8.9 -45.6 -54 | -6 -61.9 -69.4 | -77.3 -85.0 | -92.0 -100.1 -109.1 | |||||||
| 375 | -33.7 -43.5 -4 | 9.8 -57.6 -69 | -7 -78.3 -87.0 | -96.4 -105.5 | -113.3 -123 | -7 -135.6 | ||||||
| 400 | -43.5 -55.6 -6 | 2.1 -70.9 -87 | -7.0 -96.9 -106 | -9 -117.8 -12 | 8.4 -136.9 - | -50.7 -165.6 | ||||||
| 425 | -54.5 -69.9 -7 | 6.0 -85.9 -10 | 6.5 -117.7 -1 | 29.2 -141.5 | -154.2 -162.9 | -181.2 -199 | 2 | |||||
| 450 | -67.0 -86.3 -9 | 1.9 -102.9 -1 | 28.4 -140.9 | -153.7 -167.7 | -183.5 -191 | -5 -215.3 -23 | 7.0 | |||||
| 475 | -81.2 -105.0 | -109.9 -121.9 | -152.6 -166 | -4 -180.7 -19 | -7.0 -216.3 -2 | 22.9 -252.9 | -279.3 | |||||
| 500 | -97.5 -126.0 | -130.0 -143.1 | -179.8 -194 | -8 -210.8 -22 | -9.8 -252.7 -2 | -57.8 -294.3 | -326.1 | |||||
| GEE[m] 2 | 22 208 195 | 185 179 170 | 163 157 154 | 148 147 144 | ||||||||
- SCOPE OF DELIVERY
- REPLACEMENT PARTS/ACCESSORIES
- LEGAL INFORMATION
- REGULATORY INFORMATION
- CE MARK
- DISPOSAL OF ELECTRICAL AND ELECTRONIC EQUIPMENT
- SAFETY REMARKS
- WARNING
- LASER
- GENERAL INFORMATION
- CAUTION
- BATTERY
- CARRY STRAP
- IMPORTANT INFORMATION
- MEASURING VALUES
- WARRANTY
- WARRANTY CONDITIONS
- PICK-UP SERVICE FOR REPAIR SUBMISSIONS
- TABLE OF CONTENT
- Definition of the various categories of information found in this manual
- Note
- Menu Selection Button
- Main switch
- Index for diopter setting
- Diopter scale
- Eyecups (rotating)
- Eyepiece
- Strap lugs
- Battery compartment
- Lens
- Laser transmission lens
- Target mark
- Display
- PREPARATION
- INSERTING/CHANGING THE BATTERY
- BATTERY CHARGE LEVEL
- SETTING THE EYECUP
- FOR USE WITHOUT EYE GLASSES
- FOR USE WITH EYE GLASSES
- DIOPTER SETTINGS
- SETTINGS AND OPERATION
- ACTIVATING THE RANGEFINDER
- MENU CONTROL
- ACCESSING THE MAIN MENU
- NAVIGATING IN THE MAIN MENU
- SELECTING SETTINGS
- MENU OVERVIEW
- SETTING THE DISPLAY BRIGHTNESS
- METERING OPERATION
- DISTANCE MEASUREMENT MADE EASY
- SCAN MODE (OBJECT TRACKING)
- METERING RANGE/ACCURACY
- BALLISTICS
- DETERMINING THE BALLISTIC CURVE
- Example
- SETTING THE BALLISTIC CURVE
- OUTPUT FORMATS (ABC)
- Notes
- EQUIVALENT HORIZONTAL RANGE (EH-)
- HOLDOVER (HOLD)
- IMPACT POINT CORRECTION (USING ELEVATION ADJUSTMENT)
- KESTREL CORRECTION VALUES (LA+)
- DISPLAYING THE CORRECTION VALUES
- LEICA HUNTING APP
- CONNECTION
- ESTABLISHING A CONNECTION
- IN THE RANGEFINDER
- ON THE MOBILE DEVICE
- DISCONNECT THE CONNECTION
- REMOTE CONTROL
- FIRMWARE UPDATES
- CARE/CLEANING
- LEICA CUSTOMER CARE
- APPENDIX
Brand : LEICA
Model : Rangemaster CRF 3500.COM
Category : Rangefinder