Icon 8490 - Nail Clipper WAHL - Free user manual and instructions
Find the device manual for free Icon 8490 WAHL in PDF.


| Product Type | Mains Hair Clipper |
| Model | Icon 8490 |
| Brand | Wahl |
| Drive Unit | Quiet oscillating armature motor |
| Power Supply | Mains operated (AC voltage as per nameplate) |
| Sound Pressure Level | Max 60 dB(A) at 25 cm |
| Vibration | < 2.5 m/s² |
| Cutting Length Adjustment | Lever adjustment, short to long |
| Maximum Cutting Length with Comb | Extended with attachment combs (sizes vary by model) |
| Blade Set | Removable and replaceable |
| Oil for Blade Set | Included (Wahl clipper oil) |
| Cleaning Brush | Included |
| Blade Guard | Included |
| Operating Temperature | 0°C to +40°C |
| Safety Insulation | Yes (safety insulated and radio screened) |
| Compliance | EU EMC Directive 2004/108/EC, Machinery Directive 2006/42/EC |
| Guarantee | 1 year from original purchase (blades etc. excluded) |
| Country of Origin | China (based on manual: "BEET IN CHINA") |
| Customer Service (UK) | 01227 740066, customer.services@wahl.co.uk |
Frequently Asked Questions - Icon 8490 WAHL
User questions about Icon 8490 WAHL
0 question about this device. Answer the ones you know or ask your own.
Ask a new question about this device
Download the instructions for your Nail Clipper in PDF format for free! Find your manual Icon 8490 - WAHL and take your electronic device back in hand. On this page are published all the documents necessary for the use of your device. Icon 8490 by WAHL.
USER MANUAL Icon 8490 WAHL
Please read all instructions carefully to familiarise yourself with your new Wahl Mains Clipper before using.
Save these instructions for further reference.
For any further assistance or information call Customer Services on
T: 01227 740066
or visit
W: www.wahl.co.uk
E: customer.services@wahl.co.uk
CONTENTS
GENERAL USER INFORMATION Page 3
IMPORTANT SAFEGUARDS Page 6
PRODUCT DESCRIPTION Page 10
OPERATING INSTRUCTIONS
CARE AND CLEANING Page 13
DISPOSAL
WIRING
GUARANTEE
DECLARATION
GENERAL USER INFORMATION
Information about using the operation manual
▶ Before using the appliance for the first time, you must read and understand the operation manual completely. ▶ Consider the operation manual as part of the product and store it in a safe and accessible place. ▶ Include this operation manual if passing the appliance on to a third party. ▶ In the case of conflicts with national safety specifications or instructions, the national requirements must be followed.
Explanation of symbols and notes

DANGER
Danger of electric shock which may result in serious physical injury or death.

DANGER
Danger of explosion which may result in serious physical injury or death.

WARNING
Warning of possible physical injury or a health risk.

CAUTION
Information about danger of material damage.

Note with useful information and tips.

Action to be taken by owner.
- Carry out these actions in the sequence described.
List
MAINS CLIPPER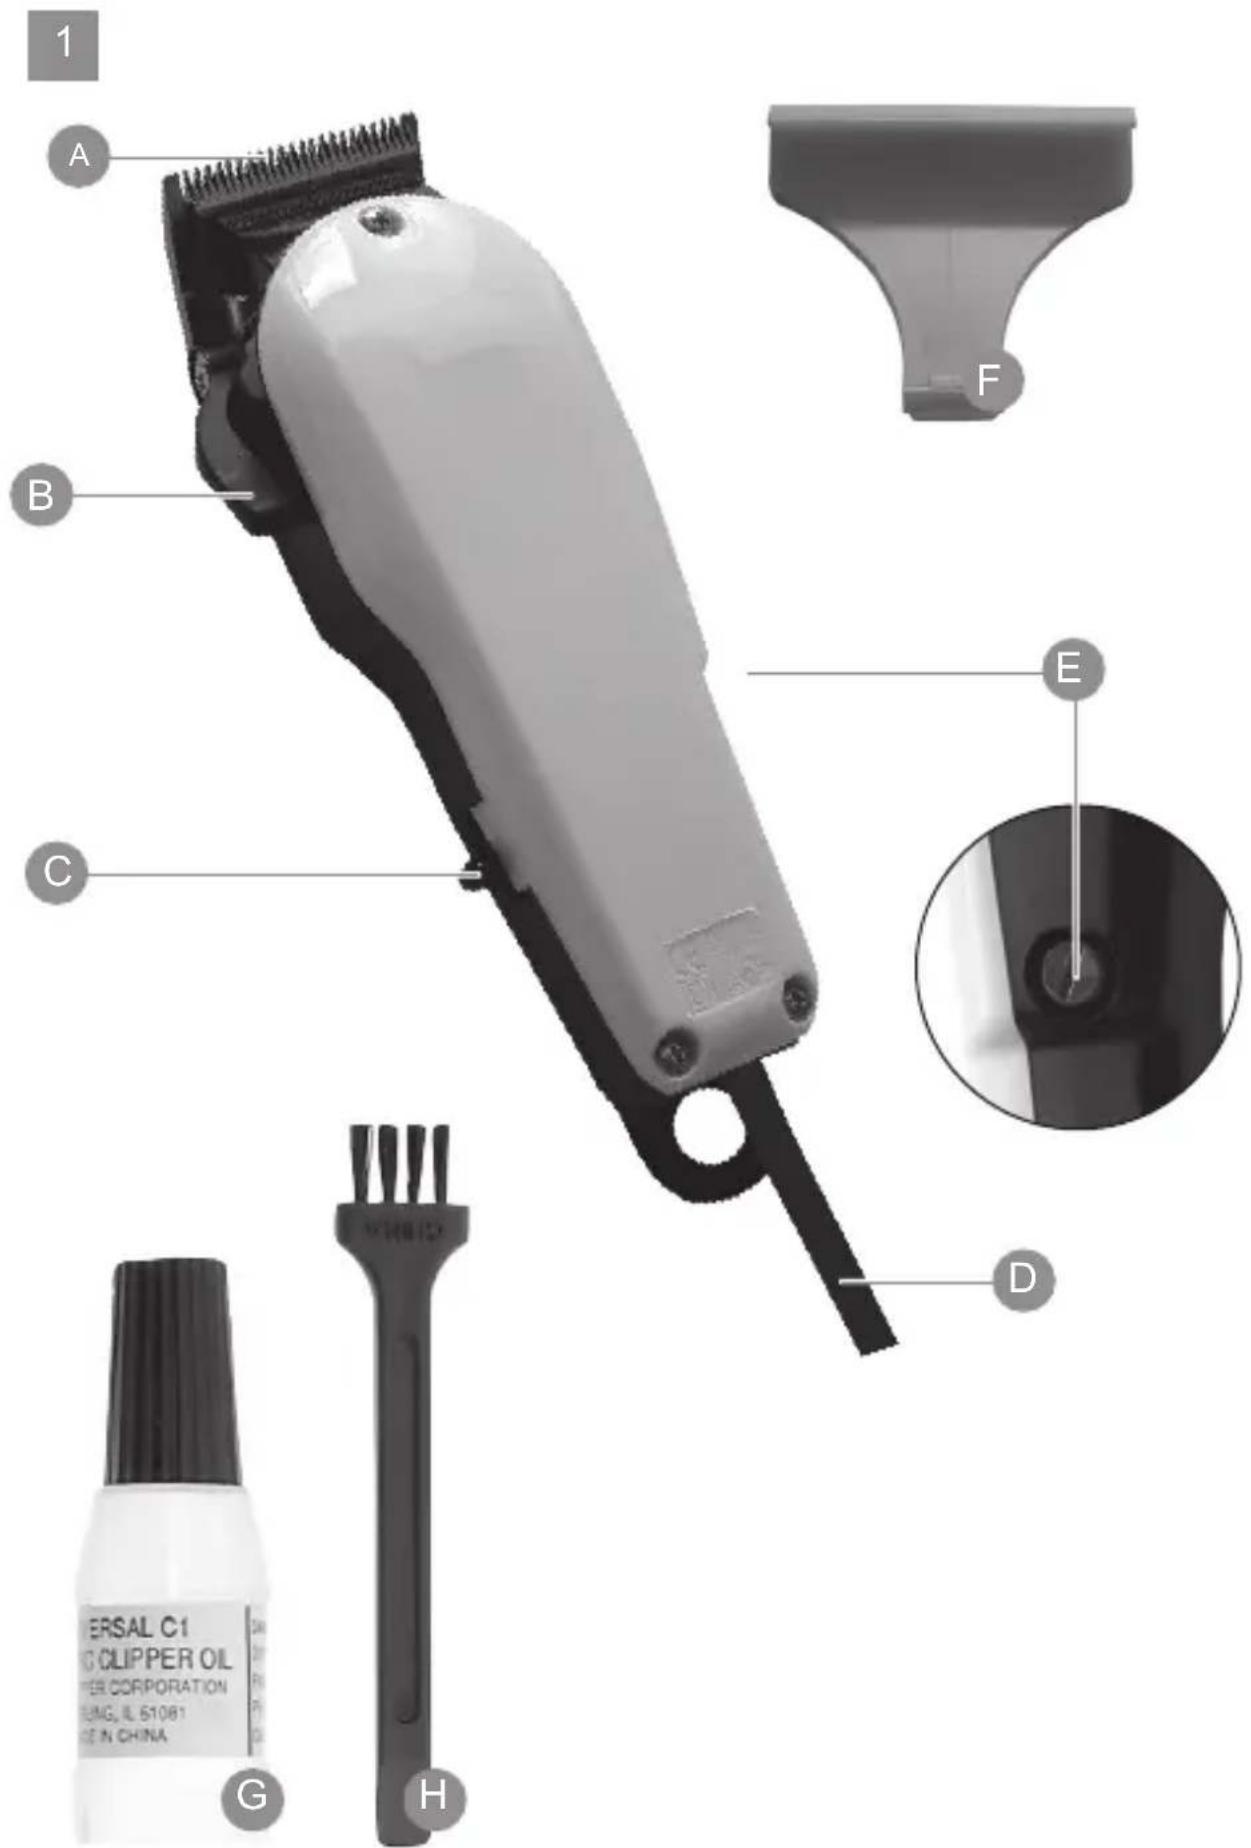




MAINS CLIPPER
Please retain this leaflet for future reference.
IMPORTANT SAFEGUARDS
When using your electrical appliance, basic safety precautions should always be followed, including the following:
Intended use
- Only use hair clippers to cut human head hair.
- Only use animal clippers to cut animal hair and animal fur.
Requirements on the user
- Read the operation manual in full and familiarise yourself with it before the first use.
- This appliance can be used by children aged from 14 years and above and persons with reduced physical, sensory or mental capabilities, or lack of experience and knowledge, if they have been given supervision or instruction concerning the use of the appliance in a safe way and understand the hazards involved. Cleaning and user maintenance shall not be undertaken by children without supervision. Children shall not play with the appliance.
- Repairs to the appliance must only be carried out by a trained electrician in accordance with the electrical engineering regulations!
Hazards
Please adhere to the following safety instructions!
Danger! Electric shock due to damage to appliance/mains cable.
▶ Do not use the appliance if it is not working correctly, if it is damaged or if it has fallen into water. Repairs may only be performed at an authorised service centre using original spare parts, in order to avoid hazards. ▶ Never use the appliance if the mains cable is damaged. A damaged mains cable may only be replaced with an original replacement cable by an authorised service centre or another similarly qualified person, in order to avoid hazards. ▶ Only specialists properly trained in the handling of electrotechnical appliances may repair electrical equipment.

Danger! Electric shock due to penetration of liquid.
▶ Never touch electrical equipment that has fallen into water. Disconnect from the mains immediately.
MAINS CLIPPER
▶ Never use electrical equipment in the bath or under the shower. ▶ Always position or store electrical equipment where it cannot fall into water (e.g. washbasin). Prevent electrical equipment from coming into contact with water and other liquids. ▶ Only use and store the appliance in dry rooms. ▶ As additional safety measure, it is recommended that a tested residual current appliance (RCD) with a residual operating current of not more than 30 mA be installed in the bathroom circuit.

Danger of explosion!
▶ Never use the appliance where aerosol (spray) products are being used or where oxygen is released.

Warning! Injuries due to incorrect handling.
▶ To prevent injury, never use the appliance if the blade set is damaged. ▶ Always switch the appliance off before storage, as the appliance can fall down due to the vibrations.

Handle with care! Damage due to incorrect power supply.
▶ Only operate the appliance with an alternating current and with the voltage stated on the nameplate.

Handle with care! Injuries due to incorrect handling.
▶ Only use accessories recommended by the manufacturer. ▶ Never insert or allow objects to fall into the openings of the appliance. ▶ Do not hold the appliance by the mains cable to carry it, and do not use the mains cable as a handle. ▶ When disconnecting the appliance from the mains, never pull on the mains cable or on the appliance itself. ▶ Do not wind the mains cable around the appliance. - Keep the mains cable and appliance away from hot surfaces. ▶ Make sure that the mains cable is not twisted or kinked when using or storing the appliance. ▶ Always store the appliance with the blade guard in place. ▶ Do not expose the appliance to temperatures below 0°C and above +40°C for any length of time. Avoid direct exposure to sunlight.
MAINS CLIPPER
PRODUCT DESCRIPTION
Description of parts (Fig. 1)
A Blade set B Cutting length adjustment lever C On/off switch D Mains cable E Adjusting screw F Blade guard G Oil for blade set H Cleaning brush
Not pictured Attachment combs and various accessories (depending on model)
Technical data
Drive unit: Quiet oscillating armature motor
Emission sound pressure level: max. 60 dB(A) @ 25 cm
Vibration: < 2.5 m/s²
The appliance is safety insulated and radio screened. It meets the requirements of EU Electromagnetic Compatibility Directive 2004/108/EC and Machinery Directive 2006/42/EC.
Declaration of conformity: See page 18.
OPERATING INSTRUCTIONS
Preparation

Keep the packaging material for safe storage or transport later.
▶ Check that the contents are complete. ▶ Check all the parts for possible transport damage.
Safety

Handle with care! Damage due to incorrect power supply.
▶ Only operate the appliance with an alternating current and with the voltage stated on the nameplate.
Mains operation
- Oil the blade set (Fig. 6).
- Insert the appliance plug into the mains socket.
- Switch on the appliance using the on/off switch (Fig. 2a) and, after use, switch it off again (Fig. 2b).

Accessories are available from your dealer.
Adjusting the power screw (Not found in all Wahl models)
If your clipper has a power screw, it has been adjusted for peak efficiency before leaving the factory. However, if the voltage in your home is low, you may need to readjust it. To adjust power, first use the on/off switch to turn the appliance on, then use the plastic brush, a screwdriver, or a thin coin to turn the power screw (E) in a clockwise direction until the arm strikes the coil, making a noise (Fig. 3b). Then slowly turn the power screw out (counterclockwise) just until the noise stops. This is the maximum power setting (Fig. 3a).
Cutting length adjustment

Cutting lengths for different models (not found in all models):
- Raise the adjustment lever – minimum cutting length (Fig. 4a).
- Lower the adjustment lever – maximum cutting length (Fig. 4b).
Cutting with attachment combs (depending on model)
The appliance can also be operated with attachment combs. Attachment
combs can be used to extend the cutting length range. Depending on the model, different-sized attachment combs are included in the scope of supply.

Accessories are available from your dealer.
Attaching/removing the attachment comb

▶ Set the adjustment lever to the shortest cutting length (Fig. 4b).
- Place the attachment comb onto the cutting edge of the blade set and press it down onto the blade set in the direction of the housing until it clicks into position (Fig. 3a).
- The attachment comb can be easily removed by lifting the hook in the direction of the arrow (Fig. 5b).
Changing the blade set

Warning! Injuries and material damage due to incorrect handling.
▶ Switch the appliance off and disconnect from the power supply before changing the blade set.
- Switch the appliance off using the on/off switch (Fig. 2b) and disconnect from the power supply.
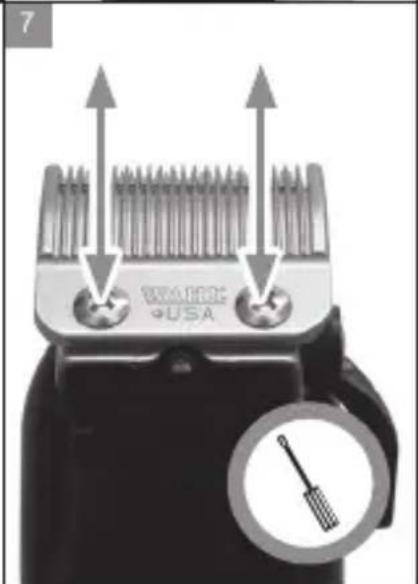
- Undo the screws on the blade set; remove the bottom blade and the top blade (Fig. 7).
When assembling, the bottom blade and the top blade should be aligned as follows:

▶ Set the adjustment lever to the shortest cutting length (Fig. 4a).
- Place the top blade on the plastic cam (Fig. 8).
- Position bottom blade and reinsert the two screws.
- Before tightening the screws, align the bottom blade (Fig. 9).

Warning! Injuries due to incorrect handling.
▶ Align the bottom blade so that there is a gap of 0.5 mm to 1.0 mm between the front edge of the bottom blade and the front edge of the top blade (Fig. 9)
- Tighten screws (Fig. 7).
CARE AND CLEANING

Danger! Electric shock due to penetration of liquid.
▶ Switch the appliance off and disconnect from the power supply before you start cleaning and care. ▶ Do not immerse the appliance in water! ▶ Do not allow any liquid to get inside the appliance. ▶ Only reconnect the appliance to the power supply if it is completely dry.
Handle with care! Danger from aggressive chemicals. Aggressive chemicals could damage the appliance and accessories.
▶ Never use solvents or scouring agents. ▶ Only use cleaning agents and blade set oil recommended by the manufacturer.

Hygienic spray and blade set oil are available from your dealer or our service centre.
Remove the attachment comb (Fig. 5) after every use. Remove the hair clippings from the blade set with the cleaning brush.

▶ If a thorough cleaning is required, the blade set can be removed. See chapter Changing the blade set.
▶ After cleaning the blade set, we recommend using hygienic spray. It keeps all blade sets hygienically clean and is effective against bacteria and viruses. ▶ Oil the blade set with the blade set oil (Fig. 6). We recommend that you clean and care for your blade set during and after clipping. Oiling and cleaning of the blade set protects against corrosion. ▶ Switch the appliance on briefly (approx. 10 seconds) to ensure the oil film is evenly distributed.

For a good and long-lasting cutting performance, it is important to oil the blade set frequently.
▶ If the cutting performance deteriorates after long use despite regular cleaning and oiling, the blade set should be replaced.
MAINS CLIPPER
▶ Only wipe the appliance with a soft, slightly damp cloth.
Problem elimination
Blade set is cutting badly.
Blade set is pulling hair out.
Cause: Blade set is dirty.
▶ Clean and oil the blade set (Fig. 6).
Cause: Blade set is worn out.
▶ Replace the blade set (Fig. 7/8/9).
Skin injury
Cause: Too much pressure on the skin.
▶ Less pressure on the skin.
Cause: Cutting angle is too high.
▶ Hold appliance more flatly to the skin.
Cause: Gap between the front edge of the bottom blade and the front edge of the top blade is not correctly aligned.
▶ Align the bottom blade (Fig. 7).
Appliance is not working.
Cause: Defective power supply.
▶ Make sure that contact between the appliance plug and the socket is faultless. Check the mains cable for possible damage.
▶ Check the power supply.
DISPOSAL

Handle with care! Environmental damage in the case of incorrect disposal.
▶ Correct disposal will ensure environmental protection and prevent any potentially harmful impact on people or the environment.
Adhere to the relevant legal requirements when disposing of the appliance. Information on the disposal of electrical and electronic appliances in the European Community.

Within the European Community, national regulations are specified for the disposal of electrical appliances, based on EU Waste Electrical and Electronic Equipment Directive 2002/96/EC (WEEE). In accordance with this, the appliance can no longer be disposed of with the local or domestic waste.
The appliance will be accepted free of charge by local collection points or recycling centres.
MAINS CLIPPER
WIRING

WARNING: If the supply cord is damaged it must be replaced by the manufacturers service agent or a similarly qualified person in order to avoid a hazard.
The wires in the mains lead are coloured in accordance to the following code:
Blue Neutral (N) Brown live (L)
This lead is fitted with a 3 pin plug which has a 3 amp fuse fitted. If the plug supplied is not suitable for your socket or becomes damaged, it should be cut off and disposed of, and a suitable plug fitted as detailed below.
The wire which is coloured BLUE must be connected to the terminal in the plug which is marked with the letter 'N' or coloured BLACK or BLUE.
The wire which is coloured BROWN must be connected to the terminal in the plug which is marked with the letter 'L' or coloured RED or BROWN.
DO NOT connect either wire to the terminal in the plug which is marked with the letter 'E' or has the Earth symbol, or coloured GREEN or GREEN/YELLOW.
This lead has been specifically designed for use with Wahl professional mains powered clippers and should not be used with any other product.
Wahl (UK) Ltd. accept no responsibility for any accidental injury or damage resulting from the incorrect fitting of this product.
GUARANTEE
This product is guaranteed against defects in material and workmanship for a period of one year from the date of original purchase or receipt as a gift.
Should this product become defective during the guarantee period, return it to the store of purchase together with your proof of purchase for repair or replacement.
Alternatively within the guarantee period you can return the product to Wahl (UK) Ltd who will repair any such defect or elect to replace the product or any part of it, without charge, provided there is proof of purchase. Should a replacement be offered this will not extend the original guarantee period.
The guarantee becomes invalid in the case of misuse, alteration or repair by unauthorised persons.
This guarantee does not include blades, cables, shaver heads, foils and cutters etc., which are consumable parts.
This guarantee in no way affects your rights under law in the United Kingdom.
Title: CE Certificate of Conformity
Document Owner: Administrator
Form : F0094
Revision: 4.00
Issue Date: 07/12/2012
WAHL®
We Wahl (UK) Ltd
of Herne Bay Trade Park, Sea Street, Herne Bay, Kent, CT6 8JZ
Declare that:
Product Type: Hair Clipper
Product Name: Vibrator Clipper
Model Number: 8467,8265,8462,8263,8490,8453,8233
In accordance with the following Directives
2004/108/EC Conforms with the essential requirements of the Electromagnetic Compatibility Directive and its amending directives
2006/42/EC Conforms with the essential requirements of the Machinery Directive and its amending directives
2009/125/EC Conforms with the essential requirements of the Eco-Design Requirements of Energy Related Products Directive and its amending directives. (ErP/EuP)
Has been designed and manufactured to the following specifications:
EN 60335-1:2002+A1/A11:2004+A12/A2:2006+A13:2008+A14:2010
EN 60335-2-8:2003+A1:2005+A2:2008
EN 55014-1:2006+A1:09+A2:2011
EN 55014-2:1997+A1:01+A2:2008
EN 61000-3-3:2006+A1:2009+A2:2009
EN 61000-3-3:2008
EN 62233:2008
I hereby declare that the equipment named above has been tested and found to comply with the relevant sections of the above referenced specifications. The unit complies with the essential requirements of the Directives.
Signed for and on behalf of Wahl (UK) Ltd
Position: Technical Manager
Signature:
Name: Mark Gould
Date: 11/10/2013

Test Facilities: Wahl (UK) Ltd
Herne Bay Trade Park
Sea Street
Herne Bay
Kent
CT6 8JZ
MAINS CLIPPER
WAHL (UK) LTD
STERLING HOUSE
CLIPPER CLOSE
RAMSGATE, KENT
CT12 5GG
CUSTOMER SERVICES T: 01227 740066
www.wahl.co.uk
Form No. Z202
Rev.6 09-18

- CONTENTS
- GENERAL USER INFORMATION
- DANGER
- WARNING
- CAUTION
- MAINS CLIPPER
- IMPORTANT SAFEGUARDS
- INTENDED USE
- REQUIREMENTS ON THE USER
- HAZARDS
- DANGER! ELECTRIC SHOCK DUE TO DAMAGE TO APPLIANCE/MAINS CABLE
- DANGER! ELECTRIC SHOCK DUE TO PENETRATION OF LIQUID
- DANGER OF EXPLOSION
- WARNING! INJURIES DUE TO INCORRECT HANDLING
- HANDLE WITH CARE! DAMAGE DUE TO INCORRECT POWER SUPPLY
- HANDLE WITH CARE! INJURIES DUE TO INCORRECT HANDLING
- PRODUCT DESCRIPTION
- OPERATING INSTRUCTIONS
- PREPARATION
- SAFETY
- MAINS OPERATION
- ADJUSTING THE POWER SCREW (NOT FOUND IN ALL WAHL MODELS)
- CUTTING LENGTH ADJUSTMENT
- CUTTING WITH ATTACHMENT COMBS (DEPENDING ON MODEL)
- ATTACHING/REMOVING THE ATTACHMENT COMB
- CHANGING THE BLADE SET
- WARNING! INJURIES AND MATERIAL DAMAGE DUE TO INCORRECT HANDLING
- CARE AND CLEANING
- HANDLE WITH CARE! DANGER FROM AGGRESSIVE CHEMICALS. AGGRESSIVE CHEMICALS COULD DAMAGE THE APPLIANCE AND ACCESSORIES
- PROBLEM ELIMINATION
- BLADE SET IS CUTTING BADLY
- BLADE SET IS PULLING HAIR OUT
- SKIN INJURY
- APPLIANCE IS NOT WORKING
- DISPOSAL
- HANDLE WITH CARE! ENVIRONMENTAL DAMAGE IN THE CASE OF INCORRECT DISPOSAL
- WIRING
- GUARANTEE
- IN ACCORDANCE WITH THE FOLLOWING DIRECTIVES
- HAS BEEN DESIGNED AND MANUFACTURED TO THE FOLLOWING SPECIFICATIONS
Brand : WAHL
Model : Icon 8490
Category : Nail Clipper