
TRi-XO - Water pump ZODIAC - Free user manual and instructions
Find the device manual for free TRi-XO ZODIAC in PDF.


| Brand | Zodiac |
| Model | TRi-XO CrossOver Chlorinator |
| Product Type | Saltwater Chlorine Generator for swimming pools |
| Power Supply | 230V AC, 50Hz, max 8A (via dedicated outlet) |
| Chlorine Output | Adjustable 0–100%, Boost (100% for 24h), Low (10%) |
| Control Interface | LCD display with navigation buttons (ON/OFF, UP/DOWN, MENU/BACK, SELECT/ENTER) |
| Timers | 2 built-in timers for filtration/chlorination scheduling |
| Clock | 24-hour format, settable |
| External Controller Compatibility | Polaris EOS, Jandy, Zodiac Aqualink, Pentair Intellitouch |
| Flow Switch | Electronic flow switch for safety shut-off |
| Salt Type Selection | Standard pool salt or mineral salt blends (e.g., Element minerals) |
| Recommended Salt Level | 4000–7000 ppm (optimally 4000 ppm at 27°C) |
| Cell Cleaning | Reverse polarity self-cleaning cycle; manual cleaning with Zodiac cell cleaner or dilute muriatic acid |
| Safety Features | RCD protection (≤30mA), auto shut-off on no flow, overheat protection, child safety (3.5m from pool) |
| Installation Requirements | Power pack mounted ≤1.8m from cell, horizontal cell installation, 40/50mm pipe connections |
| Warranty | 3 years (12 months for commercial use); electrodes: 2 years after initial 3-year warranty |
| Dimensions (Power Pack) | Approx. 450mm wide × 470mm high (panel required if mounted on post) |
| Accessories Included | Electrolytic cell, mounting bracket, couplings/unions/reducers for 40/50mm pipe, owner’s manual |
Frequently Asked Questions - TRi-XO ZODIAC
User questions about TRi-XO ZODIAC
0 question about this device. Answer the ones you know or ask your own.
Ask a new question about this device
Download the instructions for your Water pump in PDF format for free! Find your manual TRi-XO - ZODIAC and take your electronic device back in hand. On this page are published all the documents necessary for the use of your device. TRi-XO by ZODIAC.
USER MANUAL TRi-XO ZODIAC
natural_image
Exterior view of a modern office building (no signage)Congratulations on your purchase of the Zodiac TRi-XO CrossOver Chlorinator.

TRi-XO allows users to select between using normal pool salt or mineral salt blends. Simply select the type of salt you are using from the start up screen to program it into the software.
Zodiac recommends using Element mineral salts if you want to have a more luxurious feeling pool. Element includes high levels of magnesium chloride which has been used for centuries in mineral spa resorts across the world. Magnesium is well known for its relaxation and skin healing properties.

In this Kit you will receive the following:
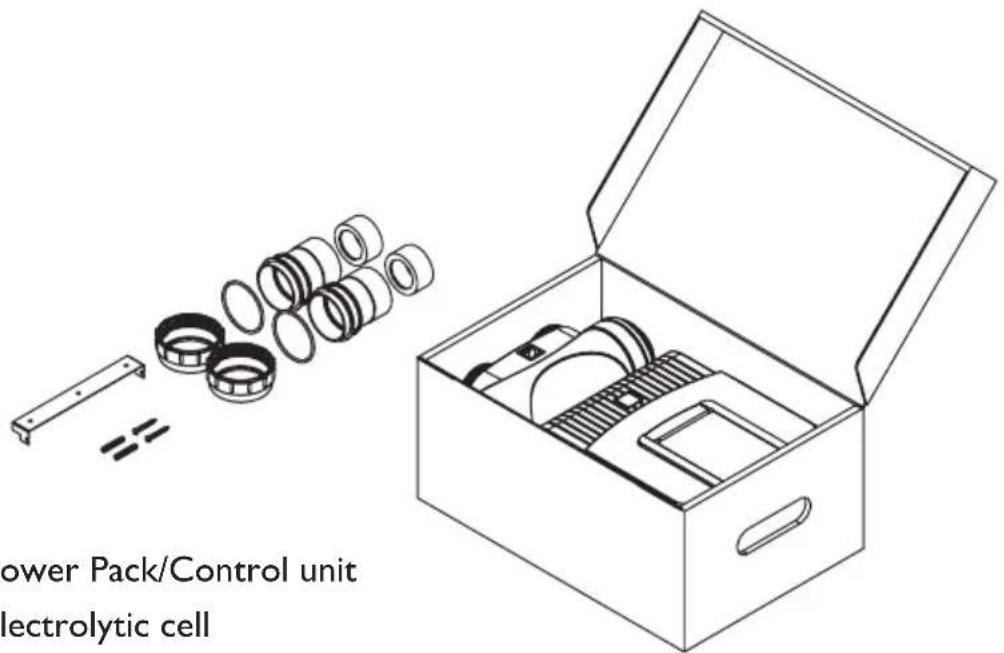
I x Power Pack/Control unit
I x Electrolytic cell
I x Owners manual
I x mounting bracket with wall plugs and screws set
I x set Couplings, unions and reducers to suit 40mm/50mm piping
At Zodiac, we take safety seriously. Always exercise caution when using electrical appliances and follow the instructions. Failure to do so could result in permanent injury, electrocution or drowning.
IMPORTANT INFORMATION
YOU MUST READ THIS INFORMATION BEFORE INSTALLATION. ALWAYS READ THE LABEL AND OPERATION MANUAL BEFORE USING. PLEASE KEEP YOUR MANUAL AS IT CONTAINS YOUR WARRANTY.
GENERAL WARNINGS
Zodiac saltwater chlorine generators are designed for domestic swimming pool use only. Contrary use could affect performance and void warranty.
Operating a chlorine generator without water flowing through the cell may cause a build up of flammable gases, resulting in fire or explosion.
Keep equipment out of reach of children.
A damaged supply cord should only be replaced by the manufacturer, authorized service agent or electrician.
When installing and using this electrical equipment, always follow basic safety precautions.
Before performing installation, disconnect all power.
For swimming pools, Australian standards recommend a minimum of 1 Part Per Million (ppm) of free available chlorine must be maintained at all times.
Service to Zodiac equipment should only be carried out by qualified and authorized pool professionals.
CHILD SAFETY
Children should not be allowed to operate or perform maintenance on this product.
No one, particularly children, should sit, step, lean, or climb on any of your pool's operational system.
In the interests of child safety, all components of a pool's operational system should be located at least 3.5 metres away from the pool.
ELECTRICAL HAZARD
To avoid accidental contact with lawn mowers and hedge trimmers, power cords should remain within sight and above ground at all times.
The Zodiac TRi-XO Power pack must not come into contact with water and must be installed at least 3.5 metres from the inside wall of your swimming pool.
Should a lack of water be detected, the unit's electronic flow switch is designed to turn off the system. Interfering with the electronic flow switch could result in personal injury and/or damage to the cell.
One pump per electrical socket only (no ancillary equipment should be connected to the same outlet). This outlet is rated to a max. 8 amps.
This appliance is not intended for use by persons (including children) with reduced physical, sensory or mental capabilities, or lack of experience and knowledge, unless they have been given supervision or instruction concerning use of the appliance by a person responsible for their safety.
Children should be supervised to ensure that they do not play with the appliance.
The installation of the chlorinator should be carried out by a qualified person in accordance with the Australian wiring rules AS/NZS 3000.
The chlorinator power pack should be located in the correct pool zone and connected to supply via a power outlet that is protected by a residual current device (RCD) having a rated residual operating current not exceeding 30mA. The power outlet should have a degree of protection suitable for the pool zone. Ensure that equipotential bonding of all parts of the pool installation is carried out.
natural_image
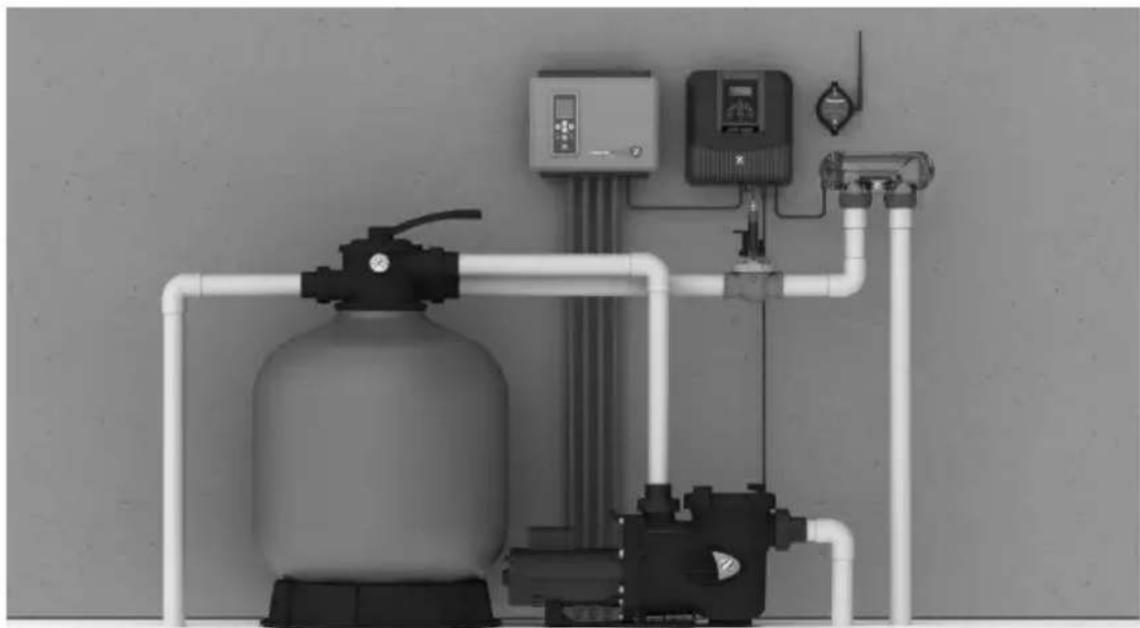
Industrial piping and control system with pressure vessel and digital meters (no visible text or symbols)I. Locate a suitable space for the power pack bracket. It should be installed no further than 1.8 metres away from the cell - ideally in a filtration shed or close to the filtration equipment.
PLEASE NOTE: if fixing to a post it must have a waterproof panel fitted (behind the unit), at least 450mm wide and 470 mm high.
- Using screws provided, fasten the bracket securely to the wall and position the power pack on the bracket. Plug into power point, but don't turn on the power.
POSITIONING THE CHLORINE GENERATING CELL
PLEASE NOTE: The cell should always be the last device placed on the water pipe (In the return line to the pool).
-
Ensure the cell is placed horizontally, with the Inlet pipe connecting to the fitting closest to the cell lead.
-
Using screw barrel fittings (supplied), attach the cell to the pipe. If using 40mm pipe, you will need to fit the cell using the reducing bushes (also supplied).
-
When connecting the lead from the power pack to the cell match up the corresponding colours and pins, then fit the end cap.
(Note: Either RED wire can be connected to either RED pin on the electrode.)
NAVIGATION BUTTONS
- Plug your pool pump into the outlet socket in the bottom of the TRi-XO (this will allow the TRi-XO timer to control the filtration times)
- Once all connections are together press the mains power switch to ON.
Use the following UI buttons to access and select all menus and commands:

ON/OFF
Turn Chlorinator on/off.

UP/DOWN
Scroll up/down within current menu to highlight a specific menu command.

MENU/BACK
Enters into the main menu, and used to go back to previous menu.

SELECT/ENTER
Select/enters current highlighted menu command. Display the next related command or activate the selected function
At start up it is necessary to select the correct salt type being used in the pool. If using salt or using a mineral blended salt simply select the correct type as shown on the screen once the unit is powered up.
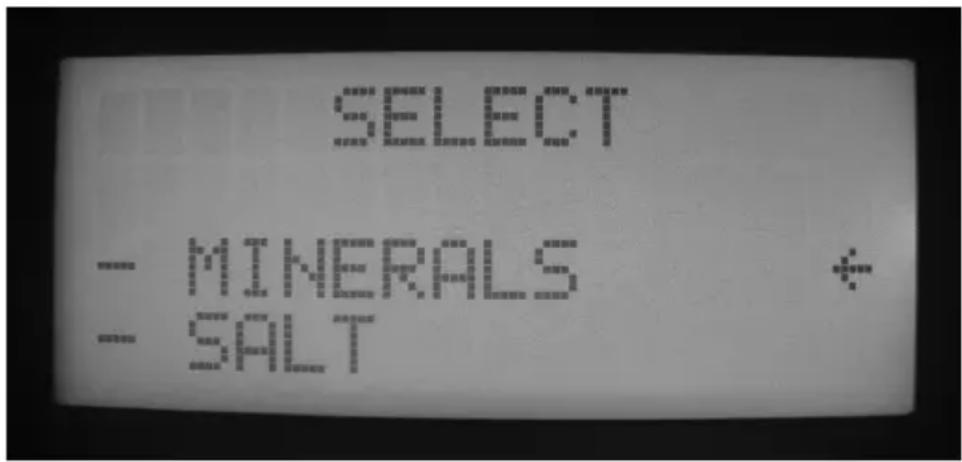
I. Use ↗ / ↘ to scroll to the right selection
2. Press SELECT to set the software to your preference
Note: If the choice selected is wrong or you wish to change at any future time you can reset the software and start again. This will clear all settings, time, timers etc...
To reset the software hold ↗ at the same time then release, you should now see the start up screen. The software has been reset.
USING INBUILT CLOCK AND TIMERS
When it comes to chlorination, every pool is different. To get what's right for you, you will need to set the unit's clock and timers.
SETTING THE CLOCK
I. Press the MENU button to enter the MAIN MENU.
-
Use ↗ / buttons and scroll to SET CLOCK.
-
Press SELECT.
-
Use ↗ / buttons to set the hours.
-
Press SELECT to save the hours.
-
Use the ↗ / buttons to set the minutes.
-
Press SELECT to save the minutes.
TRi-XO will then return to the MAIN MENU.
- Press MENU to return to the operating screen.
NOTE: The time is displayed in 24 Hour format
TURNING CHLORINE GENERATION ON
The chlorine generation of the TRi-XO can be controlled in a number of ways:
I. Manually set to an output level, with the operating times determined by an external timer.
2. Using the in-built timers on the TRi-XO unit (refer to 'The Timers')
3. Using a connection to an external controller (refer to 'Connecting to a controller').
To turn the chlorine generation on manually, press the ON/OFF button. The output level can be set as described in 'Setting the Chlorine Output.'
NOTE: For safety reasons, the TRi-XO chlorine generator will continually dose chlorine for a maximum of 30 hours if left running with no 'OFF' time – unless connected to en external controller. After this time the TRi-XO will switch to 'OFF'.
THE TIMERS
The Zodiac TRi-XO chlorine generator comes with two inbuilt timers that switch the filtration and chlorination system on and off as required.
During swimming season, consider running the system for around 8 hours a day. This can be increased to 10 hours during periods of very hot weather.
In winter, it may only be necessary to run your pool's filtration system for 4 hours a day. These shorter periods of activity will lengthen the life of the unit's electrode.
For best year round results, set the unit to operate during the cooler hours of the early morning, evening or when swimmers are using the pool.
PROGRAMMING THE TIMERS
To activate the timer, you will need to enter both an ON and OFF time. If no OFF time is entered, the chlorine generator will switch off at the default time of 12:00am (0:00).
You will know that a valid time has been entered when a “T” Symbol is displayed in the top right hand corner of the LCD display when the unit is displaying the ‘operating screen’.
USING INBUILT CLOCK AND TIMERS
To program the timer:
I. Press the MENU button.
-
Press ↓ button to move arrow to 'SET TIMERS'.
-
Press SELECT to enter the 'SET TIMERS' menu.
-
Press ↗ / ↘ to select the timer you wish to set. (Timer 1 or Timer 2)
-
Press SELECT.
-
Press ↗ / ↙ to set the hours (on time).
-
Press SELECT to save the hours.
-
Press ↗ / ↘ to set the minutes (on time).
-
Press SELECT to save the minutes.
-
Press ↗ / ↘ to set the hours (off time).
II. Press SELECT to save the hours.
-
Press ↗ / ↘ to set the minutes (off time).
-
Press SELECT to save the minutes.
TRi-XO will return to the 'SET TIMERS' menu.
USING INBUILT CLOCK AND TIMERS
CLEARING THE TIMERS
To clear the timer:
I. Press the Ⓜ button.
2. Press ↗ / button to scroll to 'SET TIMERS'.
3. Press SELECT to enter the 'SET TIMERS' menu.
4. Press ↗ / ↘ to scroll to 'CLEAR TIMERS'.
5. Press SELECT.
A confirmation message will appear on the screen.
EXTERNAL TIME CLOCK
At times, it may be desirable to control chlorine generation using an external time switch. If the chlorine generator is turned ON, and the external timer fails to switch the mains power off within 30 hours, the Zodiac TRi-XO will automatically stop chlorinating in order to prevent over chlorination.
To set the chlorine generator to run from an external clock:
I. Clear the Timer by following the procedure outlined in 'Clearing the Timers'.
- Press the ⏻ button to turn the chlorine generator on.
SETTING THE CHLORINE OUTPUT
The amount of chlorine required by your pool is dependent on a number of factors including the size of the pool, the number of users and the climate.
Output will appear as a percentage on the screen readout. Monitoring the pool's chlorine level over time and then adjusting the output percentage accordingly will ensure optimum sanitation.
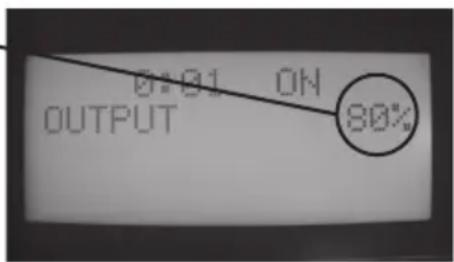
To set Chlorine Output levels:
I. Press the ⏻ button to turn the chlorine generator on.
2. Press the ↗ / buttons to set the desired output level.
PLEASE NOTE: if using a pool cover you will need to reduce the chlorine production substantially, please use LOW mode if you use a cover. Simply press LOW button.
CORRECT SETTINGS FOR YOUR POOL
| Free Chlorine (ppm) | pH | Total Alkalinity (ppm) | Calcium Hardness (ppm) | Cyanuric Acid (ppm) | Salt Level (ppm) | Sensors | |
| Australian Standard | 1 – 3 7.2 | -7.8 80 – 300 | 90 – 300 30 – | 50 4000 - 7000 | |||
| Ideal reading/range | 1 – 3 7.5 | 80 – 140 90 – 300 | 50 | 4000 ppm at 27°C | |||
| To increase | Add chlorine or increase output of equipment | Add buffer or soda ash (sodium carbonate) | Add sodium bicarbonate | Add calcium chloride | Add Cyanuric acid | Add Salt | |
| To decrease | Add muriatic acid | Add muriatic acid or dry acid | Partially drain & refill pool | Partially drain & refill pool | Partially drain & refill pool | ||
| Frequency of testing (in peak season) | Weekly Weekly Weekly | Weekly Weekly Monthly Quarterly | |||||
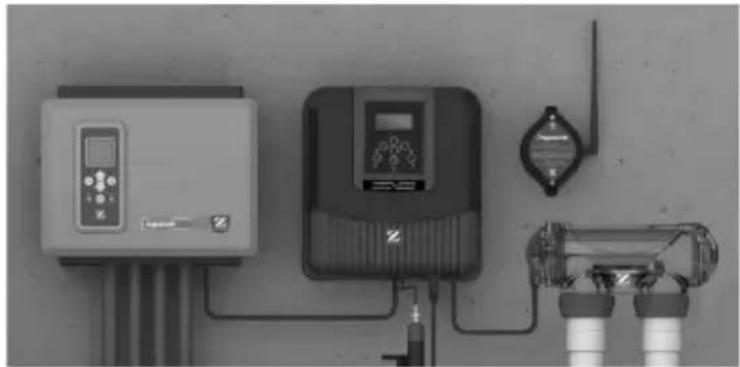
You must set the controller type on the TRi-XO before making the wiring connection.
natural_image
Industrial electrical equipment setup with control panels, valves, and pipes (no visible text or symbols)SETTING THE CONTROLLER
(To be done before making a wiring connection)
I. Switch power to the TRi-XO unit on.
-
Wait for the start-up sequence to complete.
-
Press the MENU button.
-
Press the button to scroll down to 'CONTROLLER'.
-
Press SELECT to enter the controller menu.
-
Press ↗ / to highlight the controller being used.
-
Press SELECT to save the controller setting.
-
TRi-XO will return to the main menu.
-
Press MENU to return to the operating screen.
ATTENTION JANDY 'REV L' OR LATER USERS
It is critical that the controller setting be set to the correct Zodiac, Jandy or Pentair controller designation. There are a number of different revisions locked into the TRi-XO software. Please see the controller user manual to determine the model and/or revision you are using. If the incorrect setting is selected, damage can be caused to the Jandy Aqualink Control Unit.
CAUTION WHEN WIRING TO A CONTROLLER
IMPORTANT
Wiring of the controller should be completed by an authorised pool equipment installer.
Before any wiring connections/disconnections ensure mains power is removed from both the controller and the Zodiac TRi-XO unit.
When connected to a controller, the TRi-XO Chlorine generator acts as the ‘slave’ - responding to requests. This means timer settings are ignored and the output settings cannot be changed, although all other ‘menu’ functions are still accessible, except for LOW and BOOST modes.
WIRING TO A CONTROLLER
The following instructions should be read in conjunction with the installation guide provided with the Controller.
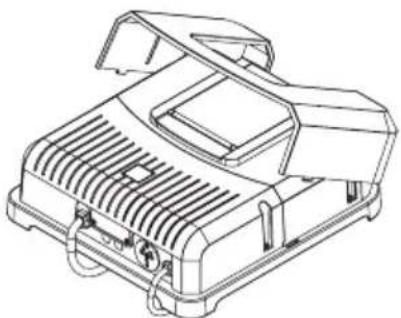
I. Remove black 'dress' cover by pressing in at the sides
- Remove the screws which attach the lower cover to the main unit:
natural_image
Line drawing of a mechanical device casing with ventilation grilles and mounting brackets (no text or symbols)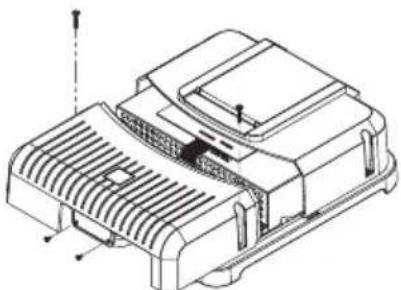
natural_image
Technical line drawing of a mechanical component with ventilation grilles and mounting holes (no text or symbols)CONNECTING TO A CONTROLLER
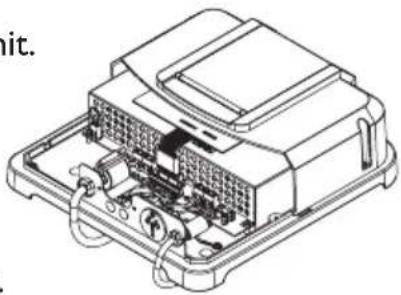
- Remove the lower cover from the TRi-XO unit.
NOTE: If using either pH upgrade or PRO unit – carefully disconnect the ribbon cable from the TRi-XO unit.
natural_image
Technical line drawing of an electronic device with internal components and wiring (no text or symbols)-
Remove the small white bung closest to the centre of the lower panel of the TRi-XO unit.
-
Thread the controller cable through the hole (a grommet may be necessary depending on the size of the cable being used).
-
Attach a cable tie to the controller cable as shown in the diagram. The wiring colour codes are outlined below:
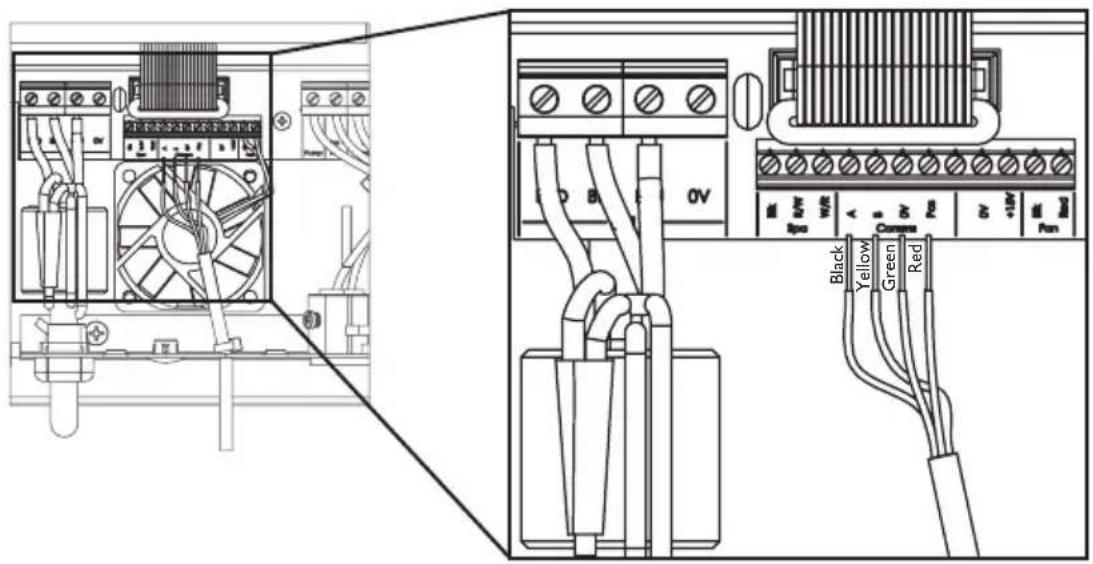
Depending on the make of the Controller, make the following wiring connections:
Polaris EOS / Jandy / Zodiac Aqualink / Aqualink TRi
Green wire (0V) to '0V' terminal on the TRi-XO
Red wire to the (+V) 'POS' terminal on the TRi-XO
Yellow/White (B) wire to 'B' terminal on TRi-XO
Black wire (A) to 'A' terminal on TRi-XO
Pentair Intellitouch
GREEN wire to 'B' terminal on TRi-XO
Red wire to 'POS' terminal on TRi-XO
Yellow wire to 'A' terminal on TRi-XO
Black wire to '0V' terminal on TRi-XO
TESTING THE WIRING CONNECTION
Once a connection has been made between the Controller and the Chlorine generator, it will need to be tested.
I. Turn on the power to the Controller and the Zodiac TRi.-XO
2. If successful, a 'T' symbol will appear in the top right hand corner of the screen after about 20 seconds.
3. If the controller does not connect, turn power off to both the devices and try again.
VERIFY THE WIRING CONNECTIONS
To verify the connection:
I. Switch the TRi-XO unit on and check the controller setting (follow instructions under 'SETTING CONTROLLER').
2. Re-test the connection.
Note: For safety reasons, the Zodiac TRi-XO reverts to the OFF setting if the communication connection is lost.
CONNECTION TO CONTROLLER FOR POOL/SPA COMBINATIONS
To connect a Zodiac TRi-XO unit to Pool or Spa Valves, you will need to make a “splice” into the control lines from the Controller, located inside the controller itself.
For further information, consult the installation manual of the Controller being used.
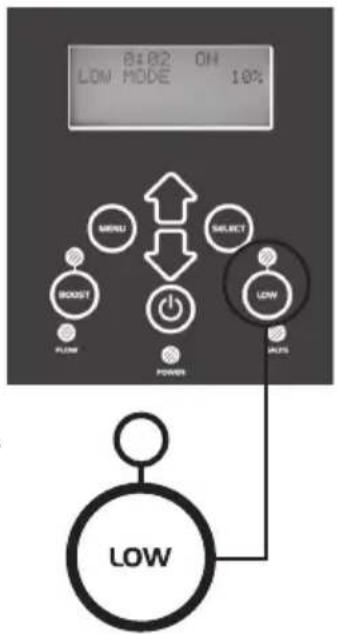
If your pool has a cover, you should set the output level to "low". This is also known as "winter" mode.
Reducing your chlorine output will help prevent damage to your pool's cover and other equipment.
MANUAL SETTING
I. To select Low mode press LOW.
This will drop the chlorine output to around 10%.
- 'Low' will appear on the screen.
Note: Low or Winter mode cannot be selected when TRi is being controlled by an external controller.
AUTOMATIC SETTING
The Zodiac TRi-XO can be connected to the valves of an automatic pool/spa system.
When the input from the valves is set to 'Low' the TRi-XO will automatically revert to 'Low' mode and the output will be locked at 10% Details of the wiring connection are outlined in the "Connection to Automatic Pool/Spa Valve" section of this manual.
For users who upgrade to the pH or PRO modules, the automatic pH/ACL control function is disabled when in LOW mode.
THE BOOST SETTING
At times your pool may require a larger than normal application of chlorine. The Boost function is used to rapidly add chlorine.
In BOOST or “Superchlorinate” mode, output settings are temporarily overridden and the chlorine generator runs for 24 hours at 100% Chlorine Production.
In ‘TIMER’ mode, the circulation pump will run for 24 hours, before automatically reverting to previous output / timer settings.
In ‘MANUAL’ mode, the chlorine generator will run at 100% for a cumulative total of 24 hours before reverting to the previous output setting.
NOTE:
The 'BOOST' mode cannot be engaged under the following circumstances:
1) If the TRi-XO is in the 'OFF' operating mode. The chlorinator must be 'ON' for BOOST to be engaged.
2) Or from the front panel when the TRi-XO is being controlled by an external controller.
In most cases a BOOST function can be set from the controller menu.
Consult your third party controller manual for more information.
flowchart
graph TD
    A["8:01 ON BOOST"] --> B["MENU"]
    B --> C["SELECT"]
    C --> D["POWER"]
    D --> E["UPW"]
    E --> F["SALTS"]
    G["BOOST"] --> H["PUB"]
    H --> I["POWER"]
SETTING THE BOOST MODE
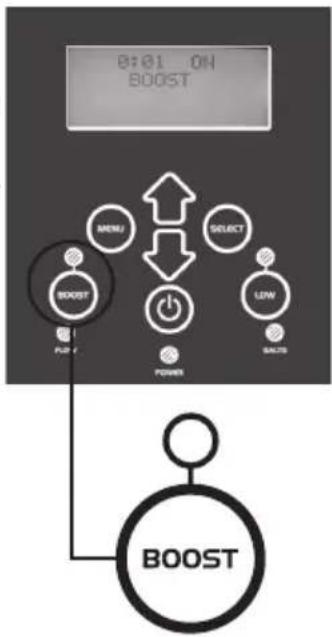
To activate the BOOST setting:
Press the BOOST button.
'BOOST' will be displayed on the screen and chlorine generation will commence.
HELP AND TROUBLESHOOTING
The Zodiac TRi-XO chlorine generator automatically provides a number of inbuilt warnings that can help identify problems and offer solutions.
To access the HELP menu:
I. Press the Ⓗ button.
-
Using the ↗ / buttons, scroll to the 'HELP/DIAG' menu.
-
Press SELECT to enter the 'HELP/DIAG' menu.
-
Once in the 'HELP/DIAG' menu, use the ↗ / ↘ buttons to scroll to the error/warning that has been displayed.
-
Press SELECT.
A number of suggested solutions are momentarily displayed, in order of priority.
After displaying, the TRi-XO automatically reverts back to the 'HELP/DIAG' menu.
- To exit to the default operating screen press the MENU button. Or it will automatically exit after one minute.
MAINTENANCE
To keep your TRi-XO Unit in the best possible condition it is recommended regular maintenance should be performed.
INSPECTING AND CLEANING THE ELECTRODE
In areas that experience calcium hardness the TRi-XO electrode will benefit from cleaning.
To clean your electrode:
I. Switch off the filter pump and chlorine generator, close necessary valves and unplug the cell terminal cap.
-
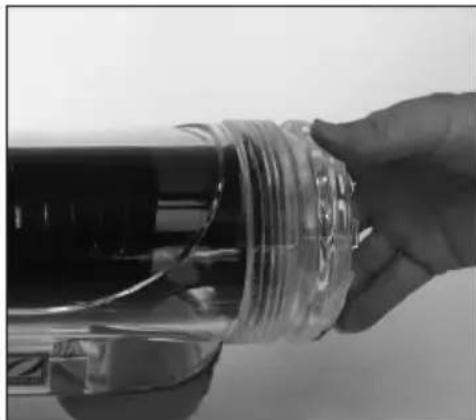
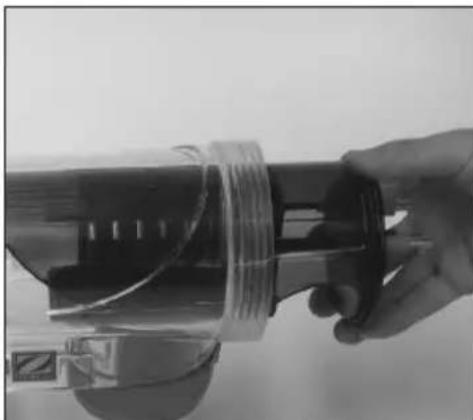
Unscrew the retaining ring and remove the electrode. If calcium buildup is present, immerse the electrode in cell cleaning solution without immersing the terminals.
-
We recommend using Zodiac Salt Chlorinator Cell Cleaner to clean the electrode. However you can mix your own by carefully adding one (1) part of Hydrochloric (Muriatic) acid
natural_image
Close-up of a hand holding a transparent plastic bag attached to a black cylindrical object (no text or symbols visible)to ten (10) parts water. Stronger solutions will shorten terminal life.
-
Allow the cleaning solution to dissolve the calcium deposits for about 10 minutes. Dispose of the cleaning solution at an approved Council Depot and never into storm water or sewage drains.
-
Rinse the electrode in clean water and re-fit the electrode in the cell housing.
-
Replace the cell head and plug assembly and reset valves and switches. Turn pump and TRi-XO on.
-
Confirm chlorine output and settings on the power pack. Timer settings will be automatically retained.
natural_image
Close-up of a hand holding a cylindrical mechanical component with coiled spring and plastic wrap (no visible text or symbols)| Messages Meaning Solution | ||
| Check Salt Check Minerals | Your salinity level may be low | Take a water sample to the pool shop to see if your salt or mineral levels need topping up. Please note that this can be affected by low water temperatures. If the water temp is below 21°C it is imperative that you check the salinity before adding extra salt/minerals |
| Check Cell | Cell may be approaching end of life | Contact your local pool care professional to ask about a replacement cell |
| Check Pump | Pumps output is off due to pump protection being activated | Check to see if there is water flow through the cell housing, if there is no flow or very low flow there may be a problem with the pump, or the pump is disconnected. Ensure all electrical connections are in place and there is no blockage in the pipe. Manually turn the chlorinator on to clear the warning |
| No Flow | Too little or no flow of water through the cell housing. Chlorine production is halted when this warning is displayed | Check to see if there is water flow through the cell housing, if there is no flow or very low flow there may be a problem with the pump, or the pump is disconnected. Ensure all electrical connections are in place and there is no blockage in the pipe |
| Check Pwr Supply | Power pack has over heated or encountered a problem | This warning may appear when the power supply has over heated and needs time to cool down. It could be triggered due to very high ambient temperatures or there may be a heat source nearby (remove the heat source if possible). If the problem persists you may need seek help from a pool care professional |
| Cell Cleaning | Cell has gone into reversing mode to clean | This represents the cell is going through its normal cleaning cycle. There is no need to do anything when this message is displayed |
| Boost | Cell is in 100% production mode | This message represents that the unit is at 100% output for a 24 hour period |
| Low | Cell is in 10% production mode | This message represents that the unit is at 10% output |
Express Warranty\*
Zodiac Group Australia Pty Ltd (Zodiac Australia) warrants that the Zodiac TRi-XO CrossOver Chlorine Generator will be free from defects in materials and workmanship for the period of 3 years from the date of purchase.
* The warranty applicable to commercial application is limited to 12 months from the date of installation.
Conditions
This express warranty only applies if the Product has been purchased from a dealer authorised by Zodiac Australia to supply it (Authorised Dealer).
Purchase from an Authorised Dealer ensures that the product is a genuine Zodiac product, that it is the version designed for Asia Pacific conditions, and that the Purchaser has access to appropriate technical knowledge and advice.
2 Zodiac Australia's liability under this express warranty is limited, at its option, to the repair or replacement of the Product or the payment of the cost of having the Product repaired or replaced.
3 This express warranty does not apply in the following circumstances:
(a) if the Product has not been installed in accordance with Zodiac's installation instructions;
(b) if the Product has been modified other than as authorised by Zodiac Australia or if a component part has been replaced by a part that is not a genuine Zodiac product;
(c) if a defect results from use of the Product outside recommended operating conditions; or
(d) if a defect results from damage (including damage to any internal electronics) caused by a power surge or lightning strike.
Zodiac chlorinators are designed and tested in accordance with International Standard EN 61000-6-1 immunity measurements. They are designed to tolerate minor fluctuations (2000 volts) in power supply that can be reasonably expected to occur in the energy grid. They will not tolerate power surges outside these limits nor will they withstand lightning strikes.
4 Without limiting 3 above, products sold by Zodiac Australia are designed for use with swimming pool water balanced in accordance with Australian Standard AS3633-1989 with a pH range of 7.0 - 7.8. Maximum chlorine readings should not exceed 4ppm. Where pool water is not maintained within these parameters, Zodiac Australia will not be responsible under this express warranty for any resulting damage, including damage caused by corrosion, scaling or stress loading.
5 Replacement parts supplied under this express warranty are warranted to be free from defects in materials and workmanship for the remainder of the warranty period or for 12 months from the supply of the replacement, whichever is longer.
6 All replacement electrodes after the initial 3 year warranty, will be subject to a warranty period of 2 years.
Product warranty registration
7 Purchasers should register their Products as soon as conveniently possible after purchase by completing a Product Warranty Registration by going online to www.zodiac.com.au.
8 Product registration must occur, and proof of purchase must be received by Zodiac Australia, prior to any warranty work being approved. Where applicable, a serial number, installation date and name of installer is required as part of the registration process.
How to make a warranty claim
9 The Purchaser must telephone or email Zodiac Australia Customer Service and obtain a warranty ID number for the warranty claim.
Contact details are:
Zodiac Group Australia Pty Ltd
219 Woodpark Road
Smithfield NSW 2164
Customer Service
Telephone: 1300 763 021
Email address: aftersales@zodiac.com
10 Zodiac Australia reserves the right to determine, in relation to each warranty claim, whether the Product should be returned to the Authorised Dealer at the address where the Purchaser purchased the Product or whether warranty service will be provided in the field, repaired at a Zodiac workshop or at the premises of an authorized Zodiac warranty agent.
II If it is necessary for the Purchaser to incur freight charges in making a valid claim under this warranty, Zodiac Australia will reimburse the Purchaser for charges reasonably incurred upon proof of the charges.
Additional guarantees, rights and remedies
Australian Purchasers - Guarantees under the Australian Consumer Law
12 The benefits of this express warranty are in addition to other guarantees, rights and remedies Australian consumers have under the Australian Consumer Law.
13 Zodiac Australia products come with guarantees that cannot be excluded under the Australian Consumer Law. You are entitled to a replacement or refund for a major failure and for compensation for any other reasonably foreseeable loss or damage. You are also entitled to have the goods repaired or replaced if the goods fail to be of acceptable quality and the failure does not amount to a major failure.
Purchasers in other Countries
14 The laws and regulations of other countries may confer on Purchasers in those countries additional rights and remedies. To the extent that they cannot be excluded or modified, Purchasers have the benefits of those rights and remedies in addition to the benefits of this express warranty. To the full extent that it is permissible to do so, those additional rights and remedies are excluded or modified so as to be consistent with Zodiac Australia's express warranty.
INCONSISTENCY WITH WARRANTY STATEMENTS IN PRODUCT MANUALS OR OTHER DOCUMENTS ACCOMPANYING PRODUCTS
If any warranty statements in a Zodiac Australia product manual or other document are inconsistent with the above Express Warranty and Guarantees, the above overrides and replaces the inconsistent statements.
Additional information about this product can be found at zodiac.com.au
For further information and assistance please consult your local pool professional.
NOTES

Zodiac is a registered trademark of Zodiac Group Australia Pty Ltd ABN 87 002 641 965
ZODIAC CUSTOMER SERVICE CENTRE
Zodiac Group Australia:
219 Woodpark Rd, Smithfield,
NSW 2164 Australia
Tel: 1300 763 021
Fax: 1300 781 688
Email: aftersales@zodiac.com.au
www.zodiac.com.au
Due to constant developments and improvements, specifications may change without notice. Improper use could affect performance and void warranty.
© Copyright Zodiac Australia Ltd 2014
- IMPORTANT INFORMATION
- GENERAL WARNINGS
- CHILD SAFETY
- ELECTRICAL HAZARD
- POSITIONING THE CHLORINE GENERATING CELL
- NAVIGATION BUTTONS
- ON/OFF
- UP/DOWN
- MENU/BACK
- SELECT/ENTER
- USING INBUILT CLOCK AND TIMERS
- SETTING THE CLOCK
- TURNING CHLORINE GENERATION ON
- THE TIMERS
- PROGRAMMING THE TIMERS
- CLEARING THE TIMERS
- EXTERNAL TIME CLOCK
- SETTING THE CHLORINE OUTPUT
- SETTING THE CONTROLLER
- (To be done before making a wiring connection)
- ATTENTION JANDY 'REV L' OR LATER USERS
- CAUTION WHEN WIRING TO A CONTROLLER
- IMPORTANT
- WIRING TO A CONTROLLER
- CONNECTING TO A CONTROLLER
- Polaris EOS / Jandy / Zodiac Aqualink / Aqualink TRi
- Pentair Intellitouch
- TESTING THE WIRING CONNECTION
- VERIFY THE WIRING CONNECTIONS
- CONNECTION TO CONTROLLER FOR POOL/SPA COMBINATIONS
- MANUAL SETTING
- AUTOMATIC SETTING
- THE BOOST SETTING
- NOTE:
- SETTING THE BOOST MODE
- HELP AND TROUBLESHOOTING
- MAINTENANCE
- INSPECTING AND CLEANING THE ELECTRODE
- Express Warranty\*
- Conditions
- Product warranty registration
- How to make a warranty claim
- Zodiac Group Australia Pty Ltd
- Customer Service
- Additional guarantees, rights and remedies
- Australian Purchasers - Guarantees under the Australian Consumer Law
- Purchasers in other Countries
- INCONSISTENCY WITH WARRANTY STATEMENTS IN PRODUCT MANUALS OR OTHER DOCUMENTS ACCOMPANYING PRODUCTS
- Additional information about this product can be found at zodiac.com.au
- NOTES
- ZODIAC CUSTOMER SERVICE CENTRE
Brand : ZODIAC
Model : TRi-XO
Category : Water pump