
AVUW60LM2A1 - Air conditioner LG - Free user manual and instructions
Find the device manual for free AVUW60LM2A1 LG in PDF.


| Product Type | Split Air Conditioner Outdoor Unit |
| Model | AVUW60LM2A1 |
| Refrigerant | R410A |
| Pipe Connection - Gas | 15.88 mm (5/8 inch) |
| Pipe Connection - Liquid | 9.52 mm (3/8 inch) |
| Standard Pipe Length | 7.5 m |
| Maximum Pipe Length | 70 m |
| Maximum Elevation Difference | 40 m |
| Additional Refrigerant Charge | 80 g/m beyond 7.5 m |
| Power Supply Phase | 3-phase |
| Recommended Earth Leakage Circuit Breaker (ELCB) | 20 A |
| Recommended Wire Cross-Sectional Area | 2.5 mm² (12 AWG) |
| Flare Nut Torque - Gas (15.88 mm) | 75±7 N·m |
| Flare Nut Torque - Liquid (9.52 mm) | 38±4 N·m |
| Energy Saving Tips | Use blinds, keep doors closed, clean filter every 2 weeks |
| Safety Features | ELCB required, grounding mandatory, disconnect device required |
| Maintenance | Clean air filter every 2 weeks |
| Installation Requirements | Professional installation only, comply with local codes |
Frequently Asked Questions - AVUW60LM2A1 LG
User questions about AVUW60LM2A1 LG
0 question about this device. Answer the ones you know or ask your own.
Ask a new question about this device
Download the instructions for your Air conditioner in PDF format for free! Find your manual AVUW60LM2A1 - LG and take your electronic device back in hand. On this page are published all the documents necessary for the use of your device. AVUW60LM2A1 by LG.
USER MANUAL AVUW60LM2A1 LG
Please read this installation manual completely before installing the product.
Installation work must be performed in accordance with the national wiring standards by authorized personnel only.
Please retain this installation manual for future reference after reading it thoroughly.
Single Outdoor
TIPS FOR SAVING ENERGY
Here are some tips that will help you minimize the power consumption when you use the air conditioner. You can use your air conditioner more efficiently by referring to the instructions below:
- Do not cool excessively indoors. This may be harmful to your health and may consume more electricity.
- Block sunlight with blinds or curtains while you are operating the air conditioner.
- Keep doors or windows closed tightly while you are operating the air conditioner.
- Adjust the direction of the air flow vertically or horizontally to circulate indoor air.
- Speed up the fan to cool or warm indoor air quickly, in a short period of time.
- Open windows regularly for ventilation as the indoor air quality may deteriorate if the air conditioner is used for many hours.
- Clean the air filter once every 2 weeks. Dust and impurities collected in the air filter may block the air flow or weaken the cooling / dehumidifying functions.
For your records
Staple your receipt to this page in case you need it to prove the date of purchase or for warranty purposes. Write the model number and the serial number here:
Model number :
Serial number :
You can find them labeled on the side of each unit.
Dealer's name :
Date of purchase :
IMPORTANT SAFETY INSTRUCTIONS
READ ALL INSTRUCTIONS BEFORE USING THE APPLIANCE.
Always comply with the following precautions to avoid dangerous situations and ensure peak performance of your product

WARNING
It can result in serious injury or death when the directions are ignored

CAUTION
It can result in minor injury or product damage when the directions are ignored

WARNING
• Install or repair by unqualified persons can result in hazards to you and others.
- Installation MUST comply with local building codes. If there is no local codes, comply with the Nation Electrical Code NFPA 70/ANSI C1-1003, Canadian Electrical Code Part1 CSA C.22.1. or current edition.
- The information contained in the manual is intended for use by a qualified service technician familiar with safety procedures and equipped with the proper tools and test instruments.
- Failure to carefully read and follow all instructions in this manual can result in equipment malfunction, property damage, personal injury or death.
- This appliance is not intended for use by persons (including children) with reduced physical, sensory or mental capabilities, or lack of experience and knowledge, unless they have been given supervision or instruction concerning use of the appliance by a person responsible for their safety.
Installation
- Do not install duct through disassemble or prepare the product yourself.
- This product can not install duct.
- Do not use a defective or underrated circuit breaker. Use this appliance on a dedicated circuit.
- There is risk of fire or electric shock.
- For electrical work, contact the dealer, seller, a qualified electrician, or an authorized service center.
- Do not disassemble or repair the product. There is risk of fire or electric shock.
• Always ground the product. - There is risk of fire or electric shock.
- Install the panel and the cover of control box securely.
- There is risk of fire or electric shock.
• Always install a dedicated circuit and breaker. - Improper wiring or installation may cause fire or electric shock.
- Use the correctly rated breaker or fuse.
- There is risk of fire or electric shock.
- Do not modify or extend the power cable.
- There is risk of fire or electric shock.
- Do not let the air conditioner run for a long time when the humidity is very high and a door or a window is left open.
- Moisture may condense and wet or damage furniture.
- Be cautious when unpacking and installing the product.
- Sharp edges could cause injury. Be especially careful of the case edges and the fins on the condenser and evaporator.
- For installation, always contact the dealer or an authorized service center.
-
There is risk of fire, electric shock, explosion, or injury.
-
Do not install the product on a defective installation stand.
- It may cause injury, accident, or damage to the product.
- Be sure the installation area does not deteriorate with age.
- If the base collapses, the air conditioner could fall with it, causing property damage, product failure, and personal injury.
- Use a vacuum pump or Inert (nitrogen) gas when doing leakage test or air purge. Do not compress air or Oxygen and do not use Flammable gases. Otherwise, it may cause fire or explosion.
- There is the risk of death, injury, fire or explosion.
- Do not turn on the breaker or power under condition that front panel, cabinet, top cover, control box cover are removed or opened. Otherwise, it may cause fire, electric shock, explosion or death.
Operation
- Take care to ensure that power cable could not be pulled out or damaged during operation. There is risk of fire or electric shock.
- Do not place anything on the power cable. There is risk of fire or electric shock.
- Do not touch(operate) the product with wet hands. There is risk of fire or electrical shock.
- Do not place a heater or other appliances near the power cable. There is risk of fire and electric shock.
- Do not allow water to run into electric parts. There is risk of fire, failure of the product, or electric shock.
- Do not store or use flammable gas or combustibles near the product. There is risk of fire or failure of product.
- Do not use the product in a tightly closed space for a long time. Oxygen deficiency could occur.
- When flammable gas leaks, turn off the gas and open a window for ventilation before turn the product on. Do not use the telephone or turn switches on or off. There is risk of explosion or fire.
- If strange sound, smell or smoke comes from product, turn the breaker off or disconnect the power supply cable. There is risk of electric shock or fire.
- Stop operation and close the window in storm or hurricane. If possible, remove the product from the window before the hurricane arrives. There is risk of property damage, failure of product or electric shock.
- Do not open the inlet grill of the product during operation.(Do not touch the electrostatic filter, if the unit is so equipped.) There is risk of physical injury, electric shock, or product failure.
- When the product is soaked (flooded or submerged), contact an authorized service center. There is risk of fire or electric shock.
- Be cautious that water could not enter the product. There is risk of fire, electric shock, or product damage.
- Ventilate the product from time to time when operating it together with a stove, etc. There is risk of fire or electric shock.
- Turn the main power off when cleaning or maintaining the product. There is risk of electric shock.
- When the product is not be used for a long time or the product use first time after test running, turn on main power switch before 6 hours ago.
- Take care to ensure that nobody could step on or fall onto the outdoor unit. This could result in personal injury and product damage.

CAUTION
Installation
- Always check for gas (refrigerant) leakage after installation or repair of product. Low refrigerant levels may cause failure of product.
- Install the drain hose to ensure that water is drained away properly. A bad connection may cause water leakage.
- Keep level even when installing the product. To avoid vibration or water leakage.
- Do not install the product where the noise or hot air from the outdoor unit could damage the neighborhoods. It may cause a problem for your neighbors.
- Use two or more people to lift and transport the product. Avoid personal injury.
- Do not install the product where it will be exposed to sea wind (salt spray) directly. It may cause corrosion on the product. Corrosion, particularly on the condenser and evaporator fins, could cause product malfunction or inefficient operation.
Operation
- Do not expose the skin directly to cool air for long periods of time. (Don't sit in the draft.) This could harm to your health.
- Do not use the product for special purposes such as preserving foods, works of art, etc. It is a consumer air conditioner, not a precision refrigeration system. There is risk of damage or loss of property.
- Do not block the inlet or outlet of air flow. It may cause product failure.
- Use a soft cloth to clean. Do not use harsh detergents, solvents, etc. There is risk of fire, electric shock, or damage to the plastic parts of the product.
- Do not touch the metal parts of the product when removing the air filter. They are very sharp! There is risk of personal injury.
- Do not step on or put anything on the product. (outdoor units) There is risk of personal injury and failure of product.
- Always insert the filter securely. Clean the filter every two weeks or more often if necessary. A dirty filter reduces the efficiency of the air conditioner and could cause product malfunction or damage.
- Do not insert hands or other objects through the air inlet or outlet while the product is operated. There are sharp and moving parts that could cause personal injury.
- Do not drink the water drained from the product. It is not sanitary and could cause serious health issues.
- Use a firm stool or ladder when cleaning or maintaining the product. Be careful and avoid personal injury.
- Replace the all batteries in the remote control with new ones of the same type. Do not mix old and new batteries or different types of batteries. There is risk of fire or explosion
- Do not recharge or disassemble the batteries. Do not dispose of batteries in a fire. They may burn or explode.
- If the liquid from the batteries gets onto your skin or clothes, wash it well with clean water. Do not use the remote if the batteries have leaked. The chemicals in batteries could cause burns or other health hazards.
- If you eat the liquid from the batteries, brush your teeth and see doctor. Do not use the remote if the batteries have leaked. The chemicals in batteries could cause burns or other health hazards.
TABLE OF CONTENTS
2TIPS FOR SAVING ENERGY
3IMPORTANT SAFETY INSTRUCTIONS
7INSTALLATION OF OUTDOOR UNIT
9WIRING CONNECTION
9Electrical Wiring
10Connecting Cables between Indoor Unit and Outdoor Unit
12Connecting the cable to Outdoor Unit
13 CONNECTING PIPES
13Preparation of Piping
14Connection of piping - Outdoor
15Forming the piping
16LEAKAGE TEST AND EVACUATION
16Preparation
16Leakage test
17Evacuation
18TEST RUNNING
20INSTALLATION GUID AT THE SEASIDE
20SEASONAL WIND AND CAUTIONS IN WINTER
INSTALLATION OF OUTDOOR UNIT
You need to select adequate installation location considering the following conditions, and make sure to acquire the consent of the user.
Installation Places
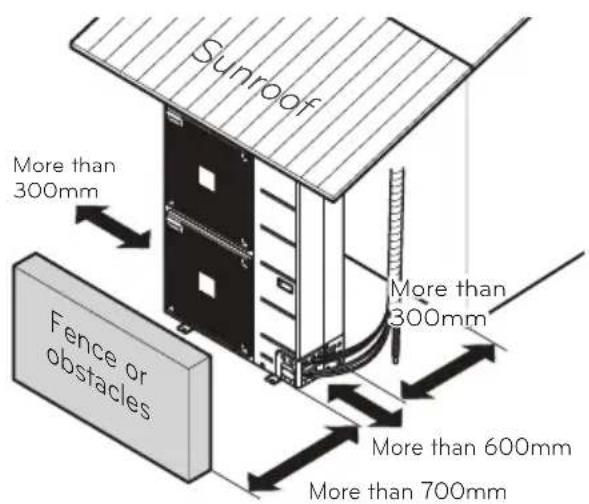
- If an awning is built over the unit to prevent direct sunlight or rain exposure, make sure that heat radiation from the condenser is not restricted.
- Ensure that the spaces indicated by arrows around front, back and side of the unit are respected.
- Do not place animals and plants in the path of the warm air.
- Take the air conditioner weight into account and select a place where noise and vibration are minimum.
- Select a place so that the warm air and noise from the air conditioner do not disturb neighbors.
- Select a place that can sufficiently endure the weight and vibration of the outdoor unit and where even installation is possible.
- Select a place that has no direct impact of snow or rain
- Select a place with no danger of snowfall or icicle drop
- Select a place without weak floor or base such as decrepit part of the building or with a lot of snow accumulation
- Install at a place with fluent water draining to prevent damage from localized heavy rain and avoid frequent flooded area.
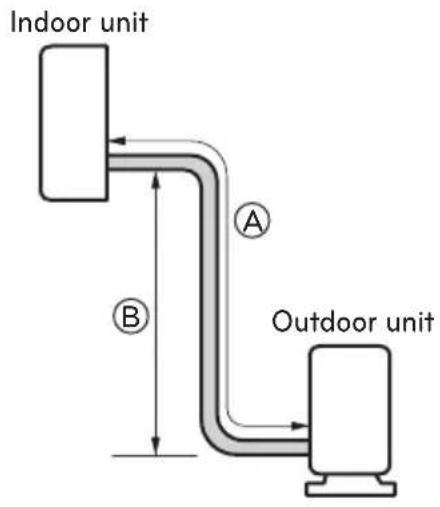
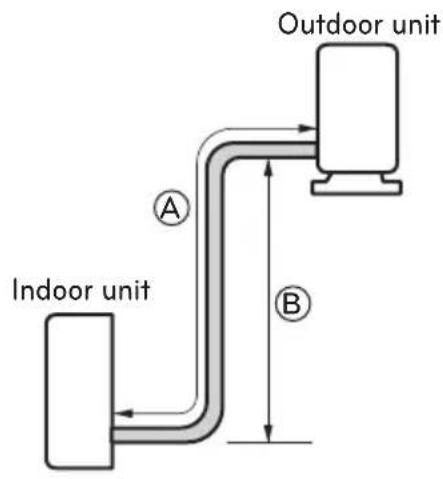
Piping length and the elevation
| MODEL | Pipe Size mm(inch) | Length A m | Elevation B m | Additional-Refrigerant g/m | ||
| Gas Liquid Standard | Max. Max. | |||||
| ∅ 15.88(5/8) | ∅ 9.52(3/8) | 7.5 70 | 40AVUW60 | LM2A80 | ||

CAUTION
If installed tube is shorter than 7.5 m, additional charging is not necessary. Additional Refrigerant = (A - 7.5 m) x Additional refrigerant (g)
WIRING CONNECTION
Electrical Wiring
Perform the electrical wiring work according to the electrical wiring connection.
- All wiring must comply with local requirements.
- Select a power source that is capable of supplying the current required by the air conditioner.
- Use a recognized ELCB(Earth Leakage Circuit Breaker) between the power source and the unit. A disconnection device to adequately disconnect all supply lines must be fitted.
- Model of circuit breaker recommended by authorized personnel only
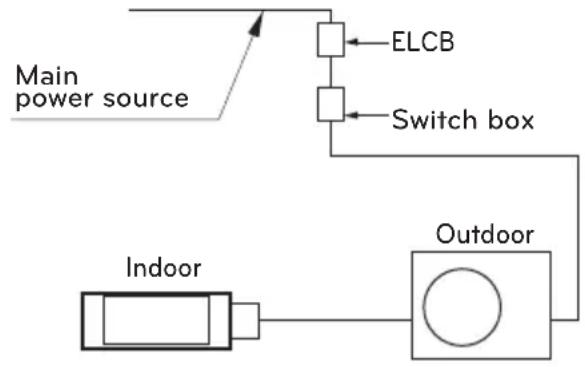
flowchart
graph TD
    A["Main power source"] --> B["ELCB"]
    A --> C["Switch box"]
    D["Indoor"] --> E["Outdoor"]
    E --> F["Circle"]
    style A fill:#f9f,stroke:#333
    style D fill:#ccf,stroke:#333
    style E fill:#cfc,stroke:#333
| Model Phase ELCB | ||
| AVUW60LM2A1 3 20 A |
Connecting Cables between Indoor Unit and Outdoor Unit
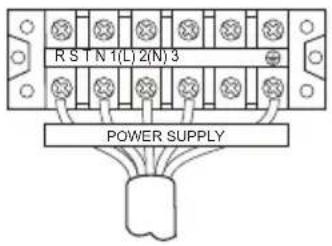
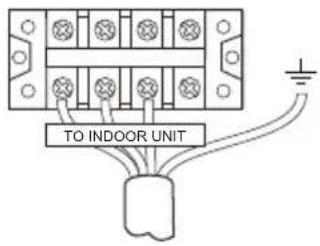
- Connect the wires to the terminals on the control board individually according to the outdoor unit connection.
- Ensure that the color of the wires of outdoor unit and the terminal No. are the same as those of indoor unit respectively

CAUTION
The power cord connected to the outdoor unit should be complied with IEC 60245 or HD 22.4 S4 (This equipment shall be provided with a cord set complying with the national regulation.
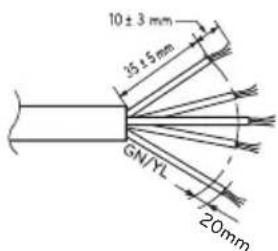
| Model | Phase (∅) | Area(mm2) |
| AVUW60LM2A1 | 3 | 2.5(12AWG) |
The connecting cable connected to the outdoor unit should be complied with IEC 60245 or HD 22.4 S4 (This equipment shall be provided with a cord set complying with the national regulation.)
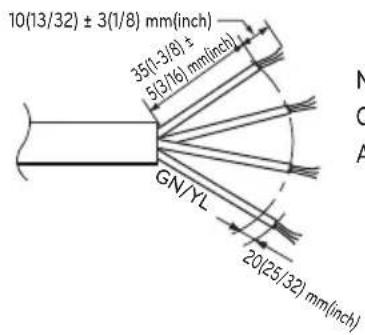
NORMAL CROSS-SECTIONAL AREA 0.75mm²
When the connection line between the indoor unit and outdoor unit is over 40 m(131.2 ft), connect the telecommunication line and power line separately.
If the supply cord is damaged, it must be replaced by a special cord or assembly available from the manufacturer of its service agent.
Precautions when laying power wiring
Use round pressure terminals for connections to the power terminal block.
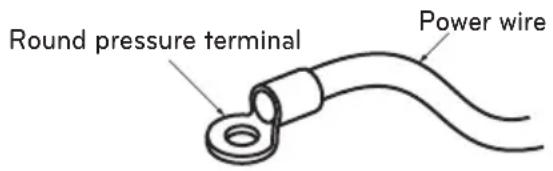
When none are available, follow the instructions below.
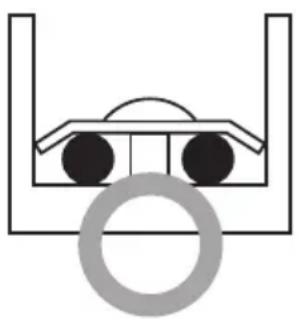
- Do not connect wiring of different thicknesses to the power terminal block. (Slack in the power wiring may cause abnormal heat.)
- When connecting wiring which is the same thickness, do as shown in the figure below.
natural_image
Simple line drawing of a mechanical or structural component with two circular holes and a central curved structure (no text or symbols)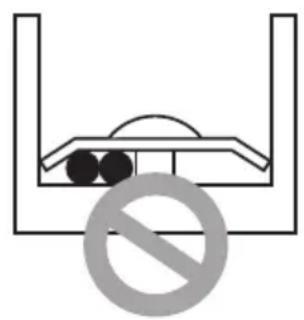
natural_image
Simple line drawing of a container with two circular objects inside, enclosed by a U-shaped frame and a prohibition symbol (no text or labels)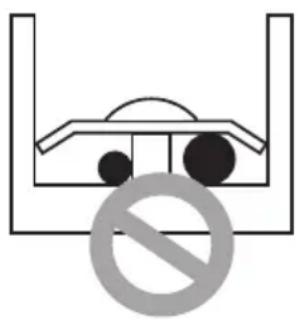
natural_image
Simple line drawing of a vehicle under load with no text or symbols- For wiring, use the designated power wire and connect firmly, then secure to prevent outside pressure being exerted on the terminal block.
- Use an appropriate screwdriver for tightening the terminal screws. A screwdriver with a small head will strip the head and make proper tightening impossible.
- Over-tightening the terminal screws may break them.
Connecting the cable to Outdoor Unit
Remove the side panel for wiring connection. Use the cord clamp to fix the cord cord.
Earthing work
- Case 1: Terminal block of Outdoor Unit have ⏻ mark.
Connect the cable of diameter 1,6mm ^2 or more to the earthing terminal provided in the control box and do earthing. - Case 2: Terminal block of Outdoor Unit don't have ⏚ mark.
Connect the cable of diameter 1,6mm^2 or more, to the panel of control box, marked as and fasten with earth screw
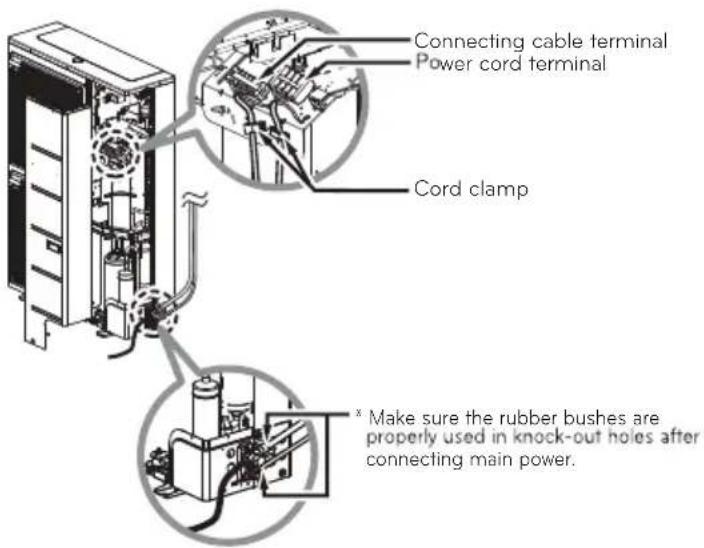
CAUTION
- The circuit diagram is not subject to change without notice.
- Be sure to connect wires according to the wiring diagram.
- Connect the wires firmly, so that They won't be pulled out easily.
- Connect the wires according to color codes by referring the wiring diagram.
- The Power cord connected to the unit should be selected according to the specifications.
CONNECTING PIPES
Preparation of Piping
Main cause of gas leakage is defect in flaring work. Carry out correct flaring work in the following procedure.
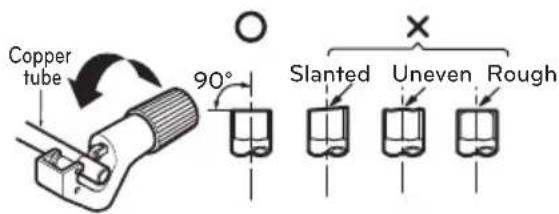
Cut the pipes and the scale.
- Use the accessory piping kit or the pipes purchased locally.
- Measure the distance between the indoor and the outdoor unit.
- Cut the pipes a little longer than measured distance.
- Cut the cable 1.5 m(4.9 ft) longer than the pipe length.
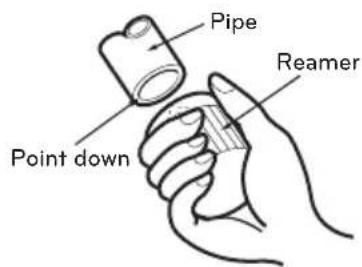
Burrs removal
- Completely remove all burrs from the cut cross section of pipe/tube.
- Put the end of the copper tube/pipe to downward direction as you remove burrs in order to avoid to let chips drop in the tubing.
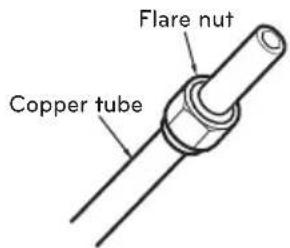
Putting nut om
- Remove flare nuts attached to indoor and outdoor units, than put them on pipe/tube having completed burr removal. (Not possible to put them on after flaring work)
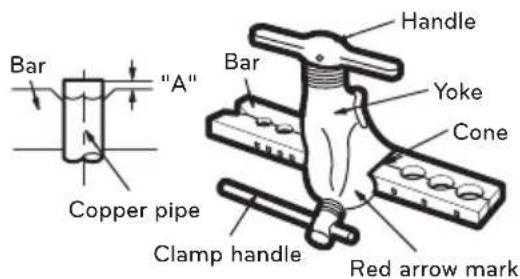
Flaring work
- Carry out flaring work using dedicated flaring tool for R410A as shown below.
| Outside diameter | A | ||
| mm inch mm inch | |||
| ∅ 6.35 1 | /4 1.1~1.3 | 0.043~0.051 | |
| ∅ 9.52 3 | /8 1.5~1.7 | 0.059~0.067 | |
| ∅ 12.7 1 | /2 1.6~1.8 | 0.063~0.071 | |
| ∅ 15.88 5 | /8 1.6~1.8 | 0.063~0.071 | |
| ∅ 19.05 3 | /4 1.9~2.1 | 0.075~0.083 | |
Firmly hold copper tube in a bar(or die) as indicated dimension in the table above.
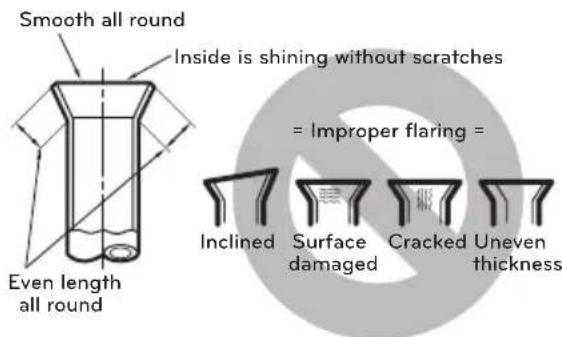
Check
- Compare the flared work with figure below.
- If flare is noted to be defective, cut off the flared section and do flaring work again.
Connection of piping - Outdoor
- Align the center of the piping and sufficiently tighten the flare nut by hand.
- Finally, tighten the flare nut with torque wrench until the wrench clicks. When tightening the flare nut with torque wrench ensure the direction for tightening follows the arrow on the wrench.
| Outside diameter | Torque | |
| mm inch N·m | ||
| ∅6.35 1/4 | 16±2 | |
| ∅9.52 3/8 | 38±4 | |
| ∅12.7 1/2 | 55±6 | |
| ∅15.88 5/8 | 75±7 | |
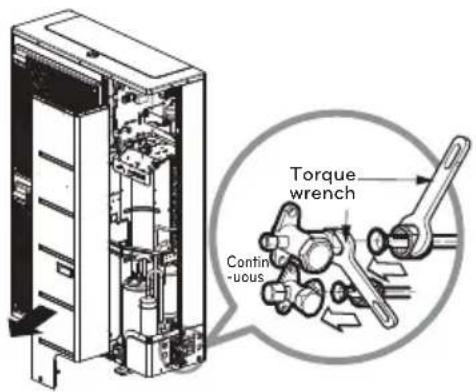
* When tighten the pipe, hold the haxagonal body.
- When connecting in a downward direction, knock out the knock-out hole of the base pan. (refer to figure 2)
- TIPS FOR SAVING ENERGY
- For your records
- IMPORTANT SAFETY INSTRUCTIONS
- READ ALL INSTRUCTIONS BEFORE USING THE APPLIANCE.
- WARNING
- CAUTION
- Installation
- Operation
- TABLE OF CONTENTS
- INSTALLATION OF OUTDOOR UNIT
- Installation Places
- Piping length and the elevation
- WIRING CONNECTION
- Electrical Wiring
- Connecting Cables between Indoor Unit and Outdoor Unit
- Precautions when laying power wiring
- Connecting the cable to Outdoor Unit
- Earthing work
- CONNECTING PIPES
- Preparation of Piping
- Cut the pipes and the scale.
- Burrs removal
- Putting nut om
- Flaring work
- Check
- Connection of piping - Outdoor
Brand : LG
Model : AVUW60LM2A1
Category : Air conditioner