
CF146 - Freezer Avanti - Free user manual and instructions
Find the device manual for free CF146 Avanti in PDF.


| Product Type | Chest Freezer |
| Model | CF146 |
| Brand | Avanti |
| Capacity | 14 cubic feet (approx.) |
| Dimensions (approx.) | 40" W x 28" D x 33" H |
| Weight (approx.) | 100 lbs |
| Power Supply | 115 V AC, 60 Hz, 15 A circuit |
| Temperature Control | Manual dial from MIN to MAX (OFF, MIN, MID, MAX) |
| Defrost Method | Manual defrost with drain plug |
| Storage Basket | 1 included for organization |
| Power Indicator Light | Amber light shows power is connected |
| Door Type | Chest lid with integrated handle |
| Installation | Freestanding only, 5" clearance on back and sides |
| Climate Class | Ambient temperature 55°F to 90°F (13°C to 32°C) |
| Refrigerant | R134a or similar (not specified) |
| Warranty | 1 year parts and labor; 2-5 year compressor (labor not included) |
| Safety Features | Child entrapment warning; grounded plug; no extension cord |
| Cleaning | Interior with baking soda solution; exterior with mild detergent |
| Spare Parts Availability | Order via Avanti Customer Service (800-220-5570) |
| Country of Origin | Not specified (likely China or USA) |
| Energy Saving Tips | Place in cool area; minimize door openings; avoid overloading |
Frequently Asked Questions - CF146 Avanti
User questions about CF146 Avanti
0 question about this device. Answer the ones you know or ask your own.
Ask a new question about this device
Download the instructions for your Freezer in PDF format for free! Find your manual CF146 - Avanti and take your electronic device back in hand. On this page are published all the documents necessary for the use of your device. CF146 by Avanti.
USER MANUAL CF146 Avanti
natural_image
Line drawing of a single open refrigerator with ventilation grilles and a power cord (no text or symbols)CAUTION: (Picture may vary)
BEFORE USE, PLEASE READ AND FOLLOW ALL SAFETY RULES AND OPERATING INSTRUCTIONS.
Avanti has a policy of continuous improvement on its products and reserves the right to change materials and specifications without notice.
Avanti Products, A Division of the Mackle Co., Inc.
P.O. Box 520604 - Miami, Florida 33152
www.avantiproducts.com
TABLE OF CONTENTS
| Help Us Help You | 3 |
| Parts and Features | 4 |
| Chest Freezer Safety | 5 |
| Important Safeguards | 6 |
| Important Safety Instructions | 7 |
| Installation Instructions | 7 |
| Before Using Your Freezer | 7 |
| Installation of Your Freezer | 7 |
| Electrical Connection | 8 |
| Operating Your Freezer | 8 |
| Temperature Control | 8 |
| Defrosting Your Freezer | 9 |
| The Freezer Compartment | 9 |
| Care and Maintenance | 10 |
| Cleaning Your Freezer | 10 |
| Vacation Time | 10 |
| Moving Your Freezer | 10 |
| Energy Saving Tips | 10 |
| Troubleshooting Guide | 11-12 |
| Service for Your Appliance | 12 |
| Wiring Diagram | 12 |
| Your Avanti Products Warranty | 13 |
| Instrucciones en Español | 14 – 18 |
| Registration Information and Registration Card | 19 |
HELP US HELP YOU...
Read this guide carefully.
It is intended to help you operate and maintain your new freezer properly.
Keep it handy to answer your questions. If you don't understand something or you need more assistance, please call:
Avanti Customer Service 800-220-5570
Keep proof of original purchase date (such as your sales slip) with this guide to establish the warranty period.
CAUTION:
THIS FREEZER IS NOT DESIGNED FOR THE STORAGE OF MEDICINE OR OTHER MEDICAL PRODUCTS.
Write down the model and serial numbers.
You'll find them on a plate located on the bottom outside wall of the freezer.
Please write these numbers here:
Date of Purchase
Model Number
Serial Number
Use these numbers in any correspondence or service calls concerning your freezer.
If you received a damaged freezer, immediately contact the dealer (or builder) that sold you the freezer.
Save time and money. Before you call for service, check the Troubleshooting Guide. It lists causes of minor operating problems that you can correct yourself.
IF YOU NEED SERVICE
We're proud of our service and want you to be pleased. If for some reason you are not happy with the service you receive, here are some steps to follow for assistance.
FIRST, contact the people who serviced your freezer. Explain why you are not pleased. In most cases, this will solve the problem.
NEXT, if you are still not pleased, write all the details, including your telephone number, and send it to:
Customer Service
Avanti Products
10880 NW 30 Street
Miami, FL 33172 USA
PARTS & FEATURES
CF146
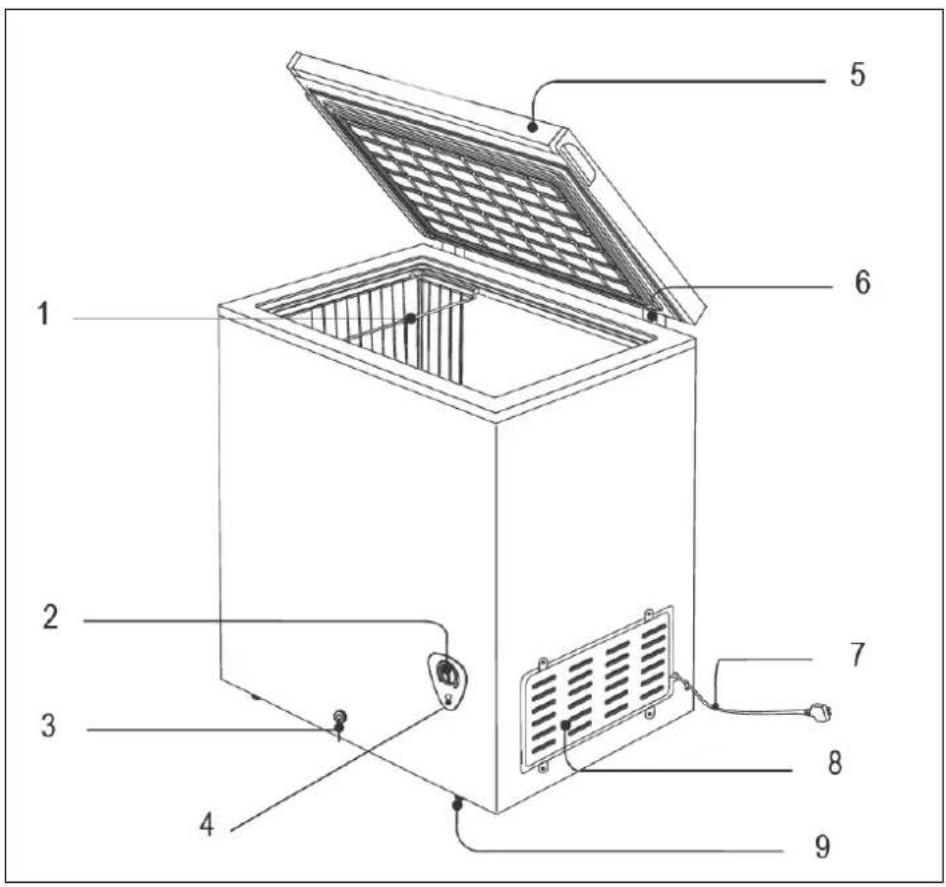
1 Storage Basket
2 Temperature Control
3 Defrost Drain
4 Power Indicator Light
5 Door with Integrated Handle
6 Hinge
7 Power Cord
8 Side Panel
9 Legs
CHEST FREEZER SAFETY
Your safety and the safety of others are very important.
We have provided many important safety messages in this manual and on your appliance. Always read and obey all safety messages.

This is the Safety Alert Symbol. This symbol alerts you to potential hazards that can kill or injure you and others. All safety messages will follow the Safety Alert Symbol and either the wards" DANGER", "WARNING" or "CAUTION".

DANGER

Danger means that failure to heed this safety statement may result in severe personal injury or death.

WARNING

Warning means that failure to heed this safety statement may result in extensive product damage, serious personal injury, or death.
CAUTION
Caution means that failure to heed this safety statement may result in minor or moderate personal injury, or property or equipment damage.
All safety messages will alert you to what the potential hazard is, tell you how to reduce the chance of injury, and let you know what can happen if the instructions are not followed.

IMPORTANT SAFEGUARDS
Before the chest freezer is used, it must be properly positioned and installed as described in this manual, so read the manual carefully. To reduce the risk of fire, electrical shock or injury when using the chest freezer, follow basic precautions, including the following:

DANGER

- Plug into a grounded 3-prong outlet, do not remove grounding prong, do not use an adapter, and do not use an extension cord
- Replace all panels before operating
- It is recommended that a separate circuit, serving only your chest freezer, be provided. Use receptacles that cannot be turned off by a switch or pull chain
- Never clean chest freezer parts with flammable fluids. These fumes can create a fire hazard or explosion. And do not store or use gasoline or other flammable vapors and liquids in the vicinity of this or any other appliance. The fumes can create a fire hazard or explosion.
- Before proceeding with cleaning and maintenance operations, make sure the power line of the unit is disconnected.
- Do not connect or disconnect the electric plug when your hands are wet
- Unplug the chest freezer or disconnect the power before cleaning or servicing. Failure to do so can result in electrical shock or death.
- Do not attempt to repair or replace any part of your chest freezer unless it is specifically recommended in this material. All other servicing should be referred to a qualified technician.

WARNING

- Use two or more people to move and install the chest freezer. Failure to do so can result in back or other injury.
- To ensure proper ventilation for your chest freezer, the front of the unit must be completely unobstructed. Choose a well-ventilated area with temperatures above 55^0F (13^0C) and below 90^0F (32^0C) . This unit must be installed in an area protected from the elements, such as wind, rain, water spray or sunlight.
- The chest freezer should not be located next to ovens, grills or other sources of high heat.
- The chest freezer must be installed with all electrical, water and drain connections in accordance with state and local codes. A standard electrical supply (115 V AC only, 60 Hz), properly grounded in accordance with the National Electrical Code and local codes and ordinances is required.
- Do not kink or pinch the power supply cord of the chest freezer.
- The fuse (or circuit breaker) size should be 15 amperes.
- It is important for the chest freezer to be leveled in order to work properly. You may need to make several adjustments to level it.
- All installation must be in accordance with local plumbing code requirements.
- Make certain that the pipes are not pinched or kinked or damaged during installation.
- Check for leaks after connection.
- Never allow children to operate, play with or crawl inside the chest freezer
- Do not use solvent-based cleaning agents or abrasives on the interior. These cleaners may damage or discolor the interior.
- Do not use this apparatus for other than its intended purpose.
IMPORTANT SAFETY INSTRUCTIONS
| WARNING | To reduce the risk of fire, electrical shock, or injury when using your freezer, follow these basic precautions: |
| Read all instructions before using the freezer.DANGER or WARNING:Risk of child entrapment.Child entrapment and suffocation are not problems of the past. Junked or abandoned freezers are still dangerous, even if they will “just sit in the garage a few days.”Before you throw away your old freezer:Take off the doors. Leave the shelves in place so that children may not easily climb inside.Never allow children to operate, play with, or crawl inside the freezer.Never clean freezer parts with flammable fluids. The fumes can create a fire hazard or explosion.Do not store or use gasoline or any other flammable vapors and liquids in the vicinity of this or any other freezer. The fumes can create a fire hazard or explosion.-Save these instructions- | |
INSTALLATION INSTRUCTIONS
Before Using Your Freezer
- Remove the exterior and interior packing.
- Check to be sure you have all of the following parts:
■ 1 Storage Basket
■ 1 Instruction Manual
■ 1 Plastic Scraper
- Before connecting the freezer to the power source, let it stand upright for approximately 2 hours. This will reduce the possibility of a malfunction in the cooling system from handling during transportation.
- Clean the interior surface with lukewarm water using a soft cloth.
Installing Your Freezer
- This appliance is designed to be free standing only, and should not be recessed or built-in.
- Place your freezer on a floor that is strong enough to support the freezer when it is fully loaded.
- Allow 5 inches of space between the back and sides of the freezer, which allows the proper air circulation.
- Locate the freezer away from direct sunlight and sources of heat (stove, heater, radiator, etc.). Direct sunlight may affect the acrylic coating and heat sources may increase electrical consumption. Extreme cold ambient temperatures may also cause the freezer not to perform properly.
- Avoid locating the freezer in moist areas.
- Plug the freezer into an exclusive, properly installed-grounded wall outlet. Do not under any circumstances cut or remove the third (ground) prong from the power cord. Any questions concerning power and/or grounding should be directed toward a certified electrician or an authorized Avanti Products service center.
- After plugging the appliance into a wall outlet, allow the unit to cool down for 2\~3 hours before placing food in the freezer compartment.
Warning
Improper use of the grounded plug can result in the risk of electrical shock. If the power cord is damaged, have it replaced by an authorized Avanti Products service center.
This freezer should be properly grounded for your safety. The power cord of this freezer is equipped with a three-prong plug which mates with standard three prong wall outlets to minimize the possibility of electrical shock.
Do not under any circumstances cut or remove the third ground prong from the power cord supplied.
This freezer requires a standard 115/120Volt\~60Hz electrical outlet with three-prong ground.
The cord should be secured behind the freezer and not left exposed or dangling to prevent accidental injury.
Never unplug the freezer by pulling the power cord. Always grip the plug firmly and pull straight out from the receptacle.
Do not use an extension cord with this appliance. If the power cord is too short, have a qualified electrician or service technician install an outlet near the appliance.
The light indicates that the freezer is properly connected to the electrical power. The light indicates power supply, and will glow even if the temperature control dial is turned to "OFF", or the compressor has failed to work and the compartment is not being cooled.
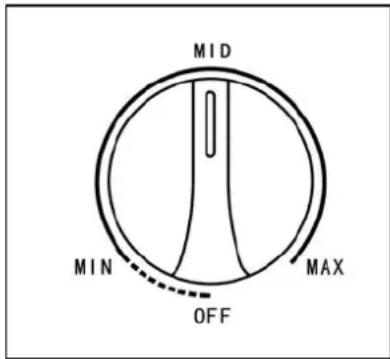
- Your freezer has one control for regulating the temperature. The temperature control is located on the lower right hand corner.
- The first time you turn the unit on, switch the thermostat to the "MAX" setting and run for at least 2 hours before putting frozen foods inside. This will ensure the cabinet is thoroughly chilled before food is put in.
- The range of the temperature control is from position"MIN" the warmest to "MAX" the coldest. Adjust the temperature control to the setting that best suits your needs. The setting of "MID" should be appropriate for home or office freezer use.
• To turn the freezer off, turn the temperature control to "OFF".
NOTE:
- Turning the temperature control to "OFF" position stops the cooling cycle but does not shut off the power to the freezer.
- If the unit is unplugged, lost power, or turned off; you must wait 3 to 5 minutes before restarting the unit. If you attempt to restart before this time delay, the freezer will not start.
• Large amounts of food will lower the cooling efficiency of the appliance. - If you choose to change the thermostat setting, adjust thermostat control by one numerical increment at a time. Allow several hours for temperature to stabilize between adjustments.
Defrosting Your Freezer
- When? For the most efficient operation and minimum energy consumption, defrost the freezer when the frost on the freezer walls is excessive or 14 to 12 inch thick.
- Choose a time when the stock of frozen food is low.
CAUTION
Do not use boiling water because it may damage the plastic parts. In addition, never use a sharp or metallic instrument to remove frost as it may damage the cooling coils and will void the warranty. We recommend using the plastic scraper provided with your unit.
- Remove the frozen food from the freezer and place it in a cooler to protect the food.
- Turn the thermostat knob to "OFF".
- Unplug the freezer. The Power Supply light should be off (amber light out).
- During defrosting, the ice melts into the cabinet.
- Remove the drain plug on the inside floor of the freezer by pulling straight out.
- Place a shallow pan outside drain outlet. The defrost water will drain out.
- Check the pan occasionally so the water does not overflow.
- Clean the interior of the freezer.
- Replace the plug on the inside floor.
- Reset the thermostat to desired setting.
- Allow the cabinet to cool for one hour.
- Return food to the freezer.
HELPFUL HINT:
Defrosting usually takes a few hours. Leaving the door open will help speed the process. Also, pouring warm water (not boiling) on the ice/frost will help speed melting. If you must use a scraper- please use caution - it is very easy to damage the freezer compartment and void your warranty.
The Freezer Compartment
- This compartment is designed for the long-term storage of frozen food. Storage time is up to three months.
- The storage life of frozen foods varies and the recommended storage time should not be exceeded. The instructions regarding the care of frozen foods should be followed when defrosting the freezer.
- Pre-packed commercially frozen food should be stored in accordance with the frozen foods manufacturer's instructions for a three star frozen food storage compartment or home freezer.
- Place frozen food into the freezer as quickly as possible after purchase. If there are instructions on the packet, carefully follow these instructions regarding storage times.
- The freezer door is susceptible to breaking due to excessive ice build up. Be sure to defrost when the ice reaches 14 to 12 inch thick.
- A storage basket is provided for the organization of odd-shaped items. To reach other packages in the freezer, just slide the basket to one side, or lift it out.
CARE AND MAINTENANCE
Cleaning Your Freezer
- Upon installation of your new appliance, it is recommended that it be cleaned thoroughly.
- Turn the temperature control to "OFF", unplug the freezer, remove the food and storage basket.
- Wash the inside with a damp warm cloth containing a water and baking soda solution. The solution should be about 2 tablespoons of baking soda to a quart of water.
- Wash the storage basket with a mild detergent solution.
- Be sure to keep the door gasket (seal) clean to keep the unit running efficiently.
• The outside of the freezer should be cleaned with mild detergent and warm water. - Dry the interior and exterior with a soft cloth.
- The condenser coils should be vacuumed when they are dusty or dirty.
- It is recommended that the unit be cleaned each time it is defrosted to help keep the unit odor free and running efficiently.
Vacation Time
- Remove all the food.
- Unplug the freezer.
- Clean the freezer.
- Leave the door open slightly to avoid possible formation of condensation, mold, or odors.
- Use extreme caution in the case of children. The unit should not be accessible to child's play.
- Short vacations: Leave the freezer operating during vacations of less than three weeks.
- Long vacations: If the appliance will not be used for several months, remove all food and unplug the power cord. Clean and dry the interior thoroughly. To prevent odor and mold growth, leave the door open slightly: blocking it open if necessary or have the door removed.
Moving Your Freezer
- Remove all the food.
- Securely tape down all loose items inside your freezer.
- Tape the doors shut.
- Be sure the freezer stays in the upright position during transportation.
Energy Saving Tips
- The freezer should be located in the coolest area of the room, away from heat producing appliances or heating ducts, and out of the direct sunlight.
- Let hot foods cool to room temperature before placing in the freezer. Overloading the freezer forces the compressor to run longer. Foods that freeze too slowly may lose quality, or spoil.
- Be sure to wrap foods properly, and wipe containers dry before placing them in the freezer. This cuts down on frost build-up inside the freezer.
- Freezer storage bin should not be lined with aluminum foil, wax paper, or paper toweling. Liners interfere with cold air circulation, making the freezer less efficient.
- Organize and label food to reduce door openings and extended searches. Remove as many items as needed at one time, and close the door as soon as possible.
PROBLEMS WITH YOUR FREEZER
You can solve many common freezer problems easily, saving you the cost of a possible service call. Try the suggestions below to see if you can solve the problem before calling the servicer.
TROUBLESHOOTING GUIDE
| PROBLEM | POSSIBLE CAUSE |
| Freezer does not operate. | Not plugged in.The circuit breaker tripped or a blown fuse.The freezer temperature control is set to "OFF". |
| Compressor turns on and off frequently. | The room temperature is hotter than normal.A large amount of food has been added to the freezer.The door is open too often.The door is not closed completely.The temperature control is not set correctly.The door gasket does not seal properly.The freezer does not have the correct clearances.The freezer has recently been disconnected for a period of time. Four hours are required for the freezer to cool down completely. |
| Temperature inside the freezer is too warm. | Temperature control is set to "MIN". Turn the control to a cooler setting and allow several hours for the temperature to stabilize.Door is kept open too long or is opened too frequently. Warm air enters the freezer every time the door is opened. Open the door less often.The door is not closed completely.The door gasket does not seal properly.A large amount of warm or hot food might have been stored recently. Wait until the freezer has had a chance to reach its selected temperature.The freezer has recently been disconnected for a period of time. Four hours are required for the freezer to cool down completely. |
| Temperature inside the freezer is too cold. | Temperature control is set too cold. Turn the control to a warmer setting and allow several hours for the temperature to stabilize. |
| Temperature of external freezer surface is warm. | The exterior freezer walls can be as much as 30°F warmer than room temperature. This is normal while the compressor works to transfer heat from inside the freezer cabinet. |
| Popping or cracking sound when compressor comes on. | Metal parts undergo expansion and contraction, as in hot water pipes. This is normal. Sound will level off or disappear as freezer continues to run. |
| Bubbling or gurgling sound, like water boiling. | Refrigerant (used to cool freezer) is circulating throughout the system. This is normal. |
| Vibrations. Check to assure that the freezer is | on a level surface.Floor is uneven or weak. Freezer rocks on the floor when it is moved slightly. Be sure floor can adequately support freezer. Level the freezer by putting wood or metal shims under part of the freezer.The freezer is touching the wall. Re-level thefreezer and move it from the wall.See “Installation Instructions”. |
| Moisture forms on inside freezer walls. | Weather is hot and humid, which increases internal rate of frost build-up. This is normal.Door is slightly open.Door is kept open too long, or is opened too frequently. Open the door less often.The door is not sealed properly. |
| Moisture forms on outside of freezer. | Door is slightly open, causing cold air from inside the freezer to meet warm moist air from outside. |
| The door will not close properly. | The freezer is not on a level surface.The gasket is dirty.The storage basket is out of position. |
We are proud of our customer service organization and the network of professional service technicians that provide service on your Avanti freezers. With the purchase of your Avanti freezer, you can be confident that if you ever need additional information or assistance, the Avanti Products Customer Service Team will be here for you. Just call us toll-free.
AVANTI PRODUCTS CUSTOMER SERVICES
| Product Information800-323-5029 | Whatever your questions are about our products, help is available. |
| Part Orders800-220-5570 | You may order parts and accessories that will be delivered directly to your home, by personal check, money order, Master Card, or Visa. |
| In-Home Repair Service800-220-5570 | An Avanti Products authorized service center will provide expert repair service, scheduled at a time that is convenient for you. Our trained servicers know your freezer inside and out. |
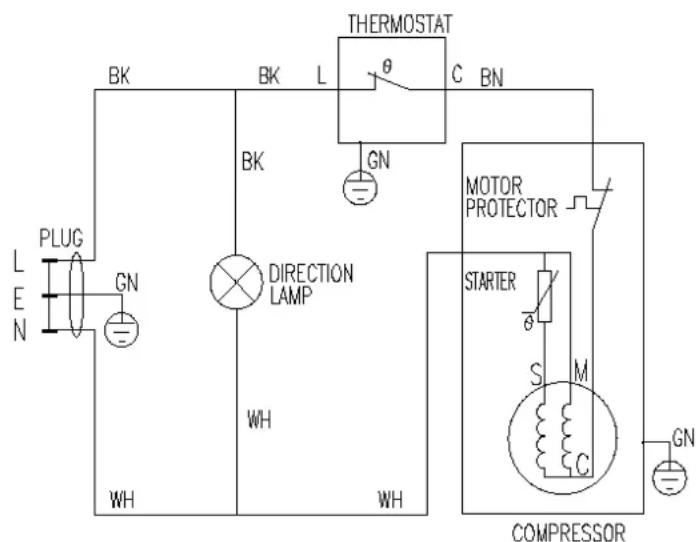
WIRING DIAGRAM
| YOUR Avanti Products WARRANTY | Staple your sales receipt here. Proof of original purchase date is needed to obtain service under warranty. |
WHAT IS COVERED
LIMITED ONE-YEAR
WARRANTY
For one year from the date of purchase by the original owner, Avanti Products will, at its option, repair or replace any part of the freezer, which proves to be defective in material or workmanship under normal use.
During this period Avanti Products will provide all parts and labor necessary to correct such defects free of charge, so long as the freezer has been installed and operated in accordance with the written instructions in this manual. In rental or commercial use, the warranty period is 90 days. All Avanti Appliances of 3.5 cubic foot capacity or less must be brought/sent to the appliance service shop for repair. Avanti Products will provide you with a reasonably similar replacement product that is either new or factory refurbished
LIMITED SECOND THROUGH FIFTH YEAR WARRANTY
For the second through the fifth year from date of original purchase, Avanti Products will provide a replacement compressor free of charge due to a failure. You are responsible for the service labor and freight charges. In rental or commercial use, the limited compressor warranty is one year and nine months. Cost to move the freezer to the servicers' shop and back to the users' home, as may be required, are the users' responsibility.
WHAT IS NOT COVERED
- Content losses of food due to spoilage.
- Incidental or consequential damages.
- Parts and labor costs for the following will not be considered as warranty:
- Chest freezer lid liners.
• Light bulbs and/or plastic housing. - Plastic cabinet liners.
- Punctured evaporator that voids the warranty on the complete sealed system.
• Repairs performed by unauthorized servicers. -
Shipping and handling costs associated with the replacement of the unit.
-
Service calls that do not involve defects in material or workmanship such as customer education, door reversal, or proper installation.
- Surcharges including, but not limited to, any after hour, weekend, or holiday service calls, tolls ferry trip charges, or mileage expense for service calls to remote areas including the state of Alaska.
- Service calls that are related to external problems, such as abuse, misuse, inadequate electrical power, accidents, fire, floods, or acts of God.
- Replacement of house fuses or resetting circuit breakers.
- Failure of the product if it is used for other than its intended purpose.
- This warranty does not apply outside the Continental USA.
Thank you for purchasing this fine Avanti product. Please fill out this card and return it within 100 days of purchase and receive these important benefits:
Protect your product:
We will keep the model number and date of purchase of your new Avanti product on file to help you refer to this information in the event of an insurance claim such as fire or theft.
➢ Promote better products:
We value your input. Your responses will help us develop products designed to best meet your future needs.
(detach here)
Avanti Registration Card
Name
Model #
Serial #
Address
Date Purchased
Store/Dealer Name
City
State
Zip
Occupation
Area Code
Phone Number
As Your Primary Residence, Do You:
□Own
□Rent
Did You Purchase An Additional Warranty: Your Age:
□Extended
□Food Loss
□None
□under 18
□18-25
□26-30
Reason For Choosing This Avanti Product:
Please indicate the most important factors that influenced your decision to purchase this product.
Marital Status:
□Price
□Product Features
□Avanti Reputation
□Product Quality
□Salesperson Recommendation
□Friend/Relative Recommendation
□Warranty
□Other
□Married □Single
Is This Product Used In The:
□Home □Business
How Did You Learn About This Product:
□Advertising
□In Store Demo
□Personal Demo
□Other
Comments
- HELP US HELP YOU...
- Read this guide carefully.
- Avanti Customer Service 800-220-5570
- CAUTION:
- Write down the model and serial numbers.
- IF YOU NEED SERVICE
- PARTS & FEATURES
- CHEST FREEZER SAFETY
- Your safety and the safety of others are very important.
- DANGER
- WARNING
- CAUTION
- IMPORTANT SAFEGUARDS
- IMPORTANT SAFETY INSTRUCTIONS
- INSTALLATION INSTRUCTIONS
- Before Using Your Freezer
- Installing Your Freezer
- NOTE:
- Defrosting Your Freezer
- HELPFUL HINT:
- The Freezer Compartment
- CARE AND MAINTENANCE
- Cleaning Your Freezer
- Vacation Time
- Moving Your Freezer
- Energy Saving Tips
- PROBLEMS WITH YOUR FREEZER
- WHAT IS COVERED
- LIMITED ONE-YEAR
- WARRANTY
- LIMITED SECOND THROUGH FIFTH YEAR WARRANTY
- WHAT IS NOT COVERED
- Protect your product:
- ➢ Promote better products:
- Avanti Registration Card
- Did You Purchase An Additional Warranty: Your Age:
- Reason For Choosing This Avanti Product:
- Is This Product Used In The:
- How Did You Learn About This Product:
Brand : Avanti
Model : CF146
Category : Freezer