
KMG31BL - Kitchen sink CDA - Free user manual and instructions
Find the device manual for free KMG31BL CDA in PDF.


| Product Type | Kitchen Sink |
| Brand | CDA |
| Model | KMG31BL |
| Material | Stainless Steel |
| Number of Bowls | 1 |
| Drainer | Yes |
| Tap Hole Diameter | 35 mm (cut on site) |
| Waste Fitting Included | Yes (with overflow) |
| Overflow | Yes |
| Installation Type | Top-mount (drop-in) |
| Worktop Thickness Compatibility | 30 mm or 40 mm |
| Certification | EU 1935/2004/EC, EU 2002/72/EC |
| Parts Guarantee | 5 years |
| Labour Guarantee | 2 years |
| Cleaning Recommendation | Mild detergent, avoid abrasives |
| Recommended Accessories | Wire sink-basket, drainer-rack |
Frequently Asked Questions - KMG31BL CDA
User questions about KMG31BL CDA
0 question about this device. Answer the ones you know or ask your own.
Ask a new question about this device
Download the instructions for your Kitchen sink in PDF format for free! Find your manual KMG31BL - CDA and take your electronic device back in hand. On this page are published all the documents necessary for the use of your device. KMG31BL by CDA.
USER MANUAL KMG31BL CDA
Installation, use and maintenance
EU Declaration of Conformity:
Having regard to materials and articles intended to come into contact with foodstuffs, we declare that the materials composing the sink meet the requirements laid out in EU directives 1935/2004/EC and 2002/72/EC.
Taking care of your sink
Your CDA sink is manufactured using material developed specifically to withstand the rigours of everyday kitchen use. However, we advise you to follow these precautions to keep the sink in pristine condition:
- Do not use a plastic washing-up bowl in the sink as grit and other particles may become embedded in the bowl and scratch or erode the sink surface. CDA specifically recommend the use of wire sink-baskets and drainer-racks to help protect your sink. Take care to not cut the plastic coating on these accessories with sharp cutlery or the edges of pans, etc.
- Do not use neat bleach or other harsh cleaning agents on the metal sink waste as this may cause tarnishing. This is especially important if the waste is either solid brass or brass plated.
- Avoid dropping heavy or sharp objects into the sink as they may scratch or damage the surface.
- The surface of the sink can be affected by certain chemicals e.g. neat bleach, nail polish remover, paint stripper, solvents, brush cleaner and insecticides. If any of these substances come into contact with the sink, wipe off immediately with a dry cloth, wash with mild detergent and rinse with water.
- Do not use abrasive liquids, powders or steel pads to clean the sink
as they will damage the sink surface and make it more susceptible to staining. The sink may be cleaned with a dilute bleach solution.
- Do not place very hot objects directly on the sink, place them on a special surface (board) made from wood or heat-proof plastic, etc.
- If the sink comes into contact with acidic materials, rinse immediately with plenty of water and wipe with a soft dry cloth.
- In hard-water areas, a limescale deposit may build up on the sink. The limescale may become stained by coloured foods such as coffee or red wine. If this occurs, we recommend use of a mild limescale remover.
• Particularly stubborn organic stains can be removed effectively by soaking the sink in a biological washing-powder solution, dishwasher powder solution or diluted bleach. - Do not leave rusty objects in contact with the sink. Rust can cause staining, cracking or even permanent damage to the sink surface.
- To avoid staining of the surface do not leave food or other materials with corrosive properties such as juices, salt, vinegar, mustard etc. on the sink for a long time.
- After using the sink, rinse it clean with warm soapy water and rinse with clean water before wiping dry.
- During installation, protect from scratches, scuffs and other damage.
- Do not stand the sink on its edges or corners. This may damage it.
- Do not overtighten or strain plumbing fittings.
- The moulding and edges of the sink must be absolutely level so water flows off the drainer.
Installation
Before Installation
Offer up the sink to the worktop and/or the cabinets to confirm that the external dimensions of the bowl are compatible with the cabinets themselves.
- Place the special included sealant along the whole perimeter of the sink that will be in contact with the surface.
Confirm that with the sink in position:
- There is adequate space to install any taps or other required accessories.
- There is adequate space to install the waste pipework and that any necessary modification to internal shelves to accommodate the waste (and trap) is acceptable.
- Access to any water stop-cock or other services will still be adequate after the installation.
Drain connection
- Follow the instructions supplied with the drain fittings.
Cutting the tap hole
Only cut the tap hole from the underside of the sink.
- Select the tap hole position based on whether left hand or right hand drainer is required.
- Locate the centre of the required tap hole and cut it out using a suitable 35mm diameter hole cutter (available from most plumbers merchants or DIY stores).
- Caution: Ensure that the sink is safely supported around the hole to be cut out.
Installation
- Place the sink upside-down on the worktop where it will be mounted.
- Draw the perimeter of the sink on the worktop with a pencil.
- Remove the sink and draw a dotted line, 1cm inside the perimeter.
- Double check the marking out and positioning before starting to cut the worktop.
• Make the cutout with suitable tools along the dotted line. - After cutting out the worktop aperture, we recommend you seal the cut edges with silicone (or similar) sealant to help prevent ingress of water.
- Insert each clip into one of the pre-machined slots on the underside of the sink. It is also often easier to mount the clips, taps, waste-fitting and overflow onto the sink prior to fitting the sink to the worktop (see next page for assembly of overflow waste system).
- Position the sink on the worktop (Fig. 1) ensuring the sink is in the desired position.
- Tighten each clip's screw accordingly.
- The taps, waste-fitting and overflow can now be mounted onto the sink (if not already done) and fully connected to their respective services.
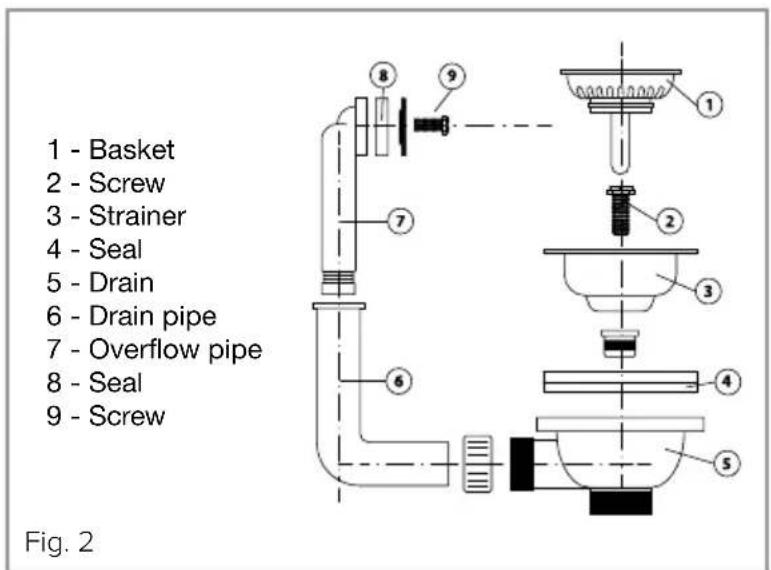
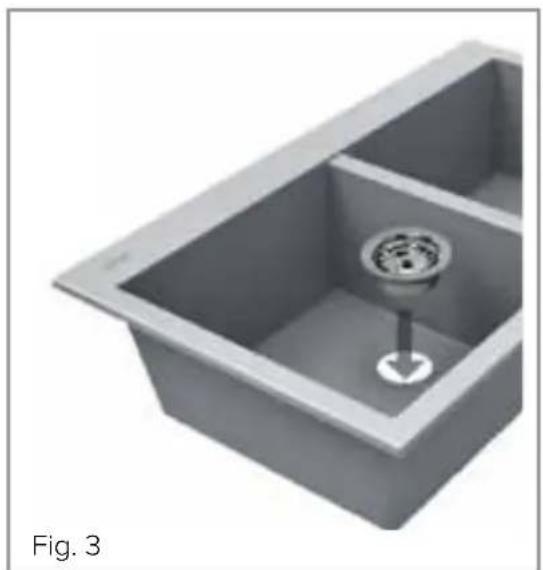
- Assemble the supplied waste and overflow fittings as shown (Fig. 2) and insert into the sink from above (Fig. 3). NOTE: do not use silicone sealant to fit the waste and overflow fittings.
1: Seal
2: Sink
3: Worktop
4: Fitting bracket supplied (suitable for 30mm or 40mm worktop)

Fig. 1
natural_image
3D rendering of a square sink with a circular drain and central hole, labeled 'Fig. 3' (no text or symbols on the diagram itself)- To check the waste for leaks, close the plug/basket of the waste fitting, turn on the tap and fill the sink to the level of the overflow; turn off the tap and wait several minutes to verify that the water doesn’t drain away.
• Empty the sink.
If a washing machine or dishwasher is going to be installed beneath the sink top:
- Before installing the washing machine or dishwasher, make sure that all of the fastening brackets for the sink top have been fastened securely.
- To prevent overheating, which may result in the deformation and consequent detachment of the sink from the top, adjust the feet on the washing machine/dishwasher so that there is sufficient ventilation between the top of the appliance and the sink. To aid the circulation and cooling of the air, it is recommended that ventilation slots be made in the cabinet base.
The guarantee is valid providing that
- The product has been installed by a suitably qualified person.
- Installation has been carried out in accordance with instructions and current legislation.
• Proof of purchase can be produced. - The product has been used for domestic purposes only.
- The product has not been tampered with or repair attempted or modified by any unauthorised person.
- All products have been installed in accordance with WRAS regulations and local water bye-laws
- The care guidelines in this document have been followed.
The guarantee does not cover
- Damage by misuse, neglect or transit.
- Use of parts not used or recommended by CDA.
- Routine maintenance, general wear & tear and installation faults.
- Products used for commercial or professional purposes.
Your sink is guaranteed against defects in materials and/or workmanship for 5 years. At the discretion of CDA, should a fault arise the sink may be repaired or replaced and agreed refitting may be reimbursed on receipt on a faulty sink/part, once they have been inspected and deemed faulty.
E & O E. All instructions, dimensions and illustrations are provided for guidance only. CDA reserve the right to change specifications without prior notice.

natural_image
Woman in red apron holding a tray of food inside a kitchen with ovens and a 2-year badge (no visible text or symbols on main subject)
|C|D|A|
Built for your life
For service or queries relating to your product please contact:
The Customer Care Department on 01949 862 012 or email customer.care@cda.eu
For more information please contact:
The Sales Department on 01949 862 010 or email sales@cda.eu
Customer Care Department. The CDA Group Ltd, Harby Road, Langar, Nottinghamshire, NG13 9HY T: 01949 862 012 F: 01949 862 003 E: customer.care@cda.eu


- EU Declaration of Conformity:
- Taking care of your sink
- Installation
- Before Installation
- Confirm that with the sink in position:
- Drain connection
- Cutting the tap hole
- If a washing machine or dishwasher is going to be installed beneath the sink top:
- The guarantee is valid providing that
- The guarantee does not cover
Brand : CDA
Model : KMG31BL
Category : Kitchen sink