
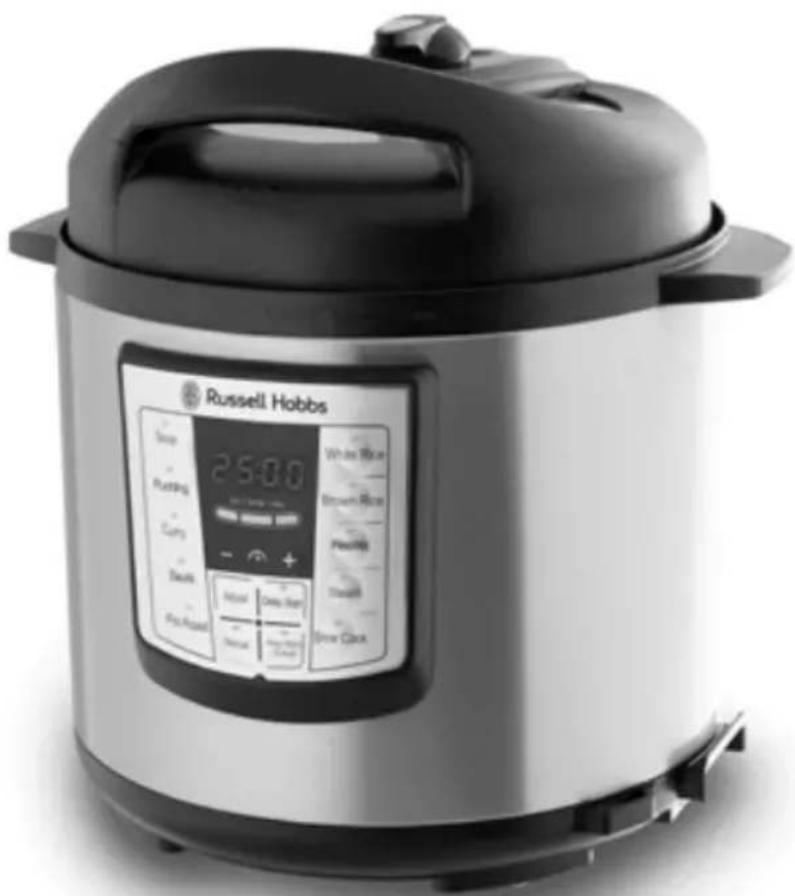
Express Chef RHPC1000 - Multicooker RUSSELL HOBBS - Free user manual and instructions
Find the device manual for free Express Chef RHPC1000 RUSSELL HOBBS in PDF.


| Product Type | Electric Pressure Cooker / Multicooker |
| Brand | Russell Hobbs |
| Model | Express Chef RHPC1000 |
| Capacity | 6 L (approx.) |
| Power Supply | 220-240V ~ 50/60Hz (estimated 1000W) |
| Functions | White Rice, Brown Rice, Risotto, Steam, Slow Cook, Pot Roast, Sauté, Curry, Pudding, Soup, Manual |
| Preset Cooking Times | Adjustable: Less, Normal, More for most functions |
| Delay Start | Up to 24 hours (not available for Slow Cook and Pudding) |
| Keep Warm | Automatic after cooking, temperature 60-80°C |
| Pressure Release Methods | Natural release and Quick release (via exhaust valve) |
| Lid Design | Detachable, locking mechanism when pressurized |
| Safety Features | Red float valve, exhaust valve, anti-block shield, lid lock, overheat protection |
| Accessories Included | Rice spoon, soup spoon, trivet, measuring cup |
| Cooking Pot Material | Non-stick coated, dishwasher safe |
| Cleaning | Hand wash lid parts (gasket, valves, anti-block shield); wipe exterior; cooking pot dishwasher safe |
| Warranty | 2 years (Australia/New Zealand) |
| Weight | Approx. 5.5 kg |
| Dimensions (WxDxH) | Approx. 35 x 30 x 30 cm |
Frequently Asked Questions - Express Chef RHPC1000 RUSSELL HOBBS
User questions about Express Chef RHPC1000 RUSSELL HOBBS
0 question about this device. Answer the ones you know or ask your own.
Ask a new question about this device
Download the instructions for your Multicooker in PDF format for free! Find your manual Express Chef RHPC1000 - RUSSELL HOBBS and take your electronic device back in hand. On this page are published all the documents necessary for the use of your device. Express Chef RHPC1000 by RUSSELL HOBBS.
USER MANUAL Express Chef RHPC1000 RUSSELL HOBBS
Spectrum Brands Australia Pty Ltd
Locked Bag 3004 Braeside
Victoria 3195 Australia
Customer Service in Australia
Toll Free: 1800 623 118
Email: info@spectrumbrands.com.au
Website: www.spectrumbrands.com.au
Spectrum Brands New Zealand Ltd
PO Box 9817 Newmarket
Auckland 1149 New Zealand
Customer Service in New Zealand
Toll Free: 0800 736 776
Email: service@spectrumbrands.co.nz
Website: www.spectrumbrands.co.nz
Spectrum Brands Australia Pty Ltd and Spectrum Brands New Zealand Ltd
Warranty Against Defects

In this warranty:
Australian Consumer Law means the Australian consumer law set out in Schedule 2 to the Competition and Consumer Act 2010;
CGA means the New Zealand Consumer Guarantees Act 1993;
Goods means the product or equipment which was accompanied by this warranty and purchased in Australia or New Zealand, as the case may be;
Manufacturer, We or us means:
-
for Goods purchased in Australia, Spectrum Brands Australia Pty Ltd ABN, 78 007 070 573; or
-
for Goods purchased in New Zealand, Spectrum Brands New Zealand Ltd, as the case may be, contact details as set out at the end of this warranty;
Supplier means the authorised distributor or retailer of the Goods that sold you the Goods in Australia or in New Zealand; and
You means you, the original end-user purchaser of the Goods.
-
Our goods come with guarantees that cannot be excluded under the Australian Consumer Law, or the CGA. You are entitled to a replacement or refund for a major failure and compensation for any other reasonably foreseeable loss or damage. You are also entitled to have the goods repaired or replaced if the goods fail to be of acceptable quality and the failure does not amount to a major failure.
-
The benefits provided by this Warranty are in addition to all other rights and remedies in respect of the Goods which the consumer has under either the Australian Consumer Law or the CGA. The original purchaser of the Goods is provided with the following Warranty subject to the Warranty Conditions:
-
We warrant the Goods for all parts defective in workmanship or materials from the date of purchase (Warranty Period), for the period of:-
(a) Two (2) years for Russell Hobbs products (see product packaging for details)
(b) Two (2) years with five (5) year motor warranty for Russell Hobbs products (see product packaging for details)
(c) Limited Lifetime, Ten (10) years for Russell Hobbs cookware.
(d) One (1) year for George Foreman.
If the Goods prove defective within the Warranty Period by reason of improper workmanship or material, we may, at our own discretion, repair or replace the Goods without charge.
Warranty Conditions
- The Goods must be used in accordance with the manufacturer's instructions. This Warranty does not apply should the defect in or failure of the Goods be attributable to misuse, abuse, accident or non-observance of manufacturer's instructions on the part of the user. As far as the law permits, the manufacturer does not accept liability for any direct or consequential loss, damage or other expense caused by or arising out of any failure to use the Goods in accordance with the manufacturer's instructions.
- Exhaustible components (such as batteries, filters and brushes) of the Goods are included under this Warranty only where there is a defect in workmanship or materials used.
- The warranty granted under clause 3 is limited to repair or replacement only.
- Any parts of the Goods replaced during repairs or any product replaced remain the property of the manufacturer. In the event of the Goods being replaced during the Warranty Period, the warranty on the replacement Goods will expire on the same date as for the Warranty Period on the original Goods which are replaced.
- In order to claim under the warranty granted under clause 3 you must:
(a) Retain this warranty with your receipt/proof of purchase; and
(b) Return the Goods to us at the relevant address or to the Supplier by prepaid freight within the Warranty Period accompanied with (i) the legible and unmodified original proof of purchase, which clearly indicates the name and address of the Supplier, the date and place of purchase, the product name or other product serial number and (ii) this warranty.
- This warranty is immediately void if:
(a) Any serial number or appliance plate is removed or defaced;
(b) The Goods have been serviced or otherwise repaired by a person not authorised to do so by us or where non approved replaced parts are used.
-
The Goods are designed for domestic use only. A limited 90-day Warranty applies to any industrial or commercial use of the Goods. The Goods must be connected to the electrical voltage requirements as specified in the ratings label located on the Goods.
-
This warranty does not cover the cost of claiming under the warranty or transport of the Goods to and from the Supplier or us.
-
This warranty is only valid and enforceable in Australia against Spectrum Brands Australia Pty Ltd and in New Zealand against Spectrum Brands New Zealand Ltd.
Contact us or the Supplier for further details.
Register your product online
If you live in Australia please visit: www.spectrumbrands.com.au/warranty
If you live in New Zealand Please visit: www.spectrumbrands.co.nz/warranty
Registration of your warranty is not compulsory, it gives us a record of your purchase
AND entitles you to receive these benefits: Product information; Hints and tips; Recipes and news; Information on special price offers and promotions.
Any questions? Please contact Customer Service for advice.
Congratulations on the purchase of your new Russell Hobbs Express Chef Pressure Cooker. Each unit is manufactured to ensure safety and reliability.
Before using the appliance for the first time, please read this instruction booklet carefully and keep it for future reference. Pass it on if you pass on the appliance.
When using this appliance, basic safety precautions should always be followed.
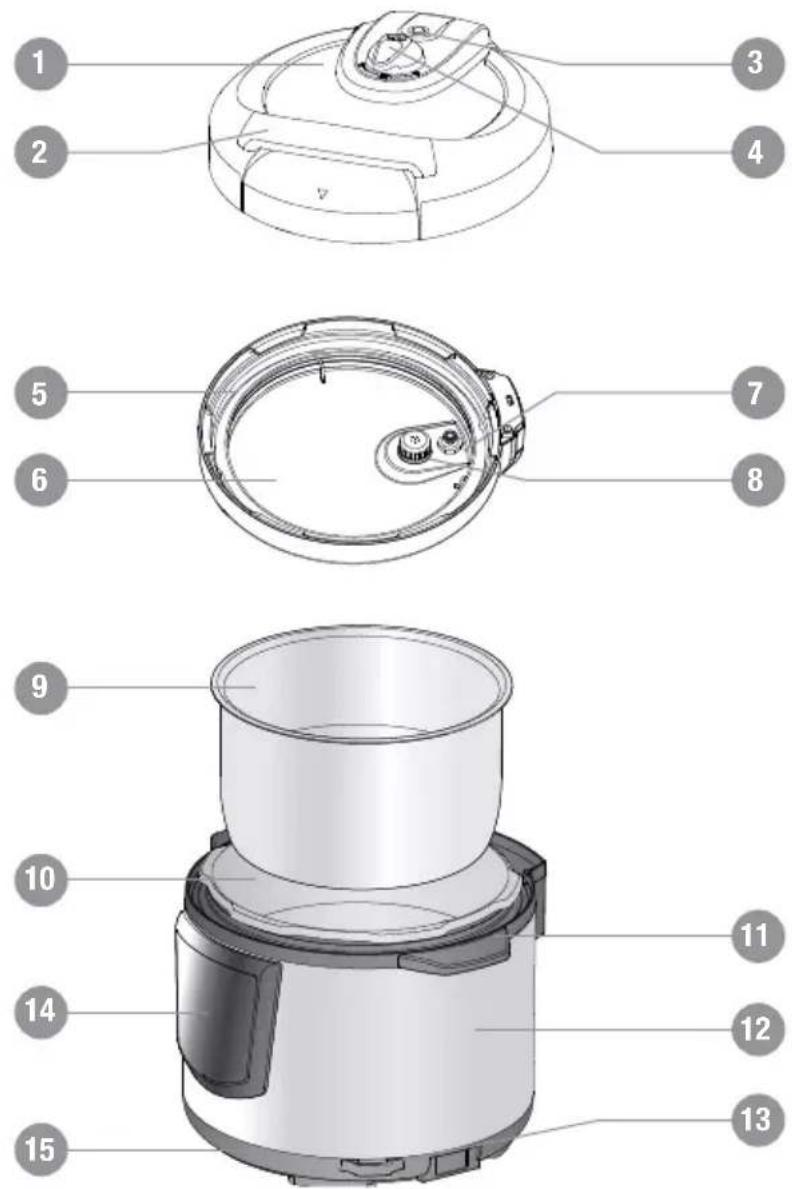
-
Lid
-
Lid handle
-
Red float valve
-
Exhaust valve
-
Gasket
-
Inside of lid
-
Red float valve seal
-
Anti-block shield
-
Cooking pot
-
Interior
-
Handle
-
Housing
-
Rice spoon holder
-
Control panel
-
Base
| Accessories | Rice Spoon | Soup Spoon | Trivet | Measuring Cup | Power Cord |
 |  | 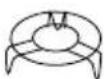 |  |  |
HOW PRESSURE COOKING WORKS
Your Russell Hobbs Pressure Cooker has been specially designed to safely control the steam pressure and temperature during cooking.
When liquid inside a pressure cooker is boiled, steam builds up and creates pressure. This pressure allows the temperature to rise above the normal 100^ C boiling point and creates a ‘superheated vapour’ that has a cooking potential several times greater than standard cooking methods.
BEFORE FIRST USE
- Remove all packaging material from the product.
- As some parts may be packed separately, check to ensure all items have been unpacked before disposing of the packaging.
- Remove all accessories and components.
- Wash all removable parts as instructed in “CARE AND CLEANING” section of this manual.
- Select a level, dry countertop where the appliance is to be used, allowing air space on all sides to provide sufficient ventilation and a safe distance from hot surfaces of the pressure cooker.
- To prevent damage from steam and heat, ensure the pressure cooker is not placed directly under cupboards when in use.
- Do not place cooking pot into an oven or on a directly on a stove top. The cooking pot must only be used with this pressure cooker.
- Ensure the pressure cooker is always disconnected from the wall power outlet when not in use.
COOKING PREPARATION
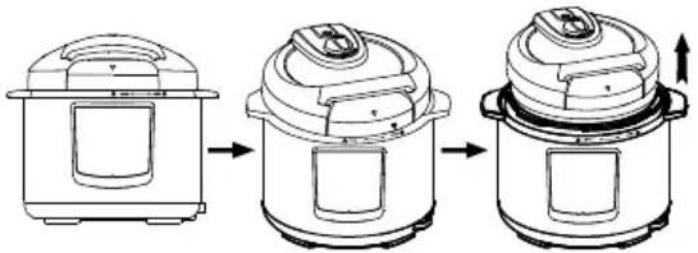
1. How to open the lid
Hold the lid handle and turn the lid counter-clockwise until the “▼” marking on the lid aligns with the “OPEN ▲” marking on the pressure cooker and lift the lid up and off the pressure cooker.
natural_image
Three-step line drawing of a cooking pot with lid, showing step-by-step preparation and rotation (no text or symbols)2. Check whether parts on the lid are correctly in place
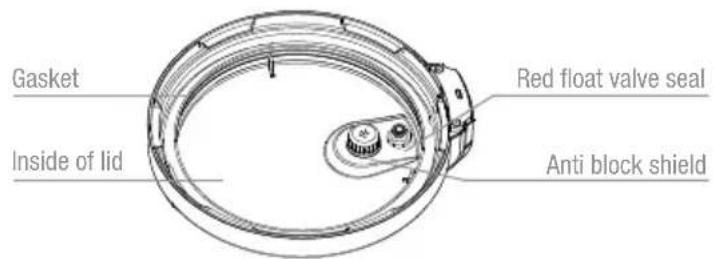
Check the red float valve and exhaust valve for any obstructions, and ensure the gasket, red float valve seal and anti-block shield are installed correctly.
Note: Always ensure these parts are clean before use.
Refer to 'Important Information For Reliable and Safe Operation' section.
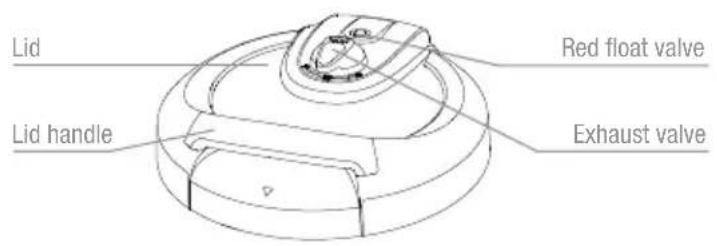
3. In most cases food and water should be added to the cooking pot prior to placing it in the pressure cooker.
The exterior of the cooking pot must be clean and dry before placing into the pressure cooker.
NOTE: If adding ingredients to the cooking pot while the pot is in the pressure cooker, avoid any spillage into the interior of the pressure cooker as this may cause damage to the appliance. If a spillage does occur, switch the power off and clean immediately.
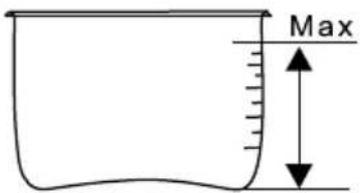
Total amount of food and water should not exceed the MAX level of the cooking pot. Level markings can be seen on the inside of the cooking pot. The unused space is used to build up pressure.
IMPORTANT: The pressure cooker requires liquid to work. A minimum of 1 cup (250ml) of liquid must be added to the cooking pot.
4. Inserting the cooking pot in the pressure cooker
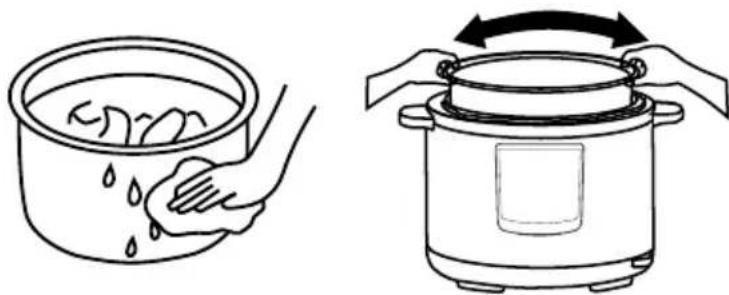
Be sure to remove any food residue and water droplets from the exterior of the cooking pot and interior of the pressure cooker.
After placing the cooking pot into the pressure cooker, rotate the cooking pot slightly left to right to ensure the pot is in place and there is contact between the cooking pot and heating plate.
natural_image
Illustration showing two cooking steps: one with a bowl of food being washed, and another with a rice cooker being placed on it (no text or symbols)5. Close the lid
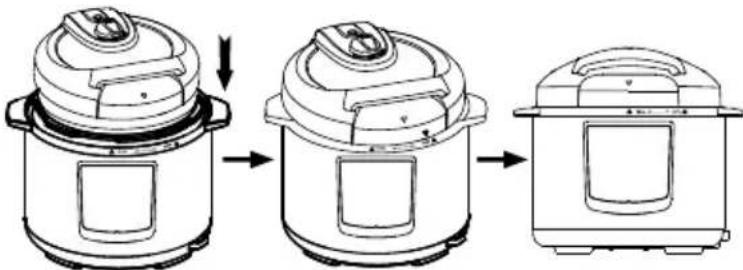
Place the lid onto the pressure cooker, aligning the “▼” marking on the lid with the “OPEN ▲” marking on the pressure cooker. Rotate the lid clockwise until the “▼” marking on the lid aligns with the “▲CLOSE” marking on the pressure cooker.
IMPORTANT: Be sure the lid is fully locked into place. If the lid is not in place correctly the pressure cooker will beep.
The “▼” marking on the lid must align directly with the “▲CLOSE” marking on the pressure cooker, otherwise the pressure cooker will not pressurise.
natural_image
Line drawing of three-step cooking process showing a rice cooker with lid, side panel, and side panel (no text or symbols)6. Position the exhaust valve
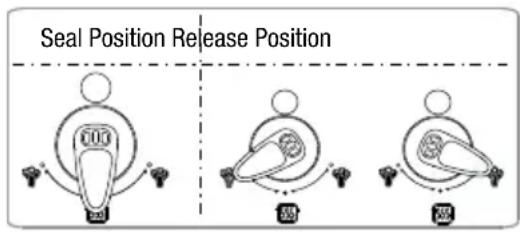
When cooking, align the handle of exhaust valve with the sealing icon, indicating that the pressure cooker is airtight.
Seal Position Release Position
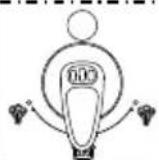
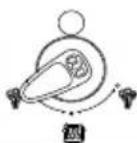

Note: if the exhaust valve has not been aligned to the 📄 seal icon, pressure will not build up and you may not achieve desired cooking results.
7. Insert the Power Cord
Insert the power cord into the socket provided on the side of the pressure cooker.
NOTE: When the plug is switched on at the power outlet, the power will come on.

natural_image
Line drawing of a cord with two pins and a power plug (no text or symbols)IMPORTANT INFORMATION FOR RELIABLE AND SAFE OPERATION
REMOVAL AND INSTALLATION OF THE ANTI-BLOCK SHIELD AND THE GASKET
- Prior to each use, inspect and ensure the gasket, anti-block shield, red float valve and red float valve seal are clean correctly fitted to the lid.
- Thoroughly clean after each use to ensure all food residues are removed.
- Never stretch the gasket as this may affect sealing and pressure effectiveness of the appliance.
- If the gasket becomes damaged it should not be used. Contact customer service for a replacement.
NOTE: Always ensure the anti-block shield and gasket are clean and in place before cooking.
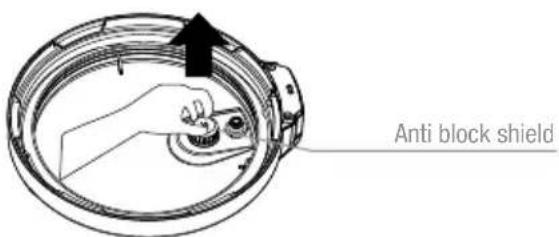
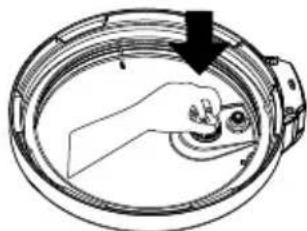
REMOVAL AND INSTALLATION OF THE ANTI-BLOCK SHIELD:
To remove: Twist and lift upwards
To install: Push down into position
natural_image
Technical line drawing of a mechanical component with a downward arrow indicating direction (no text or symbols)IMPORTANT: Also check the red float valve and seal are clean and in place before cooking.
REMOVAL AND INSTALLATION OF THE GASKET:
natural_image
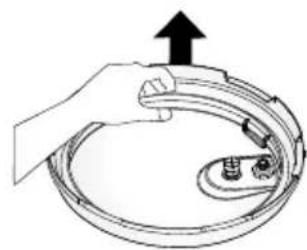
Illustration of a hand holding a circular device with an upward arrow, no text or symbols presentTo remove: starting at one point, slowly pull the gasket up, continue to gently pull upwards until the whole gasket is removed from the metal ring inside the lid.
natural_image
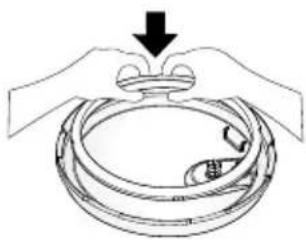
Illustration of hands holding a circular object with a handle, no text or symbols presentTo install: Place the gasket on top of metal ring inside the lid. Press down gently all the way around until the gasket sits in place securely around the metal ring.
GENERAL FUNCTIONS
IMPORTANT: Be certain to use utensils that will not scratch the cooking surface of the cooking pot. Use the utensil provided or use silicone or rubber utensils when cooking and serving. Do not use metal utensils, be careful not to scrape the non-stick finish.
- Complete the Cooking Preparation as per pages 7 and 8.
- Plug in and switch on at the power outlet. The display screen will flash 4 red horizontal lines, indicating that the pressure cooker is in standby mode.
- Select a menu function by pressing the corresponding button on the control panel.
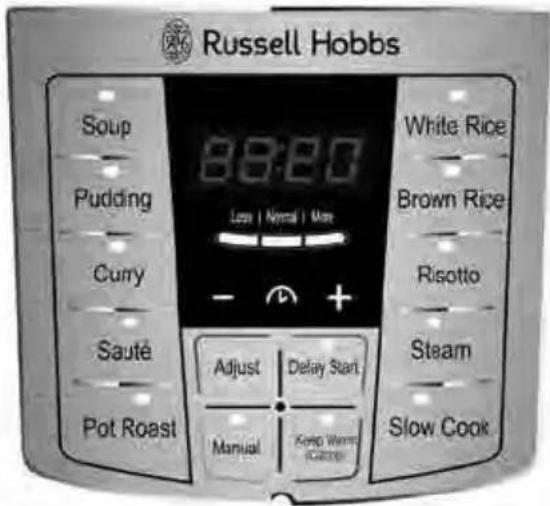
A red light will illuminate above the button showing your menu selection and the display screen will continue to flash 4 red horizontal lines.
NOTE: This method will apply for all functions except for Manual and Steam. Please see the “MANUAL OPERATION” section on page 19 for detailed instructions on how to use the Manual and Steam functions.
- After 10 seconds the pressure cooker will beep 3 times and the display screen will then display "HEAt" indicating the pressure cooker is in heating mode and beginning to build pressure. The display will not begin to count down time until sufficient pressure has built up. Time to build pressure can vary and depends on the menu selected, volume and temperature of the ingredients placed in the cooking pot.
NOTE: Lid safety- once there is pressure built up within the pressure cooker, for safety reasons the lid will lock and not be able to be opened until it is de-pressurised.
- Once cooking is complete and time has elapsed the pressure cooker will beep 10 times and automatically switch to the "KEEP WARM" setting and the display screen will display "EAt" indicating your food is now ready to eat. You will need to de-pressurise the unit either by quick release or natural release. See section "DE-PRESSURISING AND OPENING THE LID" on page 11.
NOTE: Some food will deteriorate if kept in "keep warm" mode for extended periods of time.
- Switch off the wall power outlet and remove the plug from the socket.
NOTE: During the cooking functions, you can cancel the current operation and return to standby mode by pressing the "Keep Warm/Cancel" button. Keep warm can be switched on or off by pressing the "Keep Warm/Cancel" button.
NOTE: During cooking, some steam will release from the exhaust valve, this is normal as the pressure cooker is maintaining required pressure.
DE-PRESSURISING AND OPENING THE LID
CAUTION: The lid will not unlock until pressure inside the pot has been released. This will be indicated when steam has stopped coming out of the exhaust valve and the red float valve has lowered.
Once cooking is complete, the pressure cooker will automatically switch to KEEP WARM. You then have two options to release pressure prior to opening the lid:
A. Natural pressure release method
When the unit is finished cooking, it will automatically switch to KEEP WARM. In this mode, the unit will naturally release pressure and the red float valve will eventually lower. This will take up to 20 minutes depending on the contents and amount of pressure built up. During this time, food will continue to cook. This method is recommended for ingredients that will not “overcook”.
B. Quick pressure release method
- Cover your hand with an oven mitt to protect your skin from escaping steam.
- Using tongs or a wooden spoon to carefully rotate the exhaust valve to the release position in very short spurts, taking care to keep your hands and face away from the escaping steam coming from the exhaust valve.
- If liquid is ejected from the valve, wait a minute longer before proceeding.
- The red float valve will eventually lower and all pressure will be released.
IMPORTANT: Be sure to keep clear of the Exhaust valve steam outlet at all times as the escaping steam will be extremely hot and can scald.
IMPORTANT:
- For liquid foods (such as soups, stocks, casseroles and soaked beans) only fill the unit 12 way, otherwise the food may eject from the exhaust valve.
- Never pull out the exhaust valve when pressure is releasing.
- When a large quantity of food is cooked, do not release pressure immediately after cooking. It is recommended to leave the food in KEEP WARM mode for 5-10 minutes before releasing the pressure.
HOW TO OPEN THE LID
Wearing an oven mitt, hold the lid handle and turn the lid counter-clockwise until the “▼” marking on the lid aligns with the “OPEN ▲” marking on the housing. To open the lid, lift and tilt it so it opens from the back first, to avoid steam coming towards you.
CAUTION: Be careful when opening the lid as there may still be steam built up in the pressure cooker.
NOTE: Once the lid has been opened, if you would like to close and lock the lid back into place, you may need to carefully push down using the handle of the lid and rotating with gentle pressure. This is because there may be a small amount of pressure remaining in the cooking pot which needs to be released before the lid will lock again.
CAUTION: Do not touch the metal part of the lid as it may be very hot.
REMOVING THE COOKING POT AFTER COOKING
Always wait until the cooking pot is cool enough to handle (less than 40^ C) before removing from the pressure cooker, as a hot cooking pot may cause serious burns or damage to benchtops.
PRE-SET AUTOMATIC COOKING FUNCTIONS
WHITE RICE
The white rice function on the Pressure Cooker will create delicious fluffy rice every time; and suits Basmati, Jasmine and Long Grain rice. Simply follow the packet instructions for the ratio of water to rice but as a general rule use 1 cup of white rice to 1 1/2 cups of water. There is also no need to rinse white rice or add salt or oil; simply put the rice in the cooking pot with the measured amount of water and press the WHITE RICE function.
BROWN RICE
It's always tricky perfecting brown rice – it seems to take forever on the stovetop. Not with your pressure cooker! Simply add 2 cups of liquid to 1 cup of brown rice, press the BROWN RICE function and you will have delicious brown rice ready to eat in no time.
RISOTTO
Use this function to create creamy risottos with little fuss. No more standing over the cooktop stirring, stirring, stirring! Simply cook the Risotto (Aborio rice) in oil with the SAUTÉ function to toast the rice and add any other ingredients and liquids, secure the lid and press the RISOTTO function. It’s never been easier to create a delicious risotto every time! See the recipe guide in the back of this instruction booklet for some recipes to get you started.
STEAM
NOTE: The STEAM function works using the same method as MANUAL. Please see the "MANUAL OPERATION" section on page 19 for detailed instructions on how to use the Manual and Steam functions.
This function is perfect for steaming vegetables and seafood, as well as mouth watering dumplings and dim-sims. When steaming in the pressure cooker, you should first place the trivet over at least one cup of water. Then place food items in a steamer basket and place this on the trivet. Close the lid, press STEAM and adjust the time up or down depending on how long you need to steam the food. To speed up cooking time, instead of adding cold water, you can place hot water in the bowl. See the recipe guide in the back of this instruction booklet for some recipes to get you started.
SLOW COOK
There is nothing better than a delicious slow cooked meal and slow cooking in your pressure cooker couldn't be simpler. Just follow your recipe instruction and press the SLOW COOK button. The pressure cooker default time is 4 hours but you can alter this depending on your recipe requirements. The minimum amount of time on the pre-set function is 2 hours and the maximum time is 10 hours. However unlike a normal slow cooker, as the pressure builds up the usual cook time will be less than a traditional slow cooker, so keep this in mind when cooking with this function.
You can slow cook meat, soups, bolognaise, fruit or vegetables as you would in a normal slow cooker. See the recipe guide in the back of this instruction booklet for some recipes to get you started.
POT ROAST
Sunday roasts just got easier, as you can even cook roasts such as topside beef, shoulders of lamb or pork, whole chickens and silverside with the pot roast function.
You can brown your piece of meat first using the SAUTÉ function to seal in the flavour. Then use 1-2 cups stock for the liquid in the bowl, place meat on the trivet and select POT ROAST function for required time and you will end up with a succulent roast in less time than a traditional oven. You can even use the left over stock in the pot to make your gravy. See the recipe guide in the back of this instruction booklet for some recipes to get you started.
IMPORTANT: Always remember to ‘rest’ meat for at least 10 minutes for it to relax and retain juices. It is also wise to have a meat thermometer in your kitchen to test the doneness of your meat (safe internal temperatures for red meat is 72^ C, poultry 75^ C and fish 65^ C), especially for large cuts of meat. Also, please note, it is not recommended to cook frozen meat.
SAUTÉ
The SAUTÉ function cooks at a medium-high heat similar to stove top cooking. This function will heat the cooking pot quickly and is useful for browning meat for casseroles and slow cooking along with caramelising ingredients, as well as toasting rice for risottos. This function is for a set time of 20 minutes maximum. Should your recipe require sautéing or simmering for longer, simply Press KEEP WARM/CANCEL and press SAUTÉ again which will cook for another cycle of 20 minutes.
Ingredients will not brown or caramelise unless you use the Sauté function first. To caramelise, brown or sauté ingredients prior to pressure cooking, simply select the SAUTÉ function. When you have finished sautéing, press the KEEP WARM/CANCEL button.
You can then select the desired cooking function. Refer to the GENERAL FUNCTIONS Section on page 10.
See the recipe guide in the back of this instruction booklet for some recipes to get you started.
IMPORTANT:
- Do not place the cooking pot directly on a stove top. The cooking pot must only be used with this pressure cooker.
- Do not place the lid on when using the Sauté function. If you do so, the pressure cooker will beep repeatedly until the lid is removed.
CURRY
No need for hours of simmering and stirring with the CURRY function of your pressure cooker! Curry can be ready in just 30 minutes and still have rich and intense flavours along with tender meat as if you have cooked it for hours. Should you be adapting a favourite curry recipe for the pressure cooker, just remember to halve the amount of liquid. See the recipe guide in the back of this instruction booklet for some fabulous recipes to get you started.
PUDDINGS (AND CAKES)
Using the pudding function you can cook stunning puddings, creamy rice desserts, cheese cakes and sponge style cakes in your pressure cooker. Desserts cooked in the pressure cooker come out beautifully moist and spongy and can be cooked in a round cake tin, pudding bowl or individual ramekins. The cake tin, pudding bowl or ramekins will need to be double wrapped in foil for cooking in the pressure cooker.
NOTE: Prior to adding ingredients we strongly recommend that you measure that your cake tin will fit in the cooking pot.
Place water in the cooking pot along with the trivet, then place your cake tin or ramekins on top of the trivet. For most steamed puddings, water will need to come 34 way up the side of the cake tin or pan, or ramekin.
You will need to be very careful when taking out the cake tin or pan from the pressure cooker and suggest you make a ‘foil strap’ to help you lift the vessel out without burning yourself. Take a length of 50cm foil and fold it long ways to form a 6cm wide strap. Place this under the cooking vessel for you to lower it onto the trivet - you can use this to lift it out. Please refer to the recipe section of this manual to get you started.
SOUP
Using the soup function you can create delicious soups and rich stocks in minutes. The pressure cooker can produce delicious hearty soups. It will also give you an intensely rich stock for soups, sauces and gravies. If you are adapting a favourite soup recipe for the pressure cooker, just remember to halve the amount of liquid. See the recipe guide in the back of this instruction booklet for some recipes to get you started.
IMPORTANT: After making soup or stock, allow at least 15 minutes before releasing pressure to ensure the hot liquid inside will not boil over.
NOTE: If you recipe includes pasta as an ingredient, cook it separately then it add to your soup when it has finished cooking. Pasta should not be cooked in the pressure cooker as it creates foam that can block the pressure cooker exhaust valve and red float valve.
COOKING MENU FUNCTIONS
Time for pressure to build up will vary depending on the recipe or function selected. Once pressure has built up, cooking time will commence. Please note cooking times will vary due to ingredient sizes, quantities and starting temperatures.
| Function | Cooking Time (excluding heat up/pressure building time) | Temperature (approx.) | Adjust function & Time (mins) | Delay Start (Hrs) | |
| White Rice 11-17mins 120°C | Less 8-14 | 2-24Normal 9-15 | |||
| More 11-17 | |||||
| Brown Rice 25-31mins 120°C | Less 20-26 | 2-24Normal 22-28 | |||
| More 25-31 | |||||
| Risotto 20mins 115°C | Less 10 | 2-24Normal 15 | |||
| More 20 | |||||
| Steam 30mins 115°C | n/a | 2-24 | |||
| Slow Cook | 4hrs 95°C | n/a | n/a | ||
| Pot Roast | 40mins 115°C | Less 30 | 2-24Normal 40 | ||
| More 50 | |||||
| Sauté | 35mins 115°C | Less 30 | 2-24Normal 35 | ||
| More 40 | |||||
| Curry | 30mins 115°C | Less 15 | 2-24Normal 20 | ||
| More 25 | |||||
| Pudding | 40mins 140°C | Less 35 | n/a | ||
| Normal 36 | |||||
| More 40 | |||||
| Soup | 30mins 115°C | Less | 8 | 2-24Normal 13 | |
| More 18 | |||||
| Manual | 30mins 115°C | n/a | 2-24 | ||
PRESSURE COOKER FUNCTIONS
ADJUST FUNCTION:
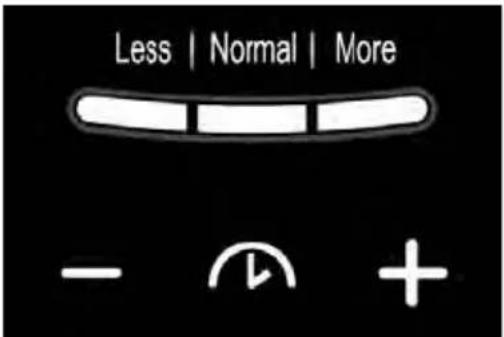
The adjust function allows you to adjust the pre-set cooking time. It can be used depending on the quantity of food added to the cooking pot. A larger quantity may require more cooking time versus a smaller quantity.
- Finish cooking preparation as per page 7.
- Press your desired menu selection button, then within 10 seconds of pressing your menu selection button, you can use the “Adjust” button to determine the amount of cooking time. The options are Less, Normal or More.
NOTE: The default is Normal.
- Each time you press the "Adjust button" it will scroll through and light up Less, Normal or More on the control panel.
Refer to the COOKING MENU FUNCTIONS table on page 16 to determine how this will change cooking times.
NOTE: Once operation begins you cannot use the adjust button. If required you can change the function by pressing the Keep Warm/Cancel button and re-select the function required.
NOTE: The adjust function can be used for all menu selections except for Steam, Slow Cook & Manual – refer to the Cooking Menu Functions table on page 16 for more details.
DELAY START FUNCTION:
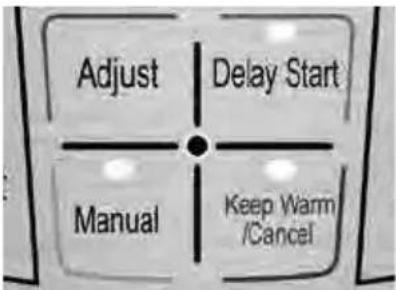
The delay start function allows you to add your ingredients into the pressure cooker and postpone the cooking function. This means you can program the cooking function to finish at a time when you are ready to eat.
NOTE: The time set will be when the pressure cooker will finish cooking. For example, if you want your meal to be cooked and ready to eat in 6 hours, select "6:00" using the instructions below.
IMPORTANT: Do not use the delay start function when cooking perishable ingredients including meat, dairy, eggs, poultry and fish as they may spoil.
-
Within 10 seconds of pressing your menu selection button, press the "Delay Start" button once and the hour flashes. Then use the "-" & "+" buttons to select the amount of hours before you would like your meal to be ready.
-
Press the "Delay Start" button again and the minutes will flash. Then use the "-" & "+" buttons to adjust the number of minutes.
NOTE: The minute selection is in 10 minute increments.
- 10 seconds after the desired time is selected, the pressure cooker will beep 3 times, the DELAY START button light will become solid and the display screen timer will then begin to count down.
NOTE: Once the desired time is selected, wait for the program to automatically start.
NOTE: Press the Keep Warm/Cancel button at any time to cancel the function selected.
- After the preset time elapses and when cooking is complete the pressure cooker will automatically switch to Keep Warm mode.
NOTE: Delay start is not available for the Slow Cook and Pudding menu functions. All other menu functions have the option a 2 hour up to 24 hour delay start function.
KEEP WARM FUNCTION:
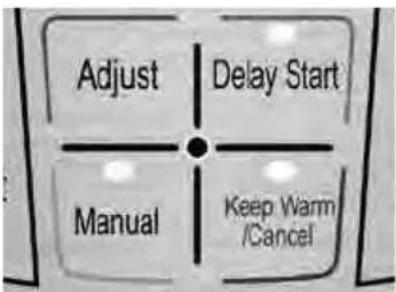
- After cooking, the pressure cooker automatically switches into "KEEP WARM" mode.
- When in "KEEP WARM" mode, the indicator light will illuminate and "EAt" will be displayed on the display screen.
• The keep warm temperature is 60-80°C. - If the "Keep Warm/Cancel" button is pressed while in standby mode, the pressure cooker will heat up.
IMPORTANT: For health and safety reasons do not use the keep warm function to heat or re-heat foods.
NOTE: Some food will deteriorate if kept in "keep warm" mode for extended periods of time.
NOTE: When the cooking cycle has finished, the unit will automatically switch to KEEP WARM and slowly release pressure for up to 30 minutes. Please note, food will continue to cook until all the pressure is released.
MANUAL OPERATION:
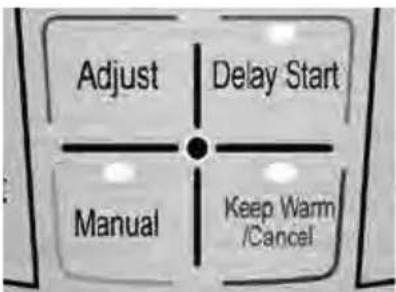
NOTE: The STEAM function works using the same method as MANUAL. See detailed instructions on how to use the Manual and Steam functions below:
The manual function can be used if the preset menu functions and timings do not suit your required cooking preferences.
- Press the Manual button, and within 10 seconds use the "+" and "-" buttons to select the desired cooking time. Time can be set from 1 to 60 minutes.
NOTE: The default time for manual cooking is 30 minutes
- 10 seconds after the time is selected, the pressure cooker will beep 3 times and the "Manual" button light will stop flashing and become solid.
NOTE: Press the Keep Warm/Cancel button at any time to cancel the function selected.
The display screen will then display “HEAt” indicating the pressure cooker is in heating mode and beginning to build pressure. The display will not begin to count down time until sufficient pressure has built up. Time to build pressure can vary and depends on the menu selected, volume and temperature of the ingredients placed in the cooking pot.
NOTE: Lid safety - once there is pressure built up within the pressure cooker, for safety reasons the lid will lock and will not be able to be opened until it has de-pressurised.
- Once cooking is complete, the pressure cooker will beep 10 times and automatically switch to the "Keep Warm" setting and the display screen will display "EAt". Your food is now ready to eat.
NOTE: Some food will deteriorate if kept in "keep warm" mode for extended periods of time.
- Switch off the wall power outlet and remove the plug from the socket.
Follow the guide below as an approximate indication for recommended cooking times.
VEGETABLES
Vegetables cook in no time in the pressure cooker. Always use the quick pressure release method when the cook time has ended, this will ensure your vegetables retain some texture and don't overcook. Use at least one cup of water (or liquid) when cooking vegetables and if cooking frozen vegetables, allow an additional 2 minutes cooking time.
Should the vegetables require more cooking, simply place them back in the pressure cooker, turn it off and place the lid on to steam them a bit more.
| FOOD COOKING TIME PRESSURE RELEASE | ||
| Zucchini, chopped 1-3 minutes Quick Release | ||
| Green Beans, 500g 2 minutes Quick Release | ||
| Carrots, sliced 2 minutes Quick Release | ||
| Parsnip, chopped 2 minutes Quick Release | ||
| Broccoli & Cauliflower 2-3 minutes Quick Release | ||
| Pumpkin, Butternut, peeled & sliced 3-5 minutes Quick Release | ||
| Pumpkin, Kent, peeled & sliced 4-6 minutes Quick Release | ||
| Carrots, whole 5 minutes Quick Release | ||
| Potatoes, medium, chopped | 5-7 minutes Quick Release | |
| Baby Potatoes, whole | 8 minutes Quick Release | |
| New or Desiree Potatoes, whole | 10-12 minutes | Quick Release |
| Corn, 3 cobbs on trivet | 12-14 minutes | Quick Release |
| Beetroot, whole on trivet | 20 - 25 minutes | Quick Release |
MEAT, FISH & POULTRY
Meat cooked in the pressure cooker will give a succulent and flavoursome result, every time. For maximum flavour, first brown the meat or poultry (not fish) on all sides in the pressure cooker using 1 tablespoon of oil on the SAUTÉ function before locking the lid and commencing pressure-cooking.
Refer to the guide below for MANUAL cook times and use this as a general indication for adapting recipes that you want to convert for the pressure cooker. Always remember to ‘rest’ meat for at least 10 minutes for it to relax and retain their juices. It is also wise to have a meat thermometer in your kitchen to test the doneness of your meat (safe internal temperatures for red meat is 72^ C, poultry 75^ C and fish 65^ C), especially for large cuts of meat. Also, please note, it is not recommended to cook meat from frozen.
| CHICKEN | ||
| Chicken Breasts, 600g 5-7 minutes Quick Release | ||
| Chicken Marylands, bone in, 600g 8-10 minutes Quick Release | ||
| Chicken Thighs, 600g 8-10 minutes Quick Release | ||
| Whole Chicken, 1.5kg 22-26 minutes Quick Release | ||
| Whole Chicken, 2kg 24-28 minutes Quick Release | ||
| BEEF | ||
| Casserole, 3cm cubes 10-12 minutes Natural Release, 10 minutes | ||
| Corned Beef / Silverside | 30 minutes per kg | Natural Release, 10 minutes |
| Ribs, 6cm, 2kg | 45 minutes | Quick Release |
| Brisket / Skirt, 1.5kg | 50-55 minutes Natural Release, 10 minutes | |
| Pot Roast, Topside / Chuck, 1.8kg | 90-95 minutes Natural Release, 10 minutes | |
| VEAL | ||
| Casserole, 3cm cubes 8-10 minutes Natural Release, 10 minutes | ||
| Shoulder Roast, boneless | 15 minutes per kg | Natural Release, 10 minutes |
| LAMB | ||
| Shanks, 3 x 300g | 18-20 minutes Natural Release, 10 minutes | |
| Shoulder Roast, boneless, 1.2kg | 20-22 minutes Natural Release, 10 minutes | |
| PORK | ||
| Spareribs, 1.5kg | 28-30 minutes Quick Release | |
| Shoulder Roast, boneless, 1.5kg | 35-40 minutes Natural Release, 10 minutes | |
| FISH | ||
| Prawns, in a steamer basket on trivet | 1 minute | Quick Release |
| Mussels, in a steamer basket on trivet | 1-2 minutes Quick Release | |
| Fillets, white flesh, 500g in a steamer basket on trivet | 3-6 minutes Quick Release | |
| Steaks, darker, 500g in a steamer basket on trivet | 4-7 minutes Quick Release | |
| Whole fish, gutted and cleaned, 500g in a steamer basket on trivet | 4-7 minutes Quick Release | |
RICE & GRAINS
The following recommendations are only a guide. You can always return the lid and KEEP WARM to continue cooking slightly. Alternatively, add 12 cup of hot water and pressure cook for an additional 1 minute and leave to release pressure naturally.
Never fill (combined rice/grain and liquid) past the halfway mark when cooking in the pressure cooker.
| FOOD - 1 CUP OF EACH COOKING TIME PRESSURE RELEASE | ||
| Couscous - 2 cups water 2-3 minutes | Natural Release, 10 minutes | KEEP WARM |
| Quinoa, - 2 cups water 4-6 minutes | Natural Release, 10 minutes | KEEP WARM |
| Rice, Basmati - 1 1/2 cups water 5-7 | minutes Natural Release, | 10 minutes, KEEP WARM |
| Rice, white - 1 1/2 cups water 5-7 min | minutes Natural Release, 10 | minutes, KEEP WARM |
| Rice, brown - 2 cups water 12-15 min | minutes Natural Release, 15 | minutes, KEEP WARM |
| Rice, wild - 3 cups water 20-25 min | utes Natural Release, 15 min | utes, KEEP WARM |
PRESSURE COOKING TIPS
- The pressure cooker must never be filled more than 2/3 full or to the MAX. marking, the unused space is needed to produce pressure.
- The amount of liquid required is less than for traditional cooking methods.
- Time to build pressure can vary and depends on the menu selected, volume and temperature of the ingredients placed in the cooking pot. Once pressure has built up, cooking will commence.
- Cooking times will vary slightly due to ingredient sizes and starting temperatures.
- When adapting your own recipe to cook in the pressure cooker, reduce the cook time by half and the liquid by half. However, never cook with less than 1 cup of liquid. We suggest you experiment with your recipes to get a feel for what changes you will need to adapt.
- Hot liquid will come to pressure quicker than cold liquid.
- Foods can overcook if using the natural release method.
- Do not cook foods that foam such as oatmeal, barley, rhubarb, apples and pasta. Foaming from these foods can block the pressure cooker exhaust valve and red float valve.
CARE AND CLEANING
- Switch off the wall power outlet and remove the plug from the socket.
- Allow the pressure cooker to cool completely prior to cleaning.
- Remove the lid and cooking pot, and hand wash them in warm soapy water. The cooking pot is dishwasher safe.
- If ingredients have built up and stuck at the bottom of the cooking pot, soak the pot in warm water before cleaning.
- Remove the gasket, anti-block shield, exhaust valve, red float valve and red float valve seal and wash in warm soapy water. Allow all parts to dry completely before re-installing into the lid.
Note: Ensure gasket and anti-block shield are put back correctly. Refer to assembly information on page 9.
- Wipe the exterior with a damp cloth and dry thoroughly.
- Dry all parts completely before placing them back into the pressure cooker interior. Ensure the outside of the cooking pot is completely dry and that the inside of the pressure cooker is also dry.
- Do not use alkaline cleaning agents or harsh abrasives when cleaning the cooking pot and exterior.
- Do not immerse base in water or any other liquid.
- When storing the pressure cooker, leave the lid disengaged to preserve the life of the gasket.
- If your pressure cooker has been left with an odour, simply place 2 cups of boiling water in the cooking pot with half a lemon in it and use the manual function to cook for 3 minutes with the exhaust valve in release position. Rinse thoroughly, dry well and store.
- If there is a lingering odour soak the rubber gasket in warm soapy water. This will help to degrease the rubber and to avoid lingering odour.
- The cooking pot is dishwasher safe. However, with many non-stick cooking vessels, it is wise to simply wash in hot soapy water in your sink. This will maintain the non-stick coating of the cooking pot over life.
- When cooking, cleaning and caring for your pressure cooker, be certain to use utensils that will not scratch the cooking surface of the cooking pot.
TROUBLESHOOTING
| Problem Possible Reason | Solution | ||
| Difficult to close the lid | Gasket not positioned correctly | Ensure the gasket is positioned correctly | |
| Small amount of pressure remains in the cooking pot | Carefully push down using the plastic edges of the lidCAUTION: do not touch the metal part of the lid as it will be very hot | ||
| Difficult to open the lid | Red float valve fails to lower after pressure release | Press down on the red float valve lightly with a wooden spoon | |
| Pressure exists inside the cooker | Allow the pressure to release, then try to open the lid again | ||
| Leakage from lid | No gasket Install the gasket | ||
| Food particles attached to gasket Clean the gasket ring | |||
| Gasket worn | Replace the gasket ring, contact customer service | ||
| Lid not closed firmly Open, then close the lid again | |||
| Leakage from red float valve | Food particles attached to red float valve seal | Clean the float valve seal | |
| Gasket ring for red float valve worn | Replace the seal for red float valve, contact customer service | ||
| Float valve unable to rise | No enough food and liquid in the cooking pot | Ensure a minimum of 1 cup (250ml) of liquid is in the cooking pot | |
| Steam from exhaust valve does not stop | Exhaust valve not in sealing position | Move the exhaust valve to the seal position | |
| Lights are not illuminating on control panel | Plug may not be plugged in properly Please inspect the socket | ||
| All lights flash | C1 appears on display screen | Sensor fails | Contact customer service for direction |
| C2 appears on display screen | |||
| C5 appears on display screen | Temperature is too high because there is no liquid inside the cooking pot | Add liquid as required – at least 1 cup (250ml). | |
| C6 appears on display screen | Pressure switch fails | Ensure the cooking pot is inserted correctly | |
| Rice half cooked/too hard Too little water added | Add one cup of (hot) water and cook for a further 5 minutes. Leave on KEEP WARM function for a further five minutes before removing the lid. | ||
| Rice too soft Too much water added Reduce water level next time | |||
IMPORTANT SAFEGUARDS
When using this appliance, basic safety precautions should be followed, including but not limited to:
- To protect against electrical hazards do not immerse the power cord, plug or pressure cooker body in water or any other liquid.
- Do not use in the bathroom or near any source of water.
- Do not use outdoors.
- Do not use the appliance near or below any curtains or other combustible materials.
- The appliance should be positioned so that escaping steam does not damage overhead or surrounding cupboards.
- Always use the appliance handles and do not touch the hot cooking surfaces. The temperature of accessible surfaces/parts may become very hot when the appliance is operating.
- This appliance generates heat and escaping steam during use. To avoid risk of burns, stay clear of the steam vent while cooking and wait for the pressure cooker to cool down fully before touching the cooking pot and lid.
- The ducts in the pressure regulator (exhaust valve and red float valve) allowing the escape of steam should be checked regularly to ensure they are not blocked.
- The lid must not be opened until the pressure has decreased sufficiently.
- This appliance is not intended for use by persons (including children) with reduced physical, sensory or mental capabilities, or lack of experience and knowledge, unless they have been given supervision or instruction concerning use of the appliance by a person responsible for their safety.
- Always turn off and unplug from the power outlet when not in use and before cleaning the appliance.
- To disconnect, turn off the wall power outlet, then grasp the plug and remove from wall power socket. Never pull by the cord.
- Do not operate this appliance with a damaged cord/plug or after the appliance has malfunctioned, or been dropped or damaged in any manner. Contact Customer service for replacement, examination, repair or adjustment.
- There are no user serviceable parts. If the power cord or appliance is damaged, it must be replaced or repaired by the manufacturer or similarly qualified person in order to avoid a hazard.
- Do not use accessories of not specifically designed for use with this product.
- Do not use on an inclined plane or unstable surface.
- Cook only in the cooking pot. Do not pour liquid directly into the interior. Doing so may result in personal injury from electric shock and/or damage to the appliance.
- Do not use the cooking pot if it is dented or distorted.
- Do not turn on the pressure cooker without first placing the cooking pot inside the interior of the pressure cooker.
- Always be sure the cooking pot contains liquid before the pressure cooker is switched on.
-
Do not overfill or attempt to cook food items too large for the appliance.
-
Do not fill the pressure cooker with cooking oil or try to use it as a deep fryer.
- Do not use keep warm mode to reheat cold rice or other foods.
- Always take care when removing food after cooking as it is hot.
- Keep the appliance and the power cord away from the edge of tables or countertops and out of reach of children and infirm persons.
- Do not move the appliance when in use.
- Do not cover the appliance when in use.
- Do not place on or near any heat sources.
- Always thoroughly clean the appliance after use.
- Follow the instructions when cleaning this appliance.
- Do not use appliance for other than its intended purpose as described in this instruction book.
- This appliance is not a toy. Children should be supervised to ensure they do not play with the appliance.
- Do not leave the appliance unattended when in use or where it may be touched by children or persons with disabilities.
- This appliance is not intended to be operated by means of an external timer or separate remote control system.
- For added safety, electrical appliances should be connected to a power outlet that is protected by a residual current device (RCD), also often referred to as a 'Safety Switch'. Your switchboard may already incorporate an RCD. If unsure, call an electrician for verification and fitting if necessary.
SAVE THESE INSTRUCTIONS
THIS APPLIANCE IS FOR HOUSEHOLD USE ONLY
NOTES

Russell Hobbs
RECIPE BOOK
EXPRESS CHEF PRESSURE COOKER
RHPC1000
CHUNKY CHORIZO, PUMPKIN & FENNEL SOUP
Preparation Time: 15 minutes
Cooking Time: 40 minutes
Ingredients:
2 tsp olive oil
2 chorizo sausages, thinly sliced
2 rashers smoked bacon, diced
14 tsp chilli flakes
12 tsp fennel seeds
1 clove garlic, finely chopped
12 red onion, finely chopped
1 x 500g Jap pumpkin, skinned & diced to 2cm cubes
400g tin diced tomatoes
14 tsp dried thyme
1L vegetable stock
Fresh parsley to serve
Sour cream to serve
Method:
- Place the oil in the pressure cooker and press SAUTÉ, leave to heat up for 1 minute then add chorizo, bacon, chilli, fennel seeds, garlic and onion and sauté for 3-4 minutes, stirring constantly. Add the pumpkin, tomatoes, thyme and vegetable stock.
- Press KEEP WARM / CANCEL, secure the lid and press the SOUP function. This will cook for 30 minutes and when the cooking has finished, press KEEP WARM / CANCEL and release the pressure naturally.
- When the pressure has released, remove the lid and stir in the fresh parsley. Serve hot with a swirl of sour cream.
Serves 6-8
www.russellhobbs.com.au
www.russellhobbs.co.nz
RUSSELL HOBBS and logo are Trade Marks of Spectrum Brands, Inc., or one of its subsidiaries.
©2013 Spectrum Brands, Inc.
Recipes are to be used in conjunction with the RHPC1000 Pressure Cooker by Russell Hobbs. All rights reserved. No part of this publication may be reproduced, stored in a retrieval system or transmitted in any form or by any means, electronic, mechanical, photocopying, recording or otherwise, without prior permission of the copyright owner.
CHICKEN STOCK
Preparation Time: 5 minutes
Cook Time: 30 minutes (+ de-pressurising time)
Ingredients:
1 small chicken
5 cups water
1 stick of celery, sliced
1 brown onion, peeled and halved
1 carrot, sliced
1 bay leaf
1 tsp whole pepper corns
Method:
- Pour the water in the bottom of your pressure cooker and add all ingredients except the chicken.
- Place the trivet into the bottom of the cooking pot and place the chicken on it. Secure the lid and press the SOUP function.
- Leave the pressure to release naturally and carefully remove the lid.
- Using tongs, remove the chicken and place it on a plate for another use.
- Discard the vegetables, bay leaf and pepper corns and strain the chicken stock into a container for refrigeration until use.
TIP: Shred the chicken to make chicken soup or a chicken salad
AROMATIC TOMATO SOUP
Preparation Time: 5 minutes
Cook Time: 15 minutes
Ingredients:
2 tsp olive oil
12 brown onion, finely diced
2 carrots, finely diced
1 stalk celery, chopped
1 clove garlic, crushed and chopped
1 tsp dried rosemary
400g can diced tomatoes
2 tbs tomato paste
1L beef stock (or 3 beef stock cubes in 1L water)
2 tsp balsamic vinegar
12 tsp black pepper
12 cup continental parsley, finely chopped
Parmesan cheese to serve
Method:
- Place the olive oil in the pressure cooker and press SAUTÉ. When it comes up to heat, sauté the carrots, onions, celery, garlic and rosemary for 3-4 minutes.
- Add the rest of the ingredients, give a good stir and secure the lid. Press the Manual function and adjust the cook time to 5 minutes. When the cooking has finished, leave on KEEP WARM for 10 minutes then carefully release the pressure using the quick pressure release method. Serve with parmesan cheese.
Serves 4
MOROCCAN LAMB POT ROAST
Preparation Time: 15 minutes (plus marinating time 30 minutes)
Cook Time: 45 minutes
Ingredients:
2kg lamb shoulder, de-boned
2 red onions, peeled and cut into thin wedges
3 tbs olive oil
4 garlic cloves, crushed
1 lemon, rind finely zested
1 tsp chilli flakes
1 tsp ground cumin
1 tsp dried thyme leaves
12 tsp dried oregano
14 tsp salt & pepper
12 cup dry white wine
1 cup chicken stock
Tabouli to serve
Greek yoghurt to serve
Lemon juice to serve
Method:
- Place 2 tbs of oil, garlic, lemon zest, chilli, cumin, thyme, oregano, salt and pepper in your food processor and blitz to a paste. Place the lamb shoulder in a large baking tray and spread the paste all over to marinate at room temperature for 20 minutes.
- Press SAUTÉ on your pressure cooker and leave to heat up for 1 minute. Add the marinated lamb and brown on all sides. Remove the lamb onto a plate.
- Sauté the onions for 2 minutes, then add the wine and chicken stock. Finally, return the lamb to the cooking pot and secure the lid in place. Press KEEP WARM / CANCEL to end sauté function.
- Press the POT ROAST function of your pressure cooker which will cook for 40 minutes.
- At the end of the cook time, leave on KEEP WARM for 10 minutes to slowly release some of the pressure. Then manually release the remainder of the pressure using the quick pressure release method, take the meat out to rest for 10 minutes before carving. Return the lid for the pan juices to keep warm while the meat is resting. Slice the rested lamb and serve on a bed of tabouli. Pour the warm pan juices over the meat and dollop Greek yoghurt on the top with a big squeeze of lemon juice.
Serves 8
CORNED BEEF
Preparation Time: 10 minutes
Cook Time: 1 hour, 20 minutes
Ingredients:
1.2kg corned beef (silverside)
1 brown onion, peeled and halved
4 cloves
2 bay leaves
1 tsp peppercorns
1 carrot, peeled and chopped
1tbs brown sugar
2 tbs malt vinegar
Water (to cover corned beef)
Method:
- Wash the corned beef under cold water and set aside.
- Put 2 cups of water in your pressure cooker and stir in malt vinegar and sugar. Add all other ingredients with enough water to just cover the corned beef.
- Press the POT ROAST function of your pressure cooker which will cook for 40 minutes.
- At the end of the cook time, leave on KEEP WARM for 20 minutes to slowly release some of the pressure. Then use the quick release method for the remainder of the pressure, take the meat out to rest for 15 minutes before carving.
Serves 8
TIP: Serve with mashed potato, sautéed cabbage and mustard sauce.
MASSAMAN BEEF CURRY
Preparation Time: 10 minutes
Cook Time: 25 minutes (+ de-pressurising time)
Ingredients:
1 tsp canola oil
2 brown onions, peeled and quartered
4 tbs Massaman curry paste
400g coconut milk
1.2kg beef chuck, cut into 2 cm pieces
1 cup vegetable stock
1 tbs fish sauce
1 tbs soy sauce
1 tbs brown sugar
1kg baby potatoes, halved
1 bunch coriander to serve
12 cup of toasted peanuts to serve
Rice to serve
Method:
- Place the oil in the pressure cooker and press SAUTÉ, leave to heat up for 1 minute. Add the onions and sauté for 2 minutes (don't stir too much – you want to colour them), then remove them to a plate. Add the Massaman curry paste and sauté, stirring constantly, until fragrant (1-2 minutes) then pour in the coconut milk. Add the beef and stir in the onions, stock, fish sauce, soy sauce, brown sugar and potatoes.
- Press KEEP WARM / CANCEL, secure the lid and press the CURRY function. This will cook for Cook 30 minutes and when the cooking has finished, leave on KEEP WARM for the pressure to release naturally.
- Adjust seasoning to taste and serve with fresh coriander, toasted peanuts and rice.
Serves 6-8
Preparation Time: 10 minutes
Cook Time: 5 minutes
Ingredients:
1 tsp vegetable oil
1 brown onion, peeled and quartered
1 garlic clove, crushed
Knob of ginger, 1cm, peeled and finely grated
1 green chilli, finely sliced
2 tbs green curry paste
1.2kg chicken thigh fillets, diced into 3cm pieces
250g can coconut milk
1 tsp lime zest
1 tbs palm sugar
3 tsp fish sauce
2 Kaffir lime leaves, torn in half
Juice of 1 lime
Jasmine rice to serve
Coriander leaves to serve
Method:
- Place the oil in the pressure cooker and press SAUTÉ, leave to heat up for 1 minute. Add the onion, garlic, ginger and green chilli and sauté for 3 minutes. Stir in the curry paste and sauté for a further minute until fragrant.
- Add the chicken and then stir in the coconut milk along with the lime zest. Add the palm sugar, fish sauce and Kaffir lime leaves.
- Press KEEP WARM / CANCEL, secure the lid and press the MANUAL function and adjust the cook time to 5 minutes.
- When the cooking has finished, leave on KEEP WARM for 5 minutes then carefully release the pressure manually using the quick pressure release method. Gently stir through the lime juice, taste and adjust the sweet and sour flavour if necessary. Serve with Jasmine rice and fresh coriander leaves.
Serves 4-6
PEA AND PANCETTA RISOTTO
Preparation Time: 10 minutes
Cook Time: 25 minutes
Ingredients:
1 tbs extra virgin olive oil
20g butter
2 cups Arborio rice
1 brown onion, finely diced
100g pancetta, diced
1 garlic clove, finely chopped
12 cup white wine
4 cups chicken stock, warmed
12 cup parmesan cheese
12 cup continental parsley, chopped
12 cup frozen peas
1 tsp lemon zest
Salt & pepper to taste
Method:
- Place the oil and butter in the pressure cooker and press SAUTÉ, leave to heat up for 1 minute. Add the pancetta and onion and sauté for 2 minutes, then add the Arborio rice and sauté, stirring constantly, for a further 4 minutes to toast the rice.
- Add the garlic and wine and sauté for 2 minutes, stirring, to cook out the alcohol, then add the warm stock.
- Press KEEP WARM / CANCEL, secure the lid and press the RISOTTO function which will cook for 20 minutes.
- When the cooking has finished, leave on KEEP WARM for 5 minutes then carefully release the pressure using the quick pressure release method. Gently stir through the parmesan, parsley, frozen peas, lemon zest, salt and pepper and let sit for 5 minutes before serving.
Serves 4-6
POTATOES WITH DILL & CHIVES
Preparation Time: 5 minutes
Cook Time: 10 minutes
Ingredients:
1 tbs extra virgin olive oil
2 tbs butter
1 tsp celery salt
2 tbs fresh dill, chopped
6 large new potatoes, quartered lengthways
1 cup chicken stock, warm
Pepper to taste
2 tbs chives, chopped
Method:
- Place the oil and butter in the pressure cooker and press SAUTÉ, leave to heat up for 1 minute. Add celery salt and dill and sauté for 2 minutes, then add the potatoes and sauté for 1 minute.
- Add the warm stock.
- Press KEEP WARM / CANCEL, secure the lid and press the MANUAL function and adjust the cook time to 5 minutes.
- When the cooking has finished, leave on KEEP WARM for 5 minutes then carefully release the pressure using the quick pressure release method.
- Remove the potatoes to a serving platter and season with pepper and chives.
Serves 6-8
TIP: Great as a side. Serve warm or cold.
Preparation Time: 20 minutes
Cook Time: 4 hours (+ de-pressurising time)
Ingredients:
3 chicken Maryland pieces, skin off
12 cup soy sauce
12 cup honey
14 cup hoisin sauce
12 cup currants
1 tbs olive oil
3 cloves garlic, crushed
2cm piece of ginger, peeled & finely chopped
12 tsp Chinese five-spice
1 red onion, diced
1 small chilli, chopped finely
1 tbs corn flour
White rice to serve
Spring onion to serve
Method:
- Place the soy sauce, honey, hoisin sauce, currants, olive oil, garlic, ginger, Chinese five spice, onion and chilli in the cooking pot of the pressure cooker and stir with a wooden spoon to combine.
- Add the chicken, breast side down and secure the lid. Press the SLOW COOK function to cook for 4 hours.
- At the end of the cooking time, leave on KEEP WARM to release pressure naturally. When the pressure has released, carefully take the chicken pieces out and place on a chopping board to rest for 20 minutes.
- Meanwhile, add the corn flour to the cooking pot, stir and replace the lid. Press the MANUAL function and cook for 1 minute. Leave to KEEP WARM.
- Meanwhile, shred the chicken using 2 forks and place on a serving platter. Pour the sauce over the top and serve hot with fluffy white rice sprinkled with slices of spring onion.
Serves 4-6
POACHED PEARS
Preparation Time: 10 minutes
Cooking Time: 2 hours, 5 minutes
Ingredients:
4 ripe pears, peeled and left whole
1 cinnamon stick
5 cloves
1 knob of ginger, 1cm
1 tsp lemon zest
14 cup brown sugar
1 star anise
1 vanilla pod
2 cups water
Method:
- Add the sugar, spices, lemon zest, vanilla pod, ginger and water to your pressure cooker and press SAUTÉ, stirring until it comes to a boil. Simmer for 5 minutes.
- Press KEEP WARM / CANCEL, add pears and place the lid on. Now press SLOW COOK and cook for 2 hours. Use the quick pressure release method for this recipe.
- Serve warm with a ladle of pan juice syrup and pouring cream.
Serves 4
APPLE RELISH
Preparation Time: 10 minutes
Cooking Time: 2 hours (+ de-pressurising time)
Ingredients:
1.2kg Granny Smith Apples, peeled, cored & chopped
2 brown onions, finely diced
1/2 cup apple cider vinegar
^3/_4 cup raw sugar
14 tsp salt
1 tbs lemon juice
12 tsp ground cinnamon
14 tsp ground cloves
14 tsp ground allspice
Method:
- Place all ingredients into the pressure cooker and stir to combine.
- Place the lid on and turn the setting to SLOW COOK and cook for 2 hours. When cooking time has finished, leave pressure to release naturally.
- Store in sterilised, air tight jars in the refrigerator.
Makes approximately 3 cups of relish
TIP: Use apple relish as a condiment for roasted meats, especially pork.
VANILLA SPONGE CAKE
Preparation Time: 15 minutes
Cook Time: 35 minutes
Ingredients:
1½ cup castor sugar
2 eggs, at room temperature
2 cups self-raising flour
1 cup milk
50g butter, melted
12 tsp vanilla bean paste (or 1 tsp vanilla essence)
Cooking oil spray for greasing
Cream or ice cream to serve
Flaked almonds to serve
Method:
- Generously grease a cake tin or similar (16cm x 8cm). Place the trivet in the bottom of the pressure cooker bowl and fill the pressure cooker with 1 litre of warm water (4 cups).
- Using electric beaters or a bench mixer, whisk the eggs for 3 minutes until light and fluffy. Add the sugar and continue whisking for a further 3 minutes.
- Gently stir in the flour with a wooden spoon and mix gently until it forms a batter with no lumps. Stir in the milk, melted butter and vanilla to combine.
- Pour the cake batter into the prepared cake tin so it is half full and double-wrap with aluminium foil – grease the foil area that will sit at the top of the cake, just in case it touches the foil when rising.
- Take a 50cm length of foil and fold it long ways to form a 6cm wide strap. Place this under the cake tin / pudding bowl to gently lower it onto the trivet. Fold in the edges over the top of the cake tin / pudding bowl and pour enough warm water to come 34 ways up the side of the cake tin. Place the pressure cooker lid on and secure it in place.
- Press the PUDDING function and your cake will be ready in approximately 40 minutes. When it has finished the cooking cycle, leave it on KEEP WARM for 5 minutes until releasing the pressure manually using the quick pressure release method. Using oven mitts, gently take the cake out of the pressure cooker using the foil straps to lift it out.
- Leave the cake to cool slightly in the tin, then carefully turn out onto a serving platter. Serve warm with cream or ice-cream and a sprinkle of toasted flaked almonds.
CREAMY RICE PUDDING
Preparation Time: 10 minutes
Cook Time: 25 minutes
Ingredients:
2 tbs butter
3 cups milk, warmed
1 cup long grain rice
1/3 cup castor sugar
1 tsp vanilla
1 tsp ground cinnamon
Method:
- Place the butter in the pressure cooker and press SAUTÉ. When the butter has melted, add the warm milk and stir in the rice, vanilla and sugar. Press KEEP WARM / CANCEL, secure the lid and press the RISOTTO function. This will cook for 20 minutes.
- When the cooking has finished, leave on KEEP WARM for 5 minutes then carefully release the pressure manually using the quick pressure release method. Stir through the cinnamon and serve warm or at room temperature.
Serves 4-6
STEAMED VANILLA & GOLDEN SYRUP PUDDING
Preparation Time: 15 minutes
Cook Time: 40 minutes (+ 10 minutes de-pressurising time)
Ingredients:
20g butter for greasing
12 cup castor sugar
120g butter, softened
1/2 tsp vanilla bean paste (or 1 tsp vanilla essence)
2 eggs
120g plain flour
14 cup milk
^3/_4 cup golden syrup
Cream or ice cream to serve
Toasted flaked almonds to serve
Method:
- Generously grease a pudding bowl (16cm x 8cm) and pour in the golden syrup. Place the trivet in the bottom of the pressure cooker bowl and fill the pressure cooker with 1 litre of warm water (the water will need to come 34 ways up the side of the pudding bowl).
- Using electric beaters, cream the butter, sugar and vanilla until pale and fluffy.
- Add eggs one at a time and mix thoroughly, then stir in the flour and milk to form a batter. Pour the pudding batter into your prepared pudding bowl and double-wrap with aluminium foil.
- Take a 50cm length of foil and fold it long ways to form a 6cm wide strap. Place this under the pudding bowl to gently lower it onto the trivet. Fold in the edges over the top of the pudding bowl and place the pressure cooker lid on and lock it in place.
- Press the PUDDING function and your pudding will be ready in approximately 40 minutes. When the cooking cycle has finished, leave it on KEEP WARM for 10 minutes to slowly release some of the pressure. Then manually release the remainder of the pressure using the quick pressure release method before taking the pudding bowl out using the foil straps to lift it out (always use oven mitts when doing this to avoid burning yourself).
- Serve from the pudding bowl or carefully turn out onto a serving platter. Serve warm with cream or ice-cream and a sprinkle of toasted flaked almonds.
Serves 4-6
NOTES
NOTES

- Spectrum Brands Australia Pty Ltd and Spectrum Brands New Zealand Ltd
- Warranty Against Defects
- Warranty Conditions
- HOW PRESSURE COOKING WORKS
- BEFORE FIRST USE
- COOKING PREPARATION
- How to open the lid
- Check whether parts on the lid are correctly in place
- In most cases food and water should be added to the cooking pot prior to placing it in the pressure cooker.
- Inserting the cooking pot in the pressure cooker
- Close the lid
- Position the exhaust valve
- Insert the Power Cord
- IMPORTANT INFORMATION FOR RELIABLE AND SAFE OPERATION
- REMOVAL AND INSTALLATION OF THE ANTI-BLOCK SHIELD AND THE GASKET
- REMOVAL AND INSTALLATION OF THE ANTI-BLOCK SHIELD:
- REMOVAL AND INSTALLATION OF THE GASKET:
- GENERAL FUNCTIONS
- DE-PRESSURISING AND OPENING THE LID
- Natural pressure release method
- Quick pressure release method
- IMPORTANT:
- HOW TO OPEN THE LID
- REMOVING THE COOKING POT AFTER COOKING
- PRE-SET AUTOMATIC COOKING FUNCTIONS
- WHITE RICE
- BROWN RICE
- RISOTTO
- STEAM
- SLOW COOK
- POT ROAST
- SAUTÉ
- CURRY
- PUDDINGS (AND CAKES)
- NOTE: Prior to adding ingredients we strongly recommend that you measure that your cake tin will fit in the cooking pot.
- SOUP
- IMPORTANT: After making soup or stock, allow at least 15 minutes before releasing pressure to ensure the hot liquid inside will not boil over.
- COOKING MENU FUNCTIONS
- PRESSURE COOKER FUNCTIONS
- ADJUST FUNCTION:
- NOTE: The default is Normal.
- DELAY START FUNCTION:
- KEEP WARM FUNCTION:
- MANUAL OPERATION:
- NOTE: The STEAM function works using the same method as MANUAL. See detailed instructions on how to use the Manual and Steam functions below:
- NOTE: The default time for manual cooking is 30 minutes
- NOTE: Press the Keep Warm/Cancel button at any time to cancel the function selected.
- NOTE: Lid safety - once there is pressure built up within the pressure cooker, for safety reasons the lid will lock and will not be able to be opened until it has de-pressurised.
- NOTE: Some food will deteriorate if kept in "keep warm" mode for extended periods of time.
- VEGETABLES
- MEAT, FISH & POULTRY
- RICE & GRAINS
- PRESSURE COOKING TIPS
- CARE AND CLEANING
- Note: Ensure gasket and anti-block shield are put back correctly. Refer to assembly information on page 9.
- IMPORTANT SAFEGUARDS
- SAVE THESE INSTRUCTIONS
- THIS APPLIANCE IS FOR HOUSEHOLD USE ONLY
- NOTES
- Russell Hobbs
- RECIPE BOOK
- CHUNKY CHORIZO, PUMPKIN & FENNEL SOUP
- Ingredients:
- Method:
- CHICKEN STOCK
- AROMATIC TOMATO SOUP
- MOROCCAN LAMB POT ROAST
- CORNED BEEF
- MASSAMAN BEEF CURRY
- PEA AND PANCETTA RISOTTO
- POTATOES WITH DILL & CHIVES
- POACHED PEARS
- APPLE RELISH
- VANILLA SPONGE CAKE
- CREAMY RICE PUDDING
- STEAMED VANILLA & GOLDEN SYRUP PUDDING
Brand : RUSSELL HOBBS
Model : Express Chef RHPC1000
Category : Multicooker