
450-10 - Blender OSTER - Free user manual and instructions
Find the device manual for free 450-10 OSTER in PDF.


| Product Type | Blender |
| Brand | Oster |
| Model | 450-10 |
| Jar Capacity | 5 cups (1.2 L) |
| Motor Type | Multi-speed, powerful food processing motor with free-floating design |
| Speed Control | Dial with Pulse function (3-speed or 2-speed depending on variant) |
| Pulse Function | Yes, for controlled cycle blending |
| Blade Material | Stainless steel ice crushing blade |
| Cover | Two-piece vinyl cover with removable feeder cap (also acts as measuring cup) |
| Jar Material | Heat and cold resistant plastic, graduated markings |
| Base Material | Plastic housing |
| Voltage | 120 V AC (check appliance label) |
| Power Consumption | Approximately 450 W |
| Safety Features | Do not immerse base; avoid contact with moving blades; always operate with cover |
| Cleaning | Hand wash only; do not use dishwasher; wipe motor base with damp cloth |
| Dimensions (approximate) | 7 x 7 x 15 inches (17.8 x 17.8 x 38.1 cm) |
| Weight (approximate) | 3.5 lbs (1.6 kg) |
| Warranty | 1-year limited warranty |
| Intended Use | Household use only |
| Accessories Included | Jar, cover with feeder cap, sealing ring, blade assembly, instruction manual |
| Spare Parts Availability | Replacement jars, blades, and seals available at Authorized Service Centers |
Frequently Asked Questions - 450-10 OSTER
User questions about 450-10 OSTER
0 question about this device. Answer the ones you know or ask your own.
Ask a new question about this device
Download the instructions for your Blender in PDF format for free! Find your manual 450-10 - OSTER and take your electronic device back in hand. On this page are published all the documents necessary for the use of your device. 450-10 by OSTER.
USER MANUAL 450-10 OSTER
natural_image
Illustration of four Osterizer brand blisters with control knobs and gauges (no text or symbols on the devices themselves)| 250-22 | 465-15 | 465-54 | 4134 | |
| 450-10 | 465-31 | 4090 | 4190 | |
| MODELOS MODELS | 450-20 | 465-41 | 4093 | 4241 |
| 450-21 | 465-42 | 4122 | 4655 | |
| 461-13 | 465-43 | 4126 | BLSTBG4127V | |
| 465-13 | 465-52 | 4128 |
PLEASE READ ALL INSTRUCTIONS BEFORE USING THIS APPLIANCE
MANUAL DE INSTRUÇÕES
LIQUIDIFICADOR OSTERIZER®
LEIA TODAS AS INSTRUÇÕES ANTES DE USAR ESTE APARELHO
PRECAUCIONES IMPORTANTES
natural_image
Illustration of two hands performing a mechanical press or stamping operation on a base (no text or symbols present)When using electrical appliances, basic safety precautions should always be followed, including the following:
READ AND KEEP ALL INSTRUCTIONS.
- To protect against risk of electrical shock, do not put Blender base in water or other liquid.
- Close supervision is necessary when any appliance is used by or near children, or incapacitated persons.
- Unplug from outlet when not in use, before putting on or taking off parts, and before cleaning.
- Avoid contact with moving parts.
- DO NOT operate any appliance with a damaged cord or plug or after the appliance malfunctions, or is dropped or damaged in any manner. Return appliance to the nearest Authorized Sunbeam Appliance Service Center for examination, repair or electrical or mechanical adjustment.
- The use of attachments, including canning and/or ordinary jars and processing assembly parts not recommended by SUNBEAM ^® or OSTER ^® , may cause a risk of injury to persons.
- Keep hands and utensils out of jar while blending to prevent the possibility of severe injury to persons and/or damage to the Blender. If scraping, folding, etc., is necessary, turn off and unplug the Blender, and only use a rubber spatula.
- Blades are sharp. Handle carefully.
- To reduce risk of injury to persons, never place cutting blades on base without Blender jar properly attached.
- Screw on jar bottom firmly. Injury can result if moving blades become exposed.
- Always operate Blender with cover in place.
- Make sure that the voltage in your outlet is the same as the voltage indicated on the appliance.
- Always hold jar while processing. If the jar should turn when the motor is switched "On," switch "Off" immediately and tighten Blender jar in threaded jar bottom.
- When blending hot liquids, remove the feeder cap from the two-piece cover. DO NOT fill Blender jar beyond the four-cup level. On six-cup models, DO NOT fill beyond five -cup level. Always begin processing at the lowest speed setting. Keep hands and other exposed skin away from the cover opening to prevent possible burns.
- DO NOT use outdoors.
- DO NOT let the cord hang over edge of table or countertop.
- DO NOT let cord rest against hot surfaces.
-
DO NOT leave Blender unattended while it is operating.
-
This appliance is not intended for use by persons (including children) with reduced physical, sensory or mental capabilities, or lack of experience and knowledge, unless they have been given supervision or instruction concerning use of the appliance by a person responsible for their safety. Children should be supervised to ensure that they do not play with the appliance.
THIS UNIT IS FOR HOUSEHOLD USE ONLY.
The maximum rating as marked on the unit is based on the attachment that draws the greatest load. Other recommended attachments may draw significantly less power.
SAVE THESE INSTRUCTIONS
POWER CORD SPECIAL INSTRUCTIONS
- Try to position the blender near the power source to reduce the hazards associated with power cords (such as becoming entangled or tripping over a long power cord).
- Do not pull, twist or otherwise abuse the power cord.
- Do not wrap the power cord around the main body of the blender during or after use.
- Do not use an extension cord with this product.
DESCRIPTION OF THE APPLIANCE
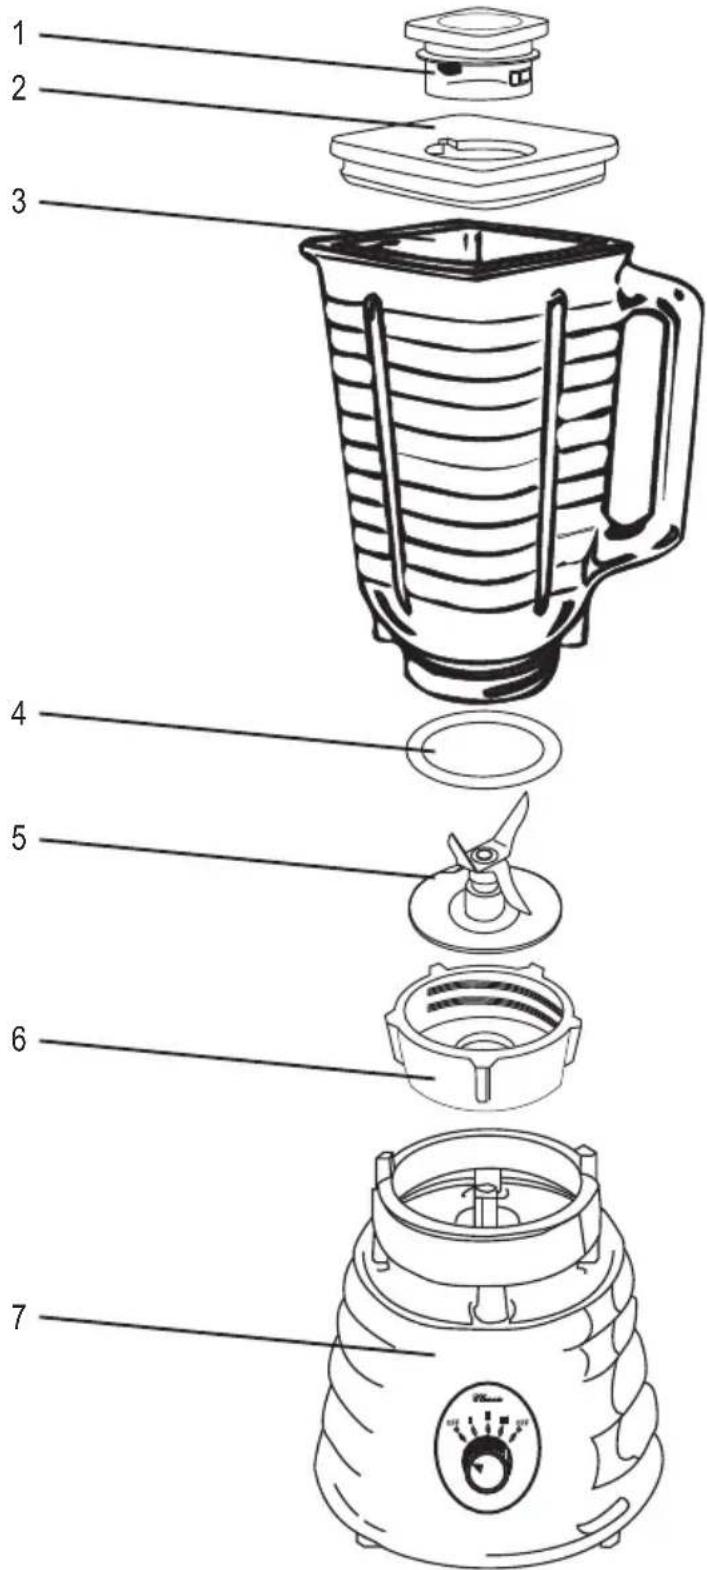
- Plastic feeder cap
- Vinyl cover
- Jar
-
Sealing ring
-
Ice Crushing Blade
- Threaded jar bottom
- Housing motor base
KNOWING YOUR OSTERIZER® BLENDER
COVER
The cover for your OSTERIZER® Blender consists of two parts, the plastic feeder cap and the vinyl cover. The cover is self-sealing, and is made of vinyl which is resistant to absorption of odors and stains. The feeder cap is removable for use as a measuring cup and provides an opening for the addition of other ingredients.
JAR
The jar for the Blender is graduated for easy measurement and is molded of heat and cold resistant material. The convenient handle and pouring lip permit easy removal of liquid mixtures while thicker mixtures are more easily removed through the bottom opening.
PROCESSING ASSEMBLY
The processing assembly consists of three parts: a sealing ring used as a cushion between the jar and the blade; a blade of high-grade stainless steel; a threaded jar bottom.
MOTOR AND MOTOR BASE
The powerful multi-speed motor is the heart of the appliance and is designed just for this unit. It is completely enclosed within the housing. The motor uses a “free-floating” feature to reduce noise and wear. This allows the square post which protrudes from the motor base to move slightly from side to side. The powerful food processing motor can be overloaded. To avoid this possibility, closely follow the instructions in this book.
ASSEMBLING YOUR BLENDER
CAUTION: Follow these important steps to assemble, tighten, and mount Blender jar quickly and correctly. INJURY MAY RESULT IF MOVING BLADES ARE EXPOSED.
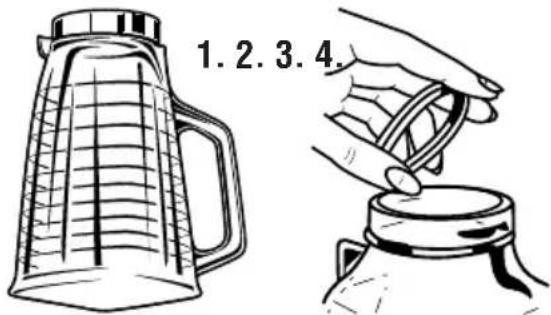
-
Turn jar upside down so the small opening is at the top.
-
Place sealing ring on jar opening.

natural_image
Two-step illustration showing hands performing a mechanical or electrical operation on a base (no text or symbols present)-
Turn the blade blades upside down and place in mouth of jar.
-
Thread jar bottom to jar.
TIGHTENING THE JAR
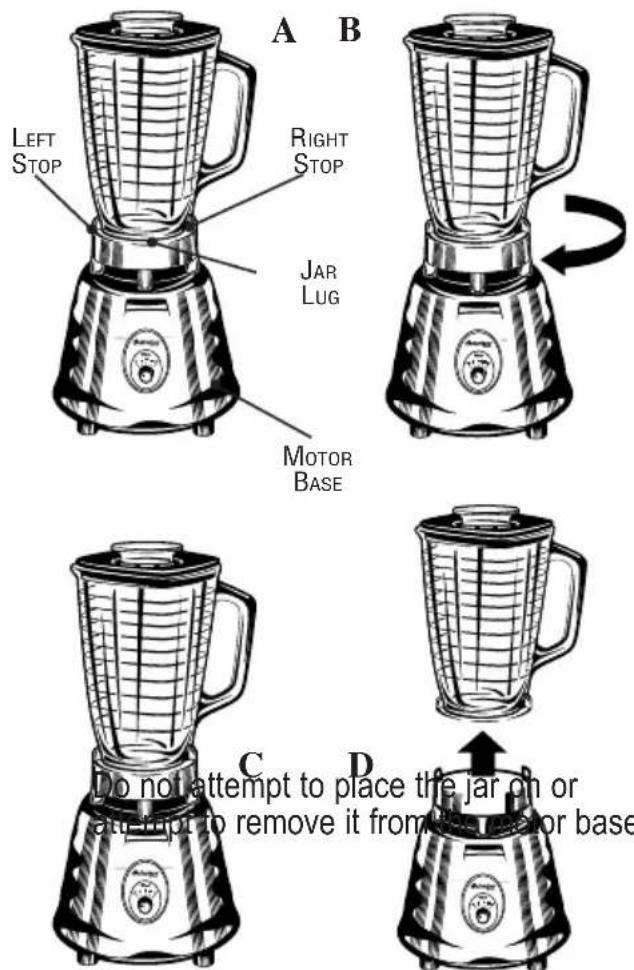
A. To tighten jar bottom, put assembled jar securely into motor base ring with handle and lug in front of the right stop.
B. Using jar handle, turn jar to the left as far as possible. This insures that the jar bottom is tightened properly.
C. To operate Blender, place assembled jar in motor base ring with jar lug against flat side of the motor base stop. If jar lug does not rest against flat side of right stop, remove jar assembly and place against flat side of left stop. Seat jar firmly and operate.
D. To remove jar, lift straight up. (If it is not easily removed, rock gently and lift up, do not twist). If jar bottom cannot be loosened by hand, place assembled jar into motor base ring with handle in front of left side stop. Using handle, turn jar to right until jar bottom loosens.
while
the
motor
is
ALWAYS HOLD JAR WITH ONE HAND WHILE PROCESSING!
HOW YOUR OSTERIZER® BLENDER WORKS
Your OSTERIZER® Blender is a multi-speed appliance which operates on a wide range of speeds from very slow to very fast. This range of speeds makes food preparation fast and easy.
In addition, your OSTERIZER® Blender has two distinct methods of operation:
- CONTINUOUS run for blending, liquefying and fine chopping.
- CONTROLLED CYCLE BLENDING, used for chopping pieces of food, such as vegetables, nuts or cheeses. There are several different ways of operating the CONTROLLED CYCLE / BLENDING CYCLE feature, but all involve turning the motor "ON" and "OFF" intermittently. When "ON," food is chopped and tossed away from the blades. When "OFF," the food is distributed around the blades to make processing more uniform.
NOTE: A cycle consists of operating the blender for about two seconds and then allowing the blades to coast to a stop.
USING YOUR OSTERIZER® BLENDER
DIAL MODELS
- Turn dial to desired speed and blend ingredients to desired consistency.
- Turn dial to the off "O" position to stop the blender and turn blender off.
- To use the PULSE function:
a. For models with 3 speeds:
- To use PULSE if dial is on the off to the left of the dial position, turn dial to speed I for a brief desired length of time and turn it right back to the off "O" position.
- To use PULSE if dial is on the off position on the right of the dial turn dial to speed III for a brief desired length of time and turn it right back to the off "O" position.
b. For models with 2 speeds:
- To use PULSE if dial is on the off to the left of the dial position, turn dial to speed I for a brief desired length of time and turn it right back to the off "O" position.
-
To use PULSE if dial is on the off position on the right of the dial turn dial to speed II for a brief desired length of time and turn it right back to the off "O" position.
-
Repeat cycle as desired.


TOGGLE MODELS
- Push switch up and blend ingredients to desired consistency.
- Push switch to the off "O" position to stop the blender and turn blender off.
- To use PULSE, push switch down for desired length of time.
- Release PULSE and allow blade to stop. Repeat cycle as desired.
CARE AND CLEANING
Blender jar parts are corrosion resistant, sanitary and easily cleaned. Before first use and after every use, separate jar parts and clean thoroughly in warm, soapy water, then rinse and dry well. DO NOT WASH ANY PARTS IN AN AUTOMATIC DISHWASHER.
Periodically check all parts before re-assembly. If the processing blades are stuck or difficult to turn, DO NOT USE BLENDER. Check by carefully turning the blades in a counterclockwise direction (opposite edges are sharp). Blades should turn freely.
If the jar is chipped or cracked, DO NOT USE BLENDER. Further use could result in the jar breaking during use. Use only OSTERIZER® Blender recommended replacement parts available at an Authorized Service Center.
USE OF DAMAGED OR NON-RECOMMENDED PARTS COULD RESULT IN SEVERE PERSONAL INJURY AND/OR DAMAGE TO THE BLENDER.
See Page 4 for proper jar assembly and user instructions.
NEVER IMMERSE THE MOTOR BASE IN WATER. The housing can be cleaned with a damp cloth (unplug first). The motor is permanently lubricated and does not require any additional lubrication. ANY SERVICING SHOULD BE PERFORMED BY AN AUTHORIZED SERVICE FACILITY.
DO'S AND DON'Ts
Do's:
- Use only the line voltage and frequency as specified on the bottom of the Blender.
- Always operate Blender on a clean, dry surface to prevent air from carrying foreign material or water into the motor.
- Put liquid portions of recipes into Blender jar first unless the instructions in recipes specify otherwise.
- Cut all firm fruits and vegetables, cooked meats, fish and seafoods into pieces no larger than 3/4 inch/1.8 cm to 1 inch/2.5 cm. Cut all kinds of cheeses into pieces no larger than 3/4 inch/1.8 cm.
- Use rubber spatula to push ingredients to be chopped into liquid portion of recipe ONLY when motor is OFF.
- Place cover firmly on Blender jar before starting, and rest hand on the jar cover when starting and running motor.
- Remove heavy dips and spreads, nut butters, mayonnaise and products of similar consistency by removing the processing assembly and pushing the mixture out through the bottom opening into serving dishes or storage jar.
- Pour mixture of liquid or semi-liquid consistency, such as muffin and cake batter, from Blender jar.
- Allow cooked vegetables and broth to cool before pouring into Blender jar for processing.
- If the motor seems to labor when processing at one of the lower speeds, switch to the next higher speed to prevent overloading the motor.
- Use a Mini Jar or 5-cup/1.2 liter blender jar to process citrus rind, coffee beans or cereal grains. Use only glass Blender jar to process whole spices and hard cheese.
Don'ts:
- Do Not expect your Blender to replace all of your kitchen appliances. It will not: mash potatoes, whip egg whites or substitutes for dairy toppings, grind raw meat, knead or mix stiff dough or extract juices from fruits and vegetables.
- Do Not process mixtures too long. Remember, the Blender performs its tasks in seconds, not minutes. It is better to stop and check the consistency after a few seconds than to overblend and have a mushy or too finely ground product.
- Do Not overload the motor with extra-heavy or extra-large loads. If the motor stalls, turn off immediately, unplug cord from outlet and remove a portion of the load before beginning again.
- Do Not attempt to remove Blender jar from motor base or replace it until the motor has come to a complete stop. Blender parts can be damaged.
- Do Not remove jar cover while processing, as food spillage can occur. Use feeder cap opening to add ingredients.
- Do Not place or store processing assembly on motor base without first correctly assembling to Blender jar. Severe injury can result if Blender is accidentally turned on.
- Do Not use any utensil, including spatulas, in the jar while the motor is running. They can catch in the moving blades, break the jar and cause severe injury.
- Do Not use ANY jar not recommended by the manufacturer for processing foods. Other jars may break or loosen during processing and cause severe injury.
- Do Not use Mini Jars for processing whole spices (except peppercorns) or hard cheeses, as they can break the Mini Jars and cause injury.
RECIPES FOR YOUR BLENDER
ESPRESSO MOUSSE
1/4 cup/50 ml cold water 1 Tbsp./15 ml sugar
2 envelopes unflavored gelatin 1/2 tsp./2 ml vanilla extract
1/2 cup/125 ml brewed espresso 1 cup/250 ml heavy cream
1/2 cup/125 ml boiling water 2 egg yolks
1 cup/250 ml semi-sweet 1-1/2 cups/375 ml ice cubes chocolate morsels
Put cold water and gelatin into your OSTERIZER® Blender jar and let set 2 minutes; then add hot espresso and boiling water. Cover, vent feeder cap and process at PULSE until gelatin is dissolved. Turn unit to ON. With motor running, remove feeder cap, add chocolate morsels, sugar and vanilla extract. Continue processing until mixture is smooth. Add cream, egg yolks and ice, replace cap and continue processing until mixture begins to thicken. Pour at once into serving dishes. Let set 5 to 10 minutes before serving. Garnish with sweetened whipped cream and chocolate shavings.
CREAM OF BROCCOLI SOUP
1 cup/250 ml water 2 chicken boullion cubes
1 package/10 oz. or 280 g 1/2 cup/125 ml all-purpose flour frozen chopped broccoli 1 cup/250 ml half and half
2 cups/500 ml milk croutons for garnish
2 cups/250 ml processed cheese, cubed
In a large saucepan, cook broccoli in 1 cup/250 ml water. (Do Not Drain)
Put milk, cheese cubes, boullion and flour into your Osterizer® Blender jar. Cover and process at ON. Add cheese mixture to broccoli. Add the half and half. Cook, stirring frequently, over medium heat until hot and until mixture thickens. Serve garnished with croutons.
Yield: 4 – 6 Servings
MAYONNAISE
1 egg dash cayenne pepper
1/2 tsp./2 ml dry mustard 2 Tbsp./30 ml white tarragon vinegar
1/2 tsp./2 ml sugar 1 cup/250 ml salad oil
1/2 tsp./2 ml salt
Put eggs, seasonings, vinegar and 1/4 cup/50 ml of oil into your OSTERIZER ^® Blender jar. Cover and process at MED-HIGH speed. Immediately remove feeder cap and pour in the remaining oil in a steady stream. If necessary, STOP BLENDER, use rubber spatula to keep mixture around processing blades. Cover and continue to process. Store covered in the refrigerator up to 1 week.
Yield: About 1-1/4 cups/300 ml
VARIATION: For low-cholesterol Mayonnaise, use 2 egg whites instead of 1 whole egg. Process as above.
APPETIZERS
NIPPY ONION DIP
1/3 cup/75 ml water 1 cup/250 ml creamed cottage cheese
1 package dry onion soup mix 4 strips bacon, diced, fried and
1 Tbsp./15 ml horseradish well drained
Put water, onion soup mix, horseradish and cottage cheese into your OSTERIZER® Blender jar. Cover and process at BLEND until smooth. Use a base for chilled dips such as California Onion Dip, on baked potatoes or in salads.
Yield: 1-1/2 Cups/375 ml
BEVERAGES
DAIQUIRI
1/3 cup/75 ml frozen limeade concentrate 3 jiggers light rum 5 ice cubes
Put all ingredients into your OSTERIZER® Blender jar. Cover and process at LIQUEFY (ICE CRUSH) until smooth. Stop blender, add ice cream, cover and process 1 cycle at BLEND.
Yield: 2 6-oz./170-g Servings
VARIATIO N: FROZ EN DA IQU IRI
Add one more jigger rum, double the amount of ice and continue to blend until the consistency of sherbet. Do not strain.
Yield: 4 - 6 oz./170 g Servings
MILK SHAKES AND MALTS
1 cup/250 ml milk flavoring
2 cups/500 ml vanilla ice cream malt powder, if desired
Put all ingredients into your OSTERIZER® Blender jar. Cover and process at LIQUEFY (ICE CRUSH) until smooth.
Yield: 2 8-oz./225-g Servings
I-YEAR LIMITED WARRANTY
Sunbeam Products, Inc. (“Sunbeam”) warrants that for a period of ONE year from the date of purchase, this product will be free from defects in material and workmanship. Sunbeam, at its option, will repair or replace this product or any component of the product found to be defective during this warranty period. Replacement will be made with a new or remanufactured product or component. If the product is no longer available, replacement may be made with a similar product of equal or greater value. This is your exclusive warranty.
This warranty is valid for the original retail purchaser from the date of initial retail purchase and is not transferable. Keep the original sales receipt. Proof of purchase is required to obtain warranty performance. Sunbeam dealers, service centers or retail stores selling Sunbeam products do not have the right to alter, modify or any way change the terms and conditions of this warranty.
This warranty does not cover normal wear of parts or damage resulting from any of the following: negligent use or misuse of the product, use on improper voltage or current, use contrary to the operating instructions, disassembly, repair or alteration by anyone other than Sunbeam or an Authorized Service Center. Further, the warranty does not cover Acts of God, such as fire, flood, hurricanes and tornadoes.
Sunbeam shall not be liable for any incidental or consequential damages caused by the breach of any express or implied warranty. Except to the extent prohibited by applicable law, any implied warranty of merchantability or fitness for a particular purpose is limited in duration to the duration of the above warranty.
How To Obtain Warranty Service: Please see country specific warranty insert or contact your local authorized distributor.
DO NOT RETURN THIS PRODUCT TO THE PLACE OF PURCHASE
PRECAUÇÕES IMPORTANTES
natural_image
Illustration of two hands performing a mechanical press or stamping operation on a base (no text or symbols present)MILK SHAKES E MALTES
© 2015 Sunbeam Products, Inc. All rights reserved. Distributed by Sunbeam Latin America, LLC, 5200 Blue Lagoon Drive, Suite 860, Miami, FL 33126.
One year limited warranty – please see insert for details.
- LIQUIDIFICADOR OSTERIZER®
- PRECAUCIONES IMPORTANTES
- READ AND KEEP ALL INSTRUCTIONS.
- THIS UNIT IS FOR HOUSEHOLD USE ONLY.
- SAVE THESE INSTRUCTIONS
- POWER CORD SPECIAL INSTRUCTIONS
- DESCRIPTION OF THE APPLIANCE
- KNOWING YOUR OSTERIZER® BLENDER
- COVER
- JAR
- PROCESSING ASSEMBLY
- MOTOR AND MOTOR BASE
- ASSEMBLING YOUR BLENDER
- TIGHTENING THE JAR
- HOW YOUR OSTERIZER® BLENDER WORKS
- USING YOUR OSTERIZER® BLENDER
- DIAL MODELS
- TOGGLE MODELS
- CARE AND CLEANING
- DO'S AND DON'Ts
- Do's:
- Don'ts:
- RECIPES FOR YOUR BLENDER
- ESPRESSO MOUSSE
- CREAM OF BROCCOLI SOUP
- MAYONNAISE
- APPETIZERS
- NIPPY ONION DIP
- BEVERAGES
- DAIQUIRI
- MILK SHAKES AND MALTS
- I-YEAR LIMITED WARRANTY
- PRECAUÇÕES IMPORTANTES
- MILK SHAKES E MALTES
Brand : OSTER
Model : 450-10
Category : Blender