
V350 - Flash GODOX - Free user manual and instructions
Find the device manual for free V350 GODOX in PDF.

| Product Type | Camera Flash for Sony |
| Model | V350S |
| Guide Number | 36 (m ISO 100, @105mm) |
| Flash Coverage | 24-105mm (auto/manual), 14mm with wide panel |
| Flash Duration | 1/350 to 1/20000 seconds |
| Recycle Time | 0.1-1.7 seconds |
| Full Power Flashes | Over 500 |
| Power Supply | 7.2V/2000mAh Li-ion battery |
| Battery Charging Time | Approximately 2.5 hours |
| Wireless Transmission | 2.4G radio, range up to 50m |
| Wireless Channels | 16 (1-16) |
| Wireless ID | OFF or 01-99 |
| Wireless Slave Groups | 3 (A, B, C) |
| Flash Modes | TTL, Manual (M), Multi (Stroboscopic) |
| Sync Modes | High-speed sync (up to 1/8000s), first-curtain, second-curtain |
| Bounce Flash Head | 0-270° horizontal, -7° to 90° vertical |
| Auto Focus Assist Beam | Effective range 0.6-4m (center), 0.6-2.5m (periphery) |
| Dimensions | 150 x 62 x 38 mm |
| Weight | 290g (with battery), 210g (without battery) |
| Compatible Cameras | Sony (α7RIII, α7RII, α7R, α58, α99, ILCE6000L, α77II, RX10, α9) |
| Warranty | One year (excluding consumables like flash tube) |
| Firmware Upgrade | Via USB (Micro USB) with Godox G2 software |
| Over-Temperature Protection | Yes (limits continuous flashes) |
| Auto Power Off | Approx. 90 sec (master), 60 min (slave) |
| Maintenance | Keep dry, clean contacts, professional repair only |
Frequently Asked Questions - V350 GODOX
User questions about V350 GODOX
0 question about this device. Answer the ones you know or ask your own.
Ask a new question about this device
Download the instructions for your Flash in PDF format for free! Find your manual V350 - GODOX and take your electronic device back in hand. On this page are published all the documents necessary for the use of your device. V350 by GODOX.
USER MANUAL V350 GODOX
natural_image
Line drawing of a Godox brand flash unit with top panel and base mount (no text or symbols on body)INSTRUCTION MANUAL 说明手册
中英文双语 / Chinese English Bilingual
深圳市神牛摄影器材有限公司
GODOX Photo Equipment Co., Ltd.
地址/Add: 深圳市宝安区福海街道塘尾社区耀川工业区厂房2栋1层至4层、4栋1层至4层
1st to 4th Floor, Building 2/1st to 4th Floor, Building 4, Yaochuan Industrial Zone, Tangwei Community, Fuhai Street, Bao'an District, Shenzhen 518103, China
电话/Tel: +86-755-29609320(8062) 传真/Fax: +86-755-25723423
邮箱/E-mail: godox@godox.com http://www.godox.com
705-V350S0-00 Made in China
FC CE RoHS
在使用本产品之前:
Before using this product:
Please read this user manual carefully in order to ensure your safety and the proper operation of this product. Keep for future reference.
前言
在使用本产品之前:
natural_image
Collection of photography equipment including POS, camera, lamp, and cover (no visible text or symbols)电池
- 特性
natural_image
Diagram of a camera with control panel and directional arrow (no text or symbols)1 拆卸电池
natural_image
Mechanical assembly diagram showing a component with a downward arrow indicating motion (no text or symbols present)2 安装电池。
natural_image
Mechanical assembly diagram showing a component with an arrow indicating direction (no text or symbols present)- 电池电量指示
natural_image
Four-step mechanical assembly diagram showing progressive assembly of a component (no text or symbols)快门同步设置
2 设置闪光输出
- 旋转调节旋钮为闪光组设定闪光输出。
拍摄照片
- 各组以设定的闪光光比闪光。
7、Multi:手动无线闪光拍摄
1 设定频闪模式。
神牛2.4G无线漏闪原因及解决办法
natural_image
Illustration of a flatbed device with a mesh cover and a handle, showing an upward arrow (no text or symbols)natural_image
Diagram showing a device with a screen and a lid, no text or symbols present2 推入广角散光板。
natural_image
Technical line drawing of a rectangular device with a mesh grille and side brackets (no text or symbols)使用广角散光板
Thank you for purchasing this product.
This V350S camera flash applies to SONY series cameras and is compatible with TTL autoflash. With this TTL compatible flash, your shooting will become simpler. You can easily achieve a correct flash exposure even in complex light-changing environments. This camera flash features:
• GN36 (m ISO 100, @105mm).
- Pro 2000mAh Li-ion Battery -- 0.1s\~1.7s recycle — over 500 full power pops.
- Fully support Sony TTL camera flash. Workable as Master or Slave unit in a wireless flash group.
- With built-in 2.4GHz wireless remote system to support transmitting and receiving.
- Provided multiple functions, include manual flash, multi flash, HSS (up to 1/8000s), rear curtain sync, FEC, etc.
- Support with firmware upgrade.

Warning
▲ Always keep this product dry. Do not use in rain or in damp conditions.
Do not disassemble. Should repairs become necessary, this product must be sent to an authorized maintenance center.
Keep out of reach of children.
▲ Stop using this product if it breaks open due to extrusion, falling or strong hit. Otherwise, electric shock may occur if you touch the electronic parts inside it.
Do not fire the flash directly into the eyes (especially those of babies) within short distances. Otherwise visual impairment may occur.
Do not use the flash unit in the presence of flammable gases, chemicals and other similar materials. In certain circumstance, these materials may be sensitive to the strong light emitting from this flash unit and fire or electromagnetic interference may result.
Do not leave or store the flash unit if the ambient temperature reads over 50°C. Otherwise the electronic parts may be damaged.
⚠ Turn off the flash unit immediately in the event of malfunction.
VING Pioneering Li-ion Camera Flash
Conventions used in this Manual
- This manual is based on the assumption that both the camera and camera flash's power switches are powered on.
- Reference page numbers are indicated by "p.**".
- The following alert symbols are used in this manual:
The Caution symbol gives supplemental information.
The Note symbol indicates a warning to prevent shooting problem.
Contents
27 Foreword
28 Warning
31 Name of Parts
Body
Control Panel
LCD Panel
What's in the Box of V350S?
Separately Sold Accessories
33 Battery
35 Attaching to a Camera
35 Power Management
36 Flash Mode: TTL Autoflash
FEC (Flash Exposure Compensation)
Shutter Sync Setting
38 Flash Mode - M: Manual Flash
39 Flash Mode – Multi: Stroboscopic Flash
40 Wireless Flash Shooting: Radio (2.4G) Transmission
Wireless Settings
Setting Master Unit's Flash Mode
Setting the Communication Channel
Wireless ID Settings
TTL: Fully Automatic Wireless Flash Shooting
M: Wireless Flash Shooting with Manual Flash
Multi: Wireless Flash Shooting with Manual Flash
45 Other Applications
Auto Focus Assist Beam
Bounce Flash
Creating a Catchlight
ZOOM: Setting the Flash Coverage and Using the Wide Panel
Low Battery Indicator
47 C.Fn: Setting Custom Functions
48 Protection Function
49 Firmware Upgrade
49 Technical Data
51 Troubleshooting
52 Compatible Camera Models
52 Maintenance
Name of Parts
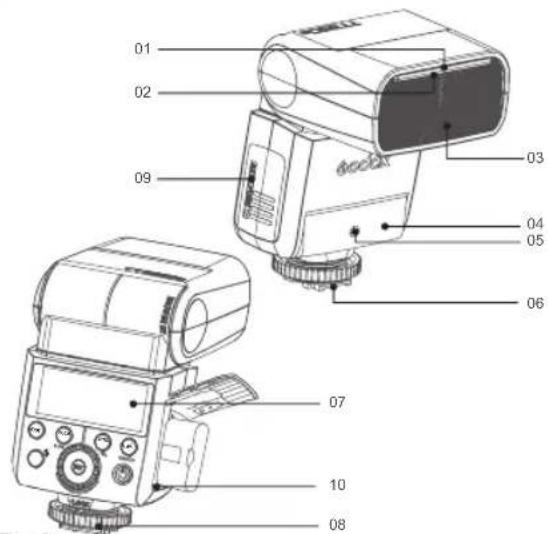
- Body
-
Catchlight Panel
-
Hotshoe
-
Built-in Wide Panel
-
LCD Panel
-
Flash Head
-
Lock Ring
-
Optic Control Sensor
-
Battery Compartment
-
Focus Assist Beam
-
USB Port
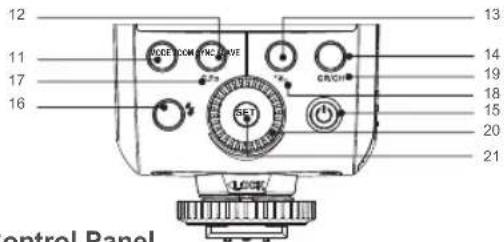
- Control Panel
Mode Selection Button
press for 2 seconds)
Zoom Selection Button
< *Z> Wireless Selection
13.
Button (reusable button, long press for 2 seconds)
-
S1/S2 Optic Slave Triggering Selection Button (in non-wireless mode) -
Group/Channel Button (reusable button, in wireless mode) -
< ⏻ > Power Switch
-
< 4 > Test Button / Flash Ready20. Select Dial Indicator.
-
< SET> Set
-
Custom Function Setting Button (reusable button, long -
Set Button
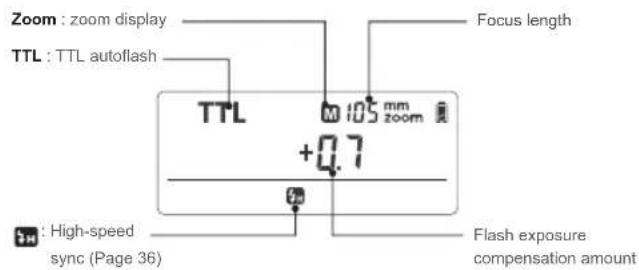
- LCD Panel
(1) TTL Autoflash
(2)M Manual Flash
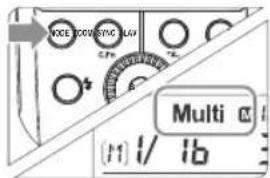
(3)Multi Flash
(4) Radio Transmission Shooting
- Slave Unit
• What's in the Box of V350S?
-
Flash unit 2. Mini stand 3. Protection case 4. Diffuser
-
Li-ion battery pack 6. Battery charger 7. Battery charger cable
-
Instruction manual
• Separately Sold Accessories
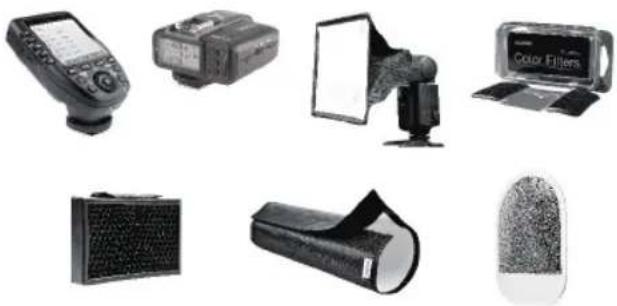
The product can be used in combination with the following accessories sold separately, so as to achieve best photography effects: XPro, X1T-S wireless flash trigger, Mini softbox, White & Silver reflector, Honeycomb, Color gels, Snoot, etc.
natural_image
Collection of photography equipment including POS, camera, lamp, screen, and film (no visible text or symbols)Battery
- Features
- This flash unit uses Li-ion polymer battery which has long runtime. The available charge-and-discharge times are 500.
- It is reliably safe. The inner circuit is against overcharge, overdischarge, overcurrent, and short circuit.
- Take only 2.5 hours to fully charge the battery by using the standard battery charger.
- Cautions
- Do not short circuit.
- Do not expose to rain or immerse into water. This battery is not water proof.
- Keep out of reach of children.
- No over 24 hours' continuous charging.
- Store in dry, cool, ventilated places.
- Do not put aside or into fire.
- Dead batteries should be disposed according to local regulations.
- Please charge the battery to approx. 60% before being placed for long time.
- If the battery had ceased using for over 3 months, please make a full recharge.
- Loading and Unloading the Battery
natural_image
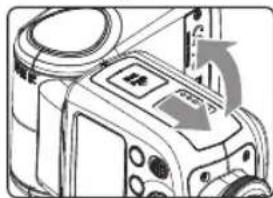
Diagram of a camera module with directional arrows indicating motion (no text or symbols)1 To load the battery, push the battery compartment cover downward and open it, and the battery pack will pop out.
natural_image
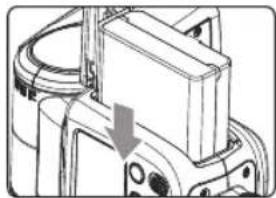
Mechanical assembly diagram showing a component with a downward arrow indicating motion (no text or symbols present)2 To load the battery, according to the triangle sign on the battery pack, insert it into the compartment until it is locked. Then close the compartment.

natural_image
Mechanical assembly diagram showing a rotating component with a curved arrow indicating motion (no text or symbols)- Battery Level Indication
Make sure the battery pack is securely loaded in the flash. Check the battery level indication on the LCD panel to see the remaining battery level.
| Battery Level Indication | Meaning |
| 2 grids | Full |
| 1 grid | Middle |
| Blank grid | Low |
| Blinking | The battery level is going to be used out immediately. And the flash will auto power off in 1 minute.Note: Please recharge the battery as soon as possible (within 10 days). Then, the battery can be used or be placed for long period. |
Attaching to a Camera
natural_image
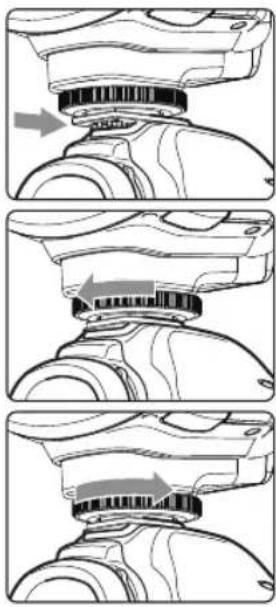
Three-step diagram showing mechanical assembly steps with arrows indicating motion (no text or symbols)1 Attach the Camera Flash. • Slip the camera flash's mounting foot into the camera's hotshoe all the way.
2 Secure the Camera Flash. • Rotate the lock ring on the mounting foot until it locks up.
3 Detach the Camera Flash. - Rotate the lock ring on the mounting foot until it is loosened.
Power Management
Use ⏻ Power Switch to power the flash unit on (Long press the button for one second) or off. Turn off if it will not be used for an extended period of time. Setting as a master flash, it will turn the power off automatically after a certain period (approx. 90 seconds) of idle use. Pressing the camera shutter halfway or pressing any flash button will wake up the flash unit. Setting as a slave flash, it will enter sleep mode after a certain period (adjustable, 60 minutes by default) of idle use. Pressing any flash button will wake it up.
C.Fn Disabling Auto Power Off function is recommended when the flash is used off camera. (C.Fn-ST, Page 47)
Flash Mode: TTL Autoflash
This flash has three flash modes: TTL, Manual (M), and Multi (Stroboscopic). In TTL mode, the camera and the flash will work together to calculate the correct exposure for the subject and the background. In this mode, multiple TTL functions are available: FEC, HSS, second curtain sync, etc.
* Press
TTL Mode
Press
- Press the camera release button halfway to focus.
- When the shutter button is fully pressed, the flash will fire a pre-flash that the camera will use to calculate exposure and flash output the instant before the photo is taken.
Display"HI": When the flash output value is up to the maximum value, "HI" will be displayed and blinking for 3 seconds. Adjust the camera's parameters if underexposure appears.
Display"Lo": When the flash output value is up to the minimum value, "Lo" will be displayed and blinking for 3 seconds. Adjust the camera's parameters if overexposure appears.
FEC: Flash Exposure Compensation
With FEC function, this flash can adjust from -3 to +3 in 1/3rd stops. It is useful in situations where minor adjusting of the TTL system is needed based on the environment.
Setting FEC:
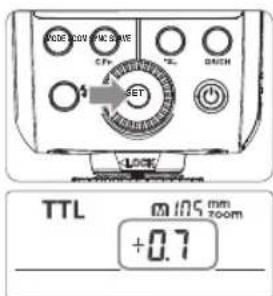
1 Press the SET Button and the flash exposure compensation amount will be highlighted on the LCD panel.
2 Turn the Select Dial to set the amount.
- "0.3" means 1/3 step, "0.7" means 2/3 step.
- To cancel the flash exposure compensation, set the amount to “+0”.
3 Press < SET > button again to confirm the setting.
Shutter Sync Settings:
-
High-speed sync: press the
button and is displayed on the LCD panel. Press the MENU or shortcut Fn on Sony camera to enter Flash Mode and choose Fill-flash Then, set the camera shutter. -
Second-curtain sync: press the MENU or shortcut Fn on Sony camera to enter Flash Mode and choose REAR flash 📄 Then, set the camera shutter.
-
With high-speed sync, the faster the shutter speed, the shorter the effective flash range.
- Multi flash mode cannot be set in high-speed sync mode.
• Over-temperature protection may be activated after 15 consecutive high-speed sync flashes. - Try to avoid using high-speed sync flash, which will cut short flash tube's lifetime.
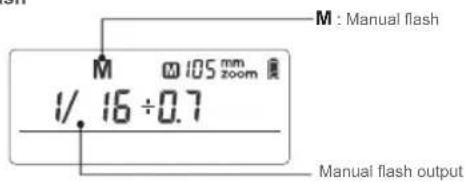
Flash Mode - M: Manual Flash
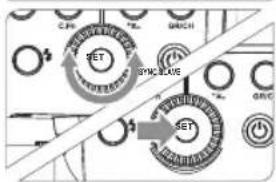
The flash output is adjustable from 1/1 full power to 1/128th power in 1/3rd stop increments. To obtain a correct flash exposure, use a hand-held flash meter to determine the required flash output.

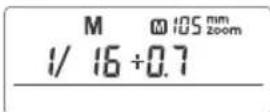
1 Press < MODE > button so that < M > is displayed.
2 Turn the Select Dial to choose a desired flash output amount. In high-speed sync mode, the adjustable flash range is 1/16\~1/1.
Flash Output Range
The following table makes it easier to see how the stop changes in terms of f/stop when you increase or decrease the flash output. For example, when you decrease the flash output to 1/2, 1/2-0.3, or 1/2-0.7, and then increase the flash output to more than 1/2, 1/2+0.3, 1/2+0.7, and 1/1 will be displayed.
Figures displayed when reducing flash output level→
| 1/1-0.3 | 1/1-0.7 | 1/2-0.3 | 1/2-0.7 | 1/41 | ...... | ||
| 1/2+0.7 | 1/2+0.3 | 1/4+0.7 | 1/4+0.3 | 21/1 |
Figures displayed when increasing flash output level
In the M mode, high-speed sync and rear curtain sync functions can be achieved.
Optical S1 Secondary Unit Setting
In M manual flash mode, press the
Optical S2 Secondary Unit Setting
Press the
- S1 and S2 optic triggering and off camera high-speed mode are only available in M manual flash mode.
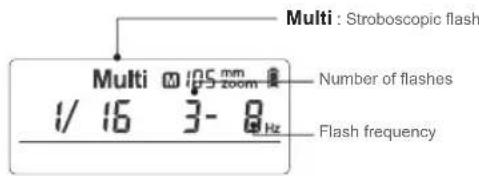
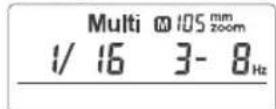
Flash Mode – Multi: Stroboscopic Flash
With stroboscopic flash, a rapid series of flashes is fired. It can be used to capture a multiple images of a moving subject in a single photograph.
You can set the firing frequency (number of flashes per sec. expressed as Hz), the number of flashes, and the flash output.
1 Press
2 Turn the Select Dial to choose a desired flash output.
3 Set the flash frequency and flash times.
- Press the SET Button to select the flash frequency. Turn the Select Dial to set the number.
- Press the SET Button again to select the flash times. Turn the Select Dial to set the number.
Calculating the Shutter Speed
During stroboscopic flash, the shutter remains open until the firing stops. Use the formula below to calculate the shutter speed and set it with the camera.
Number of Flashes / Flash Frequency = Shutter Speed
For example, if the number of flashes is 10 and the firing frequency is 5 Hz, the shutter speed should be at least 2 seconds.
To avoid overheating and deteriorating the flash head, do not use stroboscopic flash more than 10 times in succession. After 10 times, allow the camera flash to rest for at least 15 minutes. If you try to use the stroboscopic flash more than 10 times in succession, the firing might stop automatically to protect the flash head. If this happens, allow at least 15 minutes' rest for the camera flash.
- Stroboscopic flash is most effective with a highly reflective subject against a dark background.
• Using a tripod and a remote control is recommended.
- Stroboscopic flash can be used with "buLb".
- If the number of flashes is displayed as “--”, the firing will continue until the shutter closes or the battery is exhausted. The number of flashes will be limited as shown by the following table.
Maximum Stroboscopic Flashes:
| Flash output\Hz | 1 | 2 | 3 | 4 | 5 | 6-7 | 8-9 | 10 | 20-50 | 60-99 |
| 1/4 | 6 | 3 | 2 | 2 | 2 | 2 | 2 | 2 | 2 | 2 |
| 1/8 | 14 | 14 | 6 | 4 | 3 | 3 | 3 | 2 | 2 | 2 |
| 1/16 | 30 | 30 | 30 | 20 | 10 | 8 | 5 | 3 | 3 | 3 |
| 1/32 | 60 | 60 | 60 | 50 | 50 | 40 | 12 | 5 | 5 | 5 |
| 1/64 | 90 | 90 | 90 | 80 | 80 | 70 | 60 | 20 | 10 | 10 |
| 1/128 | 90 | 90 | 90 | 90 | 90 | 90 | 80 | 70 | 30 | 20 |
Wireless Flash Shooting: Radio (2.4G) Transmission
- You can set up three slave groups for TTL autoflash shooting. With TTL autoflash, you can easily create various lighting effects.
- Any flash settings for the slave units on the master flash in TTL mode will be automatically sent to the slave units. So the only thing you need to do is to set the master unit for each slave group without any operation for the slave units at all during the shooting.
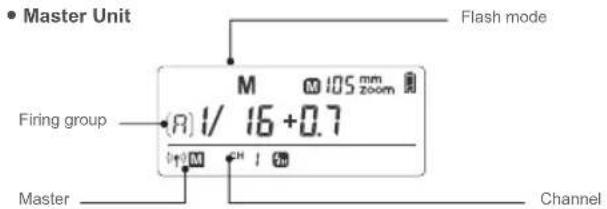
- This flash can work in TTL /M /Multi / OFF flash modes when set as a master unit.
When using Godox 2.4G wireless X system, V350S is perfectly compatible with other products of our company.
As a master unit, V350S can control the following slave unit models: AD600, AD600M, AD360II-C, AD360II-N, V860IIS, V850II, TT685S, TT600.
As a slave unit, V350S can be controlled by the following master unit models: XPro, X1T-S, V860IIS, V850II, TT685S, TT600.
- Even with multiple slave units, the master unit can control all of them via wireless.
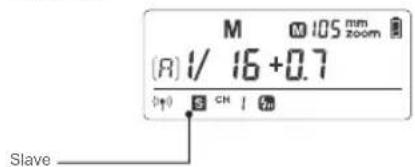
- In this user manual, "master unit" refers to the camera flash on a camera and "slave unit" will be controlled by the master unit.
1. Wireless Settings
You can switch between normal flash and wireless flash. For normal flash shooting, be sure to set the wireless setting to OFF.
Master Unit Setting
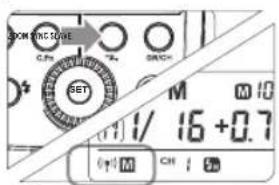
1 Long Press the
Slave Unit Setting
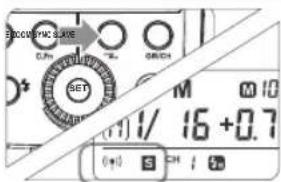
1 Long Press the
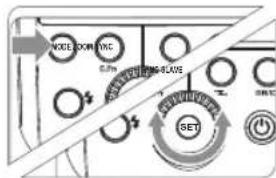
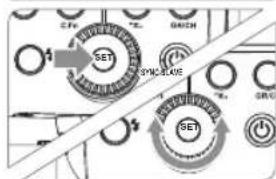
2. Setting Master Unit's Flash Mode
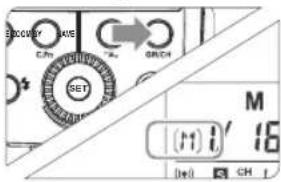
1 Press the
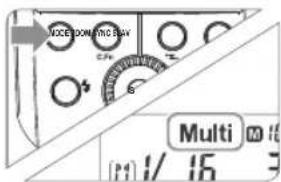
2 Press the
3. Setting the Communication Channel
If there are other wireless flash systems nearby, you can change the channel IDs to prevent signal interference. The channel IDs of the master unit and the slave unit(s) must be set to the same.
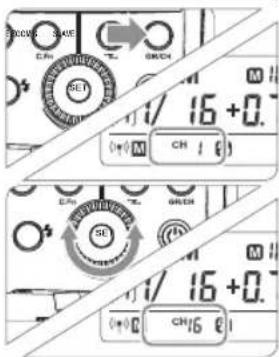
1 Long press the
2 Press the
4. Wireless ID Settings
Change the wireless channels and wireless ID to avoid interference for it can only be triggered after the wireless IDs and channels of the master unit and the slave unit are set to the same. Press the
- 深圳市神牛摄影器材有限公司
- 在使用本产品之前:
- 前言
- 电池
- - 特性
- 拆卸电池
- 安装电池。
- - 电池电量指示
- 快门同步设置
- 设置闪光输出
- 拍摄照片
- 7、Multi:手动无线闪光拍摄
- 设定频闪模式。
- 神牛2.4G无线漏闪原因及解决办法
- 使用广角散光板
- Thank you for purchasing this product.
- Warning
- VING Pioneering Li-ion Camera Flash
- Conventions used in this Manual
- Contents
- - Body
- - Control Panel
- - LCD Panel
- • What's in the Box of V350S?
- • Separately Sold Accessories
- Battery
- - Features
- - Cautions
- - Loading and Unloading the Battery
- - Battery Level Indication
- Attaching to a Camera
- Power Management
- Flash Mode: TTL Autoflash
- TTL Mode
- FEC: Flash Exposure Compensation
- Shutter Sync Settings:
- Flash Mode - M: Manual Flash
- Flash Output Range
- Optical S1 Secondary Unit Setting
- Optical S2 Secondary Unit Setting
- Flash Mode – Multi: Stroboscopic Flash
- Calculating the Shutter Speed
- Number of Flashes / Flash Frequency = Shutter Speed
- Wireless Flash Shooting: Radio (2.4G) Transmission
- Wireless Settings
- Master Unit Setting
- Slave Unit Setting
- Setting Master Unit's Flash Mode
- Setting the Communication Channel
- Wireless ID Settings
- TTL: Fully Automatic Wireless Flash Shooting
- Autoflash Shooting with One Slave Unit
- Master Unit Setting
- Slave Unit Setting
- Check the communication channel
- Position the camera and flashes
- Check the flash operation
- M: Wireless Flash Shooting with Manual Flash
- Setting the flash mode to
- Taking the picture
- Multi: Wireless Flash Shooting with Manual Flash
- Setting
- Setting flash output/flash frequency/flash times.
- Slave/Master Unit's Positioning and Operation Range
- Wireless Multiple Flash Shooting
- The Reason & Solution of Not Triggering in Godox 2.4G Wireless
- Other Applications
- Auto Focus Assist Beam
- Bounce Flash
- Creating a Catchlight
- ZOOM: Setting the Flash Coverage and Using the Wide Panel
- Using the Wide Panel
- Low Battery Warning
- C.Fn: Setting Custom Functions
- Protection Function
- Over-Temperature Protection
- Other Protections
- Firmware Upgrade
- Troubleshooting Compatible Camera Models
- The Camera Flash cannot be charged.
- The Camera Flash does not fire.
- The power turns off by itself.
- Auto zoom does not work.
- The flash exposure is underexposed or overexposed.
- Photos have dark corners or only parts of the target subject are illuminated.
- Maintenance
- FCC Statement
Brand : GODOX
Model : V350
Category : Flash