
H1n - Dictaphone ZOOM - Free user manual and instructions
Find the device manual for free H1n ZOOM in PDF.


| Product Type | Handy Recorder (Dictaphone) |
| Dimensions (W × D × H) | 50.0 mm × 137.5 mm × 32.0 mm |
| Weight | 60 g (main unit only) |
| Power Supply | 2 AAA batteries (alkaline, NiMH, or lithium) or AC adapter (ZOOM AD-17, DC 5V/1A) |
| Battery Life (approx.) | 10 hours with alkaline batteries (built-in mic, 44.1 kHz/16-bit) |
| Recording Media | microSD/microSDHC cards (Class 4 or higher, up to 32 GB) |
| Recording Formats | WAV (44.1/48/96 kHz, 16/24-bit) and MP3 (48-320 kbps) |
| Built-in Microphone | 90° XY stereo mic, 120 dB SPL maximum input, matched pair |
| Inputs | MIC/LINE IN (stereo mini jack, plug-in power 2.5V) |
| Outputs | Combined PHONE/LINE OUT (stereo mini jack), built-in speaker (500 mW, 8Ω) |
| Display | 1.25" monochrome LCD (96×64) with REC LED (red) |
| USB | microUSB (USB 2.0 High Speed, mass storage and audio interface) |
| Audio Interface | USB class compliant, asynchronous transfer, 44.1/48 kHz, 16-bit, 2-in/2-out |
| Key Features | Auto REC, Pre-REC, Self-timer, Sound Mark, Overdubbing, Speed adjustment (×0.5-×2.0), A-B Repeat, Play Mode with effects, Limiter, Lo-cut filter, Auto level |
| Cleaning | Soft cloth; use damp cloth if needed; no abrasive cleaners, wax, or solvents |
| Safety Precautions | Use specified batteries only, avoid extreme temperatures/humidity, don't disassemble, use low volume to prevent hearing damage |
| Repair and Parts | Contact ZOOM service; no user-serviceable parts inside; firmware updates available |
| General Info | Manufacturer: ZOOM Corporation; manual copyright 2017; FCC Class B compliant; EU Declaration of Conformity |
Frequently Asked Questions - H1n ZOOM
User questions about H1n ZOOM
0 question about this device. Answer the ones you know or ask your own.
Ask a new question about this device
Download the instructions for your Dictaphone in PDF format for free! Find your manual H1n - ZOOM and take your electronic device back in hand. On this page are published all the documents necessary for the use of your device. H1n by ZOOM.
USER MANUAL H1n ZOOM
You must read the Usage and Safety Precautions before use.
© 2017 ZOOM CORPORATION
Copying or reprinting this manual in part or in whole without permission is prohibited.
Usage and Safety Precautions
In this operation manual, symbols are used to highlight warnings and cautions that you must read to prevent accidents. The meanings of these symbols are as follows.
| WARNING\Something that could cause serious injury or death | CAUTION\Something that could cause injury or damage to the equipment |
Other symbols used
| ! An action that is mandatory An action that is prohibited |

WARNING
■ Operation with batteries
Use 2 commercially-available AAA batteries (alkaline dry cell batteries, NiMH batteries or lithium dry cell batteries).
① Carefully study the warning indications of the batteries before use.
Always keep the battery and SD card covers closed during use.
■ Alterations
Do not open the case or modify the product.

CAUTION
■ Product handling
Do not drop, bump or apply excessive force to the unit.
! Be careful not to allow foreign objects or liquids to enter the unit.
■ Battery handling
Install batteries with the correct +/- orientations.
Use the specified batteries.
Do not use new and old batteries together. Do not use batteries of different brands or types together.
Remove the batteries when the unit will not be used for a long time.
If a leak occurs, thoroughly wipe the battery case and battery terminals to remove the leaked fluid.
■ Operating environment
Do not use in extremely high or low temperatures.
Do not use near heaters, stoves and other heat sources.
Do not use in very high humidity or where it could be splashed by water.
Do not use in places with frequent vibrations.
Do not use in places with much dust or sand.
Volume
Do not use at a loud volume for a long time.
■ Interference with other electrical equipment
In consideration of safety, the H1n been designed to minimize its emission of electromagnetic waves and to suppress interference from external electromagnetic waves. However, equipment that is very susceptible to interference or that emits powerful electromagnetic waves could result in interference if placed nearby. If this occurs, place the H1n and the other device farther apart.
With any type of electronic device that uses digital control, including the Halotromagnetic interference could cause malfunction, corrupt or destroy data and result in other unexpected trouble. Always use caution.
Cleaning
Use a soft cloth to clean the exterior of the unit if it becomes dirty. If necessary, use a damp cloth that has been wrung out well to wipe it.
Never use abrasive cleansers, wax or solvents such as alcohol, benzene or paint thinner.
■ Breakdown and malfunction
If the unit becomes broken or malfunctions, immediately disconnect the AC adapter, turn the power off and disconnect other cables. Contact the store where you bought the unit or ZOOM service with the following information: product model, serial number and specific symptoms of breakdown or malfunction, along with your name, address and telephone number.
■ Copyrights
- Windows ^ is a trademark or registered trademark of Microsoft ^ Corporation.
• Mac OS is a trademark or registered trademark of Apple Inc. - iOS is a trademark or registered trademark of Cisco Systems, Inc. (USA).
- The microSDHC logo is a trademark.
- Other product names, registered trademarks and company names in this document are the property of their respective companies.
Note: All trademarks and registered trademarks in this document are for identification purposes only and are not intended to infringe on the copyrights of their respective owners.
Recording from copyrighted sources, including CDs, records, tapes, live performances, video works and broadcasts, without permission of the copyright holder for any purpose other than personal use is prohibited by law.
Zoom Corporation will not assume any responsibility related to infringements of copyrights.
FCC regulation warning (for U.S.A.)
This equipment has been tested and found to comply with the limits for a Class B digital device, pursuant to Part 15 of the FCC Rules. These limits are designed to provide reasonable protection against harmful interference in a residential installation. This equipment generates, uses, and can radiate radio frequency energy and, if not installed and used in accordance with the instructions, may cause harmful interference to radio communications. However, there is no guarantee that interference will not occur in a particular installation. If this equipment does cause harmful interference to radio or television reception, which can be determined by turning the equipment off and on, the user is encouraged to try to correct the interference by one or more of the following measures:
- Reorient or relocate the receiving antenna.
- Increase the separation between the equipment and receiver.
- Connect the equipment into an outlet on a circuit different from that to which the receiver is connected.
- Consult the dealer or an experienced radio/TV technician for help.
For EU Countries

Declaration of conformity
Introduction
Thank you very much for purchasing a ZOOM H1andy Recorder (hereafter, ""). H1n
The H1as the following features.
90° XY mic
The 90° XY mic captures three-dimensional images of sound.
This stereo mic uses a matched pair and can handle a maximum sound pressure of 120 dB SPL, enabling it to record clearly without distortion even during band rehearsals and club performances.
Straightforward interface
The input level can be adjusted simply by turning a dial, and recording settings can be changed without complicated procedures.
After learning it once, the simple user interface allows settings to be made without hassle.
Display with great visibility and language localization
The full-dot display allows the interface to change as needed.
Moreover, parameter names, messages and other information can be shown in the set language using the capabilities of this display.
USB audio interface that uses asynchronous transfer
The asynchronous transfer system used is not impacted by computer jitter, enabling faithful reproduction of the original sound.
Additional recording functions from other models
The features include automatic recording that monitors the input level to determine when to start, pre-recording to prevent missing beginnings, and sound marks that are useful for synchronizing with external equipment.
The H1n also has a new self-timer function that is convenient when recording alone.
Overdubbing function
New sounds can be recorded over existing recordings nondestructively.
Since a new file is created and the original file is left unchanged, you can overdub without worrying about mistakes.
Advanced playback functions
Speed adjustment, A-B repeat, playback position skipping and other functions are useful for transcribing, studying and learning pieces of music. This recorder is useful even after recording.
Usage and Safety Precautions Introduction Names of parts Display overview
Preparations
Providing power Inserting microSD cards Turning the power on/off Setting the language shown Setting the date and time Preventing misoperation
Recording
Adjusting input levels Selecting the recording format Reducing noise Setting the limiter Recording Using additional recording functions Adjusting connected equipment levels (playing test tones) Overdubbing Monitoring recording Using external mics
Playback
Playing recordings Adjusting the volume Using repeat playback Deleting marks Checking file information Using additional playback functions
Working with files
Deleting files
Using USB functions
Connecting with other devices Using as a card reader Using as an audio interface
Making various settings
Opening the SETTING screen Setting the date format Setting the display backlight Adjusting the display contrast Setting the type of battery used Setting the Auto Power Off function Setting how the counter appears Setting how files are named
Other functions
Formatting microSD cards Testing microSD card performance Checking the versions Restoring default setting values Updating the firmware Adding languages
Troubleshooting
Specifications
Names of parts
Front
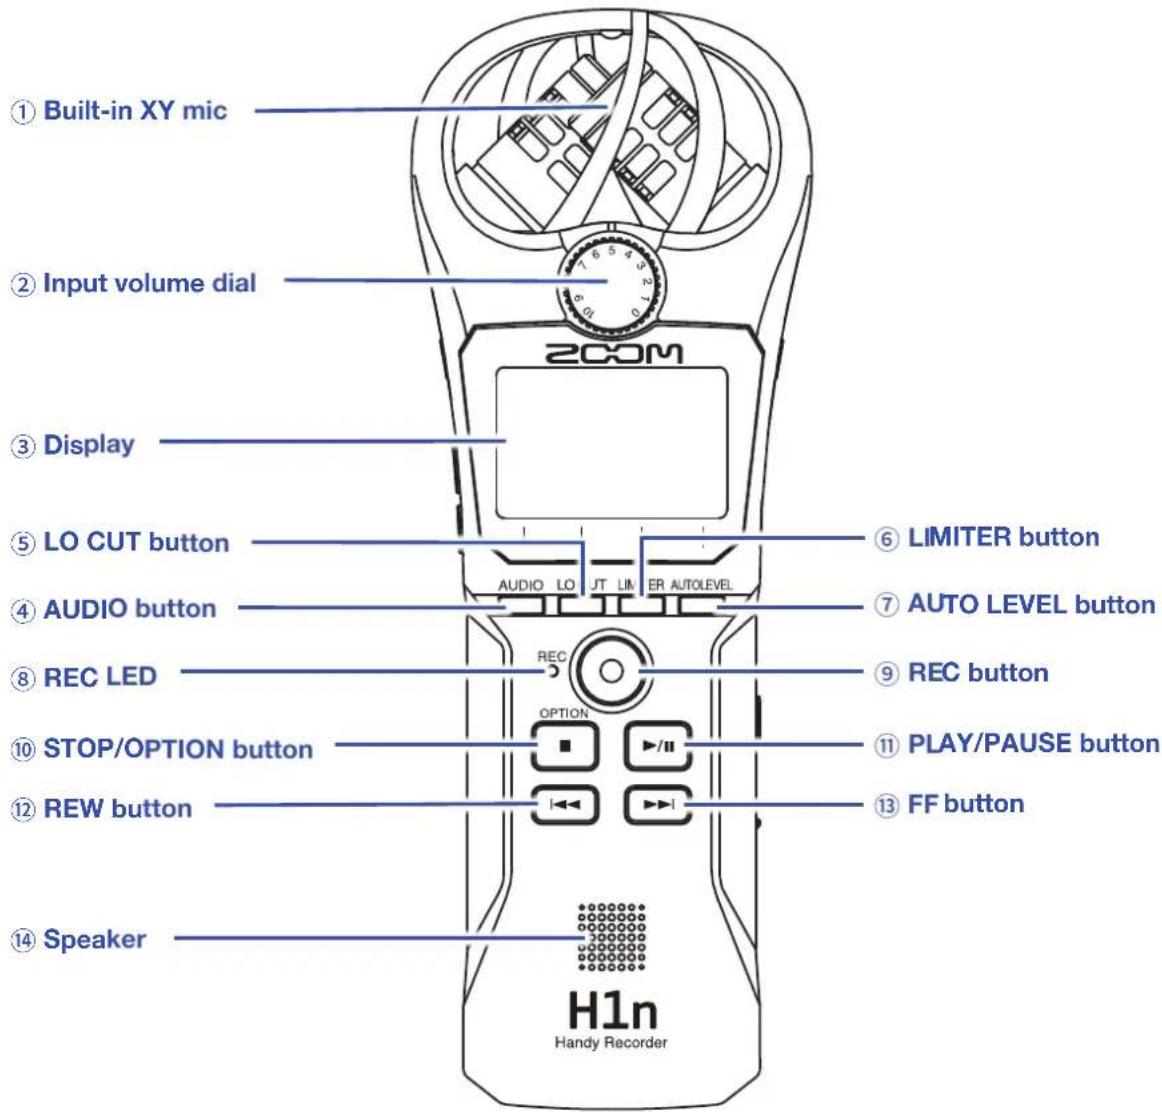
① Built-in XY mic
This has two crossing directional mics. This mic can record a three-dimensional sound with natural depth and width.
② Input volume dial
Use to adjust the input level.
③ Display
This shows various types of information.
④ AUDIO button
Use this to operate the function shown 1st from the left at the bottom of the display.
⑤ LO CUT button
Use this to operate the function shown 2nd from the left at the bottom of the display.
⑥ LIMITER button
Use this to operate the function shown 3rd from the left at the bottom of the display.
⑦ AUTO LEVEL button
Use this to operate the function shown 4th from the left at the bottom of the display.
⑧ REC LED
This lights during recording. It blinks rapidly when the input sound level is high.
⑨ REC button
Use to start recording.
⑩ STOP/OPTION button
Use to stop file playback and show various functions.
⑪ PLAY/PAUSE button
Use to start and pause playback of recorded files.
⑫ REW button
Use to skip files and search backward to a playback position.
⑬ FF button
Used to skip files and search forward to a playback position.
⑭ Speaker
Sound is output here during file playback.
■ Left and right sides
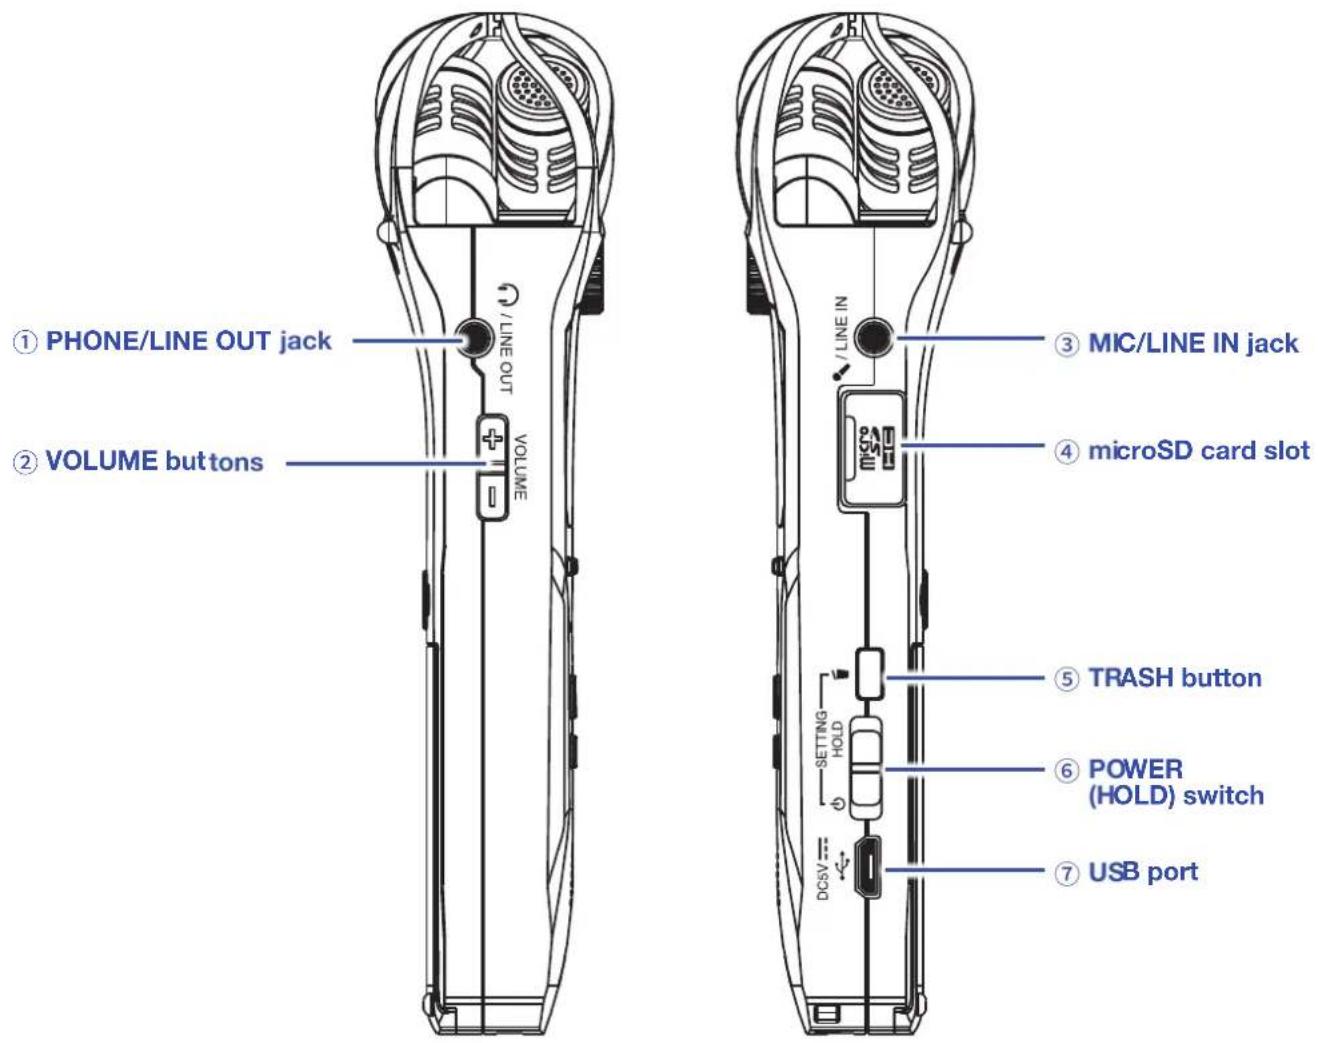
① PHONE/LINE OUT jack
This can output sound to headphones or a connected device.
② VOLUME buttons
Use to adjust the volume.
③ MIC/LINE IN jack
A connected mic can be used to record. Mics that require plug-in power can be used with this jack.
④ microSD card slot
Insert a microSD card here.
⑤ TRASH button
Use to delete recorded files.
⑥ POWER (HOLD) switch
Use this to turn the power ON/OFF and to disable button operation.
⑦ USB port
Connect this to a computer or iOS device to use the H1n as an audio interface or card reader.
Recording Screen
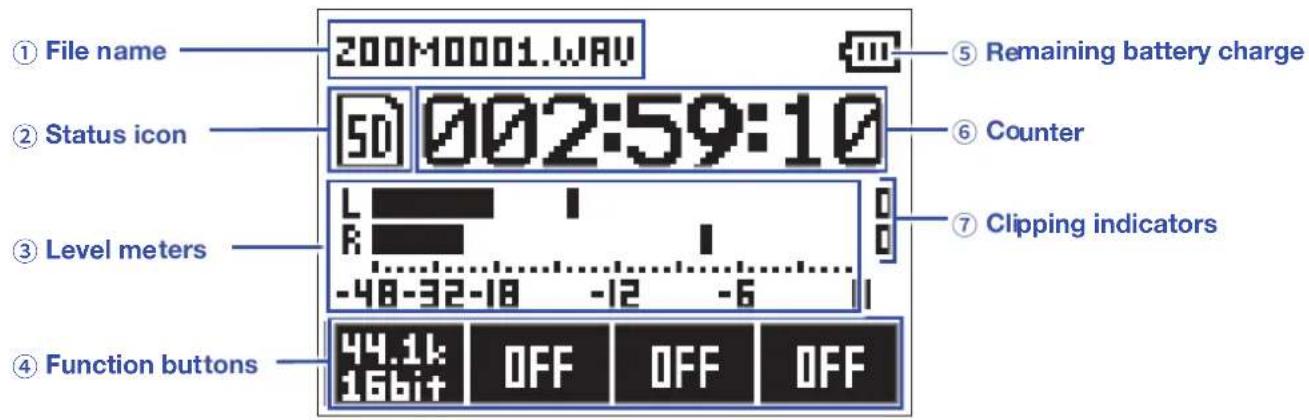
① File name
This shows the name of the file being recorded.
② Status icon
This shows the recording status.
50 Ready
Recording
II Paused
▶ Overdubbing ( "Overdubbing")
③ Level meters
These shows the current input levels.
④ Function buttons
These show functions that can be set on the Recording Screen.
From left to right, these correspond to ☐, ☐, ☐ and ☐
⑤ Remaining battery charge
This shows the remaining battery charge. When the remaining battery charge becomes low, replace the batteries ( "Using batteries") or connect an AC adapter ( "Using an AC adapter").
⑥ Counter
This shows either the current elapsed recording time or the remaining available recording time ( "Setting how the counter appears").
⑦ Clipping indicators
These appear lit when loud sounds are input. If the clipping indicators light, adjust the input level ( "Adjusting input levels") or set the limiter ( "Setting the limiter").
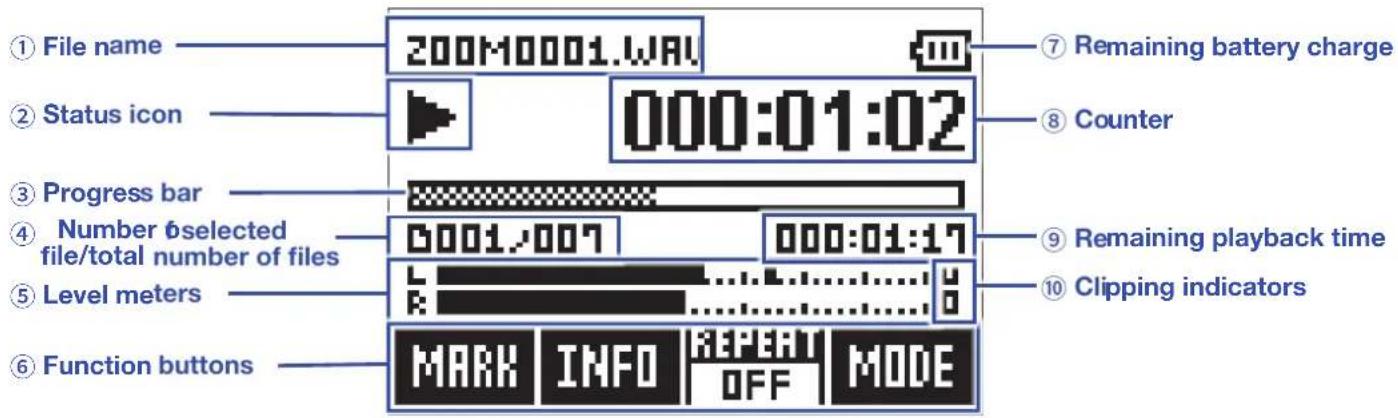
① File name
This shows the name of the file being played.
② Status icon
This shows the playback status.
Playing
Plused
Searching backward
Searching forward
K
Jumping to the previous file/mark
→
Jumping to the next file/mark
③ Progress bar
This shows the current playback location.
④ Number of selected file/total number of files
⑤ Level meter
These show the input levels of the playing audio.
⑥ Function buttons
These show functions that can be set on the Playback Screen.
From left to right, these correspond to



⑦ Remaining battery charge
This shows the remaining battery charge. When the remaining battery charge becomes low, replace the batteries ( "Using batteries") or connect an AC adapter ( "Using an AC adapter").
⑧ Counter
This shows the playback time from the file beginning.
⑨ Remaining playback time
This shows the remaining time of the playing file.
⑩ Clipping indicator
These appear lit when the output levels are high.
Providing power
Using batteries
- Turn the power off and then remove the battery cover.
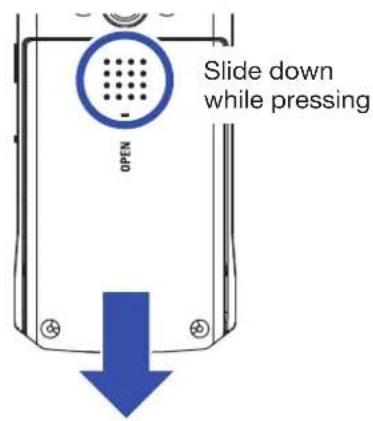
- Install the batteries.
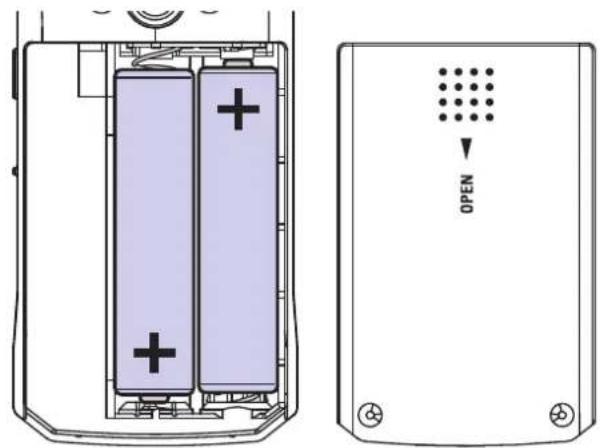
natural_image
Diagram of a battery pack with two internal batteries and an open panel showing a grid pattern (no text or symbols)- Replace the battery cover.
NOTE
- Use only one type of battery (alkaline, NiMH or lithium) at a time.
- If the remaining battery power indicator becomes 0, turn the power off immediately and install new batteries.
-
After installing the batteries, set the battery type correctly (→ "Setting the type of battery used").
-
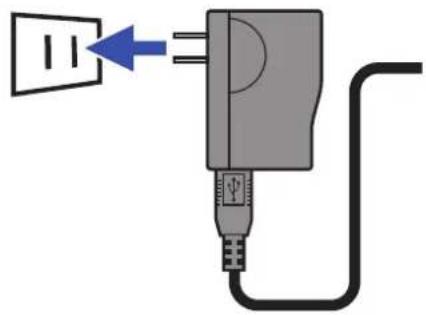
Connect the cable of an AD-17 AC adapter to the USB port.
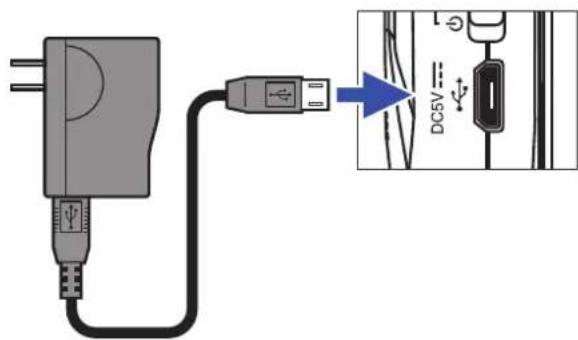
- Plug the AC adapter into an outlet.
natural_image
Diagram of a plug with a blue arrow pointing to its left port, connected to a black cable (no text or symbols)Inserting microSD cards
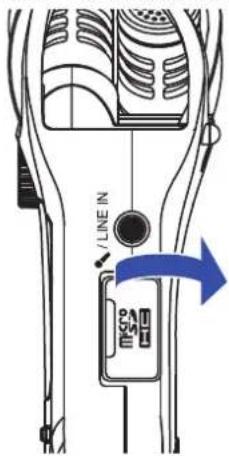
- Turn the power off and then open the microSD card slot cover.
- Insert the microSD card into the card slot.
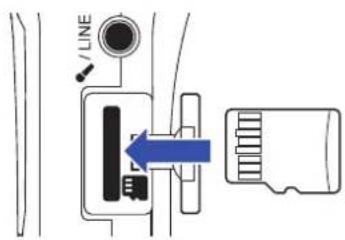
To remove a microSD card, push it further into the slot and then pull it out.
- Close the microSD card slot cover.
NOTE
- Always make certain that the power is off when inserting or removing a microSD card. Inserting or removing a card while the power is on could result in data loss.
- When inserting a microSD card, be sure to insert the correct end with the top side up as shown.
- Recording and playback are not possible when a microSD card is not loaded in the H1n
• To format a microSD card, see "Formatting microSD cards".
Turning the power on/off
Turning the power on
1. Slide toward .
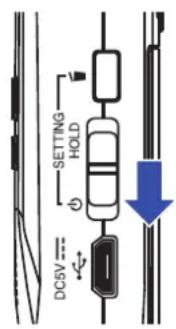
This turns the power on and opens the Recording Screen.
NOTE
- The first time you turn the power on after purchase, you must set the language
(→ "Setting the language shown") and the date/time (→ "Setting the date and time"). - If "No SD Card!" appears on the display, confirm that a microSD card is inserted properly.
- If "Invalid SD Card!" appears on the display, the card is not formatted correctly. Format the microSD card
(→ "Formatting microSD cards") or use a different microSD card (→ "Inserting microSD cards").
Turning the power off
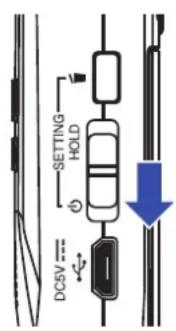
1. Slide toward .
NOTE
Keep sliding the switch until "Goodbye See You!" appears.
Setting the language shown
Set the language shown on the display.
- While pressing, turn the power on.
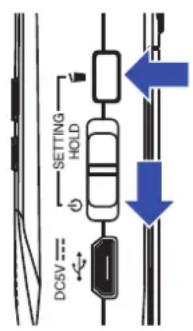
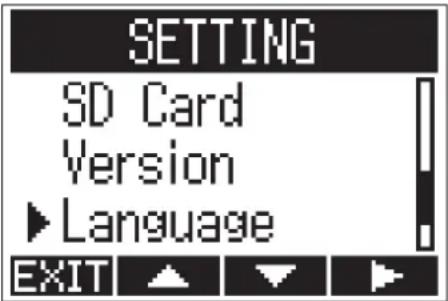
This opens the SETTING screen.
- Use LOCUT and to select "Language", and press.
AUTOLEVEL

- Press LOCUT or to LIMITER to select the language to use, and press.
AUTOLEVEL

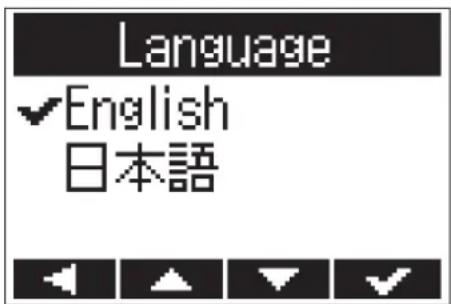
This completes setting the language.
HINT
The first time you turn the power on after purchase, this screen opens automatically.
Setting the date and time
Set the date and time so the recorder can add this data to recording files.
- While pressing, turn the power on.
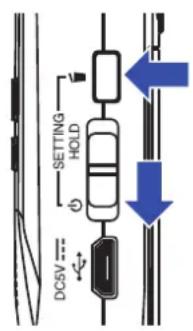
This opens the SETTING screen.
- Use LOCUT and to select "Date/Time", and press
AUTOLEVEL
.
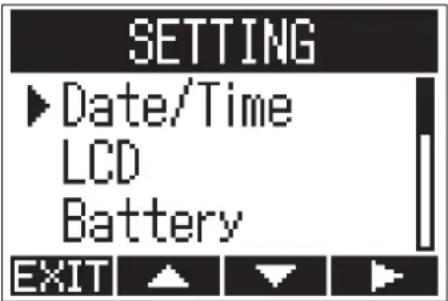
- Use LOCUT and to select "Set Date/Time", and press
AUTOLEVEL
.
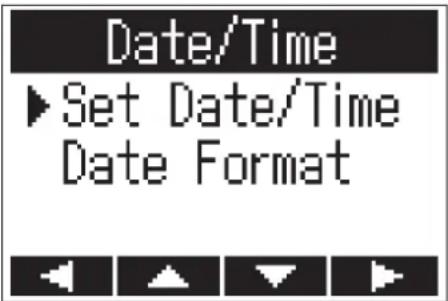
4. Use AUDIO and to move the cursor.
![Set Date/Time YYYY MM DD 2017, 08, 01 [00] 00 ■STOP:CANCEL REC:OK](/content/2026/05/883178/images/12177c8847d7db5b4f0febb14e9b164cde4d6992ff41045c83fda4271a07b493.jpg)
HINT
The first time you turn the power on after purchase, this screen opens automatically after you set the language used.
5. Use LOCUT and to change the value selected by the cursor.
![Set Date/Time YYYY MM DD 2017 08 01 [12] 00 ■STOP:CANCEL ●REC:OK](/content/2026/05/883178/images/308a67250b402ee30209b4a87159aa8ad7b1f1bdca0d0c00f6119ea20e473162.jpg)
6. Press
This completes setting the date and time.
Preventing misoperation
Misoperation during recording can be prevented by using the HOLD function to disable use of the Huntons.
Activating the HOLD function
- Slide ⏻ HOLD to HOLD.
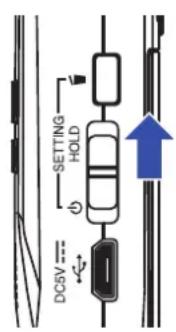
Deactivating the HOLD function
- Slide black to the middle.
Adjusting input levels
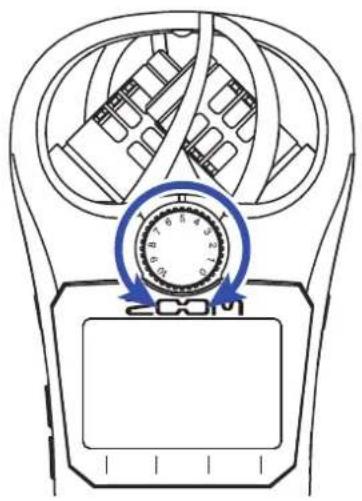
Adjusting levels manually
1. Turn the input volume dial.
natural_image
Diagram of a mechanical device with a dial indicator and circular motion arrows, no readable text or symbols present.HINT
- Adjust so that the peak level stays around -12dB .
- If the sound distorts even when you lower the input level, try changing mic positions and adjusting the output levels of connected devices.
- To cut noise from wind and other sources during recording, see "Reducing noise".
- To stop input signal clipping, see "Setting the limiter".
NOTE
If the REC LED is blinking, the sound could be distorted, so lower the input level.
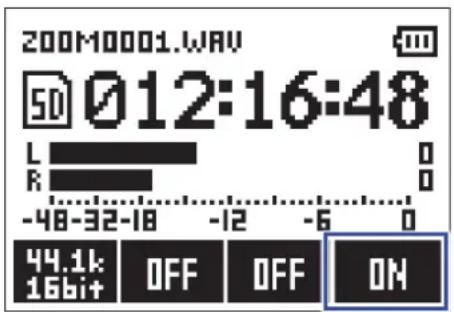
This function automatically adjusts the input level according to the input signal.
1. Press AUTOLEVEL to select ON.
NOTE
When automatic level adjustment is ON, turning the input volume dial has no effect.
Selecting the recording format
The recording format can be selected in consideration of audio quality and file size.
1. Press to select the recording format.
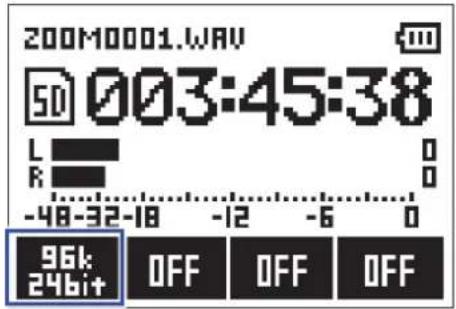
The display shows the selected recording format and the remaining possible recording time.
The following recording formats can be set.
| Setting Recording format Audio quality File size | |||
| 96k24bit | 96 kHz/24-bit WAV | High↑ | Large↑ |
| 48k24bit | 48 kHz/24-bit WAV | ||
| 48k16bit | 48 kHz/16-bit WAV | ||
| 44.1k16bit | 44.1 kHz/16-bit WAV | ||
| MP3320k | 320 kbps MP3 | ||
| MP3256k | 256 kbps MP3 | ||
| MP3192k | 192 kbps MP3 | ||
| MP3128k | 128 kbps MP3 | ||
| MP348k | 48 kbps MP3 | ↓Low | ↓Small |
NOTE
- WAV format is better for recording when audio quality is important.
- Since the MP3 format uses compression, the audio quality is reduced, but the file size is smaller. This is convenient when you want to save large amounts of recordings and use less space on the microSD card, for example.
Reducing noise
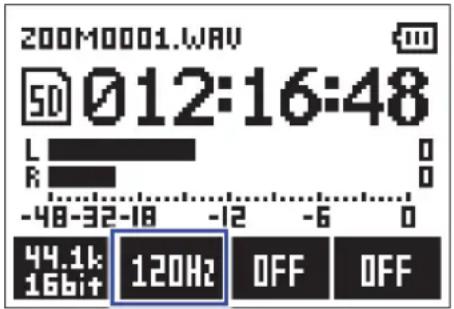
This function can reduce low-frequency noise, including wind and vocal pops.
1. Press to set the cutoff frequency.
HINT
Select OFF, 80Hz, 120Hz or 160Hz as the frequency.
Setting the limiter
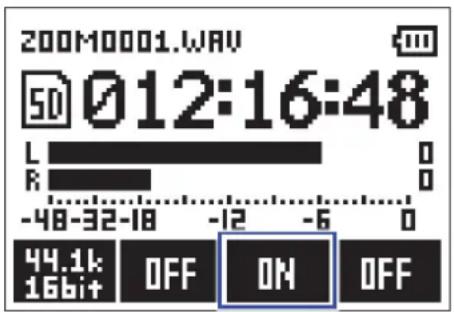
The limiter can prevent distortion by controlling input signals that have excessively high levels.
1. Press LIMITER to select ON.
NOTE
When the input sensitivity is high (input volume dial is set to a large value), noise will be more noticeable when the signal level is low.
Recording
1. Press
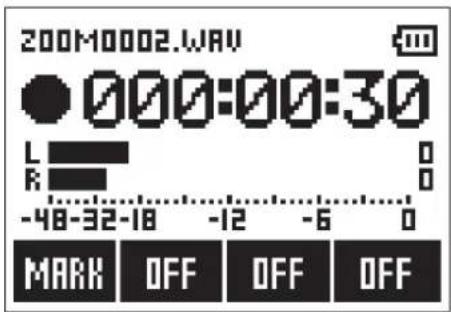
The following operations are possible during recording.
| Pause/resume | Press ▶/□ |
| Add a mark | Press AUDIO |
NOTE
- Marks are used as cue points. During playback, press for to jump to a mark position.
- When recording is paused, a mark will be added automatically at that point.
- Up to 99 marks can be added to each recording.
- If the file size exceeds 2 GB during recording, a new file will be created automatically and recording will continue without pause.
2. Press
This ends recording.
Using additional recording functions
When the Recording Screen is open, press to enable use of additional recording functions.
Recording automatically (AUTO REC)
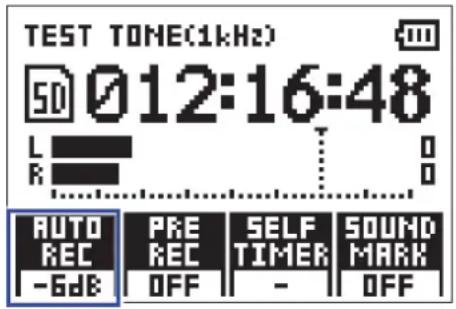
Recording will start automatically when the input level exceeds the set value.
- While pressing, press to set the recording starting level.
HINT
The input level can be set to Off, -48 dB, -24 dB, -12 dB or -6 dB.
- Press
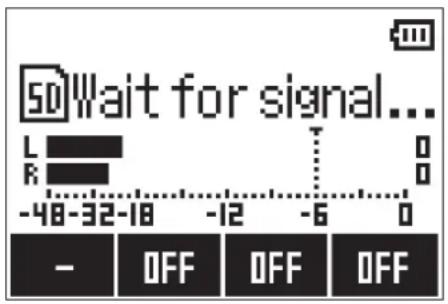
This will start automatic recording standby.
HINT
You can press ● again to start recording immediately.
- Press to end recording standby or stop recording.
NOTE
This cannot be used with the SELF TIMER function. When automatic recording is enabled, the self timer will be disabled.
The input signal can be captured for about 2 seconds before Ⓐ is pressed. This is useful when a performance starts suddenly, for example.
- While pressing, press to turn it ON.
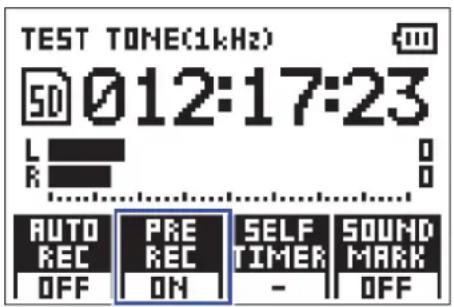
- Press
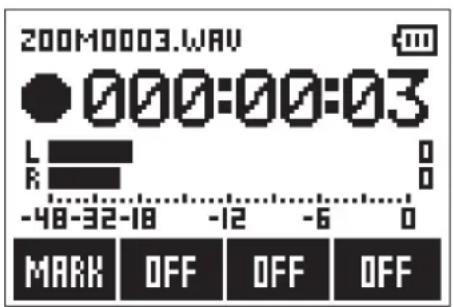
This starts recording the input signal from 2 seconds earlier.
NOTE
This cannot be used with the SELF TIMER function. When PRE REC is enabled, SELF TIMER will be disabled.
Recording starts automatically after the set time passes.
- While pressing, press to set the timer.
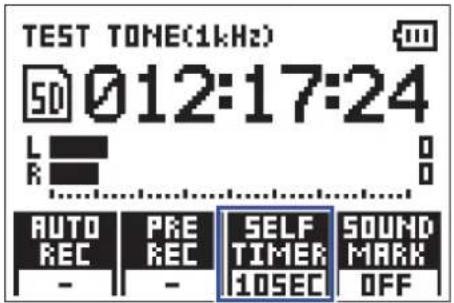
HINT
The timer can be set to OFF, 3SEC, 5SEC or 10SEC.
- Press
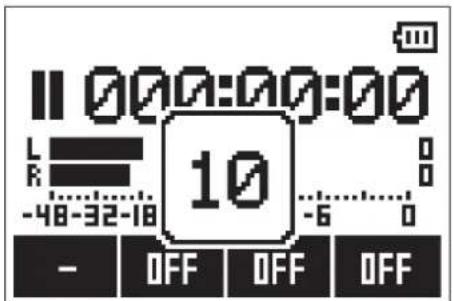
This starts the self timer countdown, and the REC LED blinks.
HINT
During the countdown, you can press again to start recording immediately.
- Press to end recording standby or stop recording.
NOTE
- This cannot be used with the AUTO REC function. When the SELF TIMER is enabled, AUTO REC will be disabled.
- This cannot be used with the PRE REC function. When the SELF TIMER is enabled, PRE REC will be disabled.
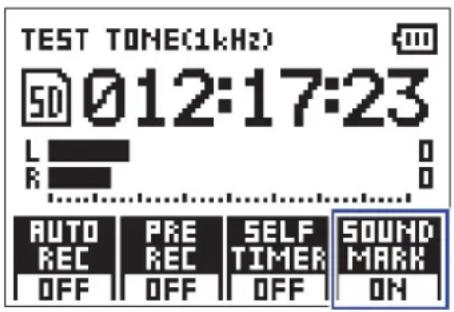
Tone signals (sound markers) can be output from the LINE OUT jack when recording is started and stopped. When recording audio for video with the H1n, sending the H3input signal to the camera input can make aligning audio and video easier.
1. While pressing, press to turn it ON.
Adjusting connected equipment levels (playing test tones)
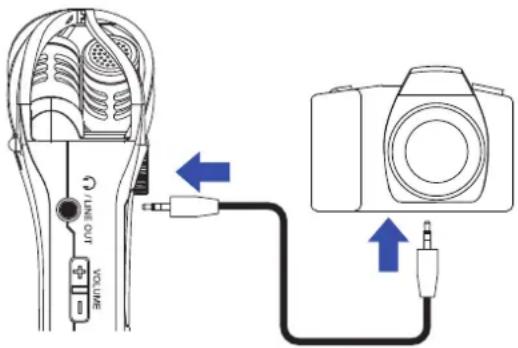
When the H3 connected to a digital SLR camera or other external device, a test tone can be played to match their output levels.
- Minimize the input gain of the other device.
NOTE
If the automatic gain control function on the other device is on, turn it off.
- Use an audio cable to connect the external mic jack of the other device with the PHONE/LINE OUT jack of the H1n.
- While pressing , press . ▶/□
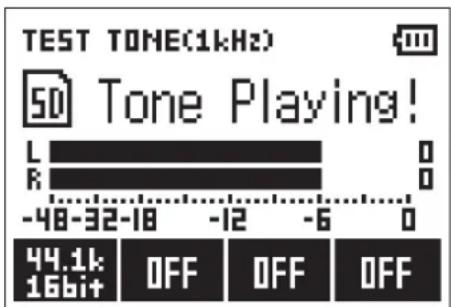
This plays a test tone from the PHONE/LINE OUT jack.
NOTE
Be careful of the volume if you are monitoring the sound with headphones, for example.
HINT
The test tone is a 1kHz sine wave at -6 dBFS.
- Adjust the input gain of the other device.
While checking the audio level meter of the connected device, make small adjustments to the input gain of that device until the audio signal level is about -6 dB.
- Press
This stops the test tone.
NOTE
See the operation manual of the other device for information about its operation.
Overdubbing
You can record over a file as it is playing back and save it as a new file. This is convenient when, for example, recording a performance one part at a time.
- Press ▶ and ▶ to select a file.
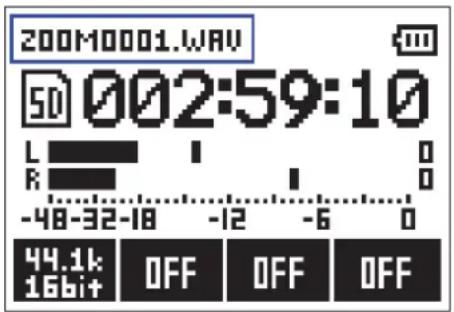
- While pressing ▶ press . Ⓞ
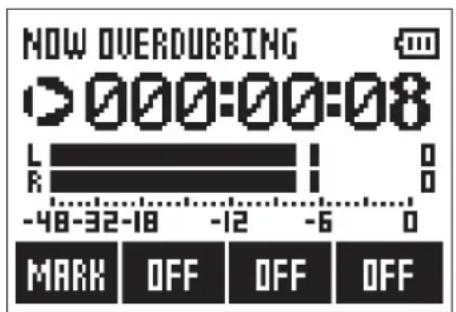
This starts overdubbing.
- Press
This stops overdubbing.
NOTE
- The AUTO REC, PRE REC, SELF TIMER and SOUND MARK functions will be disabled.
• Overdubbing is not possible if the recording format of the file is MP3.
• Overdubbing will record a file with the same format as the original file.
Monitoring recording
The sound being recorded can be monitored using headphones.
1. Connect headphones to the PHONE/LINE OUT jack on the H1n
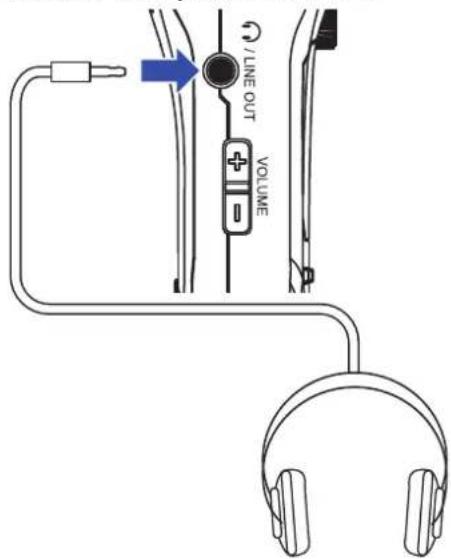
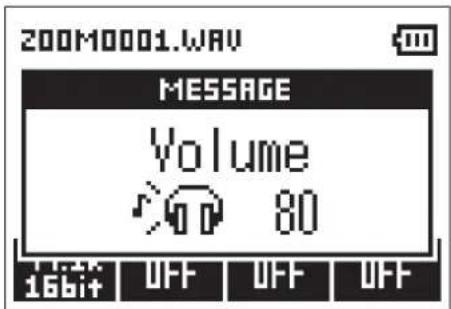
2. Press and to adjust the monitoring volume.
HINT
The monitoring volume can be set from 0 to 100.
Using external mics
A connected mic can be used to record sound.
1. Connect an external mic to the MIC/LINE IN jack on the H1n
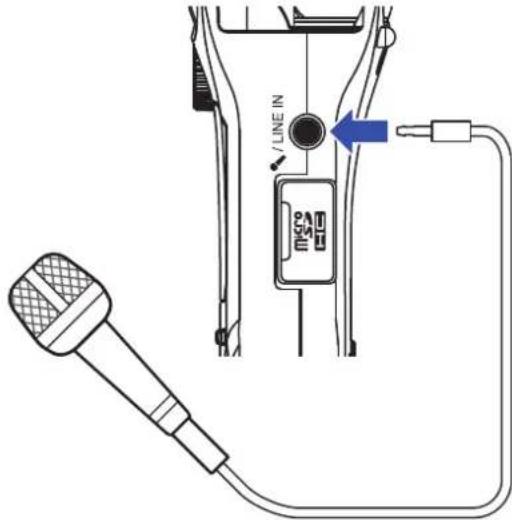
2. Press
This starts recording.
NOTE
• The built-in XY mic is disabled when an external mic is connected.
• The H1m supply plug-in power if the connected mic uses it.
Playing recordings
- Press ◀◀◀ and ▶▶◀ to select the file for playback.
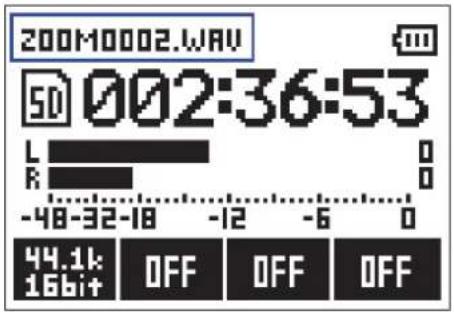
- Press ▶/II
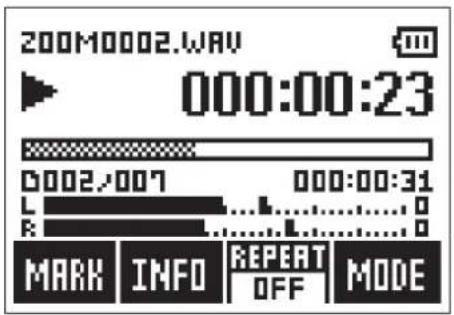
The following operations are possible during playback.
| Pause/resume | Press ▶/□ |
| Search forward | Press and hold ▶▶I |
| Search backward | Press and hold ▶◀◀ |
| Add a mark | Press AUDIO during playback |
| Jump to the next mark (if one exists)Play the next file (if no mark exists) | Press ▶▶I |
| Jump to the previous mark (if one exists)Play the previous file (if no mark exists) | Press ▶◀◀ |
HINT
- Marks are used as cue points.
- If you press ▶▶▶ after the last mark during playback, the next file will be played.
If you press before the first mark during playback, the previous file will be played.
- Press
Playback stops and the Recording Screen opens.
Adjusting the volume
1. Press and .
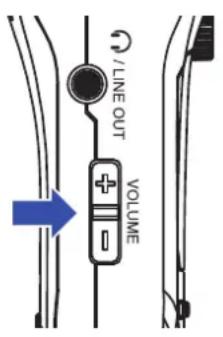
HINT
- The volume can be adjusted separately for the speaker and headphones.
• The volume can be set from 0 to 100.
Using repeat playback
Just the file currently playing or all the files saved on the microSD card can be played back repeatedly.
1. Press to set the repeat type.
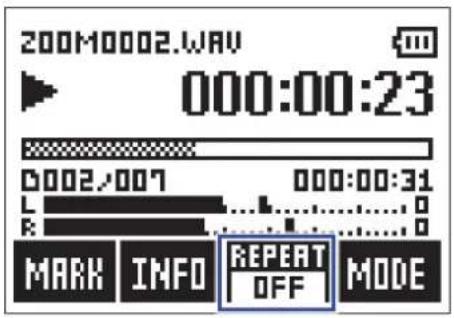
The following repeat types can be used.
Setting value Explanation
OFF Every file from the selected one to the last one will be played back.
ONE The selected file will be played repeatedly.
ALL All files will be played back repeatedly.
Deleting marks
Marks added to files can be deleted when not needed.
- Pause playback.
- Use land to jump to the mark that you want to delete.
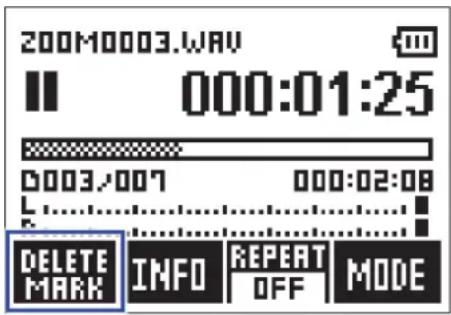
The function button on the far left changes from "MARK" to "DELETE MARK".
- Press AUDIO .
- Use LOCUT and to select "Delete", and press.
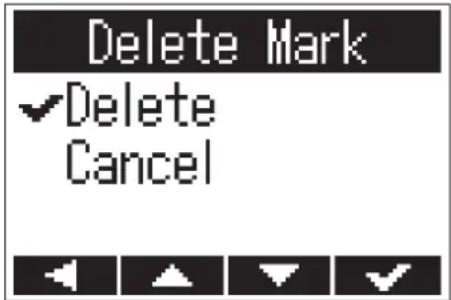
The selected mark will be deleted.
Checking file information
You can view a variety of information about the selected file.
- Press ◀◀ and ▶▶▶ to select a file.
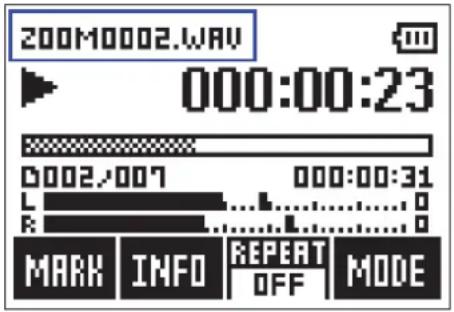
- Press LOCUT
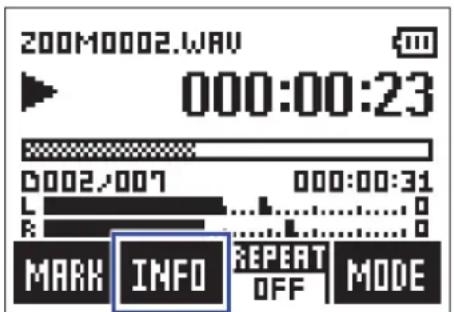
- Check the file information.
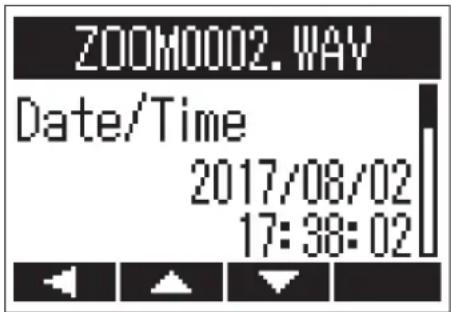
Press LOCUT and to change the page.
HINT
The information items that can be viewed are the date and time, the recording format, the file size, and the recording length.
- Press AUDIO .
This reopens the Playback Screen.
Using additional playback functions
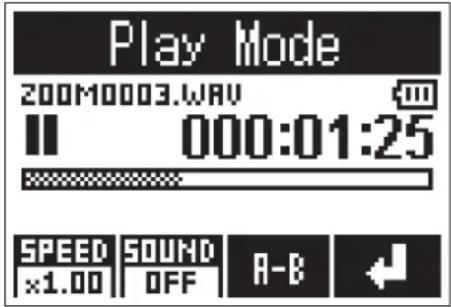
Press ☐ to switch to Play Mode, which allows you to use functions that are useful for listening to passages and transcribing words.
Adjusting the playback position precisely
The playback position can be adjusted a few seconds at a time.
- Press AUTOLEVEL on the Playback Screen.
This activates Play Mode.
- Use land to adjust the playback position precisely.
Go back 3 seconds: Press
Go forward 10 seconds: Press ▶▶▶▶
NOTE
If there is a mark before the amount of time, playback will stop at the mark position instead.
-
Press AUTOLEVEL to exit Play Mode.
-
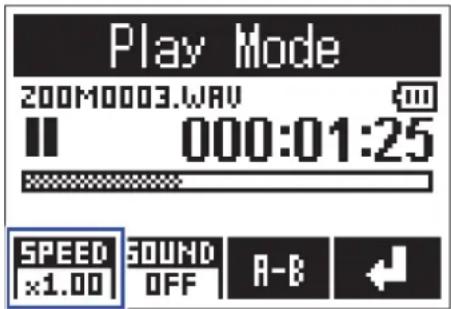
Press AUTOLEVEL on the Playback Screen.
This activates Play Mode.
- Press AUDIO to change the playback speed.
HINT
The playback speed can be set to ×0.50, ×0.75, ×1.00, ×1.50 or ×2.00.
- Press AUTOLEVEL to exit Play Mode.
These effects can be applied to change the sound during playback.
- Press AUTOLEVEL on the Playback Screen.
This activates Play Mode.
- Press to select the sound effect to use.
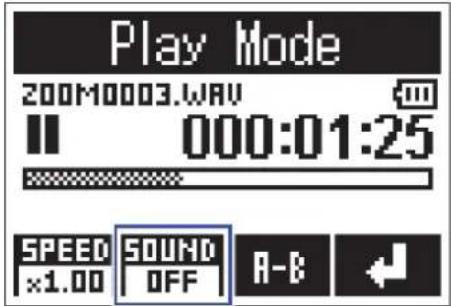
The following sound effects can be activated.
| Setting value Explanation | |
| OFF The sound will not be changed. | |
| SPEECH This makes recordings of speeches and meetings sound better. | |
| Vo CUT This cuts vocals. | |
| BASS This cuts frequencies other than low frequencies. | |
| ROCK This emphasizes low and high frequencies. | |
- Press AUTOLEVEL to exit Play Mode.
Playback can be repeated between two set points.
- Press AUTOLEVEL on the Playback Screen.
This activates Play Mode.
- Press ▶ and ▶ to move the position where you want repeat playback to start.
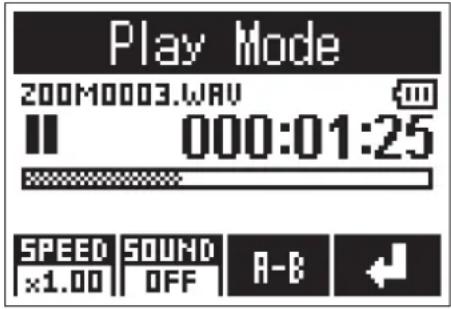
You can also press ▶ and move the position during playback.
- Press LIMITER to set the starting point.
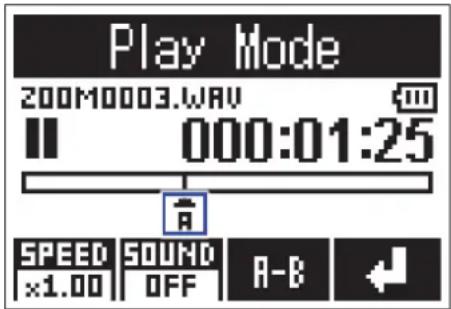
"A" will appear at the set point.
- Press LIMITER at the point where you want repeat playback to stop to set the ending point.
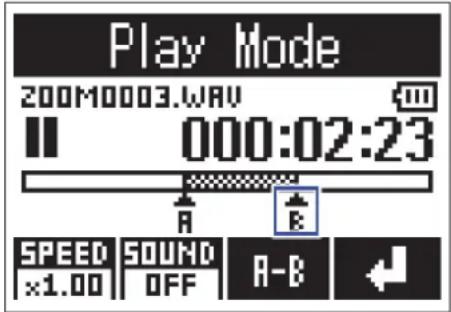
"B" will appear at the set point, and repeat playback between the A and B points will start.
5. Press LIMITER to stop repeat playback.
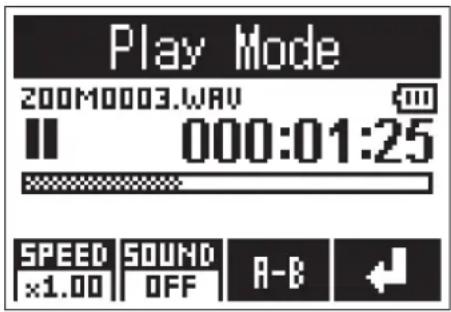
6. Press AUTOLEVEL to exit Play Mode.
Deleting files
Files that are not needed can be deleted.
- Press ▶ and ▶ to select a file.
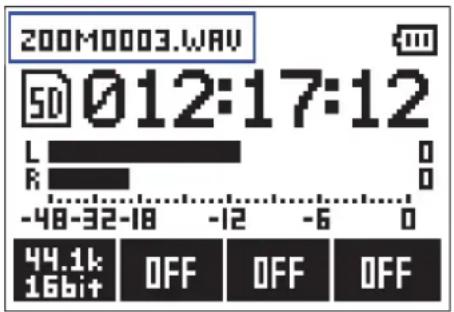
HINT
Files can be deleted on both the Recording Screen and the Playback Screen.
-
Press
-
Use LOCUT and to select "Delete", and press.

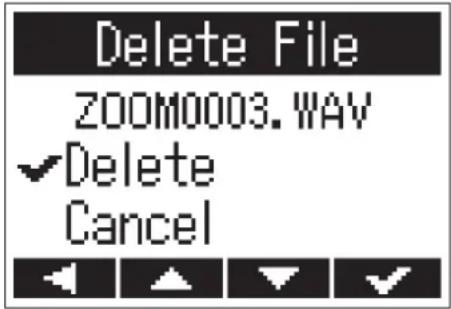
The selected file will be deleted.
Connecting with other devices
The H1n can be used as a card reader or audio interface when the H1n is connected to a computer, iOS device or other equipment.
- When the Recording Screen is open, use a USB cable to connect the H1n and the other equipment.
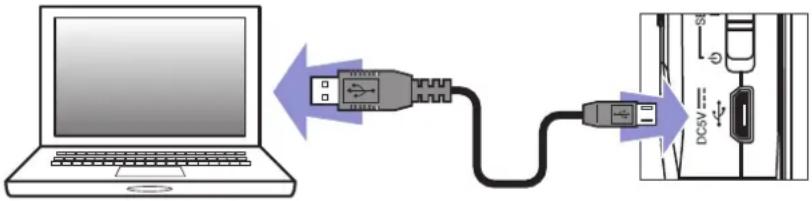
The USB screen will open.
NOTE
A Lightning to USB Camera Adapter is necessary to connect an iOS device.
Using as a card reader
You can use a computer to check the files saved on the microSD card and copy those files to the computer.
- Press or on the USB screen to select "Card Reader", and press .

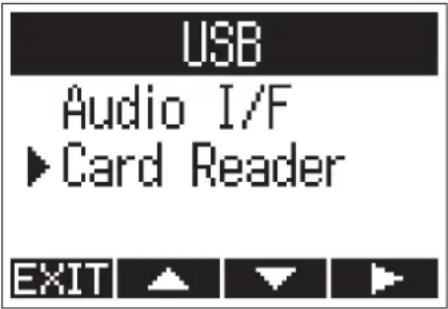
- Use the computer to work with the files saved on the microSD card.
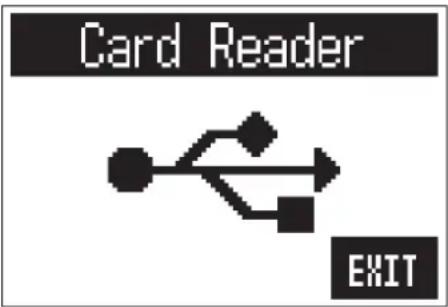
- When you want to disconnect, use the computer to end the USB connection with the H1n
Windows: Select H1om "Safely Remove Hardware".
Mac OS: Drag the Hlon to the Trash and drop it.
NOTE
Always conduct computer disconnection procedures before removing the USB cable.
-
Press AUTOLEVEL
-
Use LOCUT and to select "Exit", and press.

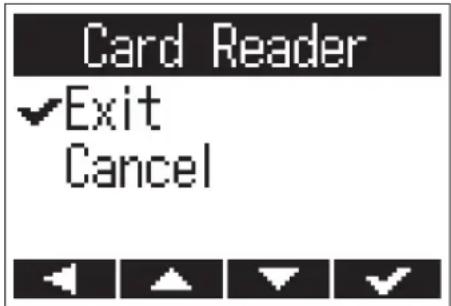
This ends card reader operation and reopens the Recording Screen.
- Disconnect the USB cable from the Hard the other equipment.
Using as an audio interface
H1n input signals can be input directly to a computer, iOS device or other equipment, and playback signals on a computer, iOS device or other equipment can be output from the H1n
- Press or on the USB screen to select "Audio I/F", and press .

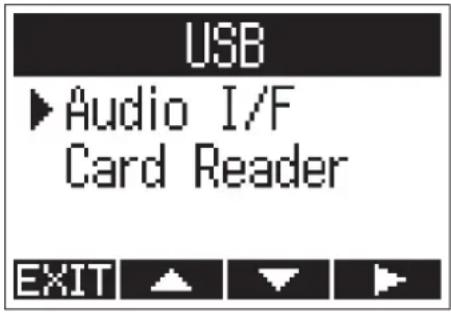
- Use LOCUT and to LIMITER to select the type of device, and press.

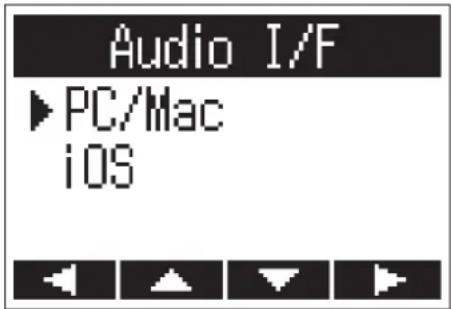
NOTE
After selecting "iOS", follow the instructions on screen and disconnect the cable once. Then, select "iOS" again and reconnect the cable.
- Use LOCUT and to select the power source, and press.

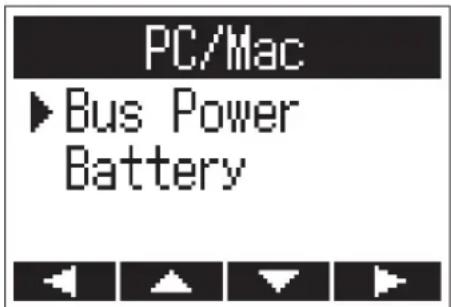
The following power sources can be selected.
| Setting value Explanation | |
| Bus Power Power is supplied from the connected device through the USB cable. | |
| Battery | Power is supplied by the batteries in the H1n. Select this when connected to a computer that has low USB bus power supply capability. |
NOTE
When "iOS" is selected, power is supplied by the batteries in the H1his screen will not be shown.
- Monitoring playback signals from connected devices
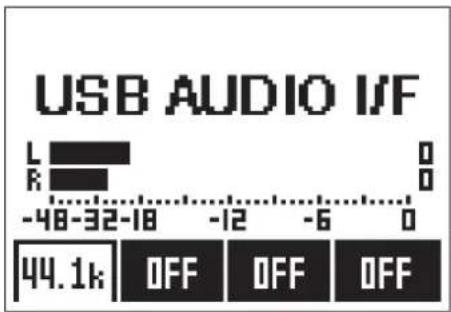
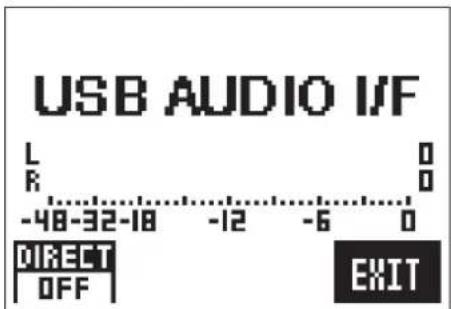
- To disconnect, while pressing , press .
- Use LOCUT and to select "Exit", and press .

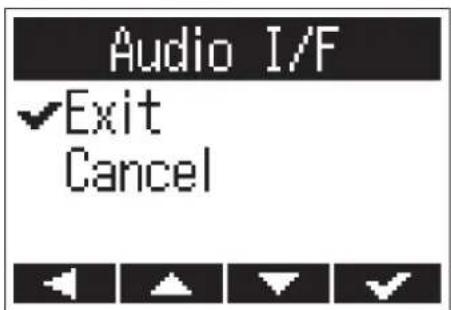
This ends audio interface operation and reopens the Recording Screen.
- Disconnect the USB cable from the Hand the other equipment.
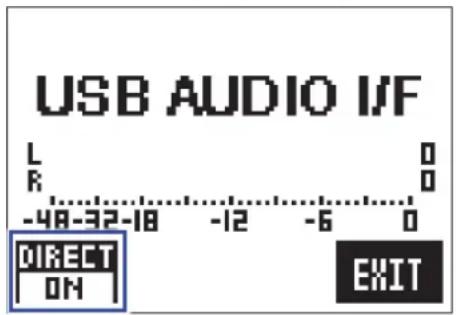
This directly outputs the H1put signal from the before sending it to the computer or iOS device. enables monitoring without latency
This
- During audio interface operation, while pressing press to turn it ON.
Opening the SETTING screen
Various settings can be made on the SETTING screen.
1. While pressing, turn the power on.
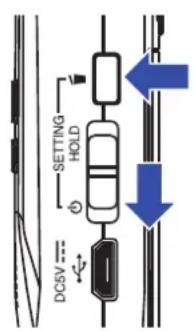
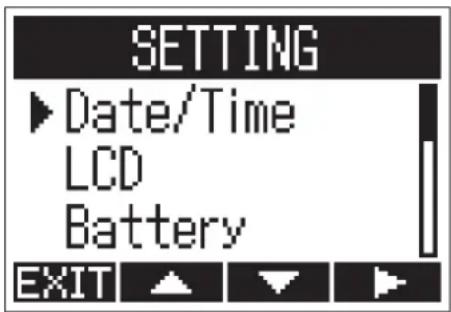
This opens the SETTING screen.
Setting the date format
The date format, which is used when adding dates to file names and when showing the date on the Playback Screen, can be changed.
- On the SETTING screen, use LOCUT and to select "Date/Time", and press .

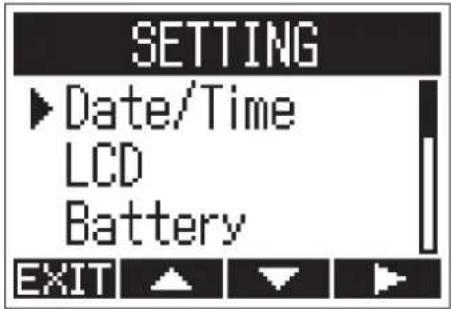
- Use LOCUT and to select "Date Format", and press .

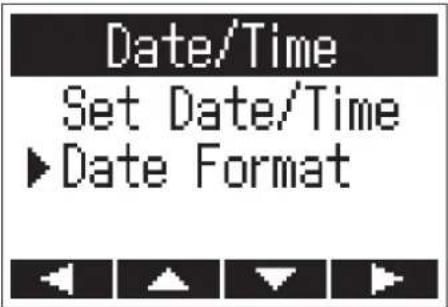
- Use LOCUT and to select the date format, and press .

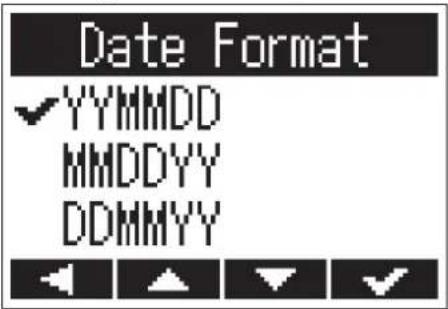
The following date formats can be used.
| Setting value Explanation |
| YYMMDD Year, month, day order |
| MMDDYY Month, day, year order |
| DDMMYY Day, month, year order |
Setting the display backlight
The display backlight can be set to turn off after a specific amount of time without use.
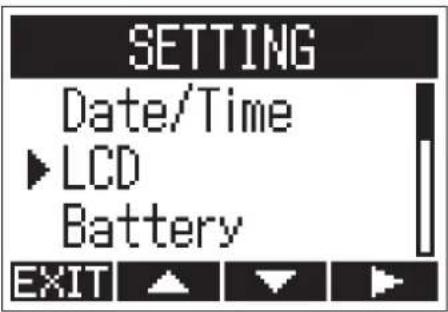
- On the SETTING screen, use LOCUT and to select "LCD", and press .

- Use LOCUT and to select "Backlight", and press .

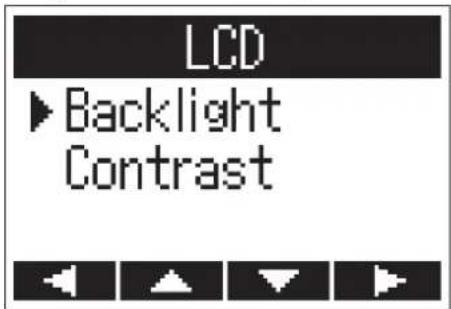
- Use □ and □ to set the amount of time until the backlight turns off, and press □.
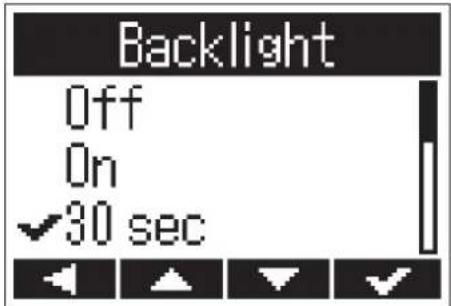
The time until the backlight turns off can be set as follows.
| Setting value Explanation | |
| Off The backlight always | stays off. |
| On The backlight always | stays on. |
| 30 sec The backlight turns | off if no operation occurs for 30 seconds. |
| 1 min The backlight turns | off if no operation occurs for 1 minute. |
| 2 min The backlight turns | off if no operation occurs for 2 minutes. |
| 3 min The backlight turns | off if no operation occurs for 3 minutes. |
| 4 min The backlight turns | off if no operation occurs for 4 minutes. |
| 5 min The backlight turns | off if no operation occurs for 5 minutes. |
Adjusting the display contrast
- On the SETTING screen, use LOCUT and to LIMITER to select "LCD", and press.

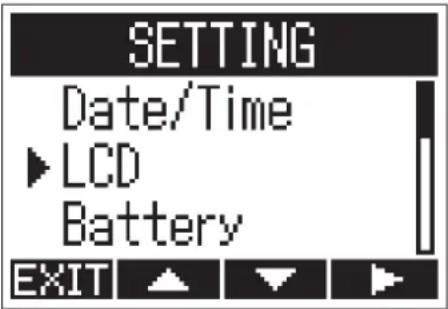
- Use LOCUT and to select "Contrast", and press.

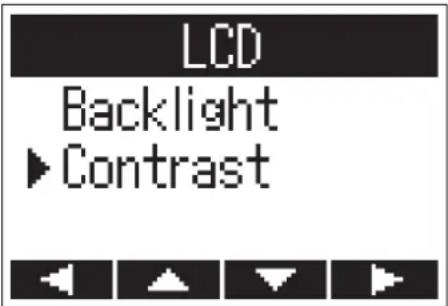
- Use LOCUT and to adjust the contrast, and press.

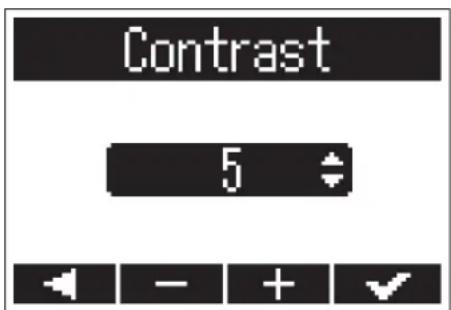
HINT
This can be set from 1 to 10.
Setting the type of battery used
Set the type of battery used so that the amount of remaining battery charge can be shown accurately on the display.
- On the SETTING screen, use LOCUT and to select "Battery", and press.

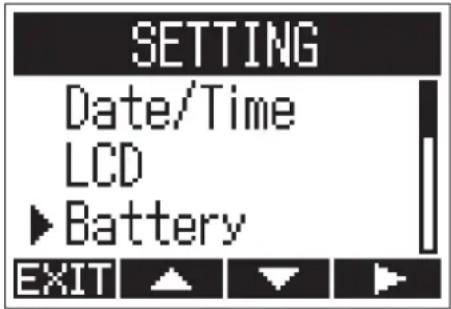
- Use LOCUT and to LIMITER to select the battery type, and press.

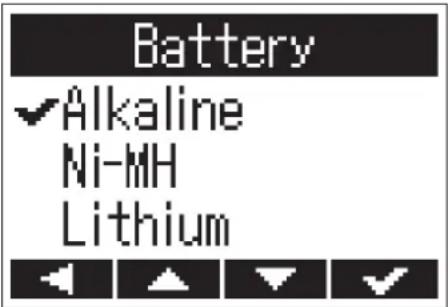
HINT
The options are Alkaline, Ni-MH and Lithium.
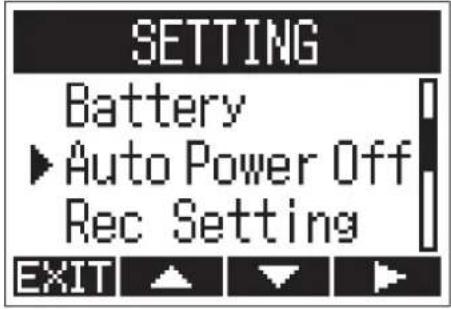
Setting the Auto Power Off function
When operating with batteries, the power will automatically turn off if it is not used for a set amount of time.
- On the SETTING screen, use LOCUT and LIMITER to select "Auto Power Off", and press AUTOLEVEL.
- Use □ and □ to set the time until the power turns off, and press □.
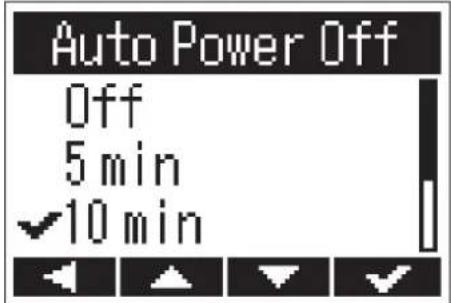
| Setting value Explanation | |
| Off The Auto Power Off function is disabled. | |
| 5 min The power will turn off automatically 5 minutes after the last button operation. | |
| 10 min The power will turn off automatically 10 minutes after the last button operation. | |
| 30 min The power will turn off automatically 30 minutes after the last button operation. | |
| 60 min The power will turn off automatically 60 minutes after the last button operation. | |
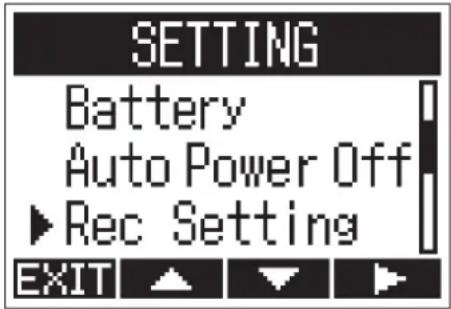
Setting how the counter appears
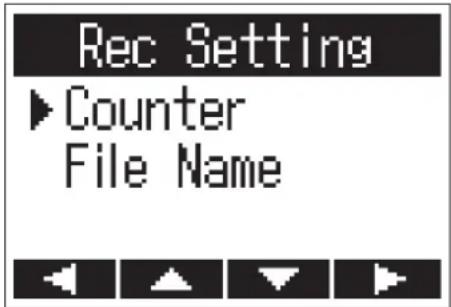
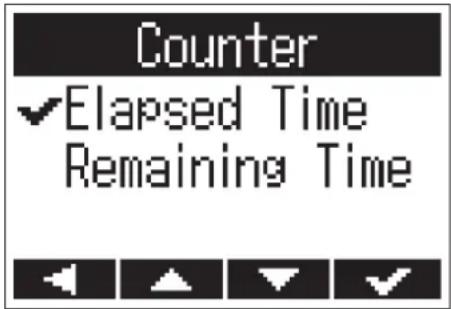
The recording time shown during recording (counter) can be set to either the current elapsed recording time (count up) or the remaining possible recording time (count down).
- On the SETTING screen, use LOCUT and to select "Rec Setting", and press .

- Use LOCUT and to LIMITER to select "Counter", and press.

- Press LOCUT or to LIMITER to select how it is shown, and press .

Setting how files are named
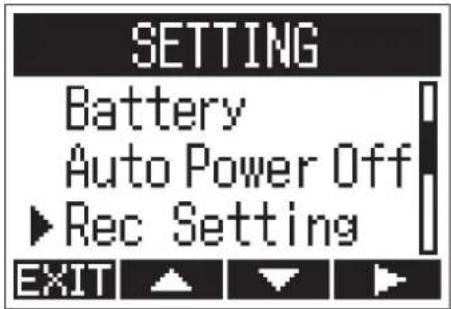
The way that files are named automatically during recording can be changed.
- On the SETTING screen, use LOCUT and to select "Rec Setting", and press .

- Use LOCUT and to select "File Name", and press .

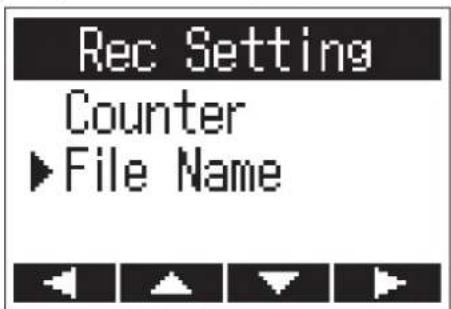
- Use LOCUT and to LIMITER to select the file name format, and press .

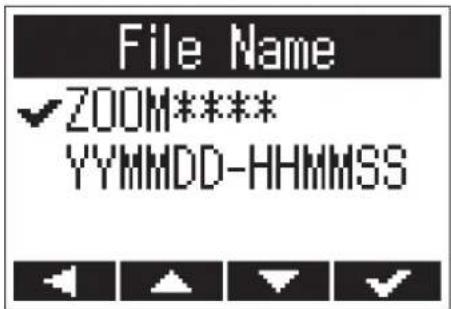
The following file name formats can be used.
| Setting value Explanation | |
| ZOOM**** | Files are named with consecutive numbers from "ZOOM0001.WAV/MP3" to "ZOOM9999.WAV/.MP3". |
| YYMMDD-HHMMSS | Files are named with the date and time, using a "YYMMDD-HHMMSS.WAV/MP3" format. |
NOTE
- If set to "YYMMDD-HHMMSS", files will be named with the date and time when recording started.
- When set to "YYMMDD-HHMMSS", the "Date Format" setting will be used (→ "Setting the date format").
Formatting microSD cards
A microSD card that has been purchased or formatted by a computer should be formatted for use with the H1n.
- While pressing, turn the power on.
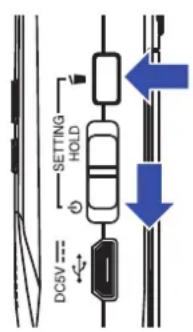
This opens the SETTING screen.
- Use LOCUT and to select "SD Card", and press.

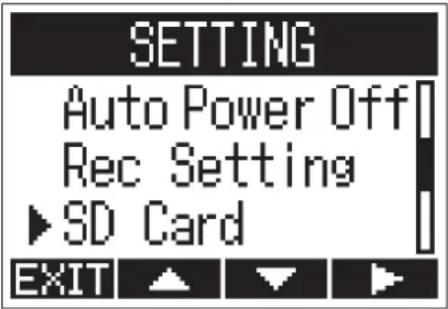
- Use LOCUT and to select "Format", and press.

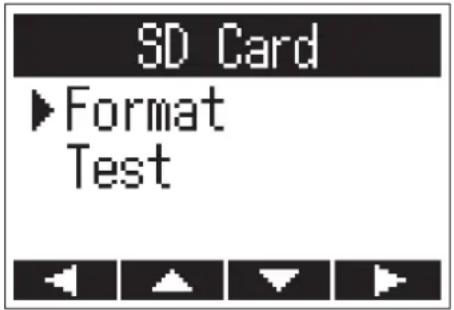
4. Use LOCUT and to select "Execute", and press.

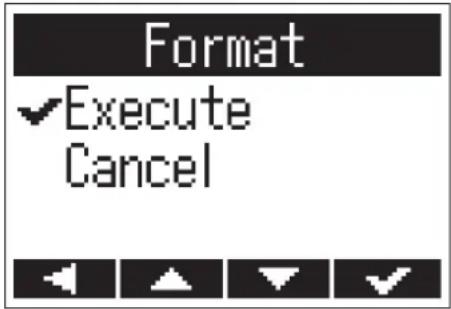
This formats the microSD card for use with the H1n
NOTE
- Before using microSD cards that have just been purchased or that have been formatted on a computer, they must be formatted by the H1n
- Be aware that all data saved on the microSD card will be deleted when it is formatted.
Testing microSD card performance
A microSD card can be tested for usability with the H1n
A Quick Test can be done in a short amount of time, while a Full Test examines the entire microSD card.
Conducting a Quick Test
- While pressing, turn the power on.
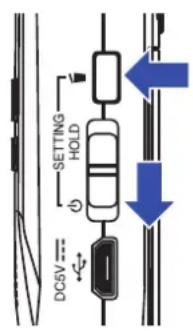
This opens the SETTING screen.
- Use LOCUT and to select "SD Card", and press.

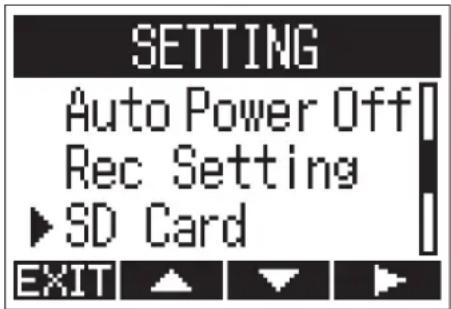
- Use LOCUT or to LIMITER to select "Test", and press.

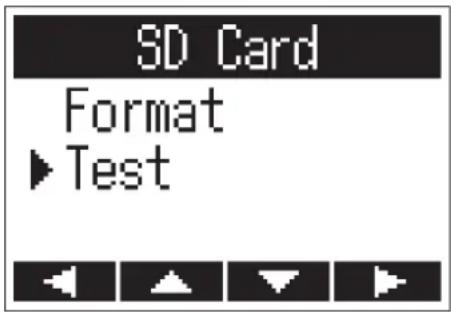
- Use LOCUT or to LIMITER to select "Quick Test", and press.

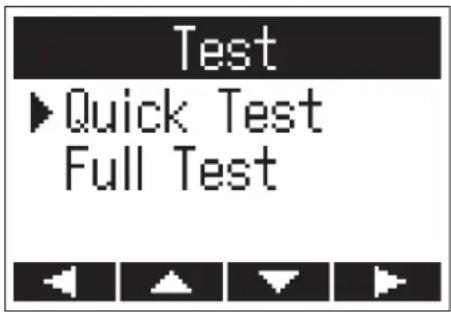
- Use LOCUT and to select "Execute", and press .

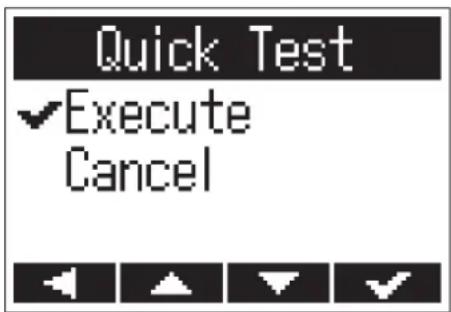
This starts a quick test of the microSD card.
- Check the result when the test completes.
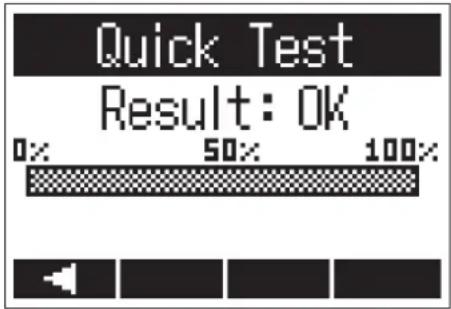
The result of the evaluation is shown.
NOTE
Even if a performance test result is "OK", there is no guarantee that writing errors will not occur. Use this information as a guide.
NOTE
Use the AC adapter to supply power when conducting a full test ( "Using an AC adapter").
- While pressing, turn the power on.
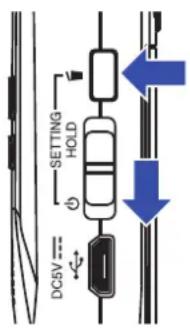
This opens the SETTING screen.
- Use LOCUT and to select "SD Card", and press.

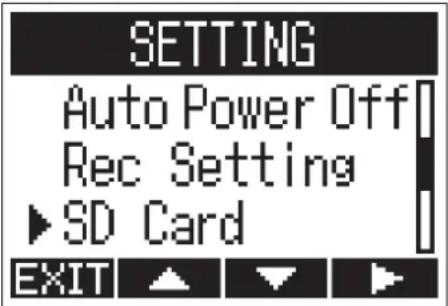
- Use LOCUT or to LIMITER to select "Test", and press.

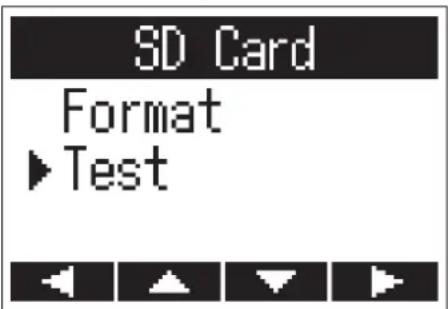
- Use LOCUT or to LIMITER to select "Full Test", and press.
AUTOLEVEL
Test
Quick Test
▶ Full Test


The amount of time required for the full test will be shown.
- Use LOCUT and to select "Execute", and press.
AUTOLEVEL
Full Test
√Execute Cancel


This starts a full test of the microSD card.
HINT
You can press ▶to pause and resume a test.
- Check the result when the test completes.
![Full Test Result: OK 0x 50x 100% ACCESS RATE [AVERAGE: 4%] MAX : 14%]](/content/2026/05/883178/images/91b54e4c2028a95dc8bad42a4e8283600a0135d8f4c78cd257f96d5352b9c7ba.jpg)
The result of the evaluation is shown.
NOTE
Even if a performance test result is "OK", there is no guarantee that writing errors will not occur. Use this information as a guide.
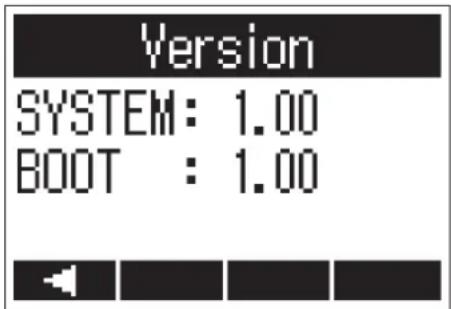
Checking the versions
You can check the firmware versions.
- While pressing, turn the power on.
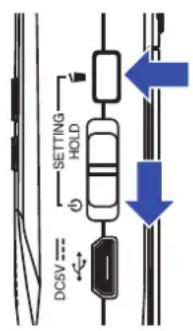
This opens the SETTING screen.
- Use LOCUT and to select "Version", and press.
AUTOLEVEL
SETTING
Rec Setting
SD Card
Version
EXIT
- Check the firmware versions.
Restoring default setting values
The Hastings can be restored to their factory defaults.
- While pressing, turn the power on.
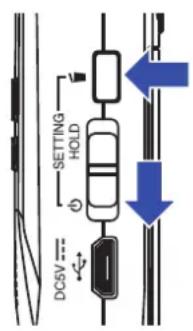
This opens the SETTING screen.
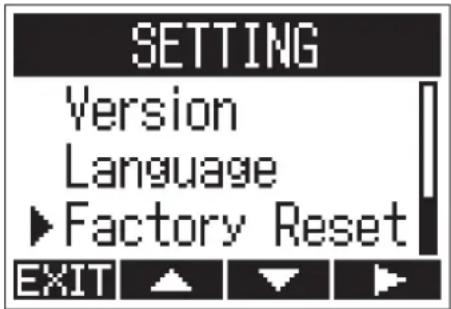
- Use LOCUT and to select "Factory Reset", and press.

- Use LOCUT and to select "Execute", and press.

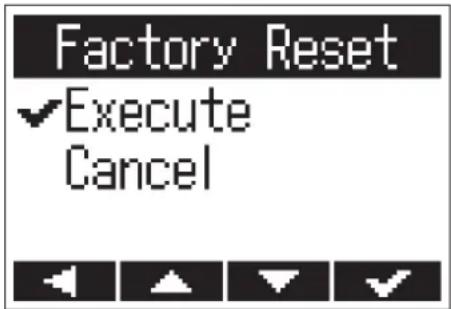
This starts resetting the H1n
After the settings are reset, the power will automatically turn off.
NOTE
Input level settings will not be reset.
Updating the firmware
The H1mware can be updated to the latest versions.
- Install new batteries in the H1n (→ "Using batteries") or connect the dedicated AC adapter (→ "Using an AC adapter").
- Copy the firmware update file to the root directory on a microSD card.
NOTE
Files for the latest firmware updates can be downloaded from the ZOOM website (www.zoom.co.jp).
- Insert the microSD card into the H1n (→ "Inserting microSD cards").
- Whilepressing, turn the power on.
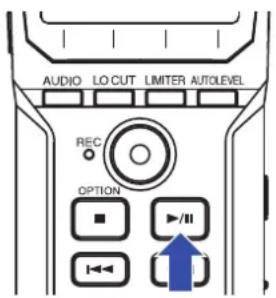
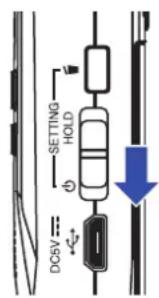
This opens an update execution confirmation screen.
- Use LOCUT and to select "Update", and press.

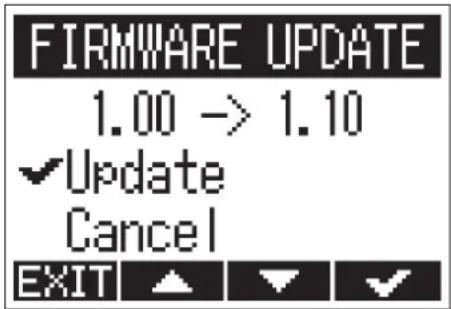
The firmware update starts.
NOTE
During the firmware update, do not turn the power off or remove the microSD card. Doing so could cause the H1n to become unstartable.
6. After the firmware update completes, turn the power off.
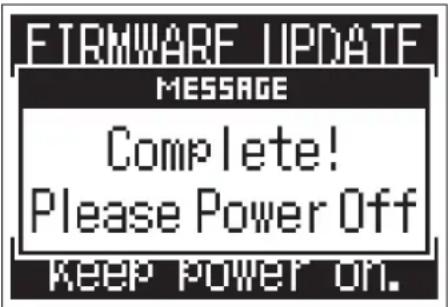
NOTE
Executing a firmware update is not possible if the remaining battery power is low. Replace the batteries with new ones ( "Using batteries") or connect the AC adapter ( "Using an AC adapter").
Adding languages
By adding new languages, the language displayed by the Ham be changed.
- Copy the file for the language you want to add to the root directory on a microSD card.
NOTE
Download language files from the ZOOM website (www.zoom.co.jp).
- Insert the microSD card into the H1n (→ "Inserting microSD cards").
- Whilepressing, turn the power on.
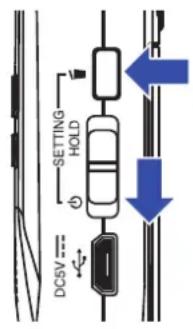
This opens the SETTING screen.
- Use LOCUT and to LIMITER to select "Language", and press.

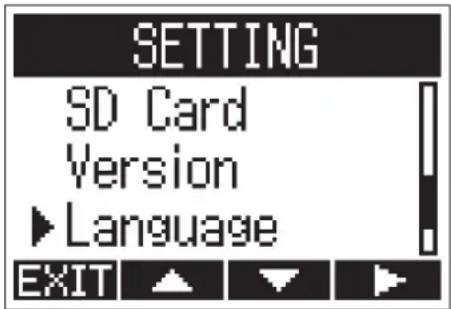
- Use LOCUT and to select "Add Language", and press .

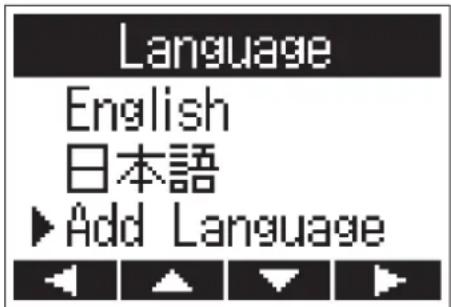
6. Use LOCUT and to select the language you want to add, and press .

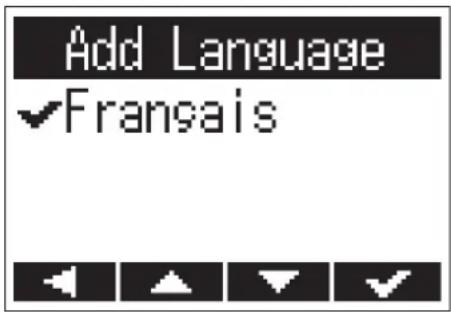
The selected language will be added.
HINT
Added languages will be deleted if the H1n is reset ( "Restoring default setting values").
If you think that the H1operating strangely, check the following items first.
Recording/playback trouble
■ No sound is output/volume is low
- Confirm that the volume of the H1n is not set too low (→ "Adjusting the volume").
- Check the volume of the computer, iOS device or other equipment connected to the H1n
■ Recorded sound cannot be heard or is very quiet
- Confirm that the mic is oriented in a suitable direction.
- Check the input level settings (→ "Adjusting input levels").
■ Recording not possible
- Confirm that the REC LED is lit (→ "Names of parts").
- Check the remaining recordable time with the recording time (counter) shown on the Recording Screen ( "Recording Screen").
- Confirm that a microSD card is loaded properly in the card slot (→ "Inserting microSD cards").
- If the HOLD function is on, buttons operations will be disabled. Disable the HOLD function (→ "Preventing misoperation").
Other trouble
■ Computer does not recognize the H1en though they are connected by a USB cable
- Confirm that the OS of the connected computer is supported (→ "Connecting with other devices").
- The USB function must be set on the H1n allow the computer to recognize the H1n (→ "Connecting with other devices").
- Confirm that the USB cable being used is not just for charging.
Specifications
| Recording media microSD/microSDHC cards (Class 4 or higher, up to 32 GB) | |
| Recording formats WAV: 44.1 kHz/16-bit, 48 kHz/16-bit, 48 kHz/24-bit, 96 kHz/24-bit | |
| MP3: 48 kbps, 128 kbps, 192 kbps, 256 kbps, 320 kbps | |
| Display 1.25" monochrome LCD (96×64) with REC LED (red) | |
| Inputs Built-in mic 90° XY stereo format, 120 dB SPL maximum input sound pressure-∞ dB - +39 dB input gain | |
| MIC/LINE IN Input connector: stereo mini jack-∞ dB - +39 dB input gain2 kΩ or higher input impedanceplug-in power (2.5 V) supported | |
| Outputs Combined line/headphone stereo mini jack | |
| Built-in speaker 500 mW 8Ω mono speaker | |
| USB microUSB | |
| Mass storage class operation:USB 2.0 High Speed | |
| Audio interface operation:USB class compliant44.1/48kHz sampling rate, 16-bit depth, 2-in/2-outTransfer method: asynchronous | |
| Power 2 AAA batteries (alkaline, NiMH or lithium)AC adapter (ZOOM AD-17): DC 5V/1A | |
| Estimated continuous recording time using batteries | About 10 hours (alkaline batteries, using built-in mic, 44.1 kHz/16-bit)Note: The above value is approximate.Note: The continuous battery operation time was determined using in-house testing methods. It will vary greatly according to use conditions. |
| External dimensions 50.0 mm (W) × 137.5 mm (D) × 32.0 mm (H) | |
| Weight (main unit only) 60 g | |

- Usage and Safety Precautions
- Other symbols used
- WARNING
- ■ Operation with batteries
- ■ Alterations
- CAUTION
- ■ Product handling
- ■ Battery handling
- ■ Operating environment
- Volume
- ■ Interference with other electrical equipment
- Cleaning
- ■ Breakdown and malfunction
- ■ Copyrights
- FCC regulation warning (for U.S.A.)
- For EU Countries
- Declaration of conformity
- Introduction
- 90° XY mic
- Straightforward interface
- Display with great visibility and language localization
- USB audio interface that uses asynchronous transfer
- Additional recording functions from other models
- Overdubbing function
- Advanced playback functions
- Preparations
- Recording
- Playback
- Working with files
- Using USB functions
- Making various settings
- Other functions
- Troubleshooting
- Specifications
- Names of parts
- Front
- ① Built-in XY mic
- ② Input volume dial
- ③ Display
- ④ AUDIO button
- ⑤ LO CUT button
- ⑥ LIMITER button
- ⑦ AUTO LEVEL button
- ⑧ REC LED
- ⑨ REC button
- ⑩ STOP/OPTION button
- ⑪ PLAY/PAUSE button
- ⑫ REW button
- ⑬ FF button
- ⑭ Speaker
- ■ Left and right sides
- ① PHONE/LINE OUT jack
- ② VOLUME buttons
- ③ MIC/LINE IN jack
- ④ microSD card slot
- ⑤ TRASH button
- ⑥ POWER (HOLD) switch
- ⑦ USB port
- Recording Screen
- ① File name
- ② Status icon
- ③ Level meters
- ④ Function buttons
- ⑤ Remaining battery charge
- ⑥ Counter
- ⑦ Clipping indicators
- Providing power
- Using batteries
- NOTE
- Inserting microSD cards
- Turning the power on/off
- Turning the power on
- Slide toward .
- Turning the power off
- Setting the language shown
- Setting the date and time
- Use AUDIO and to move the cursor.
- HINT
- Use LOCUT and to change the value selected by the cursor.
- Press
- Preventing misoperation
- Activating the HOLD function
- Deactivating the HOLD function
- Adjusting input levels
- Adjusting levels manually
- Turn the input volume dial.
- Press AUTOLEVEL to select ON.
- Selecting the recording format
- Press to select the recording format.
- Reducing noise
- Press to set the cutoff frequency.
- Setting the limiter
- Press LIMITER to select ON.
- Press
- Press
- Using additional recording functions
- Recording automatically (AUTO REC)
- While pressing, press to turn it ON.
- Adjusting connected equipment levels (playing test tones)
- Overdubbing
- Monitoring recording
- Connect headphones to the PHONE/LINE OUT jack on the H1n
- Press and to adjust the monitoring volume.
- Using external mics
- Connect an external mic to the MIC/LINE IN jack on the H1n
- Playing recordings
- Adjusting the volume
- Press and .
- Using repeat playback
- Press to set the repeat type.
- Deleting marks
- Checking file information
- Using additional playback functions
- Adjusting the playback position precisely
- Press LIMITER to stop repeat playback.
- Press AUTOLEVEL to exit Play Mode.
- Deleting files
- Connecting with other devices
- Using as a card reader
- Using as an audio interface
- Opening the SETTING screen
- While pressing, turn the power on.
- Setting the date format
- Setting the display backlight
- Adjusting the display contrast
- Setting the type of battery used
- Setting the Auto Power Off function
- Setting how the counter appears
- Setting how files are named
- Formatting microSD cards
- Use LOCUT and to select "Execute", and press.
- Testing microSD card performance
- Conducting a Quick Test
- Checking the versions
- Restoring default setting values
- Updating the firmware
- After the firmware update completes, turn the power off.
- Adding languages
- Use LOCUT and to select the language you want to add, and press .
- Recording/playback trouble
- ■ No sound is output/volume is low
- ■ Recorded sound cannot be heard or is very quiet
- ■ Recording not possible
- Other trouble
- ■ Computer does not recognize the H1en though they are connected by a USB cable
Brand : ZOOM
Model : H1n
Category : Dictaphone