
DWR-720 - Telephone D-LINK - Free user manual and instructions
Find the device manual for free DWR-720 D-LINK in PDF.


| Product Type | HSPA+ Mobile Router |
| Brand | D-Link |
| Model | DWR-720 |
| Dimensions (L x W x H) | 100.3 x 49.35 x 14.13 mm (3.95 x 1.94 x 0.56 in) |
| Battery Capacity | 2000 mAh rechargeable Li-Ion |
| Battery Life | Up to 6 hours of mobile usage |
| Cellular Technology | HSPA+ / UMTS / GSM |
| Max Download Speed | 21.6 Mbps (HSPA+) |
| Max Upload Speed | 5.76 Mbps (HSPA+) |
| Wi-Fi Standard | 802.11 b/g/n (up to 150 Mbps) |
| Antenna | Internal 3G main and diversity, internal Wi-Fi |
| USB Interface | Micro USB (charging and data) |
| SIM Slot | Standard 6-pin (U)SIM |
| Storage Slot | microSD (up to 32 GB) |
| Wireless Security | 64/128-bit WEP, WPA/WPA2 |
| Firewall | NAT, IP/Port Filter, MAC Filter, DoS Prevention |
| Operating Temperature | -10 to 55°C (14 to 131°F) |
| Certifications | FCC, CE |
| Package Contents | DWR-720, Battery, USB Cable |
Frequently Asked Questions - DWR-720 D-LINK
User questions about DWR-720 D-LINK
0 question about this device. Answer the ones you know or ask your own.
Ask a new question about this device
Download the instructions for your Telephone in PDF format for free! Find your manual DWR-720 - D-LINK and take your electronic device back in hand. On this page are published all the documents necessary for the use of your device. DWR-720 by D-LINK.
USER MANUAL DWR-720 D-LINK
natural_image
Black D-Link smartphone with two connected buttons and a 'D-Link' logo (no visible text beyond branding)User Manual
HSPA+ Mobile Router
DWR-720
Preface
D-Link reserves the right to revise this publication and to make changes in the content hereof without obligation to notify any person or organization of such revisions or changes.
Manual Revisions
| Revision Date Description | |
| 1.0 10/02 /2015 • Initial release |
Trademarks
D-Link and the D-Link logo are trademarks or registered trademarks of D-Link Corporation or its subsidiaries in the United States or other countries. All other company or product names mentioned herein are trademarks or registered trademarks of their respective companies.
Copyright © 2015 by D-Link Corporation, Inc.
All rights reserved. This publication may not be reproduced, in whole or in part, without prior expressed written permission from D-Link Corporation, Inc.
Table of Contents
Product Overview....1
Package Contents....1
System Requirements 2
Introduction 3
Hardware Overview....4
Top Side....4
Battery Cover Removed....5
LED Icons 6
Installation 7
Connect to Your Network 7
Insert a microSD Card 8
Driver Installation 9
Wireless Installation Considerations....10
Configuration....11
Initial Connection to the Router 11
Connect via USB....11
Connect via Wi-Fi 12
Web-based Configuration....14
Configuration Utility....14
Home 15
Navigation....15
Device Status....16
Home....17
Wizard....18
Internet....20
Connection 20
2G/3G Modem 22
SIM 23
PLMN....24
Network 25
Wi-Fi....25
DHCP 27
NAT....29
SMS....31
Local 31
New Message....31
Wi-Fi....32
Basic....32
Wireless Security 34
Wired Equivalent Privacy (WEP) 34
Wi-Fi Protected Access (WPA)....35
Wi-Fi Protected Setup (WPS) 36
MAC Filter 37
Station Lists....38
Security 39
Firewall 39
IP Filter 39
IPv6 Filter 40
MAC Filter 41
DDOS....42
URL Filter....43
Table of Contents
| Application | 44 |
| About | 44 |
| Configuration | 45 |
| Firmware Upgrade | 46 |
| Standby Mode | 47 |
| Remote Control | 48 |
| Password | 50 |
| Date and Time | 51 |
| Language | 53 |
| System Log | 54 |
Connecting to a Wireless Network ....55
Using Windows 8.1/8.0 55
Using Windows 7 ....57
Configuring Wireless Security 59
Using Windows Vista™ 62
Configuring Wireless Security 63
Using Windows ^2 XP 65
Configure WEP 66
Configure WPA-PSK....68
Troubleshooting....70
Networking Basics....72
Check your IP address....72
Statically Assign an IP address....73
Technical Specifications 74
Regulatory Information 75
Product Overview Package Contents
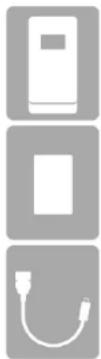
D-Link DWR-720 HSPA+ Mobile Router
Battery
USB Cable
If any of the above items are missing from your package, please contact your reseller.
System Requirements
| Network Requirements | A compatible (U)SIM card with mobile data service1 |
| Web-based Configuration Utility Requirements | Computer with the following:Windows®, Macintosh, or Linux-based operating systemAn installed Ethernet adapterBrowser Requirements:Internet Explorer 8 or higherFirefox 12.0 or higherSafari 4.0 or higherChrome 20.0 or higherWindows® Users: Make sure you have the latest version of Java installed. Visit www.java.com to download the latest version. |
1 Subject to services and service terms available from your carrier.
Introduction
The D-Link DWR-720 HSPA+ Mobile Router lets you share a fast mobile Internet connection with multiple PCs and mobile devices wherever you go. It offers 3G HSPA+ compatibility for fast downlink and uplink data rates, so you get the high-speed upload and download speeds even when you're on the go. Set up a personal mobile network anywhere, anytime allowing you and those around you to access the Internet, and share files.
High-Speed Mobile Internet with 3G Connectivity
The DWR-720 HSPA+ Mobile Router gives you high-speed access to the Internet wherever you are and lets you share it on the go. Using HSPA+ technology, you can achieve download speeds of up to 21.6 Mbps and upload speeds of up to 5.76 Mbps ^1 . The built-in 3G antenna provides a reliable connection to your 3G service provider, and a separate Wi-Fi antenna gives extended coverage to the computers and mobile devices connected to the DWR-720.
Mobile Internet for All of Your Devices
The HSPA+ Mobile Router lets you share your fast mobile connection over Wi-Fi from a device small enough to fit in your pocket. With the DWR-720, you can get online with your notebook, smartphone, tablet, or any other wireless device using a single 3G mobile connection. The DWR-720 provides high-speed Wireless N coverage to give high-speed wireless access to everybody – whether you are with colleagues on a business trip, or travelling with friends and family.
Built-in Software for Instant Access Anywhere
The DWR-720 is truly plug and play, with drivers built right into the router so you can connect without the need to install anything. Open a browser, connect the router, and you can set up your network right from a web interface. This means that notebooks and netbooks without a CD-ROM drive can connect and get up and running in no time. Once the device is set up, you can simply power it on to start up your portable mobile network, meaning that you can share your mobile Internet connection without even needing a computer.
Designed for True Portability
The DWR-720 HSPA+ Mobile Router is small and slim enough to carry around in your purse, bag, or pocket. It features a microSD card slot for optional removable storage (up to 32 GB), allowing you to always have your files and contacts on hand. The built-in 2000 mAh rechargeable Li-Ion battery can provide up to six hours of mobile usage, meaning that you can share your mobile Internet connection in the car, in the park, or anywhere, and work or play longer without needing to recharge.
^1 All references to speed are for comparison purposes only. Actual speeds will vary depending on a range of factors including mobile network coverage, signal strength, network activity, and environmental conditions.
Hardware Overview
Top Side
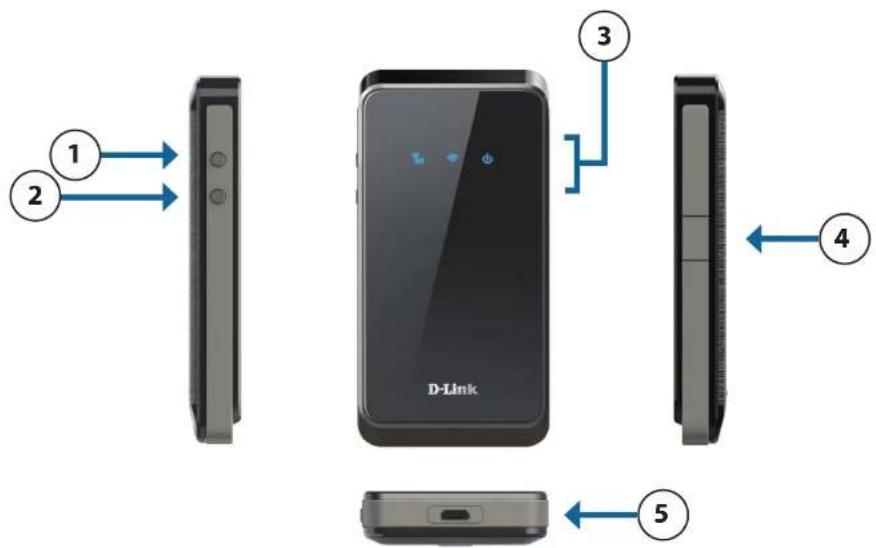
| 1 | Power Button Press and hold this button for 6 seconds to power on/off the device. | |
| 2 | WPS Button | Press this button to add new wireless devices quickly and easily using Wi-Fi Protected Setup (WPS). |
| 3 | Status LEDs | Please refer to LED Icons on page 6. |
| 4 | microSD card slot | If you wish to use the onboard storage functionality, insert a microSD card here. |
| 5 | Micro USB port | Use the included cable to connect to a powered USB port to charge the device, or connect to a computer to access the configuration utility. |
Hardware Overview
Battery Cover Removed
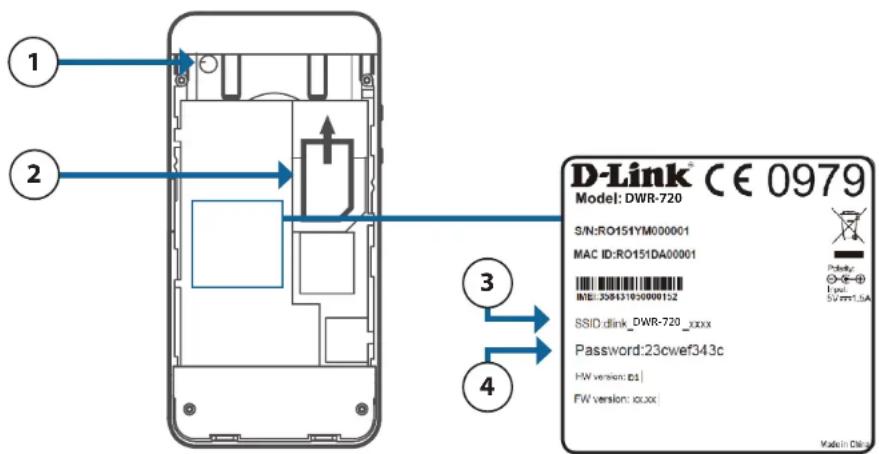
| 1 | Reset Button | Using a paper clip, press and hold this button for 5 seconds to reset the device to factory defaults.Note: Ensure that the battery is inserted and the unit is powered on when pressing the reset button. |
| 2 | SIM Card Slot Insert a | SIM card to access the Internet and your SIM card contacts list. |
| 3 | Wi-Fi Network (SSID) | The factory default network name (SSID) of the DWR-720 will be displayed here. |
| 4 | Network (SSID)Password | The network (SSID) password of the DWR-720 will be displayed here. |
Hardware Overview LED Icons
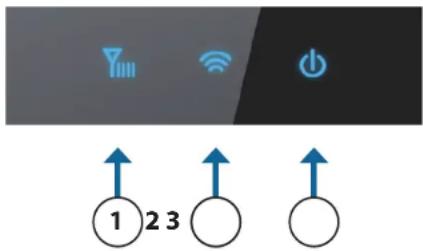
| Number | Name Color Explanation | ||
| 1 | Signal LED | Blue | Solid: Registering with 3G network |
| Blinking: Connected to 3G network | |||
| Purple | Solid: Registering with 2G network | ||
| Blinking: Connected to 2G network | |||
| Red | No signal or SIM error | ||
| 2 | Wi-Fi LED | Blue | Solid: Wi-Fi Active |
| Blinking: Transmitting data / WPS active | |||
| 3 | Battery LED | Blue | Battery level greater than 50% |
| Amber | Charging | ||
| Green | Battery level 10% - 50% | ||
| Red | Battery Low | ||
| Purple | SMS message received |
Installation
This section will guide you through the installation process.
Connect to Your Network
- Ensure that your DWR-720 Mobile Wi-Fi Hotspot 21 Mbps is powered off.
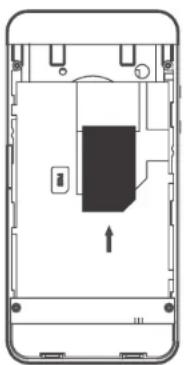
- Remove the back cover and take out the battery. Slide your (U)SIM card into the slot provided, ensuring that the alignment is the same as indicated by the logo next to the slot. The gold contacts on the card should be facing downwards.
Caution: Always unplug and turn off the router before installing or removing the SIM card. Never insert or remove the SIM card while the router is in use.
- Press and hold the power button on the side of the router.
a. The Battery LED will light up green as the router performs its initialization processes.
b. After a few moments, the LED icons will show the current status of the router's various functions. For more details on the LED icons, please refer to LED Icons on page 6
natural_image
Diagram of a smartphone rear panel showing internal components and a central device (no text or symbols)Insert a microSD Card
- Ensure that your DWR-720 HSPA+ Mobile Router is powered off.
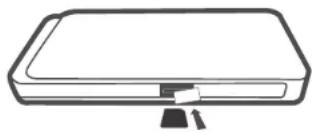
- Open the cover of the microSD slot on the side of the router.
- Insert the microSD card into the slot and push it in until it locks into place.
- Close the cover.
natural_image
Simple line drawing of a rectangular electronic device with a small clip and two connectors (no text or symbols)Driver Installation
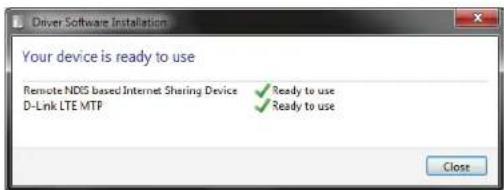
When you plug the DWR-720 into your computer, any necessary drivers will immediately install. . Your version of Windows may prompt you to confirm the driver installation.
Note: These drivers are Windows-only. Mac and Linux users will still be able to configure the DWR-720 using the web configuration utility described in Configuration Utility on page 14.
Wireless Installation Considerations
The DWR-720 can be accessed using a wireless connection from anywhere within the operating range of its wireless network. Keep in mind that the quantity, thickness, and location of walls, ceilings, or other objects that the wireless signals must pass through may adversely affect wireless signals. Ranges vary depending on the types of materials and background RF (radio frequency) noise in your home or office. The key to maximizing the wireless range is to follow these basic guidelines:
- Minimize the number of walls and ceilings between the router and other network devices. Each wall or ceiling can reduce your adapter's range from 3 to 90 feet (1 to 30 meters).
- Be aware of the direct line between network devices. A wall that is 1.5 feet thick (0.5 meters) appears to be almost 3 feet (1 meter) thick at a 45-degree angle. At a 2-degree angle it appears over 42 feet (14 meters) thick. Position devices so that the signal will travel straight through a wall or ceiling (instead of at an angle) for better reception.
- Try to position access points, wireless routers, and computers so that the signal passes through open doorways and drywall. Materials such as glass, metal, brick, insulation, concrete, and water can affect wireless performance. Large objects such as fish tanks, mirrors, file cabinets, metal doors, and aluminum studs may also have a negative effect on range.
- If you are using a 2.4 GHz cordless phone, make sure that the 2.4 GHz phone base is as far away from your wireless device as possible. The base transmits a signal even if the phone is not in use. In some cases, cordless phones, X-10 wireless devices, and electronic equipment such as ceiling fans, fluorescent lights, and home security systems may dramatically degrade wireless connectivity.
Configuration
This section will show you how to configure your new D-Link mobile router using the web-based configuration utility.
Initial Connection to the Router
By default, the DWR-720 comes configured to work with most 3G SIM cards. Simply connect to it via Wi-Fi or use the included USB to access the SIM's 3G Internet connection. When configuring the router for the first time, you will need to establish a direct connection with the router in order to access the web-based configuration utility. This can be done using the included USB cable, or by connecting wirelessly to the DWR-720. Ensure that the router is powered on and has sufficient battery power before commencing the setup process.
Connect via USB
To connect to the router via USB, plug the provided micro USB cable into the micro USB port on the bottom of the router, and plug the other end into an available USB port on your computer. Your router is now ready for configuration, please refer to Configuration Utility on page 14 to continue the setup process.
Connect via Wi-Fi
Note: The following example uses Windows 7's built-in wireless connection utility. If you are using a different operating system, or a third party connection utility, the process may be different. Please refer to the documentation that came with your operating system or wireless client for further information on how to connect to a wireless network.
To connect to the router using Wi-Fi, open your operating system's wireless networking utility and scan for available networks to connect to. By default, the network name (SSID) of the DWR-720 will be in the format dlink_DWR-720_xxxx, where "xxxx" represents the last four character's of the router's MAC address.
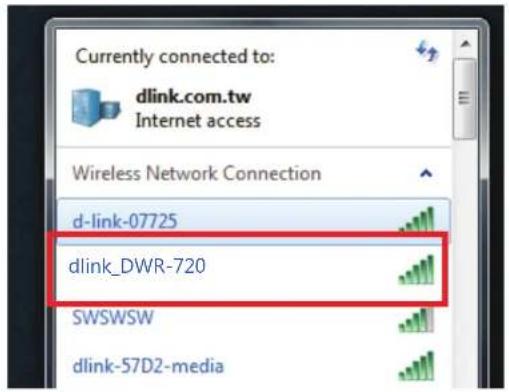
Once you have located your DWR-720's wireless network, connect to it.
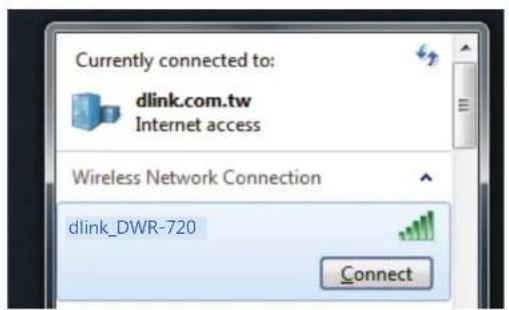
Section 3 - Configuration
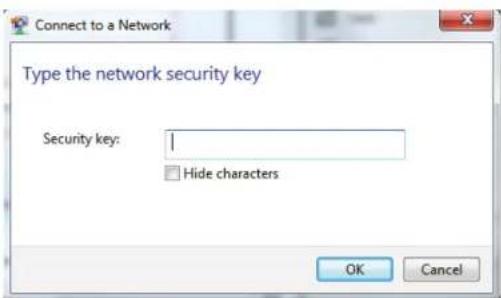
You will then be prompted to enter the network security key for your router. The unique security key for your router will be displayed on a sticker in the router's battery bay. Enter the security key in the box provided and click OK. Your wireless connection utility should confirm that the connection is successful, and you can move to the next step to continue to configuration process.
Web-based Configuration
To access the configuration utility, open a web browser (such as Internet Explorer) and enter the IP address of the router, which is 192.168.0.1 by default.

Configuration Utility
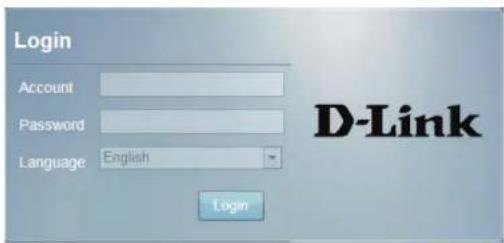
Once you have reached the configuration utility through your web browser, you will need to log in. Enter admin as the username, and then enter the password. By default, the password is blank. You can also select your language from the drop-down menu.
Click Login to continue.
Home Navigation
Throughout the interface you will find a menu bar at the top of the page which includes tabs for easy navigation, and a summary bar in the upper right corner with a quick view of essential information.

Home The Home tab will return you the home page, where a summary of the system information is shown.
Wizard: Click on this tab to start the setup wizard, which will guide you through the basic setup process.
Internet: The Internet tab gives you Internet setup and settings options.
Network: The Network tab allows you to configure the network settings for your Local Area Network (LAN).
SMS: From the SMS you can view and send SMS messages via your mobile network.
Wi-Fi: The Wi-Fi allows you to configure your Wi-Fi network, as well as add new devices using WPS.
Security: The Security tab allows you to configure firewall and security settings to protect your network from WAN-side intrusions.
Application: From this tab, you can manage the administrative configuration of your router, such as time and date, firmware, language, and remote management.
Device Status
A summary of the device's current status will be displayed on the information panel at the top of the right-hand side of the navigation bar. The following is a description of the indications, from left to right.

SIM: This icon shows whether or not a compatible (U)SIM card has been inserted into the device.
SMS: The number to the right of this icon indicates the number of unread messages in the SMS inbox.
Signal Strength: Indicates the current strength of the mobile network signal being received.
Operator Name: The name of the mobile network operator to which the device is currently connected.
Roaming: Indicates that the device is connected to a network other than your service provider's home network.
Internet: Indicates that there is an Internet connection present.
Wi-Fi Network: Indicates that the router's Wi-Fi network is currently active. The number to the right of this icon indicates the number of wireless clients currently connected to the router's Wi-Fi network.
Logout: Click this button to log out of the configuration interface.
Home
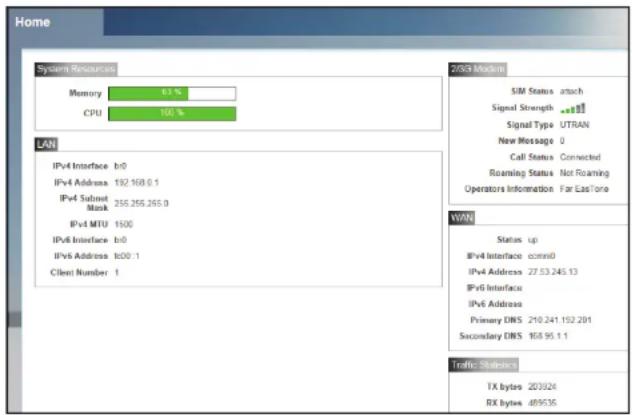
The Home page acts as a dashboard to quickly display your configuration settings and provide a summary of the current status of your network.
System This area displays the percentage of the router's memory and Resources: CPU currently being used by the system.
LAN: This area displays a summary of the current settings for the router's LAN.
2G/3G This area shows the current status of your 2G or 3G mobile Modem: network connection.
WAN: This area displays a summary of the router's current WAN settings. These details will reflect the mobile network connection which is being received from the service provider.
Traffic This area shows the amount of data which has been sent (TX) Statistics: and received (RX) over the mobile network. This information may not reflect the amount recorded by your mobile service provider.
Wizard
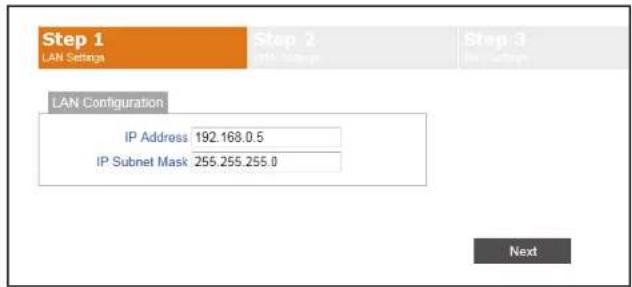
The Wizard page will guide you through the steps required to configure the basic settings of your router such as the IP address, network name (SSID), and password. Click on the Wizard button on the navigation bar to commence the wizard.
LAN CONFIGURATION
IP Address: If you wish to change the router's IP address, enter the new address here. If you change the IP address from the default, you will need to enter the new address in your Internet browser's address bar in order to access the web-based configuration utility.
IP Subnet If you wish to change the router's subnet mask, enter it here. Mask:
Click Next to continue.
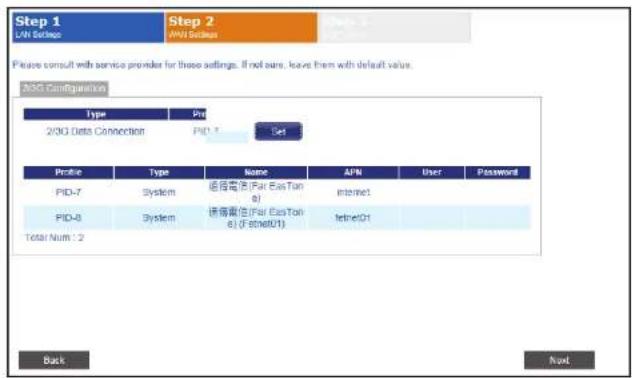
2/3G CONFIGURATION
If you wish to change the 2G or 3G service provider or connection type, click on a profile in the list to highlight it, and click Set to set that profile as the default.
Click Next to continue, or Back to return to the previous step.
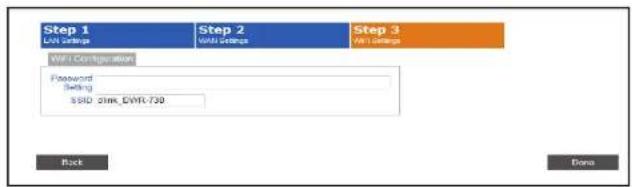
WI-FI CONFIGURATION
Password Choose a password for your wireless security. Clients Setting: will need this password in order to access your network wirelessly. If you are currently connected to the router using Wi-Fi, you will need to reconnect to the router using your new password once the wizard has been completed.
SSID: If you wish to change your wireless network name (SSID), enter a new name in the field provided. If you change the SSID, you may need to re-connect to the router using the new SSID before you can access your network or the configuration utility.
Click Done to complete the wizard, or click Back to return to the previous page.
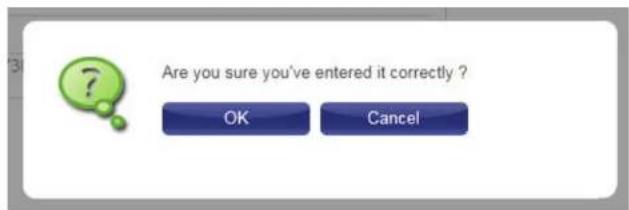
After you have clicked Done, a confirmation window will appear. Click OK to save the configuration.
Internet
Connection
This page allows you to configure the Internet settings for your mobile network connection. Use the tabs in the left-hand column to navigate through the different settings categories.
Flight Mode: Flight mode turns off all communications so that the device can be powered on safely when in an aircraft. Select whether you want to Enable or Disable flight mode from the dropdown menu, and click Change to effect the change.
Preferred Select your preferred cellular network connection mode: Cellular Always On - The router will automatically connect to your Network: preferred mobile network and remain connected while the device is powered on. Manual Mode - You must manually connect to the preferred mobile network. On Demand - The router will connect to the preferred mobile network when Internet access is required.
Click Change to effect the change.
Roaming Select whether you would like to Enable or Disable mobile Mode: network roaming from the drop-down menu.
Caution: Using networks other than the ones provided by your service provider may result in roaming charges.
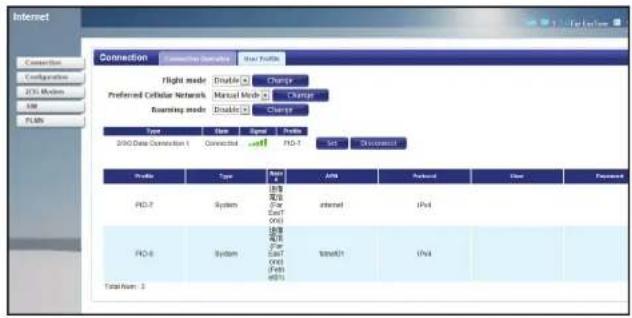
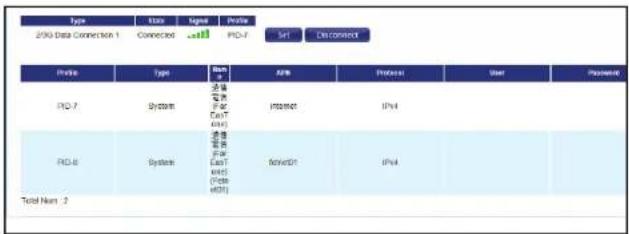
Connection: Shows the type and status of the current mobile connection. To change the connection profile, select a user profile from the table below and click Set to activate the profile. Click Disconnect to manually disconnect the current mobile data service.
Profiles: The profiles table shows the details of currently configured user profiles. To add a new user profile, navigate to the User Profile tab at the top of this section.
Name: Click Add to add a new user profile.
APN: Enter a name to identify the new user profile.
Enter the Access Point Name (APN) for the connection. If you do not know this information, please contact your service
Protocol: provider.
Select the protocol to be used for the connection from the
User: drop-down menu.

Password: Enter the username to be used for this connection.
Delete: Enter the password to be used for this connection.
Click the delete icon to delete this profile from the list.
Click OK to save the profile.
Click Apply to apply the profile settings and return to the Internet menu.
2G/3G Modem
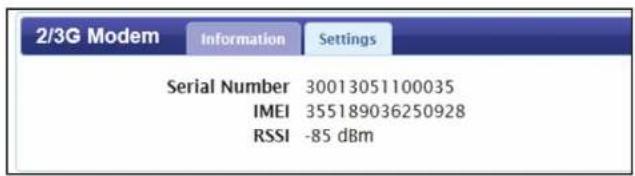
This section displays information about your 2G or 3G modem connection.
INFORMATION
Information: Displays information about your 2G or 3G modem.
SETTINGS
Network: Select your preferred modem type from the drop-down menu:
Auto - The modem will automatically select the modem type depending on the network it is connected to.
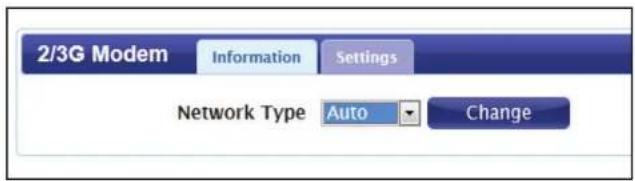
3G Only - The modem will only connect to 3G networks.
2G Only - The modem will only connect to 2G networks.
If you wish to change the modem type, select your new modem type and click Change to effect the change. Re-enter the new PIN code.
Click Apply to apply the changes.
SIM
This section allows you to turn SIM lock on or off for the SIM card which is currently inserted into the router.
PIN Code: Enter the PIN code for the SIM card. Click Enable to turn on SIM lock, or click Disable to turn off SIM lock.

PLMN
This page allows you to view available Public Land Mobile Networks (PLMN). This page can also be used to select a preferred network when you are roaming outside of your home network.
Mode: Select Automatic to allow the router to automatically connect to the first available network when roaming. Select Manual to choose your preferred roaming network from the list below.
If you have selected Manual mode, click on the preferred network to select it, and then click the Update button to select that network as the preferred network. Click Query to refresh the list of available networks.
Note: You will need to manually disconnect the current mobile data service before selecting a network using PLMN. Please refer to Connection on page 20 for further information on how to do this.

Network
The Network pages allow you to check the current status of your Local Area Network (LAN), and make changes to LAN settings.
Wi-Fi
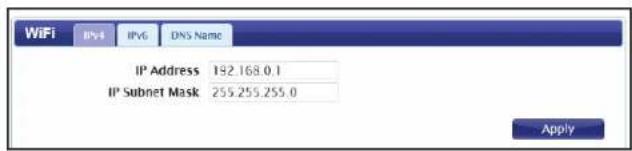
This section allows you to configure the IP settings for your wireless network.
IPV4
IP Address: Enter the IPv4 address for your Wi-Fi network. If you change this address, you will need to enter the new address in your web browser's address bar in order to access the web-based configuration utility.
IP Subnet Mask: Enter the IPv4 subnet mask for your Wi-Fi network.
Click Apply to save the current configuration.
IPV6
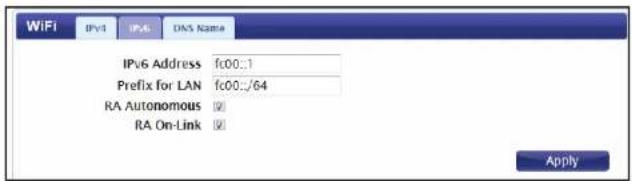
IPv6 Address: Enter the IPv6 address for your Wi-Fi network.
Prefix for LAN: Enter the prefix to be used to delegate IPv6 addresses to the LAN.
RA Autonomous: Check the box to set the router announcement mode to autonomous.
RA On-Link: Check the box to enable router announcement on-link
Click Apply to save the current configuration.
DNS NAME
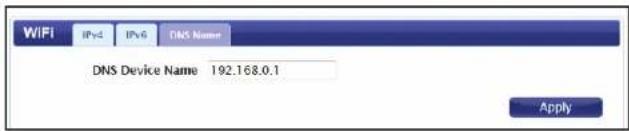
DNS Device Enter your router's DNS device name in the field provided. Name:
Click Apply to save the current configuration.
DHCP
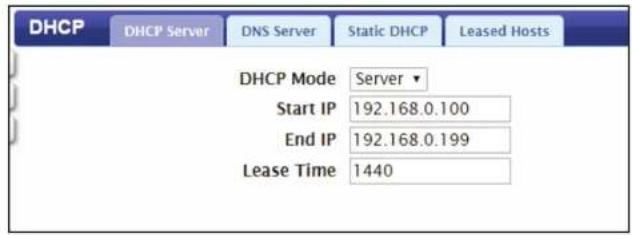
The DWR-720 has a built-in DHCP server which can assign IP addresses to connected clients. This section allows you to configure the DHCP settings.
DHCP SERVER
DHCP Mode: Select None from the drop-down menu if you do not wish to enable the DHCP Server. Select Server to specify a DHCP server, and enter the information in the fields below.
Start IP: Set the starting address of the IP range.
End IP: Set the ending address of the IP range.
Lease Time: Set the lease time of the IP addresses issued by the DHCP server.
Click Apply to save the current configuration.
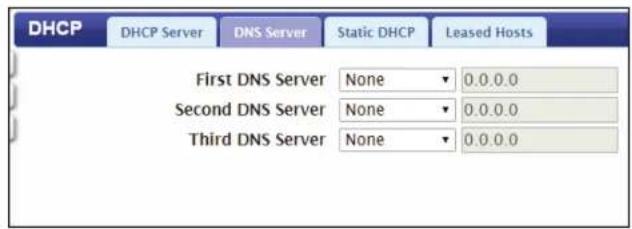
DNS SERVER
First/Second/ Select None from the drop-down menus if you do not wish to Third DNS specify a first, second, or third DNS server. Select User Define Server: to specify a DNS server, and enter the address of the server in the field provided.
Click Apply to save the current configuration.
STATIC DHCP
Use this option to specify a DHCP address reservation to a particular device or machine based on MAC address. To add a new reservation, click Add.
MAC Address: Enter the MAC address of the device or machine for which you wish to make the DHCP reservation.
IP Address: Enter the IP address that you wish to reserve. This address must be within the DHCP address pool.
Click OK to save the reservation.

LEASED HOSTS
This table shows the details of clients currently assigned a DHCP address from the DHCP server. Click Refresh to update the table.
MAC Address: The MAC address of the device or machine assigned an DHCP address.
IP Address: The IP address of the device or machine assigned an DHCP address.

NAT
This section allows you to configure functions related to Network Address Translation (NAT) such as port triggering and DMZ.
PORT TRIGGER
Use this option to have inbound traffic automatically forwarded to a dynamic address on the LAN when triggered by outbound traffic. To add a new port triggering rule, click Add.
Active: Check the box to activate this rule.
Name: Specify a name to identify the rule.
Trigger Select TCP or UDP as the protocol for the trigger ports from Protocol: the drop-down menu.
Trigger Port: Enter the starting and ending trigger port for the rule.
Open Protocol: Select TCP or UDP as the protocol for the ports to be opened from the drop-down menu.
Open Port(s): Enter the starting and ending ports to be opened when the trigger occurs.
Delete: Click the Delete icon to delete the rule.
Click OK to save the rule. Click Apply to apply the current rules and return to the Network page.

DMZ
DMZ is short for Demilitarized Zone. Checking DMZ Enable will expose a chosen computer to the outside world by completely disabling all firewalls.
Note: Only recommend for advanced users, enabling this option will potentially expose your computer to cyber attacks over the Internet.
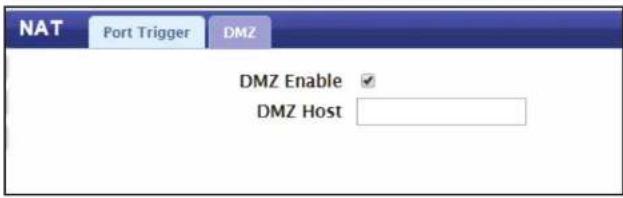
DMZ Host: Enter the DMZ host IP address here.
SMS
The DWR-720 can send and receive SMS text messages through the mobile network's SMS function.
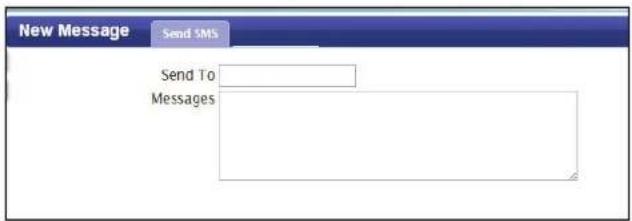
New Message
DMZ
Send To: Enter the phone number that you wish to send the message to.
Messages: Enter the body of the message to be sent.
Click Apply to save the current configuration.
Local
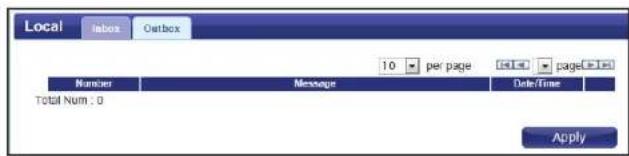
INBOX
This tab shows a summary of SMS messages in the inbox.
OUTBOX
This tab shows a summary of messages in the outbox which are yet to be sent.
Wi-Fi
The Wi-Fi pages allow you to check the current status of your Wi-Fi network, and make changes to Wi-Fi settings.
Basic
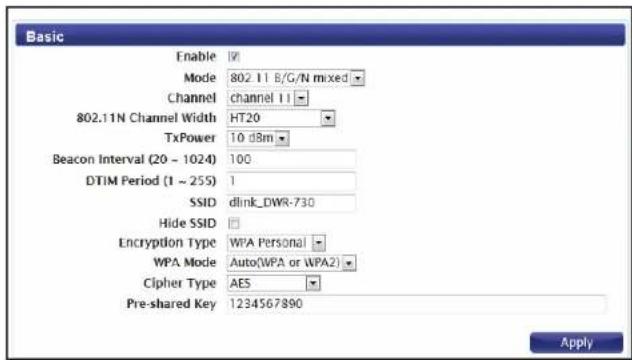
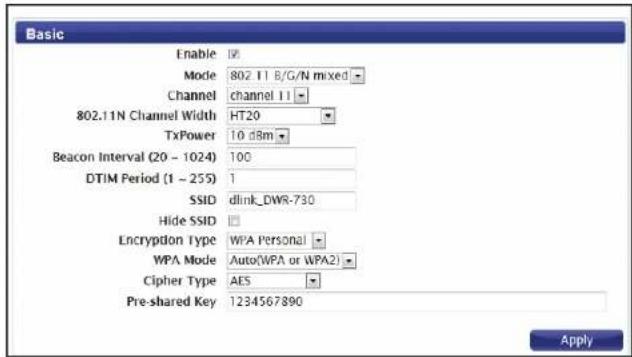
This section allows you to configure your Wi-Fi network and specify the wireless security method to be used to secure your network.
Enable Check the box to enable the Wi-Fi function.
Mode: Select the desired 802.11 wireless mode from the dropdown menu. You should make your selection based on the standards supported by the wireless clients which will be connecting to your network.
Channel: To have the router automatically select the optimal wireless channel, select Auto from the drop-down menu. If you wish to select a particular channel, select it from the drop-down menu.
802.11N If you are using the 802.11n standard, you can Channel Width: manually select the channel width which best suits your network environment.
TxPower: Select the desired transmission power from the drop-down menu.
Beacon Interval: The beacon interval determines how often information about the wireless network is broadcast. It is recommended that you do not adjust this setting unless instructed to do so.
Section 3 - Configuration
DTIM Period: The Delivery Traffic Indication Message broadcasts information about buffered data to clients that are currently in low-power mode. Enter the desired DTIM period as a number of beacon intervals.
SSID: Enter the SSID (network name) to identify your wireless network.
Hide SSID: Check the box to hide the SSID of your network. If the SSID is hidden, wireless clients must manually enter it in order to connect to your network.
Encryption Select the wireless encryption method that you wish to use Type: from the drop-down menu. Depending on the method that you select, you may need to configure additional settings. For more information regarding wireless encryption and how to configure it, please refer to Wireless Security on page 34. If you do not wish to enable wireless security, select None from the drop-down menu.
Click Apply to save the current settings.
Wireless Security
It is recommended that you enable wireless security on your router in order to protect your wireless network from unauthorized access. You should select a wireless security protocol that is compatible with the wireless clients which will be accessing your network.
Wired Equivalent Privacy (WEP)
Wired Equivalent Privacy (WEP) is an older wireless security standard, which although providing more protection than no security at all, has some weaknesses which could make it vulnerable to intrusion. It is recommended that you only use WEP if your wireless clients do not support Wi-Fi Protected Access (WPA). WEP is not supported by the 802.11n standard, and therefore you will not be able to achieve 802.11n speeds if using WEP.
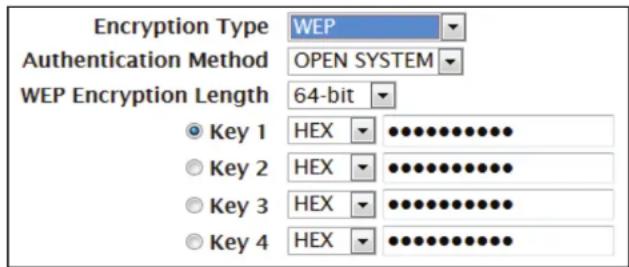
Encryption Type: Select WEP from the drop-down menu.
Authentication Select the desired authentication method from the drop- Method: down menu: Auto - The router will automatically determine the authentication method based on the client that is connecting to it. Open System - Clients do not require authentication in order to associate with the router. The encryption key will be used to encrypt data packets sent over the network. Shared - The encryption key is used for authentication as well as to encrypt data packets.
WEP Encryption Select the length of the encryption key to be used. Length: 64-bit - A 64-bit key comprises a string of 10 hexadecimal characters, or 5 ASCII characters. 128-bit - A 128-bit key comprises a string of 26 hexadecimal characters, or 13 ASCII characters.
Key 1-4: You can predetermine up to 4 WEP keys. Select the WEP key you wish to use by clicking on the radio buttons next to the keys. Select whether you wish to use HEX or ASCII characters in your key using the drop-down menu. Enter the desired key in the field provided. Click Apply to save the current settings.
Wi-Fi Protected Access (WPA)
Wi-Fi Protected Access (WPA) is a newer and more secure encryption protocol which makes significant improvements over WEP. There are two versions of WPA; the original WPA, and the newer WPA2.
Encryption Type: Select WPA Personal from the drop-down menu.
WPA Mode: Select the desired authentication method from the drop-down menu:
Auto (WPA or WPA2) - The router will automatically determine the version of WPA to be used based on the client that is connecting to it.
WPA - Clients will only be able to associate with the router using the WPA standard.
WPA2 - Clients will only be able to associate with the router using the WPA2 standard. Clients which do not support WPA2 will not be able to associate with the router.
Cipher Type: Select the desired cipher type from the drop-down menu: TKIP - This cipher is used by the WPA standard.
AES - A newer cipher used by the WPA2 standard. Use of this cipher type is required in order to achieve 802.11 speeds.
Pre-Shared Key The pre-shared key is the password which clients will require in order to connect to your network. Enter a password of between 8 and 63 characters in length.
Click Apply to save the current settings
| Encryption Type | WPA Personal |
| WPA Mode | Auto(WPA or WPA2) |
| Cipher Type | TKIP and AES |
| Pre-shared Key | 1234567890 |
Wi-Fi Protected Setup (WPS)
Wi-Fi Protected Setup (WPS) enables you to quickly and securely add compatible devices to your wireless network.
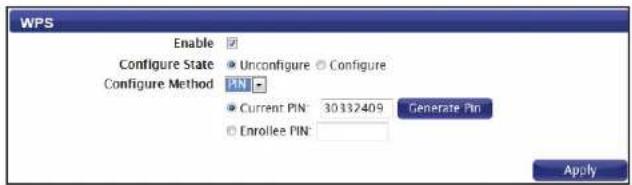
Enable: Check the box to enable the Wi-Fi Protected Setup feature.
Configure State: Select whether you wish to Configure or Unconfigure the WPS function using the radio buttons.
Configure Select the WPS method that you wish to use. If your device Method: supports Push Button Connection (PBC), simply select this option and click Apply to start the connection process. You will then have 120 seconds to press the WPS button on your wireless device in order to initiate the connection. If your device does not support PBC, you can select the PIN method and continue to the next step.
Current PIN: A PIN is a unique number that can be used to add the router to an existing network or to create a new network.
Generate PIN: For extra security, a new PIN can be generated. Click Generate to create a new PIN. The current PIN will be shown in the field next to Current PIN. This PIN can be used by wireless clients to join your network using the PIN method.
Enrollee PIN: If the device you are trying to add to the network was provided with a PIN number, select this option and enter the device's PIN in the field.
Click Apply to commence the connection process.
MAC Filter
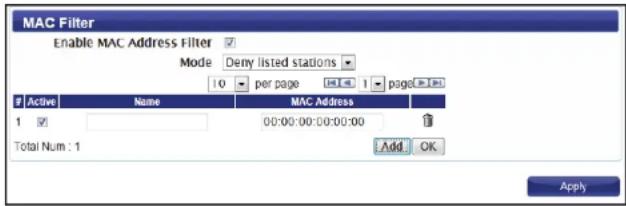
The MAC filtering option allows you to allow or deny access to wireless clients based on their MAC address.
Enable MAC Check the box to enable the MAC filtering feature. Address Filter:
Mode: Select the filtering mode from the drop-down menu. You can choose to Deny Listed Stations access to your network, or Allow Listed Stations access.
LISTED STATIONS TABLE
To add a new filtering rule, click Add.
Active: Check the box to activate the rule.
Name: Enter a name to identify the machine or station which will be filtered.
MAC Address: Enter the MAC address of the machine or station which you wish to filter.
Delete: Click the Delete icon to delete the rule from the table.
Click OK to save the current rule and add it to the table. Click Apply to save all changes and return to the Wi-Fi page.
Station Lists
The Station List tab shows a list of all wireless clients currently connected to your wireless network.

Security
The Security tab allows you to configure your router's firewall settings and enable features to protect your network from outside intrusions and malicious attacks.
Firewall IP Filter
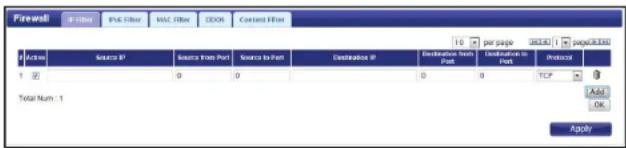
Click Add to add a new filtering rule.
Active: Check the box to activate the IP filter rule.
Source IP: Enter the source IP address to be filtered.
Source From Enter the starting port on the source IP. Port:
Source To Port: Enter the ending port on the source IP.
Destination IP: Enter the destination IP address to be filtered.
Destination From Enter the starting port of the destination IP. Port:
Destination To Enter the ending port of the destination IP. Port:
Protocol: Select the protocol for the IP filter rule.
Delete: Click the icon to delete the IP filtering rule.
Click OK to save the filtering rule. Click Apply to save the current configuration.
IPv6 Filter
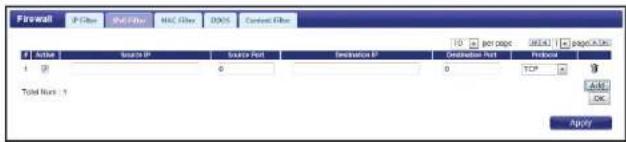
Click Add to add a new filtering rule.
Active: Check the box to active the IP filter rule.
Source IP: Enter the source IP address to be filtered.
Source Port: Enter the port for the source IP.
Destination IP: Enter the destination IP address to be filtered.
Destination Port: Enter the port on the destination IP.
Protocol: Select the protocol for the IP filter rule.
Delete: Click the icon to delete the IP filtering rule.
Click OK to save the current filtering rule. Click Apply to save the current configuration.
MAC Filter
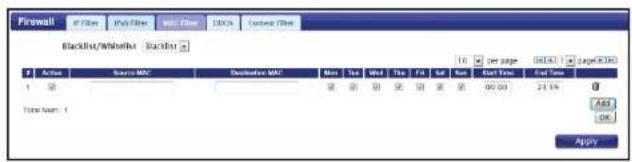
The MAC filter lets you to allow or deny access to your wireless network based on a client's MAC address.
Click Add to add a new MAC filtering rule.
Blacklist/ Select Blacklist to deny access to only the MAC addresses Whitelist: listed below. Select Whitelist to allow access to only the MAC addresses listed below.
Active: Check the box to activate the MAC filter rule.
Source MAC: Enter the MAC address of the machine or device which you wish to filter packets coming from.
Destination MAC: Enter the MAC address of the machine you wish to filter packets.
Day: Check the box for each day that you wish to activate the MAC filtering rule.
Start Time: Enter the starting time at which you wish to activate the MAC filtering rule each day.
End Time: Enter the ending time at which you wish to deactivate the MAC filtering rule each day.
Delete: Click the icon to delete this MAC filtering rule.
Click OK to add the current rule to the rules list. Click Apply to save the current configuration.
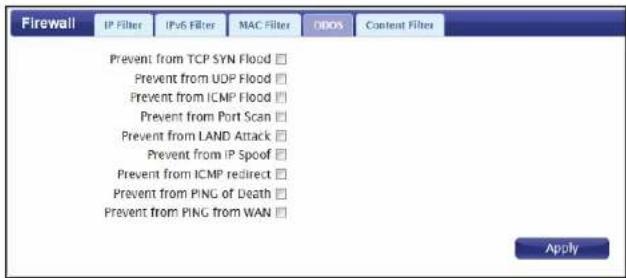
DDOS
This section allows you to enable various security features to protect against Denial of Service (DoS) attacks.
DoS Prevention Check the box next to the rule to enable prevention against Filters: that specific kind of DoS attack.
Click Apply to save the current configuration.
URL Filter
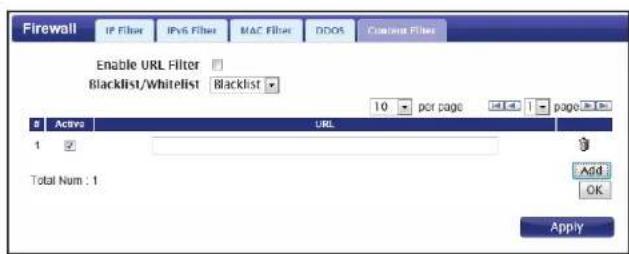
The content filter allows you to allow or deny access to specific URLs.
Enable URL Filter: Check the box to enable URL filtering.
Blacklist/ Select Blacklist to deny access to only URLs listed in the rule Whitelist: table. Select Whitelist to allow access to only URLs listed in the rule list.
Active: Check the box to activate the URL filtering rule.
URL: Enter the URL that you wish to allow or deny access to. If you enter a domain name, all URLs under this domain will be allowed or denied access.
Delete: Click the icon to delete the rule.
Click Add to save the rule and add it to the rule table. Click Apply to save the current configuration.
Application
This tab allows you to configure the router's administrative functions, such as time & date, remote access, and firmware. You can also access the system log.
About
This tab shows the router's basic information.
About
Device Name DWR-730 Configuration Manager
FW Version V2.00_CN
IMEI 355189036250928
Configuration
BACKUP
Click Backup to save the router's current configuration to a file on your computer. You will then be prompted with a "save file" dialogue, where you can choose where to save the configuration file.
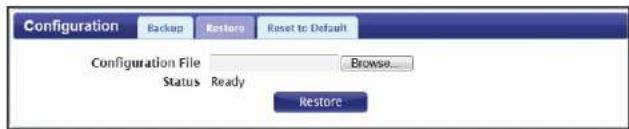
RESTORE
Click Browse to locate a previously saved configuration file on your computer. Once you have located the file, click Restore to configure the router according to the selected configuration file.
RESET TO DEFAULT
Click Reset to restore the router's settings to the factory defaults.
Warning: All settings stored on the router will be lost following a factory reset.


Firmware Upgrade
You can upgrade the firmware of the router here. Make sure the firmware file you want to use is on the local hard drive of the computer. Please check your local D-Link support site or http://support.dlink.com for firmware updates and language packs.
Click Choose File to locate a previously downloaded firmware file on your computer. Once the file has been located, click Upgrade to carry out the firmware upgrade process.

Important: All current settings will be restored to their factory defaults following a firmware upgrade.
Section 3 - Configuration
Standby Mode
This section allows you to configure the router's automatic power-saving modes.
Enable Auto Check the box to enable the automatic power saving Power Saving: features.
Enter Standby Enter the number of minutes after which the router will enter Mode: standby mode if no activity is detected.
Enter Hibernate Enter the number of minutes after which the router will enter Mode: hibernate mode if no activity is detected.
Auto Power Off: Enter the number of minutes after which the router will shut down if no activity is detected.
Click Apply to save the current configuration.
Remote Control
This section is for advanced users who wish to remotely configure the DWR-720.
HTTP
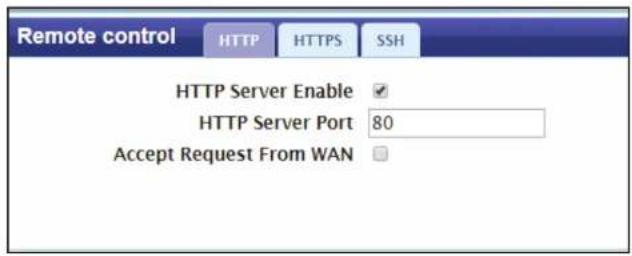
HTTP Server By default the HTTP Server is enabled. Check the box to Enable: disable this function. Please note, if you disable the HTTP Server function you will no longer be able to configure the router using this web configuration utility.
HTTP Server The HTTP Server port number. Port:
Accept Check this box to allow access to the web server from WAN. Request From WAN:
Click Apply to save the current configuration.
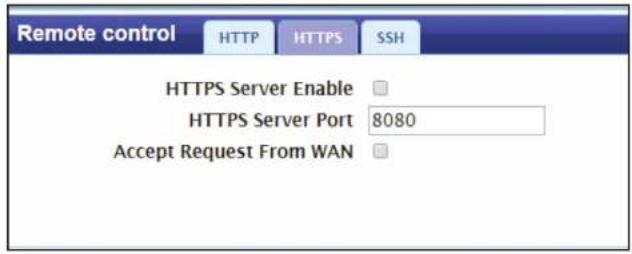
HTTPS
HTTPS Server By default the HTTPS Server is enabled. Check the box to Enable: disable this function. Please note, if you disable the HTTPS Server function you will no longer be able to configure the router using this web configuration utility.
HTTPS Server The HTTPS Server port number. Port:
Accept Request From WAN: Check this box to allow access to the web server from WAN
Click Apply to save the current configuration.
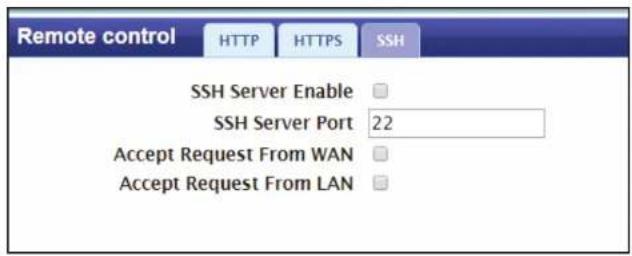
SSH
SSH Server By default the SSH Server is disabled. Check the box to Enable enable this function.
SSH Server Port: The SSH Server port number.
Accept Request Check this box to allow access to the web server from WAN. From WAN:
Accept Request Check this box to allow access to the web server from LAN. From LAN:
Click Apply to save the current configuration.
Password
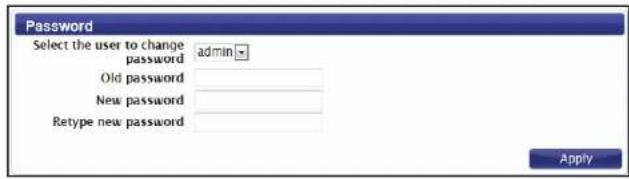
This page lets you change the configuration interface passwords for the Administrator (Admin) and User accounts.
Select the user Select whether you wish to change the password for the to change admin or user account from the drop down menu. password:
Old Password: Enter the existing password for this account.
New Password: Enter the new password for this account.
Retype New Type the new password again to confirm. Password:
Click Apply to save the current configuration.
Date and Time
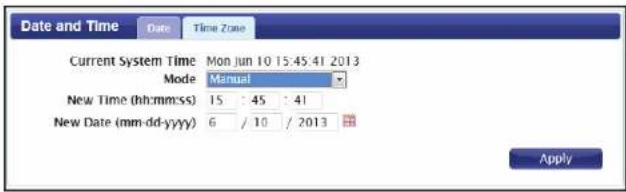
This page lets you set the time and date for your router, and also configure automatic time synchronization and daylight savings time.
DATE
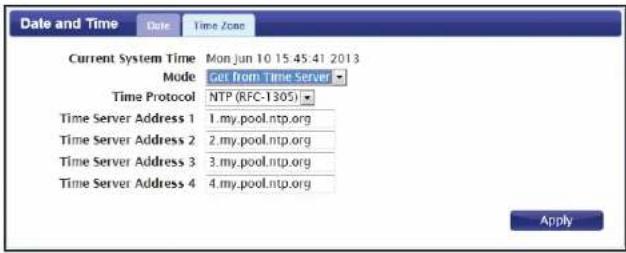
Current System Displays the current time and date according to the router's Time: system clock.
Mode: Select Manual to manually set the time and date, or select Get from Time Server to have the router automatically synchronize the time with a Network Time Protocol (NTP) server.
New Time: If you selected Manual mode, enter the current time.
New Date: If you selected Manual mode, enter the current date.
Time Protocol: If you selected Get time From Server, select the desired time protocol from the drop-down menu.
Time Server Enter up to four NTP server addresses which will be used to Address 1-4: synchronize the router's system time and date.
Click Apply to save the current settings.
TIME ZONE
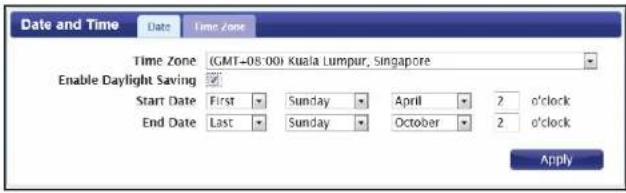
Time Zone: Select your time zone from the drop-down menu.
Enable Daylight Check the box to enable automatic adjustment for daylight Saving: saving.
Start Date: Enter the details of the starting date and time for daylight saving time in your region.
End Date: Enter the details of the ending date and time for daylight saving time in your region.
Click Apply to save the current settings.
Language
Language: Select your preferred language from the drop-down menu.
Click Apply to save the current configuration.

System Log
The system log displays a record of all events which occur while the router is running.
LOG SETTING
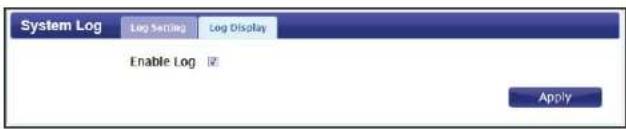
Enable Log: Check the box to enable the router's log-keeping function.
Click Apply to save the current configuration.
LOG DISPLAY
Refresh: Click to update the log display.
Clear Log: Click to clear all log entries.
Display Log Select the level of log event which you wish to view from the Level: drop-down menu.
![System Log Log Setting Log Display Refresh Clear_Log Display Log Level Notice Jun 10 15:46:29 (none) kern.notice kernel: [19763.556136] [PWM-SYS] pwm_bat_update(264) ______system__.pwm_bat_update Jun 10 15:46:29 (none) kern.notice kernel: [19763.567173] [PWM-SYS] pwm_bat_bq275xx_mode (352). Trigger Re-charging Jun 10 15:46:29 (none) kern_notice kernel: [19763.571313] [PWM-SYS] pwm_hotspot_protect (148): Enable Charging](/content/2026/05/882643/images/025536463b75be277923e424840853d922d7d59934905cfc004acc1ce0589ec5.jpg)
Connecting to a Wireless Network Using Windows 8.1/8.0
It is recommended to enable wireless security (WPA/WPA2) on your wireless router or access point before configuring your wireless adapter. If you are joining an existing network, you will need to know the security key (Wi-Fi password) being used.
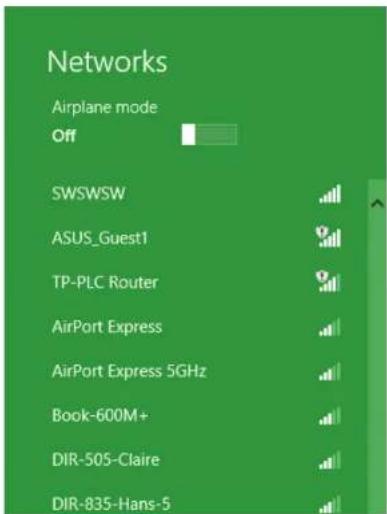
To join an existing network, locate the wireless network icon in the taskbar, next to the time display.
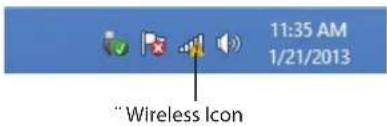
Clicking on this icon will display a list of wireless networks which are within connecting proximity of your computer. Select the desired network by clicking on the network name.
Section 4 - Connecting to a Wireless Network
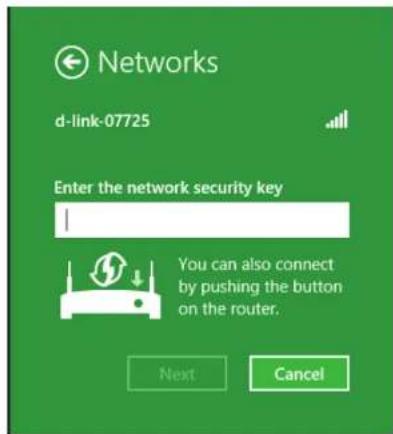
You will then be prompted to enter the network security key (Wi-Fi password) for the wireless network. Enter the password into the box and click Next.
If you wish to use Wi-Fi Protected Setup (WPS) to connect to the router, you can also press the WPS button on your router at this point to enable the WPS function.
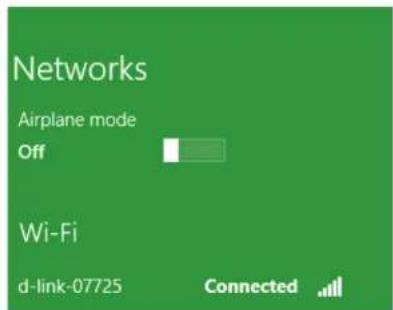
When you have established a successful connection to a wireless network, the word Connected will appear next to the name of the network to which you are connected.
Using Windows 7
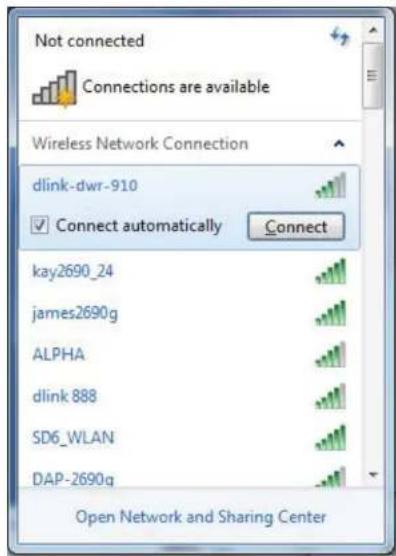
Windows 7 users may use the built-in wireless utility to connect to a wireless network. If you are using another company's utility or Windows 2000, please refer to the user manual of your wireless adapter for help with connecting to a wireless network. Most utilities will have a "site survey" option similar to the Windows 7 utility as seen below.
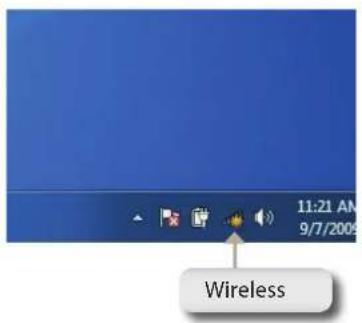
If you receive the Wireless Networks Detected bubble, click on the center of the bubble to access the utility. You can also click on the wireless icon in your system tray (lower-right corner).
The utility will display any available wireless networks in your area.
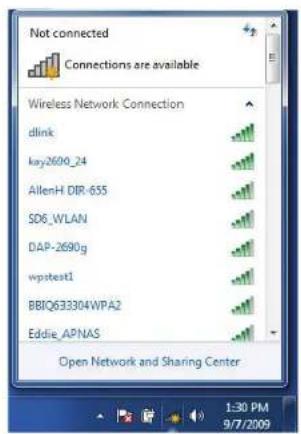
Highlight the wireless network (SSID) you would like to connect to and click the Connect button.
If you get a good signal but cannot access the Internet, check your TCP/IP settings for your wireless adapter. Refer to Networking Basics on page 72 for more information.
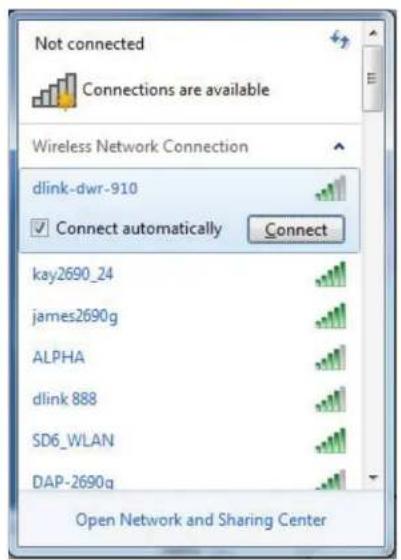
Configuring Wireless Security
It is recommended to enable wireless security (WPA/WPA2) on your wireless router or access point before configuring your wireless adapter. If you are joining an existing network, you will need to know the security key or pass phrase being used.
-
Click on the wireless icon in your system tray (lower-right corner).
-
The utility will display any available wireless networks in your area.
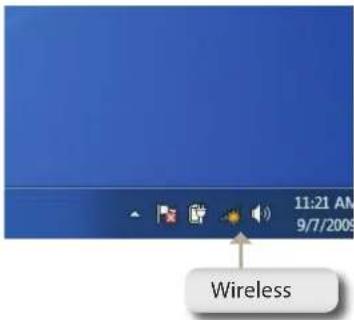
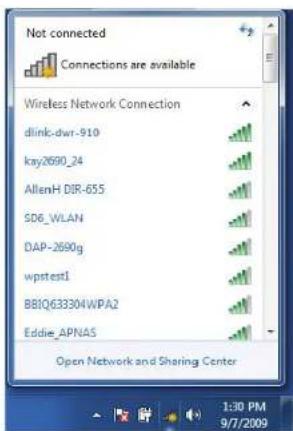
- Highlight the wireless network (SSID) you would like to connect to and click the Connect button.
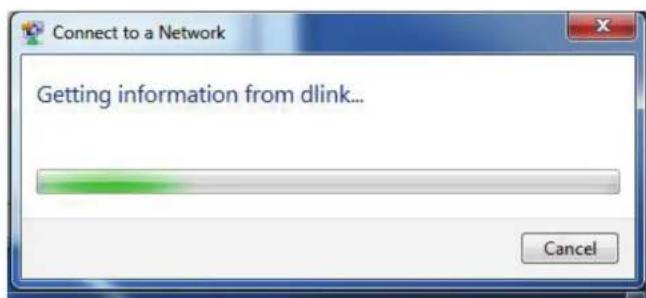
- The following window appears while your computer tries to connect to the router.
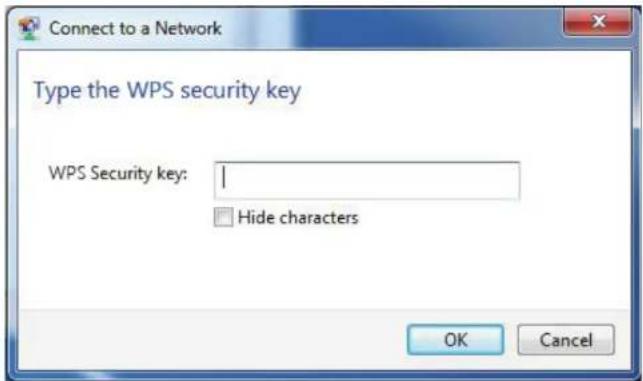
- Enter the same security key or passphrase that is on your router and click Connect.
It may take 20-30 seconds to connect to the wireless network. If the connection fails, please verify that the security settings are correct. The key or passphrase must be exactly the same as on the wireless router.
Using Windows Vista™
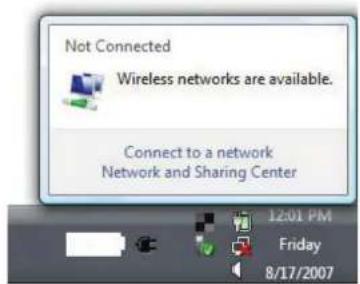
Windows ^® Vista ^™ users may use the built-in wireless utility. If you are using another company's utility or Windows ^® 2000, please refer to the user manual of your wireless adapter for help with connecting to a wireless network. Most utilities will have a "site survey" option similar to the Windows ^® Vista ^™ utility as seen below.
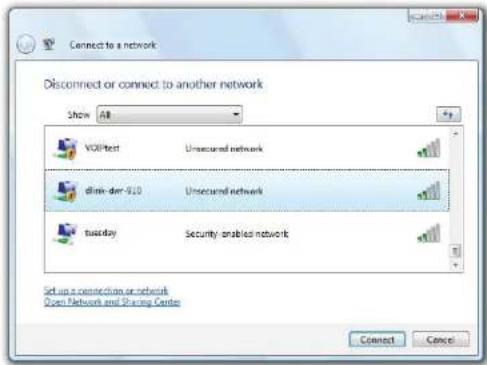
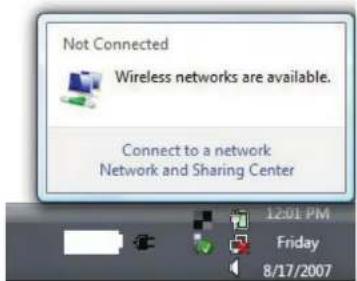
If you receive the Wireless Networks Detected bubble, click on the center of the bubble to access the utility.
or
Right-click on the wireless computer icon in your system tray (lower-right corner next to the time). Select Connect to a network.
The utility will display any available wireless networks in your area. Click on a network (displayed using the SSID) and click the Connect button.
If you get a good signal but cannot access the Internet, check the TCP/IP settings for your wireless adapter. Refer to Networking Basics on page 72 for more information.
Configuring Wireless Security
It is recommended to enable wireless security (WEP/WPA/WPA2) on your wireless router or access point before configuring your wireless adapter. If you are joining an existing network, you will need to know the security key or passphrase being used.
-
Open the Windows °Vista™ Wireless Utility by right-clicking on the wireless computer icon in your system tray (lower right corner of screen). Select Connect to a network.
-
Highlight the wireless network (SSID) you would like to connect to and click Connect.
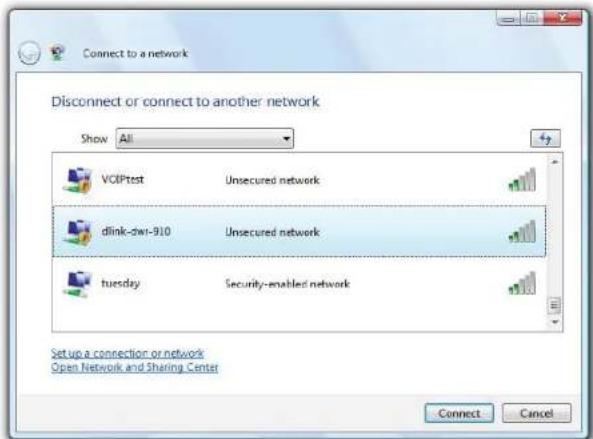
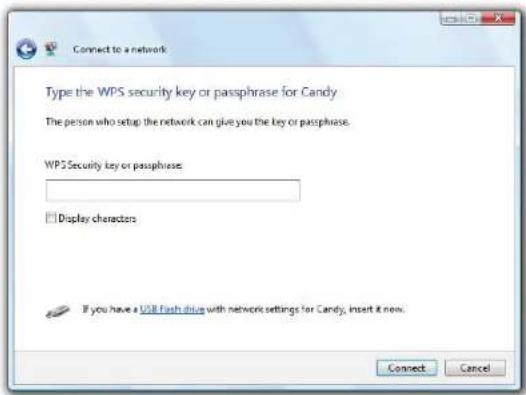
- Enter the same security key or passphrase that is on your router and click Connect.
It may take 20-30 seconds to connect to the wireless network. If the connection fails, please verify that the security settings are correct. The key or passphrase must be exactly the same as on the wireless router.
Connect to a Wireless Network Using Windows® XP
Windows® XP users may use the built-in wireless utility (Zero Configuration Utility). The following instructions are for Service Pack 2 users. If you are using another company's utility or Windows® 2000, please refer to the user manual of your wireless adapter for help with connecting to a wireless network. Most utilities will have a "site survey" option similar to the Windows® XP utility as seen below.
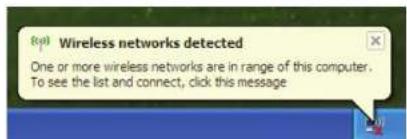
If you receive the Wireless Networks Detected bubble, click on the center of the bubble to access the utility.
or
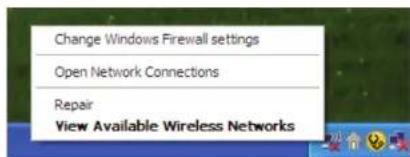
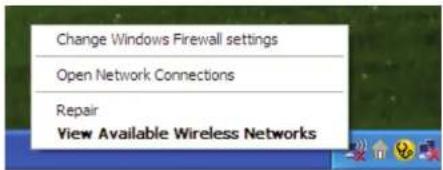
Right-click on the wireless computer icon in your system tray (lower-right corner next to the time). Select View Available Wireless Networks.
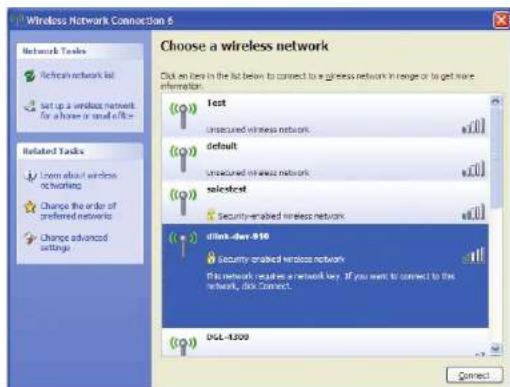
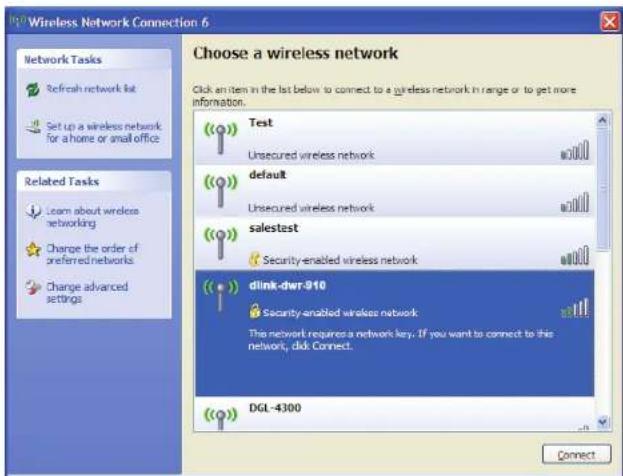
The utility will display any available wireless networks in your area. Click on a network (displayed using the SSID) and click the Connect button.
If you get a good signal but cannot access the Internet, check the TCP/IP settings for your wireless adapter. Refer to Networking Basics on page 72 for more information.
Configure WEP
It is recommended to enable WEP on your wireless router or access point before configuring your wireless adapter. If you are joining an existing network, you will need to know the WEP key being used.
-
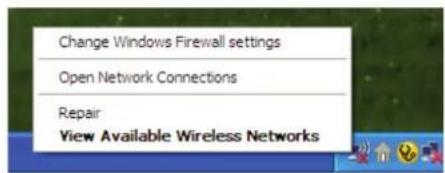
Open the Windows® XP Wireless Utility by right-clicking on the wireless computer icon in your system tray (lower-right corner of screen). Select View Available Wireless Networks.
-
Highlight the wireless network (SSID) you would like to connect to and click Connect.
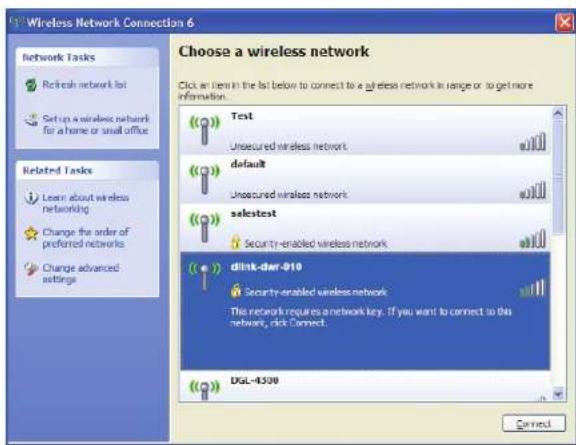
Section 4 - Connecting to a Wireless Network
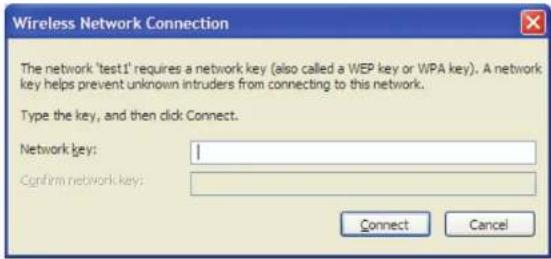
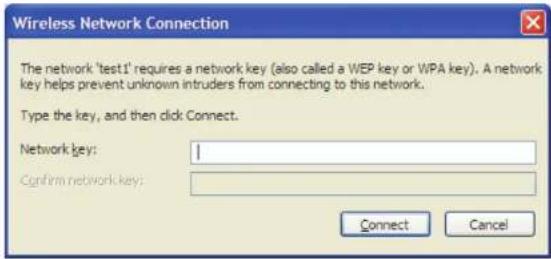
- The Wireless Network Connection box will appear. Enter the same WEP key that is on your router and click Connect.
It may take 20-30 seconds to connect to the wireless network. If the connection fails, please verify that the WEP settings are correct. The WEP key must be exactly the same as on the wireless router.
Configure WPA-PSK
It is recommended to enable WPA on your wireless router or access point before configuring your wireless adapter. If you are joining an existing network, you will need to know the WPA key being used.
-
Open the Windows ^4 XP Wireless Utility by right-clicking on the wireless computer icon in your system tray (lower-right corner of screen). Select View Available Wireless Networks.
-
Highlight the wireless network (SSID) you would like to connect to and click Connect.
- The Wireless Network Connection box will appear. Enter the WPA-PSK passphrase and click Connect.
It may take 20-30 seconds to connect to the wireless network. If the connection fails, please verify that the WPA-PSK settings are correct. The WPA-PSK passphrase must be exactly the same as on the wireless router.
Troubleshooting
This chapter provides solutions to problems that can occur during the installation and operation of the DWR-720. Read the following descriptions if you are having problems.
1. Why can't I access the web-based configuration utility?
When entering the IP address of your router (192.168.0.1 for example), you are not connecting to a website on the Internet or have to be connected to the Internet. The device has the utility built-in to a ROM chip in the device itself. Your computer must be on the same IP subnet to connect to the web-based utility.
- Make sure you have an updated Java-enabled web browser. We recommend the following:
- Internet Explorer 8 or higher, Chrome 19.0, Firefox 12.0, or Safari 4.0.
- If attempting to connect wirelessly, ensure that the wireless LED icon is showing. Also, ensure that you are connected to the correct network name (SSID) for your mobile router.
- Make sure that the computer you are using is not connected to any other devices (such as routers or switches) which might have the same IP address as the DWR-720, as this may cause an IP address conflict. If you have a conflict, temporarily unplug any other devices from your computer while you configure the DWR-720. You can also change the IP address of the DWR-720 in the Network section of the configuration utility. Please refer to Wi-Fi on page 25 for further information on changing the IP address. You may also need to renew your computer's IP address configuration. To do this, start the Command utility: Click on Start > Run. In the run box type cmd and click OK. (Windows Vista users type cmd in the Start Search box.) This will bring up a black screen with white text. At the command prompt, type ipconfig /release and wait for the process to be completed. Next, type ipconfig /renew which will renew your computer's IP address configuration.
- Disable any Internet security software running on the computer. Software firewalls such as ZoneAlarm, BlackICE, Sygate, Norton Personal Firewall, and Windows XP firewall may block access to the configuration pages. Check the help files included with your firewall software for more information on disabling or configuring it.
- Configure your Internet settings:
- Go to Start > Settings > Control Panel. Double-click the Internet Options Icon. From the Security tab, click the Default Level button to restore the settings to their defaults.
- Click the Connection tab and set the dial-up option to Never Dial a Connection. Click the LAN Settings button. Make sure nothing is checked. Click OK.
- Go to the Advanced tab and click the button to restore these settings to their defaults. Click OK three times.
- Close your web browser (if open) and re-open it.
2. What can I do if I forgot my password?
If you forgot your password, you must reset your router. Please note that this process will change all your settings back to the factory defaults.
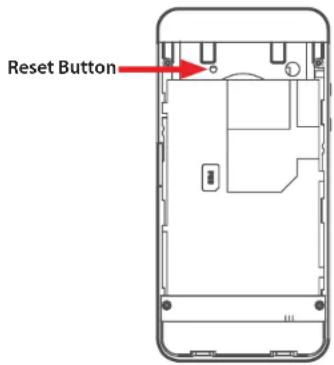
To reset the router, first remove the back cover of the router to expose the battery. Using a paperclip or similar object, press and hold the reset button, which is located inside the hole to the upper-left of the SIM card slot (see diagram). The DWR-720 will restore the factory default settings. Wait about 30 seconds for the router to restart before you attempt to reconnect to it. The default IP address is 192.168.0.1, and the default username is admin and the password should be left blank.
Networking Basics
Check your IP address
After you install your new D-Link adapter, by default, the TCP/IP settings should be set to obtain an IP address from a DHCP server (i.e. wireless router) automatically. To verify your IP address, please follow the steps below.
Click on Start > Run. In the run box type cmd and click OK. (Windows" Vista" users type cmd in the Start Search box.)
At the prompt, type ipconfig and press Enter.
This will display the IP address, subnet mask, and the default gateway of your adapter.
![C:\WINDOWS\system32\cmd.exe Microsoft Windows XP [Version 5.1.2600] (C) Copyright 1985-2001 Microsoft Corp. C:\Documents and Settings>ipconfig Windows IP Configuration Ethernet adapter Local Area Connection: Connection-specific DNS Suffix . : dlink IP Address. . . . . . . . . . . . . : 10.5.7.114 Subnet Mask . . . . . . . . . . . . : 255.255.255.0 Default Gateway . . . . . . . . . . : 10.5.7.1 C:\Documents and Settings>](/content/2026/05/882643/images/4a4a7df8042097f1c2fdd2aca719a64f08aeb3b25fa838c405da908445b4cbf3.jpg)
If the address is 0.0.0.0, check your adapter installation, security settings, and the settings on your router. Some firewall software programs may block a DHCP request on newly installed adapters.
Statically Assign an IP address
If you are not using a DHCP capable gateway/router, or you need to assign a static IP address, please follow the steps below:
Step 1
| Windows® 8 | Click on Start > Control Panel > Network and Internet Connections > Network Connections > Configure your Internet Protocol (IP) settings. |
| Windows® 7 | Click on Start > Control Panel > Network and Internet > Network and Sharing Center > Manage Network Connections. |
| Windows® VistaTM | Click on Start > Control Panel > Network and Internet > Network and Sharing Center > Manage Network Connections. |
| Windows® XP | Click on Start > Control Panel > Network Connections. |
Step 2
Right-click on the Local Area Connection which represents your network adapter and select Properties.
Step 3
Highlight Internet Protocol (TCP/IP) and click Properties.
Step 4
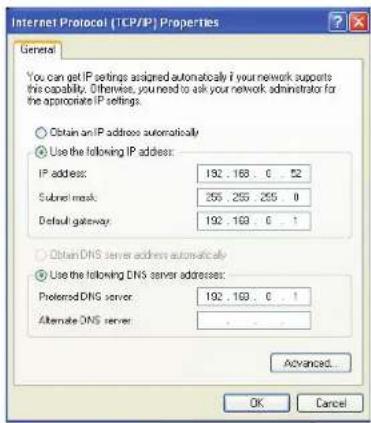
Click Use the following IP address and enter an IP address that is on the same subnet as your network or the LAN IP address on your router.
Example: If the router's LAN IP address is 192.168.0.1, make your IP address 192.168.0.X where X is a number between 2 and 99. Make sure that the number you choose is not in use on the network. Set Default Gateway the same as the LAN IP address of your router (192.168.0.1).
Set Primary DNS the same as the LAN IP address of your router (192.168.0.1). The Secondary DNS is not needed or you may enter a DNS server from your ISP.
Step 5
Click OK twice to save your settings.
Technical Specifications
Radio Frequency Bands
• HSPA+/UMTS: 900/2100 MHz
- WCDMA B1/B8
• GSM: 850/900/1800/1900 MHz
Cellular Access
• HSPA+
- Downlink: 21 Mbps
- Uplink: 11 Mbps
Wi-Fi Access Point
• 802.11n (150 Mbps compatible)
• 802.11g (54 Mbps)
• 802.11b (11 Mbps)
Antenna
• One 3G main antenna
• One 3G internal diversity antenna
- Internal Wi-Fi antenna
USB Interface
- micro USB port
USIM Slot
• Standard 6-pin SIM card interface
Status Indicators
- 3 LED icons
Storage
- microSD card slot
Wireless Security
• 64/128-bit WEP (Wired Equivalent Privacy)
• WPA & WPA2 (Wi-Fi Protected Access)
Firewall
• Network Address Translation (NAT)
- IP/ Port Filter
Dimensions (L x W x H)
- 100.3 x 49.35 x 14.13 mm (3.95 x 1.94 x 0.56 inches)
Weight
• TBD
Operating Temperature
-10 to 55^ (14 to 131^ )
Certifications
• FCC/CE
Appendix D - Regulatory Information
Regulatory Information
European Union:
This device complies with the essential requirements of the R&TTE Directive 1999/5/EC. For more information, please refer to the Declaration of Conformity.
Notice of Wireless Radio LAN Usage in The European Community:
- At the time of writing this addendum, some countries such as Italy, Greece, Portugal, and Spain have not allowed operation of radio devices in the 5 Ghz bands, although operation of 2.4 Ghz radio devices is allowed. Please check with your local authority to confirm.
- This device is restricted to indoor use when operated in the European Community using channels in the 5.15-5.35 GHz band to reduce the potential for interference.
- This device is a 2.4 GHz wideband transmission system (transceiver), intended for use in all EU member states and EFTA countries, except in France where restrictive use applies. This device may not be used for setting up outdoor radio links in France and in some areas the RF output power may be limited to 10 mW EIR P in the frequency range of 2454–2483.5 MHz. For detailed information the end-user should contact the national spectrum authority in France.
This equipment may be operated in AL, AD, BE, BG, DK, DE, FI, FR, GR, GW, IS, IT, HR, LI, LU, MT, MK, MD, MC, NL, NO, AT, OL, PT, RO, SM, SE, RS, SK, ES, CI, HU, CY
Usage Notes:
- To remain in conformance with European National spectrum usage regulations, frequency and channel limitations will be applied on the products according to the country where the equipment will be deployed.
- This device is restricted from functioning in Ad-hoc mode while operating in 5 Ghz. Ad-hoc mode is direct peer-to-peer communication between two client devices without an Access Point.
- Access points will support DFS (Dynamic Frequency Selection) and TPC (Transmit Power Control) functionality as required when operating in 5 Ghz within the EU.
2.4 GHz Wireless Frequency and Channel Operation in EEC Countries:
| Region Frequency Band Max output power (EIRP) | ||
| Metropolitan 2400 - 2454 MHz 100 mW | ||
| Guadeloupe, Martinique, St Pierre et Miquelon, Mayotte | 2454 - 2483.5 MHz 100 mW indoor, 10 mW outdoor | |
| Reunion et Guyane 2400 - 2483.5 MHz 100 mW | ||
| Rest of EU community 2420 - 2483.5 MHz 100 mW |
| R&TTE 1999/5/EC | |||
| WLAN 2.4 - 2.4835 GHz | |||
| IEEE 802.11b/g/n | |||
| Spectrum Regulation MHz, Europa (ETSI) max. EIRP Innenbereich max. EIRP Außenbereich | |||
| Europa 2400 - 2483.5 MHz 100 | mW | 100 mW | |
| Frankreich | 2400 - 2454 MHz | 100 mW | 100 mW |
| 2454 - 2483.5 MHz 100 mW | 10 mW | ||
CE
Disposing of and Recycling Your Product

ENGLISH
EN

This symbol on the product or packaging means that according to local laws and regulations this product should be not be disposed of in household waste but sent for recycling. Please take it to a collection point designated by your local authorities once it has reached the end of its life, some will accept products for free. By recycling the product and its packaging in this manner you help to conserve the environment and protect human health.
D-Link and the Environment
At D-Link, we understand and are committed to reducing any impact our operations and products may have on the environment. To minimise this impact D-Link designs and builds its products to be as environmentally friendly as possible, by using recyclable, low toxic materials in both products and packaging.
D-Link recommends that you always switch off or unplug your D-Link products when they are not in use. By doing so you will help to save energy and reduce CO2 emissions.
To learn more about our environmentally responsible products and packaging please visit www.dlinkgreen.com.
DEUTSCH
DE

Appendix D - Regulatory Information
Appendix D - Regulatory Information
ESPAÑOL
ES

Appendix D - Regulatory Information
D-Link e l'ambiente
Appendix D - Regulatory Information
POLSKI
PL

Appendix D - Regulatory Information
Appendix D - Regulatory Information
NORSK
NO

Appendix D - Regulatory Information
SUOMI
FI

Appendix D - Regulatory Information
D-Link och miljön
- User Manual
- Preface
- Manual Revisions
- Trademarks
- Table of Contents
- Product Overview....1
- Installation 7
- Configuration....11
- Connecting to a Wireless Network ....55
- Troubleshooting....70
- Networking Basics....72
- Technical Specifications 74
- Regulatory Information 75
- Product Overview Package Contents
- System Requirements
- Introduction
- High-Speed Mobile Internet with 3G Connectivity
- Mobile Internet for All of Your Devices
- Built-in Software for Instant Access Anywhere
- Designed for True Portability
- Hardware Overview
- Top Side
- Hardware Overview LED Icons
- Installation
- Connect to Your Network
- Insert a microSD Card
- Driver Installation
- Wireless Installation Considerations
- Configuration
- Initial Connection to the Router
- Connect via USB
- Connect via Wi-Fi
- Section 3 - Configuration
- Web-based Configuration
- Configuration Utility
- Home Navigation
- Device Status
- Home
- Wizard
- LAN CONFIGURATION
- 2/3G CONFIGURATION
- WI-FI CONFIGURATION
- Internet
- Connection
- 2G/3G Modem
- INFORMATION
- SETTINGS
- SIM
- PLMN
- Network
- Wi-Fi
- IPV4
- IPV6
- DNS NAME
- DHCP
- DHCP SERVER
- DNS SERVER
- STATIC DHCP
- LEASED HOSTS
- NAT
- PORT TRIGGER
- DMZ
- SMS
- New Message
- Local
- INBOX
- OUTBOX
- Basic
- Wireless Security
- Wired Equivalent Privacy (WEP)
- Wi-Fi Protected Access (WPA)
- Wi-Fi Protected Setup (WPS)
- MAC Filter
- LISTED STATIONS TABLE
- Active Name MAC Address
- Station Lists
- Security
- Firewall IP Filter
- IPv6 Filter
- Action
- DDOS
- URL Filter
- Application
- About
- BACKUP
- RESTORE
- RESET TO DEFAULT
- Firmware Upgrade
- Standby Mode
- Remote Control
- HTTP
- HTTPS
- SSH
- Password
- Date and Time
- DATE
- TIME ZONE
- Language
- System Log
- LOG SETTING
- LOG DISPLAY
- Connecting to a Wireless Network Using Windows 8.1/8.0
- Section 4 - Connecting to a Wireless Network
- Using Windows 7
- Configuring Wireless Security
- Using Windows Vista™
- Connect to a Wireless Network Using Windows® XP
- Configure WEP
- Configure WPA-PSK
- Troubleshooting
- Why can't I access the web-based configuration utility?
- What can I do if I forgot my password?
- Networking Basics
- Check your IP address
- Statically Assign an IP address
- Step 2
- Step 3
- Step 4
- Step 5
- Technical Specifications
- Radio Frequency Bands
- Cellular Access
- Wi-Fi Access Point
- Antenna
- USB Interface
- USIM Slot
- Status Indicators
- Storage
- Firewall
- Dimensions (L x W x H)
- Weight
- Operating Temperature
- Certifications
- Regulatory Information
- European Union:
- Notice of Wireless Radio LAN Usage in The European Community:
- Usage Notes:
- GHz Wireless Frequency and Channel Operation in EEC Countries:
- Disposing of and Recycling Your Product
- ENGLISH
- D-Link and the Environment
- DEUTSCH
- ESPAÑOL
- D-Link e l'ambiente
- POLSKI
- NORSK
- SUOMI
- D-Link och miljön
Brand : D-LINK
Model : DWR-720
Category : Telephone