
PowerVault MD1400 - Disk array DELL - Free user manual and instructions
Find the device manual for free PowerVault MD1400 DELL in PDF.


| Product Type | Disk Array Enclosure |
| Brand | Dell |
| Model | PowerVault MD1400 |
| Form Factor | 2U Rackmount |
| Drive Bays | 12 |
| Supported Drive Types | 3.5-inch SAS/SATA (up to 6 Gbps) |
| Interface | SAS 6 Gbps (12 Gbps with appropriate HBA) |
| Power Supply (AC) | 600 W (redundant, hot-pluggable) |
| Power Supply (DC) | 700 W (redundant, hot-pluggable) |
| Voltage (AC) | 100–240 V AC, 50/60 Hz, autoranging |
| Voltage (DC) | –(48–60) V DC |
| Heat Dissipation (AC) | 2047 BTU/hr (redundant 600W) |
| Heat Dissipation (DC) | 2388 BTU/hr (redundant 700W) |
| Maximum Operating Temperature | 35°C (95°F) |
| Dimensions (H x W x D) | 8.68 cm (3.42 in) x 48.26 cm (19 in) x 75.53 cm (29.74 in) |
| Weight (empty) | Approximately 12.7 kg (28 lb) |
| Hot-Swappable Components | Drives, power supplies, cooling fans |
| Cooling | Advanced air cooling with hot-swappable fan modules |
| Management | Front panel LEDs and optional modular disk storage manager (MDSM) |
| Rack Support | Dell ReadyRails II (optional sliding rails) |
| Maintenance | Tool-less drive and PSU replacement; cable securing strap |
| Compliance | Safety, EMC, and regulatory certifications |
Frequently Asked Questions - PowerVault MD1400 DELL
User questions about PowerVault MD1400 DELL
0 question about this device. Answer the ones you know or ask your own.
Ask a new question about this device
Download the instructions for your Disk array in PDF format for free! Find your manual PowerVault MD1400 - DELL and take your electronic device back in hand. On this page are published all the documents necessary for the use of your device. PowerVault MD1400 by DELL.
USER MANUAL PowerVault MD1400 DELL
Dell Storage MD1400 and MD1420 Enclosures Getting Started Guide
Notes, Cautions, and Warnings

NOTE: A NOTE indicates important information that helps you make better use of your computer.

CAUTION: A CAUTION indicates either potential damage to hardware or loss of data and tells you how to avoid the problem.

WARNING: A WARNING indicates a potential for property damage, personal injury, or death.
Copyright © 2014 Dell Inc. All rights reserved. This product is protected by U.S. and international copyright and intellectual property laws. Dell™ and the Dell logo are trademarks of Dell Inc. in the United States and/or other jurisdictions. All other marks and names mentioned herein may be trademarks of their respective companies.
2014 - 08
Rev. A01
Installation And Configuration

WARNING: Before performing the following procedure, review the safety instructions that came with the system.
Unpacking A Rack System
Unpack your system and identify each item.
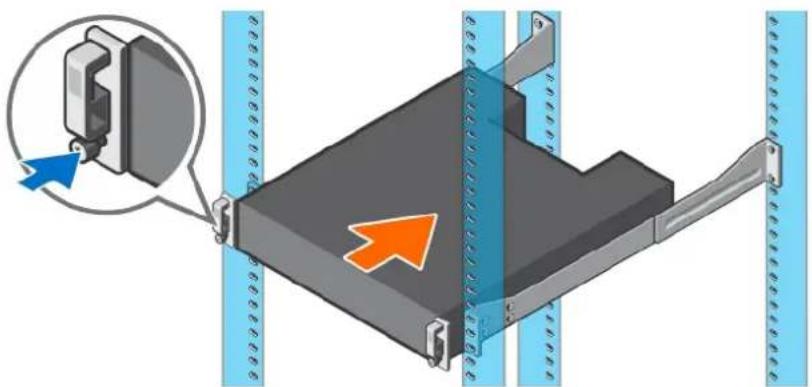
Assemble the rails and install the system in the rack following the safety instructions and the rack installation instructions provided with your system.
natural_image
Diagram of a mechanical assembly with a highlighted component and directional arrow (no text or symbols)Figure 1. Installing the System in a Rack.
Connecting The Power Cable(s)
natural_image
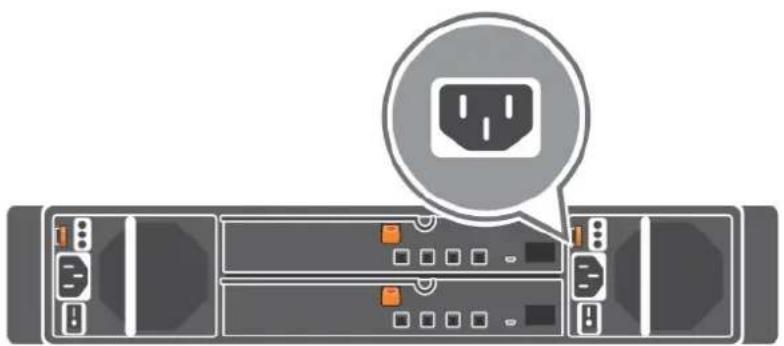
Illustration of a server rack with an open socket and a speech bubble containing a plug icon (no text or symbols present)Figure 2. Connecting the Power Cable(s)
Connect the system's power cable(s) to the system and, if a monitor is used, connect the monitor's power cable to the monitor.
Securing The Power Cable(s)
natural_image
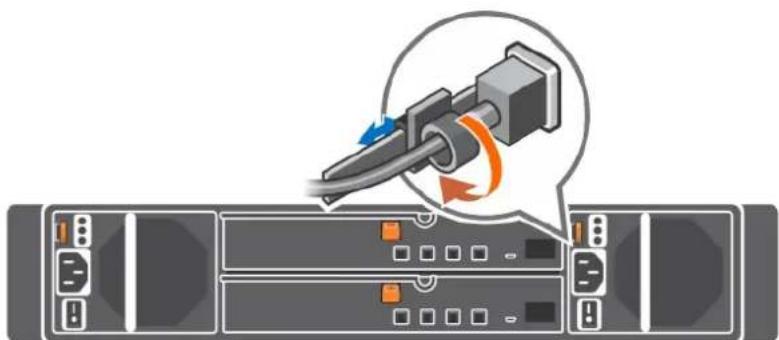
Illustration of a server rack with a cable being inserted, showing ports and connections (no text or symbols)Figure 3. Securing the Power Cable(s)
Bend the system power cable(s), as shown in the illustration, and attach to the cable strap.
Plug the other end of the power cable(s) into a grounded electrical outlet or a separate power source such as an uninterruptible power supply (UPS) or a power distribution unit (PDU).
Turning On The System
natural_image
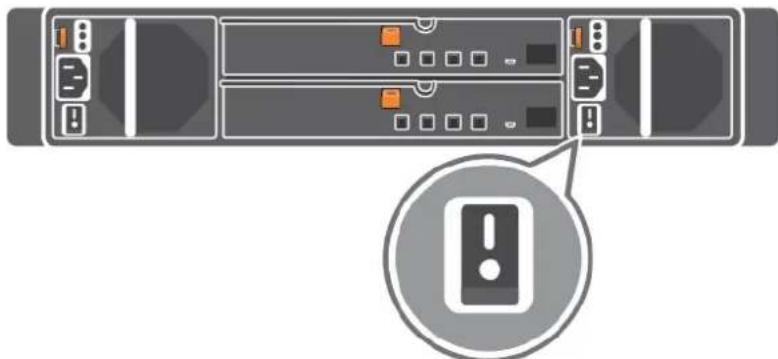
Front view of a server rack with ports and indicator lights, no visible text or symbolsFigure 4. Turning on the System
Press the power button on the system. The power indicator should light.
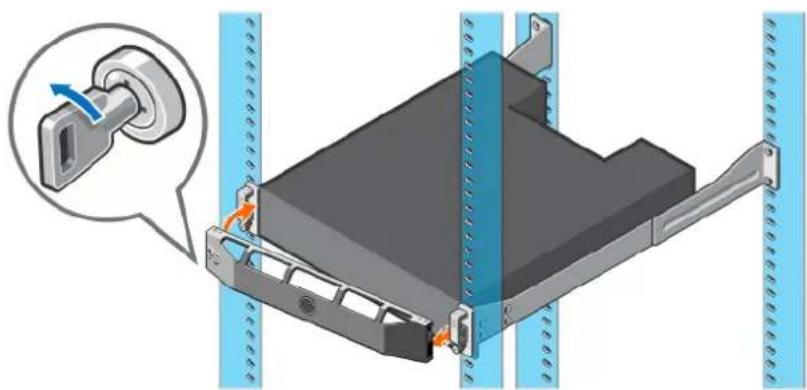
Installing The Optional Bezel
natural_image
3D diagram of a server rack with a lock and mounting bracket, showing internal components and a close-up inset (no text or symbols)Figure 5. Installing the Optional Bezel
Install the bezel (optional).
Complete The Operating System Setup
If you purchased a preinstalled operating system, see the documentation associated with the operating system. To install an operating system for the first time, see the installation and configuration documentation for your operating system. Be sure the operating system is installed before installing hardware or software not purchased with the system.

NOTE: See dell.com/ossupport for the latest information on supported operating systems.
Dell Software License Agreement
Before using your system, read the Dell Software License Agreement that came with your system. You must consider any media of Dell-installed software as BACKUP copies of the software installed on your system's hard drive. If you do not accept the terms of the agreement, call the customer assistance telephone number. For customers in the United States, call 800-WWW-DELL (800-999-3355). For customers outside the United States, see dell.com/support and select your country or region from the top left of the page.
Other Information You May Need

WARNING: See the safety and regulatory information that shipped with your system. Warranty information may be included within this document or as a separate document.
Your product documentation includes:
Owner's Manual
Provides information about system features and describes how to troubleshoot the system and install or replace system components. This document is available online at dell.com/support/manuals.
Rack
Describes how to install your system into a rack. This document is shipped with your rack solution.
Installation
Instructions
Deployment
Guide
Provides information about cabling your system and the installation and initial configuration of your system. This document is available online at dell.com/support/manuals.
NOTE: Always check for updates on dell.com/support/manuals and read the updates first because they often supersede information in other documents.
NOTE: When upgrading your system, it is recommended that you download and install the latest BIOS, drivers, and systems management firmware on your system from dell.com/support.
Obtaining Technical Assistance
If you do not understand a procedure in this guide or if the system does not perform as expected, see your system Owner's Manual. Dell offers comprehensive hardware training and certification. See dell.com/training for more information. This service may not be offered in all locations.
Technical Specifications
NOTE: The following specifications are only those required by law to ship with your system. For a complete and current listing of the specifications for your system, go to dell.com/support.
Power
| AC Power Supply (per power supply) | |
| Wattage 600 W | |
| Heat dissipation | 2047 BTU/hr (redundant, 600 W power supply) |
| NOTE: Heat dissipation is calculated using the power supply wattage rating. | |
| Voltage | 100–240 V AC, autoranging, 50/60 Hz |
| NOTE: This system is also designed to be connected to IT power systems with a phase to phase voltage not exceeding 230 V. | |
| DC Power Supply (per power supply) | |
| Wattage 700 W | |
| Heat dissipation | 2388 BTU/hr (redundant, 700 W power supply) |
| NOTE: Heat dissipation is calculated using the power supply wattage rating. | |
| Voltage –(48–60) V DC | |
Temperature
Maximum operation ambient temperature 35°C
For information on supported expanded operating temperature range and configurations, see dell.com/support/manuals.
- Dell Storage MD1400 and MD1420 Enclosures Getting Started Guide
- Notes, Cautions, and Warnings
- Installation And Configuration
- Unpacking A Rack System
- Connecting The Power Cable(s)
- Securing The Power Cable(s)
- Turning On The System
- Installing The Optional Bezel
- Complete The Operating System Setup
- Dell Software License Agreement
- Other Information You May Need
- Obtaining Technical Assistance
- Technical Specifications
- Temperature
Brand : DELL
Model : PowerVault MD1400
Category : Disk array