
10R - Headphones Sena - Free user manual and instructions
Find the device manual for free 10R Sena in PDF.


| Product Type | Motorcycle Bluetooth Communication System |
| Dimensions | Ultra slim and lightweight design; exact dimensions not specified |
| Weight | Approximately 50g (main unit only) |
| Bluetooth Version | Bluetooth 4.1 |
| Supported Profiles | Headset Profile, Hands-Free Profile (HFP), Advanced Audio Distribution Profile (A2DP), Audio Video Remote Control Profile (AVRCP) |
| Intercom Range | Up to 900 meters (980 yards) in open terrain |
| Intercom Participants | Up to 4-way intercom |
| Battery Type | Rechargeable lithium-ion battery pack |
| Charging Time | Approximately 2.5 hours |
| Battery Life | Depends on usage; typical talk time up to 10 hours (varies with features) |
| Key Features | Voice prompts, Advanced Noise Control, Music Sharing, Audio Multitasking, HD Intercom, Universal Intercom |
| Microphone Options | Wired boom microphone (for open face helmet) and wired microphone (for full face helmet) |
| Speaker Type | Pair of helmet speakers with foam covers and adjustable pads |
| Mounting | Hook and loop fasteners or double-sided adhesive tape for main unit and battery pack |
| Remote Control | Compatible with optional Handlebar Remote (sold separately) |
| Firmware Upgrade | Yes, via Sena Device Manager (PC/Mac) or Sena Utility App |
| Smartphone App | Sena Utility App (iOS and Android) |
| Cleaning | Clean helmet mounting surfaces with moistened towel and dry thoroughly |
| Safety Warning | Read user guide before use; avoid high volume for long periods to prevent hearing damage; use only approved charger |
| Spare Parts | Speakers (with pads and covers), microphones (boom and wired), battery pack, cables, fasteners, adhesive tapes |
| Repairability | Fault reset via pin-hole reset button; factory reset through configuration menu |
| General Information | Designed for motorcycle helmets; supports intercom, phone calls, GPS navigation, and stereo music |
Frequently Asked Questions - 10R Sena
User questions about 10R Sena
0 question about this device. Answer the ones you know or ask your own.
Ask a new question about this device
Download the instructions for your Headphones in PDF format for free! Find your manual 10R - Sena and take your electronic device back in hand. On this page are published all the documents necessary for the use of your device. 10R by Sena.
USER MANUAL 10R Sena
Low Profile Motorcycle Bluetooth® Communication System
Bluetooth
4.1

900m 980yds Intercom

Four-way Intercom

Ultra Slim & Feather Light

Voice Prompt

Advanced Noise Control

Universal Intercom

Music Sharing

Audio Source Priority

Audio Multitasking

WARNING
To minimize the risk of serious injury, death or product damage, read this User's Guide and the Quick Start Guide before using the product for the first time. Go to sena.com to access these documents if they are missing or unreadable. Keep both Guides for future reference.
© 1998-2021 Sena Technologies, Inc. All rights reserved.
Sena Technologies, Inc reserves the right to make any changes and improvements to its product without providing prior notice.
Sena™ is a trademark of Sena Technologies, Inc. or its subsidiaries in the USA and other countries. SF1™, SF2™, SF4™, SFR™, SRL™, Momentum™, Momentum INC™, Momentum Lite™, Momentum Pro™, Momentum INC Pro™, Momentum EVO™, Cavalry™, Latitude SR™, Latitude SX™, Latitude S1™, 30K™, 33i™, 50S™, 50R™, 50C™, 5S™, 20S EVO™, 20S™, 10S™, 10C PRO™, ProRide EVO™, 10C EVO™, 10U™, 10Upad™, 10R™, ACS10™, C1™, 3S™, 3S PLUSTM, SMH5™, SMH5-FMTM, SMH5 MultiCom™, SMH10™, SMH10R™, SPH10™, SPH10H-FMTM, Savage™, Prism Tube WiFi™, Prism™, Bluetooth Audio Pack for GoPro®, Impulse™, R1™, R1 EVO™, R1 EVO CS™, R2™, R2 EVO™, R2X™, M1™, M1 EVO™, RUMBA™, RC1™, RC3™, RC4™, Stryker™, Handlebar Remote™, Wristband Remote™, PowerPro Mount™, Powerbank™, FreeWire™, WiFi Docking Station™, WiFi Sync Cable™, WiFi Adapter™, +mesh™, +Mesh Universal™, MeshPort Blue™, MeshPort Red™, MeshPort Black™, Econo™, OUTRUSH™, OUTRUSH R™, OUTSTAR™, OUTSTAR S™, OUTFORCE™, OUTRIDE™, EcoCom™, Parani A10™, Parani A20™, Parani M10™, pi™, Snowtalk™, Snowtalk2™, SR10™, SR10i™, SM10™, SPIDER RT1™, SPIDER ST1™, X1TM, X1 Pro™, X1STM, Expand™, Expand Boom™, Bluetooth Mic & Intercom™, Tufftalk™, Tufftalk Lite™, Tufftalk M™ are trademarks of Sena Technologies, Inc. or its subsidiaries. These trademarks may not be used without the express permission of Sena.
GoPro® is a registered trademark of Woodman Labs of San Mateo, California. Sena Technologies, Inc. ("Sena") is not affiliated with Woodman Labs. The Sena Bluetooth Pack for GoPro® is an after-market accessory specially designed and manufactured by Sena Technologies, Inc. for the GoPro® Hero3 and Hero4 allowing for Bluetooth capabilities.
The Bluetooth ^® word mark and logos are owned by the Bluetooth SIG, Inc. and any use of such marks by Sena is under license. iPhone, iPod touch are registered trademarks of Apple Inc. Zumo ^™ is a trademark of Garmin Ltd. or its subsidiaries. TomTom ^™ is the trademark or registered trademark owned by TomTom International B.V. Other trademarks and tradenames are those of their respective owners.
CONTENTS
1 INTRODUCTION....4
2 PACKAGE CONTENTS....5
3 INSTALLING THE 10R ON YOUR HELMET....8
3.1 Installing the Main Unit.
3.2 Installing the Speakers....10
3.3 Installing the Microphones....11
3.4 Installing the Battery Pack 14
4 GETTING STARTED....15
4.1 Button Operation....15
4.2 Powering On and Off....16
4.3 Charging....16
4.4 Checking the Battery Level....17
4.5 Volume Adjustment 17
4.6 Sena Softwares 18
5 PAIRING THE 10R WITH BLUETOOTH DEVICES....18
5.1 Mobile Phone Pairing - Mobile Phone, Bluetooth Stereo Device 19
5.2 Second Mobile Phone Pairing - Second Mobile Phone, GPS, and SR10.... 19
5.3 Advanced Selective Pairing - A2DP Stereo or Handsfree 20
5.4 Intercom Pairing 21
6 MOBILE PHONE, GPS, SR10 23
6.1 Mobile Phone Call Making and Answering....23
6.2 Speed Dialing 24
6.3 GPS Navigation 25
6.4 Sena SR10, Two-Way Radio Adapter 25
7 STEREO MUSIC 26
7.1 Bluetooth Stereo Music 26
7.2 Music Sharing 26
8 INTERCOM....27
8.1 Two-way Intercom 27
8.2 Three-way Intercom 28
8.3 Four-way Intercom 30
9 THREE-WAY CONFERENCE PHONE CALL WITH INTERCOM PARTICIPANT....31
10 GROUP INTERCOM 32
11 UNIVERSAL INTERCOM....33
11.1 Universal Intercom Pairing....34
11.2 Two-way Universal Intercom 34
11.3 Three-way Universal Intercom....35
11.4 Four-way Universal Intercom 36
12 FUNCTION PRIORITY....38
13 CONFIGURATION SETTING 39
13.1 Headset Configuration Setting 39
13.2 Software Configuration Setting 40
14 REMOTE CONTROL 43
14.1 Pairing with the Handlebar Remote 43
14.2 Using the Handlebar Remote 44
15 FIRMWARE UPGRADE 45
16 TROUBLESHOOTING 45
16.1 Intercom Failure 45
16.2 Intercom Reconnection 45
16.3 Fault Reset 46
16.4 Factory Reset 46
1 INTRODUCTION
Thank you for choosing the Sena 10R, Low Profile Bluetooth Stereo Headset and Intercom. With the 10R, you can call handsfree on your Bluetooth mobile phone, listen to stereo music or voice instructions of GPS navigations wirelessly, and have intercom conversations in full duplex with a passenger or other motorcycle riders.
The 10R is compliant with the Bluetooth 4.1 supporting the following profiles: Headset Profile, Hands-Free Profile (HFP), Advanced Audio Distribution Profile (A2DP), and Audio Video Remote Control Profile (AVRCP). Please check with the manufacturers of other device to determine their compatibility with this headset.
Please read this User's Guide carefully before using the headset. Also check www.sena.com for the latest version of the User's Guide and additional information related to Sena Bluetooth products.
The 10R features:
• Light weight and ultra slim profile
- Bluetooth intercom up to 900 meters (980 yards)*
- Four-way intercom
- Three-way conference phone call with intercom participant
- Universal Intercom™
- Voice prompts
• Smartphone App for iPhone and Android
- Music Sharing
- Advanced Noise Control™
- Sidetone
- Speed Dialing
- Firmware upgradeable
Key Specifications:
- Bluetooth 4.1
- Supporting profiles: Headset Profile, Hands-Free Profile (HFP), Advanced Audio Distribution Profile (A2DP), and Audio Video Remote Control Profile (AVRCP).
2 PACKAGE CONTENTS
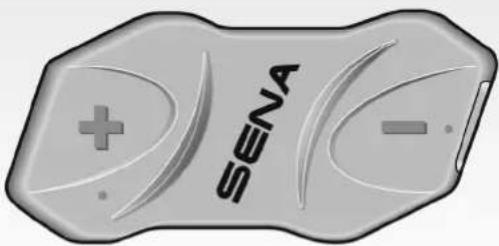
- Headset Main Unit
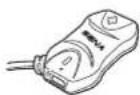
- Hook and Loop Fasteners for Main Unit (2)

• Double Sided Adhesive Tapes for Main Unit (2)

Speaker
- Speakers (2)
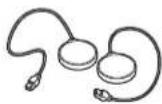
• Hook and Loop Fasteners for Speakers (4)
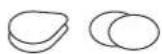
• Foam Speaker Covers (2)

• Speaker Pads (Thick) (2)

- Speaker Pads (Thin) (2)

Wired Boom Microphone
• Wired Boom Microphone
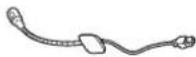
- Hook and Loop Fastener for Wired Boom Microphone

• Microphone Sponges (2)

- Boom Microphone Holder

- Hook and Loop Fastener for Boom Microphone Holder

Wired Microphone
- Wired Microphone
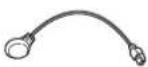
- Hook and Loop Fastener for Wired Microphone

Others
• USB Power & Data Cable
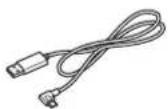
Battery Pack
• 10R Battery Pack
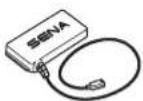
- Battery Pack Holder
• Double Sided Adhesive Tapes for Battery Pack Holder

3 INSTALLING THE 10R ON YOUR HELMET
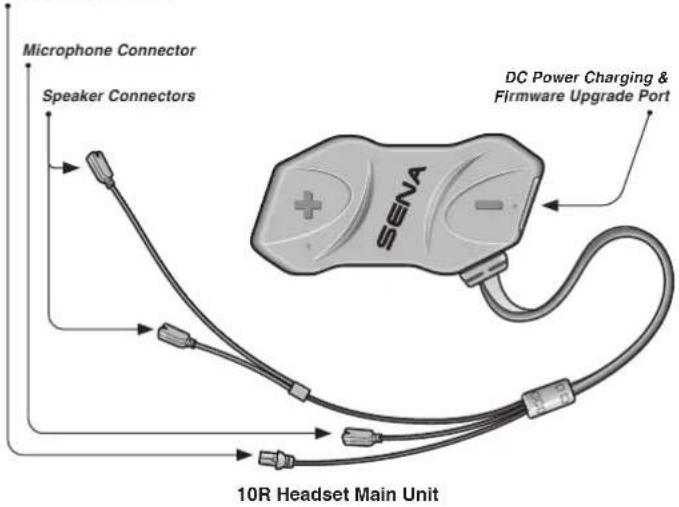
Battery Pack Connector
3.1 Installing the Main Unit
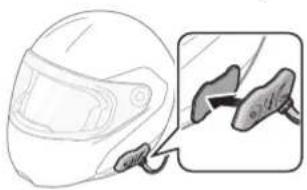
3.1.1 Using the Hook and Loop Fasteners for Main Unit
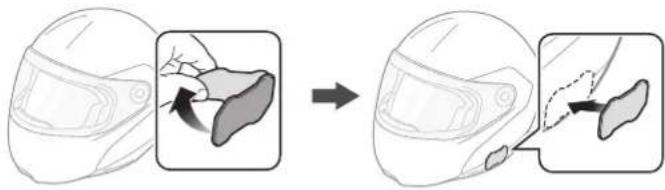
- Clean the area on the left side of the helmet where you will attach the hook and loop fasteners for main unit with a moistened towel and dry thoroughly.
- Peel off the cover of the adhesive tape of the loop fastener for main unit and attach it to the helmet.
natural_image
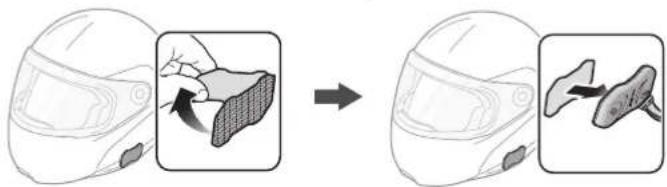
Illustration of a helmet being adjusted to form a foot, showing the change from front to side view (no text or symbols present)- Peel off the cover of the adhesive tape of the hook fastener for main unit and attach it to the back plate of the main unit.
natural_image
Illustration of a car helmet being adjusted for a seatbelt, showing the change from front to side (no text or symbols present)- Attach the main unit using the hook and loop fasteners that you fitted. Make sure that the main unit is firmly attached to the helmet.
natural_image
Line drawing of a motor helmet and a close-up of the gear (no text or symbols)3.1.2 Using the Double Sided Adhesive Tapes for Main Unit
If you cannot attach the hook and loop fasteners to the helmet, can use double sided adhesive tape.

-
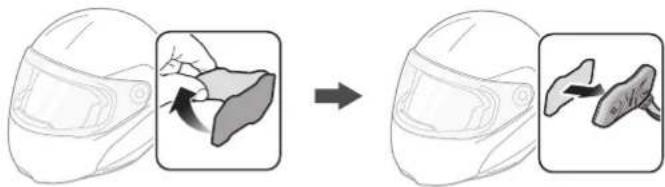
Clean the area on the left side of the helmet where you will attach the double sided adhesive tapes with moistened towel and dry thoroughly.
-
Peel off the cover from one side of the double sided adhesive tapes for main unit and attach it to the back plate of the main unit.
natural_image
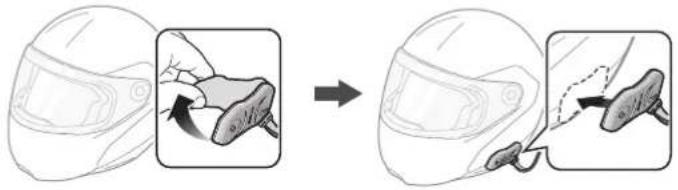
Illustration of a helmet being adjusted for liver, showing two views (no text or symbols)- Peel off the cover from the other side of the double sided adhesive tapes and attach the main unit on the left side of your helmet.
natural_image
Illustration of a helmet being adjusted to form a cable, showing the process from pinning to disassembly (no text or symbols present)- Make sure that the main unit sticks on the helmet firmly. Maximum adhesion occurs after 24 hours.
CAUTION:
Sena recommends using the hook and loop fasteners for main unit. The double sided adhesive tape is provided for convenience, but is not the recommended mounting method. Sena is not responsible for its use.
3.2 Installing the Speakers
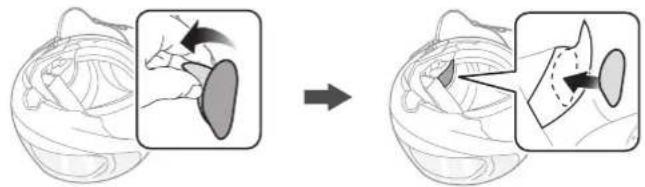
- Peel off each cover of the hook and loop fasteners for speakers to expose the adhesive surface. Then, attach the fasteners to the ear pockets inside the helmet.
natural_image
Illustration of a hand holding a small object before and after a transformation, showing structural changes (no text or symbols)- Attach the speakers to the hook and loop fasteners for speakers inside the helmet.
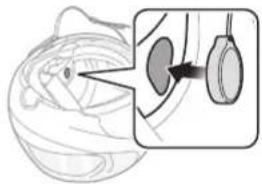
natural_image
Illustration of a medical procedure showing a magnified view of a device with internal components (no text or symbols)- Align the arrows on the main unit and speaker cables and insert speaker cables into each speaker connector.
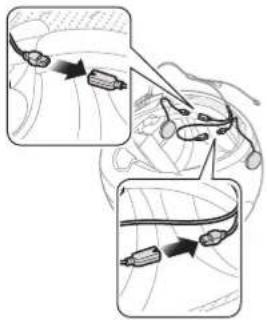
natural_image
Medical illustration showing two steps of a procedure with arrows indicating movement (no text or labels)Note:
- Three cables connect to the main unit. The longest is the cable for the speakers. The second longest cable has a male connector and is for the battery pack. The shortest cable is for the microphone.
- The cable for the speakers has two leads. The longer lead is for the right speaker and the shorter lead is for the left speaker.
- If the helmet has deep ear pockets, you can use the speaker pads to bring the speakers closer to your ears.
3.3 Installing the Microphones
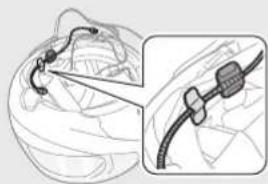
3.3.1 Using the Wired Boom Microphone
- Peel off the cover of the hook and loop fastener for wired boom microphone to expose the adhesive tape. Then, attach the hook and loop fastener on the inside surface of the left external shell.
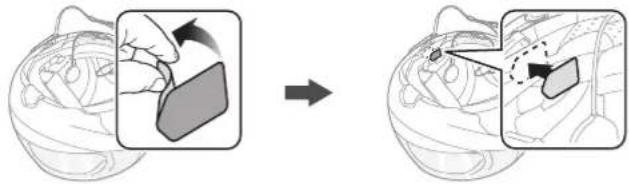
natural_image
Illustration of a hand holding a small object before and after a change, showing structural changes (no text or symbols)
- Attach the wired boom microphone's mounting plate to the hook and loop fastener.
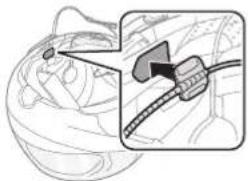
natural_image
Diagram of a car interior with a cable and connector, no visible text or symbolsNote:
- After you install the wired boom microphone, make sure you reinstall the helmet's internal padding.
- You can use the boom microphone holder after attaching the hook and loop fastener for boom microphone holder on it to ensure secure installation.
natural_image
Medical illustration showing a surgical procedure on a patient's neck with catheter insertion (no text or labels)-
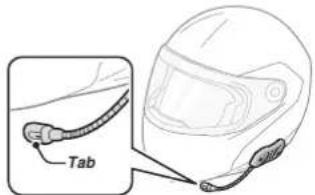
Make sure that the microphone's receiver is located near your mouth.
-
Adjust the head of the microphone so that the tab is facing away from your mouth.
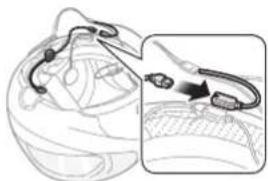
- Align the arrows on the main unit and microphone cables and insert the microphone cable into the microphone connector.
natural_image
Medical illustration showing a laparoscopic cable inserted into a patient's ear with an inset close-up of the insertion site (no text or labels)Note:
Three cables connect to the main unit. The longest is the cable for the speakers. The second longest cable has a male connector and is for the battery pack. The shortest cable is for the microphone.
3.3.2 Using the Wired Microphone
If you have a full face helmet, you can use the wired microphone.
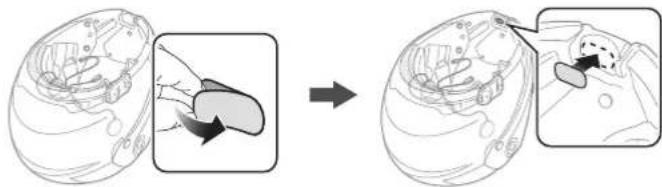
- Peel off the cover of the hook and loop fastener for wired microphone to expose the adhesive tape. Then, attach the hook and loop fastener on the inside of the helmet's chin guard.
natural_image
Diagram showing a medical procedure on an anatomical structure, with no visible text or symbols- Attach the wired microphone to the hook and loop fastener for wired microphone.
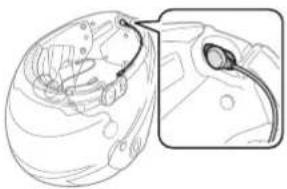
natural_image
Line drawing of a medical device with an inset showing a magnified view of internal components (no text or symbols)- Align the arrows on the main unit and microphone cables and insert the microphone cable into the microphone connector.
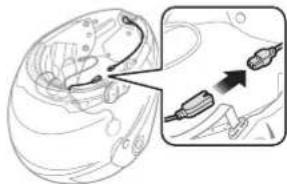
natural_image
Medical illustration showing a cross-sectional view of internal anatomy with an inset close-up of internal structures (no text or labels)Note:
Three cables connect to the main unit. The longest is the cable for the speakers. The second longest cable has a male connector and is for the battery pack. The shortest cable is for the microphone.
3.4 Installing the Battery Pack
- Clean the area on the back side of the helmet where you will attach the double sided adhesive tapes with moistened towel and dry thoroughly.
- Peel off the cover from one side of the double sided adhesive tapes for battery pack holder and attach it to the back plate of the battery pack holder.
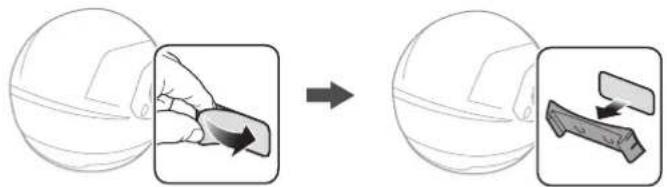
natural_image
Illustration showing a hand holding a small object before and after a change, with no text or symbols present.- Peel off the cover from the other side of the double sided adhesive tapes and attach the battery pack holder on the back side of your helmet.
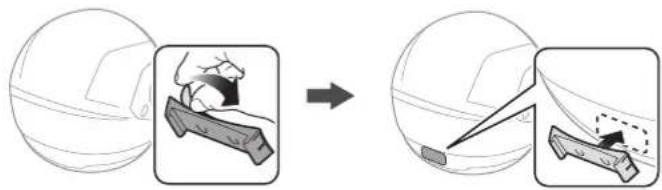
natural_image
Diagram showing a car interior before and after a change, with no visible text or symbols- Make sure that the double sided adhesive tapes sticks on the helmet firmly. Maximum adhesion occurs after 24 hours.
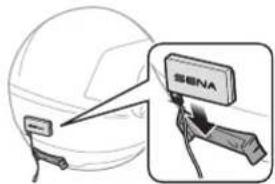
- To secure the battery pack, slide the battery pack into the battery pack holder until you hear it click.
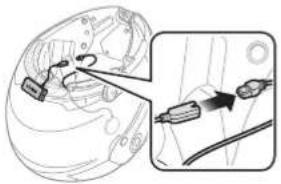
- Align the arrows on the main unit and battery pack cables and insert the battery pack cable into the battery pack connector.
natural_image
Diagram showing a car interior with a close-up of its internal components, no text or symbols present.Note:
- Three cables connect to the main unit. The longest is the cable for the speakers. The second longest cable has a male connector and is for the battery pack. The shortest cable is for the microphone.
- To remove the battery pack from the battery pack holder, slide the battery pack upward.
- After connecting all the cables, store any excess cable behind the internal padding of the helmet to prevent wires from becoming damaged.
4 GETTING STARTED
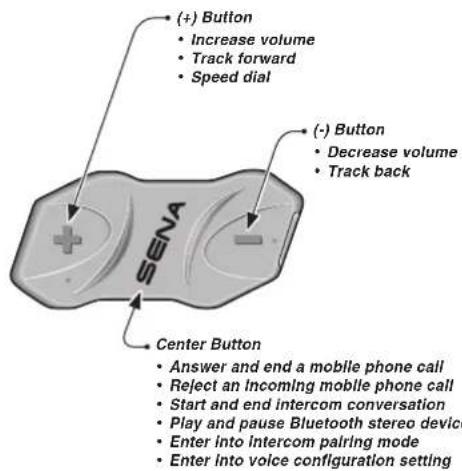
4.1 Button Operation
4.2 Powering On and Off
To power on the headset, press the Center Button and the (+) Button at the same time while hearing ascending beeps and a voice prompt, "Hello". To power off the headset, press the Center Button and the (+) Button at the same time while hearing descending beeps and a voice prompt, "Goodbye".
4.3 Charging

WARNING
When charging the battery, use only the approved charger provided by the manufacturer. Use of a non-approved charger may cause fire, explosion, leakage, and other hazards which may also reduce the life time or performance of the battery.
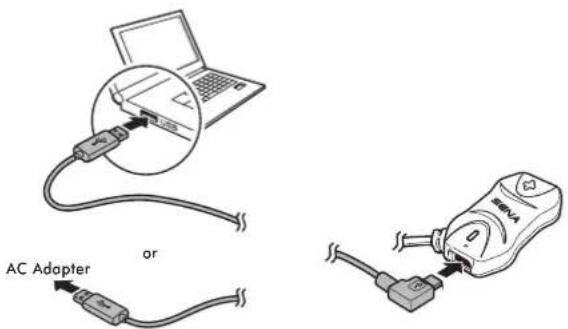
You can charge the headset by connecting the supplied USB power & data cable into a computer's USB port or USB wall charger. You can use any standard micro USB cable to charge the unit. The charging LED turns red while charging and turns blue when fully charged. It takes about 2.5 hours to be completely charged.
Note:
Any 3rd party USB charger can be used with Sena products if the charger is approved by either the FCC, CE, or IC.

CAUTION
Please make sure to take off your 10R-installed helmet while charging. The headset automatically turns off during charging.
4.4 Checking the Battery Level
4.4.1 LED Indicator
When the headset is powering on, the red LED flashes rapidly indicating the battery level.
4 flashes = High, 70 \~ 100%
3 flashes = Medium, 30 \~ 70%
2 flashes = Low, 0 \~ 30%
Note:
- The battery performance may be reduced over time with usage.
- Battery life may vary depending on conditions, environmental factors, functions of the product in use, and devices used with it.
4.4.2 Voice Prompt Indicator
When you power on the headset, keep pressing the Center Button and the (+) Button simultaneously for about 3 seconds until you hear three, high toned beeps. Then you will hear a voice prompt indicating the battery level. However, if you release the buttons as soon as the headset turns on, you will not hear a voice prompt for the battery level indication.
4.5 Volume Adjustment
You can easily adjust the volume by tapping the (+) Button or the (-) Button. You will hear a beep when the volume reaches the maximum or minimum level. The volume is set and maintained independently at different levels for each audio source even when you reboot the headset. For example, once you set the volume for mobile phone handsfree, it will not change even if you adjust the volume for your Bluetooth MP3 music. However, if you adjust the volume during stand-by mode, it will affect volume levels of every audio source.

WARNING
Use of the product at a high volume for a long period of time may damage your eardrums or hearing ability. Keep the volume at a modest level to prevent damage.
4.6 Sena Softwares
4.6.1 Sena Device Manager
The Sena Device Manager allows you to upgrade the firmware and configure its settings directly from your PC or Apple computer. Download the Sena Device Manager from sena.com.
4.6.2 Sena Utility App
By simply pairing your phone with your headset, you can use the Sena Utility App for quicker and easier set up and management.
- Download
- Android: Google Play Store > Sena Utility
- iOS: App Store > Sena Utility
5 PAIRING THE 10R WITH BLUETOOTH DEVICES
Before using the 10R Bluetooth headset with any other Bluetooth devices for the first time, you will need to pair them together. You can pair the 10R with Bluetooth mobile phones, Bluetooth stereo devices such as MP3 players, or motorcycle specific Bluetooth GPS navigation, and with other Sena Bluetooth headsets. The pairing operation is required only once for each Bluetooth device. The headset remains paired with the devices and automatically reconnects to them when they are within range. You will hear a high toned single beep and a voice prompt whenever the headset reconnects to the paired device:
"Phone connected" to a mobile phone, "Media connected" to a Bluetooth stereo device.
5.1 Mobile Phone Pairing - Mobile Phone, Bluetooth Stereo Device
- To enter the voice configuration menu, press and hold the Center Button for 10 seconds until you hear the voice prompt, "Configuration menu".
- By tapping the (+) Button, you will hear the voice prompt, "Phone pairing".
- Enter 0000 for the PIN. Some mobile phones may not ask for the PIN.
- The mobile phone confirms that pairing has completed and the 10R is ready to use. You will hear a voice prompt, "Your headset is paired".
- If the pairing process is not completed within three minutes, the 10R will return to stand-by mode.
Note:
- If a Bluetooth connection between the headset and a mobile phone is disconnected, press the Center Button for 3 seconds until you hear a high tone single beep to recover the Bluetooth connection immediately.
- If the Bluetooth connection between the headset and a media player is disconnected, press the Center Button for 1 second to recover the Bluetooth connection and play.
5.2 Second Mobile Phone Pairing - Second Mobile Phone, GPS, and SR10
Typical Bluetooth headsets can connect with only one Bluetooth device, but a second mobile phone pairing allows the headset to connect with another Bluetooth device such as a second mobile phone, an MP3 Player, or the Sena SR10, the Bluetooth adapter.
- To enter the voice configuration menu, press and hold the Center Button for 10 seconds until you hear the voice prompt, "Configuration menu".
- Tap the (+) Button until you hear a voice prompt, "Second mobile phone pairing".
- Search for Bluetooth devices on your mobile phone. Select the Sena 10R in the list of the devices detected on the mobile phone.
- Enter 0000 for the PIN. Some mobile phones may not ask for the PIN.
- The mobile phone confirms that the pairing has completed and the 10R is ready to use. You will hear a voice prompt, "Your headset is paired".
Note:
- If you have two audio (A2DP) devices connected to your headset then the audio from one device will interrupt the audio from the other device. For example, if you are playing music from the primary mobile phone, then it can be interrupted by playing music from the secondary mobile phone and vice versa.
- You have to use a motorcycle specific GPS, which transmits turn-by-turn voice instructions to the headset by Bluetooth. Most automotive GPS systems do not have this feature.
- The Sena SR10 is a Bluetooth two-way radio adapter for group communication, and uses Hands-Free Profile. The incoming audio from the two-way radio via SR10 is heard in the background while having an intercom conversation or a mobile phone call.
- The GPS navigation or a radar detector could be connected to the SR10 by wire. The GPS voice instruction or the radar detector alarm is also heard in the background via SR10 while having an intercom conversation or a phone call. Please refer to the SR10 User's Guide for details.
5.3 Advanced Selective Pairing - A2DP Stereo or Handsfree
When you are using a smartphone, sometimes you may need to selectively use the 10R for A2DP stereo music only or for mobile phone handsfree only. These instructions are for advanced users who want to pair the 10R to their smartphones with only one selective profile: A2DP for stereo music of HFP for phone calls.
If you have previously paired a mobile phone to the 10R, you must clear the previous pairing list on both devices: the mobile phone and the 10R. To clear the pairing list on the 10R, please do a factory reset or following the pairing list clearing procedure described in section 13.1, "Headset Configuration Setting". To clear the pairing list on the mobile phone, please refer to the mobile phone manual. For most smartphones, delete the Sena 10R from the list of Bluetooth devices in the settings menu.
5.3.1 A2DP Stereo Music Only
- To enter the voice configuration menu, press and hold the Center Button for 10 seconds until you hear the voice prompt, "Configuration menu".
- Tap the (+) Button four times and you will hear the voice prompt, "Media selective pairing".
- Search for Bluetooth devices on your smartphone. Select Sena 10R in the list of devices detected on your phone.
- Enter 0000 for the PIN. Some mobile phones may not ask for the PIN.
5.3.2 HFP for Phone Call Only
- To enter the voice configuration menu, press and hold the Center Button for 10 seconds until you hear the voice prompt, "Configuration menu".
- Triple tap the (+) Button and you will hear the voice prompt, "Phone selective pairing".
- Search for Bluetooth devices on your smartphone. Select Sena 10R in the list of devices detected on your phone.
- Enter 0000 for the PIN. Some mobile phones may not ask for the PIN.
5.4 Intercom Pairing
5.4.1 Pairing with Other 10R Headsets for Intercom Conversation
The 10R can be paired with up to three other headsets for Bluetooth intercom conversation.
- Turn on the two 10R headsets (A and B) that you would like to pair with each other.
- Press and hold the Center Button for 5 seconds, then you will hear a mid-tone single beep and the voice prompt, "Intercom pairing".
SENA | 10R
- Simply tap the Center Button of any one of the two headsets A or B and wait until the LEDs of both headsets turn to blue and intercom connection is automatically established. The two 10R headsets A and B are paired with each other for intercom conversation. If the pairing process is not completed within one minute, the 10R will return to stand-by mode.
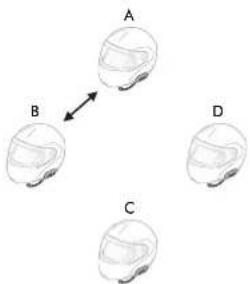
Pairing A & B
- You can make other pairing between headsets A and C, and between headsets A and D by following the same procedure as above.
- The intercom pairing queue is 'Last-Come, First-Served'. If a headset has multiple paired headsets for intercom conversations, the last paired headset is set as first intercom friend. The previous intercom friend becomes second intercom friend, and third intercom friend.
Note:
For example, after the pairing procedures listed above, headset D is the first intercom friend of headset A. Headset C is the second intercom friend of headset A, and headset B is the third intercom friend of headset A.
5.4.2 Pairing with Other Sena Headset Models for Intercom Conversation
The 10R can be paired with all other Sena headset models such as the 20S, SMH10 and the SMH5 for intercom conversation. Please follow the same procedure as above to pair with these headset models.
Note:
The SMH5 cannot participate in three-way or four-way conference intercom with the 10R. The SMH5 has a limited capability of having two-way intercom with other Sena headsets.
6 MOBILE PHONE, GPS, SR10
6.1 Mobile Phone Call Making and Answering
- When you have an incoming call, tap the Center Button to answer the call.
- You can also answer the incoming call by loudly speaking any word of your choice if Voice Activated Phone Answering (VOX Phone) is enabled, unless you are connected to intercom.
- To end a call, press the Center Button for 2 seconds until you hear a mid-tone single beep, or wait for the called person to end the call.
- To reject a call, press the Center Button for 2 seconds until you hear a beep while the phone is ringing.
- There are several ways to make a phone call:
- Enter numbers on your mobile phone's keypad and make a call. Then the call is automatically transferred to the headset.
– In stand-by mode, press the Center Button for 3 seconds, to activate the voice dialing of your mobile phone. For this, the voice dialing function must be available on the mobile phone. Refer to your mobile phone manual for further instruction.
Note:
- If you have two phones connected to your headset and you have an incoming call from the second phone during the call of the first phone, then you may still receive the call from the second phone. In this case, the call from the first phone is on waiting mode. If you end a call, then it will automatically guide you to the first phone call.
- If you have a mobile phone and a GPS connected to your headset, you may not be able to listen to the GPS voice instruction during the phone call.
6.2 Speed Dialing
You can quickly make a phone call by using the voice speed dial menu.
- To enter into the voice speed dial menu, press and hold the (+) Button for 3 seconds and you will hear a mid-tone single beep and a voice prompt saying "Speed dial".
- Tap the (+) Button or the (-) Button to navigate between the menus. You will hear voice prompts for each menu item.
- Tap the Center Button to select a voice menu among the followings:
(1) Last number redial (4) Speed dial 3
(2) Speed dial 1 (5) Cancel
(3) Speed dial 2
-
After selecting the last number redial menu, you will hear a voice prompt, "Last number redial". Then, to redial the last phone call number, tap the Center Button.
-
To call one of the speed dials, tap the (+) Button or the (-) Button to navigate between the menus until you hear a voice prompt saying "Speed dial (#)". Then, tap the Center Button.
-
If you want to exit the speed dial immediately, tap the (+) Button or the (-) Button until you hear a voice prompt saying "Cancel", and tap the Center Button. If you do not press any button within 15 seconds, the 10R will exit the voice speed dial menu and go back to stand-by mode.
Note:
- Make sure that you connect the mobile phone and the headset to use the speed dial function.
- You need to assign speed dial numbers before using the speed dial (please refer to section 13.2.1, "Speed Dial").
6.3 GPS Navigation
6.3.1 GPS Pairing
- Press and hold the Center Button for 10 seconds until you will hear a voice prompt saying "Configuration menu".
- Tap the (+) Button until you will hear a voice prompt saying "GPS pairing".
- Search for Bluetooth devices on the GPS navigation. Select the Sena 10R in the list of the devices detected on the GPS.
- Enter 0000 for the PIN.
Note:
When Audio Multitasking is enabled, if you pair your GPS device via GPS Pairing, its instructions will not interrupt your intercom conversations, but will overlay with them.
6.4 Sena SR10, Two-Way Radio Adapter
You can use a two-way radio and the 10R Bluetooth intercom simultaneously by using the Sena SR10, a Bluetooth Two-way Radio Adapter (please refer to section 5.2, "Second Mobile Phone Pairing - Second Mobile Phone, GPS, and SR10"). Incoming audio from the two-way radio will not interrupt an intercom conversation but is heard in the background. This is useful when you have an intercom conversation with a passenger on the back seat and use a two-way radio for group communication with other motorcycle riders.
7 STEREO MUSIC
7.1 Bluetooth Stereo Music
The Bluetooth audio device must be paired with the 10R by following the "Mobile Phone Pairing - Mobile Phone, Bluetooth Stereo Device" procedures described in the section 5.1. The 10R supports the Audio/Video Remote Control Profile (AVRCP), so if your Bluetooth audio device also supports the AVRCP, you can use the 10R to remotely control music playback. Not only can you adjust the volume but you can also use functions such as play, pause, next track and previous track.
- To play or pause music, press the Center Button for 1 second until you hear a double beep.
- To adjust the volume, tap the (+) Button or the (-) Button.
- To track forward or track back, press and hold the (+) Button or the (-) Button for 1 second until you hear a mid-tone single beep.
7.2 Music Sharing
You can start sharing music with an intercom friend using Bluetooth stereo music during a two-way intercom conversation (please refer to section 8.1, "Two-way Intercom"). When you terminate music sharing, you can go back to the intercom conversation. To start or terminate sharing music, press the Center Button for 1 second during an intercom conversation until you hear a double beep. To track forward or track back, press and hold the (+) Button or the (-) Button for 1 second.
Note:
- Both you and your intercom friend can remotely control music playback such as track forward and track back.
- Music sharing will be paused when you are using your mobile phone or listening to GPS instructions.
- When Audio Multitasking is enabled, if an intercom call is made when you are listening to music, music sharing will not work.
8 INTERCOM
Please make sure your intercom devices are paired as described in section 5.4, "Intercom Pairing"
8.1 Two-way Intercom
8.1.1 Starting Two-way Intercom
You can start an intercom conversation with one of any intercom friends by tapping the Center Button. Tap the Center Button once to intercom with the first intercom friend, tap the Center Button twice to intercom with the second intercom friend, and tap the Center Button three times to intercom with the third intercom friend.
8.1.2 Ending Two-way Intercom
You can end an intercom conversation by using the Center Button Press and hold the Center Button for 1 second to end any intercom. Or you can single tap to end intercom with the first intercom friend, double tap to end intercom with the second intercom friend, and triple tap to end intercom with the third intercom friend.

Start/End Two-way Intercom Conversation
8.2 Three-way Intercom
8.2.1 Starting Three-way Intercom
You (A) can have a three-way conference intercom with two other 10R friends (B & C) by establishing two intercom connections simultaneously. While a three-way conference intercom is in progress, mobile phone connection of all three participants is temporarily disconnected. However, as soon as the conference intercom terminates or one of the participants leaves the intercom, all mobile phones automatically reconnect to their headsets. If you have an incoming mobile phone call during the conference intercom, terminate the conference intercom to automatically reconnect and receive the phone call.
- You (A) need to be paired with two other friends (B & C) for three-way conference intercom.
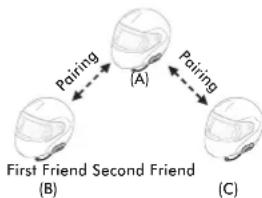
flowchart
graph TD
    A["First Friend"] -->|Pairing| B["(A)"]
    B -->|Pairing| C["(C)"]
    style A fill:#f9f,stroke:#333
    style B fill:#ccf,stroke:#333
    style C fill:#cfc,stroke:#333
- Start an intercom conversation with one of the two friends in your intercom group. For example, you (A) may start an intercom conversation with the intercom friend (B). Or intercom friend (B) may start an intercom call with you (A).
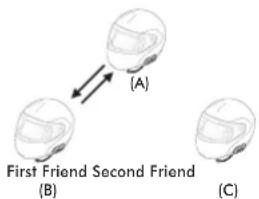
- You (A) can call the second intercom friend (C) by double tapping the Center Button, or the second intercom friend (C) may join the intercom by making an intercom call to you (A).
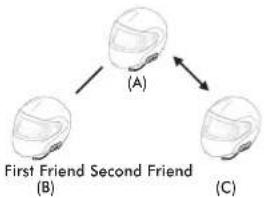
flowchart
graph TD
    A["First Friend"] --> B["Second Friend"]
    B --> C["Third Friend"]
    style A fill:#f9f,stroke:#333
    style B fill:#ccf,stroke:#333
    style C fill:#cfc,stroke:#333
- Now you (A) and two 10R intercom friends (B & C) are having a three-way conference intercom.
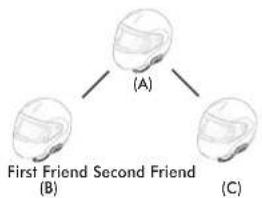
flowchart
graph TD
    A["First Friend"] --> B["Second Friend"]
    B --> C["Third Friend"]
    style A fill:#f9f,stroke:#333
    style B fill:#f9f,stroke:#333
    style C fill:#f9f,stroke:#333
8.2.2 Ending Three-way Intercom
You can completely terminate the conference intercom or just disconnect an intercom connection with one of your active intercom friends.
- Press the Center Button for 3 seconds until you hear a beep to terminate three-way conference intercom completely. It terminates both intercom connections with (B) and (C).
- Tap or double tap the Center Button to disconnect intercom connection with one of the two intercom friends accordingly. For example, by single tapping the Center Button, you can terminate the intercom connection with just the first intercom friend (B). However, you still have the intercom connection with your second intercom friend (C).
| Center Button Operation Result | |
| Press for 3 seconds Disconnect (B) & (C) | |
| Single tap Disconnect (B) | |
| Double tap Disconnect (C) |
End Three-way Intercom
8.3 Four-way Intercom
8.3.1 Starting Four-way Intercom
You can have four-way conference intercom with three other 10R users by adding one more intercom participant to the three-way intercom. While you are having a three-way intercom as above in section 8.2, "Three-way Intercom", a new participant (D), who is an intercom friend of your intercom friend (C), may join the conference intercom by making an intercom call to your intercom friend (C). Please note that in this case, the new participant (D) is an intercom friend of (C), not of you (A).
8.3.2 Ending Four-way Intercom
As same in the case of three-way intercom, you can completely get out of the four-way conference intercom or just disconnect a single intercom connection.
-
Press the Center Button for 3 seconds until you hear a beep to terminate four-way conference intercom. It terminates the intercom connections between you (A), and your intercom friends (B) and (C).
-
Tap or double tap the Center Button to disconnect the intercom connection with one of the two intercom friends accordingly. However, when you disconnect the second friend (C) by double tapping the Center Button, you will be disconnected with the third participant (D) as well. This is because the third participant (D) is connected with you via the second friend (C).
| Center Button Operation Result |
| Press for 3 seconds Disconnect (B), (C) & (D) |
| Single tap Disconnect (B) |
| Double tap Disconnect (C) & (D) |
End Four-way Intercom
Note:
Multiple headsets are connected during multi-way intercom. With various signals interfering each other, the intercom distance of multi-way intercom is relatively shorter than that of two-way intercom.
9 THREE-WAY CONFERENCE PHONE CALL WITH INTERCOM PARTICIPANT
- When you have an incoming mobile phone call during an intercom conversation, you will hear a ring tone. You can choose whether to 1) answer the mobile phone call and stop the intercom conversation, or 2) reject the phone call and stay on the intercom conversation.
1) To answer the phone call and stop the intercom conversation, tap the Center Button. The VOX Phone feature does not work if you are connected to intercom. When you hang up the phone call, the intercom will automatically be recovered.
2) To reject the phone call and stay on the intercom conversation, press the Center Button for 2 seconds until you hear a beep.
Unlike other motorcycle Bluetooth headsets, this prevents a user from being dropped out of an intercom conversation by an incoming mobile call.
- When you have an incoming intercom call during a mobile phone call, you will hear 4 high-toned beeps, alerting you that there is an incoming intercom call. You will also hear a voice prompt, "Intercom requested". In this case, the intercom call does not override the mobile call because intercom has lower priority than mobile call. You have to hang up the mobile phone call to make or receive an intercom call.
- You can have a three-way conference phone call by adding an intercom friend to the mobile phone conversation. During a mobile phone conversation, tap the Center Button to invite one of the intercom friends to the mobile phone line. To disconnect the intercom first and go back to your private mobile phone call, terminate the intercom by tapping the Center Button. To end the mobile phone call first and maintain the intercom conversation, tap the Center Button for 2 seconds, or wait for the person on the mobile phone line to end the call.
| Start | Tap the Center Button while having a mobile phone call |
| End intercom first Tap the Center Button | |
| End phone call first | Tap the Center Button for 2 secondsorWait for the called person to end the call |
Start & End Three-way Conference Phone Call
10 GROUP INTERCOM
Group Intercom allows you to instantly create a multi-way conference intercom with three other most recently paired headsets.
- Go through intercom pairing with up to three headsets you want to have Group Intercom with.
- Tap the (+) Button and (-) Button simultaneously to begin Group Intercom. The LED will flash blue and red simultaneously and you will hear a voice prompt, "Group intercom".
- To terminate Group Intercom, press the Center Button for 3 seconds during Group Intercom. You will hear a voice prompt, "Group intercom terminated".
11 UNIVERSAL INTERCOM
You can have an intercom conversation with non-Sena Bluetooth headsets using the Universal Intercom function. Non-Sena Bluetooth headsets can be connected to the Sena Bluetooth headset if they support the Bluetooth Hands-Free Profile (HFP). The working distance may differ depending on the performance of Bluetooth headset that it is connected to. In general, it is shorter than normal intercom distance since it uses the Bluetooth Hands-Free Profile. The Universal Intercom affects both the phone call connection and the multipoint connection (mostly used for GPS connections for riders). You cannot use a multipoint connection device while you are using the Universal Intercom in case as below.
- If a non-Sena headset does not support a multipoint connection, it cannot use a phone call connection while using the Universal Intercom.
- As for Sena headsets, the Universal Intercom affects the multipoint connection.
- If non-Sena headset (already paired as Universal Intercom with Sena) is turned on, then the multipoint connection is automatically deactivated. And the non-Sena headset is automatically connected to Sena headset as a Universal Intercom. So you cannot use multipoint connection devices such as GPS, while a non-Sena headset is turned on.
- Even though you disconnect the non-Sena headset as a Universal Intercom, it will not automatically restore the multipoint connection. To restore the multipoint connection, you should turn off the non-Sena headset first, then try to connect to multipoint device manually from the device screen or simply reboot the device so that it automatically connects to the Sena headset.
11.1 Universal Intercom Pairing
The 10R can be paired with non-Sena Bluetooth headsets for Bluetooth intercom conversation. You can pair the 10R with only one non-Sena Bluetooth headset so if you pair with a different non-Sena Bluetooth headset, the previous pairing will be removed.
- Turn on the 10R and a non-Sena Bluetooth headset that you want to pair with.
- Press and hold the Center Button for 10 seconds to enter the configuration menu. Tap the (+) Button or the (-) Button until you hear a voice prompt, "Universal intercom pairing". Tap the Center Button to enter into Universal Intercom Pairing mode and the blue LED will flash rapidly and you will hear multiple beeps.
- Perform the operation required for handsfree pairing on the non-Sena Bluetooth headset (refer to the User's Manual for the headsets you want to use). The 10R will automatically pair with a non-Sena Bluetooth headset when each are in pairing mode.
11.2 Two-way Universal Intercom
You can initiate the Universal Intercom connection with non-Sena Bluetooth headsets using the same intercom connection method as you would between other Sena headsets. You may single tap the Center Button to begin an intercom conversation with the first intercom friend, double tap with the second intercom friend, and triple tap with the third intercom friend.
Non-Sena Bluetooth headsets may initiate the Universal Intercom connection, by activating the voice dialer or using the redialing operation. You may also disconnect the existing connection by using the operation to end a call (refer to the User's Manual for the headsets for voice dialer, redialing, and ending a call).
11.3 Three-way Universal Intercom
You may make a three-way Universal Intercom connection with two 10Rs and one non-Sena Bluetooth headset. If the intercom connection is made, all headsets connected cannot use the mobile phone call function since the connection between the headset and the phone is disconnected temporarily. If you disconnect the intercom call, the mobile phone connection is made again automatically so that you can use a mobile phone call function.
- You (A) need to be paired with a non-Sena Bluetooth headset (B) and another 10R headset (C) for the three-way conference intercom.
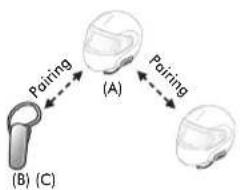
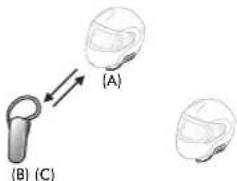
- Start an intercom conversation with non-Sena Bluetooth headset (B) in your intercom group. For example, you (A) may start a intercom conversation with non-Sena Bluetooth headset (B). The non-Sena Bluetooth headset (B) may also start an intercom call with you (A).
- The other 10R (C) may join the intercom by making an intercom call to you (A).
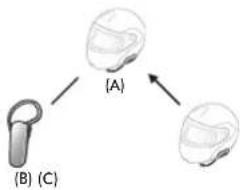
flowchart
graph TD
    A["(A)"] --> B["(B)"]
    B --> C["(C)"]
- Now you (A), non-Sena Bluetooth headset (B), and the other 10R (C) are having a three-way conference intercom.
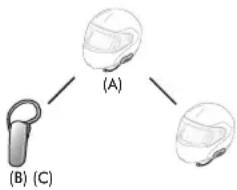
- You may disconnect three-way Universal Intercom using the same way as you do in normal three-way intercom. Please refer to section 8.2.2, "Ending Three-way Intercom".
11.4 Four-way Universal Intercom
You may make a four-way Universal Intercom connection with a couple of different configurations, 1) three 10Rs and one non-Sena Bluetooth headset or 2) two 10Rs and two non-Sena Bluetooth headsets.
You may have a couple of other Four-way Universal Intercom configurations, 1) your headset (A), a non-Sena Bluetooth headset (B), another 10R (C), and a non-Sena Bluetooth headset (D), 2) your headset (A), a non-Sena Bluetooth headset (B), and two other 10R headsets (C and D). You may make the four-way Universal Intercom call the same way as a normal four-way intercom call.
11.4.1 Four-way Universal Intercom Case 1
Two 10R headsets (A and C) and two non-Sena Bluetooth headsets (B and D).
- You (A) may start an intercom conversation with the non-Sena Bluetooth headset (B).
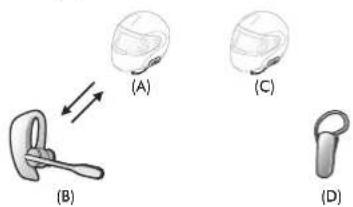
- The other 10R (C) may join the intercom by making an intercom call to you (A).
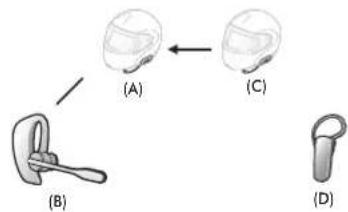
flowchart
graph TD
    A["Step (A)"] --> B["Step (B)"]
    B --> C["Step (C)"]
    C --> D["Step (D)"]
- The non-Sena Bluetooth headset (D) may join the conference intercom by making an intercom call to the 10R (C).
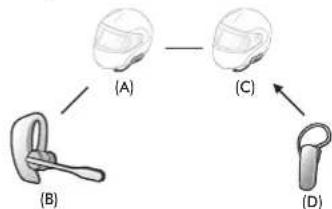
flowchart
graph TD
    A["(A)"] --> B["(B)"]
    B --> C["(C)"]
    C --> D["(D)"]
- Now two 10R headsets (A & C) and two non-Sena Bluetooth headsets (B & D) are connected with the four-way Universal Intercom.
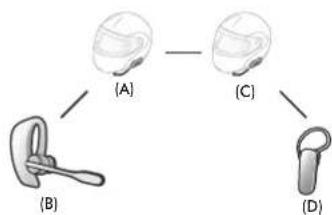
flowchart
graph TD
    A["(A)"] --> B["(B)"]
    B --> C["(C)"]
    C --> D["(D)"]
You may disconnect a four-way Universal Intercom using the same way as you do in a normal four-way intercom. Please refer to section 8.3.2, "Ending Four-way Intercom".
11.4.2 Four-way Universal Intercom Case 2
Three 10R headsets (A, C and D) and one non-Sena Bluetooth headset (B). The procedure is the same as case 1 described in section 11.4.1.
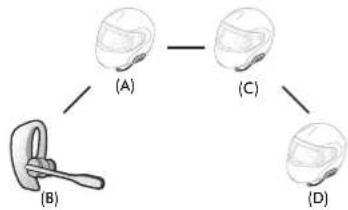
flowchart
graph TD
    A["(A)"] --> B["(B)"]
    B --> C["(C)"]
    C --> D["(D)"]
12 FUNCTION PRIORITY
The 10R operates in the following order of priority:
(highest) Mobile phone
Intercom
Music sharing by Bluetooth stereo music
(lowest) Bluetooth stereo music
A lower priority function is always interrupted by a higher priority function.
Note:
If you select music as the audio source priority, the order of priority will change as below:
(highest) Mobile phone
Bluetooth stereo music
Intercom
(lowest) Music sharing by Bluetooth stereo music
13 CONFIGURATION SETTING
13.1 Headset Configuration Setting
- To enter configuration menu, press and hold the Center Button for 10 seconds until you will also hear a voice prompt, "Configuration menu".
- Tap the (+) Button or the (-) Button to navigate between the menus. You will hear voice prompts for each menu item.
- You can execute the command by tapping the Center Button.
| Configuration Menu Tap Center Button | |
| Phone Pairing None | |
| Second Mobile Phone Pairing None | |
| GPS Pairing None | |
| Phone Selective Pairing None | |
| Media Selective Pairing None | |
| Configuration Menu Tap Center Button | |
| Delete All Pairings Execute | |
| Remote Control Pairing Execute | |
| Universal Intercom Pairing Execute | |
| Factory Reset Execute | |
| Exit Configuration Execute | |
13.2 Software Configuration Setting
You can change the settings of the headset through the Sena Device Manager or the Sena Utility App.
13.2.1 Speed Dial
Assign phone numbers for speed dialing to make a phone call quickly.
13.2.2 Audio Source Priority (Default: Intercom)
Audio Source Priority allows you to select the priority between the intercom and music (which includes GPS app instructions and message notifications) from a smartphone. If the intercom is selected as the audio source priority, your music will be interrupted during an intercom conversation. If music is selected as the audio source priority, intercom conversations will be interrupted while your music is heard.
Note:
Audio Source Priority is active only when Audio Multitasking is disabled.
13.2.3 Audio Boost (Default: Disable)
Enabling Audio Boost increases the overall maximum volume. Disabling Audio Boost reduces the overall maximum volume, but delivers more balanced sound.
13.2.4 VOX Phone (Default: Enable)
If this feature is enabled, you can answer incoming calls by voice. When you hear a ringtone for an incoming call, you can answer the phone by saying a word such as "Hello" loudly or by blowing air into the microphone. VOX phone is temporarily disabled if you are connected to intercom. If this feature is disabled, you have to tap the Center Button to answer an incoming call.
13.2.5 VOX Intercom (Default: Disable)
If this feature is enabled, you can initiate an intercom conversation with the last connected intercom friend by voice. When you want to start intercom, say a word such as "Hello" loudly or blow air into the microphone. If you start an intercom conversation by voice, the intercom terminates automatically when you and your intercom friend remain silent for 20 seconds. However, if you manually start an intercom conversation by tapping the Center Button, you have to terminate the intercom conversation manually. However, if you start intercom by voice and end it manually by tapping the Center Button, you will not be able to start intercom by voice temporarily. In this case, you have to tap the Center Button to restart the intercom. This is to prevent repeated unintentional intercom connections by strong wind noise. After rebooting the headset, you can start intercom by voice again.
13.2.6 HD Voice (Default: Disable)
HD Voice allows you to communicate in high-definition during phone calls. This feature increases the quality so that the audio will be crisp and clear during phone call conversations.
If this feature is enabled, incoming phone calls will interrupt intercom conversations and audio from the SR10 will not be heard during intercom conversations. Three-Way Conference Phone Call with Intercom Participant will not be available if HD Voice is enabled.
Note:
- Refer to the manufacturer of your Bluetooth device that will be connected to the headset to see if it supports HD Voice.
- HD Voice is active only when Audio Multitasking is disabled.
13.2.7 HD Intercom (Default: Enable)
HD Intercom enhances the two-way intercom audio from normal quality to HD quality. HD Intercom will become temporarily disabled when you enter into a multi-way intercom. If this feature is disabled, the two-way intercom audio will change to normal quality.
Note:
- The intercom distance of HD Intercom is relatively shorter than that of normal intercom.
- HD intercom is active only when Audio Multitasking is disabled.
13.2.8 Intercom VOX Sensitivity (Default: 3)
VOX sensitivity can be adjusted depending on your riding environment. Level 5 is the highest sensitivity setting and 1 is the lowest.
13.2.9 Voice Prompts (Default: Enable)
You can disable voice prompts by software configuration setting, but the following voice prompts are always on.
- headset configuration setting menu, battery level indicator, speed dial
13.2.10 Sidetone (Default: Disable)
Sidetone is audible feedback of your own voice. It helps you to naturally speak at the correct level according to varying helmet noise conditions. If this feature is enabled, you can hear what you are speaking during an intercom conversation or a phone call.
13.2.11 Advanced Noise Control™ (Default: Enable)
When Advanced Noise Control is enabled, the background noise is reduced during an intercom conversation. When it is disabled, the background noise is mixed with your voice during intercom.
13.2.12 Audio Multitasking™ (Default: Disable)
Audio Multitasking allows you to hear the audio from two features simultaneously. When Audio Multitasking is enabled, phone calls, GPS instructions, and intercom conversations can be overlaid with audio from the music or GPS app instructions from a smartphone in the background with reduced volume. Increasing or decreasing the volume of the audio in the foreground will also increase or decrease the volume of the overlaid audio in the background. The volume of the foreground audio can be adjusted using the headset. How much background audio that is heard can be adjusted using the Sena Utility App. HD Intercom, HD Voice, and Audio Source Priority become disabled temporarily when Audio Multitasking is enabled.
| Model | Foreground* Background** | |||
| Phone GPS Intercom Music or Smart Navi | ||||
| 10R | O^A | O^A | ||
| O | O | |||
| O^B | O^B | |||
| O | O | |||
Foreground and Background Combination Table
* Two audio sources in the foreground can be heard simultaneously with the same volume level.
** Only one background source can be heard at a time while listening to an audio source in the foreground.
A. GPS instructions can be heard during phone calls and the volume level of both audio sources can be adjusted using the headset.
B. GPS app directions will be heard in the background during intercom conversations.
Note:
- Audio Multitasking will be activated during two-way intercom conversations with a headset that also supports this feature.
- When Audio Multitasking is disabled, the background audio source will return to its independent volume level.
- Audio Multitasking has limited usage for iOS devices.
- For Audio Multitasking to work properly, you need to power the headset off and on. Please restart the headset.
- Some GPS devices may not support this feature.
13.2.13 Background Volume (Default: Level 5)
The Background Volume can be adjustable only when the Audio Multitasking turns on. Level 9 is the highest volume and 0 is the lowest.
14 REMOTE CONTROL
You can remotely control the 10R via Bluetooth using the Handlebar Remote (sold separately). This eliminates the need to take off your hand for button operations. Your 10R and the Handlebar Remote must be paired together before use.
14.1 Pairing with the Handlebar Remote
- Turn on the 10R and the Handlebar Remote.
- Press the Center Button for 10 seconds to enter the configuration menu. Tap the (+) Button until you hear a voice prompt saying, "Remote control pairing". Press the Center Button to enter into Remote Control Pairing mode and the red LED will flash rapidly and you will hear multiple beeps.
- On the Handlebar Remote, press the Rear Button for 5 seconds until its LED flashes red and blue. The 10R will automatically perform pairing with the Handlebar Remote in pairing mode. You will hear a voice prompt, "Remote control connected", when they are successfully connected.
14.2 Using the Handlebar Remote
Handlebar Remote button operations on various functions are described in the table below.
| Type Function Handlebar Remote | LED | ||
| Basic Function | Volume adjustment Move the Joystick up or down - | ||
| Configuration menu Press the Front Button for 10 seconds - | |||
| Mobile Phone | Mobile phone pairing Press the Joystick for 5 seconds | Blue & red alternatively flashing | |
| Second mobile phone pairing | Press the Front Button for 5 seconds Red flashing | ||
| Tap the Rear Button within 2 seconds | |||
| Answer & end phone call | Tap the Rear Button - | ||
| Voice dial Tap the Rear Button - | |||
| Speed dial Double tap the Rear Button - | |||
| Reject incoming call | Press the Front Button for 2 seconds | - | |
| Type Function Handlebar Remote | LED | ||
| Intercom | Intercom pairing | Press the Front Button for 5 seconds Red flashing | |
| Tap the Front Button of any one of the two headsets | |||
| Start/End each intercom | Tap the Front Button | - | |
| End all intercoms | Press the Front Button for 3 seconds | - | |
| Start Group Intercom | Press the Front Button for 3 seconds | Green flashing | |
| End Group Intercom | Press the Front Button for 3 seconds | - | |
| Music | Play/Pause Blueloth music | Press the Joystick for 1 second | - |
| Track forward/back | Move the Joystick left or right for 1 second | - | |
Handlebar Remote Button Operation Table
15 FIRMWARE UPGRADE
The 10R supports firmware upgrades. You can update the firmware using the Sena Device Manager (please refer to section 4.6.1, "Sena Device Manager"). Please visit Sena Bluetooth website at www.sena.com to check the latest software downloads.
16 TROUBLESHOOTING
16.1 Intercom Failure
When you try to start an intercom conversation with an intercom friend who is unavailable within range or already having a conference intercom with other riders or a mobile phone call, you will hear a low tone double beep signifying an intercom busy signal. In this case, you have to try again later.
16.2 Intercom Reconnection
If your intercom friend goes out of range while having an intercom conversation, you may hear static noise and eventually the intercom will be disconnected. In this case, the 10R automatically tries to reconnect the intercom every 8 seconds and you will hear high tone double beeps until the intercom is reestablished. If you do not want to make a reconnection, tap the Center Button to stop the attempt.
16.3 Fault Reset
When the 10R is not working properly or is in faulty status for any reason, you may reset by pushing the pin-hole reset button below the (+) Button. Insert a paper clip into the reset pin-hole and press the reset button for a second with light pressure. The 10R will be switched off. Restart the system and try again. This will not restore the headset to factory default settings.
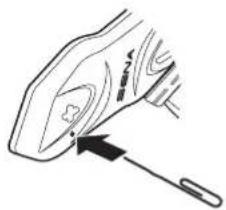
16.4 Factory Reset
If you want to restore the headset to factory default settings, use the Factory Reset in the configuration menu. The headset automatically restores the default settings and turns off. Please refer to section 13.1, "Headset Configuration Setting" for more details.
- WARNING
- CONTENTS
- INTRODUCTION
- PACKAGE CONTENTS
- Speaker
- Wired Boom Microphone
- Wired Microphone
- Others
- Battery Pack
- INSTALLING THE 10R ON YOUR HELMET
- Installing the Main Unit
- Using the Hook and Loop Fasteners for Main Unit
- Using the Double Sided Adhesive Tapes for Main Unit
- CAUTION:
- Installing the Speakers
- Note:
- Installing the Microphones
- Using the Wired Boom Microphone
- Using the Wired Microphone
- Installing the Battery Pack
- GETTING STARTED
- Button Operation
- Powering On and Off
- Charging
- CAUTION
- Checking the Battery Level
- LED Indicator
- Voice Prompt Indicator
- Volume Adjustment
- Sena Softwares
- Sena Device Manager
- Sena Utility App
- PAIRING THE 10R WITH BLUETOOTH DEVICES
- Mobile Phone Pairing - Mobile Phone, Bluetooth Stereo Device
- Second Mobile Phone Pairing - Second Mobile Phone, GPS, and SR10
- Advanced Selective Pairing - A2DP Stereo or Handsfree
- A2DP Stereo Music Only
- HFP for Phone Call Only
- Intercom Pairing
- Pairing with Other 10R Headsets for Intercom Conversation
- SENA | 10R
- Pairing with Other Sena Headset Models for Intercom Conversation
- MOBILE PHONE, GPS, SR10
- Mobile Phone Call Making and Answering
- Speed Dialing
- GPS Navigation
- GPS Pairing
- Sena SR10, Two-Way Radio Adapter
- STEREO MUSIC
- Bluetooth Stereo Music
- Music Sharing
- INTERCOM
- Two-way Intercom
- Starting Two-way Intercom
- Ending Two-way Intercom
- Three-way Intercom
- Starting Three-way Intercom
- Ending Three-way Intercom
- Four-way Intercom
- Starting Four-way Intercom
- Ending Four-way Intercom
- End Four-way Intercom
- THREE-WAY CONFERENCE PHONE CALL WITH INTERCOM PARTICIPANT
- GROUP INTERCOM
- UNIVERSAL INTERCOM
- Universal Intercom Pairing
- Two-way Universal Intercom
- Three-way Universal Intercom
- Four-way Universal Intercom
- Four-way Universal Intercom Case 1
- Four-way Universal Intercom Case 2
- FUNCTION PRIORITY
- CONFIGURATION SETTING
- Headset Configuration Setting
- Software Configuration Setting
- Speed Dial
- Audio Source Priority (Default: Intercom)
- Audio Boost (Default: Disable)
- VOX Phone (Default: Enable)
- VOX Intercom (Default: Disable)
- HD Voice (Default: Disable)
- HD Intercom (Default: Enable)
- Intercom VOX Sensitivity (Default: 3)
- Voice Prompts (Default: Enable)
- Sidetone (Default: Disable)
- Advanced Noise Control™ (Default: Enable)
- Audio Multitasking™ (Default: Disable)
- Background Volume (Default: Level 5)
- REMOTE CONTROL
- Pairing with the Handlebar Remote
- Using the Handlebar Remote
- FIRMWARE UPGRADE
- TROUBLESHOOTING
- Intercom Failure
- Intercom Reconnection
- Fault Reset
- Factory Reset
Brand : Sena
Model : 10R
Category : Headphones