
Tasciugo AriaDry DEX210 - Dehumidifier DELONGHI - Free user manual and instructions
Find the device manual for free Tasciugo AriaDry DEX210 DELONGHI in PDF.
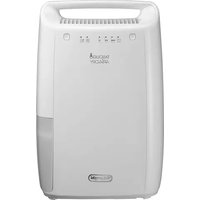


| Product Type | Dehumidifier |
| Brand | DeLonghi |
| Model | Tasciugo AriaDry DEX210 |
| Refrigerant | R290 (flammable) |
| Tank Capacity | 2.1 liters |
| Operating Temperature Range | 2°C - 30°C |
| Operating Humidity Range | 30% - 90% RH |
| Fan Speeds | 1 |
| Frost Protection | Yes (automatic low-temperature operation) |
| Air Filter | Yes (washable dust filter; silver-ion filter on some models) |
| Anti-Allergen Filter | Available on some models (replace every 2 years) |
| Continuous Drain | Yes (with supplied hose) |
| Control Panel | ON/STAND-BY button, MODE button, humidity level selection (40%, 50%, 60%, Dry) |
| Indicator Lights | Tank full/missing, dehumidification/frost protection |
| Safety Devices | 3-minute compressor delay, automatic shut-off when tank full |
| Power Supply | Refer to rating plate (typical 220-240 V ~ 50 Hz) |
| Power Consumption | Refer to rating plate |
| Application | Household dehumidification, laundry drying |
| Maintenance | Clean filter weekly, clean cabinet with damp cloth |
| Installation Area | Minimum 4 m², keep 50 cm clearance in front |
| Package Includes | Dehumidifier, condensate drain hose, user manual |
Frequently Asked Questions - Tasciugo AriaDry DEX210 DELONGHI
User questions about Tasciugo AriaDry DEX210 DELONGHI
0 question about this device. Answer the ones you know or ask your own.
Ask a new question about this device
Download the instructions for your Dehumidifier in PDF format for free! Find your manual Tasciugo AriaDry DEX210 - DELONGHI and take your electronic device back in hand. On this page are published all the documents necessary for the use of your device. Tasciugo AriaDry DEX210 by DELONGHI.
USER MANUAL Tasciugo AriaDry DEX210 DELONGHI
Read these instructions carefully before using the appliance. Failure to follow these instructions may result in injuries and equipment damage.
The manufacturer is not liable for damages resulting from failure to follow these instructions for use.
SAFETY
Symbols used in these instructions
Important warnings carry these symbols. These warnings must be strictly observed.
Failure to observe these indications could result in electric shocks, serious injuries, fire or damages to the appliance.

Danger!
Failure to observe the warning may result in life threatening injuries by electric shock.

Caution!
Failure to observe the warning may result in injuries or equipment damage.

Please note!
This symbol identifies important advice or information for the user.
FUNDAMENTAL SAFETY WARNING

Caution!
- The appliance is not intended for use by persons (including children) with reduced physical, sensory or mental capabilities, or lack of experience and knowledge, unless they have been given supervision or instruction concerning use of the appliance by a person responsible for their safety.
- Children should be supervised to ensure that they do not play with the appliance.
FOR EUROPEAN MARKET ONLY:
- This appliance can be used by children aged from 8 years and above and per-
sons with reduced physical, sensory or mental capabilities or lack of experience and knowledge if they have been given supervision or instruction concerning use of the appliance in a safe way and understand the hazards involved. Children shall not play with the appliance. Cleaning and user maintenance shall not be made by children without supervision.
Keep the appliance and its cord out of reach of children aged less than 8 years.

Danger!
Because the appliance runs on electricity, electrical shocks cannot be excluded.
Therefore, please observe the following safety instructions:
- If the power cord is damaged, it must be replaced by the manufacturer or the manufacturer's Customer Experience in order to avoid all risk.
- Do not touch the appliance with wet hands or feet.
- Do not touch the plug with wet hands.
- Make sure that the socket used is freely accessible at all times, enabling the appliance to be unplugged when necessary.
- Unplug directly from the plug only.
Never tug the power cord, because it could damage the cord.
- To disconnect the appliance completely you must unplug it from the mains socket.
- If the appliance is faulty, do not attempt to repair.
Turn it off, unplug from the mains socket and contact Customer Experience.
- Never move the appliance by pulling on the power cable.
- The appliance must not be modified in any way, as any modifications may be extremely dangerous.
- Do not use an extension cable.
- The appliance must be installed in accordance with the rules on household appliances in force in the country concerned.
- The appliance must be connected to an efficient earth system. Have your electrical circuit checked by a qualified electrician.

Caution!
• After unpacking, make sure the appliance is complete and undamaged. - Keep all packaging material (plastic bags, polystyrene foam) out of reach of children. • Use the appliance on a flat surface. - Do not use the appliance in case of obvious damage. Contact Customer Experience.
Problems and repairs
In the event of problems, first try and resolve them by reading the information given in the "Troubleshooting" section on page 13. If the appliance requires repair, always contact Customer Experience - see enclosed guarantee. Always insist on original spare parts. Repairs carried out by unauthorized personnel may be dangerous and invalidate the guarantee.
Appropriate use
This is a household appliance only.
Use this appliance only as described in this instruction manual. These instructions are not intended to cover every possible condition and situation that may arise. Common sense and caution must be used when installing, operating and maintaining any electrical appliance.
Specific information regarding appliances with R290 refrigerant gas
• Thoroughly read all of the warnings. - When defrosting and cleaning the appliance, do not use any tools other than those recommended by the manufacturing company. - The appliance must be placed in an area without any continuous sources of ignition (for example: open flames, gas or electrical appliances in operation). - Do not puncture and do not burn. - Refrigerant gases can be odourless. - The appliance must be installed, used and stored in an area that is greater than 4 m². - This appliance contains R290 refrigerant gas. (For more details on the refrigerant, see back cover). - R290 is a refrigerant gas that complies with the European directives on the environment. Do not puncture any part of the refrigerant circuit. - If the appliance is installed, operated or stored in a non-ventilated area, the room must be designed to prevent the accumulation of refrigerant leaks resulting in a risk of fire
or explosion due to ignition of the refrigerant caused by electric heaters, stoves, or other sources of ignition.
- The appliance must be stored in such a way as to prevent mechanical failure.
- Individuals who operate or work on the refrigerant circuit must have the appropriate certification issued by an accredited organisation that ensures competence in handling refrigerants according to a specific evaluation recognized by associations in the industry. • Repairs must be performed based on the recommendations from the manufacturing company. Maintenance and repairs that require the assistance of other qualified personnel must be performed under the supervision of an individual specified in the use of flammable refrigerants.
- The materials used for packaging can be recycled. You are therefore recommended to dispose of them in special differentiated waste collection containers.
- Do not use the appliance outdoors.
- Do not obstruct the entrances and exits of air.
- Do not use the appliance in laundry rooms.
Electrical connections
After transporting the appliance, wait at least an hour before turning it on.
Before plugging the appliance into the outlet, check that:
- The mains voltage corresponds to the operating voltage stated on the rating plate.
- The mains socket and the electrical supply line are adequate for the required load.
- The power outlet matches the plug. If this is not the case, have the plug replaced by a qualified electrician • The outlet is properly grounded.
Operating instructions
Read these instructions carefully before using the appliance.
- Keep these instructions. If the appliance is transferred to other owners, they should also be given these instructions.
- Failure to follow these instructions may result in injuries and equipment damage. The manufacturer is not liable for damages resulting from failure to follow these Instruction for Use.
- Please refer to the guarantee leaflet for contact details.

Please note!
Keep these Instructions for Use. If the appliance is transferred to other owners, they should also be given these instructions.
INSTALLATION
Position the appliance in the room to be dehumidified. A free space of at least 50 cm must be left at the front of the dehumidifier, so as not to block the air outlet. For efficient ventilation a space of about 5-10 cm should be left at the back of the appliance. The condensate can be drained in one of the following ways:
a) Draining into the tank
The condensate can be drained directly into the tank. The tank can be easily removed (Fig.1).
b) Continuous external draining
If the appliance is to be operated for long periods but you are unable to empty the tank regularly, you are recommended to use continuous draining.
1) Remove the continuous drain cap by turning it counterclockwise then remove the rubber stopper from the spout 2 (Fig. 2). 2) Apply the accessory tube to the spout as shown in Figure 3. 3) Make sure the end of the hose is no higher than the spout. Otherwise the water will flow into the tank of the appliance (Fig. 4).
Make sure there are no kinks in the hose.
DESCRIPTION (page 3)
Appliance description (page 3 - A)
A1. Control panel A2. Condensate collection tank A3. Lifting handle A4. Air intake grill A5. Dust Air filter or silver-ion air filter (on certain models only) A6. Air outlet grill A7. Condensate drain hose (approx. 1 m) A8. Anti-allergen filter (on certain models only)
Control panel description (page 3 - B)
B1. ON/STAND-BY button B2. MODE button B3. Tank full/tank missing indicator light B4. Dehumidification/frost protection function light. B5. Set humidity level
HOW TO DEHUMIDIFY
- Connect the appliance into an outlet.
- Check that the "tank full/tank missing" indicator light
( ) is turned off, otherwise empty the tank or position it correctly.
- To turn the appliance on, press the ON/STAND BY button
- Press the "MODE" (B2) button to select the desired
humidity ( , ◆ ◆ ◆ ◆ ◆ ◆
The appliance will adjust the humidity level according to your choice:
Approx 60% environment humidity
Approx 50% environment humidity
Approx 40% environment humidity
Selecting 📋 activates the "dry" function, ideal for speeding up the drying of laundry.
i Please note!
- If the humidity in the room is greater than the set humidity, the appliance will start to dehumidify and will stop functioning only when the desired level of humidity is reached.
INDICATOR LIGHTS
Tank control light (Tank control system)
This dehumidifier is equipped with a device that monitors the correct functioning of the appliance.
The corresponding indicator light, located on the control panel, turns on to warn the user when:
- the tank is full:
empty the tank
- the tank is missing:
reposition the tank
- the tank is positioned incorrectly:
position it properly
- in continuous drain:
the hose is obstructed or the difference in level is too great (the water continues to be discharged into the tank)
remove the obstruction.
Once the cause has been eliminated, the light goes out and the appliance resumes operation.
* C- PAUSE Low temperature operation indicator light
When the room temperature is too low, the electronic low temperature operation device is activated. The device makes the ap-
pliance operate by alternating dehumidification cycles and fan only cycles, thus avoiding the formation of frost. For frequent use in cold environments, it is recommended to heat the room at the same time, even slightly. This allows the dehumidifier to operate in conditions that ensure better performance and faster dehumidification.

Please note!
- The appliance is equipped with a security device (delay of 3 minutes) that protects the compressor against too frequent starts and stops.
- When started up, or when power is restored, the appliance operates in the mode selected before it shut down.
CLEANING AND MAINTENANCE
Always remove the plug from the power socket before performing any cleaning or maintenance operations. For safety reasons, never wash the dehumidifier using a water jet.
Cleaning the cabinet
- Clean the appliance using a damp cloth then dry with a dry cloth.
- Never use petrol, alcohol or solvents to clean the appliance.
- Never spray the appliance with insecticides or similar. These could cause the plastic parts to warp.
Cleaning the dust air filter or silver-ion air filter (on certain models only)
If the filter is dirty, air circulation is compromised and the efficiency of dehumidifying is decreased. It is therefore good practice to clean the filter at regular intervals. The frequency depends on the environment and the duration of operation.
If the unit is used constantly or systematically, you are recommended to clean the filter once a week.
- To remove the air filter, remove the grill and extract the filter by pulling it (see Fig. 5).
- Use a vacuum cleaner to remove dust accumulations from the filter. If the filter is very dirty, rinse well with lukewarm water. The temperature of the water should not exceed 40°C. After washing the filter, allow it to dry completely before re-inserting it. If present, the silver-ion air filter, besides retaining powder particles, has also an efficient antibacterial action. In addition, it greatly reduces irritants such as pollen and spores. The filter is treated with small particles of silver (on the scale of millionths of a millimetre) which are able to block the multiplication of and destroy any bacteria or spores coming into contact with them.
Anti-allergen filter (on certain models only)
Some models are equipped with an anti-allergen filter that can notably reduce the concentration of allergens transported by air in a quick and efficient way.
To apply the filter, remove it from the packaging and insert it into its place in the grill at the back of the appliance, as shown in Figure 6.
It is recommended to replace the filter every 2 years.
If the appliance is not used for long periods
- After unplugging the appliance from the power socket, empty the tank.
- Clean and reposition the filter.
- Cover the appliance with a plastic bag to protect it from dust.
DISPOSAL

The appliance must not be disposed of with household waste, but taken to an authorised waste separation and recycling centre.
TECHNICAL SPECIFICATIONS
Power supply voltage See rating plate
Absorbed power "
Frost protection device Yes
Fan speeds 1
Air filter Yes
Anti-allergen filter (only on certain models) Yes
Tank capacity 2.1 litres
Operation limits:
temperature 2°C-30°C
relative humidity 30-90%
TROUBLESHOOTING
Check the following points before calling your local authorised Service Centre.
| PROBLEMS CAUSE SOLUTION | ||
| The appliance is operating in dehumidifying mode, but the humidity does not decrease | The filter is blockedThe temperature or humidity in the room is too lowThe room is too big for the dehumidifying power of the appliance or there are too many sources of humidity (pots of boiling water, etc.)The humidity set point is too high | Clean the filterIn certain conditions, it is normal for the appliance not to dehumidify. Verify the operation limits of the appliance in the "Technical Specifications" section. In certain cases, it is recommended to heat the environmentDecrease the humidity set point |
| The appliance does not work for approx 3 minutes after start-up | The safety device has tripped Wait for 3 minutes to pass and restart | |
| The appliance does not work | The appliance is not plugged inThere is no currentThe appliance is set on low humidity levelThe tank is full of waterThe tank is not positioned correctly | Plug into the mainsCheck the power supplySet the appliance to a greater humidity levelEmpty the tankGently place the tank into the correct position |
- SAFETY
- SYMBOLS USED IN THESE INSTRUCTIONS
- DANGER
- CAUTION
- PLEASE NOTE
- FUNDAMENTAL SAFETY WARNING
- FOR EUROPEAN MARKET ONLY
- PROBLEMS AND REPAIRS
- APPROPRIATE USE
- SPECIFIC INFORMATION REGARDING APPLIANCES WITH R290 REFRIGERANT GAS
- ELECTRICAL CONNECTIONS
- OPERATING INSTRUCTIONS
- INSTALLATION
- DRAINING INTO THE TANK
- CONTINUOUS EXTERNAL DRAINING
- DESCRIPTION (PAGE 3)
- APPLIANCE DESCRIPTION (PAGE 3 - A)
- CONTROL PANEL DESCRIPTION (PAGE 3 - B)
- HOW TO DEHUMIDIFY
- I PLEASE NOTE
- INDICATOR LIGHTS
- TANK CONTROL LIGHT (TANK CONTROL SYSTEM)
- C- PAUSE LOW TEMPERATURE OPERATION INDICATOR LIGHT
- CLEANING AND MAINTENANCE
- CLEANING THE CABINET
- CLEANING THE DUST AIR FILTER OR SILVER-ION AIR FILTER (ON CERTAIN MODELS ONLY)
- ANTI-ALLERGEN FILTER (ON CERTAIN MODELS ONLY)
- IF THE APPLIANCE IS NOT USED FOR LONG PERIODS
- DISPOSAL
- TECHNICAL SPECIFICATIONS
- OPERATION LIMITS
- TROUBLESHOOTING
Brand : DELONGHI
Model : Tasciugo AriaDry DEX210
Category : Dehumidifier