
WAU28PH1BY - Washing machine BOSCH - Free user manual and instructions
Find the device manual for free WAU28PH1BY BOSCH in PDF.


| Product type | Washing machine |
| Brand | Bosch |
| Model | WAU28PH1BY |
| Dimensions (H x W x D) | 85 cm x 60 cm x 60 cm |
| Weight | Approximately 80 kg |
| Power supply | 230 V, 50 Hz |
| Load capacity | 9 kg |
| Maximum spin speed | 1400 rpm |
| Energy class | A (old scale) / C (new scale) |
| Water consumption per cycle | Approximately 50 L |
| Noise level (wash/spin) | 52 dB / 76 dB |
| Main functions | Delayed start, child lock, extra rinse, stop fill |
| Maintenance and cleaning | Regular cleaning of the pump filter, detergent drawer and door seal |
| Spare parts and repairability | Repairability index 8.0/10; spare parts available (door, seal, electronic board, etc.) |
| General information | Eco-designed appliance compliant with EU Regulation 2019/2023; manual includes repair tips |
Frequently Asked Questions - WAU28PH1BY BOSCH
User questions about WAU28PH1BY BOSCH
0 question about this device. Answer the ones you know or ask your own.
Ask a new question about this device
Download the instructions for your Washing machine in PDF format for free! Find your manual WAU28PH1BY - BOSCH and take your electronic device back in hand. On this page are published all the documents necessary for the use of your device. WAU28PH1BY by BOSCH.
USER MANUAL WAU28PH1BY BOSCH
natural_image
3D cutaway diagram of a mechanical component showing internal structure and mounting features (no text or symbols)natural_image
3D rendering of a gray washing machine with a red arrow pointing to the door panel (no text or symbols visible)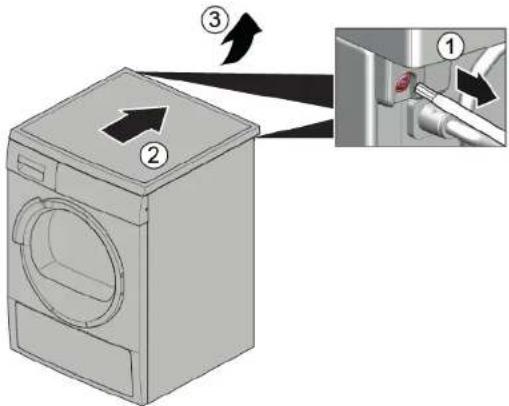

Ремонт
natural_image
Interior view of a washing machine showing internal components and ventilation ducts (no text or symbols visible)
ВНИМАНИЕ!
natural_image
3D rendering of a mechanical component with concentric rings and mounting flanges (no visible text or symbols)natural_image
Close-up of a metallic circular object with three red circular markers on the side (no text or symbols visible)natural_image
Interior view of a washing machine showing internal components like hoses and gauges (no text or symbols visible)natural_image
Diagram showing a mechanical component being lowered into a blue liquid, with no visible text or symbols.natural_image
Diagram of a medical device with a circular component and a blue base, showing internal components (no text or labels)-
- Свалете винтовете (1).
-
Освободете крепежните елементи (2, 3).

3.1.2 Postavljanje radne ploče
▶ Postavite obratnim redoslijedom.

Popravak
3.2 Zamjena ploče


Oštri rubovi kućišta!
Porezotine
▶ Nosite zaštitne rukavice.


Isklizavanje nagnutih uređaja!
- Otpustite priključni kontakt upravljačke jedinice.
- Uklonite ploču.
3.2.2 Postavljanje ploče
▶ Postavite obratnim redoslijedom.

Popravak
3.3.2 Postavljanje ladice za deterdžent
▶ Postavite obratnim redoslijedom.

Popravak
natural_image
3D cutaway diagram of a mechanical assembly showing internal components and directional arrows (no text or symbols)- Uklonite ručicu ladice za deterdžent.
3.4.2 Postavljanje ručice ladice za deterdžent
▶ Postavite obratnim redoslijedom.

Popravak
3.5 Zamjena vrata
OPREZ
natural_image
3D rendering of a washing machine with a red arrow pointing to the door panel (no text or symbols visible)- Uklonite vrata prema gore.
3.5.2 Postavljanje vrata
▶ Postavite obratnim redoslijedom.

Popravak
- Spustite uređaj.
Popravak
- Uklonite vijke u području pumpe (2). 5. 1. Otpustite vijke na stražnjoj strani uređaja (1).

- Uklonite radnu ploču (2, 3).


Popravak
-
- Uklonite vijke (1).
-
Otpustite zahvatne elemente ploče (2, 3).
- Otpustite vijke kućišta dozatora.
natural_image
Interior view of a washing machine showing internal components and ventilation ducts (no text or symbols visible)9.

POZORI
Opasnost od oštećene površine!
natural_image
3D rendering of a mechanical component with concentric rings and mounting flanges (no visible text or symbols)- Uklonite brtvu vrata.
natural_image
Close-up of a metallic circular object with three red circular markers on its surface (no text or symbols visible)- Uklonite bravu vrata.

Popravak
3.8.2 Postavljanje brave vrata

natural_image
Interior view of a washing machine showing internal components like gears and hoses (no text or symbols visible)natural_image
Diagram showing a mechanical component with a curved arrow indicating motion, no text or symbols present- Uklonite poklopac pumpe.

natural_image
Diagram of a medical device with a circular component and a blue base, showing internal components (no text or symbols)3.10.2 Postavljanje poklopca pumpe
▶ Postavite obratnim redoslijedom.

Popravak
- Spustite uređaj.

Popravak
-
- Uklonite vijke (1).
-
Gurnite radnu ploče do stražnje strane uređaja (2).
- Pomaknite radnu ploču prema gore (3) da biste je uklonili.
-
- Uklonite vijke (1).
-
Otpustite zahvatne elemente (2, 3).
- Uklonite ploču.
7.


OPREZ
- Uklonite prednju ploču.
natural_image
3D mechanical assembly diagram showing internal components and directional arrows (no text or symbols)natural_image
3D rendering of a gray washing machine with a red arrow pointing to the door panel (no text or symbols visible)- Položte spotřebič.

Oprava

Oprava
natural_image
Interior view of a washing machine showing internal components and ventilation ducts (no text or symbols visible)
POZORI
natural_image
3D rendering of a mechanical component with concentric rings and mounting flanges (no visible text or symbols)natural_image
Close-up of a metallic circular object with three red circular markers on its surface (no text or symbols visible)natural_image
Interior view of a washing machine showing internal components like gears and hoses (no text or labels visible)natural_image
Diagram showing a mechanical component with a downward arrow and blue base, no text or symbols presentnatural_image
Diagram of a mechanical device with a circular housing and a blue base, showing internal components (no text or symbols)- Položte spotřebič.

Oprava
natural_image
3D mechanical assembly diagram showing internal components and directional arrows (no text or symbols)natural_image
3D rendering of a gray washing machine with a red arrow pointing to the door panel (no text or symbols visible)- Fjern døren opad.
- Sænk apparatet ned.

Reparation
- Fjern skruerne i pumpeområdet (2). 5. 1. Løsn skruerne bag på apparatet (1).

- Fjern toppladen (2, 3).

Reparation
-
- Fjern skruerne (1).
-
Frigør betjeningspanelets låseelementer (2, 3).
- Løsn dispenserhusets skruer.

-
Fjern betjeningspanelet.
-
Fjern tromlelysholderen foroven.
natural_image
Interior view of a washing machine showing internal components and ventilation ducts (no text or symbols visible)
BEMAERKI
Fare for beskadiget overflade!
natural_image
3D rendering of a mechanical component with concentric rings and mounting brackets (no visible text or symbols)- Fjern dørpakningen.
natural_image
Close-up of a metallic circular object with two red circular markers on the side (no text or symbols visible)- Fjern dørlåsen.

Reparation
▶ Sørg for at sikre apparater mod at glide.


natural_image
Interior view of a washing machine showing internal components like hoses and gauges (no text or labels visible)- Abn pumpens afdækning.

natural_image
Diagram showing a mechanical component being lowered into a blue liquid, with no visible text or symbols.- Fjern pumpens afdækning.
natural_image
Diagram of a medical device with a circular component and a blue base, showing internal components (no text or labels)▶ Sørg for at sikre apparater mod at glide.
Løft apparatet op i fronten.
- Fjern skruerne forneden (1).

- Sænk apparatet ned.

Reparation
- Fjern betjeningspanelet.
7.


PAS PÄ!
- Fjern frontpanelet.
3.11.2 Montering af frontpanel
3.1.2 Werkblad monteren
3.3.2 Wasmiddellade monteren
natural_image
3D cutaway diagram of a mechanical component showing internal parts and directional arrows (no text or symbols)natural_image
3D rendering of a gray washing machine with a red arrow pointing to the door panel (no text or symbols visible)3.6.2 Deurcomponenten monteren


Reparatie
natural_image
Interior view of a washing machine showing internal components and ventilation ducts (no text or symbols visible)
LET OPI
natural_image
3D rendering of a mechanical component with concentric rings and mounting flanges (no visible text or symbols)natural_image
Close-up of a metallic circular object with three red circular markers on its surface (no text or symbols visible)natural_image
Interior view of a washing machine showing internal components like hoses and gauges (no text or labels visible)natural_image
Diagram showing a mechanical component with a downward arrow and blue base, no text or symbols presentnatural_image
Diagram of a mechanical device with a circular housing and a blue base, showing internal components (no text or symbols)3.10.2 Pompdeksel monteren
Repair hints - Washing machine
i Concerning this document.... 108
1.1 Important information.... 108
1.1.1 Purpose.... 108
1.2 Explanation of symbols 108
1.2.1 Danger levels.... 108
1.2.2 Hazard symbols 108
1.2.3 Structure of the warnings.... 109
1.2.4 General symbols.... 109
Tools and aids.... 110
Repair 111
3.1 Replacing worktop.... 111
3.1.1 Removing worktop 111
3.1.2 Installing worktop 111
3.2 Replacing fascia panel.... 112
3.2.1 Removing fascia panel 112
3.2.2 Installing fascia panel 112
3.3 Replacing detergent drawer 113
3.3.1 Removing detergent drawer.... 113
3.3.2 Installing detergent drawer.... 113
3.4 Replacing detergent drawer handle 114
3.4.1 Removing detergent drawer handle.... 114
3.4.2 Installing detergent drawer handle.... 114
3.5 Replacing door 115
3.10.1 Removing pump cover 124
3.10.2 Installing pump cover 124
3.11 Replacing front panel 125
3.11.1 Removing front panel.... 125
3.11.2 Installing front panel.... 127
i Concerning this document
1.1 Important information
1.1.1 Purpose
These repair hints support consumer to repair appliances by himself according to the applicable eco-design regulation (as of 03/2021).
They contain information how to exchange defined spare parts including warnings and risks.
In case of questions, please contact our customer service. We will only be liable for damages if the repair hints have been followed properly.
1.2 Explanation of symbols
1.2.1 Danger levels
The warning levels consist of a symbol and a signal word. The signal word indicates the severity of the danger.
| Warning level Meaning | |
| Danger | Non-observance of the warning message will result in death or serious injuries. |
| Warning | Non-observance of the warning message could result in death or serious injuries. |
| Caution | Non-observance of the warning message could result in minor injuries. |
| Notice | Non-observance of the warning message could result in damage to property. |
Table 1: Danger levels
1.2.2 Hazard symbols
Hazard symbols are symbolic representations which give an indication of the kind of danger.
The following hazard symbols are used in this document:
| Hazard symbol Meaning | ||
 | General warning message | |
 | Danger from electrical voltage | |
 | Risk of explosion | |
 | Danger of cuts | |
 | Danger of crushing |
i Concerning this document
| Hazard symbol Meaning | ||
 | Danger from hot surfaces | |
 | Danger from strong magnetic field | |
 | Danger from non-ionizing radiation | |
Table 2: Hazard symbols
1.2.3 Structure of the warnings
Warnings in this document have a standardised appearance and a standardised structure.


Type and source of danger!
Possible consequences of ignoring the danger / warning.
▶ Measures and prohibitions for preventing the danger.
The following example shows a warning that warns against electric shock due to live parts. The measure for avoiding the danger is mentioned.


Risk of electric shock due to live parts!
Death by electrocution
- Disconnect appliances from electrical supply at least 60 seconds before starting repairs.
1.2.4 General symbols
The following general symbols are used in this document:
| Gen. symbol Meaning | |
| Identification of a special tip (text and/or graphic) | |
| Identification of a simple tip (only text) | |
| Identification of a link to a video tutorial |
| Gen. symbol Meaning | |
| Identification of required tools | |
| Identification of required preconditions | |
| Identification of a condition (if ..., then ...) | |
| Identification of a result | |
| StartIdentification of a key or button | |
| [00123456] Identification of a material number | |
| StatusIdentification of displayed text / window(in the appliance's display) | |
Table 3: General symbols

Tools and aids
| Designation Details Images | ||
| Auxiliary tool[15000155] | Tool for loosening out of plastic parts | 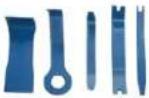 |
| Screwdriver Torx T20 with bore hole [00340764] | 100 mm, for screws with safety pin |  |
| Torque spanner [15000441] | Torque spanner 20 - 100 Nm | |
| Slot screwdriver [00340854] | Blade 3.5 mm x 0.6 mm x 100 mm, Protective Insulation 1000 V AC |  |
| Slot screwdriver [00340855] | Blade 5.5 mm x 1.0 mm x 125 mm, Protective Insulation 1000 V AC |  |
| Needle-nose pliers, angled pattern [00341269] | Length 200 mm | 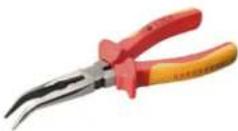 |
| Side-cutting pliers [00342182] | Length: 200 mm | 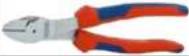 |
| Designation Details Images | ||
| Combination wrench[00340811] | Wrench size 10°mm, M6 |  |
| Combination wrench[00340814] | Wrench size 13°mm, M8 |  |
| Combination wrench[00340817] | Wrench size 17 mm, M10 |  |
| Combination wrench[15000459] | Wrench size 16°mm, M10 |  |

Repair
3.1 Replacing worktop
Required tools:
Torx Bit TX20 with hole, long 6.3°mm (1/4") 152°mm, for screws [00341272] with safety pin
Prerequisite:
√ Appliance is disconnected from power supply.
√ Appliance is disconnected from water supply.
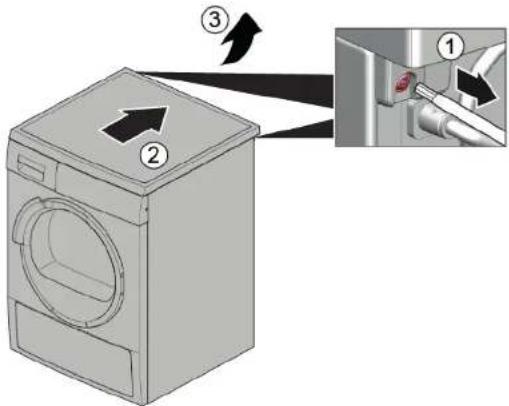
3.1.1 Removing worktop
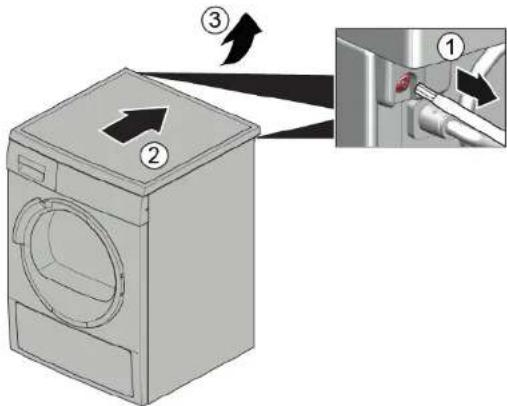
- Remove screws (1).
- Push worktop to the back of the appliance (2).
- Move worktop upwards (3) to remove it.

3.1.2 Installing worktop
▶ Install in reverse order.

Repair
3.2 Replacing fascia panel


Sharp housing edges!
Cut injuries
▶ Wear protective gloves.


Slipping of tilted appliances!
Bone fractures / crush injuries
- Secure appliances against slipping.


Risk of falling parts due to released screws!
Injury because of falling parts.
- Secure component from falling down.


Risk of falling parts due to released screws!
Damage to other parts of the appliance or at customers home e.g. bottom.
- Secure component from falling down.
Prerequisite:
√ Appliance is disconnected from power supply.
√ Appliance is disconnected from water supply.
√ Worktop has been removed.→ Page 111
√ Detergent drawer has been removed.→ Page 113
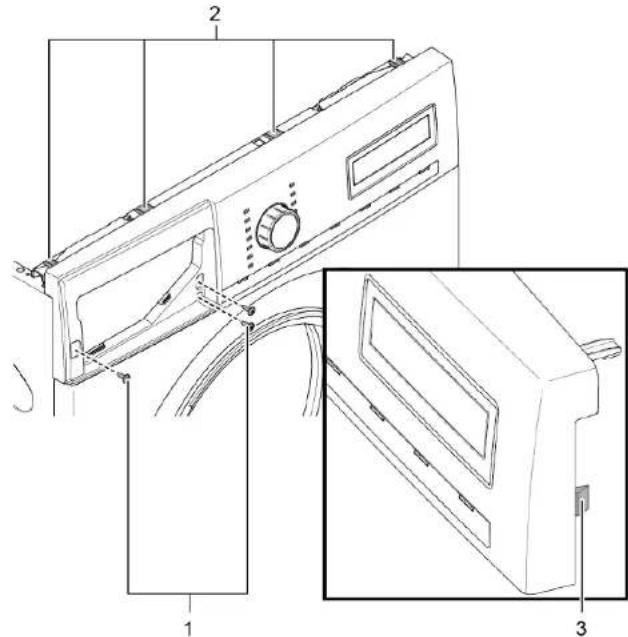
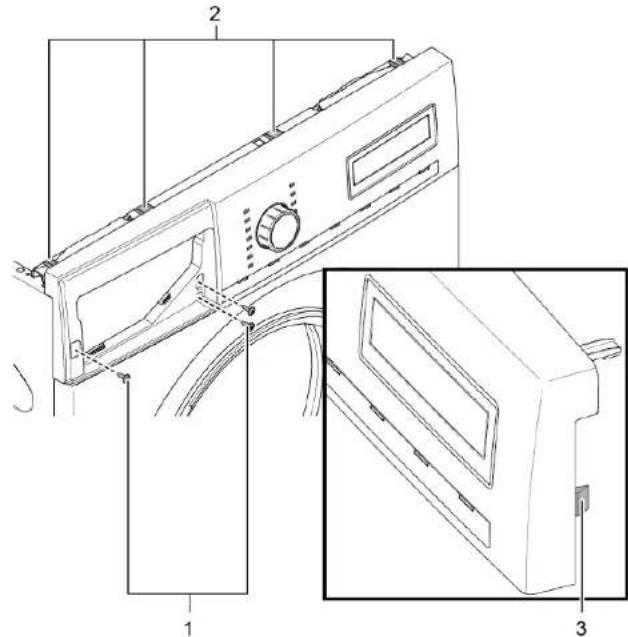
3.2.1 Removing fascia panel
-
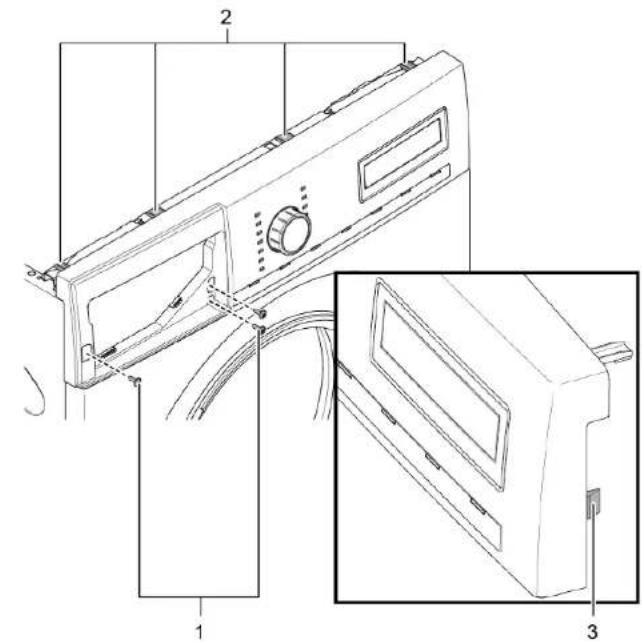
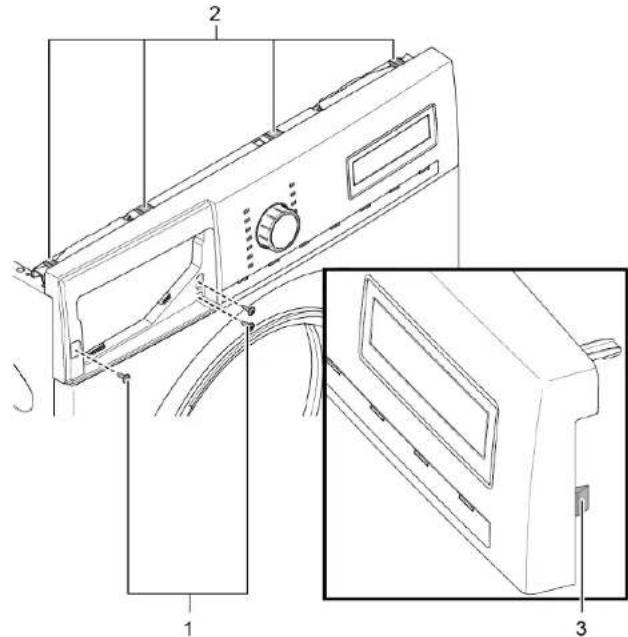
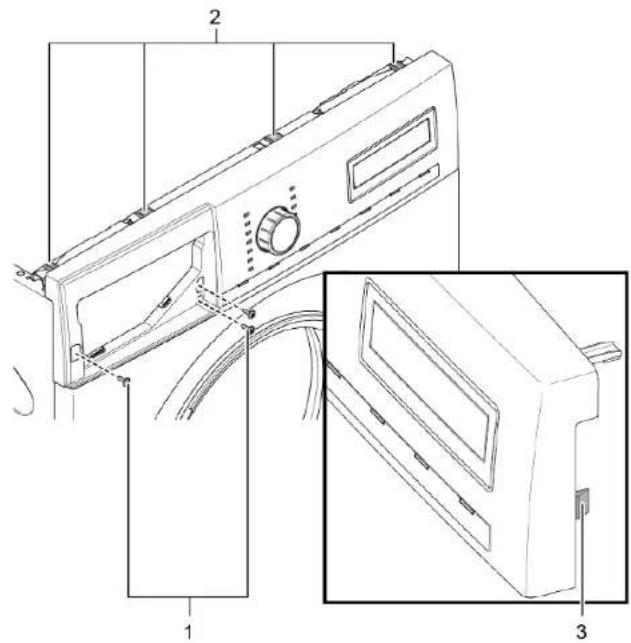
- Remove screws (1).
- Release catch elements (2, 3).

-
Release plug contact of control unit.
-
Remove fascia panel.
3.2.2 Installing fascia panel
▶ Install in reverse order.
Repair
3.3 Replacing detergent drawer
Prerequisite:
√ Appliance is disconnected from power supply
√ Appliance is disconnected from water supply.
3.3.1 Removing detergent drawer
-
Pull out detergent drawer.
2.1. Press down on insert (1). -
Remove detergent drawer (2).

3.3.2 Installing detergent drawer
▶ Install in reverse order.

Repair
3.4 Replacing detergent drawer handle
Prerequisite:
√ Appliance is disconnected from power supply.
√ Appliance is disconnected from water supply.
√ Detergent drawer has been removed.→ Page 113
3.4.1 Removing detergent drawer handle
- Release catch elements.

natural_image
3D cutaway diagram of a mechanical component showing internal structure and mounting features (no text or symbols)- Remove detergent drawer handle.
3.4.2 Installing detergent drawer handle
▶ Install in reverse order.

Repair
3.5 Replacing door

Open hinge areal
Finger crushing / entrapment
▶ Do not reach into the hinge area.
▶ Wear protective gloves.
Prerequisite:
√ Appliance is disconnected from power supply.
√ Appliance is disconnected from water supply.
√ Door is opened.
3.5.1 Removing door
1.

Notice
Risk of falling parts due to released screws!
Damage to other parts of the appliance or at customers home e.g. bottom.
- Secure component from falling down.


Risk of falling parts due to released screws!
Injury because of falling parts.
- Secure component from falling down
Remove screws (1).

natural_image
3D rendering of a gray washing machine with a red arrow pointing to the door panel (no text or symbols visible)- Remove door upwards.
▶ Install in reverse order.

Repair
3.6 Replacing door components

Open hinge areal
Finger crushing / entrapment
▶ Do not reach into the hinge area.
▶ Wear protective gloves.
Prerequisite:
√ Appliance is disconnected from power supply.
√ Appliance is disconnected from water supply.
√ Door has been removed.→ Page 115
3.6.1 Removing door components
- Disassemble door from outside to inside.

3.6.2 Installing door components
▶ Install in reverse order.

Repair
3.7 Replacing door seal


Sharp housing edges!
Cut injuries
▶ Wear protective gloves.


Risk of falling parts due to released screws!
Injury because of falling parts.
- Secure component from falling down.


Risk of falling parts due to released screws!
Damage to other parts of the appliance or at customers home e.g. bot-
tom.
- Secure component from falling down.
Prerequisite:
√ Appliance is disconnected from power supply.
√ Appliance is disconnected from water supply.
Detergent drawer has been removed.→ Page 113
√ Door has been removed.→ Page 115
√ Pump cover has been removed.→ Page 124
Slipping of tilted appliances!
Bone fractures / crush injuries
- Secure appliances against slipping.
Lift up appliance at front.
- Release screws at bottom of front panel (1).

- Lower appliance down.

Repair
- Remove screws in pump area (2). 5. 1. Release screws at back of appliance (1).

- Remove worktop (2, 3).

Repair
-
- Remove screws (1).
-
Release cat elements of fascia panel (2, 3).
- Release screws of dispenser housing.

-
Remove fascia panel.
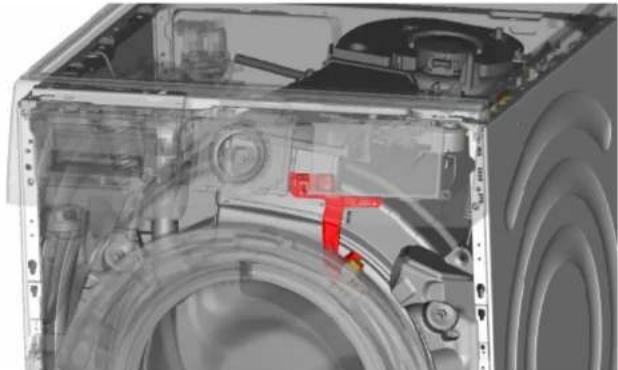
-
Remove drum light holder at top.

natural_image
Interior view of a washing machine showing internal components like wheels and hoses (no text or symbols visible)9.

Notice
Risk of damaged surface!
Surface of appliance can be scratched by using wrong tools.
▶ Only use plastic tools to replace the tension ring.
Remove tension ring from gasket with a plastic tool.
- Release door seal from front panel.
- Release cable connector from door lock.

Repair
- Release screws on top of front panel (3).
-
Remove front panel.
-
Release all hose connections.

natural_image
3D rendering of a mechanical component with concentric rings and mounting brackets (no visible text or symbols)- Remove door seal.
⚠ Warning Risk of falling parts due to inco Injury or damage to the appliance ▶ Tighten tension ring of boo
▶ Install in reverse order.

Repair
3.8 Replacing door lock
As a manufacturer, we are obliged to provide consumers with the spare part door lock including repair instructions in accordance with Regulation (EU) 2019/2023. However, we would like to point out that after replacing a door lock, an electrotechnical safety test by a qualified electrician is required before the device is put into operation. This person must be verifiably qualified according to the country-specific laws, regulations and standards.


Risk of electric shock due to live parts!
Danger to life through electric shock in case of improper repair
Electric parts should be repaired by a qualified electricians.
After the repair have a safety test according VDE 0701 or country-specific regulations performed.


Sharp housing edges!
Cut injuries
▶ Wear protective gloves.


Slipping of tilted appliances!
Bone fractures / crush injuries
▶ Secure appliances against slipping.


Risk of falling parts due to released screws!
Injury because of falling parts.
- Secure component from falling down.

Risk of falling parts due to released screws!
Damage to other parts of the appliance or at customers home e.g. bot- tom.
- Secure component from falling down.
Prerequisite:
√ Appliance is disconnected from power supply.
√ Appliance is disconnected from water supply.
√ Appliances is freely accessible.
√ Worktop has been removed.→ Page 111
√ Fascia panel has been removed.
√ Door has been removed.→ Page 115
√ Tension ring has been removed.
√ Front panel has been removed.
√ Door seal has been removed.
- Disconnect door lock plug.
- Release door lock.

natural_image
Close-up of a metallic circular object with two red circular markers and a small square on the surface (no text or symbols visible)- Remove door lock.

Repair
▶ Install in reverse order.

Repair
3.9 Replacing drum light


Sharp housing edges!
Cut injuries
▶ Wear protective gloves.


Slipping of tilted appliances!
Bone fractures / crush injuries
- Secure appliances against slipping.


Risk of falling parts due to released screws!
Injury because of falling parts.
- Secure component from falling down.


Risk of falling parts due to released screws!
Damage to other parts of the appliance or at customers home e.g. bot- tom.
- Secure component from falling down.
Prerequisite:
√ Appliance is disconnected from power supply.
√ Appliance is disconnected from water supply.
√ Appliances is freely accessible.
√ Worktop has been removed.→ Page 111
√ Detergent drawer has been removed.→ Page 113
√ Fascia panel has been removed.
3.9.1 Removing drum light

natural_image
Interior view of a washing machine showing internal components like hoses and gauges (no text or labels visible)- Pull drum light holder out of appliance.
- Disconnect electrical connections.
- Remove drum light from drum light holder.
3.9.2 Installing drum light
▶ Install in reverse order.

Repair
3.10 Replacing pump cover
Prerequisite:
√ Appliance is disconnected from power supply.
√ Appliance is disconnected from water supply.
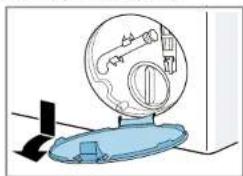
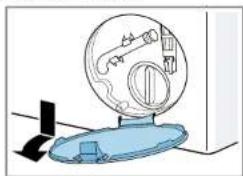
3.10.1 Removing pump cover
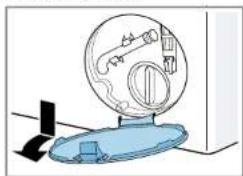
- Open pump cover.

natural_image
Diagram showing a mechanical component with a downward arrow and blue base, no text or symbols present- Remove pump cover.
natural_image
Diagram of a mechanical device with a circular housing and a blue base, showing internal components (no text or symbols)3.10.2 Installing pump cover
▶ Install in reverse order.

Repair
3.11 Replacing front panel


Sharp housing edges!
Cut injuries
▶ Wear protective gloves.
Prerequisite:
√ Appliance is disconnected from power supply.
√ Appliance is disconnected from water supply.
√ Detergent drawer has been removed.→ Page 113
√ Door has been removed.→ Page 115
√ Door seal has been removed.
√ Pump cover has been removed.→ Page 124
3.11.1 Removing front panel
1.


Slipping of tilted appliances!
Bone fractures / crush injuries
▶ Secure appliances against slipping.
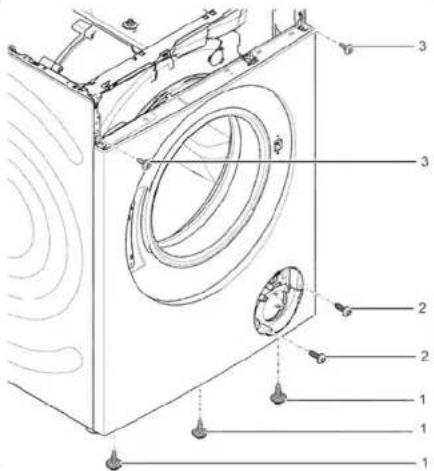
Lift up appliance at front.
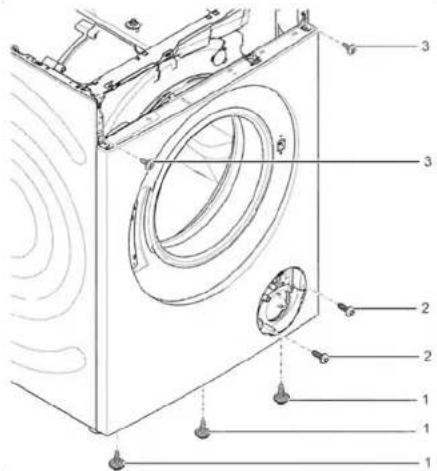
- Remove screws at bottom (1).

- Lower appliance down.

Repair
-
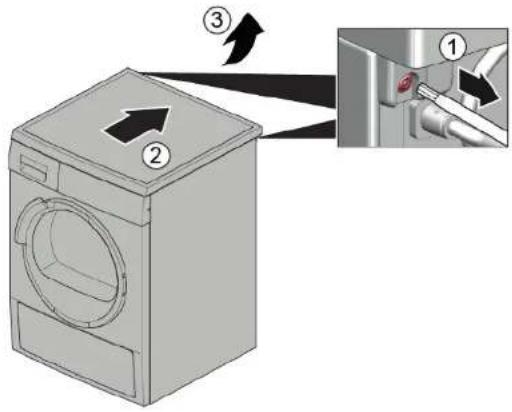
- Remove screws (1).
-
Push worktop to the back of the appliance (2).
- Move worktop upwards (3) to remove it.
-
- Remove screws (1).
-
Release catch elements (2, 3).

- Remove fascia panel.
7.


Caution
Risk of falling parts due to released screws! Injury because of falling parts.
▶ Secure component from falling down.

Repair

Notice
Risk of falling parts due to released screws! Damage to other parts of the appliance or at customers home e.g. bottom.
▶ Secure component from falling down.
Remove screws at front beginning from bottom to top (2, 3).
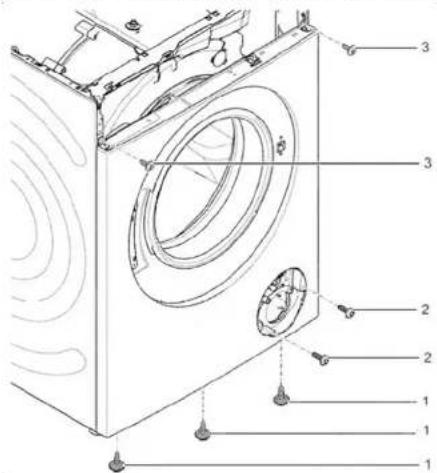
- Remove front panel.
3.11.2 Installing front panel
▶ Install in reverse order.
Remonditeave - Pesumasin
i Selle dokumendiga seoses 129
1.1 Tähtis teave 129
1.1.1 Eesmärk 129
1.2 Sümbolite selgitus 129
1.2.1 Ohutasemed.... 129
3.1.2 Tööpinna paigaldamine
▶ Paigaldage vastupidises järjekorras.

Remont
3.3.2 Pesuaine sahtli paigaldamine
▶ Paigaldage vastupidises järjekorras.
Remont
natural_image
3D cutaway diagram of a mechanical component showing internal layered structure and mounting features (no text or symbols)natural_image
3D rendering of a gray washing machine with a red arrow pointing to the door panel (no text or symbols visible)3.6.2 Ukse osade paigaldamine
▶ Paigaldage vastupidises järjekorras.
Remont
- Langetage seadet allapoole.

Remont

Remont
natural_image
Interior view of a washing machine showing internal components and ventilation ducts (no text or symbols visible)
TÄHELEPANUI
natural_image
3D rendering of a mechanical assembly with concentric rings and mounting brackets (no visible text or symbols)natural_image
Close-up of a metallic circular object with three red circular markers on its surface (no text or symbols visible)- Eemaldage ukselukk.

Remont
natural_image
Interior view of a washing machine showing internal components like hoses and gauges (no text or labels visible)natural_image
Diagram showing a mechanical component being lowered into a blue liquid, with no visible text or symbols.- Eemaldage pumba kate.

natural_image
Diagram of a medical device with a circular component and a blue base, showing internal components (no text or labels)3.10.2 Pumba katte paigaldamine
- Langetage seadet allapoole.

Remont
-
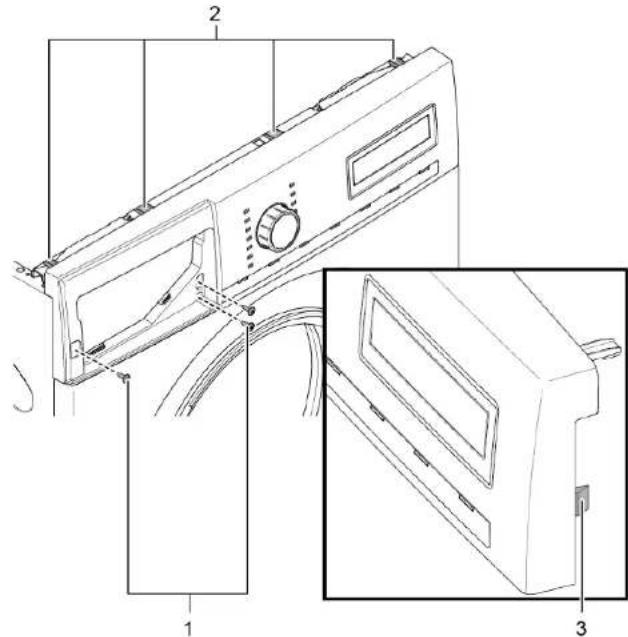
- Eemaldage kruvid (1).
-
Vabastage kinnituselemendid (2, 3).
- Eemaldage esipaneel.
3.11.2 Esipaneeli paigaldamine
▶ Paigaldage vastupidises järjekorras.
3.3.2 Pesuainelokeron asentaminen
natural_image
3D cutaway diagram of a mechanical component showing internal parts and directional arrows (no text or symbols)natural_image
3D rendering of a gray washing machine with a red arrow pointing to the door panel (no text or symbols visible)- Laske kone alas.

Korjaus
Korjaus
natural_image
Interior view of a refrigerator showing internal components like washing machine and air ducts (no text or symbols visible)9.

HUOMIO!
natural_image
3D rendering of a mechanical component with concentric rings and mounting brackets (no visible text or symbols)- Poista luukun tiiviste.
natural_image
Close-up of a metallic circular object with three red circular markers on its surface (no text or symbols visible)natural_image
Interior view of a washing machine showing internal components and ventilation ducts (no text or symbols visible)natural_image
Diagram showing a mechanical component with a curved arrow indicating motion, no text or symbols present- Poista pumpun suojus.

natural_image
Diagram of a medical device with a circular component and a blue base, showing internal components (no text or labels)- Laske kone alas.

Korjaus
-
- Poista ruuvit (1).
-
Vapauta lukitusosat (2, 3).
- Poista etupaneeli.
3.11.2 Etupaneelin asentaminen
natural_image
3D cutaway diagram of a mechanical component showing internal parts and directional arrows (no text or symbols)natural_image
3D rendering of a gray washing machine with a red arrow pointing to the door panel (no text or symbols visible)
Réparation
natural_image
Interior view of a washing machine showing internal components and ventilation ducts (no text or symbols visible)
ATTENTION! Risque de dommage superficiel!
natural_image
3D rendering of a mechanical component with concentric rings and mounting brackets (no visible text or symbols)- Retirer le joint de porte.
natural_image
Close-up of a metallic circular object with three red circular markers on its surface (no text or symbols visible)- Retirer la fermeture de porte.

Réparation
natural_image
Interior view of a washing machine showing internal components and ventilation ducts (no text or symbols visible)natural_image
Diagram showing a mechanical component with a downward arrow and blue base, no text or symbols presentnatural_image
Diagram of a mechanical device with a circular component and a blue base, showing internal components (no text or symbols)natural_image
3D mechanical assembly diagram showing internal components and directional arrows (no text or symbols)natural_image
3D rendering of a gray washing machine with a red arrow pointing to the door panel (no text or symbols visible)
Instandsetzen
natural_image
Interior view of a washing machine showing internal components and ventilation ducts (no text or symbols visible)
ACHTUNG
natural_image
3D rendering of a mechanical component with concentric rings and mounting flanges (no visible text or symbols)natural_image
Close-up of a metallic circular object with three red circular markers on its surface (no text or symbols visible)natural_image
Interior view of a washing machine showing internal components like hoses and gauges (no text or labels visible)natural_image
Diagram showing a mechanical component with a rotating arm and base, no text or symbols presentnatural_image
Diagram of a mechanical device with a circular component and a blue base, showing internal components (no text or symbols)natural_image
3D mechanical assembly diagram showing internal components and directional arrows (no text or symbols)natural_image
3D rendering of a washing machine with a red arrow pointing to the door panel (no text or symbols visible)
Επισκευή
natural_image
Interior view of a washing machine showing internal components and ventilation ducts (no text or symbols visible)
ΠΡΟΣΟΧΗ!
natural_image
3D rendering of a mechanical component with concentric rings and mounting flanges (no visible text or symbols)natural_image
Close-up of a metallic circular object with three red circular markers on its surface (no text or symbols visible)natural_image
Interior view of a refrigerator showing internal components like wheels and air ducts (no text or symbols visible)natural_image
Diagram showing a mechanical component with a downward arrow and blue base, no text or symbols presentnatural_image
Diagram of a mechanical device with a circular component and a blue base, showing internal components (no text or symbols)natural_image
3D mechanical assembly diagram showing internal components and directional arrows (no text or symbols)natural_image
3D rendering of a gray washing machine with a red arrow pointing to the door panel (no text or symbols visible)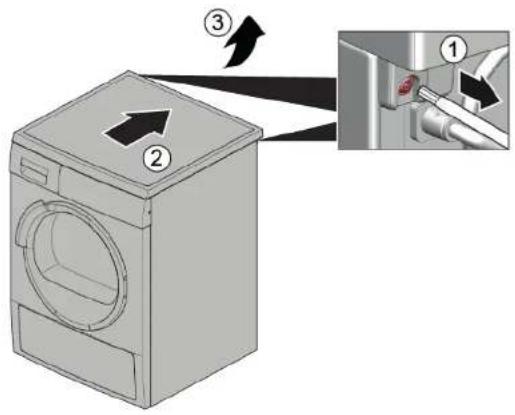

Javítás
natural_image
Interior view of a washing machine showing internal components and ventilation ducts (no text or symbols visible)
FIGYELEM!
natural_image
3D rendering of a mechanical component with concentric rings and mounting flanges (no visible text or symbols)natural_image
Close-up of a metallic circular object with two red circular markers on the side (no text or symbols visible)natural_image
Interior view of a washing machine showing internal components and ventilation ducts (no text or symbols visible)natural_image
Diagram showing a mechanical component with a downward arrow and blue base, no text or symbols presentnatural_image
Diagram of a mechanical device with a circular housing and a blue base, showing internal components (no text or symbols)natural_image
3D cutaway diagram of a mechanical assembly showing internal components and directional arrows (no text or symbols)natural_image
3D rendering of a gray washing machine with a red arrow pointing to the door panel (no text or symbols visible)Riparazione
natural_image
Interior view of a washing machine showing internal components and ventilation ducts (no text or symbols visible)
ATTENZIONE!
natural_image
3D rendering of a mechanical component with concentric rings and mounting brackets (no visible text or symbols)natural_image
Close-up of a metallic circular object with three red circular markers on its surface (no text or symbols visible)natural_image
Interior view of a washing machine showing internal components like gears and hoses (no text or labels visible)natural_image
Diagram showing a mechanical component with a rotating arm and base, no text or symbols presentnatural_image
Diagram of a mechanical device with a circular housing and a blue base, showing internal components (no text or symbols)natural_image
3D cutaway diagram of a mechanical component showing internal layered structure and mounting features (no text or symbols)natural_image
3D rendering of a gray washing machine with a red arrow pointing to the door panel (no text or symbols visible)- Pazeminiet ieriči.

Remonts
- Nonemiet darbvirsmu (2, 3).


Remonts
natural_image
Interior view of a washing machine showing internal components and ventilation ducts (no text or symbols visible)
UZMANIBUI
natural_image
3D rendering of a mechanical component with concentric rings and mounting flanges (no visible text or symbols)natural_image
Close-up of a metallic circular object with three red circles and a small square on the side (no text or symbols visible)- Nonemiet durtinu slēgu.

Remonts
natural_image
Interior view of a washing machine showing internal components and ventilation ducts (no text or symbols visible)natural_image
Diagram showing a mechanical component with a curved arrow indicating motion, no text or symbols present- Nonemiet sukna vaku.

natural_image
Diagram of a medical device with a circular component and a blue base, showing internal components (no text or labels)- Pazeminiet ieriči.

Remonts
natural_image
3D mechanical assembly diagram showing internal components and directional arrows (no text or symbols)natural_image
3D rendering of a washing machine with a red arrow pointing to the door panel (no text or symbols visible)- Nuimkite stalviršj (2, 3).


Remontas
natural_image
Interior view of a washing machine showing internal components and ventilation ducts (no text or symbols visible)
DÉMESIO!
natural_image
3D rendering of a mechanical component with concentric rings and mounting flanges (no text or symbols visible)natural_image
Close-up of a metallic circular object with three red circular markers on its surface (no text or symbols visible)natural_image
Interior view of a washing machine showing internal components like hoses and gauges (no text or labels visible)natural_image
Diagram showing a mechanical component being lowered into a blue liquid, with no visible text or symbols.- Nuimkite siurblio dangtelj.

natural_image
Diagram of a medical device with a circular component and a blue base, showing internal components (no text or symbols)3.10.2 Siurblio dangtelio uždéjimas
- Nuimkite antjuostę.
7.

⚠️ PERSPÉJIMAS
Pavojus, kad atpalaidavus varžtus dalys nukris! Krentančios dalys gali sužeisti.
- Løsne kontrollenhetens pluggkontakt.
- Demonter instrumentpanelet.
natural_image
3D cutaway diagram of a mechanical component showing internal structure and mounting features (no text or symbols)natural_image
3D rendering of a gray washing machine with a red arrow pointing to the door panel (no text or symbols visible)- Senk apparatet ned.
Reparasjon
- Fjern skruene i pumpeområdet (2). 5. 1. Løsne skruene på baksiden av apparatet (1).
Reparasjon
-
- Fjern skruene (1).
-
Løsne instrumentpanelets låselementer (2, 3).
- Løsne skruene i dispenserhuset.
-
Demonter instrumentpanelet.
-
Demonter trommellampeholderen på toppen.

natural_image
Interior view of a refrigerator showing internal components like washing machine and air ducts (no text or symbols visible)9.

OBS!
Fare for skader på overflaten!
-
Demonter frontpanelet.
-
Løsne alle slangekoblingene.

natural_image
3D rendering of a mechanical component with concentric rings and mounting brackets (no visible text or symbols)natural_image
Close-up of a metallic circular object with three red circular markers on its surface (no text or symbols visible)- Demonter dørlåsen.

Reparasjon
natural_image
Interior view of a washing machine showing internal components and ventilation ducts (no text or symbols visible)natural_image
Diagram showing a mechanical component with a curved arrow indicating motion, no text or symbols present- Ta av pumpedekslet.
natural_image
Diagram of a medical device with a circular component and a blue base, showing internal components (no text or symbols)- Senk apparatet ned.

Reparasjon
-
- Fjern skruene (1).
-
Skyv arbeidsplaten til baksiden av apparatet (2).
- Beveg arbeidsplaten opp (3) for á fjerne den.

-
- Fjern skruene (1).
-
Løsne låselementene (2, 3).
- Demonter instrumentpanelet.
7.


FORSIKTIG
- Demonter frontpanelet.
natural_image
3D cutaway diagram of a mechanical assembly showing internal components and directional arrows (no text or symbols)natural_image
3D rendering of a gray washing machine with a red arrow pointing to the door panel (no text or symbols visible)- Opuścić urządzenie.

Naprawy

Naprawy
natural_image
Interior view of a washing machine showing internal components and ventilation ducts (no text or symbols visible)
UWAGAI
natural_image
3D rendering of a mechanical component with concentric rings and mounting flanges (no text or symbols visible)natural_image
Close-up of a metallic circular object with two red circular markers on the side (no text or symbols visible)natural_image
Interior view of a washing machine showing internal components and ventilation ducts (no text or symbols visible)natural_image
Diagram showing a mechanical component with a downward arrow and blue base, no text or symbols present- Zdjąć osłone pompy.

natural_image
Diagram of a mechanical device with a circular housing and a blue base, showing internal components (no text or symbols)- Opuścić urządzenie.

Naprawy
3.1.2 Instalar o tampo
3.3.2 Instalar a gaveta para detergente
natural_image
3D cutaway diagram of a mechanical assembly showing internal components and directional arrows (no text or symbols)natural_image
3D rendering of a gray washing machine with a red arrow pointing to the door panel (no text or symbols visible)- Baixe o aparelho.

Reparação


Reparação
-
- Remova os parafusos (1).
- Solte os elementos de encaixe do painel da fachada (2, 3).
- Solte os parafusos do involucro do dispensador.

natural_image
Interior view of a washing machine showing internal components and ventilation ducts (no text or symbols visible)
ATENÇÃO!
natural_image
3D rendering of a mechanical component with concentric rings and mounting flanges (no visible text or symbols)natural_image
Close-up of a metallic circular object with three red circular markers on its surface (no text or symbols visible)natural_image
Interior view of a washing machine showing internal components like gears and hoses (no text or labels visible)natural_image
Diagram showing a mechanical component with a downward arrow and blue base, no text or symbols present- Remova a tampa da bomba.

natural_image
Diagram of a mechanical device with a circular housing and a blue base, showing internal components (no text or symbols)3.10.2 Instalar a tampa da bomba
- Baixe o aparelho.

Reparação
-
- Remova os parafusos (1).
-
Solte os elementos de encaixe (2, 3).

- Remova o painel da fachada.
7.

CUIDADO
- Remova o painel frontal.
3.11.2 Instalar o painel frontal
natural_image
3D cutaway diagram of a mechanical assembly showing internal components and directional arrows (no text or symbols)natural_image
3D rendering of a washing machine with a red arrow pointing to the door panel (no text or symbols visible)3.6.2 Montarea componentelor uşii
- Coborâți aparatul.

Repararea

Repararea
natural_image
Interior view of a washing machine showing internal components and ventilation ducts (no text or symbols visible)
natural_image
3D rendering of a mechanical component with concentric rings and mounting flanges (no visible text or symbols)natural_image
Close-up of a metallic circular object with three red circular markers on its surface (no text or symbols visible)natural_image
Interior view of a washing machine showing internal components like wheels and hoses (no text or labels visible)natural_image
Diagram showing a mechanical component with a downward arrow and blue base, no text or symbols presentnatural_image
Diagram of a mechanical device with a circular housing and a blue base, showing internal components (no text or symbols)- Coborâți aparatul.

Repararea
- Uvořnite kontakt zástrčky riadiacej jednotky.
- Odoberte panel oblożenia.
3.2.2 Montáž panelu obloženia
natural_image
3D cutaway diagram of a mechanical assembly showing internal components and directional arrows (no text or symbols)natural_image
3D rendering of a gray washing machine with a red arrow pointing to the door panel (no text or symbols visible)- Odoberte dvere smerom nahor.
3.5.2 Montáž dverí

Oprava
-
Odoberte panel oblożenia.
-
Odstráňte držiak osvetlenia bubna v homej časti.

natural_image
Interior view of a washing machine showing internal components and ventilation ducts (no text or symbols visible)
POZORI
Riziko poškodenia povrchu!
natural_image
3D rendering of a mechanical component with concentric rings and mounting flanges (no visible text or symbols)natural_image
Close-up of a metallic circular object with three red circular markers on its surface (no text or symbols visible)- Odoberte poistku dvierok.

Oprava
natural_image
Interior view of a washing machine showing internal components and wiring (no text or symbols visible)- Vytiahnite držiak osvetlenia bubna spotrebiča.
- Odpojte elektrické pripojenia.
- Odoberte osvetlenie bubna z držiaka osvetlenia bubna.
natural_image
Diagram showing a mechanical component with a downward arrow and blue base, no text or symbols presentnatural_image
Diagram of a mechanical device with a circular housing and a blue base, showing internal components (no text or symbols)-
- Odstráňte skrutky (1).
-
Uvol'nite zachytávacie prvky (2, 3).

- Odoberte panel obloženia
7.


UPOZORNENIE
natural_image
3D cutaway diagram of a mechanical component showing internal layered structure and mounting points (no text or symbols)- Odstranite ročaj predalčka za detergent.
natural_image
3D rendering of a gray washing machine with a red arrow pointing to the door panel (no text or symbols visible)- Odstranite vrata v smeri navzgor.
- Spustite aparat.
Popravilo
- Odstranite delovno površino (2, 3).


Popravilo
-
Odstranite ploščo za vence.
-
Odstranite držalo lučke bobna na vrhu.

natural_image
Interior view of a washing machine showing internal components like wheels and hoses (no text or symbols visible)
POZORI
natural_image
3D rendering of a mechanical component with concentric rings and mounting flanges (no visible text or symbols)- Odstranite tesnilo vrat.
natural_image
Close-up of a metallic circular object with three red circular markers on its surface (no text or symbols visible)- Odstranite varovalo vrat.

Popravilo
natural_image
Interior view of a washing machine showing internal components and ventilation ducts (no text or symbols visible)- Izvlecite držalo luči bobna iz aparata.
- Odklopite električne priključke.
- Odstranite luč bobna z držala luči bobna.
natural_image
Diagram showing a mechanical component with a downward arrow and blue base, no text or symbols presentnatural_image
Diagram of a mechanical device with a circular housing and blue base, showing internal components (no text or symbols)- Spustite aparat.

Popravilo
-
- Odstranite vijake (1).
-
Potisnite delovno površino proti zadnjemu delu aparata (2).
- Premaknite delovno površino navzgor (3), da jo odstranite.

-
- Odstranite vijake (1).
-
Sprostite držalne elemente (2, 3).

3.1.2 Montar la tapa superior
▶ Montar en orden inverso.

Reparación
3.2 Sustituir el panel de control




Requisito:
natural_image
3D cutaway diagram of a mechanical component showing internal structure and mounting features (no text or symbols)natural_image
3D rendering of a gray washing machine with a red arrow pointing to the door panel (no text or symbols visible)- Bajar el aparato.
Reparación
Reparación
natural_image
Interior view of a washing machine showing internal components and wiring (no visible text or labels)
ATENCION
natural_image
3D rendering of a mechanical component with concentric rings and mounting flanges (no visible text or symbols)natural_image
Close-up of a metallic circular object with three red circular markers on its surface (no text or symbols visible)natural_image
Interior view of a washing machine showing internal components and ventilation ducts (no text or symbols visible)natural_image
Diagram showing a mechanical component with a curved arrow indicating motion, no text or symbols presentnatural_image
Diagram of a medical device with a circular component and a blue base, showing internal components (no text or labels)3.10.2 Montar la tapa de la bomba
▶ Montar en orden inverso.

Reparación
3.11 Sustituir el panel frontal


Requisito:
- Bajar el aparato.

Reparación
- Lossa stickkontakten till styrenheten.
- Ta bort kontrollpanelen.
3.2.2 Montera kontrollpanel
natural_image
3D cutaway diagram of a mechanical component showing internal structure and mounting features (no text or symbols)natural_image
3D rendering of a gray washing machine with a red arrow pointing to the door panel (no text or symbols visible)3.6.2 Montera luckans komponenter
- Sänk ner maskinen.

Reparation

Reparation
natural_image
Interior view of a washing machine showing internal components and ventilation ducts (no text or symbols visible)
OBS!
-
Ta bort frontpanelen.
-
Ta bort alla slangkopplingar.

natural_image
3D rendering of a mechanical component with concentric rings and mounting flanges (no text or symbols visible)natural_image
Close-up of a metallic circular component with three red circular markers and a small square symbol (no text or labels)- Ta bort luckans lás.

Reparation
natural_image
Interior view of a washing machine showing internal components like hoses and gauges (no text or labels visible)natural_image
Diagram showing a mechanical component with a curved arrow indicating motion, no text or symbols present- Ta bort pumphöljet.

natural_image
Diagram of a medical device with a circular component and a blue base, showing internal components (no text or labels)3.10.2 Montera pumphölje
- Sänk ner maskinen.

Reparation
- Ta bort kontrollpanelen.
7.


FÖRSIKTIGT!
- Ta bort frontpanelen.
3.11.2 Montera frontpanel
natural_image
3D mechanical assembly diagram showing internal components and directional arrows (no text or symbols)natural_image
3D rendering of a gray washing machine with a red arrow pointing to the door panel (no text or symbols visible)- Cihazı indirin.

Onarim

Onarim
natural_image
Interior view of a washing machine showing internal components like hoses and fans (no text or labels visible)
DİKKATI
natural_image
3D rendering of a mechanical component with concentric rings and mounting flanges (no text or symbols visible)natural_image
Close-up of a metallic circular object with three red circular markers on its surface (no text or symbols visible)natural_image
Interior view of a washing machine showing internal components and ventilation ducts (no text or symbols visible)natural_image
Diagram showing a mechanical component with a downward arrow and blue base, no text or symbols presentnatural_image
Diagram of a mechanical device with a circular housing and blue base, showing internal components (no text or symbols)- Cihazı indirin.

Onarim
- Ön paneli sökünüz.
- Ремонт
- ВНИМАНИЕ!
- Postavljanje radne ploče
- Popravak
- Zamjena ploče
- Postavljanje ploče
- Postavljanje ladice za deterdžent
- Postavljanje ručice ladice za deterdžent
- Zamjena vrata
- OPREZ
- Postavljanje vrata
- POZORI
- Postavljanje brave vrata
- Postavljanje poklopca pumpe
- Oprava
- Reparation
- BEMAERKI
- Montering af frontpanel
- Werkblad monteren
- Wasmiddellade monteren
- Deurcomponenten monteren
- Reparatie
- LET OPI
- Pompdeksel monteren
- Repair hints - Washing machine
- i Concerning this document.... 108
- Tools and aids.... 110
- Repair 111
- i Concerning this document
- Important information
- Purpose
- Explanation of symbols
- Danger levels
- Hazard symbols
- Structure of the warnings
- General symbols
- Tools and aids
- Repair
- Replacing worktop
- Removing worktop
- Installing worktop
- Replacing fascia panel
- Prerequisite:
- Removing fascia panel
- Installing fascia panel
- Replacing detergent drawer
- Removing detergent drawer
- Installing detergent drawer
- Replacing detergent drawer handle
- Removing detergent drawer handle
- Installing detergent drawer handle
- Replacing door
- Open hinge areal
- Removing door
- Notice
- Replacing door components
- Removing door components
- Installing door components
- Replacing door seal
- Replacing door lock
- Replacing drum light
- Removing drum light
- Installing drum light
- Replacing pump cover
- Removing pump cover
- Installing pump cover
- Replacing front panel
- Removing front panel
- Installing front panel
- Remonditeave - Pesumasin
- i Selle dokumendiga seoses 129
- Tööpinna paigaldamine
- Remont
- Pesuaine sahtli paigaldamine
- Ukse osade paigaldamine
- TÄHELEPANUI
- Pumba katte paigaldamine
- Esipaneeli paigaldamine
- Pesuainelokeron asentaminen
- Korjaus
- HUOMIO!
- Etupaneelin asentaminen
- Réparation
- Instandsetzen
- ACHTUNG
- Επισκευή
- ΠΡΟΣΟΧΗ!
- Javítás
- FIGYELEM!
- Riparazione
- ATTENZIONE!
- Remonts
- UZMANIBUI
- Remontas
- DÉMESIO!
- Siurblio dangtelio uždéjimas
- ⚠️ PERSPÉJIMAS
- Reparasjon
- OBS!
- FORSIKTIG
- Naprawy
- UWAGAI
- Instalar o tampo
- Instalar a gaveta para detergente
- Reparação
- ATENÇÃO!
- Instalar a tampa da bomba
- Instalar o painel frontal
- Montarea componentelor uşii
- Repararea
- Montáž panelu obloženia
- Montáž dverí
- UPOZORNENIE
- Popravilo
- Montar la tapa superior
- Reparación
- Sustituir el panel de control
- Requisito:
- ATENCION
- Montar la tapa de la bomba
- Sustituir el panel frontal
- Montera kontrollpanel
- Montera luckans komponenter
- Montera pumphölje
- FÖRSIKTIGT!
- Montera frontpanel
- Onarim
- DİKKATI
Brand : BOSCH
Model : WAU28PH1BY
Category : Washing machine