
MA-7510BK - Screen MAXELL - Free user manual and instructions
Find the device manual for free MA-7510BK MAXELL in PDF.


| Product Type | 75-inch UHD Commercial Display |
| Screen Size | 75" (189 cm) DLED |
| Resolution | 3840 x 2160 (UHD), 16:9 |
| Brightness | 400 cd/m² (typical) |
| Viewing Angle | 178° horizontal / 178° vertical |
| Panel Technology | DLED (Direct LED) |
| Audio Output | 2 x 12 W integrated speakers |
| Video Inputs | 3 x HDMI 2.0, 1 x DisplayPort 1.2 In, 1 x VGA |
| Video Output | 1 x DisplayPort 1.2 Out, 1 x HDMI Out |
| Control Ports | RS232, 2 x RJ12 (sensor & service), IR input |
| Network | 2 x Ethernet LAN (1 for Android), Wi-Fi 802.11 a/b/g/n/ac (Android) |
| USB Ports | 2 x USB 2.0 (1 for Android), 1 x Micro SD (Android) |
| Other Connectivity | Audio In (for VGA), Headphone/Line Out, SPDIF Optical Out, Micro USB |
| Power Supply | 110-240 V AC, 50-60 Hz, 2.7 A |
| Power Consumption | Typical: 200 W; Standby: <0.5 W (estimated) |
| Weight | 36 kg (approx. 79 lb) |
| Dimensions (W x H x D) | 1684 x 967 x 93 mm (with stand?) |
| VESA Mount | 600 x 400 mm; M8 screws |
| Operating Temperature | 0 °C to 40 °C |
| Operating Humidity | 10-90% RH (non-condensing, estimated) |
| OS | Android (built-in) |
| Cleaning | Use a damp cloth or LCD cleaner; do not spray directly |
| Safety | No user-serviceable parts; refer to qualified service personnel |
| Repair | Only authorized service should repair; use manufacturer-specified parts |
| Included Accessories | Remote control, 2 x AAA batteries, IR extender, wall mount kit, quick start guide |
Frequently Asked Questions - MA-7510BK MAXELL
User questions about MA-7510BK MAXELL
0 question about this device. Answer the ones you know or ask your own.
Ask a new question about this device
Download the instructions for your Screen in PDF format for free! Find your manual MA-7510BK - MAXELL and take your electronic device back in hand. On this page are published all the documents necessary for the use of your device. MA-7510BK by MAXELL.
USER MANUAL MA-7510BK MAXELL
Connecting the IR Receiver....8
Turning the Display On/Off 8
Infrared Overlay Touch Screen....9
Remote Control 10
First Time Installation.... 11
Android Launcher 11
Media Playback via USB Input 15
Settings Menu Content......17
Connectivity 23
DisplayPort 25
HDMI Out....25
Real Time Clock (RTC)....26
Crestron Connected 26
Controlling With An External PC....26
RS232/LAN Command Tables....28
RS232 HEX Commands....37
Maximum Pixel Rates....39
Input Matrix....39
Supported Media Formats from USB ....40
System Features ....42
Federal Communication Commission Interference Statement 43
Accessories Included....43
Information for Users on Disposal of Old Equipment and Batteries 43
License Notification 44
Vesa Wall Mount Measurements....45
Installation On An Indented Wall 45
Important Safety Information

CAUTION: TO REDUCE THE RISK OF ELECTRIC SHOCK DO NOT REMOVE COVER (OR BACK). NO USER-SERVICEABLE PARTS INSIDE. REFER SERVICING TO QUALIFIED SERVICE PERSONNEL.
Please read these instructions fully and carefully before use and keep for future reference
WARNING: This device is not intended for use by persons (including children) without physical, sensory or mental capabilities, or lack of experience and/or knowledge unless they have been given supervision or instruction concerning use of the device by a person responsible for their safety.
• This product is for indoor use only.
- Use this product at an altitude of less than 2000 meters above the sea level and in dry locations and in regions with moderate or tropical climates.
- Please keep this manual for further use.
- Unplug your product before starting to clean. Do not clean the product when it is on. Do not use liquid or aerosol cleaners. Use a damp cloth for cleaning. If that does not help, please use LCD display cleansers. Do not apply the cleaner directly on the product.
- To prevent breakdown, do not use non-advised accessories.
- Please do not place your product near wash basins, sinks, water pans, pools etc.
- Do not expose the product to dripping or splashing of liquids and do not place objects filled with liquids, such as vases, cups, etc. on or over the product (e.g., on shelves above the unit).
- Please leave at least 5 cm of free space between the product and walls or other furnitures for ventilation purposes.
- That product can only be started by the defined power source on its rating plate. For further information, please contact with your dealer.
- As a safety precaution, a three-wired grounding plug is given with the product. As a safety precaution, please do not make any change on the grounding plug. Always use earthed socket outlet for product.
- Please provide the plug and socket to supply the needed power for appliance.
- Please place the product in a position that electric cables cannot be affected by the operations on the product.
- Follow all warnings and instructions marked on the product.
- Follow the on screen instructions for operating the related features.
- To prevent the risk of fire or electric shock, please do not overuse the plugs and extension cords. Please do not open the lid of the monitor to service yourself. If the required service needs are not met by an authorized service, dangerous voltage and other risks may occur.
- If you will not use the product for a long period of time, unplug the power cord from the mains.
- Put the product on a well-ventilated place and prevent from bright light, overheat and damp.
- The product should be kept in 0 C° - 40 C°. Otherwise, the appliance may be damaged permanently.
- Plug the appliance to a grounded outlet. Always use the grounded power cord supplied with your product. Manufacturer is not responsible for any damage caused unearthed usage.
- The socket-outlet shall be installed near the equipment and shall be easily accessible.
- Do not stay in contact with the parts of the product that become hot for long periods of time. Doing so may result in low-temperature burns.
- The LCD panel used in this product is made of glass. Therefore, it can break when the product is dropped or applied with impact. Be careful not to be injured by broken glass pieces in case the LCD panel breaks.
- Usage of the monitor must not be accompanied by fatal risks or dangers that, could lead directly to death, personal injury, severe physical damage or other loss, including nuclear reaction control in nuclear facility, medical life support system, and missile launch control in a weapon system.
- Do not expose the product to direct sunlight or do not place open flames such as lit candles on the top of or near the product.
- Do not place any heat sources such as electric heaters, radiators, etc. near the product.
- In order to prevent a potential electrical shock, in extreme weather (storms, lightning) disconnect the product from the mains.
-
Do not touch the controls other than those described in the operating instructions. Improper adjustment of controls not described in the instructions can cause damage, which often requires extensive adjustment work by a qualified technician.
-
Do not shake the product. Ensure that it stays in a balanced stance on its position.
- Do not throw or drop any object on your product.
- Do not interfere on your products screen or any other surface with a sharp object.
- Do not keep your product in a humid environment.
- Do not keep your product in an extremely cold environment.
- Do not keep your product in an extremely hot environment.
- Do not place the product on the floor and inclined surfaces.
- To avoid danger of suffocation, keep plastic bags out of the reach of the babies, children and domestic animals.
Vent holes of the product
The vent holes are designed to provide the product to work constantly and prevent it from overheating. Do not block these openings in anyway. For the same reason, please do not place your product on beds, sofas, carpets and similar surfaces.
Never insert an object into the product through vents or openings. High voltage flows in the product, and inserting any objects in the vents or openings of the product may cause electric shock, short circuit of the internal parts and/or fire. For the same reason, do not spill water or liquid on the product.
Repair
Unless a basic implementation on the product is specified by the producers' technical department on a document, do not repair your product by yourself. Otherwise, your guarantee may get suspended and you may risk your health or your product. In case of need, consult your authorized service.
- When the cable is worn off or harmed.
- If the product has been dropped or the cabinet has been damaged.
- If the performance of the product is changed or the appliance needs to be repaired.
- When a liquid was spilled on the product or when objects have fallen into the product.
- When the product has been exposed to rain or water.
- When the product does not operate properly as described in the operating instructions.
Replacement parts
In case the product needs replacement parts, make sure that the service person uses replacement parts specified by the manufacturer, or those with the same characteristics and performance as the original parts. Use of unauthorized parts can result in fire, electric shock and/or other danger.
Safety checks
Upon completion of service or repair work, request the service technician to perform safety checks to ensure that the product is in proper operating condition.
Wall mounting
When mounting the product on a wall, be sure to install the product according to the method recommended by the manufacturer.
- Read the instructions before mounting the product on the wall.
- The wall mount kit is optional. You can obtain from your local dealer, if not supplied with the product.
- Do not install the product on a ceiling or on an inclined wall.
- Use the specified wall mounting screws and other accessories.
- Tighten the wall mounting screws firmly to prevent the product from fall. Do not over-tighten the screws.
Power Cord
- The power cord is used to disconnect the product from the mains and therefore it must remain readily operable. If the product is not disconnected electrically from the mains, the device will still draw power for all situations even if the product is in standby mode or switched off.
- Use only the power cord supplied with the monitor.
- Do not damage the power cord nor place heavy objects on it, stretch it, over bend it or step on it. Also, do not add extension cords. Damage to the cord may result in fire or electric shock.
- When unplugging the appliance, always pull directly on the plug. Do not pull from the cable when unplugging the appliance.
- Do not use the power cord with a power tap. Adding an extension cord may lead to fire as a result of overheating.
- Do not remove or insert the power plug with wet hands. Doing so could result in electric shock.
- Unplug the power cord if it is not used for a long time.
- Do not attempt to repair the power cord if it is broken or malfunctioning. When damaged it must be replaced, this should only be done by qualified personnel.
Especially for child safety
- Don't allow children to climb on or play with the monitor.
- Don't place the monitor above furniture that can easily be used as steps.
- Remember that children can become excited while watching a program, especially on a “larger than life” monitor. Care should be taken to place or install the
monitor where it cannot be pushed, pulled over, or knocked down.
- Care should be taken to route all cords and cables connected to the monitor so that they cannot be pulled or grabbed by curious children.
Connections
Be sure to turn off the main power switch and disconnect the plug from the power outlet before connecting/disconnecting cables. Also, read the manual of the equipment to be connected.
Be careful not to confuse the input terminal with the output terminal when connecting cables. Accidentally reversing cables connected to the input and output terminals may cause malfunctions and other problems.
Positioning
If a monitor is positioned in an unstable or inclined location, it can be potentially hazardous due to falling. Many injuries, particularly to children, can be avoided by taking simple pre-cautions such as:
- Using fixing devices like wall mount brackets recommended or supplied by the manufacturer.
• Educating children about the dangers of climbing on furniture to reach the monitor or its controls. If your existing product is being retained and relocated, the same considerations as above should be applied
Transport and Shipping
- Your device must be kept in its original packaging to protect from damage to its accessories during transport and shipping.
- Keep the product in normal position during transport.
- Do not drop the device during transport and protect it against impacts.
- Damages and faults that occur during transport after the delivery of the appliance to the customer are not included in the warranty cover.
- Product transportation, installation, repair and servicing must be done by qualified technical service personnel.
Intended Use
- This product is intended to be used in public places such as schools, offices, theatres, places of worship.
- Product is only suitable for connecting commercial mains socket outlets. Do not connect product industrial socket outlets.
Foreseeable misuse and incorrect use
- For apparatus intended to be used in vehicles, ships or aircraft or at altitudes exceeding 2000m above sea level, for outdoor use or in general for the application other than mentioned in user manual additional requirements may be necessary.

CAUTION

Do not leave a static image displayed for prolonged period of time. If a static image is displayed continuously for a long period of time, that image may cause image sticking on the display. This condition is not permanent, but may require a considerable amount of operational display time to dissipate, depending upon the degree of image stick. 120 minutes of continuous motion display will eliminate most image sticking effects at normal room temperature (not lower than 10 C).
As the nature of the TFT technology, you may see some amount of bright, dark, red, green and blue dots and sparklings on the screen, those do not affect the performance of the computer and are not accepted as a defect.
Warning
This is a class A. In a domestic environment this may cause radio interference in which case the user may be required to take adequate measures.
BATTERY SAFETY GUIDELINES
Used correctly, domestic batteries are a safe and dependable source of portable power. Problems can occur if they are misused or abused resulting in leakage or, in extreme cases, fire or explosion.
Here are some simple guidelines to safe battery use designed to eliminate any such problems.
- Take care to fit your batteries correctly, observing the plus and minus marks on the battery and appliance. Incorrect fitting can cause leakage or, in extreme cases, fire or even an explosion.
- Replace the whole set of batteries at one time, taking care not to mix old and new batteries or batteries of different types, since this can result in leakage or, in extreme cases, fire or even an explosion.
-
Store unused batteries in their packaging and away from metal objects which may cause a short-circuit resulting in leakage or, in extreme cases, fire or even an explosion.
-
Remove dead batteries from equipment and all batteries from equipment you know you are not going to use for a long time. Otherwise the batteries may leak and cause damage.
- Batteries must not be exposed to excessive heat such as sunshine or fire.
- Never dispose of batteries in fire or with hazardous or flammable materials as this can cause them to explode. Please recycle dead batteries; do not put with the normal household waste.
- Never attempt to recharge ordinary batteries, either in a charger or by applying heat to them. They may leak, cause fire or even explode. There are special rechargeable batteries which are clearly marked as such.
- Supervise children if they are replacing batteries themselves in order to ensure these guidelines are followed.
- Do not ingest the battery, Chemical Burn Hazard.
- This product or the accessories supplied with the product may contain a coin/button cell battery. If the coin/button cell battery is swallowed, it can cause severe internal burns in just 2 hours and can lead to death.
- Remember that small button cell batteries such as used in some hearing aids, toys, games and other appliances, are easily swallowed by young children and this can be dangerous.
- Keep new and used batteries away from children.
- Make sure battery compartments are secure. If the battery compartment does not close securely, stop using the product and keep it away from children.
- Seek immediate medical attention if you believe batteries might have been swallowed or placed inside any part of the body.
- If leaked battery fluid gets on your skin or clothing, rinse immediately and thoroughly. If it gets into your eye, bathe your eye well rather than rubbing and seek medical treatment immediately. Leaked battery fluid that gets into your eye or your clothing may cause a skin irritation or damage your eye.
CAUTION
RISK OF EXPLOSION IF BATTERY IS REPLACED BY AN INCORRECT TYPE. DISPOSE OF USED BATTERIES ACCORDING TO THE INSTRUCTIONS.
Markings on the Product
The following symbols are used on the product as a marker for restrictions and precautions and safety instructions. Each explanation shall be considered where the product bears related marking only. Note such information for security reasons.

Class II Equipment: This appliance is designed in such a way that it does not require a safety connection to electrical earth.

Class II Equipment With Functional Earthing: This appliance is designed in such a way that it does not require a safety tion to electrical earth, the earth connection is r functional purposes.

Protective Earth Connection: The marked terminal is intended for connection of the protective earthing conductor associated with pply wiring.

Hazardous Live Terminal: The marked terminal(s) is/are hazardous live under normal operating conditions.

Caution, See Operating Instructions: The marked area(s) contain(s) user replaceable coin or button cell batteries.
Any issues which are caused by customer mis-adjustment of any software including the operating system are not covered by the warranty.
Depending on the model you buy, the actual appearance of the product may differ from the images used in this manual.
General View
Front Side
natural_image
Blank gray rectangle with a numbered label '1' pointing to the top-left corner (no other text or symbols)- LCD Panel
Rear Side (1)
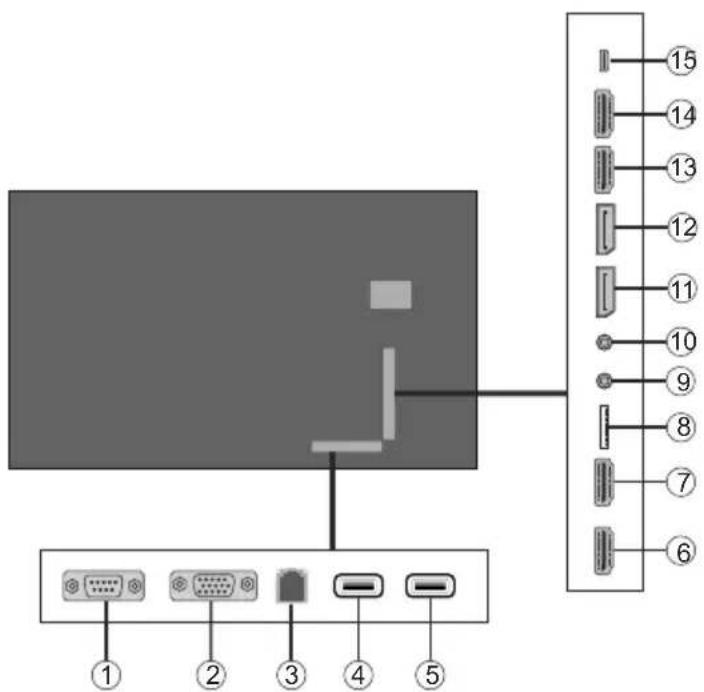
- RS232
- VGA
- Ethernet
- USB (2.0)
- HDMI2 In
- HDMI3 In
- IR Input
- Headphone/Line Out
- Display Port In
- Display Port Out
- HDMI1 In
- HDMI Out
- Micro USB
Android Sockets
- USB (2.0)
- Micro SD
Rear Side (2)

flowchart
graph TD
    A["1"] --> B["2"]
    B --> C["3"]
    C --> D["4"]
    D --> E["5"]
    style A fill:#ccc,stroke:#333
    style E fill:#ccc,stroke:#333
- SPDIF Optical Out
- Ethernet (for Android)
- Audio In (For VGA)
- RJ12 (for sensor)
- RJ12 (service use only)
Control Buttons on the Display

To turn on the Display: Press the centre of the joystick in and hold it down for a few seconds, the Display will turn on.
To turn the Display off: Press the centre of the joystick in and hold it down for a few seconds, the Display will turn into standby mode.
To change source: Press the centre of the joystick in, the sources list will appear on the screen. Scroll through the available sources by pushing the joystick up or down.
To change volume: Increase the volume by pushing the joystick right. Decrease the volume by pushing the joystick left.
Note: Main menu OSD cannot be displayed via joystick.
Connecting the IR Receiver
Before plugging the Display into the mains supply, connect the supplied IR receiver to the IR input on the Display. Place the IR receiver in sight of your own remote control. Simply operate your remote control whilst pointed at the IR receiver and it will relay the control signal to your Display.
In case your Display has touch screen feature and if the IR receiver is going to be placed on the Display it shouldn't be placed facing the inside of the screen, otherwise the signals of the touch screen and the remote may interfere with each other. To improve the performance of your remote control place the IR receiver as shown in the drawing below.

1 Front side of the Display
Turning the Display On/Off
After connecting the Display to the mains set the main On/Off switch to the "1" position. The Display will switch into standby mode. Press the Standby button on the remote or press the centre of the joystick in located on the rear left side of the Display and hold it down for a few seconds to switch it on from standby.
Press the centre of the joystick in and hold it down for a few seconds or press the Standby button on the remote to switch the Display into standby mode. To switch the Display off, set the On/Off switch to the "2" position.
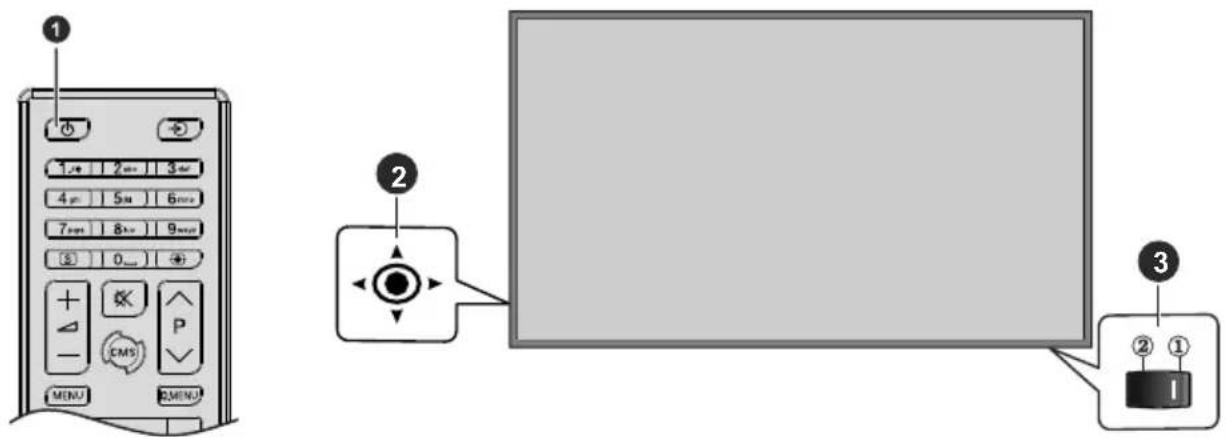
1 Standby button
2 Joystick
3 On/Off Switch (*)
(*) The location of the On/Off switch may differ depending on the model.
| LED Status Status of the monitor | |
| Power LED not lit Power on | |
| Power LED lit Power off (Standby mode) | |
| Power LED flashing (slow) Scheduler active (optional) | |
| Power LED flashing (fast) Software update |
Infrared Overlay Touch Screen
Infrared Overlay Touch Screen adds touch screen feature to your Display. The Touch Screen could be connected to the internal USB input of the Display internally or externally via the USB connection cable of the Touch Screen itself. If you switch the Display's source to the embedded OPS (if available), touch screen feature can be used with the OPS. It can also be used with external source devices. In this case the external source device should be connected to the Display via a Micro USB to USB cable or via the USB cable of the Touch Screen itself depending on the model. Connect the Micro USB end of the Micro USB to USB cable to the Micro USB port of the Display and the USB end to the external source device or connect the USB cable of the Touch Screen to the external source device as shown in the example connections below. Touch screen will become functional after a short period of time.
The Touch Screen is HID compliant. Windows, Linux, Mac and Android operating systems support HIDs. But in some cases a driver/patch may be required in order to use the touch screen with an external source device. In this case, the required driver/patch should be installed onto the external source device. Otherwise the Touch Screen may not work properly. Refer to the user manual of the source device for further information. Touch screen controls the currently displayed image on the screen of the Display. If an embedded OPS is being used the touch screen controls the embedded OPS. If an external source device is connected via HDMI or VGA and the source is selected accordingly, then the connected device will be controlled.
Example Connection 1 (External PC)
Touch Screen is internally connected to the internal USB input of the Display.

1 Rear side of the Display
2 Micro USB
3 HDMI In
In the undermentioned circumstances the coordinates of the Touch Screen and Display's screen may need to be accurately matched by calibration.
• After the first time you have installed the touch screen driver software or patch.
- If inconsistency is occurred between the mouse and your finger action.
• After changing the Touch Screen or Display.
- If the resolution of the Display is changed.
Note: If any driver/patch is missing or you require technical support, please contact your retailer.
Remote Control
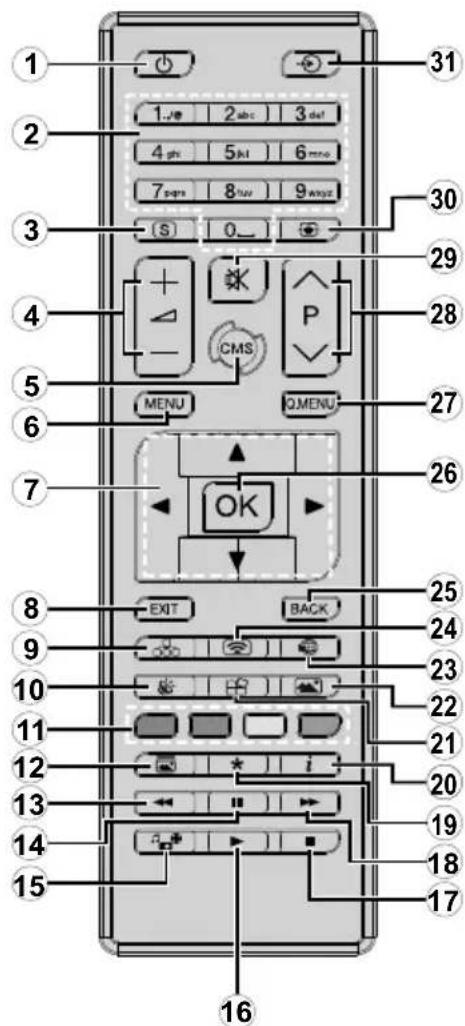
- Standby: Switches On / Off the Display
- Numeric buttons: Enters a number or a letter in the text box on the screen.
- Options: Displays Settings>Options menu
- Volume +/-: Increases or decreases the volume
- No Function
- Menu: Displays the main menu
- Directional buttons: Helps navigate menus, content etc.
- Exit: Closes and exits from displayed menus or returns to previous screen
- Network: Displays Network/Internet Settings menu
- Sound: Displays Sound menu
- Coloured Buttons: Follow the on-screen instructions for coloured button functions
- Picture Mode: Cycles between picture modes
- Rapid reverse: Moves frames backwards in media such as movies
- Pause: Pauses the media being played
- Media browser: Opens the media browsing screen
- Play: Starts to play selected media
- Stop: Stops the media being played
-
Rapid advance: Moves frames forward in media such as movies
-
No function
- Info: Displays information about on-screen content
- No function
- Picture: Displays Picture menu
- Internet: No Function.
- Wireless Display: Opens the wireless display connection screen
- Back/Return: Returns to previous screen
- OK: Confirms user selections
- Quick Menu: Displays picture and sound setting menus
- No function
- Mute: Completely turns off the volume of the Display
- Screen: Changes the aspect ratio of the screen
- Source: Shows all available content sources
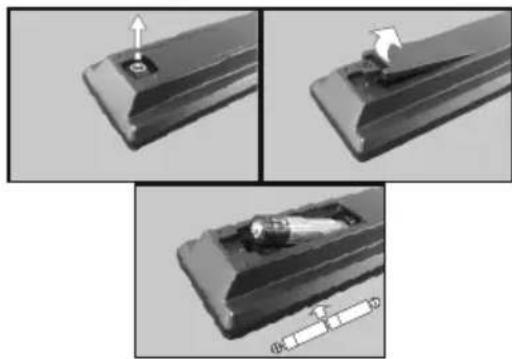
Inserting the Batteries into the Remote
Remove the screw that secure the battery compartment cover on the back side of the remote control first. Lift the cover gently. Insert two AAA batteries. Make sure the (+) and (-) signs match (observe correct polarity). Place the cover back on. Then screw the cover back on again.
natural_image
Three-panel technical illustration showing a mechanical component with an arrow indicating direction, no visible text or symbolsFirst Time Installation
Note: In order the First Time Installation to be completed successfully the Display should be connected to the internet.
When turned on for the first time, the language selection screen will be displayed. Select the desired language and press OK.
On the next screen, set your country preference and press OK to continue.
You will be asked to set and confirm a PIN at this point. For some country options, the PIN cannot be set to 0000, in this case you need to enter another 4-digit number combination. You have to enter this PIN if you are asked to enter a PIN for any menu operation later.
The More Settings menu will be displayed next. Set ID, Auto Software Update options can be configured using this menu. Model name, Serial number and Software version options are for information only. They will be grayed out and not selectable. You can save the model information data of the Display to a connected USB device using the Save model information option. You can also copy database files from a connected USB device to the Display using the Clone from USB option. Refer to the Options Menu Content section for more information on the options of this menu. After the settings are completed, highlight Next and press OK to continue.
Note: Please ensure Wifi and BT is set to Auto.
On the next screen, the Network/Internet Settings menu will be displayed. Please refer to Connectivity section to configure a wired or a wireless connection. If you want your Display to consume less power in standby mode, you can disable the Wake On option by setting it as Off. After the settings are completed highlight Next and press OK button to continue.
The First Time Installation is completed. The Display will be on the Android source.
To repeat this process and reset the Display's settings to the factory defaults enter the Settings>Options menu, highlight First time installation and press OK. You will be asked to enter the PIN that you have defined in the First Time Installation. If the correct PIN is entered a confirmation message will be displayed asking whether you want to delete all settings and reset the Display. Select Yes and press OK to confirm.
Note: Do not turn off the Display while initializing first time installation. Note that, some options may not be available depending on the country selection.
Android Launcher
The Display will be opened on the Android source when it is turned on for the first time. Press the Source button on the remote, move the focus to ANDROID and press the OK button to switch to Android source if another source is set as the currently active input source.
Note: Wireless display input source is not available from the Android input.
Setting up the internet connection
There is a secondary ethernet socket on the rear side of the Display for Android source only. Plug an ethernet cable into this socket in order to establish a wired LAN connection for Android source. The connection status will be displayed in the All apps>-Settings>Device-Network menu under the Ethernet caption on the home screen of Android as Connected or Not connected.
You can also connect to a Wireless LAN for Android source by turning on the Wi-Fi option under the same menu. Refer to following Network and Connecting to Internet sections for more information on internet based settings for Android source.
Home Screen
To interact with the user interface on the home screen, touch, touch and hold or touch and drag your finger on the screen instead of using the remote control. The remote control buttons may not function properly.
On the home screen a logo, wallpaper, time and date widget, a navigation tool bar and a launch bar will be available.
For information on how to configure the home screen see the Settings (Home Screen) section.
Logo
The logo used on the home screen of the launcher is configurable. You can change the logo and its position from the configuration menu of the home screen.
Wallpaper
The wallpaper used on the home screen of the launcher is also configurable. You can change it from the configuration menu of the home screen.
Time & Date Widget
In the middle of the home screen time and date information will be displayed. You can enable or disable this widget from the configuration menu of the home screen.
Home Screen Apps
Only All apps application will be pre-loaded on the home screen which is located on the left hand side of the screen. You can manage the home screen applications from the hidden Settings menu. See the Settings (Home Screen) section for more information on this settings menu.
All apps: Touch All apps in order to access many pre-loaded applications such as App Store, Chromium, Downloads, File Manager, Gallery and Settings. See Settings section for detailed
information on Settings menu contents. If you experience problems with an unsupported file format, you can download an auxiliary application such as a media player from the App Store.
Navigation Toolbar
Over the bottom edge of the screen navigation toolbar will be available. Touch the Collapse/Expand button of the tool bar to expand it. You can touch this button again to hide. Back, Home and Recent Apps buttons will be available when you expand the bar. You can use these buttons to navigate through the menus without having to use the remote control.
Toolbar in collapsed state

Toolbar in expanded state

1 Collapse / Expand
2 Back: Touch to return to the previous screen, or to close a dialogue box, menu, or keyboard
3 Home: Touch to return to the home screen
4 Recent Apps: Touch to display recent apps
The toolbar is pinned to the bottom edge of the screen. However you can change the position of it. Touch and hold the bar and then drag your finger in left or right direction to move the bar over the bottom edge of the screen. The toolbar can not be dragged when it is in expanded state.
Settings (Home Screen)
To configure the home screen you need to enter the hidden Settings menu. In order to do that touch and hold the logo on the home screen for at least 5 seconds and then raise your finger. You will be requested to enter a password in order to access the settings. Enter the default password(*) using the virtual keyboard, unless you have defined another password, and then touch OK.
(*) Default password is set to android.
You can configure the wallpaper, logo, home screen applications, language, enable or disable the displaying of the time and date widget and change the password using the options in the Settings screen.
Wallpaper: The preview of the current wallpaper will be displayed. Touch BROWSE to select a new wallpaper. The supported file formats are BMP, JPEG, PNG, GIF and WebP. Touch RESET to reset the default wallpaper.
Logo: The preview of the current logo will be displayed. Touch BROWSE to select a new logo. The supported file formats are BMP, JPEG, PNG, GIF and WebP. Touch RESET to reset the default logo. The logo can be positioned in any of the 4 corners of the screen. Touch the desired position option to set. Top left, Top right, Bottom left and Bottom right options will be available.
Home screen applications: The applications of the home screen will be shown. Touch Add (plus sign), then touch the app you want to add from the listed applications. You can add up to 8 apps to home screen. To remove an application from the home screen touch the application and then touch Remove on the next screen.
Time and Date Widget: This widget shows the current system time and date information in system language. Touch the on/off switch indicator located under the Clock title to enable or disable the displaying of the time and date widget on the home screen.
Language: Touch the current language under the Language title if you want the change it. Available languages will be listed. Touch the desired language to set as current language. You will be asked to enter the password. Enter the password and touch OK to return to Settings menu. Touch Cancel to return to home screen.
Password: Touch SET NEW PASSWORD to change the default password.
Android System Settings Menu
In order to access the Settings menu touch All apps on the home screen and then touch the Settings app. The available options will be listed. Touch one to see the details and available options.
1. Device
1.1. Network
Wi-Fi: To turn on the WLAN touch Wi-Fi option. Available wireless networks will be searched and listed. Touch one to connect. You may be asked to enter a password to connect to the selected network, in case the network is password protected. You cannot use the wireless connection if you are connected via Ethernet.
Other options: Under the Other options caption Scanning always available option will be available. Connect via WPS and Add new network options will also be available under this caption when the WLAN is turned on. You can use the Add new network option in order to connect to the networks with hidden SSID's (wireless network name) by entering the SSID manually.
When the WPS option is selected the Display will start a search for the WPS router. Press the WPS
button on your wireless router/modem to establish the connection. This way you wont need to enter or select a network name and the related password.
By turning the Scanning always available option on you can allow google location service and other apps to scan for networks and get location information, even when WLAN is turned off.
Ethernet: Under the Ethernet caption you can see the LAN status (Connected - Not connected) and also MAC/IP addresses if connected. You can also set a proxy server and change the IP settings using the related options.
1.2. Sound
You can set your sound preferences. You can enable/disable System sounds and set the Surround sound option as Auto, Always or Never.
1.3. Apps
Under this menu option applications installed on your Display will be listed. App Permissions, Downloaded Apps and System apps options will be available. You can display the information of the apps and manage them using the available options. You can also manage the permissions required by the applications. You can turn on and off the permissions for each application.
1.4. Display
Resolution and Orientation options will be available. You can set the resolution and the orientation of the Display manually by selecting one of the listed options or set as Auto.
1.5. Storage & reset
Using the options of this menu you can display the storage status informations, manage the connected storage devices and reset the Display to factory default.
Device storage: Storage informations for Internal shared storage and other connected storage devices will be displayed if available. Under the Device storage option the connected storage devices which are used as an internal storage will be listed. For these devices Eject and Erase & format as removable storage options will be available. To safely remove a storage device use the Eject option. In this case the device will not be removed from the device list but its state will be shown as Not connected. Use the Erase & format as removable storage option to format a storage device and use it as a removable storage device again.
Removable storage: Under this option the removable storage devices connected to the Display will be listed if any available. To safely remove a storage device use the Eject option. Use the Erase & format as device storage option to format a storage device and use it as an internal storage device. In this case the device will be listed under the Device storage option.
reset: Factory data reset option will be available. Use this option to clear user data (i.e system app updates, user apps, audio, video, photos) and reset the Display to factory default.
1.6. About
Using the options of this menu you can display detailed informations about the Android system, manage the system updates or restart the Android launcher. You can manually check if a system update is available on the network or on the connected storage device using the System Update option and restart the Android launcher using the Restart option.
2. Preferences
2.1. Date & time
Set the date and time options of your Display.
Automatic date & time: You can enable or disable network-provided date&time data by setting this option accordingly. This option is enabled by default.
Set date: You can set the date using this option. This option will be inactive if the Automatic date & time option is enabled.
Set time: You can set the time using this option. This option will be inactive if the Automatic date & time option is enabled.
Set time zone: You can set the time zone using this option.
Use 24-hour format: You can use this option to toggle between the 24-hour and 12-hour time formats.
2.2. Language
Select your language preference.
2.3. Keyboard
There are different types of keyboards, mainly used to provide input methods for non Latin languages. You can select your keyboard language and keyboard type.
2.4. Lock Screen
This option can be used to lock the entire screen and Settings menu if desired.
Captions: This option is for Closed Caption(CC) settings.
Display - Enable/Disable CC
Display options - Set the text Language and size
Caption style - Set caption style
High-contrast text: You can increase the contrast of all texts system-wide.
Services: Available services will be displayed.
System Bar Service - You can enable, disable or configure this service using the options of this menu. When this service is enabled all the text
that is typed by the user will be collected, expect passwords.
Text to speech - Choose the TTS engine. TTS is a feature used by the apps. Only the Pico TTS is supported currently. You can also configure the TTS engine, set the speech rate, listen to an example of the speech and see the current language status using the other options of this menu.
3. Personal
3.1. Location
You can allow or restrict apps to use your location information, display recent location requests or allow the use of the wireless connection to estimate the location.
3.2. Security & restrictions
Using the options of this menu;
- You can allow or restrict installation of apps from sources other than the Play Store.
- Set the Display to disallow or warn before installation of apps that may cause harm.
- Restrict access to apps and other content in your account.
You can restrict the use of certain apps by switching the Display to a restricted profile. The Home menu will only show the apps you allowed. You need a PIN code to switch out of the restricted profile. Restricted Profile option will appear at the bottom row of the home screen. Move the focus to this option and press OK to enter. Exit restricted profile option will be highlighted. Press OK and enter the PIN you defined to switch out of the restricted profile mode.
Installing Third Party Applications
Check if the installation of apps from sources other than the Play Store is allowed from the System Settings>Personal>Security & restrictions menu. If the checkbox next to the Unknown sources option is not checked, highlight this option and press OK. Then follow the below mentioned steps in order to install a third party application.
- Copy the file with the extension ".apk" onto a FAT formatted USB storage device
- Connect the USB storage device to one of the Android USB inputs on the Display. Refer to General View section to see the USB inputs dedicated to the Android system.
- Select the USB storage device from the Android launchers Removable Storage menu and press OK to browse the content. Highlight the file with the extension ".apk" and press OK. Your permission will be asked. Select Install and press OK again to proceed.
Connecting To Internet
To configure wired and wireless settings you should access the System Settings>Device>Network menu on the home screen. Two options will be available, Wi-Fi and Ethernet.
To Connect to a Wired Network
There is a secondary LAN port on the rear side of your Display dedicated to Android source. Connect your Display to your modem/router via this LAN port using an ethernet cable. Refer to the General View section in the first pages of this manual to find out the right socket.
The status of the Ethernet option in the Network Settings menu will be changed to Connected. The MAC and IP addresses will also be displayed under this caption.

1 Broadband ISP connection
2 LAN (Ethernet) cable
3 LAN input on the rear side of the Display
To Connect to a Wireless Network
A wireless LAN modem/router is required to connect the Display to a wireless network.
Highlight Wi-Fi option in the Network menu and press OK to turn on the WLAN. Available networks will be listed. Select one and press OK to connect. You may be asked to enter a password to connect to the selected network, in case the network is password protected. Additionally you can connect to your router/modem via WPS or add new networks by using the related options.

natural_image
Diagram showing a network device with wireless signal waves and a globe icon, above a blank screen (no text or symbols)1 Broadband ISP connection
A network with hidden SSID (wireless network name) can not be detected by other devices. If you want to connect to a network with hidden SSID, select Add new network option under the Other options caption. Add the network by entering its name manually using the related option. To make your modem's SSID visible, you should change your SSID settings via the modem's software.
If your router has WPS, you can directly connect to the modem/router without entering a password or adding the network first. Select Connect via WPS option under the Network Settings>Wi-Fi menu on the home screen. Go to your modem/router device and press the WPS button on it to make the connection. You will see a connection confirmation on your Display once the devices have paired. Select OK to proceed. No further configuration is required.
- A Wireless-N router (IEEE 802.11a/b/g/n/ac) with simultaneous 2.4 and 5 GHz bands is designed to increase bandwidth. These are optimized for smoother and faster HD video streaming, file transfers and wireless gaming.
• The frequency and channel differ depending on the area. - The transmission speed differs depending on the distance and number of obstructions between the transmission products, the configuration of these products, the radio wave conditions, the line traffic and the products that you use. The transmission may also be cut off or may get disconnected depending on the radio wave conditions, DECT phones or any other WLAN 11b appliances. The standard values of the transmission speed are the theoretical maximum values for the wireless standards. They are not the actual speeds of data transmission.
- The location where the transmission is most effective differs depending on the usage environment.
- The Wireless feature of the Display supports 802.11 a,b,g & n type modems. It is highly recommended that you should use the IEEE 802.11n communication
protocol in order to avoid any possible problems while watching videos.
- You must change your modem's SSID when there are any other modems around with the same SSID. You can encounter connection problems otherwise. Use a wired connection if you experience problems with a wireless connection.
Note: Android system allows only one network connection at a time. If the Display is connected to the network both wirelessly and via ethernet (wired) while it is on android source, the ethernet connection will take priority. Since if this is the case, WLAN connection can not be established. Unplug the ethernet cable to allow wireless connection.
Media Playback via USB Input
You can connect 2.5" and 3.5" inch (HDD with external power supply) external hard disk drives or USB memory stick to your Display by using the USB input/s of the Display.
IMPORTANT! Back up the files on your storage devices before connecting them to the Display. Manufacturer will not be responsible for any file damage or data loss. Certain types of USB devices (e.g. MP3 Players) or USB hard disk drives/memory sticks may not be compatible with this Display. The Display supports FAT32 and NTFS disk formatting.
Wait a little while before each plugging and unplugging as the player may still be reading files. Failure to do so may cause physical damage to the USB player and the USB device itself. Do not pull out your drive while playing a file.
You can use USB hubs with your Display's USB input/s. External power supplied USB hubs are recommended in such a case.
It is recommended to use the Display's USB input/s directly, if you are going to connect a USB hard disk.
Note: When viewing image files the Media Browser menu can only display 1000 image files stored on the connected USB device.
Media Browser Menu
You can play back music and movie files and display photo files stored on a USB storage device by connecting it to your Display. Connect a USB storage device to one of the USB inputs located on the rear side of the Display.
After connecting a USB storage device to your Display Media Browser menu will be displayed on the screen. You can access the content of the connected USB device any time later from the Sources menu. Select the related USB input option from this menu and press OK. Then select the file of your choice and press OK to display or play it back.
|You can set your Media Browser preferences by using the Settings menu. Settings menu can be accessed via the information bar which is displayed on
the bottom of the screen when pressed the Info button while playing back a video file or displaying a picture file. Press the Info button, highlight the gear wheel symbol positioned on the right side of the information bar and press OK. Picture Settings, Sound Settings, Media Browser Settings and Options menus will be available. The contents of these menus may change according to the type of the currently open media file. Only Sound Settings menu will be available while playing back audio files.
| Loop/Shuffle Mode Operation | |
| Start playback and activate [DHZA] | All files in the list will be continuously played in original order |
| Start playback and activate [TTC6] | The same file will be played continuously (repeat) |
Start playback and activate  | All files in the list will be played once in random order |
Start playback and activate  , , | All files in the list will be continuously played in the same random order. |
To use the functions on the information bar highlight the symbol of the function and press OK. To change the status of a function highlight the symbol of the function and press OK as much as needed. If the symbol is marked with a red cross, that means it is deactivated.
USB Auto Play Feature
USB AutoPlay feature is to start playing the media content installed on a removable device, automatically. It uses the Media Browser. The media content types have different priorities in order to be played. The reducing priority order is as Photo, Video and Audio. That means, if there is Photo content in the root directory of the removable device, Media Browser will play the Photos in a sequence (in file name order) instead of Video or Audio files. If not, it will be checked for Video content and as last Audio.
This feature will only work if all of the following circumstances occur:
- The USB device is plugged in.
- USB Auto Play option is enabled. It is placed in the Settings>System>More menu.
Failover Feature
If No Signal option in the Settings>Options>Controls menu is set as Failover the Display checks the connected USB device for available files to play. If no playable files are available or there is no USB device connected to the Display, the No Signal image will be displayed and the Display will turn itself off after a period of 5 minutes. If there isn't any No Signal Image available, No Signal OSD will be displayed on the screen and the Display will turn itself off after a period of 5 minutes.
Note: The setting of the USB Auto Play option in the Settings>System>More menu is not important, in Failover mode it will function anyway.
Settings Menu Content
| Picture Menu Content | ||
| Mode | You can change the picture mode to suit your preference or requirements. Picture mode can be set to one of these options: Text, Game, Sports, EyeCare and Natural. | |
| Contrast | Adjusts the light and dark values on the screen. | |
| Brightness | Adjusts the brightness values on the screen. | |
| Sharpness | Sets the sharpness value for the objects displayed on the screen. | |
| Colour | Sets the colour value, adjusting the colours. | |
| Energy Saving | This Display is designed to be environmentally friendly. If you set this option to Minimum, Medium, Maximum or Auto the Display will reduce energy consumption by regulating the backlight level accordingly. If you like to set the backlight level to a fixed value set as Custom and adjust the Backlight (located under this setting) manually using Left or Right buttons on the remote. Set as Off to turn this setting off.If pressed Right button while Auto option is selected or Left button while Custom option is selected, "Screen will be off in 15 seconds." message will be displayed on the screen.Select Proceed and press OK to turn the screen off immediately. If you don't press any button, the screen will be off in 15 seconds. Press any button on the remote or on the Display to turn the screen on again.When the Display is not in use, please switch off or disconnect the Display from the mains plug. This will also reduce energy consumption.Note: Available options may differ depending on the selected Mode. | |
| Backlight | This setting controls the backlight level. The backlight function will be inactive if the Energy Saving is set to an option other than Custom. | |
| Advanced Settings | ||
| Dynamic Contrast | You can change the dynamic contrast ratio to desired value. | |
| Noise Reduction | If the signal is weak and the picture is noisy, use the Noise Reduction setting to reduce the amount of noise. | |
| Colour Temp | Sets the desired colour temperature value. Cool (1300K), Normal (9300K) and Warm (8500K) options are available. | |
| Picture Zoom | Sets the desired image size format. | |
| Picture Shift | This option may be available depending on the Picture Zoom setting. Highlight and press OK, then use directional buttons to shift the picture upwards or downwards. | |
| Film Mode | Films are recorded at a different number of frames per second. Turn this feature on when you are watching films to see the fast motion scenes clearly. | |
| Skin Tone | Skin tone can be changed between -5 and 5. | |
| RGB Gain | Adjust the strength of the red, green and blue colours. You can use this feature for fine adjustment of white balance in the picture. | |
| HDMI Full Range | While watching from a HDMI source, this feature will be visible. You can use this feature to enhance blackness in the picture. | |
| Reset | Resets the picture settings to factory default settings (except Game mode). | |
| DP Stream Setting (*) | Sets the DisplayPort stream type. MST and SST options are available.*) This menu item appears only when the input source is set to DP. | |
| Sound Menu Content | |
| Volume | Adjusts the volume level. |
| Equalizer | Selects the equalizer mode. Custom settings can be made only when in User mode. |
| Balance | Adjusts whether the sound comes from the left or right speaker. |
| Headphone | Sets headphone volume.Please ensure before using headphones that the headphone volume is set to a low level, to prevent damage to your hearing. Only available if Headphone/Lineout option is set to Headphone. |
| Audio Link | Press OK to open the Audio Link menu screen. Using this screen you can discover and connect the sound devices to your Display wirelessly. |
| AVL (Automatic Volume Limiting) | Sets the sound to obtain fixed output level between sources.If the Dolby Audio menu item is set to an option other than Off the AVL setting options will change. Auto, Night, Normal and Off options will be available. In Auto mode the TV will switch to Normal or Night mode automatically according to the current time information. If no time information is available this option will always function as Normal. When the TV switches to Night mode for the first time after setting this option as Auto, an information bar will pop up on the screen.Please note that compared to Normal mode Night mode provides more aggressive dynamic compression control which is suitable for silent environments. |
| Headphone/Lineout | When you connect an external amplifier to your Display using the headphone jack, you can select this option as Lineout. If you have connected headphones to the Display, set this option as Headphone.Please ensure before using headphones that this menu item is set to Headphone. If it is set to Lineout, the output from the headphone socket will be set to maximum which could damage your hearing. A warning message will be displayed on the screen when switched to Lineout option. Remove your headphone and press OK to continue. |
| Dynamic Bass | Enables or disables the Dynamic Bass. |
| Dolby Audio | Smart, Movie, Music, News and Off options will be available. Set as Off to disable.Note: Some items in Sound menu will be grayed out and unavailable if set to an option other than Off. |
| Surround Sound | Surround sound mode can be changed as On or Off. |
| Digital Out | Sets digital out audio type. PCM and Compressed options are available. |
| Network Menu Content | ||
| Network Type | Disable the network connection or change the connection type. | |
| Scan Wireless Networks | Start a search for wireless networks. This option will be available if the Network Type is set as Wireless Device. | |
| Press WPS on your wifi router | If your modem/router device has WPS, you can directly connect to it using this option Highlight this option and press OK. Go to your modem/router device and press the WPS button on it to make the connection. This option will be available if the Network Type is set as Wireless Device. | |
| Internet Speed Test | Start a speed test to check your connection bandwidth. The result will be displayed on the screen when finished. | |
| Advanced Settings | Change the IP and DNS configurations of your Display. | |
| Wake On | Enable or disable this feature by setting it as On or Off. | |
| Note: For detailed information on the options of this menu refer to the Connectivity section. | ||
| Options Menu Content | ||
| Device Info | ||
| Set ID | Sets the device ID. You can select a value between 0-99 using the numeric buttons on the remote in order to identify your Display. | |
| Software upgrade | Displays current software version. Press OK to see the upgrade options. You can use these options to start a manual search for software updates and set your automatic scan preference. | |
| Serial number | Displays serial number of the unit. (Cannot changed by user) | |
| Model name | Displays model name of the unit. (Cannot changed by user) | |
| Save model information | Copies the model information data of the unit to a connected USB device. | |
| Controls | ||
| Pixel shift | Enables or disables pixel shifting. This option can be used to avoid image retention (after image effects) that can occur when displaying fixed patterns or still images for long periods of time. If enabled, the picture and OSD (On-Screen Display) will be shifted at specified time intervals. | |
| No Signal | Sets the behavior preference of the Display, when no signal is detected from the current set input source. Failover and Input Search options are available.If Failover is selected the Display checks the connected USB device for available files to play. If no playable files are available or there is no USB device connected to the Display, the No Signal image will be displayed. If there isn't any No Signal Image available, No Signal OSD will be displayed on the screen. The setting of the USB Auto Play option in the Settings>System>More menu is not important, in Failover mode it will function anyway.If Input Search is selected the Display will search all available input sources consecutively to find signal. If no signal is detected from other available sources, No Signal OSD will be displayed and the signal search will continue according to the order in the Sources list until the ANDROID source is reached as it will always be available. | |
| ControlButton Lock | Set as Off to prohibit the use of the buttons on the Display. | |
| Remote Control Lock | Set as On to inhibit the use of the remote. Remote control will function in Stand-By mode independently from the setting of this option.To turn this option off and be able to use the remote again, press MENU/M-1-9-7-3 buttons on the remote consecutively. Options menu will appear. Enter the Controls menu and set this option as Off. | |
| UART 0 | Select ASCII/HEX protocol for UART 0. Default value is ASCII. There is no need to restart the Display after selection in order to work with the protocols correctly. If the selection is changed, the latest selected protocol will be preserved and started when the Display is booted up.Note that ASCII/HEX selection is not working while debug logs are enabled. If it is wrongly changed to HEX while debug logs are enabled, revert the selection to ASCII are reboot the Display in order to correct the debug logs and the ASCII protocol behaviour. Also note that HEX protocol will work with the baud rate value 19200 for UART 0. | |
| UART 1 | Select ASCII/HEX protocol for UART 1. Default value is HEX. There is no need to restart the Display after selection in order to work with the protocols correctly. If the selection is changed, the latest selected protocol will be preserved and started when the Display is booted up.Note that ASCII/HEX selection is always working as expected. It does not matter if the debug logs are enabled or not.Also note that HEX protocol will work with the baud rate value 9600 for UART1 | |
| Embedded Touch | Enables or disables the functionality of the embedded touch screen. | |
| Wifi & BT | Sets the source option for these funtions. Auto, Display and Android options will be available.Note: BT will not be functional for Android source. | |
| Menu lock | You can block the usage of the menu button on the remote by setting this item as All menus. When you press the menu button, you will be asked to enter the PIN that you have defined in the First Time Installation. Set as Off to disable this function. | |
| Auto Source Switch | If this option is enabled the Display will switch to the currently active HDMI source automatically when a device is connected to the Display through the HDMI1 or HDMI2 input socket. Set as Enabled to enable this feature.When the HDMI source is removed the Display will switch to other active HDMI source. If there isn't any other device connected to the Display and the HDMI Wake UP option for the related HDMI source is enabled the Display will switch into the standby mode.There is also a 3-second restriction for the successive connected HDMI sources. This means, second HDMI device must be plugged in 3 seconds after the first HDMI device is plugged in.Note: This feature applies for HDMI1 and HDMI2 input sockets only. Refer to the General View section to see the HDMI inputs. | |
| Power Up Settings | ||
| Power Up Mode | Configures the power up mode preference. Last State, Always On and Standby options are available. | |
| Quick Standy | If this feature is enabled the Display can be turned on again with the RS232 and LAN commands if it is turned off through it. Press Left or Right button to enable or disable the feature. | |
| Boot Up Picture Mode | Configures the picture mode preference at power on. If set as Off the last set picture mode will be used at power on. | |
| HDMI1 Wake Up | If this option is set as Enabled, the Display will turn on with the HDMI1 input source, when it is switched on. This feature works based on HDMI 5V signal. When this signal is active the Display wakes up and when the signal is inactive the Display shuts down. You can disable this option by setting as Disabled.If any Scheduler is set or an OPS unit is connected to the Display, this option will be inactive and can not be set as Enabled.Note: This feature may not be available depending on the model of your unit. | |
| HDMI2, HDMI3, Wake Up (optional) | If this option is set as Enabled, the Display will turn on with the HDMI2 input source, when it is switched on. This feature works based on HDMI 5V signal. When this signal is active the Display wakes up and when the signal is inactive the Display shuts down. You can disable this option by setting as Disabled.If any Scheduler is set or an OPS unit is connected to the Display, this option will be inactive and can not be set as Enabled.Note: This feature or HDMI3 options may not be available depending on the model of your unit. | |
| USB | ||
| Clone to USB | Copies the database files from the unit to a connected USB device. | |
| Clone from USB | Copies the database files from a connected USB device to the unit. | |
| Copy app cache from USB | Copies app cache data from a connected USB device to the unit.Note: This feature may not be available depending on the model of your unit. | |
| USB Information | Press OK to open the USB information menu screen. Current Total space and Free space information of the connected USB device will be displayed. You can also format the connected USB device using the Format Disk option in this menu (FAT32 format only). | |
| USB Operations | Highlight and press OK to perform USB operations. | |
| USB Option | Set as Off to disable the USB ports on the Display. You can also set this option as 5V to provide 5 volts power over USB. In this case it will still not be available to browse the USB content via Media Browser feature of the Display. | |
| Safely Remove | You can use this option to remove the devices connected to the USB inputs of the Display safely. Highlight this option and press OK. Wait for the message to be displayed on the screen indicating that you can remove your device and then remove your device. Failure to do so, may cause problems when you connect your USB device to other devices and you might have to format your USB device. | |
| OPS Settings | Press OK to open the OPS Settings menu screen. Three sub-menu options are available.OPS Information: Displays read-only information about the OPS unit, if supported.OPS Status: Displays whether the OPS module is on or off. Allows the change of status via soft PSON signal (0.5s)Boot Signal: Enables or disables sending of a PSON signal. The Display checks the status signal of the OPS at bootup in order to turn it on by sending a PSON signal if it is off. Some OPS's send incorrect information on their status during the bootup of the Display, so they seem to be on even though they are off. For such non-standard OPS's, this option must be enabled. In this case, a PSON signal will be send for the OPS regardless of the received status information at bootup.Powerdown: Turns the OPS off via hard PSON signal (5s)Note: This menu will not be available if OPS is not supported or not connected to the unit. | |
| Volume Settings | Press OK to see available menu options. | |
| Reset to Default Values | Highlight this option and press the OK button on the remote to return the Display to default settings. | |
| First time installation | Highlight and press OK to perform First Time Installation and reset all settings to factory settings. You will need to enter the correct PIN to carry out this operation.Note: Enter the PIN you have defined during the First Time Installation process. | |
| System Menu Content | ||
| Language | Sets the OSD menu language preference. | |
| Date/Time | Sets date and time. | |
| Sources | Enables or disables selected source options. There will be Regular, Enhanced and Disabled options available for HDMI sources, if your Display supports Ultra HD. Regular and Enhanced options are affecting the colour settings of the selected HDMI source. To be able to watch 4K images from an HDMI source related source setting should be set as Enhanced if the connected device is HDMI 2.0 compatible. Set as Regular if the connected device is HDMI 1.4 compatible. Set accordingly or disable the related HDMI source by setting as Disabled.Note: HDMI cables which are longer than 5 metres and which are not HDMI certified can cause display problems. | |
| More | Displays other setting options of the Display. | |
| Menu Timeout | Changes timeout duration for menu screens. | |
| Standby Led | Enables or disables the functionality of the standby led. If disabled the led will not function. | |
| Auto Display OFF | Sets the desired time for the Display to automatically go into standby mode when not being operated. | |
| DP Stream Setting (*) | Sets the DisplayPort stream type. MST and SST options are available. (*) This menu item appears only when the input source is set to DP. | |
| USB Auto Play | Using this option you can set your Display to start playing the media content installed on a removable device automatically. Refer to USB Auto Play Feature section for detailed information. | |
Connectivity
To configure wired or wireless settings you should access the Network menu in the Settings menu.
Wired Connectivity
To Connect to a Wired Network
- You must have a modem/router connected to an active broadband connection.
- There is a LAN port at the rear (back) of your Display Connect your Display to your modem/router via this LAN port using an Ethernet cable.

1 Broadband ISP connection
2 LAN (Ethernet) cable
3 LAN input on the rear side of the Display
Configuring Wired Device Settings
Network Type
Set the Network Type as Wired Device if you are connecting via an Ethernet cable.
Internet Speed Test
Highlight Internet Speed Test and press the OK button. Display will check the internet connection bandwidth and display the result when complete.
Advanced Settings
Highlight Advanced Settings and press the OK button. On the next screen you can change the IP and DNS settings of the Display. Highlight the desired one and press Left or Right button to change the setting from Automatic to Manual. Now you can enter the Manual IP and / or Manual DNS values. Select the related item in the drop down menu and enter the new values using the numeric buttons on the remote. Highlight Save and press the OK button to save settings when complete.
Other Information
You can also enable or disable Wake On feature using the related option. The status of the connection will be displayed as Connected or Not Connected and the current IP and MAC addresses, if a connection is established.
Wireless Connectivity
To Connect to a Wireless Network
- You must have a wireless modem/router connected to an active broadband connection.

natural_image
Illustration of a wireless router connected to a globe via a cable, with no visible text or symbols.1 Broadband ISP connection
- A Wireless-N router (IEEE 802.11a/b/g/n) with simultaneous 2.4 and 5 GHz bands is designed to increase bandwidth. These are optimized for smoother and faster HD video streaming, file transfers and wireless gaming.
- The frequency and channel differ depending on the area.
- The transmission speed differs depending on the distance and number of obstructions between the transmission products, the configuration of these products, the radio wave conditions, the line traffic and the products that you use. The transmission may also be cut off or may get disconnected depending on the radio wave conditions, DECT phones or any other WLAN 11b appliances. The standard values of the transmission speed are the theoretical maximum values for the wireless standards. They are not the actual speeds of data transmission.
- The location where the transmission is most effective differs depending on the usage environment.
- The Wireless feature of the Display supports 802.11 a,b,g & n type modems. It is highly recommended that you should use the IEEE 802.11n communication protocol in order to avoid any possible problems while watching videos.
- You must change your modem's SSID when there are any other modems around with the same SSID. You can encounter connection problems otherwise. Use a wired connection if you experience problems with a wireless connection.
Configuring Wireless Device Settings
Open the Network menu and select Network Type as Wireless Device to start connection process.
Highlight Scan Wireless Networks option and press OK to start a search for available wireless networks.
All found networks will be listed. Highlight your desired network from the list and press OK to connect.
Note: If the modem supports N mode, you should set N mode settings.
If the selected network is password-protected, enter the correct key by using the virtual keyboard. You can use this keyboard via the directional buttons and the OK button on the remote control.
Wait until the IP address is shown on the screen.
This means that the connection is now established. To disconnect from a wireless network, highlight Network Type and press Left or Right buttons to set as Disabled.
If your router has WPS, you can directly connect to the modem/router without entering a password or adding the network first. Highlight Press WPS on your wifi router option and press OK. Go to your modem/router device and press the WPS button on it to make the connection. You will see a connection confirmation on your Display once the devices have paired. Select OK to proceed. No further configuration is required.
Highlight Internet Speed Test and press the OK button to check your internet connection speed. Highlight Advanced Settings and press the OK button to open the advanced setting menu. Use directional and numeric buttons to set. Highlight Save and press the OK button to save settings when complete.
Other Information
You can also enable or disable Wake On feature using the related option. The status of the connection will be displayed as Connected or Not Connected and the current IP and MAC addresses, if a connection is established.
Connecting to your mobile device via WLAN
- If available, you can download a virtual remote controller application from the server of your mobile device application provider.
Note: This feature may not be supported on all mobile devices.
Wake ON
Wake-on-LAN (WoL) and Wake-on-Wireless LAN (WoWLAN) are standards that allow a device to be turned on or woken up by a network message. The message is sent to the device by a program executed on a remote device connected to the same local area network, such as a smartphone.
Your Display is WoL and WoWLAN compatible. This feature might be disabled during the First Time Installation process. To enable this feature set the Wake On option in the Network menu as On. It is necessary that both the device, from which the network message will be sent to the Display, and the Display are connected to the same network. Wake On
feature is only supported for Android OS devices and can only be used via YouTube and Netflix applications. In order to use this feature the Display and the remote device should be connected at least once while the Display is on. If the Display is powered off, the connection should be re-established, the next time it is switched on. Otherwise this feature will be unavailable. This does not apply, when the Display is switched into the standby mode.
If you want your Display to consume less power in standby mode, you can disable this feature by setting the Wake On option as Off.
Connecting Other Wireless Devices
Your Display supports another short range wireless connection technology too. A pairing is required before using these kind of wireless devices with the Display set. You should do the followings to pair your device with the Display:
- Set the device to pairing mode
- Start device discovery on the Display
Note: Refer to the user manual of the wireless device to learn how to set the device to pairing mode.
You can connect audio devices or remote controllers wirelessly to your Display. Unplug or switch off any other connected audio device in order for wireless connection feature to work correctly. For audio devices you should use the Audio Link option in the Settings>Sound menu, for remote controllers the Smart Remote option in the Settings>System>More menu. Select the menu option and press the OK button to open the related menu. Using this menu you can discover and connect the devices that use the same wireless technology and start to use them. Follow the on-screen instructions. Start the device discovery. A list of available wireless devices will be displayed. Select the device you want to connect from the list and press the OK button to connect. If "Device connected" message is displayed, the connection is successfully established. If the connection fails try it again.
Note: Wireless devices may operate within the same radio frequency range and may interfere with one another. To improve the performance of your wireless device place it at least 1 meter away from any other wireless devices.
Wireless Display
Wireless Display is a standard for streaming video and sound content. This feature provides the ability to use your Display as wireless display device.
Using with mobile devices
There are different standards which enable sharing of screens including graphical, video and audio content between your mobile device and Display.
Plug in the WLAN USB dongle to Display first, then press the Source button on the remote and switch to Wireless Display source.
A screen appears stating that the Display is ready for connection.
Open the sharing application on your mobile device. These applications are named differently for each brand, refer to the instruction manual of your mobile device for detailed information.
Scan for devices. After you select your Display and connect, the screen of your device will be displayed on your Display.
Note: This feature can be used only if the mobile device supports this feature. If you experience problems with the connection check if the operating system version you use supports this feature. There may be incompatibility problems with the operating system versions which are released after the production of this Display. Scanning and connecting processes differ according to the programme you use. The maximum supported resolution is 1920x1080. Image quality may be affected by neighbouring wireless networks and your internet connection speed.
Connectivity Troubleshooting
Wireless Network Not Available
- Ensure that any firewalls of your network allow the Display wireless connection.
- Try searching for wireless networks again, using the Network menu screen.
If the wireless network does not function properly, try using the wired network. Refer to the Wired Connectivity section for more information on the process.
If the Display does not function using the wired connection, check the modem (router). If the router does not have a problem, check the internet connection of your modem.
Connection is Slow
See the instruction book of your wireless modem to get information on the internal service area, connection speed, signal quality and other settings. You need to have a high speed connection for your modem.
Distruption during playback or slow reactions
You could try the following in such a case:
Keep at least three meters distance from microwave ovens, mobile telephones, bluetooth devices or any other WLAN compatible devices. Try changing the active channel on the WLAN router.
Internet Connection Not Available
If the MAC address (a unique identifier number) of your PC or modem has been permanently registered, it is possible that your Display might not connect to the internet. In such a case, the MAC address is authenticated each time when you connect to the internet. This is a precaution against unauthorized access. Since your Display has its own MAC address, your internet service provider cannot validate the MAC address of your Display. For this reason, your Display cannot connect to the internet. Contact your internet service provider and request information on how to connect a different device, such as your Display, to the internet.
It is also possible that the connection may not be available due to a firewall problem. If you think this causes your problem, contact your internet service provider. A firewall might be the reason of a connectivity problem.
DisplayPort
DisplayPort version 1.2 is supported via the DisplayPort input and output connectors on your Display.
DP Stream Setting option in the System>Settings>More menu is set as MST(Multi-Stream Transport) by default. If a MST compliant source device is connected to the Display, the streaming data should be configured on the source device (Daisy-chaining). If DisplayPort version 1.1 compliant or SST (Single-Stream Transport) compliant source device with DisplayPort version 1.2 support is connected to the Display, DisplayPort output on the Display will work as a splitter. In this case, same image will be displayed in all connected Displays.
To be able to stream the same image to all connected Displays using a MST compliant device, DP Stream Setting option in the System>Settings>More menu should be set as SST.
The maximum amount of the Displays that can be connected by using daisy-chaining function may differ depending on the source device's capacity. The image that will be displayed in all Displays will be defined by the source device. For example, to be able to stream 4 different FHD images, the source device should be capable of supporting this operation.
Note: It is recommended to use a DisplayPort certified cable for connection. In SST operation mode the total amount of the Displays is limited (a maximum of 7 units) due to HDCP encryption. If the signal is stable and there is no cable loss, there will be no limitation in case the source content is not HDCP-encrypted. For proper operation in MST operation mode make sure your source device is MST compliant. If your source device is a computer check the specifications of its graphic card to ensure MST compatibility.
HDMI Out
The HDMI port located on the rear left side of the Display functions as an output port (upper HDMI port, HDMI Out). This port will not function as an input, thus no source devices should be connected to this port. Only the content received from the HDMI input
port located also on the rear left side of the Display (lower HDMI port, HDMI1 In) can be outputted from this port. The contents received from other inputs such as VGA or Display Port, can not be outputted. This is a default function and you can not disable/ enable through any menu option. HDMI output port will always function if a source device is connected to the specified HDMI input.
Real Time Clock (RTC)
Your Display has an RTC. It is used to maintain the real date and time information for a period of time if the energy supply is interrupted by separating the Display from the mains or by a power blackout. In this case the Display will use the date and time information stored in RTC.
- All time sources are able to override RTC date/time.
- Display tries to connect to the NTP server periodically (6 hours after last update) to get the current date and time information. If the Display successfully gets these informations from the NTP server, updates itself and RTC with the received date and time information. If the NTP server update fails, the Display uses RTC time and date to update itself.
- The RTC battery provides power to the integrated real-time clock and the calendar. Without any external power source, RTC is able to function for a minimum of 14 days.
- If RTC is used as time source, manual date-time set is enabled from Date/Time option in the Settings> System menu.
Crestron Connected
- In order to work with Crestron Connected protocol, "CrestronConnected" profile option should be enabled.
- Flash UI which is served by the display device is not supported. Flash UI which is served by the control system can be used. Flash UI will not be directly connected to display device but will be connected indirectly over control system in this case.
- Widi source is not visible to the Crestron Connected interfaces (e.g. Roomview, Xpanel). The reason is when we select this source the connection is broken and therefore could not communicate with crestron devices again.
- Configuration page to set control system ip address/hostname, ip id, and port can be reached by writing the ip address of display to the browser address bar on your computer.
- If SecureCommand profile option is enabled, configuration page is opened with a password dialog. After entering the correct password configuration dialog appears. Password is the same with the one used in SETUSERSECLEVEL command.
Controlling With An External PC
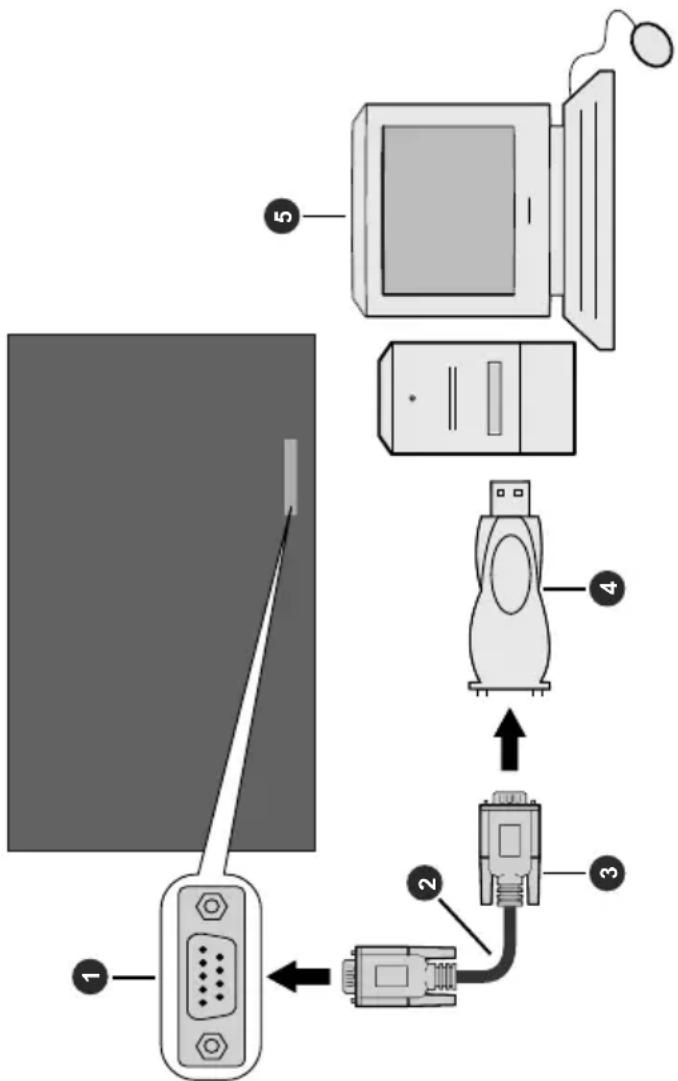
1 RS-232 Input Socket
2 RS-232 straight cable (commercially available)
3 To COM port
4 RS-232 to USB Adaptor
5 PC
You can control the product from an external PC via RS-232 (COM port) or LAN (Ethernet port) on the PC. For instance, system source can be changed by RS-232 from remote computer. When a command is sent from the PC to the product, the product operates according to the received command and sends a response message to the PC.
Equipment/Tools:
- RS-232 (female) to RS-232(male) cable or LAN cable (connected via router)
- USB to RS-232(male) cable
- Notebook or PC which has USB or LAN port
- Installed program on remote PC to send commands: In general, the RS-232 commands are sent for operating the implemented functions via serial port
and utility. A suitable utility can be used such as described below.
Connecting to the Display (LAN port)
Download and install the PuTTY software from the following link first: http://www.putty.org/.
Run the software and enter the Display's IP address in the field Host Name. Enter "1986" as a default value in the field Port. Then select "Telnet" as Connection type and click the Open button.
Note: Refer to the Connectivity section of this manual for information on connecting the Display to a network and displaying the IP address of the Display.
(*) The LAN socket on the rear side of the Display should be used. Refer to the General View section in the first pages of this manual to find out the right socket. The socket loacted on the rear side of the Display is dedicated for Android and thus should not be used for this type of connection.

Use the commands in the RS232 Command Table. For example, if "GETVOLUME" command is entered, current volume level should be displayed on the putty window as shown in the pictures below.
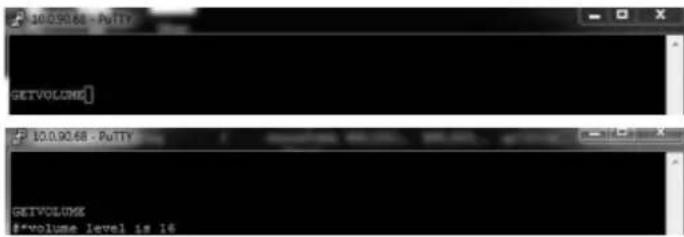
Another example;
Volume level can be changed by using "VOLUME" command. After sending this command, you can verify the changes from the Display.

The last example ;
When "GETSOURCE" command is entered, current source should be displayed on the putty window as shown in the picture below.

Connecting to the Display (RS232 port)
Run the software and select Serial as Connection Type. Enter the Display's serial port in the field Serial Line (in the following example it is COM4) and "115200" in the field Speed. Then click the Open button.

RS232/LAN Command Tables
| AUDIO COMMANDS | ||||
| Command Description | Option Parameter Return | |||
| GETVOLUME Volume | level information. no parameter #*volume level is ... | |||
| HEADPHONEVOLUME | "Set headphone volume level." integer n (0 ≤ n ≤ 100) #*set headphone volume to n | |||
| GETHEADPHONEVOLUME | "Headphone volume level information." no parameter #*headphone volume is ... | |||
| GETMUTE Get mute | value on/off. no parameter | "*MUTE OFF or\n"*MUTE ON" | ||
| SETMUTE Set mute | value on/off. no parameter | "*MUTE OFF or\n"*MUTE ON" | ||
| SETSOUNDMODE | "Set sound mode. SETEUSERFREQ 100Hz 10" | "integer n (0 = mono, 1 = stereo, 2 = dual I, 3 = dual II, 4 = mono left, 5 = mono right)" | "*setSoundMode() set to n or\n"*Invalid sound mode entered" | |
| SETBALANCE Set balance value. integer n (-50 < n < 50) | "*set balance level to n or\n"*invalid balance level entered" | |||
| GETBALANCE Get balance value. no parameter #*balance level is ... | ||||
| SETAVL | Set AVL state. integer n (0 = off, 1 = on) | "*set avl state to n | ||
| GETAVL | Get AVL state. no parameter | "*avl state is ... | ||
| SETDYNAMICBASS | Set dynamic bass state. integer n (0 = off, 1 = on) | "*set dynamic bass state to n | ||
| SETEUSERFREQ | Set equalizer user freq. value for any band. "string n (120Hz, 500Hz, 1.5KHz, 5KHz, 10KHz) integer n -13 < n < 13 Example: SETEUSERFREQ 120Hz 10" | "*setEQUserFreq() set to n or\n"*Incorrect sound system parameter entered or\n"*Incorrect equalizer mode. It should be USER mode" | ||
| GETDIGITALOUT | Get digital out. no parameter | "*digital out is pcm or *digital out is compressed | ||
| SETEQMODE | Set equalizer mode. string n (Music, Movie, Speech, Flat, Classic, User) | "*setEQMode() set to n or\n"*Incorrect equalizer parameter entered" | ||
| SETDIGITALOUT | Set digital out. string n (compressed, pcm) | "*setDigitalOut() set to n OR\n"*Incorrect digital out mode parameter entered | ||
| VOLUMEUP | "Increase Volume Level by 1 step (Until max volume)" no parameter | "*volume LEVEL is increased to ... or\n"*You can NOT increase volume LEVEL further. Confirmed Max Volume Level is ..." | ||
| VOLUMEDOWN | Decrease Volume Level by 1 step | no parameter | "*volume LEVEL is decreased to .. or\n"*You can NOT decrease volume LEVEL further. Current Volume level is ..." | |
| SETHEADPHONEOUTPUT | Set headphone output string n (headphone,lineout) | "#*set headphone output to n or #*Invalid Parameter" | |
| GETHEADPHONEOUTPUT | Get headphone output no parameter #*LINEOUT or #*HEADPHONE | ||
| GETDYNAMICBASS Get dynamic bass state. no parameter | #*the dynamic bass state is ... (0 = off, 1= on) | ||
| GETBASSGAIN Get bass gain no parameter | "#*the bass gain level is n Note: Above n is -6 <= n <= 6" | ||
| GETEQUSERFREQ | Get equalizer user freq. value of specified band | string n (120Hz, 500Hz, 1.5KHz, 5KHz, 10Khz) | "#*the equalizer value for the band is n or #*Incorrect sound system parameter entered Note: Above n is -13 < n < 13" |
| GETEQMODE Get equalizer mode no parameter | "#*the equalizer mode is n Note: Above n is one of Music, Movie, Speech, Flat, Classic, User" | ||
| SOUNDRESET Reset sound settings no parameter | "#*Fixed Volume is set to ... #*Fixed volume availability is set to ... #*Headphone volume control availability is set to ... #*Start volume availability is set to ... #*Start volume limit is set to ... #*Start headphone volume limit is set to ... #*Lower volume limit is set to ... #*Upper volume limit is set to ... #*Headphone volume limit is set to ... #*Wakeup time volume is set to ... #*All equalizer bands are set to ... #*Volume is set to ... #*Headphone volume is set to ... #*Headphone balance is set to ... #*Headphone bass is set to ... #*Headphone treble is set to ... #*Digital audio out is set to ... #*Audio output description path is set to ... #*Audio description is ... #*Audio description relative volume is set to ... #*Audio description language is set to ... #*Sound Loudness is set to ... #*Sound mode digital is set to ... #*Sound mode is set to ... #*Sound subwoofer is set to ... #*SPDIF out is ... #*DTS is ... #*Bass gain is set to .. or #*Dynamic bass is ... " | ||
| BROWSER COMMANDS | |||
| Command Description | on Parameter Return | ||
| OPENURL | Starts the given URL and returns web page load status directly. | string-integer n <load url='n' /> | #*status= ... url=n |
| GETURL | Gets URL of the current page if the portal is active. | no parameter #*URL : ... | |
| GETUSERAGENT | Gets portal user agent. no parameter #*Current UA : ... | ||
| GETCURSORPOSITION | Gets cursor position in the browser. | no parameter #*X: ... Y: ... | |
| SETCURSORPOSITION | Sets cursor position in the browser. | string-integer a,b #*X: a Y: b | |
| GENERAL DISPLAY COMMANDS | |||
| Command Description | Option Parameter Return | ||
| SETRC | Enables/disables remote control commands. | string-integer n (n = ON, n = OFF) | set remote state On or set remote state OFF |
| SETSOURCE | Set source as enable/disable. | "string n, integer b (n = SCART1, n = SCART2, n = FAV, n = SVHS, n = HDMI1, n = HDMI2, n = HDMI3, n = HDMI4, n = YPBPR, n = VGA, n = SCART1S, n = SCART2S) (b = 1(enable), b = 0(disable))" DP In, DP Out. | "*Selected source n #*Enable/Disable state : b" |
| GETSOURCE Gets source. no parameter #*source is ... | |||
| GETCOUNTRY | Get country in channels state. | no parameter #*COUNTRY IS : ... | |
| GETSWVERSION | Returns the software version of tv. | no parameter #*V... | |
| KEY Send key to Eclipse. | string-integer n (n = 0, n = 1, ..., n = up, ..., n = menu, ....ext.) | n key send to Eclipse | |
| RESET | Reset the device. | no parameter | Reset process was successfully accomplished. You need to establish the connection again. |
| STANDBY | Switch display to hard standby.(Note: Don't use this command with the product that has OPS. You can use other "KEY standby" command.) | no parameter | "*enterLowPowerMode() returns successfully. or #*enterLowPowerMode() returns unsuccessfully! or #*enterStandbyMode() returns successfully. or #*enterStandbyMode() returns unsuccessfully!" |
| MENUTIMEOUT Set menu time out mode. | integer n (n = 0 , n = 15, n = 30, n = 60) | "*set menu timeout mode to OFF or"*set menu timeout mode to 60 or"*Invalid menu timeout mode" | |
| GETMODELNO Get model no. no parameter #*Model no: ... | |||
| GETSERIALNO Get serial no. no parameter #*Serial no: ... | |||
| GETLED Get led on/off state. no parameter | "*LED is on"*LED is off" | ||
| GETRC | Get remote control commands enabled status | no parameter | "*remote control commands are on"*remote control commands are off" |
| USBOPERATIONS Perform USB Operations no parameter | You may observe prints Bank 0, Bank 1 etc. Be sure or observe debug print outs: "MFC ISP: done" will be written... This may take over 10 minutes. | ||
| GETMENUTIMEOUT Get menu time out mode no parameter | "*menu timeout mode is OFF"*menu timeout mode is n"*can not get menu timeout mode Note: Above n is one of (15, 30, 60)" | ||
| GETTVLIFETIME | Prints Monitor life time in minutes. | no parameter #*Monitor Life Time: n | |
| SELECTSOURCE | Select source.(0=TV, other source indexes(some of them are not enabled)) | integer n (5=FAV,7=HDMI1, 8=HDMI2,11=YPbPr, 12=Vga,18=DVI, 19=DP,20=OPS) | "*select TV source or"*select External source ..." |
| KEY standby | Switch box to Standby mode. ( For quick standby) | no parameter standby key send to Eclipse | |
| TIME | Display the current date and time. | no parameter Time = ... | |
| GETSTANDBY Get standby on/off. no parameter | "*standby offor"*standby on" | ||
| STARTFTI | Start First Time Installation. | no parameter #*FTI was initialising. | |
| CHANGELNG Change active language. | "integer-integer x yx = language type (0 = System Language, 1 = Event Language, 2 = Primary Audio Language, 3 Secondary Audio Language,4 = Primary SubtitleLanguage, 5 = Secondary Subtitle Language, 6 = Primary Teletext Language,7 = Secondary Teletext Language)y = language (0 = Danish,1 = German, 2 = Estonian,3 = English, 4 = Spanish,5 = Greek, 6 = French,7 = Gaelic, 8 = Croatian,9 = Italian, 10 = Latvian,11 = Lithuanian, 12 = Hungarian, 13 = Dutch, 14= Norwegian, 15 = Polish,16 = Portuguese, 17 = Russian, 18 = Romanian, 19= Albanian, 20 = Slovenian,21 = Slovak, 22 = Serbian,23 = Finnish, 24 = Swedish,25 = Turkish, 26 = Czech, 27= Ukrainian, 28 = Bulgarian,29 = Arabic, 30 = Persian, 31= Hebrew , 32 = Belarusian,33 = Macedonian, 34 = Montenegrin, 35 = Kazakh,36 = Thai)Example: CHANGELNG 0 25(To set system language to Turkish)" | "**Active language was changed or"*Incorrect item parameter entered" | |
| SETCOUNTRY | Set country in no channels state. | string-integer n(TURKEY, GERMANY, ...) | |
| SETQUICKSTANDBY | SETQUICKSTANDBYn, where n is one of (off, on). | string-integer n (n = ON, n = OFF) | |
| GETQUICKSTANDBY | Returns Quick Standby state n (on or off) | no parameter #*Quick Standby is n | |
| USBOPERATIONS Perform USB Operations no parameter | You may observe prints Bank 0,Bank 1 etc. Be sure or observe debug print outs: "MFC ISP: done" will be written... This may take over 10 minutes. | ||
| ENTERACTIVESTANDBY | Enter active standby state | no parameter | |
| EXITACTIVESTANDBY Exit active standby state no parameter #* TV is not in | |||
| NETWORK COMMANDS | |||
| Command Description | Parameter Return | ||
| set_IP_address | Set static IP address of eth0 network interface. | str-int n Example: set_IP_address 192.168.0.15 | "*IP address setting Succesfull #*IP address setting NOK" |
| get_IP_address | Get IP address of eth0 network interface. Usage: get_IP_address | no parameter #*IPaddr: ... | |
| SETNETWORKTYPE | set network type (eg. SETNETWORKTYPE value) (value should be 'wired', 'wireless' or 'disabled' as string) | string n ('wired', 'wireless' or 'disabled') | #*Network type is set to: |
| GETNETWORKTYPE | get network type (eg. GETNETWORKTYPE) | no parameter | #*the network type is |
| SETSUBNETMASK | set subnet mask (subnet mask value should be of format nnn.nnn.nnn.nnn) (eg. SETSUBNETMASK nnn.nnn.nnn.nnn) | string "nnn.nnn.nnn.nnn" | "*set subnet mask: nnn.nnn.nnn.nnn#*setting subnet mask is failed" |
| GETSUBNETMASK | get subnet mask (eg. GETSUBNETMASK) | no parameter | #*the subnet mask is nnn.nnn.nnn.nnn |
| SETDEFAULTGATEWAY | set default gateway (default gateway value should be of format nnn.nnn.nnn.nnn) (eg. SETDEFAULTGATEWAY nnn.nnn.nnn.nnn) | string "nnn.nnn.nnn.nnn" | "*set default gateway: nnn.nnn.nnn.nnn"*setting default gateway is failed" |
| GETDEFAULTGATEWAY | get default gateway (eg. GETDEFAULTGATEWAY) | no parameter | #*the default gateway is nnn.nnn.nnn.nnn |
| GETDNS1 | get DNS server 1 (eg. GETDNS1) | no parameter | #*DNS server 1 is nnn.nnn.nnn.nnn |
| GETDNS2 | get DNS server 2 (eg. GETDNS2) | no parameter | #*DNS server 1 is nnn.nnn.nnn.nnn |
| INTERNETSPEED start internet speed test no parameter | " Speed test is started.Prints ""No internet connection found"" message if fails." | ||
| VGA/PC COMMANDS | |||
| Command Description | Parameter Return | ||
| HPOS Set horizontal position. int n (-25 ≤ n ≤ 25) | "set horizontal position to ... (percentage in the range)#*invalid value entered" | ||
| VPOS Set vertical position. int n (-25 ≤ n ≤ 25) | "#*set vertical position to ... (percentange in the range)#*invalid value entered" | ||
| DOTCLOCK Set dot clock. int n (-50 ≤ n ≤ 50) | "#*set dot clock to ... (percentange in the range)#*invalid value entered" | ||
| AUTOPOS Set auto position no parameter #*set auto position | |||
| GETHPOS | Get horizontal position. | no parameter | #*The horizontal position is ... |
| GETVPOS | Get vertical position. | no parameter | #*The vertical position is ... |
| GETDOTCLOCK | Get dot clock. | no parameter | #*The dot clock is ... |
| SETOPSPOWER Set OPS power status | string parameter "on" or "off" | "*Turning OPS on\n*Turning OPS off\n*The OPS is already on\n*The OPS if already off\n*The OPS is not enabled\n*The OPS is not plugged in\n*invalid value entered" |
| PICTURE COMMANDS | |||
| Command Description | Parameter Return | ||
| COLOURTEMP Set colour temperature. | str-int n (n = normal, warm, cool) | #*setColourTemp() set to n | |
| GETPICTUREMODE Get picture mode. no parameter | #*Picture Mode is ... for current source | ||
| PICTUREMODE Select picture mode. | int n (1 = dynamic, 2 = natural, 3 = cinema, 4 = game) | "#*setPictureMode() set to n #*Incorrect picture mode paramater entered" | |
| GETCONTRAST | Get picture contrast value. | no parameter #*THE CONTRA | ST VALUE : ... |
| SETCONTRAST | Set picture contrast value. | int n (0 ≤ n ≤ 100) | "#*Picture contrast value is set to n #*Same value is set. Do nothing. #*Incorrect value must between defined ranges 0-100" |
| GETBRIGHTNESS | Get picture brightness value. | no parameter #*THE BRIGHTNESS VALUE : ... | |
| SETBRIGHTNESS | Set picture brightness value. | int n (0 ≤ n ≤ 100) | "#*Picture brightness value is set to n #*Same value is set. Do nothing. #*Incorrect value must between defined ranges 0-100" |
| GETSHARPNESS | Get picture sharpness value. | no parameter #*THE SHARPNESS VALUE : ... | |
| SETSHARPNESS | Set picture sharpness value. | int n (0 ≤ n ≤ 100) | "#*Picture brightness value is set to n #*Same value is set. Do nothing. #*Incorrect value must between defined ranges 0-100" |
| GETCOLOUR Get picture colour value. no parameter #*THE COLOUR VALUE : ... | |||
| SETCOLOUR Set picture colour value. int n (0 ≤ n ≤ 100) | "#*Picture colour value is set to n #*Same value is set. Do nothing. #*Incorrect value must between defined ranges 0-100" | ||
| SETSKINTONE | Set picture skin tone value. | int n (-5 ≤ n ≤ 5) | "#*Picture skin tone value is set to n #*Same value is set. Do nothing. #*Incorrect value must between defined ranges -5-5" |
| PICTUREZOOM Set picture zoom mode. | str-int n (n = auto, 16:9, subtitle, 14:9, 14:9zoom, 4:3, full(only for HD channels), panaromic, cinema) | "#*setPictureZoomMode() set to n #*Incorrect picture zoom mode parameter entered" | |
| SETWB Set white balance value. | str-int type, value (type = redgain, greengain, bluegain, redoffset, greenoffset, blueoffset) (0 ≤ value ≤250) | "#*White Balance is set to value Invalid value for White Balance (0-255) Invalid type for White Balance" | |
| GETWB Get white | balance value. | str-int type (type = redgain, greengain, bluegain, redoffset, greenoffset, blueoffset) | #* type ... |
| SET3DMODE | Set 3D mode values (values are off, auto, side by side, top bottom and game) | int n (n = off, auto, side by side, top bottom, game) | "*set3DMode() set to n #*Incorrect 3d mode parameter entered" |
| SETVIRTUAL3D Set virtual 3d values. | int n (0 = off, 1 = low, 2 = medium, 3 = high) | "seMonitorirtual3D() set to n Incorrect virtual 3d mode paramater entered " | |
| CONTRASTUP | Increase Contrast Level by 1 step | no parameter Picture contrast | value is set to ... |
| CONTRASTDOWN | Decrease Contrast Level by 1 step | no parameter Picture contrast | value is set to ... |
| GETENERGYSAVING | Get energy saving mode. (if enabled from profile) | no parameter #*The energy saving mode is ... | |
| GETPOWERSAVE Get power save mode no parameter | "*Powersavemode is ON #*Powersavemode is OFF" | ||
| GETCOLOURTEMP Get colour temperature. no parameter #*Colour temp is ... | |||
| GETHUE Get picture hue value. no parameter #*Hue level is ... | |||
| GETSKINTONE | Get picture skin tone value. | no parameter #*Picture skin tone is ... | |
| GETPATTERN | Get selected pattern of the Monitor screen | no parameter The pattern is ... | |
| VIDEO WALL COMMANDS | |||
| Command Description | Parameter Return | ||
| SETROWCOUNT | Set row count. | integer n (0 ≤ n ≤ 100) | #*set row count to n |
| GETROWCOUNT Get | row count. no p | parameter #*row count is ... | |
| SETCOLUMNCOUNT | Set column count. | integer n (0 ≤ n ≤ 100) | #*set column count to n |
| GETCOLUMNCOUNT | Get column count. no para | meter #*column count is ... | |
| SETCELL | Set cell. | integer n (0 ≤ n ≤ 100) | #*set cell to n |
| GETCELL | Get cell. | no parameter | #*cell is ... |
| SETOFFSET | Set offset. | integer n (0 ≤ n ≤ 100). n is the number of pixels which will be cropped from all four sides. | #*set offset to n |
| GETOFFSET | Get offset. | no parameter | #*offset is ... |
| SETVIDEOWALL Set videowall parameters | "parameters for items in following format: RowCount-ColumnCount-Cell-Offset" | #*set row count to ..., set column count to ..., set cell to ..., set offset to ... | |
| GETVIDEOWALL Get videowall parameters no p | parameter | #*row count is ..., column count is ..., cell is ..., offset is ... | |
| SETALLVIDEOWALL | Set all videowall parameters | "parameters for items in following format: picture_mode-contrast-brightness-sharpness-color-powesave_mode-backlight_mode-colortemp-zoom_mode-hdmi_trueblack-picture_hue-volume-headphone_volume" | #* ... ("set to" for each parameter in order) |
| GETALLVIDEOWALL | Get all videowall parameters | no parameter | #*picture_mode-contrast-brightness-sharpness-color-powesave_mode-backlight_mode-colortemp-zoom_mode-hdmi_trueblack-picture_hue-volume-headphone_volume |
| SETPIXELSHIFT | Set pixel shift is enabled or not | string-integer n (n = on, n = off) | "#*ACK #*NACK" |
| GETPIXELSHIFT Get | pixel shift no parameter #*Pixel Shift is ... | ||
| MEDIA BROWSER COMMANDS | |||
| Command Description | on Parameter Return | ||
| SETVIEWSTYLE | set view style (Flat or Folder) | string n (Flat, Folder) | #*The view style is set to ... (Flat or Folder) |
| GETVIEWSTYLE | get view style (Flat or Folder) | no parameter | #*The view style is ... (Flat or Folder) |
| SETSLIDESHOWINTERVAL | set slide show interval | integer n (5, 10, 15, 20, 25, 30) | #*The slideshow interval is set to ... seconds |
| GETSLIDESHOWINTERVAL | get slide show interval no parameter | #*The slideshow interval is ... seconds | |
| SETUSBAUTOPLAY set | usb autoplay mode string n (ON, OFF) | #*The USB autoplay is set to ... (ON, OFF) | |
| GETUSBAUTOPLAY | get usb autoplay mode | no parameter | #*The USB autoplay is ... (ON, OFF) |
| ADMIN PANEL COMMANDS | |||
| Command Description | Option Parameter Return | ||
| RST Restart no | parameter #Monitor will be | restarted | |
| STV | Sets Monitor Volume, parameter value will ve set for volume level | integer (volume level) #Volume set level= ... | |
| STL Set Monitor | Language | string-int (please look at abbreviations of languages) | #Language changed to ... |
| STWA | Stop wake up alarm | no parameter | #WakeupAlarm stopped !!! |
| STEA | Stop emergency alarm | none | #Emergency Alarm is stopped !!! |
| UNP | Send Message | "string-int (message text - 0) [message content should be ""word1+ word2+word3 ...""] | #Message Sent in SUCCESS !!! |
| GTSURL | Get Monitor Portal URL | none | #StartUp url is .... |
| OPTIONS SETTINGS COMMANDS | |||
| Command Description | on Parameter Return | ||
| GETTOTALSPACE | get total usb space (in MB) | no parameter #*The total space is ... MB | |
| GETFREESPACE | get free usb space (in MB) | no parameter #*The total space is ... MB | |
| SAVEMODELINFO | saves model name and sw version to a removable device | no parameter | #*Model info is savedOR#*No Removable drive is connected(If there is no device connected) |
RS232 HEX Commands
Protocol Test Steps
- Before testing, please know the board type you have. There are two types of board. The UART 0 and UART 1 connections of the these boards are explained below:
- RJ12 is connected to UART 0, DSUB9 is connected to UART 1. Therefore, UART 0 and UART 1 could be tested separately in this type of the board
- RJ12 and DSUB9 both are connected to UART 0. UART 1 is supported for OPS module but not reachable. Therefore, only UART 0 could be tested in this type of the board.
- Activate HEX protocol on Display.
a. Enter Options menu.
b. Change ASCII option to HEX in UART 0 or UART 1 sub-menu item
- Open any serial port communications program (e.g Realterm). Configure serial communication settings as below:
Baud Rate : 19200 for UART0, 9600 for UART1
Parity : None
Data Bits : 8
Stop Bits : 1
Handshake : None
- Note that UART0 default value: ASCII, UART1 default value: HEX
In the tables given below, XY represents are variable byte.
All byte values are hexadecimal.
Error Responses
- NAK reply: 15 When the display cannot understand the received command, it returns this value. In such a case, check the sending code and send the same command again.
- Error reply: 1C 00 00 When the display cannot execute the received command for any reasons, it returns this value. In such a case, check the sending code and the setting status of the display.
| Command received by display | Reply sent by display for successful operation | |||||||||||||||||
| Byte Number 0 1 2 3 4 | 5 6 7 | 8 9 10 | 11 | 12 | 0 1 | 2 Notes | ||||||||||||
| Header Data | ||||||||||||||||||
| Header code | Packet | Data Size | CRC flag | Action Type | Setting code | |||||||||||||
| Name | Operation L H L | H L | H L H | L H L | L H | |||||||||||||
| Monitor | ON BE EF 03 06 | 00 19 | D3 02 | 00 00 | 60 02 | 00 06 | ||||||||||||
| OFF | BE | EF 03 | 06 00 | 19 D3 | 02 00 | 00 60 | 01 00 06 | |||||||||||
| GET | BE | EF 03 | 06 00 | 19 D8 | 03 00 | 00 60 | 07 00 1 | D 00 | XY | XY can be either 00 or 01. 00 means OFF, 01 means ON. | ||||||||
| Mute | ON BE EF 03 06 | 00 D6 | D2 01 | 00 02 | 20 01 | 00 06 | ||||||||||||
| OFF | BE | EF 03 | 06 00 | 46 D3 | 01 00 | 02 20 | 00 00 06 | |||||||||||
| GET | BE | EF 03 | 06 00 | 75 D3 | 02 00 | 02 20 | 00 00 1 | D 00 | XY | XY can be either 00 or 01. 00 means OFF, 01 means ON. | ||||||||
| Screen | ON BE EF 03 06 | 00 6B | D9 01 | 00 20 | 30 01 | 00 06 | ||||||||||||
| OFF | BE | EF 03 | 06 00 | FB D8 | 01 00 | 20 30 | 00 00 06 | |||||||||||
| GET | BE | EF 03 | 06 00 | C8 D8 | 02 00 | 20 30 | 00 00 1 | D 00 | XY | XY can be either 00 or 01. 00 means OFF, 01 means ON. | ||||||||
| Source | OPS | BE | EF 03 | 06 00 | FE D2 | 01 00 | 00 20 | 00 00 06 | ||||||||||
| HDMI | BE | EF 03 | 06 00 | OE D2 | 01 00 | 00 20 | 03 00 06 | |||||||||||
| VGA | BE | EF 03 | 06 00 | E D2 | 01 00 | 00 20 | 01 00 06 | |||||||||||
| SCART2(CVBS) | BE EF | 03 06 | 00 00 | 00 01 | 00 00 | 20 04 | 00 06 | |||||||||||
| FAV | BE | EF 03 | 06 00 | 00 00 | 01 00 | 00 20 | 05 00 06 | |||||||||||
| S-Video | BE | EF 03 | 06 00 | 00 00 | 01 00 | 00 20 | 06 00 06 | |||||||||||
| Source | HDMI2 | BE | EF 03 | 06 00 | 00 00 | 01 00 | 00 20 | 08 00 06 | ||||||||||
| HDMI3 | BE | EF 03 | 06 00 | 00 00 | 01 00 | 00 20 | 09 00 06 | |||||||||||
| HDMI4 | BE | EF 03 | 06 00 | 00 00 | 01 00 | 00 20 | A 00 06 | |||||||||||
| YPbPr | BE | EF 03 | 06 00 | 00 00 | 01 00 | 00 20 | B 00 06 | |||||||||||
| SCART2(S-Video) | BE | EF 03 | 06 00 | 00 00 | 01 00 | 00 20 | D 00 06 | |||||||||||
| TV | BE | EF 03 | 06 00 | 00 00 | 01 00 | 00 20 | OE 00 06 | |||||||||||
| SCART1(CVBS) | BE EF | 03 06 | 00 00 | 00 01 | 00 00 | 20 OF | 00 06 | |||||||||||
| SCART1(S-Video) | BE | EF 03 | 06 00 | 00 00 | 01 00 | 00 20 | 10 00 06 | |||||||||||
| DVD | BE | EF 03 | 06 00 | 00 00 | 01 00 | 00 20 | 11 00 06 | |||||||||||
| DVI | BE | EF 03 | 06 00 | 00 00 | 01 00 | 00 20 | 12 00 06 | |||||||||||
| DP | BE | EF 03 | 06 00 | 00 00 | 01 00 | 00 20 | 13 00 06 | |||||||||||
| WIDI | BE | EF 03 | 06 00 | 00 00 | 01 00 | 00 20 | 15 00 06 | |||||||||||
| GET | BE | EF 03 | 06 00 | CD D2 | 02 00 | 00 20 | 00 00 | 1D 00 | XY | XY can be one of the following: 01: OPS, 02: HDMI, 03: VGA, 04: SCART2(CVBS), 05: FAV, 06: S-Video, 08: HDMI2, 09: HDMI3, 0A: HDMI4, 0B: YPbPr, 0D: SCART2(S-Video), 0E: TV, 0F: SCART1(CVBS), 10: SCART1(S-Video), 11: DVD, 12: DVI, 13: DP, 15: WIDI Note that all of the sources are not enabled. | ||||||||
| Volume | GET | BE | EF 03 | 06 00 | 31 D3 | 02 00 | 01 20 | 00 00 | 1D 00 | XY | ||||||||
| INCREMENT | BE | EF 03 | 06 00 | 57 D3 | 04 00 | 01 20 | 00 00 06 | |||||||||||
| DECREMENT | BE | EF 03 | 06 00 | 86 D2 | 05 00 | 01 20 | 00 00 06 | |||||||||||
| SET | BE | EF 03 | 06 00 | 31 D3 | 03 00 | 01 20 | 01 XY 06 | XY can take 00 as a minimum and 1D as a maximum. | ||||||||||
Maximum Pixel Rates
For Ultra HD panels,
| Source Max. Resolution | Colour Space Bits | /Component Pixel/Rate | ||
| HDMI 4K@60Hz YCbCr4:4:4/RGB 8 bit 594MHz | ||||
| OPS 4K@60Hz YCbCr4:4:4/RGB 8 bit 594MHz | ||||
| DP 4K@30Hz YCbCr4:4:4/RGB 8 bit 297MHz | ||||
Input Matrix
| Timing fH (kHz) fV (Hz) | Dot clock (MHz) | Input | ||||
| HDMI DP | ||||||
| VESA | 720 x 400 31.5 | 70.156 26.25 | O | |||
| 640 x 480 | 31.469 | 59.95 | 25.175 | O | O | |
| 800 x 600 | 37.879 | 60.317 | 40 | O | O | |
| 1024 x 768 | 48.363 | 60.004 | 65 | O | O | |
| 1360 x 768 | 47.712 | 60.015 | 85.5 | O | O | |
| 1920 x 1080 | 67.5 | 60 | 148.5 | O | O | |
| ED | 853x480p | 31.5 | 60 | 27.03 | O | O |
| 1024x576p | 31.25 | 50 | 27 | O | O | |
| HD | 1280x720p | 37.5 | 50 | 74.25 | O | O |
| 44.995 | 59.94 74. | 176 O | O | |||
| 45 | 60 | 74.25 | O | O | ||
| 1920x1080i | 28.13 | 50 | 74.25 | O | O | |
| 33.716 | 59.94 74. | 175 O | O | |||
| 33.75 | 60 | 74.25 | O | O | ||
| 1920x1080p | 56.25 | 50 | 148.5 | O | O | |
| 67.432 | 59.95 148.35 | O | O | |||
| 67.5 | 60 | 148.5 | O | O | ||
| UHD (Only for 4K models) | 3840x2160p | 67.5 | 30 | 297 | O | O |
| 3840x2160p | 135 | 60 | 594 | O | ||
Supported Media Formats from USB
Video File Formats
| Video Codec Resolution Bit Rate Container | |||
| MPEG1/2 | 1080Px2@30fps, 1080P@60fps | 40Mbps | MPEG program stream (.DAT, .VOB, .MPG, .MPEG), MPEG transport stream (.ts, .trp, .tp), MP4 (.mp4, .mov), 3GPP (.3gpp, .3gp), AVI (.avi), MKV (.mkv), ASF (.asf) |
| MPEG4 | MPEG program stream (.MPG, .MPEG), MP4 (.mp4, .mov), 3GPP (.3gpp, .3gp), AVI (.avi), MKV (.mkv), ASF (.asf) | ||
| XviD MP4 (.mp4, .mov), AVI (.avi), MKV (.mkv), ASF (.asf) | |||
| Sorenson H.263 FLV (.flv), AVI (.avi) | |||
| H.263 MP4 (.mp4, .mov), 3GPP (.3gpp, .3gp), AVI (.avi), MKV (.mkv) | |||
| H.264 | 3840x2160@30fps, 1080P@60fps | 135Mbps | FLV (.flv), MP4 (.mp4, .mov), 3GPP (.3gpp, .3gp), MPEG transport stream (.ts, .trp, .tp), ASF (.asf), AVI (.avi), MKV (.mkv) |
| Motion JPEG 720P | @30fps 10Mbps | AVI (.avi), 3GPP (.3gpp, .3gp), MP4 (.mp4, .mov), MKV (.mkv), ASF (.asf) | |
| VP8 1080P@30fps | 20Mbps MKV (.mkv), WebM (.webm) | ||
| HEVC/H.265 | 4K2K@60fps 100Mbps | MP4 (.mp4, .mov), MKV (.mkv), MPEG transport stream (.ts, .trp, .tp) | |
| 1080P@60fps 50Mbps | MP4 (.mp4, .mov), MKV (.mkv), MPEG transport stream (.ts, .trp, .tp), 3GPP (.3gpp, .3gp) | ||
| VP9 4K2K@30fps | 100Mbps MKV (.mkv), WebM (.webm) | ||
Picture File Formats
| Image | Photo Resolution | on (width x height) | Remark | |
| JPEG | Base-line | 15360x8640 | The limit for max resolution depends on DRAM size | |
| Progressive 1 | 024x768 | |||
| PNG | non-interlace | 9600x6400 | ||
| interlace | 1200x800 | |||
| BMP | 9600x6400 |
Audio File Formats
| Audio Codec | Sample rate | Bit Rate | Container |
| MPEG1/2 Layer1 | 16KHz ~ 48KHz | 32Kbps ~ 448Kbps | MP3 (.mp3), AVI (.avi), ASF (.asf), Matroska (.mkv, .mka), MPEG transport stream (.ts, .trp, .tp), MPEG program stream (.DAT, .VOB, .MPG, .MPEG), WAV (.wav) |
| MPEG1/2 Layer2 | 16KHz ~ 48KHz | 8Kbps ~ 384Kbps | MP3 (.mp3), AVI (.avi), ASF (.asf), Matroska (.mkv, .mka), MPEG transport stream (.ts, .trp, .tp), MPEG program stream (.DAT, .VOB, .MPG, .MPEG), WAV (.wav) |
| MPEG1/2 Layer3 | 16KHz ~ 48KHz | 8Kbps ~ 320Kbps | MP3 (.mp3), AVI (.avi), ASF (.asf), Matroska (.mkv, .mka), 3GPP (.3gpp, .3gp), MP4 (.mp4, .mov, m4a), MPEG transport stream (.ts, .trp, .tp), MPEG program stream (.DAT, .VOB, .MPG, .MPEG), FLV (.flv), WAV (.wav) |
| AC3 | 32KHz, 44.1KHz, 48KHz | 32Kbps ~ 640Kbps | AC3 (.ac3), AVI (.avi), Matroska (.mkv, .mka), 3GPP (.3gpp, .3gp), MP4 (.mp4, .mov, m4a), MPEG transport stream (.ts, .trp, .tp), MPEG program stream (.DAT, .VOB, .MPG, .MPEG) |
| EAC3 | 32KHz, 44.1KHz, 48KHz | 32Kbps ~ 6 Mbps | EAC3 (.ec3), 3GPP (.3gpp, .3gp), MP4 (.mp4, .mov, m4a), MPEG transport stream (.ts, .trp, .tp), MPEG program stream (.DAT, .VOB, .MPG, .MPEG) |
| AAC, HEAAC 8KHz ~ 48KHz | AAC (.aac), AVI (.avi), Matroska (.mkv, .mka), 3GPP (.3gpp, .3gp), MP4 (.mp4, .mov, m4a), MPEG transport stream (.ts, .trp, .tp), MPEG program stream (.DAT, .VOB, .MPG, .MPEG), FLV (.flv), RM (.ra) | ||
| WMA 8KHz ~ 48KHz | 128bps ~ 320Kbps | ASF (.wma, .asf), AVI (.avi), Matroska (.mkv, .mka) | |
| WMA 10 Pro M0 48KHz < 192kbps | |||
| WMA 10 Pro M1 48KHz < 384kbps | |||
| WMA 10 Pro M2 96KHz < 768kbps | |||
| G711 A/mu-law 8KHz | 64Kbps ~ 128Kbps | WAV (.wav), AVI (.avi), Matroska (.mkv, .mka), 3GPP (.3gpp, .3gp), MP4 (.mp4, .mov, m4a) | |
| LBR (cook) | 8KHz, 11.025KHz, 22.05KHz, 44.1KHz | 6Kbps ~ 128Kbps | RM (.ra) |
| FLAC 8KHz~96KHz < 1.6Mbps Matroska (.mkv, .mka) | |||
Subtitle File Formats
| Internal Subtitles | ||
| Extension Container Subtitle Code | ||
| dat, mpg, mpeg, vob MPG, MPEG DVD Subtitle | ||
| ts, trp, tp TS DVB Subtitle | ||
| mp4 | MP4 | DVD SubtitleUTF-8 Plain Text |
| mkv | MKV | ASSSSAUTF-8 Plain TextVobSubDVD Subtitle |
| avi | AVI (1.0, 2.0),DMF0,1, 2 | XSUBXSUB+ |
| External Subtitles | ||
| Extension | Subtitle Parser | Remark |
| .srt | Subrip | |
| .ssa/.ass | SubStation Alpha | |
| .smi | SAMI | |
| .sub | SubViewer MicroDVD DVDSusbtitleSystem SubIdx (VobSub) | SubViewer 1.0 & 2.0 Only |
| .txt | TMPlayer | |
System Features
Panel
| Panel type | 75" (189m) 16/7 DLED | |
| Resolution | 3840x2160(16:9) - UHD | |
| Visual angle | Horizontal | 89° |
| Perpendicular | 89° | |
| Max. brightness | Typ: 400 cd/m2 | |
| H-Frequency | 60 Khz | |
| V-Frequency | 67,5 Khz | |
Audio
2 x 12 W Audio Output Power
Network Connection
1 x Ethernet (LAN) for Internet connectivity
1 x Ethernet (LAN) for Internet connectivity (Android) 802.11 a/b/g/n built in WLAN support (Android)
Input/Output Ports
1 x RS232 port
1 x VGA port
1 x Ethernet port
1 x Ethernet port (Android)
1 x USB 2.0 port
1 x USB 2.0 port (Android)
1 x Micro SD port (Android)
3 x HDMI 2.0 In port (1.4 for FHD panels)
1 x IR port
1 x Headphone/Line Out port
1 x HDMI Out port
1 x SPDIF Optical Out port
1 x DiplayPort v1.2 In
1 x DiplayPort v1.2 Out
1 x Audio In port
1 x RJ12 (for sensor) port
1 x RJ12 (service use only) port
OPS (Optional)
Up to 40W
Power
110-240V AC 50-60Hz 2.7A
Weight (kg)
36
Display Dimensions DxLxH (mm)
1684mm × 967mm × 93mm
Wireless LAN Transmitter Specifications
| Frequency Ranges | Max Output Power |
| 2400 - 2483,5 MHz (CH1-CH13) < 100 mW | |
| 5150 - 5250 MHz (CH36 - CH48) < 200 mW | |
| 5250 - 5350 MHz (CH52 - CH64) < 200 mW | |
| 5470 - 5725 MHz (CH100 - CH140) < 200 mW |
Country Restrictions
This device is intended for home and office use in all EU countries (and other countries following the relevant EU directive) without any limitation except for the countries mentioned below.
| Country Restriction | |
| Bulgaria | General authorization required for outdoor use and public service |
| France In-door | use only for 2454-2483.5 MHz |
| Italy | If used outside of own premises, general authorization is required |
| Greece | In-door use only for 5470 MHz to 5725 MHz band |
| Luxembourg | General authorization required for network and service supply(not for spectrum) |
| Norway | Radio transmission is prohibited for the geographical area within a radius of 20 km from the centre of Ny-Ålesund |
| Russian Federation | In-door use only |
| Israel | 5 GHz band only for 5180 MHz-5320 MHz range |
The requirements for any country may change at any time. It's recommended that user checks with local authorities for the current status of their national regulations for both 2.4 GHz and 5 GHz wireless LAN's.
Warning
Surges could cause data loss except monitoring modes.
Federal Communication Commission Interference Statement
This equipment has been tested and found to comply with the limits for a Class B digital device, pursuant to Part 15 of the FCC Rules. These limits are designed to provide reasonable protection against harmful interference in a residential installation. This equipment generates, uses and can radiate radio frequency energy and, if not installed and used in accordance with the instructions, may cause harmful interference to radio communications. However, there is no guarantee that interference will not occur in a particular installation. If this equipment does cause harmful interference to radio or television reception, which can be determined by turning the equipment off and on, the user is encouraged to try to correct the interference by one of the following measures:
- Reorient or relocate the receiving antenna.
- Increase the separation between the equipment and receiver.
- Connect the equipment into an outlet on a circuit different from that to which the receiver is connected.
- Consult the dealer or an experienced radio/TV technician for help.
FCC Caution: Any changes or modifications not expressly approved by the party responsible for compliance could void the user's authority to operate this equipment.
This device complies with Part 15 of the FCC Rules. Operation is subject to the following two conditions: (1) This device may not cause harmful interference, and (2) this device must accept any interference received, including interference that may cause undesired operation.
For product available in the USA/Canada market, only channel 1\~11 can be operated. Selection of other channels is not possible.
IMPORTANT NOTE
FCC Radiation Exposure Statement
This equipment complies with FCC radiation exposure limits set forth for an uncontrolled environment. This equipment should be installed and operated with minimum distance 20cm between the radiator & your body.
Accessories Included
- Remote Control
- Batteries: 2 x AAA
- Instruction Book
- Quick Start Guide
- IR Extender
- Wall Mount Kit
- OPS (Optional)
• Infrared Overlay Touch Screen Kit
Information for Users on Disposal of Old Equipment and Batteries
[European Union only]
Equipment bearing these symbols should not be disposed as general household waste.
You should look for appropriate recycling facilities and systems for the disposal of these products.
Notice: The sign Pb below the symbol for batteries indicates that this battery contains lead.

1 Products
2 Battery
License Notification
The terms HDMI and HDMI High-Definition Multimedia Interface, and the HDMI Logo are trademarks or registered trademarks of HDMI Licensing Administrator, Inc. in the United States and other countries.

HIGH-DEFINITION MULTIMEDIA INTERFACE
Manufactured under license from Dolby Laboratories. Dolby, Dolby Audio and the double-D symbol are trademarks of Dolby Laboratories. Confidential unpublished works. Copyright ©1992-2019 Dolby Laboratories. All rights reserved.
DOLBY AUDIO™
This product is protected by certain intellectual property rights of Microsoft Corporation. Use or distribution of such technology outside of this product is prohibited without a license from Microsoft or an authorized Microsoft subsidiary.
Vesa Wall Mount Measurements

| Hole Pattern Sizes (mm) | W | H |
| 600 400 | ||
| Screw Sizes | ||
| Length (X) | min. (mm) 15 | |
| max. (mm) 15 | ||
| Thread (Y) M8 | ||
Installation On An Indented Wall

A Minimum 50 mm
B Minimum 70 mm
C Minimum 50 mm
D Minimum 50 mm
E Ambient temperature range: 0-35°C

When installing the product on an indented wall, allow at least the space specified above between the product and wall for ventilation and ensure that the ambient temperature is kept between 0^ C- 35^ C.
Do not expose the product to direct sunlight.
We will take no responsibility for any damages or failures in case our products are not being used subject to these recommendations and/or instructions for use.
- Important Safety Information
- Please read these instructions fully and carefully before use and keep for future reference
- Vent holes of the product
- Repair
- Replacement parts
- Safety checks
- Wall mounting
- Power Cord
- Especially for child safety
- Connections
- Positioning
- Transport and Shipping
- Intended Use
- Foreseeable misuse and incorrect use
- Warning
- BATTERY SAFETY GUIDELINES
- CAUTION
- Markings on the Product
- General View
- Front Side
- Rear Side (1)
- Android Sockets
- Rear Side (2)
- Connecting the IR Receiver
- Turning the Display On/Off
- Infrared Overlay Touch Screen
- Example Connection 1 (External PC)
- Remote Control
- Inserting the Batteries into the Remote
- First Time Installation
- Android Launcher
- Setting up the internet connection
- Home Screen
- Logo
- Wallpaper
- Time & Date Widget
- Home Screen Apps
- Navigation Toolbar
- Settings (Home Screen)
- Android System Settings Menu
- Device
- Network
- Sound
- Apps
- Display
- Storage & reset
- About
- Preferences
- Date & time
- Language
- Keyboard
- Lock Screen
- Personal
- Location
- Security & restrictions
- Installing Third Party Applications
- Connecting To Internet
- To Connect to a Wired Network
- To Connect to a Wireless Network
- Broadband ISP connection
- Media Playback via USB Input
- Media Browser Menu
- USB Auto Play Feature
- Failover Feature
- Connectivity
- Wired Connectivity
- Configuring Wired Device Settings
- Network Type
- Internet Speed Test
- Advanced Settings
- Other Information
- Wireless Connectivity
- Configuring Wireless Device Settings
- Connecting to your mobile device via WLAN
- Wake ON
- Connecting Other Wireless Devices
- Wireless Display
- Using with mobile devices
- Connectivity Troubleshooting
- Wireless Network Not Available
- Connection is Slow
- Distruption during playback or slow reactions
- Internet Connection Not Available
- DisplayPort
- HDMI Out
- Real Time Clock (RTC)
- Crestron Connected
- Equipment/Tools:
- Connecting to the Display (LAN port)
- Connecting to the Display (RS232 port)
- RS232 HEX Commands
- Protocol Test Steps
- Error Responses
- Maximum Pixel Rates
- Supported Media Formats from USB
- System Features
- Audio
- Network Connection
- Input/Output Ports
- OPS (Optional)
- Power
- Weight (kg)
- Display Dimensions DxLxH (mm)
- Country Restrictions
- Federal Communication Commission Interference Statement
- IMPORTANT NOTE
- FCC Radiation Exposure Statement
- Accessories Included
- Information for Users on Disposal of Old Equipment and Batteries
- [European Union only]
- License Notification
- DOLBY AUDIO™
- Vesa Wall Mount Measurements
- Installation On An Indented Wall
Brand : MAXELL
Model : MA-7510BK
Category : Screen