ZHU30RSJSS - Cooker Monogram - Free user manual and instructions
Find the device manual for free ZHU30RSJSS Monogram in PDF.


| Product Type | Induction Cooktop |
| Brand | Monogram |
| Model | ZHU30RSJSS |
| Width | 76.2 cm (30 inches) |
| Number of Burners | 4 (per illustration for 30" model) |
| Power Supply | 240 V, 60 Hz, single-phase (standard estimate) |
| Total Power | Not specified in the manual |
| Surface Material | Glass Ceramic |
| Controls | Touch controls with power level arcs and +/− keys |
| Burner Synchronization Function | Yes (for left burners) |
| Timer | Independent or linked to burners (multiple timers) |
| Control Lock | Manual or automatic (custom setting) |
| Hot Surface Indicator | Yes, one per burner |
| Pan Detection | Yes, automatic shutdown after 25 seconds without pan |
| Power Sharing | Yes (between burners in the same zone) |
| Suitable for Cookware | Only for ferromagnetic pans (magnet sticks) |
| Recommended Cleaning | CERAMA BRYTE® cleaning cream and soft pad |
| Available Accessories | Replacement griddle (JXGRIDL1), scraper, flush mount kit |
| Warranty | 1 year parts and labor (domestic use) |
| Country of Manufacture | Not specified |
Frequently Asked Questions - ZHU30RSJSS Monogram
User questions about ZHU30RSJSS Monogram
0 question about this device. Answer the ones you know or ask your own.
Ask a new question about this device
Download the instructions for your Cooker in PDF format for free! Find your manual ZHU30RSJSS - Monogram and take your electronic device back in hand. On this page are published all the documents necessary for the use of your device. ZHU30RSJSS by Monogram.
USER MANUAL ZHU30RSJSS Monogram
For a Spanish version of this manual, visit our Website at GEAppliances.com.
For a French version of this manual, visit our Website at GEAppliances.com.
Printed in the United States
Consumer Information
| Induction Cooktop | ||
| Introduction | Your new Monogram cooktop makes an eloquent statement of style, convenience and kitchen planning flexibility. Whether you chose it for its purity of design, assiduous attention to detail-or for both of these reasons-you'll find that your Monogram cooktop's superior blend of form and function will delight you for years to come.Your Monogram cooktop was designed to provide the flexibility to blend in with your kitchen cabinetry. Its sleek design can be beautifully integrated into the kitchen.The information on the following pages will help you operate and maintain your cooktop properly.If you have any questions, visit our Website at: monogram.com | |
| Contents | Care and CleaningGlass Cooktop 19-20Consumer ServicesBefore You Call for Service 20Important Phone Numbers 7Model and Serial Number 2Safety Instructions 4-5Warranty 6 | Operating InstructionsCookware Recommendations 16-17Features of Your Cooktop 8-9How Induction Cooking Works 15Kitchen Timer 12-13Locking the Cooktop 12Setting the Controls 10-14Surface Elements 10 |
| Before using your cooktop | Read this manual carefully. It is intended to help you operate and maintain your new cooktop properly.Keep it handy for answers to your questions. | If you don't understand something or need more help, there is a list of toll-free consumer service numbers included in the back section of this manual.ORVisit our Website at: monogram.com |
| Write down the model & serial numbers | You'll find them on a label under the cooktop.Fill out and return the Consumer Product Registration Card that is packed with this product. | Before sending in the card, please write the numbers here:Model NumberSerial NumberUse these numbers in any correspondence or service calls concerning your cooktop. |
Consumer Information
| Induction Cooktop | ||
| If you received a damaged cooktop | Immediately contact the dealer (or builder) that sold you the cooktop. | |
| Save time & money | Read this manual. Inside you will find many helpful hints on how to use and maintain your cooktop properly. Just a little preventive care on your part can save you a great deal of time and money over the life of your cooktop. | You'll find many answers to common problems in the Before You Call for Service section. If you review our chart of Troubleshooting Tips first, you may not need to call for service at all. |
| If you need service | To obtain service, see the Consumer Services page in the back of this manual.We're proud of our service and want you to be pleased. If for some reason you are not happy with the service you receive, here are some steps to follow for further help.FIRST, contact the people who serviced your appliance. Explain why you are not pleased.In most cases, this will solve the problem. | NEXT, if you are still not pleased, write all the details—including your phone number—to:Manager, Customer RelationsGE AppliancesAppliance ParkLouisville, KY 40225 |
WARNING!
Read all safety instructions before using the product. Failure to follow these instructions may result in fire, electrical shock, serious injury or death.
GENERAL SAFETY INSTRUCTIONS
- Use this cooktop only for its intended purpose as described in this Owner's Manual.
- Be sure your cooktop is properly installed and grounded by a qualified installer in accordance with the provided installation instructions.
- Do not attempt to repair or replace any part of your cooktop unless it is specifically recommended in this manual. All other servicing should be performed by a qualified technician.
- Before performing any service, unplug the cooktop or disconnect the power supply at the household distribution panel by removing the fuse or switching off the circuit breaker.
- Do not leave children alone—children should not be left alone or unattended in an area where the cooktop is in use. They should never be allowed to climb, sit or stand on any part of the cooktop.
-
CAUTION: Do not store items of interest to children above the cooktop—children climbing on the cooktop to reach items could be seriously injured.
-
Use only dry pot holders—moist or damp pot holders on hot surfaces may result in burns from steam. Do not let pot holders touch hot surface units or heating elements. Do not use a towel or other bulky cloth in place of pot holders.
- Never use your cooktop for warming or heating the room.
- Do not touch surface elements. These surfaces may be hot enough to burn even though they are dark in color. During and after use, do not touch, or let clothing or other flammable materials contact the surface elements or areas nearby the surface elements; allow sufficient time for cooling first.
- Potentially hot surfaces include the cooktop and areas facing the cooktop.
- Do not heat unopened food containers. Pressure could build up and the container could burst, causing an injury.
- Cook meat and poultry thoroughly—meat to at least an internal temperature of 160°F and poultry to at least an internal temperature of 180°F. Cooking to these temperatures usually protects against foodborne illness.
KEEP FLAMMABLE MATERIALS AWAY FROM THE COOKTOP
Failure to do so may result in fire or personal injury.
- Do not store or use flammable materials near the cooktop, including paper, plastic, pot holders, linens, wall coverings, curtains, drapes and gasoline or other flammable vapors and liquids.
- Never wear loose-fitting or hanging garments while using the cooktop. These garments may ignite if they contact hot surfaces causing severe burns.
- Do not let cooking grease or other flammable materials accumulate in or near the cooktop. Grease on the cooktop may ignite.
READ AND SAVE THESE INSTRUCTIONS
COOKTOP SAFETY INSTRUCTIONS
- In the event of a fire, do not use water or grease on fires. Never pick up a flaming pan. Turn the controls off. Smother a flaming pan on a surface unit by covering the pan completely with a well-fitted lid, cookie sheet or flat tray. Use a multi-purpose dry chemical or a foam-type fire extinguisher.
- Never leave the surface units unattended at medium or high heat settings. Boilovers cause smoking and greasy spillovers that may catch on fire.
-
Never leave oil unattended while frying. If allowed to heat beyond its smoking point, oil may ignite resulting in fire that may spread to surrounding cabinets. Use a deep fat thermometer whenever possible to monitor oil temperature.
-
To avoid spillover and fire, use a minimum amount of oil when shallow pan-frying and avoid cooking frozen foods with excessive amounts of ice.
- Use the proper pan size - select cookware having flat bottoms large enough to cover the surface heating element. The use of undersized cookware will expose a portion of the surface unit to direct contact and may result in ignition of clothing. Proper relationship of cookware to surface unit will also improve efficiency.
- To minimize the possibility of burns, ignition of flammable materials and spillage, the handle of a container should be turned toward the center of the range without extending over nearby surface units.
INDUCTION COOKTOP SAFETY INSTRUCTIONS
- Use care when touching the cooktop. The glass surface of the cooktop will retain heat after the controls have been turned off.
- Do not cook on a broken cooktop. If the glass cooktop should break, cleaning solutions and spillovers may penetrate the broken cooktop and create a risk of electric shock. Contact a qualified technician immediately.
- Avoid scratching the glass cooktop. The cooktop can be scratched with items such as knives, sharp instruments, rings or other jewelry, and rivets on clothing.
-
Do not place or store items that can melt or catch fire on the glass cooktop, even when it is not being used. If the cooktop is inadvertently turned on, they may ignite. Heat from the cooktop or oven vent after it is turned off may cause them to ignite also.
-
Use CERAMA BRYTE® ceramic Cooktop Cleaner and CERAMA BRYTE® Cleaning Pad to clean the cooktop. Wait until the cooktop cools and the indicator light goes out before cleaning. A wet sponge or cloth on a hot surface can cause steam burns. Some cleaners can produce noxious fumes if applied to a hot surface. Read and follow all instructions and warnings on the cleaning cream label. NOTE: Sugary spills are an exception. They should be scraped off while still hot using an oven mitt and a scraper. See the Cleaning the glass cooktop section for detailed instructions.
- CAUTION: Persons with a pacemaker or similar medical device should exercise caution when using or standing near an induction cooktop while it is in operation. The electromagnetic field may affect the working of the pacemaker or similar medical device. It is advisable to consult your doctor or the pacemaker manufacturer about your particular situation.
This unit has been tested and found to comply with the limits for a class B digital device, pursuant to Part 18 of the FCC rules. These limits are designed to provide reasonable protection against harmful interference in a residential installation. This unit generates, uses and can radiate radio frequency energy and, if not installed and used in accordance with the instructions, may cause harmful interference to radio communications. However, there is no guarantee that interference will not occur in a particular installation. If this unit
does cause harmful interference to radio or television reception, which can be determined by turning the unit off and on, the user is encouraged to try to correct the interference by one or more of the following measures:
- Reorient or relocate the receiving antennae.
- Increase the distance between the unit and receiver.
- Connect the unit into an outlet or a circuit different from that to which the receiver is connected.
WHAT IS COVERED
From the Date of the Original Purchase
YOUR MONOGRAM COOKTOP WARRANTY
Staple sales slip or cancelled check here. Proof of original purchase date is needed to obtain service under warranty.
LIMITED ONE-YEAR WARRANTY
For one year from date of original purchase, we will provide, free of charge, parts and service labor in your home to repair or replace any part of the cooktop that fails because of a manufacturing defect.
This warranty is extended to the original purchaser and any succeeding owner for products purchased for ordinary home use in the 48 mainland states, Hawaii, Washington, D.C. or Canada. If the product is located in an area where service by a GE Authorized Servicer is not available, you may be responsible for a trip charge or you may be required to bring the product to an Authorized GE Service location for service. In Alaska the warranty is the same except that it is LIMITED because you must pay to ship the product to the service shop or for the service technician's travel costs to your home.
All warranty service will be provided by our Factory Service Centers or by our authorized Customer Care® servicers during normal working hours.
Should your appliance need service, during warranty period or beyond, in the USA call 800.444.1845. In Canada: 800.561.3344. Please have your serial number and model number available when calling for service.
WHAT IS NOT COVERED
- Service trips to your home to teach you how to use the product.
- Improper installation, delivery or maintenance.
If you have an installation problem, contact your dealer or installer. You are responsible for providing adequate electrical, gas, exhausting and other connecting facilities as described in the Installation Instructions provided with the product. -
Replacement of house fuses or resetting of circuit breakers.
-
Damage to the product due to misuse or abuse.
- Failure of the product if it is used for other than its intended purpose or used commercially.
- Damage to product caused by accident, fire, floods or acts of God.
- Incidental or consequential damage caused by possible defects with this appliance.
- Damage caused after delivery.
- Product not accessible to provide required service.
EXCLUSION OF IMPLIED WARRANTIES—Your sole and exclusive remedy is product repair as provided in this Limited Warranty. Any implied warranties, including the implied warranties of merchantability or fitness for a particular purpose, are limited to one year or the shortest period allowed by law.
Some states/provinces do not allow the exclusion or limitation of incidental or consequential damages, so the above limitation or exclusion may not apply to you. This warranty gives you specific legal rights, and you may also have other rights which vary from state to state/province to province. To know what your legal rights are in your state/province, consult your local or state/provincial consumer affairs office or your state's Attorney General.
Warrantor in USA: General Electric Company, Louisville, KY 40225
Warrantor in Canada: Mabe Canada Inc.
With the purchase of your new Monogram appliance, receive the assurance that if you ever need information or assistance from GE, we'll be there. All you have to do is call—toll-free!
GE Answer Center®
In the USA: 800.626.2000
Whatever your question about any Monogram major appliance, GE Answer Center® information service is available to help. Your call—and your question—will be answered promptly and courteously. And you can call any time. GE Answer Center® service is open 24 hours a day, Monday through Saturday.
OR
Visit our Website at: monogram.com
In Canada, call 800.561.3344.
In-Home Repair Service
In the USA: 800.444.1845
In Canada: 800.561.3344
A GE consumer service professional will provide expert repair service, scheduled at a time that's convenient for you. Many GE Consumer Service company-operated locations offer you service today or tomorrow, or at your con venience (7:00 a.m. to 10:00 p.m. week days, 8:00 a.m. to 6:00 p.m. Satur day and Sunday). Our factory-trained technicians know your appliance inside and out—so most repairs can be handled in just one visit.
In Canada: Monday to Friday, 7:00 a.m. to 8:00 p.m. and Saturday, 8:00 a.m. to 5:00 p.m. EDST.
For Customers With Special Needs...
In the USA: 800.626.2000
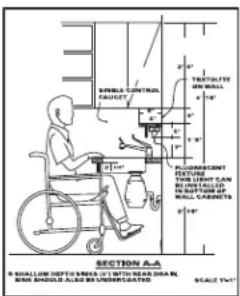
GE offers, free of charge, a brochure to assist in planning a barrier-free kitchen for persons with limited mobility.
Consumers with impaired hearing or speech who have access to a TDD or a conventional teletypewriter may call 800.TDD.GEAC (800.833.4322) to request information or service.
Service Contracts
In the USA: 800.626.2224
In Canada: 800.561.3344
You can have the secure feeling that GE Consumer Service will still be there after your warranty expires. Purchase a GE contract while your warranty is still in effect and you'll receive a substantial discount. With a multiple -year contract, you're assured of future service at today's prices.
Parts and Accessories
In the USA: 800.626.2002
In Canada: 800.561.3344
Individuals qualified to service their own appliances can have parts or accessories sent directly to their home. The GE parts system provides access to over 47,000 parts...and all GE Genuine Renewal Parts are fully warranted. VISA, MasterCard and Discover cards are accepted.
User maintenance instructions contained in this manual cover procedures intended to be performed by any user. Other servicing generally should be referred to qualified service personnel. Caution must be exercised, since improper servicing may cause unsafe operation.
Features
(Throughout this manual, features and appearance may vary.)
flowchart
graph TD
    A["1"] --> B["Circle 1"]
    A --> C["Circle 2"]
    A --> D["Circle 3"]
    A --> E["Circle 4"]
    A --> F["Circle 5"]
    B --> G["Measurement Gauge 1-1"]
    C --> H["Measurement Gauge 2-2"]
    D --> I["Measurement Gauge 3-3"]
    E --> J["Measurement Gauge 4-4"]
    F --> K["Measurement Gauge 5-5"]
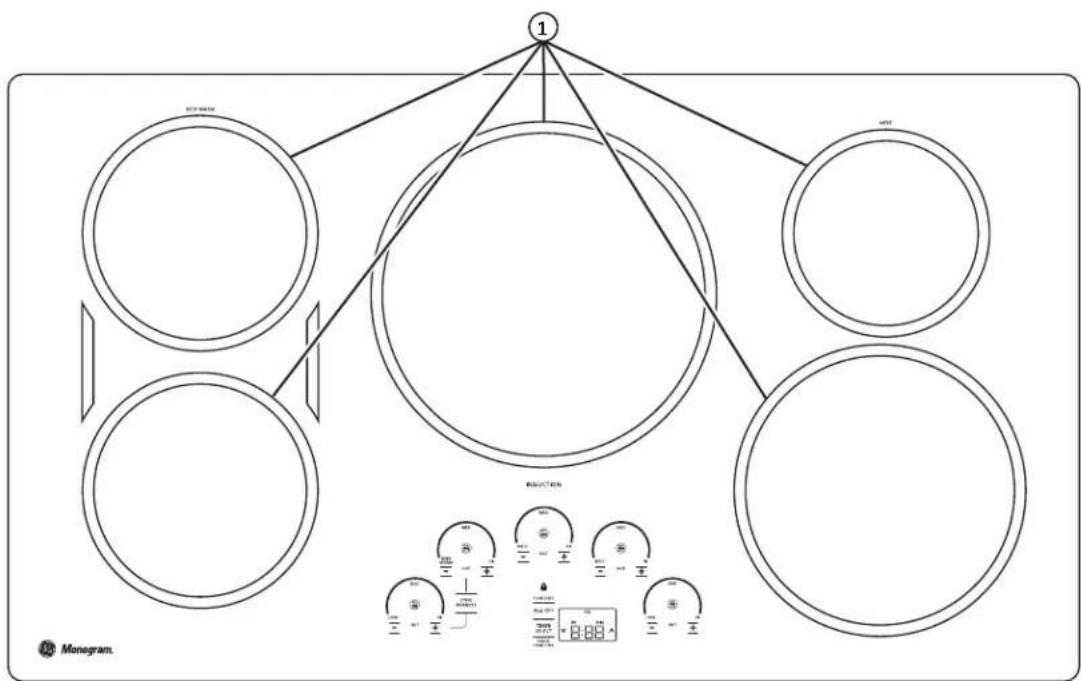
ZHU36 - 36" Induction Cooktop"
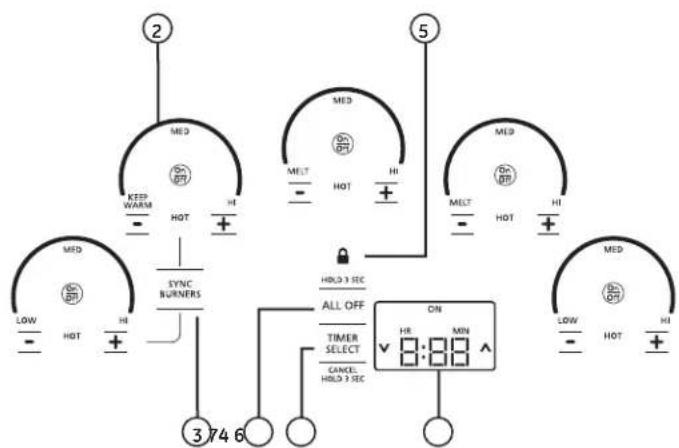
| Feature | Index | Page | ||
| 1 | Cooking | Element(s) | 10 | |
| 2 | Power Level Arc | 10 | ||
| 3 | Sync | Burners | 11 | |
| 4 | All | Off | 10 | |
| 5 | Lock | 12 | ||
| 6 | Timer | Select | 12 | |
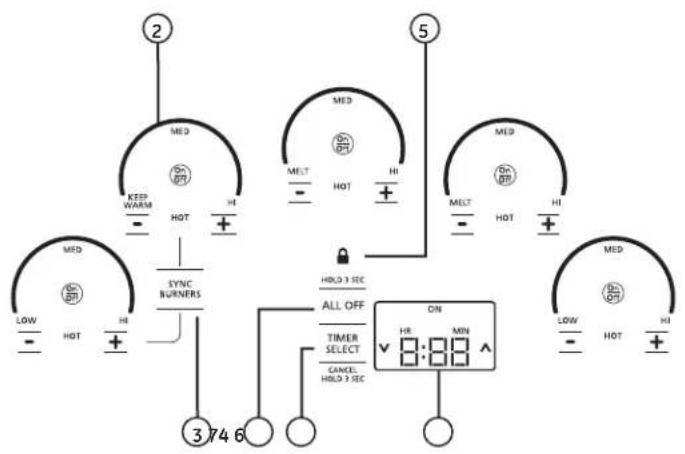
| 7 | Display | 12 |
Features
(Throughout this manual, features and appearance may vary.)
flowchart
graph TD
    A["①"] --> B["Circle 1"]
    A --> C["Circle 2"]
    A --> D["Circle 3"]
    B --> E["Circle 4"]
    C --> F["Circle 5"]
    D --> G["Circle 6"]
    E --> H["Measurement Units: 100%"]
    F --> I["Measurement Units: 8.88"]
    G --> J["Measurement Units: 9.88"]
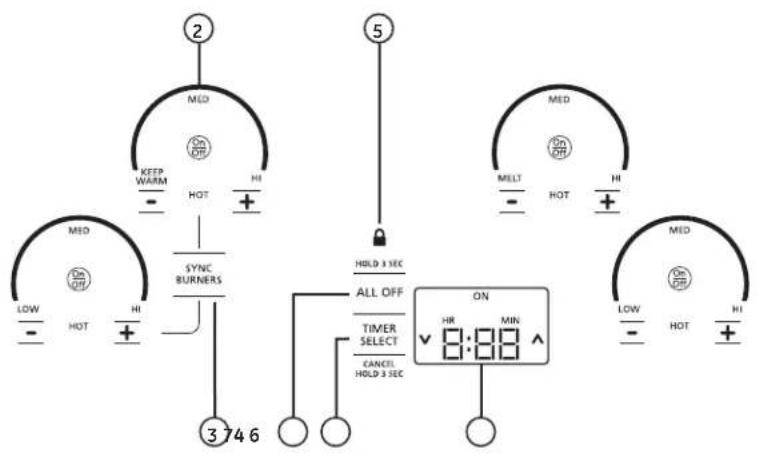
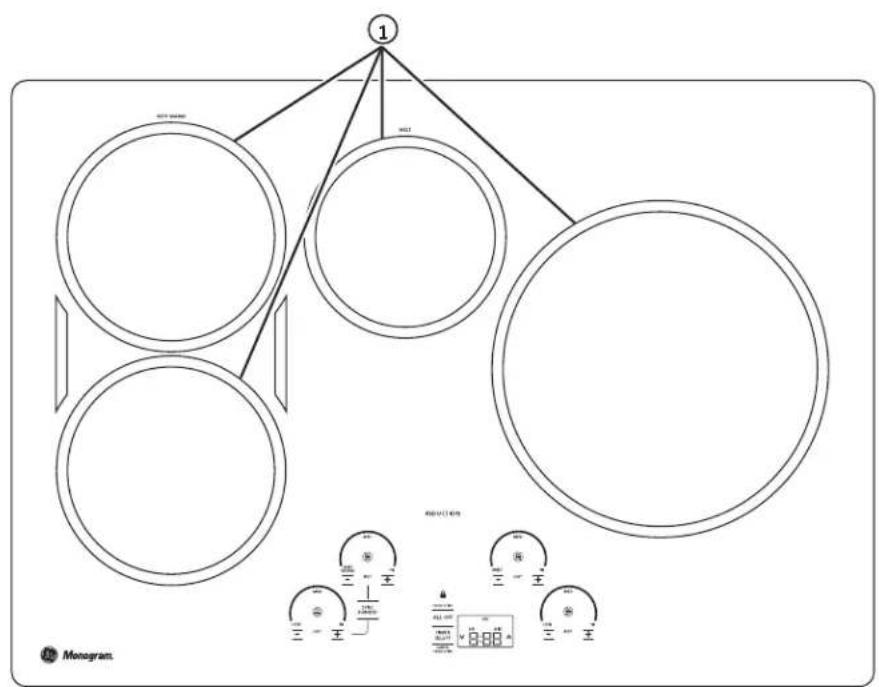
ZHU30 - 30" Induction Cooktop
| Feature | Index | Page | ||
| 1 | Cooking | Element(s) | 10 | |
| 2 | Power Level Arc | 10 | ||
| 3 | Sync | Burners | 11 | |
| 4 | All | Off | 10 | |
| 5 | Lock | 12 | ||
| 6 | Timer | Select | 12 | |
| 7 | Display | 12 |
Operating The Cooking Elements
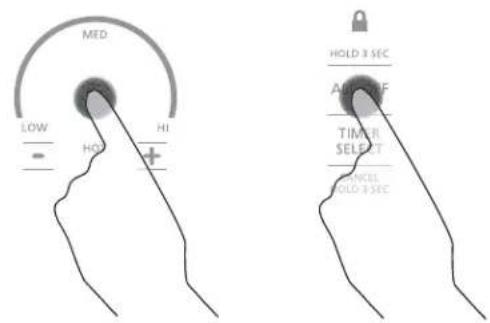
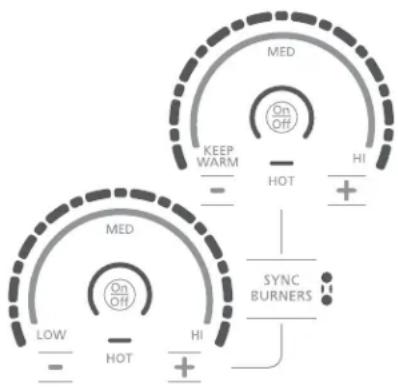
Turn Burner(s) On: Touch and hold On/Off pad about half a second. A chime can be heard with each touch to any pad.
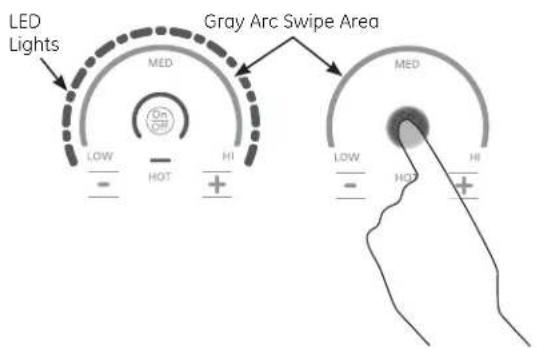
Power level can be selected in any of the following ways:
-
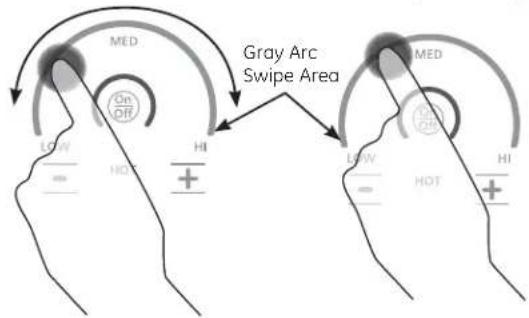
Swipe the gray arc (on the graphics) to the desired power level. There is no sensor on the LEDs, or;
-
Touch Anywhere along the gray arc, or;
-
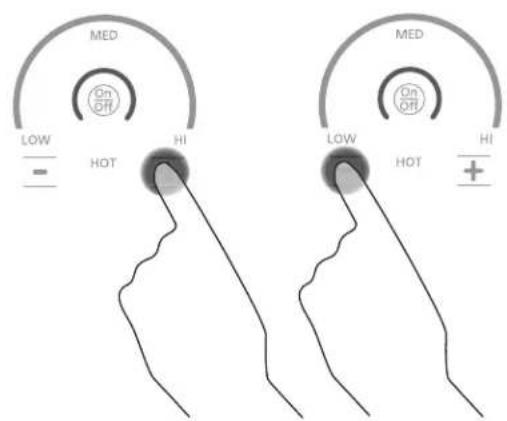
Touch + or - pads to adjust power level, or;
-
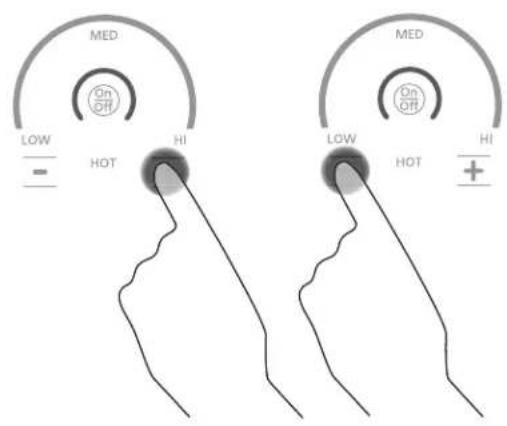
Shortcut to Hi: Immediately after turning unit on, touch the + pad, or;
-
Shortcut to Low: Immediately after turning unit on, touch the - pad.
Turn Burner(s) Off
Touch On/Off pad for an individual burner or touch the All Off pad.
Selecting Cooktop Settings
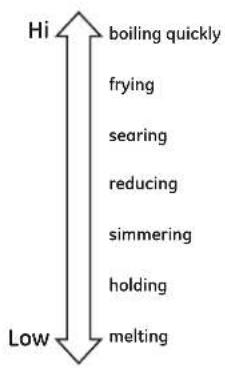
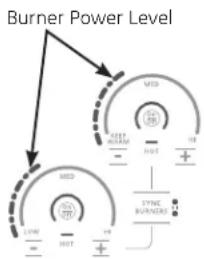
Choose the element/burner that is best fit to the cookware size. Each element/burner on your new cooktop has its own power levels ranging from low to high. Power level settings necessary for cooking will vary depending on the cookware being used, the type and quantity of food, and the desired outcome. In general use lower settings for melting, holding and simmering and use higher settings for heating quickly, searing and frying. When keeping foods warm confirm selected setting is sufficient to maintain food temperature above 140°F. Larger elements and elements marked "Keep Warm" are not recommended for melting.
Hi is the highest power level, designed for large quantity rapid cooking and boiling. Hi will operate for a maximum of 10 minutes. Hi may be repeated after the initial 10 minute cycle by pressing the + pad.
CAUTION: Do not place any cookware, utensils or leave excess water spills on control key pads. This may result in unresponsive touch pads and turning off the cooktop if present for several seconds.
How To Synchronize Left Elements
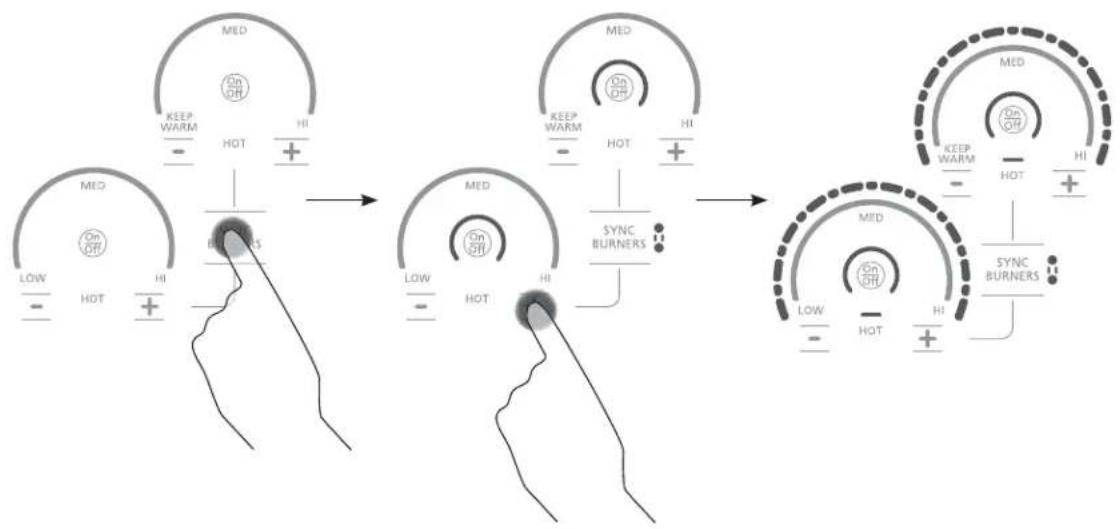
To Turn On
Hold the Sync Burners pad for about half a second to connect the two burners. Operate either element as described on page 7 to adjust power level.
To Turn Off
- Touch the On/Off pad on either burner to turn off the Sync Burners.
or - Touch the Sync Burners to turn both burners off.
flowchart
graph TD
    A["Start: Low/HOT/ON/OFF"] --> B["Switch State"]
    B --> C{On/OFF}
    C --> D["Switch State"]
    D --> E["Switch State"]
    E --> F["End: Low/HOT/ON/OFF"]

    subgraph Before
        G["Low/HOT"] --> H["ON/OFF"]
        I["ON/OFF"] --> J["HI"]
        K["HI"] --> L["+"]
        M["+"] --> N["+"]
    end

    subgraph After
        O["Low/HOT"] --> P["ON/OFF"]
        Q["ON/OFF"] --> R["HI"]
        S["HI"] --> T["+"]
        U["+"] --> V["+"]
    end

    G --> H
    H --> I
    I --> J
    J --> K
    K --> L
    L --> M
    M --> N
    N --> O
    O --> P
    P --> Q
    Q --> R
    R --> S
    S --> T
    T --> U
    U --> V
    V --> W["End"]
Using Your Cooktop
Induction Cooktop
Power Sharing
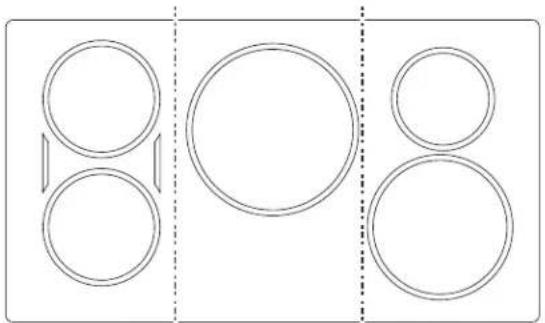
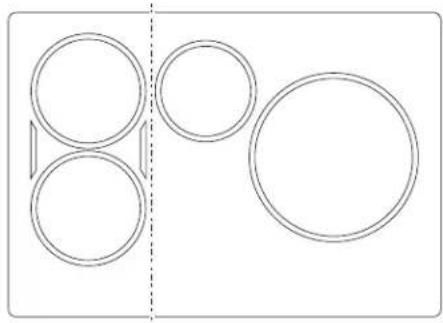
A 36" cooktop has 3 cooking zones and a 30" cooktop has 2 cooking zones. If two elements in the same zone are in use and at least one element is at the maximum power level (Hi), the Hi setting
will operate at a reduced power level. Note that the display will not change. This is how power is shared between two elements in the same cooking zone.
natural_image
Pure diagram of three circular shapes with dashed vertical lines, no text or symbols presentLeft Zone Right Zone Center Zone Left Zone Right Zone
natural_image
Pure geometric diagram with circles and a dashed vertical line, no text or symbols present30" Wide cooktop.36" Wide cooktop.
Cooktop Lockout
Lock
Touch Control Lock pad for 3 seconds.
To Turn Off
Touch Control Lock pad again for 3 seconds.
See Custom Settings section to activate Auto Lock feature.
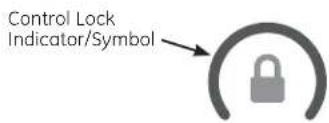
Cooktop Lockout: locks operation of the controls
Single Kitchen Timer
To Turn On
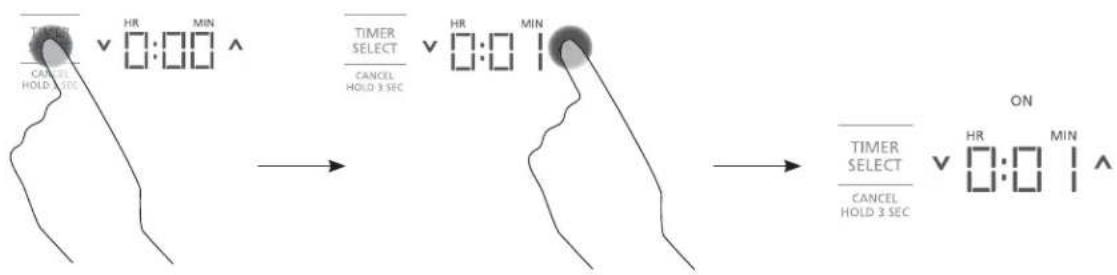
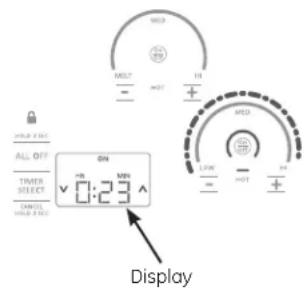
Touch the Timer Select pad. Touch the A or V arrows to choose the desired number of minutes. Timer automatically starts 3 seconds after pad is touched. The "ON" LED will appear automatically when timer is set.
To Turn Off
Hold Timer Select pad for 3 seconds to cancel timer. Alarm will sound continuously when time is up until user turns timer off.
NOTE: Use the kitchen timer to measure cooking time or as a reminder. The kitchen timer does not control the cooking elements. Timer turns off if there is no activity for 30 seconds.
flowchart
graph LR
    A["Timer\nCANCE\nHOLD 3 SEC"] --> B["TIMER\nSELECT\nCANCEL\nHOLD 3 SEC"]
    B --> C["Timer\nSELECT\nCANCEL\nHOLD 3 SEC"]
    C --> D["ON\nOK/HR MIN^"]
Multiple Timers
Timer Mode
For more information see Custom Settings, Timer Mode section for Multi-Timer feature. Each burner can be linked to a timer. Burner must be on to set the timer. When more than one burner is on, the order of the timer is from left to right.
To Turn ON Multiple Timers
- Touch the Timer Select pad. The corresponding burner power level and the display will blink. Touch the or V arrows to adjust time. Timer automatically starts after 3 seconds if there is no further action. The "ON" LED will light when timer is on.
- To set timer for the next burner, touch the Timer Select pad. The corresponding burner power level and the display will blink. Touch the or V arrows to adjust time. Timer automatically starts after 3 seconds if there is no further action. The "ON" LED will light when timer is on. Repeat the steps for the remaining timers.
To Turn ON Multiple Timers
Hold Timer Select pad for 3 seconds to cancel timer. The corresponding burner power level and display will blink. When the burner times out, the corresponding timer also times out.
flowchart
graph TD
    A["MDD"] --> B["CYNE BURNERS"]
    C["MDD-barb"] --> D["+"]
    E["LOW"] --> F["-"]
    G["+"] --> H["+"]
    I["+"] --> J["-"]
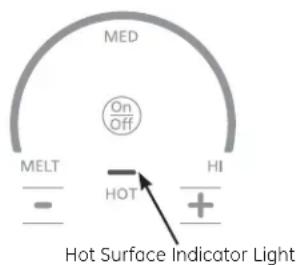
Hot Light Indicator
A hot surface indicator light (one for each cooking element) will glow when the glass surface is hot and will remain on until the surface has cooled to a temperature that is safe to touch.
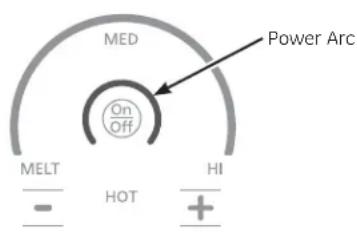
Pan Detection Removal
When a pan is removed from the cooktop surface, Burner level turns off; Power arc starts to blink. If a pan is not detected for 25 seconds, the control turns off automatically, lights turn off.
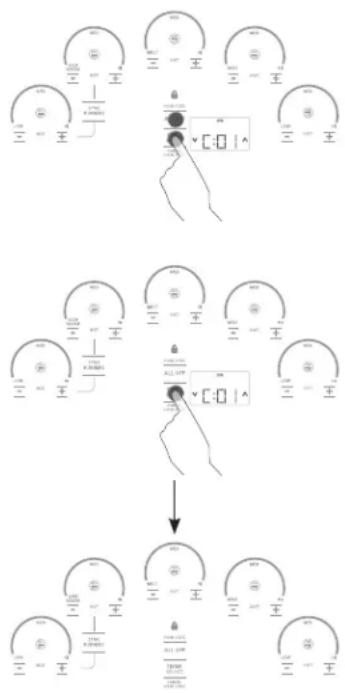
Custom Settings
- Press and hold All Off pad for 3 seconds, then immediately press and hold the Timer Select pad for 3 seconds to enter custom settings. Those two pads must be pressed within 30 seconds. Any other pad will cancel mode.
- "C --" appears on display. To navigate through the Custom Settings, use the (up) or V (down) pads. If (up) is selected the display cycle starts at "C01". If V (down) is selected, the display cycle starts at "C62".
- To activate a new Custom Setting the user will touch and hold the Timer Select pad for 3 sec. Only ONE of the Custom Setting Choices can be activated for each Custom Setting. The red "On" LED will turn on and a sound will go off once a new custom setting is activated.
- The cooktop will exit Custom Settings if it is inactive for 3 minutes.
- To exit Custom Settings and save any changes, touch and hold the All Off pad for 3 seconds.
Custom Settings Chart
Custom Settings Custom Setting Choices
| C0 (Factory Settings) C01 - Factory Reset (Clears customized settings and restores defaults) | |
| C1 (Control Lock) | C11 - Standard Lock (ie; Only on when lock button pressed for 3 seconds.) If using a timer, Control Lock is unavailable. |
| C12 - Auto Lock (ie; Engages after cooktop has been in standby mode for 10 minutes.) The unit should be completely off to go into Auto Lock. | |
| C2 (LED light level) C21 - Full illumination | |
| C3 (Button Loudness) | C31 - All sounds activated at 100% (For alarm sounds, 100% = Whatever level is set in c4.) |
| C32 - Button sound level reduced by 50%, Alarm sounds at 100% | |
| C33 - Button sounds deactivated, Alarm sounds activated at 100% | |
| C4 (Timer Alarm Loudness) | C41 - High |
| C42 - Low | |
| C5 (Timer Alarm Duration) | C51 - Indefinite (ie; alarm continues until cancelled by user). |
| C52 - Alarm sounds for 60 seconds. | |
| C53 - Alarm sounds for 30 seconds. | |
| C54 - Alarm sounds for 15 seconds. | |
| C6 (Timer Mode) C61 - Single Kitchen Time (Independent of elements.) | |
* Options in grey are default settings
How Induction Cooking Works
The elements beneath the cooking surface produce a magnetic field that causes the electrons in the ferrous metal pan to vibrate and produce heat.
The cooking surface itself does not heat. Heat is produced in the cooking pan, and cannot be generated until a pan is placed on the cooking surface.
When the element is activated, the pan begins to heat immediately and in turn heats the contents of the pan.
Magnetic induction cooking requires the use of cookware made of ferrous metals—metals to which magnets will stick, such as iron or steel.
Use pans that fit the element size. The pan must be large enough for the safety sensor to activate an element.
The cooktop will not operate if a very small steel or iron utensil (less than the minimum size across the bottom) is placed on the cooking surface when the unit is turned on—items such as steel spatulas, cooking spoons, knives and other small utensils.
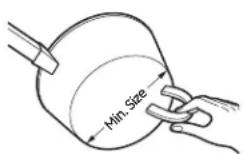
Use the minimum size pan for the element. The pan material is correct if a magnet sticks to the bottom.
Cooking Noise
Cookware "noise"
Slight sounds may be produced by different types of cookware. Heavier pans such as enameled cast iron produce less noise than a lighter weight multi-ply stainless steel pan. The size of the pan, and the amount of contents, can also contribute to the sound level.
When using adjacent elements that are set at certain power level settings, magnetic fields may interact and produce a low whistle or intermitted "hum". These noises can be reduced or eliminated by lowering or raising the power level settings of one or both of the elements. Pans that completely cover the element ring will produce less noise.
A low "humming" noise is normal particularly on high settings.
Sounds you may here: You may hear a slight "Buzz" when cooking with Hi mode. This is normal. The sound depends on the type of pot being used. Some pots will "Buzz" louder depending on the material. A "Buzz" sound may be heard if the pan contents are cold. As the pan heats, the sound will decrease. If the power level is reduced, the sound level will go down.
Choosing The Correct Cookware To Use
Using the correct size cookware
Pans that are not ferrous or are too small will not allow the induction element to turn on, and the ON indicator for that element location will flash for 25 seconds and then turn off. If a pan is removed for more than 25 seconds, the power will be shut off. Cookware larger than the element ring may be used; however, heat will only occur above the element. For best results, the cookware must make FULL contact with the glass surface.
Do not allow the bottom of the pan or cookware to touch the surrounding metal cooktop trim or to overlap the cooktop controls.
For best performance, match the pan size to the element size. Using a smaller pot on a larger burner will generate less power at any given setting.
Suitable Cookware
Use quality cookware with heavier bottoms for better heat distribution and even cooking results. Choose cookware made of magnetic stainless steel, enamel coated cast iron, enameled steel and combinations of these materials.
Some cookware is specifically identified by the manufacturer for use with induction cooktops. Use a magnet to test if the cookware will work.
Flat-bottomed pans give best results. Pans with rims or slight ridges can be used.
Round pans give best results. Pans with warped or curved bottoms will not heat evenly.
For wok cooking, use a flat-bottomed wok. Do not use a wok with a support ring.
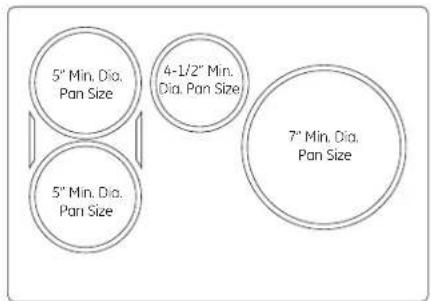
30" wide cooktop. Use the minimum recommended size pan shown for each cooking element.
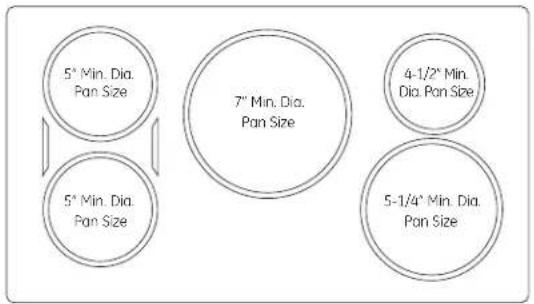
36" wide cooktop. Use the minimum recommended size pan shown for each cooking element.
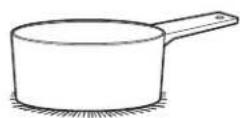
Use flat-bottomed pans.
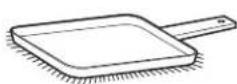
Use a griddle.
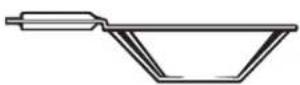
Use a flat-bottomed wok.
Choosing The Correct Cookware To Use
Cookware recommendations
Cookware must fully contact the surface of the cooking element.
Use flat-bottomed pans sized to fit the cooking element and also to the amount of food being prepared.
Induction interface disks are NOT recommended.
INCORRECT
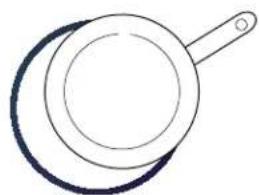
natural_image
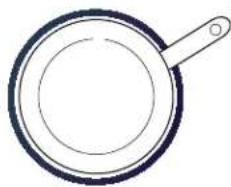
Simple line drawing of a frying pan with a handle (no text or symbols)Cookware not centered on cooking element surface.
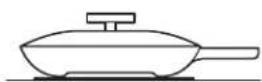
Curved or warped pan bottoms or sides.
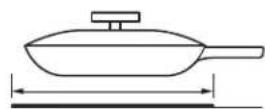
Pan does not meet the minimum size required for the cooking element used.
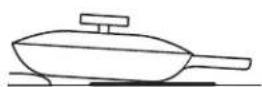
Pan bottom rests on cooktop trim or does not rest completely on the cooktop surface.
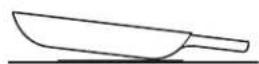
Heavy handle tilts pan.
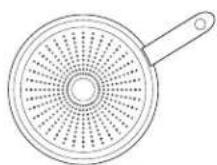
Pan is partially magnetic on the bottom.
CORRECT
natural_image
Simple line drawing of a frying pan with a handle (no text or symbols)Cookware centered correctly on cooking element surface.
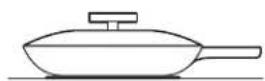
Flat pan bottom.
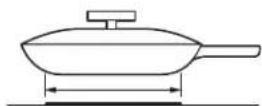
Pan size meets or exceeds the recommended minimum size for the cooking element used.
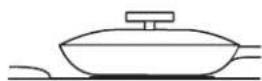
Pan bottom rests completely on the cooktop surface.

Pan is properly balanced.
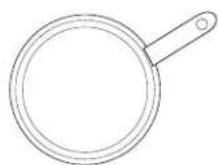
Pan is completely magnetic on the bottom.
Using the Griddle
CAUTION: Burn Hazard
- Griddle surfaces may be hot enough to cause burns during and after use. Place and remove the griddle when it is cool and all surface units are off. Use oven mitts if you will touch the griddle while hot. Failure to do so can result in burns.
- Place and remove the griddle only when griddle is cool and all surface burners are turned OFF.
Before using this cookware for the first time, wash it to make sure it is clean. Then season it lightly, rubbing cooking oil onto the cooking surface.
How To Place The Griddle
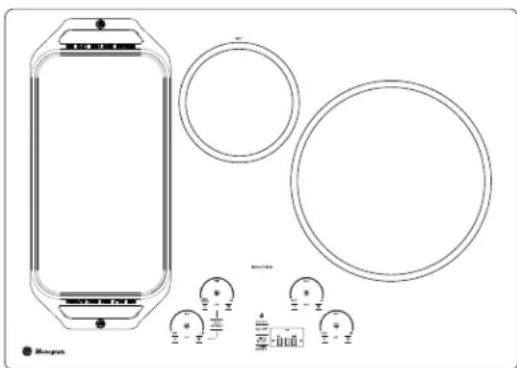
IMPORTANT: Always place and use your griddle at the designated location on the cooktop.
natural_image
Technical line drawing of a device with circular components and terminal elements (no text or symbols)| Type of Food Cook Setting | |
| Warming Tortillas Med-Lo | |
| Pancakes Med-Lo | |
| Hamburgers Med | |
| Fried Eggs | Med-Lo |
| Breakfast Sausage Links Med | |
| Hot Sandwiches (such as Grilled Cheese) | Med-Lo |
Griddle settings are intended to be a guideline and may need to be adjusted based on individual cooking preferences.
Griddle Operation
To turn on the surface units for the entire griddle, use the Sync Burner control feature. Touch the Sync Burner pad and then adjust power level to desired setting as described on page 8.
IMPORTANT NOTES:
- Clean the griddle with a sponge and mild detergent in warm water. DO NOT use blue or green scrubbing pads or steel wool.
- Avoid cooking extremely greasy foods and be careful of grease spillover while cooking.
- Never place or store any items on the griddle, even when it is not in use. The griddle can become heated when using the surrounding surface units.
- Avoid using metal utensils with sharp points or rough edges, which might damage the griddle. Do not cut foods on the griddle.
- Do not use cookware as a storage container for food or oil. Permanent staining and/or craze lines could result.
- Your griddle will discolor over time with use.
- Do not clean the griddle in a self-cleaning oven.
• Always allow the cookware to cool before immersing in water. - Do not overheat the griddle.
Normal Daily Use Cleaning
ONLY use CERAMA BRYTE® Ceramic Cooktop Cleaner on the glass cooktop. Other creams may not be as effective.
To maintain and protect the surface of your glass cooktop, follow these steps:
- Before using the cooktop for the first time, clean it with CERAMA BRYTE® Ceramic Cooktop Cleaner. This helps protect the top and makes cleanup easier.
- Daily use of CERAMA BRYTE® Ceramic Cooktop Cleaner will help keep the cooktop looking new.
- Shake the cleaning cream well. Apply a few drops of CERAMA BRYTE® Ceramic Cooktop Cleaner directly to the cooktop.
-
Use a paper towel or CERAMA BRYTE® Cleaning Pad for Ceramic Cooktops to clean the entire cooktop surface.
-
Use a dry cloth or paper towel to remove all cleaning residue. No need to rinse.
NOTE: It is very important that you DO NOT heat the cooktop until it has been cleaned thoroughly.
Clean your cooktop after each spill. Use CERAMA BRYTE® Ceramic Cooktop Cleaner.
Burned-On Residue
NOTE: DAMAGE to your glass surface may occur if you use scrub pads other than those recommended.
- Allow the cooktop to cool.
- Spread a few drops of CERAMA BRYTE® Ceramic Cooktop Cleaner on the entire burned residue area.
- Using the included CERAMA BRYTE® Cleaning Pad for Ceramic Cooktops, rub the residue area, applying pressure as needed.
-
If any residue remains, repeat the steps listed above as needed.
-
For additional protection, after all residue has been removed, polish the entire surface with CERAMA BRYTE® Ceramic Cooktop Cleaner and a paper towel.
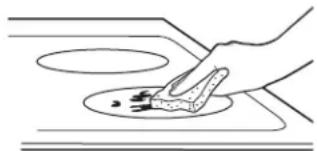
natural_image
Line drawing of a hand using a tool to clean or store food on a plate (no text or symbols)Use a CERAMA BRYTE® Cleaning Pad for Ceramic Cooktops.
Heavy, Burned-On Residue
- Allow the cooktop to cool.
- Use a single-edge razor blade scraper at approximately a 45^ angle against the glass surface and scrape the soil. It will be necessary to apply pressure to the razor scraper in order to remove the residue.
- After scraping with the razor scraper, spread a few drops of CERAMA BRYTE® Ceramic Cooktop Cleaner on the entire burned residue area. Use the CERAMA BRYTE® Cleaning Pad to remove any remaining residue.
- For additional protection, after all residue has been removed, polish the entire surface with CERAMA BRYTE® Ceramic Cooktop Cleaner and a paper towel.
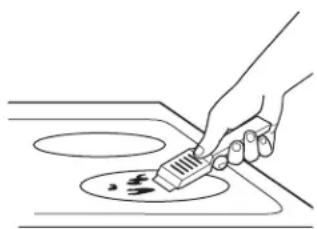
natural_image
Line drawing of a hand using a tool to clean or store floor tiles on a stove (no text or symbols)The CERAMA BRYTE® Ceramic Cooktop Scraper and all recommended supplies are available through our Parts Center. See instructions under "Assistance / Accessories" section.
NOTE: Do not use a dull or nicked blade.
Metal marks and scratches
1 Be careful not to slide pots and pans across your cooktop. It will leave metal markings on the cooktop surface.
These marks are removable using the CERAMA BRYTE® Ceramic Cooktop Cleaner with the CERAMA BRYTE® Cleaning Pad for Ceramic Cooktops.
2 If pots with a thin overlay of aluminum or copper are allowed to boil dry, the overlay may leave black discoloration on the cooktop.
This should be removed immediately before heating again or the discoloration may be permanent.
WARNING: Carefully check the bottom of pans for roughness that would scratch the cooktop.
Glass surface—potential for permanent damage
Damage from sugary spills and melted plastic:
1 Turn off all surface elements. Remove hot pans.
2 Wearing an oven mitt:
a. Use a single-edge razor blade scraper (CERAMA BRYTE® Ceramic Cooktop Scraper) to move the spill to a cool area on the cooktop.
b. Remove the spill with paper towels.
3 Any remaining spillover should be left until the surface of the cooktop has cooled.
4 Don't use the surface elements again until all of the residue has been completely removed.
NOTE: If pitting or indentation in the glass surface has already occurred, the cooktop glass will have to be replaced. In this case, service will be necessary.
Our testing shows that if you are cooking high sugar mixtures such as jelly or fudge and have a spillover, it can cause permanent damage to the glass surface unless the spillover is immediately removed.
To order parts
To order CERAMA BRYTE® Ceramic Cooktop Cleaner and the cooktop scraper, please call our toll-free number:
National Parts Center 800.626.2002
CERAMA BRYTE® Ceramic
Cooktop Cleaner.....#WX10X300
CERAMA BRYTE® Ceramic
Cooktop Scraper ....# WX10X0302
Kit.....# WB64X5027
(Kit includes cream and cooktop scraper)
CERAMA BRYTE® Cleaning Pads for
Ceramic Cooktops ......# WX10X350
Replacement Griddle (for any model
that has "Sync Burners") .....# JXGRIDL1
Flush mount kit ....# JXFLUSH1
Sous Vide Kit ...... # JXSOUSV1
Stainless Steel Cleaner
and Polisher ......# PM10X311
Induction Cooktop
Questions? Before you call for service...
| Problem Possible Cause What To Do | ||
| Surface elements will not maintain a rolling boil or cooking is slow | Improper cookware being used. Use pans that are recommended for induction, have flat bottoms and match the size of the surface element. | |
| Surface elements do not work properly | Cooktop controls improperly set. Check to be sure the correct control is set for the surface element you are using. | |
| Power arc ON indicator blinking | Wrong pan type. Use a magnet to check that cookware is induction compatible. | |
| Pan is too small. Blinking "ON" indicator - pan size is below the minimum size for the element. See the Using the correct size cookware section. | ||
| Pan not positioned correctly. Center the pan in the cooking ring. | ||
| +, -, or control lock pads have been touched before an element is turned on. | See the Operating the Cooking Elements section. | |
| Scratches on cooktop glass surface | Incorrect cleaning methods being used. Use recommended cleaning procedures. See the Cleaning the glass cooktop section. | |
| Cookware with rough bottoms being used or coarse particles (salt or sand) were between the cookware and the surface of the cooktop. Cookware has been slid across the cooktop surface. | To avoid scratches, use the recommended cleaning procedures. Make sure bottoms of cookware are clean before use, and use cookware with smooth bottoms. | |
| Areas of discoloration on the cooktop | Food spillovers not cleaned before next use. | See the Cleaning the glass cooktop section. |
| Hot surface on a model with a light-colored glass cooktop. | This is normal. The surface may appear discolored when it is hot. This is temporary and will disappear as the glass cools. | |
| Plastic melted to the surface | Hot cooktop came into contact with plastic placed on the hot cooktop. | See the Glass surface - potential for permanent damage section in the Cleaning the glass cooktop section. |
| Pitting (or indentation) of the cooktop | Hot sugar mixture spilled on the cook-top. | Call a qualified technician for replacement. |
| Unresponsive keypad Keypad is dirty. Clean the keypad. | ||
| A fuse in your home may be blown or the circuit breaker tripped. | ||
| Pan detection/sizing not working properly | Improper cookware being used. Use a flat induction capable pan that meets the minimum size for the element being used. See the Using The Correct Size Cook-ware section. | |
| Pan is improperly placed. Make sure the pan is centered on the corresponding surface element. | ||
| Cooktop control improperly set. Check to see that the control is set properly. | ||
| Noise | Sounds you may hear: Buzzing, whistling and humming. | These sounds are normal. See Cooking Noise section. |
GARANTIE LIMITÉE D'UN AN
flowchart
graph TD
    A["1"] --> B["Circle 1"]
    A --> C["Circle 2"]
    A --> D["Circle 3"]
    A --> E["Circle 4"]
    A --> F["Circle 5"]
    B --> G["Measurement Range"]
    C --> G
    D --> G
    E --> G
    F --> G
    G --> H["Measurement Range"]
    H --> I["Measurement Range"]
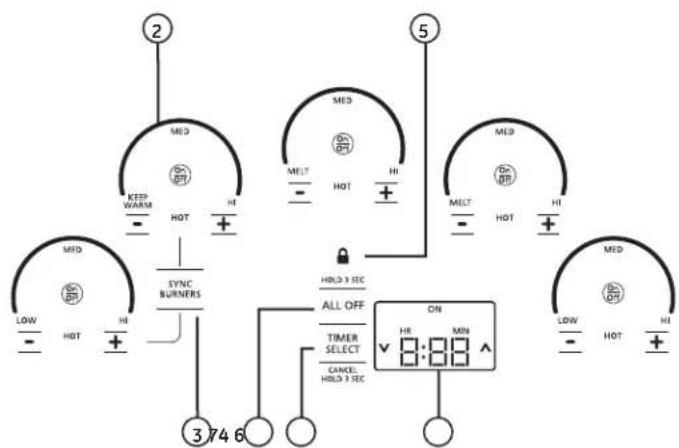
ZHU36 - Table de cuisson de 36"
ZHU30 - Table de cuisson de 30"
natural_image
Pure diagram of three vertical panels with circular shapes and dashed lines, no text or symbols presentnatural_image
Pure geometric diagram with circles and a dashed vertical line, no text or symbols presentTable de cuisson de 30 po.Table de cuisson de 36 po.
natural_image
Simple line drawing of a frying pan with a handle (no text or symbols)natural_image
Simple line drawing of a frying pan with a handle (no text or symbols)natural_image
Technical line drawing of a mechanical component with circular features and a labeled scale (no text or symbols beyond basic technical markings)REMARQUES IMPORTANTES :
natural_image
Simple line drawing of a hand using a tool to clean or store items on a circular surface (no text or symbols)natural_image
Line drawing of a hand using a spatula to clean or store food on a stove (no text or symbols)flowchart
graph TD
    A["1"] --> B["Circle 1"]
    A --> C["Circle 2"]
    A --> D["Circle 3"]
    A --> E["Circle 4"]
    A --> F["Circle 5"]
    B --> G["Measurement Gauge 1-1"]
    C --> H["Measurement Gauge 2-2"]
    D --> I["Measurement Gauge 3-3"]
    E --> J["Measurement Gauge 4-4"]
    F --> K["Measurement Gauge 5-5"]
ZHU36 - Estufas de 36"
ZHU30 - Estufas de 30"
natural_image
Two identical diagrams showing circular arrangements with dashed vertical lines, no text or symbols present.natural_image
Simple line drawing of a frying pan with a handle (no text or symbols)natural_image
Simple line drawing of a frying pan with a handle (no text or symbols)natural_image
Technical line drawing of a device with circular components and a labeled component (no text or symbols present)NOTAS IMPORTANTES:
natural_image
Simple line drawing of a hand using a tool to clean or store food on a plate (no text or symbols)natural_image
Line drawing of a hand using a tool to clean or store contents on a stove (no text or symbols)- WARNING!
- GENERAL SAFETY INSTRUCTIONS
- KEEP FLAMMABLE MATERIALS AWAY FROM THE COOKTOP
- READ AND SAVE THESE INSTRUCTIONS
- COOKTOP SAFETY INSTRUCTIONS
- INDUCTION COOKTOP SAFETY INSTRUCTIONS
- WHAT IS COVERED
- YOUR MONOGRAM COOKTOP WARRANTY
- Staple sales slip or cancelled check here. Proof of original purchase date is needed to obtain service under warranty.
- LIMITED ONE-YEAR WARRANTY
- WHAT IS NOT COVERED
- With the purchase of your new Monogram appliance, receive the assurance that if you ever need information or assistance from GE, we'll be there. All you have to do is call—toll-free!
- Features
- Operating The Cooking Elements
- Turn Burner(s) Off
- Selecting Cooktop Settings
- How To Synchronize Left Elements
- To Turn On
- To Turn Off
- Using Your Cooktop
- Power Sharing
- Cooktop Lockout
- Lock
- Single Kitchen Timer
- Multiple Timers
- Timer Mode
- To Turn ON Multiple Timers
- Hot Light Indicator
- Pan Detection Removal
- Custom Settings
- Custom Settings Chart
- How Induction Cooking Works
- Cooking Noise
- Cookware "noise"
- Choosing The Correct Cookware To Use
- Using the correct size cookware
- Suitable Cookware
- Cookware recommendations
- Using the Griddle
- CAUTION: Burn Hazard
- How To Place The Griddle
- Griddle Operation
- IMPORTANT NOTES:
- Normal Daily Use Cleaning
- Burned-On Residue
- Heavy, Burned-On Residue
- Metal marks and scratches
- Glass surface—potential for permanent damage
- Damage from sugary spills and melted plastic:
- To order parts
- GARANTIE LIMITÉE D'UN AN
- REMARQUES IMPORTANTES :
- NOTAS IMPORTANTES:
Brand : Monogram
Model : ZHU30RSJSS
Category : Cooker