
SEIH4648CV4 - Range hood Summit - Free user manual and instructions
Find the device manual for free SEIH4648CV4 Summit in PDF.


| Product Type | Kitchen range hood |
| Brand | Summit |
| Model | SEIH4648CV4 |
| Category | Stainless steel kitchen hood |
| Use | External venting or recirculation (charcoal filter) |
| Installation Type | Wall or ceiling mount |
| Material | Stainless steel |
| Minimum Safety Distance | 65 cm between cooking surface and lowest part of hood |
| Number of Extraction Speeds | Up to 4 speeds plus a turbo speed (depending on control panel) |
| Types of Control Panels | Slide switch, electrical button, digital display, 5-touch, touch, progressive touch |
| Lighting | Integrated lighting with dimmer on some models |
| Bulb Type | Halogen with aluminum reflector (or LED, depending on model) |
| Grease Filters | Metal, dishwasher-safe |
| Charcoal Filters | Replacement recommended every 3 months |
| Timer | Yes, with programmable auto-off (5 to 15 min depending on panel) |
| Filter Clog Indicator | Yes, on touch and progressive touch panels |
| Turbo Function | Yes, on digital display panel |
| Power Supply | 220-240 V, 50/60 Hz (check rating plate) |
| Electrical Protection | Protected circuit with omni-polar disconnection device |
| Compliance | Directives 2006/95/EC (low voltage) and 2004/108/EC (electromagnetic compatibility) |
| Supplied Accessories | Connection pipes, wall plugs, screws, telescopic structure (depending on model) |
| Repairability | Spare parts available from the manufacturer; bulb replacement by user |
Frequently Asked Questions - SEIH4648CV4 Summit
User questions about SEIH4648CV4 Summit
0 question about this device. Answer the ones you know or ask your own.
Ask a new question about this device
Download the instructions for your Range hood in PDF format for free! Find your manual SEIH4648CV4 - Summit and take your electronic device back in hand. On this page are published all the documents necessary for the use of your device. SEIH4648CV4 by Summit.
USER MANUAL SEIH4648CV4 Summit
natural_image
Line drawings of kitchen appliances including a double door, a high-temperature oven, and a mounted air conditioner unit (no text or symbols present)Manual for the Installation, use and maintenance of stainless steel kitchen range hoods
a. This product is designed for domestic use.
b. Electric input for the device must be 120 Volt, 60 Hz.
c. This product must be connected to a grounded electrical source.
d. All of the electrical installation must be done by a qualified electrician. Installations done by unqualified persons may result in poor performance, failure of the device, and accidents.
e. If the lights in your device have been on for a long time, do not touch them. They are hot enough to burn your hands.
f. Kitchen hoods are designed for cooking in domestic residences. There is a risk of failure if they are used for other purposes, and this will void the warranty.
g. Comply with local codes and regulations related to discharging air. (This warning does not apply to hoods with no stack).
h. Do not cook flammable foods below the hood.
i. Start the hood after placing pots or pans on your cooking surface. Otherwise, high temperatures may result in deformation of parts of the hood.
j. Do not leave hot oil on the cooking surface. Pots that contain hot oil can ignite, causing fires.
k. When frying foods, be watchful of curtains. They may catch fire.
I. Change the filters regularly. Oily residues could become fire risks.
m. When replacing filters, always use the same type of filter as the original. Substitutes may be unsuitable.
n. Do not use the device without a filter. Do not remove filters while the device is working.
o. If there is ignition or sparking, cut off the electric power to the device. (Turn off the switch.)
p. If the device is not cleaned regularly, built-up grime and dirt could cause a fire.
q. When you make the stack installation for your hood, use 150 mm (5.9") diameter pipes. The stack installation must be as short and with as few bends as possible.
r. Keep the packing materials away from children, as these materials could be dangerous to them.
s. Ensure that children do not play with the device. Do not let little children use the device.
t. If there is a fire, cut off the power to the hood and cooking devices and cover the flame. Do not use water to extinguish the fire.
READ AND SAVE THESE INSTRUCTIONS
WARNING! TO REDUCE THE RISK OF A RANGE-TOP GREASE FIRE:
a. Never leave surface units unattended at high settings. Boilovers cause smoking and greasy spillovers that may ignite. Heat oils slowly on low or medium settings.
b. Always turn hood ON when cooking at high heat or when flambéing food.
c. Clean ventilating fans frequently. Grease should not be allowed to accumulate on fan or filters.
d. Use proper pan size. Always use cookware appropriate for the size of the surface element.
WARNING! TO REDUCE THE RISK OF INJURY TO PERSONS IN THE EVENT OF A RANGE-TOP GREASE FIRE, OBSERVE THE FOLLOWING:
a. SMOTHER FLAMES with a close-fitting lid, cookie sheet or metal tray, then turn off the burner. BE CAREFUL TO PREVENT BURNS. If the flames do not go out immediately, EVACUATE AND CALL THE FIRE DEPARTMENT.
b. NEVER PICK UP A FLAMING PAN – you may be burned.
c. DO NOT USE WATER, including wet dishcloths or towels, to douse the fire – a violent steam explosion could result.
d. Use an extinguisher ONLY if:
i. You know you have a Class ABC extinguisher, and you already know how to operate it.
ii. The fire is small and contained in the area where it started.
iii. The fire department is being called.
iv. You can fight the fire with your back to an exit.
3
WARNING! TO REDUCE THE RISK OF FIRE, ELECTRIC SHOCK, OR OTHER INJURY, OBSERVE THE FOLLOWING:
a. Use this unit only in the manner intended by the manufacturer. If you have questions, contact the manufacturer.
b. Before servicing or cleaning the unit, switch power off at the service panel and lock the service-disconnecting means to prevent power from being switched on accidentally. If the service-disconnecting means cannot be locked, securely fasten a prominent warning device, such as a tag, to the service panel.
c. To Reduce The Risk Of Fire Or Electric Shock, Do Not Use This Fan With Any Solid-State Speed Control Device.
d. TO REDUCE THE RISK OF FIRE, USE ONLY METAL DUCTWORK.
CAUTION:
a. The Fan In This Device Is For General Ventilating Use Only. Do Not Use To Exhaust Hazardous Or Explosive Materials And Vapors.
b. To reduce the risk of fire and to properly exhaust air, be sure to duct air outside. Do not vent exhaust air into spaces within wall, ceilings, attics, crawl spaces or garages.
WARNINGS ABOUT HANDLING AND CARRYING
a. All the materials used in the packaging of your device are suitable for recycling.
b. Comply with the warning labels on the packs during transportation.
c. Grasp handling grips while carrying your device.

natural_image
Technical line drawing of a hairdryer tool with multiple screw and pin components (no text or labels)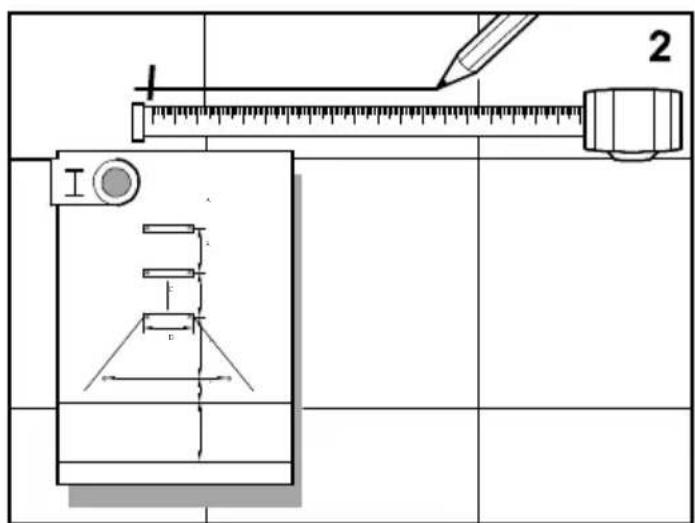


natural_image
Illustration of a hand using a power tool on a grid background, no text or symbols present
natural_image
Technical line drawing of a mechanical device with a fan and mesh panel (no text or symbols)
natural_image
Diagram of a mechanical device with two gates and a fan, showing directional arrows indicating motion (no text or symbols)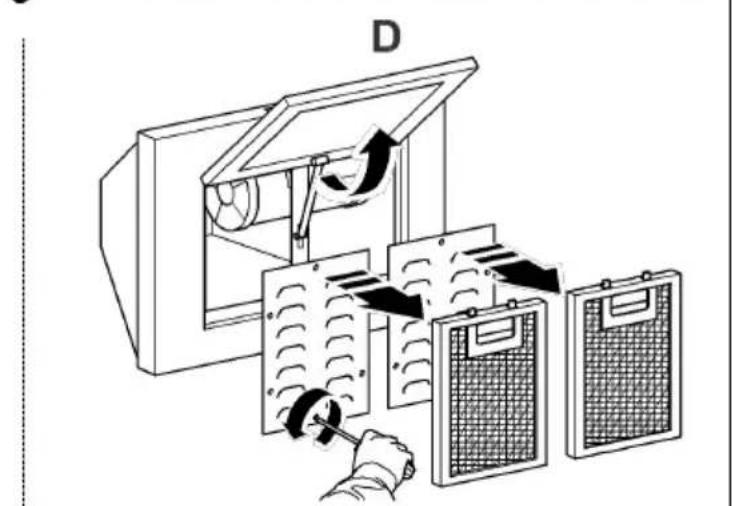


natural_image
Technical illustration of a 3D room interior with a transparent enclosure and wall-mounted fixtures, showing a close-up of a hand holding a tool near a door (no text or symbols present)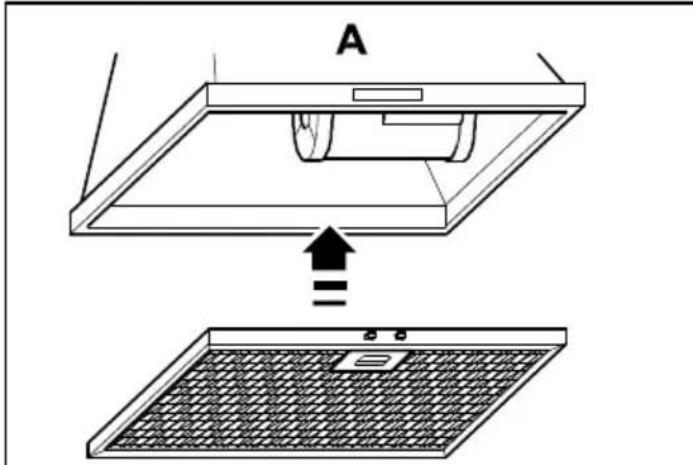




natural_image
Technical line drawing of a mechanical assembly with no visible text or symbols
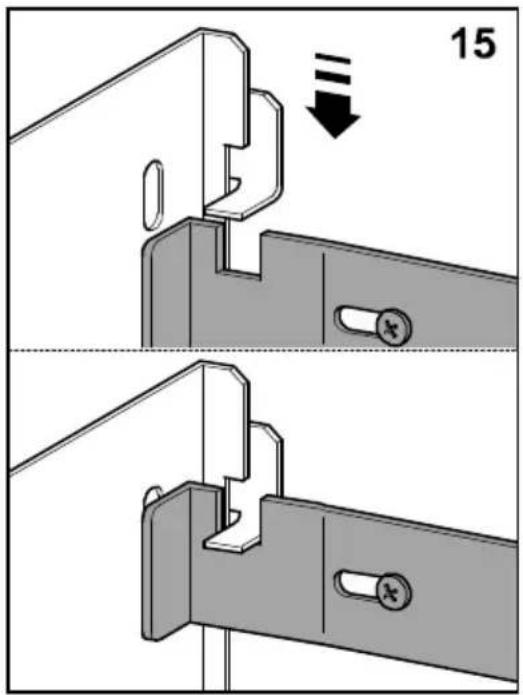


Fig. 1

Fig. 2
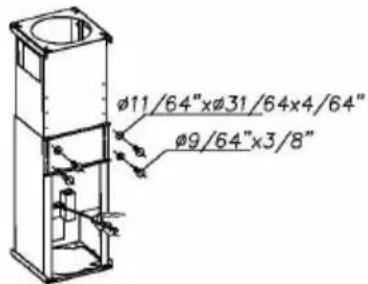
Fig. 3
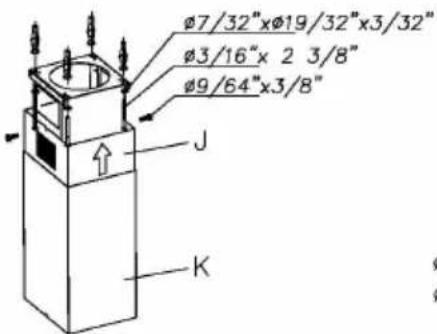
Fig. 4

Fig. 5
natural_image
Technical line drawing of a mechanical device with a base, top, and two solar panels below (no text or symbols)Fig. 6

P2


P4

P6




natural_image
Illustration of hands adjusting a mechanical component with a rotating arrow (no text or symbols)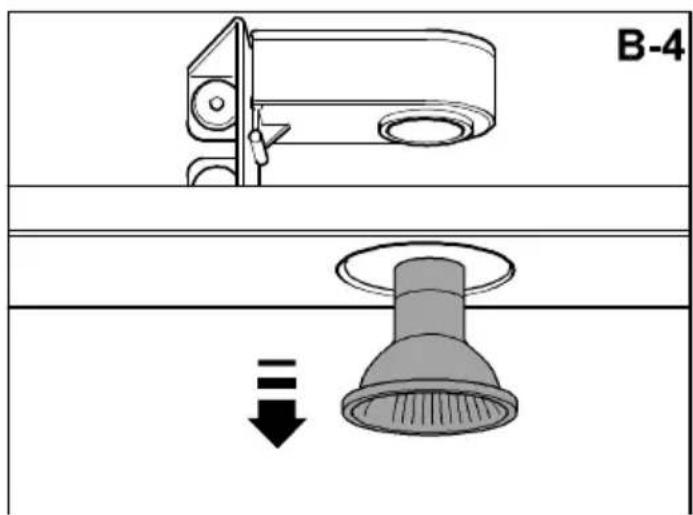
Dear Customer,
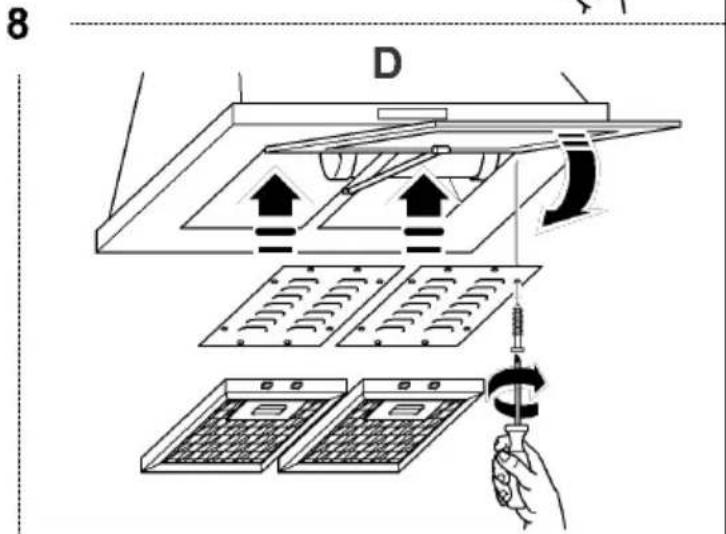
Thank you for buying our range hood. Please follow diagrams on pages 4-7 for proper installation, and carefully read the instructions below for more on installation, plus information on optimum use and maintenance.
Note: The figures mentioned in this manual are on pages 4 through 10.
INSTALLATION
Hood installation on walls (pages 4-6)

Warning: Consult local regulations regarding fumes outlets. Do not connect the hood to a fume, ventilation or hot air duct. Confirm that room ventilation is appropriate with the local authorities. Make sure the maximum air extraction flow rate for the appliances in the room does not exceed 4 Pa (0.04 mbar). The room must have adequate ventilation if an extractor hood is used simultaneously with appliances that run on gas or other fuels. The evacuated air must be extracted through ducts that are used for evacuating fumes from appliances that run on gas or other fuels. Regulations regarding air extraction must be complied with.
WARNING – TO REDUCE THE RISK OF FIRE, ELECTRIC SHOCK, OR INJURY TO PERSONS, OBSERVE THE FOLLOWING:
a) Installation work and electrical wiring must be done by qualified person(s) in accordance with all applicable codes and standards, including fire-rated construction.
b) Sufficient air is needed for proper combustion and exhausting of gases through the flue (chimney) or fuel burning equipment to prevent back drafting. Follow the heating equipment manufacturer's guideline and safety standards such as those published by the National Fire Protection Association (NFPA), and the American Society for Heating, Refrigeration and Air Conditioning Engineers (ASHRAE), and the local code authorities.
c) When cutting or drilling into wall or ceiling, do not damage electrical wiring and other hidden utilities.
d) Ducted fans must always be vented to the outdoors.
- Use rigid metal ductwork with a minimum diameter of 150 mm (about 4^3/4 ) to evacuate fumes outside.
- The above restrictions do not apply to hoods with no fumes outlet to outside (recirculation system with activated charcoal filter).
• Install the hood in line with the instructions on the template provided. - Use only with range hood cord-connection kits that have been investigated and found acceptable for use with this model range hood.
- The minimum distance to the hood must be at least 65 cm (about 25").
Hood installation on ceiling (page 7)
- Remove the Styrofoam protective piece before use.
- The accessories needed for installation are inside the hood.
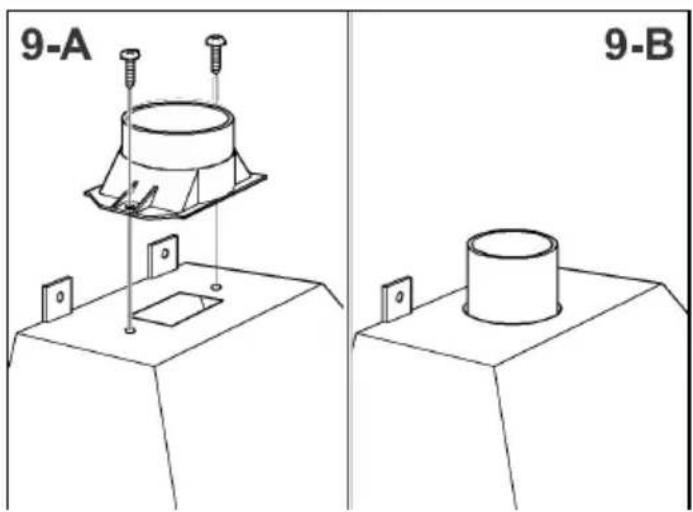
- Use the two screws to attach the reducer pipe H to the upper platen (Fig. 1). Connect the 6" non-flammable pipe to the opening in the ceiling.
- Confirm that the ceiling will support the weight of the hood. Drill 4 holes in the ceiling using a 5/6" bit and insert the plugs (Fig. 2).
- Adjust the length of the telescopic structure and attach the two pieces with 8 screws and washers. Bear in mind that the minimum distance from working surface to the base of the hood should not be less than 25" (Fig. 3).
- Attach the previously adjusted telescopic structure to the ceiling using 4 screws and washers (Fig. 4).
- Introduce pipe J with the grate on the upper part and attach the telescopic structure using 2 screws (Fig. 4).
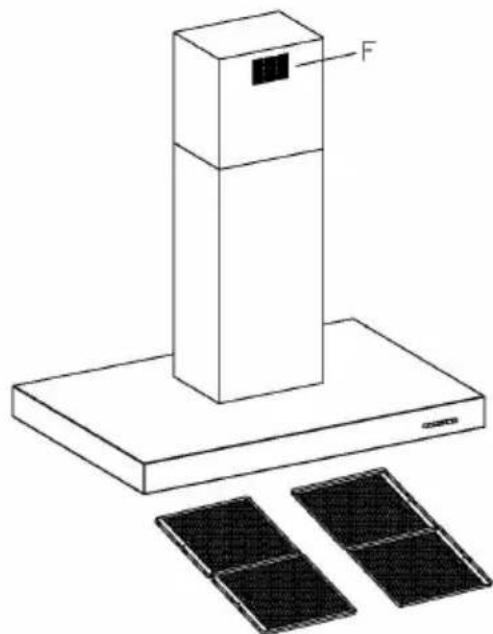
- Introduce pipe K and keep it raised (Fig. 5).
- Affix the hood to the telescopic structure using the nuts and washers (Fig. 5).
- Lower pipe K and attach it to the hood with 2 screws (Fig. 5)
Connecting the hood to the grid

Warning: Before connecting the hood: Switch off the electricity supply and check that the supplied voltage and frequency coincide with that indicated on the appliance nameplate.
Connect the hood directly to the electrical grid, protected by a separator device accessible for disconnection, in line with local regulations.
USE OF THE HOOD

WARNING: NOT SUITABLE FOR USE WITH SOLID-STATE SPEED CONTROLS.
Safety

Warning: The hood may stop working during an electrostatic discharge (e.g. lightning). This involves no risk of damage. Switch off the electrical supply to the hood and reconnect after one minute.
Do not allow the hood to be used by children or persons with reduced (physical, sensory or mental) capabilities or lack of experience and knowledge, unless they have been given instruction concerning use of the appliance by a person responsible for their safety.
Children should be supervised so that they do not play with the appliance.
To avoid the risk of fire, clean the metal filter regularly, be especially careful with pans containing hot oil and do not flambé food below the hood.
Do not use the hood if it shows signs of damage or imperfection. Contact an official distributor or authorized dealer.
Accessible parts may heat up when using cooking appliances.
Control Panel
The different control panels are described below. Check the panel model installed on your hood and see the figure indicated in each case.
Panel with sliding switch (Fig. P1 on page 8)
- Extractor fan speed - positions: OFF, speed 1, 2 and 3
- Extractor fan operating control pilot light.
- Lighting on and off switch.
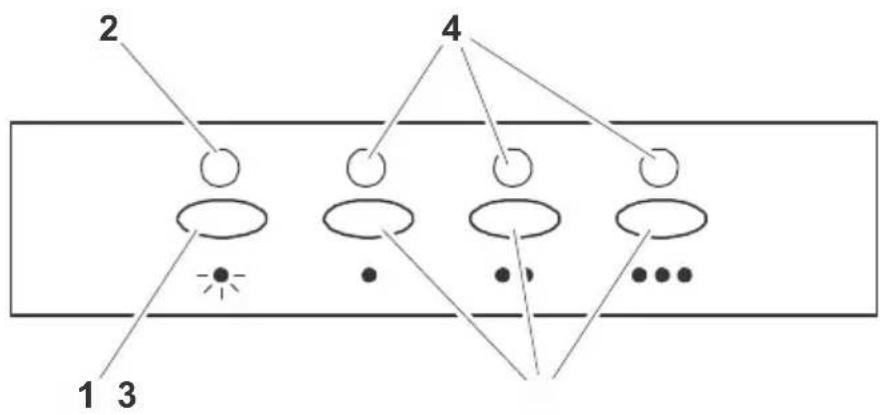
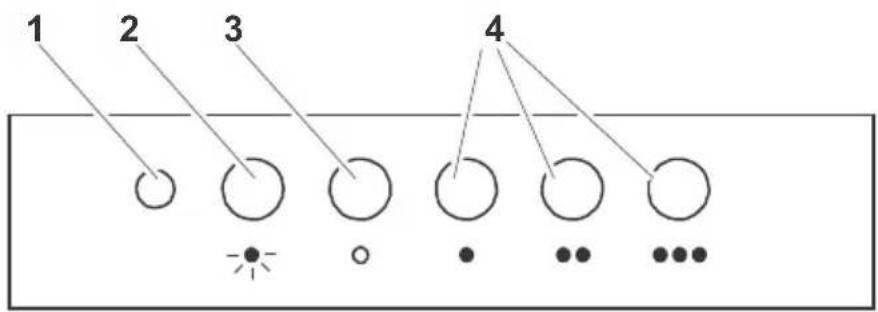
Panel with electronic button (Fig. P2 on page 8)
- Lighting on and off.
- Lighting operating control pilot light.
- Extractor fan speed - button: speed 1, 2 and 3. Press the current speed again to switch off the extractor fan.
- Extractor fan operating speed control pilot light.
Timer: Keep the chosen speed button pressed down for two seconds until the display flashes. The extractor fan stops after 15 minutes and the lighting switches off. To cancel the timer: Press the chosen speed button once.
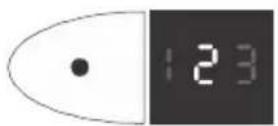
Four-speed panel - Digital display (Fig. P3 on page 8)
- Lighting on and off.
- Extractor fan on and off.
-
Decrease extractor fan speed.
-
Extractor fan speed display panel.
- Increase extractor fan speed.
- Enable extractor fan turbo speed.
- Enable and disable extractor fan timer.
Timer: The extractor fan works for 5 minutes at the current speed and another 5 minutes at each of the lower speeds until it stops and the lighting switches off.
Five-button panel (Fig. P4 on page 9)
- Extractor fan operating control pilot light.
- Lighting on and off.
- Extractor fan off.
- Extractor fan speed - button: speed 1, 2 and 3
Touch panel (Fig. P5 on page 9)
- Filter clean warning display/button. Warning of the need to replace the filter – press to deactivate once the filter has been cleaned or replaced.
- Enable and disable extractor fan timer.
- Lighting on and off. Keep pressed down to adjust the lighting intensity.
- Extractor fan on and off.
- Extractor fan speed - button: speed 1, 2 and 3/4
Timer: The extractor fan works for 5 minutes at the current speed and another 5 minutes at each of the lower speeds until it stops.
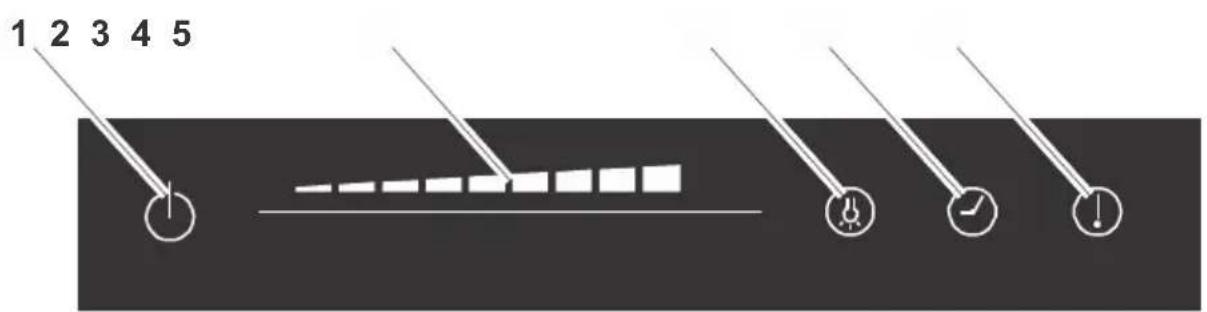
Sliding touch panel (Fig. P6 on page 9)
- Extractor fan on and off.
- Sliding touch panel for extractor fan speed control. Also used in combination with button -3-.
- Lighting on and off. Press the button and, while it is flashing, adjust the lighting intensity using the sliding touch panel -2-.
- Enable and disable extractor fan timer.
- Clean Filter warning display/button. Warning of the need to replace the filter – Press to deactivate once the filter has been cleaned or replaced.
Timer: The extractor fan works for 2 minutes at the current speed and another 2 minutes at each of the lower speeds until it stops and the lighting switches off.
Warning on the ZEN Model: The front panel automatically extends and retracts on switching the hood on/off.
HOOD MAINTENANCE

Warning: Always switch off the electricity supply before carrying out maintenance work on the hood. In the event of a fault, contact an official distributor or authorized dealer.
Exterior cleaning: Use non-corrosive, liquid detergent and avoid the use of abrasive cleaning products.
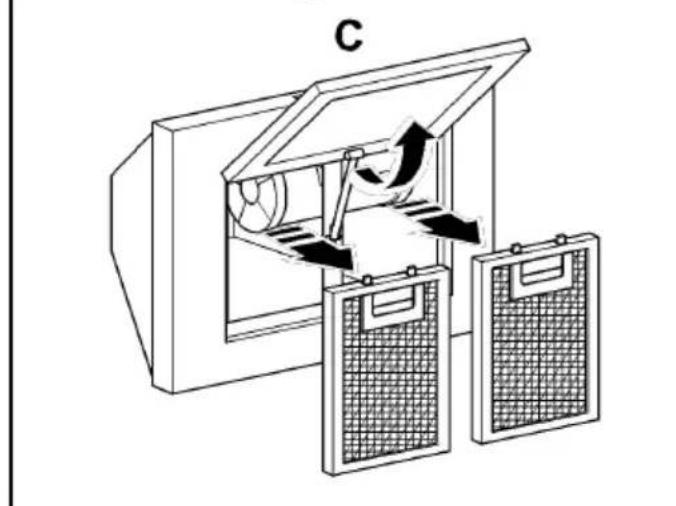
Grease filters: To avoid fires, clean thoroughly once a month or whenever the display pilot light indicates the need. To do so, remove the filters and wash with hot water and detergent. If using a dishwasher, position the filters vertically to prevent solid remains from depositing on them.
Activated charcoal filters: Replace every 3 months.

Important: increase the filter cleaning/replacement frequency if the hood is used for more than 2 hours a day. Always use genuine filters from the manufacturer.
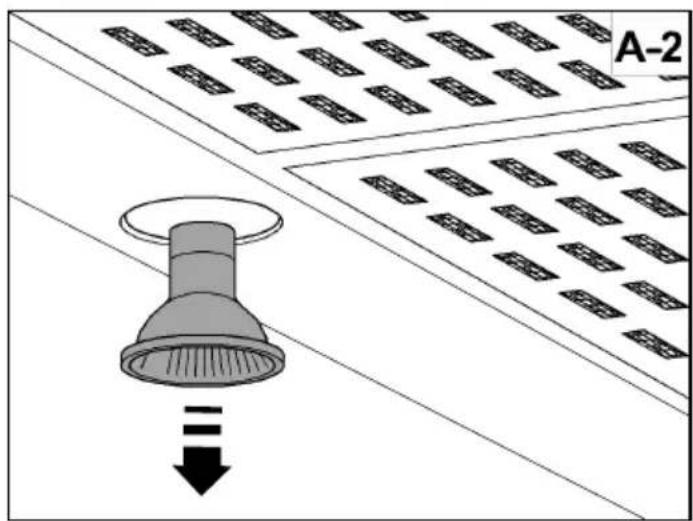
Bulb replacement (look for the symbol in the figures on page 10)

Warning: Do not handle the bulbs until the electricity supply has been switched off and they have cooled.
Important: Use new bulbs according to the type indicated on the hood nameplate.
Use bulbs with an aluminum reflector to replace halogen bulbs. Do not use dichroic bulbs – risk of overheating.
On kitchen hoods equipped with tungsten lamps, the lights should only be used during operation of the motor. They should not be left on permanently and used as a light source.
LIMITED WARRANTY
SUMMIT Appliance warrants this product to be free from defects in materials and workmanship for a period of one year from the date of original purchase or delivery. Any parts determined to be defective will be replaced by SUMMIT at no charge to you. Plastic parts, liners, and outer cabinets are warranted to be manufactured to commercially acceptable standards and free from defects at the time of delivery.
This limited warranty does not apply to:
- Improper installation
- Customer misuse, negligence or damage
- Incorrect electrical current
- Products with serial number altered or removed
- Products sold or used outside the fifty United States or District of Columbia
- Commercial or industrial users
- Damage to this product from accidents, alterations, failure to follow instructions, fire, floods, earthquakes, war, civil disturbance or Acts of God.
SUMMIT is not liable for consequential or incidental damage.
DISCLAIMER OF IMPLIED WARRANTIES; LIMITATION OF REMEDIES
CUSTOMER'S SOLE AND EXCLUSIVE REMEDY UNDER THIS LIMITED WARRANTY SHALL BE PRODUCT REPAIR AS PROVIDED HEREIN. IMPLIED WARRANTIES, INCLUDING WARRANTIES OF MERCHANTABILITY OR FITNESS FOR A PARTICULAR PURPOSE, ARE LIMITED TO ONE YEAR. WARRANTOR SHALL NOT BE LIABLE FOR INCIDENTAL OR CONSEQUENTIAL DAMAGES. SOME STATES DO NOT ALLOW THE EXCLUSION OR LIMITATION OF INCIDENTAL OR CONSEQUENTIAL DAMAGES, OR LIMITATIONS ON THE DURATION OF IMPLIED WARRANTIES OF MERCHANTABILITY OR FITNESS, SO THESE EXCLUSIONS OR LIMITATIONS MAY NOT APPLY TO YOU. THIS WARRANTY GIVES YOU SPECIFIC LEGAL RIGHTS AND YOU MAY ALSO HAVE OTHER RIGHTS, WHICH VARY FROM STATE TO STATE.
FELIX STORCH, INC.
Summit Appliance Division
770 Garrison Avenue
Bronx, New York 10474
www.summitappliance.com
For parts and accessory ordering, troubleshooting and helpful hints, visit:
www.summitappliance.com/support
or call 1-800-932-4267

CAMPANA EXTRACTORA DE ACERO INOXIDABLE
Estimado cliente:

- Manual for the Installation, use and maintenance of stainless steel kitchen range hoods
- READ AND SAVE THESE INSTRUCTIONS
- WARNING! TO REDUCE THE RISK OF A RANGE-TOP GREASE FIRE:
- WARNING! TO REDUCE THE RISK OF INJURY TO PERSONS IN THE EVENT OF A RANGE-TOP GREASE FIRE, OBSERVE THE FOLLOWING:
- WARNING! TO REDUCE THE RISK OF FIRE, ELECTRIC SHOCK, OR OTHER INJURY, OBSERVE THE FOLLOWING:
- CAUTION:
- WARNINGS ABOUT HANDLING AND CARRYING
- Dear Customer,
- INSTALLATION
- Hood installation on walls (pages 4-6)
- WARNING – TO REDUCE THE RISK OF FIRE, ELECTRIC SHOCK, OR INJURY TO PERSONS, OBSERVE THE FOLLOWING:
- Hood installation on ceiling (page 7)
- Connecting the hood to the grid
- USE OF THE HOOD
- Safety
- Control Panel
- Panel with sliding switch (Fig. P1 on page 8)
- Panel with electronic button (Fig. P2 on page 8)
- Four-speed panel - Digital display (Fig. P3 on page 8)
- Five-button panel (Fig. P4 on page 9)
- Touch panel (Fig. P5 on page 9)
- Sliding touch panel (Fig. P6 on page 9)
- HOOD MAINTENANCE
- LIMITED WARRANTY
- DISCLAIMER OF IMPLIED WARRANTIES; LIMITATION OF REMEDIES
- CAMPANA EXTRACTORA DE ACERO INOXIDABLE
Brand : Summit
Model : SEIH4648CV4
Category : Range hood