
Lars - Car seat Lionelo - Free user manual and instructions
Find the device manual for free Lars Lionelo in PDF.


| Product type | Child car seat |
| Brand | Lionelo |
| Model | Lars |
| Weight group | 0/1 (0-18 kg) |
| Recommended age | From birth to about 4 years |
| Installation | Seat belt or ISOFIX system |
| Dimensions (L x W x H) | 45 x 45 x 65 cm |
| Seat weight | 5 kg |
| Shell material | Polypropylene |
| Cover material | Polyester |
| Harness | 5-point, height adjustable |
| Headrest | Height adjustable |
| Recline | Multiple positions including lie-flat |
| Safety standard | ECE R44/04 |
| Side protection | Integrated, energy absorber |
| Cover care | Machine washable at 30°C |
| Shell cleaning | Damp cloth |
| Spare parts available | Yes, contact manufacturer |
| Warranty | 2 years |
| Use | Car only, rear-facing up to 15 months |
Frequently Asked Questions - Lars Lionelo
User questions about Lars Lionelo
0 question about this device. Answer the ones you know or ask your own.
Ask a new question about this device
Download the instructions for your Car seat in PDF format for free! Find your manual Lars - Lionelo and take your electronic device back in hand. On this page are published all the documents necessary for the use of your device. Lars by Lionelo.
USER MANUAL Lars Lionelo
natural_image
Line drawing of a car seat with no text or symbols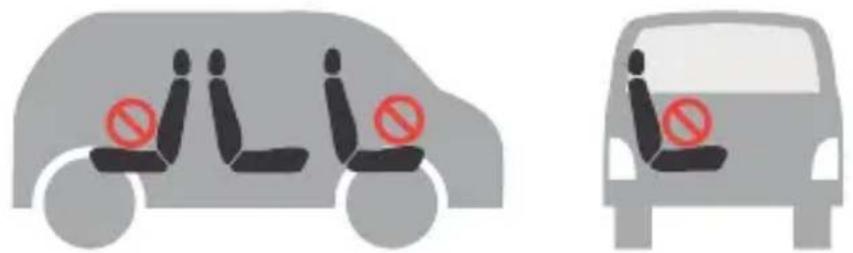
A
natural_image
Illustration of a person performing a stretching exercise with a blue arrow indicating direction (no text or symbols)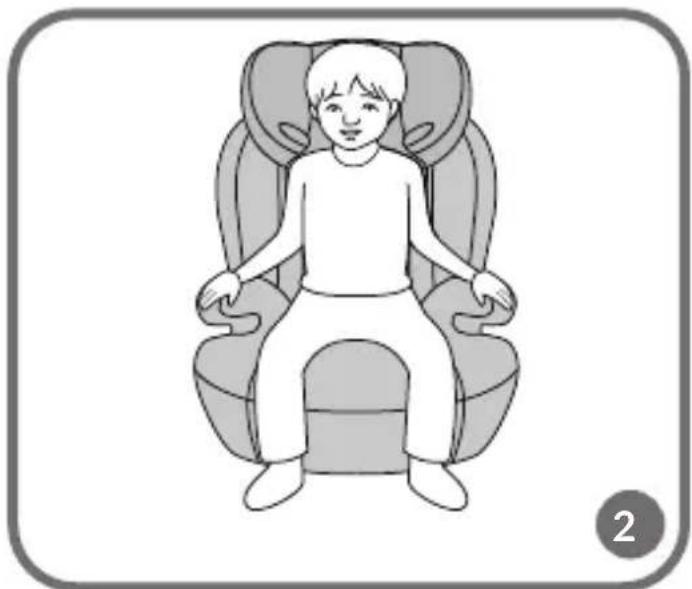
natural_image
Illustration of a person seated in a car seat, no text or symbols present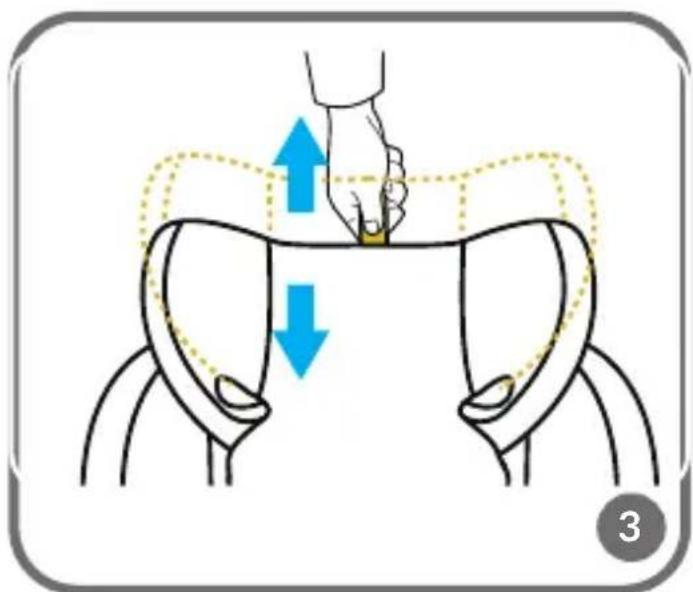
natural_image
Illustration showing three steps of a yellow children's seat: opening, folding, and adjusting the seat (no text or symbols)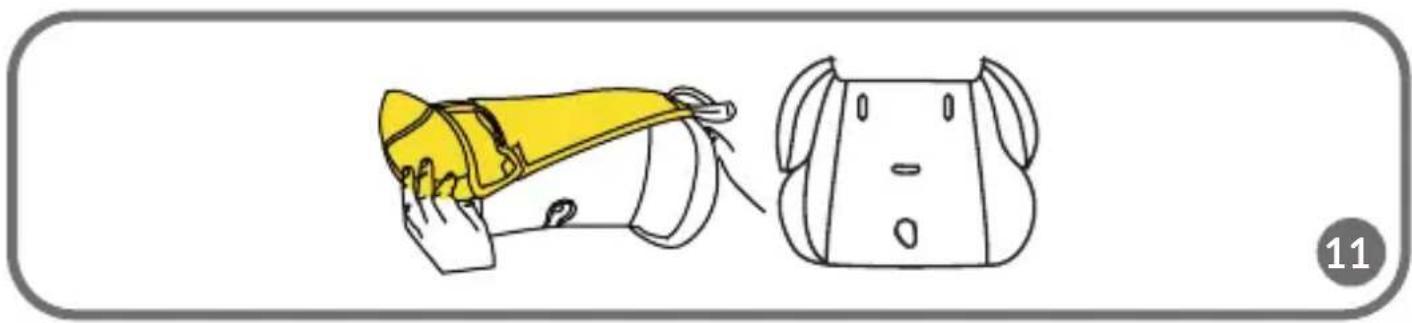
natural_image
Illustration of a yellow bag and a matching backpack with handles, no text or symbols presentDear customer!
Should you have any remarks or questions concerning the product, please do not hesitate to contact us: help@lionelo.com
Producer:
BrandLine Group Sp. z o. o.
This is a i-Size booster seat Enhanced Child Restraint System. It is approved according to UN Regulation No 129, for use primarily in “i-Size seating positions” as indicated by vehicle manufacturers in the vehicle user’s manual.
If in doubt, consult either the Enhanced Child Restraint System manufacturer or the retailer.
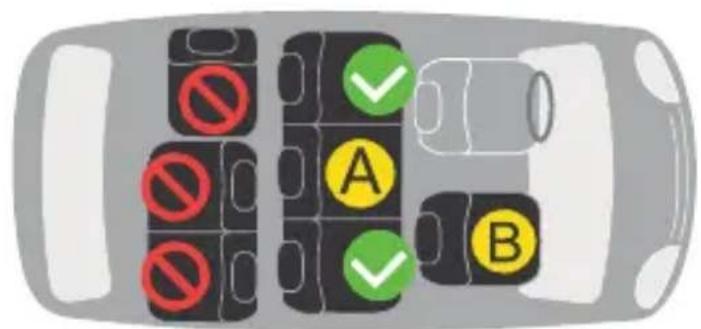
The product is suitable for installation on the locations marked with the symbol in fig. B, and marked i-Size.
The product is suitable for installation on the seat marked with the symbol in Fig. A. only if the seat is equipped with 3-point seat belts.
The product is suitable for installation on the seat marked with the symbol B in fig. A. only in the case of an inactive airbag. It is recommended that the seat should only be installed in the rear seats of the car.
WARNINGS:
- The product is designed for children between 100 and 150 cm tall.
- Hard parts and plastic parts of the child restraint system should be placed and installed in such a way that they cannot be trapped by a sliding seat or vehicle door under normal vehicle operating conditions.
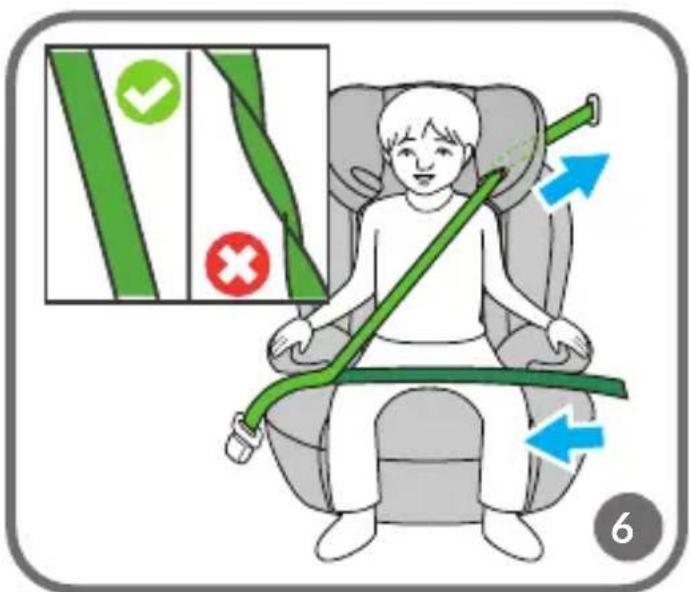
- Any seat belts that restrain a child must be well-fitted to the child's body structure. The belts must not be twisted.
- The straps securing the restraint to the vehicle must be tight.
- Make sure the lap belts run low to adequately secure the pelvis.
- If the product has been exposed to strong elements (such as impact), it should be replaced.
- Do not make any changes to the seat or add new components without approval from
the approval authority. To ensure maximum safety for your child, the equipment should be attached and used as recommended in the instructions.
- The plastic parts of this seat can heat up in the sun and cause burns on the child's skin.
- Never leave a child alone in a car seat in a vehicle.
- Luggage and other similar items should be secured so that they will not cause any injury in a collision situation.
- Do not use the seat without its fabric cover.
- The cover cannot be replaced with an item from another set. It is an integral part of the set and affects the operation of the restraint.
- Always carry this instruction manual with you.
- Refer to the vehicle manufacturer's owner's instruction manual.
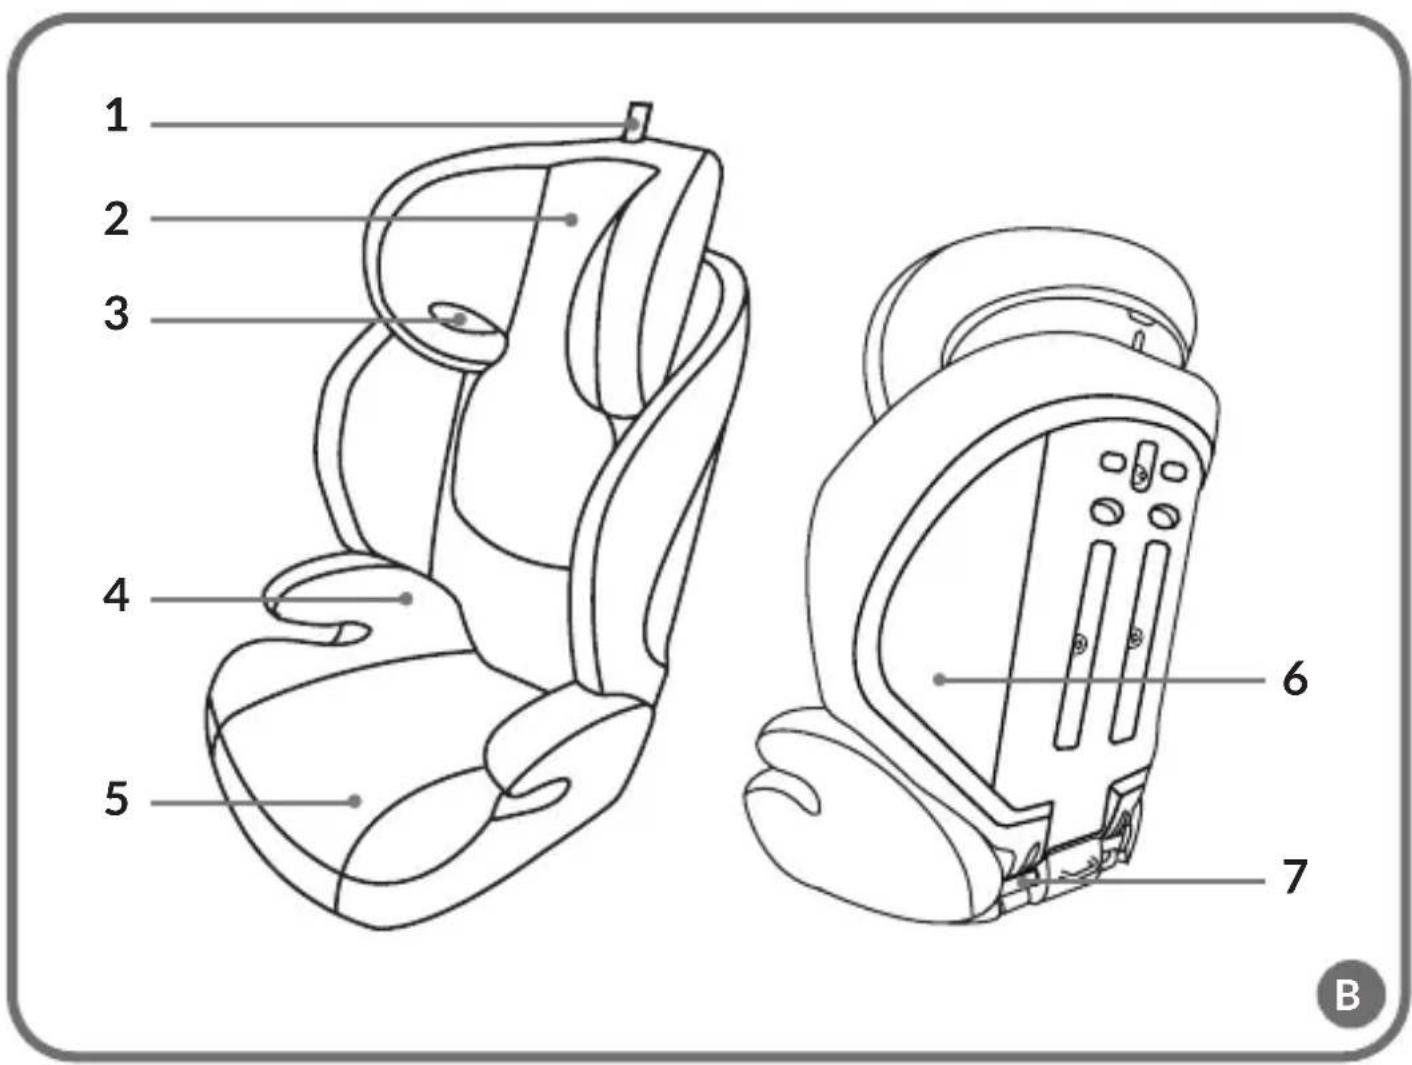
DESCRIPTION OF PARTS (FIG. B)
- Headrest height adjustment belt
- Headrest
- Shoulder belt guide
- Armrests
- Lap belt guide
- Backrest
- Backrest attachments
BACKREST INSTALLATION
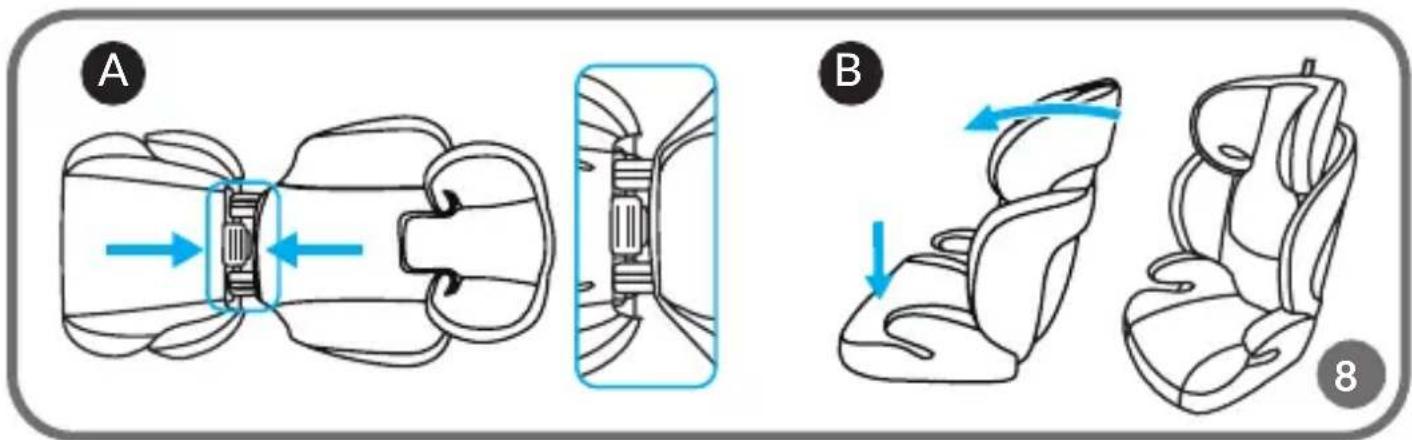
Place the rubber straps of the cover on the backrest attachments, place the attachments in the corresponding holes of the base (A, fig. 8), and then lift and set the backrest upright (B, fig. 8).
BACKREST REMOVAL
It is possible to remove the backrest. To do this:
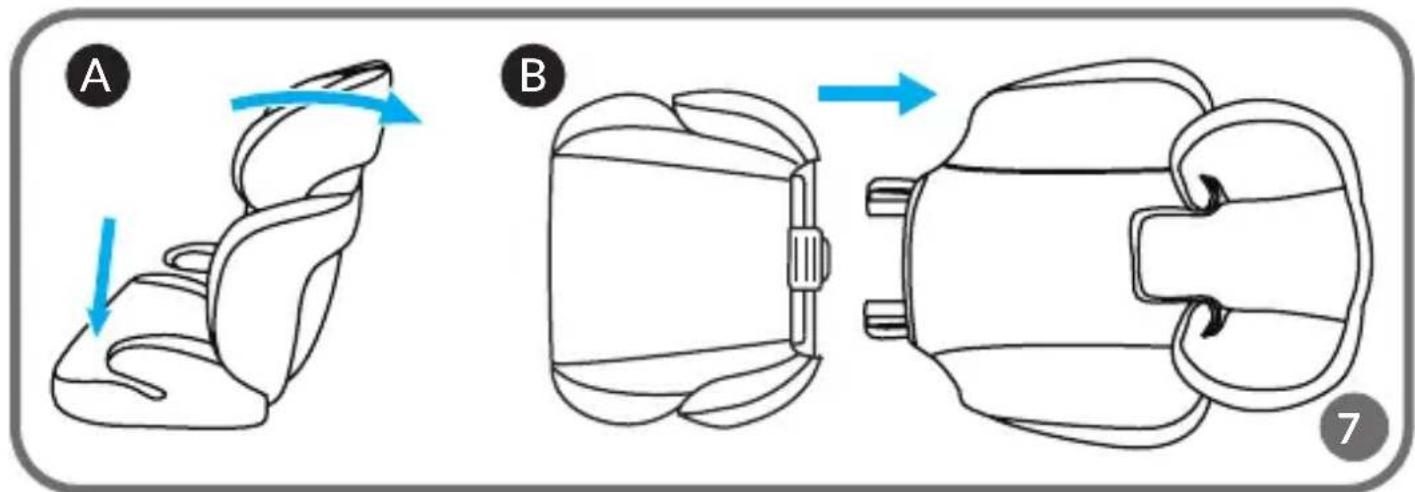
- Push the backrest of the seat fully in the horizontal direction (A, fig. 7).
- Disconnect the backrest attachments and separate the backrest from the base (B, fig. 7).
- To reinstall the backrest, put the rubber straps of the cover on the backrest attachments, place the attachments in the corresponding holes of the base (A, fig. 8), and then lift and set the backrest upright (B, fig. 8).
INSTALLATION OF THE SEAT IN THE CAR
The seat can be installed using the 3-point car belts alone. To do this:
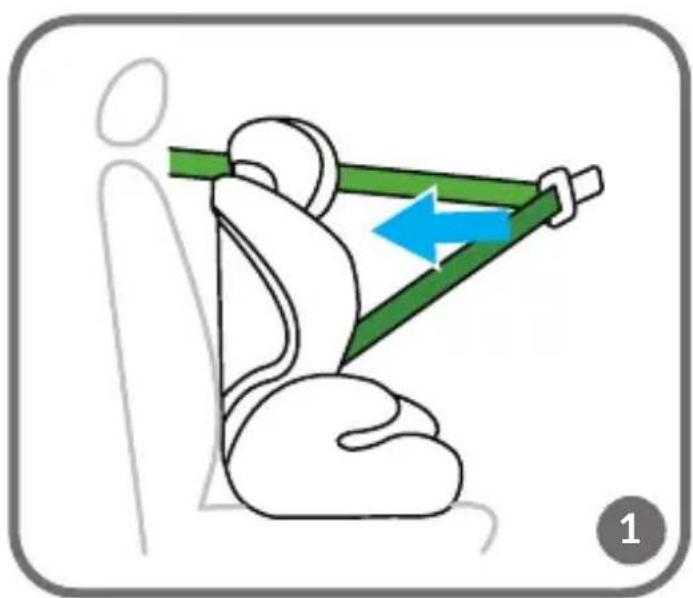
- Place the seat on the car's bench seat and pull out the seat belt as far as possible (fig. 1). Make sure the seat is pressed against the backrest of the car's bench seat.
- Place the child in the seat (fig. 2).
- Adjust the height of the headrest (fig. 3).
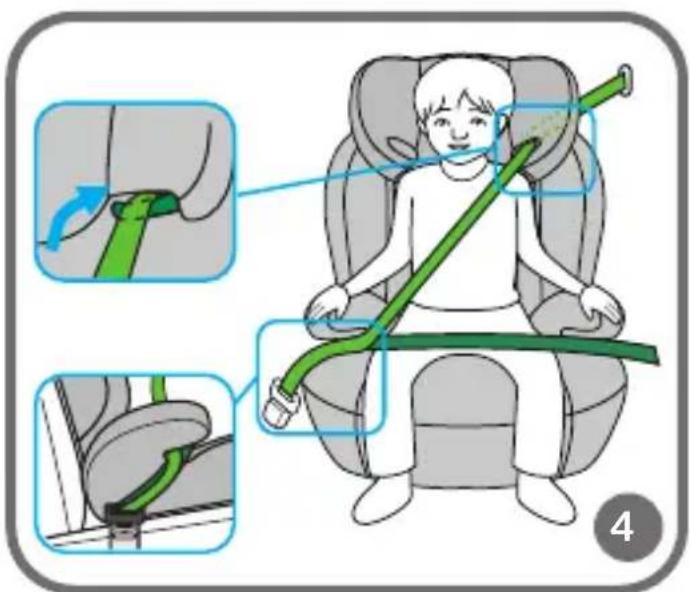
- Guide the seat belt through the shoulder belt guides located under the headrest, and the lap belt (fig. 4).
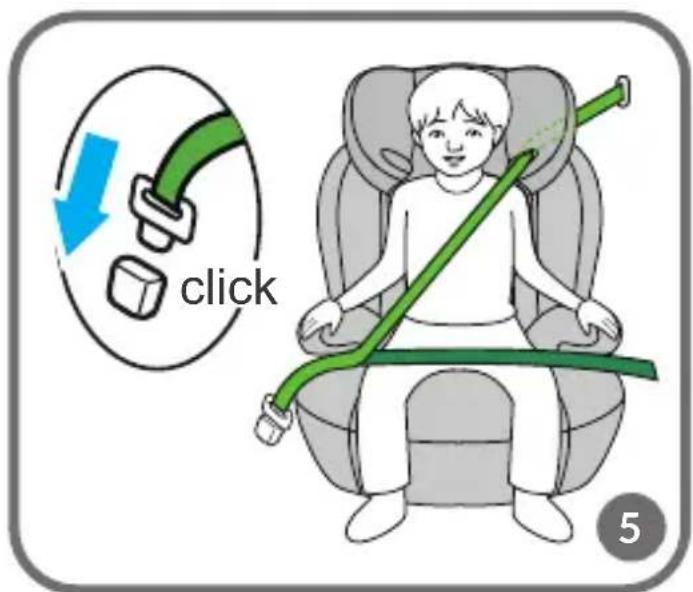
- Then pass both belts under the armrest and fasten them (fig. 5).
- Tighten the belts and make sure they are not twisted (fig. 6).
NOTE
The belts should be tight against the child's body, but should not be too tight and cause discomfort.
Make sure the lap belt runs low and protects the child's pelvis and passes through the lap belt guide.
REMOVAL OF THE SEAT IN THE CAR
Unbuckle the seat belt and remove it from the guides.
HEADREST ADJUSTMENT
To adjust the height of the headrest, pull the adjustment belt (1, fig. B) and set the desired height.
COVER REMOVAL
To remove the seat cover, follow these steps:
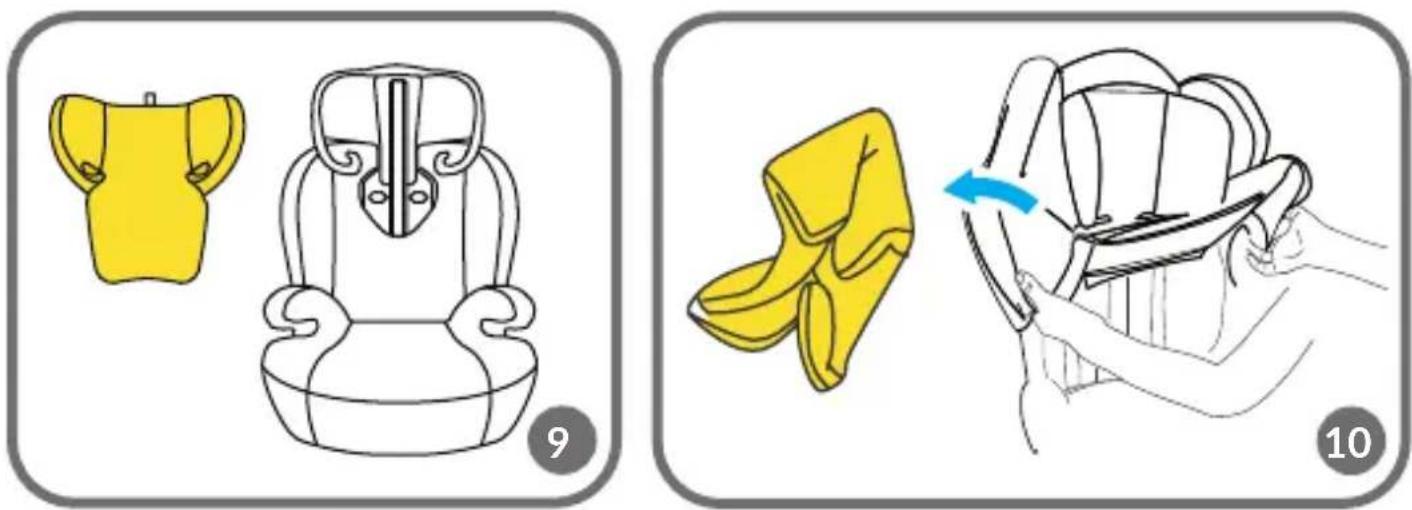
- Unfasten the metal clasps located at the back of the headrest, and then remove the headrest cover (fig. 9).
- Remove the backrest cover by pulling it upward (fig. 10).
- Remove the seat base cover by pulling it upward (fig. 11).
To reattach the cover, follow the above steps in reverse order.
CLEANING AND MAINTENANCE
- Clean minor dirt with a damp sponge and a mild detergent.
-
The cover can be washed at a maximum temperature of 30^ C. For this purpose, the cover must be completely removed from the seat (see: Cover manual).
-
When drying, do not use dryers. The cover should not be exposed to sunlight for drying. Plastic parts can be cleaned with a damp cloth and mild detergent.
- Note! Do not use strong detergents or bleaching agents.
The photos are for reference only, the actual look of the products may differ from the ones shown in the pictures.
PL
Drogi Kliencie!
JUSTERING AV NACKSTÖDET
Brand : Lionelo
Model : Lars
Category : Car seat