
Noa Plus - Car seat Lionelo - Free user manual and instructions
Find the device manual for free Noa Plus Lionelo in PDF.


| Product Type | Car Seat |
| Brand | Lionelo |
| Model | Noa Plus |
| Weight Group | 0+/1/2/3 (0 - 36 kg) |
| Dimensions (H x W x D) | 61 x 44 x 54 cm |
| Weight | 7.5 kg |
| Shell Material | Reinforced Polypropylene |
| Harness | 5-point |
| Installation | Isofix + Top Tether or seat belt |
| Orientation | Rear-facing (0-18 kg), Forward-facing (15-36 kg) |
| Main Features | 5-position recline adjustment, height-adjustable headrest, integrated side protection |
| Care and cleaning | Removable and machine-washable cover at 30°C |
| Safety | Approved according to R129 (i-Size) standard |
| Spare parts and repairability | Available on request from Lionelo customer service |
| General information | 2-year warranty, user manual included |
Frequently Asked Questions - Noa Plus Lionelo
User questions about Noa Plus Lionelo
0 question about this device. Answer the ones you know or ask your own.
Ask a new question about this device
Download the instructions for your Car seat in PDF format for free! Find your manual Noa Plus - Lionelo and take your electronic device back in hand. On this page are published all the documents necessary for the use of your device. Noa Plus by Lionelo.
USER MANUAL Noa Plus Lionelo
natural_image
Black and white baby car seat with lionelo branding, no visible text or symbols on body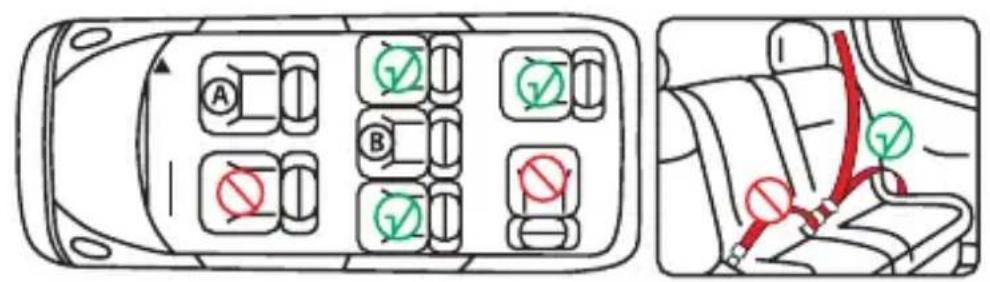
1
2
natural_image
Simple line drawing of a person with large eyes and a neutral expression (no text or symbols)ABC
natural_image
Simple line drawing of a person with large eyes and a neutral expression (no text or symbols)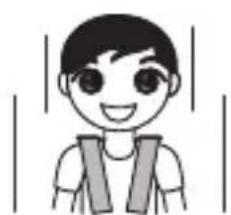
natural_image
Simple cartoon illustration of a smiling boy wearing sunglasses and a vest (no text or symbols)3
natural_image
Line drawing of a mechanical device with no visible text or symbols4
natural_image
Illustration of a child wearing a full-body safety harness inside a seatbelt, with no text or symbols present.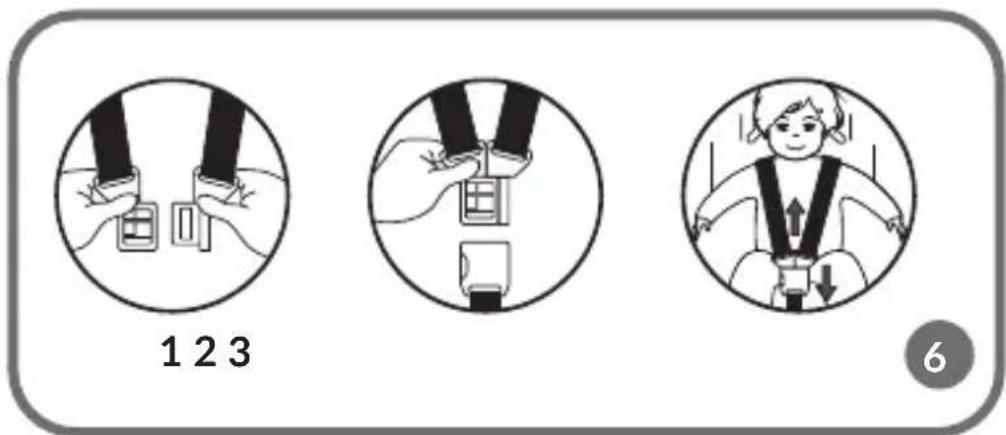
natural_image
Illustration of a baby wearing a full-body seatbelt, with a hand holding a buckle and a downward arrow indicating pressure or force (no text or symbols)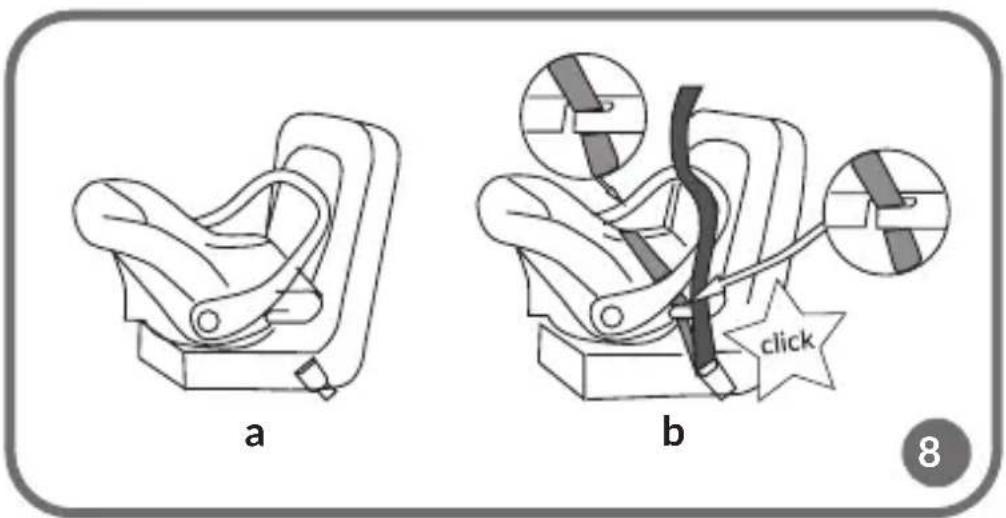
natural_image
Diagram of a car seatbelt switch with a magnified inset showing the switch mechanism (no text or symbols)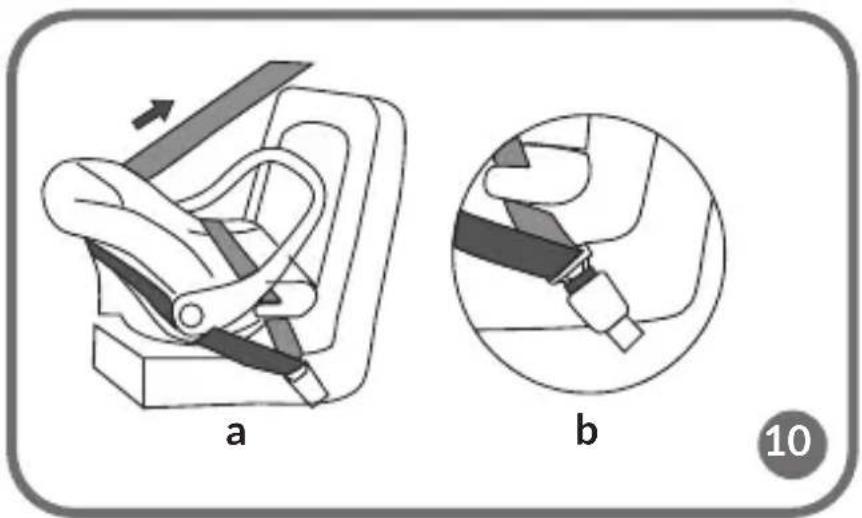
natural_image
Illustration of a car seatbelt buckle assembly (a) and its magnified view (b), no text or symbols present.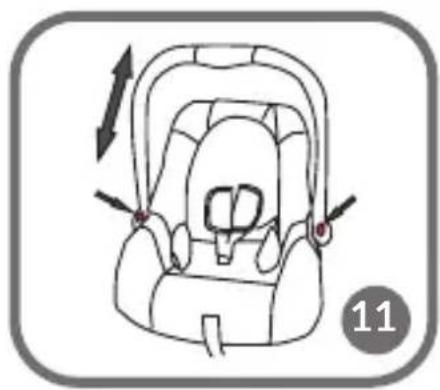
natural_image
Line drawing of a car seat with arrows indicating clockwise motion (no text or symbols)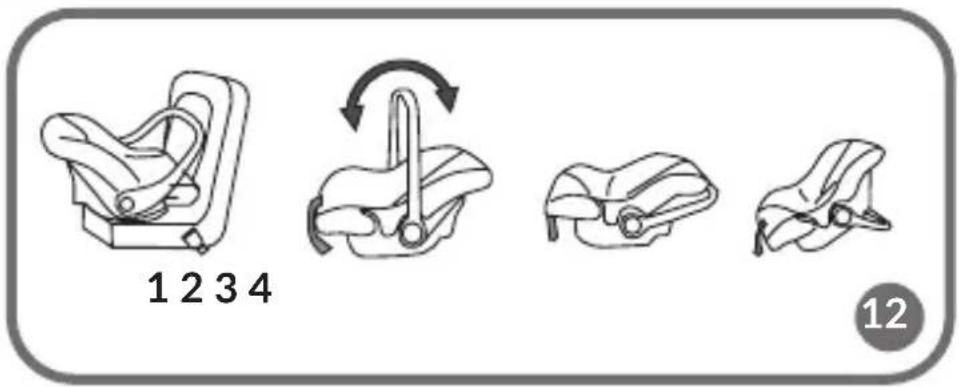
flowchart
graph TD
    A["Medical Tool"] --> B["Surgical Robot"]
    B --> C["Anatomical Inplantation"]
    C --> D["Anatomical Anatomical Inplantation"]
    D --> E["Laparoscopic Implantation"]
    E --> F["Anatomical Anatomical Inplantation"]
    F --> G["Laparoscopic Anatomical Inplantation"]
    style A fill:#f9f,stroke:#333
    style B fill:#ccf,stroke:#333
    style C fill:#cfc,stroke:#333
    style D fill:#fcc,stroke:#333
    style E fill:#cff,stroke:#333
    style F fill:#ffc,stroke:#333
    style G fill:#cfc,stroke:#333
Info
This is a “universal” child restraint. Approved in accordance with UN Regulation No. 44, series of amendments 04, for general vehicle use and suitable for mounting on most car seats.
Acorrect installation is possible if the vehicle manufacturer has declared in the vehicle's manual that the vehicle is capable of accepting a “universal” child restraint for this age group.
This child restraint has been classified as “universal” under more stringent conditions than those applied to earlier designs, which do not carry this notice. In case of any questions, please contact either the manufacturer or the retailer of the device.
NOTE! Suitable for installation only if type-approved vehicles are equipped with three-point retractor seat belts that have been approved in accordance with UN Regulation No. 16 or other equivalent standards.
Dear Customer!
In case of any questions or comments on the purchased product, please contact us: help@lionelo.com
Before using the product, please read the included user manual carefully.
Producer:
BrandLine Group Sp. z o. o.
The product is compliant with ECE R44/04 as a car safety seat suitable for the 0+ age group that is for children between 0 and 13kg of weight. Only when used correctly can the safety seat protect your child the most effectively. Failure to comply with the provisions in the manual can result in an accident. In order to protect your child, always install and use LO-Noa Plus as described in this manual.
1. Important information
Before using the car safety seat please read this user manual carefully.
Improper use may lead to a serious threat to the life of your child.
WARNING: Do not mount the safety seat on a passenger seat equipped with an airbag.
2. Function
Noa Plus has been classified as a “universal” car safety seat for children from Group 0+, that is - those weighing less than 13 kg.
Group 0+: children weighing less than 13 kg
Do not install the safety seat in a forward-facing position if the child.
Children from group 0+ must use the 5-point safety harness (included with the seat), while the safety seat itself must be secured by the vehicle's 3-point seat belt. The safety seat can only be mounted in vehicles approved to ONZ/EKG Regulation No.16 or other equivalent standards.
See fig. 1
√ Correct installation of the safety seat.
Incorrect installation of the safety seat.
Ⓐ Do not mount the safety seat on a passenger seat equipped with an airbag.
The installation of the safety seat is possible if a vehicle's middle seat is equipped with a 5-point safety belt.
3. Safety notes
- The hard parts and plastic parts of the child restraint shall be placed and installed in such a way that, under normal conditions of use of the vehicle, they cannot be trapped by the sliding seat or door of the vehicle.
- Do not install the device on seats equipped with active front airbags.
- All straps that secure the restraint to the vehicle must be taut, straps that secure the child must be adapted to the child's body, and must not be twisted.
- Make sure the lap belts run low so that the pelvis is held firmly.
- If the device was subjected to sudden loads during an accident, it must be replaced.
- Do not make any modifications to the seat or install any additional components without the consent of the competent authorities. To ensure maximum safety for your child, the equipment must be secured and used in accordance with
the instructions provided in the manufacturer's instructions.
- The plastic parts of this car seat may heat up in the sun and cause burns on the baby's skin.
- Protect the seat from the sun. Otherwise, the seat may be too hot for your child's skin.
- Never leave your child unattended in the restraint.
- Luggage and other objects that can cause injury in the event of a collision should be properly secured.
- A child restraint system without upholstery should not be used. It is not allowed to replace the seat upholstery other than that recommended by the manufacturer, as it is an integral part of the device that affects its functioning.
- Keep the seat user manual when using the device. Keep it in the car where the car seat is installed.
- Do not use load bearing points of contact other than those described in the instructions and marked on the child restraint.
- If in doubt about the position of the adult seat belt buckle relative to the main load-bearing points, contact the child restraint system manufacturer.
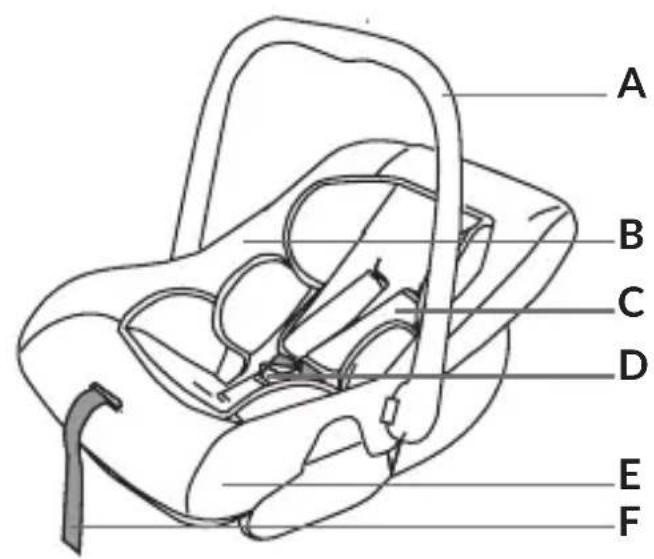
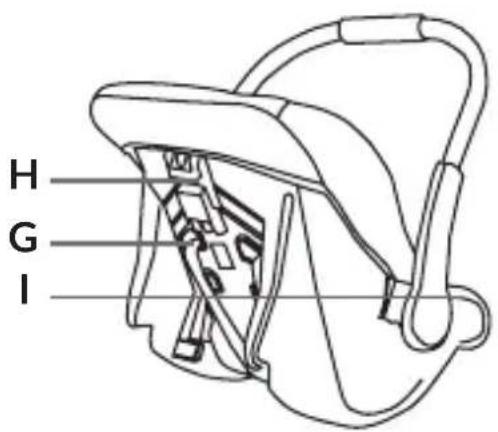
4. Set (fig. 2)
A. handle
F. seatbelts adjustment strap
B. back
G. strap holes
C. seatbelts
H. belts guide
D. safety lock
I. lap strap
E. cover
5. Usage
5.1 Shoulder straps height adjustment
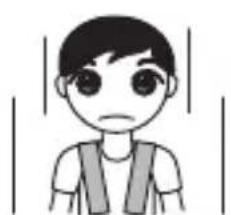
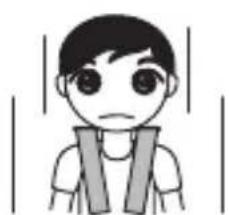
The shoulder straps should be placed as close to the baby's shoulders as possible. If the position of the straps is incorrect, remove them and install at a suitable height (fig. 3).
1 - to low
2 - to high
3 - correct
5.2 Straps usage / adjustment
If the position of the safety straps is not suitable for your child, please complete the following steps:
Step 1: loosen the shoulder straps.
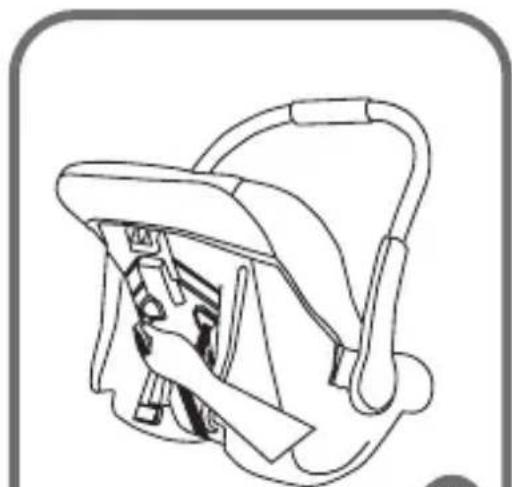
Step 2: remove both straps from the baby seat and uncouple them (fig. 4).
Step 3: run the straps through the proper holes. Make sure that both straps are installed at the same height and they are not twisted.
5.2.1 Loosening the straps
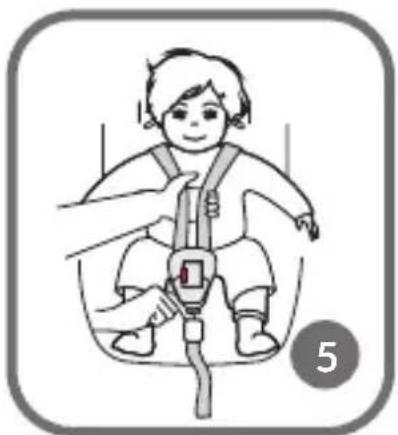
Step 1: Press the button located under the seat, at the front of the baby seat.
Step 2: While holding the button, pull the shoulder straps to loosen them (fig. 5).
5.2.2 Securing a child in the baby seat (fig. 6)
When the shoulder straps are properly adjusted to the height of your child, please complete the following steps:
Step 1: Unfasten the buckle and put the straps apart so that they don't block the seat. Then, place your child in the baby seat.
Step 2: Run the shoulder straps over the baby's shoulders and put the two metal connectors together, as shown in the picture 1.
Step 3: Insert the joint connector into the buckle, as shown in the picture 2. The “click” sound indicates that the connector has been properly locked in the buckle.
Step 4: Pull the shoulder straps to make sure that they are properly secured in the buckle, as shown in the picture 3.
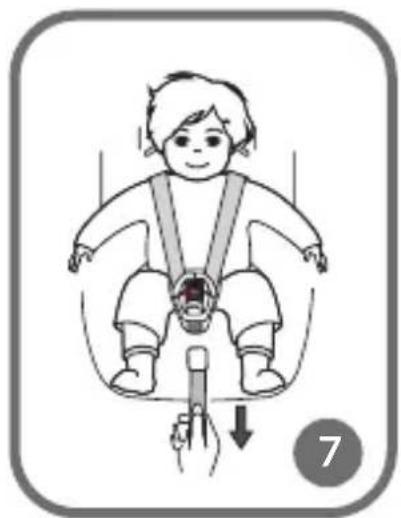
5.2.3 Tightening the straps
Pull the shoulder straps up so as to stretch them out. Then pull the adjustment strap to tighten the harness (fig. 7).
The shoulder straps should be neither too tight nor too loose so as not to cause discomfort to the child.
5.3 Securing the baby seat
In order to properly mount the baby seat in a car, please refer to the corresponding information in the vehicle's manual.
Do not mount the baby seat in a vehicle's front car seat with active airbags.
This baby seat can only be secured in a car with a 3-point seat belt.
The baby seat must be installed in a rear-facing position.
Step 1: Move the lever to the extended position. Place the baby seat on the car seat. The handle must be rested on the back of the car seat (fig. 8a).
Step 2: Run the belt through all guides of the baby seat. Lock the belt connector
in the vehicle's safety buckle. Pull the belt to make sure it is properly secured in the buckle (fig. 8b).
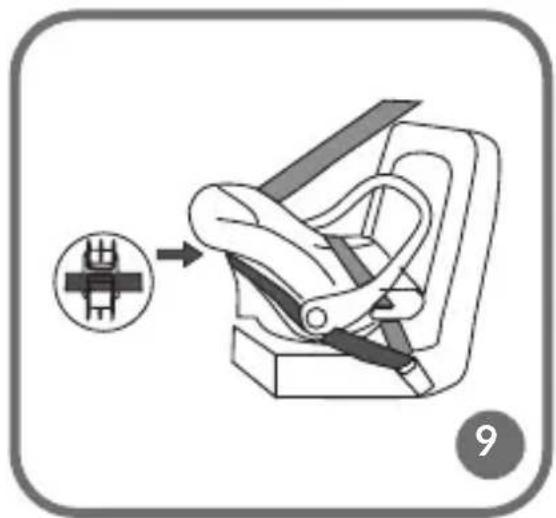
Step 3: Hook the shoulder part of the belt in the guide located at the rear side of the baby seat's back (fig. 9).
Step 4: Tighten the 3-point seat belt by pulling it as it is shown in the picture (fig. 10a).
After all these steps the baby seat is properly installed and secured (fig. 10b).
Make sure that the belt hasn't twisted during the installation and it is properly tightened.
To remove the baby seat from the car, please follow the above steps in reverse order.
5.4 Changing the handle's position
The seat's handle can be placed in 4 different positions. In order to change the position, press the red buttons at the both sides of the baby seat simultaneously. The buttons are located in the side corners of the baby seat (fig. 11, 12).
You can place the handle in 4 different positions:
- It is the only position you can use while mounting the baby seat on a vehicle's seat.
- Basic position - you can choose it to carry a child.
- Resting position - use it to freely put a child in/out of the baby seat.
- Base position - ideal when you feed or play with a child.
Each time you change the handle's position make sure it has been properly secured (locked).
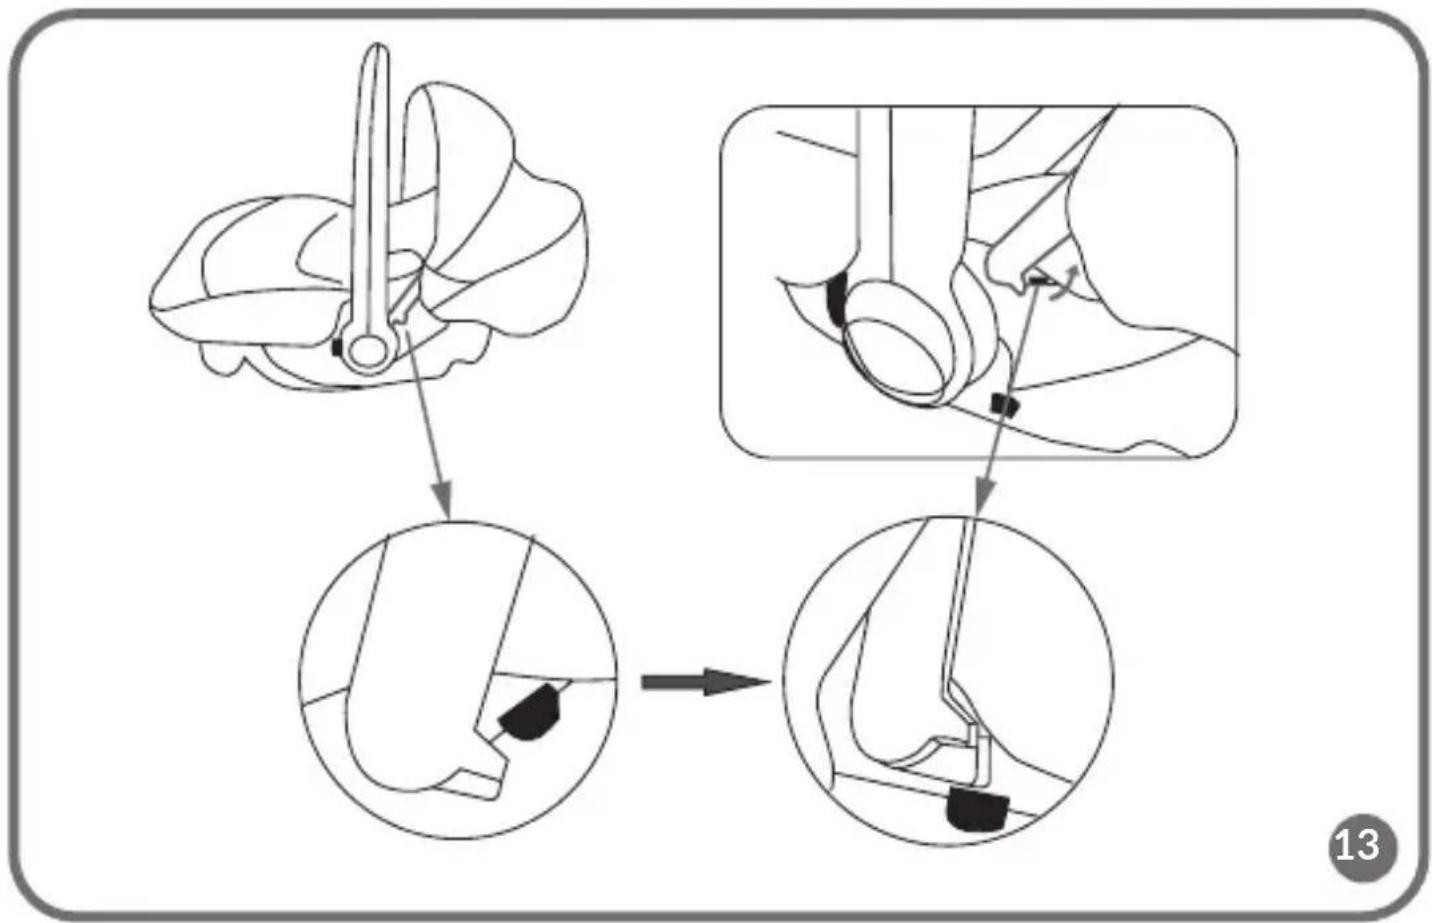
5.5 Using the hood (fig. 13)
The handles at the ends of the frame are adjustable. "Click" sounds indicate that the hood has been properly folded / unfolded.
5.6 Maintenance
The cover can be easily removed for cleaning. In order to do so, first pull the straps out of the baby seat. Then remove the cover.
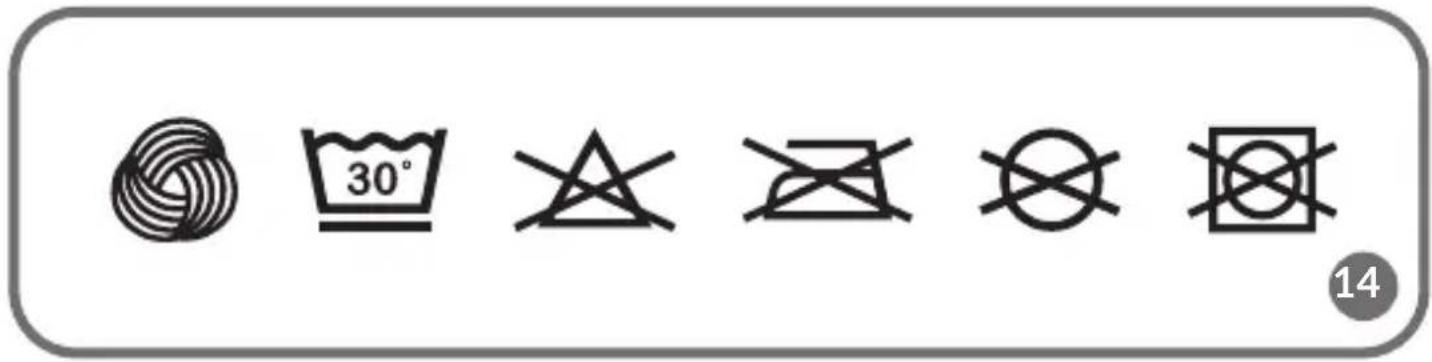
Cleaning: Straps and plastic parts can be cleaned with mild detergents and warm
water (up to 30^ ). Do not clean the baby seat or any of its components with chemicals, bleachers or corrosive liquids (fig. 14).
6.What should be done after the accident?
If the collision occurred at the speed greater than 10 km/h, ensure that the safety seat has no mechanical damage. If it doesn't work properly, stop using it so as not to put your child at risk.
Illustrations are for informational purposes only. The actual appearance of the products may differ from the pictures.
PL
Informacja
Detailed warranty conditions are available on the website:
Thank you for purchasing our product
- Info
- Dear Customer!
- Producer:
- Important information
- Function
- Group 0+: children weighing less than 13 kg
- See fig. 1
- Safety notes
- Set (fig. 2)
- Usage
- Shoulder straps height adjustment
- Straps usage / adjustment
- Loosening the straps
- Securing a child in the baby seat (fig. 6)
- Tightening the straps
- Securing the baby seat
- After all these steps the baby seat is properly installed and secured (fig. 10b).
- Changing the handle's position
- Using the hood (fig. 13)
- Maintenance
- 6.What should be done after the accident?
- PL
- Informacja
Brand : Lionelo
Model : Noa Plus
Category : Car seat