P18HP - Air conditioner ElectriQ - Free user manual and instructions
Find the device manual for free P18HP ElectriQ in PDF.


| Product Type | Portable Air Conditioner with Heat Pump |
| Model | P18HP |
| Cooling Capacity | 5.2 kW (18,000 BTU) |
| Heating Capacity | 4.7 kW (16,000 BTU) |
| Power Supply | 220-240 V / 50 Hz, earthed outlet |
| Rated Input (Cooling) | 2000 W |
| Rated Input (Heating) | 2043 W |
| Running Current (Cooling) | 9.3 A |
| Running Current (Heating) | 9.4 A |
| Noise Level | <65 dB(A) |
| Net Weight | 30 kg |
| Refrigerant Type | R290 |
| Refrigerant Quantity | 300 g |
| Dimensions (L x D x H) | 470 x 370 x 764 mm |
| Functions | Cooling, Heating, Fan, Dehumidifier, Auto |
| Fan Speeds | Low, Medium, High |
| Timer | 24-hour programmable on/off timer |
| Remote Control | Included (functions same as control panel) |
| Self-Evaporative System | Yes (reduces need to empty water tank in cooling mode) |
| Drainage Options | Manual drainage via plug; continuous drainage for heating/dehumidifier modes |
| Air Filter Cleaning | Washable mesh filter every 2 weeks; optional carbon filter replace every 3-6 months |
| Safety Features | Compressor protection (3-minute restart delay); tank full indicator; overheating protection |
| Minimum Room Size (for R290) | 14.4 m² |
| Operating Temperature Range | 7 °C to 35 °C |
Frequently Asked Questions - P18HP ElectriQ
User questions about P18HP ElectriQ
0 question about this device. Answer the ones you know or ask your own.
Ask a new question about this device
Download the instructions for your Air conditioner in PDF format for free! Find your manual P18HP - ElectriQ and take your electronic device back in hand. On this page are published all the documents necessary for the use of your device. P18HP by ElectriQ.
USER MANUAL P18HP ElectriQ
natural_image
White industrial air conditioner unit with closed lid and side button (no visible text or symbols)PORTABLE AIR CONDITIONER WITH HEATPUMP P16HP / P18HP
Thank you for choosing electriQ
Please read this user manual before using this innovative Air Conditioner and keep it safe for future reference.
Visit our page www.electriQ.co.uk for our entire range of Intelligent Electricals.
CONTENTS
SAFETY INSTRUCTIONS 3
FEATURES AND PARTS LIST 5
INSTALLATION 7
OPERATION AND SETTINGS 9
WATER-DRAINAGE 11
MAINTENANCE 12
TROUBLESHOOTING 13
APPENDIX 14
SAFETY INSTRUCTIONS
IMPORTANT!
- Carefully read the instructions before operating the unit
- This appliance is for indoor use only.
- Rating: This unit must be only connected to a 220-240 V / 50 Hz earthed outlet.
- Installation must be in accordance with regulations of the country where the unit is used.

natural_image
Simple line drawing of an open book with no text or symbols visible- If you are in any doubt about the suitability of your electrical supply have it checked and, if necessary, modified by a qualified electrician.
- This air conditioner has been tested and is safe to use. However, as with any electrical appliance - use it with care.
- Disconnect the power plug from socket before dismantling, assembling or cleaning.
- Avoid touching any moving parts within the appliance.
- Never insert fingers, pencils or any other objects though the guard.
- This appliance can be used by children aged from 8 years and above and persons with reduced physical, sensory or mental capabilities or lack of experience and knowledge if they have been given supervision or instruction concerning use of the appliance in a safe way and understand the hazards involved. Children shall not play with the appliance. Cleaning and user maintenance shall not be made by children without supervision.
- Do not leave children unsupervised with this appliance.
- Do not clean the unit by spraying it or immersing it in water.
- Never connect the unit to an electrical outlet using an extension cord. If an outlet is not available, one should be installed by a qualified electrician.
- Never operate this appliance if the cord or plug is damaged. Ensure the power cord is not stretched or exposed to sharp objects/edges.
- The power cord must not be immersed in water, as this could result in electric shock.
- A damaged supply cord should be replaced by the manufacturer or a qualified electrician in order to avoid a hazard.
- Any service other than regular cleaning or filter replacement should be performed by an authorized service representative. Failure to comply could result in a voided warranty.
- When defrosting and cleaning the appliance, only use tools recommended by the manufacturer.
- Do not use the appliance for any purpose other than its intended use.
- The air conditioner must always be stored and transported upright, otherwise irreparable damage may be caused to the compressor; if in doubt we suggest waiting at least 24 hours before starting the unit.
- Avoid restarting the air conditioner unless 3 minutes have passed since being turned off. This prevents damage to the compressor.
- Never use the mains plug or an external timer as a switch to start and stop the air conditioner. Use the provided ON/OFF button located on the control panel.
• Always place the unit on a dry and stable surface.
- The appliance should not be installed in laundry or wet rooms
- R290 refrigerant gas complies with European environmental directives. R290 has a low GWP (Global Warming Potential) of 3.
- The P16HP contains about 225 g of R290 refrigerant gas, and the P18HP contains about 300g of R290 refrigerant gas.
- Do not use or store in unventilated spaces with an area smaller than 10.8 m ^2 per unit for P16HP and 14.4 m ^2 per unit for P18HP. The room must be such as to prevent stagnation of possible leaks of refrigerant gas as there could be a danger of fire or explosion hazard should the refrigerant come into contact with electric heaters, stoves or other sources of ignition.
- Do not use the product and contact the retailer for advice, if damage has occurred to the unit which may have compromised the refrigerant system.
- Do not open the air conditioner, to attempt service or repair the unit. Any internal servicing of the unit must be carried out only by the manufacturer or its authorized technicians.
- Any repairs or maintenance must only be carried out on the unit by a suitably qualified engineer. Before opening and servicing the unit the authorized engineer must be in possession of a copy of the manufacturer's service manual and must follow the safety information contained within it to ensure all hazards are minimized.
- The refrigerant system should not be perforated or punctured.
- Do not pierce or burn.
- Be aware that refrigerants may not contain an odour.
- Do not use means to accelerate the defrosting process or to clean, other than those recommended by the manufacturer.
- The appliance shall be stored in a room without continuously operating ignition sources (For example: open flames, an operating gas appliance or an operating electric heater)
ENERGY SAVING AND UNIT SAFETY PROTECTION TIPS
- Do not cover or restrict the airflow from the outlet or inlet grills.
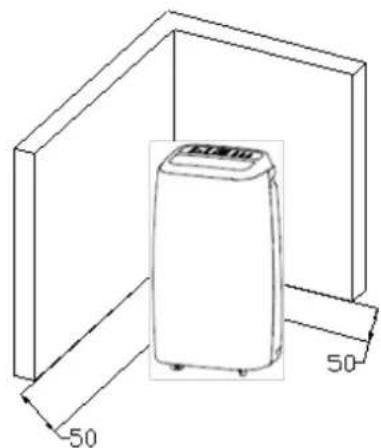
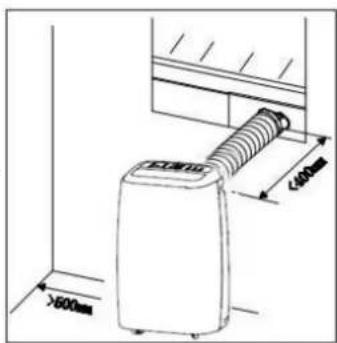
- For maximum performance the air conditioner should be situated at least 50cm from the walls or other objects.
- Keep the filters clean. Under normal conditions, filters should only need cleaning once every three weeks (approximately). Since the filters remove airborne particles, more frequent cleaning maybe necessary, depending on the air quality.
- For the initial start-up set the fan speed to maximum and the thermostat to 4-5 degrees lower than the current temperature. After, set the fan to low and set the thermostat to your desired setting.
- To protect the unit we recommend the unit should only be used when the temperature of the room is between 7°C and 35°C. If the temperature is below this use electrical heating to raise the temperature above 10°C before starting the unit.
FEATURES AND PARTS LIST
FEATURES
● Full climate control, cooling, heating, fan and dehumidifier
● Self-evaporative system - no external water tank needed
● Powerful but compact
● LED screen, indicates temperature and operation mode
- Enhanced design with hot air outlet positioned higher – This allows for improved performance with the use of a short hose
- 24 hour programmable timer function – Allows you to choose when the unit operates.
- 3 speed fan Low, Medium and High for best balance between quiet operation and maximum airflow
- Compressor protection technology
PARTS LIST
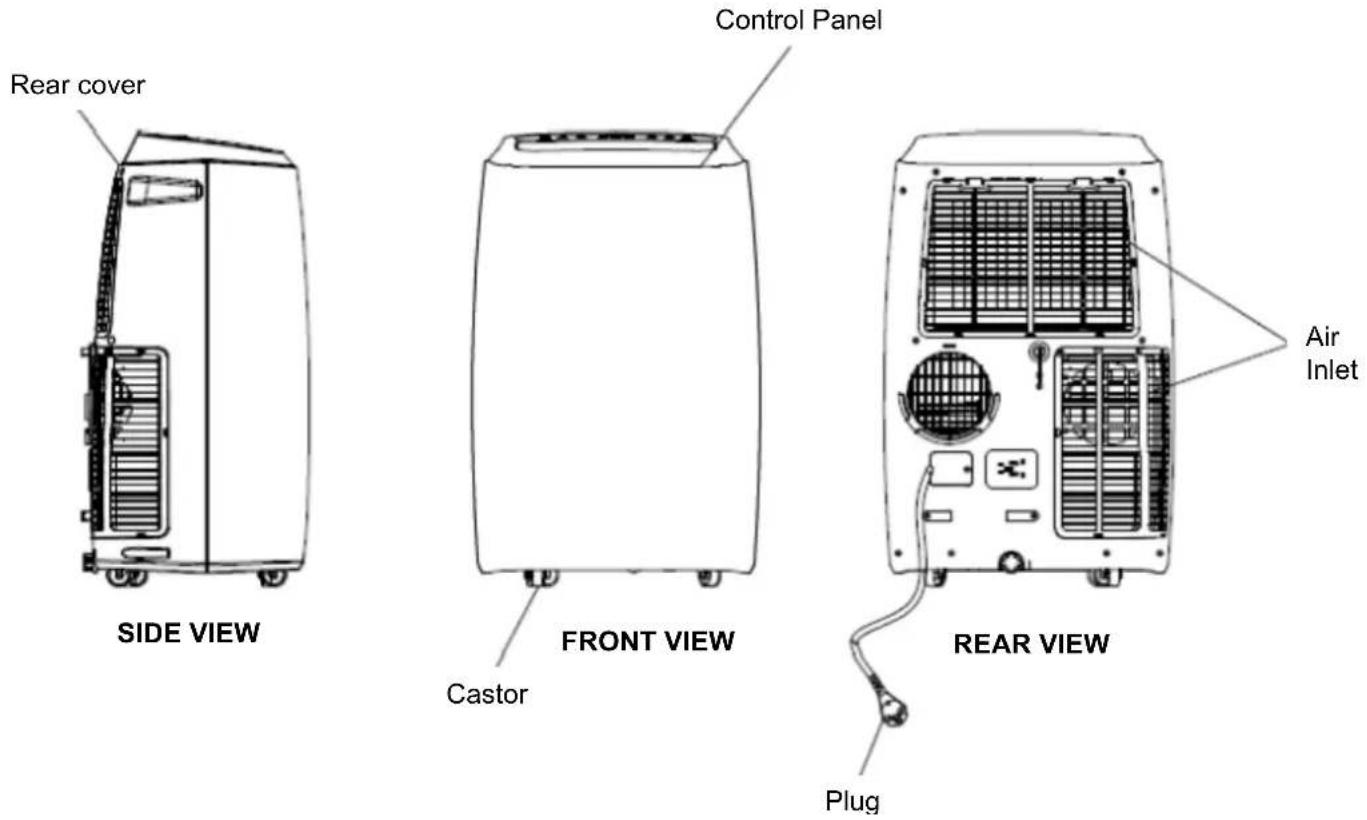
ACCESSORIES
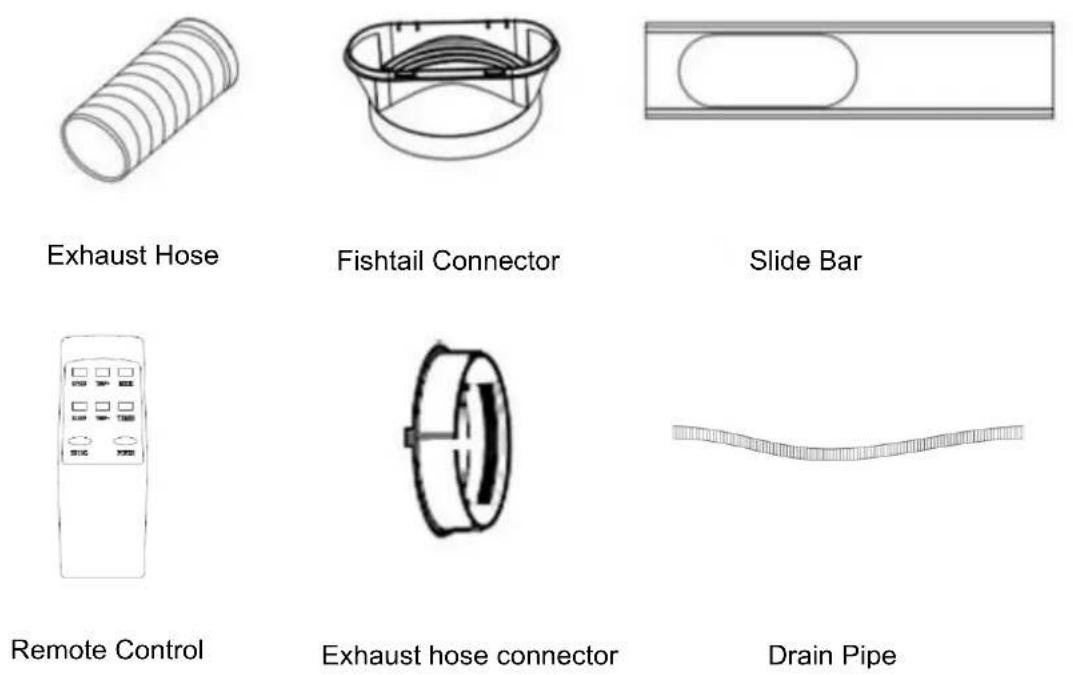
Please Note: The design of the accessories may change as part of our continual product improvement.
INSTALLATION
Warning: Before using this unit, please keep it upright for at least 3-4 hours.
This unit can easily be moved from one room to another.
While moving the unit please note that it must always be kept upright and then placed on an even surface.
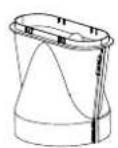
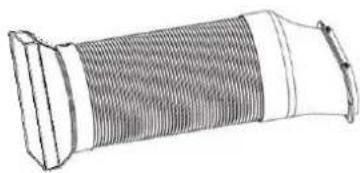
- Assemble the fishtail adaptor on to the hose, by extending the end of the hose and twisting the fishtail into position (At least 3 full rotations)
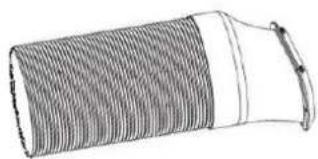
natural_image
Illustration of a coiled cable or hose with a flanged end (no text or symbols)- Assemble the Exhaust hose connector on to the other end of the hose, by extending the opposite end of the hose and twisting the outlet into position (At least 3 full rotations)
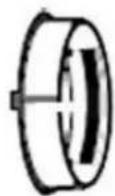
natural_image
Illustration of a cylindrical mechanical component with internal grooves and a curved handle (no text or symbols)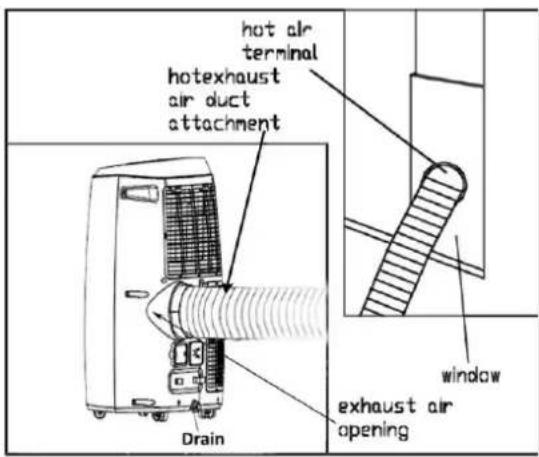
-
Attach the Exhaust hose connector to the rear of the air conditioner
-
Make sure the unit is upright and there are no obstructions to the air inlets and outlet grills. A minimum of 50cm clearance should be left between the inlet/outlet grills and any obstruction.
natural_image
Technical line drawing of a device with 50mm dimension标注 (no text or symbols on the device itself)INSTALLATION OF WINDOW KIT
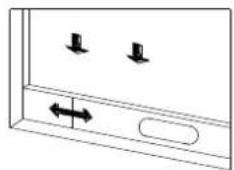
- Partially open the window and then fix the slide bar into the opening in the window, by putting it into position before closing the window onto it to seal the gap.
natural_image
Simple line drawing of a door with two downward arrows and an arrow pointing left (no text or symbols)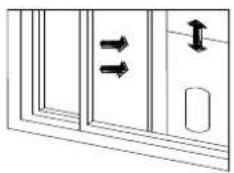
natural_image
Pure diagram of a door with double-headed arrows indicating direction, no text or symbols present- Push the fishtail adaptor into the slot in the slide bar
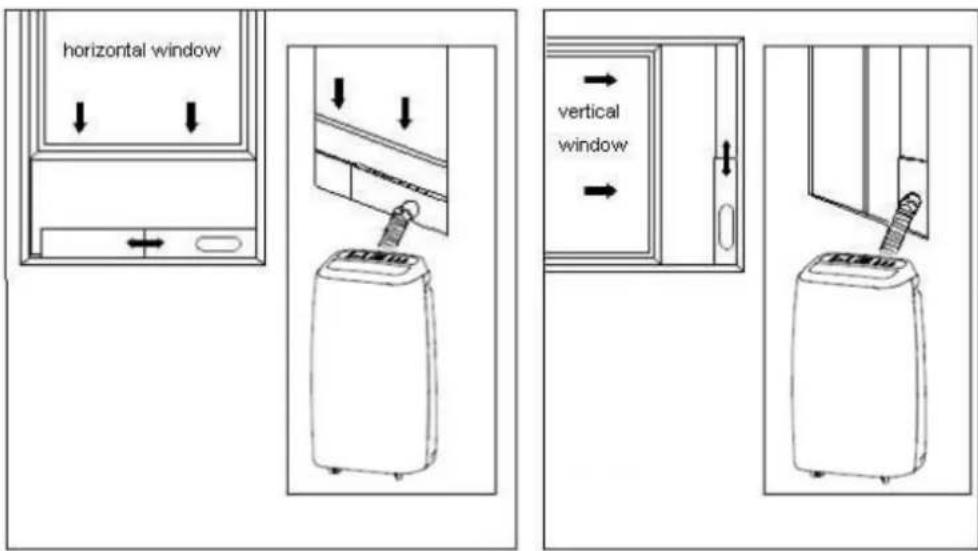
Note: The slide bar is only designed to be installed with sliding or sash windows or doors. The slidebar is not designed or to be used with any other style of window. However the fish tail adaptor can be used with most windows /doors. When using cooling or heating modes ensure that the opening is left as small as possible.
The best form of installation is through a wall duct. By properly venting you expel hot air from your room while efficiently cooling it.
IMPORTANT SAFEGUARDS
The length of the soft hose extends from 28 cm to 150 cm. If hose is extended above this length the unit may malfunction and this can invalidate the warranty.
The outlet vent must be well ventilated and not obstructed as this will cause the unit to overheat.
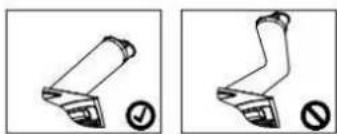
Avoid bending the air hose more than 30 degrees.
natural_image
Two identical diagrams showing a mechanical component with a checkmark and a circular symbol, no text or labels present.OPERATION AND SETTINGS
CONTROL PANEL & FUNCTION
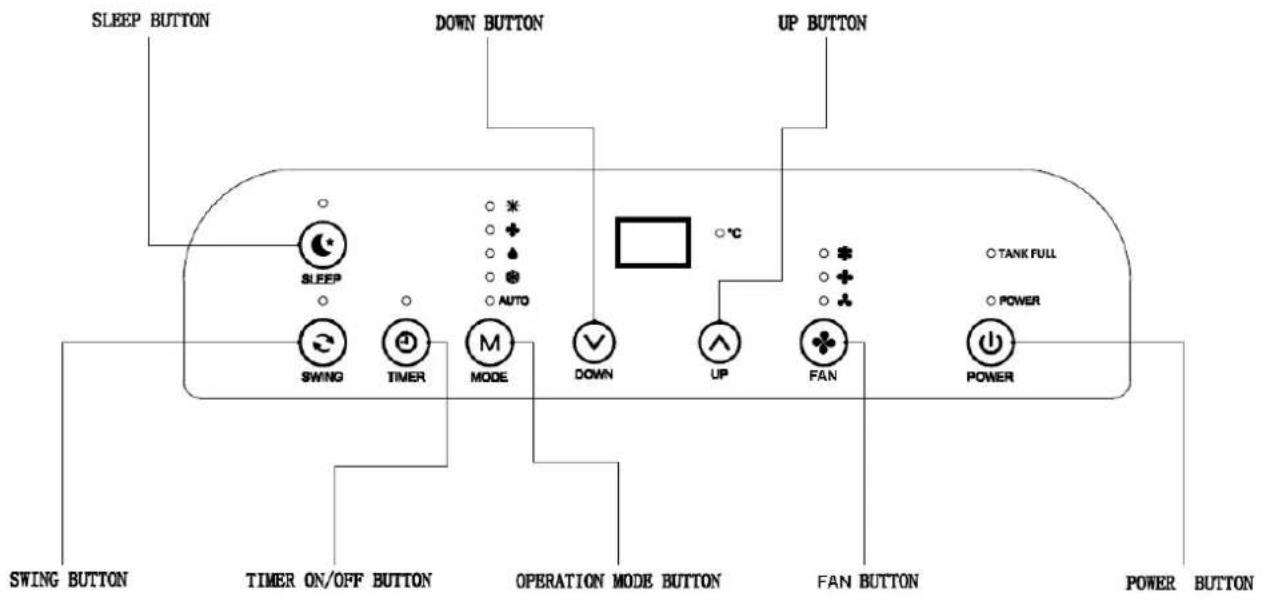
POWER BUTTON
Press to turn unit "ON" or "OFF"
MODE
Pressing this button will select between the Cooling , Heating , Auto, Fan and Dehumidify nodes.
COOLING MODE: Cold air will be expelled through the top of the unit and hot air will be expelled through the vent hose.
HEATING MODE: Hot air will be expelled through the top of the unit and cold air will be expelled through the vent hose. Continuous drainage should be set up for the moisture collected.
DEHUMIDIFY MODE: The unit should be set up without a vent hose, moisture is extracted from the air that passes through the unit. Continuous drainage should be set up for the moisture collected.
FAN MODE: No cooling effect, circulates air within the room, vent pipe not required.
AUTO MODE: The unit will change between Heating, cooling and fan modes depending on the desired temperature set.
During cooling and heating modes – These buttons raise or lower the temperature by 1^ C for each press. The minimum temperature is 16^ C and max. 31^ C.
FAN SPEED
Press to select either LOW, MEDIUM or HIGH fan speed.
NOTE: In dehumidifying mode, this button is invalid as the unit is designed to run at low speed in dehumidifying mode.
SLEEP MODE
Press the SLEEP button to enter sleep mode, the default fan speed is low and the Sleep mode indicator led will illuminate.
When the sleep mode is turned on:
After one hour the set temperature will increase by 1 degree Celsius, after another hour the set temperature will increase by another degree, and will then remain set at that temperature.
Please note:
- Sleep mode cannot be used in dry and fan modes.
- If internal tank becomes full, the machine will turn off and sleep mode will be cancelled.
SWING BUTTON
After machine is on and mode selected, press this button and the louver will swing continuously up and down; by pressing this button again the movement will stop and the louver remain fixed in position.
TIMER BUTTON
The in-built timer will allow you to set the unit to turn on or turn off after a set period of time, Please note only one timer can be used at any time.
ON TIMER – The timer will turn on the unit automatically after the time set has elapsed.
- With the unit turned off, press the TIMER button, then set the number of hours' time you desire the unit to start by using the UP and DOWN buttons.
- Once the set time has elapsed, the unit will turn on automatically.
- Press the POWER button before the time has elapsed and the unit will turn on as normal and the timer will be cancelled
- The function and fan speed can be set whilst setting the timer.
OFF TIMER – The timer will turn off the unit automatically after the time set has elapsed.
- While the unit is operating, press the TIMER button then set the number of hours' time you desire the unit to stop by using the UP and DOWN buttons.
- Once the set time has elapsed, the unit will turn off automatically.
- Press the POWER button before the time has elapsed, the setting time will be cancelled and the unit will turn off.
TANK FULL INDICATOR
When the internal water tank is full, the unit will stop operation, and the TANK FULL indicator will illuminate. To restart operation, empty the water tank following the information in the Water drainage section
LED DISPLAY
The display indicates the current target temperature or the remaining timer settings. When the set temperature or the timer is adjusted, the new setting is shown.
The display is also used to show error codes. Should a fault occur, see ERROR CODES.
REMOTE CONTROL
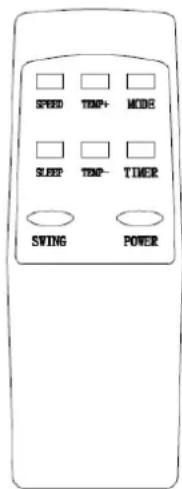
- POWER - ON/OFF Switch
- MODE – Operation Mode
- TIMER - Timer Mode
- SPEED – Fan Speed Selector
- TEMP+ - Temperature Up
- TEMP--Temperature Down
- SLEEP
- SWING
The functions on the remote are the same as those on the main control panel
WATER-DRAINAGE
MANUAL DRAINAGE:
- When the internal water tank is full the unit will stop working and the TANK FULL indicator will illuminate.
- Shut off the unit and unplug. Try not to move the model abruptly as this may cause water to spill out from internal water tank.
- Place a tray under the water plug.
- Unscrew the water plug (A) and remove the rubber bung (B) - water will drain from the internal tank.
- When drained replace the rubber bung and screw the water plug back into place
CONTINUOUS DRAINAGE:
Continuous drainage should be set up when the unit is used in heating or dehumidify modes.
- Unscrew the water plug (A) and remove the rubber bung (B).
- Connect a suitably sized water pipe to the port.
- You can plumb this pipe into your current plumbing system, lead it outside or use a water pump.
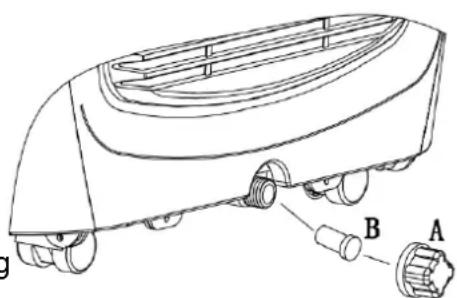
natural_image
Line drawing of a car air conditioner unit with labeled parts A and B (no text or symbols beyond labels)Note: This model has a self-evaporative function, which reduces the need to empty the water tank while in cooling mode. If the unit is vented correctly most of the water is reused to cool the condenser coils and any excess is evaporated. Please do not use continuous drainage if you intend to use the self-evaporating facility. In heating or dehumidifier mode we advise to use the continuous drainage.
MAINTENANCE
CLEANING
Please shut off the unit and unplug from the mains before cleaning or performing any maintenance
CLEAN THE SURFACE
Clean the plastic housing with a duster or a soft wet cloth.
Do not use chemical solvents (such as benzene, alcohol or gasoline) as they may cause irreversible damage.
AIR FILTER CLEANING
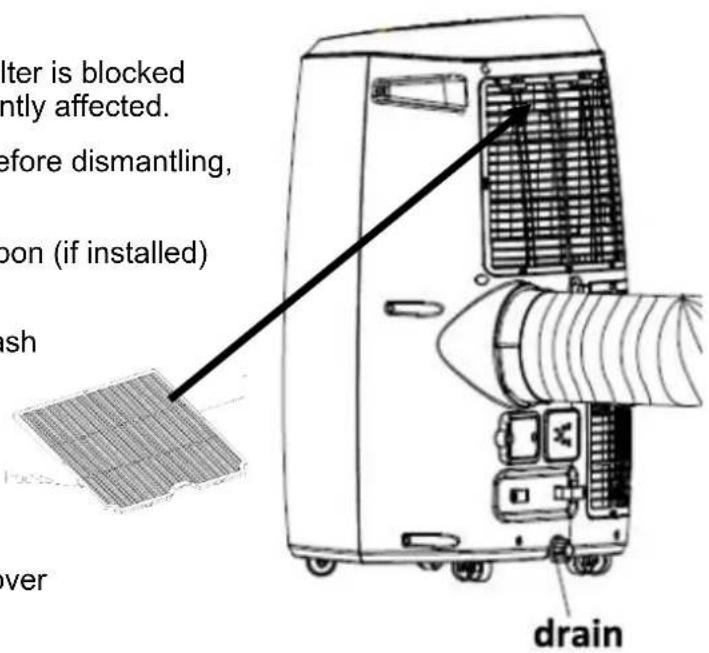
a) Clean the air filters every 2 weeks. If the air filter is blocked with dust, the unit's performance will be significantly affected.
b) Disconnect the power plug from the socket before dismantling, assembling or cleaning
c) Open the air filter covers and remove the carbon (if installed) and washable mesh filter
d) Hoover gently the carbon filter and do not wash
e) Wash the mesh air filters by immersing them in warm (about 40^ C) water with a neutral detergent.
f) Rinse it and then dry it thoroughly.
g) Carefully re-install air filters back into their cover
Please note: If in use, the optional active carbon filter (cloth) should be replaced every 3-6 months based on the environment.
END OF SEASON MAINTENANCE:
- Pull out the plug from the drainage hole and empty the internal tank. You can also drain the water by leaning the unit.
- Then switch the unit to low fan mode.
- Keep the unit in this mode for half day - until the conduit is dried. Doing this helps to keep the inside of the unit dry and prevents mould developing
- Turn off the unit and pull out the plug.
- Coil the wire and bind it together, then put it into the accessories space.
- Separate the air-exhausted pipe and store it safely.
- Cover the unit and keep it in a dry place.
- Take the batteries out of remote control and store, or dispose, them safely
Keep all accessories with the unit ready for next season.
TROUBLESHOOTING
Do not repair or disassemble the unit by yourself, unauthorized repair attempts will invalidate the warranty and may cause bodily harm.
| Problem | Reasons | Solutions |
| The unit does not work | No power supply | Power-on and turn on the unit. |
| Water-full indicator illuminated | Drain the internal water tank | |
| Timer function is active | Cancel Timer function | |
| Room temperature too low or too high | Use only in ambient temperatures between 7-35°C | |
| The unit does not seem to perform. | In direct sunlight | Draw the curtains, UV affects RC |
| Windows or doors open.Large amount of people or a heat source in the room. | Close windows and turn on another air conditioner | |
| Filter is very dirty | Clean or change the air filter | |
| Air inlet or air outlet is blocked | Clear out debris | |
| Room temperature is lower than setting temperature | Change the setting temperature | |
| The unit loud | The unit is not put on flat surface | Put the unit on flat and hard surface |
| Compressor does not work | Overheating protection is active | Check venting.Restart the unit after 5 minutes when compressor has cooled |
| Remote control doesn't work | Operating distance is too far. | Move remote control closer to the unit and make sure it aims at the air-outlet grille |
| Control panel has not received the signal from remote control. | ||
| The batteries are flat | Replace the batteries | |
| E0 | Room temperature abnormal or there is electrical short on temperature sensor | Temperature not within 7-35 C operating range. If temperature within operating range refer to Service Centre (check room temperature sensor or relevant circuit) |
| E3 | Pipe temperature sensor failure | Switch off the unit, let it rest for min; minutes and restart. If still error please contact the service centre. |
| E2/E4 | Water tank is full inside the machine | Drain out water from drain port at bottom rear of the unit. |
If the above solutions do not resolve the problem please contact the service centre.
APPENDIX
Disposal: Do not dispose this product as unsorted municipal waste. Collection of such waste must be handled separately as special treatment is necessary.
natural_image
Pure electrical circuit lines without any symbolsRecycling facilities are now available for all customers at which you can deposit your old electrical products. Customers will be able to take any old electrical equipment to participating civic amenity sites run by their local councils. Please remember that this equipment will be further handled during the recycling process, so please be considerate when depositing your equipment. Please contact the local council for details of your local household waste recycling centres.
TECHNICAL DATA
| P16HP | P18HP | ||
| Capacity | Cooling | 4.6 kWh16,000 BTU | 5.2 kWh18,000 BTU |
| Heating | 4.2 kWh14,000 BTU | 4.7 kWh16,000 BTU | |
| Rated Input | Cooling | 1769W | 2000W |
| Heating | 1826W | 2043W | |
| Running Current | Cooling | 8.0 Amps | 9.3 Amps |
| Heating | 8.4 Amps | 9.4 Amps | |
| Noise (sound power) | <65dB(A) | <65dB(A) | |
| Permitted Excessive Operating Pressure | 1.0/2.6MPa | 1.0/2.6MPa | |
| Maximum Allowable Pressure | 1.2/3.2Mpa | 1.2/3.2Mpa | |
| Power Supply | 220-240V/50Hz | 220-240V/50Hz | |
| Net Weight | 29 kgs | 30 kgs | |
| Refrigerant Quantity | 225g | 300g | |
| Dimensions(L*D*H) | 470*370*764 mm | 470*370*764 mm | |
 | Unit must be vented outside when in Air Cooling and Heating mode.For the purposes of EU regulation EN12102 this is a local air conditioner and produces less than 65dB(A) sound energy. | ||
electriQ UK SUPPORT
www.electriQ.co.uk/support
Please, for your own convenience, make these simple checks before calling the service line.
If the unit still fails to operate call: 0330 390 3061 or complete the online form
- Has the unit been standing upright for at least 2 hours?
- Is the unit plugged into the mains?
- Is the fuse OK?
- Switch the unit off and wait three minutes to see if the issue is resolved. Restart the unit.
- Check if the water tank is full.
Office hours: 9AM - 5PM Monday to Friday
Unit J6, Lowfields Business Park
Lowfields Way, Elland
West Yorkshire, HX5 9DA
- PORTABLE AIR CONDITIONER WITH HEATPUMP P16HP / P18HP
- CONTENTS
- SAFETY INSTRUCTIONS
- IMPORTANT!
- ENERGY SAVING AND UNIT SAFETY PROTECTION TIPS
- FEATURES AND PARTS LIST
- FEATURES
- INSTALLATION
- INSTALLATION OF WINDOW KIT
- IMPORTANT SAFEGUARDS
- OPERATION AND SETTINGS
- POWER BUTTON
- MODE
- FAN SPEED
- SLEEP MODE
- Please note:
- SWING BUTTON
- TIMER BUTTON
- TANK FULL INDICATOR
- LED DISPLAY
- REMOTE CONTROL
- WATER-DRAINAGE
- MANUAL DRAINAGE:
- CONTINUOUS DRAINAGE:
- MAINTENANCE
- CLEANING
- CLEAN THE SURFACE
- AIR FILTER CLEANING
- END OF SEASON MAINTENANCE:
- TROUBLESHOOTING
- APPENDIX
- electriQ UK SUPPORT
- www.electriQ.co.uk/support
Brand : ElectriQ
Model : P18HP
Category : Air conditioner