
P904ICHNE - Cooker BERTAZZONI - Free user manual and instructions
Find the device manual for free P904ICHNE BERTAZZONI in PDF.


| Product Type | Induction cooktop with integrated hood |
| Brand | Bertazzoni |
| Model | P904ICHNE |
| Number of cooking zones | 4 zones (including Bridge mode on left and right zones) |
| Cooking type | Induction |
| Dimensions (W x D x H) | Approx. 90 cm x 52 cm x 5 cm (estimated) |
| Power supply | 220-240 V, 50/60 Hz |
| Main functions | Booster (10 min), Bridge, Cooking Assist (3 levels), Timer, Countdown, Pause, Recall |
| Integrated hood | Yes, extraction and recirculation modes, 6 speeds + intensive (8 min), hood timer (5/10/20 min) |
| Hood power (intensive speed) | 6th speed timed 8 minutes |
| Filters | Washable metal grease filter (cleaning alarm after 30 h); washable activated charcoal filter (one time wash then replace, alarm after 120 h in recirculation mode) |
| Safety | Child Lock, automatic safety shut-off, pan detection (symbol u), residual heat indicator (H), overheating protection (code E2), key lock |
| Cleaning the cooktop | Specific products for ceramic glass, scraper for stubborn residues, avoid abrasive products |
| Liquid collection tray | Capacity 0.7 L, empty frequently |
| Compatible cookware types | Ferromagnetic bases (enameled steel, cast iron, special induction stainless steel), diameters: single zone 90-115 mm, Bridge mode 220-245 mm |
| Cooking Assist temperatures | Level 1: approx. 40°C (melt), Level 2: approx. 70°C (reheat), Level 3: approx. 98°C (boil) |
| Common error codes | U400 (voltage), E2 (overheating), Er20/22/31/36/47 (hardware/software issues) |
| Installation | Four mounting modes, requires a specialized technician, safety distance under drawer 70 mm |
Frequently Asked Questions - P904ICHNE BERTAZZONI
User questions about P904ICHNE BERTAZZONI
0 question about this device. Answer the ones you know or ask your own.
Ask a new question about this device
Download the instructions for your Cooker in PDF format for free! Find your manual P904ICHNE - BERTAZZONI and take your electronic device back in hand. On this page are published all the documents necessary for the use of your device. P904ICHNE by BERTAZZONI.
USER MANUAL P904ICHNE BERTAZZONI
INSTRUCTIONS ON MOUNTING AND USE
PRESCRIPTIONS DE MONTAGE ET MODE D'EMPLOI
MONTAGEVOORSCHRIFTEN EN GEBRUIKSAANWIIZING
MONTERINGS- OCH BRUKSANVISNINGAR
MONTERINGS- OG BRUGSVEJLEDNING

P904ICHNE
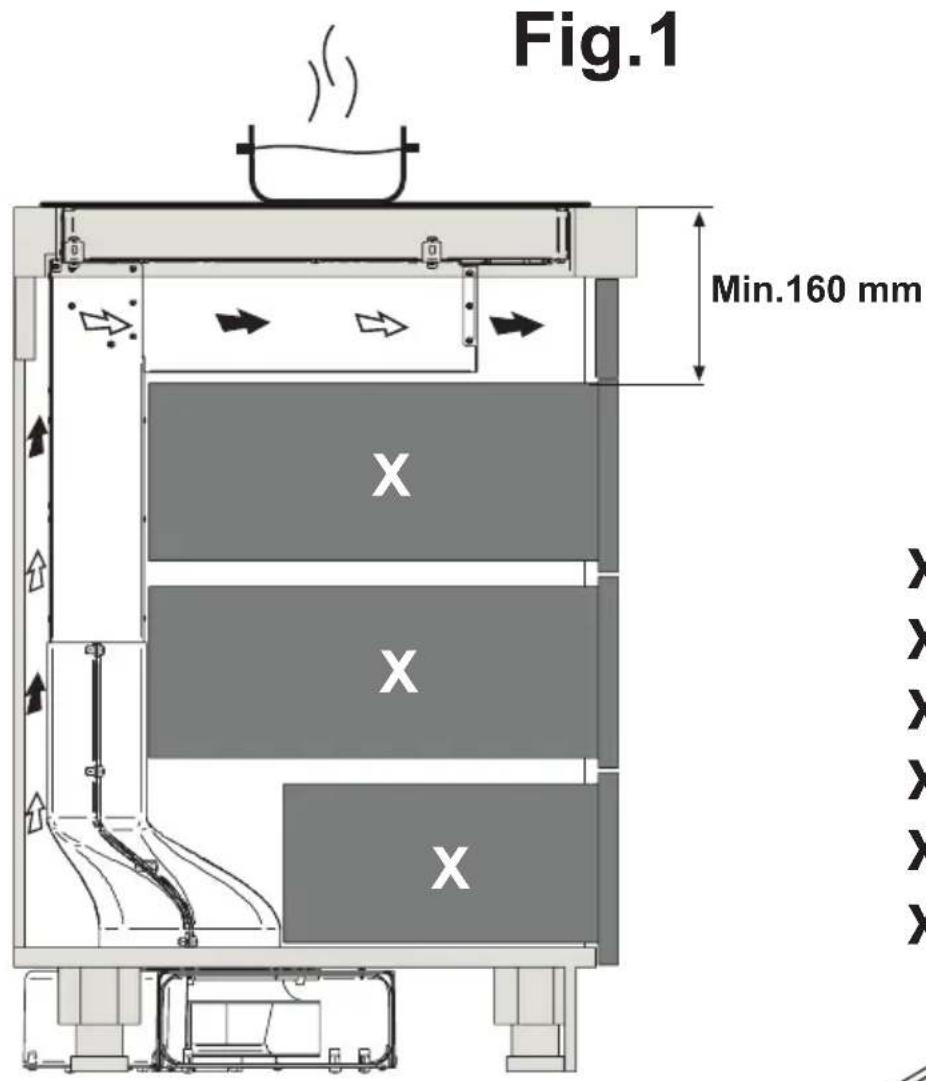
X : Schublade
X : Drawer
X : Tiroir
X : Schuif
X : Cajón
X : Cassetto
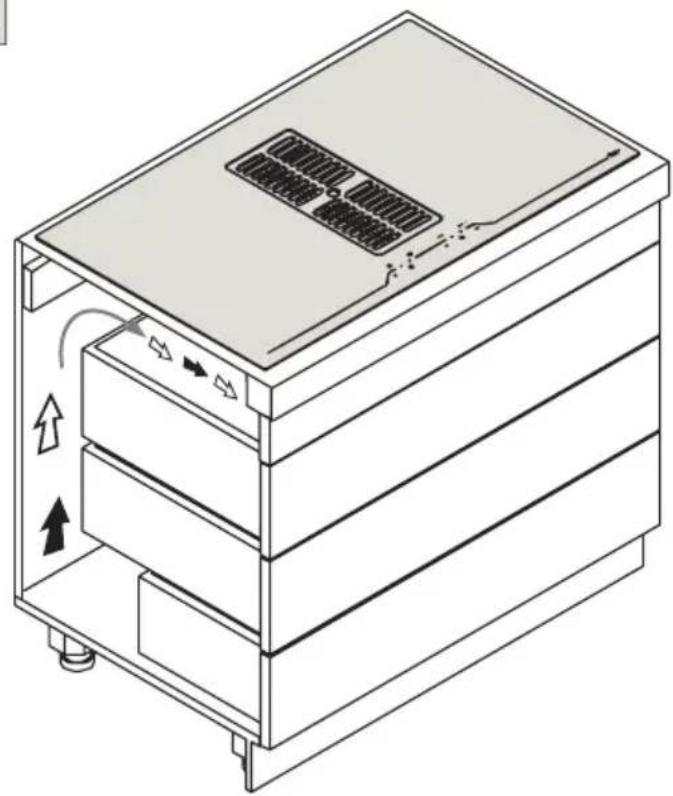
natural_image
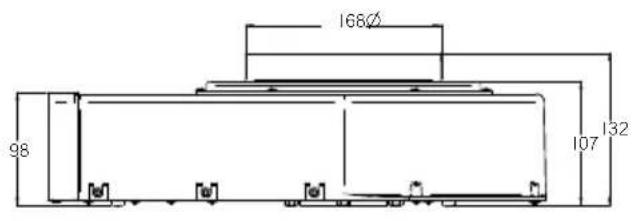
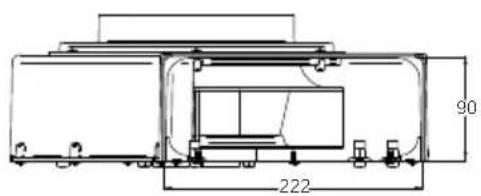
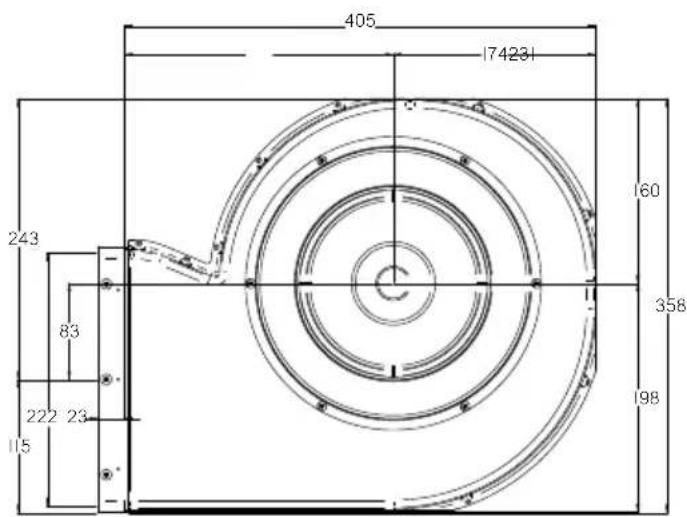
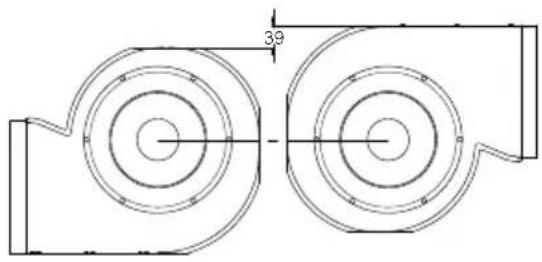
Technical line drawing of a multi-tiered industrial or storage unit with heat exchangers and ventilation ducts (no text or symbols)Technical drawing
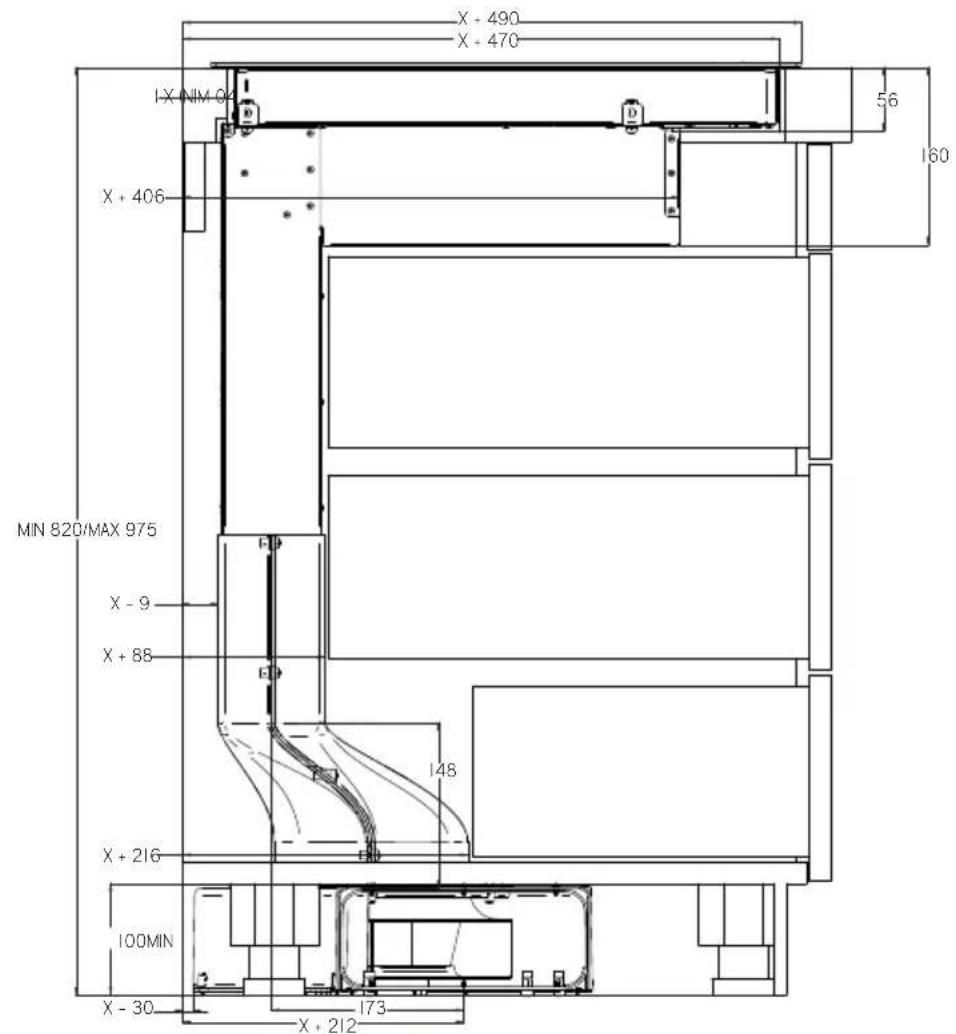
P904ICHNE can be installed in 4 different modes to better suit the layout of every kitchen; choose the mounting type that is more suitable for your furniture.
Installation version 1
Installation version 1
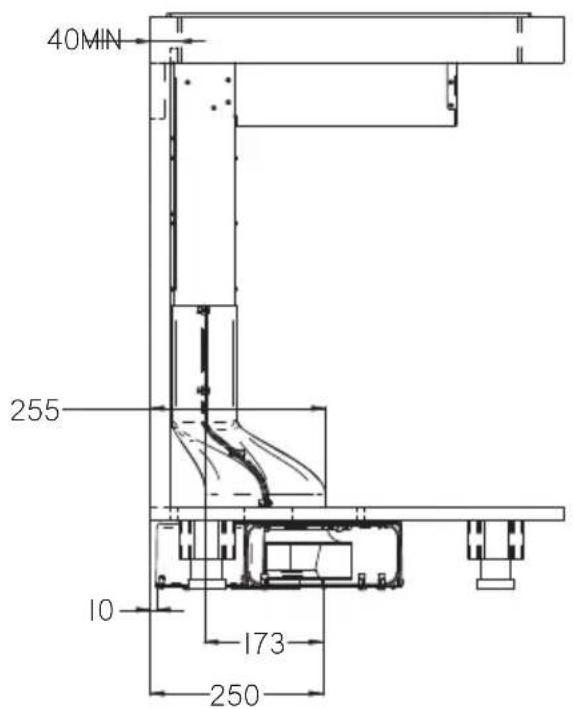
Installation Version 1
Installation version 1
Installation version 1
Installation version 2
Installation version 2
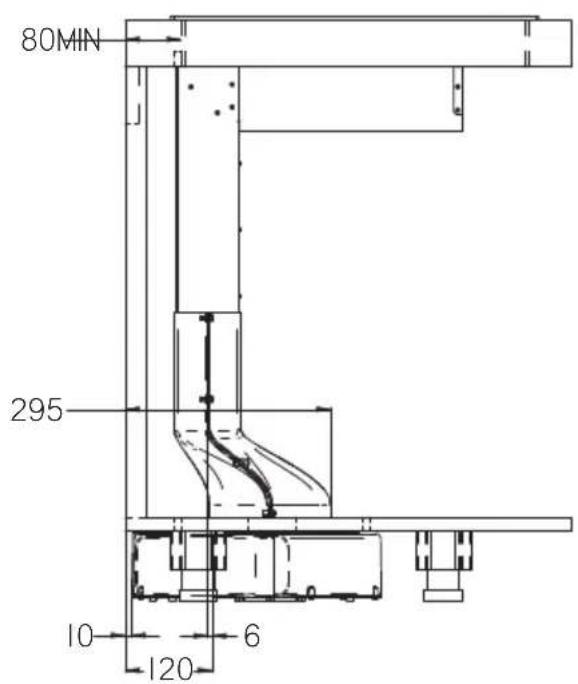
Installation Version 2
Installation version 2
Installation version 2
Installation version 3
Installation version 3
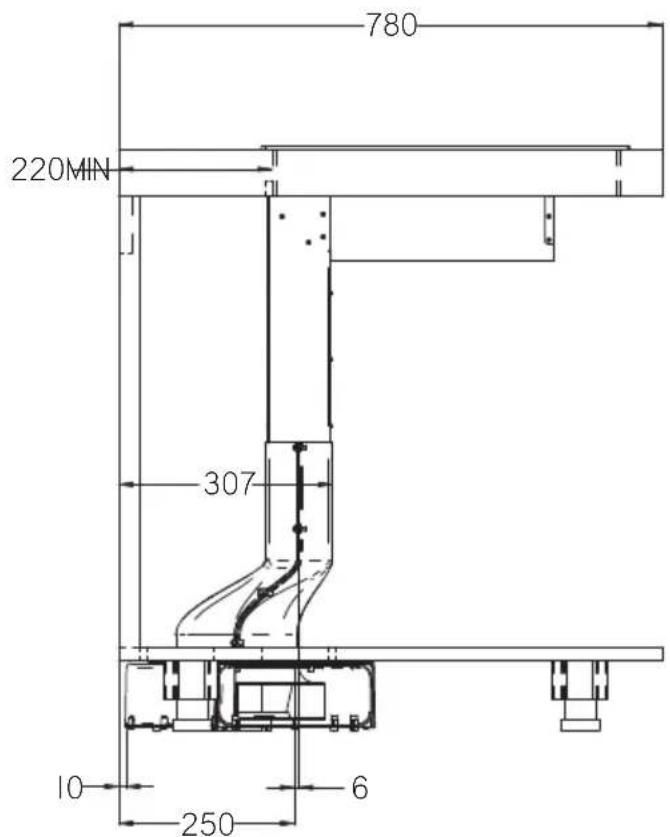
Installation Version 3
Installation version 3
Installation version 3
Installation Version 4 Installation version 4 Installation version 4
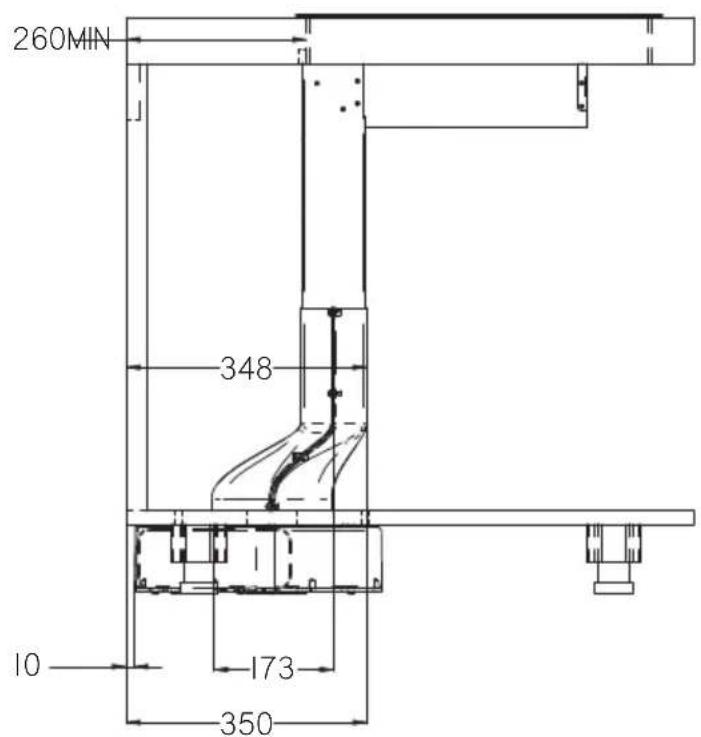
Installation Version 4
Installation version 4
Installation version 4
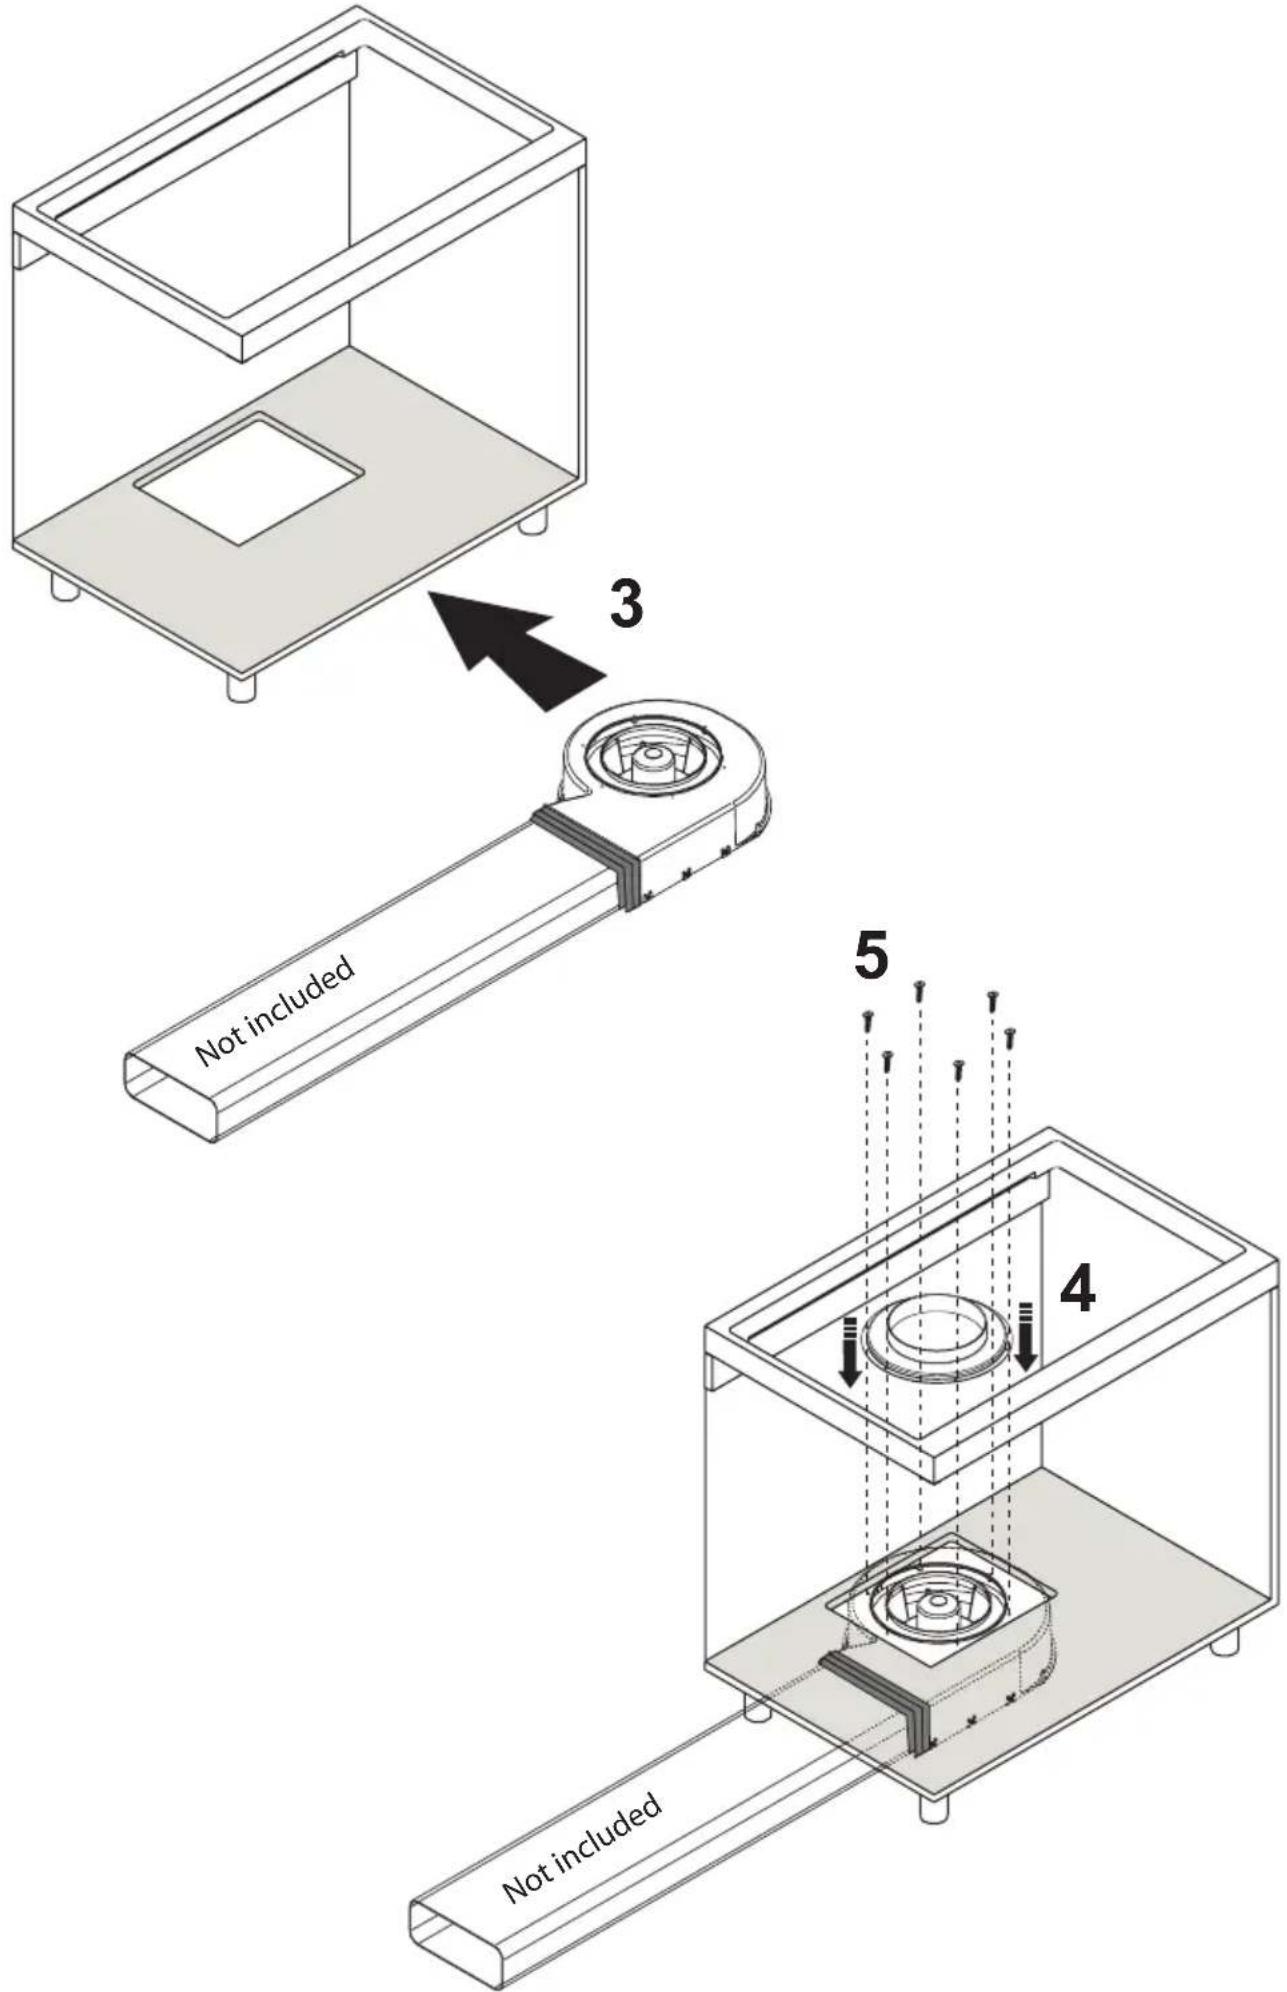
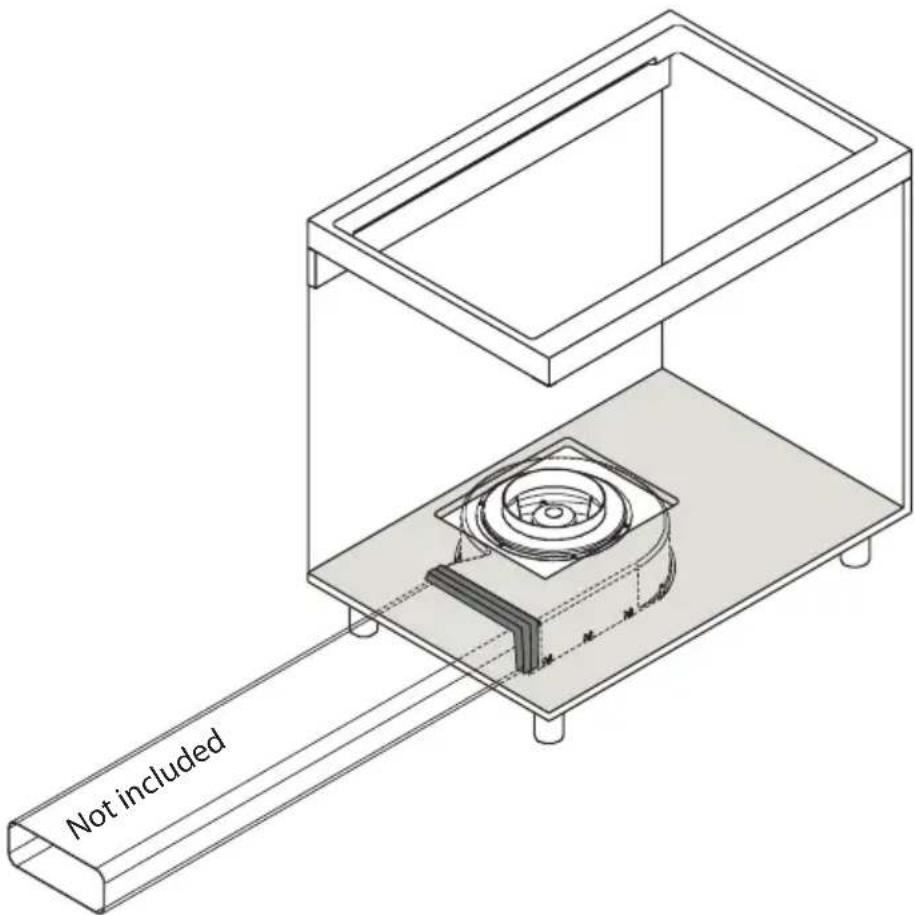
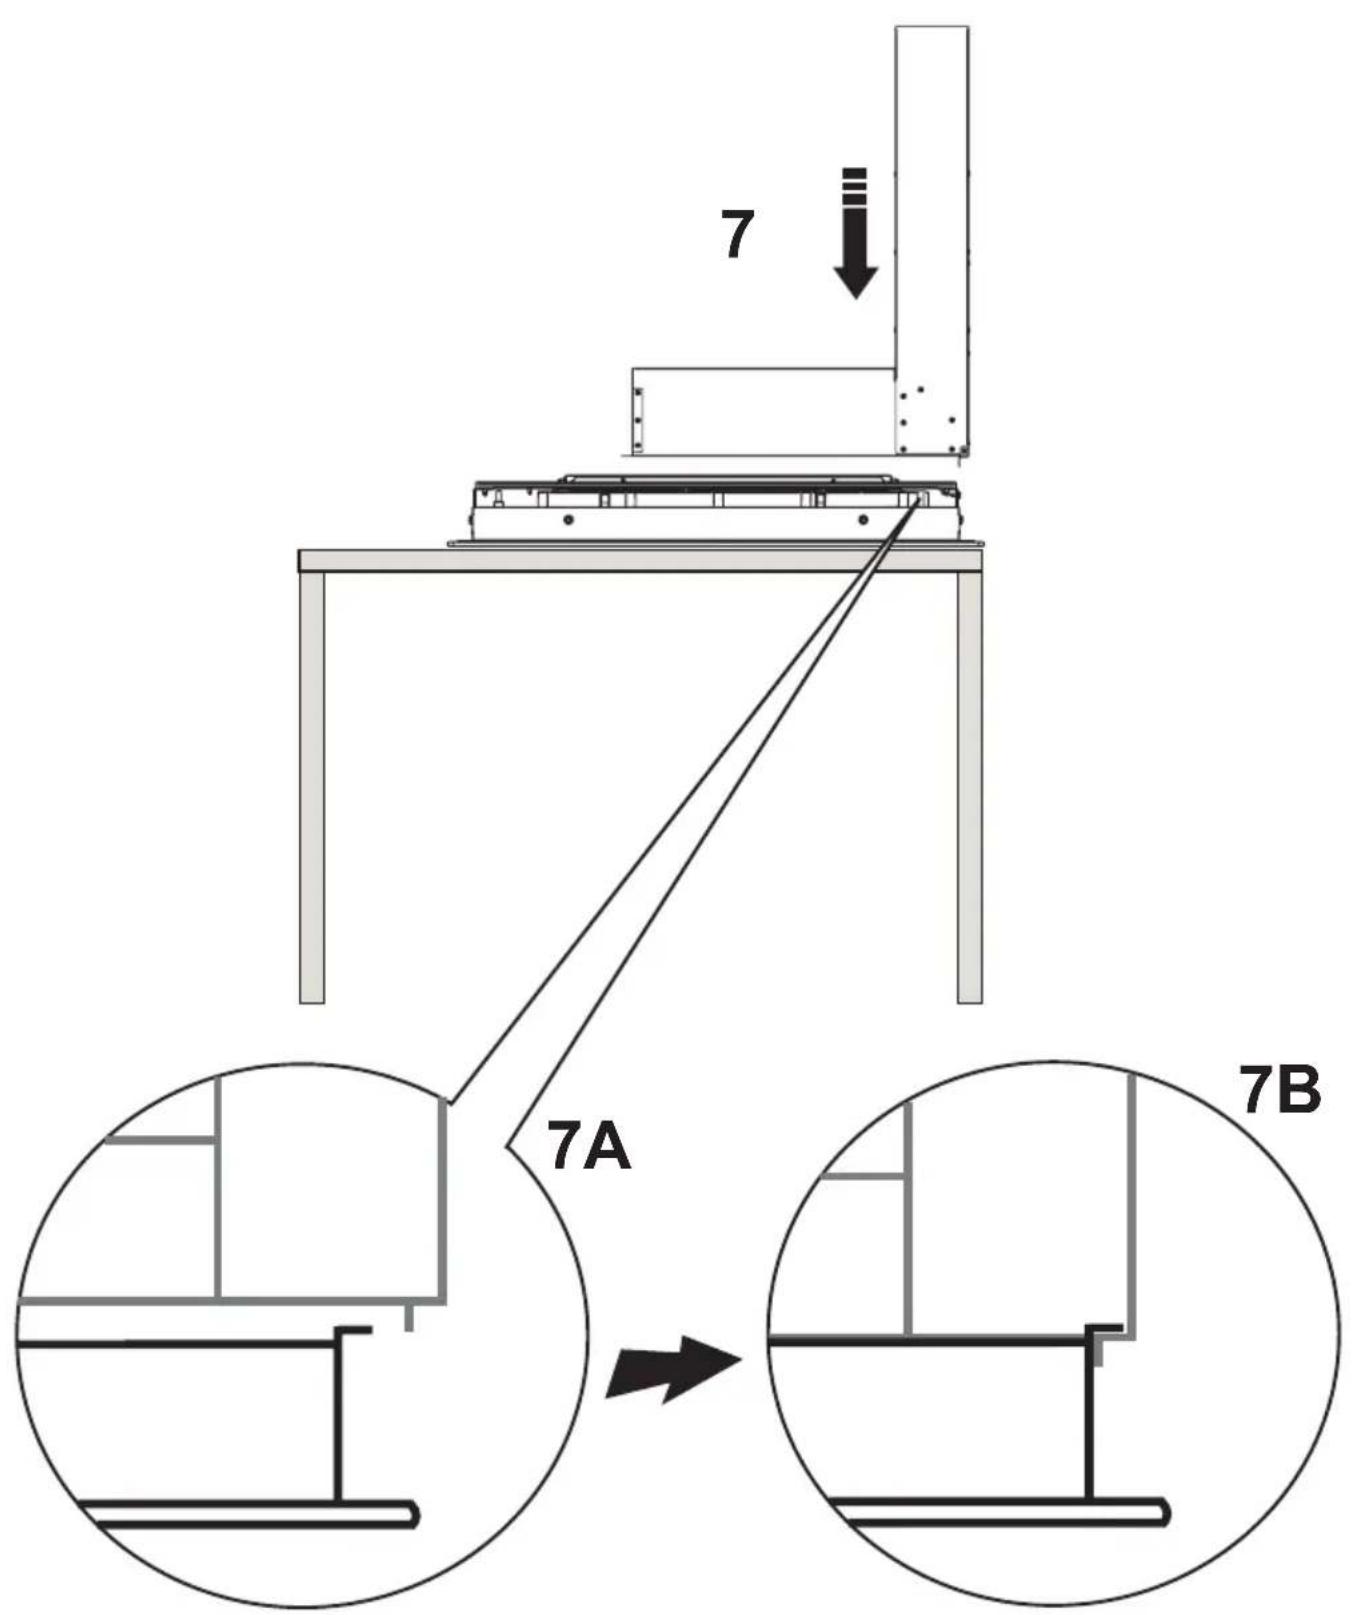
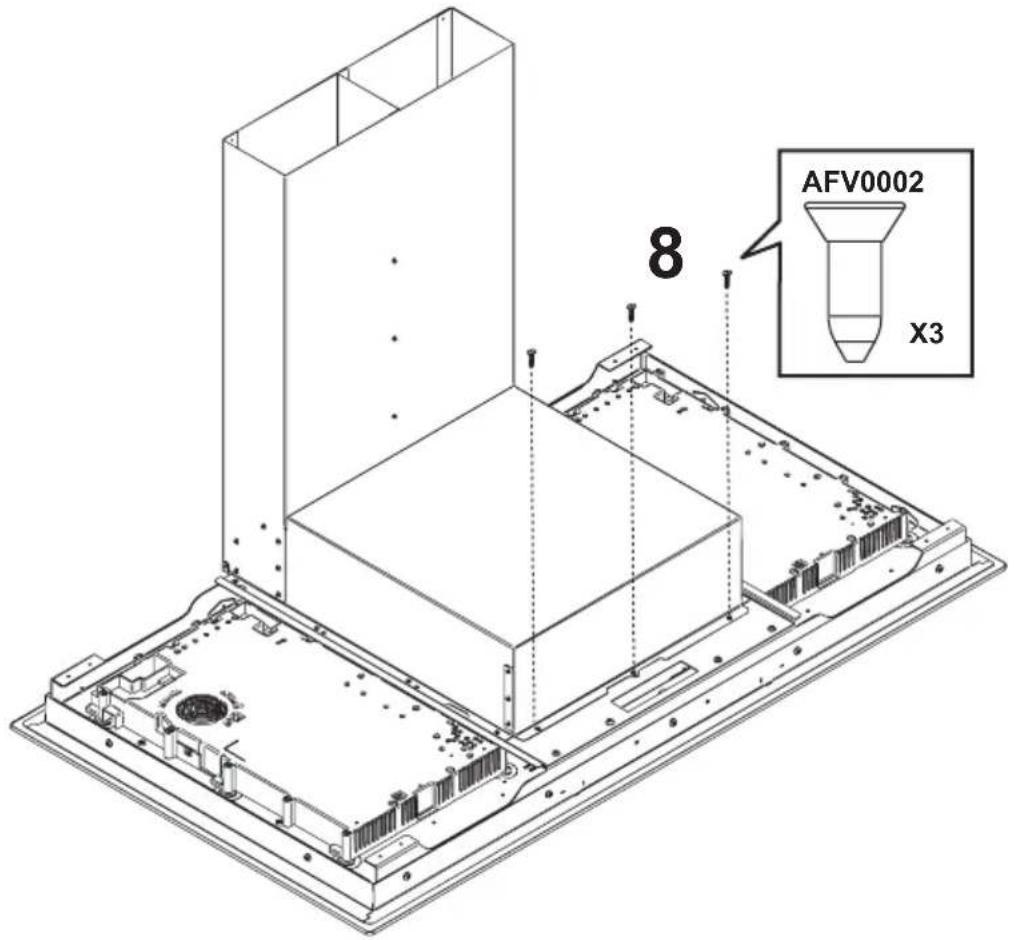
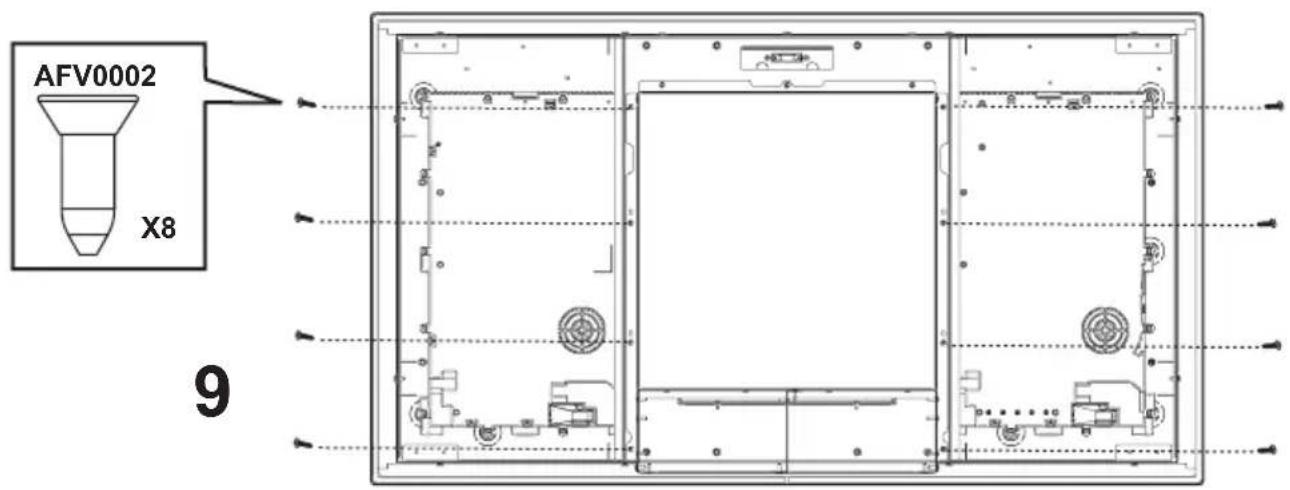
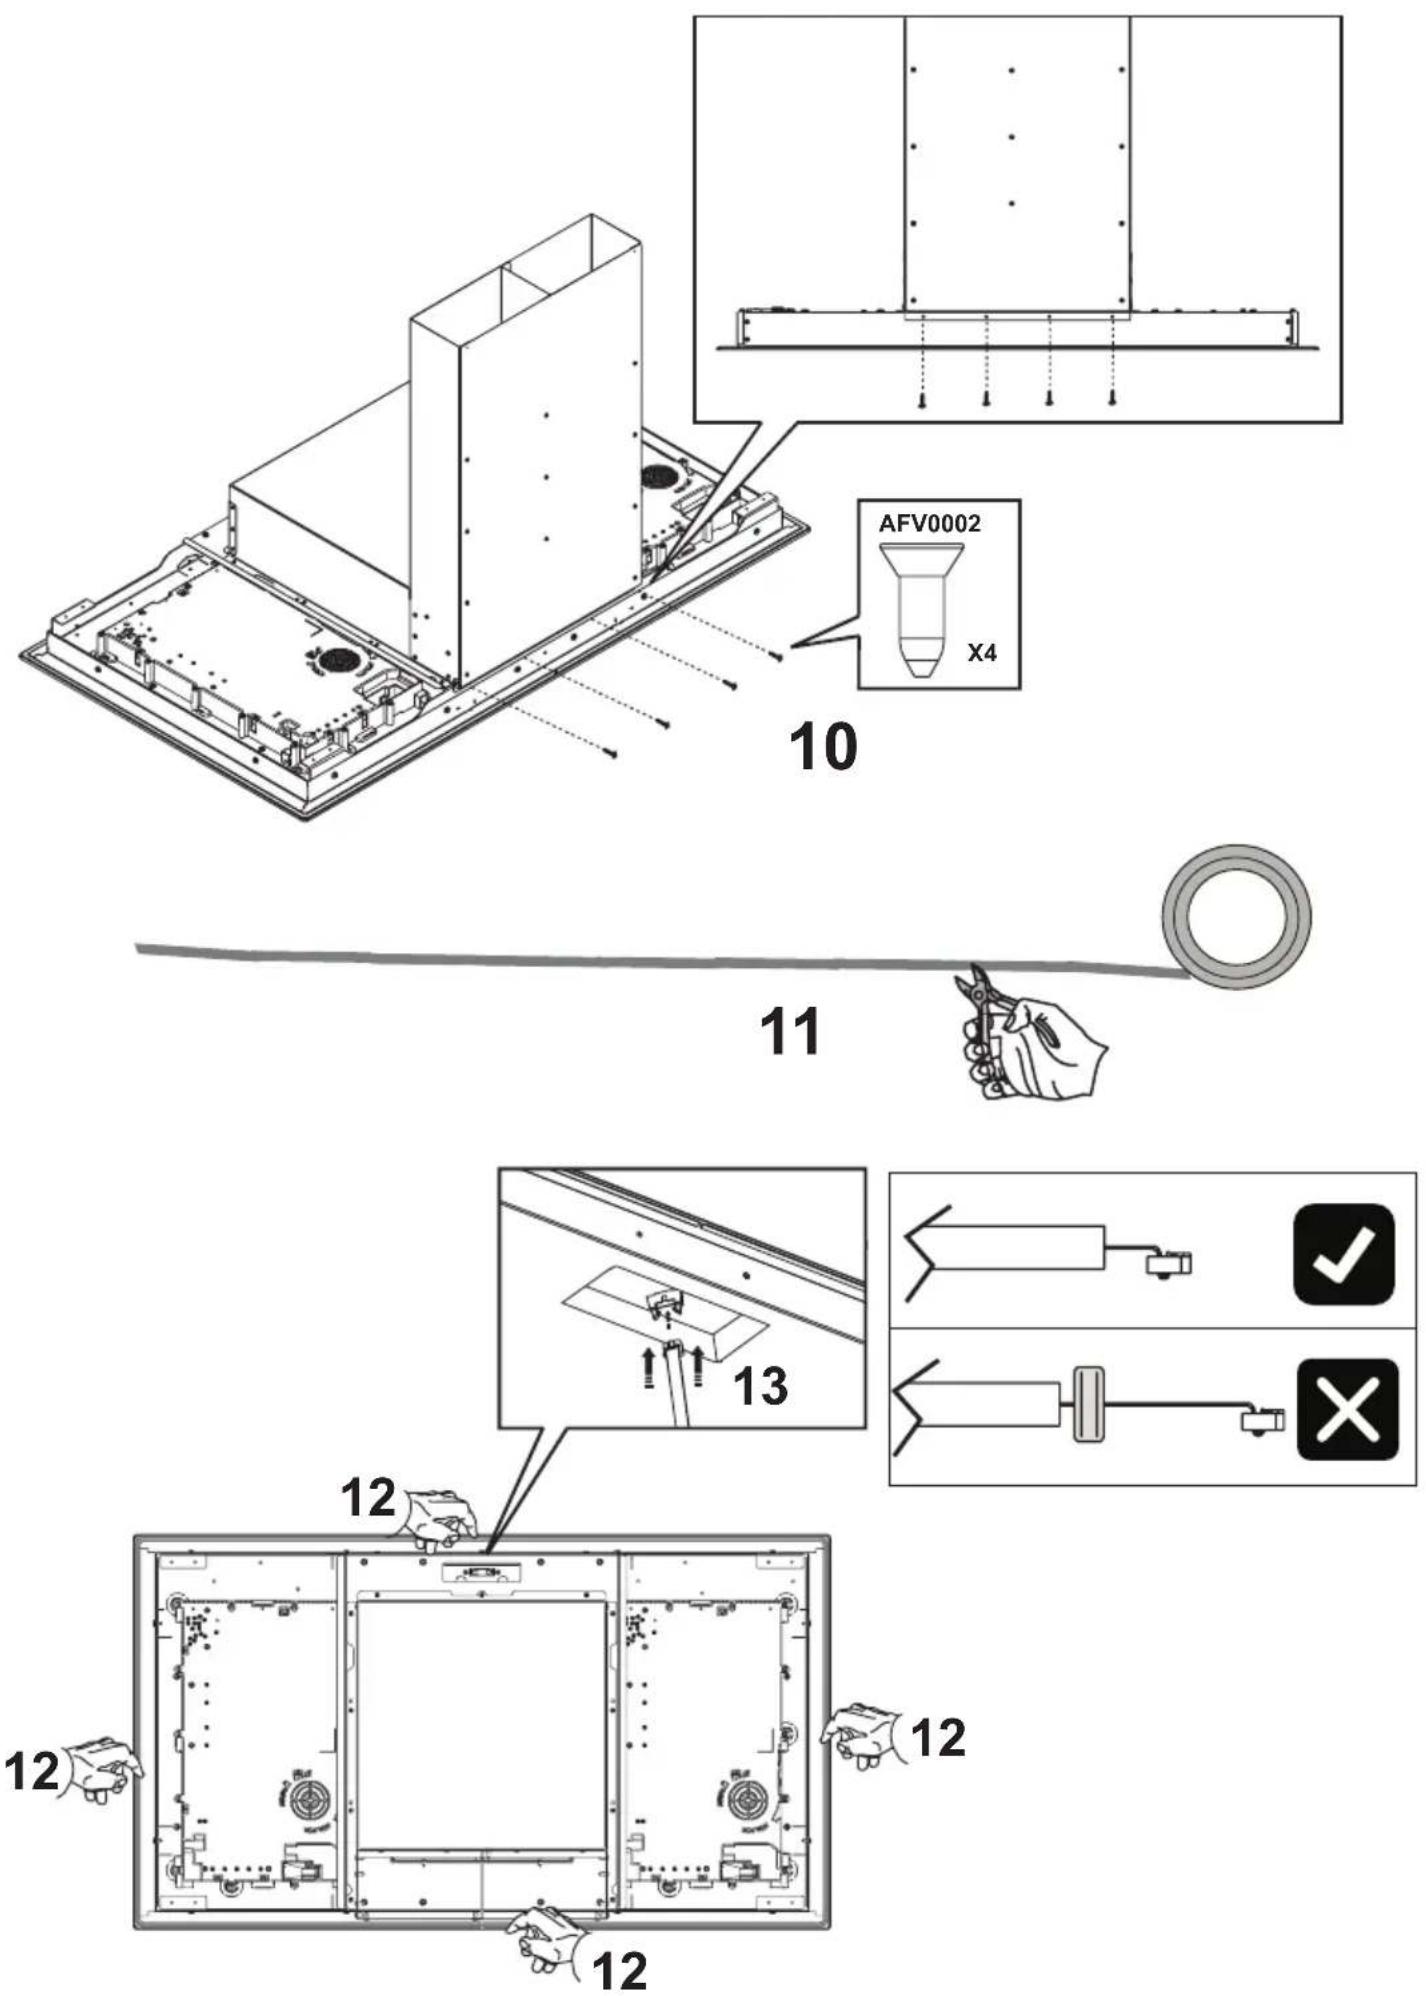
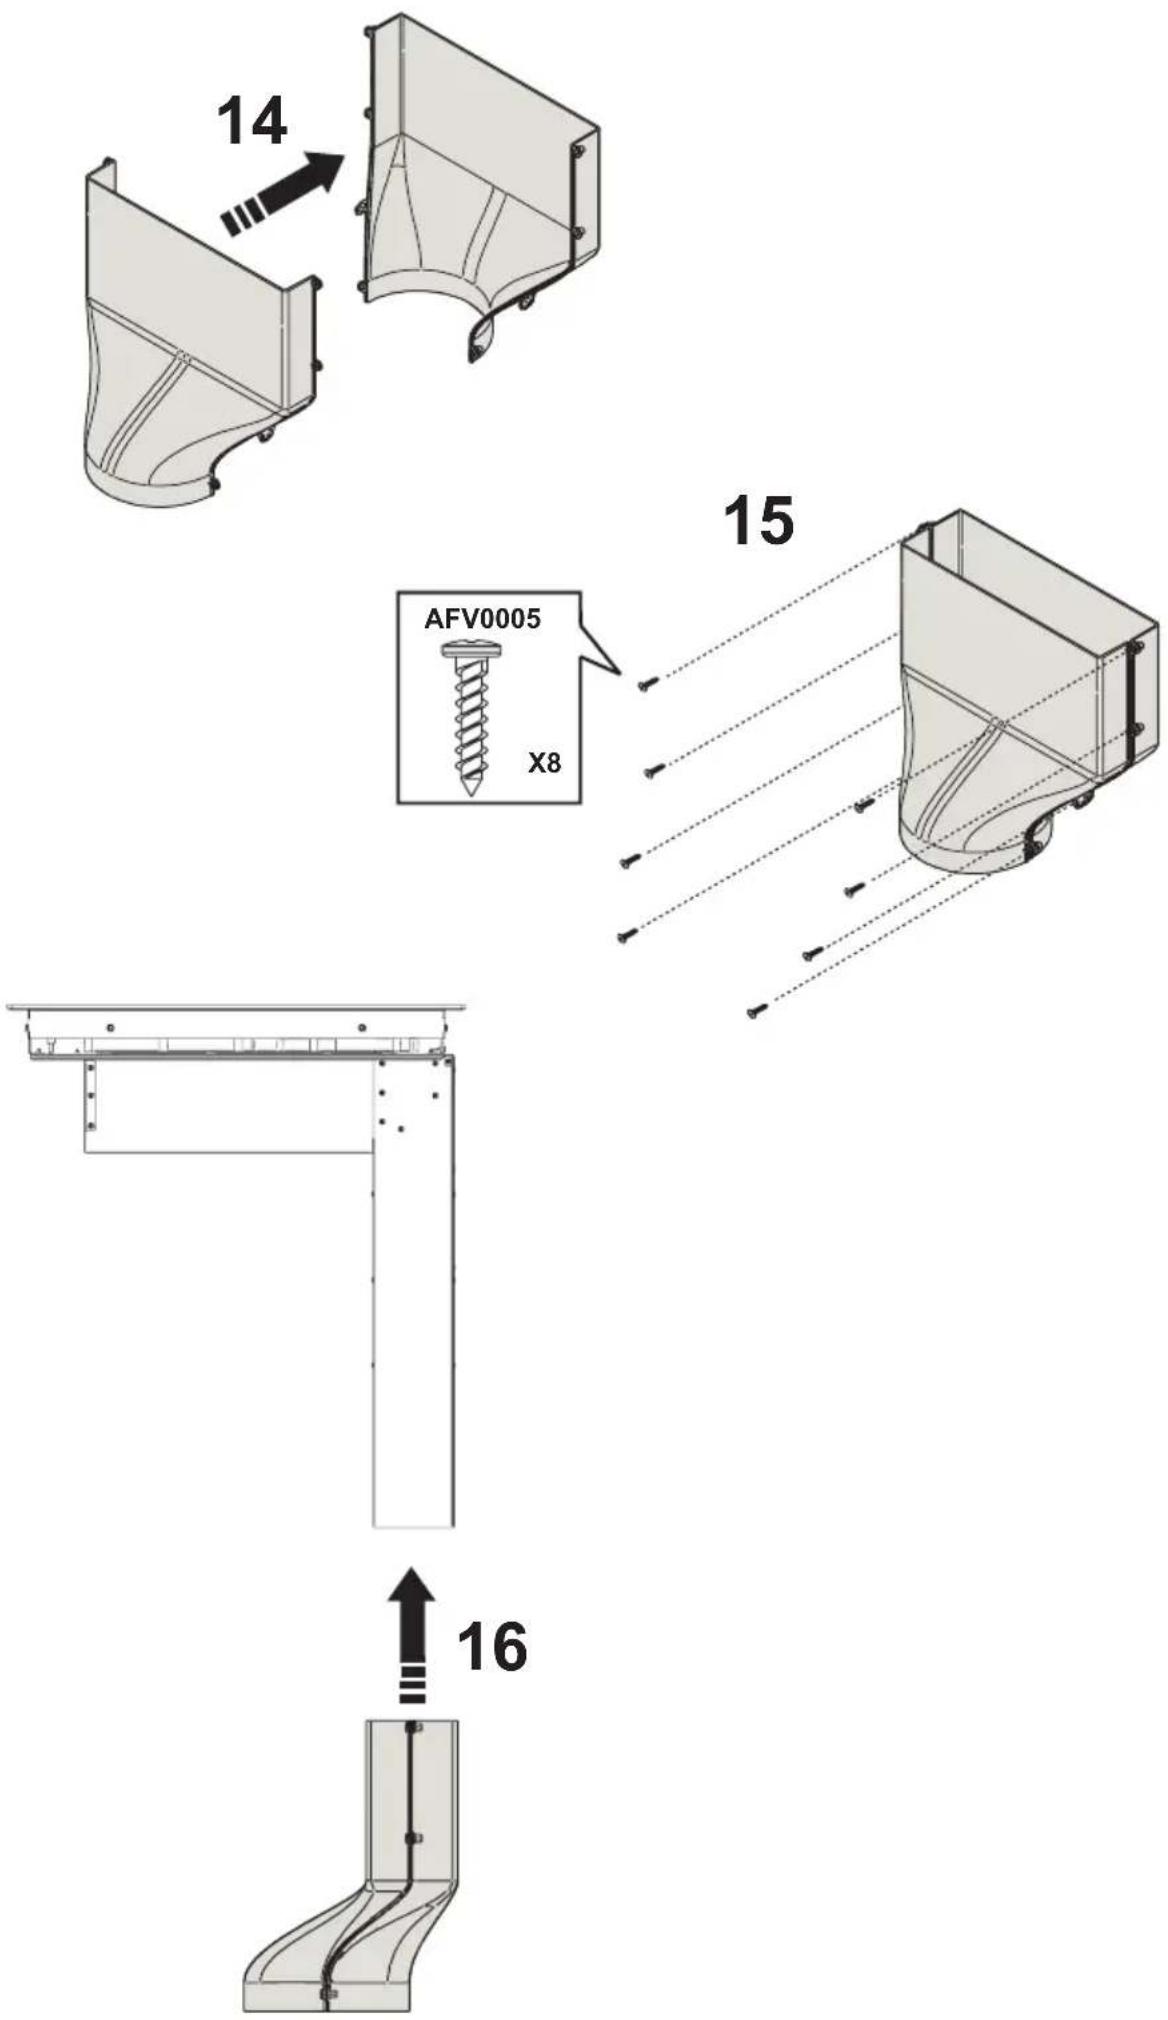
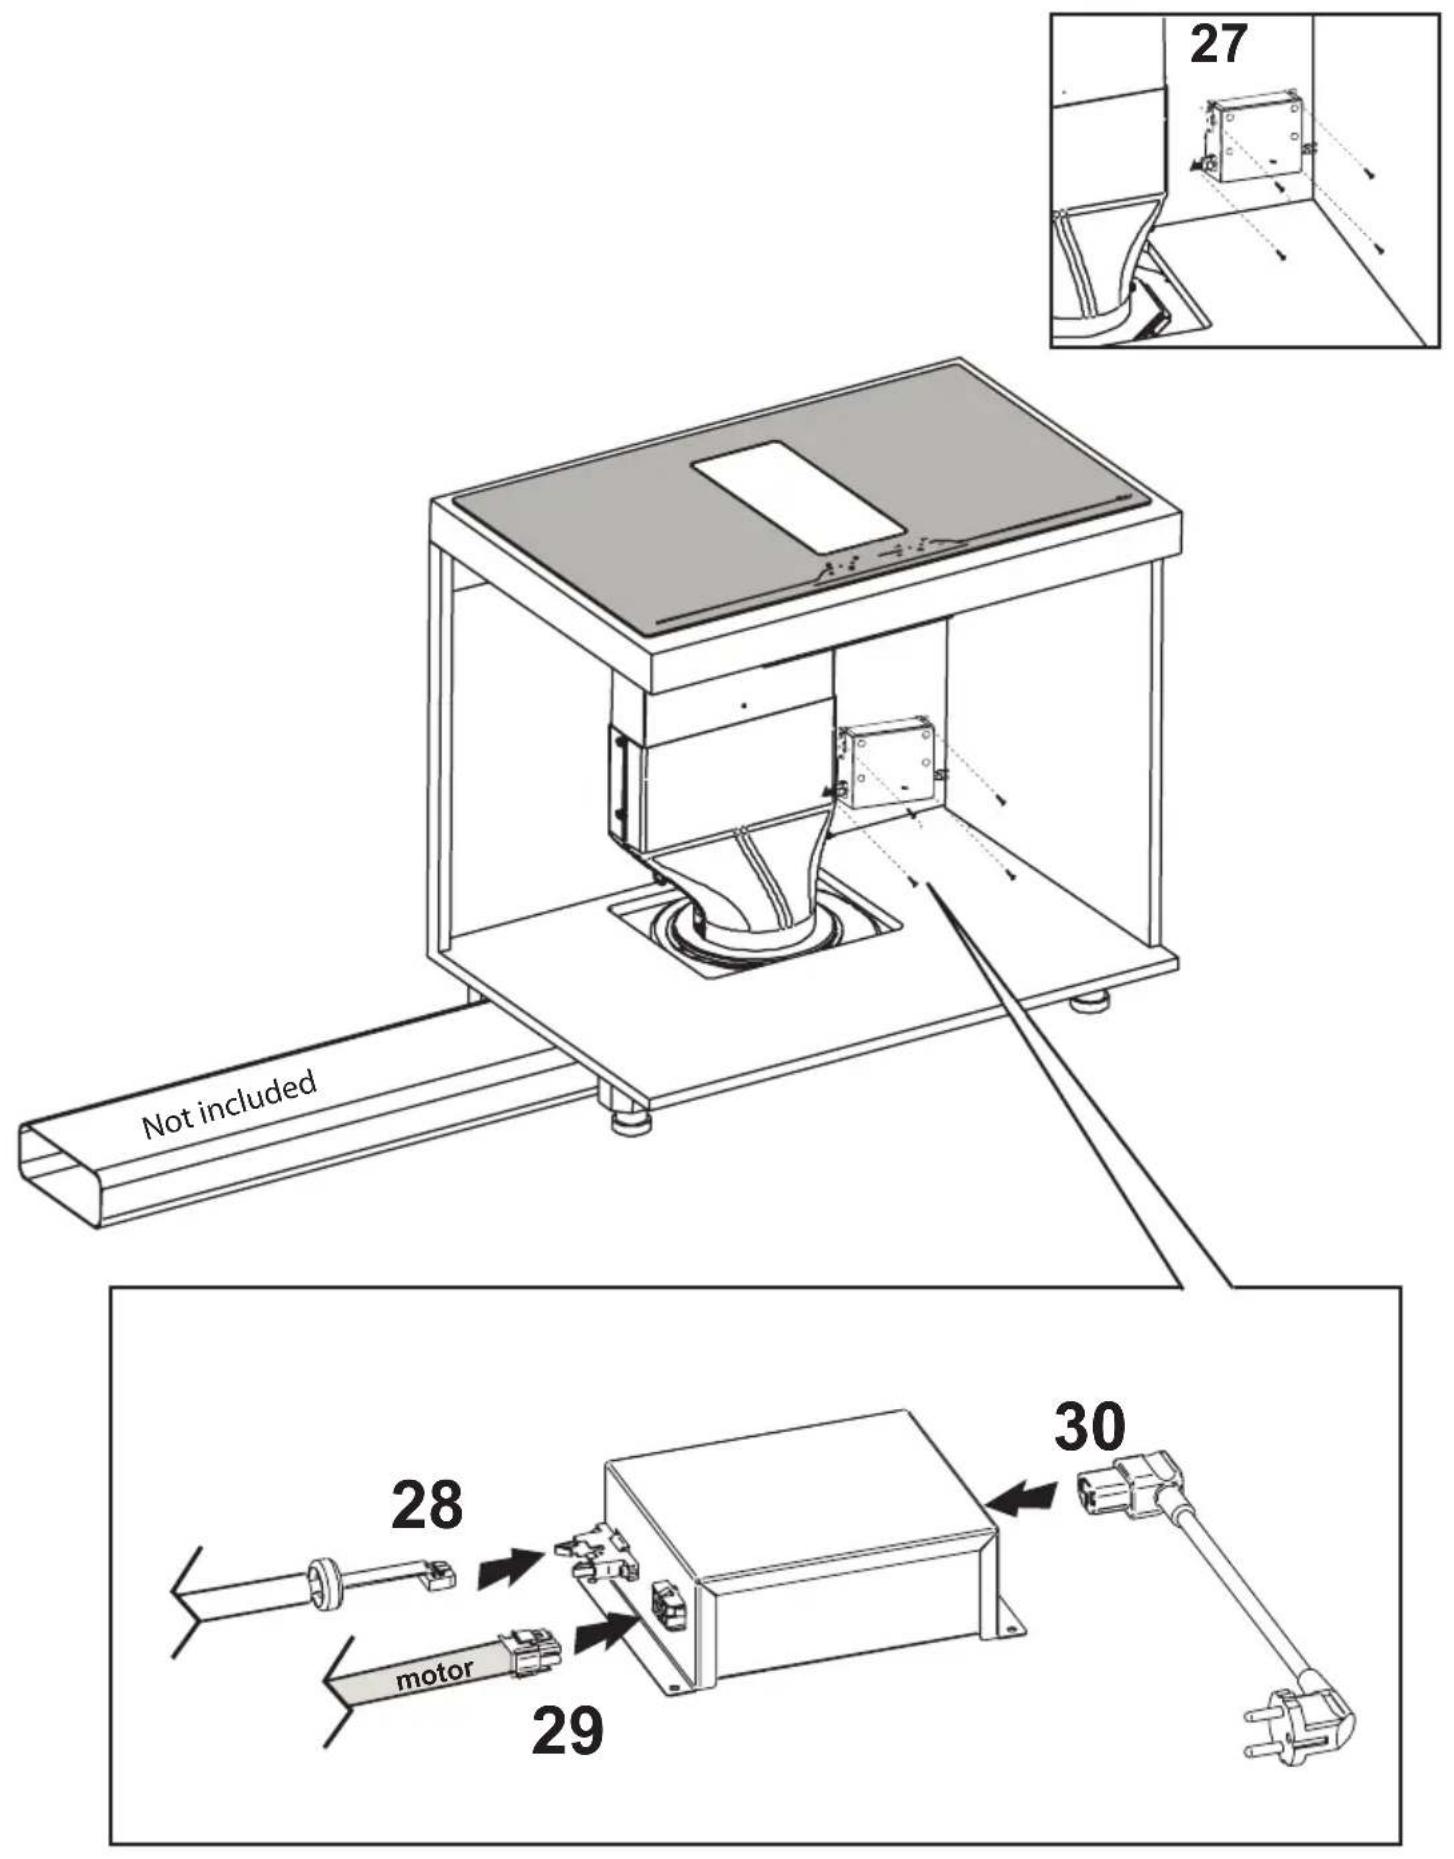
From this point on, the assembly instructions apply to each of the four setup modes; be careful to the position of the motor and the fitting, specific to the type of installation chosen.
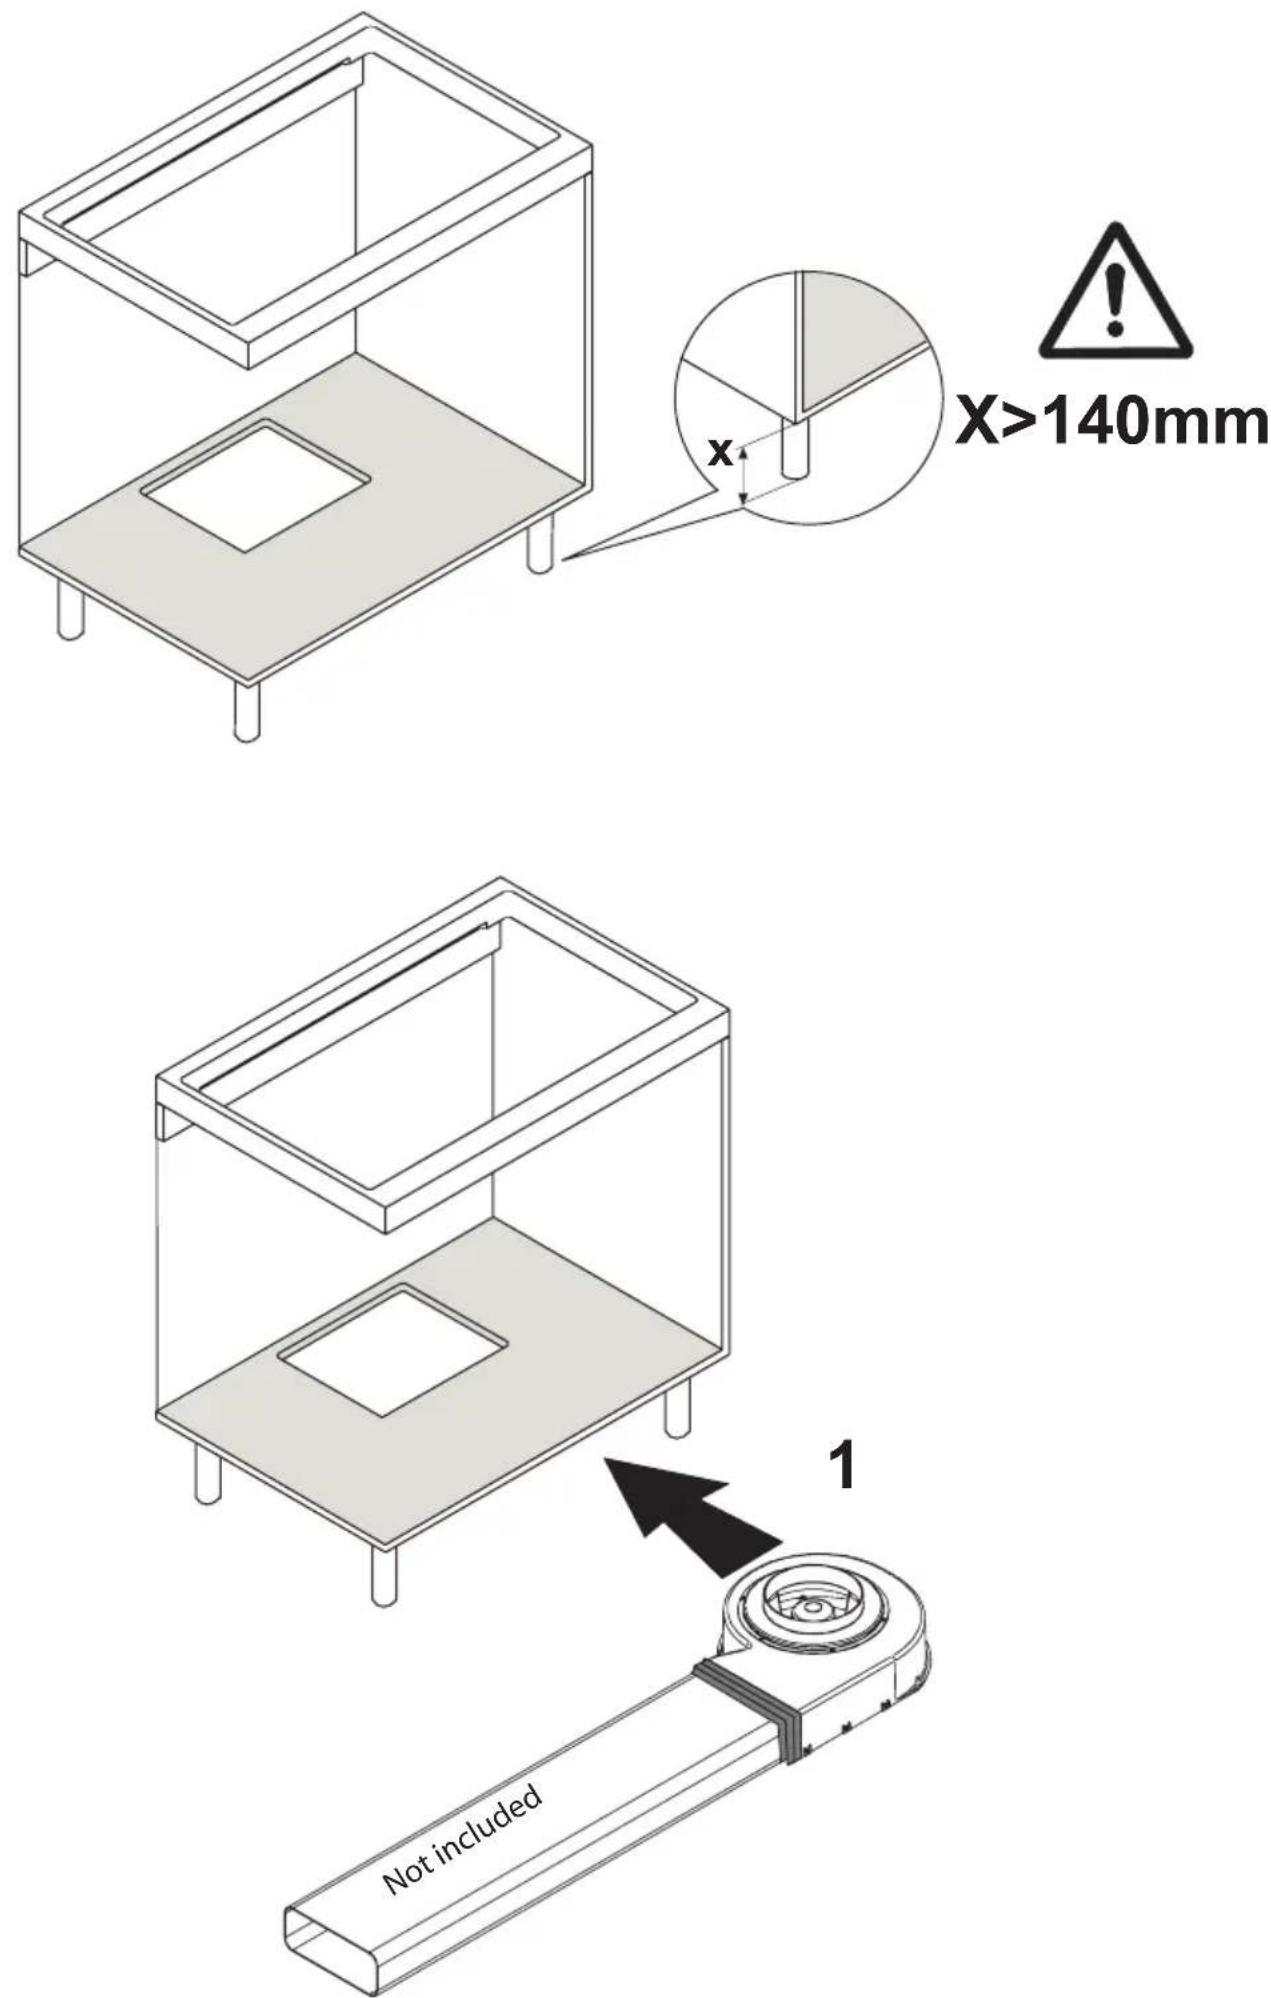
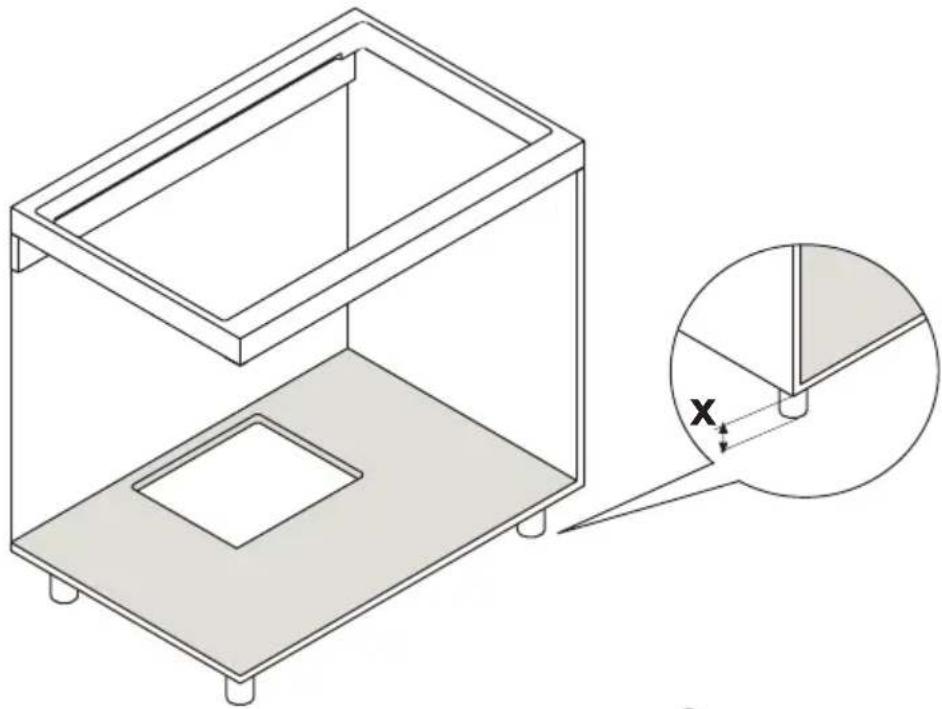
natural_image
Isometric line drawing of a two-tiered rectangular box with a square opening, plus an inset showing a pie chart with X and Y axes (no text or symbols)
X<140mm
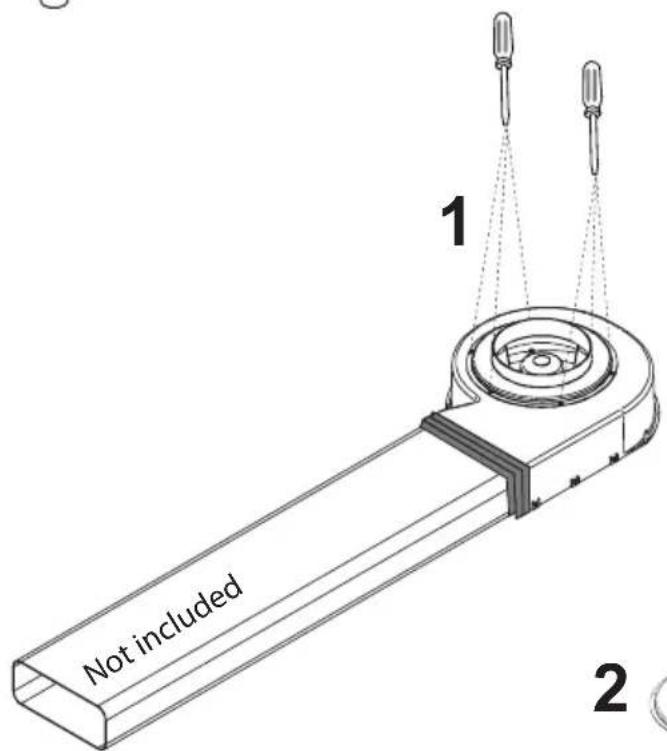
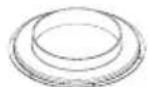
natural_image
Technical line drawing of a mechanical device with a labeled component '17' (no text or symbols on the diagram itself)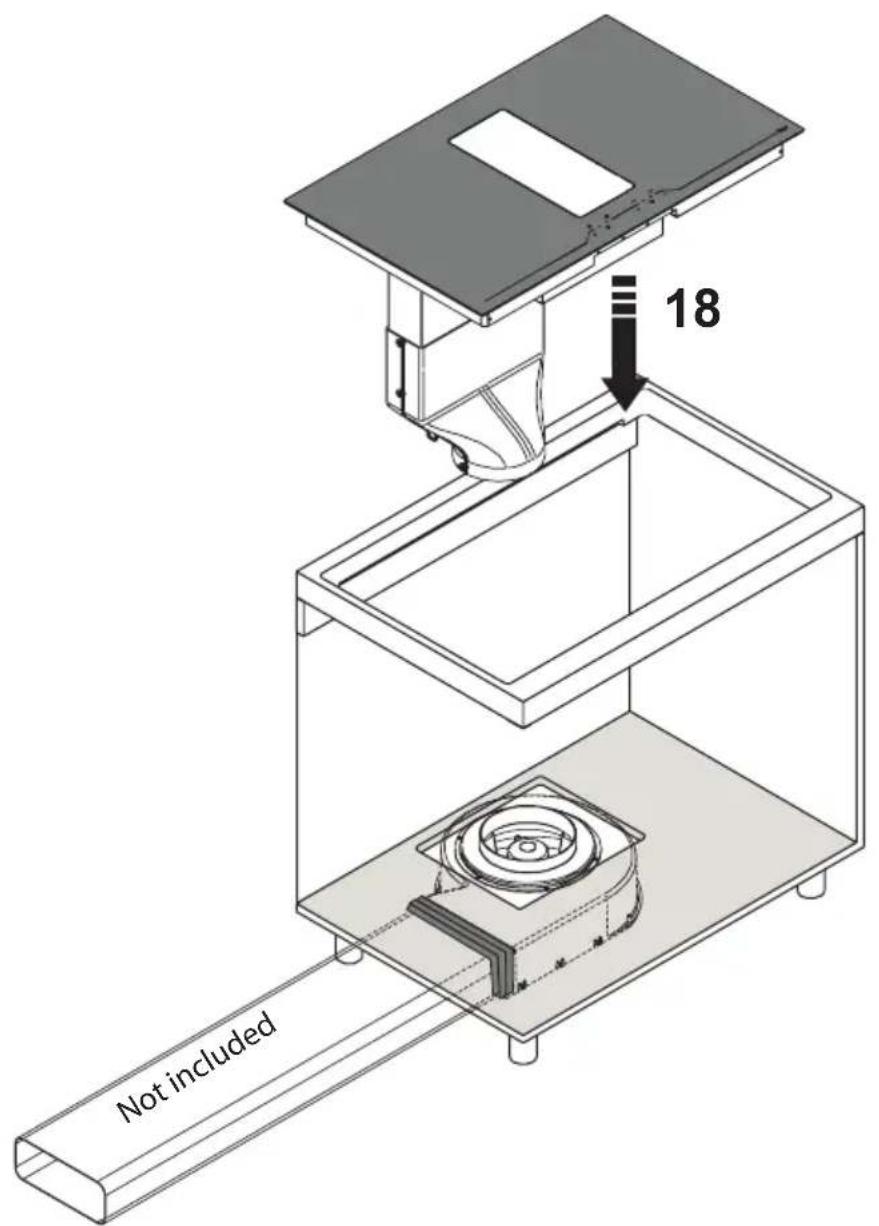
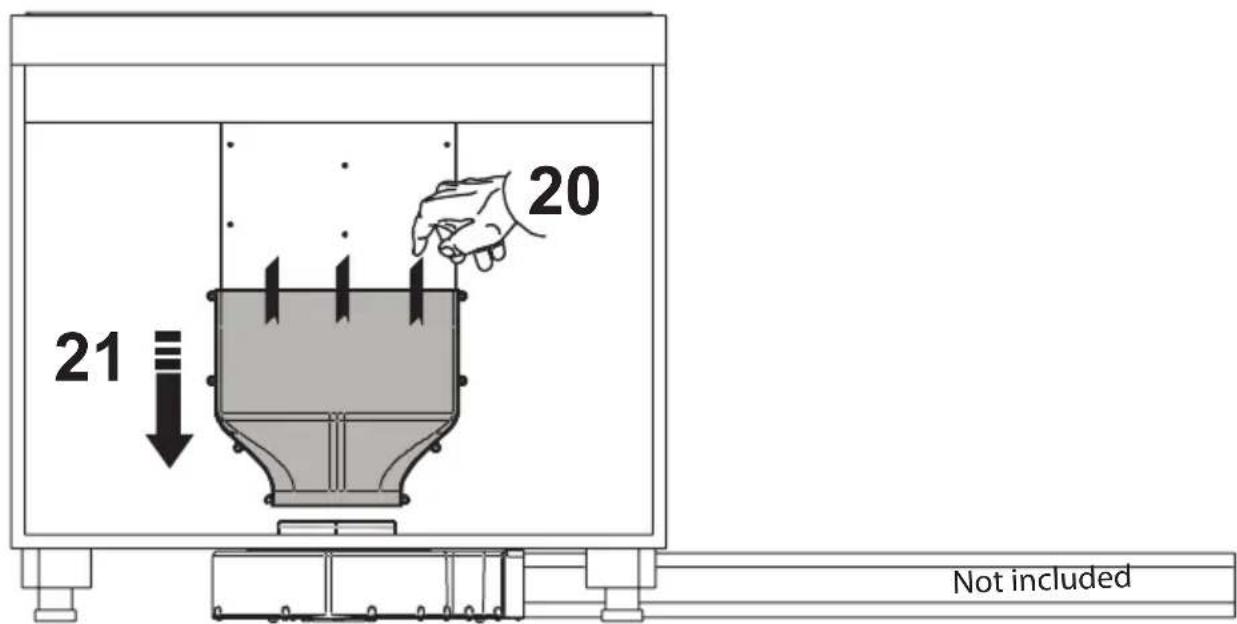
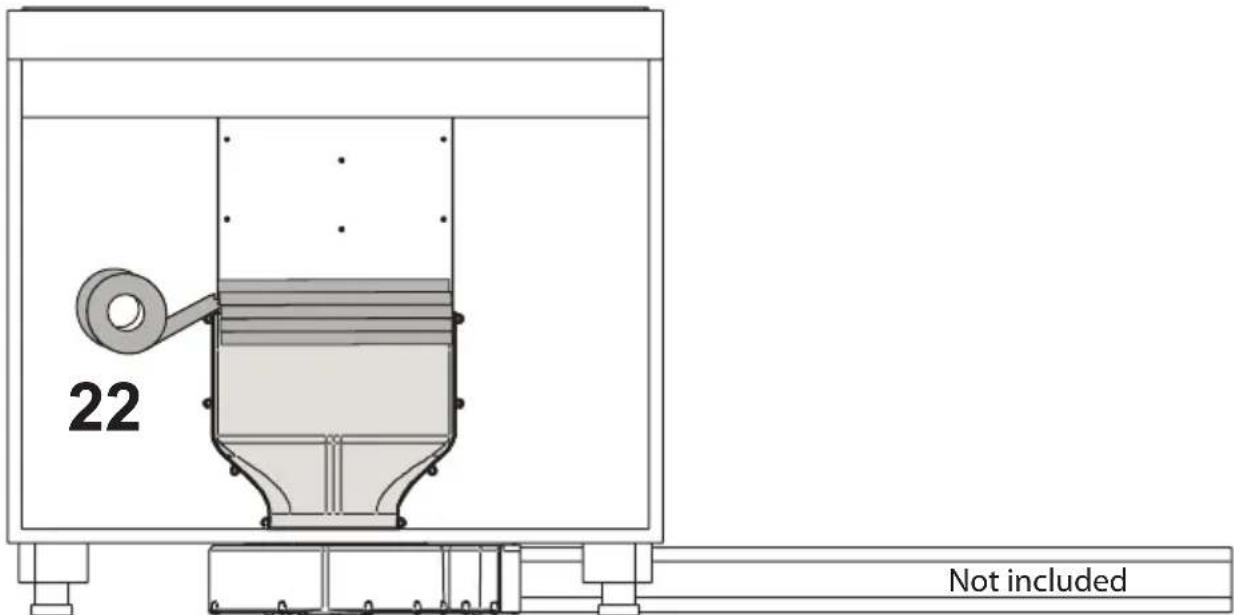
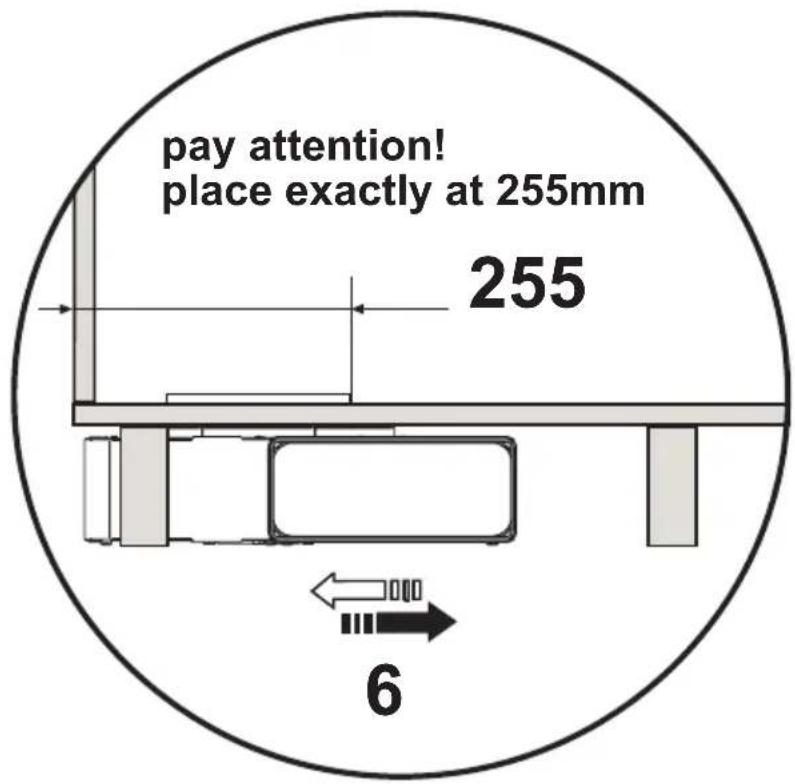
23

258
pay attention!
place exactly at 258mm
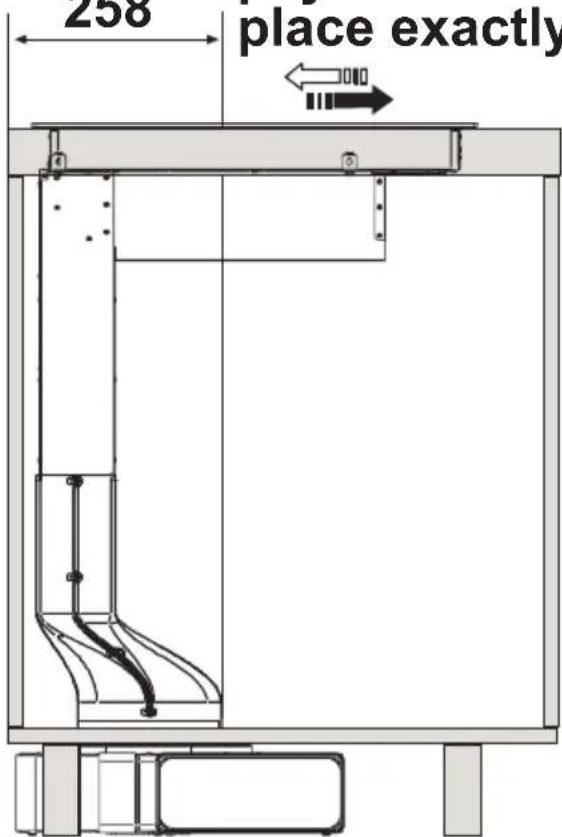
24
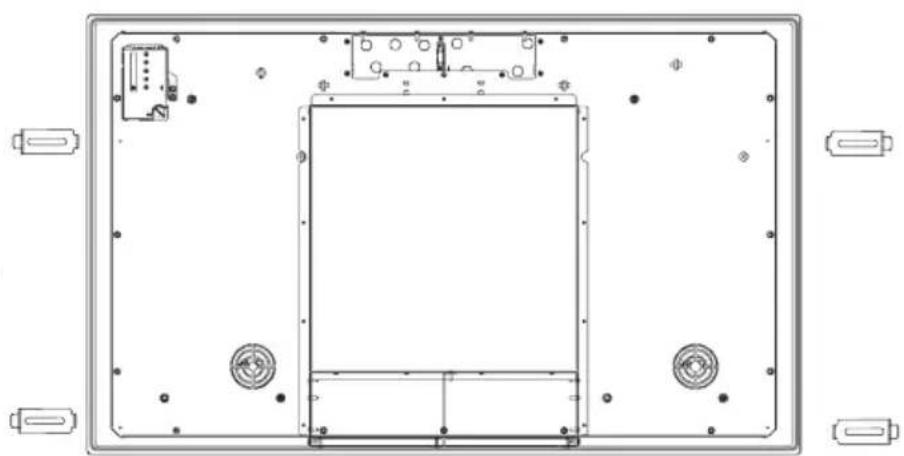
natural_image
Technical line drawing of a rectangular electronic device with mounting holes and internal components (no text or symbols)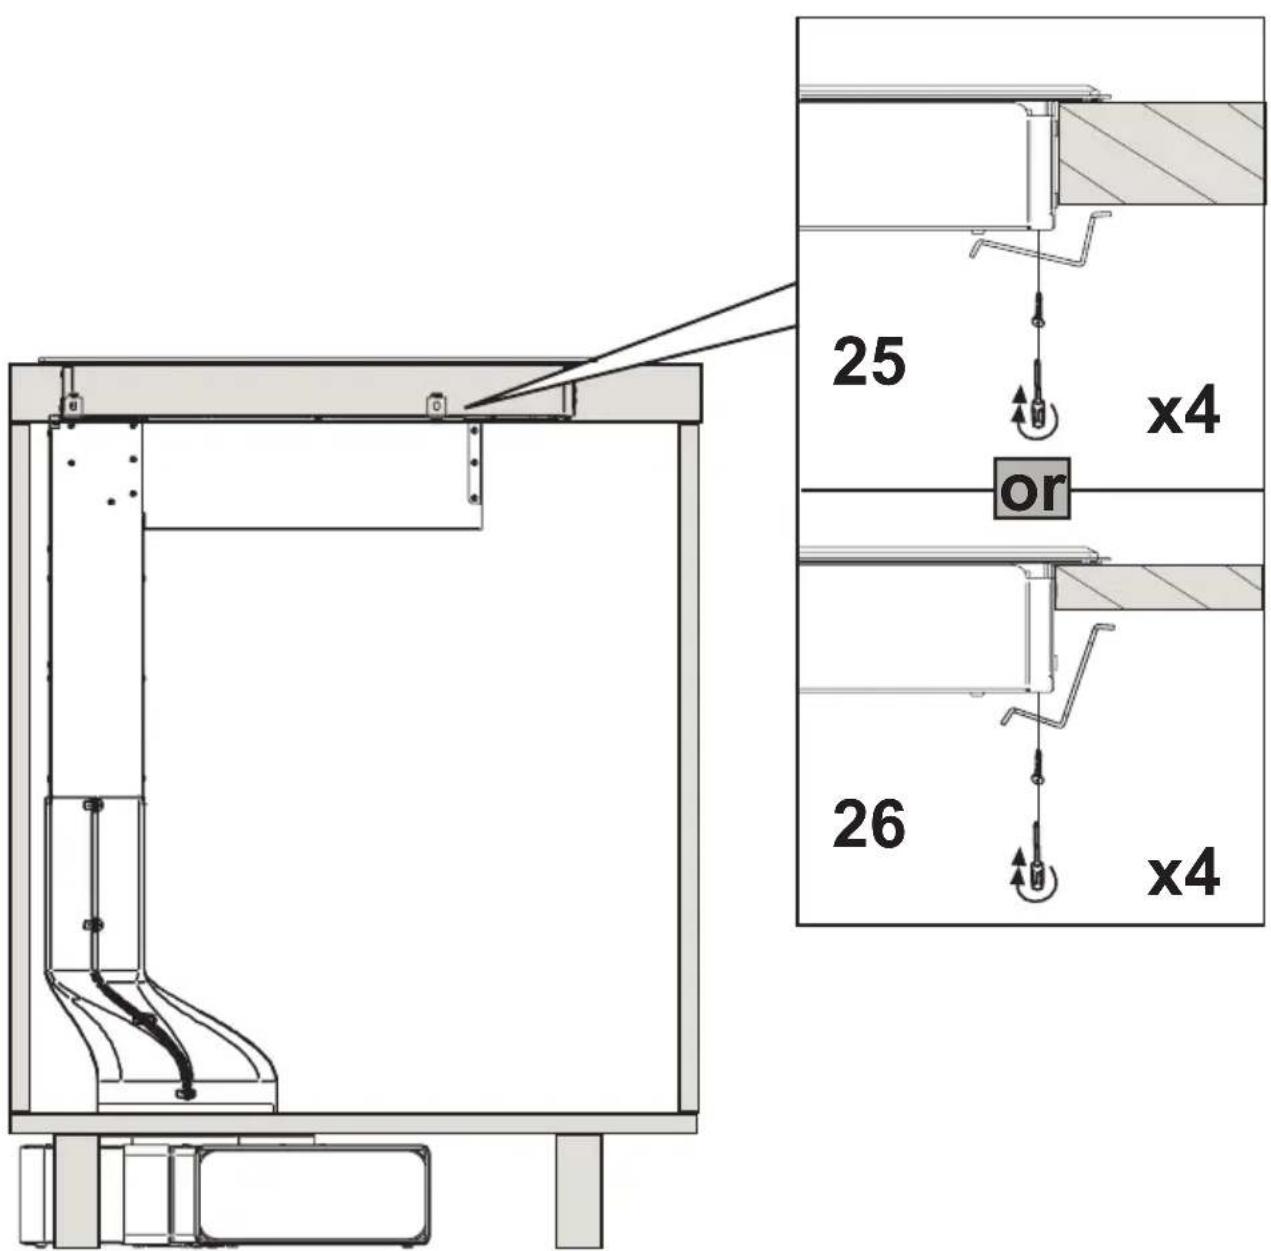
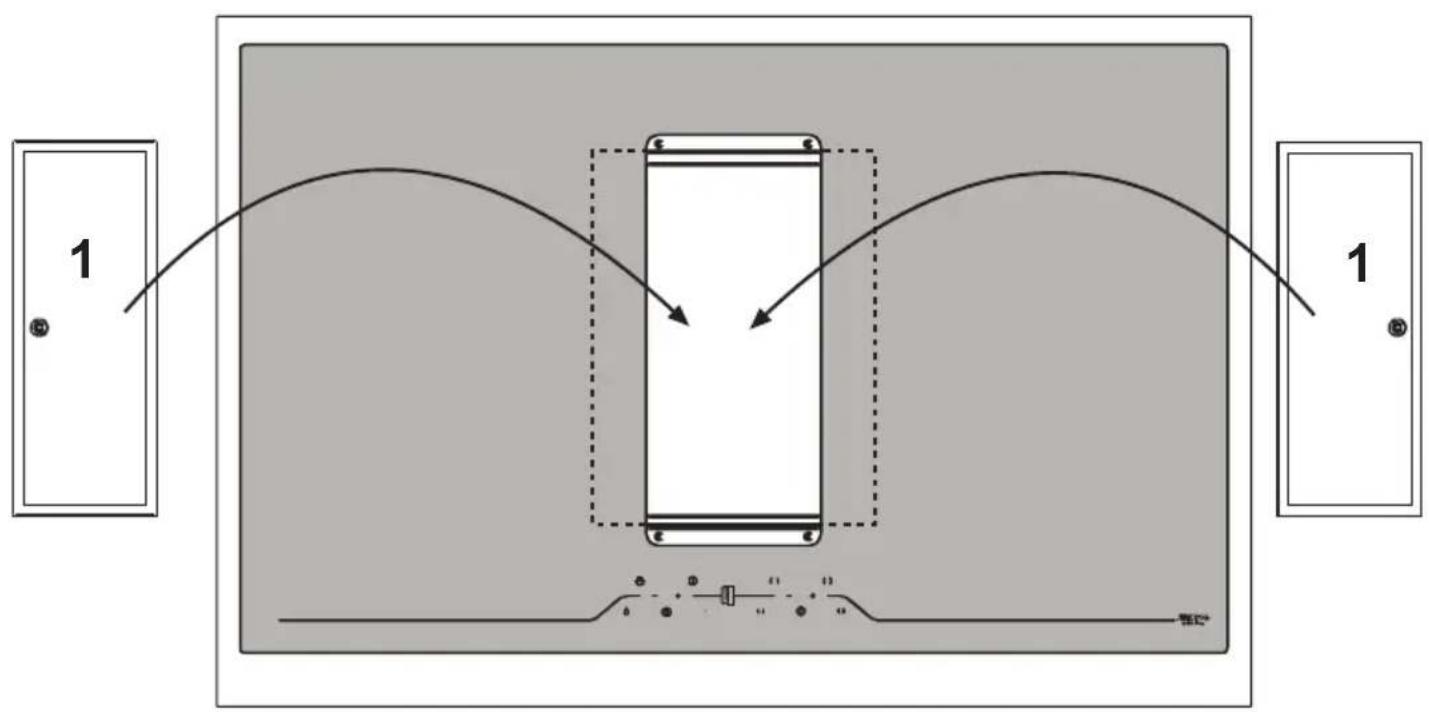
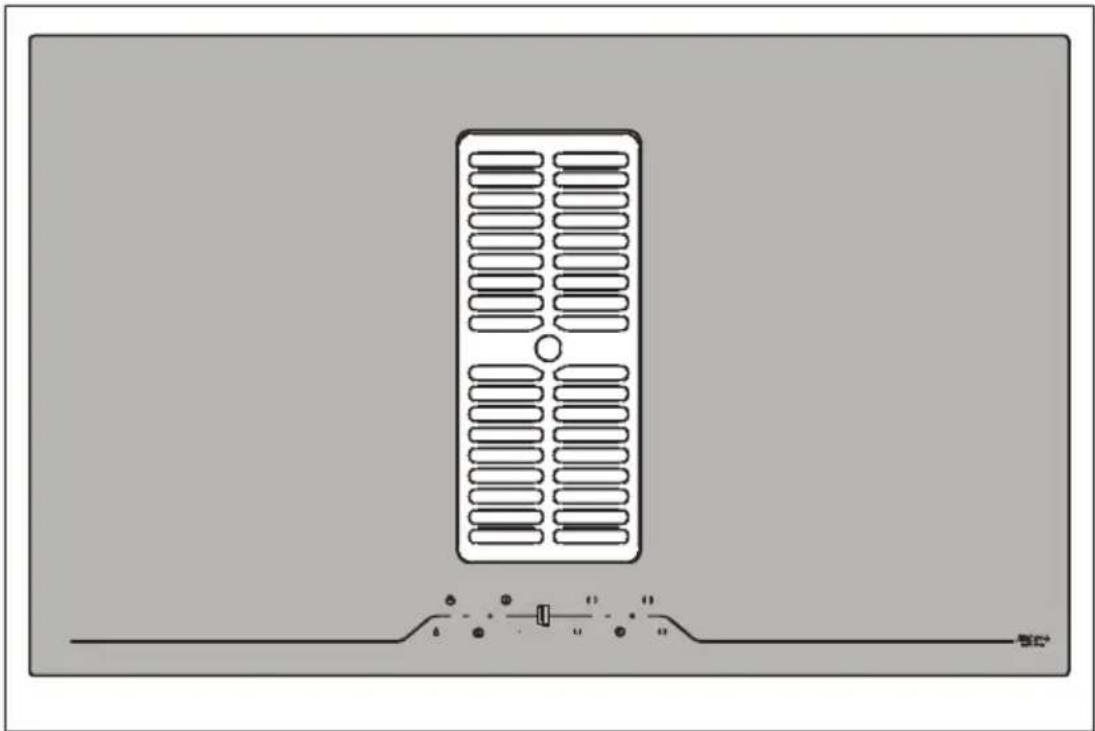
exhaustion mode
flowchart
graph TD
    A["Panel 1"] --> B["Device with arrow"]
    C["Panel 1"] --> D["Device with arrow"]
    B --> E["Output"]
    D --> E
    style A fill:#f9f,stroke:#333
    style C fill:#f9f,stroke:#333
    style B fill:#ccf,stroke:#333
    style D fill:#ccf,stroke:#333
exhaustion mode
natural_image
Diagram of a mobile phone with ventilation slots and a power cord, no text or symbols presentrecirculation mode
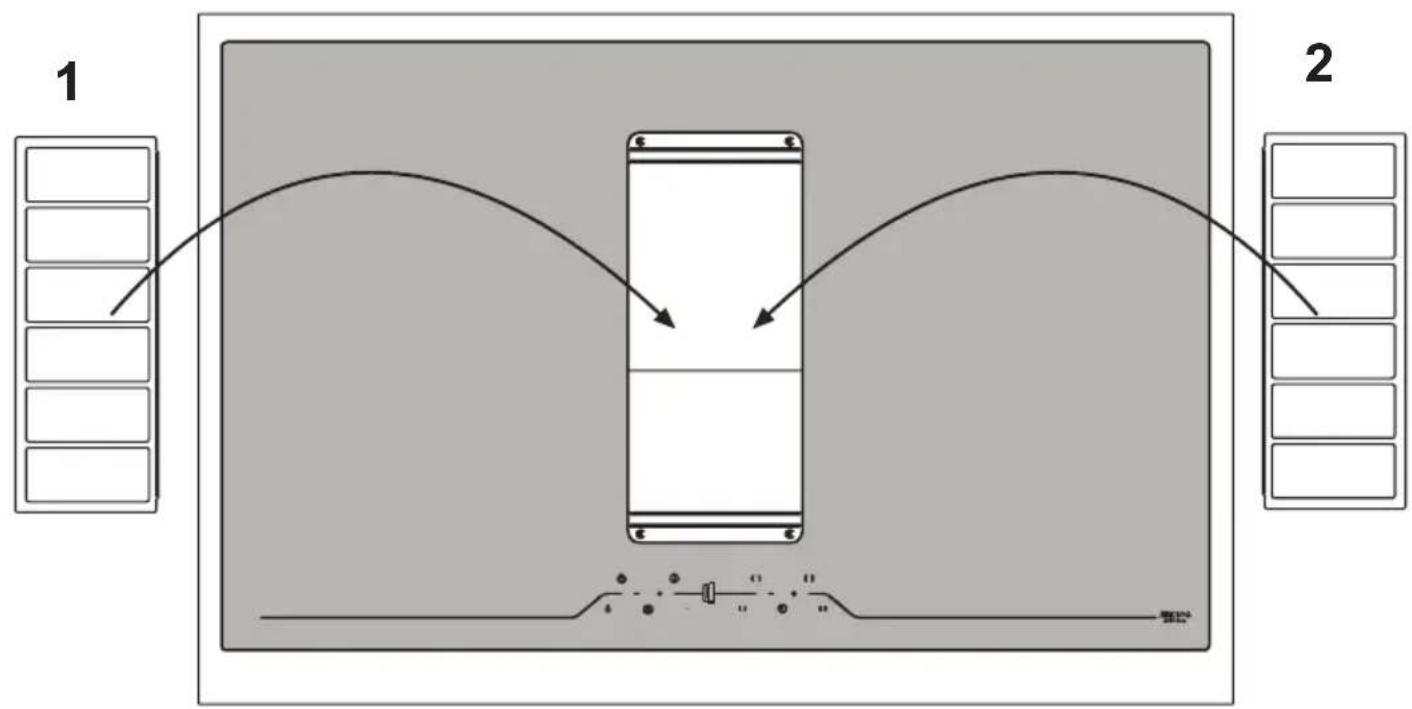
flowchart
graph LR
    A["1"] --> B["Device"]
    C["2"] --> D["Bus"]
    style A fill:#f9f,stroke:#333
    style C fill:#f9f,stroke:#333
    style B fill:#ccf,stroke:#333
    style D fill:#ccf,stroke:#333
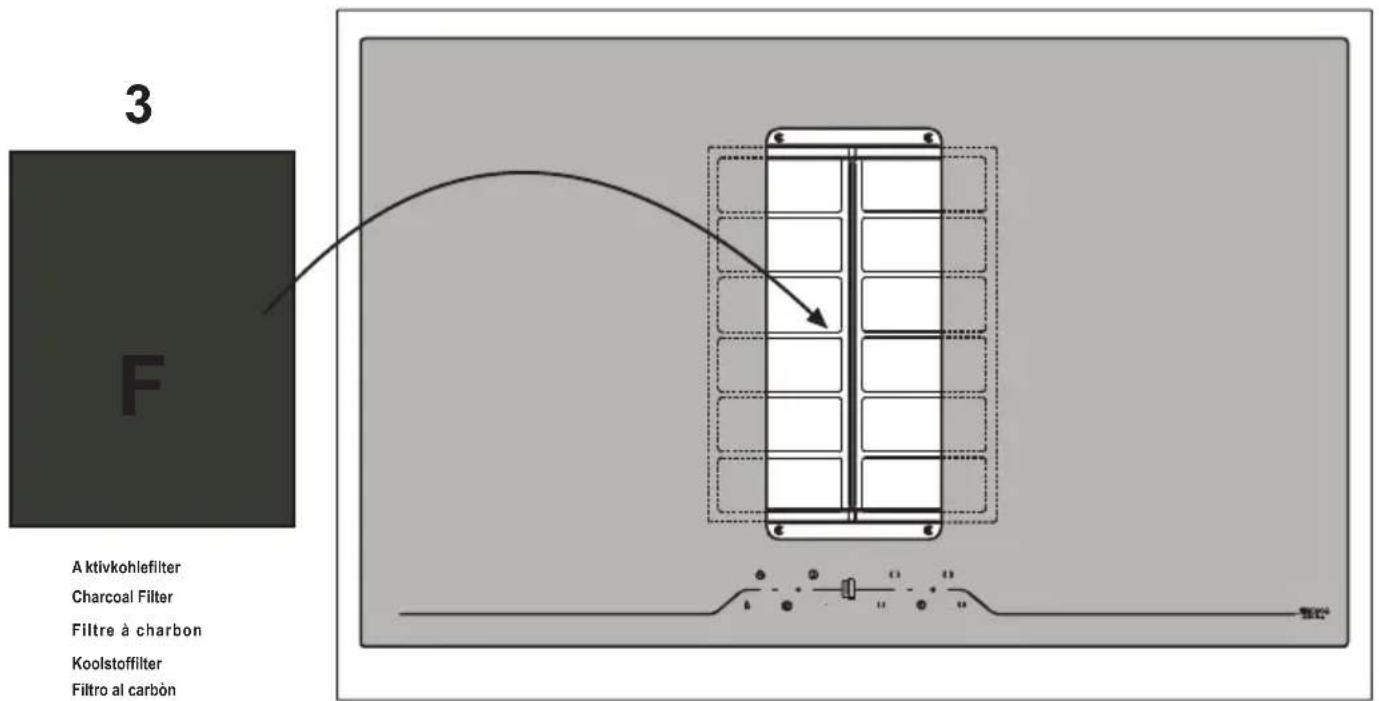
Aktivkohlefilter
Charcoal Filter
Filtre à charbon
Koolstofffilter
Filtro al carbón
Filtro al carbone
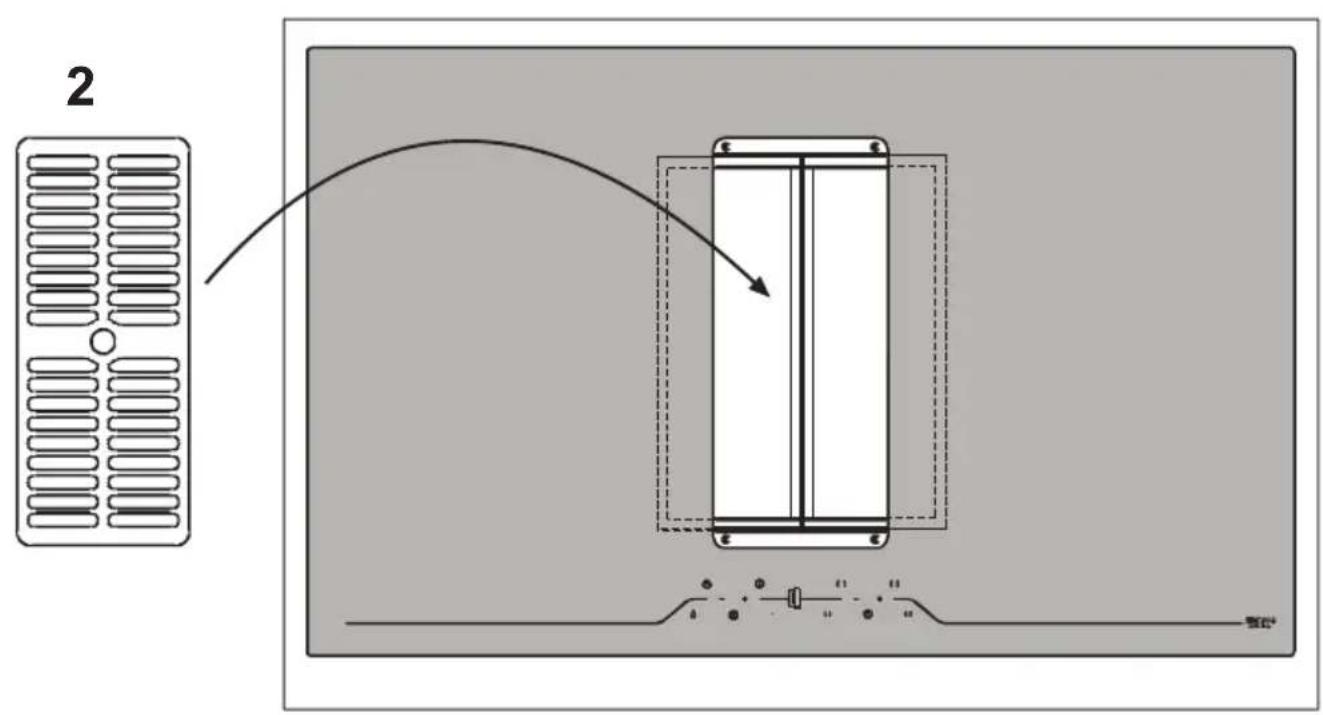
recirculation mode
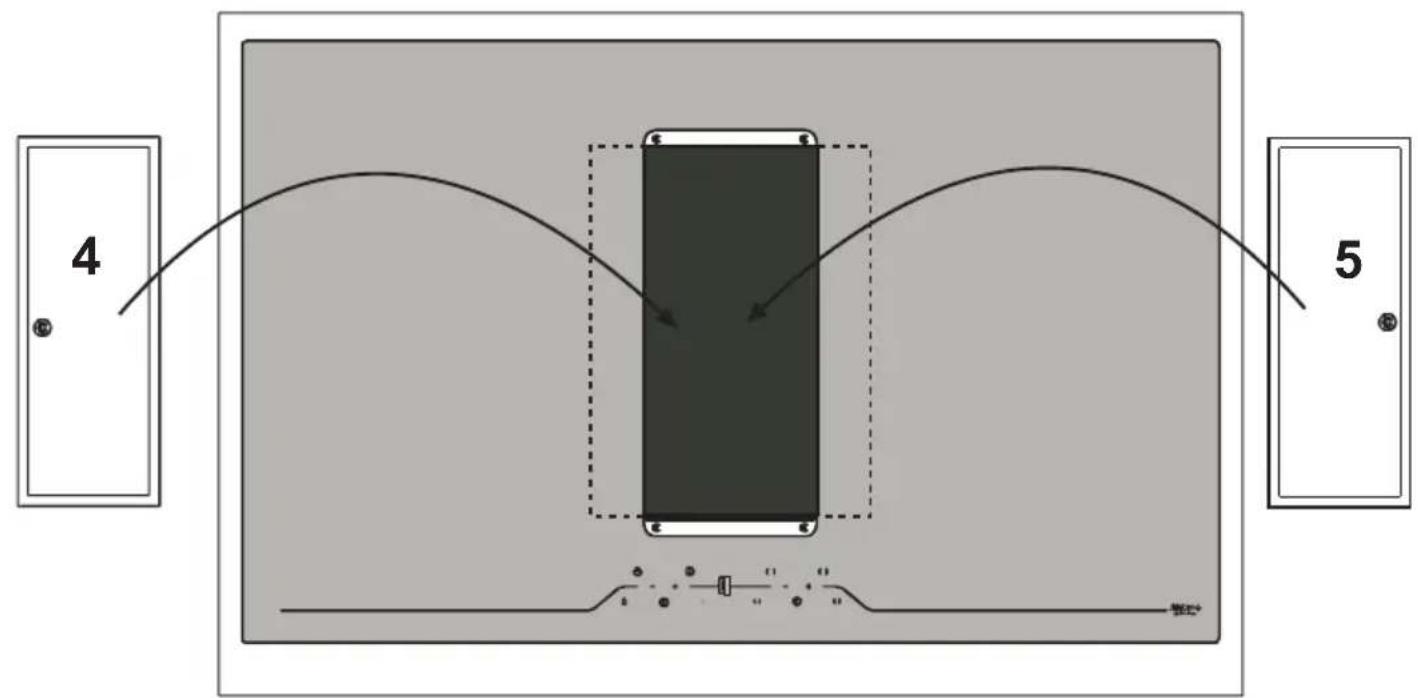
flowchart
graph TD
    A["4"] --> B["Central Block"]
    C["5"] --> B
    B --> D["Output Line"]
    style B fill:#999,stroke:#333,stroke-width:2px
7
natural_image
Diagram of a mobile phone with ventilation slots and a speedometer, no text or symbols presentElectrical connection diagram
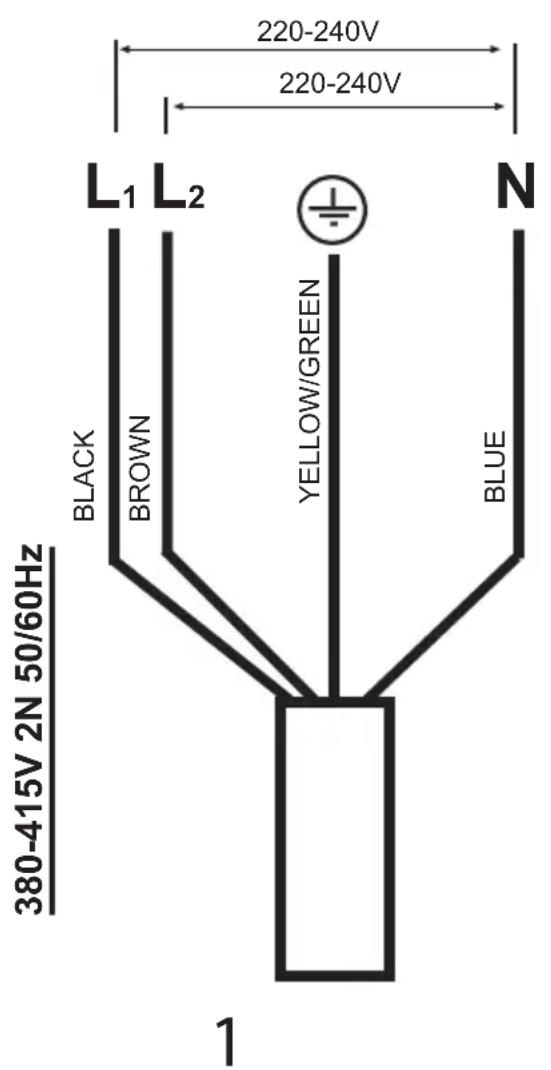
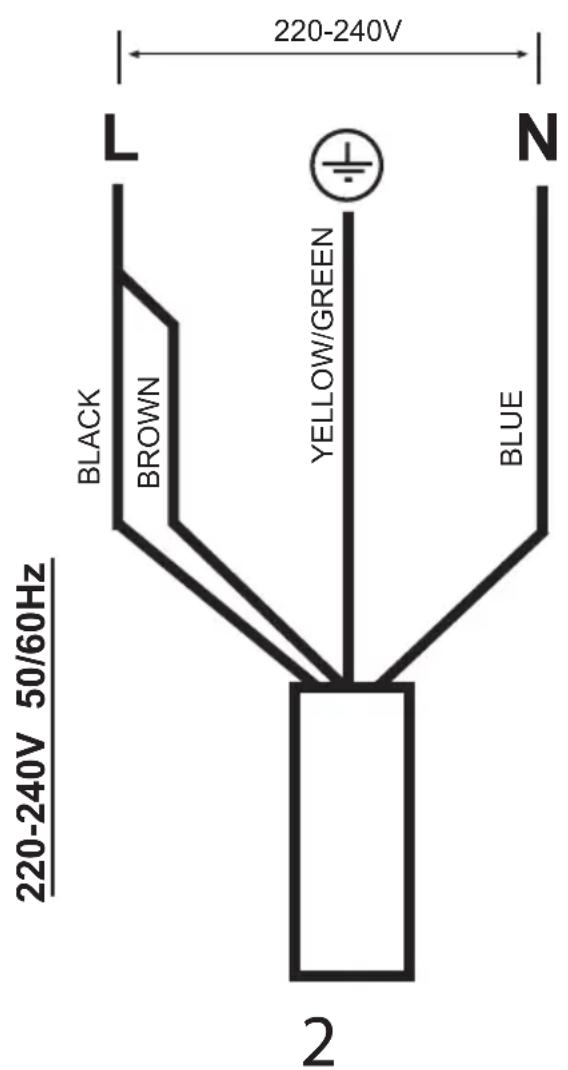
The induction hob is composed of 2 modules, each one can absorb 3.7kW max. The total rated power of the product is 14,8kW (3,7kW+3,7kW+3,7kW+3,7kW)
Attenzione
This instruction handbook is conserved together with the P904ICHNE for future consultation. If the equipment is sold or transferred to another person, make certain the instruction handbook is supplied together with it, so that the new user can become aware of the operation of the cooker hood and related warnings. These warnings have been compiled for your safety and the safety of others. Please take the time to read them carefully before installing and using the equipment. Be sure to also consult the drawings in the front pages, including the alphabetic and numeric references in the text descriptions. Closely follow the instructions in this manual. The manufacturer declines all responsibility for any inconveniences, damage or fires caused due to non-compliance with the instructions in this manual. The installation and electrical connection must be provided by a qualified service technician. The supplier is not liable for any warranty for damages caused by improper installation or improper use of the appliance. Do not modify or seek to modify the specifications of this appliance.
The cooking top must always be used within the limits of normal domestic use, not for professional use, but simply to prepare and keep dishes warm. Any other use is not allowed. The unit should not be left unsupervised during its operation.
This appliance can be used by children from the age of 8 onwards, and by persons with reduced physical, sensory or mental capabilities, or lack of experience and knowledge, provided they are properly monitored, or if they have been instructed in the safe use of the appliance and are aware of related dangers.
Children must not be allowed to play with the appliance.
Make use of the locking device to prevent children from accidentally turning on the device, or modifying its functions. The unit should not be left unsupervised during its operation.
Do not control the cooking top using a remote timer.
The unit should not be left unsupervised during its operation.
Make certain children at home are prevented from toppling hot pots and pans to the floor. Turn the handles and knobs of pots and pans to the side on the cooking top, so that they are above the cooking top, and to prevent the risk of burns.
For safety reasons, the cooking top must be used only after having been installed in its recessed housing.
Prior to proceeding with the installation, check to make sure there are no visible signs of damage to the cooking top. Never start up a damaged unit, as it may pose a safety risk.
Cleaning and maintenance must not be carried out by children without proper supervision.
If the power cord is damaged, it must be replaced by a qualified service centre or technician only.
The electrical installation must have a breaker upstream from the appliance which ensures that all poles are disconnected with a contact gap of at least 3mm.
CAUTION: The hob protection devices must be only those designed by the appliance manufacturer or those indicated as suitable in the manufacturers instructions or the hob protection devices incorporated in the appliance.
The use of inappropriate protection devices may provoke accidents.
During the installation the equipment must be connected to a power source whose system impedance is matched to a value of 0.005+j0.005[Ohm].
Do not seal the area between the glass and the worktop with silicone because should the cooktop need to be replaced, the glass could break during removal.
The unit's installation and electrical connection to the power grid must be carried out by qualified service technicians only. The device's electrical safety can be guaranteed solely if a regular ground connection is provided for the cooking top. If in doubt, have the electrical system checked by a qualified electrician. Do not connect the cooking top to the mains using extension cords or multiple sockets, since they will not guarantee the required safety (e.g. risk of overheating).
Prior to connecting the cooktop, compare the connection specifications (voltage and fre quency) indicated on the unit's identification nameplate with those of the mains electricity supply.
These specifications must absolutely correspond, otherwise the unit may be subject to damage. Contact an electrician if in doubt.
Disconnect the unit from the mains when carrying out installation work, maintenance or repairs.
Comply with all air discharge regulations.
CAUTION: If the surface is cracked, switch off the appliance to avoid the possibility of electric shock.
Never open unit's outer casing. Any contact with live parts or the modification of electrical or mechanical parts can cause operating abnormalities.
The induction hob should not be used as a work surface. The rough underside of food containers can scratch the surface of the cooktop.
Always keep the cooking areas and underside of food containers perfectly dry.
Fire hazard
Oil and grease that are too hot will catch fire quickly.
Do not leave overheated oil or grease unsupervised.
If oil or grease should catch fire, do not attempt to put out the flames with water. Extinguish the flames with a lid or plate, or with a fireproof blanket. Turn off the cooking zone. Never place flammable items on the hob.
WARNING: Fire hazard: do not leave objects on the cooking surface.
Burn hazard
CAUTION: This appliance and its accessible parts become very hot during use.
Pay attention to avoid touching the heating elements.
Keep children under 8 years of age away from the appliance, unless they are continually monitored.
Do not place objects such as knives, forks, spoons or lids on the induction top, as they may overheat.
Do not heat closed containers, such as tin receptacles, on the cooking top. The excess pressure generated could blow up the container.
Suitable food containers
Only ferromagnetic containers are suitable for induction cooking; the following receptacles, in particular, are suitable: enamelled steel, cast iron, special dishes for induction cooking in stainless steel.
Use only pots and pans with a smooth bottom. Do not introduce any objects between the bottom of the pot and the glass ceramic surface, such as adapters.
| Cooking zone Minimum diameter Maximum recommended diameter | ||
| OCTA (single) 90mm 115 mm | ||
| OCTA (bridged mode) | 220 mm 245 mm | |
To find whether receptacles are suitable, check whether they are attracted by a magnet.
Another type of special receptacle exists for induction cooking, with a bottom that is not entirely ferromagnetic.
Non-suitable food containers
Never use recipients made of: normal finegrained steel, glass, pottery, copper and aluminium. Do not place empty containers on the cooking zone, as they may cause damage.
Do not place hot recipients on the control panel, in the area of the pilot lights or on the edge of the cooking top, as they may cause damage.
Danger of mishaps
Pots from which liquids have completely evaporated can cause damage to the glass ceramic top, for which the manufacturer does not assume any responsibility.
The appliance is equipped with a cooling fan. If a drawer is set under the recessed hob, a suitable distance must be ensured between the contents of the drawer and the lower part of the unit, in order to avoid compromising ventilation.
The worktop should be flat and horizontal. The furniture should be cut to measure before installing the appliance. Remove any chips to avoid compromising the operation of electrical components.
Considering the ventilation of the cooktop, the following must be provided:
-if the cooktop is installed above a drawer, leave a 70 mm space between the drawer and the top of the cooktop (fig.1).
Do not store small objects or sheets of paper in the drawer under the cooking hob, since such objects may be aspirated and could break the fan, thus hindering the unit's cooling; likewise, do not store metal or inflammable objects, which could become very hot or catch fire.
If the cooking hob is assembled behind a cabinet door, power it on only with the door left open. Close the cabinet door only if the appliance and residual heat indicator lights are off.
If the unit is assembled above an oven or an electric pyrolytic stovetop, it should not be operated while the pyrolytic process is ongoing, as it can trigger the cooktop's overheating protection.
The cooktop should not be installed above dishwashers because the steam released by the latter may lead to faulty operation of the electronic circuit of the cooktop.
Do not make use of any steam devices, as steam can reach the appliance's live parts and cause a short circuit.
Any interventions or repairs on the unit during the warranty period must be carried out solely by the manufacturer's authorised service centre; conversely, the warranty will be is invalidated and terminated immediately. The manufacturer will not recognise any warranties under any circumstances for any problems subsequently encountered.
Replace any defective or damaged parts with original spare parts: only original spare parts can ensure compliance with safety standards.
Notice to persons with pacemakers: keep in mind that an electromagnetic field is generated in the immediate vicinity of the unit while it is in operation.
The possibility that the pacemaker's operation may be affected is very remote. If in doubt, contact the pacemaker manufacturer or your doctor.
Warning: do not pour any type of liquid into the suction slot of the hood.
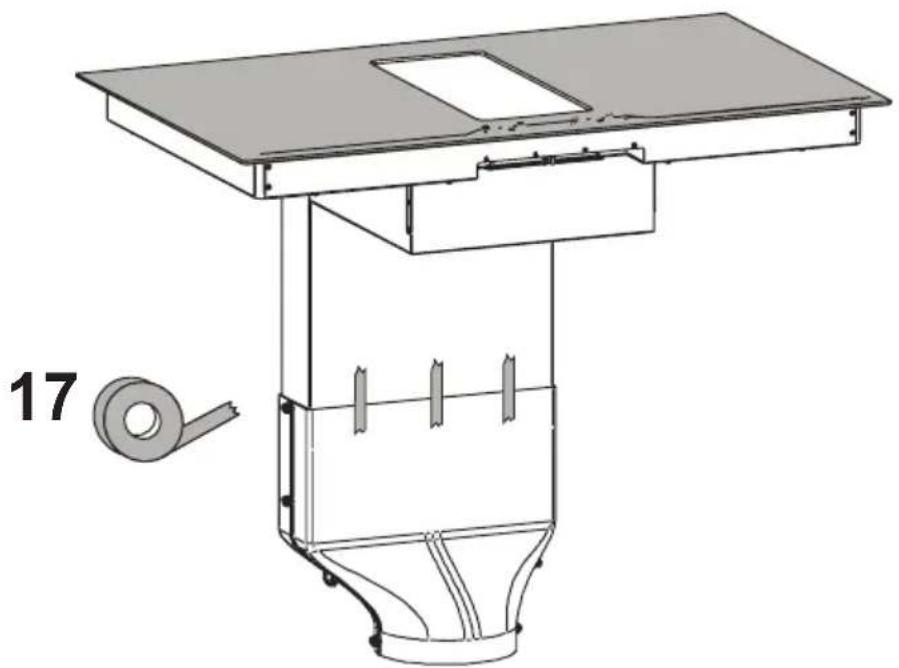
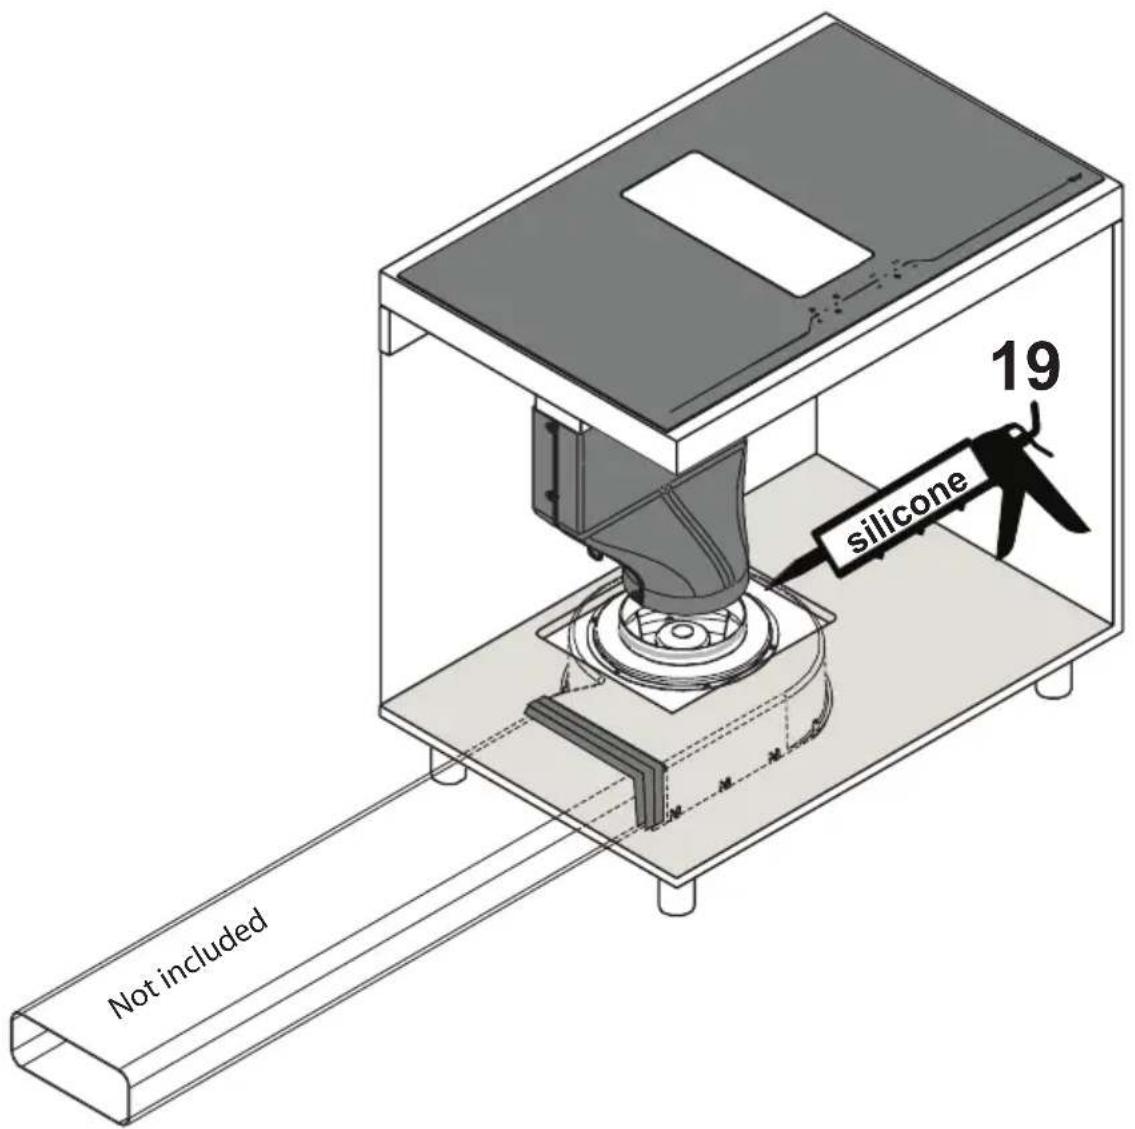
Warning: it is recommended to seal with silicone or adhesive tape all the joints of the pipes, both of the exhaust pipes and the fittings that join the various parts.
In the case of installation in filtration mode, pay particular attention to the positioning of the fume exhaust area to avoid possible turbulence, so as not to interfere either with the suction system or with the hob.
In the installations in filtration mode, place the pipes inside of the plinth of the furniture, ensuring air evacuation to the outside via a special grid, in order to prevent moisture from building up inside of the same.
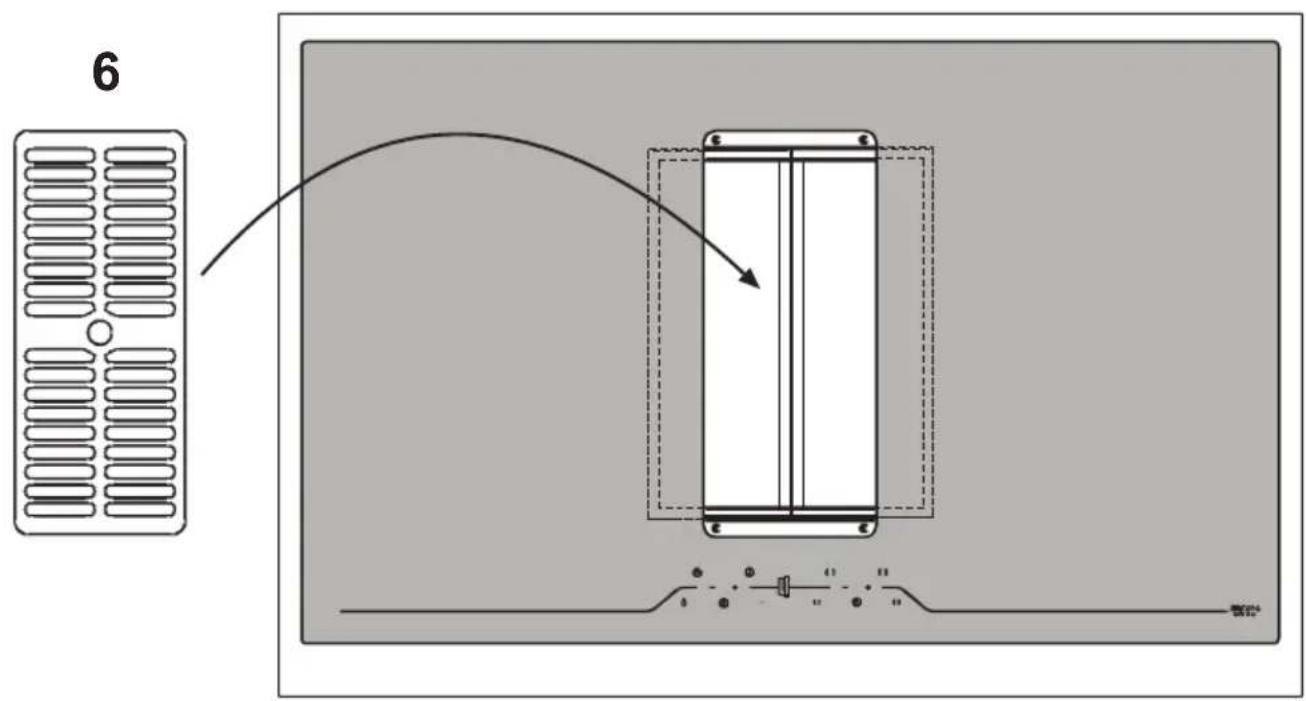
Turn on the suction device only when the cover is open. To open and close the cover, use only the dedicated slot.
The liquid collection tray must be emptied on a regular basis.
Such tray is designed to contain about 0,7 litre of water; in case of spillage or fall of fluids on the device, turn off the appliance immediately and empty the tray. If the liquid fallen on the floor is greater than the maximum capacity of the tray, turn off the device and contact the customer service immediately.
After use, turn off the cooking hob through its control device and do not rely on the cookware detector.
Noise emissions
Induction can generate slight noise emissions, which can vary depending on the material, type of pot and power setting selected.
When the cooktop is used frequently, the cooling fan turns itself on to protect the electronics, generating a buzzing sound: this is perfectly normal.
First usage
Use a damp cloth to clean and dry the cooktop before using it for the first time.
It is recommended to dry the appliance after having cleaned it with a damp cloth, in order to prevent the build-up of limescale.
When the unit is powered on for the first time, odours or fumes may be generated. The odour will diminish with each subsequent use, until it disappears altogether. Odours and any fumes are not caused by a faulty connection or damage to the appliance, and are not hazardous to health.
Aspira is equipped with touch sensitive electronic sensor keys.
Switching on the cooktop
Press the power button ①
If no other control is enabled, the hob turns off automatically for safety reasons.
Activating the desired cooking zones
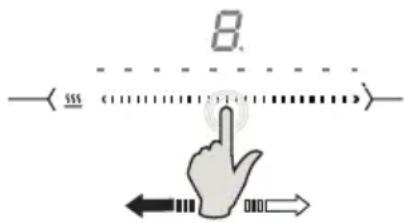
Every cooking zone is equipped with its own dedicated slider. The hob automatically detects which cooking zone to activate, based on the position of the pot.
When you place the pot on the desired zone, the dedicated control is immediately enabled.
On display appears 0; operate the slider to select the desired power level that ranges from 1 to P
P: indicates the Booster function and is present on every cooking zone. To activate it, operate the slider to enable power P. Such function remains active for 10 minutes, after which the system switches to power 9.
Note: if the cooking zone has already reached the maximum temperature, the booster function cannot be enabled; the value P flashes for 1 to three seconds and the function will be disabled automatically.
We recommend you use this function to boil water faster.
Note: the booster function can be enabled on all cooking zones up to maximum two at a time.
Switching off the cooktop and residual heat indication
Touch the power button.

The main indicator light and cooking zone lights will switch off. The cooktop is now powered off. The residual heat indicator, displayed as a H on each cooking zone, will remain lit until these zones have not sufficiently cooled down.
Warning: risk of burns
Do not touch a cooking zone for which the indication (H) appears.
If a cooking zone remains lit for too long at the same power level, the appliance will automatically switch it off, and the residual heat indicator H will appear. Switch it back on to reset the cooking zone's operation.
The table below lists the maximum uninterrupted operating time for each power level:
| Power | Operating limit in minutes |
| 1 516 | |
| 2 402 | |
| 3 318 | |
| 4 258 | |
| 5 210 | |
| 6 138 | |
| 7 138 | |
| 8 | 90 |
| 9 | 10 |
| Toggle Function Liv.1-2-3 | 5 |
Flexi Mode
If the pot used is large enough to cover two adjacent cooking zones, the slider of each zone turns on; at this point, touch both sliders simultaneously to activate the Bridge function, indicated by the symbols [ and ], that allows you to control both cooking zones simultaneously, as a single larger zone. The two zones will be controlled by the slider of the leftmost zone. To disable the Bridge function, touch again both sliders simultaneously.
CAUTION: the Bridge function can be activated only on the two left zones and/or two right zones, while it cannot be activated on the two middle zones.
If the bridge function is active, only one booster can be activated, only on the cooking zones that are not set to Bridge mode.
Cooking Assist
Every cooking zone is equipped with three temperature levels that can be selected and set:
1-approxim. 40°: ideal for melting products like chocolate and butter
2 approxim. 70°: ideal as food warmer
3-approxim. 98°: ideal for boiling

Touch the key once, twice or for three times to select the desired level, indicated by the ignition of the relative symbol; upon the fourth pressure, the function will be disabled.
Pod detection
Place on the cooking zones a pot, of suitable material and diameter, as shown in the section on suitable cookware. The zones will activate.
If the pots used are not suitable, hence not recognized by the various cooking zones, the potdetection function will indicate this problem with the symbol "u"
The cooking zone turns off automatically after 10 minutes if no pot is recognized.
Timer
The timer function can be set from 1 minute to 9 hours 59 minutes on each cooking zone.
To activate the timer: select the cooking zone and set the desired power level, then press the keys + and - simultaneously, and use the keys + or - to set the desired time.
The timer symbol will turn on the dedicated control of the selected cooking zone.
A 2-minute beep will indicate when the time set elapses. The cooking zone turns off automatically.
Countdown
The countdown function can be activated only with the hob turned on, from 1 minute to 9 hours 59 minutes but, opposite to timer function, this function does not shut down the cooking zones and remains active even after the hob is turned off.
To activate it, press the keys + and - simultaneously, and use the keys + or - to set the desired countdown time. The timer symbol will turn on between the keys + and -.
A beep warns the user when the time elapses.
To change the timer or the countdown time, press the keys + and – simultaneously with the function active and selected, then set the desired time with the keys + and –.
NOTE: you can set up to 4 timers simultaneously (one for every cooking zone) and one countdown.
Child-Lock safety function

The cooker is equipped with a safety lock so that it cannot be accidentally turned on by a child.
To activate, press the button. A second press deactivates it. When the child lock is activated a LED above the button lights up.
Pause
11
By pressing this key with at least one cooking zone active, the pause function is activated; this function stops temporarily (for a maximum of 10 min.) any plane activity including any active timers. To disable this function press again the pause key and unlock by acting on the right slider.
Recall
If the cooking plane is unintentionally extinguished (with at least one of the cooking zones active) it is possible to call up all the functions previously activated with the recall function. To activate it turn the cooking plane on again within 6 seconds after turning off and then press the pause key within a further 6 seconds.
g5

This device allows you to choose the operating mode (suction or filtration), depending on the installation.
Upon first start-up, the display shows which operating mode is enabled.
Filtration: the display shows the letters C and the filter reset button flashes quickly.
Suction: the display indicates the letter C and the filter reset button is off.
During this phase you can change the operating modes by pressing the key F
A beep confirms the program change.
Once the set time elapses, the program will exit this operating mode and goes to standby mode or by pressing the on/off button of the motor
To access the operating mode selection again, turn off power to the appliance and then power it again.
Note: in suction mode, when the device is turned off, suction still operates for 20 minutes at a minimum speed, to allow evaporating any possible condensation that has formed during the cooking phases.
B:Motor on/off key: when touched, this key enables the motors; if pressed, it shuts down the motor. By operating the keys "+" and "-" the user can modify the suction speed (power).
C:Suction speed (power) decrease key: when touched, this key decreases the suction speed of the hood.
D:Suction speed (power) increase key: when touched, this key increases the suction speed of the hood.
F:Filter reset key: when touched, this key will reset the warnings on anti-grease metal filter (1) saturation and replacement of carbon filter (2).
(1) After 30 hours of hood operation, the symbol F, alternating with the symbol G, will flash indicating the need to clean the anti-grease metal filters; this alarm prevents the operation of the suction system until it is reset, to allow the condensate tray to empty (operation to be performed as needed, but however each time you reset the filters).
(2) Active only in filtration mode: After 120 hours of operation of the hood, the symbol F, alternating with the symbol C, will flash indicating the need to clean/replace the activated carbon filters; the carbon filters can be washed in the dishwasher once, and then they must be replaced.
In suction mode, the alarm of carbon filters is disabled.
A:Timer key: when touching the key, the timer will be enabled, regardless of the selected suction speed. Upon first touch, the time will be 5 minutes (shown by a flashing button on the key), the second touch corresponds to 10 minutes (double flashing time) and the third touch to 20 minutes (triple flashing time). The timer key will flash throughout the entire operation.
A fourth pressure of the button will disable the timer function.
E: Intensive key: Touching the key will directly activate the motor intensive speed (6th speed, timed for approximately 8 minutes).
The timing of the 6th speed is active only in suction mode.
Cooking top
The cooking top must be cleaned after each use. Allow the appliance to cool before cleaning it.
Prior to cleaning the ceramic glass cooking hob, it is advisable to activate the Child Lock function, so that the cooking top is not switched on accidentally (see Child Lock function).
Use only cleaning products specially formulated for ceramic glass cooking tops. Respect all indications on the product packaging.
Do not use the following cleaning products, as they may cause damage to the surfaces of the ceramic glass cooking top:
softeners or products for eliminating stains and/or rust;
dishwashing and/or dishwasher detergents;
detergents for glass;
detergents containing soda, ammonium, acids or chlorides;
any abrasive detergent, sponge or brush;
solvents;
dirt removing rubber erasers;
pointed objects;
oven or grill cleaning products;
any steam device, as steam can reach the appliance's live parts and cause a short circuit.
To prevent damaging the cooking top frame, observe the following guidelines:
Use hot water only, with little soap;
Never use pointed utensils or abrasive products;
Do use a window scraping tool.
Any cooking or dirt residue should be removed with a window scraping tool. Be careful when using scraping tools to avoid injury.
If sugar or food preparations containing sugar, plastic or aluminium foil end up on the hot cooking top, it is advisable to switch it off. Remove these substances immediately from the cooking zone, even if the cooking top is still hot, using a scraper; otherwise these substances can damage the ceramic glass top when cooling down.
(Warning: burn hazard!!!) Lastly, clean the cooking zone when it has cooled.
The symbols on the cooking top can wear out as a result of using abrasive or aggressive detergents, steel wool, and the scraping of pots and pans. Avoid using these cleaning products. In any case, this will not in any way compromise the unit's correct operation.
Note: all of the problem issues described in this section are solely of an aesthetic nature and do not in any way affect the appliance's correct operation. They cannot be restored under the warranty.
These errors appear on the cooking top display.
| Error code | Description | Possible causes | Solution |
| flashing | Continuous activation of one or more keys. The control turns off after 10 seconds. | Liquids or cookware on the control zones. | Clean the control zone or remove the cookware. |
| U400 | Input current >300 V. The control unit shuts down after 1 second, emitting a continuous beep. | Incorrect connection. | Contact the authorized technical support centre and specify the error code. |
| E2 Hob overheated. | Hob overheated (cooking with empty pots)Output heat on sensors > safety level. | Cool down the hob; the error disappears after cooling.If the error persists, contact the authorized technical support centre and specify the error code. | |
| Er20, Er22, Er31, Er36, Er47, E5, E6, E9 | Problems due to hardware, software or power supply. | Hardware errors detected | Contact the authorized technical support centre and specify the error code. |
Attention
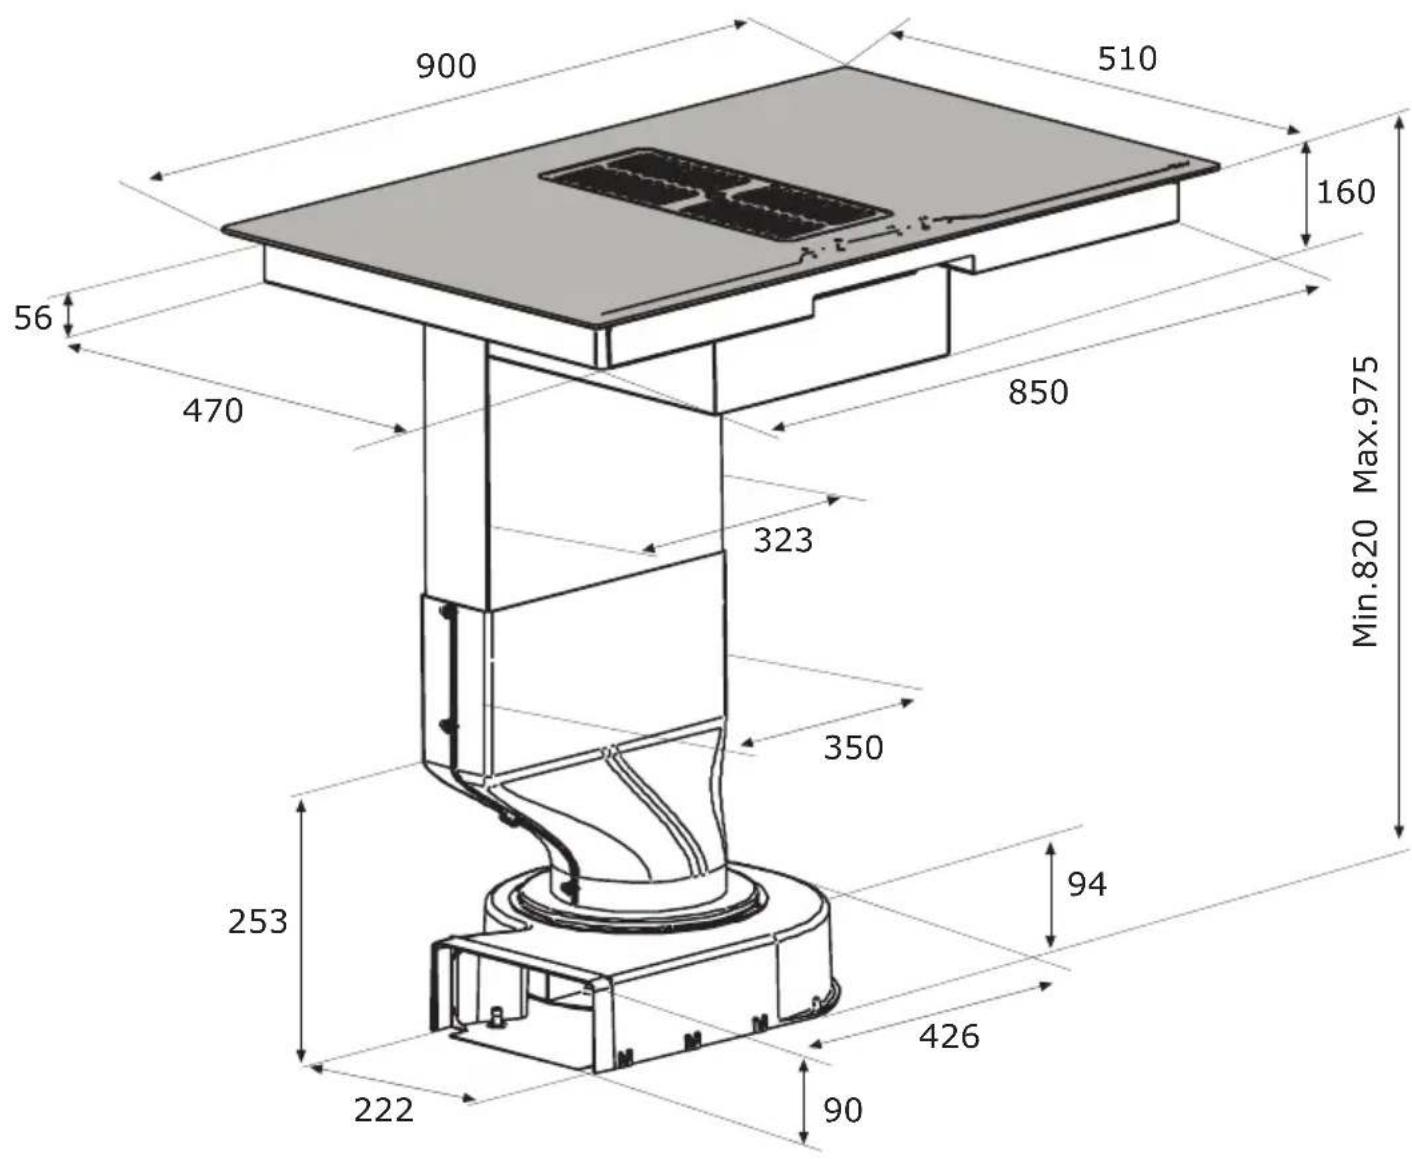
- Technical drawing
- exhaustion mode
- Electrical connection diagram
- Attenzione
- Fire hazard
- Burn hazard
- Suitable food containers
- Non-suitable food containers
- Danger of mishaps
- Noise emissions
- First usage
- Switching on the cooktop
- Activating the desired cooking zones
- Switching off the cooktop and residual heat indication
- Warning: risk of burns
- Flexi Mode
- Cooking Assist
- Pod detection
- Timer
- Countdown
- Child-Lock safety function
- Pause
- 11
- Recall
- g5
- Cooking top
- Attention
Brand : BERTAZZONI
Model : P904ICHNE
Category : Cooker